1
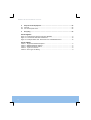
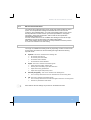
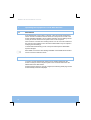
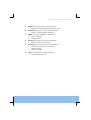
ST.US.E10287.1 USER GUIDE RX8200 Advanced Modular Receiver Software Version 2.0.0 RX8200 Advanced Modular Receiver ENGLISH (UK) www.tandbergtv.com RX8200 Advanced Modular Receiver Trademarks Dolby® / Dolby® Digital / AC-3® are registered trademarks of Dolby Laboratories Licensing Corporation. Customer Services Europe, Middle East and Africa: Tel: +44 (0) 23 8048 4455 Fax: +44 (0) 23 8048 4467 [email protected] Americas: Tel: +888 671 1268 (US and Canada) Tel: +678 812 6255 (Outside of mainland US) [email protected] China: Tel: +86 10 6856 0260 (Beijing) Tel: +852 2530 3215 (Hong Kong) [email protected] Australia/NZ: Tel: +612 8923 0450 [email protected] Internet Address: http://www.tandbergtv.com Technical Training International: 2 Tel: +44 (0) 23 8048 4229 Fax: +44 (0) 23 8048 4467 [email protected] This document and the information contained in it is the property of TANDBERG Television Ltd and may be the subject of patents pending and granted. It must not be used for commercial purposes nor copied, disclosed, reproduced, stored in a retrieval system or transmitted in any form or by any means (electronic, mechanical, photocopying, recording or otherwise), whether in whole or in part, without TANDBERG Television’s prior written agreement. Issue 1 first published in 2009 by: TANDBERG Television Ltd © 2009 TANDBERG Television Ltd. All rights reserved. Registered Company Number 03695535 Registered Address: Unit 2 Strategic Park, Comines Way, Hedge End, Southampton, Hampshire, SO30 4DA United Kingdom RX8200 Advanced Modular Receiver Contents 1 1.1 1.2 Who Should Use This User Guide? ...........................................................................5 What Equipment is Covered by This User Guide? ........................................................5 Factory Fitted Hardware and Software Options.............................................................5 2 2.1 2.2 2.3 2.4 2.5 Installing the Equipment .............................................................................................7 Introduction ....................................................................................................................7 Operating Voltage ..........................................................................................................7 Power Cable and Earthing .............................................................................................7 Rear Panel Connectors..................................................................................................7 Connecting the Receiver to the Power Supply ..............................................................9 3 3.1 3.2 3.3 Operating the Equipment From the Front Panel.....................................................10 Introduction ..................................................................................................................10 Receiver Front Panel ...................................................................................................10 Using the Front Receiver Panel Menu System............................................................10 4 4.1 4.2 4.3 4.4 Operating the Equipment From A Web Browser ....................................................12 Introduction ..................................................................................................................12 Receiver Web Browser Interface .................................................................................12 Using the Receiver Web Browser Interface.................................................................13 Page Structure .............................................................................................................13 5 5.1 5.2 5.3 5.4 5.5 5.6 5.7 Quick Start Guide - Using the Front Panel Control ................................................16 Making Signal Connections to the Unit........................................................................16 Configuring the Inputs ..................................................................................................16 Selecting a Decode Service (Program) .......................................................................17 Configuring the Video Output.......................................................................................18 Configuring the Audio Outputs.....................................................................................18 Configuring for Single-service Decryption ...................................................................18 Configuring for Multi-service Decryption......................................................................18 6 6.1 6.2 Equipment Packaging ...............................................................................................19 Packaging Statement ...................................................................................................19 Packaging Markings.....................................................................................................19 7 7.1 7.2 7.3 Materials Declarations...............................................................................................21 Overview ......................................................................................................................21 For the European Union...............................................................................................21 For China .....................................................................................................................21 3 RX8200 Advanced Modular Receiver 8 8.1 8.2 Disposal of this Equipment.......................................................................................22 General.........................................................................................................................22 For the European Union...............................................................................................22 9 Recycling ....................................................................................................................23 List of Figures Figure 2.1: Example Rear Panel Connectors (RX8200) .........................................................8 Figure 3.1: Front Panel LEDs and Pushbuttons....................................................................10 Figure 4.1: Example Status Tab - Web Control for an RX8000 Receiver.............................13 List of Tables Table 1.1: Equipment Model Descriptions...............................................................................5 Table 1.2: RX8200 Hardware Options.....................................................................................5 Table 1.3: RX8200 Software Options ......................................................................................6 Table 2.1: Types of Connector ................................................................................................8 Table 2.2: Fuse Type and Rating ............................................................................................9 4 RX8200 Advanced Modular Receiver 1 Who Should Use This User Guide? This User Guide is written for operators/users of the RX8200 Advanced Modular Receivers to assist in installation and operation. WARNING Do not remove the covers of this equipment. Hazardous voltages are present within this equipment and may be exposed if the covers are removed. Only TANDBERG Television trained and approved service engineers are permitted to service this equipment. CAUTION Unauthorised maintenance or the use of non-approved replacements may affect the equipment specification and invalidate any warranties. 1.1 What Equipment is Covered by This User Guide? Table 1.1: Equipment Model Descriptions 1.2 Model Number Marketing Code Description RX8200 RX8200/BAS MPEG-2/MPEG-4 HD/SD Modular receiver, ac mains voltage input. Factory Fitted Hardware and Software Options Table 1.2: RX8200 Hardware Options Marketing Code Description RX8200/HWO/DVBS2 4-input DVB-S & DVB-S2 capable satellite input RX8200/HWO/MP2/422 MPEG-2 4:2:2 decode card with only SD decode functionality enabled RX8200/HWO/HD HD output card with1x CVBS, 1x RGB, 3x connectors for ASI/HD-SDI/(SD)SDI, RX8200/HWO/SD SD output card with 2x CVBS, 2x connectors for ASI/SDI RX8200/HWO/BAL/AUD Balanced analogue and digital audio output providing 2 stereo pairs of audio RX8200/HWO/IP/OUT Dual gigabit IP output card 5 RX8200 Advanced Modular Receiver Table 1.3: RX8200 Software Options Marketing Code 6 Description RX8200/SWO/DVBS2/QPSK DVB-S2 QPSK License key RX8200/SWO/DVBS2/8PSK DVB-S2 8PSK License key RX8200/SWO/DVBS2/LSYM DVB-S2 Low Symbol Rate License Key RX8200/SWO/CI Common Interface CA single service decryption RX8200/SWO/MSD CI Multi Service Descrambling RX8200/SWO/BISS BISS mode 1 & E CA RX8200/SWO/BISS/MSD BISS Multi-service descrambling RX8200/SWO/DIR Tandberg Director single service CA RX8200/SWO/DIR5/MSD Director Multi Service Descrambling RX8200/SWO/PW Password Protection for Web Browser RX83XX/SWO/MPEG2/SD MPEG-2 SD decoding RX83XX/SWO/MPEG2/HD MPEG-2 HD & SD decoding RX8200/SWO/MP2/MP4/SD MPEG-2 & MPEG-4 SD Decode RX8200/SWO/MP2/MP4/SD/HD MPEG-2 & MPEG-4 HD and SD Decode RX8200/SWO/MP2/HD/422 MPEG-2 HD and SD 4:2:2 decode RX8200/SWO/DCONV Simultaneous down-conversion of HD to SD RX8200/SWO/UPCONV Up-conversion from SD to HD (to 1080i or 720p) RX8200/SWO/XCONV Cross-conversion RX8200/SWO/LDELAY Low latency decode RX8200/SWO/MPEG4/SD MPEG-4 AVC SD decoding RX8200/SWO/MPEG4/HD MPEG-4 AVC HD & SD decoding RX8200/SWO/AC3 Dolby Digital ® decoding / downmixing RX8200/SWO/FSYNC Frame Sync RX8200 Advanced Modular Receiver 2 Installing the Equipment 2.1 Introduction Use this User Guide for guidance on installation and operation. Only use installation accessories recommended by the manufacturers. 2.2 Operating Voltage CAUTION This product should be operated only from the type of power source indicated on the marking label. If you are not sure of the type of power supply to your business, consult a qualified electrical engineer or your local power company. AC Models AC models are fitted with a wide-ranging power supply. It is suitable for supply voltages of 100-240 V ac -10% +6% at 50/60 Hz nominal. 2.3 Power Cable and Earthing Check that the power cable is suitable for the country in which the Receiver is to be used. WARNINGS 1. 2. 2.4 The Technical Earth is not a protective earth for electric shock protection. This unit must be correctly earthed through the moulded plug supplied. If the local mains supply does not have an earth conductor do not connect the unit. Before connecting the unit to the supply, check the supply requirements. Contact Customer Services for advice. Rear Panel Connectors Always use the specified cables supplied for signal integrity and compliance with EMC requirements (see Reference Guide). 7 RX8200 Advanced Modular Receiver AUDIO OUT 1 & 2 RF IN 1,2,3,4 IP OUT 1 & 2 AUDIO OUT 3 & 4 CVBS COMONENT VIDEO ASI/SD-SDI/ HD-SDI OUT ASI INPUT ALARM TECHNICAL EARTH CONTROL 1 & 2 FRAMESYNC INPUT Figure 2.1: Example Rear Panel Connectors (RX8200) Table 2.1: Types of Connector 8 Type of Connector Description CVBS 75 Ω BNC connector for SD composite video output RF IN 1,2,3 & 4 F-type connectors for DVB or DVB-S2 modulated input feed AUDIO OUT 9-way male D-type connectors for analogue and balanced digital audio output IP OUT 1 & 2 8-way RJ-45 connectors for 1000BaseT IP output feed & deencapsulated IP data CONTROL 1 & 2 8-way RJ-45 connectors for 10/100BaseT Ethernet control and monitoring ASI IN 75 Ω BNC connector for ASI input feed ALARM 9-way male D-type connector for alarm signal output TECHNICAL EARTH Spade connector for unit technical earth ASI/SD-SDI/HD-SDI OUT 1 , 2 & 3 75 Ω BNC connector for ASI or SDI (user selectable) output feeds RX8200 Advanced Modular Receiver 2.5 Connecting the Receiver to the Power Supply WARNINGS 1. 2. 3. Do not overload wall outlets and extension cords as this can result in a risk of fire or electric shock As no mains switch is fitted to this unit, ensure the local power supply is switched OFF before connecting the supply cord. The Receiver is not fitted with an on/off switch. Ensure that the socket-outlet is installed near the equipment so that it is easily accessible. Failure to isolate the equipment properly may cause a safety hazard. Connect the Receiver to the power supply as follows: !Power Supply Ensure the power supply is isolated and switched off. !Receiver Ensure the correct fuse type and rating has been fitted to both the equipment and the power cable. !Supply Cord Connect the lead to the Receiver input connector and then to the power supply. Switch on the power supply. Table 2.2: Fuse Type and Rating Power Supply Fuse Type and Rating 100 - 240 V ac IEC/EN 60127-2 Sheet 5 Bussmann S505/Littelfuse 215 2 A 250 V T HBC 9 RX8200 Advanced Modular Receiver 3 Operating the Equipment From the Front Panel 3.1 Introduction The front panel display and keypad may be used to configure, control and monitor the Receiver when an external control system or PC is not used. NOTE Not all of the receiver User Settings may be viewed or changed from the front panel. The full set of User Settings may be found on the Web browser control interface. A list of receiver User Settings that may be viewed or changed via the front panel and those that may be viewed or changed via the external web browser interface can be found in the Reference Guide. 3.2 Receiver Front Panel CAM slot Status LED LCD display USB Serial Edit Save Left Up Down Right Figure 3.1: Front Panel LEDs and Pushbuttons 3.3 Using the Front Receiver Panel Menu System 3.3.1 Arrow Pushbuttons The four arrow pushbuttons are used to navigate through the receiver menu system. Each arrow pushbutton backlight is illuminated when a further menu can be reached by pressing that pushbutton. 10 RX8200 Advanced Modular Receiver 3.3.2 Edit and Save Pushbuttons The edit and save pushbuttons are used to modify User Settings within the menu system. The edit pushbutton backlight is illuminated when the current menu contains a user modifiable setting. To modify a User Setting within a menu, press the edit pushbutton and then use the up and down pushbuttons to change the User Setting. During this edit operation, both the edit and save pushbutton backlights will be illuminated. If a menu contains more than one modifiable User Setting then the left and right pushbuttons are used to select which User Setting will be edited. When a User Setting has been modified, the save pushbutton should be pressed to confirm and action this new User Setting. 3.3.3 Menu Structure The range of modifiable User Settings will vary depending on which receiver model is being used. All models have the User Settings arranged within the following top-level menus: • • • • System: This menu contains User Settings for: IP Control ports set-up IP Control ports link status Unit Build version details Unit Electronic Serial Number Input: This menu contains User Settings for: Input feed lock status and bit-rate Primary and secondary input feed selection Input feed tuning parameters Input feed signal and quality levels Service (Program): This menu contains User Settings for: The currently selected service for decode from the incoming feed CA: This menu contains User Settings for: The currently selected services for decryption from the incoming feed Director 5 parameters and status More detail on all User Settings may be found in the Reference Guide. 11 RX8200 Advanced Modular Receiver 4 Operating the Equipment From A Web Browser 4.1 Introduction A PC Web Browser may be used to configure, control and monitor the Receiver. The PC must be connected to either of the two IP control ports on the rear of the receiver (labelled CONTROL 1 and 2). Before operation, the User Settings for the control port must be entered via the system menu on the front panel. If the receiver is connected to an existing network or is not on the same subnet as the control PC then assistance from the network administrator may be required in modifying the User Settings. To assist with troubleshooting, the IP control ports will respond to ICMP PING request messages. More details on all receiver User Settings available on the Web Browser Interface can be found in the Reference Guide. 4.2 Receiver Web Browser Interface To use the receiver Web Browser Interface, the IP address assigned to the receiver control port in the front panel system menu should be entered into the address field of the Web browser. Provided that the network is correctly configured, the following status page should be automatically loaded and displayed. 12 RX8200 Advanced Modular Receiver Figure 4.1: Example Status Tab - Web Control for an RX8000 Receiver 4.3 Using the Receiver Web Browser Interface The User Settings that may be viewed or modified from the Web Browser interface are grouped together by function and are displayed on a number of pages. These pages can be viewed by selecting the relevant tabs. After any changes are made to User Settings, the ‘Apply Changes’ button must be pressed to action the changes. 4.4 Page Structure All models have the user setting pages selectable from the following tabs: 13 RX8200 Advanced Modular Receiver • • • • • • 14 Status: This page contains User Settings for: Unit name and IP address Input feed status Video decode status Audio decode status Decryption status Unit alarm status and log Device Info: This page contains User Settings for: IP Control Ports Set-up Unit and module build version details Fan and unit temperature status SNMP trap table Unit reset Alarms: This page contains User Settings for: Alarm filtering Alarm priority configuration Alarm mapping to output relays Customisation: This page contains User Settings for: Enabled license details Input: This page contains User Settings for: Input feed lock status and bit-rate Primary and secondary feed selection Input tuning parameters Input signal and quality levels Service (Program): This page contains User Settings for: The currently selected service for decode from the incoming feed The currently selected PCR component from the incoming feed The currently selected video component from the incoming feed The currently selected audio components from the incoming feed The currently selected splice signal components from the incoming feed The currently selected subtitle and teletext components from the incoming feed The currently selected services for decryption from the incoming feed Service selection behaviour control Video decode aspect ratio conversion control Video test pattern selection Audio output control VBI data output control RX8200 Advanced Modular Receiver • • • • • • Output: This page contains User Settings for: Selection and configuration of the output feeds Download: This page contains User Settings for: Status of in-band software download. SNMP: This page contains User Settings for: Protocol selection MIB parameters Presets: This page contains User Settings for: Save and recall of unit presets Save/Load: This page contains User Settings for: Saving and restoring unit configuration Saving unit logs Saving unit MIBs Help: This page contains User Settings for: Using the web interface 15 RX8200 Advanced Modular Receiver 5 Quick Start Guide - Using the Front Panel Control 5.1 Making Signal Connections to the Unit !If you have an incoming satellite RF feed, connect this to the rear panel connector marked RF Input !If you have an incoming ASI (Fiber) feed, connect this to the connector marked ASI Input !Decoded PAL or NTSC video is output on connector CVBS. ! Decoded analogue or digital audio is output on connectors AUDIO OUT 1, 2, 3 or 4. Adaptor cables are used to provide the connector type required for the installation. !The incoming feed is routed through the unit and output on connectors ASI OUT 1, 2 or 3 !For models with option RX83XX/HWO/IP/OUT fitted, the incoming feed is also routed through the unit and output on connectors IP OUT 1 and IP OUT 2 !If the unit is to be controlled by Web browser or PC based control system then the control PC should be connected to connector CONTROL 1 or CONTROL 2 !If the unit is to be used to decrypt (non-Director) encrypted feeds then a Conditional Access Module and card should be inserted in the slot labelled Conditional Access Interface in the front panel 5.2 Configuring the Inputs 5.2.1 ASI Input To configure the unit for ASI (Fiber) input. !Select ASI input from a submenu off menu 2 5.2.2 Satellite (DVB-S or DVB-S2) Input Ensure that the incoming feed is connected to connector 1. To configure the unit for Satellite input the following User Settings should be modified. All of these settings may be found in submenus off front panel menu 2. 16 RX8200 Advanced Modular Receiver !Select SAT input Set the LNB frequency Set the Satellite frequency Set the Symbol Rate Set the Modulation scheme and FEC Set the Roll-Off Set the set the LNB power output Set the set the LNB power output level A description of each of these User Settings can be found in the Reference Guide. NOTE If the unit has successfully locked to the incoming feed, then the TS Lock value in menu 2 should be LOCKED. 5.3 Selecting a Decode Service (Program) Navigate to the Service Selection menu (Menu 3). !For incoming feeds containing only a single service the service will be selected automatically !For incoming feeds containing more than one service press Edit and, using the Up and Down pushbuttons, scroll through the service name list. Then press Save to select the required service. !Alternatively, use the Right pushbutton to move the cursor to the service ID field and press Edit. Enter the required service ID using the Up and Down pushbuttons for each digit of the service ID. NOTE If the unit has successfully selected a service, then menu 3 should display the Service ID and Service name. 17 RX8200 Advanced Modular Receiver 5.4 Configuring the Video Output !The unit will automatically decode the first video component that it finds within the selected service. !An alternative video component may be selected from the service tab on the Web Control interface. If the incoming video is successfully decoded then the status ‘OK’ should be displayed on the appropriate page. Successfully decoded High Definition video will be output from the connector marked “Video Component”. Successfully decoded Standard Definition video will be output from the connector marked “CVBS”. 5.5 Configuring the Audio Outputs !The unit will automatically decode the first two audio components that it finds within the selected service. !Alternative audio components may be selected from the service tab on the Web Control interface 5.6 Configuring for Single-service Decryption !If the service selected for video decode (see Section 5.3) contains encrypted components these components will automatically be decrypted by the unit. !The outgoing feed from the unit will contain these decrypted components. 5.7 Configuring for Multi-service Decryption !When a feed containing more than one encrypted services is applied to the unit, the first 24 services detected are automatically decrypted. A list of these services can be found in the service table off front panel menu 4. !This list may be modified from the CA tab on the Web Control interface. NOTE This is only applicable for units models that have Multi-service Decryption licenses enabled. 18 RX8200 Advanced Modular Receiver 6 Equipment Packaging 6.1 Packaging Statement The outer carton and any cardboard inserts are made from 82% recycled material and are fully recyclable. 6.2 Packaging Markings The symbols printed on the outer carton are described below: Handle with care This way up Fragile Protect from moisture See Reference Guide for details of compliance with directives. See Reference Guide for details of compliance. Defines country of origin. 19 RX8200 Advanced Modular Receiver The packaging is reusable per GB 18455-2001 This symbol guarantees that packaging with this symbol is recyclable and will be accepted by cardboard recyclers Recyclable per GB 18455-2001 20 RX8200 Advanced Modular Receiver 7 Materials Declarations 7.1 Overview TANDBERG Television products are designed and manufactured in keeping with good environmental practise. Our component and materials selection policy prohibits the use of a range of potentially hazardous materials. In addition, we comply with relevant environmental legislation. 7.2 For the European Union For product sold into the EU after 1st July 2006, we comply with the EU RoHS Directive. We also comply with the WEEE Directive. 7.3 For China For product sold into China after 1st March 2007, we comply with the “Administrative Measure on the Control of Pollution by Electronic Information Products”. In the first stage of this legislation, content of six hazardous materials has to be declared together with a statement of the “Environmentally Friendly Use Period (EFUP)”: the time the product can be used in normal service life without leaking the hazardous materials. TANDBERG Television expects the normal use environment to be in an equipment room at controlled temperatures (around 22°C) with moderate humidity (around 60%) and clean air, near sea level, not subject to vibration or shock. Where TANDBERG Television product contains potentially hazardous materials, this is indicated on the product by the appropriate symbol containing the EFUP. For TANDBERG Television products, the hazardous material content is limited to lead (Pb) in some solders. This is extremely stable in normal use and the EFUP is taken as 50 years, by comparison with the EFUP given for Digital Exchange/Switching Platform in equipment in Appendix A of “General Rule of Environment-Friendly Use Period of Electronic Information Products”. This is indicated by the product marking: 50 It is assumed that while the product is in normal use, any batteries associated with real-time clocks or battery-backed RAM will be replaced at the regular intervals. The EFUP relates only to the environmental impact of the product in normal use, it does not imply that the product will continue to be supported for 50 years. 21 RX8200 Advanced Modular Receiver 8 Disposal of this Equipment 8.1 General Dispose of this equipment safely at the end of its life. Local codes and/or environmental restrictions may affect its disposal. Regulations, policies and/or environmental restrictions differ throughout the world. Contact your local jurisdiction or local authority for specific advice on disposal. 8.2 For the European Union "This product is subject to the EU Directive 2002/96/EC on Waste Electrical and Electronic Equipment (WEEE) and should not be disposed of as unsorted municipal waste." 22 RX8200 Advanced Modular Receiver 9 Recycling TANDBERG Television provides assistance to customers and recyclers through our web site http://www.tandbergtv.com/ProductRecycling.ink Please contact TANDBERG Television’s customer services for assistance with recycling if this site does not show the information you require. Where it is not possible to return the product to TANDBERG Television or its agents for recycling, the following general information may be of assistance: !Before attempting disassembly, ensure the product is completely disconnected from power and signal connections. !All major parts are marked or labelled to show their material content. !Depending on the date of manufacture, this product may contain lead in solder. !Some circuit boards may contain battery-backed memory devices. 23 RX8200 Advanced Modular Receiver BLANK 24