1
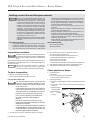
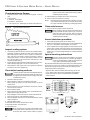
PFG
Gas-fired
Water boiler
Series 6
Boiler Manual
• Installation
• Service
• Operation
• Boiler Parts
For additional information,
refer to . . .
Control Supplement
Read all instructions before installing
Installer
Leave all instructions with boiler for future reference.
Any claims for damage or shortage in shipment must be filed
immediately against the transportation company by the consignee.
Owner
Installation and service must be performed by qualified contractor.
Part No. 550-110-640/0703
PFG SERIES 6 GAS-FIRED WATER BOILER — BOILER MANUAL
Contents
Section I: Installation
Codes ......................................................... 3
Select the boiler location ............................ 3
Chimney or vent requirements ................... 4
Boiler foundation ........................................ 4
Residential garage installation .................. 5
Boiler piping connections . . ....................... 5
Filling the system ........................................ 6
Bypass piping ............................................. 8
Freeze protection ....................................... 8
Draft hood installation ................................ 9
Damper installation .................................... 9
Size and install gas piping ......................... 9
Wiring multiple zones ............................... 10
Checkout procedure ................................. 11
Section II: Service
3-11
Combustion air .............................................. 3
Installation clearances .................................. 3
When removing boiler . . ............................... 4
Placing the boiler .......................................... 5
Hydrostatic pressure test ............................... 5
Multiple zoning .............................................. 6
Recommended piping ................................... 7
External heat exchangers ............................. 8
Use with refrigeration system ........................ 8
Spill switch installation .................................. 9
Breeching erection ........................................ 9
Wiring .......................................................... 10
Install room thermostat ................................ 10
12-15
Also refer to additional instructions shipped with the boiler for specific control operation . . ............... 12
Suggested minimum service schedule for qualified service technician only ....................................... 12
Section III: Replacement Parts
16-17
Section IV: Ratings, Dimensions
18-19
Hazard definitions
The following defined terms are used throughout this manual to bring attention to the presence of hazards of various
risk levels, or to important information concerning the life of the product.
Indicates presence of hazards that will cause severe personal injury, death or substantial property
damage.
Indicates presence of hazards that can cause severe personal injury, death or substantial property
damage.
Indicates presence of hazards that will or can cause minor personal injury or property damage.
Indicates special instructions on installation, operation or maintenance that are important but not
related to personal injury or property damage.
The boiler contains ceramic fiber and fiberglass materials. Use care when handling these materials per
instructions on page 13 of this manual. Failure to comply could result in severe personal injury.
Do not use petroleum-based cleaning or sealing compounds in boiler system. Severe damage to system
components can result, causing substantial property damage.
Read all instructions before installing. Failure to follow all instructions in proper order can cause severe
personal injury, death or substantial property damage.
When calling or writing about the boiler— Please have the boiler model number from the boiler rating
label and the CP number from the boiler jacket. You may list the CP number in the space provided on
the Installation and service certificate found on page 11.
2
Part Number 550-110-640/0703
PFG SERIES 6 GAS-FIRED WATER BOILER — BOILER MANUAL
Section I: Installation
Codes
Air directly from outside to boiler room:
Installation must comply with all local codes, laws, regulations
and ordinances. Also United States National Fuel Gas Code ANSI
Z223.1-latest edition. When required, the installation must conform
to Standard for Controls and Safety Devices for Automatically
Fired Boilers, ANSI/ASME CSD-1. Safe lighting and other
performance criteria were met with the gas manifold and control
assembly provided on the boiler when the boiler underwent tests
specified in ANSI Z21.13-latest edition.
Canadian installations must comply with CAN/CSA B149.1 or .2
Installation Codes. The equipment shall be installed in accordance
with those installation regulations in force in the local area where
the installation is to be made. These shall be carefully followed in
all cases. Authorities having jurisdiction shall be consulted before
installations are made.
•
•
Combustion air and ventilation openings
Combustion air and ventilation openings must comply with Section
5.3, Air for Combustion and Ventilation, of National Fuel Gas
Code ANSI Z223.1-latest edition, or applicable local building codes.
Canadian installations must comply with CAN/CSA B149.1 or .2
Installation Codes.
Provide adequate combustion and ventilation air to:
•
Assure proper combustion
•
Reduce risk or severe personal injury or
death from flue gas spillage and carbon
monoxide emissions.
Select the boiler location
•
•
•
•
•
Tightly constructed buildings must be provided with openings to
outside for combustion and ventilation air. These openings must be
sized to handle all fuel burning appliances, exhaust and ventilation
fans and fireplaces.
When openings to boiler room are taken to interior spaces, provide
two permanent openings: a combustion air opening within 12 inches
of floor and a ventilation opening within 12 inches of ceiling. Each
opening must provide a minimum free area of one square inch per
1,000 Btuh input of all appliances in room plus requirements for
any exhaust fans in room. The interior space supplying combustion
and ventilation air must have adequate infiltration from outside.
Installation clearances
Suggested minimum clearances for servicing
•
•
•
•
24 inches for cleaning and servicing, left side.
18 inches for access to controls and components, front.
48 inches from top for cleaning flueways.
6 inches on remaining sides.
Required minimum clearances to combustible material in
alcove installations
PFG 5 thru 8:
Top 42"
R. Side 5"
Front: Alcove
Rear 5"
L. Side 5"
PFG 8:
Provide service clearances listed above and
minimum 24" between jacket and any
combustible wall(s) and ceiling. Install in
space large in comparison to size of boiler.
•
•
•
Part Number 550-110-640/0703
Consider all connections to boiler before selecting a location.
Boiler must be installed so gas control system components are
protected from dripping or spraying water or rain during operation
or service.
Non-combustible floor ONLY. See “Boiler foundation”, Page 4.
To avoid personal injury, death or property damage,
keep boiler area clear and free from combustible
materials, gasoline and other flammable vapors and
liquids.
Do not install an exhaust fan in the boiler room.
Boiler installation must assure sufficient openings in building and
boiler room to provide adequate combustion air and ventilation.
Consider construction tightness of building when deciding whether
additional outside openings may be needed.
Older buildings with single-pane windows, minimal weatherstripping and no vapor barrier often provide enough natural
infiltration and ventilation without dedicated openings.
New construction or remodeled buildings are most often built
tighter. Windows and doors are weather stripped, vapor barriers
are used and openings in walls are caulked. As a result, such tight
construction is unlikely to allow proper natural air infiltration and
ventilation.
Air from inside building (boiler in interior room):
Tightly constructed buildings must be provided with combustion air
and ventilation openings to boiler room which are adequate to handle
the boiler needs plus the needs of all other fuel-burning appliances,
fireplaces and exhaust or ventilation fans.
Combustion and ventilation openings connecting directly or by
ducting to outside, or to attic or crawl spaces that freely connect
with outside, must be sized as follows:
1. Outside wall or vertical ducting - one square inch per 4,000
Btuh input of all appliances in room plus requirements for
any exhaust fans or other appliances in room.
2. Horizontal ducting - one square inch per 2,000 Btuh of all
appliances in room plus requirements for any exhaust fans
or other appliances in room.
3. All ducting must be same size as permanent openings.
Minimum area dimensions of ducting must be no less than
9 square inches.
4. Other size ducting must comply with local codes.
Single wall vent pipe must be at least 6 inches from combustible
material.
Type "B" double wall metal vent pipe - refer to vent manufacturer's
recommendation for clearances to combustible material.
Hot water pipes must be at least ½" from combustible material.
3
PFG SERIES 6 GAS-FIRED WATER BOILER — BOILER MANUAL
Chimney or vent requirements
(also refer to Breaching erection, Page 9)
Venting must be installed according to Part 7, Venting of
Equipment, of National Fuel Gas Code, ANSI Z223.1-latest edition
and applicable building codes. Canadian installations must comply
with CAN/CSA B149.1 or .2 Installation Codes.
Minimum chimney or vent sizes are on page 18. A chimney or vent
without a listed cap should extend at least 3 feet above the highest
point where it passes through a roof of a building and at least 2 feet
higher than any portion of a building within a horizontal distance
of 10 feet. A chimney or vent must not extend less than those
distances stated above.
A lined chimney is preferred and must be used when required by
federal, provincial, territorial, state or local building codes. Vitreous
tile linings with joints which prevent the retention of moisture and
linings made of noncorrosive materials are best. Advice for flue
connections and chimney linings can usually be obtained from the
local gas utility. Type "B" double wall metal vent pipe or single wall
vent pipe may be used as a liner.
Cold masonry chimneys, also known as outside chimneys, typically
have one or more walls exposed to outside air.
When any atmospheric gas-fired boiler with automatic vent damper
is vented through this type of chimney, the potential exists for
condensation to occur. Condensation can damage a masonry
chimney.
Weil-McLain recommends the following to prevent possible
damage:
1. Line chimney with corrosion-resistant metal liner such as AL294C® single wall stainless steel or B-vent. Size liner per National Fuel
Code ANSI Z223.1-latest edition.
2. Provide drain trap to remove any condensate.
Inspect existing chimney or vent before installing
boiler. Failure to clean or replace perforated pipe or
tile lining will cause severe injury or death.
Do not alter boiler draft hood or place any
obstruction or non-approved damper in the
breeching of vent system. AGA/CSA certification
becomes void. Flue gas spillage and carbon monoxide
emissions will occur causing severe personal injury
or death.
corrosion and other deficiencies which could cause an unsafe
condition.
c. Insofar as is practical, close all building doors and windows and all
doors between the space in which the appliances remaining connected
to the common venting system are located and other spaces of the
building. Turn on clothes dryers and any appliance not connected to
the common venting system. Turn on any exhaust fans, such as
range hoods and bathroom exhausts, so they will operate at maximum
speed. Do not operate a summer exhaust fan. Close fireplace
dampers.
d. Place in operation the appliance being inspected. Follow the lighting
instructions. Adjust thermostat so appliance will operate continuously.
e. Test for spillage at the draft hood relief opening after 5 minutes of
main burner operation. Use the flame of a match or candle, or
smoke from a cigarette, cigar or pipe.
f. After it has been determined that each appliance remaining connected
to the common venting system properly vents when tested as outlined
above, return doors, windows, exhaust fans, fireplace dampers, and
any other gas-burning appliance to their previous conditions of use.
g. Any improper operation of the common venting system should be
corrected so the installation conforms with the National Fuel Gas
Code, ANSI Z223.1-latest edition. When resizing any portion of the
common venting system, the common venting system should be
resized to approach the minimum size as determined using the
appropriate tables in Part 11 in the National Fuel Gas Code, ANSI
Z223.1-latest edition.
Canadian installations must comply with CAN/CSA B149.1 or .2
Installation Code.
Boiler foundation
Never install boiler on combustible flooring or
carpeting, even if a concrete or aerated foundation is
used. Severe personal injury, death or substantial
property damage can result.
1. See Figure 1. A level concrete or solid brick pad is required if:
a) There is a possibility of the floor becoming flooded.
b) Non-level conditions exist.
Where two or more gas appliances vent into a common chimney
or vent, equivalent area should be at least equal to the area of the
vent outlet on the largest appliance plus 50 percent of the area of
the vent outlet on the additional appliance.
When removing boiler from common
venting system
Failure to follow all instructions listed below can
cause flue gas spillage and carbon monoxide
emissions, resulting in severe personal injury, death
or substantial property damage.
At the time of removal of an existing boiler, the following steps
shall be followed with each appliance remaining connected to the
common venting system placed in operation, while the other
appliances remaining connected to the common venting system
are not in operation.
a. Seal any unused openings in the common venting system.
b. Visually inspect the venting system for proper size and horizontal
pitch and determine there is no blockage or restriction, leakage,
4
Part Number 550-110-640/0703
PFG SERIES 6 GAS-FIRED WATER BOILER — BOILER MANUAL
Figure 1
Boiler foundation
Residential garage installation
Install boiler so burners are at least 18 inches above the floor.
Hydrostatic pressure test
Pressure test before attaching gas piping or electrical supply.
1. Plug any necessary boiler tappings or openings.
2. Connect water supply. Fill boiler and purge all air. Test at 45 psi for
more than 10 minutes.
Do not leave boiler unattended. A cold water fill could
expand and cause excessive pressure, resulting in
severe personal injury, death or substantial property
damage.
3. Check for maintained gauge pressure and leaks. Repair if found.
2. An aerated boiler foundation is recommended if any of the following
conditions exist:
a) Electrical wiring or telephone cables buried in the concrete floor
of the boiler room.
b) Concrete floor is "green."
c) There is a history of the floor becoming flooded.
d) Water is channeled under the concrete.
Placing the boiler
1. Remove boiler from shipping pallet. Do not drop boiler or bump
jacket on floor or pallet.
2. Level boiler so that air can be separated from the circulating water.
Shim legs if necessary. Do not alter legs.
3. Remove front jacket door and burner access panel. Unscrew access
panel screws, remove and discard shipping washers, and reinstall
screws.
4. Check for proper orifice sizing from charts below.
Proper orifices must be used. Failure to do so will
cause severe personal injury, death or substantial
property damage.
5. Level and straighten the burners.
Burners must be seated properly in locating slots
with their openings facing up. Gas orifices must inject
down the center of the burner. Failure to properly
seat burners will result in severe personal injury, death
or substantial property damage.
6. Reinstall access panel.
Part Number 550-110-640/0703
Leaks must be repaired at once. Failure to do so can
cause boiler damage, resulting in substantial property
damage.
Do not use petroleum-based sealing compounds in
boiler system. Severe damage to boiler will result,
causing substantial property damage.
4. Drain boiler and remove testing plugs.
Boiler piping connections to the heating
system (refer to piping diagrams, Page 7)
Failure to properly pipe the boiler may result in
improper operation and damage to the boiler or
building.
These boilers are provided with built-in air elimination systems.
1. Install relief valve vertically in top ¾" tapping in right end section.
Relief valve discharge piping must be piped near to
the floor or to a floor drain to eliminate potential of
severe burns. Do not pipe the relief valve discharge
to any area where freezing could occur.
2. Install pressure-temperature gauge in tapping provided in left end
section.
3. This boiler is for forced hot water circulation only. The circulator
and expansion tank must be selected and sized according to the
design requirements of the system.
a) Size and install circulator. Can be installed on supply or return
piping
b) Size expansion tank to handle the volume of water in the system.
4. Expansion tank installations.
a) Closed type expansion tanks - connect from the ¾" N.P.T.
expansion tank tapping on the left end section (located just
behind the supply outlet tapping) to the expansion tank using ¾"
N.P.T. piping. Any horizontal expansion tank piping must pitch
upward toward the tank at least 1 inch for each 5 feet of piping.
b) Diaphragm type expansion tank - may be located anywhere in
the system, preferably near the boiler.
5
PFG SERIES 6 GAS-FIRED WATER BOILER — BOILER MANUAL
A manual or automatic type air vent must be installed
in the ¾" N.P.T. tapping when a diaphragm type
tank is used.
The most common cause of lime deposits in boilers is inadequate
expansion tank volume. If the expansion tank is too small, system
water is lost from the relief valve and make-up water is added
through the fill valve. Eventual section failure will result.
5. Connect the system supply piping to the supply outlet tapping on
the left end of the boiler. See Figure 2a for minimum pipe size.
6. Connect the system return piping to the return tapping on the right
end of the boiler. See Figure 2a for minimum pipe size.
7. Install drain valve provided with boiler on left side. The installer
must provide a drain cock to drain the right (return) side of the
boiler and its connecting piping. The drain cock on the left side of
the boiler will not fully drain the right side.
8. Low water cut off:
a) Must be installed on any PFG boiler if the boiler is located above
radiation level.
b) Must be installed on all PFG-8 boilers to meet ASME specifications
(low water cut-off not supplied by Weil-McLain).
c) May be required by certain state, local or territorial codes or
insurance companies.
If a low water cut-off is required, use a control designed especially for
water installations. An electrode probe type low water cut-off may
be located in a tee in the supply line above the boiler.
9. If the system is to be ASME inspected and approved, an additional
high temperature limit is needed. Purchase and install the control in
the supply outlet piping to the boiler.
10. Connect the cold water fill supply piping close to the boiler.
6
Multiple zoning
1. Zone valves:
a) Refer to zone valve manufacturer's literature for wiring and
application. A separate transformer is required to power zone
valves.
b) Provide balancing valves to adjust the flow so it is about the same
in each zone.
2. Circulators:
a) Zoning with circulators requires a relay for each circuit.
b) Install flow control valves to prevent gravity circulation.
c) Provide balancing valves to adjust the flow so it is about the same
in each zone.
d) Size common return and supply piping for total flow of all
circulators
Filling the system
1. Close manual air vents, drain cock, and automatic air vent, if used.
2. Fill to correct system pressure. Correct pressure will vary with each
application. Residential systems are often designed for 12 pounds
cold fill pressure.
3. Open automatic air vent one turn, if used.
4. Air must be vented for the system. Air in the system can interfere
with water circulation and cause improper heat distribution.
a) Open manual water feed valve.
b) Starting on the lowest floor, open the air vents one at a time until
water squirts out. Close vent.
c) Repeat with remaining vents.
d) Close manual water feed valve when correct boiler pressure is
reached.
5. To purge air from system, install isolation valve in return piping.
a) Connect a garden hose to the purge valve located above the
isolation valve.
b) Close isolation valve. Open purge valve.
c) Open hand water feed valve and allow system to purge all air. If
system has more than one circuit, purge each circuit separately by
opening each balancing valve one at a time.
d) Close purge valve.
e) Open isolation valve.
f) Fill the system to the correct pressure.
6. Keep the system filled by occasionally opening the air vents as in
Step 4 above. Add water to make up system pressure.
Part Number 550-110-640/0703
PFG SERIES 6 GAS-FIRED WATER BOILER — BOILER MANUAL
Recommended boiler and system piping
Figure 2a
Minimum recommended pipe sizes
(forced hot water)
Figure 2b Piping – Closed type expansion tank
Supply and return sizes refer to minimum size of pipe connected
to the boiler for 20°F temperature drop between supply and
return.
Figure 2c
Piping – Closed diaphragm type expansion
tank
Note: Use circulators or zone valves in each circuit for multiple circuit applications.
Part Number 550-110-640/0703
7
PFG SERIES 6 GAS-FIRED WATER BOILER — BOILER MANUAL
Bypass piping
Use with refrigeration system
BYPASS PIPING IS NOT NORMALLY REQUIRED ON ANY
BASEBOARD SYSTEM
Bypass piping should be used for the following installations.
Bypass, supply, and return piping should be same size.
The boiler must be installed so that chilled medium is piped in
parallel with the heating boiler with appropriate valves to prevent
the chilled medium from entering the boiler. Consult I=B=R
Installation and Piping Guides.
If boiler is connected to heating coils located in air handling units
where they can be exposed to refrigerated air, gravity circulation
during the cooling cycle must be prevented with flow control valves
or other automatic means.
1. To protect:
• radiant panels, plaster, etc. from high temperature water supplied
from boiler, or
• boiler from condensation caused by low temperature water
returned from system.
2. To protect boiler from condensation formed by low water temperature
returned from large water content converted gravity systems, etc.,
see Figure 4.
Figure 4
Figure 3
Size and install gas piping
In sizing the gas piping, the following factors should be considered.
External heat exchangers
The PFG boiler can be used with a storage tank/heat exchanger
unit for domestic hot water. The boiler/tank combination should
be installed and wired in accordance with the tank manufacturer's
instructions, which will also show any additional components
required. A zone valve or separate circulator must be installed to
regulate the production of hot water.
Freeze protection
Use antifreeze especially made for hydronic systems. Inhibited
propylene glycol is recommended.
Do not use automotive, ethylene glycol or undiluted
antifreeze. Severe personal injury, death or substantial
property damage can result.
50% solution provides protection to about -30°F
Local codes may require a back-flow preventer or actual disconnect
from city water supply.
Determine quantity according to system water content. Boiler water
content is listed on page 19.
Follow antifreeze manufacturer's instructions.
8
a) Diameter and length of the gas supply piping.
b) Number of fittings.
c) Maximum gas consumption (including any possible future
expansion).
d) Allowable loss in gas pressure from gas meter outlet to boiler.
For pressure drops, see ANSI Z223-1 latest edition. Canadian
installations must comply with CAN/CSA B149.1 or .2
Installation Codes.
1. Size natural gas piping from the following table. Piping must be
sized to provide proper inlet gas pressure to the gas valve when boiler
is operating at rated input. For natural gas, inlet gas pressure to gas
valve should be a minimum of 5 inches water column and a maximum
of 13 inches water column. If inlet natural gas pressure exceeds 13
inches water column, a 100 percent lock-up type gas pressure regulator
of adequate size must be installed in gas supply piping and adjusted
to prevent pressure in excess of 13 inches water column.
To obtain cubic feet per hour, divide the input (Btu per hour) by the
heating value (Btu per cubic foot).
Part Number 550-110-640/0703
PFG SERIES 6 GAS-FIRED WATER BOILER — BOILER MANUAL
Pipe delivery schedule
Figure 5
2. PFG 6 thru 8 only (and no damper on PI boilers) - for propane
gas, inlet gas pressure to gas valve should be 11 to 13 inches
water column. The gas pressure regulator (furnished by the
gas supplier) must be adjusted to provide lock-up pressures
not exceeding 13 inches water column. Select the pipe size, tanks
and regulators as required.
12. Before placing boiler in operation, check boiler and its gas
connection for leaks.
If boiler is to be propane fired, a conversion kit must
be used. Failure to use kit, properly install kit or use
kit on boiler with damper will result in severe personal
injury, death or substantial property damage.
3. Remove jacket door and connect from gas valve to gas meter.
4.
5.
6.
7.
8.
9.
10.
11.
Use a street elbow or an elbow and close nipple at the inlet
connection of the gas valve to run gas piping through opening
in jacket side panel.
Follow good piping practices.
Pipe joint compound (pipe dope) must be resistant to corrosive
action of liquefied petroleum gases and applied sparingly only
to male threads of pipe joints.
A drip leg must be installed at inlet of gas connection to boiler.
Where local utility requires drip leg be extended to the floor,
use an appropriate length of pipe between the cap and tee.
A ground joint union must be installed in the piping to provide
for servicing (see Figure 5).
Install manual shut-off valve outside boiler jacket as shown in
Figure 5 when required by local codes.
Piping must be supported by hangers, not by the boiler or its
accessories.
In Canada only - when manual main shut off valve is used, it
must be identified by installer.
Purge all air from the supply piping.
Part Number 550-110-640/0703
Gas supply piping
Do not check for gas leaks with an open flame - use
bubble test. Failure to do so can cause severe personal
injury, death or substantial property damage.
a) If test pressure is less than 13.0 inches water column then close
manual main shut-off valve.
b) If test pressure is greater than 13.0 inches water column then
boiler and gas valve must be disconnected from gas supply
piping.
PFG-8, as requiried by ANSI Z21.13/CSA 4.9, is equipped with a
manual test valve as shown in Figure 5a. Close this valve to test
boiler gas valve without supplying gas to the manifold.
Figure 5a
Leak test valve (model PFG-8 ONLY)
9
PFG SERIES 6 GAS-FIRED WATER BOILER — BOILER MANUAL
Draft hood installation
Secure the draft hood to the outlet at the top of the boiler with
sheet metal screws. The bottom of the draft hood or "skirt" must
have the clearance dimension above the jacket top panel as indicated
on the draft hood.
Do not alter draft hood. A.G.A./CSA design
certification becomes void. If draft hood is altered,
severe personal injury or death will occur, resulting
from flue gas spillage or carbon monoxide emissions.
Spill switch installation
(PFG-5 ONLY)
Fasten spill switch to draft hood as shown on page 16. Connect
wires as shown on wiring diagram label located inside boiler door.
Damper installation
If damper will be installed, see Control Supplement for information.
Breeching erection
(also refer to chimney or vent requirements, Page 4)
Connect from draft hood or damper outlet to chimney or vent
with same size as breeching. Where possible, vertical venting to the
outside from the draft hood or damper outlet will offer best
performance. Where horizontal breeching is used, slope upward
at least ¼ inch per lineal foot toward the chimney or vent and
support with hangers to prevent sagging.
Refer to wiring diagram label affixed to the inside of the jacket
door. Bring electrical supply through proper opening in the jacket
left end panel and into the electrical junction box. Wire electrical
supply, circulator and thermostat as shown on the wiring diagram.
For boilers equipped with control systems other than constant
burner pilot, refer to separate instructions for application data.
Wiring multiple zones
Refer to zone valve manufacturer's literature for wiring and
application. A separate transformer is required to power zone
valves. Zoning with circulators requires a relay for each circuit.
Install room thermostat
Install room thermostat on an inside wall. Never install where it
will be influenced by drafts, hot or cold water pipes, lighting fixtures,
television, rays of the sun or near a fireplace.
Heat anticipator in thermostat must be set to match the power
requirements of the primary control to which it is connected. Refer
to wiring diagram on jacket door for recommended heat anticipator
setting with standard equipment. Wire the thermostat as shown.
Figure 6
Typical wiring – zoning with zone valves
A minimum vertical height of 3 feet of breeching
before any elbow or horizontal breeching is
recommended to reduce chances of flue gas spillage
at the draft hood. Long horizontal breechings,
excessive numbers of elbows or tees, or other
obstructions that restrict the flow of combustion
gas should be avoided.
Breeching must not be connected to any portion of a mechanical
draft system that can operate under positive pressure.
Wiring
For your safety, turn off the electrical power supply
at the service entrance panel before making any
electrical connections to avoid possible electrical shock
hazard.
All wiring must be installed in accordance with requirements of the
National Electrical Code and any additional national, state or local
code requirements having jurisdiction. All wiring must be N.E.C.
Class 1. The boiler must be electrically grounded in accordance
with the National Electrical Code, ANSI/NFPA No. 70-latest edition.
In Canada, all wiring must be done in accordance with the CSA
C22.1 Canadian Electrical Code Part 1.
If original rollout thermal fuse element wire as supplied with
PFG-5 boiler must be replaced, type 200°C wire or equivalent must
be used. If other original wire as supplied with any PFG boiler
must be replaced, type 105°C wire or equivalent must be used.
The boiler is shipped with control components completely wired
except for spill switch and damper (if provided).
A separate electrical circuit should be used for the boiler with a
fused disconnect switch (15 amp. recommended).
10
Part Number 550-110-640/0703
PFG SERIES 6 GAS-FIRED WATER BOILER — BOILER MANUAL
Check-out procedure
Check off steps as completed.
❏ 1. Check to make sure base insulation is secure. See "Inspect
Base Insulation," page 15.
❏
12. High limit control set to design temperature requirements
of the system? Maximum high limit setting - 240 °F.
❏
13. For multiple zones, flow adjusted so it is about the same
in each zone?
5. Air purged from gas piping? Piping checked for leaks?
❏
6. Follow operating/lighting instruction label on boiler for
proper start-up. Also refer to “To Place in Operation,”
page 13.
14. Thermostat heat anticipator is set properly? Refer to
"Install Room Thermostat," page 10, and wiring diagram on
jacket door.
❏
15. Boiler cycled with the thermostat? Raise to highest setting.
Boiler should go through normal start-up cycle. Lower to
lowest setting. Boiler should go off.
❏
16. Measure gas input (natural gas only):
❏
❏
❏
❏
❏
2. Boiler and heat distribution units filled with water?
❏
7. Are proper orifices installed? See page 5 for proper orifice
size.
Proper orifices must be used. Failure to do so will
cause severe personal injury, death or substantial
property damage.
3. Automatic air vent, if used, open one turn?
4. Air purged from system?
❏
8. Proper burner flame? Refer to "Check Main Burner
Flames" and "Check Pilot Burner Flame," page 13.
❏
9. Test limit control: While burners are operating, move the
indicator of the high limit control below actual boiler
water temperature. The burners should go off while the
circulator continues to operate. Raise the limit control
above the boiler water temperature and the burners
should reignite.
❏
❏
relight, flame sensing element will sense pilot flame and the
main burners reignite.
b. For standing pilot systems: Turn gas knob to PILOT position
and extinguish pilot flame - Pilot gas flow should stop in less
than 3 minutes. Put system back into operation, see page 13.
10. Test any additional field-installed controls: If boiler has
low water cut-off, additional high limit or other controls,
test for operation as outlined by manufacturer. Burners
should be operating and should go off when controls are
tested. When controls are restored, burners should
reignite.
11. To test ignition system shut-off device:
a. For PI systems: Connect a manometer to outlet side of gas
valve. Start boiler, allowing for normal start-up cycle to occur
and main burners to ignite. With main burners on, manually
shut off gas supply at manual main shut-off gas valve. Burners
should go off. Open manual main shut-off gas valve. The
manometer should confirm there is no gas flow. Pilot will
a. Operate boiler 10 minutes.
b. Turn off all other appliances served by the gas meter,
including gas stove, pilot lights and gas yard lights.
c. At natural gas meter measure time (in seconds) required to
use on cubic foot of gas.
d. Calculate gas input:
e. Btuh calculated should approximate input rating on rating
label.
❏
17. Check manifold gas pressure by connecting manometer
to downstream test tapping on main gas valve. Manifold gas
pressure for natural gas should be 3 1/2 inches water column
and for propane gas should be 10 inches water column.
❏
18. Several operating cycles observed for proper operation?
If damper is provided, see Control Suppelement for checkout procedure.
❏
❏
❏
19. Room thermostat set to desired temperature?
20. Installation and Service Certificate on this page completed?
21. All instructions shipped with this boiler reviewed with
owner or maintenance person, returned to envelope and given
to owner or displayed near boiler?
Installation and Service Certificate
Boiler model __________________
Measured Btuh input ____________
Installer ________________________
(company)
Series __________
CP number ___________
Date installed _______________
Installation instructions have been followed.
Check-out sequence has been performed.
Above information is certified to be correct.
Information received and left with owner/maintenance
________________________________
(address)
______________________________
(phone)
_____________________________________
(installer’s signature)
Part Number 550-110-640/0703
11
PFG SERIES 6 GAS-FIRED WATER BOILER — BOILER MANUAL
Section II: Service
Also Refer to Additional Instructions Shipped With The
Boiler For Specific Control Operation and
Troubleshooting.
Verify Proper Operation After Servicing.
Your boiler should be inspected, cleaned and, if
necessary, adjusted once a year. A qualified service
agency should be called.
To avoid personal injury, before servicing:
1. Disconnect electrical supply.
2.
Shut-off gas supply.
3. Allow boiler to cool.
Label all wires prior to disconnection when servicing
controls. Wiring errors can cause improper and
dangerous operation.
To avoid personal injury, death or property damage,
keep the boiler area clear and free from combustible
materials, gasoline and other flammable vapors and
liquids.
Do not block flow of air to boiler. Incomplete
combustion and carbon monoxide emissions can
cause severe personal injury, death or substantial
property damage.
Do not store sources of hydrocarbons (i.e., bleaches,
cleaners, chemicals, sprays, paint removers, fabric
softeners, etc.) in boiler area. This can contribute to
shortened boiler/vent system life.
Suggested Minimum Service Schedule for
Qualified Service Technician Only
Beginning of each heating season:
1. Annual service call by a qualified service agency.
2. Check burners and flueways and clean if necessary. Reference
"Clean Boiler Heating Surfaces" and "Clean Main Burners,"
page 14.
3. Visually inspect base insulation. Reference "Inspect Base
Insulation," page 13.
4. Follow procedure "To Place in Operation," page 13.
5. Visually inspect main burner flames. Refer to "Check Main
Burner Flames," page 13.
6. Check pilot flame. Refer to page 13.
7. Visually inspect venting system for blockage, deterioration
or leakage. Reference "Inspect Venting System," page 14.
8. Check operation of low water cut-off, if used, and additional
safety devices. Refer to manufacturer's instructions.
9. Check that boiler area is free from combustible materials,
gasoline and other flammable vapors and liquids.
10. Check for and remove any obstruction to the flow of
combustion or ventilation air to the boiler.
11. Follow instructions on circulator to oil, if oil lubricated.
Over oiling will damage the circulator. Water lubricated
circulators do not need oiling.
Daily during heating season:
1. Check that boiler area is free from combustible materials,
gasoline and other flammable vapors and liquids.
2. Check for and remove any obstruction to the flow of
combustion or ventilation air to the boiler.
12
Periodically during heating season:
1. Check relief valve. Reference manufacturer's instructions
on relief valve tag.
2. Test low water cut-off, if used. Blowdown if low water cutoff is float type. Reference manufacturer's instructions.
Monthly during heating season:
1. Check for leaks in the boiler and piping. If found, repair at
once.
Leaks must be repaired at once. Failure to do so can
cause boiler damage, resulting in substantial property
damage.
Do not use petroleum-based sealing compounds in
boiler system. Severe damage to boiler will result,
causing substantial property damage.
2. Visually inspect main burner flames. Reference "Check Main
Burner Flames."
3. Check pilot flame. Refer to page 13.
4. Visually inspect venting system for blockage, deterioration
or leakage. Reference "Inspect Venting System," page 14.
5. Check automatic air vent for leakage. If leaking, remove
vent cap and push valve core in to wash off sediment that
may have accumulated on the valve seat. Release valve, replace
cap, and open one turn.
End of each heating season:
1. Follow "Annual Shutdown Procedure," page 14.
Part Number 550-110-640/0703
PFG SERIES 6 GAS-FIRED WATER BOILER — BOILER MANUAL
Handling ceramic fiber and fiberglass materials
This product contains fiberglass jacket insulation and
ceramic fiber materials in combustion chamber lining
or base panels in gas fired products. Airborne fibers
from these materials have been listed by the State of
California as a possible cause of cancer through
inhalation. The combustion chamber lining or base
insulation panels in this product contain ceramic fiber
materials. Ceramic fibers can be converted to
cristobalite in very high temperature applications. The
International Agency for Research on Cancer (IARC)
has concluded, "Crystalline silica inhaled in the form
of quartz or cristobalite from occupational sources is
carcinogenic to humans (Group 1).":
Suppliers of fiberglass wool products recommend the
following precautions be taken when handling these
materials:
Precautionary measures
• Avoid breathing fiberglass dust and contact with skin or eyes.
• Use NIOSH certified dust respirator (N95). This type of
respirator is based on the OSHA requirements for fiberglass
wool at the time this document was written. Other types of
Inspect base insulation:
The boiler contains ceramic fiber and fiberglass materials.
Use care when handling these materials. See WARNING
above. Failure to comply could result in severe personal
injury.
Make sure base insulation is secure against base front and back panels. If
base insulation is damaged or displaced, do not operate boiler. Replace or
reposition insulation.
Failure to replace damaged insulation or reposition
insulation can result in a fire hazard, causing severe
personal injury, death or substantial property damage.
•
•
•
•
•
respirators may be needed depending on the job site conditions.
Current NIOSH recommendations can be found on the
NIOSH web site at http://www.cdc.gov/niosh/homepage.html.
NIOSH approved respirators, manufacturers, and phone
numbers are also listed on this web site.
Wear long-sleeved, loose fitting clothing, gloves, and eye
protection.
Apply enough water to the combustion chamber lining or base
insulation to prevent airborne dust.
Remove combustion chamber lining or base insulation from
the boiler and place it in a plastic bag for disposal.
Operations such as sawing, blowing, tear out and spraying may
generate airborne fiber concentration requiring additional
protection. Bag for disposal.
Wash potentially contaminated clothes separately from other
clothing. Rinse clothes washer thoroughly.
NIOSH stated First Aid.
•Eye: Irrigate immediately
•Breathing: Fresh air.
4. If boiler fails to start, check for following conditions:
a) Loose connection or blown fuse?
b) High limit setting below boiler water temperature?
c) Thermostat setting below room temperature?
d) Gas not turned on at meter?
e) Gas not turned on at boiler?
f) If above fails to eliminate the trouble, refer to Control Supplement.
5. Make sure boiler goes through several normal operating cycles.
6. Turn thermostat or operating control to desired setting.
Check pilot burner flame:
To place in operation:
1. Make sure boiler is filled with water.
2. Follow lighting/operating instructions on boiler.
For propane boilers only:
•
•
•
•
Your propane supplier mixes an odorant with the
propane to make its presence detectable. In some
instances, the odorant can fade, and the gas may no
longer have an odor.
Propane gas can accumulate at floor level. Smell near
the floor for the gas odorant or any unusual odor. If
you suspect a leak, do not attempt to light the pilot.
Use caution when attempting to light a propane
pilot. This should be done by a qualified service
technician, particularly if pilot outages are
common.
Periodically check the odorant level of your gas.
Inspect boiler and system at least yearly to make sure
all gas piping is leak-tight.
Consult your propane supplier regarding installation
of a gas leak detector. There are some products on the
market intended for this purpose. Your supplier may
be able to suggest an appropriate device.
1. Proper pilot flame
a) Blue flame.
b) Inner cone engulfing pilot flame sensor.
c) Pilot flame sensor glows cherry red.
2. Improper pilot flame
a) Overfired - flames large and lifting or blowing past pilot flame
sensor.
b) Underfired - flame small; pilot flame sensor not engulfed by
inner cone.
c) Lack of primary air
- flame tip yellow.
d) Pilot flame sensor
not
heated
properly.
Figure 7
Typical pilot burner flame
3. If boiler starts, go to Step 5. If boiler fails to start, go to Step 4.
Part Number 550-110-640/0703
13
PFG SERIES 6 GAS-FIRED WATER BOILER — BOILER MANUAL
seat burner will result in severe personal injury, death or
substantial property damage.
Check main burner flames:
1. Proper burner flame - Yellow-orange streaks may appear - caused by
dust.
2. Improper flame
a) Overfired - Flames large.
b) Underfired - Flames small.
c) Lack of primary air - Yellow tipping on flames; sooting will occur.
Figure 8
Typical main burner flame
13. Reinstall draft hood, damper (when used), and breeching.
14. Follow "To Place in Operation" procedure.
NOTE: Excessive sooting indicates improper combustion of the gas.
Call a qualified service agency or your local gas utility to check
for proper combustion and make any necessary adjustments.
Clean main burners:
1. Vacuum or brush burners to remove dust and lint.
When reinstalling, burner tubes must be seated in their
locating slots with the openings facing up. Gas orifices
must inject down center of burner. Failure to properly
seat burner will result in severe personal injury, death or
substantial property damage.
Annual shut-down procedure:
Inspect venting system:
1. Check venting system at least once a month during heating season.
With boiler in operation (at least 5 minutes), hold a candle or match
below lower edge of draft hood "skirt." If flame is undisturbed or
leans under skirt, vent system is functioning properly. If flame is
extinguished, flickers, or reduced while flame is pushed out side
skirt, the vent system must be checked for obstructions or other
causes of improper venting.
2. Inspect all parts of venting systems for deterioration from corrosion,
physical damage, sagging, etc. Correct all conditions found.
3. Verify damper, if used, is open when burner ignites. For additional
information, see Control Supplement.
Clean boiler heating surfaces
The boiler contains ceramic fiber and fiberglass materials.
Use care when handling these materials per instructions
on page 13 of this manual. Failure to comply could result
in severe personal injury.
1. Follow shut-down procedure.
2. Remove breeching, draft hood and damper (when used).
Remove jacket top panel. Turn back jacket insulation to expose
collector hood.
3. Remove collector hood. Clean excess boiler cement from collector
hood and cast iron sections.
4. Remove radiation plates.
5. Remove burners from base of boiler. Follow "Clean Main Burners,"
page 14, to thoroughly clean burners.
6. Place newspaper in base of the boiler to collect soot that will fall.
7. With a wire flue brush, clean between the sections.
8. Remove newspaper and soot. Vacuum or brush base and surrounding
area to remove soot.
9. Reinstall radiation plates.
10. Reinstall collector hood. Seal with boiler cement.
11. Reinstall insulation and jacket panel.
12. Reinstall burners.
When reinstalling, burner tubes must be seated in their
locating slots with the openings facing up. Gas orifices
must inject down center of burner. Failure to properly
14
1. Follow lighting/operating instructions label on boiler.
2. DO NOT drain the system unless exposure to freezing temperatures
will occur. If antifreeze is used with system, do not drain.
3. If the complete boiler and piping system must be drained to avoid
freezing, then a means must be provided for draining water from
BOTH ends of the boiler at or below the level of the return tapping.
A boiler drain cock is provided by Weil-McLain on the left side of the
boiler only.
Special servicing instructions
Failure to use PFG Series 6 intermediates or to properly
seal sections per Figure 9 can cause flue gas spillage or
carbon monoxide emissions, resulting in severe personal
injury, death or substantial property damage.
PFG Series 6 intermediate sections have smooth ground sealing surfaces.
These sections must be used if replacing intermediate sections. End
sections have rope groove in place of smooth ground sealing surface.
If replacing any section (see Figure 9):
- Approved RTV silicone sealant (Dow Corning 700 or 732
or G.E. 808 or 108) must be used to seal between intermediates.
- Cope seal must be used to seal between intermediates
and end sections.
Figure 9
Section assembly
Part Number 550-110-640/0703
PFG SERIES 6 GAS-FIRED WATER BOILER — BOILER MANUAL
Common problems and possible solutions
Part Number 550-110-640/0703
15
PFG SERIES 6 GAS-FIRED WATER BOILER — BOILER MANUAL
Section III: Replacement Parts
The boiler contains ceramic fiber and fiberglass materials. Use care when handling these materials per
instructions on page 13 of this manual. Failure to comply could result in severe personal injury.
To avoid personal injury, before replacing any parts on the boiler:
1. Turn off power.
2. Shut off gas supply.
3. Allow boiler to cool.
16
Part Number 550-110-640/0703
PFG SERIES 6 GAS-FIRED WATER BOILER — BOILER MANUAL
Replacement Parts
Part Number 550-110-640/0703
17
PFG SERIES 6 GAS-FIRED WATER BOILER — BOILER MANUAL
Section IV: Ratings and dimensions
Ratings
DOE
Standard equipment
Factory Fire Tested
Insulated Extended Jacket
Built-In Air Separator
Draft Hood (Shipped in separate carton)
Combination Gas Valve
Non-Linting Pilot Burner
Aluminized Steel Burners
Combination Relay Receptacle and 40 VA Transformer
Relay
High Limit Control
Spill Switch (PFG-5 only)
Rollout Thermal Fuse Element (PFG-5 only)
30 P.S.I. Relief Valve (shipped in separate carton)
(boiler sections tested for 50 P.S.I. water working pressure)
Combination Pressure-Temperature Gauge
(shipped in separate carton)
Drain Valve (shipped in separate carton)
18
PIDN
Intermittent Electronic Ignition System
Automatic Vent Damper
PIN
Intermittent Electronic Ignition System
SPN
Constant Burning Thermally Supervised Pilot System
Thermocouple
Part Number 550-110-640/0703
PFG SERIES 6 GAS-FIRED WATER BOILER — BOILER MANUAL
Dimensions
* Locate manual main Shut-Off Gas Valve (where required) according to local utility requirements.
Part Number 550-110-640/0703
19
PFG SERIES 6 GAS-FIRED WATER BOILER — BOILER MANUAL
20
Part Number 550-110-640/0703