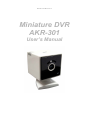
1
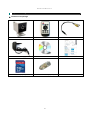
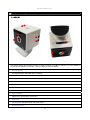
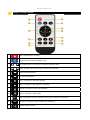
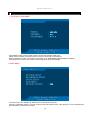
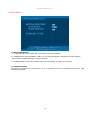
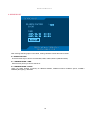
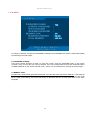
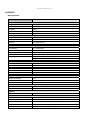
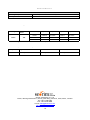
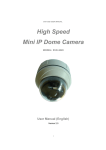
AKR-301 Full Manual V.1.0
Miniature DVR
AKR-301
User’s Manual
1
AKR-301 Full Manual V.1.0
※ The contents of the manual can be modified without prior notice to customers
GENERAL SAFETY AND PRECAUTIONS
This AKR-301 is manufactured to meet international safety standards. Review the following safety
precautions to avoid injury and prevent damage to the AKR-301 or any products connected to it.
1. Use a correct power source. Do not connect this product to a power source that supplies more than
the specified voltage (DC12V), as this will cause damage to the unit.
2. Never insert anything metallic into the AKR-301 as this can cause electric shock.
3. Do not operate in wet & dusty conditions. Keep product surfaces clean and dry. Avoid placing the
AKR-301 in areas like a damp basement or a dusty hallway.
4. Do not expose this product to rain or use near water. If the product gets wet, unplug it and contact an
authorized dealer immediately.
5. To clean the outside case of the AKR-301, use a lightly dampened cloth (no solvents).
6. Do not operate if you suspected to unit is faulty. If there are any unusual sounds or smells coming
from the AKR-301, immediately unplug it and contact an authorized dealer or service centre.
7. Do not attempt to remove the top cover.
Warning: Removing the AKR-301’s cover can cause an electrical shock.
8. Handle AKR-301 carefully to avoid damaging the product. Dropping your AKR-301 on any hard
surface may cause the unit to malfunction. If the AKR-301 doesn’t work properly due to physical
damage, contact an authorized dealer for repair or exchange.
9. The unit has a lithium battery preinstalled.
10. The standard lithium cell 3V battery located on the motherboard should be replaced if the time clock
does not hold its time after the power is turned off.
2
AKR-301 Full Manual V.1.0
TABLE OF CONTENTS
Chapter 1: Packing Contents
CONTENTS IN THE PACKAGE
05
Chapter 2: Getting To Know Your AKR-301
AKR-301
06
Chapter 3: Remote Controller
REMOTE CONTROLLER PANEL
08
Chapter 4: Getting Started
OVERVIEW OF SET UP PROCEDURES
09
Chapter 5: Hardware Installation
SD Memory INSTALLATION
10
CONNECTING THE AKR-301 TO YOUR TV SET OR MONITOR
10
ALARM INSTALLATION
11
Chapter 6: AKR-301Menu
1. ACCESS TO OSD MENU
12
2. MAIN MENU
12
3. SYSTEM SETUP
3.1 DAYLIGHT SAVING
3.2 VIDEO OUTPUT
3.3 BRIGHTNESS
13
4. RECORDING SETUP
4.1 VIDEO QUALITY
4.2 FRAME RATE
4.3 PRE RECORDING TIME
4.4 POST RECORDING TIME
4.5 AUDIO RECORDING
4.6 DISK OVERWRITE
14
5. EVENT SETUP
5.1 MOTION DETECTION
5.2 SCHEDULE SETUP
15
3
AKR-301 Full Manual V.1.0
6. SEARCH LIST
6.1 SEARCH FACTOR
16
7. SUB MENU
17
7.1 PASSWORD CHANGE
7.2 MEMORY SYNC
17
17
Appendix:
TECHNICAL SPECIFICATIONS
18
RECORDING TIME TABLE
19
4
AKR-301 Full Manual V.1.0
Chapter 1: Packing Contents
▶ Contents in the package
AKR-301 Main Unit
Remote Control
AV-OUT Cable
12V Power Supply
Installation CD
Quick Guide
SD Card (Option)
USB SD Reader (Option)
5
AKR-301 Full Manual V.1.0
Chapter 2: Getting To Know Your AKR-301
▶ AKR-301
①②
⑤
③
⑩
⑥
④
⑨
⑪
⑧
⑦
This chapter briefly describes the functions of each connection and LED on AKR-301. For more details on
the set-up and operation of AKR-301, refer to Chapter 6, AKR-301 MENU.
1
Recording LED
This light indicates while AKR-301 is recording.
2
Power LED
This light indicates when the AKR-301 is powered up.
3
AV-OUT
Connect AV-OUT monitor cable.
4
Power
Connect 12V power supply.
5
Focus Handle
Adjust focus. (Focus Near / Focus Far)
6
CCD Lens
1/3” Sony New Structure Super HAD Color CCD
7
Recording Button
6
AKR-301 Full Manual V.1.0
The button to record video.
8
Bracket Hole
The hole to connect wall mount bracket (Soon Be Available)
9
SD Memory Slot
Insert SD Card into the data storage slot.
10
Remote Controller Receiver
The remote control must be pointing at the AKR-301 and be in line of sight to work.
11
Reset
Pressing the reset button will return the AKR-301 setting to factory default.
7
AKR-301 Full Manual V.1.0
Chapter 3: Remote Control
1
REC: Starts AKR-301 recording.
2
MENU: Enters the AKR-301 ‘MENU’ mode.
3
UP/ DOWN buttons to chooses menu fields and changes values.
4
Plays recorded video forward. Plays recorded video backward.
5
REW: Fast Rewind button
6
FF: Fast forward button
7
PLAY: The button to start video playback.
8
STOP: The button to stop playback or recording.
9
PAUSE: The button to pause video playback.
10
MUTE: The button to pause audio.
11
ENT: The button to choose or change a menu option or values in a menu field.
12
SEARCH: The button to find recorded files in SD Memory.
13
MODE: Exit Menu Mode
8
AKR-301 Full Manual V.1.0
Chapter 4: Getting Started
OVERVIEW ON SET-UP PROCEDURES
Below is an overview of the installation steps required get your AKR-301 unit working.
Each step is explained in detail in Chapter 5 - Hardware Installation.
(1) Insert a SD MEMORY.
(2) Connect the AKR-301 to a TV set or monitor by using AV-OUT cable.
(3) Connect the power.
(4) Turn the power on.
(5) Start TV Monitoring and recording.
General Operating Advice:
● Make sure that a SD Memory card is inserted.
(See Chapter 5 -Hardware Installation)
● The firmware used in AKR-301 is compatible with your computer’s operating system (i.e. Windows).
Therefore, you can take the SD memory card from this AKR-301 and install it in your computer to view
recorded video. (Refer to the AKR Player manual.)
● AKR-301 offers you the flexibility to choose a recording frame rate (maximum rate: 30 frames per second).
The faster frame rate the greater the SD Memory storage capacity required. Reducing the frame rate
(minimum rate: 1 frame per 10 seconds) will allow a greater recording duration.
● When first powering up AKR-301, the unit enters the default operational state: “VIEW mode”.
In this mode, AKR-301 does not record nor play the recorded stream, but only shows the current images from
the camera.
● The default recording values for the AKR-301 are 30 frames per second (25 frames in PAL) with normal
video quality. If you use 1GB SD Memory, AKR-301 can record for approximately 2 hours.
● If the power is inappropriately turned off while AKR-301 is in the record mode (i.e. power failure), it will reenter the record mode automatically when power is re-established.
Refer to Chapter 5 - Hardware Installation for more information on installation procedures.
9
AKR-301 Full Manual V.1.0
Chapter 5: Hardware Installation
SD MEMORY INSTALLATION
① Format SD Memory
Most SD cards are pre-formatted to FAT32. If not, insert the
card into the SD card slot on your PC and format it there.
※ In case there is no card slot on your PC, use and external
card reading device.
② Insert SD Memory into SD slot
on AKR-301
After formatting, take the SD Memory card from your PC and
insert it into SD slot on AKR-301.
③ Backup recorded files in SD Memory
When SD Memory storage is full, the recorded files can be
backed up in your PC. Insert SD card in your PC and move
the files of SD card into the HDD of our PC. You can also
check each recorded file through AKR Player.
※ It is recommended that only SanDisk or Transcend SD cards are used, these are compatible with AKR-301.
※ Be sure to turn off AKR-301 first when you take out SD card from the slot.
CONNECTING THE AKR-301TO YOUR TV SET OR MONITOR
① Video Output Connection (For TV / monitor screen display)
To display images from the AKR-301, connect the video output signal to your monitor or Television. Any
Television with a VIDEO INPUT terminal is suitable for displaying the images. The diagram above shows
the video signal connections.
10
AKR-301 Full Manual V.1.0
② Audio Output Connection (For TV / monitor speaker)
Using RCA cable, connect the AUDIO-OUT terminal of AV-OUT cable to AUDIO-IN terminal on your TV.
11
AKR-301 Full Manual V.1.0
Chapter 6: AKR-301 Menu
1. ACCESS TO OSD MENU
AKR-301
1.0
****
Press ‘MENU’ button on the remote control to access the AKR-301 OSD menu.
Please refer to ‘Chapter 3: Remote control’ on how to use remote control buttons.
Default password is ‘0000’. To change the password; go to ‘[SUB MENU]Æ[PASSWORD CHANGE]’.
Use the up/down arrows on the remote control to adjust the numerical settings.
2. MAIN MENU
YES
In the main menu, the ‘indicator ‘■’ will be shown on the left of each menu.
Press the ‘UP/DOWN’ button on remote control to select the desired menu. After placing ‘■’ on the desired menu,
press ‘ENTER’ to access the sub-menu.
12
AKR-301 Full Manual V.1.0
3. SYSTEM SETUP
NTSC
LOW
Configure current time and ‘day light saving’ option. On setting the current time, the field order should be as
follows;
2004/02/17 = year/month/day 19:44:32 = hour/minute/second
3.1 DAY LIGHT SAVING
SELECT ‘ON” when you want to use day light saving time. You can set up a time of period when day light
saving is applied.
3.2 VIDEO OUTPUT
Not selectable. Display NTSC or PAL according to unit’s CCD type.
3.3 BRIGHTNESS:
Select brightness value among low, medium and high.
13
AKR-301 Full Manual V.1.0
4. RECORDING SETUP
HIGH
15
HIGH
YES
NO
30 MIN
4.1 VIDEO QUALITY
LEVEL (HIGH / NORMAL / LOW): Select desired video level from ‘LOW’ to ‘HIGH’.
Compression Bit rate for HIGH: 1.2Mbps
Compression Bit rate for Normal: 750Kbps
Compression Bit rate for Low: 500Kbps
4.2 FRAME RATE
NTSC: Selectable among 0.1 / 0.2 / 0.5 / 1 / 3 / 6 / 15 / 30
PAL: Selectable among 0.1 / 0.2 / 0.5 / 1 / 5 / 6 / 8 / 12.5 / 25
4.3 PRE RECORDING TIME
High: up to 5 seconds for pre-recording available
Normal: 750Kbps / up to 8 seconds for pre-recording available
Low: 500Kbps / up to 10 seconds for pre-recording available
4.4 POST RECORDING TIME
Post-recording time means is the recording time between the beginning and end of an event. (1 sec to 30
mins)
4.5 AUDIO RECORDING:
Audio function can be turned OFF or ON in the menu.
Note: When recording audio, set the RECORD FRAMERATE to 5 or greater. If you set it under 5, audio
recording will not work.
4.6 DISK OVERWRITE
If overwrite is set to ON, the AKR-301 will continue recording while automatically overwriting the oldest
recorded files when SD memory storage capacity is full. Set to OFF, the recording will stop when the SD
Memory is full.
4.6.1. DISK FULL WARNING: Select ‘YES’ if you want to display ‘DISK FULL WARNING’ when the SD card is
full.
4.6.2. REMAINING TIME: This shows remaining time for further recording.
14
AKR-301 Full Manual V.1.0
5. EVENT SETUP
ON
HIGH
ON
5.1 MOTION DETECTION
5.1.1 MOTION (ON / OFF): Select ‘ON” if you want to use motion detection.
5.1.2 SENSITIVIITY (LOW / NORMAL / HIGH): You can select the degree of sensitivity of motion detection.
Set to HIGH for greater sensitivity to small movements.
5.1.3. MARK DISPLAY (ON / OFF): Select ‘ON’ if you want “Motion” to display on the monitor.
5.2 SCHEDULE SETUP
Schedule the recording time on this menu. Up to 4 schedules can be set. Configure period of time when
recording is available.
15
AKR-301 Full Manual V.1.0
6. SEARCH LIST
TIME
2007 / 01 / 01
2007 / 01 / 31
00:00
23:59
SEARCH
After entering searching option in the fields, clicking ‘SEARCH’ will list the search results.
6.1 SEARCH FACTOR:
There are three ways to search recorded files; TIME, EVENT, BOTH (TIME & EVENT)
6.1.1 SEARCH MODE – TIME:
Enter the time period you wish to search for.
6.1.2 SEARCH MODE – EVENT:
When you select ‘EVENT (or BOTH) on SEARCH MODE’, additional search conditions opens; ALARM /
EMERG (Emergency) / MOTION
16
AKR-301 Full Manual V.1.0
7. SUB MENU
YES
ON
30 MB
125 MB
To change a password, navigate to PASSWORD CHANGE in the SUB MENU and press the select button [ENT].
The following screen will appear:
7.1 PASSWORD CHANGE:
The Factory Default Password is 0000. To enter this number, press the UP/DOWN button on the remote
controller. Once you input the your current password, set a new six digit password using the numbered buttons
UP,REW,DOWN,FF on the remote controller. Then, confirm your new password by entering the number again.
7.2 MEMORY SYNC:
The index file is automatically generated and stored in the SD card when inserted into AKR-301. If the index file
does not match the files actually stored in the SD card, users can synchronize the index file list and the actual
file list. While synchronizing, the process percentage is displayed and then its value goes back to ‘NO’ when
completed.
17
AKR-301 Full Manual V.1.0
APPENDIX
SPECIFICATION
ITEM
DESCRIPTION
CCD Module
Image Device
1/3” Sony New Structure Super HAD Color CCD
Effective Pixels(HxV)
510x492(NTSC ), 500x582(PAL)
Sensitivity
0.9Lux
Video Out
VBS 1Vpp ±10%, 75ohm
Field of View(deg)
Video
90(D)
Compression format
MPEG4(500K-1200Kbps)
Frame Rate
30fps(NTSC), 25fps(PAL)
Video In
Video Out
AUDIO
CCD Image Sensor
1CH Analog Composite, 1Vp-p, 75 Ohms
Compression
G.711, 8bit PCM
Bit Rate
64Kbps
Sampling Frequency
8 KHz
Input
Output
1 CH Mono, Microphone Input
1 CH Mono, Line Out
Maximum Out Range : 1100mVp-p
9.7dB
Gain
STORAGE
Media
Capacity
I/O CONNECTOR
DC Input
Video Output
Audio Output
SD Memory Interface
REMOTE CONTROLL
SD Memory, Standard SD
Max. 4GB
12VDC, DC Jack
1ch, 75Ohm, 3.5Φ, AV Phone Jack
1ch, Mono, 3.5Φ, AV Phone Jack
1ch, SD Memory Card Slot
IR Receiver Module
3.0V
Remote Controller
15Key
Receive Range
±30°, 6m
LED DISPLAY
Power
Red, 3V Power on, Light in power on
Record
Green, Light in Recording
SWITCH
Reset
Tactile Switch, 1Key
POWER
Input Voltage
DC12V
Input Voltage Range
9V ~ 14.5V(Restricted in CCD Module)
Power Consumption
AT DC12V, 250mA
Power Supply
DC12V, 500mA, External power supply
DC Jack
ID:1.35Φ, OD:3.5Φ
18
AKR-301 Full Manual V.1.0
OPERATING CONDITIONS
Operating Temperature
Humidity
-10~50℃(Restricted in CCD Module)
20~80% RHG
ENCODING CONDITIONS
Based on 1GB of storage with the installation of 1 camera.
RECORDING TIME TABLE
Video Signal
Record
Mode
Video Quality
HIGH
NTSC*
30 fps
2 Hours
15 fps
7 fps
1 fps
4 Hours
8 Hours
16 Hours
1ch
NORMAL
2 .1/2Hours 5 Hours
10 Hours
LOW
3 Hours
6 Hours
12 Hours
* The NTSC signal mode is used for most of televisions produced in the U.S.
20 Hours
24 Hours
FRAME SIZE (ROUGH DATA SIZE)
Quality
High
Normal
Low
Size
1200Kbps
700 Kbps
500 Kbps
Seorim Technology Co., Ltd
#1001, daerung technotown vi, 493-6, gasan-dong, kumchun, seoul, korea, 153-803
Tel: +82-2-2108-5860
Fax: +82-2-2108-5869
E-mail: [email protected]
http://www.seorimtech.com
19