1
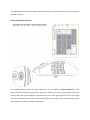
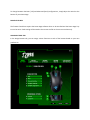
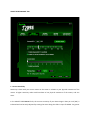
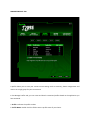
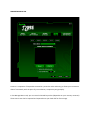
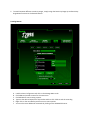
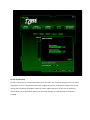
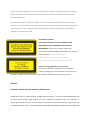
MASTER
GUIDE
The
Razer
Naga
is
the
ultimate
Massively
Multiplayer
Online
Gaming
mouse
that
shifts
the
balance
between
keyboard
and
mouse
by
putting
an
unprecedented
number
of
in‐game
commands
in
one
place.
A
multi‐button
thumb
grid
with
full
remapping
and
macro
functionality
places
every
command
you
need
in
the
palm
of
your
hand.
An
ergonomic
form
shaped
to
maximize
ease
of
use
lets
you
game
in
comfort
for
hours
on
end.
With
the
Razer
Naga,
you
will
Get
Imba.
CONTENTS
1.
2.
3.
4.
5.
6.
7.
8.
9.
Package
Contents
/
System
Requirements
Key
Features
Installation
/
Registration
/
Technical
Support
Configuring
Your
Razer
Naga
Using
Your
Razer
Naga
Advanced
Settings
Guide
Safety
and
Maintenance
Legalese
FCC
Declaration
Of
Conformance
/
WEEE
Information
1.
PACKAGE
CONTENTS
Razer
Naga
Gaming
Mouse
Certificate
of
Authenticity
Quick
Start
Guide
Master
Guide
Razer
Naga
Grid
Trainer
SYSTEM
REQUIREMENTS
PC/Mac
®
with
USB
port
Windows®
7
/
Windows
Vista®
/
Windows®
XP
or
Mac
OS®
X
(v10.4
and
above)
Internet
connection
(for
driver
installation)
35MB
of
free
hard
disk
space
2.
KEY
FEATURES
A
Mouse
Button
1
–
Click
B
Mouse
Button
2
–
Menu
C
Mouse
Button
3
–
Scroll
Wheel
and
Button
D
Mouse
Button
4
–
Backward
E
Mouse
Button
5
–
Forward
F
Thumb
Grid
–
12
fully
programmable
buttons
with
Macro‐Functionality
G
Razer
Precision
3.5G
Laser™
Sensor
H
Basic
/
Advanced
Switch
I
Ultraslick™
Teflon®
Feet
J
1000Hz
Ultrapolling™
/
1ms
Response
Time
K
16‐Bit
Ultra‐Wide
Data
Path
3.
INSTALLATION
/
REGISTRATION
/
TECHNICAL
SUPPORT
Windows®
7
/
Windows
Vista®
/
Windows®
XP
installation
instructions
Step
1:
Plug
your
Razer
Naga
into
the
USB
port
of
your
computer.
Step
2:
Download
the
Driver
Installer
from
http://www.razersupport.com/.
Step
3:
Run
the
installer.
Step
4:
Choose
setup
language.
Click
OK
to
proceed.
Step
5:
The
Razer
Naga
setup
screen
appears.
Click
NEXT
to
proceed.
Step
6:
Read
the
license
agreement.
If
you
agree
to
all
the
terms,
select
“I
accept
the
terms
in
the
license
agreement”.
Click
NEXT
to
proceed.
Step
7:
Enter
your
User
Name
and
Organization.
Click
NEXT
to
proceed.
Step
8:
Choose
your
installation
setup.
Click
NEXT
to
proceed.
Step
9:
If
everything
is
correct.
Click
INSTALL
to
begin
installation.
Step
10:
At
the
end
of
the
installation,
click
FINISH
to
complete
the
installation.
Step
11:
Follow
the
instructions
onscreen
to
restart
your
computer.
Click
YES.
Mac
OS
X
(v10.4
and
above)
installation
instructions
Step
1:
Plug
your
Razer
Naga
into
the
USB
port
of
your
Mac.
Step
2:
Close
the
“Keyboard
Setup
Assistant”
if
prompted.
Step
3:
Download
the
Driver
Installer
from
http://www.razersupport.com/.
Step
4:
Run
the
installer.
Step
5:
An
installation
warning
screen
will
appear.
Click
CONTINUE
to
proceed
with
the
installation.
Step
6:
The
Razer
Naga
introduction
screen
appears.
Click
CONTINUE
to
proceed.
Step
7:
Read
the
software
license
agreement
and
click
CONTINUE.
Step
8:
A
confirmation
popup
screen
will
appear.
Click
AGREE
if
you
accept
all
terms
of
the
agreement.
Step
9:
If
you
want
to
choose
the
destination
folder
where
the
driver
software
will
reside,
click
CHANGE
INSTALL
LOCATION.
Otherwise,
click
INSTALL
to
begin
installation.
Step
10:
Key
in
your
password
if
prompted.
Step
11:
At
the
end
of
the
installation,
follow
the
instructions
onscreen
to
restart
your
computer.
Click
RESTART.
Registering
your
Razer
Naga
Please
visit
www.razerzone.com/registration/
for
online
product
registration.
What
you’ll
get:
•
2
years’
limited
manufacturer’s
warranty
•
Free
online
technical
support
at
www.razersupport.com.
4.
CONFIGURING
YOUR
RAZER
NAGA
Basic
[123]
Configuration
The
Razer
Naga
provides
a
twelve
button
[1‐12]
Thumb
Grid
in
two
configurations:
Basic
[123]
and
Advanced
[Num].
In
Basic
[123]
configuration,
the
twelve
buttons
[1‐12]
are
assigned
to
1,2,3,4,5,6,7,8,9,0,‐,=
of
the
keyboard
respectively.
This
allows
you
to
replicate
the
default
action
bar
for
most
MMO
games
onto
the
Thumb
Grid.
With
this
function,
you
have
better
control
of
your
character’s
movement
in
game.
Advanced
[Num]
Configuration
In
the
Advanced
[Num]
mode,
the
twelve
buttons
[1‐12]
are
assigned
to
1,2,3,4,5,6,7,8,9,0,‐,+
of
the
Number
Pad
for
the
keyboard
respectively.
Beside
your
default
action
bar,
by
assigning
game
functions
to
the
number
pad
of
your
keyboard,
you
will
have
access
to
more
game
functions
right
at
your
finger
tips.
Note:
Activating
the
Num
Lock
of
the
keyboard
affects
the
function
of
the
Thumb
Grid
when
your
Razer
Naga
is
in
the
Advanced
[Num]
configuration.
To
change
between
the
Basic
[123]
and
Advanced
[Num]
configurations,
simply
adjust
the
switch
at
the
bottom
of
your
Razer
Naga.
DRIVER
FEATURES
The
features
listed
here
require
the
Razer
Naga
software
driver
to
be
installed
and
the
Razer
Naga
Tray
Icon
to
be
active.
Each
setting
will
be
saved
to
the
current
Profile
on
the
current
machine
only.
ASSIGN
BUTTONS
TAB
In
the
Assign
Buttons
tab,
you
can
assign
various
functions
to
each
of
the
buttons
based
on
your
own
preferences.
The
following
functions
are
possible:
Click:
Perform
a
normal
mouse
click.
Menu:
Open
a
context‐sensitive
menu.
Universal
Scrolling:
Activate
universal
scrolling
by
clicking
and
holding
the
assigned
button.
Drag
your
Razer
Naga
to
scroll
in
the
direction
of
the
mouse
movement.
Double
Click:
Perform
a
double
click
with
the
assigned
button.
Macro:
If
the
button
function
or
key
is
not
listed,
or
if
you
would
like
to
assign
a
macro
to
a
button,
select
MACRO
from
the
dropdown
menu.
In
addition,
all
saved
macros
will
be
shown
on
a
sub
dropdown
menu
for
quick
selection
when
you
mouse
over
the
MACRO
option.
Sensitivity
Stage
Up:
Switch
the
current
sensitivity
stage
to
the
next
stage.
Sensitivity
Stage
Down:
Switch
the
current
sensitivity
stage
to
the
previous
stage.
Profile
Settings:
Switch
to
a
profile
on
the
fly
and
immediately
load
all
your
preferred
mouse
settings.
When
you
select
PROFILE
SETTINGS
from
the
dropdown
menu,
a
sub‐menu
will
appear
and
allow
you
to
choose
desired
profile
to
switch
to.
Forward:
Issue
a
“Forward”
command
in
Windows
Explorer
/
Internet
Explorer.
Backward:
Issue
a
“Back”
command
in
Windows
Explorer
/
Internet
Explorer.
On‐The‐Fly
Sensitivity:
Enable
change
of
sensitivity
settings
on
the
fly
without
the
need
to
enter
the
configuration
menu.
Single
Key:
Activate
a
key
on
your
keyboard.
Scroll
Up:
Scroll
up
the
page
you
are
currently
viewing.
Scroll
Down:
Scroll
down
the
page
you
are
currently
viewing.
Button
Off:
Disable
any
function
on
the
assigned
button.
Choose
the
THUMB
GRID
VIEW
to
gain
access
to
the
12
buttons
Thumb
Grid.
All
12
buttons
can
be
assigned
to
various
functions
based
on
your
own
preferences.
In
addition,
you
can
switch
between
the
Basic
[123]
and
Advanced
[Num]
configuration
to
assign
a
different
set
of
functions
to
your
Thumb
Grid.
If
you
do
not
want
wish
to
use
the
Thumb
Grid
button,
click
the
DISABLE
ALL
button
to
disable
the
Thumb
Grid
buttons
and
prevent
accidental
activation
of
the
various
buttons
on
the
Thumb
Grid.
ADJUST
PERFORMANCE
TAB
1.
Current
Sensitivity
Sensitivity
is
how
much
your
cursor
moves
on
the
screen
in
relation
to
your
physical
movement
of
the
mouse.
A
higher
sensitivity
value
would
translate
to
less
physical
movement
of
the
mouse,
and
vice
versa.
In
the
ADJUST
PERFORMANCE
tab,
the
current
sensitivity
of
your
Razer
Naga
in
dots
per
inch
(DPI)
is
indicated
and
can
be
easily
adjusted
by
moving
the
arrow
along
the
slider
in
steps
of
100DPI.
For
greater
flexibility
in
adjustment,
you
can
select
the
ENABLE
INDEPENDENT
X‐Y
SENSITIVITY
option
and
move
the
individual
X
and
Y
arrows
along
the
slider.
To
display
the
On‐The‐Fly
Sensitivity
indicator
onscreen
whenever
you
make
changes
on
the
fly,
select
the
ENABLE
ON‐THE‐FLY
SENSITIVITY
ONSCREEN
DISPLAY
option.
2.
Acceleration
Acceleration
allows
you
to
increase
your
physical
mouse
movement
to
onscreen
cursor
movement
ratio
based
on
the
rate
of
change
of
your
movement
speed.
The
higher
the
value
of
acceleration,
the
higher
the
ratio
will
be.
You
can
activate
acceleration
by
checking
the
ENABLE
ACCELERATION
box
and
moving
the
arrow
along
the
slider.
3.
Polling
Rate
The
polling
rate
determines
the
time
intervals
that
the
PC
retrieves
data
from
your
mouse.
A
higher
value
would
mean
shorter
intervals
and
therefore
less
latency.
You
can
switch
between
125Hz,
500Hz
and
1000Hz.
MANAGE
PROFILES
TAB
A
profile
allows
you
to
store
your
various
mouse
settings
such
as
sensitivity,
button
assignments
and
macros
as
a
single
group
for
your
convenience.
In
the
Manage
Profiles
tab,
you
can
create
and
launch
customized
profiles
based
on
the
application
you
have
activated.
a.
Profile:
Indicates
the
profile
number
b.
Profile
Name:
Double‐click
this
field
to
enter
a
profile
name
of
your
choice.
c.
Application:
Right‐click
on
this
field
and
select
“Assign
Application”
to
open
up
the
directory
browsing.
Select
the
executable
file
of
the
program
you
want
the
profile
to
be
tied
to.
d.
Auto
Switch:
Select
this
option
to
activate
the
current
profile
as
an
On‐The‐Fly
profile.
Right‐clicking
inside
the
Manage
Profile
tab
allows
you
to
quickly
access
a
list
of
extra
commands.
MANAGE
MACROS
TAB
A
macro
is
a
sequence
of
keystrokes
executed
in
a
particular
order
and
timing.
It
allows
you
to
execute
a
chain
of
commands,
with
the
press
of
just
one
button,
to
optimize
your
gameplay.
In
the
Manage
Macros
tab,
you
can
record
unlimited
keystrokes
(dependent
on
your
memory
resources).
These
macros
can
also
be
imported
and
exported
onto
your
hard
disk
for
future
usage.
LIGHTING
AND
MAINTAINENCE
Lighting
Turn
on/off
the
Scroll
Wheel
&
Thumb
Grid
lighting
and
Razer
Logo
lighting
on
the
Razer
Naga.
Maintenance
Update
the
Razer
driver
and
firmware
software
by
clicking
on
the
CHECK
FOR
UPDATES
button.
This
will
connect
you
to
www.razersupport.com
for
the
latest
driver/firmware/addon
downloads.
You
can
also
restore
your
Razer
Naga
to
the
default
settings
by
pressing
the
RESTORE
ALL
SETTINGS
TO
DEFAULT
button.
USING
YOUR
RAZER
NAGA
Setting
Sensitivity
Stages
A
sensitivity
stage
is
a
preset
sensitivity
value
you
can
swap
to
on
the
fly.
This
means
you
can
change
to
your
preferred
sensitivity
instantly
by
toggling
between
sensitivity
stages.
To
preset
a
sensitivity
stage:
1.
2.
3.
4.
Load
the
Razer
Configurator
and
click
on
the
Adjust
Performance
tab.
Click
on
the
SENSITIVITY
STAGE
button.
A
Sensitivity
Stage
Settings
pop
up
box
will
appear.
Select
the
number
of
sensitivity
stages
needed.
Choose
the
stage
you
would
like
to
preset
and
adjust
using
the
arrow
on
the
slider.
5. To
switch
between
different
sensitivity
stages,
simply
assign
the
Sensitivity
Stage
Up
and
Sensitivity
Stage
Down
functions
to
the
desired
buttons.
Creating
Macros
A.
B.
C.
D.
E.
F.
Load
the
Razer
Configurator
and
click
on
the
Manage
Macros
tab.
Click
NEW
and
provide
a
name
for
the
new
macro.
Click
RECORD
to
start
creating
a
macro.
Type
out
the
desired
sequence
of
keystrokes
and
then
click
STOP
to
end
the
recording.
Right‐click
on
the
recorded
keystroke
to
access
more
options.
You
can
also
insert
additional
commands
by
clicking
on
the
ADVANCED
button.
On‐The‐Fly
Sensitivity
On‐The‐Fly
Sensitivity
is
a
feature
that
allows
you
to
fine‐tune
your
sensitivity
settings
even
in
the
midst
of
gameplay.
If
On‐The‐Fly
Sensitivity
has
been
assigned
to
a
button,
pressing
that
assigned
button
and
moving
the
scroll
wheel
will
produce
a
bar
at
the
lower
right‐hand
corner
of
your
screen.
While
this
feature
allows
you
to
dynamically
adjust
your
sensitivity
settings,
it
is
accessible
only
if
the
driver
is
installed.
SAFETY
AND
MAINTENANCE
Safety
Guidelines
In
order
to
achieve
maximum
safety
while
using
your
mouse,
we
suggest
that
you
adopt
the
following
guidelines:
1. Avoid
looking
directly
into
the
tracking
beam
of
your
mouse
or
pointing
the
beam
in
any
one
else’s
eye.
Note
that
the
tracking
beam
is
NOT
visible
to
the
naked
human
eye
and
is
set
on
an
always‐on
mode.
2. Should
you
have
trouble
operating
the
mouse
properly
and
troubleshooting
does
not
work,
unplug
the
device
and
contact
the
Razer
hotline
or
go
to
www.razersupport.com
for
support.
Do
not
attempt
to
service
or
fix
the
device
yourself
at
any
time.
3. Do
not
take
apart
the
mouse
(doing
so
will
also
void
your
warranty)
and
do
not
attempt
to
service
it
yourself
or
operate
it
under
abnormal
current
loads.
4. Keep
your
mouse
away
from
liquid,
humidity
or
moisture.
Operate
your
mouse
only
within
the
specified
temperature
range
of
0˚C(32˚F)
to
40˚C(104˚F).
Should
you
operate
it
in
a
temperature
that
is
beyond
this
range,
unplug
and
switch
off
the
device
in
order
to
let
the
temperature
stabilize
within
the
optimal
temperature
range.
COMFORT
Here
are
some
tips
to
ensure
that
you
are
comfortable
while
using
your
mouse.
Research
has
shown
that
long
periods
of
repetitive
motion,
improper
positioning
of
your
computer
peripherals,
incorrect
body
position,
and
poor
habits
may
be
associated
with
physical
discomfort
and
injury
to
nerves,
tendons,
and
muscles.
Please
follow
these
guidelines
to
ensure
comfortable
use
of
your
mouse
and
avoid
injury.
1. Position
your
keyboard
and
monitor
directly
in
front
of
you
with
your
mouse
next
to
it.
Place
your
elbows
next
to
your
side,
not
too
far
away
and
your
mouse
within
easy
reach.
2. Adjust
the
height
of
your
chair
and
table
so
that
the
keyboard
and
mouse
are
at
or
below
elbow
height.
3. Keep
your
feet
well
supported,
posture
straight
and
your
shoulders
relaxed.
4. During
gameplay,
relax
your
wrist
and
keep
it
straight.
If
you
do
the
same
tasks
with
your
hands
repeatedly,
try
not
to
bend,
extend
or
twist
your
hands
for
long
periods.
5. Do
not
rest
your
wrists
on
hard
surfaces
for
long
periods.
Use
a
wrist
support
such
as
Razer’s
gel‐filled
eXactRest™
to
support
your
wrist
while
gaming.
6. Customize
the
buttons
on
your
mouse
to
suit
your
style
of
gaming
in
order
to
minimize
repetitive
or
awkward
motions
while
gaming.
7. Make
sure
that
your
mouse
fits
comfortably
in
your
hands.
8. Do
not
sit
in
the
same
position
all
day.
Get
up,
step
away
from
your
desk
and
do
exercises
to
stretch
your
arms,
shoulders,
neck
and
legs.
9. If
you
should
experience
any
physical
discomfort
while
using
your
mouse,
such
as
pain,
numbness,
or
tingling
in
your
hands,
wrists,
elbows,
shoulders,
neck
or
back,
please
consult
a
qualified
medical
doctor
immediately.
MAINTENANCE
AND
USE
The
Razer
Naga
is
equipped
with
a
laser
sensor,
which
has
a
tracking
beam
that
is
invisible
to
the
naked
human
eye.
There
is
a
little
regular
maintenance
to
keep
the
Razer
Naga
in
optimum
condition.
Once
a
month
we
recommend
you
unplug
the
mouse
from
the
USB
port
and
clean
the
lens
below
the
Razer
Naga
with
a
soft
cloth
or
cotton
swab.
Use
a
little
warm
water
but
no
soap
or
harsh
cleaning
agents.
To
get
the
ultimate
experience
in
movement
and
control,
we
highly
recommend
a
premium
mousing
surface
from
Razer.
Some
surfaces
will
cause
undue
wear
on
the
feet
requiring
constant
care
and
eventual
replacement.
Do
note
that
the
sensor
of
the
Razer
Naga
is
‘tuned’
or
optimized
especially
for
the
Razer
mousing
surfaces.
This
means
that
the
sensor
has
been
tested
extensively
to
confirm
that
the
Razer
Naga
reads
and
tracks
best
on
Razer
mousing
surfaces.
Other
premium
mousing
surfaces
from
companies
like
Everglide™
may
work
just
as
well.
Class
1M
laser
products
International
standards
and
safety.
INVISIBLE
LASER
RADIATION:
DO
NOT
VIEW
DIRECTLY
WITH
OPTICAL
INSTRUMENTS.
Class
1m
laser
products
comply
with
International
Standard
IEC
60825‐1
Ed
2:
2007,
Class
1M
Laser
Product
Invisible
and
also
complies
with
21
CFR
1040.10
and
1040.11
except
for
deviations
pursuant
to
Laser
Notice
No.
50,
dated
June
24,
2007.
Safety
and
usage
guidelines
for
laser
products
Do
not
direct
laser
beam
toward
eye.
For
Class
1M
laser
products,
viewing
laser
output
with
optical
instruments
(e.g.,
eye
loupes,
magnifiers,
and
microscopes)
within
a
distance
of
100mm
may
posed
an
eye
hazard.
LEGALESE
COPYRIGHT
AND
INTELLECTUAL
PROPERTY
INFORMATION
©2009
Razer
USA
Ltd.
Patent
Pending.
All
Rights
Reserved.
Razer™,
the
Razer
Triple‐Headed
Snake
logo,
the
Razer
distressed
word
logo,
Naga™
and
other
trademarks
contained
herein
are
trademarks
or
registered
trademarks
of
Razer
USA
Ltd
and/or
its
affiliated
or
associated
companies,
registered
in
the
United
States
and/or
other
countries.
Windows
and
the
Windows
logo
are
trademarks
of
the
Microsoft
group
of
companies.
Mac
OS,
Mac
and
the
Mac
logo
are
trademarks
or
registered
trademarks
of
Apple
Inc.,
registered
in
the
U.S.
and
other
countries.
World
of
Warcraft
and
Blizzard
Entertainment
are
trademarks
or
registered
trademarks
of
Blizzard
Entertainment,
Inc.
in
the
U.S.
and/or
other
countries.
Warhammer,
Warhammer
Online,
Age
of
Reckoning,
and
all
associated
marks,
names,
races,
race
insignia,
characters,
vehicles,
locations,
units,
illustrations
and
images
from
the
Warhammer
world
are
either
®,
TM
and/or
©
Games
Workshop
Ltd
2000‐2008.
Aion,
NCsoft,
the
interlocking
NC
logo
and
all
associated
logos
and
designs
are
trademarks
or
registered
trademarks
of
NCsoft
Corporation.
All
other
trademarks
are
the
property
of
their
respective
owners.
Razer
USA
Ltd
(“Razer”)
may
have
copyright,
trademarks,
trade
secrets,
patents,
patent
applications,
or
other
intellectual
property
rights
(whether
registered
or
unregistered)
concerning
the
product
in
this
Master
Guide.
Furnishing
of
this
Master
Guide
does
not
give
you
a
license
to
any
such
copyright,
trademark,
patent
or
other
intellectual
property
right.
The
Razer
Naga
product
(the
“Product”)
may
differ
from
pictures
whether
on
packaging
or
otherwise.
Razer
assumes
no
responsibility
for
such
differences
or
for
any
errors
that
may
appear.
Information
contained
herein
is
subject
to
change
without
notice.
LIMITED
PRODUCT
WARRANTY
For
the
latest
and
current
terms
of
the
Limited
Product
Warranty,
please
visit
http://warranty.razerzone.com.
LIMITATION
OF
LIABILITY
Razer
shall
in
no
event
be
liable
for
any
lost
profits,
loss
of
information
or
data,
special,
incidental,
indirect,
punitive
or
consequential
or
incidental
damages,
arising
in
any
way
out
of
distribution
of,
sale
of,
resale
of,
use
of,
or
inability
to
use
the
Product.
In
no
event
shall
Razer’s
liability
exceed
the
retail
purchase
price
of
the
Product.
COSTS
OF
PROCUREMENT
For
the
avoidance
of
doubt,
in
no
event
will
Razer
be
liable
for
any
costs
of
procurement
unless
it
has
been
advised
of
the
possibility
of
such
damages,
and
in
no
case
shall
Razer
be
liable
for
any
costs
of
procurement
liability
exceeding
the
retail
purchase
price
of
the
Product.
GENERAL
These
terms
shall
be
governed
by
and
construed
under
the
laws
of
the
jurisdiction
in
which
the
Product
was
purchased.
If
any
term
herein
is
held
to
be
invalid
or
unenforceable,
then
such
term
(in
so
far
as
it
is
invalid
or
unenforceable)
shall
be
given
no
effect
and
deemed
to
be
excluded
without
invalidating
any
of
the
remaining
terms.
Razer
reserves
the
right
to
amend
any
term
at
any
time
without
notice.
FCC
DECLARATION
OF
CONFORMANCE
/
WEEE
INFORMATION
FCC
DECLARATION
OF
CONFORMANCE
This
equipment
has
been
tested
and
found
to
comply
with
the
limits
for
a
Class
B
digital
device,
pursuant
to
part
15
of
the
FCC
Rules.
These
limits
are
designed
to
provide
reasonable
protection
against
harmful
interference
in
a
residential
installation.
This
equipment
generates,
uses
and
can
radiate
radio
frequency
energy
and,
if
not
installed
and
used
in
accordance
with
the
instructions,
may
cause
harmful
interference
to
radio
communications.
However,
there
is
no
guarantee
that
interference
will
not
occur
in
a
particular
installation.
If
this
equipment
does
cause
harmful
interference
to
radio
or
television
reception,
which
can
be
determined
by
turning
the
equipment
off
and
on,
the
user
is
encouraged
to
try
to
correct
the
interference
by
one
or
more
of
the
following
measures:
Reorient
or
relocate
the
receiving
antenna.
Increase
the
separation
between
the
equipment
and
the
receiver.
Connect
the
equipment
into
an
outlet
on
a
circuit
different
from
that
to
which
the
receiver
is
connected.
Consult
the
dealer
or
an
experienced
radio
TV
technician
for
help.
For
more
information,
refer
to
the
online
help
system
on
www.razerzone.com.
Industry
Canada
Compliance
Statement
This
Class
B
digital
apparatus
complies
with
Canadian
ICES‐003.
Cet
appareil
numérique
de
la
classe
B
est
conforme
à
la
norme
NMB‐003
du
Canada.
ENGLISH
STATEMENT
OF
COMPLIANCE
WITH
EU
DIRECTIVE
Hereby,
Razer
(Europe)
GmbH,
declares
that
this
Razer
Naga™
Laser
Gaming
Mouse
is
in
compliance
with
the
essential
requirements
and
other
relevant
provisions
of
Directive
2004/108/EC
FRENCH
DÉCLARATION
DE
CONFORMITÉ
AVEC
LES
DIRECTIVES
DE
L'UNION
EUROPÉENNE
Par
la
présente
Razer
(Europe)
GmbH
déclare
que
l'appareil
Razer
Naga™
Laser
Gaming
Mouse
est
conforme
aux
exigences
essentielles
et
aux
autres
dispositions
pertinentes
de
la
directive
2004/108/CE
ITALIAN
DICHIARAZIONE
DI
CONFORMITA’
CON
LE
DIRETTIVE
EU
Con
la
presente
Razer
(Europe)
GmbH
dichiara
che
questo
Razer
Naga™
Laser
Gaming
Mouse
è
conforme
ai
requisiti
essenziali
ed
alle
altre
disposizioni
pertinenti
stabilite
dalla
direttiva
2004/108/CE
DEUTSCH
EG‐KONFORMITÄTSERKLÄRUNG
Hiermit
erklärt
Razer
(Europe)
GmbH,
dass
sich
dieser/diese/dieses
Razer
Naga™
Laser
Gaming
Mouse
in
Übereinstimmung
mit
den
grundlegenden
Anforderungen
und
den
anderen
relevanten
Vorschriften
der
Richtlinie
2004/108/EG
befindet.
ESPAÑOL
DECLARACIÓN
DE
CONFORMIDAD
CON
LA
DIRECTIVA
DE
LA
UE
Por
medio
de
la
presente
Razer
(Europe)
GmbH
declara
que
el
Razer
Naga™
Laser
Gaming
Mouse
cumple
con
los
requisitos
esenciales
y
cualesquiera
otras
disposiciones
aplicables
o
exigibles
de
la
Directiva
2004/108/CE
PORTUGUÊS
DIRECTIVA
DA
UE
COM
DECLARAÇÃO
DE
CONFORMIDADE.
Razer
(Europe)
GmbH
declara
que
este
Razer
Naga™
Laser
Gaming
Mouse
está
conforme
com
os
requisitos
essenciais
e
outras
disposições
da
Directiva
2004/108/CE
DANSK
ERKLÆRING
OM
OVERENSSTEMMELSE
MED
EU‐DIREKTIV
Undertegnede
Razer
(Europe)
GmbH
erklærer
herved,
at
følgende
udstyr
Razer
Naga™
Laser
Gaming
Mouse
overholder
de
væsentlige
krav
og
øvrige
relevante
krav
i
direktiv
2004/108/EF
POLSKI
OŚWIADCZENIE
O
ZGODNOŚCI
Z
DYREKTYWĄ
UE
Niniejszym
Razer
(Europe)
GmbH
oswiadcza,
ze
Razer
Naga™
Laser
Gaming
Mouse
jest
zgodny
z
zasadniczymi
wymogami
oraz
pozostałymi
stosownymi
postanowieniami
Dyrektywy
2004/108/EC
GREEK
ΜΕ
ΤΗΝ
ΠΑΡΟΥΣΑ
Razer
(Europe)
GmbH
ΔΗΛΩΝΕΙ
ΟΤΙ
Razer Naga™
Laser
Gaming
Mouse
ΣΥΜΜΟΡΦΩΝΕΤΑΙ
ΠΡΟΣ
ΤΙΣ
ΟΥΣΙΩΔΕΙΣ
ΑΠΑΙΤΗΣΕΙΣ
ΚΑΙ
ΤΙΣ
ΛΟΙΠΕΣ
ΣΧΕΤΙΚΕΣ
ΔΙΑΤΑΞΕΙΣ
ΤΗΣ
ΟΔΗΓΙΑΣ
2004/108/EK
The
full
Declaration
of
Conformity
can
be
requested
via
the
following
:
Company
:
Razer
(Europe)
GmbH
Address
:
Winterhuder
Weg
82,
D‐22085
Hamburg,
Germany
E‐mail
:
[email protected]
English
Correct
Disposal
of
This
Product
(Waste
Electrical
&
Electronic
Equipment)
(Applicable
in
the
European
Union
and
other
European
countries
with
separate
collection
systems)
This
marking
shown
on
the
product
or
its
literature,
indicates
that
it
should
not
be
disposed
with
other
household
wastes
at
the
end
of
its
working
life.
To
prevent
possible
harm
to
the
environment
or
human
health
from
uncontrolled
waste
disposal,
please
separate
this
from
other
types
of
wastes
and
recycle
it
responsibly
to
promote
the
sustainable
reuse
of
material
resources.
Household
users
should
contact
either
the
retailer
where
they
purchased
this
product,
or
their
local
government
office,
for
details
of
where
and
how
they
can
take
this
item
for
environmentally
safe
recycling.
Business
users
should
contact
their
supplier
and
check
the
terms
and
conditions
of
the
purchase
contract.
This
product
should
not
be
mixed
with
other
commercial
wastes
for
disposal.
Français
Comment
éliminer
ce
produit
(déchets
d’équipements
électriques
et
électroniques)
(Applicable
dans
les
pays
de
l’Union
Européen
et
aux
autres
pays
européens
disposant
de
systémes
de
collecte
sélective)
Ce
symbole
sur
le
produit
ou
sa
documentation
indique
qu’il
ne
doit
pas
être
éliminé
en
fin
de
vie
avec
les
autres
déchets
ménagers.
L’élimination
incontrôlée
des
déchets
pouvant
porter
préjudice
à
l’environnement
ou
à
la
santé
humaine,
veuillez
le
séparer
des
autres
types
de
déchets
et
le
recycler
de
façon
responsable.
Vous
favoriserez
ainsi
la
réutilisation
durable
des
ressources
matérielles.
Les
particuliers
sont
invités
à
contacter
le
distributeur
leur
ayant
vendu
le
produit
ou
à
se
renseigner
auprès
de
leur
mairie
pour
savoir
où
et
comment
ils
peuvent
se
débarrasser
de
ce
produit
afin
qu’il
soit
recyclé
en
respectant
l’environnement.
Les
entreprises
sont
invitées
à
contacter
leurs
fournisseurs
et
à
consulter
les
conditions
de
leur
contrat
de
vente.
Ce
produit
ne
doit
pas
être
éliminé
avec
les
autres
déchets
commerciaux.
Italiano
Corretto
smaltimento
del
prodotto
(rifiuti
elettrici
ed
elettronici)
(Applicabile
in
i
paesi
dell’Unione
Europea
e
in
quelli
con
sistema
di
raccolta
differenziata)
Il
marchio
riportato
sul
prodotto
o
sulla
sua
documentazione
indica
che
il
prodotto
non
deve
essere
smaltito
con
altri
rifiuti
domestici
al
termine
del
ciclo
di
vita.
Per
evitare
eventuali
danni
all'ambiente
o
alla
salute
causati
dall'inopportuno
smaltimento
dei
rifiuti,
si
invita
l'utente
a
separare
questo
prodotto
da
altri
tipi
di
rifiuti
e
di
riciclarlo
in
maniera
responsabile
per
favorire
il
riutilizzo
sostenibile
delle
risorse
materiali.
Gli
utenti
domestici
sono
invitati
a
contattare
il
rivenditore
presso
il
quale
è
stato
acquistato
il
prodotto
o
l'ufficio
locale
preposto
per
tutte
le
informazioni
relative
alla
raccolta
differenziata
e
al
riciclaggio
per
questo
tipo
di
prodotto.
Gli
utenti
aziendali
sono
invitati
a
contattare
il
proprio
fornitore
e
verificare
i
termini
e
le
condizioni
del
contratto
di
acquisto.
Questo
prodotto
non
deve
essere
smaltito
unitamente
ad
altri
rifiuti
commerciali.
Deutsch
Korrekte
Entsorgung
dieses
Produkts
(Elektromüll)
(Anzuwenden
in
den
Ländern
der
Europäischen
Union
und
anderen
europäischen
Ländern
mit
einem
separaten
Sammelsystem)
Die
Kennzeichnung
auf
dem
Produkt
bzw.
auf
der
dazugehörigen
Literatur
gibt
an,
dass
es
nach
seiner
Lebensdauer
nicht
zusammen
mit
dem
normalen
Haushaltsmüll
entsorgt
werden
darf.
Entsorgen
Sie
dieses
Gerät
bitte
getrennt
von
anderen
Abfällen,
um
der
Umwelt
bzw.
der
menschlichen
Gesundheit
nicht
durch
unkontrollierte
Müllbeseitigung
zu
schaden.
Recyceln
Sie
das
Gerät,
um
die
nachhaltige
Wiederverwertung
von
stofflichen
Ressourcen
zu
fördern.
Private
Nutzer
sollten
den
Händler,
bei
dem
das
Produkt
gekauft
wurde,
oder
die
zuständigen
Behörden
kontaktieren,
um
in
Erfahrung
zu
bringen,
wie
sie
das
Gerät
auf
umweltfreundliche
Weise
recyceln
können.
Gewerbliche
Nutzer
sollten
sich
an
Ihren
Lieferanten
wenden
und
die
Bedingungen
des
Verkaufsvertrags
konsultieren.
Dieses
Produkt
darf
nicht
zusammen
mit
anderem
Gewerbemüll
entsorgt
werden.
Espagñol
Eliminación
correcta
de
este
producto
(material
eléctrico
y
electrónico
de
descarte)
(Aplicable
en
la
Unión
Europea
y
en
países
europeos
con
sistenmas
de
recogida
selectiva
de
residuos)
La
presencia
de
esta
marca
en
el
producto
o
en
el
material
informativo
que
lo
acompaña,
indica
que
al
finalizar
su
vida
útil
no
deberá
eliminarse
junto
con
otros
residuos
domésticos.
Para
evitar
los
posibles
daños
al
medio
ambiente
o
a
la
salud
humana
que
representa
la
eliminación
incontrolada
de
residuos,
separe
este
producto
de
otros
tipos
de
residuos
y
recíclelo
correctamente
para
promover
la
reutilización
sostenible
de
recursos
materiales.
Los
usuarios
particulares
pueden
contactar
con
el
establecimiento
donde
adquirieron
el
producto,
o
con
las
autoridades
locales
pertinentes,
para
informarse
sobre
cómo
y
dónde
pueden
llevarlo
para
que
sea
sometido
a
un
reciclaje
ecológico
y
seguro.
Los
usuarios
comerciales
pueden
contactar
con
su
proveedor
y
consultar
las
condiciones
del
contrato
de
compra.
Este
producto
no
debe
eliminarse
mezclado
con
otros
residuos
comerciales.
Português
Eliminação
Correcta
Deste
Produto
(Resíduo
de
Equipamentos
Eléctricos
e
Electrónicos)
Esta
marca,
apresentada
no
produto
ou
na
sua
literatura
indica
que
ele
não
deverá
ser
eliminado
juntamente
com
os
resíduos
domésticos
indiferenciados
no
final
do
seu
período
de
vida
útil.
Para
impedir
danos
ao
ambiente
e
à
saúde
humana
causados
pela
eliminação
incontrolada
de
resíduos
deverá
separar
este
equipamento
de
outros
tipos
de
resíduos
e
reciclá‐lo
de
forma
responsável,
para
promover
uma
reutilização
sustentável
dos
recursos
materiais.
Os
utilizadores
domésticos
deverão
contactar
ou
o
estabelecimento
onde
adquiriram
este
produto
ou
as
entidades
oficiais
locais
para
obterem
informações
sobre
onde
e
de
que
forma
podem
levar
este
produto
para
permitir
efectuar
uma
reciclagem
segura
em
termos
ambientais.
Os
utilizadores
profissionais
deverão
contactar
o
seu
fornecedor
e
consultar
os
termos
e
condições
do
contrato
de
compra.
Este
produto
não
deverá
ser
misturado
com
outros
resíduos
comerciais
para
eliminação.
Dansk
Korrekt
affaldsbortskaffelse
af
dette
produkt
(elektrisk
&
elektronisk
udstyr)
Mærket
på
dette
produkt
eller
i
den
medfølgende
dokumentation
betyder,
at
produktet
ikke
må
bortskaffes
sammen
med
almindeligt
husholdningsaffald
efter
endt
levetid.
For
at
undgå
skadelige
miljø‐
eller
sundhedspåvirkninger
på
grund
af
ukontrolleret
affaldsbortskaffelse
skal
dette
produkt
bortskaffes
særskilt
fra
andet
affald
og
indleveres
behørigt
til
fremme
for
bæredygtig
materialegenvinding.
Hjemmebrugere
bedes
kontakte
forhandleren,
hvor
de
har
købt
produktet,
eller
den
lokale
myndighed
for
oplysning
om,
hvor
og
hvordan
de
kan
indlevere
produktet
med
henblik
på
miljøforsvarlig
genvinding.
Erhvervsbrugere
bedes
kontakte
leverandøren
og
læse
betingelserne
og
vilkårene
i
købekontrakten.
Dette
produkt
bør
ikke
bortskaffes
sammen
med
andet
erhvervsaffald.