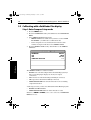
1
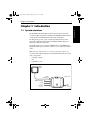
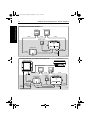
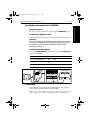
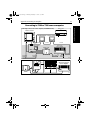
81198_1.book Page i Monday, February 11, 2002 8:36 AM
Pathfinder
Smart Heading
System
Owner’s
Handbook
Document Number: 81198-1
Date: February 2002
81198_1.book Page ii Monday, February 11, 2002 8:36 AM
Handbook information
To the best of our knowledge, the information in this handbook was
correct when it went to press. However, Raymarine cannot accept
liability for any inaccuracies or omissions it may contain. In addition, our
policy of continuous product improvement may change specifications
without notice. As a result, Raymarine cannot accept liability for any
differences between the product and the handbook.
Copyright Information
Autohelm, HSB (High Speed Bus), SailPilot, SeaTalk and SportPilot are
registered trademarks of Raymarine Ltd.
Raymarine, AST (Advanced Steering Technology), AutoAdapt,
AutoLearn, AutoRelease, AutoSeastate, AutoTack, AutoTrim,
FastTrim, GyroPlus, RayGyro, RayPilot and WindTrim are trademarks
of Raymarine Ltd.
Handbook contents © Raymarine Ltd 2002.
81198_1.book Page iii Monday, February 11, 2002 8:36 AM
Preface
iii
Contents
About this Handbook .............................................................................................v
Important Information .................................................................. v
Warranty ...................................................................................... vi
Safety notices ............................................................................... vi
EMC conformance ...................................................................... vi
Chapter 1: Introduction .....................................................................................1
1.1 System overview .......................................................................... 1
1.2 System components ...................................................................... 2
Fluxgate compass ......................................................................... 2
GyroPlus 2 unit ............................................................................. 2
1.3 Using the Smart Heading System ................................................. 2
Chapter 2: Installation .......................................................................................3
2.1 Planning the installation ............................................................... 4
Typical integrated systems ............................................................ 4
Tools required ............................................................................... 6
Parts required ................................................................................ 6
Cabling guidelines ........................................................................ 6
EMC installation guidelines ......................................................... 7
2.2 Installing the GyroPlus 2 unit ....................................................... 8
GyroPlus 2 unit - dimensions ........................................................ 8
GyroPlus 2 unit - inputs/outputs ................................................... 8
Site requirements .......................................................................... 9
Mounting the GyroPlus 2 unit ..................................................... 10
2.3 Installing the fluxgate compass ................................................... 12
Fluxgate compass - description and dimensions ......................... 12
Select the location ....................................................................... 12
Mount the fluxgate compass ....................................................... 14
Connect the fluxgate compass to the GyroPlus 2 unit ................ 15
2.4 Connecting to Pathfinder Plus .................................................... 16
SeaTalk connections ................................................................... 16
NMEA connections .................................................................... 16
Chapter 3: Calibration ......................................................................................19
3.1 Compass calibration overview ................................................... 19
3.2 Calibrating with a Pathfinder Plus display .................................. 20
Step 1: Enter Compass Setup mode ............................................ 20
Step 2: Linearise the compass ..................................................... 21
Step 3: Align the heading ............................................................ 22
81198_1.book Page iv Monday, February 11, 2002 8:36 AM
iv
Pathfinder Smart Heading System - Owner’s Handbook
Chapter 4:
Fault-finding & Maintenance ......................................................25
Regular checks ............................................................................ 25
Fault-finding ............................................................................... 25
Servicing ..................................................................................... 26
EMC, servicing and safety guidelines ........................................ 26
Product support ........................................................................... 26
Appendix:
Connecting to Autopilots .............................................................27
Connecting to T150 or T400 course computers .......................... 27
Installation instructions for T150/T400 ...................................... 29
Calibration .................................................................................. 29
Integrating with other Raymarine autopilots .............................. 30
Connecting to ST4000+ or ST5000+ autopilot .......................... 30
Connecting to T100 or T300 course computer ........................... 31
Specifications .......................................................................................................32
81198_1.book Page v Monday, February 11, 2002 8:36 AM
Preface
v
About this Handbook
Welcome to the handbook for the Pathfinder Smart Heading System,
consisting of the GyroPlus 2 unit and the fluxgate compass. This product
is primarily designed to provide a fast heading output on NMEA (10 Hz
at 0.1° resolution) for MARPA and radar/chart overlay features on
Raymarine Pathfinder Plus displays.
Note: For more information about MARPA and radar/chart overlay,
please refer to your Pathfinder Plus owner’s handbook.
The GyroPlus 2 unit can also be used separately to provide rate of turn
information for Raymarine course computers (see the Appendix).
This handbook contains the following chapters:
Chapter
Contents
Page
Chapter 1: Introduction
Introduces the Smart Heading System, its
components, its features and its use.
page 1
Chapter 2: Installation
Explains how to install the Smart Heading System page 3
and make the system connections.
Chapter 3: Calibration
Explains how to calibrate the Smart Heading
System after installation.
Chapter 4: Fault-finding & Provides general maintenance procedures and
Maintenance
information.
Appendix: Connecting to
Autopilots
Explains how to use the GyroPlus 2 unit with
Raymarine autopilots.
page 19
page 25
page 27
At the end of this handbook we have included product specifications and
warranty certificate.
Note: This handbook contains important information about installing,
using and maintaining your new Raymarine product. To get the best from
the product, please read this handbook thoroughly.
Important Information
Before using this product, please read the following information about:
•
•
•
Warranty
Safety notices
EMC conformance
81198_1.book Page vi Monday, February 11, 2002 8:36 AM
vi
Pathfinder Smart Heading System - Owner’s Handbook
Warranty
To register your new Raymarine product, please take a few minutes to fill
out the warranty card. It is important that you complete the owner
information and return the card to us to receive full warranty benefits.
Safety notices
WARNING: Smart Heading System stabilization
Excessive turn rates during the first 10 seconds after power-up may
temporarily reduce Smart Heading System performance.
WARNING: Navigation aid
Although we have designed this product to be accurate and reliable,
many factors can affect its performance. As a result, it should only be
used as an aid to navigation and should never replace common sense
and navigational judgement. Always maintain a permanent watch
so you can respond to situations as they develop.
WARNING: Product installation
This equipment must be installed and operated in accordance with
the instructions contained in this handbook. Failure to do so could
result in poor product performance, personal injury and/or damage
to your boat.
WARNING: Electrical safety
Make sure the power supply is switched off before you make any
electrical connections.
WARNING: Calibration requirement
Before using the Smart Heading System, you MUST complete the
calibration procedures explained in Chapter 3: Calibration.
EMC conformance
All Raymarine equipment and accessories are designed to the best
industry standards for use in the recreational marine environment. The
design and manufacture of Raymarine equipment and accessories
conform to the appropriate Electromagnetic Compatibility (EMC)
standards, but correct installation is required to ensure that performance
is not compromised.
81198_1.book Page 1 Monday, February 11, 2002 8:36 AM
Chapter 1: Introduction
1
Chapter 1: Introduction
The Pathfinder Smart Heading System is designed to provide a fast,
accurate heading output that is suitable for the MARPA and radar/chart
overlay features on Pathfinder Plus radars and chartplotters.
It is designed to operate as part of an integrated Raymarine system,
and can be calibrated using a Raymarine Pathfinder Plus display or a
Raymarine autopilot control unit.
The heading output is provided as an HDM sentence on NMEA 0183,
updated ten times per second. It is accurate to +/-2° and has a resolution
of 0.1°.
Note: For more information, refer to the Specifications on page 32.
As shown in the following diagram, the Smart Heading System consists
of two components:
•
•
a fluxgate compass
and
a GyroPlus 2 unit
Smart Heading System
Fluxgate
compass
Compass
heading signal
GyroPlus 2 unit
NMEA fast heading
SeaTalk
Power*
(* if not supplied
using SeaTalk)
Rate
data*
(* if required)
D5913-1
1 Introduction
1.1 System overview
81198_1.book Page 2 Monday, February 11, 2002 8:36 AM
2
Pathfinder Smart Heading System - Owner’s Handbook
1 Introduction
1.2 System components
Fluxgate compass
The fluxgate compass is the direction sensor for the Smart Heading
System. It provides the GyroPlus 2 unit with information about the boat’s
current heading.
GyroPlus 2 unit
The GyroPlus 2 unit contains:
•
•
•
a rate gyro sensor that measures the boat’s yaw (its rate of turn)
a micro-processor and related circuitry to combine this rate of turn
information with the fluxgate compass signal to provide fast, accurate
heading output
inputs and outputs to allow connections with Raymarine equipment
Note: The GyroPlus 2 unit is primarily designed to be used as part of the
Smart Heading System. However, it can also be used as a ‘stand alone’
sensor to provide rate of turn information for Raymarine course
computers. Refer to the Appendix for more information.
1.3 Using the Smart Heading System
Powering-up
Excessive turn rates during the first 10 seconds after power-up may
temporarily reduce Smart Heading System performance. For optimum
performance, keep the boat as stable as possible immediately after
power-up. This will allow the GyroPlus 2 unit to stabilize.
Radar bearing alignment
For optimum MARPA and radar/chart overlay performance, the radar
bearing alignment must be correct on the Pathfinder Plus. Refer to the
Pathfinder Plus Owner’s Handbook for more details.
81198_1.book Page 3 Monday, February 11, 2002 8:36 AM
Chapter 2: Installation
3
Chapter 2: Installation
The sections in this chapter explain how to install the Smart Heading
System and connect it to Pathfinder Plus units.
Section
Page
Planning the installation
page 4
Installing the GyroPlus 2 unit
page 8
Installing the fluxgate compass
page 12
Connecting to Pathfinder Plus
page 16
Note: Refer to the Appendix first if you are connecting the GyroPlus 2
unit to a Raymarine autopilot.
2 Installation
WARNING: Calibration requirement
You MUST calibrate the Smart Heading System after installation
using a suitable Raymarine autopilot or Pathfinder Plus display (see
Chapter 3: Calibration).
81198_1.book Page 4 Monday, February 11, 2002 8:36 AM
4
Pathfinder Smart Heading System - Owner’s Handbook
2.1 Planning the installation
Before you start installing the Smart Heading System, read through the
information in this chapter. In particular, consider:
•
•
•
•
2 Installation
•
what connections you need to make to Pathfinder Plus units and/or
any other Raymarine equipment (see below)
where you can locate the compass – so it is away from possible
sources of magnetic interference
where you can locate the GyroPlus 2 unit – so it is on a vertical surface
how you will supply power to GyroPlus 2 unit (via SeaTalk or directly
from the boat’s distribution panel)
the EMC and cabling guidelines
Typical integrated systems
When installing the Smart Heading System, you need to make the
following connections:
•
•
Smart Heading System:
• provide power to the GyroPlus 2 unit (see page 11)
• connect the fluxgate compass to the GyroPlus 2 unit (see page 15)
Pathfinder Plus connections:
• connect the Smart Heading System to the Pathfinder Plus using
both NMEA and SeaTalk
• the SeaTalk connection allows the Pathfinder Plus unit to
calibrate the Smart Heading System (see page 16)
• the NMEA connection provides the Pathfinder Plus with fast
heading data for MARPA and radar/chart overlay (see page 16)
Adding the GyroPlus 2 unit to an autopilot
Refer to the Appendix if you need to add only the GyroPlus 2 unit to a
Raymarine autopilot (which has an existing fluxgate compass).
Connecting to a single Pathfinder Plus
If you connect the Smart Heading System to a single Pathfinder Plus
(with no other SeaTalk instruments), you will need to provide power to
the GyroPlus 2 unit direct from the distribution panel (see page 11). This
is because the Pathfinder Plus does not provide power to SeaTalk.
Note: If you need to connect the Smart Heading System to more than one
Pathfinder Plus, see page 17.
81198_1.book Page 5 Monday, February 11, 2002 8:36 AM
Chapter 2: Installation
5
Connecting to a single Pathfinder Plus
Radar Scanner
Pathfinder Plus Radar
Fluxgate Compass
GyroPlus 2 Unit
NMEA out
Power
12/24V
D5921-2
Connecting to Pathfinder Plus and SeaTalk instruments
If you connect the Smart Heading System to both a Pathfinder Plus unit
and an existing SeaTalk system, you can provide power either through
SeaTalk (as shown below) or direct from the distribution panel.
Connecting to Pathfinder Plus and SeaTalk instruments
Radar Scanner
Pathfinder Plus Radar
SeaTalk Instrument
SeaTalk
Fluxgate Compass
GyroPlus 2 Unit
NMEA out
SeaTalk (calibration and power)
Power
12/24V
12V
SeaTalk
D5920-2
2 Installation
SeaTalk (for calibration not power)
Power
12/24V
81198_1.book Page 6 Monday, February 11, 2002 8:36 AM
6
Pathfinder Smart Heading System - Owner’s Handbook
Tools required
•
•
•
•
•
drill and 3 mm (1/8 in) drill bit
cross-head/pozi-drive screwdriver
small flat-bladed screwdriver (for GyroPlus 2 unit terminals)
wire-strippers
hand bearing compass (to help identify suitable fluxgate location)
Parts required
Smart Heading System - parts supplied
Fluxgate compass
with 8 m (26 ft) cable
2 Installation
GyroPlus 2 unit
!
Compass
warning label
COMPASS AREA
2 m (6 ft 6 in) SeaTalk cable
(plug at one end, bare ends at other end)
No 8 x 1 inch pan-head
self-tapping screws (x6)
D5914-1
Cable ties (x6)
Also packed: Owner's Handbook (including warranty information) & Worldwide Distributors List
Additional parts required
In addition to the parts supplied you may also require:
•
•
•
suitable 2-core cable for NMEA output to Pathfinder Plus
suitable power cable and 3 A fuse/circuit breaker (if required)
additional SeaTalk cables (if required)
Cabling guidelines
When running cables, always observe the following guidelines:
•
•
•
•
if a cable has to be fed through the deck, use a good quality deck gland
where cables are fed through holes, use grommets to prevent chafing
secure long cable runs so they do not present a hazard
wherever possible, route cables away from fluorescent lights, engines
and radio transmitting equipment, as these may cause interference
81198_1.book Page 7 Monday, February 11, 2002 8:36 AM
Chapter 2: Installation
7
EMC installation guidelines
All Raymarine equipment and accessories are designed to the best
industry standards for use in the recreational marine environment.
Their design and manufacture conforms to the appropriate
Electromagnetic Compatibility (EMC) standards, but correct installation
is required to ensure that performance is not compromised. Although
every effort has been taken to ensure that they will perform under all
conditions, it is important to understand what factors could affect the
operation of the product.
For optimum EMC performance, we recommend that wherever possible:
•
•
•
•
Raymarine equipment and cables connected to it are:
• At least 1 m (3 ft) from any equipment transmitting or cables
carrying radio signals e.g. VHF radios, cables and antennas. In the
case of SSB radios, the distance should be increased to 2 m (7 ft).
• More than 2 m (7 ft) from the path of a radar beam. A radar beam
can normally be assumed to spread 20 degrees above and below
the radiating element.
The equipment is supplied from a separate battery from that used for
engine start. Voltage drops below 10 V, and starter motor transients,
can cause the equipment to reset. This will not damage the
equipment, but may cause the loss of some information and may
change the operating mode.
Raymarine specified cables are used. Cutting and rejoining these
cables can compromise EMC performance and must be avoided
unless doing so is detailed in the installation manual.
If a suppression ferrite is attached to a cable, this ferrite should not be
removed. If the ferrite needs to be removed during installation it must
be reassembled in the same position.
2 Installation
The guidelines given here describe the conditions for optimum EMC
performance, but it is recognized that it may not be possible to meet all of
these conditions in all situations. To ensure the best possible conditions
for EMC performance within the constraints imposed by any location,
always ensure the maximum separation possible between different items
of electrical equipment.
81198_1.book Page 8 Monday, February 11, 2002 8:36 AM
8
Pathfinder Smart Heading System - Owner’s Handbook
2.2 Installing the GyroPlus 2 unit
2 Installation
130 mm (5.1 in )
GyroPlus 2 unit - dimensions
150 mm (5.9 in)
39 mm
(1.5 in)
D5915-1
GyroPlus 2 unit - inputs/outputs
GyroPlus 2 unit - inputs/outputs
Fluxgate
compass in
NMEA 0183 in
Not used
NMEA 0183 out
Heading at 10 Hz,
±2˚ accuracy, 0.1˚ resolution
SeaTalk in/out
including Heading at 2 Hz,
±2˚ accuracy, 0.5˚ resolution
Rate
output
22 mV/˚/sec
Power in
10 V to 32 V
D5916-1
81198_1.book Page 9 Monday, February 11, 2002 8:36 AM
Chapter 2: Installation
9
Site requirements
CAUTION:
The GyroPlus 2 unit is not waterproof, so it MUST be installed in a
dry location away from water splash or spray from bilges, hatches,
etc.
Mount the GyroPlus 2 unit below deck, in a dry location that is:
•
•
•
Orientation
As the GyroPlus 2 unit measures the boat’s rate of turn, it is important to
mount it on a vertical surface (as shown). If necessary, make up a suitable
wedge-shaped packing piece to provide a vertical surface. Make sure you
mount the unit the correct way up (as indicated on the mounting label) –
with the power inputs at the bottom left.
CAUTION:
For the GyroPlus 2 unit to work accurately, you must mount it within
+/- 10º of the vertical. For optimum performance, mount the
GyroPlus 2 unit so it is as close as possible to vertical.
Front
view
Vertical
10˚
10˚
Side
view
Vertical
10˚
10˚
D5917-1
2 Installation
•
•
•
vertical (see below)
protected from excessive vibration and excessive temperatures:
engine room mounting is not recommended
shielded from physical damage
accessible for installation and servicing
at least 230 mm (9 in) from any compass (including the fluxgate
compass in the Smart Heading System)
at least 500 mm (20 in) from any radio receiving equipment
81198_1.book Page 10 Monday, February 11, 2002 8:36 AM
10
Pathfinder Smart Heading System - Owner’s Handbook
Mounting the GyroPlus 2 unit
Fit the GyroPlus 2 unit to the vertical surface as follows:
1. Remove the outer cover (as shown below).
2 Installation
b
a
D5918-2
2. Temporarily hold the GyroPlus 2 unit in the required position so you
can mark the centers of the two fixing holes.
3. Use a 3 mm (1/8 in) drill bit to make two pilot holes.
4. Screw one of the self-tapping screws provided (No 8 x 1 in) into each
hole, so each screw-head is at least 15 mm from the surface.
5. Place the fixing holes over the screw heads, then move the GyroPlus
2 unit down so the screw heads are at the top of the keyhole slots.
a
b
b
a
D5919-1
6. Tighten the screws to secure the GyroPlus 2 unit.
Note: Replace the outer cover after you have connected all cables.
81198_1.book Page 11 Monday, February 11, 2002 8:36 AM
Chapter 2: Installation
11
GyroPlus 2 unit - power supply
As described at the start of this Chapter, you can provide power to the
GyroPlus 2 unit either:
•
•
via SeaTalk (12 V)
or
direct from your boat’s distribution panel (12 V or 24 V): using
suitable cable protected with a 3 A in-line fuse or equivalent circuit
breaker
Note: If you connect power to both the SeaTalk terminals and the
POWER terminals, the GyroPlus 2 unit will power up when either or both
of these is switched on.
2 Installation
Power from SeaTalk
Red
Screen
Yellow
Plug into SeaTalk instrument
or SeaTalk junction box
D5951-1
Note: Secure the SeaTalk cable to the loops on the GyroPlus 2 unit with
one of the supplied cable ties.
Power from distribution panel
3 A fuse or equivalent
circuit breaker
12 V or 24 V
power supply
D5929-1
Note: Secure the power cabling to the loops on the GyroPlus 2 unit with
one of the supplied cable ties.
81198_1.book Page 12 Monday, February 11, 2002 8:36 AM
12
Pathfinder Smart Heading System - Owner’s Handbook
2.3 Installing the fluxgate compass
Fluxgate compass - description and dimensions
The fluxgate compass contains a self-levelling mechanism. This enables
the compass to provide accurate readings with pitch and roll movements
up to +/- 35°.
76 mm (3 in)
2 Installation
76 mm (3 in)
D5381-1
Figure 2-1: Fluxgate compass dimensions
Note: The rattle that the fluxgate compass makes when shaken is normal.
It is caused by the pendulum weight hitting a buffer inside of the case.
Select the location
The compass is primarily designed for mounting below deck on a
vertical bulkhead.
Note: On steel boats the Fluxgate Compass should be mounted above
deck (see page 13).
Standard location
To achieve the best performance from the compass, mount it:
•
•
•
•
as near as possible to the boat’s pitch and roll center to minimize
compass disturbance (as shown in the shaded areas in Figure 2-2)
at least 0.8 m (2 ft 6 in) away from the boat’s steering compass to
prevent deviation of either compass
away from the front third of the boat (otherwise shock motion will
affect compass performance)
away from potential sources of magnetic interference, such as:
motors, drive units, loudspeakers, alternators/starters, electric cables,
large ferrous objects (such as engines, ballast, keel, gas bottles and
tool boxes)
81198_1.book Page 13 Monday, February 11, 2002 8:36 AM
Chapter 2: Installation
13
Note: Because the compass is electronically aligned after installation
(see Chapter 3: Calibration), you can mount it so it faces in any direction.
0.3L to 0.5L
L
2 Installation
0.3L to 0.5L
L
D5382-1
Figure 2-2: Compass - recommended location for non-steel hulls
Finding the most suitable location
To identify the best compass location on your boat, start at the pitch and
roll center then move the compass up and/or aft until you find a location
with minimal magnetic disturbance.
To check if the intended mounting location is free from magnetic
influence:
1. Temporarily fix a simple handheld compass at the intended location.
2. Turn the boat through 360°, watching for any differences between the
hand bearing compass and the boat’s main steering compass.
3. The site is suitable for the fluxgate compass if the differences are less
than 10° on all headings.
Location on steel-hulled boats
On steel-hulled boats you must mount the compass at least 1 m (3 ft)
above the main deck or wheelhouse. If mounted below deck, the compass
will not work correctly as the hull shields the Earth’s magnetic field.
81198_1.book Page 14 Monday, February 11, 2002 8:36 AM
14
Pathfinder Smart Heading System - Owner’s Handbook
The following diagram shows recommended mounting positions for
steel-hulled boats.
Note: The higher above the waterline you mount the compass, the more
the boat’s pitch and roll will affect compass performance.
2 Installation
1.8 m (6 ft)
1.2 m (4 ft)
1.2 m (4 ft)
D5383-2
Figure 2-3: Compass - recommended location for steel-hulled boats
Mount the fluxgate compass
CAUTION:
You must mount the fluxgate compass vertically, with the cables
exiting at the base.
1.
2.
3.
4.
Hold the fluxgate compass against the mounting location.
Mark the four mounting holes, then remove the fluxgate compass.
Drill four pilot holes using a 3 mm (1/8 in) drill bit.
Making sure the cable exits at the bottom, secure the fluxgate
compass using four of the self-tapping screws provided (No 8 x 1 in).
81198_1.book Page 15 Monday, February 11, 2002 8:36 AM
Chapter 2: Installation
15
Ver
t
ica
l
D5384-1
Figure 2-4: Fluxgate compass - orientation
Note: Stick the supplied warning label near to the fluxgate compass,
where it is clearly visible.
1. The fluxgate compass is supplied with 8 m (26 ft) of cable. Route the
cable to the GyroPlus 2 unit, taking into account the EMC installation
guidelines (see page 7).
Note: Make sure you leave some spare cable so, if necessary, you can
re-position the compass to reduce deviation.
2. Connect the five cores of the cable to the FLUXGATE terminals on the
GyroPlus 2 unit (as shown).
Fluxgate compass
Screen
Red
Green
Yellow
Blue
D5922-1
3. Secure the compass cable to the loops on the GyroPlus 2 unit with one
of the supplied cable ties.
2 Installation
Connect the fluxgate compass to the GyroPlus 2 unit
81198_1.book Page 16 Monday, February 11, 2002 8:36 AM
16
Pathfinder Smart Heading System - Owner’s Handbook
2.4 Connecting to Pathfinder Plus
You need to connect the GyroPlus 2 unit to the Pathfinder Plus using both
NMEA and SeaTalk:
•
•
the SeaTalk connection allows the Pathfinder Plus unit to calibrate
the compass
the NMEA connection provides the fast heading information for
MARPA and radar/chart overlay
SeaTalk connections
2 Installation
Use the supplied SeaTalk cable to connect the GyroPlus 2 unit to the
Pathfinder Plus unit:
•
•
•
insert the bare ends into the appropriate color-coded SeaTalk
terminals on the GyroPlus 2 unit
secure the SeaTalk cable to the loops on the GyroPlus 2 unit with one
of the supplied cable ties
insert the SeaTalk plug into the socket on the Pathfinder unit or into a
SeaTalk junction box already connected to the Pathfinder unit
NMEA connections
Use a suitable cable to connect the NMEA out terminals on the
GyroPlus 2 unit to the Pathfinder Plus unit’s Power/NMEA cable.
Secure the NMEA cabling to the loops on the GyroPlus 2 unit with one of
the supplied cable ties.
GyroPlus 2 unit outputs
NMEA output + (GREEN)
NMEA output - (BLUE)
connect to
Pathfinder Plus cable inputs
Channel 2 NMEA data input + (GREEN)
Channel 2 NMEA return - (BLUE)
Note: If necessary you can use the Channel 1 NMEA inputs on the
Pathfinder Plus cable. Refer to the Pathfinder Plus owner’s handbook
for more information.
81198_1.book Page 17 Monday, February 11, 2002 8:36 AM
Chapter 2: Installation
17
Connecting to more than one Pathfinder Plus unit
You can use the NMEA out terminals on the GyroPlus 2 unit to supply
fast heading information to up to ten Pathfinder Plus units (depending on
the length of NMEA cable run).
To use MARPA and radar/chart overlay on all units you will need to
connect each Pathfinder Plus unit directly to the NMEA out
terminals on the GyroPlus 2 unit, so they receive fast heading data.
Connecting to more than one Pathfinder Plus display
Pathfinder Plus Radar
Radar Scanner
Pathfinder Plus Radar
2 Installation
hsb2
SeaTalk
SeaTalk
Fluxgate Compass
GyroPlus 2 unit
Power
12/24V
NMEA out
NMEA out
SeaTalk
SeaTalk
Power
12/24V
Power
12/24V
D5930-1
81198_1.book Page 18 Monday, February 11, 2002 8:36 AM
2 Installation
18
Pathfinder Smart Heading System - Owner’s Handbook
81198_1.book Page 19 Monday, February 11, 2002 8:36 AM
Chapter 3: Calibration
19
Chapter 3: Calibration
CAUTION:
If you fail to complete calibration, the performance of the Smart
Heading System will be impaired on some compass headings.
This chapter explains how to calibrate the Smart Heading System using a
Pathfinder Plus display. This chapter contains the following sections:
Section
Page
Section 3.1, Compass calibration overview
page 19
Section 3.2, Calibrating with a Pathfinder Plus display
page 20
Note: The Pathfinder Plus display must contain software release 2
(or later) to enable the compass calibration feature. Contact your
Raymarine dealer if you need more information or a software upgrade.
Note: You can also calibrate the compass system using a Raymarine
autopilot (see the Appendix).
3.1 Compass calibration overview
When you have completed installation, you must take the boat on a short
seatrial to calibrate the Smart Heading System. This involves:
•
linearising the compass – to reduce errors caused by deviating
magnetic fields on your boat
aligning the heading – so the heading from the Smart Heading System
matches a known reference
You should only perform the initial seatrial:
•
•
in conditions of light wind and calm water
in waters that are clear of any obstructions, so the boat has plenty of
clear space to maneuver
Note: If you have a GPS connected to your Pathfinder Plus, make sure
you switch it on so you can align your compass heading to COG (course
over ground).
CAUTION: EMC conformance
Always check the installation before going to sea to make sure that it
is not affected by radio transmissions, engine starting etc.
3 Calibration
•
81198_1.book Page 20 Monday, February 11, 2002 8:36 AM
20
Pathfinder Smart Heading System - Owner’s Handbook
3.2 Calibrating with a Pathfinder Plus display
Step 1: Enter Compass Setup mode
1. Press the MENU button.
2. Press the SYSTEM SET UP soft key. You will then see the SYSTEM SET UP
MENU.
3. Select COMPASS SET UP from the menu:
• COMPASS SETUP is not visible when you first access the SYSTEM
SET UP MENU – you will need to scroll down the list
• use the trackpad to move to the bottom item in the box, then
continue moving down the list to select COMPASS SET UP
4. Press the COMPASS SET UP soft key. You will then see the COMPASS
SET UP box.
3 Calibration
COMPASS
COMPASS SET
SET UP
UP
HEADING
247°M
COG
SOG
CORRECTED DEVIATION
186°M
2.5 kts
---°
D5952-1
The COMPASS SET UP box contains four items:
• HEADING = the current heading from the Smart Heading System (if
there is no heading figure displayed, check your compass
connections)
• COG = Course Over Ground heading from GPS (if connected)
• SOG = Speed Over Ground from GPS (if connected)
• CORRECTED DEVIATION = the amount of deviation corrected during
compass linearisation
At this stage, because you have not calibrated the Smart Heading System:
•
•
HEADING and COG will differ
CORRECTED DEVIATION will show dashes instead of a value
Note: Press ENTER or CLEAR if you need to return to the SYSTEM SETUP
MENU at any time.
81198_1.book Page 21 Monday, February 11, 2002 8:36 AM
Chapter 3: Calibration
21
Step 2: Linearise the compass
LINEARISE
COMPASS
ALIGN
HEADING
LINEARISE
COMPASS
LINEARISE
COMPASS
D5953-1
1. Press the LINEARISE COMPASS soft key to start the linearising process.
Note: If you see a WARNING - COMPASS NOT CONNECTED message, check
your Smart Heading System connections.
2. You will then see the LINEARISING COMPASS box.
LINEARISING
LINEARISING COMPASS
COMPASS
HEADING
247°M
COG
SOG
CORRECTED DEVIATION
186°M
2.8 kts
---°
TURN BOAT SLOWLY TO LINEARISE
COMPASS. THIS SHOULD TAKE
ABOUT TWO COMPLETE REVOLUTIONS
D5956-1
Minimum of
2 circles
D3326-2
Note: If you turn the boat too quickly, you will see WARNING: TURNING
TOO FAST - SLOW DOWN. Apply less helm to turn in a larger circle.
Note: Press the CANCEL LINEARISE soft key if you need to stop compass
linearisation at any time. The display reverts to the COMPASS SET UP box,
without retaining any deviation that has been calculated.
3 Calibration
3. Start turning the boat in circles with the boat speed below 2 knots.
You will need to complete about two circles, taking at least 2 minutes
to complete each 360°. The bar will indicate how much of the
linearisation is complete.
81198_1.book Page 22 Monday, February 11, 2002 8:36 AM
22
Pathfinder Smart Heading System - Owner’s Handbook
4. When compass linearisation is complete, the Pathfinder Plus unit will
beep and briefly display the following pop-up message.
LINEARISATION COMPLETE.
ALIGN HEADING TO KNOWN REFERENCE
D5956-1
5. You will then see the ALIGNING HEADING box, showing the corrected
deviation.
Note: If the deviation figure exceeds 15°, the fluxgate compass is being
affected by ferrous objects on your boat. Move the fluxgate compass to a
better location. Higher deviation figures are acceptable on steel boats.
Step 3: Align the heading
ALIGNING
ALIGNING HEADING
HEADING
HEADING
247°M
COG
SOG
CORRECTED DEVIATION
186°M
3.0 kts
005°
3 Calibration
LINEARISATION COMPLETE.
ALIGN HEADING TO KNOWN REFERENCE
D5957-1
Align to COG (if available)
Note: If COG is not available, proceed to ‘Fine-tune the alignment’.
1. Manually steer the boat on a steady course at a speed which enables
you to hold that course.
2. If you have a GPS connected to your Pathfinder Plus:
• hold the boat on a straight course and increase the boat speed to
more than 3 knots, then wait about 30 seconds for COG to
stabilize on an accurate course
ADJUST
HEADING
ALIGN
TO COG
CANCEL
ALIGNMENT
D5958-1
81198_1.book Page 23 Monday, February 11, 2002 8:36 AM
Chapter 3: Calibration
•
23
press the ALIGN TO COG soft key: the HEADING value will then be
aligned to the COG (course over ground) heading received from
the GPS and you will see the following pop-up message
HEADING ALIGNED TO COG.
USE ADJUST HEADING KEYS
TO FINE TUNE HEADING
D5959-1
•
expect some difference between COG and the heading when the
boat turns
Note: If you press ALIGN TO COG when the SOG is less than 3 knots you
will see the warning message: SOG TOO LOW. CANNOT ALIGN TO COG.
Increase the boat’s speed then press ALIGN TO COG again.
3. Because many factors (such as tides and leeway affecting the boat)
can make the actual heading differ from COG, you may then need to
fine-tune the heading alignment (see below).
Fine-tune the alignment
ADJUST
HEADING
ALIGN
TO COG
CANCEL
ALIGNMENT
D5958-1
1. Use the ADJUST HEADING soft keys to adjust the displayed heading so
it matches the boat’s steering compass or a known transit bearing.
HEADING
155°M
Steering compass
Known
heading
D5960-1
2. Save the aligned heading by pressing the ENTER or CLEAR key to
return to the COMPASS SETUP menu.
Note: If you do not want to save the new aligned heading, press CANCEL
ALIGNMENT to return to the COMPASS SETUP menu and restore the
previous heading value.
3. Then press ENTER or CLEAR key twice to return to normal operation.
3 Calibration
Heading on
Pathfinder Plus
81198_1.book Page 24 Monday, February 11, 2002 8:36 AM
3 Calibration
24
Pathfinder Smart Heading System - Owner’s Handbook
81198_1.book Page 25 Monday, February 11, 2002 8:36 AM
Chapter 4: Fault-finding & Maintenance
25
Chapter 4: Fault-finding & Maintenance
All Raymarine products are designed to provide many years of
trouble-free operation. We also put them through comprehensive
testing and quality assurance procedures before shipping.
Regular checks
CAUTION:
The GyroPlus 2 unit and fluxgate compass do NOT contain userserviceable parts. They should be serviced only by authorized
Raymarine service technicians.
On a regular basis:
•
•
check that all connections and mountings are secure/undamaged
check the system components for any signs of physical damage or
water damage
Note: Do not use chemical or abrasive materials to clean the
GyroPlus 2 unit cover or fluxgate compass case. If they are dirty,
wipe them with a clean, damp cloth.
Fault-finding
Status LEDs
The GyroPlus 2 unit has two status LEDs just above the Rate outputs.
These light-up during normal operation and flash to indicate compass/
gyro faults:
Normal operation
Both LEDs on for 3 sec
Turn to port
Red LED on whilst turning
Turn to starboard
Green LED on whilst turning
Stationary
Both LEDs off
Fault-finding
Red LED flashing
Compass fault - check connections
Green LED flashing
GyroPlus 2 unit fault - contact Raymarine Technical Services
4 Fault-finding & Maintenance
On power-up
81198_1.book Page 26 Monday, February 11, 2002 8:36 AM
26
Pathfinder Smart Heading System - Owner’s Handbook
Servicing
EMC, servicing and safety guidelines
•
•
•
•
•
Raymarine equipment should be serviced only by authorized
Raymarine service technicians. They will ensure that service
procedures and replacement parts used will not affect
performance. There are no user serviceable parts in any
Raymarine product.
Some products generate high voltages: never handle the cables/
connectors when power is being supplied to the equipment.
When powered up, all electrical equipment produces
electromagnetic fields. These can cause adjacent pieces of
electrical equipment to interact with one another, with a
consequent adverse effect on operation. In order to minimize
these effects and enable you to get the best possible performance
from your Raymarine equipment, guidelines are given in the
installation instructions, to enable you to ensure minimum
interaction between different items of equipment, i.e. ensure
optimum Electromagnetic Compatibility (EMC).
Always report EMC-related problems to your nearest Raymarine
dealer. We use such information to improve our quality standards.
In some installations, it may not be possible to prevent the
equipment from being affected by external influences. In general
this will not damage the equipment but it can lead to spurious
resetting action, or momentarily may result in faulty operation.
4 Fault-finding & Maintenance
Product support
Raymarine products are supported by a worldwide network of
distributors and Authorized Service Representatives. If you
encounter any difficulties with this product, please contact either
your national distributor, or your service representative, or the
Raymarine Technical Services Call Center. Refer to the back
cover or the Worldwide Distributor List for contact details.
81198_1.book Page 27 Monday, February 11, 2002 8:36 AM
Appendix: Connecting to Autopilots
Appendix:
27
Connecting to Autopilots
A.1 Connecting to T150 or T400 course computers
Connecting the GyroPlus 2 unit to a T150/T400 upgrades the course
computer so it has the same functions as a 150G/400G:
• ‘AST’ (Advanced Steering Technology) is enabled, providing
enhanced course keeping and FastTrim
• AutoLearn is enabled, providing automatic steering calibration when
used with a ST6001+ or ST7001+ autopilot control unit
• the course computer NMEA 1 port will transmit 10 Hz fast heading,
suitable for MARPA and radar/chart overlay on Pathfinder Plus units
Connecting to T150/T400 course computer
To connect the GyroPlus 2 unit to a T150/T400:
• leave the autopilot fluxgate compass connected to the T150/T400
• power the GyroPlus 2 unit via SeaTalk
• connect its RATE OUTPUT to RATE GYRO inputs on the T150/T400
Connecting to T150/T400 course computer and Pathfinder Plus
To connect the GyroPlus 2 unit to a T150/T400 course computer and also
a Pathfinder Plus:
• leave the autopilot fluxgate compass connected to the T150/T400
• connect the RATE OUTPUT on the GyroPlus 2 unit to the RATE
GYRO inputs on the T150/T400
• power the GyroPlus 2 unit from both SeaTalk and the distribution
panel:
• provide power from SeaTalk so the GyroPlus 2 unit receives
power when the course computer is powered up but the Pathfinder is off
• provide power from the same switch as the Pathfinder Plus so the
GyroPlus 2 unit receives power when the Pathfinder is powered
up but the course computer is off
• connect the NMEA 1 outputs on the course computer to the NMEA
inputs on the Pathfinder Plus
Connecting to Autopilots
The information in this Appendix explains how to connect the
GyroPlus 2 unit to the following Raymarine autopilot systems:
• connecting to T150 or T400 course computers (Section A.1)
• integrating with other Raymarine autopilots (Section A.2)
• ST4000+ or ST5000+ autopilot (see page 30)
• T100 or T300 course computer (see page 31)
81198_1.book Page 28 Monday, February 11, 2002 8:36 AM
28
Pathfinder Smart Heading System - Owner’s Handbook
Connecting to Autopilots
Connecting to T150/T400 Course Computer
SeaTalk Instrument
ST6001+
SeaTalk
SeaTalk
SeaTalk
Fluxgate Compass
Course Computer
GyroPlus 2 unit
SeaTalk
SeaTalk
Gyro Data
Power
12/24V
D5934-1
Connecting to T150/T400 course computer and Pathfinder Plus
Pathfinder Plus Radar
SeaTalk Instrument
SeaTalk
GyroPlus 2 Unit
Radar Scanner
ST6001+
SeaTalk
Fluxgate
Compass
SeaTalk
Course Computer
SeaTalk
NMEA out
Power
12/24V
Power
12/24V
SeaTalk
NMEA out
Gyro Data
Power
12/24V
D5931-1
81198_1.book Page 29 Monday, February 11, 2002 8:36 AM
Appendix: Connecting to Autopilots
29
Installation instructions for T150/T400
Leave the compass connected to course computer FLUXGATE inputs.
Installing the GyroPlus 2 unit
Follow the installation instructions for the GyroPlus 2 unit in Chapter 2.
CAUTION:
If you are using the Smart Heading System as the primary heading
reference for an autopilot, you must ensure that it receives power
(via SeaTalk or direct from the distribution panel) when the
autopilot is switched on.
Connecting the Rate Output
Connect the RATE OUTPUT on the GyroPlus 2 unit to the RATE GYRO
inputs on T150/T400.
GyroPlus 2 unit outputs
Rate output GROUND (GREY)
Rate output SIGNAL (YELLOW)
connect to Course computer inputs
X
GREY
YELLOW
RED - DO NOT CONNECT
T150 or T400
course computer
Yellow
Screen
Screen
Yellow
D5929-1
Calibration
You do not need to re-calibrate the autopilot fluxgate compass after
connecting the GyroPlus 2 unit to the T150/T400.
Note: If you need to calibrate the fluxgate compass for any reason in the
future, follow the procedures in the autopilot owner’s handbook.
Connecting to Autopilots
Fluxgate compass
81198_1.book Page 30 Monday, February 11, 2002 8:36 AM
30
Pathfinder Smart Heading System - Owner’s Handbook
Connecting to Autopilots
A.2 Integrating with other Raymarine autopilots
If you already have a Raymarine fluxgate compass mounted in a suitable
location as part of your autopilot system (not T150/T400), you need to:
•
•
•
install GyroPlus 2 unit and connect the existing SeaTalk system to the
SeaTalk terminals on the GyroPlus 2 unit
re-route the compass cable and connect it to the FLUXGATE inputs
on the GyroPlus 2 unit
use the autopilot control head or Pathfinder Plus to re-calibrate the
compass (see either the autopilot owner’s handbook or Chapter 3:
Calibration in this handbook for more details)
The GyroPlus 2 unit will then output:
•
•
an accurate, stabilized heading on SeaTalk for the autopilot
fast heading data on NMEA for the Pathfinder Plus functions
CAUTION:
If you are using the Smart Heading System as the primary heading
reference for an autopilot, you must ensure that it receives power
(via SeaTalk or direct from the distribution panel) even if the
Pathfinder Plus is switched off.
Connecting to ST4000+ or ST5000+ autopilot
Connecting to ST4000+ or ST5000+ autopilot (and Pathfinder Plus)
Pathfinder Plus Radar
Radar Scanner
SeaTalk Instrument
SeaTalk
ST4000+
or ST5000+
SeaTalk
Fluxgate Compass
GyroPlus 2 Unit
NMEA out
SeaTalk
Power
12/24V
Power
12/24V
Power
12V
D5933-1
81198_1.book Page 31 Monday, February 11, 2002 8:36 AM
Appendix: Connecting to Autopilots
31
Connecting to T100 or T300 course computer
Connecting to Autopilots
Radar Scanner
Connecting to T100 or T300 course computer (and Pathfinder Plus)
Pathfinder Plus Radar
SeaTalk Instrument
ST6000+ or ST6001+
SeaTalk
SeaTalk
SeaTalk
T100 or T300
Course Computer
Fluxgate Compass
GyroPlus 2 Unit
NMEA out
SeaTalk
Power
12/24V
SeaTalk
Power
12/24V
Gyro Data
Power
12/24V
D5932-1
Type 100 or Type 300
course computer
Yellow
Screen
Screen
Yellow
D5923-1
81198_1.book Page 32 Monday, February 11, 2002 8:36 AM
32
Pathfinder Smart Heading System - Owner’s Handbook
Connecting to Autopilots
Specifications
GyroPlus 2 unit
Nominal supply voltage:
12 V or 24 V DC
Operating voltage range:
10 V to 32 V DC
Power consumption (max):
130 mA
Operating conditions:
temperature range
relative humidity limit
water protection
-10°C to 55°C (14°F to 131°F)
80%
drip resistant when mounted vertically
Storage conditions:
temperature range
relative humidity limit
-5°C to 60°C (23°F to 140°F)
75%
Dimensions:
width
height
depth
150 mm (5.9 in)
130 mm (5.1 in)
39 mm (1.5 in)
Weight:
0.27 kg (9.5 oz)
Inputs:
• fluxgate compass
• SeaTalk
• power
• service port (NMEA 0183 v2.3 in)
Outputs:
• NMEA 0183 v2.3 out: Heading (HDM) 10 Hz at 0.1° resolution,
accurate to ±2°
NMEA Heading sentence: $APHDM,XXX.X,M*hh<CR><LF>
• SeaTalk (2 Hz, including Heading at 0.5° resolution, accurate to ±2°)
• Analogue Rate: 22 mV/°/sec
Heading error correction:
• compensates for 1st and 2nd harmonic deviation errors
• eliminates northerly turning error
CE approvals - conforms to:
89/336/EC (EMC), EN60945:1997
81198_1.book Page 1 Monday, February 11, 2002 8:36 AM
Limited Warranty Certificate
Raymarine warrants each new Light Marine/Dealer Distributor Product to be of good materials and
workmanship, and will repair or exchange any parts proven to be defective in material and
workmanship under normal use for a period of 2 years/24 months from date of sale to end user, except
as provided below.
Defects will be corrected by Raymarine or an authorized Raymarine dealer. Raymarine will, except
as provided below, accept labor cost for a period of 2 years/24 months from the date of sale to end user.
During this period, except for certain products, travel costs (auto mileage and tolls) up to 100 round
trip highway miles (160 kilometres) and travel time of 2 hours, will be assumed by Raymarine only
on products where proof of installation or commission by authorized service agents, can be shown.
Warranty Limitations
Raymarine Warranty policy does not apply to equipment which has been subjected to accident, abuse
or misuse, shipping damage, alterations, corrosion, incorrect and/or non-authorized service, or
equipment on which the serial number has been altered, mutilated or removed.
Except where Raymarine or its authorized dealer has performed the installation, it assumes no
responsibility for damage incurred during installation.
This Warranty does not cover routine system checkouts or alignment/calibration, unless required by
replacement of part(s) in the area being aligned.
A suitable proof of purchase, showing date, place, and serial number must be made available to
Raymarine or authorized service agent at the time of request for Warranty service.
Consumable items, (such as: Chart paper, lamps, fuses, batteries, styli, stylus/drive belts, radar mixer
crystals/diodes, snap-in impeller carriers, impellers, impeller bearings, and impeller shaft) are
specifically excluded from this Warranty.
Magnetrons, Cathode Ray Tubes (CRT), TFT Liquid Crystal Displays (LCD) and cold cathode
fluorescent lamps (CCFL), hailer horns and transducers are warranted for 1 year/12 months from date
of sale. These items must be returned to a Raymarine facility.
All costs associated with transducer replacement, other than the cost of the transducer itself, are
specifically excluded from this Warranty.
Overtime premium labor portion of services outside of normal working hours is not covered by this
Warranty.
Travel cost allowance on certain products with a suggested retail price below $2500.00 is not
authorized. When/or if repairs are necessary, these products must be forwarded to a Raymarine
facility or an authorized dealer at owner’s expense will be returned via surface carrier at no cost to the
owner.
Travel costs other than auto mileage, tolls and two (2) hours travel time, are specifically excluded on
all products. Travel costs which are excluded from the coverage of this Warranty include but are not
limited to: taxi, launch fees, aircraft rental, subsistence, customs, shipping and communication
charges etc. Travel costs, mileage and time, in excess to that allowed must have prior approval in
writing.
TO THE EXTENT CONSISTENT WITH STATE AND FEDERAL LAW:
(1) THIS WARRANTY IS STRICTLY LIMITED TO THE TERMS INDICATED HEREIN, AND
NO OTHER WARRANTIES OR REMEDIES SHALL BE BINDING ON RAYMARINE
INCLUDING WITHOUT LIMITATION ANY WARRANTIES OF MERCHANTABLE OR
FITNESS FOR A PARTICULAR PURPOSE.
(2) Raymarine shall not be liable for any incidental, consequential or special (including punitive or
multiple) damages.
All Raymarine products sold or provided hereunder are merely aids to navigation. It is the
responsibility of the user to exercise discretion and proper navigational skill independent of any
Raymarine equipment.
Document number: 84064-8
April 2001
81198_1.book Page 2 Monday, February 11, 2002 8:36 AM
Factory Service Centers
United States of America
UK, Europe, Middle East, Far East
Raymarine Inc
22 Cotton Road, Unit D
Nashua, NH 03063-4219, USA
Raymarine Ltd
Anchorage Park, Portsmouth
PO3 5TD, England
Telephone: +1 603 881 5200
Fax: +1 603 864 4756
www.raymarine.com
Telephone: +44 (0)23 9269 3611
Fax: +44 (0)23 9269 4642
www.raymarine.com
Sales & Order Services
Telephone: +1 800 539 5539 Ext. 2333 or
+1 603 881 5200 Ext. 2333
Customer Support
Telephone: +44 (0)23 9271 4713
Fax: +44 (0)23 9266 1228
Technical Support
Telephone: +1 800 539 5539 Ext. 2444 or
+1 603 881 5200 Ext. 2444
Email: [email protected]
Email: [email protected]
Product Repair Center
Telephone: +1 800 539 5539 Ext. 2118
Stick barcode label here
Purchased from
Purchase date
Dealer address
Installed by
Installation date
Commissioned by
Commissioning date
Owner’s name
Mailing address
This portion should be completed and retained by the owner.