1
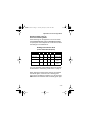
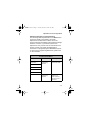
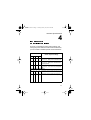
MB20xi A6.book Page i Tuesday, January 25, 2005 4:07 PM
MB200/201
Direct Thermal
Printer
i
Operator’s Manual
MB20xi A6.book Page ii Tuesday, January 25, 2005 4:07 PM
© Copyright 2005. All rights reserved. No part of this
document may be reproduced or issued to third parties in
any form whatsoever without the express permission of
SATO International. The materials in this document is
provided for general information and is subject to change
without notice. SATO International assumes no
responsibilities for any errors that may appear.
Warning: This equipment complies with the
requirements in Part 15 of FCC rules for a Class B
computing device. Operation of this equipment in a
residential area may cause unacceptable interference
to radio and TV reception requiring the operator to
take whatever steps are necessary to correct the
interference.
Barcode SATO International Pte Ltd
438A Alexandra Road
#05-01/02, Alexandra Technopark
Singapore 119967
Phone: +65 (6271) 2122
Fax: +65 (6271) 2151
www.satoworldwide.com
Version: SI-MB20xi-01rA-02-05-OM
ii
MB20xi A6.book Page iii Tuesday, January 25, 2005 4:07 PM
Safety Precautions
As a preventive measure to ensure safe usage of this
machine so as to safeguard against damage to
yourself, other people or property, there are many
display diagrams used in this instruction manual and
on this machine. The displays and their meanings are
illustrated in the following pages. Please take time to
read and understand the content.
Warning
If this display and its warning is
ignored, any mishandling could
result in death or serious
injuries.
If this display and its warning is
Attention ignored, any mishandling could
result in serious injuries as well
as damage to properties.
iii
MB20xi A6.book Page iv Tuesday, January 25, 2005 4:07 PM
Safety Precautions
Explanation of hazard symbols
The triangle sign means ‘Be
careful’. The content within the triangle
illustrates specific hazards. In this case,
the sign on the left means ‘beware of
electric shock’.
Example
The circular sign means ‘prohibited’.
The content within the circle illustrates a
specific prohibition. In this case the sign
on the left means ‘disassembly
prohibited’.
Example
The black circular sign means
‘must do’. The content within the sign
Example
illustrates specific items that must be
carried out. In this case the sign on the
left means ‘the plug must be unplugged from the
socket’.
iv
MB20xi A6.book Page v Tuesday, January 25, 2005 4:07 PM
Warning
Warnings
Liquids
Do not place any liquids or small metallic objects near
the printer. Should any of these fall into the printer,
immediately turn off the power and contact your
nearest dealer or service center. Continued use
increases the risk of fire or electric shocks.
Foreign Matter
Do not insert or drop metallic or flammable objects
into the openings of the printer (such as outlets for
cables). If this happens, immediately turn off the
power and contact your nearest dealer or service
center. Continued use increases the risk of fire or
electric shocks.
Foreign Matter
Should the printer be dropped or become damaged,
immediately turn off the power and contact your
nearest dealer or service center. Continued use
increases the risk of fire or electric shocks.
v
MB20xi A6.book Page vi Tuesday, January 25, 2005 4:07 PM
Warning
Warnings
Abnormal Conditions
Continued use of the printer while it is emitting smoke
or strange odors increases the risk of fire or electric
shocks. Immediately turn off the power and contact
your nearest dealer or service center. Do not try to
service the printer by yourself.
Disassembly
Never try to take the unit apart or modify it in any
way. Doing so increases the risk of fire or electric
shocks. Contact your nearest dealer or service center
for repairs.
Battery care
Never try to take apart the battery pack or modify it in
any way. Never expose the battery to direct heat or
fire, or take any actions that may lead to physical
damage. When charging the battery pack, be sure to
use the printer or the specified battery charger.
vi
MB20xi A6.book Page vii Tuesday, January 25, 2005 4:07 PM
Warning
Warnings
Power Supply Precautions
• Use only the specified voltage and use only the
specified battery charger.
• Never use the battery charger with any other battery
pack except for the specified type. Doing so can
rupture the battery, or cause leakage, fire or electric
shocks.
• Never cut, damage or modify the power cord. Also,
never place heavy objects on the power cord or
heat or pull the power cord. Doing so may damage
the cord.
• Should the power cord ever become seriously
damaged (internal wiring exposed or shorted),
contact your nearest dealer or service center for
repair.
• Never modify, excessively bend, twist, or pull the
power cord.
Continued use of the printer in any of the above
situations can lead to increased risks of fire or electric
shocks.
vii
MB20xi A6.book Page viii Tuesday, January 25, 2005 4:07 PM
Cautions
Location
Do not locate the printer in the area subjected to high
humidity or dew. If dew forms inside the printer,
immediately turn off the printer and do not use it until
all moisture has dried up. Continued use creates the
danger of electric shock or the printer damage.
Power
Do not use wet hands to operate the power switch,
replace the battery pack or unplug the AC adapter or
battery charger. Doing so increases the risk of electric
shock.
Hazardous parts
• The entire thermal head gets very hot after printing.
Avoid touching any part of it when replacing paper
or cleaning the printer.
• Do not try to replace the thermal head by yourself.
• The cutter contains a blade, so be careful not to get
cut by the sharp blade.
viii
MB20xi A6.book Page ix Tuesday, January 25, 2005 4:07 PM
Warnings
Replacing the Battery Pack
• Use only specified replacement battery packs.
• Make sure to install the pack in the correct direction
to avoid the danger of injury or damage to
surrounding areas.
• To replace small-size rechargeable (Lithium ion)
batteries, seal the old battery pack with tape and
ask our sales representative or service center about
disposal methods. Do not place the battery pack
together with other batteries such as dry batteries.
Long periods of non usage
If you have no plan to use the print for a long time,
remove the battery pack from the printer and unplug
the AC adapter from the wall outlet.
Maintenance and Cleaning
For safe maintenance or cleaning of the printer, make
sure to remove the battery pack and the AC adapter
from the printer.
ix
MB20xi A6.book Page x Tuesday, January 25, 2005 4:07 PM
Other Precautions
Avoid placement in extreme temperatures
Do not place the printer in highly humid areas or at
outside the -15°C to 50°C temperature range.
When the printer is being transported...
The normal vibration encountered during
transportation is acceptable, but avoid dropping the
printer or exposing it to extreme vibrations.
Do not disassemble or modify the printer
The printer has high-precision components inside
requiring fine adjustments.
Use only the specified cables
Special cables are required to connect to external
equipment through the external input terminals.
Contact your nearest dealer or service center if
necessary.
Use only specified options
Do not use a device not specified as option.
Use the specified paper
Use the specified paper to avoid printing errors and to
avoid damaging the print head.
x
MB20xi A6.book Page 1 Tuesday, January 25, 2005 4:07 PM
TABLE OF CONTENTS
Safety Precautions ............................................. iii
Explanation of hazard symbols .......................... iv
Warnings ............................................................ v
Cautions ............................................................. viii
Replacing the Battery Pack ............................... ix
Other Precautions .............................................. x
Introduction .......................................... 1-1
Notes on Bluetooth/Wireless Communication .... 1-2
Setup ..................................................... 2-1
Unpacking the printer ......................................... 2-1
Part Names ........................................................ 2-2
Functions of various parts .................................. 2-4
Charging the battery pack with a charger........... 2-5
Charging the battery pack with the printer.......... 2-7
Using the battery pack ....................................... 2-8
Using the optional AC Adapter for power........... 2-10
Operation and Configuration ................ 3-1
Performing a Test Print ...................................... 3-2
Printing via the RS-232C Interface..................... 3-3
Printing via the IrDA Interface ............................ 3-4
Printing via the Wireless LAN Interface.............. 3-5
Printing via the Bluetooth Interface .................... 3-6
1
MB20xi A6.book Page 2 Tuesday, January 25, 2005 4:07 PM
Interface Specifications ....................... 4-1
Cleaning and Maintenance ................... 5-1
Cleaning the Print Head ..................................... 5-1
Cleaning the Platen and Peel Roller................... 5-2
Troubleshooting .................................... 6-1
Basic Specifications and Optional Accessories......................................................... 7-1
Basic Specifications............................................ 7-1
Optional Accessories .......................................... 7-7
2
MB20xi A6.book Page 1 Tuesday, January 25, 2005 4:07 PM
Introduction
INTRODUCTION
1
This manual is intended to familiarize you with the
basic features and operation of the MB200/201i
barcode printer in a short time.
Key features:
• High speed CPU and printing speed
• Long battery life
• Supports Infrared, RS232 and Bluetooth I/O
• Durable and rugged design
• Supports media up to 67 mm in width
• Supports the Mobile Programming Language or
Sato Basic Programming Language of the MB200
Please read this manual* carefully to make full use of
this product.
* All information herein was correct at the time of this
document’s release. Revised versions of this document
are created to match updates in firmware and procedures.
1-1
MB20xi A6.book Page 2 Tuesday, January 25, 2005 4:07 PM
Introduction
Notes on Bluetooth/Wireless Communication
Compliance Statement
This product has been certified for compliance with the
relevant radio interference regulations of your country
or region. To ensure continued compliance, do not:
• Disassemble or modify this product
• Remove the certificate label (serial number seal) affixed to this product
Use of this product near microwave and/or other wireless LAN equipment, or where static electricity or radio
interference is present, may shorten the communication distance, or even disable communication.
“Bluetooth” is a trademark of Bluetooth SIG,
Inc., USA., and is used herein under licence.
Caution: Before using the wireless LAN interface,
make all the security settings of the wireless LAN
equipment are configured in accordance with the
instructions supplied with the equipment.
1-2
MB20xi A6.book Page 1 Tuesday, January 25, 2005 4:07 PM
Setup
SETUP
2
Unpacking the printer
If any component shown here is missing, contact
your nearest dealer or service center.
Notes:
The printer is shipped with the belt holder already installed.
Cushioning material may vary for different regions. An external
battery charger is available separately or included in the Starter kit.
2-1
MB20xi A6.book Page 2 Tuesday, January 25, 2005 4:07 PM
Setup
Part Names
2-2
MB20xi A6.book Page 3 Tuesday, January 25, 2005 4:07 PM
Setup
Part Names (cont’d)
2-3
MB20xi A6.book Page 4 Tuesday, January 25, 2005 4:07 PM
Setup
Functions of various parts
RS-232C
Interface
Allows connection to a computer
or handy terminal
Label
guide
Set to meet the size
of the label used
RS-232C
cover
Protects the RS-232C connector
from dust and damage
Label
guide
adjust dial
Allows adjustment of the label
guide to fit the width of an
installed label roll
Cover
Opens up to allow the installation of labels
Cover for
Label
guide
adjust dial
Protects the label guide adjustment dial from dust or damage
Cover
Open/
Close
lever
Enables the user to releases the
cover, or to lock the cover shut
Label output area
This is the area where the
printed label is output
Easy cutter
Cuts printed labels
Label width
markings
Indicates the width of label
installed or in use.
IrDA filter
Contains the IrDA (infrared)
sensor and emitter
DC input
jack
Connects to AC adapter which
supplies direct current to the
printer
DIP switch
Sets the operation mode of the
printer. (See page 53.)
Cover for
DC input
jack
Protects the DC input terminal
and DIP switch fro dust and
damage
Dispenser
unit
Moved to select
Dispense mode
FEED key
Press to feed label
POWER
key
Allows the user to turns ON/OFF
the printer
PRINT key
Takes the printer Online
or Offline
Cover for special
battery pack
Status LED
Indicates the
status of the printer. (See pages
36, 37, and 48 to
52)
Indicates the amount of battery
power remaining for the printer
Belt clip
Suspends the printer on a belt,
to allow greater mobility
Battery
cover
Battery
indicator
(LED)
* Do not hang the printer on to
anything but a belt
2-4
MB20xi A6.book Page 5 Tuesday, January 25, 2005 4:07 PM
Setup
Charging the battery pack with a charger
If your printer comes with the optional battery
charger, you can use it to charge the supplied battery
pack. Follow the steps below:
1. Connect the charger to the
wall outlet and turn on the
power. The POWER lamp
lights red.
2. Align the battery pack with its
metal contacts facing front,
and slide it forward into the
charger.
The CHARGE lamp lights red
when charging starts. It
turns off when the battery
pack is fully charged. In the
case of a five-battery
charger, when charging
starts, the CHARGE lamp
glows red. It then glows
green when the battery
packs are fully charged.
metal contacts
3. After charging, remove the
battery pack from the
charger by sliding it out.
2-5
MB20xi A6.book Page 6 Tuesday, January 25, 2005 4:07 PM
Setup
Notes:
• If the POWER lamp does not light when you turn on
the power, check the power cord connection.
• If the CHARGE lamp does not light at the start of
charging, make sure the battery pack is firmly
mounted into the charger. Poor mounting of the
battery pack may result in faulty charging.
• When the fully charged battery pack is placed into
the battery charger, the CHARGE lamp turns on
and then off. In the case of the five-socket charger,
the CHARGE lamp lights green.
• When charging a battery pack that has not been
used for a long time, the CHARGE lamp may blink
for a while. This does not indicate an error. You can
continue charging.
• The battery pack can be recharged over about 300
times (when used at normal temperatures). If the
battery pack is fully charged but runs out quickly,
replace it with a new battery.
Charging Time
It takes about 2.5 hours for a fully discharged battery
pack to return to a fully charged state.
2-6
MB20xi A6.book Page 7 Tuesday, January 25, 2005 4:07 PM
Setup
Charging the battery pack with the printer
If your printer comes with the optional AC adapter, the
printer can be used to charge the supplied battery
pack. Follow the steps below:
1. Remove the cover of the
printer’s DC input jack
and connect the AC
adapter’s DC output
terminal to it.
2. Connect the AC adapter
to the wall outlet and turn
on the power. The
POWER lamp on the
adapter lights green.
Charging starts and the
battery indicator on the
printer lights red. When the battery pack is fully
charged, the battery indicator goes off.
In the case of the MB200/201i Wireless LAN
interface model, the CHARGE LED on the LCD
screen lights red when charging starts, and goes
off when charging is complete.
Charging Time
With the AC adapter, it takes about 5 hours for the battery
pack to reach full charge from a fully discharged state.
2-7
MB20xi A6.book Page 8 Tuesday, January 25, 2005 4:07 PM
Setup
Using the battery pack
Turn the printer off before removing or replacing the
battery.
Insertion
1. Unlatch the battery
compartment cover.
2. Align the battery pack so
that its metal terminals
are facing forward. Insert
the battery pack while
pressing and holding the
gray hook. Close the
battery cover.
Removal
Push aside the gray hook in
the compartment. The
battery pack is released
upwards. To pull out the
battery pack, make use of
the tape that is attached to
the top part of the battery
pack.
2-8
MB20xi A6.book Page 9 Tuesday, January 25, 2005 4:07 PM
Setup
Using the battery pack (cont’d)
Notes
Remove the battery pack only when the STATUS
LED is OFF. When the printer is turned off, the
STATUS LED goes off. Do not remove the battery
while the STATUS LED is on. Otherwise, the
information stored in the printer may not be updated.
2-9
MB20xi A6.book Page 10 Tuesday, January 25, 2005 4:07 PM
Setup
Using the optional AC Adapter for power
If your printer comes with the optional AC
adapter, the printer can be operated on AC
power instead of the supplied battery pack.
Follow the steps below:
1. Remove the cover of the
printer’s DC input jack
and connect the AC
adapter’s DC output
terminal to it.
2. Connect the AC adapter
to the wall outlet and turn
on the power. The
POWER lamp on the
adapter lights green.
Notes:
Be sure to turn the printer power off when removing
the DC output terminal of AC adapter or
disconnecting the power source. Otherwise, the
information stored in the printer may not be updated.
2-10
MB20xi A6.book Page 11 Tuesday, January 25, 2005 4:07 PM
Setup
Using the optional AC Adapter for power
Notes (cont’d)
A battery pack is unnecessary when an AC adapter is
used. If a battery pack and an AC adapter are being
used at the same time, the printer will attempt to
charge the battery pack (if it is not already fully
charged).
2-11
MB20xi A6.book Page 12 Tuesday, January 25, 2005 4:07 PM
Setup
Installing the label roll
The method of installing label media varies with
your choice of the two possible print modes—
’continuous’ or ‘dispense’ mode.
1. Make sure you can see the
red platen roller. If not, slide
the dispenser unit down, by
lifting its top edge upwards
at the two arrow marks.
Now push the dark gray
Cover Open/Close lever
downwards to release the
cover.
2. Place the label roll into the
printer. Make sure the label
roll is placed with the first
label feeding from the
bottom of the roll and not
from the top (see picture).
2-12
Dispenser
unit
Ensure that the first label
emerges from the bottom
(not top) of the roll.
MB20xi A6.book Page 13 Tuesday, January 25, 2005 4:07 PM
Setup
Installing the label roll (cont’d)
3. Lift up the label guide adjust
dial cover and turn the dial
till the label guides press
loosely against label roll.
Turn the label roll lightly by
the hand and confirm that it
rotates smoothly. Otherwise
paper may not be fed
correctly during operation.
Close the dial cover.
* When replacing a label roll
of the same width as that
used previously,
adjustment of the label
guide is not necessary.
4. Close the cover after confirming that the leading
edge of the label is outside the printer.
This completes the label installation for
continuous mode operation.
2-13
MB20xi A6.book Page 14 Tuesday, January 25, 2005 4:07 PM
Setup
Installing the label roll (cont’d)
For operating in the Dispense mode, the
following label loading procedures apply.
1. Make sure you can see the
red platen roller. If not, slide
the dispenser unit down, by
lifting its top edge upwards
at the two arrow marks.
Now push the dark gray
Cover Open/Close lever
downwards to release the
cover.
2. Peel the first label on the
top of the label. This step is
unnecessary when a nonseparate label is used.
2-14
Dispenser
unit
MB20xi A6.book Page 15 Tuesday, January 25, 2005 4:07 PM
Setup
Installing the label roll (cont’d)
3. Insert the label roll into
the printer. Make sure the
first label emerges from
the bottom (not top) of the
roll.
Ensure that the first label
emerges from the bottom
(not top) of the roll.
4. Lift up the label guide
adjust dial cover and turn
the dial till the label
guides press loosely
against label roll. Turn the
label roll lightly by hand
and confirm that it rotates
smoothly. Otherwise the
paper may not be fed
correctly during
operation. Close the dial
cover.
* When replacing a label
roll of the same width as
that used previously,
adjustment of the label
guide is not necessary.
2-15
MB20xi A6.book Page 16 Tuesday, January 25, 2005 4:07 PM
Setup
Installing the label roll (cont’d)
3. Close the cover after
confirming that the leading
edge of the label is outside
the printer by at least
10mm.
* When using nonseparate labels, press
the FEED button to feed
a piece of label and pull
the label upward to cut it
along the perforation. If
the label becomes
jammed, retry the label
setting procedure.
4. Push the dispenser unit
forward so that it covers
the red platen roller.
This completes the label installation for
Dispense mode operation. To resume operation
in Continuous mode, lift the top edge of the
dispenser unit (where two arrow marks are
imprinted) to it downwards. In Continuous
mode, the red platen roller will be visible.
2-16
MB20xi A6.book Page 1 Tuesday, January 25, 2005 4:07 PM
Operation and Configuration
OPERATION AND
CONFIGURATION
3
After setting up the printer and label roll in Section 2,
you can now operate the printer properly.
Turning the printer ON
Press and hold the
POWER button. When the
STATUS LED lights
green, release the button
Turning the printer OFF
Press and hold the
POWER button again.
When the STATUS LED
goes off, release the
button.
3-1
MB20xi A6.book Page 2 Tuesday, January 25, 2005 4:07 PM
Operation and Configuration
Performing a Test Print
Users can perform test prints to evaluate the print
quality and also diagnose problems.
1. Set the printer DIP switch for
Test Print mode as shown
on pages 4-2/4-3.
2. Press the POWER button
while pressing and holding
down the FEED button. The
printer enters the test mode.
Press the FEED button
again to do a test print.
3. Verify the following using the
output of the test printing.
• All printed characters are
solid black, without any chipped areas.
• Overall print quality is readable and sharp.
A low battery condition may affect the print quality.
Make sure the printer is running on AC or on a full
battery during a test print.
Notes:
If any fault is detected, contact your SATO dealer or
service center. Before asking for a repair, please read
the Troubleshooting section of this manual.
3-2
MB20xi A6.book Page 3 Tuesday, January 25, 2005 4:07 PM
Operation and Configuration
Printing via the RS-232C Interface
Use the following procedure to print by connecting to
a computer or a handy terminal through an RS-232C
cable option.
1. Locate the RS-232C
interface port cover and lift
it up to expose the port.
2. Plug one end of the RS232C cable firmly into the
port. Make sure that the
arrow mark on the
connector of the RS- 232C cable matches with the
arrow mark by the side of the printer’s port.
3. Plug the other end of the RS-232C cable to the
corresponding RS-232C connector of the computer
or handy terminal. For information on the host
device RS-232C connector, refer to the relevant
instruction manual.
3-3
MB20xi A6.book Page 4 Tuesday, January 25, 2005 4:07 PM
Operation and Configuration
Printing via the IrDA Interface
Use the following procedure to print through
IrDA interface.
1. Place the printer 20 cm away from the IrDA port of
the computer or handy terminal. Adjust the printer
position so that the center of its IrDA filter projects
a 30° conical area which contains the IrDA
transceiver of the computer or handy terminal.
IrDA communication is limited to a 15 to 20 cm range.
The usable range may vary depending on the
usage environment, or the capabilities of other IrDA devices.
Communication is compromised by direct sunlight or
ambient light. In such a case, block the strong light from
entering the IrDA filter, or reduce the distance between the
two IrDA ports.
3-4
MB20xi A6.book Page 5 Tuesday, January 25, 2005 4:07 PM
Operation and Configuration
Printing via the Wireless LAN Interface
To print using the Wireless LAN MB200/201i, you
need to have a properly configured wireless LAN set
up. The next step is to configure the MB200/201i to
share the same network settings in order to establish
communication.
1) Check the DIP Switches:
The printer’s DIP switches are factory set for WLAN
operation. Check that Dip switch 1 is OFF and Dip switch 2 is
ON. In case you need to reset other switches, refer to the full
DIP-Switch table in the next chapter, Interface Specifications.
2) Setup a connection to the Wireless Network
The next step is to ensure that your printer is
configured with the proper IP address, subnet mask,
gateway, SSID, Channel, WLAN mode and
security settings. Refer to your MIS personnel for
details of your existing wireless network settings.
Your SATO-certified System Integrator/dealer can
help to set up the connection to your corporate
wireless network. To configure the printer yourself,
consult them for the necessary software tools.
Note
When printing with the WLAN interface, the usable
range between the printer and the host may vary
depending on the usage environment and the
capabilities of the connected devices.
3-5
MB20xi A6.book Page 6 Tuesday, January 25, 2005 4:07 PM
Operation and Configuration
Printing via the Bluetooth Interface
To print using the Bluetooth-enabled version of
MB200/201i, you need to have a bluetooth-enabled
computing device. Two more steps are required.
1) Check the DIP Switches:
The printer’s DIP switches are factory set for bluetooth
operation. Check that Dip switch 1 is OFF and Dip switch 2 is
ON. This is the main setting for Bluetooth operation. In case you
need to reset other switches, refer to the full DIP-Switch table in
the next chapter, Interface Specifications.
2) Synchronize Bluetooth settings
After setting the DIP-switches, the next step is to
ensure that both bluetooth devices are configured to
operate with the same PIN code and Authentication
mode settings. Refer to the instruction manual of the
computing device for details on how to set these
parameters.
For the MB200/201i, these parameters can be set by
a SATO-certified System Integrator/dealer, or by
using Bluetooth communication software available
from your SATO dealer or service center.
Note
When printing with the Bluetooth interface, the usable
range between the printer and the host may vary
depending on the usage environment and the
capabilities of the connected devices.
3-6
MB20xi A6.book Page 7 Tuesday, January 25, 2005 4:07 PM
Operation and Configuration
Optional LCD screen
The Bluetooth and Wireless LAN versions of the
printer are factory-fitted with a Liquid Crystal Display
(LCD). The screen can display the following
information:
Dispense Mode Manual/Auto status
Test Print mode
Battery
strength
Two-line
text
display
MANU
T
Signal
strength
ONLINE
QTY:0000
Battery strength: Three-segment indicator. When all
segments are lit, voltage level is greater than 8.0 V.
Two segments indicator a level of between 7.8 V and
7.9 V. One segment indicates a level of between 7.6 V
and 7.7 V. When all segments are off (voltage level
below 7.5 V, printing is not possible.)
Signal strength: Three-segment indicator to indicate
Minimum, Medium and Maximum signal quality. An X
indicates no reception.
Test Print indicator: Appears in Test Print mode.
3-7
MB20xi A6.book Page 8 Tuesday, January 25, 2005 4:07 PM
Operation and Configuration
Optional LCD screen (cont’d)
Two-line text display: Displays the following:
1) Various status messages: Firmware version,
Online mode, Offline mode, labels remaining in
print queue, Test Print status, Default Setting,
Complete, Factory Clear, Press Feed Key, Press
Print Key, Hex Dump Mode, Set up Display, Adjust
LCD, Exit, Contrast, Back Light On
2) Warning messages: Cover Open, Paper End,
Sensor Error, Buffer Near Full, Head Protect, Head
Error, Module Error,
3) WLAN information: Messages such as Adhoc
mode, Infrastructure mode, IP address, subnet
mask, default gateway, Socket Port Number.
Adjusting Display Contrast
To adjust the contrast of the LCD, go into
Maintenance mode. Use the FEED button to select
options, and the PRINT button to confirm a selection.
Now select the “Adjust LCD” option and then the
Contrast “option”. Values cycle between 30 and 63.
3-8
MB20xi A6.book Page 9 Tuesday, January 25, 2005 4:07 PM
Operation and Configuration
Printing Procedure
After the proper setup and basic configuration
procedures, you are ready to print to the
MB200/201i.
1. Make sure the host
computer is ready to
transmit data, and ensure
that the STATUS LED is lit.
(Press the PRINT button to
take the printer ONLINE).
2. Start the print job from the
computer. When printing is
finished, pinch either the left
or right corner of the printed
roll of label(s) and tear it off
in the direction of the arrow
in the diagram.
Notes
• The number of sheets you can print is determined
by the printer’s mode (continuous or peel mode).
• When printing non-separate labels and you have
torn the labels at a wrong place, stop the printing
and follow the instructions on the next page to
correct the print job.
3-9
MB20xi A6.book Page 10 Tuesday, January 25, 2005 4:07 PM
Operation and Configuration
Adjusting printing for Non-separate labels
When printing on a continuous label roll (nonseparate), if you tear off a label at the wrong
place, proceed as follows.
1. Interrupt printing on the
computer, or by pressing
the PRINT key in the
ONLINE state to take the
printer OFFLINE.
(STATUS LED goes off).
2. Press the FEED button to
feed a label. When the
feeding stops, tear off the
label correctly by pulling
the label in the direction
of the arrow shown in the
diagram. The label is now
aligned properly for
printing to resume.
3. Press the PRINT button to return to the online state
(STATUS LED lights green). You can now resume
the print job.
3-10
MB20xi A6.book Page 11 Tuesday, January 25, 2005 4:07 PM
Operation and Configuration
Choosing the Label Dispensing mode
You can choose to dispense labels in Continuous
Mode and Dispense Mode. In either mode, test
printing and online printing are available.
You can select Dispense mode for non-separate
labels by using the printer setting tool.
3-11
MB20xi A6.book Page 12 Tuesday, January 25, 2005 4:07 PM
Operation and Configuration
Configuring Dispense mode
Dispense Mode can be set to Auto Print or Manual
Print, as described below.
Type
Operation
Auto Print
Prints one label after receiving data and waits for peeling.
After peeling a label, automatically prints next label.
Manual
Print (this
is the
default setting)
Prints one label after receiving data and enters offline
state. Pressing the PRINT key allows next label to be
printed. After printing the specified number of labels, printing terminates. No printing occurs even when the PRINT
key is pressed.
To switch between Auto or Manual Print for the
Dispense Mode, set the DIP switches and then hold
down the PRINT or FEED button when turning the
printer ON. The new settings take effect when the
printer is next turned ON.
Setting Auto Print dispense mode:
DSW1-4=OFF,OFF,OFF,ON + Cover open + Print
button + power ON
Setting Manual Print dispense mode:
DSW1-4=OFF,OFF,OFF,ON + Cover open + FEED
button + power ON
When setting the dispense mode, the STATUS LED
blinks green, and turns into a steady green signal
upon completion of setting. Turn off the printer ONLY
when the STATUS LED is a steady green light.
3-12
MB20xi A6.book Page 13 Tuesday, January 25, 2005 4:07 PM
Operation and Configuration
Other Printer Modes
Available printer modes include Normal, Test Print,
Head Check Setting and Online Command Setting
mode.
Normal mode
STATUS LED behaviour in Normal Mode
Operational State
STATUS LED
LED Action
START OF PRINTING
Orange
Steady
ONLINE
Green
Steady
OFFLINE
OFF
NA
Green
Blinks every
4 seconds
STANDBY (after 5 seconds of
inactivity)
Note: The Battery indicator (only available on the
Bluetooth/WLAN model) remains lit even when the
printer is OFFLINE. During the Standby state, the
printer resumes normal operational status upon
sensing any incoming data or pressing of the buttons.
3-13
MB20xi A6.book Page 14 Tuesday, January 25, 2005 4:07 PM
Operation and Configuration
Printer modes (cont’d)
Test Print Mode
Enter Test Print mode as shown, by using the FEED
and POWER buttons.
STATUS LED behaviour in Test Print Mode
3-14
Operational State
STATUS LED
LED Action
ENTERING TEST PRINT MODE
Orange
Steady
START OF TEST PRINT
Green
Blinks
DURING TEST PRINT
Green
Steady
END OF TEST PRINT
OFF
NA
MB20xi A6.book Page 15 Tuesday, January 25, 2005 4:07 PM
Operation and Configuration
Printer modes (cont’d)
Head Check Setting Mode
Head checking can be applied to one of two areas:
the normal print area and the barcode print area.
To specify the area subjected to a head check, follow
the settings in the table below:
Setting Head Check Area
(cover must be left open)
H.Check setting
DSW-1
DSW-2
DSW-3
DSW-4
Other keys
Normal Print Area
OFF
ON
OFF
ON
hold down PRINT
button
Disable H. Check
OFF
ON
OFF
ON
hold down FEED
button
Barcode Print Area
ON
OFF
OFF
ON
hold down PRINT
button
Disable H. Check
ON
OFF
OFF
ON
hold down FEED
button
You can check the current setting with a test printout
as described in “Performing a Test Print” on page 2.
When setting the Head Check options, the STATUS
LED blinks green, and turns into a steady green
signal upon completion of setting. Turn off the printer
ONLY when the STATUS LED is a steady green light.
3-15
MB20xi A6.book Page 16 Tuesday, January 25, 2005 4:07 PM
Operation and Configuration
Printer modes (cont’d)
Online Command Compatibility Mode
The printer can be set for compatibility with SBPL
commands or with the older MB200 commands.
Setting Online Command compatibility
(cover must be left open)
DSW-1
DSW-2
DSW-3
DSW-4
Other keys
MB200
online commands
Compatibility
ON
ON
ON
ON
hold down PRINT
button
SBPL
online commands
ON
ON
ON
ON
hold down FEED
button
You can check the current setting with a test printout
as described in “Performing a Test Print” on page 2.
When setting the online command compatibility
options, the STATUS LED blinks green, and turns
into a steady green signal upon completion of setting.
Turn off the printer ONLY when the STATUS LED is a
steady green light.
3-16
MB20xi A6.book Page 17 Tuesday, January 25, 2005 4:07 PM
Operation and Configuration
Offset Configuration via Programming
The following offset adjustments for the MB200/201i
printer are usually unnecessary. Almost all
adjustments are electrical in nature due to the
printer’s advanced self aligning and balancing design
features. However, if you need to perform the
adjustments, they can be sent as commands to the
printer. Consult your SATO representative for
information on programming the MB200/201i printer,
or refer to the Programming Reference guide found
on the CD-ROM.
POSITION ADJUSTMENTS
Adjustment
Printer Setting
Commands
Method
Description
Use the <PG>
programming
command.
Saves the values
to the Flash ROM.
Use the <A3>
programming
command.
Takes effect
instantly; the
value is cleared
once the power is
turned off.
Base Point Offset
Pitch Offset
Dispense Offset
Tear-Off Offset
Base Point Offset
3-17
MB20xi A6.book Page 18 Tuesday, January 25, 2005 4:07 PM
Operation and Configuration
POSITION ADJUSTMENTS
Pitch Offset
Use the <PO3>
programming
command.
Takes effect
instantly; the
value is cleared
once the power is
turned off.
Dispense Offset
Use the <PO1>
programming
command.
Takes effect
instantly; the
value is cleared
once the power is
turned off.
Tear-Off Offset
Use the <PO2>
programming
command.
Takes effect
instantly; the
value is cleared
once the power is
turned off.
3-18
MB20xi A6.book Page 1 Tuesday, January 25, 2005 4:07 PM
Interface Specifications
INTERFACE
SPECIFICATIONS
4
Through a combination of DIP switch settings and
turning the printer ON with certain buttons held down,
you can enable or disable special functions/features.
DIP Switch
Other required settings
1
2
3
4
OFF
OFF
ON
OFF
Power ON with Cover Open, Print button held down, FEED
button held down – Factory Clear w/o clear Head Counter
ON
OFF
ON
OFF
Power ON with Cover Open, Print button held down, FEED
button held down – Factory Clear + clear Head Counter +
clear Factory Counter
OFF
OFF
ON
OFF
Power ON with Cover Open, PRINT button held down, FEED
button held down – resets to default settings: Factory Clear
mode
Online Command Compatibility Settings
ON
ON
ON
ON
Power ON with Cover Open, PRINT button held down, FEED
button not held down – MB200 command compatibility
ON
ON
ON
ON
Power ON with Cover Open, PRINT button not held down,
FEED button held down – SBPL command compatibility
4-1
MB20xi A6.book Page 2 Tuesday, January 25, 2005 4:07 PM
Interface Specifications
RS-232C settings
OFF
OFF
OFF
OFF
Power ON with Cover Closed, PRINT button not held down,
FEED button not held down –RS-232C Normal mode
OFF
OFF
OFF
OFF
Power ON with Cover Closed, PRINT button not held down,
FEED button held down – RS-232C User test print mode
OFF
OFF
OFF
OFF
Power ON with Cover Open, PRINT button held down, FEED
button not held down – RS-232C default setting mode
OFF
OFF
ON
ON
Power ON with Cover Closed, PRINT button not held down,
FEED button not held down – RS-232C Hex Dump mode
OFF
OFF
OFF
ON
Power ON with Cover Closed, PRINT button not held down,
FEED button not held down – RS-232C Font download
OFF
OFF
OFF
ON
Power ON with Cover Open, PRINT button held down, FEED
button not held down – Dispense mode, Auto print
OFF
OFF
OFF
ON
Power ON with Cover Open, PRINT button not held down,
FEED button not held down – Dispense mode, Manual print
OFF
OFF
ON
OFF
Power ON with Cover Closed, PRINT button not held down,
FEED button not held down – RS-232C Program Download
IrDA Settings
ON
OFF
OFF
OFF
Power ON with Cover Closed, PRINT button not held down,
FEED button not held down – IrDA Normal mode
ON
OFF
OFF
OFF
Power ON with Cover Closed, PRINT button not held down,
FEED button held down – IrDA User test print mode
ON
OFF
ON
ON
Power ON with Cover Closed, PRINT button not held down,
FEED button not held down – IrDA Hex Dump mode
ON
OFF
OFF
ON
Power ON with Cover Open, PRINT button held down, FEED
button not held down – Head Check, Barcode Print Area
ON
OFF
OFF
ON
Power ON with Cover Open, PRINT button not held down,
FEED button held down – Cancel Head Check
4-2
MB20xi A6.book Page 3 Tuesday, January 25, 2005 4:07 PM
Interface Specifications
Bluetooth/WLAN Settings
OFF
ON
OFF
OFF
Power ON with Cover Closed, PRINT button not held down,
FEED button not held down – Normal operation mode
Power ON with Cover Closed, PRINT button not held down,
FEED button held down – Test Print mode
Power ON with Cover Open, Print button not held down, FEED
button held down – Maintenance mode
OFF
ON
ON
ON
Power ON with Cover Open, PRINT button not held down,
FEED button not held down – HEX dump mode
Power ON with Cover Open, PRINT button held down, FEED
button not held down – Enable CRC Check
Power ON with Cover Open, PRINT button not held down,
FEED button held down – Disable CRC Check
OFF
ON
OFF
ON
Power ON with Cover Open, Print button held down, FEED
button not held down – Activate Head Check
Power ON with Cover Open, Print button not held down, FEED
button held down – Deactivate Head Check
OFF
ON
ON
OFF
Power ON with Cover Open, Print button held down, FEED
button held down – Factory Clear + Clear Head Counter
Note:
A small label may produce a large amount of data when
printing a Hex Dump.
4-3
MB20xi A6.book Page 4 Tuesday, January 25, 2005 4:07 PM
Interface Specifications
WARNING: Never connect or disconnect interface
cables (or use a switch box) with power applied to
either the host or the printer. This may cause
damage to the interface circuitry in the printer/host
and is not covered by warranty.
Note: Some hosts monitor the Request-To-Send
(RTS) signal (pin 4 of 25) to determine if the printer
is ready to receive data. Since the printer does not
generate this signal, the RTS line must be held true
(high) in order to allow communication. Perform
this by connecting the RTS pin to the Clear-ToSend (CTS) signal (pin 5 of 25).
4-4
MB20xi A6.book Page 1 Tuesday, January 25, 2005 4:07 PM
Cleaning and Maintenance
CLEANING AND
MAINTENANCE
5
By cleaning and maintaining the printer regularly, you
will prolong its durability and reliability, and also
reduce the inconvenience of unnecessary
malfunctions. Perform the following procedures
regularly after turning the printer OFF and removing
the battery pack.
Cleaning the Print Head
Slide the Cover Open/
Close lever to release the
cover. If the lever is not
accessible, first slide the
dispenser unit away by
lifting the top edge where
the arrow marks are
located. (see Step 1 of
“Installing the label roll” on
page 12).
Wipe off any dirt using a
cloth (soaked) in alcohol.
Never use thinner, benzene,
or kerosene.
5-1
MB20xi A6.book Page 2 Tuesday, January 25, 2005 4:07 PM
Cleaning and Maintenance
Cleaning the Platen and Peel Roller
Users can perform test prints to evaluate the print
quality and also diagnose problems.
Slide the Cover Open/
Close lever to release the
cover. If the lever is not
accessible, first slide the
dispenser unit away by lifting
the top edge where the arrow
marks are located. (see Step
1 of “Installing the label roll”
on page 12).
Wipe off any dirt using a
cloth (soaked) in alcohol.
Never use thinner, benzene,
or kerosene.
5-2
MB20xi A6.book Page 1 Tuesday, January 25, 2005 4:07 PM
Troubleshooting
TROUBLESHOOTING
6
When you experience any problems operating the
printer, refer to the following tables.
What to do in case of...
Print Fault
Cause
Remedy
Smudged printing
1. Print head is dirty
2. Roller is dirty
1. Clean the print head
2. Clean the platen and dispense roller
(See Section 5: “Cleaning and Maintenance”)
Vertical streaking in
printouts
1. Print head is dirty
2. Print head is faulty
1. Clean the print head
2. Replace the print head
Slanted text characters
1. Paper guide is positioned incorrectly
1. Retry with different label paper. Use
only SATO-certified media for best
print quality and minimal problems
2. Clean the platen and peel roller (See
Section 5: “Cleaning and Maintenance”)
2. Roller is dirty
No printing
1. RS-232C cable connection is faulty
2. IrDA Interface is
faulty
3. Bluetooth/WLAN
interface is faulty
4. Dip Switch setting is
incorrect
5. Print head is faulty
1. Check the connection of the RS-232C
cable connector (See “Printing via the
RS-232C Interface” on page 3)
2. The printer and IrDA host must be
within 15 or 20m of each other. The
host must be located within a from
the center of the IrDA filter (com area)
of the printer. (See “Printing via the
IrDA Interface” on page 4)
3. Check the communication protocol
settings
4. Double-check Dip Switch settings
(See Section 4: “Interface Specifications”)
5. Replace the print head.
6-1
MB20xi A6.book Page 2 Tuesday, January 25, 2005 4:07 PM
Troubleshooting
STATUS
(LED)
Mode
Description
Cause
Remedy
Light (Red)
All
modes
Low battery
Battery charge level is low.
Recharge the battery
Blink (Red)
every 2s
Online
Error in
Bluetooth or
WLAN card
Interface module error
(Bluetooth, wireless LAN)
Replace the board
Light (Red)
After
Power
On
1 Program
illegal
error
2 Flashromerror
Flash ROM read/write
error has occurred
1 Replace Flash
ROM*
2 Retry downloading
program*
Blink
(GreenÌRed) every
2s
Online
Head error
Head wiring is
disconnected
Replace the head*
Blink (Red)
every
0.5s
Online
Cover open
Paper End
Sensor
error
1 Cover is not locked
2 Cover-open/close sensor
malfunctioning
1 Paper is not present
1 Wrong sensor level
2 Wrong sensor type
3 Paper skew
1 Lock the cover
2 Adjust sensor level*
1 Load paper
1 Adjust sensor level*
2 Set correct sensor
type
3 Reload paper
Blink
(Green) at
0.5s
intervals
Online
(Printing
or receiving data)
Buffer
near-full
Insufficient space in
Receive Buffer area
Stop sending data
from the host and
wait till the buffer
becomes empty.
Resume sending
data.
Blink
(Green)
every 4s
All
modes
Sleep mode
Not in error. Low power
consumption mode is
active
Clear this mode by
receiving data, pressing a key, opening or
closing the cover.
Blink
(Green->off>Red->off)
every 1s
All
modes
Head overheat
protection
feature
When print head is hotter
than 70°C the print head
overheat protection feature
is activated. Not in error.
Cleared when the
head temperature
drops to 50°C
* Contact your nearest dealer or SATO representative for support
6-2
MB20xi A6.book Page 3 Tuesday, January 25, 2005 4:07 PM
Troubleshooting
WARNING: NEVER CONNECT OR DISCONNECT INTERFACE CABLES (OR USE A SWITCH BOX) WITH POWER
APPLIED TO EITHER THE PRINTER OR THE HOST. THIS
MAY CAUSE DAMAGE TO THE INTERFACE CIRCUITRY
AND IS NOT COVERED BY WARRANTY.
6-3
MB20xi A6.book Page 4 Tuesday, January 25, 2005 4:07 PM
Troubleshooting
6-4
MB20xi A6.book Page 1 Tuesday, January 25, 2005 4:07 PM
Basic Specifications & Optional Accessories
7
BASIC SPECIFICATIONS &
OPTIONAL ACCESSORIES
Basic Specifications
Attribute
Description
Printing system
Thermal printing system
Head density
8 dots/mm (203 dpi)
Maximum print area 48 mm (width) x 160 mm (pitch)
Print speed
Dimensions
MB200i:
MB201i:
103 mm/s max. (The speed varies
depending on print duty and environment of use.)
88 mm (width) x 128 mm (depth) x
73 mm (height) (excluding belt clip)
88 mm (width) x 119 mm (depth) x
64 mm (height) (excluding belt clip)
Weight
MB200i: 405g with battery pack
MB201i: 390 g with battery pack
Power supply
(Battery)
Prints 4 rolls of thermal labels with
full charge. (equivalent of 48 m)
Continuous printing is permitted
(provided print duty is 16% or less.)
7-1
MB20xi A6.book Page 2 Tuesday, January 25, 2005 4:07 PM
Basic Specifications & Optional Accessories
Paper thickness
0.064 ~ 0.190 mm (use only SATOcertified paper).
Shape of paper
Roll paper: Wound with surface out
Maximum diameter: f58 mm
Label size (Liner
sheet and eye mark
pitch)
Width: 25.4 to 55 mm (28.4 to 58
mm)
Pitch: 13 to 160 mm (16 to 163
mm)
Media Roll Size
MB200i:
67 mm (2.63”) outer diameter
MB201i:
58 mm (2.28”) outer diameter
19 mm inner diameter (core)
7.9 mm inner diameter (coreless)
Label printing
modes
Continuous, Dispense (peel)
Self-diagnosis
Head check/Cover open/Paper
end/Battery check/Test print
Power saving
features
Auto power off after non operation
for 5 minutes. With Bluetooth or
wireless LAN specifications,
default is no auto power off. Auto
power off time can be changed via
the printer operation register command <PG>.
For details of the command, refer
to the Programming Guide.
7-2
MB20xi A6.book Page 3 Tuesday, January 25, 2005 4:07 PM
Basic Specifications & Optional Accessories
Interfaces
• RS-232C
• Photo coupling
• Bluetooth
• Wireless LAN
Attribute
Mini DIN
IrDA communication (Complies
with IrDA standard Ver. 1.2. Communication range: 15 to 20 cm
max.)
IrOBex/BHT protocol/Ir Comm
Bluetooth Specification Ver. 1.1
Class 2
Wireless LAN interface
(IEEE802.11b)
TCP/IP (FTP, LPR, SOCKET)
Description
Paper sensors
Reflection type (eye mark),
Transmission type (gap)
Text Character
magnification
1 to 6 times
Character rotation
0°, 90°, 180°, 270°
Character type
SATO standard font: X20, X21,
X22, X23, X24, OCR-A, OCR-B,
POP character Kanji: 16 x 16, 22 x
22, 24 x 24 Square Gothic (JIS
Level 1, Level 2)
7-3
MB20xi A6.book Page 4 Tuesday, January 25, 2005 4:07 PM
Basic Specifications & Optional Accessories
Barcode
JAN8/13, UPC-E/UPC-A, NW-7,
CODE39, CODE93, CODE128,
INTERLEAVED2of5, Customer
barcode, RSS-14 However, barcode shall be used with the following. Parallel barcode: Thin bar
width of 2 dots or more Serial barcode: Thin bar width of 3 dots or
more
Two-dimensional
code
Any one of PDF417, QR code
(including micro QR), Data matrix
code (ECC200), MAXI code, Composite symbol can be used by
downloading.
Switches
POWER, PRINT, and FEED buttons
Indicators
STATUS LED: One (Lights in three
color: Green, Red and Orange)
Battery LED: Three
Application
standards
FCC 15 ClassB, EN55022,
EN55024, EN61000-3-2,
EN61000-3-3, UL60950-1, CSA
C22.2 No.60950, GB9243,
GB9254, GB17625.1
Protective feature
Overcharge protection
Head overheat protection
Detection of Low Battery state
7-4
MB20xi A6.book Page 5 Tuesday, January 25, 2005 4:07 PM
Basic Specifications & Optional Accessories
Waterproof feature
Rainproof type (JIS protection
class 3), Shoulder rainproof cover
(option) installed.
* Removed when communication
cable is connected.
Operating ambient temperature:
Environmental
condition (including -15 to 50°C
Humidity: 20 to 80% without conbattery pack)*
densation
Storage ambient temperature: 25 to 60°C
*Does not apply to
Humidity: 20 to 80% without conlabel media
densation
Options
Battery pack, AC adapter, Battery
charger (Single-socket), Battery
charger (5-socket), Rainproof
case, Shoulder belt, Belt hook
(one-touch type), Waist case,
RS-232C cable
Notes:
1. Before using a wireless interface with this
equipment, make sure that any radio transmission/
reception equipment onsite, do not share the same
frequency range as this product’s wireless setup.
2. If any harmful radio interference should occur due
to operation of RF equipment that share the same
transmission/reception characteristics, contact your
nearest dealer or service center to take appropriate
7-5
MB20xi A6.book Page 6 Tuesday, January 25, 2005 4:07 PM
Basic Specifications & Optional Accessories
measure to prevent interference (e.g., installing
partitions).
MB200/200i Radio Frequency characteristics
2.4FH1
Freq band
used
2.4 GHz
Modulation
system
Frequency Hopped Spread Spectrum system
10 mm max.
Assumed
distance of
interference
Availability
of frequency
change
7-6
All area is used and exclusion of the band for equipment for mobile object
identification is
impossible
MB20xi A6.book Page 7 Tuesday, January 25, 2005 4:07 PM
Basic Specifications & Optional Accessories
Optional Accessories
The MB200/201i direct thermal printer is supported by
a wide range of accessories to increase its flexibility.
Battery Items
Spare battery pack—having a
spare pack reduces interruption
during extended periods of
printer operation.
AC Adapter—allows the printer
to be operated via an AC outlet,
and to charge a battery pack
loaded inside the printer.
(Warning: use only the
specified AC Adapter designed
for your printer)
Single-slot Battery Charger—
use this to charge a battery
pack without using the printer
connected to an AC outlet.
Five-slot Battery Charger—use
this to charge multiple spare
battery packs at the same time.
7-7
MB20xi A6.book Page 8 Tuesday, January 25, 2005 4:07 PM
Basic Specifications & Optional Accessories
Optional Accessories
Portability enhancements
Belt Hook—allows users to
attach or detach the printer
for the waist belt easily.
Single-slot Battery Charger—
use this to charge a battery
pack without using the printer
connected to an AC outlet.
Installation: Pass your belt
through the belt holder. Insert the
belt hook into the belt holder until
it clicks into place. If the belt
hook is not inserted properly, the
printer may fall off.
Detachment: Pull the printer
sideways and upwards to
remove it from the belt hook.
7-8
MB20xi A6.book Page 9 Tuesday, January 25, 2005 4:07 PM
Basic Specifications & Optional Accessories
Optional Accessories
Portability enhancements
Shoulder Belt—allows users
to hang the printer from the
shoulder.
Installation: Pass the shoulder
belt through the belt hole of
the printer from the outside in.
Pass one end of the
shoulder belt through the buckle
and adjust the length. If the
shoulder belt is poorly secured
the printer to may fall off.
7-9
MB20xi A6.book Page 10 Tuesday, January 25, 2005 4:07 PM
Basic Specifications & Optional Accessories
Optional Accessories (cont’d)
Portability enhancements
Rainproof case—comes with
a shoulder belt to protect the
printer during wet weather.
Installation: Pinch the Rainproof case with the belt clip of the
printer. If the Rainproof case is not pinched with the belt clip
correctly, the printer may fall off.
7-10
MB20xi A6.book Page 11 Tuesday, January 25, 2005 4:07 PM
Basic Specifications & Optional Accessories
Optional Accessories (cont’d)
Portability enhancements
Waist case—a protective
case that hangs from the
waist for transporting the
printer.
Installation: Pinch the Waist case with the belt clip of the
printer. If the Waist case is not pinched by the belt clip
correctly, the printer may fall off.
7-11
MB20xi A6.book Page 12 Tuesday, January 25, 2005 4:07 PM
Basic Specifications & Optional Accessories
Optional Accessories (cont’d)
Connectivity options
RS-232C cable—allows connection of the printer to a
PC or handy terminal.
Factory-installed options
Wireless LAN Interface (with LCD)—allows printing via a
WLAN network. The interface comes with an LCD on the
front panel to display the status of wireless communication.
Bluetooth Interface (with LCD)—allows printing via a
Bluetooth connection. The interface comes with an LCD on
the front panel to display the status of Bluetooth
communication.
For more details about the optional accessories, consult
your authorized SATO representative.
7-12
MB20xi A6.book Page 13 Tuesday, January 25, 2005 4:07 PM
MB20xi A6.book Page 14 Tuesday, January 25, 2005 4:07 PM
Basic Specifications & Optional Accessories
7-14