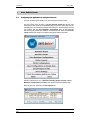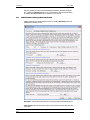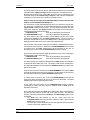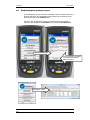
1
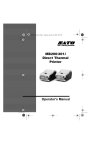
User Manual –
SATO Australia Pty Ltd
Document Control Record
Sato_OnSale
Document Control Record
Document Details:
Author:
Ident:
Version:
Date:
Norman Bain
090616-01
1.0.007.0
14th July 2009
Recipients:
Doug Brown
Change History:
Version
1.0.001.0
Status
Draft
Date
th
25 May 2009
Details of Changes
Author
Creation
PJB
1.0.003.0
28th May 2009
1.0.004.0
10th June 2009
Changes for new features.
NJB
1.0.005.0
16th June 2009
Changes for new features
NJB
1.0.006.0
9th July 2009
Changes for new logos
NJB
1.0.007.0
14th July 2009
Bluetooth printing
NJB
1.0.011.0
28th Aug 2009
File reporting; raw label printing
NJB
NJB
Copyright © 2009 Purpose Built Software Pty Ltd:
All rights reserved. No part of this document may be reproduced or copied in any
form by any means (graphic, electronic or mechanical, including photocopying or
recording by any information retrieval system) without the prior written permission of
Purpose Built Software Pty Ltd.
This page must be reproduced with all copies of this document. It must not be
removed from this document under any circumstances.
Version 1.0.011.0 - Commercial-in-Confidence
2009
Copyright © Purpose Built Software Pty Ltd
28th August
Page i
User Manual
Sato_OnSale
Table of Contents
1.
INTRODUCTION ...................................................................................................................1
1.1
Sato OnSale .....................................................................................................................1
1.1.
Hardware and Operating System ....................................................................................2
2.
INSTALLATION & SETUP ......................................................................................................3
2.1.
Active Sync .......................................................................................................................3
2.2.
Sato OnSale Setup...........................................................................................................3
2.3.
Using the program for the first time .................................................................................6
2.4.
Installing the PDA Application..........................................................................................6
3.
SATO_ONSALE PDA APPLICATION .....................................................................................8
3.1.
Fetching the printer layouts and discounts information from the Server .......................8
3.2.
Price Markdown..............................................................................................................10
3.3.
Printing (raw) labels........................................................................................................10
4.
SATO_ONSALE SERVER ...................................................................................................12
4.1.
Confguring the application to suit your business...........................................................12
4.2.
LabelFormats: setting up barcode formats ...................................................................13
4.3.
Price Markdown Configuration: how much the user can discount...............................16
4.4.
Print Layout: editing the printed output ..........................................................................17
4.5.
Markdown Reports: producing a report.........................................................................18
5.
CONFIGURATION AND SETTING UP PRINTERS .....................................................................22
5.1.
Printer Configurations: setting up the printer.................................................................22
5.2.
Printer Configurations: enabling the PDA for bluetooth printing...................................23
Version 1.0.011.0 - Commercial-in-Confidence
2009
Copyright © Purpose Built Software Pty Ltd
28th August
Page ii
User Manual
1.
Sato_OnSale
Introduction
1.1 Sato OnSale
The Sato OnSale application was developed by Purpose Built Software from a vision
presented by Sato Australia.
The OnSale application allows a user with a barcode scanner enabled PDA to scan
items within a retail environment; then select a dollar or percentage markdown and
print a new (price embedded) barcode.
Also supported is the ability to print quantities of “raw” labels for attachment to new
goods arriving at a store.
The user is able to set configurations to allow for the many styles of embedding SKU
and Price information within barcodes. Many barcode formats can be configured;
each with their own set of rules for markdown (and raw labels) and for the resultant
layout of the printed result.
This is a powerful yet easy to use program.
For more information about this and other SATO products contact:
SATO Australia
Ph: 1800 624 654
Email: [email protected]
Web: www.satoaustralia.com
For software development generally contact:
Norman Bain
Technical Director
Purpose Built Software
[email protected]
Ph: +61 2 9906 7300
For software support for this product contact:
[email protected]
Ph: +61 2 9906 7300
Please be sure to include the words “Sato OnSale” in your support request and the
application version you are using.
Version 1.0.011.0 - Commercial-in-Confidence
2009
Copyright © Purpose Built Software Pty Ltd
28th August
Page 1
User Manual
1.1.
Sato_OnSale
Hardware and Operating System
There are several PDA models and operating systems that are compatible with the
Sato OnSale software. These include but are not limited to:
•
Any of the Motorola range of Handheld Computers in particular the PPT8800,
MC3000, MC55, FR6000 and FR68 ranges.
•
For detail of supported hardware products from other manufacturers contact your
Sato representative.
See www.motorola.com for a few examples of the hardware available.
Version 1.0.011.0 - Commercial-in-Confidence
2009
Copyright © Purpose Built Software Pty Ltd
28th August
Page 2
User Manual
2.
Sato_OnSale
Installation & Setup
The software is delivered
Sato_OnSale_Setup.exe.
as
a
single
windows
executable
named
This may be downloaded at anytime from the website at
http://downloads.purposebuilt.com.au/Sato/Sato_OnSale_Setup.exe
2.1.
Active Sync
To install Sato OnSale to a PDA you must first install ActiveSync and create a
partnership with your PDA first.
ActiveSync is a free Microsoft product that facilitates communication between a
Handheld (PDA) computer and a desktop PC.
To attain the ActiveSync download compatible with Windows XP (or earlier) PCs
please use this link:
http://www.microsoft.com/windowsmobile/en-us/help/synchronize/activesyncdownload.mspx
For Windows Vista the ActiveSync equivalent is called Mobile Device Center; it is
often (but not always) installed with the operating system. If you use Windows Vista
and the Mobile Device Center is not installed, then the download link is at:
http://www.microsoft.com/windowsmobile/en-us/help/synchronize/device-centerdownload.mspx
Contact [email protected] if you need assistance with this step.
2.2.
Sato OnSale Setup
There are two applications for the Sato_OnSale program. The first is the desktop
based Sato_OnSale_Server. The second is the Sato_OnSale_Pda program.
The Server program allows setup of barcode and printer layouts in manner
appropriate for your business then send it all to the PDAs.
The PDA program allows a user to scan an existing barcode; apply a discount and
print a new label.
Running the Sato_OnSale_Setup.exe will display the initial welcome screen and guide
you through the rest of the installation process.
Version 1.0.011.0 - Commercial-in-Confidence
2009
Copyright © Purpose Built Software Pty Ltd
28th August
Page 3
User Manual
Sato_OnSale
Note (for Vista users and for some virus protection systems) if you are presented with
a security warning like the one below please click [Allow or Run] to continue.
Version 1.0.011.0 - Commercial-in-Confidence
2009
Copyright © Purpose Built Software Pty Ltd
28th August
Page 4
User Manual
Sato_OnSale
Installation
Review and agree to the licence agreement and follow the prompts.
NOTE: For Vista users the “Launch Sato_OnSale Now” option on the last screen is
disabled; please start Sato_OnSale by use of the desktop (or Start Menu) shortcut
icon.
You should now see the Main Menu as shown below.
Version 1.0.011.0 - Commercial-in-Confidence
2009
Copyright © Purpose Built Software Pty Ltd
28th August
Page 5
User Manual
2.3.
Sato_OnSale
Using the program for the first time
To get you started we have created a set of common Barcode Label Formats, Printer
Layouts and Markdown Styles. If this is your first time using this program it is
recommended you click the [Reset Configurations to Sample Data] button to setup
something you can play with. Most users simply modify these samples to suit their
own needs once they see the printed result.
Click the [Reset Configurations to Sample Data] button to create a set of
configurations that the PDA can use now.
If later you wish to FULLY remove the sample data then close the Server application;
then restart the Server application after first deleting the file at:
C:\Program Files\Sato\Sato_OnSale\Sato_OnSale_Server.pbs
2.4.
Installing the PDA Application
The Sato_OnSale_Pda program is installed in a “push” manner to the PDA by the
Server program sending the program to the PDA while the PDA is in the cradle.
Before installing the Sato_OnSale application to your PDA, please ensure that you
have:
•
•
•
Correctly installed your PDA and cradle
Have installed Microsoft ActiveSync
Created an ActiveSync connection (either partnership or guest) with your PDA
From the Sato_OnSale_Server desktop application click on the [Install Program to
Pda] button.
Ensure that the PDA is in the cradle and has an ActiveSync connection then click Yes
to proceed.
Version 1.0.011.0 - Commercial-in-Confidence
2009
Copyright © Purpose Built Software Pty Ltd
28th August
Page 6
User Manual
Sato_OnSale
A screen will appear showing the progress of files being copied to the PDA.
At the end of the Installation you should see an “Installation completed
successfully message”.
Once installation to the PDA is complete, the Sato_OnSale_Pda application may be
found on the PDA by clicking the start button on the PDA. Programs and
“Sato_OnSale” will be found in the list of installed programs.
Click the [Sato OnSale] entry and you will be presented with the Main Menu screen
on the PDA.
Version 1.0.011.0 - Commercial-in-Confidence
2009
Copyright © Purpose Built Software Pty Ltd
28th August
Page 7
User Manual
3.
3.1.
Sato_OnSale
Sato_OnSale PDA Application
Fetching the printer layouts and discounts information from the Server
The first time you use the Sato_OnSale_Pda application there is need to fetch the
discounts and printer layout configurations from the Server application using the
[Fetch Configuration] utility.
Version 1.0.011.0 - Commercial-in-Confidence
2009
Copyright © Purpose Built Software Pty Ltd
28th August
Page 8
User Manual
Sato_OnSale
Clicking [Fetch Configuration] button on the PDA Main Menu shows the screen
below.
Ensure the Pda is in the cradle, that there is an Active Sync connection and that the
Sato_OnSale_Server program is running. Then click [Fetch Configuration]. Some
progress messaging should appear in the Status area; then once the configuration
has been retrieved from the Server a “Sync completed successfully” message will
present in the Status area of the Pda.
Click the [Close] button to return to the PDA Main Menu.
Version 1.0.011.0 - Commercial-in-Confidence
2009
Copyright © Purpose Built Software Pty Ltd
28th August
Page 9
User Manual
3.2.
Sato_OnSale
Price Markdown
The real work of the PDA application is performed in the Price Markdown module. It
is here that the user gets to scan barcodes and select discounts and print new labels
for products onSale.
Click the Price Markdown button on the PDA Main Menu to navigate to the Price
Markdown screen.
Scan a barcode. If the Label Format has a CCCC portion the price will show; else (for
non price embedded barcodes) an entry field for user to enter the price will display.
Select a Dollar markdown or a Percentage markdown to manipulate the discount as
required.
Ensure the printer is properly setup to receive printed output from the PDA; then press
the [Print] button and a new barcode will be printed. If the print does not succeed
(nothing happened at printer) you may need to set the ComPort or enable Bluetooth;
see the section labelled Printer Configurations: setting up the printer later in this
manual.
Click here for manual
entry of the barcode
3.3.
Printing (raw) labels
The PDA application will print normal (raw non-discounted) labels to the quantities
required. This allows the shop floor user to (use the PDA and printer to) price and
attach labels to the likes of those consumables that come into the store in smaller
Version 1.0.011.0 - Commercial-in-Confidence
2009
Copyright © Purpose Built Software Pty Ltd
28th August
Page 10
User Manual
Sato_OnSale
quantities without having to make a trip to the back office label print machine to get
the job done.
Click the Print Labels button on the PDA Main Menu to navigate to the Print Labels
screen.
Scan or enter barcode
Key in the price
Set print quantity
Send to printer
Version 1.0.011.0 - Commercial-in-Confidence
2009
Copyright © Purpose Built Software Pty Ltd
28th August
Page 11
User Manual
Sato_OnSale
4.
Sato_OnSale Server
4.1.
Confguring the application to suit your business
The Sato OnSale program allows you to make changes to the way it works.
The way to think of this is that if a particular Barcode Format (like say the ones
starting with a prefix of 29) are to be detected when scanned for on the PDA; then the
embedded price (as configured in the barcode format) is to be presented to the PDA
user together with the Price Markdown Configuation setup for that particular
barcode. The user decides the markdown and clicks Print with result that the Printer
Layout that has been setup for use with that barcode is output to the printer.
Selecting a Menu item for one of [Barcode Formats], [Printer Layouts] or [Price
Markdown Configurations] will display a list showing those items already setup.
Below (by way of an example) is the PrintLayouts List.
Version 1.0.011.0 - Commercial-in-Confidence
2009
Copyright © Purpose Built Software Pty Ltd
28th August
Page 12
User Manual
Sato_OnSale
Selecting (clicking on) a line in the list will display the detail of (and allow edit of) the
item. Clicking the [Add New] button on any of the list forms does the expected thing
by opening the related detail screen for creation of a new record.
4.2.
LabelFormats: setting up barcode formats
Clicking a line from the LabelFormats List screen or clicking [Add New] from the list
will display the following screen.
Description: enter a value that assists you to remember why you created this layout.
Label Format: tells the PDA which portions of the barcode contain prefix and price
information.
Version 1.0.011.0 - Commercial-in-Confidence
2009
Copyright © Purpose Built Software Pty Ltd
28th August
Page 13
User Manual
Sato_OnSale
For a style like FFPPPPXCCCCWWWY
FF
is the prefix
PPPP is the product PLU
X
is a checksum; the value is copied unchanged into the target.
AAAA is a marker that will copy the source AAAA portion into the target
BBBB is a marker that will copy the source CCCC portion into the target
CCCC is the price in cents
WWW is the weight value
Y
is the barcode checksum; the checksum is calculated as required.
Z
is a marker used within a source label format that performs as an X when
used in markdowns; and as a Y when used in raw label printing.
Prefix: enter the actual barcode Prefix value.
Checksum: for those barcodes that have a checksum (the Y bit); select the algorithm
to be applied when it is re-calculated just before printing the new barcode.
Raw Print Layout: select the layout to be used when printing raw (non-discount) style
labels. See the Print Layout section on how to setup printer outputs. LabelFormats
may share a common printer layout.
Markdown Print Layout: select a layout to be used when printing from the
markdown screen of the PDA. See the Print Layout section on how to setup printer
outputs. LabelFormats may share a common printer layout.
Markdown Config: select a configuration from the drop down list. See the
Markdown Configuration section on how to setup configurations. LabelFormats may
share a common markdown configuration.
Output Format: Below are described a few real world scenarios seen in retail
situations together with the technique to format Sato_OnSale to address them.
Output Format (scenario #1) Source layout is same as Target layout:
This is the most common scenario. The user scans a price embedded barcode,
reduces the price and prints a new label containing a barcode with the reduced price.
FFPPPPPXCCCCY
Source barcode
FFPPPPPXCCCCY
Target barcode
The LabelFormats are the same; so set the Output Format to <Same as Scanned>.
Setting it to <Same as Scanned> will have the effect that the new barcode will be
generated in the same Format as is defined in this screen and the Print Layout
setting will be used to generate the new label. <Same as Scanned> works for cases
where the source barcode (the one scanned) is a price embedded barcode; and (after
discount is applied) you wish to simply re-print the same style of barcode. The CCCC
price of the SourceBarcode is presented to the user for application of the discount;
then the discounted price is output to the CCCC portion of the printed barcode.
Output Format (scenario #2) Non-price EAN13 as Source barcode:
This scenario is for cases where (say) a CokeCan style EAN-13 is the barcode that is
scanned; then (after discount is applied) a new price embedded label (say) in Code128 form is required to be sent to the printer. For this scenairo the Output Format
setting needs to be set to the format definition of the barcode to be printed.
FFPPPPPPPPPPP
is the way to describe an EAN-13 in this case.
FFFFPPPPPPPPPPPCCCCC
is the way to describe appending price.
The FFFF portion of the Output Format’s Format definition (say like 1093) will be
copied from the Prefix as set in the Output Format definition.
Version 1.0.011.0 - Commercial-in-Confidence
2009
Copyright © Purpose Built Software Pty Ltd
28th August
Page 14
User Manual
Sato_OnSale
The PPPP portion of the EAN-13 (which in this scenario includes the source barcodes
checksum) will be copied unchanged into the PPPP portion of the Output Format.
Because there is not a CCCC portion within the source EAN-13 barcode the PDA
screen will change to allow manual entry of the price. After a discount is applied the
resultant price is used as the CCCC portion of the Output Format.
Output Format (scenario #3) Price-embedded EAN13 as Source barcode with
output to contain both WAS and NOW prices:
This scenario has a price embedded barcode as the one scanned by the Pda user.
The WAS price is extracted from the source bardcode because the source barcodes
Layout Format contains a CCCC portion. The user discounts the WAS price then
clicks print in usual way. The Output Format in this scenario is to be a barcode that
contains both the WAS and the NOW price.
FFPPPPPPCCCCX
is the way to describe the source barcode.
FFFFPPPPPPBBBBXCCCCC
is the way to describe the target barcode.
The FFFF portion of the Output Format’s Format definition (say like 1027) will be
copied from the Prefix as set in the Output Format definition. The CCCC portion of
the source barcode will be copied to the BBBB portion of the target barcode. The
NOW price will be copied to the CCCC portion of the target barcode.
There is another “sub-scenario” for this style; it is where the resultant target barcode is
rescanned for a further discount. Should the FFFFPPPPPPBBBBXCCCCC barcode
be scanned; then the BBBB (original price) will be presented to the user for
discounting in a manner as if the FFPPPPPPCCCCX had been scanned.
Hope you are coping with that wee wiggle; because there is one more “sub-scenario”
for this type that I need to share with you.
FFPPPPPPCCCCX
is the way to describe the source barcode.
FFFFPPPPPPAAAAXCCCCC
is the way to describe the target barcode.
The sharp amongst you would have identified that the BBBB portion has changed to
be AAAA and will be asking how come. The answer is that there is no difference in
the output after the first scan; that is after the FFPPPPPPCCCCX was scanned; both
give the same result.
However when a rescan is done of the FFFFPPPPPPBBBBXCCCCC type the BBBB
price will be (re)presented to the user as the price to be discounted; in same manner
as if user had re-scanned the original FFPPPPPPCCCCX barcode.
In contrast when a rescan is done of the FFFFPPPPPPAAAAXCCCCC type the
CCCC price will be presented to the user as the price to be discounted. The AAAA
will still be output into the target barcode as AAAA.
In both cases the CCCC portion of the FFPPPPPPCCCCX barcode is retained
(unchanged) no matter how many times the resultant AAAA or BBBB types are
themselves rescanned.
Ok so (with care) the AAAA and BBBB types could result in same output barcode if
the Pda user was careful to get the new CCCC price the same. The difference
though is in the value presented in the <OldPrice> and <ReducedBy> portions of the
printed label.
- The BBBB type will (continue to) use the CCCC price from the
FFPPPPPPCCCCX source barcode as the <OldPrice> value. It gets it from the
BBBB portion on each re-scan.
- The AAAA type use the already discounted value it gets from the CCCC portion
on each re-scan as the <OldPrice> value.
Version 1.0.011.0 - Commercial-in-Confidence
2009
Copyright © Purpose Built Software Pty Ltd
28th August
Page 15
User Manual
Sato_OnSale
-
4.3.
The <ReducedBy> is always the <OldPrice> less <NewPrice> presented in
$1.23 or 50% styles depending on the price reduction style adopted by the Pda
user.
Price Markdown Configuration: how much the user can discount
Clicking a line from the Price Markdown Configuration List screen or clicking [Add
New] from the list will display the following screen.
The screen is divided into two sections; Dollar markdown and Percentage
markdown. One or both of these setups as determined by the Allow checkbox setting
will be sent to the PDA.
Description: enter a value that assists you to remember why you created this
configuration.
Dollar Markdown:
Allow: checking this checkbox will enable (show) this configuration on the PDA.
Minimum and Maximum: these drop down lists set the lower and upper values
that will appear in the PDA’s dropdown list for a fixed price markdown. The upper
value that appears in the PDA’s list will be further constrained by the Max Percentage
value.
Increment: set this value to establish the fix price increments that will appear on
the PDA screen. Setting to (say) $0.50 would make the PDA list show $1.00, $1.50,
$2.00 etc.
Max Percentage: set this value to further constrain the upper value that appears
in the PDAs fixed price markdown amount list. Setting to (say) 50% would make
$6.00 the maximum amount that a PDA user could discount a $12.00 item.
Percentage Markdown:
Allow: checking this checkbox will enable (show) this configuration on the PDA.
Minimum and Maximum: these drop down lists set the lower and upper values
that will appear in the PDA’s dropdown list for a percentage markdown.
Increment: set this value to establish the percentage increments that will appear
on the PDA screen. Setting to (say) 5.0% would make the PDA list show 5.0%,
10.0%, 15.0% etc.
Version 1.0.011.0 - Commercial-in-Confidence
2009
Copyright © Purpose Built Software Pty Ltd
28th August
Page 16
User Manual
4.4.
Sato_OnSale
Print Layout: editing the printed output
Clicking a line from the Print Layout List screen or clicking [Add New] from the list
will display the following screen.
The layout is in the language of the target printer; in this case a Sato printer that
accepts the SBPL printer language. Please refer to your printer manual for full details.
The layout may contain embedded keywords; these keywords will be replaced with
data from the PDA after the user scans the barcode on the PDA and selects the new
pricing.
The embedded keywords are:
<Barcode>
The generated target barcode will be rendered here.
<OldPrice>
The WAS price.
<NewPrice>
The NOW price
<ReducedBy>
The markdown dollar ($1.23) or percentage (50%)
<Qty>
The entered print quantity.
Version 1.0.011.0 - Commercial-in-Confidence
2009
Copyright © Purpose Built Software Pty Ltd
28th August
Page 17
User Manual
4.5.
Sato_OnSale
Markdown Reports: producing a report
As each Markdown is sent to the printer on the PDA a record is created on the PDA of
the action performed. The LabelOutput records created on the Pda are sent to the
Server by use of the PDA->SendData option.
Ensure the Sato_OnSaleServer is running and that the PDA has an ActiveSync
connection; then navigate to the SendData screen and click the SendData button.
Open Send Data screen
Get an ActiveSync connection
then click here to send the
data to the Server
Open Report screen
Version 1.0.011.0 - Commercial-in-Confidence
2009
Copyright © Purpose Built Software Pty Ltd
28th August
Page 18
User Manual
Sato_OnSale
On entry the Markdown Report screen will ONLY show the records for the current
day; this is because the date range filter (Start and End Dates) have been set to the
current date. Select a start and end date range to display the records you would like
to produce a report on.
The same records as are displayed will be exported to the file.
The order of the exported data in the file will be the same as displayed on the screen.
The order of the display can be changed by clicking on the column headers. Holding
the CTRL key while clicking the column headers allows multiple selections.
Click the Export button to open a file dialog; then set the file name for the records to
be written to. By default the file name is “MarkdownReport.txt”.
The created file is readily viewable in a text editor like Notepad.
Version 1.0.011.0 - Commercial-in-Confidence
2009
Copyright © Purpose Built Software Pty Ltd
28th August
Page 19
User Manual
Sato_OnSale
The report file can also be viewed in Excel provided the following steps are
undertaken to ensure that the likes of long numbers (the long barcodes) get formatted
properly by Excel.
Excel will present a Text Import Wizard. Using the wizard we tell Excel that the file is comma
delimited.
Version 1.0.011.0 - Commercial-in-Confidence
2009
Copyright © Purpose Built Software Pty Ltd
28th August
Page 20
User Manual
Sato_OnSale
Select the Old Barcode column in and set the Column data format to Text. This will
stop Excel treating the value as a number and removing leading zeros and/or
removing trailing (least significant) data from long barcode numbers.
Click Finish from the wizard to display the spreadsheet.
Version 1.0.011.0 - Commercial-in-Confidence
2009
Copyright © Purpose Built Software Pty Ltd
28th August
Page 21
User Manual
Sato_OnSale
5.
Configuration and setting up printers
5.1.
Printer Configurations: setting up the printer
If your printer is Bluetooth then first make sure Bluetooth is a goer by following the
instructions in the section Printer Configurations: setting up bluetooth.
Some of the Sato printers need to have a one-time command string sent to them to
do something necessary to setup the printer for your chosen use. For example a CX
Series printer can print in both Thermal Transfer and Direct Thermal modes. Should
you wish only to use the Direct Thermal mode then the CPO command would do the
trick.
From Sato OnSale Server; clicking a line from the Printer Configurations List
screen or clicking [Add New] from the list will display the following screen.
Changes to the printer configurations will be sent to the PDA the next time the [Fetch
Configurations] utility is run from the PDA.
The PDA user selects the [Printer Configuration] from the Main Menu of the PDA to
show the screen below. Then selects and sends the configuration commands to the
printer.
This screen on the PDA also allows setup of the ComPort and BaudRate specific to
the pairing of the PDA and the printer.
For cable printing from a Motorola PDA COM1 is usually the choice. For bluetooth
printing from a Motorola PDA COM5 is usually the choice.
Version 1.0.011.0 - Commercial-in-Confidence
2009
Copyright © Purpose Built Software Pty Ltd
28th August
Page 22
User Manual
5.2.
Sato_OnSale
Printer Configurations: enabling the PDA for bluetooth printing
If your printer is bluetooth then there are a couple of steps required to associate (pair)
the PDA with the printer.
Ensure that the printer is turned on and is in bluetooth mode. Normally putting
the printer into bluetooth mode requires setting dip switches as per the printer
manual. By way of example the MB200i printers need the dip switches set Off,
On, Off, Off for Bluetooth mode. If you change the dip switch settings be sure
to cycle the printer’s power.
Once the printer is in Bluetooth mode there are some steps required on the PDA to
associate the printer with the PDA.
The following screenshots are from a Motorola MC55 PDA. Other PDAs may have a
slightly different method of achieving the pairing; contact support if required.
The first screen shows bluetooth disabled; there is a yellow mark over the bluetooth
symbol at bottom right of screen.
Tap the bluetooth icon and select Enable Bluetooth.
The third screen shows Bluetooth enabled.
Version 1.0.011.0 - Commercial-in-Confidence
2009
Copyright © Purpose Built Software Pty Ltd
28th August
Page 23
User Manual
Sato_OnSale
Now that the PDA has bluetooth enabled; we start the Sato OnSale PDA application and navigate
to the Printer Configuration screen.
Select the ComPort and BaudRate applicable for the target printer.
For the Motorola MC55 PDA the ComPort is COM5.
For the MB200i printer the BaudRate is 19200.
Click the Send Configuration To Printer button. If this is the first time this printer and this PDA
have been used together the following screens will appear.
Version 1.0.011.0 - Commercial-in-Confidence
2009
Copyright © Purpose Built Software Pty Ltd
28th August
Page 24
User Manual
Sato_OnSale
Once the search process has completed; the discovered devices will be shown.
On the first screen; select the Sato Mobile Printer and click Next.
On second screen; ensure that the selected port is COM5
and that Save as Favourite is checked. Click next.
On third screen; click the Connect button.
NOTE: if the MB200i printer presents a message box with message “Printer Offline” press the
Print button on the front of the printer to return it to the Online state; then resend the print request.
Version 1.0.011.0 - Commercial-in-Confidence
2009
Copyright © Purpose Built Software Pty Ltd
28th August
Page 25