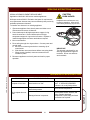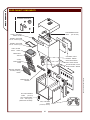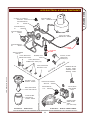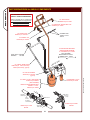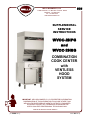
1
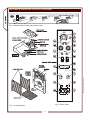
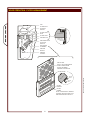
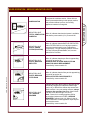
505
WELLS BLOOMFIELD, LLC
2 ERIK CIRCLE, P. O. Box 280 Verdi, NV 89439
telephone: 775-689-5707
fax: 775-689-5976
www.wellsbloomfield.com
SUPPLEMENTAL
SERVICE
INSTRUCTIONS
WVOC-2HFG
and
WVOC-2HSG
COMBINATION
COOK CENTER
with
VENTLESS
HOOD
SYSTEM
IMPORTANT: WELLS BLOOMFIELD, LLC PROPRIETARY INFORMATION.
DISSEMINATION OF THIS INFORMATION TO ANYONE OTHER THAN
WELLS AUTHORIZED SERVICE AGENTS IS STRICTLY PROHIBITED.
TECHNICAL CONTENT OF THIS MANUAL IS DESIGNED FOR
USE BY QUALIFIED PROFESSIONAL TECHNICIANS ONLY.
PRINTED IN UNITED STATES OF AMERICA
p/n SV505 Rev.(-)
S505
080519 cps
PRECAUTIONS AND GENERAL INFORMATION
GENERAL
WARNING:
RISK OF
INJURY
Installation procedures must
be performed by a qualified
technician with full knowledge
of all applicable electrical and
plumbing codes. Failure can
result in personal injury and
property damage.
WARNING:
ELECTRIC
SHOCK HAZARD
All servicing requiring access
to non-insulated electrical
components must be
performed by a qualified
technician.
Some procedures involve
exposed live circuits. Use all
due caution to avoid contact
with live electric circuits.
Failure to follow this warning
can result in severe electrical
shock.
This appliance is intended for use in commercial establishments
only.
This appliance is intended to prepare food for human consumption.
No other use is recommended or authorized by the manufacturer or its
agents.
Operators of this appliance must be familiar with the appliance use,
limitations and associated restrictions. Operating instructions must be
read and understood by all persons using or installing this appliance.
Cleanliness of this appliance is essential to good sanitation. Read and
follow all included cleaning instructions and schedules to ensure the
safety of the food product.
Disconnect this appliance from electrical power before performing any
maintenance or servicing.
DO NOT splash or pour water on, in or over any controls, control
panel or wiring. Do not use water spray or steam jet to clean this
appliance. This appliance is not jet stream approved.
The technical content of this manual, including any wiring diagrams,
schematics, parts breakdown illustrations and/or adjustment
procedures, is intended for use by qualified technical personnel.
Any procedure which requires the use of tools must be performed by a
qualified technician. All service to the fire suppression system must be
performed by an authorized Ansul® agency.
This appliance is made in the USA. Unless otherwise noted, this
appliance has American sizes on all hardware.
WARNING
IMPORTANT INSTALLATION NOTE:
SLIP / FALL
HAZARD
SPILLED OIL
6” clearance is required from back and sides of the appliance to any
combustible or non-combustible surface.
This installation requires a minimum ceiling height of 96" in order to
maintain adequate airflow.
CAUTION:
RISK OF
DAMAGE
DO NOT connect or energize
this appliance until all
installation instructions are
read and followed. Damage to
the appliance will result if
these instructions are not
followed.
xi
SV505 SvcManual WVOC-2HG
DO NOT OPERATE UNLESS
THE GREASE CUP AND
TROUGH ARE INSTALLED.
Oil and moisture will drip onto
the floor and falls may result.
Death or serious injury may
result from slipping and falling
TABLE OF CONTENTS
GENERAL
GENERAL
Precautions & General Information …………….………… xi
Specifications ..……………………………...................….. 1
Features & Operating Controls ……………………………. 2
VENTILATOR HOOD SECTION
Filter Arrangement .......................................................... 6
Service Indicator Lights .…….......................................… 7
Operational Notes ........................................................... 8
Filter System ................................................................... 10
Vacuum System .............................................................. 11
Ansul® System ............................................................... 12
Troubleshooting Suggestions ……………………………… 14
CONVECTION OVEN SECTION
Operation ........................................................................ 16
Servicing Instructions ...................................................... 18
Troubleshooting Suggestions .......................................... 24
GRIDDLE SECTION
Operation Notes ............................................................. 26
Servicing Instructions ...................................................... 27
Troubleshooting Suggestions .......................................... 29
HOTPLATE SECTION
Servicing Instructions ...................................................... 30
Troubleshooting Suggestions .......................................... 31
EXPLODED VIEWS AND PARTS LISTS
Hood Section .................................................................... 32
Ansul® Components ....................................................... 34
Convection Oven Section ................................................ 35
Cooktop Section .............................................................. 37
WIRING DIAGRAMS & SCHEMATICS ................................. 38
OTHER DOCUMENTS
Material Safety Data Sheet—Ansulex Low pH ................. 44
Maintenance Logs ............................................................ 46
SV505 SvcManual WVOC-2HG
SPECIFICATIONS
MODEL
WVOC-2HFG
WVOC-2HSG
VOLTS
WATTS
208
AMPS 3ø
AMPS 1ø
L1
L2
L3
12,300
36.7
35.0
30.7
59.0
240
16,300
42.3
40.3
35.4
68.0
208
13,200
39.0
37.4
33.1
63.3
240
17,600
35.8
44.3
47.3
73.1
INTRODUCTION
This manual contains information needed to properly service and repair Wells Bloomfield combination cook
center with ventless hood system. This manual applies to the following Wells Manufacturing models:
WVOC-2HFG
WVOC-2HSG
For installation, operation and maintenance instructions, refer to Operation Manual p/n 304963.
1
FEATURES & OPERATING CONTROLS
GENERAL
28
a11
VENTILATOR CONTROL PANEL
see pages 4 & 5
VENTILATOR
POWER ON
CHECK FILTERS
REPLACE
PREFILTER
a15
56
SERVICE
REQUIRED
REPLACE
FILTER PACK
53
VCS 2000
VENTLESS COOKING SYSTEM
19
16
18
16
18
57
a11
23
23
22
58
58
a10
12
IN CASE OF
FIRE
ANSUL
42
®
PULL
HANDLE
TO ACTIVATE
FIRE SUPPRESSION
SYSTEM
a6
41
1
43
a31
COCKED
FIRED
44
40
8
9
Fig. 1 Ventilator Section Operating Features & Controls
2
38
38
SV505 SvcManual WVOC-2HG
COOKING CONTROLS
see pages 4 & 5
FEATURES & OPERATING CONTROLS (continued)
ITEM
DESCRIPTION
COMMENT
NAMEPLATE
Gives manufacturer, make and model description. Also lists voltage
and amperage data.
FIRE SUPPRESSION
AGENT TANK (1.5 gal.)
Container for Ansulex™ Low-pH liquid fire suppression liquid.
8.
ADJUSTABLE (FRONT) LEG
Allows the unit to be leveled.
9.
RIGID (REAR) CASTER
Allows the unit to be easily positioned by lifting the front of the unit
slightly.
a10.
MANUAL PULL STATION
Provides a means of manual activation of the fire suppression system.
PULL ONLY IN CASE OF FIRE!
a11.
FUSIBLE LINKS
Automatically activates fire suppression system in the event of fire on
the cooktop.
LOWER REAR ACCESS
PANEL
Allows access to Ansul® fire suppression agent tank (a6) and controls
also access to main power contactor (41).
DISCHARGE NOZZLE
Fire suppression media discharges here (2 places).
16.
GREASE BAFFLE
Extracts and drains most grease and moisture from the air flow.
18.
PRE-FILTER ASSEMBLY
Comprises the PRE-FILTER FRAME and a replaceable
PRE-FILTER. Stops larger particles of grease from reaching the
FILTER PACK for reduced maintenance costs.
19.
HEPA/CHARCOAL FILTER
PACK
Stops most grease and smoke particles. Also assists in some cooking
odor removal.
22.
GREASE CUP
Collects grease/moisture drained from grease trough (23).
23.
GREASE TROUGH
Directs grease/moisture removed by grease baffle to grease cup.
28.
VENTILATOR EXHAUST
DUCT
Exit point for ventilator airflow - on top left rear of unit.
DO NOT BLOCK
STATUS INDICATOR
Displays status of fire suppression system (COCKED - FIRED) If
FIRED, a buzzer will sound continuously.
38.
POWER CORD
6’ cord and cap. Plug for NEMA 15-60R (receptacle by user).
40.
FUSES
Provide over-current protection.
41.
POWER CONTACTOR
Energizes cooking appliances only while ventilator section is sensed
as operational.
42.
BUILDING FIRE ALARM
RELAY
Reports fire alarm condition to building fire management system.
43.
GROUND LUG
Ground wire of power cord connects here.
44.
INTERLOCK TERMINAL
Provides connection for shut-down control by building fire management
system.
53.
FILTER INTERLOCK
SWITCHES
Proper installation of grease baffle and filter pack close these switches
in ventilator sensor circuit.
56.
VENTILATOR FAN
Provides air movement for ventilation.
57.
HOOD SIDE SHIELD
Required on left and right sides of hood. Factory installed.
58.
SIDE SPACERS
Required to maintain 6" spacing from combustibles. Field installed.
1.
a6.
12.
a15.
SV505 SvcManual WVOC-2HG
a31.
3
GENERAL
VENTILATOR SECTION
FEATURES & OPERATING CONTROLS (continued)
GENERAL
V1
V2
V3
V4
V5
V6
Fig. 2 Ventilator Section Controls & Indicator Lights
SV505 SvcManual WVOC-2HG
Fig. 4 Control Panel
Fig. 3 Cooking Section
4
FEATURES & OPERATING CONTROLS (continued)
DESCRIPTION
COMMENT
VENTILATOR SECTION INDICATORS & CONTROLS
V1
POWER SWITCH
Energizes blower motor. If, after 10 seconds, proper conditions
are met, cooking appliances are energized.
V2
POWER ON INDICATOR
GREEN. Glows when POWER switch is ON.
V3
CHECK FILTERS ALARM INDICATOR
AMBER. Glows if one or more filters are out of position. Check all
filters and baffles for proper installation.
V4*
REPLACE PREFILTER
ALARM INDICATOR
AMBER. Glows when PREFILTER is approaching the end of its
service life and must soon be replaced.
V5*
REPLACE FILTER PACK
ALARM INDICATOR
AMBER. Glows when FILTER PACK is approaching the end of its
service life and must soon be replaced.
V6*
SERVICE REQUIRED ALARM
INDICATOR
RED. Glows when PREFILTER and/or FILTER PACK has reached
the end of its service life and is too loaded to allow sufficient air flow.
Filter MUST be replaced. Appliance is SHUT DOWN until expended
filters are replaced.
*
See PRECAUTIONS & GENERAL INFORMATION, page 8 for special procedures regarding
prefilters and filter packs.
SV505 SvcManual WVOC-2HG
COOKING APPLIANCE CONTROLS
G.01
GRIDDLE TEMPERATURE
CONTROL
Thermostat control of griddle temperature
G.02
GRIDDLE HEAT INDICATOR
Glows when heating elements are energized.
H.01
FRONT HOTPLATE
TEMPERATURE CONTROL
Infinite switch control of temperature of front hotplate.
H.02
HOTPLATE "ON" INDICATOR
AMBER. Glows when front hotplate control is turned ON.
H.03
REAR HOTPLATE
TEMPERATURE CONTROL
Infinite switch control of temperature of front hotplate.
H.04
HOTPLATE "ON" INDICATOR
AMBER. Glows when rear hotplate control is turned ON.
C.01
POWER-OFF-FAN SWITCH
Switch to turn oven ON, OFF, or select FAN only.
C.02
FAN LOW-OFF-HIGH SWITCH
Switch to turn fan ON, and to select fan speed.
C.03
OVEN POWER INDICATOR
AMBER. Glows when oven is turned ON.
C.04
HEAT INDICATOR
AMBER. Glows when heating elements are energized.
C.05
DIGITAL DISPLAY
Displays time and temperature information.
A. Time remaining in program (minute : second)
B. Programmed temperature (ºF)
C.06
OVEN TIME CONTROL
Adjust programmed cooking time.
C.07
OVEN TEMP CONTROL
Adjust programmed cooking temperature.
C.08
START TIMER KEY
Begin a timed cook cycle.
C.09
ACTUAL TEMP KEY
Press to display current oven temperature.
C.10
PGM KEYS
Press to select pre-programmed time/temperature.
C.11
CANCEL KEY
Press to cancel a program in progress.
5
GENERAL
ITEM
HOOD OPERATION - FILTER ARRANGEMENT
FAN
WALL OF UNIT
FILTER PA CK
SE AL
FILTER PACK
FILTER PA CK
AIR FLOW
VENTILATOR HOOD
FILTER PA CK
PO SITIO N
SWITCH
HOL DE R CLIP
GRE ASE B AFFLE
PO SITIO N
SWITCH
H OLDER CLIP
CLIPS ONTO
LEDGE
PRE -FILTER
AS SEMB LY
GRE ASE
BA FFL E
GRE ASE
TROUGH
PRE -FILTER
NOTE: AIR FL OW A RRO W
PO INTS AWAY FROM
INSTAL LER WHEN
PRO PERLY INSTA LLE D
FILTER HOOK
R
E
TE
R
FILTER
HOOK
FILTER
RAIL
FILTER
HANDLE
FILTER
FRAME
NOTE: P RE-FILTER IS S ENSE D
AS B EING IN POS ITION BY THE
PRE SSURE DROP A CRO SS IT.
6
SV505 SvcManual WVOC-2HG
P
IL
-F
HOOD OPERATION - SERVICE INDICATOR LIGHTS
POWER SWITCH
SV505 SvcManual WVOC-2HG
INDICATOR LIGHT
When lit, indicates that electrical power is available,
(GREEN) VENTILATOR
and that the power switch (V.01) is turned ON.
POWER ON
INDICATOR LIGHT
(AMBER) CHECK
FILTERS (POSITION)
When lit, indicates that the BAFFLE, PRE-FILTER
and/or FILTER PACK is not in its proper position,
or that an interlock switch is out of adjustment.
Controlled by: Plunger switches position monitors
for Filter Pack and Grease Baffle; and, vacuum
switch S3 for Pre-Filter.
INDICATOR LIGHT
(AMBER) REPLACE
PREFILTER
When lit, indicates that the pre-filter is approaching
the end of its service life.
ALWAYS HAVE A SPARE PRE-FILTER ON
HAND FOR QUICK REPLACEMENT.
Controlled by vacuum switch S1.
INDICATOR LIGHT
(AMBER) REPLACE
FILTER PACK
When lit, indicates that the filter pack is approaching
the end of its service life.
REPLACE FILTER PACK PROMPTLY!
Controlled by vacuum switch S2.
INDICATOR LIGHT
(RED) SERVICE
REQUIRED
Indicates that either the pre-filter or the filter pack is
individually clogged (the individual indicator light
may be lit), or that the the airflow drop across both
filters is critical. As a cost saving measure, always
change a dirty pre-filter first (when lights V.04 &
V.05 are not lit, and red light V.06 is on).
Note: Power to the cooking appliance will be
de-energized whenever this RED “SERVICE
REQUIRED” indicator light is lit. When lit, the air
flow is insufficient to meet appliance vapor capture
levels requirements.
Controlled by vacuum switch S4.
7
VENTILATOR HOOD
Energizes the ventilator section. When all three
filters are sensed as being in their proper position,
and sufficient airflow is proven, the cooking
appliance contactor is energized.
HOOD OPERATION - OPERATIONAL NOTES
WARNING:
FIRE AND HEALTH
HAZARDS
VENTILATOR HOOD
DO NOT bypass or attempt to
bypass the filter placement
interlocks. Operating the
appliance without filters properly
in place will compromise the fire
protection and air filtration
capabilities of this unit.
Serious personal injury and/or
substantial property damage may
result.
NOTICE:
Operating without all filters
properly in place, and/or
operating with filter placement
interlocks defeated will void the
manufacturer’s warranty.
IMPORTANT:
NEVER wash the PREFILTER or
FILTER PACK.This will shut
down the cooking appliance.
(Red “SERVICE REQUIRED”
light will turn ON).
REPLACE PREFILTER and REPLACE FILTER PACK indicator lights
provide a timely warning that a system shut-down is imminent. The
actual time between the indicator light coming on and the loss of
cooking appliance power will depend upon the cooking conditions.
Anytime a dirty PRE-FILTER is replaced, the system airflow will
increase. If the condition of the FILTER PACK is marginal, the
REPLACE FILTER PACK light could then come on. If this happens, a
fresh FILTER PACK must be installed within a reasonably short time.
Loss of airflow through the old filter pack will soon cause a system
shut-down when the airflow falls below minimum vapor capture levels.
KEEP SPARE FILTER PACKS ON HAND.
IMPORTANT: If you decide to “get the most” out of the old filter pack,
and continue to use it until a system shut-down happens, it is advisable
to have a fresh filter pack readily at hand, and have someone available
who is capable of replacing it. Otherwise, you may experience an
extended down time, with consequent associated loss of business.
The manufacturer assumes no liability for loss of business due to
a system shutdown caused by a dirty pre-filter and/or filter pack
(i.e. red SERVICE REQUIRED light is on), when the user fails to
have the proper replacement pre-filter and/or filter pack on hand.
SV505 SvcManual WVOC-2HG
8
HOOD SECTION - OPERATIONAL NOTES (continued)
FIRE
DAMPER
LABEL
SHUTTER
DAMPER
SUPPORT
FUSIBLE LINK
280ºF
FIRE DAMPER INSTRUCTIONS
1. The FIRE DAMPER is accessible by removing the TOP PANEL
The FIRE DAMPER sets in the DAMPER SUPPORT and may be
removed by lifting straight up.
SV505 SvcManual WVOC-2HG
2. The FIRE DAMPER normally needs no maintenance. If it
becomes heavily contaminated with dust and/or grease, it must
be replaced.
3. If the FIRE DAMPER malfunctions or if the fusible link releases,
the manufacturer recommends that the entire FIRE DAMPER
ASSEMBLY be replaced.
4. Reinstall the FIRE DAMPER with the “THIS SIDE UP FOR
HORIZONTAL MOUNTING” arrow pointing away from the
BLOWER.
9
IMPORTANT:
Replace the entire fire damper
assembly if the link trips, or if the
damper mechanism becomes
heavily contaminated with dust
and/or grease.
While the fusible link alone may be
replaced, once the damper has
tripped it may no longer function
reliably.
Contact factory for pricing and
availability.
VENTILATOR HOOD
THIS SIDE UP
FOR HORIZONTAL
MOUNTING
THIS
SIDE UP
FOR VERTICAL
MOUNTING
¬ ®
AIR FLOW
ACCESS DOOR
THIS SIDE
FILTER SYSTEM
HOOD ASSEMBLY
(LOOKING UP)
VENTILATOR HOOD
FILTER PACK
POSITION MONITOR
GREASE BAFFLE
POSITION MONITOR
PRE-FILTER
ASSEMBLY
NOTE AIR FLOW ARROWS ON
GREASE BAFFLE, PRE-FILTER
AND FILTER PACK. INSTALL
THESE COMPONENTS SUCH
THAT ARROWS POINT
TOWARD FAN
FILTER
PACK
GREASE
BAFFLE
1. The GREASE BAFFLE separates grease particles and water vapor
from the air stream by the centrifugal force of the air moving through
its inter-leaved baffle plates. Ejecta is collected in the GREASE CUP
through drain holes in the baffle frame and cabinet.
The GREASE BAFFLE POSITION MONITOR plunger switch controls
electric power to the ventilator fan.
NOTE:
The charcoal portion of the
filter pack is an aid in
controlling cooking odors
only. It will not completely
eliminate such odors.
2. The PRE-FILTER is composed of a replaceable media filter and a
filter-retaining gage. The pre-filter captures the bulk of grease vapors.
Pre-filter position is monitored by a vacuum switch, which is in the
control circuit of the cooking appliance contactor.
3. The FILTER PACK is composed of a high-efficiency filter to capture
grease vapors down to a very small particle size; and, an activated
charcoal filter to help control cooking odors.
The FILTER PACK POSITION MONITOR plunger switch is in the
control circuit of the cooking appliance contactor.
10
SV505 SvcManual WVOC-2HG
NOTE:
Change the pre-filter as
soon as the "REPLACE
PRE-FILTER" indicator
glows in order to extend the
service life of the filter pack.
VACUUM SYSTEM
FAN
PORT A
VS4
PORT A
VS1
VENTILATOR HOOD
PORT B
FAN
PORT C
PORT C
PORT C
VS3
PORT B
PLENUM PORT
(AFTER FILTER PACK)
VS2
SV505 SvcManual WVOC-2HG
VS2
FILTER PACK ALERT
Will illuminate "REPLACE FILTER PACK"
indicator if pressure drop across the filter
pack exceeds setting.
VS3
PRE-FILTER ALERT
Will illuminate "REPLACE PRE-FILTER"
indicator if pressure drop across the prefilter exceeds setting.
VS4
AIR FLOW MONITOR
Pressure drop must exceed setting before
cooking appliance is energized. As filters
become plugged, airflow decreases.
Beyond the useful life of the filters, air flow
will be insufficient to maintain the required
pressure drop, which will shut-down
ventilator fan and cooking appliance and
illuminate "SERVICE REQUIRED"
indicator.
GREASE
BAFFLE
PREFILTER
SWITCH
VS1
PRESSURE
RISE FROM
FAN
PRESSURE
DROP ACROSS
FILTER PACK
PRE-FILTER POSITION MONITOR
Unit will not function unless a pre-filter
is properly installed, as sensed by the
pressure drop across it. Pressure drop
across the pre-filter must exceed setting
before cooking appliance is energized.
Insufficient pressure drop will illuminate
"CHECK FILTER" indicator.
AMBIENT
PRESSURE
VS1
PRESSURE
DROP ACROSS
BAFFLE
SWITCH FUNCTION
PRESSURE
DROP ACROSS
PRE-FILTER
CABINET PORT
(BEFORE FILTER PACK)
FILTER
PACK
FAN
SWITCH
VS2
SWITCH
VS4
AIR FLOW
SWITCH
VS3
IMPORTANT:
Vacuum switch settings are factory set, and are not
adjustable.
11
ANSUL® FIRE DETECTION SYSTEM
HOOD ASSEMBLY
VIEWED FROM REAR
SER IES
D ET EC TOR
DETECT OR
IN PLENUM
212ºF
FUSE LINK
212ºF
VENTILATOR HOOD
212ºF
IN
CA
S
FIR E O F
E
P
H UL
A L
N
DL
ANS
UL
E
MANUAL
PULL STATION
C ABLE SITS IN
GROOVE IN
PULLEY
PULLEY
ELBOW
IMPORTANT:
All servicing of the fire
detection system to be
performed by an
authorized Ansul® agent
only.
1. Cooking appliance protected by a series detector with a 212ºF
fusible link. The plenum is further protected by two 212ºF fusible links
at the inlet of the ventilator fan.
2. Fire suppression system may be activated by the manual pull station
on the front of the unit, or by a remote manual pull station if installed.
3. A microswitch in the Ansul® Automan assembly allows connection to
a building fire alarm system.
12
SV505 SvcManual WVOC-2HG
MICROSWITCH
ANSUL® FIRE SUPPRESSION SYSTEM
HOOD ASSEMBLY
UNDER-HOOD
MANIFO LD
FLEX
HOSE
NOZZLE 290
APPLY SEALANT TAPE
PLENUM
NOZZLE ASSY
NOZZLE 1W
SEAL WITH
TEFLON TAPE
I NS
ID
E
OU
TS
ID
E
FIBER
WASHER
IS ALWAYS
ON THE INSI DE
CABINET WALL
SV505 SvcManual WVOC-2HG
SEAL WITH
TEFLON TAPE
TYPICAL BULKHEAD
FITTI NG
FIRE SUPPRESSION
MEDIA TANK
PRESSURE
CARTRIDG E
1. Actuation of the Ansul® system will cause the pressure cartridge seal
to be punctured, which will pressurize the 1.5 gallon media tank. Fire
suppression media will be forced through the piping where it will spray
from the various nozzles.
2. The cooking appliance surface is protected by two type 290 nozzles.
3. The plenum area between the filters and the fan is protected by a
single type 1W nozzle.
4. The pressure integrity of the plenum bulkheads is maintained by the
use of compression fittings at the piping penetrations.
5. Nozzles are protected from grease contamination by press-on silicone
rubber caps.
13
IMPORTANT:
All servicing of the fire
suppression system to be
performed by an
authorized Ansul® agent
only.
VENTILATOR HOOD
VIEWED FROM REAR
HOOD SECTION - TROUBLESHOOTING SUGGESTIONS
SYMPTOM
VENTILATOR HOOD
Entire unit inoperative
No lights glow
No buzzer sounds
Cooking appliance inoperative
“POWER” light on hood ON. Vent
fan working ok with no service
Cooking appliance inoperative
“POWER” light on hood ON.
Vent fan working OK.
"SERVICE REQUIRED" light ON
POSSIBLE CAUSE
SUGGESTED REMEDY
Plug power cord into receptacle
Circuit breaker off or tripped
Reset circuit breaker
Damaged power cord
Replace power cord
Damaged power switch
Check switch. Replace as req’d.
External interlock jumper loose or
damaged (unit is not connected to
building fire control system)
Check jumper. Repair or replace
as required
External interlock open (unit
connected to building fire control
system)
Locate and rectify open circuit
condition in building fire control
system.
Contactor, wiring or connectors
damaged
Replace contactor
Repair wiring
Vacuum line to switch VS4
restricted
Check for restriction in vacuum
line to switch.
Vacuum switch VS4 open or
defective
Check vacuum switch VS4.
Replace as req’d.
Vacuum pickup port in plenum, or
vacuum port on blower plugged
Clean vacuum ports
NOTE: Vacuum port in plenum
may appear as a place to attach
a nozzle. Do not attach a nozzle
here. It will block the vacuum
signal (see pg 11).
Fire damper tripped
Replace fire damper
NOTE: While the fusible link alone
may be replaced, once the
damper has tripped it may no
longer function reliably.
Grease baffle and/or filter pack
position switch(es) open
Missing or un-seated filter assy.
Reseat filter or adjust interlock
switch.
Vacuum switch VS1 open or
damaged
Be sure pre-filter is hooked in
position. Check for damaged
vacuum line, or one that is
disconnected at the vacuum
switch or pick-up port. Also check
port for grease contamination.
Vent fan working OK, but amber
“CHECK FILTERS” light stays ON
14
SV505 SvcManual WVOC-2HG
Unit unplugged.
HOOD SECTION - TROUBLESHOOTING SUGGESTIONS (continued)
POSSIBLE CAUSE
Prefilter is at end of service life
Vent fan working OK, but amber
“REPLACE PREFILTER” light ON. Vacuum Switch VS3 damaged
“REPLACE PREFILTER” light
turns on some of the time.
“REPLACE FILTER PACK” light
ON.
Replace prefilter
Replace vacuum switch VS3
Pre-filter frame not hooked in
position at top
Hook metal pre-filterframe at top
to prevent air blowing around filter
Pre-filter position switch SW1
misadjusted or damaged.
Check switch SW1, adjust or
replace
Prefilter is nearing end of service
life
Replace prefilter
Filter pack nearing end of its
service life
Replace filter pack
Filter pack vacuum switch VS2
Check switch VS2, repair vacuum
lines restricted or switch damaged. lines or replace switch.
Appliance newly installed and
Ansul® system not yet charged.
Vent fan not operating and buzzer
is sounding.
SUGGESTED REMEDY
Check status of Ansul® system at
rear of unit, if fired, call Ansul®
Service Distributor for set-up.
Check status of Ansul® system at
rear of unit, if fired, call Ansul®
Service Distributor for
Ansul® system has been set off by
replacement of fire suppression
overtemp condition, or manual pull
agent and propellant. If fuse link
station has been activated.
has been activated, it must be
replaced prior to re-cocking the
Ansul® system.
SV505 SvcManual WVOC-2HG
Vent fan not operating.
Grease baffle not installed
Install grease baffle.
Buzzer silent.
Green “POWER” light ON.
Amber “CHECK FILTER” light and Grease baffle position switch SW2 Check switch SW2, adjust or
misadjusted or damaged.
replace
red “SERVICE REQUIRED” light
ON.
15
VENTILATOR HOOD
SYMPTOM
OPERATION
CAUTION:
CONVECTION OVEN OPERATING INSTRUCTIONS
HOT SURFACE
Exposed surfaces can be hot
to the touch and may cause
burns.
C.03
C.04
C.01
C.02
CAUTION:
C.05
A
SHOCK HAZARD
C.05
DO NOT splash or pour water
onto control panel or wiring.
C.05
B
C.06
C.07
C.08
C.09
C.10
C.11
NOTE: Damage caused by
moisture leaking into the
electronic controller is NOT
covered by warranty.
OVEN
SUGGESTION:
For best baking results when
making baking soda biscuits,
use rack positions 2, 5 & 8
(where rack position 1 is the
top rack).
When baking one pan:
use rack 5 (center rack)
When baking two pans:
use racks 2 & 8
When baking three pans:
use racks 2, 5 & 8
RACK SUPPORTS
A. MANUAL COOK MODE
1. Press OVEN POWER SWITCH (C.01) to ON. OVEN POWER ON
INDICATOR (C.03) will glow when the switch is ON.
3. Rotate OVEN TIME CONTROL knob (C.06) until the desired time
is displayed on the READOUT. The digits and colon will flash,
indicating that time has been set but the timer is not started.
1
2
3
4
6
5
7
8
4. Load product in the oven. Press START TIMER key (C.08). The
timer digits count down and the colon (only) flashes during the
timer period.
9
5. At the end of the timer period, an audible alarm will sound. Press
CANCEL key (C.11) to silence the alarm.
OVEN RACK
16
SV505 SvcManual WVOC-2HG
2. Rotate OVEN TEMPERATURE CONTROL knob (C.07) until the
desired cooking temperature is displayed on the READOUT
(C.05A). The oven will begin heating, HEATING indicator (C.04)
will glow and temperature digits will flash until the set temperature
is reached.
OPERATION (continued)
B. PROGRAM COOK MODE
1. Five (5) programmable keys (C.10) are provided for presetting
frequently used time / temperature combinations. To set the
program:
a. Press and hold the appropriate PGM key.
b. While holding the PGM key, turn the TIME and TEMP knobs
until the desired time and temperature is displayed on the
readout.
c. Release the PGM key to store the displayed time and temp in
memory.
2. The program for any PGM key can be recalled by momentarily
pressing that PGM key.
3. To start a programmed cook cycle, press the appropriate
PGM key and the START TIME key. Once the cook cycle
has started, the TIME and TEMP knobs are locked out to
prevent accidental re-programming.
4. The actual oven temperature may be recalled at any time
by pressing the ACTUAL TEMP key (C.09).
C. TEMPERATURE OFFSET MODE
SV505 SvcManual WVOC-2HG
1. A user preference offset mode is provided should the user feel the
oven cooks too hot or too cold.
2. The OFFSET MODE can be used to offset the set / displayed
temperature from the sensed temperature by as much as ± 35ºF,
in 5ºF increments:
a. Rotate the TIME controller until the time digits on the display
read "00:00".
b. Rotate the TEMP control until the temp digits display between
400º and 500º.
c. Press and hold the START TIMER key for five seconds.
d. Turn either the TIME or TEMP control until the desired offset is
displayed.
e. Press the ACTUAL TEMP key to exit.
CONTROL
A. The POWER switch allows the selection of ON (unit will heat, fan
will run); OFF (no heat or fan: and, FAN (fan will run, but heating
disabled).
B. The FAN switch allows the selection of either high or low fan
speed.
C. Temperature is controlled according to the programmed setpoint
and the temperature sensed in the oven cavity by a thermocouple
temperature probe.
D. Oven heating elements are energized by a relay controlled by the
temperature controller. Over-temperature protection is provided by
a hi-limit thermostat in the relay control circuit.
17
OVEN
5. At the end of the timer period, an audible alarm will sound.
Press CANCEL key (C.11) to silence the alarm.
SERVICING INSTRUCTIONS
DANGER
CONTROLLER
ELECTRIC SHOCK HAZARD
DO NOT SPRAY WATER ON OR AROUND
ELECTRICAL EQUIPMENT
DO NOT WASH FLOOR NEAR ELECTRICAL
EQUIPMENT WITH WATER SPRAY
OVEN ELECTRICAL
HI-LIMIT
THERMOSTAT
ALTERNATE
COMPONENTS
HEATING
ELEMENTS
WARNING:
SHOCK HAZARD
TEMP
PROBE
TEMP
PROBE
OVEN
All servicing requiring access
to non-insulated electrical
components must be
performed by a factory
authorized technician.
MERCURY
RELAY
COOLING
FAN
E-SAFE
RELAY
E-SAFE II
RELAY
CAUTION:
CONTACTOR
FAN
MOTOR
HOT SURFACE
HI-LIMIT
RELAY
Exposed surfaces can be hot
to the touch and may cause
burns.
DOOR RELAY
START CAPACITOR
PROXIMITY
SWITCH
CAUTION:
Disconnect power before
servicing the oven.
CABINET
RACK
SUPPORT
UPPER
HINGE
PIVOT
FAN
BAFFLE
OVEN DOOR
w/ HANDLE
DOOR LATCH
ASSY
LOWER
HINGE
18
RACK
SV505 SvcManual WVOC-2HG
SHOCK HAZARD
REPLACE SERVICING
SPRING FOR
INSTRUCTIONS
FRYHEAD SUPPORT
(continued)
ROD
CAUTION:
DRIP
SHIELD
HOT SURFACE
Exposed surfaces can be hot
to the touch and may cause
burns.
GASKETS
CAUTION:
SHOCK HAZARD
CONTROLLER
REAR VIEW
REPLACE CONVECTION OVEN CONTROLLER
1. Disconnect unit from electric power and allow to cool.
2. Remove time and temperature control knobs. Knobs pull straight off
shafts.
3. Note and mark wiring connected to rear of controller. Remove wiring.
4. Remove two nuts from studs at top of controller. Loosen two nuts on
studs at bottom. Lift controller out of cabinet.
5. Install shaft seals on time and temperature control shafts of
replacement controller. Install and connect new controller. Press
knobs on control shafts.
6. Reconnect to electric power and test for proper operation.
SV505 SvcManual WVOC-2HG
IMPORTANT:
If the drip shield is missing install moisture control kit p/n 67438.
If either switch boot is missing/damaged replace silicone boot p/n 63738.
REPLACE CONVECTION OVEN SWITCH (INDICATOR IS SIMILAR)
Disconnect power before
servicing the controller.
NOTE: When installing new
controller, check drip shield.
If it is not securely glued to the
cabinet panel, apply a thin
bead of food-grade silicone to
the notched side, then set it
over the two studs that secure
the top of the controller. When
properly installed, the drip
shield should be trapped
between the cabinet panel
and the controller.
NOTE: Shaft seals should be
installed so that the adhesive
faces are toward the controller,
and their long sides are
parallel to the long side of the
controller.
DRIP
SHIELD
1. Disconnect unit from electric power and allow to cool.
2. Open the right side panel. Note and mark wiring connections on oven
controller. Remove wiring.
3. Using a small flat blade screwdriver and working from the back
(terminal) side of the switch, depress the mounting ears. At the same
time, press the switch toward the front of the control panel. Once
mounting ears are free of the panel, pull the switch out.
GASKET
4. For switches, install a new silicone boot p/n 63738 before installing the
switch. Work the flange of new boot over the bezel of the switch,
making sure it is installed evenly.
Switches and indicators push into panel until they lock.
5. Reconnect wiring.
6. Reconnect unit to electric power and test for proper operation.
19
CONTROLLER
OVEN
SWITCH
BOOTS
SERVICING INSTRUCTIONS (continued)
CAUTION:
TEST BLOWER FAN MOTOR
HOT SURFACE
A. IF motor does not run with power switch in ON or FAN position.
Attempt to start motor by spinning blower wheel clockwise.
IF motor starts, replace capacitor (p/n 69823).
IF motor does not start, check motor, switch and wiring.
IF fan is hard to turn, check motor mounting to be sure fan is not
rubbing, otherwise replace motor (p/n 63932).
B. IF motor runs in power switch FAN position, but not in ON position.
Check power switch, proximity switch and wiring.
REMINDER: in ON position, door must be closed.
C. IF motor only runs with HIGH or LOW position of fan switch
Check fan switch and wiring, otherwise replace motor (p/n 63932).
Exposed surfaces can be hot to
the touch and may cause burns.
CAUTION:
SHOCK HAZARD
Multiple live electrical circuits are
present inside the control section
of the cabinet.
Disconnect power before
removing the side panel.
A new style capacitor and mtg. bracket (p/n 504187) kit is available to
upgrade old style units (where the capacitor is attached to the motor).
The new configuration mounts the capacitor remotely on the oven
frame.
REPLACE BLOWER FAN MOTOR
OVEN
BAFFLE & RACK SUPPORT
PLATE
MOTOR
START
CAPACITOR
AND MOUNT
BRACKET
MOTOR MOUNT DETAIL
20
FAN
MOTOR
SV505 SvcManual WVOC-2HG
1. Access blower fan by removing racks, rack support and fan baffle.
Use care around blower wheel. FAN BLADES ARE SHARP!
2. Blower fan mounts to motor shaft with set screws. Remove
blower fan.
3. Remove four nuts holding mounting bracket to cabinet. Remove
four nuts holding motor to mounting plate.
NOTE: Use care that electrical components and wiring on motor
mounting plate are not damaged.
4. Note wiring connections on motor, then disconnect wires. Remove
7/8” grommet from motor wiring box. Discard old motor.
5. Install motor on mounting bracket so that the motor wiring box is
toward the top. Be sure to attach the bonding wire between motor
and motor mount as shown at right.
6. Reinstall mounting bracket to cabinet.
7. Install 7/8” grommet in motor wiring box and connect wires.
8. Reinstall blower fan. Rotate fan several times to make sure fan or
motor shaft does
FAN WHEEL
not rub on cabinet.
MOTOR MOUNT
9. Reinstall fan baffle,
rack mounts and
7/8"
racks.
GROMMET
10. Reconnect wiring.
Reconnect unit to
electric power and
test for proper
MOTOR
operation.
MOUNTING
REPLACE SERVICING
SPRING FOR
INSTRUCTIONS
FRYHEAD SUPPORT
(continued)
ROD
SV505 SvcManual WVOC-2HG
REPLACE ELEMENT
1. Remove right side panel, racks, rack supports and fan baffle.
2. Note position of wires on elements. Disconnect wires to
element(s) being replaced.
3. Loosen nuts holding element clamps to cabinet. Disassemble
element clamps.
4. Work elements out of clamps until element being replaced can be
removed.
5. Insert new element terminals through insulation and cover plates.
6. Reassemble elements in element clamps, making sure elements
are evenly spaced. Be sure to use anti-seize on screws.
7. Reinstall element assembly on cabinet. Be sure to use anti-seize
on weldstuds.
8. Reconnect wiring to element terminals.
9. Reinstall fan baffle, rack support, racks and right side panel.
CLAMP
ELEMENTS
COVER PLATES
& INSULATION
21
CAUTION:
HOT SURFACE
Exposed surfaces can be hot to
the touch and may cause burns.
CAUTION:
SHOCK HAZARD
Multiple live electrical circuits are
present inside the control section
of the cabinet.
Disconnect power before
removing the side panel.
OVEN
REPLACE PROXIMITY SWITCH
1. Remove lower door gasket, lower front panel and switch shield.
2. Disconnect wires and pull connectors through clamp.
3. Remove screws holding proximity switch to bracket.
4. Install new switch on bracket. As an initial adjustment, position the
switch as high and as far forward as it will go.
5. Thread leads through clamp and connect to existing terminals.
6. Reassemble switch shield, door gasket and front panel.
7. Test operation:
With power switch ON, fan should run when door is closed and
latched, and shut off when door is unlatched.
BAFFLE & RACK SUPPORT
SERVICING INSTRUCTIONS (continued)
CAUTION:
REPLACE TEMPERATURE PROBE
HOT SURFACE
•
Exposed surfaces can be hot to
the touch and may cause burns.
CAUTION:
SHOCK HAZARD
Multiple live electrical circuits are
present inside the control section
of the cabinet.
Disconnect power before
removing the side panel.
TEMP
PROBE
OVEN
HI-LIMIT
THERMO
APPLY
SEALANT
OLD-STYLE
1. Remove racks, rack support and fan baffle. Remove oven right
side panel.
2. Note positions of probe leads on controller, then disconnect leads.
NOTE: Examine glass sleeving for damage, scorching and
fraying. If unserviceable, replace sleeving while replacing the
probe.
Suggestion: Tie cord to the probe leads, and to the sleeving if it is
being replaced, to ease chasing the wires through the cabinet.
3. Remove screws holding the probe panel to the cavity "ceiling".
Carefully pry panel from cavity.
4. Remove temperature probe from panel. Remove probe leads, and
sleeving if necessary, through the cavity
5. Feed new probe leads (and sleeving) back through the cabinet.
Add a thin coating of anti-sieze to the probe threads and attach to
the probe panel.
6. Apply a thin bead of hi-temperatire silicone sealant to the edge of
the probe panel before reinstalling it in the cavity.
7. Connect probe leads to controller. Reconnect unit to electric
power and test for proper operation.
•
NEW-STYLE
1.
Remove oven right side panel.
2. Note positions of probe leads on controller, then disconnect leads.
HI-LIMIT THERMOSTAT
TEMP PROBE (OLD-STYLE)
3. Remove nuts flange holding probe to cabinet. Pull probe straight
out.
4. Reassemble in reverse order. Reconnect unit to electric power
and test for proper operation.
1. Remove racks, rack support and fan baffle. Remove oven right
side panel.
2. Remove screws holding the probe panel to the cavity "ceiling".
Carefully pry panel from cavity.
3. Disconnect wiring from hi-limit thermostat. Remove nuts holding
hi-limit bracket to panel.
TEMP PROBE (NEW-STYLE)
4. Install new hi-limit. Reinstall bracket and connect wiring.
5. Apply a thin bead of hi-temperatire silicone sealant to the edge of
the probe panel before reinstalling it in the cavity.
7. Connect probe leads to controller. Reconnect unit to electric
power and test for proper operation.
22
SV505 SvcManual WVOC-2HG
REPLACE HI-LIMIT THERMOSTAT
REPLACE SERVICING
SPRING FOR
INSTRUCTIONS
FRYHEAD SUPPORT
(continued)
ROD
CAUTION:
Per Federal environmental regulations, mercury-bearing devices may
no longer be included in new-manufacture appliances. For Wells
Bloomfield equipment, this applies mainly to mercury-wetted-contact
relays. In addition, the E-Safe I electronic relay has been phased out
in favor of the E-Safe II relay.
The type of oven controller, the type of griddle controller and the type
of relay used will determine the replacement part requirement:
• For ovens with mercury relay 63920 or E-Safe I relay, order oven
upgrade kit 65846A to upgrade to E-Safe II.
• For ovens with "old" oven controller 67438, use contactor 502789.
• For ovens with "new" oven controller 504713, use either contactor
502789 or E-Safe II relay 506967B.
EQUIPMENT
RELAY REPLACEMENT
WVOC-2HG with (old) griddle
control 65846
Contactor 502789
WVOC-2HG with (new) griddle
control 307348
E-Safe II relay 506967B
WVOC-2HG with mercury relay
63920 or E-Safe I relay 504892
Upgrade Kit 65846A
WVOC-2HG with (old) oven
control 67438
Contactor 502789
WVOC-2HG with (new) oven
control 504713
E-Safe II relay 506967B
or Contactor 507289
SV505 SvcManual WVOC-2HG
MERCURY
RELAY
63920
RELAY, E-SAFE I
504892
CONTACTOR
502789
RELAY, E-SAFE II
506976B
23
HOT SURFACE
Exposed surfaces can be hot to
the touch and may cause burns.
CAUTION:
SHOCK HAZARD
Multiple live electrical circuits are
present inside the control section
of the cabinet.
Disconnect power before
removing the side panel.
OVEN
RELAY AND CONTACTOR REPLACEMENT
SERVICING INSTRUCTIONS (continued)
CAUTION:
BURN HAZARD
Allow appliance to cool
completely before
adjusting.
HINGE ADJUSTMENT
PRECAUTIONS:
None
FREQUENCY:
Monthly, at a Minimum; or, As Needed
TOOLS:
Phillips (+) Screwdriver
7/16" Nut Driver
7/8" and 1-1/8" Wrenches
THE FOLLOWING PROCEDURE IS TO BE
PERFORMED BY QUALIFIED PERSONNEL ONLY
CHECK ALIGNMENT
1. Remove bottom panel to access pivot.
2. Gap between top of door and frame , and between bottom
of door and frame must be approximately equal
Adjust height of door by loosening jamb nut, then turning
pivot on its screw mounting. Clockwise lowers the door
height. Re-tighten jamb nut .
3. Gap between left side of door and frame must be the
same from top to bottom
Adjust door for plumb by loosening holding screws. Turn
adjusting bolt to increase or decrease gap at bottom.
Clockwise increases gap. Re-tighten holding screws.
Hinge Adjustment
4. Gap between top of door and frame must be the same
from side to side
Adjust door for level by loosening holding screws, then
raising or lowering latch-end of door until it is level.
Re-tighten holding screws.
5. Reinstall bottom panel.
Procedure is complete
24
SV505 SvcManual WVOC-2HG
EQUAL
CLEARANCES
OVEN
BOTTOM
PANEL
REPLACE
OVEN
SPRING
TROUBLESHOOTING
FOR FRYHEAD SUGGESTIONS
SUPPORT ROD
No power to appliance
SV505 SvcManual WVOC-2HG
Oven will not heat
Fan does not run
Door pops open during cook
cycle
ERROR CODES
POSSIBLE CAUSE
SUGGESTED REMEDY
Circuit breaker off or tripped
Reset circuit breaker
Power cord unplugged or
damaged
Check power cord
Plug in or repair as required
Hood section not "ON"
Verify that Hood Power Switch is
"ON". If "SERVICE REQUIRED"
indicator is lit, rectify filter
problem.
Fuse blown or fuse cap loose
Check power fuses. If blown,
correct problem and replace
fuses
Power switch in OFF or FAN
position
Press power switch to ON
Fan switch in OFF position
Press fan switch to HIGH or LOW
Oven door not closed
Be sure door is closed and
latched
Temperature control not set
Set to desired temperature
Hi-limit control tripped on
excessive oven temperature
Allow oven to cool
Hi-limit will reset
Controller detects error
Refer to error codes below
Damaged power switch or wiring
Replace switch. Repair wiring
Damaged or disconnected temp
probe
Check probe. Reconnect or
repair
Damaged oven relay
Replace relay
Damaged air heating element(s)
Replace one or both elements
Damaged oven controller
Replace controller
Fan switch in OFF position
Press fan switch to HIGH or LOW
Fan wheel loose on shaft
Tighten fan set screws
Motor start capacitor or wiring
damaged
Replace capacitor. Repair wiring
Motor or wiring damaged
Replace motor. Repair wiring
Hinge out of adjustment
Adjust hinge
Door strike loose
tighten strike screws
Door latch damaged
Replace latch
F1
F2
F3
F4
F5
F6
Relay closed or relay ohms low when not cooking
Actual temperature greater than T-SET MAX +60ºF (±35ºF)
Open temperature sensor
Shorted temperature sensor
Relay open or relay ohms high when cooking
No 60 Hz (Cycles per second other than 60 Hz detected)
25
OVEN
SYMPTOM
OPERATION NOTES
WARNING
GRIDDLE GENERAL ARRANGEMENT
HOT SURFACES
Griddle surface can be VERY
HOT and may cause severe
burns on contact.
CAUTION
SHOCK HAZARD
GRIDDLE PLATE
W/TROUGH
ELEMENTS
GREASE
DRAWER
DO NOT splash or pour water
onto control panel or wiring.
JUMPERS
ELEMENT
CLAMPS
CAUTION:
SHOCK HAZARD
Multiple live electrical circuits are
present inside the control and
cooktop sections of the cabinet.
Disconnect power before
removing the side panel or
cooktop panels.
ADAPTER, BAYONET
INSULATION RETAINERS
INSULATION
TEMP
PROBE
TEMP CONTROL
HEAT INDICATOR
SEASONING
The metal surface of the griddle has microscopic pores. It is
important to fill the pores with oil to provide a hard, non-stick cooking
surface.
1. Turn GRIDDLE TEMPERATURE CONTROL clockwise to
375ºF. Allow the griddle to heat until the GRIDDLE HEAT ON
INDICATOR goes OFF, showing that the griddle is up to set
temperature.
2. Spread a light film of oil over the entire griddle surface.
3. Allow the oil film to "cook in" for 2 - 3 minutes, or until the oil
smokes.
4. Wipe the griddle surface with a clean cloth to remove any
standing oil.
5. For new griddles, repeat this procedure 2 - 3 times, until the
griddle has a slick, clean surface.
26
SV505 SvcManual WVOC-2HG
GRIDDLE
CONTROL KNOB
REPLACE SPRING FOR
SERVICING
FRYHEAD INSTRUCTIONS
SUPPORT ROD
REPLACE CONTROLLER
WARNING
HOT SURFACES
1. Disconnect unit from electric power and allow to cool.
2. Remove the right side panel. Note and mark wiring connections on
the griddle controller. Remove wiring.
3. Remove knob from control shaft. Knob pulls sraight off.
Griddle surface can be VERY
HOT and may cause severe
burns on contact.
CAUTION:
4. Unscrew nut holding controller shaft to control panel. Withdraw
controller.
5. Be sure insulator is in place, then install new controller.
Reconnect wiring.
SHOCK HAZARD
Disconnect electric power before
servicing.
6. Reconnect unit to electric power and test for proper operation.
NOTE: Griddle controller 65846 was modified to
allow the use of an electronic relay. The only
visual difference is on the vendor identification
label.
"OLD" controller 65846:
Model: 120R-7-Z096-156
"NEW" controller 65846:
Model: 120R-7-Z096A-156
VENDOR
ID LABEL
GRIDDLE CON TROLLER
INSULATOR
CONTROL KNOB
HEAT "ON"
IND ICATOR
REPLACE TEMPERATURE PROBE
1. Disconnect unit from electric power and allow to cool.
3. Note and mark wiring connections on the griddle controller.
Remove probe wiring from controller.
Suggestion: Tie cord to the probe leads to ease chasing the wires
through the cabinet and sleeving.
4. Probe is held to griddle plate by a bayonet fitting Remove probe
from griddle plate by pushing in then turning counter-clockwise.
Withdraw probe and wiring from cabinet.
5. Feed new probe wires through cabinet. Be sure wiring is fed
through the sleeving at the insulation retainers and cabinet
penetrations.
6. Install new probe in griddle fitting and connect probe wires to
controller.
7. Reattach griddle, hotplate panel and right side panel to cabinet.
8. Reconnect unit to electric power and test for proper operation.
27
1 2 3 4 5 6 7
6 0 HE AT
LIGHT
R ED
WH ITE
65
59
64
62
63
61
58
TEMP
PROBE
RELAY
L2
L1
HOTPLATE
LIGHTS
GRIDDLE
SV505 SvcManual WVOC-2HG
2. Remove right side panel and hotplate panel. Griddle plate is held
in place by four screws into the frame: 2 on back, 1 on left side
and 1 at the interior brace. Remove screws and lift hotplate.
SERVICING INSTRUCTIONS (continued)
WARNING
REPLACE HEATING ELEMENT(S)
HOT SURFACES
1. Disconnect unit from electric power and allow to cool.
Griddle surface can be VERY
HOT and may cause severe
burns on contact.
CAUTION:
SHOCK HAZARD
Disconnect electric power before
servicing.
2. Remove right side panel and hotplate panel. Griddle plate is held
in place by four screws into the frame: 2 on back, 1 on left side
and 1 at the interior brace. Remove screws and lift griddle plate.
3. Note and mark position of wiring and jumper on elements.
Disconnect wiring from elements. Remove temperature probe.
4. Mark insulation for orientation. Fold insulation retainers to allow
insulation to be removed. Carefully lift insulation from griddle.
5. Remove element clamps as necessary. Replace element(s), then
reinstall clamps (refer to Clamping Diagram below). Be sure to
use anti-sieze on element clamp studs.
6. Reinstall insulation. Be sure to capture wiring and sleeving in
rearmost insulation retainers. Reconnect wiring. Reinstall
temperature probe
7. Reattach griddle, hotplate panel and right side panel to cabinet.
8. Reconnect unit to electric power and test for proper operation.
TEMP PROBE
51968
53474
51969
Griddle Access
52054
51969
52040
53474
53474
53474
L3
L2
L1
52040
NUT
51968
LEAD
JUMPER
(WHEN USED)
68746
51969
51969
53474
53474
51968
ELEMENT
53474
51969
53474
53474
51968
NOTE: BEND TABS FLAT TO RETAIN INSULATION
STUD LOCATION
50496 HEATING ELEMENT
Clamping Diagram
28
FRONT
NOTE:
Examine connectors for
condition. Replace any that are
burned, distorted or excessively
discolored.
51968
51969
53474
Power Lead Connections
NOTE:
GRIDDLE PLATE
SHOWN INVERTED
SV505 SvcManual WVOC-2HG
GRIDDLE
NUT
REPLACE
GRIDDLE
SPRING
TROUBLESHOOTING
FOR FRYHEAD SUPPORT
SUGGESTIONS
ROD
No power to appliance
Griddle will not heat
Griddle too hot
Food sticks to griddle
SV505 SvcManual WVOC-2HG
*
**
POSSIBLE CAUSE
SUGGESTED REMEDY
Circuit breaker off or tripped
Reset circuit breaker
Power cord unplugged or
damaged
Check power cord
Plug in or repair as required
Hood section not "ON"
Verify that Hood Power Switch is
"ON". If "SERVICE REQUIRED"
indicator is lit, rectify filter
problem.
Fuse blown or fuse cap loose
Check power fuses. If blown,
correct problem and replace
fuses
Griddle controller set too low
Set to desired temperature
Heating element wiring or
connectors damaged
Replace element.
Repair wiring and/or connectors
Temperature probe damaged
Replace probe
Controller damaged
Replace griddle controller*
Relay damaged
Replace relay**
Temperature probe loose in
bayonet fitting
Reinstall temperature probe
Be sure fitting is tight in griddle
Controller damaged
Replace griddle controller*
Surface not seasoned
Season griddle
Griddle controller 65846 was modified to allow the use of an electronic relay.
The only visual difference is on the vendor identification label.
"OLD" controller 65846: Model: 120R-7-Z096-156
"NEW" controller 65846: Model: 120R-7-Z096A-156
Refer to graphic at right to determine which griddle controller is used.
VENDOR
ID LABEL
Unit will require different replacement relays, based on the type of griddle
controller used:
For "old" griddle controller 65846, use contactor 502789.
Alternately: replace "old" controller 65846 with "new" griddle
controller 65846 and E-Safe II relay 506967B.
"Old" controller 65846 is no longer available.
In those few cases of conflict where an "old" griddle controller may be have been used in an oven
with a "new" oven controller, or vice versa, Wells Mfg. recommends replacing a failed mercury
relay or malfunctioning E-Safe I electronic relay with upgrade kit 65846A. This will upgrade the
unit to the latest E-Safe II configuration.
29
GRIDDLE
SYMPTOM
SERVICING INSTRUCTIONS
CAUTION:
REPLACE INFINITE SWITCH
BURN HAZARD
1. Disconnect unit from electric power and allow to cool.
Hotplate burner surfaces are very
hot during operation. Allow unit to
cool before performing any service.
ELEMENT
COLD PIN
2. Remove the right side panel. Note and mark wiring
connections on the infinite switch. Remove wiring.
3. Remove knob from control shaft. Knob pulls sraight off.
4. Unscrew screws holding switch body to control panel.
Withdraw switch.
5. Install new infinite switch. Be carreful of orientation. Switch
body is marked with "UP" indicator arrow. Reconnect wiring.
6. Reconnect unit to electric power and test for proper operation.
REPLACE SOLID (FRENCH PLATE) ELEMENT
Applicable to Wells WVOC-2HFG ventless appliances.
SPOON SHAPED
TERMINAL LUG
Wells has introduced an upgraded element terminal lug for solid
(French plate) element cooktops. Units built prior to June 1, 2001
will require this upgrade when replacing elements.
1. When only the Ceramic Terminal Block is damaged and the
Element wire is not fused: Replace with Kit 503972. This
Kit replaces the Terminal Block with the new wire set.
NOTE: Kit p/n 503972 does not include the element..
2. When there’s damage to the element or the element wire is
fused: Replace with complete element kit 503973 (240V).
IMPORTANT: Do not cut fused
wire on element to replace terminal
block, this voids U.L.
2
1
4
HOTPLATE
ELEMENT, NEW TERMINAL LUG AND CERAMIC INSULATOR
PN 503973 (240V)
30
SV505 SvcManual WVOC-2HG
New wires with lugs spliced to
existing wire set and inserted
into new insulator. Tighten set
screws securely.
SERVICING INSTRUCTIONS (continued)
SPIRAL HEATING EL:EMENT REPLACE MENT
CAUTION:
Applicable to Wells WV-4HS-series ventless appliances.
BURN HAZARD
Wells part number 50293: Revised to the latest UL requirements,
new replacement elements may connect differently than previously
available replacement elements.
Hotplate burner surfaces are very
hot during operation. Allow unit to
cool before performing any service.
To install a new element in an existing appliance:
1. Disconnect appliance from electric power and allow to cool.
Disconnect and remove old element.
2. Power leads require #8 high-temperature copper-tin ring
terminal connectors. Ground lead requires #10 hightemperature copper-tin ring terminal connector. Replace or
install the appropriate connector terminals as required.
3. Mount new element.
4. Route wiring through trim ring as shown. Connect power and
ground leads.
a. Be sure to reconnect ground wire to mounting clip of
new element.
b. Slide insulator onto new element before connecting leads.
c. When properly installed, connector screws will hold
insulator in place.
5. Reconnect appliance to electric power and test for proper
operation.
IMPORTANT:
This element is designed for use
with high-temperature copper-tin
terminals. Do not use stainless
steel terminals.
DESCRIPTION
Hotplate will not heat
One hotplate does not
heat
POSSIBLE PROBLEM
SUGGESTED REMEDY
Hood section not "ON"
Verify that Hood Power Switch is
"ON". If "SERVICE REQUIRED"
indicator is lit, rectify filter problem.
Temperature control knobs not set to
desired temperature
Set to desired temperature
Damaged internal component
Check infinite switch, element, and
wiring. Replace damaged
components, repair wiring and loose
connections as required.
31
HOTPLATE
SV505 SvcManual WVOC-2HG
TROUBLESHOOTING SUGGESTIONS
HOOD CABINET COMPONENTS
EXPLODED VIEWS
INTERNAL BRACKETS
FIRE DAMPER ASSY
280ºF (ref. 301187)
LABEL, CONTROL
PANEL 502782
GASKET, SILICONE
15-1/4” 502772 (2 pl)
GASKET, SILICONE
18-1/2” 502773 (2 pl)
ASSY, FILTER
PACK 22619
PREFILTER
22618
HOUSING, LIGHT
SOCKET 505098
CAGE,
PRE-FILTER
22683
BULB, APPLIANCE
230V 100W 505100
GLASS GLOBE, LIGHT
BULB COVER 505099
BAFFLE, GREASE
FILTER (TYPE 3)
22684
SV505 SvcManual WVOC-2HG
GREASE CUP
504405
LEG, ADJUSTABLE
22226
(set of 4)
LEG, ADJUSTABLE
VCS 22617 (pk 2)
(REAR LEG OPTION)
SET, CASTERS
20804
(2 swivel, 2 fixed)
32
FITTING, 1/2” CONDUIT
STRAIGHT 57748
EXPLODED VIEWS
HOOD ELECTRICAL & VACUUM COMPONENTS
ASSY, BLOWER
240V
502584
VACUUM SWITCH
#4
502593
VACUUM SWITCH
#1
502590
VACUUM SWITCH
#3
502592
ASSY, VAC TUBE
MANIFOLD 502588
VACUUM SWITCH
#2
502591
ref Ansul®
77284
ref Ansul®
77284
SWITCH, POWER
8528-40
SWITCH, FILTER
INTERLOCK
500407 (2 pl)
BUZZER, 240V
64834
LIGHT, INDICATOR
GREEN 240V 55697
LIGHT, INDICATOR
AMBER 240V 50516 (3 pl)
ON
TO
C
LE
E
OO
D
HOUSING, LIGHT
SOCKET 505098
BULB, APPLIANCE
230V 100W 505100
L
CA
I
TR
FH
R
PE
LIGHT, INDICATOR
RED 240V 51157
FR
SV505 SvcManual WVOC-2HG
OD
P
- U
HO
TERMINAL BLOCK
2P 250V 53068
JUMPER, FLAME
SENSOR 54005
CONTACTOR 208/240V
50A 3-PH 502789
STRAIN RELIEF
1-1/4” 504420
RELAY, BLDG
FIRE ALARM
64514
GLASS GLOBE
LIGHT BULB
COVER 505099
POWER CORD
NEMA 15-60P
22682
(incl. strain relief)
ELECTRICAL - REAR OF LOWER CABINET
ELECTRICAL - UNDER HOOD
33
PARTS BREAKDOWN for ANSUL® COMPONENTS
EXPLODED VIEWS
FOR USE ONLY BY AUTHORIZED
ANSUL© SERVICE PERSONNEL
Refer to Ansul© part no. 418078-05
R-102 Restaurant Fire Suppression
System Design, Installation,
Recharge and Maintenance
ref. NOZZLE 290
ANSUL© p/n 419342
ref. ADAPTER, QUICK-SEAL 3/8”
ANSUL© p/n 77284
ref. NOZZLE 290
ANSUL© p/n 419342
FUSIBLE LINK
TYPE B 212ºF
504112
ref. NOZZLE 1W
ANSUL© p/n 419336
F
TO
IT
UN
ON
FR
ref. MOUNTING BRACKET
RELEASE MECHANISM
R-102 ANSUL© p/n 79493
(NOT SHOWN)
MICROSWITCH 67273
TERM.BLOCK 53068
ASSY, PULL STATION
ANSUL©
501389
F
KO
IT
UN
C
ref. CABLE, WIRE ROPE
ANSUL© p/n 15821 (50’/15m)
79653 (500’/152m) (typical)
BA
ref. PULLEY ELBOW
ANSUL© p/n 423250
(typical)
insi
de
Seal with
Teflon tape
side
Fiber
washer
is always
on the inside
ANSUL© p/n 77284
DETAIL
Cable sits in
groove in
pulley
out
cabinet wall
ANSUL© p/n 423250
DETAIL
Seal with
Teflon tape
34
SV505 SvcManual WVOC-2HG
CARTRIDGE LT-20-R
ANSUL© p/n 67099
ref. TANK 1.5 GAL, ANSULEX®
ANSUL© p/n 429864
(NOT SHOWN)
ANSULEX ® EXTINGUISHING
AGENT 1.5 GAL.
ANSUL© p/n 79694
BUSHING, TOP
HINGE 505619
SUPPORT,
OVEN RACK
21375
ET
CLIP, RACK
SUPPORT
63889
BIN
CA
PIN, HINGE
505610
OR
DO
DOOR STRIKER
505616
DOOR LATCH
505615
OVEN RACK
21376
ASSEMBLY, DOOR
COMPLETE
504444
GUARD, PROX.
SWITCH 65647
DOOR
BRACKET
PROX. SWITCH
63787
CABINET
HANDLE
505612
PIN, HINGE
505610
TRIM, LOWER
FRONT 63804
PLATE, DOOR
PIVOT 63899
SLEEVE, DOOR
HINGE 63900
HINGE, DOOR
LOWER 63896
PLATE
COVER
63899
SV505 SvcManual WVOC-2HG
HINGE, DOOR
LOWER 63896
PANEL,
CONTROLS
69651
LEG, ADJUSTABLE
22226
(set of 4
GASKET, DOOR
TOP/BOT 63817
GASKET, DOOR
SIDE
63819
35
SET, CASTERS
21372
(2 swivel casters, thd stem)
SET, CASTERS
21330
(2 swivel caster w/brake)
SET, CASTERS
21330
(2 swivel, 2 swivel w/brake)
EXPLODED VIEWS
CONVECTION OVEN CABINET
CONVECTION OVEN ELECTRICAL
EXPLODED VIEWS
ELEMENT,
2.5” SPACING
63866 (208V)
63800 (240V)
ELEMENT,
4” SPACING
63872 (208V)
63783 (240V)
COVER, GASKET
INNER
63836
THERMO,
HI-LIMIT 65180
FUSE HOLDER
HPA-EE 10A
54769
PROBE, TEMP
OC-1 504712
IT
K
AC
OF
UN
B
GASKET, ELEMENT
63834
FUSE SC-10
54871 (pk 4)
WHEEL, BLOWER
63797
RELAY, E-SAFE
(208/240V) 506967
(380-415V) 506967A
GROMMET
51040
SWITCH, PROXIMITY
65239
BRACKET, PROX.
SWITCH 63787
ASSEMBLY, CONTROL
PANEL
69655
PANEL, CONTROLS
69655
FAN, COOLING
64687
MOTOR, 1/4 HP
208/230V
63932
RELAY, HI-LIMIT
(240V, ) 507328
CAPACITOR,
MOTOR START
69823
CONTACTOR,
(208V) 57779
OVERLAY, CONTROL
PANEL 504724
KNOB, CONTROL
65653
BRACKET, START
CAPACITOR 500933
CONTROLLER, 400ºF
GRIDDLE
65846
KNOB, TEMP
CONTROL 500356
INF. SWITCH
HOTPLATE 50562
LIGHT, SIGNAL
RED
51157
NUT, 8-32 x7/8
Alu 61974 (pk 10)
SWITCH DT3P
CTR OFF 65651
CONTROLLER, TIME/TEMP
OVEN
504713
BOOT, SWITCH
SEAL
67438
GASKET, CLOSED-CELL
OVEN POTENTIOMETER
503252
SWITCH
SPDT 65657
KNOB, OC-1
67439
36
TERMINAL
BLOCK
3P 50131
SV505 SvcManual WVOC-2HG
LIGHT, SIGNAL
WHITE 60877
RELAY DPDT
208/240V
63880
EXPLODED VIEWS
COOKTOP
ELEMENT, SOLID
208/240V 503973
ELEMENT, SPIRAL
240V 2400W 50293
SOLID ELEMENT
HOLD-DOWN 501451
ELEMENT 240V
2250W 50496
JUMPER, ELEMENT
SHORT
52054
ELEMENT CLAMP
LONG
51968
INSULATION, FIBREGLAS
1"x24"x48"
57407
ELEMENT CLAMP
SHORT
51969
CLIP, INSULATION
RETAINING 53474
(pk 12)
SV505 SvcManual WVOC-2HG
ADAPTER, BAYONET
68746
PROBE, GRIDDLE
TEMP
69623
ASSEMBLY, GREASE
TRAY
501774
PANEL, FRONT
GREASE DRAWER
53948
GROMMET, INSULATION
7/8” (HEYCO)
51040
HANDLE, DOOR
51973
ASSY, PULL STATION
ANSUL
501389
37
WIRING SCHEMATIC
HOOD SECTION
G L1
L2 L3
CAC-1
CAC-2
CAC-3
WIRING
SERVICE REQUIRED
INDICATOR
PS1-1
FS1(NC)
CHECK FILTER
INDICATOR
SW1
VS4
VS1
SW2
PS1-2
COIL
TB1
JUMPER
COOKING APPLIANCE CONTACTOR
BLOWER MOTOR
POWER ON INDICATOR
VS3
REPLACE PREFILTER INDICATOR
VS2
REPLACE FILTER PACK INDICATOR
FS1(NO)
ZZZ
ANSUL® SYSTEM BUZZER
TO BLDG
FIRE ALARM
SYSTEM
COIL
FIRE ALARM RELAY
WVOC-2HFG and WVOC-2HSG
VENTILATION HOOD SECTION
WIRING SCHEMATIC
LEGEND
CAC = COOKING APPLIANCE CONTACTOR
FS1 = ANSUL® FIRE ALARM SWITCH
PS1 = POWER SWITCH
SW1 = FILTER PACK POSITION SWITCH
SW2 = GREASE BAFFLE POSITION SWITCH
VS1 = PRE-FILTER POSITION VAC SWITCH
VS2 = REPLACE FILTER PACK VAC SWITCH
VS3 = REPLACE PRE-FILTER VAC SWITCH
VS4 = AIRFLOW MONITOR VAC SWITCH
38
C
= MECHANICAL RELAY COIL
E
= ELECTRONIC CONTROL
SV505 SvcManual WVOC-2HG
TO CONVECTION OVEN AND COOKTOP
WIRING DIAGRAM
HOOD SECTION
VENTILATOR
POWER SWITCH
SERVICE
REPLACE
REPLACE
PREFILTER FILTER PACK REQUIRED
INDICATOR INDICATOR INDICATOR
CHECK
FILTER
INDICATOR
POWER ON
INDICATOR
16
EXTERNAL
CONTROL
TERMINAL
BLOCK 1
EXTERNAL
SHUTDOWN
CONTROL
13
JUMPER
2
3
21
22
6
10
14
15
BLACK
WHITE
HOOD
LIGHT
7
12
9
VACUUM SWITCH
VS4(AIRFLOW)
POWER
CORD
4
L1
L2
L3
T1
T2
T3
24
NO
RED
ANSUL® SYSTEM
FIRE SWITCH
C
GROUND
BLACK
COOKING
APPLIANCE
CONTACTOR
NO
5
2
NC
23
BLOWER
MOTOR
GREASE BAFFLE
POSITION SW
19
C
208/240VAC
75 AMPS
VACUUM SWITCH FILTER PACK
VS1(PREFILTER) POSITION SW
17
5
NO
4
18
25
NO
3
COOKING
APPLIANCE
NO
26
3
5
C
27
2
1
VACUUM SWITCH
VS3(PREFILTER)
VACUUM SWITCH
VS2(FILTER PACK)
4
NO
NO
SV505 SvcManual WVOC-2HG
DISCHARGE BUILDING
ALARM
BUZZER
RELAY
11
BUILDING
ALARM
SYSTEM
NOTES
1. REMOVE JUMPER WHEN USING
EXTERNAL CONTROL.
IMPORTANT:
DO NOT CONNECT ANY POWER TO
EXTERNAL CONTROL TERMINAL BLOCK!
2. FIRE SWITCH SHOWN WITH
ANSUL® SYSTEM CHARGED
AND COCKED
8
MODEL
3ø AMPS
VOLTS
60Hz
L1
L2
L3
1ø
AMPS
WATTS
208V
36.7
35.0
30.7
59.0
12,300
WVOC-2HFG
240V
42.3
42.3
35.4
68.0
16,300
208V
39.0
39.0
33.1
63.3
13,200
240V
35.8
35.8
47.3
73.1
17,600
WVOC-2HSG
from p/n 304982 issue C and 307369 issue B
39
WIRING
1
WIRING SCHEMATIC
OVEN SECTION
FROM COOKING APPLIANCE CONTACTOR
L1 L2 L3
G
WIRING
HEATING
INDICATOR
HLR-2
HEATING
ELEMENT
ESR-1
HLR-1
ESR-3
HLR-3
HEATING
ELEMENT
ESR-2
COOLING FAN
C
PS-1
ON
10A
OFF
HI-LIMIT
THERMO
FAN
OVEN
CONTROLLER
DR-1
E
FUSE
PS-2
ON
OFF
DR-2
FAN
DOOR
PROX. SW.
10A
LEGEND
DR = DOOR RELAY
ESR = E-SAFE II ELECTRONIC RELAY
HLR = HI-LIMIT RELAY
PS = POWER SWITCH
E
POWER ON
INDICATOR
FUSE
FAN
MOTOR
FAN HI-LO
SWITCH
C
= MECHANICAL RELAY COIL
E
= ELECTRONIC CONTROL
= MAGNETIC CONTROL
HI SP
LO SP
40
SV505 SvcManual WVOC-2HG
WVOC-2HFG and WVOC-2HSG
CONVECTION OVEN
WIRING SCHEMATIC
C
WIRING DIAGRAM
OVEN SECTION
OVEN
CONTROLLER
ON-OFF-FAN
MAIN SWITCH
18
27
35
28
E
19
TEMP
SENSOR
35 33
TO COOKTOP
31
37
39
10A
41
29
10A
L1
L2
16
FUSE
DOOR RELAY
FAN HI-LO
SWITCH
15
FUSE
HI-LIMIT
THERMO
26
L3
4
6
1
3
13
21
DOOR
PROX.
SWITCH
17
C
22
TERMINAL
BLOCK
20
23 24 25
E-SAFE II
RELAY
A2
4
OVEN
FAN
MOTOR
FROM
COOKING
APPLIANCE
CONTACTOR
E
2
A1
14
1
73
HI-LIMIT
RELAY
3
6
9
2
2
OVEN
HEATING
ELEMENTS
2 x 2800W
4
8
3
74
5
1
5
75
6
7
5
75
4
77
A
1
8
72
3
7
C
B
11
78
12
SV505 SvcManual WVOC-2HG
HEATING
INDICATOR
NOTES:
1. Wiring diagrams show units with E-Safe II electronic relays.
2. For units with mercury relays or E-Safe I electronic relays, contact factory for appropriate wiring
diagrams and/or conversion information.
41
COOLING
FAN
79
CONVECTION OVEN
WIRING DIAGRAM
from p/n 307369 issue B
WIRING
POWER ON
INDICATOR
WIRING SCHEMATIC
COOKTOP SECTION
FROM COOKING APPLIANCE CONTACTOR
L1 L2 L3
G
WIRING
FUSE
10A
FUSE
10A
INF SW 1-2
INF SW 1-1
FRONT HOTPLATE HEATING ELEMENT
HEATING INDICATOR
INF SW 2-1
INF SW 2-2
REAR HOTPLATE HEATING ELEMENT
HEATING INDICATOR
ESR-3
ESR-2
GRIDDLE
HEATING
ELEMENTS
ESR-1
E
HI-LIMIT
THERMO
E
GRIDDLE
HEATING INDICATOR
WVOC-2HFG and WVOC-2HSG
COOKTOP SECTION
WIRING SCHEMATIC
LEGEND
DR = DOOR RELAY
ESR = E-SAFE II ELECTRONIC RELAY
E = ELECTRONIC CONTROL
42
SV505 SvcManual WVOC-2HG
GRIDDLE CONTROLLER
WIRING DIAGRAM
COOKTOP SECTION
HOTPLATE REAR
HEATING ELEMENT
49
49
GRIDDLE HEATING ELEMENT
WIRING
HOTPLATE FRONT
HEATING ELEMENT
R
PE
M
JU
GRIDDLE HEATING ELEMENT
50
FRONT
HOTPLATE
INF. SWITCH
50
51
46
GRIDDLE HEATING ELEMENT
FRONT
HOTPLATE
HEATING
INDICATOR
P L1 L2
P L1 L2
H1
57
43
52
4
3
42
54
6
5
44
A1
H2
REAR
HOTPLATE
HEATING
INDICATOR
57
FROM
COOKING
APPLIANCE
CONTACTOR
66
60
59
7
4
ON-OFF-FAN
MAIN SWITCH
5
L1
31
E
65
1
6
3
62
GRIDDLE
CONTROLLER
39
HI-LIMIT
THERMO
L2
10A
WHITE
63
RED
SV505 SvcManual WVOC-2HG
1
E
H2
61
2
A2
47
58
53
64
45
H1
E-SAFE II
RELAY
GRIDDLE
HEATING
INDICATOR
REAR
HOTPLATE
INF. SWITCH
41
16
FUSE
L3
10A
TEMP
SENSOR
15
FUSE
TERMINAL
BLOCK
COOKTOP
WIRING DIAGRAM
from p/n 307369 issue B
TO OVEN
43
MSDS - ANSULEX™ Low pH FIRE SUPPRESSION MEDIA
DOCUMENTATION
SV505 SvcManual WVOC-2HG
44
SV505 SvcManual WVOC-2HG
DOCUMENTATION
MSDS - ANSULEX™ Low pH FIRE SUPPRESSION MEDIA
45
SV505 SvcManual WVOC-2HG
46
WELLS BLOOMFIELD, LLC
DOCUMENTATION
SV505 SvcManual WVOC-2HG
WELLS BLOOMFIELD, LLC
47
Replace two (2) fire suppression
links in plenum:
each link is rated @ 212ºF
Replace fire suppression link
at cooking appliance:
link is rated @ 212ºF
Replace fire damper fusible link:
rated @ 280ºF
Max interval: 12 months
DOCUMENTATION