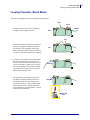
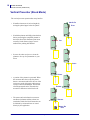
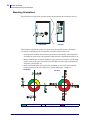
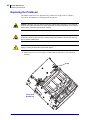
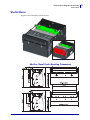
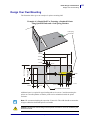
1
Zebra® KR403 Kiosk Receipt Printer Integrator Guide P1016701-001 © 2009 ZIH Corp. The copyrights in this manual and the software and/or firmware in the printer described therein are owned by ZIH Corp. Unauthorized reproduction of this manual or the software and/or firmware in the printer may result in imprisonment of up to one year and fines of up to $10,000 (17 U.S.C.506). Copyright violators may be subject to civil liability. This product may contain ZPL ®, ZPL II® , and ZebraLink™ programs; Element Energy Equalizer® Circuit; E 3® ; and Monotype Imaging fonts. Software © ZIH Corp. All rights reserved worldwide. ZebraLink and all product names and numbers are trademarks, and Zebra, the Zebra logo, ZPL, ZPL II, Element Energy Equalizer Circuit, and E 3 Circuit are registered trademarks of ZIH Corp. All rights reserved worldwide. All other brand names, product names, or trademarks belong to their respective holders. For additional trademark information, please see “Trademarks” on the product CD. Proprietary Statement This manual contains proprietary information of Zebra Technologies Corporation and its subsidiaries (“Zebra Technologies”). It is intended solely for the information and use of parties operating and maintaining the equipment described herein. Such proprietary information may not be used, reproduced, or disclosed to any other parties for any other purpose without the express, written permission of Zebra Technologies Corporation. Product Improvements Continuous improvement of products is a policy of Zebra Technologies Corporation. All specifications and designs are subject to change without notice. Liability Disclaimer Zebra Technologies Corporation takes steps to ensure that its published Engineering specifications and manuals are correct; however, errors do occur. Zebra Technologies Corporation reserves the right to correct any such errors and disclaims liability resulting therefrom. Limitation of Liability In no event shall Zebra Technologies Corporation or anyone else involved in the creation, production, or delivery of the accompanying product (including hardware and software) be liable for any damages whatsoever (including, without limitation, consequential damages including loss of business profits, business interruption, or loss of business information) arising out of the use of, the results of use of, or inability to use such product, even if Zebra Technologies Corporation has been advised of the possibility of such damages. Some jurisdictions do not allow the exclusion or limitation of incidental or consequential damages, so the above limitation or exclusion may not apply to you. P1016701-001 KR403 Integrators Guide 12/23/09 About This Document This section provides you with contact information, document structure and organization, and additional reference documents. Contents Who Should Use This Document . . . . . . . . . . . . . . . . . . . . . . . . . . . . . . . . . . . . . . . . . . . . iv How This Document Is Organized . . . . . . . . . . . . . . . . . . . . . . . . . . . . . . . . . . . . . . . . . . . iv Contacts . . . . . . . . . . . . . . . . . . . . . . . . . . . . . . . . . . . . . . . . . . . . . . . . . . . . . . . . . . . . . . . v Document Conventions . . . . . . . . . . . . . . . . . . . . . . . . . . . . . . . . . . . . . . . . . . . . . . . . . . . vi 12/23/09 KR403 Integrators Guide P1016701-001 iv About This Document Who Should Use This Document Who Should Use This Document This Integrators Guide is intended for use by any person who needs to develop a kiosk using the KR403 printer, operate, or to troubleshoot problems with the printer. How This Document Is Organized The Integrators Guide is set up as follows: Topic Description of Content Introduction Identifies basic printer features, functions and information to assist you with your initial decision to select the printer for your kiosk. Defines the wide range of printer mounting and media handling options avail. Tips and specifications are included as they apply to general use of the printer and receipt media. Explores the printer controls, sensors and, error reporting available to the operator, service technician, and kiosk system integrators. Provides the basic information needed to operate the printer: connecting power, loading media, printing test receipts, host interface connections and recommended operator maintenance. Covers the various ways and resources you are able to use to configure the printer for operation, monitoring and reporting, installing graphics, receipt forms or fonts, and updating the printer firmware. Defines printer maintenance for the operator and service technician. Covers the printer operational power requirements, concerns, verification testing, power connector, and the optional accessory power supply. Identifies proven printer and media mounting accessories available to speed your kiosk design and test process. Brings it all together with tips and suggestions to improve kiosk design including custom media mounting guidelines, media storage, interaction with other kiosk components, and internal and external environmental factors. Covers operational issues and resolutions for status indicator codes and poor print quality. Printer Interface Cabling Information Printer Overview Controls Operations Configuration Maintenance Printer Power Requirements Hardware Accessories Kiosk Design Considerations Troubleshooting Appendix P1016701-001 KR403 Integrators Guide 12/23/09 About This Document Contacts Contacts Technical Support via the Internet is available 24 hours per day, 365 days per year. Web Site: www.zebra.com E-mail Back Technical Library: [email protected] Subject line: Emaillist Self Service Knowledge Base: www.zebra.com/knowledgebase Online Case Registration: www.zebra.com/techrequest • • E-mail address: Which Department Do You Need? Europe, Africa, Middle East, India The Americas Asia Pacific Regional Headquarters Zebra Technologies International, LLC 333 Corporate Woods Parkway Vernon Hills, IL 60061-3109 U.S.A. T: +1 847 793 2600 Toll-free +1 800 423 0422 F: +1 847 913 8766 Zebra Technologies Europe Limited Dukes Meadow Millboard Road Bourne End Buckinghamshire, SL8 5XF United Kingdom T: +44 (0) 1628 556000 F: +44 (0) 1628 556001 Zebra Technologies Asia Pacific Pte. Ltd. 120 Robinson Road #06-01 Parakou Building Singapore 068913 T: + 65 6858 0722 F: +65 6885 0838 Technical Support For questions on the operation of Zebra equipment and software, please call your distributor. For additional assistance, contact us. Please have your model and serial numbers available. T: +1 877 ASK ZEBRA (275 9327) F: +1 847 913 2578 Hardware: [email protected] Software: [email protected] T: +44 (0) 1628 556039 F: +44 (0) 1628 556003 E: [email protected] T: +65 6858 0722 F: +65 6885 0838 E: China: [email protected] All other areas: [email protected] Repair Service Department For back-to-base service and repair. T: +1 877 ASK ZEBRA (275 9327) F: +1 847 821 1797 E: [email protected] To request a repair in the U.S., go to www.zebra.com/repair. T: +44 (0) 1772 693069 F: +44 (0) 1772 693046 New requests: [email protected] Status updates: [email protected] T: +65 6858 0722 F: +65 6885 0838 E: China: [email protected] All other areas: [email protected] Technical Training Department For Zebra product training courses. T: +1 847 793 6868 T: +1 847 793 6864 F: +1 847 913 2578 E: [email protected] T: +44 (0) 1628 556000 F: +44 (0) 1628 556001 E: [email protected] T: + 65 6858 0722 F: +65 6885 0838 E: China: [email protected] All other areas: [email protected] Inquiry Department For product literature and distributor and dealer information. T: +1 877 ASK ZEBRA (275 9327) E: [email protected] T: +44 (0) 1628 556037 F: +44 (0) 1628 556005 E: [email protected] E: China: [email protected] All other areas: [email protected] Customer Service Department (US) Internal Sales Department (UK) For printers, parts, media, and ribbon, please call your distributor or contact us. T: +1 877 ASK ZEBRA (275 9327) E: [email protected] T: +44 (0) 1628 556032 F: +44 (0) 1628 556001 E: [email protected] T: +65 6858 0722 F: +65 6885 0836 E: China: [email protected] All other areas: [email protected] Key: 12/23/09 T: Telephone F: Facsimile E: E-mail KR403 Integrators Guide P1016701-001 v vi About This Document Document Conventions Document Conventions The following conventions are used throughout this document to convey certain information. Alternate Color (online only) Cross-references contain hot links to other sections in this guide. If you are viewing this guide online in .pdf format, you can click the cross-reference (blue text) to jump directly to its location. Command Line Examples Command line examples appear in Courier New font. For example, type ZTools to get to the Post-Install scripts in the bin directory. Files and Directories File names and directories appear in Courier New font. For example, the Zebra<version number>.tar file and the /root directory. Icons Used Caution • Warns you of the potential for electrostatic discharge. Caution • Warns you of a potential electric shock situation. Caution • Warns you of a situation where excessive heat could cause a burn. Caution • Warns you of a situation or area where a cut could occur. Caution • Advises you that failure to take or avoid a specific action could result in physical harm to you. Caution • (No icon) Advises you that failure to take or avoid a specific action could result in physical harm to the hardware. Important • Advises you of information that is essential to complete a task. Note • Indicates neutral or positive information that emphasizes or supplements important points of the main text. Example • Provides an example, often a scenario, to better clarify a section of text. P1016701-001 KR403 Integrators Guide 12/23/09 Contents 2 • About This Document . . . . . . . . . . . . . . . . . . . . . . . . . . . . . . . . . iii Who Should Use This Document . . . . . . . . . . . . . . . . . . . . . . . . . . . . . . . iv How This Document Is Organized . . . . . . . . . . . . . . . . . . . . . . . . . . . . . . . iv Contacts . . . . . . . . . . . . . . . . . . . . . . . . . . . . . . . . . . . . . . . . . . . . . . . . . . .v Document Conventions . . . . . . . . . . . . . . . . . . . . . . . . . . . . . . . . . . . . . . . vi 1 • Introduction . . . . . . . . . . . . . . . . . . . . . . . . . . . . . . . . . . . . . . . . . 1 KR403™ Thermal Kiosk Printers . . . . . . . . . . . . . . . . . . . . . . . . . . . . . . . 2 What’s in the Box . . . . . . . . . . . . . . . . . . . . . . . . . . . . . . . . . . . . . . . . . . . 4 Unpack and Inspect the Printer . . . . . . . . . . . . . . . . . . . . . . . . . . . . . . 4 Opening the Printer . . . . . . . . . . . . . . . . . . . . . . . . . . . . . . . . . . . . . . . 5 Printer Orientation . . . . . . . . . . . . . . . . . . . . . . . . . . . . . . . . . . . . . . . . . . . 6 Printer Features . . . . . . . . . . . . . . . . . . . . . . . . . . . . . . . . . . . . . . . . . . . . . 7 General Printing Information . . . . . . . . . . . . . . . . . . . . . . . . . . . . . . . . . . . 9 KR403 Media Types . . . . . . . . . . . . . . . . . . . . . . . . . . . . . . . . . . . . . 10 Basic Printer Mounting (printer only) . . . . . . . . . . . . . . . . . . . . . . . . . . . . .11 Basic Printer Dimensions . . . . . . . . . . . . . . . . . . . . . . . . . . . . . . . . . . . . 12 Installing the Media Guide (Required Accessory) . . . . . . . . . . . . . . . . . . 13 2 • Printer Overview . . . . . . . . . . . . . . . . . . . . . . . . . . . . . . . . . . . . 15 Print Modes . . . . . . . . . . . . . . . . . . . . . . . . . . . . . . . . . . . . . . . . . . . . . . . Looping Presenter (Kiosk Mode) . . . . . . . . . . . . . . . . . . . . . . . . . . . . . . . Vertical Presenter (Kiosk Mode) . . . . . . . . . . . . . . . . . . . . . . . . . . . . . . . Receipt (Page) Imaging Modes . . . . . . . . . . . . . . . . . . . . . . . . . . . . . . . . Basic Media Mounting Considerations . . . . . . . . . . . . . . . . . . . . . . . . . . Media Supply Method . . . . . . . . . . . . . . . . . . . . . . . . . . . . . . . . . . . . Media Input Aperture . . . . . . . . . . . . . . . . . . . . . . . . . . . . . . . . . . . . . Mounting Orientations . . . . . . . . . . . . . . . . . . . . . . . . . . . . . . . . . . . . 12/23/2009 KR403 Integrators Guide 16 17 18 19 20 20 21 22 P1016701-001 viii 3 • Controls . . . . . . . . . . . . . . . . . . . . . . . . . . . . . . . . . . . . . . . . . . . 25 Controls, Indicators and Sensors . . . . . . . . . . . . . . . . . . . . . . . . . . . . . . Feed Button . . . . . . . . . . . . . . . . . . . . . . . . . . . . . . . . . . . . . . . . . . . . Power Indicator . . . . . . . . . . . . . . . . . . . . . . . . . . . . . . . . . . . . . . . . . Status Indicator Descriptions . . . . . . . . . . . . . . . . . . . . . . . . . . . . . . . Sensing, Status and Error Reporting . . . . . . . . . . . . . . . . . . . . . . . . . . . . Feed Button Modes . . . . . . . . . . . . . . . . . . . . . . . . . . . . . . . . . . . . . . . . . 26 27 27 27 28 31 4 • Operation . . . . . . . . . . . . . . . . . . . . . . . . . . . . . . . . . . . . . . . . . . 33 Basic Printer Operation Overview . . . . . . . . . . . . . . . . . . . . . . . . . . . . . . Attaching Power . . . . . . . . . . . . . . . . . . . . . . . . . . . . . . . . . . . . . . . . . . . Manual Printer Reset . . . . . . . . . . . . . . . . . . . . . . . . . . . . . . . . . . . . Determining Thermal Media Types . . . . . . . . . . . . . . . . . . . . . . . . . . Preparing a Media Roll for Use . . . . . . . . . . . . . . . . . . . . . . . . . . . . . . . . Automated Media Loading . . . . . . . . . . . . . . . . . . . . . . . . . . . . . . . . . . . Manual Media Loading . . . . . . . . . . . . . . . . . . . . . . . . . . . . . . . . . . . . . . Clearing Paper Jams . . . . . . . . . . . . . . . . . . . . . . . . . . . . . . . . . . . . . . . . Cleaning the Printhead . . . . . . . . . . . . . . . . . . . . . . . . . . . . . . . . . . . . . . Printing a Test (Printer Configuration) Receipt . . . . . . . . . . . . . . . . . . . . Connecting the Printer to the Host . . . . . . . . . . . . . . . . . . . . . . . . . . . . . Interface Cable Requirements . . . . . . . . . . . . . . . . . . . . . . . . . . . . . USB Interface Requirements . . . . . . . . . . . . . . . . . . . . . . . . . . . . . . Communicating with the Printer . . . . . . . . . . . . . . . . . . . . . . . . . . . . 34 35 36 36 37 39 40 41 42 44 45 45 46 49 5 • Printer Configuration . . . . . . . . . . . . . . . . . . . . . . . . . . . . . . . . . 51 Printer Configuration Methods and Tools . . . . . . . . . . . . . . . . . . . . . . . . Fonts and Your Printer . . . . . . . . . . . . . . . . . . . . . . . . . . . . . . . . . . . . . . Identifying Fonts in Your Printer . . . . . . . . . . . . . . . . . . . . . . . . . . . . Localizing the Printer with Code Pages . . . . . . . . . . . . . . . . . . . . . . Asian fonts and Other Large Font Sets . . . . . . . . . . . . . . . . . . . . . . . Getting Asian Fonts . . . . . . . . . . . . . . . . . . . . . . . . . . . . . . . . . . . . . . Stand Alone Printing . . . . . . . . . . . . . . . . . . . . . . . . . . . . . . . . . . . . . 52 53 53 53 54 54 54 6 • Printer Maintenance . . . . . . . . . . . . . . . . . . . . . . . . . . . . . . . . . . 55 KR403 Printer Maintenance . . . . . . . . . . . . . . . . . . . . . . . . . . . . . . . . . . Operator Maintenance . . . . . . . . . . . . . . . . . . . . . . . . . . . . . . . . . . . . . . . Dust Removal Cleaning . . . . . . . . . . . . . . . . . . . . . . . . . . . . . . . . . . On-Site Service Cleaning . . . . . . . . . . . . . . . . . . . . . . . . . . . . . . . . . . . . Replacing the Printhead . . . . . . . . . . . . . . . . . . . . . . . . . . . . . . . . . . . . . Replacing the Platen Roller . . . . . . . . . . . . . . . . . . . . . . . . . . . . . . . . . . . Replacing the Cutter Blades . . . . . . . . . . . . . . . . . . . . . . . . . . . . . . . . . . P1016701-001 KR403 Integrators Guide 56 56 56 59 62 64 66 12/23/2009 ix 7 • Printer Power Requirements . . . . . . . . . . . . . . . . . . . . . . . . . . . 71 KR403 Power Requirements . . . . . . . . . . . . . . . . . . . . . . . . . . . . . . . . . . 72 Electrostatic Discharges and Earth Currents . . . . . . . . . . . . . . . . . . 73 8 • Kiosk Hardware Integration Accessories . . . . . . . . . . . . . . . . . 75 Accessories Overview . . . . . . . . . . . . . . . . . . . . . . . . . . . . . . . . . . . . . . . Nozzle Bezel . . . . . . . . . . . . . . . . . . . . . . . . . . . . . . . . . . . . . . . . . . . . . . Shutter Bezel . . . . . . . . . . . . . . . . . . . . . . . . . . . . . . . . . . . . . . . . . . . . . . Quick-Fit Hubs . . . . . . . . . . . . . . . . . . . . . . . . . . . . . . . . . . . . . . . . . . . . . Quick Fit Leaf Spring Retainer . . . . . . . . . . . . . . . . . . . . . . . . . . . . . . . . Roll Support . . . . . . . . . . . . . . . . . . . . . . . . . . . . . . . . . . . . . . . . . . . . . . Media Roll Low Sensor . . . . . . . . . . . . . . . . . . . . . . . . . . . . . . . . . . . . . . Universal Roll Holder . . . . . . . . . . . . . . . . . . . . . . . . . . . . . . . . . . . . . . . . Printer Mounting Plate . . . . . . . . . . . . . . . . . . . . . . . . . . . . . . . . . . . . . . . Wall Mount Roll Holder . . . . . . . . . . . . . . . . . . . . . . . . . . . . . . . . . . . . . . Printer Power Supply . . . . . . . . . . . . . . . . . . . . . . . . . . . . . . . . . . . . . . . . 76 77 79 80 80 81 82 83 87 88 89 9 • Troubleshooting . . . . . . . . . . . . . . . . . . . . . . . . . . . . . . . . . . . . . 91 Status Light Descriptions . . . . . . . . . . . . . . . . . . . . . . . . . . . . . . . . . . . . . Status Light Error Resolutions . . . . . . . . . . . . . . . . . . . . . . . . . . . . . . . . . Print Quality Problems . . . . . . . . . . . . . . . . . . . . . . . . . . . . . . . . . . . . . . . Manual Calibration . . . . . . . . . . . . . . . . . . . . . . . . . . . . . . . . . . . . . . . . . Troubleshooting Tests . . . . . . . . . . . . . . . . . . . . . . . . . . . . . . . . . . . . . . . Printing a Configuration Label . . . . . . . . . . . . . . . . . . . . . . . . . . . . . . Recalibration . . . . . . . . . . . . . . . . . . . . . . . . . . . . . . . . . . . . . . . . . . . Resetting the Factory Default Values . . . . . . . . . . . . . . . . . . . . . . . . . . . Communications Diagnostics . . . . . . . . . . . . . . . . . . . . . . . . . . . . . . . . . 92 92 94 96 97 97 97 98 98 10 • Kiosk Design Considerations . . . . . . . . . . . . . . . . . . . . . . . . 101 Design Considerations Overview . . . . . . . . . . . . . . . . . . . . . . . . . . . . . Design Your Own Mounting . . . . . . . . . . . . . . . . . . . . . . . . . . . . . . . . . . Cabling and Cable Routing . . . . . . . . . . . . . . . . . . . . . . . . . . . . . . . Electrostatic Discharges and Earth Currents . . . . . . . . . . . . . . . . . Ambient Light . . . . . . . . . . . . . . . . . . . . . . . . . . . . . . . . . . . . . . . . . Cooling . . . . . . . . . . . . . . . . . . . . . . . . . . . . . . . . . . . . . . . . . . . . . . Designing Your Own Media Dispensing System . . . . . . . . . . . . . . . . . . Designing a Roll Support . . . . . . . . . . . . . . . . . . . . . . . . . . . . . . . . Designing Media Guides . . . . . . . . . . . . . . . . . . . . . . . . . . . . . . . . . Designing for Fan-Fold Media . . . . . . . . . . . . . . . . . . . . . . . . . . . . . 102 103 104 104 104 104 105 105 105 106 A • Appendix . . . . . . . . . . . . . . . . . . . . . . . . . . . . . . . . . . . . . . . . . 107 Universal Serial Bus (Mini-USB) Interface . . . . . . . . . . . . . . . . . . . . . . 108 Serial Port Interface . . . . . . . . . . . . . . . . . . . . . . . . . . . . . . . . . . . . . . . . 109 12/23/2009 KR403 Integrators Guide P1016701-001 x P1016701-001 KR403 Integrators Guide 12/23/2009 1 Introduction Contents KR403™ Thermal Kiosk Printers . . . . . . . . . . . . . . . . . . . . . . . . . . . . . . 2 What’s in the Box . . . . . . . . . . . . . . . . . . . . . . . . . . . . . . . . . . . . . . . . . . 4 Unpack and Inspect the Printer . . . . . . . . . . . . . . . . . . . . . . . . . . . . . . . 4 Media Guide - Required Accessory . . . . . . . . . . . . . . . . . . . . . . . . . . . . 5 Opening the Printer. . . . . . . . . . . . . . . . . . . . . . . . . . . . . . . . . . . . . . . . . 5 Printer Orientation. . . . . . . . . . . . . . . . . . . . . . . . . . . . . . . . . . . . . . . . . . 6 Printer Features . . . . . . . . . . . . . . . . . . . . . . . . . . . . . . . . . . . . . . . . . . . 7 General Printing Information. . . . . . . . . . . . . . . . . . . . . . . . . . . . . . . . . . 9 Auto Selected Print Widths . . . . . . . . . . . . . . . . . . . . . . . . . . . . . . . . . . . 9 KR403 Media Types . . . . . . . . . . . . . . . . . . . . . . . . . . . . . . . . . . . . . . . 10 Basic Printer Mounting (printer only) . . . . . . . . . . . . . . . . . . . . . . . . . . 11 Basic Printer Dimensions . . . . . . . . . . . . . . . . . . . . . . . . . . . . . . . . . . . 12 Installing the Media Guide (Required Accessory). . . . . . . . . . . . . . . . . 13 12/23/2009 KR403 Integrators Guide P1016701-001 2 Introduction KR403™ Thermal Kiosk Printers KR403™ Thermal Kiosk Printers The Zebra KR403 model is the best-in-class thermal kiosk printer with the widest range of features. The KR403 printer provides direct thermal printing at speeds up to 150mm/s (5.9 ips) at a 203 dpi print density. The KR403 supports the ZPL printer programming language and a wide variety of interface and feature options. The KR403™ printer features: • Looping Presenter - To reduce jamming and print image distortion caused by the user attempting to withdraw the receipt before imaging is finished, the KR403 employs an innovative “looping station”. The receipt is retained inside the print mechanism until imaging is complete, then it is presented to the user for removal. • Media Pull Detection – When the user grasps the receipt and applies force to remove it, the KR403 senses the force and dispenses the receipt in a controlled fashion to prevent tearing or jamming. • Retract and Retain – If the receipt is not taken within a specified time, the KR403 withdraws it and dumps it out the bottom of the printer, typically into a catch bin within the kiosk. The number of retracts are counted and reported back to the host. • Easy Media Loading – Automatic media loading and preparation for printing. Optional supply low sensing. • Flexible Media Support – Supports continuous, fanfold and black line receipt media and label media with automatic media sensing and calibration. • Flexible Mounting – Horizontal and vertical printer mounting covering 180° of printer orientation and up to 360° with optional media adapter. • Printhead Life Monitoring – Printhead element testing and print length odometer reporting. • Industry Leading Bar Code Support – Largest set of common and specialized linear and 2-dimensional bar code symbologies resident in a kiosk printer. • Powerful Font Support – One scalable and 16 bitmap fonts resident with support for downloadable and Unicode fonts. • Interface Support – USB v1.1 (2.0 compatible) and Serial RS-232. • Storage – 4MB of flash memory with the largest in class 1.5MB available for programming, graphics and fonts with 8MB of SDRAM for fast image processing. The KR403 printers offer a wide range of printer options and accessories: P1016701-001 • 58, 60, 80 and 82.5mm media guide widths • 70 watt external printer power module • Multiple printer media roll mounting accessory configurations and options • Media Roll Low sensor for use with Zebra and custom media roll mounting. • Full Flash (68MB) memory for storing large Unicode font sets, multiple fonts, graphics and programming. • Asian Language support with printer configuration options for the large Simplified and Traditional Chinese, Japanese, Korean, or Thai character sets. KR403 Integrators Guide 12/23/2009 Introduction KR403™ Thermal Kiosk Printers • Zebra’s ZBI 2.0 (Zebra BASIC Interpreter) programming language. ZBI allows you to create custom printer operations and software language emulation. This integrators guide provides information you will need to install and operate your printer on a daily basis. To create receipt (label) formats, refer to your programming guides or receipt (label) design applications such as Zebra Designer. Your printer, when connected to a host computer, functions as a complete system for printing receipts and labels. Note • Many printer settings may also be controlled by your printer’s driver or receipt (label) design software. Refer to the driver or software documentation for more information. 12/23/2009 KR403 Integrators Guide P1016701-001 3 4 Introduction What’s in the Box What’s in the Box To minimize cost and reduce waste, the KR403 does not include unneeded components or accessories. Additional items are required to make the printer operational. Unpack and Inspect the Printer When you receive the printer, immediately unpack it and inspect for shipping damage. • Save all packing materials. • Check all exterior surfaces for damage. • Open and close the printer and remove any media or test prints in the printer. If you discover shipping damage upon inspection: P1016701-001 • Immediately notify the shipping company and file a damage report. Zebra Technologies Corporation is not responsible for any damage incurred during shipment of the printer and will not cover the repair of this damage under its warranty policy. • Keep all packaging material for shipping company inspection. • Notify your authorized Zebra reseller KR403 Integrators Guide 12/23/2009 Introduction What’s in the Box Media Guide - Required Accessory For the printer to operate correctly, at minimum you must order and install at least one of the four (4) media guides listed below. Width (mm) Part Number Width (mm) Part Number 58 09170-058-2 80 09170-080-2 60 09170-060-2 82.5 09170-082-2 A printer evaluation kit is available for the KR403 printer that includes all four media guides. Opening the Printer To open the printer’s printhead, press the green push bar toward the back of the printer (away from the rollers) and lift the printhead up to open. Front of Printer 12/23/2009 KR403 Integrators Guide P1016701-001 5 6 Introduction Printer Orientation Printer Orientation Top of Printer Rear of Printer Media In Side of Printer Media Output 1 (See table below) Front of Printer Base Plate (bottom of printer) Media Output 2 (See table below) P1016701-001 Output Horizontal Mount Output Vertical Mount 1 Media Exit and Present 1 Media Retract and Retain (in kiosk) 2 Media Retract and Retain (in kiosk) 2 Media Exit and Present KR403 Integrators Guide 12/23/2009 Introduction Printer Features Printer Features Printhead Media Sensor (80-82.5mm) Printhead Release Push-Bar (Blackmark, Notch, and Media Out sensing) Cutter Bar Platen (drive) Roller Media Present Sensor Cutter (Hidden under roller assembly) (Inside Slot) Media Guide Status Indicator Power Indicator Media In Retract Sensor Feed Button Media Guide Not Shown Media Sensor (58-60mm) (Blackmark, Notch, and Media Out sensing) Wide Media Guide (80-82.5mm) Detection Sensor 12/23/2009 KR403 Integrators Guide P1016701-001 7 8 Introduction Printer Features Printer Features (continued) Media Feed Rollers Media Guide (required to operate, sold separately) Feed Button and Indicators (Hidden from view) Ext.Media Low Sensor Port Feed Button and Indicators Power Input (Both sides of printer) Mini-USB-B Port Serial Port Waste Bin Sensor (Bottom of Printer) Head-Up Sensor (Hidden behind side panel) P1016701-001 KR403 Integrators Guide 12/23/2009 Introduction General Printing Information General Printing Information Printer control • • • • • Printer Control Panel - Allows very basic printer configuration setup that include: configuration status (label) receipt, non-default print widths, print darkness (density) ZPL (Zebra Programming Language), a page (receipt) description language. The printer also supports the Zebra SGD (Set Get Do) printer configuration language that uses a natural language. Windows Driver and Zebra Setup Utility Zebra Designer - A receipt (label) design and print application for Zebra printers. Designer include support for graphics and logos, barcodes, text, downloading fonts. etc. ZBI 2.0 (Zebra Basic Interpreter) - ZBI allows the software integrator to create custom commands and functions, and emulate other programming languages. Print method Direct thermal page printing using thermal sensitive media Resolution 8 dots/mm (203 dpi) Print speed 150 mm/s (5.9 inches/sec.) — Default 127 mm/sec.(5 inches/sec.) 101.6 mm/sec. (4 inches/sec.) 76.2 mm/sec. (3 inches/sec.) Note: Printer media is rated for specific speed ranges and some media types and materials will print better at slower speeds Present speed 300 mm/s in kiosk mode the uses the Looping or Vertical Presenter modes. Non kiosk modes presenter speed matches the print speed. Print duty cycle Up to 33% Media Sensors Out of paper, paper in presenter, paper in retract path, black mark, and an optional external paper-low sensor. Maximum print width 80 mm = 640 pixels Auto Selected Print Widths 12/23/2009 58 mm and 60 mm guide 58 mm = 464 pixels maximum 80 mm and 82.5 guide 80 mm = 640 pixels maximum KR403 Integrators Guide P1016701-001 9 10 Introduction General Printing Information KR403 Media Types P1016701-001 Receipt Media Supply Type Outside Wound Continuous Roll: Plain receipt, receipt with black marks, and pre-printed receipt media with black marks. Fanfold: Stacked receipt media with black marks and pre-printed receipt media with black marks. Outer Roll diameter 250 mm (9.84 inches) maximum Note: The maximum roll diameter is dependent upon roll holder in use and the kiosk design. Spindle (core) diameter 25 mm minimum (typical core size) 40 mm maximum 12 mm minimum with Small Core Media Roll Adapter Paper width 58, 60, 80, and 82.5 mm (common receipt roll widths) Paper Thickness or Caliper 0.054 – 0.11 mm Paper Density or Grammage 55 –110 g/m 2 (or gsm) Note - This is an approximate area density measurement that varies by country, paper type and measurement method applied. KR403 Integrators Guide 12/23/2009 Introduction Basic Printer Mounting (printer only) Basic Printer Mounting (printer only) The printer can only be mounted to the kiosk using the four printer mounting screw holes shown in the illustration below. The printer is most secure when using all four of the mounting positions connecting the printer’s base to a rigid metal base plate in the kiosk. The kiosk’s metal printer mounting plate should be connected to the kiosks electrical (earth) ground for purposes of controlling static discharge and electrical noise. 1b 1a Mounting Positions Kiosk’s Print Base Mounting Variation Details 1a and 1b Full coverage of printer’s base plate • • • Minimum mount positions. Supports the Quick-Fit Hubs Supported by most Zebra accessory mounting solutions. 1a and 2 Partial (and Full) coverage of the printer’s base plate • Minimum three point mounting to fight torsional forces. 1 (a and b) and 2 12/23/2009 2 KR403 Integrators Guide P1016701-001 11 12 Introduction Basic Printer Dimensions Basic Printer Dimensions The mechanical drawing below outlines the basic printer mounting dimensions to install the printer in a kiosk. These basic printer dimensions do not illustrate the unique integration requirements needed to use the printer with specific printer accessories, operator servicing access, media mounting, power and cabling access, and printer media handling. 8 8.25* Media Exit 51 4.5 7.5 Horizontal Presenter Loop Area Printhead Open (grey) 115 Media Entry 67 38 Horizontal Retract Area Media Exit P1016701-001 KR403 Integrators Guide 12/23/2009 Introduction Installing the Media Guide (Required Accessory) Installing the Media Guide (Required Accessory) The media guide configures the printer to one of four (4) common roll paper widths: 58, 60, 80, or 82.5 mm. The printer senses which media guide is installed and adjusts the default print width to match it automatically: narrow (58 or 60 mm) or wide (80 or 82.5 mm). The printer is delivered without a paper guide installed. Caution • Before proceeding, always disconnect the printer from power. If the printer is installed in the kiosk, then all kiosk power should be turned off. This is to prevent accidentally having the screw or media guide bracket fall into the printer or other powered up kiosk components. The screw or bracket may fall and bounce into kiosk components mounted adjacent to or mounted below the printer. 1. If the printer has power connected or is installed in a system, always disconnect the printer from power. Pinch the top and bottom of the printer’s power connector to release the power plug’s latch and pull the plug away from the printer. Printer Power Connector and Plug with Latch 12/23/2009 KR403 Integrators Guide P1016701-001 13 14 Introduction Installing the Media Guide (Required Accessory) 2. Select the media guide that matches the width of the media you want to use for your application. Loosen or remove the media guide screw, if present. Note • Media guides are ordered separately. Only Printer Evaluation kits contain all input guides available for the KR403. 3. Open the printhead by pushing green printhead release push-bar back towards the rear of the printer and lift up the printhead. 4. Insert the media guide under the printhead. Insert the T-shaped tab of the media guide into the “T”-hole, slide it forward, and fasten the screw. The screw is pre-installed at the factory on the printer. One is included in the bag with the media guide in case the screw is damaged or lost. Many times, the installer will only need to loosen the attached screw. 5. Close the printhead. Push down on the push-bar to securely latch the printhead closed. 58 Media Guide Width in Millimeters (mm) Media Guide Screw M2.5 x 3 6. Re attach the printer’s power if needed. P1016701-001 KR403 Integrators Guide 12/23/2009 2 Printer Overview Contents Print Modes. . . . . . . . . . . . . . . . . . . . . . . . . . . . . . . . . . . . . . . . . . . . . . Looping Presenter (Kiosk Mode) . . . . . . . . . . . . . . . . . . . . . . . . . . . . . Vertical Presenter (Kiosk Mode) . . . . . . . . . . . . . . . . . . . . . . . . . . . . . . Receipt (Page) Imaging Modes . . . . . . . . . . . . . . . . . . . . . . . . . . . . . . Basic Media Mounting Considerations . . . . . . . . . . . . . . . . . . . . . . . . . Media Supply Method . . . . . . . . . . . . . . . . . . . . . . . . . . . . . . . . . . . . . . Media Input Aperture . . . . . . . . . . . . . . . . . . . . . . . . . . . . . . . . . . . . . . Mounting Orientations. . . . . . . . . . . . . . . . . . . . . . . . . . . . . . . . . . . . . . 12/23/2009 KR403 Integrators Guide 16 17 18 19 20 20 21 22 P1016701-001 16 Printer Overview Print Modes Print Modes The KR403 is a versatile printer and can print in several modes: Kiosk (the default horizontal with looping presenter or configurable vertical presenter mode), rewind (receipt only with no cut or kiosk mode features supported), and cutter (simple mode to support label media, many kiosk features are supported, except looping, retract and partial cut) modes. The most basic description of the KR403 printer is that it starts printing with the leading edge of the receipt resting at the cut position after loading media or printing a previous receipt. The printer begins printing the page image assembled in the printer. When the page has finished printing, the printer cuts the receipt to finish. In Kiosk mode, the printer stores the printed receipt in the loop area (horizontal mounting) or hanging below the printer (vertical mounting) while finishing printing and cutting the receipt. The printer then presents the receipt to the kiosk client. When the client pulls the receipt, the printer immediately detects the roller movement and causes the printer to accelerate the receipt out of the printer. This helps prevent damage to the receipt. The kiosk mode also has programable options to retract the forgotten receipt back into the kiosk’s internal waste bin below the printer. 5 4 3 2 6 1 7 8 1 3 5 7 9 P1016701-001 9 Media Input - Use Auto or Manual 2 Printhead and Platen (Drive) Roller media loading procedures Loop area (horizontal mode) - stores 4 Media Drive Roller and Loop Stop printed receipt is complete. (forward only) Media Present and Retract Roller 6 Media Present Exit (horizontal mode) Roller pivots on change of direction. Printed Media Storage (vertical mode) Detects a media pull with motor. and Retract to Waste Bin Internal Media Drive Roll - Pulls the 8 Retract to Waste Bin (horizontal mode) media out of the printer (horizontal Media Present Exit (vertical mode) mode) Provides a measured amount of media to be presented (vertical mode) Media Cutter - Full or partial media cuts at receipt page or cut immediate. KR403 Integrators Guide 12/23/2009 Printer Overview Looping Presenter (Kiosk Mode) Looping Presenter (Kiosk Mode) The loop generating presenter mechanism has many benefits: Loop • It handles documents of various lengths by storing the printed paper in a loop. Print Media In Print Cut • • • It holds the printout until fully printed and cut before presenting the completed printout to the customer. This eliminates issues many other printers have when the kiosk client tries to remove media before printing has finished. A portion of the printout is presented. When the customer takes the receipt, the printer detects a movement and issues the rest of the receipt at 300 mm/s to help ensure receipt is removed undamaged. The amount of media presented can be customized to account for differences in the kiosk wall. The retract-and-retain function can retract uncollected printouts and throw them in a wastebasket inside the kiosk. Retracts are reported to the driver so any remaining data for that printout can be deleted. Retraction can be initiated by an internal timer or issued directly by the application. Cut Present Retract Waste Bin Area 12/23/2009 KR403 Integrators Guide P1016701-001 17 18 Printer Overview Vertical Presenter (Kiosk Mode) Vertical Presenter (Kiosk Mode) The vertical presenter operation has many benefits: • It handles documents of various lengths by storing the printed paper below the printer. • It holds the printout until fully printed and cut before presenting the completed printout to the kiosk client. This eliminates print issues caused by kiosk clients trying to remove media before printing has finished. • Media In Print Cut It stores the entire receipt to re-orient the printout to face up for presentation to your client. Store Orient • • A portion of the printout is presented. When the customer takes the receipt, the printer detects a movement and issues the rest of the receipt at a speedy 300 mm/s to help ensure receipt is removed undamaged. The amount of media presented can be customized to account for differences in the kiosk wall. The retract-and-retain function can retract uncollected printouts and throw them in a wastebasket inside the kiosk. Retraction can be initiated by an internal timer or issued directly by the application. P1016701-001 KR403 Integrators Guide Present Retract Waste Bin Area 12/23/2009 Printer Overview Receipt (Page) Imaging Modes Receipt (Page) Imaging Modes The printer sets the following modes with programming commands or with the Windows driver. The KR403 printer uses ZPL ‘Page’ mode programming to assemble and print receipts. Page mode printing describes the receipt margins and the image to be placed between the margins and then printed. The image is assembled in the image (memory) buffer and then printed as one continuous print. 12/23/2009 Continuous (Kiosk Mode) Prints the image buffer and cuts the media at the end of the image defined by Label Length parameter. Continuous - Variable (Default - Kiosk Mode) If the image is larger that the preset image buffer size, then the printer expands the image buffer to accommodate the larger image up to the printer’s maximum allowed size (set by programming, available memory, and print with). The printer then prints the larger image with print margin and cut the receipt. The next receipt will return to the preset image/receipt size if the next image is the same size or smaller. Black Mark or Line (Kiosk Mode) Prints receipts that match the receipt length set by the distance between the black marks or lines, and cuts the receipt at the black mark or line by default. Cut Only (Cutter Mode) Can be used for printing labels, but it is not recommended for receipt use. Typically used for printing liner backed labels that use black marks or black lines media to identify label ‘gap’ boundaries. Requires additional programming to ensure that only the media liner is cut. Cutting labels and their adhesive backing will eventually jam the cutter and require a service technician to correct. Prints the image and cuts the receipt. Does not use the kiosk mode ‘Looping’ or ‘Vertical’ presenter functions. Cut mode does not support the ‘Retract’ media function. Does not do ‘partial’ cut in Cutter Mode. Basic Printing (Rewind mode) Not Recommended for kiosk use. Rewind Mode has a deceptive name, it could be described as Rewind Disabled as it relates to other Zebra tabletop printers that share the ZPL programming language. Rewind Mode does not allow cutting the media (including Cut Now commands), the kiosk mode ‘Looping’ or ‘Vertical’ presenter operations, retract or eject command options. KR403 Integrators Guide P1016701-001 19 20 Printer Overview Basic Media Mounting Considerations Basic Media Mounting Considerations The KR403 printer has a few basic requirements for dispensing the media to the printer from a roll or fan-fold media. The KR403 printer exclusively uses direct thermal media and it is chemically treated to react to heat. Some of these basic considerations include: • Align Printer with Media - The center line of the media roll or fan-fold stack should align with the center of the printer to provide the best image quality and keep the media un-damaged. Always use a media guide when printing! • Media Only Contacts Media Mounting and Printer in Kiosk - The media should not touch cables, other kiosk components, or surfaces other than media guides or the fan-fold media tray. • Do Not Blow Air on Media - Air should be pulled out of the media area of the kiosk to keep dust (shortens printhead life and affects print quality), aerosol bourn chemicals (such as cleaning solutions like ammonia) and exhaust heat from other kiosk components and power supplies. • Direct Sunlight, Incandescent or Infrared Lighting or Heat Sources - These light sources can come from kiosk vents and other kiosk components. Incandescent light bulbs and heat sinks are examples of heat sources that shouldn’t be near the printer, media or media storage areas. • Media Dispensing Must Be Smooth and Easy - Roll media must be able to turn with little or no drag, and allow the printer to smoothly pull media without jerking and stopping. Larger, heavier media rolls are more susceptible to these issues. Minimize roll to roll holder contact and avoid sharp contact surfaces. Fan-fold media must have sufficient room to unfold and not bind on media guide surfaces or at the perforations or sides. The printer can get distorted print (e.g. compressed print, short receipts, etc.), motor stalls, and jamming if media dispensing to the printer is not smooth and easy for the printer. Media Supply Method The KR403 printer supports two basic media supply method types: outside wound roll mount and stacked fan-fold receipt media. The media printing surface faces up towards the ‘top’ of the printer and away from the body of the printer. Top of Printer (Any Orientation) Printing Surface Printing Surface P1016701-001 KR403 Integrators Guide 12/23/2009 Printer Overview Basic Media Mounting Considerations Media Input Aperture The KR403 printer has a wide aperture to support a wide range of media mounting locations. The media can enter the printer directly or indirectly with the addition of custom media guides or printer roll or mounting accessory kits. Side Panel Cut Away 59° Media In 25° Minimum Clearance Area for Printer Power and Cabling The direct media input (or angle of contact with media guides - not shown here) will change as the media is being consumed. Minimum Clearance Area for Printer Power and Cabling This area should have a continuous physical barrier separating the media and folds from binding in the cabling, printer body, kiosk chassis seams, etc. 12/23/2009 KR403 Integrators Guide P1016701-001 21 22 Printer Overview Basic Media Mounting Considerations Mounting Orientations The printer has two basic kiosk operation modes and orientations: Horizontal and Vertical. Horizontal Vertical The maximum angle that the printer can operate from the nominal vertical or horizontal orientations is dependent upon environmental conditions and the media in use. • Environmental conditions that can affect operation include: humidity (and temperature), circulating air in the kiosk, static buildup on adjacent kiosk components and surfaces, etc. • Media considerations can include: length of receipt, partial cut of receipt in receipt design, media curving at the end of the media roll, media thickness and weight, perforations on fan-fold or receipt media, etc. • Other considerations that affect your printer mounting are also in this section include: media mounting, media path, media access, printer maintenance, cabling, etc. Horizontal Vertical Acceptable P1016701-001 Verify Operation KR403 Integrators Guide Unacceptable 12/23/2009 Printer Overview Basic Media Mounting Considerations The areas of primary concern are the horizontal operation’s ‘loop area’ and ‘waste bin’, and vertical operations ‘receipt presented storage’, ‘waste bin’ and open ‘loop area’ (with no loop). These two areas can require special attention when designing the inside of the kiosk. The printer needs the space to store the printed receipt before presenting it to the customer. The longer the receipt, the greater the area needed. When mounting the printer at angles other than the nominal vertical or horizontal orientations, simulated receipt printing operations should be observed with ideally the chosen media for use in the kiosk and in the environmental conditions that it will operate on-site. The KR403 mounting becomes even more versatile if the Small Roll Media Roll Adapter accessory is used to guide the leading edge of receipt into the input of the media drive rollers. This allows the printer to be mounted in a wider range of mounting orientations shown below Small Core Media Roll Adapter Horizontal 12/23/2009 Vertical KR403 Integrators Guide P1016701-001 23 24 Printer Overview Basic Media Mounting Considerations Notes • ___________________________________________________________________ __________________________________________________________________________ __________________________________________________________________________ __________________________________________________________________________ __________________________________________________________________________ __________________________________________________________________________ __________________________________________________________________________ __________________________________________________________________________ __________________________________________________________________________ __________________________________________________________________________ P1016701-001 KR403 Integrators Guide 12/23/2009 3 Controls Contents Controls, Indicators and Sensors . . . . . . . . . . . . . . . . . . . . . . . . . . . . . Feed Button . . . . . . . . . . . . . . . . . . . . . . . . . . . . . . . . . . . . . . . . . . . . . Status Indicator Descriptions . . . . . . . . . . . . . . . . . . . . . . . . . . . . . . . . Sensing, Status and Error Reporting . . . . . . . . . . . . . . . . . . . . . . . . . . Feed Button Modes . . . . . . . . . . . . . . . . . . . . . . . . . . . . . . . . . . . . . . . 12/23/2009 KR403 Integrators Guide 26 27 27 28 31 P1016701-001 26 Controls Controls, Indicators and Sensors Controls, Indicators and Sensors The KR403 printer has a variety of controls, indicators, and sensors to enhance the usability of the printer for the client’s kiosk experience, the kiosk operator’s service and maintenance duties, and expand the developer’s ability to provide printing and service information to the host kiosk system. The controls, indicators and sensors include: • Media ‘Feed’ button with configuration and diagnostic functionality • An array of media detection and control sensors • Printhead temperature, sensor operation failure, and printhead testing down to the pixel level • Cutter operation sensing and jam detection • Media output pull detection sensing • Support for an external low media (roll) detection sensor accessory option • Virtual sensing and report of printer operations to the host to simplify reporting and kiosk integration and design process. • Programming configurable maintenance and service warnings for printhead cleaning, printhead life, printer life, and count of media retracted back into the kiosk. These features are off by default and must be set by Set/Get/Do (SGD) or ZPL programming. Feed Button and Indicators (Hidden from view) Ext.Media Low Sensor Port Feed Button and Indicators (Both sides of printer) The printer has redundant printer control and indicator panels on each side of the printer to provide the integrator greater flexibility for designing printer mounting for servicing the printer. P1016701-001 KR403 Integrators Guide 12/23/2009 Controls Controls, Indicators and Sensors Feed Button The Blue Feed button has several functions: • Press and Release will feed media, cut, and present a complete receipt page in the default kiosk mode. All the other integrator set modes and variations of the kiosk mode will at minimum, feed a page length of media when the Feed button is pressed and released. • Any data in the print buffer will be printed. If the buffer is empty the page will be blank. In black-mark mode, the page will be synchronized with the black-mark. • Press and Hold with the Printer ON will cause the printer to enter the FEED Button Modes, a suite of manual setup and configuration operations used typically by the integrator. See the Feed Button Modes on page 31 for more details. • Press and Hold while turning the Printer ON will cause the printer to enter a printer to host communication diagnostic mode for application developers and kiosk integrator troubleshooting. Firmware update download is also supported by this mode to allow direct file transfer (like the DOS command line COPY function) to the printer without the use of custom applications or a KR403 printer driver. Power Indicator The Power Indicator is green when the printer has the 24 VDC power applied to the printer. Status Indicator Descriptions What the Status Light is Telling You 12/23/2009 LED Status and Color Printer Status OFF OFF (Power Indicator is OFF also) Solid Green On - Ready Solid Amber Stopped - Failed Internal Power-up Diagnostics Flashing Green Transferring Data - Normal Operation Flashing Red Stopped - Printhead Open, Media Out, Media Path Error or Cutter Error Double Flashing Green Paused Flashing Amber Paused - Printhead Cooling Down Alternately Flashing Green and Red Needs Service - Memory Error Flashing Red, Red and Green Needs Service - Printhead or Motor Failure Flashing Red, Amber, Green Memory Defragmentation (DO NOT reset or turn off power till finished!) KR403 Integrators Guide P1016701-001 27 28 Controls Sensing, Status and Error Reporting Status conditions are reset and rechecked when: 1. When the conditions causing them are removed 2. When the printer has power removed and reapplied. 3. When the printhead is opened or closed. Sensing, Status and Error Reporting The KR403 has an extensive array of sensing and error reporting capability available to the printer for internal process control, status reporting to the host and custom printer software development by the software integrator. Many of these features and functions are supported directly by the Windows Driver and Zebra Designer via the driver. • The printer monitors the printhead, motors, cutter and a variety of internal main board functions. • The KR403 printer has a variety of ‘virtual sensor and error flags’ that use combinations of sensors and status flags to create additional error reporting flags to simplify the software integrators task of monitoring the printer. • The KR403 printer also has an odometer for maintenance alerts for printhead cleaning and printhead low life warning (printhead will need replacement soon). This feature is off by default. • The KR403 printer also does power-up printhead testing, printhead critical fault testing for safety and has a programming accessible printhead pixel test that reports the functionality of individual pixels. This feature is off by default. The following tables and illustration shows an excerpt from ZPL programmers manual of the the error tables for the ^HQ status report. Please see the ZPL programmers guide for more details and related commands. P1016701-001 KR403 Integrators Guide 12/23/2009 Controls Sensing, Status and Error Reporting a3a Error Flags (~HQES) Error Flags Flag Group 2 Group 1 (X = Value can be any hexadecimal number [0-9, A-F]) Nibbles16-9 Nibble8 Nibble7 Nibble6 Nibble5 Nibble4 Nibble3 Nibble2 Nibble1 No Error 0 00000000 0 0 0 0 0 0 0 0 Error Present 1 00000000 X X X X X X X X Printhead Thermistor Open 1 00000000 X X X X X 2 X X Invalid Firmware Config. 1 00000000 X X X X X 1 X X Printhead Detection Error 1 00000000 X X X X X X 8 X Bad Printhead Element 1 00000000 X X X X X X 4 X Motor Over Temperature 1 00000000 X X X X X X 2 X Printhead Over Temperature 1 00000000 X X X X X X 1 X Cutter Fault 1 00000000 X X X X X X X 8 Head Open 1 00000000 X X X X X X X 4 Ribbon Out b 1 00000000 X X X X X X X 2 1 00000000 X X X X X X X 1 X 8 a X X X a Media Out a a Clear Paper Path Failed 1 a 00000000 X X X Paper Feed Error 1 a 00000000 X X X X 4 X X X Presenter Not Running a 1a 00000000 X X X X 2a X X X X X 1 a X X X X 8 a X X X X a Paper Jam during Retract a a 1 a a Black Mark not Found 1 a 00000000 00000000 X X X X Black Mark Calibrate Error 1 a 00000000 X X X 4 X X X X Retract Function timed out a 1a 00000000 X X X 2a X X X X X a X X X X Paused a 1 a 00000000 X X 1 a. This error flag is supported only on KR403 printers. b. This error is not supported by the KR403 printer. 12/23/2009 KR403 Integrators Guide P1016701-001 29 30 Controls Sensing, Status and Error Reporting Warning Flags (~HQES) Warning Flags Flag No Warning 0 Group 2 Group 1 (X = Value can be any hexadecimal number [0-9, A-F]) Nibbles16-9 Nibble8 Nibble7 Nibble6 Nibble5 Nibble4 Nibble3 Nibble2 Nibble1 00000000 0 0 0 0 0 0 0 0 Warning Present 1 00000000 X X X X X X X X Paper-near-end Sensor c 1c 00000000 X X X X X X X 8c Replace Printhead 1 00000000 X X X X X X X 4 Clean Printhead 1 00000000 X X X X X X X 2 Need to Calibrate Media 1 00000000 X X X X X X X 1 Sensor 1 (Paper before head) c 1c 00000000 X X X X X X 1c X Sensor 2 (Black mark)c 1c 00000000 X X X X X X 2c X X 4 c X c X Sensor 3 (Paper after head) c c c 1 00000000 X X X X X Sensor 4 (loop ready) 1 c 00000000 X X X X X X 8 Sensor 5 (presenter) c 1c 00000000 X X X X X 1c X X Sensor 6 (retract ready) c 1c 00000000 X X X X X 2c X X X 4 c X X 8 c X X c Sensor 7 (in retract) c Sensor 8 (at bin) c 1 c 1 00000000 00000000 X X X X X X X X X c. This error flag is supported only on KR403 printers. The graphic and terms represent the printer functions in the Looping Presenter and Vertical Presenter kiosk operating modes. P1016701-001 KR403 Integrators Guide 12/23/2009 Controls Feed Button Modes Feed Button Modes Power Off Mode (Communications Diagnostics Mode) With the printer power off, press and hold the Feed button while you turn on the power. The status light will be Amber. After approximately one (1) second, the printer will begin a series of flash sequences described below. Status Flash Sequence 12/23/2009 Action Rapid Amber Flashing Firmware Download Mode - The printer starts rapidly flashing red to denote entry into the Firmware Download mode. Releasing the Feed button here will start initializing the printer for download. The printer is ready to start downloading firmware when the status light begins to slowly flash between red and green. Amber Normal Operations Mode - The printer continues into a normal printer initialization. Releasing the Feed button here will allow the printer to start normally without firmware download or operating in communications diagnostics mode. Green Communications Diagnostic (Dump) Mode - Release the Feed button immediately after the printer status light turns green. The printer will print ‘Now in DUMP’ at the top of the receipt and then advance to the next receipt. After printing the first receipt, the printer will automatically enter into diagnostic mode in which the printer prints out a literal representation of all data subsequently received. To exit the diagnostic mode and resume printing, turn off and then turn on the printer. An alternate method for exiting the diagnostic mode is to press the Feed button as many times as it takes to clear the printer’s command buffer and print ‘Out of DUMP’ on the receipt. KR403 Integrators Guide P1016701-001 31 32 Controls Feed Button Modes Power On Modes With the printer power on and top cover closed, press and hold the Feed button for several seconds. The green status light will flash a number of times in sequence. The explanation at the right (Action) shows what happens when you release the key after the start specific number of flashes and before the next flash sequence starts. For flash sequences 4-7, the status light will flash 3-4 times before pausing and starting the next flash sequence. Status Flash Sequence Action * Configuration Status - Prints a detailed printer configuration status (label) receipt. The receipt can be used to verify printing, assist printer to computer communication configuration, maintenance, troubleshooting, and help us with customer care communications. * ** Standard Media Calibration - The printer adjusts the media sensors for optimal performance with the installed media. It also measures and sets the distance between black marks (receipt length) when the printer is set for black mark media. The printer will feed one to four receipts. Note to users familiar other Non-Kiosk ZPL printers: Kiosk printers have the media type detection disabled to keep the operator from accidently switching media types, e.g. using POS media (continuous receipt media) when the application requires black mark media for proper printing. * ** *** Serial Port Configuration - To reset the communication parameters. Press and release the Feed button while the LED rapidly flashes amber and green. For autobaud synchronization: Send the ^XA^XZ command sequence to the printer while the LED rapidly flashes amber and green. When the printer and host are synchronized, the LED changes to solid green. NOTE: No receipts will print during autobaud synchronization. * ** *** **** Factory Defaults - Resets the printer to the default factory settings and modes. See the configuration (label) receipt for a list of the primary settings affected by this Feed Mode option. Other settings are exclusively set, viewed and controlled by programming are also reset. The printer then performs a standard media calibration. * ** *** **** **** Print Width Adjustment - Prints a succession of boxes starting at the minimum print width and ending in the printer’s maximum print width in 4mm increments. Press the Feed button once when the printer has reached the desired maximum print width. Note that the printer driver and applications can override this setting. * ** *** **** **** **** Print Darkness (Density) Adjustment - Prints a succession of bar code simulation patterns starting at the minimum darkness (print density/heat) and ending in the printer’s maximum darkness in increments of four (4) using the ZPL darkness setting range values. Press the Feed button once the pattern is clear and legible. Do not continue to increase the darkness setting. Bar code line widths may become distorted reducing readability. Note that the printer driver and applications can override this setting. * ** *** **** **** **** **** Manual Media Calibration - The printer runs an enhanced version of the Standard Media Calibration (see above). Manual calibration is recommended whenever you are using preprinted media, print on the liner or back side of the media, or if the printer will not correctly auto calibrate. A graphical profile of the media sensing will print. See Manual Calibration on page 96 for an example and usage of this feature. If the Feed button remains pressed after a 7-flash sequence, the printer exits the configuration mode when the Feed button is released. P1016701-001 KR403 Integrators Guide 12/23/2009 4 Operation Contents Basic Printer Operation Overview. . . . . . . . . . . . . . . . . . . . . . . . . . . . . Attaching Power . . . . . . . . . . . . . . . . . . . . . . . . . . . . . . . . . . . . . . . . . . Manual Printer Reset . . . . . . . . . . . . . . . . . . . . . . . . . . . . . . . . . . . . . . Determining Thermal Media Types . . . . . . . . . . . . . . . . . . . . . . . . . . . . Preparing a Media Roll for Use. . . . . . . . . . . . . . . . . . . . . . . . . . . . . . . Automated Media Loading . . . . . . . . . . . . . . . . . . . . . . . . . . . . . . . . . . Manual Media Loading . . . . . . . . . . . . . . . . . . . . . . . . . . . . . . . . . . . . . Clearing Paper Jams . . . . . . . . . . . . . . . . . . . . . . . . . . . . . . . . . . . . . . Cleaning the Printhead . . . . . . . . . . . . . . . . . . . . . . . . . . . . . . . . . . . . . Printing a Test (Printer Configuration) Receipt . . . . . . . . . . . . . . . . . . . Connecting the Printer to the Host . . . . . . . . . . . . . . . . . . . . . . . . . . . . Interface Cable Requirements . . . . . . . . . . . . . . . . . . . . . . . . . . . . . . . USB Interface Requirements . . . . . . . . . . . . . . . . . . . . . . . . . . . . . . . . Serial Communications . . . . . . . . . . . . . . . . . . . . . . . . . . . . . . . . . . . . . Autobaud . . . . . . . . . . . . . . . . . . . . . . . . . . . . . . . . . . . . . . . . . . . . . . . Resetting the Default Serial Port Parameters. . . . . . . . . . . . . . . . . . . . Communicating with the Printer . . . . . . . . . . . . . . . . . . . . . . . . . . . . . . 12/23/2009 KR403 Integrators Guide 34 35 36 36 37 39 40 41 42 44 45 45 46 47 47 48 49 P1016701-001 34 Operation Basic Printer Operation Overview Basic Printer Operation Overview To assist the kiosk operator in maintaining and supporting the KR403 printer when deployed and in use, this section has media handling instructions, tips and tricks that include: P1016701-001 • Applying Power and Manual Reset • Identifying direct thermal media • Preparing the media for use • Loading media • Printing a test receipt (configuration status label) • Clearing media jams • Cleaning the printhead • Attaching the printer to the host KR403 Integrators Guide 12/23/2009 Operation Attaching Power Attaching Power Caution • Never operate the printer and power supply in an area where they can get wet. Serious personal injury could result! 1. Make sure the printer’s power supply is turned off. Or if you are using the optional power supply accessory shown in the illustration below, make sure the power supply’s AC power cord is unplugged. Note the printer does not have an integrated power switch. 2. Insert the 24 VDC power supply’s power connector into the printer’s power receptacle. Verify the power plug’s latch has locked to the connector by giving it a slow gentle pull. 3. Insert the AC power cord into the power supply. Plug the other end of the cord into an appropriate AC electrical outlet. The active power light will go on if power is on at the AC outlet. 4. With the power supply on and connected to the printer, the printer’s power status indicator will light up green. The printer will begin the printer initialization process which takes approximately 25 seconds. The printer will test the cutter and check for the presence media. The status indicator will be green if media is loaded and flashing red (single blink) if media is not loaded. Printer Printer Power Connector Plug Varies by Country AC Power Cord Optional Power Supply Accessory Active Power Light IEC 60320 C-13 Plug Note • Ensure the appropriate power cord with a three (3) prong plug and an IEC 60320-C13 connector are used at all times. These power cords must bear the relevant certification mark of the country in which the product is being used. 12/23/2009 KR403 Integrators Guide P1016701-001 35 36 Operation Attaching Power Manual Printer Reset The KR403 printer does not have a power switch or reset button. To manually reset the printer, disconnect the 24 VDC power from the printer. Wait a few seconds for the Power LED to turn off and reconnect the power plug. The printer will take around a 25 seconds to reboot and initialize. The printer can also be reset with the ZPL ~JR command when sent by the kiosk application. This is equivalent to cycling the printer power for the printer’s internal programming. Determining Thermal Media Types The KR403 printer uses direct thermal media. Direct thermal media has a chemically treated print surface that uses heat to expose or darken the area where heat is applied. Thermal transfer media or ordinary un-treated paper requires ribbon or ink for printing while direct thermal media does not. To determine what type of media is being used and print surface of the media, perform a media scratch test. The KR403 printer only uses outside wound roll media or fan-fold media. The print surface faces away from the center of the printer. Media with black marks To perform a media scratch test, complete these steps: 1. Scratch the print surface of the media with a finger nail or pen cap. Press firmly and quickly while dragging it across the media surface. Direct thermal media is chemically treated to print (expose) when heat is applied. This test method uses friction heat to expose the media. 2. Did a black mark appear on the media? P1016701-001 If a black mark... Then the media is... Does not appear on the media Thermal transfer. A ribbon or ink is required and is not support for use by the KR403. Appears on the outside of the media. Direct thermal. No ribbon or ink are required. KR403 Integrators Guide 12/23/2009 Operation Preparing a Media Roll for Use Preparing a Media Roll for Use 1. Turn the new paper roll as shown below. Paper Roll Orientation Temperature-sensitive coating 1 2. Tear off a full turn of the paper from the new paper roll. Caution • This is important since the outer end of the paper is usually fixed to the roll with some type of glue or self-adhesive substance that might otherwise cause paper jam or even print head damage. Tear Off a Full Turn from the New Paper Roll 2 Glue or similar substance 12/23/2009 KR403 Integrators Guide P1016701-001 37 38 Operation Preparing a Media Roll for Use 3. The loading process works best with the cut as a square, straight edge. Cut the paper in a suitable angle. If the media is not cut square and the operator does not have the ability to cut or tear a straight edge, then the printer can fail to load the media or even cause a media jam. The media should not make contact with the platen roller before the sensor detects the media. The distance between the platen roller and media sensor is approximately 10 mm (0.39 inches). Figure 1 • Suitable Paper Edge for Auto Load Auto Loads Auto Loads Narrow Media Auto Loads Wide Media Auto Loads Fails Auto Load Media Contact Leads Media Sensing Important • The wide media sensor (88 and 82.5 mm) and printer's power connector are both located on the right side of the printer when looking into the printer from the rear. The media sensor for narrow media (58 and 60 mm) is located on the left side when looking into the media input slot from the rear of the printer. P1016701-001 KR403 Integrators Guide 12/23/2009 Operation Automated Media Loading Automated Media Loading The printer is designed to detect media when it is inserted into the empty media input slot at the rear of the printer. The printer begins turning the platen (drive) roller when the leading edge of the media passes over the media sensor. 1. Insert the paper through the paper entry opening at the back of the printer. The printer will now feed, cut and eject a blank receipt or a printout of the last print job in the print buffer, and then automatically go to a Ready state (solid green status indicator). Figure 2 • Auto Load Insert Media Media Feeds to Presenter Cut Media Media Presented Remove presented media to print or feed media 12/23/2009 KR403 Integrators Guide P1016701-001 39 40 Operation Manual Media Loading Manual Media Loading Manual media loading is intended for maintenance operations, such as printhead cleaning and removing media jams. Please use the Auto Load procedure to load media for normal operations. 1. Open the printhead by pushing green printhead push-bar back towards the rear of the printer and lift up the printhead. 2. Insert the media through the rear of the printer and under the open printhead. Pull the media just past the cutter and platen (drive) roller. 3. Close the printhead. Push down on the push-bar to securely latch the printhead closed. 4. Press the Feed button once to get the printer out of Pause mode (double blinking green status indicator. The printer will feed 70 mm of media and cut the media. Discard the receipt scrap. Pressing the Feed once more will reprint that image to the proper paper size. P1016701-001 KR403 Integrators Guide 12/23/2009 Operation Clearing Paper Jams Clearing Paper Jams Should a paper jam occur, follow the procedure below: 1. Cut or tear the media off the back of the printer. Pull the media up towards the top of the printer and side to use the rear of the printhead door as a tear bar/straight edge. This is to use the Auto Load media loading method after clearing the jam. 2. Open the printhead by pressing the green release lever toward the rear of the printer and swing the printhead up to access the media path. 3. Remove and discard the damaged media. 4. Close the printhead and reload the media using the Auto Load media loading method. Figure 3 • Opening the Printhead 12/23/2009 KR403 Integrators Guide P1016701-001 41 42 Operation Cleaning the Printhead Cleaning the Printhead The KR403 kiosk receipt printer needs be cleaned periodically to maintain optimal print quality and maximize printhead life. Even in the cleanest environments, the printhead will get contaminates and build-up on the printhead’s pixel heating elements. These contaminates may include: dust, body oils (acids), paper or media fibers, airborne chemicals, etc. Contaminates shorten the printhead's usable life. Printing adhesive backed receipts or labels also add adhesives to this list. • Contaminates build up on the printhead over time, and get baked on the printhead's heating elements. • Contaminates also add to the normal friction wear between the media and printhead. They can act like fine sandpaper and accelerate the wear process or even damage the printhead. A basic and simple rule to use for ‘When do I tell the kiosk operator to clean the printhead’ is to ‘Clean the printhead before loading a new roll of media’. Some media vendors secure the end of the roll to the media core with tape or adhesive that can transfer to the printhead. Always use a new cleaning pen on the printhead (an old pen carries contaminates from its previous uses that may damage the printhead). The printhead can also be cleaned with a fiberfree swab (such as a Texpad swab) or a lint free, clean, damp cloth very lightly moistened with medical grade alcohol (90% pure or better). • Cleaning pens (105950-035) Box of 12 • Cleaning swabs (105909-057) Set of 25 Caution • The printhead becomes hot while printing. To protect from damaging the printhead and risk of personal injury, avoid touching the printhead. Use only the cleaning pen to perform maintenance. When you load new media, you can also clean the printhead. 1. Open the printhead. 2. Rub the cleaning pen across the dark area of the printhead. Clean from the middle to the outside. This will move contaminates to an area outside of media path and print area. This will limit the amount of residual adhesive left on the printhead to non-functional area of the printhead and platen (drive) roller. Do not use the cleaning pen on anything other than the printhead to avoid crosscontamination. 3. Wait one minute before closing the printer. Basic Printer Cleaning for the Operator Use a can of compressed air to remove dust and particle build-up from the printer. Open the printhead and spray the dust out of the printer. Due to variations in kiosk design, media and the individual kiosk’s installation environment; it difficult to recommend fixed cleaning period. An arbitrary cleaning period should be once a month. Increase the frequency of cleaning if the printer begins to have media sensing problems. Clean as required to remove build-up. P1016701-001 KR403 Integrators Guide 12/23/2009 Operation Cleaning the Printhead 12/23/2009 KR403 Integrators Guide P1016701-001 43 44 Operation Printing a Test (Printer Configuration) Receipt Printing a Test (Printer Configuration) Receipt Before you connect the printer to your computer, make sure that the printer is in proper working order. You can do this by printing a configuration receipt. 1. Make sure the media is properly loaded and Ready with the printhead closed. Then, turn the printer power on if you have not already done so. If the printer initializes with the status light blinking green (pause mode), press the Feed button once to set the printer in Ready (to print) mode. 2. Press the Feed button to print, present and removal of receipts two to three times to allow the printer to calibrate the printer for the installed media. The printer may feed several extra receipts during this process if media calibration needs to be adjusted (this is an automatic printer feature). 3. When the status light is solid green, press and hold the Feed button until the status light flashes once. 4. Release the Feed button. A printer configuration receipt will print (example below) The configuration status receipt will print as two or more receipts if the receipt size is not large enough to contain all of the status information as shown above. P1016701-001 KR403 Integrators Guide 12/23/2009 Operation Connecting the Printer to the Host Connecting the Printer to the Host The KR403 printer has a Universal Serial Bus (USB) and a RS232 Serial port interface. Caution • Keep the kiosk OFF when attaching the interface cable. The power cord must be inserted into the power supply and the power receptacle on the back of the printer before connecting or disconnecting the communications cables. Important • This printer complies with FCC “Rules and Regulations,” Part 15, for Class B . Equipment, using fully shielded data cables. Use of un-shielded cables may increase radiated emissions above the Class B limits. Interface Cable Requirements Data cables must be of fully shielded construction and fitted with metal or metallized connector shells. Shielded cables and connectors are required to prevent radiation and reception of electrical noise. To minimize electrical noise pickup in the cable: 12/23/2009 • Keep data cables as short as possible (6 foot [1.83 m] recommended). • Do not tightly bundle the data cables with power cords. • Do not tie the data cables to power wire conduits. • Avoid fluorescent lighting and power supply components. KR403 Integrators Guide P1016701-001 45 46 Operation Connecting the Printer to the Host USB Interface Requirements Universal Serial Bus (version 2.0 compliant) provides a fast interface that is compatible with your existing PC hardware. USB’s “plug and play” design makes installation easy. Multiple printers can share a single USB port/hub. When using a USB cable (not supplied with your printer), verify that the cable or cable packaging bears the “Certified USB™” mark (see below) to guarantee USB 2.0 compliance. . Mini-B USB Connector Mini-B USB Cable P1016701-001 KR403 Integrators Guide 12/23/2009 Operation Connecting the Printer to the Host Serial Communications The required cable must have a nine-pin “D” type (DB-9P) male connector on one end, which is plugged into the mating (DB-9S) serial port located on the back of the printer. The other end of this signal interface cable connects to a serial port at the host computer. Depending on the specific interface requirements, this will most likely be a Null Modem (cross-over) cable. The serial port communication settings between the printer and host (typically a PC) must match for reliable communication. The Bits per second (data or Baud rate) and Flow control are the most common settings that get changed. The host (typically a Windows PC) needs to have the data rate and data Flow control changed to match the printer’s default communication method: • Bits per second - 115K is the printer’s default Baud Rate (Bits per second). The printer and host can not communicate unless these match. • Flow control - Software and is noted by the printer’s Host Handshake setting of Xon/Xoff. The printer may communicate if these do not match, but it may not be reliable. • Data bits: 8 — Default (Windows and printer) • Parity: None — Default (Windows and printer) • Stop bits: Doesn’t care Serial communications between the printer and the host computer can be set by: • Autobaud synchronization • ZPL programming ^SC command • Resetting the printer to its default printer configuration. Autobaud Autobaud synchronization allows the printer to automatically match the communication parameters of the host computer. To Autobaud: 1. Press and hold the feed button until the green status LED flashes once, twice, and then three times. 2. While the status LED flashes, send the ^XA^XZ command sequence to the printer. 3. When the printer and host are synchronized, the LED changes to solid green. (No receipts will print during Autobaud synchronization.) ZPL ^SC Command Use the Set Communications (^SC) command to change the communications settings on the printer. 1. With the host computer set at the same communications settings as the printer, send the ^SC command to change the printer to the desired settings. 2. Change the host computer settings to match the new printer settings. Refer to the ZPL Programming Guide for more information about this command. 12/23/2009 KR403 Integrators Guide P1016701-001 47 48 Operation Connecting the Printer to the Host Resetting the Default Serial Port Parameters Do the following to reset the communications parameters on the printer to the factory defaults (serial communication settings are: 115k baud, 8 bit word length, NO parity, 1 stop bit, and XON/XOFF data flow control). 1. Press and hold the feed button until the green status LED flashes once, waits a moment and flashes twice, and then waits again before flashing three times (release immediately). 2. While the status LED rapidly flashes amber and green, press the feed button. Serial communications between the printer and the host computer can be set by the ZPL ^SC command. Serial Port Connector Tighten screws to lock cable into place P1016701-001 KR403 Integrators Guide Serial Cable 12/23/2009 Operation Connecting the Printer to the Host Communicating with the Printer The easiest way to begin using your complete kiosk printing solution is to utilize the Zebra Designer Windows Driver in PC based systems. With the driver loaded; you can test the kiosk printing system, configure your printer, send programming commands, use Windows applications to print directly to the printer, and download files (fonts, graphics, logos, update firmware, etc.). The Zebra Designer driver works directly with the free suite of Zebra application software to design and create receipts (Zebra Designer) and manage one or more printers locally. All are available on the Zebra Web site at www.zebra.com. Use the Zebra Setup Utility to load the driver and configure your printer. If the operating system automatically starts a ‘Add new hardware’ wizard, then close the wizard and continue installing the driver. Universal Serial Bus (USB) Communications The printer is a terminal device when using a universal serial bus interface. You can refer to the Universal Serial Bus Specification for details regarding this interface. Scanners, scales or other data input devices must use the serial port to send data to the printer. USB Printer Detection and Windows® operating systems Windows Vista, Windows XP, and Windows 2000 operating systems support the USB port communications with this printer when using the Zebra Setup Utility or the ZD (Zebra Designer) Windows Driver. These operating systems automatically detect the printer when connected via the USB interface. The operating system automatically starts a “Add new hardware’ wizard when connecting the printer for the first time to the PC. Close the wizard. Install the printer following the wizard. The latest driver is found at www.zebra.com. Select the USB and then media size (closest match). Click on the ‘Print test page’ button to verify a successful installation. The Windows operating system will detect and re-link a previously installed printer if it is reconnected to the USB interface or power is turned on after the PC has finished its restart of the operating system. Ignore the new device detected warnings and close the Task bar prompts. Wait several seconds for the operating system to match the printer to the driver software. The warnings will quit and the printer now should be ready to begin printing. Serial Port and Windows® operating systems The Windows operating system default settings for the serial port communication closely match the printer’s defaults settings with two exceptions; the data Baud Rate and Flow Control settings. The Windows default data Baud Rate (Bits per second) setting is 9600. The KR403 printer requires data Baud Rate set to 115k. The Windows default data Flow Control setting is NONE. The KR403 printer requires data Flow Control set to Software. Note • The KR403 printer does not support Windows Serial Port Plug and Play (PnP) device detection at this time. 12/23/2009 KR403 Integrators Guide P1016701-001 49 50 Operation Connecting the Printer to the Host Notes • ___________________________________________________________________ __________________________________________________________________________ __________________________________________________________________________ __________________________________________________________________________ __________________________________________________________________________ __________________________________________________________________________ __________________________________________________________________________ __________________________________________________________________________ __________________________________________________________________________ __________________________________________________________________________ P1016701-001 KR403 Integrators Guide 12/23/2009 5 Printer Configuration Contents Printer Configuration Methods and Tools . . . . . . . . . . . . . . . . . . . . . . . Fonts and Your Printer . . . . . . . . . . . . . . . . . . . . . . . . . . . . . . . . . . . . . Identifying Fonts in Your Printer . . . . . . . . . . . . . . . . . . . . . . . . . . . . . . Localizing the Printer with Code Pages . . . . . . . . . . . . . . . . . . . . . . . . Asian fonts and Other Large Font Sets. . . . . . . . . . . . . . . . . . . . . . . . . Getting Asian Fonts . . . . . . . . . . . . . . . . . . . . . . . . . . . . . . . . . . . . . . . 12/23/2009 KR403 Integrators Guide 52 53 53 53 54 54 P1016701-001 52 Printer Configuration Printer Configuration Methods and Tools Printer Configuration Methods and Tools The KR403 printer has a variety of printer configuration methods for the software and hardware integrator. Each is designed to assist you with various kiosk design and integration tasks. These integration tasks include printer startup, proof of concept, receipt design, status reporting, multi-printer configuration, and kiosk application design. The configuration methods from hardware to programming application include: P1016701-001 • Media Guides — Sets the printer’s maximum print width. See Media Guide Required Accessory on page 5 and Installing the Media Guide (Required Accessory) on page 13. • Control Panel — The printer’s control panel when using the Feed Button modes, provides the access or settings to automated media calibration routines, print darkness, print width (on receipt), automated serial port setup, and resetting the printer to factory defaults. See the Feed Button Modes on page 31 and the Printing a Test (Printer Configuration) Receipt on page 44 for a view of one printer’s printer configuration status label. • Windows Zebra Setup Utility and Windows Drivers — Quickly allows the developer to use the printer, test configuration options, send programming commands or files, and print directly from Windows applications. • Zebra Designer — A receipt and label design program that works with the Windows printer driver to help you quickly develop receipt layouts, and manage fonts and objects (graphics, logos and receipt forms) during proof of concept process. • ZPL, SGD (Set-Get-Do), and ZBI (Zebra Basic Interpreter) Programming Languages — The ZPL printer programming printer page description language allows the application developer to configure and control all aspects of your printer with ASCII based text programming. The SGD object based programming language is used to set and check printer configuration status and configuration. These three programming languages should be used in separate command lines or files when sending commands to your printer. The ZPL Programming Guide for the KR403 printer covers all three languages in a single manual at this time. See the KR403 Software Integrator’s Guide for assistance in quickly developing and integrating the printer. • ZebraLink (File and) Firmware Downloader — This tool is used to initialize ZBI programming capability and download files to the printer. ZBI allows the software developer to emulate other programming and create custom commands. Can be used in a printer configuration workstation to send configuration files, firmware updates, and files (programming, graphics, logos and receipt forms). Use the full featured ZebraNet Bridge instead for everything but ZBI activation • ZebraNet Bridge — Zebra Net Bridge is a printer maintenance tool for use with local and network based printers. The KR403 printer can only be managed as a locally connected printer (the KR403 printer does not have a Ethernet printer option). This Windows application is the ideal tool to use as a workstation for configuring your printer prior to installing it into a kiosk. Use it to duplicate configurations, send configuration files, firmware updates, and files (programming, graphics, logos and receipt forms). At the time of release, the KR403 Windows driver or the Setup Utility can not be loaded in the PC when using ZebraNet Bridge. It is scheduled for an update to remove the conflict with the driver and local printer management in 2010. KR403 Integrators Guide 12/23/2009 Printer Configuration Fonts and Your Printer Fonts and Your Printer The KR403 printer supports your language and font requirements with a variety of internal fonts, on-board font scaling, international font sets and character code page support, Unicode support, and font download. The KR403 printer’s font capabilities are programming language dependent. The ZPL programming language provides advanced font mapping and scaling technology to support outline fonts (TrueType™ or OpenType™) and Unicode character mapping as well as basic bitmapped fonts and character code pages. The ZPL programming guide describes and documents fonts, code pages, character access, listing fonts, and limitations of ZPL. See the printer programming guides for information on Text, Fonts and Character support. The KR403 printer includes utilities and application software that support font download into the printer for both printer programming languages. Identifying Fonts in Your Printer Fonts and memory are shared by the programming languages in the printer. Fonts can be loaded in many memory areas in the KR403 printer. ZPL programming can recognize EPL and ZPL fonts. See the respective programmer guides for more information on fonts and printer memory. • To manage and download fonts for ZPL print operation, use ZebraNet Bridge. • To display all of the fonts loaded in your KR403 printer, send the printer the ZPL command ^WD. See the ZPL Programmers Guide for details. • Bitmap fonts in the various printer memory areas are identified by the.FNT file extension in ZPL. • Scalable fonts are identified with the.TTF,.TTE or.OTF file extensions in ZPL. • The six fonts LMu.FNT through LMz.FNT are EPL Line Mode fonts and are not available for use. Localizing the Printer with Code Pages The KR403 printer supports localization with common international character map code pages. • For ZPL code page support, including Unicode, see the ^CI command in the ZPL programmer’s guide. 12/23/2009 KR403 Integrators Guide P1016701-001 53 54 Printer Configuration Fonts and Your Printer Asian fonts and Other Large Font Sets Asian language pictographic fonts have large character sets with thousands of characters that support single language code page. In order to support the large Asian character sets, the industry adopted a double-byte (67840 maximum) character system instead of the single-byte characters (256 maximum) used by Latin based language characters to address large font sets. In order to address multiple languages with a single font set, Unicode was invented. A Unicode font supports one or more code points (relate these to code page character maps) and is accessed in a standard method that resolves character mapping conflicts. ZPL supports Unicode and has support for the large pictographic double-byte character Asian font sets. Asian language support requires additional memory support by the KR403 printer configured with the Full Flash Memory factory option. The number of fonts that can be downloaded is dependent upon the amount of available flash memory not already in use and the size of the font to be downloaded. Getting Asian Fonts Asian font sets are downloaded into the printer by the user or integrator. The fonts are purchased separately from the printer. • Simplified and Traditional Chinese • Japanese — JIS and Shift-JIS mappings • Korean • Thai Stand Alone Printing Your KR403 printer can be configured to work without being attached to a computer. The printer has the ability to automatically run a single receipt form. One or more downloaded receipt forms can be accessed and run with a terminal or wedge device to call a receipt. These methods allow the developer to incorporate data input devices, such as scanners or weight scales, to the printer via the serial port. Receipt formats can be developed and stored in the printer to support receipts that have: • One or more data variables to be entered via the terminal or wedge device. The receipt will print after the last variable data field has been input. • One or more receipts formats that are called by scanning bar codes containing programming to run a receipt form. • Receipt forms designed to work as a process chain with each receipt including a bar code containing the programming to run the next receipt in the process sequence. The printer supports a special receipt form that will automatically run after a power cycle or reset. The ZPL looks for a file named AUTOEXEC.ZPL. The files must be deleted from the printer followed by a reset or a power cycle to completely remove the file. P1016701-001 KR403 Integrators Guide 12/23/2009 6 Printer Maintenance Contents KR403 Printer Maintenance . . . . . . . . . . . . . . . . . . . . . . . . . . . . . . . . . Operator Maintenance . . . . . . . . . . . . . . . . . . . . . . . . . . . . . . . . . . . . . Dust Removal Cleaning . . . . . . . . . . . . . . . . . . . . . . . . . . . . . . . . . . . . On-Site Service Cleaning . . . . . . . . . . . . . . . . . . . . . . . . . . . . . . . . . . . Replacing the Printhead . . . . . . . . . . . . . . . . . . . . . . . . . . . . . . . . . . . . Replacing the Platen Roller . . . . . . . . . . . . . . . . . . . . . . . . . . . . . . . . . Replacing the Cutter Blades . . . . . . . . . . . . . . . . . . . . . . . . . . . . . . . . . 12/23/2009 KR403 Integrators Guide 56 56 56 59 62 64 66 P1016701-001 56 Printer Maintenance KR403 Printer Maintenance KR403 Printer Maintenance There are three types of printer servicing: Operator, Service Technician (on site) and Service Depot level servicing. • Operator — Can do simple maintenance procedures that do not require the printer to be disconnected or removed from the kiosk, and do not (potentially) change the printer configuration setting in the kiosk. • Service Technician (at kiosk) — Can do deep cleaning, printer re-configuration, cutter service, and replace consumable printer components (printhead, platen, and cutter blades). All of these procedures can be done inside the kiosk without removing the printer in many kiosk enclosures. The technician may need to remove the printer to perform some of these procedures to gain access to both sides of the printer. A qualified service technician is familiar with basic safety practices. • Service Depot (printer removed from kiosk) — Complete service: repair and cleaning. Operator Maintenance The KR403 printer requires very little maintenance to keep the printer operating optimally. Airborne contaminates (dust, chemicals, etc.) enter the kiosk all the time. Adhesive used to secure the media to the roll is the other common contaminate. Cleaning the printhead after each roll is used helps keep the print quality optimal and maximizes the printhead's usable life. Dusting the media path (and sensors) minimizes particle accumulation on driver rollers and sensors. The operator should clean the printhead regularly and blowout dust and other than particles in the printer. Cleaning the Printhead See Cleaning the Printhead on page 42. Dust Removal Cleaning Do dust removal cleaning to remove particle build-up inside the printer. It is difficult to recommend a regular cleaning period due to variations in kiosk design, media, and the individual kiosk’s on-site environment. An arbitrary starting period for dust removal cleaning should be once a month. Increase the frequency of cleaning if the printer begins to have trouble sensing media, media jams, extra receipts or print quality problems. Kiosks with very clean media (few paper particles) and have a relatively dust-free environment inside of the kiosk, may allow you to reduce the frequency of this cleaning procedure. Caution • Wear protective eyeware to guard against loose objects from being propelled with air blasts and bouncing off the inside of the kiosk to hit you in your eyes! Caution • Do Not Use air from an air compressor pump. Air compressors often use oil to lubricate the pump. Water in the air also condenses (with other chemicals from air and within the pump system) and sprays throughout the printer (and kiosk). P1016701-001 KR403 Integrators Guide 12/23/2009 Printer Maintenance Operator Maintenance Use a can of compressed air to remove dust and particle build-up from the printer. 1. Spray the dust off the outside of the printer. 2. If you have access to the media output slot on the bottom of the printer, then spray the Waste Bin sensor and through out the media output slot. Waste Bin (media) Sensor Me dia S ut tp Ou lot 3. Open the printhead and remove the media guide plate (see Installing the Media Guide (Required Accessory) on page 13). 4. Spray the media input area, platen (drive) roller, and then each of the three media sensors and the head-up sensor. Media Sensors Head-up Sensor 5. Replace the media guide plate, clean the printhead (see Cleaning the Printhead on page 42), and then close the printhead. 12/23/2009 KR403 Integrators Guide P1016701-001 57 58 Printer Maintenance Operator Maintenance 6. Spray the Present and In Retract media sensors under the present and feed roller assemblies. Pivot the forward Retract and Dispense roller assembly up to gain better assess to the In Retract sensor In Retract Sensor Present Sensor P1016701-001 KR403 Integrators Guide 12/23/2009 Printer Maintenance On-Site Service Cleaning On-Site Service Cleaning The KR403 printer may require a periodic deep cleaning to remove accumulated debris that can build-up on the media path, sensors and rollers. Normally this type of cleaning will rarely need to be done if the operator does the Dust Removal Cleaning regularly. Labels and some non Zebra media can increase the need for cleaning. Labels can slowly transfer adhesive from the edges of the label to the media path (and printhead). Poor quality label media can excess adhesive. Some direct thermal receipt media can have chemicals that can harm your printhead or cause the dust and particles to stick to the media path. Some kiosk installation environments have chemicals, grease (cooking), tobacco smoke, etc. that can accumulate in the printers media path and sensors. Caution • Always disable printer power by un-plugging the printer from the kiosk power supply or turning off the printer and/or kiosk power. You may need to remove the printer from the kiosk to perform to gain access to all sides of the printer. 1. Start by doing the Dust Removal Cleaning (Dust Removal Cleaning on page 56) to reduce the accumulated contaminates in the printer. Leave the media guide off and do not clean the printhead until the end of this procedure. 2. Remove the Present Feed Roller Assembly. Push the retaining tab on either side and lift the roller assembly up out of the printer. Rotate and clean the rollers, and the rest of the assembly. Set the assembly aside. Push Tab Here and Lift 12/23/2009 KR403 Integrators Guide P1016701-001 59 60 Printer Maintenance On-Site Service Cleaning 3. Remove the Retract/Dispense Roller Assembly. Pinch the assembly at each end (next to the printer’s side plates) and lift it out of the printer. Rotate and clean the rollers, and the rest of the assembly. Set the assembly aside. 4. Open the printhead if it is closed. Using a fiber-free swab (such as a Texpad swab) or a lint free, clean, damp cloth very lightly moistened with medical grade alcohol (90% pure or better), clean all the media surfaces of dust and foreign materials. Media Path Area P1016701-001 KR403 Integrators Guide 12/23/2009 Printer Maintenance On-Site Service Cleaning 5. Clean all the all of the feed and drive rollers with a fiber-free swab (such as a Texpad swab) lightly moistened with medical grade alcohol (90% pure or better). Rotate the rollers with your fingers to expose all of the roller’s surface. Slide a swab into the media retract slot and clean the spring 6. Clean all the sensors with a fiber-free swab (such as a Cleaning swabs - p/n 105909-057) lightly moistened with medical grade alcohol (90% pure or better). Use the aerosol can of compressed air to dry the sensor. You may have to do this several times until all residue of foreign material (smoke tar, grease, adhesive) has been cleared. One or two times may only dilute or thin out residue. See the procedure for Dust Removal Cleaning on page 56 for the location of all the sensors that need cleaning. 7. Replace the Present and In Retract Roller assemblies. 8. Clean the printhead. See Cleaning the Printhead on page 42. 12/23/2009 KR403 Integrators Guide P1016701-001 61 62 Printer Maintenance Replacing the Printhead Replacing the Printhead The KR403 printer has a new adjustment free printhead. You only need a #1 Phillips screwdriver. No alignment or printing special test patterns. Caution • Prepare your work area by protecting against static discharge. Your work area must be static-safe and include a properly grounded conductive cushioned mat to hold the printer and a conductive wrist strap for yourself. Caution • The printhead becomes hot while printing. To protect from damaging the printhead and risk of personal injury, avoid touching the printhead. Use only the cleaning pen to perform maintenance. Caution • Always disable printer power by un-plugging the printer from the kiosk power supply or turning off the printer and/or kiosk power. 1. Remove the two screws securing the printhead and its ground wire to the printhead assembly. Screw Screw and Ground Lug P1016701-001 KR403 Integrators Guide 12/23/2009 Printer Maintenance Replacing the Printhead 2. Open the printhead. The printhead is now loose. Disconnect the printhead cable by gently and firmly pulling the cable connectors straight out of the printhead. Printhead (Cables not shown) 3. Put the new printhead in position and connect the cables to the printhead. The connectors are keyed and will only insert one way. Do not force the connectors. 4. Re-attach the printhead to the printhead assembly with the screws. Make sure the ground lug with the green wire is attached to the left side of the printhead assembly. 12/23/2009 KR403 Integrators Guide P1016701-001 63 64 Printer Maintenance Replacing the Platen Roller Replacing the Platen Roller The platen (drive) roller requires no tools to replace. 1. Open the printhead to gain access to the platen roller. 2. Pinch the top sides of the ‘U’ shaped (shown as red in the illustration below) black plastic platen bearings on each side of the printer. Lift the bearings, platen roller, and printline tab bracket (aligns printhead and platen roller position). Platen Bearing Platen Bearing P1016701-001 KR403 Integrators Guide 12/23/2009 Printer Maintenance Replacing the Platen Roller 3. Slide the two new platen bearings onto each end of the new platen roller’s shaft. Align the printline tab bracket to the platen roller and slide them both into the side plate of the printer. Align the printline tab bracket into the long narrow rectangular slot next to the platen bearing’s ‘U’ shaped slots and push the bearings into both sides until they snap and lock into place. 12/23/2009 KR403 Integrators Guide P1016701-001 65 66 Printer Maintenance Replacing the Cutter Blades Replacing the Cutter Blades Cutter service for the KR403 printer consists of blade replacement only at this time. It does not have a recommended on-site cleaning procedure. You only need a #8 Torx screwdriver to do this procedure. The cutter has a fixed blade (attached to the printhead) and a ‘V’ notch blade. Caution • Prepare your work area by protecting against static discharge. Your work area must be static-safe and include a properly grounded conductive cushioned mat to hold the printer and a conductive wrist strap for yourself. Caution • Always disable printer power by un-plugging the printer from the kiosk power supply or turning off the printer and/or kiosk power. Caution • Press the printer’s Feed Button to check and see if the cutter mechanism can accidentally be triggered and potentially cut you. This drains any residual current from the power supply. 1. Cutting Blade Replacement: Remove the Present Feed Roller Assembly. Push the retaining tab on either side and lift the roller assembly up out of the printer. Push Tab Here and Lift P1016701-001 KR403 Integrators Guide 12/23/2009 Printer Maintenance Replacing the Cutter Blades 2. Open the printhead. Loosen the four screws securing the cover plate assembly to the printer. lift the plate out of the printer. #8 Torx Screws (both sides) 3. Rotate the cutter gears with your finger until the cutter blade has reached its highest position and lift the cutter blade out of the printer. See the following instruction step. Cutter Blade Cutter Gear (note pin position) 12/23/2009 KR403 Integrators Guide P1016701-001 67 68 Printer Maintenance Replacing the Cutter Blades 4. Slide a new cutter blade into the cutter arm’s slot. The cutter blade’s long tab inserts into a slot in the main PCBA below the cutter. Push the blade into the Printline Tab bracket and rotate the cutter gears until the pin is in the lowest position. The cutter should be locked in place. Cutter Arm’s Slot Cutter Gear (note pin position) 5. Replace the cover plate assembly. Hold the plate down while tightening the four #8 Torq screws. 6. Replace the Present Roller assembly. P1016701-001 KR403 Integrators Guide 12/23/2009 Printer Maintenance Replacing the Cutter Blades 7. Fixed Blade Replacement: Loosely attach the two #8 Torq screws to the to the fixed blade. Turn the screws until they are even with the back side of the blade’s backside 8. With the printhead open half way, pinch the printhead. Hold the springs compressed while loosening the two screws securing the fixed blade to the printhead assembly. Slide the blade out slowly to avoid pulling the push bar‘s spring off. Pinch Screw Screw Spring 9. Slide a small flat blade screwdriver tip under the push bar spring. Be careful to not touch the printing surface of the printhead. Swing the screwdriver to the side while holding the spring away from the printhead. 12/23/2009 KR403 Integrators Guide P1016701-001 69 70 Printer Maintenance Replacing the Cutter Blades Fixed Blade Mounting Slot 10. Slide the fixed blade with the loose screws onto the printhead assembly on the side away from the screwdriver. Fixed Blade Center Tab 11. Swing the other side into its mounting slot. The center tab on the fixed blade goes under the spring (and screw driver blade). Remove the blade and verify that the spring is straight and sitting 100% on top of the center tab. 12. Push the fixed blade firmly into its mounting slot of the printhead assembly and tighten both #8 Torq screws. Verify that the printhead and latch open and lock. 13. Clean the printhead (see Cleaning the Printhead on page 42) to remove finger borne oils. P1016701-001 KR403 Integrators Guide 12/23/2009 7 Printer Power Requirements Contents KR403 Power Requirements . . . . . . . . . . . . . . . . . . . . . . . . . . . . . . . . 72 Electrostatic Discharges and Earth Currents . . . . . . . . . . . . . . . . . . . . 73 DC Power Plug Requirement . . . . . . . . . . . . . . . . . . . . . . . . . . . . . . . . 73 12/23/2009 KR403 Integrators Guide P1016701-001 72 Printer Power Requirements KR403 Power Requirements KR403 Power Requirements The KR403 printer has some unique power requirements to operate efficiently, safely and within safety and compliance regulation guidelines. To get the best performance, one should use an approved power supply to operate the KR403 printer. See the price list for an approved power supply. If a non-Zebra supplied power supply is used with the KR403, it must comply with the following requirements. POWER SUPPLY OUTPUT CHARACTERISTICS OUTPUT RATING: 24.0 Volts, 2.92 Amps, +5 to +40 degrees C. VOLTAGE: 24.0Vdc +5/-2% (Initial Tolerance, No Load) CURRENT: 2.92A Maximum OUTPUT REQUIREMENT WHEN PRINTING (worst case conditions) MAX AVERAGE POWER: 24.0V x 2.92A = 70 Watts typical PEAK POWER (90VACin, 47Hz): 243W OUTPUT REGULATION: LINE REGULATION: ± 0.5% over AC input operating range. RIPPLE & NOISE: 240mVPP at Iout = 2.92 Amps, Resistive Load (4.7µF/50V ceramic Cap. On output, 20MHz BW) TRANSIENT LOAD RESPONSE: < 5mS Recovery, 40% to 80% Load Change. OVERSHOOT, POWER-UP: 10% Max. at power-on or power-off. HOLDUP TIME: 20ms Minimum, Rated DC Load, 120 VAC/60Hz. OVER-VOLTAGE: Output Limited to +28V Max. FUSE: Yes THERMAL: Allowed, Not required Remark: When Short Circuit Protection or Over Current Protection is acti vated, the power supply wi ll shutdown autom atically. Once the abnormal condition resulting in the fai lure being removed, the power supply will restart accordingly. Automatic Recovery: Over Voltage Protection is activated, the power supply will shutdown. The power suppl y is fully protected agai nst short circuits and autom atically recovers upon removal of the short without the need for re-cycling the AC input voltage. P1016701-001 KR403 Integrators Guide 12/23/2009 Printer Power Requirements KR403 Power Requirements Electrostatic Discharges and Earth Currents Your power supply should have a earth ground connection as part of the input power and power circuit design. Preventing ESD and earth currents from affecting the printer operation requires proper connection of the printer chassis to protective earth through a mounting platform or through a separate earth conductor. DC Power Plug Requirement The KR403 printer uses a locking two pin connector. The mating connector is Tyco part number 1445022-2. The wiring for this connector and to meet the power requirements should be 20 AWG insulated wiring (UL type 1007). Tyco - 1445022-2 Ground +24 VDC 12/23/2009 KR403 Integrators Guide P1016701-001 73 74 Printer Power Requirements KR403 Power Requirements Notes • ___________________________________________________________________ __________________________________________________________________________ __________________________________________________________________________ __________________________________________________________________________ __________________________________________________________________________ __________________________________________________________________________ __________________________________________________________________________ __________________________________________________________________________ __________________________________________________________________________ __________________________________________________________________________ P1016701-001 KR403 Integrators Guide 12/23/2009 8 Kiosk Hardware Integration Accessories Contents Accessories Overview . . . . . . . . . . . . . . . . . . . . . . . . . . . . . . . . . . . . . Nozzle Bezel. . . . . . . . . . . . . . . . . . . . . . . . . . . . . . . . . . . . . . . . . . . . . Shutter Bezel . . . . . . . . . . . . . . . . . . . . . . . . . . . . . . . . . . . . . . . . . . . . Quick-Fit Hubs . . . . . . . . . . . . . . . . . . . . . . . . . . . . . . . . . . . . . . . . . . . Quick Fit Leaf Spring Retainer . . . . . . . . . . . . . . . . . . . . . . . . . . . . . . . Roll Support . . . . . . . . . . . . . . . . . . . . . . . . . . . . . . . . . . . . . . . . . . . . . Media Roll Low Sensor. . . . . . . . . . . . . . . . . . . . . . . . . . . . . . . . . . . . . Universal Roll Holder . . . . . . . . . . . . . . . . . . . . . . . . . . . . . . . . . . . . . . Printer Mounting Plate . . . . . . . . . . . . . . . . . . . . . . . . . . . . . . . . . . . . . Wall Mount Roll Holder . . . . . . . . . . . . . . . . . . . . . . . . . . . . . . . . . . . . . Printer Power Supply . . . . . . . . . . . . . . . . . . . . . . . . . . . . . . . . . . . . . . 12/23/2009 KR403 Integrators Guide 76 77 79 80 80 81 82 83 87 88 89 P1016701-001 76 Kiosk Hardware Integration Accessories Accessories Overview Accessories Overview The KR403 printer has a wide range of accessories designed and tested to work with your printer. The accessories can be used by themselves, combined with other printer accessories, or as part of your own unique printer integration design. At the time of this guides release, the following accessories are available for your printer: P1016701-001 • Nozzle Bezel — A translucent media exit bezel styled after common credit card input bezels used in ATM (Asynchronous Transfer Mode) machines and other kiosks. • Shutter Bezel — The shutter bezel is a light weight door designed to prevent the kiosk user from easily inserting foreign objects into the printer, dust, or block external light sources from interfering with the printer’s ability to detect when is media exiting the printer. • Small Core Media Roll Adapter — Designed to guide the leading edge of receipt into the input of the media present rollers. Allows the use of media roll inside diameters less than 25 mm (typically POS media) and increases the operational range of printer in a given mounting orientation (see Mounting Orientations on page 22). • Quick-Fit Printer Mounting — A quick printer release mounting system that can be used with KR403 mounting accessories or with your own design. The service tech can pull the leaf spring (latch) to unlock the printer and quickly slide it out for easy replacement or service. the parts can be ordered separately as: • Quick-Fit Hubs — Flanged hubs and printer mounting screws • Leaf Spring Retainer — Spring and two M3 x 3 mm screws • Roll Support — A rugged media roll support bracket designed to provide minimal friction and self centering of the media roll. • Media Roll Low Sensor — Optical sensor designed to mount into the Roll Support accessory or other KR403 printer mounting accessory and plug directly into the rear of the printer. • Universal Roll Holder — This versatile mounting accessory supports three roll positions with the ability to mount it on either side of the printer. • Printer Mounting Plate (for roll holder mounted below printer) — This mounting plate assembly is designed to work with the Universal Roll Holder accessory when the roll is in the Low and Under holder positions. It includes a inertia dampening spring roller to optimize printer performance when using the large 250 mm diameter rolls. • Wall Mount Roll Holder — The wall mount supports a maximum media roll diameter of 150 mm. The wall mounting bracket attaches at the front of the printer flush to the kiosk wall. • Printer Power Supply (70 watts) — This printer accessory has been optimized for use with thermal printers and in particular your KR403 printer. It has been designed and tested to meet or exceed most international safety and compliance standards. Please check for more detailed safety and compliance information for the printer and this power supply at the Zebra Web site: www.zebra.com KR403 Integrators Guide 12/23/2009 Kiosk Hardware Integration Accessories Nozzle Bezel Nozzle Bezel Horizontal Mounting Orientation Media Exit Vertical Mounting Orientation Media Exit 12/23/2009 KR403 Integrators Guide P1016701-001 77 78 Kiosk Hardware Integration Accessories Nozzle Bezel Nozzle Bezel Kiosk Mounting Dimensions Horizontal Mounting Orientation Vertical Mounting Orientation P1016701-001 KR403 Integrators Guide 12/23/2009 Kiosk Hardware Integration Accessories Shutter Bezel Shutter Bezel Supports vertical mounting orientations only. Shutter Door Open Shutter Bezel Kiosk Mounting Dimensions 12/23/2009 KR403 Integrators Guide P1016701-001 79 80 Kiosk Hardware Integration Accessories Quick-Fit Hubs Quick-Fit Hubs The Quick-Fit hubs are designed to use the printer’s mounting holes when mounted on a sheet metal surface 1.5 mm thick. See the Design Your Own Mounting on page 103 for more details. Quick-Fit Hubs and Screws Quick Fit Leaf Spring Retainer Quick Fit Leaf Spring and Screws P1016701-001 KR403 Integrators Guide 12/23/2009 Kiosk Hardware Integration Accessories Roll Support Roll Support The roll support bracket and mounting are designed (and tested) to mount to a sheet metal wall 1.5 mm thick for media rolls up to 250 mm O.D. (Outer Diameter) with media roll cores of 25.4 mm I.D. (Inner Diameter). The wider approved media roll widths (80 and 82.5 mm) align to the vertical centerline of the roll support bracket. The diagrams below show the how the narrower approved media roll widths are offset lower by 3.2 mm. To install a roll of media in the printer, the roll must clear the lip. The media roll needs to move up nearly 4 mm above the centerline of the roll support bracket for loading. Wide Narrow Wide Media (80 or 82.5 mm) Narrow Media (58 or 60 mm) Media Widths 80 & 82.5 Roll Core ID All Media Media Widths 58 & 60 Roll Core ID 20 (used for Media Low Sensor mounting) C C 3 12/23/2009 KR403 Integrators Guide P1016701-001 81 82 Kiosk Hardware Integration Accessories Media Roll Low Sensor Media Roll Low Sensor The sensor alerts the system when a fixed level of media is remaining on the roll to provide an early warning for operator servicing. The early alert allows you to replace the paper roll in a timely manner in remotely located or critical use kiosks. All paper roll holders supplied by Zebra can be equipped with paper-low sensors. Just install it, and connect the cable to the paper low connector at the back of the printer. The Media Roll Low Sensor operates by reflecting a light against the white side of a media roll to detect media. When the media is low, no light is reflected. After three successive media low conditions are noted by the printer, a media low flag is set. Installing a new roll of media will reset the flag. Note • Black marks or dirt on the side of the media roll may signal false media low conditions. External Media Low Sensor Port 300 mm Sensor Cable Length Mounts on top of the Roll Support as show here P1016701-001 KR403 Integrators Guide 12/23/2009 Kiosk Hardware Integration Accessories Universal Roll Holder Universal Roll Holder This roll holder can be fitted on the right or left side of the printer. The arm can be set at three different angles. This makes make integration in the kiosk easy. • 58 mm, 60 mm, 80 mm, and 82.5 mm media widths can be used without adjustments. • The universal roll holder supports up to Ø200 mm rolls in the ‘high’ and ‘low’ arm positions, and Ø250 mm rolls in the ‘under’ position with clearance for cabling. • No other accessories are required for the ‘high’ arm position, while the Printer Mounting Plate with the inertia dampening spring guide and cable shield is needed in the two other positions. • The optional media roll low sensor can be added to the roll support. High and Low - 150 mm max.roll Under 200 mm max.roll Arm Positions High and Low - 200 mm max.roll Under - 250 mm max.roll Arm Positions Mounts on either side Mounts on either side 200 mm Roll and ‘Low’ Roll Support Position Shown 12/23/2009 KR403 Integrators Guide P1016701-001 83 84 Kiosk Hardware Integration Accessories Universal Roll Holder ‘High’ Position (No Mounting Plate) Minimum Printhead Access Clearance Minimum Printhead Access Clearance Mounting Plate ‘Low’ Position with Mounting Plate P1016701-001 KR403 Integrators Guide 12/23/2009 Kiosk Hardware Integration Accessories Universal Roll Holder ‘Under’ Position with Mounting Plate Minimum Printhead Access Clearance Mounting Plate 12/23/2009 KR403 Integrators Guide P1016701-001 85 86 Kiosk Hardware Integration Accessories Universal Roll Holder ‘High’ Position (No Mounting Plate) ‘Low’ Position with Mounting Plate Mounting Plate ‘Under’ Position with Mounting Plate For illustration purposes: — ‘High’ position - media is not shown — ‘High’ position - both roll supports are shown P1016701-001 KR403 Integrators Guide 12/23/2009 Kiosk Hardware Integration Accessories Printer Mounting Plate Printer Mounting Plate The Printer Mounting Plate preforms several functions: 12/23/2009 • Provides a solid printer mounting base. • Designed to work with the Universal Roll Holder accessory for the ‘Low’ and ‘Under’ the printer mounting positions • This plate or an equivalent custom design is required to protect the cables and media from interfering with each other and the operator when the media roll is mounted under the printer • Includes a inertia dampening spring roller to optimize printer performance when using the large 250 mm diameter media rolls. KR403 Integrators Guide P1016701-001 87 88 Kiosk Hardware Integration Accessories Wall Mount Roll Holder Wall Mount Roll Holder The Wall Mount Roll Holder attaches at the front face of the printer to the kiosk wall. It is designed to handle 150 mm diameter media rolls. 58 mm, 60 mm, 80 mm, and 82.5 mm media widths can be used without adjustments. Include the Quick-Fit printer release and mounting system. The service tech can pull the leaf spring (latch) to unlock the printer and quickly slide it out for easy replacement or service. Roll center Media Roll Support Leaf Spring Hub Lock Quick-Fit Hubs P1016701-001 KR403 Integrators Guide 12/23/2009 Kiosk Hardware Integration Accessories Printer Power Supply Printer Power Supply The KR403 power Supply accessory can easily be incorporated into a kiosk design. The power supply is easily attached to the kiosk with tie wraps. The power supply has been tested to work with the KR403 printer and complies with all of the same safety and compliance regulations. See Attaching Power on page 35 for a simple power connection illustration. • Output voltage: 24 VDC • 70 Watts, 90-264 VAC at 47-63 Hz • Peak Power 330 Watts • Input Current: 1.5 Amp max. • Inrush Current: 40 Amp max.115 VAC or 80 Amp max.230 VAC The DC power filter and cable length is a minimum of 174 mm Power ON LED EMI Power Filter 12/23/2009 KR403 Integrators Guide P1016701-001 89 90 Kiosk Hardware Integration Accessories Printer Power Supply Notes • ___________________________________________________________________ __________________________________________________________________________ __________________________________________________________________________ __________________________________________________________________________ __________________________________________________________________________ __________________________________________________________________________ __________________________________________________________________________ __________________________________________________________________________ __________________________________________________________________________ __________________________________________________________________________ P1016701-001 KR403 Integrators Guide 12/23/2009 9 Troubleshooting This section provides information about printer error reporting that you might need for printer troubleshooting. Assorted diagnostic tests are included. Contents Status Light Descriptions . . . . . . . . . . . . . . . . . . . . . . . . . . . . . . . . . . . . . . . . . . . . . . . . . Status Light Error Resolutions . . . . . . . . . . . . . . . . . . . . . . . . . . . . . . . . . . . . . . . . . . . . . Print Quality Problems . . . . . . . . . . . . . . . . . . . . . . . . . . . . . . . . . . . . . . . . . . . . . . . . . . . Manual Calibration . . . . . . . . . . . . . . . . . . . . . . . . . . . . . . . . . . . . . . . . . . . . . . . . . . . . . . Troubleshooting Tests . . . . . . . . . . . . . . . . . . . . . . . . . . . . . . . . . . . . . . . . . . . . . . . . . . . 12/23/2009 LP 2824 Plus™ Integrators Guide 92 92 94 96 97 P1016701-001 92 Troubleshooting Status Light Descriptions Status Light Descriptions What the Status Light is Telling You LED Status and Color Printer Status For a Resolution, Refer to Number: Off Off 1 Solid Green On 2 Solid Amber Stopped 3 Flashing Green Normal Operation 4 Flashing Red Stopped 5 Double Flashing Green Paused 6 Flashing Amber Paused 7 Alternately Flashing Green and Red Needs Service 8 Flashing Red, Red and Green Needs Service 9 Flashing Red, Amber Green (* - Do NOT reset or turn off power!) Memory Defragmentation 10* Status Light Error Resolutions 1. The printer is not receiving power. • Have you turned on the printer power? • Check power connections in the kiosk from the power supply to the printer. Check the power supply’s power indicator light if the KR403 power supply accessory is used in the kiosk. See Attaching Power on page 35. • Disconnect the printer from power for 30 seconds and then reconnect the printer. 2. The printer is on and in an idle state. No action necessary. P1016701-001 KR403 Integrators Guide 12/23/2009 Troubleshooting Status Light Error Resolutions 3. The printer has failed its power on self test (POST). • If this error occurs right after you turn on the printer, contact an authorized reseller for assistance. When the printer is operating normally, the printer status light will be amber for about 30 seconds before turning green (solid or blinking). There is a memory error. • If this error occurs after you have been printing, turn the printer power off and on, and then resume printing. The printhead needs to cool down. • If this error continues, turn the printer power off for five minutes or more, and then turn on. If the amber light persists, then the printer requires service. 4. The printer is receiving data. • As soon as all of the data has been received, the status LED will turn green and the printer will automatically resume operation. 5. The media is out. • Follow the instructions for Automated Media Loading on page 39 in the Operations section, and then press the Feed button to resume printing. The printhead is open. • Close the top cover and then press the Feed button to resume printing. 6. The printer is paused. • Press the Feed button to resume printing. 7. The printhead is over temperature. • Printing will stop until the printhead cools to an acceptable printing temperature. When it does, the printer will automatically resume operation. 8. FLASH memory is not programmed. • Return the printer to an authorized reseller. 9. The printhead or motor has had a critical failure. • Return the printer to an authorized reseller. 12/23/2009 KR403 Integrators Guide P1016701-001 93 94 Troubleshooting Print Quality Problems 10. The printer is defragmenting memory. Caution • Do NOT turn off the printer power during defragmentation. Doing so can damage the printer. • Defragmentation is a normal operation of the printer – necessary to manage the memory space for optimal use. The printer will defragment its memory both after a factory default and when the printer detects that a defragment is required. When the printer is in this condition, allow it to finish defragmenting. If this warning occurs frequently, check the label formats. Formats that frequently and repeatedly write to and erase from memory my cause the printer to defragment often. Using formats that avoid frequent and repeated memory write/erase event will minimize the need for defragmentation. • If this warning condition does not go away, contact Technical Support. The printer requires service. Print Quality Problems No print on the label. • The media may not be direct thermal media. See the test procedure Determining Thermal Media Types on page 36. • Is the media loaded correctly? Follow the instructions for Automated Media Loading on page 39 in the Operations section. The printed image does not look right. • The printhead is dirty. Clean the printhead. • The printhead is under temperature. • Adjust the print darkness and/or print speed. • Use the ^PR (speed) and ~SD (darkness) commands referenced in the ZPL Programming Guide. • Manually adjust print darkness with the six-flash sequence of Feed Button Modes on page 31. • The Windows printer driver or application software may change these settings and may require a change to optimize print quality. • The media being used is incompatible with the printer. Be sure to use the recommended media for your application, and always use Zebra-approved labels and tags. • The printhead has worn out. The printhead is a consumable item and will wear out due to friction between the media and printhead. Using unapproved media may shorten life or damage your printhead. Replace the printhead. • The platen may need cleaning or replacement. The platen (driver) roller maybe losing traction due to: • P1016701-001 Foreign objects attached to its surface KR403 Integrators Guide 12/23/2009 Troubleshooting Print Quality Problems • The rubbery smooth surface has become polished and slippery, There are long tracks of missing print (blank vertical lines) on several labels. • The printhead is dirty. Clean the printhead. • The printhead elements are damaged. The printing does not start at the top of the receipt or misprinting of one to three receipts. • The printer needs to be calibrated. Refer to the two-flash sequence of Feed Button Modes on page 31 in this section. • Verify that the Label Top ( ^LT) command is correctly set for your application (consult the ZPL Programming Guide). A receipt format was sent to, but not recognized by, the printer. • Is the printer in pause mode? If so, press the Feed button. • If the status LED is on or flashing, refer to What the Status Light is Telling You on page 92. • Make sure the data cable is correctly installed. • A communications problem has occurred. First, make sure that the correct communications port on the computer is selected. Refer to Communicating with the Printer on page 49. • Verify the correct Format and Control Prefix on the printer match what you are using in your ZPL programmed label format. The default Format (COMMAND CHAR) is Caret (^) character and the Control (CONTROL CHAR) is a Tilde (~) character. Verify the characters with the Configuration Status label printout. Refer to the one-flash sequence of Feed Button Modes on page 31 to print this label. 12/23/2009 KR403 Integrators Guide P1016701-001 95 96 Troubleshooting Manual Calibration Manual Calibration Manual calibration is recommended whenever you are using pre-printed media or if the printer will not correctly auto calibrate. 1. Make sure media is loaded. 2. Turn on the printer power. 3. Press and hold the Feed button until the green status light flashes once, then twice and then continuing until the flash groups reach the group of seven flashes. Release the Feed button. 4. The printer will set the media sensor for the receipt backing being used. After it is done making this adjustment, the roll will automatically feed until a receipt is positioned at the printhead. A profile of the media sensor settings (similar to the example below) will print. Upon completion, the printer will save the new settings in memory and the printer is ready for normal operation. 5. Press the Feed button. One entire blank label will feed. If this does not happen, try defaulting (refer to the four-flash sequence in “Feed Button Modes” later in this chapter) and recalibrating the printer. Note • Performing a manual calibration disables the auto calibration function. To return to auto calibration, default the printer (refer to the four-flash sequence in Feed Button Modes on page 31 in this section). P1016701-001 KR403 Integrators Guide 12/23/2009 Troubleshooting Troubleshooting Tests Troubleshooting Tests Printing a Configuration Label To print out a listing of the printer’s current configuration, refer to the one-flash sequence in Feed Button Modes on page 31 in this section Recalibration Recalibrate the printer if it starts to display unusual symptoms, such as skipping receipts. Refer to the two-flash sequence in Feed Button Modes on page 31 in this section. 12/23/2009 KR403 Integrators Guide P1016701-001 97 98 Troubleshooting Resetting the Factory Default Values Resetting the Factory Default Values Sometimes, resetting the printer to the factory defaults may solve some problems. Refer to the four-flash sequence in Feed Button Modes on page 31 in this section. Communications Diagnostics If there is a problem transferring data between the computer and printer, try putting the printer in the communications diagnostics mode. The printer will print the ASCII characters and their respective hexadecimal values (a sample is shown below) for any data received from the host computer. To find out how, There are multiple ways to enter hex data dump mode: • The ~JD ZPL command • The dump EPL command • On power up with the Feed button pressed. Refer to the power off mode procedure in Feed Button Modes on page 31 in this section. The printer will print ‘Now in DUMP’ (see below) and advance to the top of the next label. P1016701-001 KR403 Integrators Guide 12/23/2009 Troubleshooting Communications Diagnostics The following example of a communications DUMP mode printed out. The printout displays hexadecimal data 00h-FFh (0-255 decimal) with a unique character for each hexadecimal value displayed above the hexadecimal data. The blank lines between the lines of data are where serial port and Bluetooth data handling errors get logged. The errors are: • F = Frame Error • P = Parity Error • N = Noise Error • O = Data Overrun Error To exit the diagnostic mode and resume printing, turn off and then turn on the printer. An alternate method for exiting the diagnostic mode is to press the Feed button as many times as it takes to clear the printer’s command buffer and print ‘Out of DUMP’ on the label. 12/23/2009 KR403 Integrators Guide P1016701-001 99 100 Troubleshooting Communications Diagnostics Notes • ___________________________________________________________________ __________________________________________________________________________ __________________________________________________________________________ __________________________________________________________________________ __________________________________________________________________________ __________________________________________________________________________ __________________________________________________________________________ __________________________________________________________________________ __________________________________________________________________________ __________________________________________________________________________ P1016701-001 KR403 Integrators Guide 12/23/2009 10 Kiosk Design Considerations Contents Design Considerations Overview . . . . . . . . . . . . . . . . . . . . . . . . . . . . Design Your Own Mounting . . . . . . . . . . . . . . . . . . . . . . . . . . . . . . . . Cabling and Cable Routing . . . . . . . . . . . . . . . . . . . . . . . . . . . . . . . . . Electrostatic Discharges and Earth Currents . . . . . . . . . . . . . . . . . . . Ambient Light . . . . . . . . . . . . . . . . . . . . . . . . . . . . . . . . . . . . . . . . . . . Cooling . . . . . . . . . . . . . . . . . . . . . . . . . . . . . . . . . . . . . . . . . . . . . . . . Designing Your Own Media Dispensing System. . . . . . . . . . . . . . . . . Designing a Roll Support . . . . . . . . . . . . . . . . . . . . . . . . . . . . . . . . . . Designing Media Guides. . . . . . . . . . . . . . . . . . . . . . . . . . . . . . . . . . . Designing for Fan-Fold Media . . . . . . . . . . . . . . . . . . . . . . . . . . . . . . 12/23/2009 KR403 Integrators Guide 102 103 104 104 104 104 105 105 105 106 P1016701-001 102 Kiosk Design Considerations Design Considerations Overview Design Considerations Overview The kiosk designer needs to consider how the printer is being used, operated (media supply and maintenance), service, integration with other kiosk components, and integration into the enclosure itself. The KR-403 printer needs some basic design elements to function properly, safely, and easily for the operator. The general issues are: P1016701-001 • The KR403 printer should always be installed in some kind of locking enclosure. The user or untrained personnel should not operate or service the printer. • Mounting Orientation, use of the Looping or Vertical Presenter modes, and media waste bin considerations. See Print Modes on page 16 to start. • Simple mounting of the printer to the kiosk. See Basic Printer Mounting (printer only) on page 11. • The printer base plate must be mounted to a flat surface in the kiosk. • Max. screw penetration 4mm • Printer Power Requirements and DC power connector (KR403 Power Requirements on page 72) or to use the 70 Watt Power Supply accessory (Printer Power Supply on page 89). • Media Handing - Roll or fan-fold, roll mounting or fan-fold tray, and media and printer mounting (design your own or use a KR403 printer mounting accessory). Media location in the kiosk relative to the printer (and its effects on maximum media roll diameter). • Operator access to the printer. The operator needs to view, service and maintain the printer. The operator needs access to: • The operator needs to be able to see the printer's control panel for status lights and also press the Feed button while observing the status lights for media loading, setup and servicing the printer. (See Controls, Indicators and Sensors on page 26) • Open and clean the printhead or remove jams. (see Cleaning the Printhead on page 42 and Clearing Paper Jams on page 41) • The media path between the printer and media (roll or fan-fold). A minimum clearance of 250 mm on one or the other side of the printer, printer controls, and media is needed. • Service and printer replacement: Access to mounting hardware. • Designing for the operator - ideas for a more intuitive media loading, media preparation and use of media loading labels and documents. • Cabling, Power and electrical noise sources • Ambient Lighting and external light sources • Cooling KR403 Integrators Guide 12/23/2009 Kiosk Design Considerations Design Your Own Mounting Design Your Own Mounting The illustration below gives an example of a printer-mounting shelf. Example of a Simple Shelf For Fastening a Standard Printer Using Quick-fit Hubs and a Leaf Spring Retainer mm 1 .5 Leaf spring 01473-000 156 mm 132 mm 90.8 mm 12 mm 6.5 mm 10 mm Paper width + 10 mm Min. 100 mm 10 mm Center 10 mm 10 mm 20 mm 11 mm 44 mm Add material for corner radius Additional space is required for paper loading and service access. Consider mounting the printer on a movable platform so that the printer can be maintained outside the printer enclosure. Note • We recommend making the output slot 97 mm wide. This width should accommodate all paper widths that the KR403 printers can handle. Caution • NEVER use screws that go into the printer more than 4 mm! This will destroy the electronics inside. 12/23/2009 KR403 Integrators Guide P1016701-001 103 104 Kiosk Design Considerations Design Your Own Mounting Cabling and Cable Routing Always tie cable down, use locking connectors where possible, allow for kiosk component servicing, and avoid electrical noise sources. • Tie all cables to the kiosk chassis or printer mounting hardware that are near the printer, the media path or media. The operator can accidentally disconnect the printer or other kiosk components when maintaining the kiosk. Cabling must not interfere with the proper operation of the printer and media. The operator can become caught on cabling and drop heavy media damaging the kiosk or hurting themselves. • Service Loops - There should be enough slack in the cabling to not put pressure on the cable connectors or the circuit boards. Also enough slack is needed to disconnect the printer (or their kiosk components) for servicing. Allow for movement needed to access the cable locks or slide the printer out when using the Quick-fit hubs. • Avoid electrical noise sources: fluorescent lighting and ballast, power supplies, fans, AC power lines, CRT monitors, etc. • Avoid twisting power and communication cables together. This can cause spurious noise on the communication port or raise emissions levels. Electrostatic Discharges and Earth Currents Preventing ESD and earth currents from affecting the printer operation requires proper connection of the printer chassis to protective earth through a mounting platform or through a separate earth conductor. Ambient Light There is an optical sensor 20 mm behind the paper exit at the front of the printer. Other sensors can also be affected by internal lights (and bright outside light sources entering through seams, vents, etc.) in the kiosk. To ensure proper printer operation, design the printer enclosure so that it prevents direct sunlight or light from indoor lamps from reaching the sensor through the paper exit See the Shutter Bezel on page 79 for an accessory option that has been used to shield the media output sensor from external light sources. Cooling The printer needs space on both sides of the printer to allow for convection cooling of the printer. This become more important with kiosk installing that have extreme environments and high printer use. P1016701-001 KR403 Integrators Guide 12/23/2009 Kiosk Design Considerations Designing Your Own Media Dispensing System Designing Your Own Media Dispensing System Properly dispensing the media to the printer is critical to the operation of the printer and quality print. The media, roll or fan-fold, needs to flow smooth and free with minimal drag or binding. Ideally it should have a clean and cool location for dispensing and storing media. Loading or dispensing media to the printer should not have interference or access restrictions with the kiosk enclosure or internal components. • The media entering the printer should be aligned to the center of the printer. • The printer and roll media should be level to prevent drag on the side of the roll and damage to the receipt edges. This can cause jams and printer stalls in the worst case conditions. • The media should never touch or rest on cabling, kiosk walls and components, exhaust fans (dust and heat), heat sinks, etc. • The media should be easy to reach and see inside the kiosk. Do not force the operator to bend or extend their arms too far into the kiosk to load media or service the printer. • Optional Media Storage — Media stored in the kiosk should have a dark cool area separate from the rest of the kiosk enclosure that can be closed off from the heat of the kiosk components, moisture, and cleaning chemical vapors used near the kiosk. Designing a Roll Support The design elements needed for a good media roll support are: • Simple design with no loose parts that can get misplaced, installed incorrectly, or require special techniques that can, when done incorrectly or carelessly, have the operator drop the media in the kiosk. • Minimal drag. Do not use wires, cables or bars as a roll holder - all of these cause the roll to stop and start and rock back and forth. Narrow radius roll supports case these behaviors to a lesser extent. Some media vendors use roll cores made of fiberboard that can have seams. The KR403 Roll Support accessory minimizes the media contact area (only makes contact with the outside edges) and a large enough radius to smooth over seams. The larger the roll (more mass), the greater the effect it has on drag. • Leave plenty of access room to load media when designing the area for your roll support. Leave additional clearance for the roll swinging on the support and hands that hold the media to load it. Designing Media Guides The media guides need to have a minimum radius of 10 mm. The surface should be smooth and not touch the edges of the media (causes drag or edge damage). The media should only touch radius surface and not the edge of the radius for all roll sizes that may be used (full or nearly empty). See the Wall Mount Roll Holder on page 88 and the Universal Roll Holder on page 83 side views to illustrate roll size and contact with a media guide. 12/23/2009 KR403 Integrators Guide P1016701-001 105 106 Kiosk Design Considerations Designing Your Own Media Dispensing System Designing for Fan-Fold Media Fan-fold media creates unique challenges. It has square edges that can get caught and the stack can fall into other components and cabling. Make a tray to hold the fan-fold media unless it is being pulled straight up. Always test and observe with the actual media. Fan-fold media can un-fold erratically and act differently at the beginning and end of the stack. Design a tray a little higher than the height of a full stack of media. Fan-fold media tray should keep the media stacked and never allow the media to be pulled into the kiosk. When using a media guide, the guide should ideally be twice the distance of the length of the media stack away from the media guide and aligned to the center of the stack. This allows the media to completely unfold and minimizes the chances of having it bind in other components or printing multiple receipt or tickets. P1016701-001 KR403 Integrators Guide 12/23/2009 A Appendix This section provides printer interface connection information. Contents Universal Serial Bus (Mini-USB) Interface . . . . . . . . . . . . . . . . . . . . . . . . . . . . . . . . . . . 108 Serial Port Interface . . . . . . . . . . . . . . . . . . . . . . . . . . . . . . . . . . . . . . . . . . . . . . . . . . . . 109 12/23/2009 KR403 Integrators Guide P1016701-001 108 Appendix Universal Serial Bus (Mini-USB) Interface Universal Serial Bus (Mini-USB) Interface The figure below displays the cable wiring required to use the printer’s USB interface. The printer requires cable or cable packaging that bears the “Certified USB™” mark to guarantee USB 2.0 compliance. Pin 1 Pin Signal 1 Vbus - N/C 2 D- 3 D+ 4 Not connected 5 Ground Shell Shield / Drain Wire For printer supported operating systems and drivers, see the software and documentation CD or visit the Zebra printer web site at: http://www.zebra.com For information on the USB interface, go to the USB web site at: http://www.usb.org P1016701-001 KR403 Integrators Guide 12/23/2009 Appendix Serial Port Interface Serial Port Interface Pin 1 2 3 4 5 6 7 8 9 Description Not used RXD (receive data) input to the printer TXD (transmit data) output from the printer DTR (data terminal ready) output from the printer -- controls when the host may send data Chassis ground DSR (data set ready) input to the printer RTS (request to send) output from the printer -- always in the ACTIVE condition when the printer is turned on CTS (clear to send) - Not used by the printer Not Used When XON/XOFF handshaking is selected, data flow is controlled by the ASCII control codes DC1 (XON) and DC3 (XOFF). The DTR control lead will have no effect. Interconnecting to DTE Devices — The printer is configured as data terminal equipment (DTE). To connect the printer to other DTE devices (such as the serial port of a personal computer), use an RS-232 null modem (crossover) cable. Figure 31 shows the required cable connections. Connecting the Printer to a DTE Device DB-25S Connector to DTE Device (PC) 12/23/2009 DB-9P Connector to Printer DB-9S Connector to DTE Device (PC) KR403 Integrators Guide DB-9P Connector to Printer P1016701-001 109 110 Appendix Serial Port Interface Notes • ___________________________________________________________________ __________________________________________________________________________ __________________________________________________________________________ __________________________________________________________________________ __________________________________________________________________________ __________________________________________________________________________ __________________________________________________________________________ __________________________________________________________________________ __________________________________________________________________________ __________________________________________________________________________ P1016701-001 KR403 Integrators Guide 12/23/2009