1
Combination
P
VCR
OnS
Models
VV-I
ii i
......................................
ii_i_i
_I__iii_i
.......
__,,_
, .
_
_
........
_
_ _ ii!_ _
_?
ii
i
i
i
i
i
.%
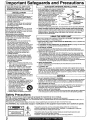
important Safeguards and Precautions
READ AND RETAIN ALL SAFETY AND
OPERATING INSTRUCTIONS,
HEED ALL
WARNINGS IN MANUAL AND ON UNiT
INSTALLATION
1 POWER SOURCE CAUTION
Operate only from power sourceindicated on unit
or in thismanual ti uncertain, have an Electdc
UtilityService Company or Video Products Dealer
verify your home power Source
; POWER CORD PLUG
For safety, this unit comes with a poladzed
type plug (one wide blade), or a throe.wire
grounding type plug
POLARIZED PLUG
The plug fits into outlet one way. If it cannot be
fully inserted, try reversing it. If it still will not fit,
have an electhoian install the proper wall outlet.
Do not tamper with the plug.
GROUNDING
PLUG CAUTION:
The plug requires a Ihree-hole grounding outlet.
If necessary, have an electrician install the
proper DUffel. Do not tamper with the plug,
3 POWER CORD
Make sure power cords are routed so they
are not likely to have anything rest on
them,roll over them, or be in the way of
walking traffic An extension cord should have
the same type plug (polarized or grounding)
and must be securely connected Overloading
well outlets or extension cords may cause fire
hazard. Frayed COrds, damaged plugs, and
damaged or cracked wire insulation are
hazardous and should be replaced by a
qualified electrician.
4 DO NOT BLOCK VENTILATION HOLES
Ventilation openings in the cabinet release
heat generated during operation. If blocked,
heat build-up may result in a fire hazard or
heat damage to cassettes.
For your protection:
a. Never cover ventilation slots while unit is
ON, or operate unit while placed on a bed,
sofa. rug, or other SOft surface.
b. Avoid built-in installation, such as a book
case or rack, unless properly vemi_ated.
5 AVOID EXTREMELY HOT LOCATIONS OR
SUDDEN TEMPERATURE CHANGES
DO not place unit over Or near a heater or
regulator, in direct sunlight, etc. If unit is
suddenly moved from a cctd place to a warm
place, moisture may condense in unit and on
the tape causing damage.
6 TO AVOID PERSONAL INJURY
• Never place unit on support or stand that is
not firm, level and adequately strong. The
unit could fail causing serious injury to a
child or adult and damage to the unit.
• Move any apPliance and cart
combination with care.
Quick stops, excessive force.
and uneven audaces may
cause objects to overturn
= Carefully follow all operating instructions.
I
OUTD(3OR ANTENNA INSTALLATION
1 SAFE ANTENNA AND CABLE CONNECTION
An outside antenna Or cable system must be
property grounded to provide some protection
against built up static charges and voltage /
Section 810 of the National Electrical
/
Coda, ANSf/NFPA 70 (in Canada,
/
part I of the Canadian Electrical
Code) provides information
regardingPrepergroundingof the
mast and supporting structure,
_
"_
=u'='_/_
[_'_......._
_
;._
,...._,_
',,==
_.
_ _.._
_=.r
_¢ _o. ,_
/
_" ............
=,ou.D_m*
,
grounding of the lead-in wire to an
_-""_
__
antenna discharge unit, size of
_ou,,_a
grounding conductors, location of
.Ec ._'t,=_L_C'._ALCO_
_"eC*"_,"_"_
antenna discharge unit.
connection to grounding electrodes, and requirements for the grounding elecfrede
2
KEEP ANTENNA CLEAR OF HIGH VOLTAGE POWER LINES OR CIRCUITS
Locate an outside antenna system well away from power lines and electric Lightor
power circuits so it wUl never touch these power sources ShOuld it ever tall When
installing antenna, absolutely never touch power lines, circuits or other power
sources as this coold be fatal.
I
USING THE VIDEO UNIT
Before unit is brought out of storage or moved to a new location,
INSTALLATION section of these safeguards
1 KEEP UNIT WELL AWAY FROM WATER
bath tub, pool, and so on.
OR MOISTURE.
refer again to the
such as a kitchen sink,
2 IF EXPOSED TO RAIN, MOISTURE. OR STRONG IMPACT, unplug unit and have
it inspected by a qualified service technician before use
3 ELECTRICAL STORMS
During a lightning storm, or before leaving unit unused for extended periods of time.
disconnect atl equipment from the power source as well as the antenna and cable system.
4 WHEN UNIT IS PLUGGED IN
• Never expose to rain or water. DO NOT OPERATE if liquid has been spilled into
ur';_t.Immediately unplug unit, and have it inspected by a service technician. Fire
ar_ shock hazards can result from electrical shorts caused by liquid contact inside
• Never drop or push any object through openings in chit. Some internal parts carry
hazardous voltages and contact can cause electric shock or fire hazard
• Avoid placing unit directly On top or underneath a TV as this may cause electrical
interference. Keep all magnets away from electronic equipment.
5 USING ACCESSORIES
Use only accessories recommended by the manufacturer to avoid risk of fire,
shock, or other hazards,
• 6 CLEANING UNIT
Unplug unit. Use a clean, dry, chemically untreated cloth to gently remove dust or
debris. DO NOT USE cleaning fluids, aerosols, or forced air that could over-spray,
or seep into unit and cause electrical shock. Any substance, such as wax, adhesive
tape, etc. may mar the cabinet surface. Exposure to greasy, humid, or dusty areas
may adversely affect internal parts.
[
SERVICE
1 DO NOT SERVICE PRODUCT YOURSELF
If, after carefully following detailed operating instructions, the unit does not operate
propody, do not attempt to open or remove covers, or make any adjustments not
described in the manual. Unplug unit and contact a qualified service technician.
2 REPLACEMENTOF
PARTS
Make sure the cervice technician uses only parts specified by the manufacturer, or
have equal safe_y characteristics as original parts, The use Of unauthorized
substitutes may result in fire, electric shock, or other hazards,
3 SAFETY CHECK AFTER SERVICING
After unit is serviced or repaired, request that a thorough safety check be done as described
in the manufacturer*s service literatureto insure video unit is in safe operating condition
Safety Precautions
i Warning: TO prevent fire or shock hazard, do not expose th_s equipment to rain or moisture.
This video recorder, equipped with the HQ ( High Quality) System, is compatible with exis_ng VHS equipment.
Only use those tapes with the _
mark. It is recommended that onJy cassette tapes that have been tested and inspected for use in 2. 4, 6,
and 8 hour VCR machines be used,
t This television receiver provides display of television closed captioning in accordance with § 15.119 of the FCC rules.
FCC WARNING:
Any unauthorized
changes
or modifications
to this equipment
would
void the user's
authority
to operate.
This symbol warns the user that unineulated voltage within the unit may have
sufficient magnitude to cause electric shock. The[afore. it is dangerous to make any
kind of contact with any inside part of this unit.
This symbol alerts the user thai important literature concerning the operation
maintenance of this unit has been included.
Therefore, it shoutd be read carefully in order to avoid any problems.
and
,.J
2
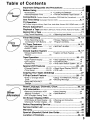
Table of Contents
Important
Safeguards
and Precautions
....................
............ 2
Before Using .................... .......................................................
• Accessories ................................ 4
• Record/Playback Time .............. 4
Connections
{Outdoor Antenna Connections,
One Time Setup
(Language,
;4
• Loading the Batteries .................. 4
* Prevent Accidental Tape Erasure ..4
Channei, Clock)
DSS/Cable
Box Connections)
...............
..........
5
6, 7
, ....................
TV Operation
(NITE mode, Using the 100 key, Rapid Tune, Audio Mute, Phones, SELF-DEMO
Picture
Adjustment
Playback
Record
...............................................
a Tape (Slow
Motion,
Still Picture, Frame by Frame, Feat_Jres for Quality)
Timer Recording
............ 1!
8
_..................
On a Tape .................................................
° One Touch Recording
mode) ......
9
.,10
. ................ 11
• Selecting Input Mode ................ 11
............... . ..........................
;...................
12, 13
• Timer Recording Using
.-Review, Replace or Clear
Combination VCR Buttons ...... 12
Program Contents ...................... 13
TV Timer
Features
. .........................................................
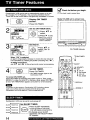
° ON-TIMER with Alarm ............ 14
° SLEEP TIMER ........................ 14
Closed
Caption
System
..................................................
° Closed Caption Mode
Feature ................ _................... 16
Tape Operation
VCR Features
Copying
V-Chip
Your Tapes
Control
(Dubbing)
Feature
18 ~ 21
• Auto Operation Functions .......... 19
• One Minute Skip ........................ 19
-VHS Index Search System_20, 21
...........................................
• Channel Caption ................ 22, 23
• Time Stamp ...................... 24, 25
. ...... 22 ~ 26
• Weak Signal Display ON/OFF ..26
•VCR Lock .................................. 26
............................................
..................................................
• Enter or Change Secret .
Code ........................................ 28
• Setup MOTION PICT.
Ratings ................................ ..._29
On-Screen
27
28 ~ 31
° Setup TV PARENTAL Ratings ..30
.Blocking Message ...... ".......•......... 31
Reset Language, Channels, Clock ..................................
Unit Information ......................................................................
• Reset all Combination VCR
Memory Functions .................. 34
• DST (Daylight Saving Time)....34
16, 17
° Caption on Mute Feature .......... 17
..............................................................
• Tape Position Display .............. 18
• Zero Search .................... :....... 18
• Repeat Play ............................ 19
Special
14, 15
• INSTANT ALARM ...................... 15
32, 33
34
• Head Cleaning .................... ...... 34
°Specifications ................... "......... 34
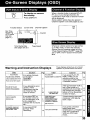
Display (OSD) ......................................................
• VCR Status & Clock Display....35
° Channel & Function Display ....35
° Warning and Instruction
Displays ....................................
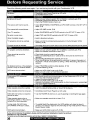
Before Requesting
Service ....................................................
Service Center List ................................................................
35
35
36
37
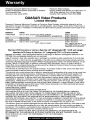
Warranty ...................................................................
............... 38
Spanish (EspaSol) Quick Use Guide ............................
39 ~ 41
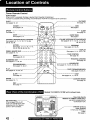
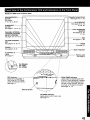
Location
of Controls
........................................
................. 42, 43
3
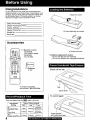
Congratulations
on your purchase of one of the most sophisticated and
reliable products on the market today. Used properly, it will
bring you and your family years of enjoyment. Please fill in
the information bellow. The serial number is on the tag
located on the back of your Combination VCR.
}
Date of Purchase
Dealer Purchased From
Dealer Add ress
Dealer Phone No.
Model No.
Serial No.
2) Insert batteries
as marked.
Accessories
[]
Remote Control
VSQS1606
(VV- 1309/VV-2009)
VSQS1607
(VV-1319W)
3) Close
[]
Battery replacement
caution
• 0o not mix old and new batteries,
• Do not mix alkaline
[] Batteries
2 "AA"
with manganese
Break off the tab.
To order accessories,
.
call toll tree 1-800-332-5368,
Tab
Screw driver
To record again.
Only use tapes with the _
Tape Speed
Setting
; SP
i (Standard
Play)
LP
(Long Play)
SLP
(Super Long Play)
4
mark in this unit,
Type of Video Cassette
T60
r "'T'12-O-_
T160
1 Hour
2 Hours
2 Hours
40 minutes
2 Hours
4 Hours
5 Hours
20 minutes
3 Hours
6 Hours
8 Hours
the cover.
Cover
the hole
with cellophane
tape.
batteries.
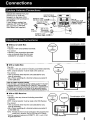
Unhook the antenna from your
previous TV or VCR and
connect it to the back of the
Combination VCR as shown in
the diagram.
If your antenna system has
separate UHF and VHF leadins, you need a UHFNHF
Band Mixer (not supplied.)
UHF/VHF Band
Mixer (not supplied)
(Round
,,Ohm
coax,a,
|rom
]
Ant nn
e
•
Without
a Cable
Back of
Combination VCR
<Model VV-2009 unit
is shown here.>
300-75 ohm
Transformer
""
- -
,'_
a
(not supplied) L_
........
(Flat)Twin Lead
_ J I
300 Ohm Cable :;:;::::::::_-_-J
Combination VCR
Box
You can;
• record or view unscrambled
channels.
You cannot;
• record or view scrambled channels.
• view a channel other than the one
selected for any type of recording.
• With a Cable Box
You can;
• record or view any channel including scrambled
channels.
NOTE: Channel selection must be made at the cable box.
,
You cannot;
• view a channel
other
type of recording.
• do a Timer recording
at the cable box.
than the one selected
of a channel
unless
Combination
VCR
Combination
VCR
for any
you select
it
Note to CABLE System Installer
This reminder is provided to call the CABLE (Cable TV) System
Installers attention to Article 820-40 of the NEC that provides
guidelines for proper grounding and, in particular, specifies that
the cable ground shall be connected to the grounding system
ol the building, as close to the point ol cable entry as practical.
• With a DSS Receiver
You can;
• record or view
channels.
any channeJ
including
scrambled
NOTE: Channel selection must be made at the DSS Receiver.
You cannot;
• view a channel other
type of recording.
• do a Timer recording
at the DSS box.
than the one selected
of a channel
uniess
for any
you select
it
NOTE: The DSS receiver must be turned off to view programs from
a cable box or antenna. See the DSS manual for details.
"DSS ®is registered trademark of DIRECTV,
Hughed Electronics.
INC,, a unit of GM
DSS Receiver
5
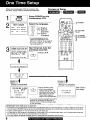
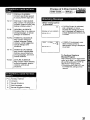
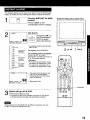
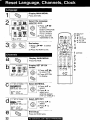
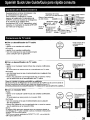
Process of Setup
When the Combination VCR is turned on the
first time, setup mode is entered automatically.
1[
2
Press POWER on the
Combination
VCR.
PUSH
CH •
;EngliSh
0PRiMIR
CH •
:Espa_ol
APP,
VOL
+
1POWER
Select the language.
SELECT
LANGUAGE
#for
@
Eng,ish
for
:Fran_ais
?for
Spanish
VOLUME
UP
(Espa_°l)French
(Frang,_is)
) CHANNEL
" UP/DOWN
• If wrong language is set, do
=Reset all Combination VCR
Memory Functions" steps page 34.
• If you use a cable box, the cable
box must be left on.
3
3
C_NNELICL(X]R
AUTOSET Start Channel
Auto Set
and Clock Auto Set.
CONNECT ANTENNA CABLE
AND IF YOU USE A CABLE
BOX, TUNE IT TO YOUR
LOCAL
PBS CH
THEN,..
PLEASE
CH
PUSH
AUTO SET
CH UP
Press CH &.
KEY
PROCEEDING
J
f
AUTO CLOCKSET
I IIIIIIIIIIIIII
PROCEED
I NG
ICasell
(Setup completed)
(Setup incomplete)
7/28/1999
WED
12:00PM
SETTING
DST:ON
: OH 10
AUTO CLOCK
SET
COMPLETED
ENO
:
PUSH
CH UP KEY
Press CH A to exit.
• It your area observes
daylight saving time, but
you would like to turn the
DST feature off, do the
Reset Clock steps on
page 33 and set DST:OFF.
next page.
AUTO
CLOCK
SET
IS INCOMPLETE
I
I See Case 2
PUSH
ACT I ON TO
SET
CLOCK
• If your area observes daylight saving time
and DST is set to ON, but the time is
incorrect; do the Time Zone Adjust steps
on the next page,
IMPORTANT
NOTE FOR AUTO CLOCK SET
• Auto clock set is performed the first time when Combination VCR is turned off each day. If used, a cable box must be left
on and tuned to the PBS channel at the time Combination VCR power is turned off if you want auto clock set to be done,
• If used, a DSS receiver, it must be turned off for auto clock set.
• If Cable Box or DSS receiver is connected to Combination VCR via Audio/Video Jacks, an RF coaxial cable must also
be connected for auto clock set and channel auto sei features,
• If for any reason the time is changed manually, automatic time correction wiJI not occur.
6
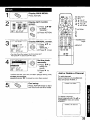
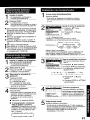
ICase
1
1 I Set TIME ZONE ADJUST.
I
Press ACTION.
DispIay MAIN MENU.
_
SELECT/
SET
MAIN
MENU
Display
screen.
SET CLOCK
UP
• :CH DOWN
@
1) Press AV<I_
to select
"CLOCK."
%
2) Press ACTION
to display.
b
l_ :VOL UP
4 :VOLDOWN
1 ACTION
4
3-----,-c-.
Iie'''T'iEZO
a
[:T'_o CLOCKS_r
j_
(@
I SELECT:&
I SET
:,t
[
END
1) Press At
soleot.
2) Press l_
to
subtract or add
hour(s) as
• KEY
_. KEY
:ACTION
c
to
KEY
necessary,
End setup.
Press ACTION twice,
• TIME ZONE ADJUST returns to
"0" it clock is set manually.
m
I
_
Clock Setup is Incomplete.
Set the clock manually.
• This Combination VCR calendar is
accurately maintained its calendar up to
Dec. 31,2089, 11:59PM
• Channel auto set selects normal TV or
Cable channels depending on your
Combination VCR hookup.
a[OOL
I
b,-.CT.:..
..TO-,
......
IF
O
el'Pre'''"
tt'ec'°c'
se,ct
,.
Display
screen.
SET CLOCK
Press ACTION to
I S INCOMPLETE
exit this mode.
PUSHACTIONTO SETCLOCK
--
Using
On Remote
_
month.
u
2) Press I_ to set.
° Likewise set date, year, time, and
DST (Daylight Saving Time.)
To Make Corrections,
repeatediy press 411. to move
to error, then correcL
c
End setup.
Press ACTION twice. (Clock
starts.)
--
AV <1_ keys--
• :CH DOWN
A :CH UP
b":VOLUME UP
4:VOLUME
DOWN
Whenever the menu or
rogram screen is
displayed, CHANNEL
LU LLI LTJI UP/DOWN and VOLUME
.....
I UP/DOWN function as
un unit
I &•,Ill.
only,
ACTION
key on the unit --
You can operate the menu
s'r_
r_._j_Jscreen using unit buttons.
I ""- II"J ITO display the menu, press
"--=_-'_-"='- I STOPtEJECT and REW
On Unit / together with no tape
" inserted.
To exit the menu, repeat above with or
without tape inserted.
7
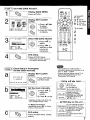
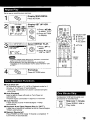
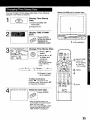
1[
Press POWER on the
Combination
VCR.
_l_check
list before you begin.
[] All connectionsare made (see page5.)
[] Your CombinationVCR is pluggedin.
2
Select a channel.
08
ABC
or
OQQ
QQQ
©QQ
®®
3
Using CH AT
NUMBERED
keys.
or
Model MY-2009 unit is shown here.
Adjust volume.
PLAY/
REPEAT
24 tllllllllll
......................
=
1 2
--
PHONES
Jack
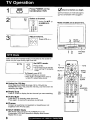
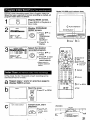
Color and picture intensity levels are adjusted so the screen is
easier on your eyes during night time use.
NITE
NITE
0
Set NITE mode.
Press NITE.
. NITE mode may be selected
when watching TV or playing
a tape.
To Cancel, press NITE.
• Previous settings are restored.
• NITE mode is cancelled when power is
turned off or power failure occurs.
__
POWER
MUTE i
TUNE
__
VOL UP/
DOWN
CH UP/
DOWN
• Using the 100 key
When selecting CABLE channels 100 to 125 with the
NUMBERED keys, first press the 100 key, and then enter the
remaining two digits.
•
Rapid Tune
Press R-TUNE to display the last channel you were watching.
• Audio
Mute
Press MUTE to instantly mute the sound.
Press again, to restore the previous sound level.
II Phones
Connect an earphone (not supplied) or headphones (not
supplied) to the Phones Jack.
• SELF-DEMO
Mode
With Power ON, hold down PLAY/REPEAT on the
Combination VCR for 5 seconds to display demo screen.
Repeat this to exit.
8
NUMBERED
Keys
100 --KEY
ACTION.
I Press
DisplayMAIN
2
Display
screen.
8
__EIMAIN
MENU
_EL_CT:A
• _I I- KEY
SET
:ACTION
KEY
|
/
J
MENU.
SET UP TV
@
%
1) Press &T<II_
to select "TV."
2) Press ACTION
to display.
2• SELECT/
SET
._'_
•
• :CH UP
V :CH DOWN
I_ :VOL UP
4 :VOL DOWN
LOCK
......
SET LIP TV ......
CAPT ION
1NPUT SELECT
: TUNER
_ELECT:A
v KEY
SET
;_ KEY
END
:ACTION
KEY
4
i£a]lb]=!
TINT
BRIGHTNESS
PICTURE
SHARPNESS
NORMAL
....... I ......
....... I ......
....... I ......
..............
4
....... I ......
SELECT:A
• KEY
ADJUST:4
_ KEY
END
:ACTION
KEY
COLOR
TINT
BRIGHTNESS
PICTURE
SHARPNESS
....... I ......
....... I ......
....... [......
..............
4
....... _......
SELECT:A
v KEY
SET
:_ KEY
END
:ACTION
KEY
Display
screen.
1) Press AT
select.
©
Adjust
1ACTION
VIDEO ADJUST
to
2) Press I_ to
display.
desired
©
To Reset
Controls
@®@
item.
1) Press Ai,_!' to
select on item.
(See below right.)
2) Press _lb, to
adjust.
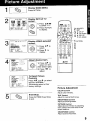
Picture
Press AV and b, to select
and set "NORMAL."
All controls return to their
factory settings.
Picture Adjustment
COLOR Control
5{
Adjust color intensity.
End setup.
Press ACTION three times
to exit.
TINT Control
Adjust for natural flesh tones.
BRIGHTNESS Control
Adjust picture brightness.
PICTURE Control
Adjust picture intensity by adjusting
both contrast and color level in the
proper balance.
SHARPNESS Control
Adiust picture sharpness.
9
_l_check
Model VV-2009 unit is shown here.
list before you begin.
[]
All connections
[]
Your Combination
are made (see page 5,)
VCR is plugged in,
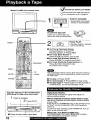
Insert a cassette.
, Combination VCR power
comes on automatically,
i
To prevent tape jam
L_-_
Inspect your cassette tapes and
remove any loose or peeling labels,
EJECT
PLAY
D
i!:
....
Press PLAY.
. Playback begins if cassett_
has no record tab.
i;
-TRACKING
• To Find a Particular Scene
Forward Search --->Press FF
Reverse Search -) Press REW
• For view Slow Motion -->
Press SLOW (To release,press SLOW)
• For view Still (Freeze) picture -.)
Press PAUSE (Torelease,pressPAUSE)
• For view Frame by Frame picture --)
Press SLOW in the Still mode
(To release, press PAUSE)
REW
- FP
SLOW --
-- STOP
After Combination VCR is in Still or Slow mode for 3 minutes, it
will switch to Stop mode automatically to protect the tape and
the video head.
/
PAUSE
• To stop -) Press STOP
• To rewind tape --) Press REW in stop mode
• To eject tape -> Press EJECT on the remote or
STOP/EJECT On the Combination VCR
You can operate on the Combination
VCR
(Model VV-2009 unit is shown here,)
1 Insert
acassette.
I
t
2
Press PLAY,
1 ,,,
• Press to stop and/or eject tape,
10
1
Dlqital Auto Tracking
Continuously analyzes the signal and adjusts for
optimum picture quality.
Manual Trackin_ Control (to reduce pictur_
Use during Playback and Slow Motion mode to reduce
picture noise.
Press the 3 or 6 NUMBERED key on the remote control
or CH ,_v on the Combination VCR until the picture
clears up,
To return to Auto Tracking, press POWER off, then on
again a few seconds later.
Black Tube <For Model VV-2009 only>
This Combination VCR uses a Black tube for better
color reproduction and picture contrast.
ModelVV-2009
unitis shownhere.
I_Check list beforeyou begin.
[] All connectionsare made (see page 5.)
[] YourCombination VCR is pluggedin.
r] Cassette with recordtab in place.
....
1
comes
ec_idt _i _
R
[_
_
ab
_
• Combination
OQ®
F
_
Q Q
or Q _b _
_
1
_
SE
• :CH DOWN
I_ :VOL UP
4 :VOL DOWN
.I select Channel.
Select Recording
speed (see page 4.)
Press SPEED.
SP
,)
= Standard
Play
LP
= Long Play
SLP = Super Long Play
,)
DIS
power
• To select 'LINE," see bottom
ot this page.
j
,t :CH UP
VCR
Press CH AT, or
NUMBERED keys.
(_ Q
3
on automatically,
Insert a cassette,
• Selected speed is displayed.
Start REC.
Recording.
Press
(_REC
4[
• To edit out unwanted
portions, press PAUSE to
pause and resume recording.
• You can not view another
channel during recording.
®©G
STOP
• To stop -) Press STOP
• One Touch Recording
PAUSE-J.
(OTR)
repeatedlyPress
RECto
_" Normal Rec-..,_0:30-....-_
1:00-_
set the recording
_'4:004--3:00_2:00"=-'1:304_"
length (30 min - 4 hours.)
• Combination VCR stops recording at a preset time.
• PROG TIMER indicator lights on the Combination VCR.
• After Combination VCR has been in Rec Pause mode for 5
minutes, it wilt stop automatically to protect the tape and
video head.
Method 1: Press CH ,Ik,V. The display will
change as follows.
(CABLE) (
E,,_._125
or
Method
2: a Press
b Press
then
ACTION
for MAIN
AV4_.
to select
press ACTION
MENU,
"TV",
• The remaining recording time of an OTR can be displayed
pressing DISPLAY.
by
You can operate on the Combination VCR
(Model VV-2009 unit is shown here.)
1 Insert
a cassette.
2
REC Indicator
for SET UP
TV screen,
c Press AV
Io select "INPUT
SELECT," and then press I_ to
select 'qrUNER" or "LINE."
d Press ACTION
mode.
twice
to exit this
• Press to stop.
4
11
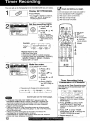
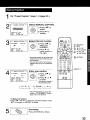
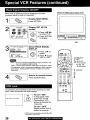
You can set up to 8 programs to be recorded while you are away.
Display
2
START
SET PROGRAM.
[_Check
list before you begin.
[]
All connections
Press PROG.
[]
Your Combination VCR is plugged in.
are made (see page 5.)
• If a program is already in memory,
press &V, and • to select an
unused program number.
[]
The clock is set to correct time.
[]
The tape is long enough.
[]
The record tab is in place.
Set the recording
DATE.
1) Press &_!' to
select,
STOP
L@
2) Press I_ or <
to set.
SELECT:&
v KEY
SET
:_ KEY
END
:PROG/ACTION
SELECT/
SET
A :CH UP
3V'
:CH DOWN
• 1 _3t = One time
• DAILY = MON-FRI
• WEEKLY SUN-SAT
= Same time once a
week
KEY
I_ :VOL UP
< :VOL DOWN
Exa_
Today's -Date
-1 PROG
(_8-9 ........
31_ i i 2,,,,., 6i_
/
7 SELECTAf • _lect_o_ Order DNLY
LWEEKL,
WEEKLY WEEKLY
J
(SAT)...... tMON
) _
(SUN
1
4
Repeat step 2 to set:
. start time, stop time
• Channel (or LINE for outside source)
• Category [NiA (not applicable), SPORTS,
MOVIE, COMEDY, MUSIC, DRAMA]
• Speed (SP, LP, SLP)
3
START
STOP
Make the notes.
If not wanted, go to step 4.
begin.
1) Press A to
2) Press AV to
_
select. I_ or ,i
3) Press
to set.
4) Press PROG
(or ACTION) to
end.
• Characters wiltchange in the following order,
.[--_A--
Timer Recording Using
.....
C 6-_!5 i__t i6h-V C R- Bu_t o--n-_You can set the Timer Recording using
ACTION key on the Combination VCR
(see page 7.)
B-- C ....... Z-BLANK- -&_-]
-=9 .......
2 -1 --O--l--!"-.
Q
Continued
on the next page.
• If "PLEASE PREPARE FOR TIMER REC" appears and/or the
PROGRAM TIMER indicator flashes, check that a cassette with
record tab is loaded and the Combination VCR is in Stop mode.
• If the start times of two programs overlap, the rower numbered
program will have priority.
• If the start time for a Timer Recording comes up during a normal
recording or One Touch Recording (page 11), the Timer Recording
will not be performed,
• If there is a power interruption of more than one minute, the
recording may not be performed or continua.
• If "INCOMPLETE" appears after all items have been set, check all
entries and make necessary corrections.
12
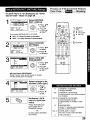
VOL
CH
Press STOPIEJECT
STOPF_JECT R_
and REW
together without a tape to display
MAIN MENU.
:_ Press &'V' <lb. to select "VCR"
and STOP/EJECT
and REW
together to display SET UP VCR
screen.
Press
&V
to select"TIMER
., PROGRAM"
and I_ to display
TIMER PROGRAM
screen.
Repeat
steps
2~5.
the
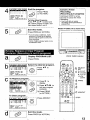
End the program.
4
CANCEL:ADD/DLT
SELECT 1-8:A
v
ENTER ;_ KEY
L END
KEY
KEY
:PROGtACTtON
|
|
|
KEY
[(_
(or ACTION.)
(Recording is in progress)
Press PROG
Hold down STOP for a few
seconds to cancel the Timer
Recording.
J
To Enter More Programs
Press &V and I_ to se|ect and
set a blank program number, and
then repeat steps 2 and 3.
5 ol
a Timer
Recording:
j!!iiii !i!!i !i !:
|
|
|
- Cancel
, Any future daily or weekly
recordings wi[I be performed as
programmed.
Model VV-2009 unit is shown here.
Exit this mode.
Press PROG (or ACTION.)
o II you're using a cable box, make
sure that it is tuned to the desired
channel and the power is left on for
timer recording.
• PROG TIMER indicator lights on the
Combination VCR,
_eg_----
Display
PROGRAM
LIST.
•
PROG TIMER indicator
Press PROG.
b
IP DTSr.A.T.STO_._ SP?]Select
13
10
8:O0p
9:0Op
14 SU
9:00plO:0Op
| CANCEL:ADD/DLT
| SELECT 1-8:&
v
| ENTER :_ KEY
END
10
SP|
L
LP]
|
|
/
KEY
KEY
:PROG/ACTION
the desired
program.
Q@o
/ b
C
sETSELECT/
• :CH UP
•:CH DOWN
_" :VOL UP
KEY
4 :VOL
DOWN
C
To Replace
START
program...
STOP
ABC
SP
CATEGORY:MOViE
SELECT:A
v KEY
SET
:4 _ KEY
END
:PROGIACTION
_',._
KEY
a PROG
1) Press I_ to
display.
2) Press AT<I_
to
set new program
contents.
@@@.
3) Press PROG
(or ACTION.)
® ® _...
®®®!
C
a
@®@
C ADD/DLT
To Clear program...
Press ADD/DLT.
12
|3
8
10
14 SU
t0:00pt2:O0a125
8:OOp 9:O0p
9:0OplO:OOp
10
SP/
SP|
L
LP/
- STOP
| EN,E..KEY'E'EOT"O;'"
,_
|
dl
Exit this mode.
Press PROG (or ACTION.)
13
[_Check
Combination VCR can be set to automatically power on in one
of 2 modes (TV or Playback.) You can also combine the OnTimer with a one minute alarm that gradually increases in volume.
list before you begin,
[] The clockis set to correcttime.
Model MY-2009 unit is shown here.
Display ON TIMER
screen.
Press ON-TIMER.
2
Set the ON-TIMER
I 1) select•
Press _t,V to
1 2) Press I_ to set.
J • Make sure a tape is
insertedif Playback
mode is selected.
SRFCT:A
• KEY
SET
:l.- KEY
END
:ON-TIMER
3
- ... _
, AL,_:ON
1_
/
1
|
L
DATE,
.....
ABC
.......
CANCEL:ADOIDLT
KEY
SELECT : • • KEY
SET
:_l • KEY
END
:ON-TIMER
KEY
Set Alarm.
[ _-_,
? Press
AV
/ _(_
| select
"ON" or
/
tO
ON TIMER Indicator
1 ON-TIMER
When "'ON" is selected,
an alarm wilt gradually increase in volume for one minute or
until cancelled by pressing any button (including VOL 411,.)
To Make Corrections,
use At
and <lb to move back and correct as necessary.
--SLEEP
41 @ ,e,O.
/?
Press ON-TIMER•
•
O
®®@
\-
DISPLAY
®® ®
I1 no button on the remote or Combination VCR (incruding a button
used to turn off the alarm) is pressed within 60 minutes after
Combination VCR turns itsell on, it will turn itself back off.
Combination
VCR can be set for auto power off.
t
SLEEP
TIMER
30
,1_
SLEEP
SLEEP
TIMER
60
TIMER
90
,Ik
SLEEP
TIMER
I
14
•:CH UP
_" :CH DOWN
I_ :VOL UP
4 :VOL DOWN
. ON TIMER indicator lights on the
Combination VCR.
To cancel ON-TIMER set,
press ON-TIMER to redisplay the screen in step 3. Then, press
ADD/DLT to clear the time ("6" is flashing.) Now, press ON-TIMER
to end. "ON TIMER END" appears on-screen tor a few seconds.
SET
SELECT/
00
Set SLEEP
TIMER.
Press SLEEP repeatedly•
• Pressing DISPLAY with sleep
timer set displays remaining time.
To Cancel, press SLEEP
repeatedly until "SLEEP TIMER
00" appears.
:® @
-- ADD/DLT
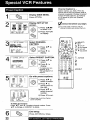
Thefeature
allows
youtosetatimeralarmforupto60minutes,
Useful
forwhenyouarecooking
andneedtoleavethekitchen.
Model
screen.
i isplay INSTANT ALARM
Press TIMER on the
Combination VCR to display.
VV-2009
unit is shown
here.
i
I
2
•
Press CH At
on
the Combination
s:2o_v
I_//
Set Alarm.
! _
I VCR to select
c.,_:__:_DI0_TKEYO2:OOIt
J time (see below.)
sE-r:UN_T
•
•
KEY
one-minute
increase
i
until
_51:0o
20_100
25:oo
I
To cancel, press ADD/DLT.
4o;_
i
50:00
I
....
:::=_==.'[
i
2 c.-"
I
1T,MER
10:00
To increase timer in progress,
Press CH AV to restart
countdown rounded up to next 1,
5, or 10 minute interval
five-minute
increase
until 30:00
<Example>
• If current timeremainingis t2:'15,
countdown will restart from 15:00,
• If current time remaining is 9:15,
countdownwill restart from 10:00,
': 30:0O L'-": :.'-" :-"_
i
I
;
_.z
• Countdown starts 3 seconds after
alarm is set.
[ 2:00
E I
[ 3:0O
i
_i.........
J
!1:00 {onemlnut_l .....
i I
[ 9!oo
I
ten-minute
increase
until60:00
Q®o
00 (Max) ....
"1
The current time (if clock is set)
and time remaining display
change positions on the screen
every 10 seconds.
Remaining Time
OOOO
oo !
Q®
(?) (D (_
------
ADD/DLT
Alarm any
willbutton
go off
0:00.
Press
to at
stop.
• The volume e| the alarm gradually increases for one minute
and then continues to beep until any button is pressed,
Q
When watching TV while INSTANT ALARM is in progress, only use
CH &V onremote to change channels.
15
1%
2
Press
DisplayACTION.
MAIN MENU.
MAIN
Display
screen.
MENU
SET UP TV
O
@
SELECT :A • ,= I_ KEY
SET
:ACTION
KEY
%
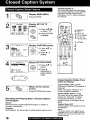
Closed Caption is ...
This multl-use system not only allows
the hearing impaired to enjoy selected
programs, but also makes useful
information from TV stations availabre
to everyone.
1) Press At,Ill,
to select "TV."
eJECl
@@o
_nE
@@@
2) Press ACTION
to display.
2• SELECT/
SET
"
_ r_ & :CH UP
.,.:,• :CH DOWN
I_ :VOL UP
.ll :VOLDOWN
1 ACTION
Display
3
I INPUT
SELECT
I
ADJUST
V'DE0
:TUNER
_ END
.......
:ACTION
/
KEY
CAPTION
CCONMUTE
J
:
CAP
OOO0
® ® ®i
® @ ®:
@®@
u
Select
.......
screen.
select.
] 1)Press
&Vto to
2) Press I_
display.
I
/
I SELECT:A
• KEY
t SET
:_. KEY
CAPTION
CAPTION
........
MODE.
C1
select.
1 2)
1) Press li,
AV to
repeatedly to
select caption
mode.
SELECT:&
• KEY
SET
:_ KEY
END
:ACTION
KEY
(-._0FF-.--_CAP
C1-._
TEXTC2
TEXTC_
JL..1CA P C2<.l)
5I
Recording and Playing
Text Program
Closed Caption Modes
which to Choose
Return to the normal
screen.
PressACTION
Back a Closed
Record:
Record normally. Closed Caption/Text
recorded automatically.
three times.
Caption/
signal, if present, is
Playback:
Start playback. Do above steps to select desired caption mode.
16
From
Caption Mode: CAP Cl or C2
A narration of selected TV programs is
displayed.
Check TV program listings for C.C.
(Closed Caption) broadcasts.
Caption Mode: TEXT Cl or C2
The lower half of the screen will be
blocked out. When the TV station
broadcasts information, such as
program listings, it will appear in this
space.
Caption Mode: OFF
Closed Caption/Text narration wilt not
be displayed.
NOTE:
The closedcaption or text signal may be
broadcast over Cl, C2, or both. Also, text
contentscan vary so you may wishto try
ditferent settings.
Closed
Caption
narration,
ifavailable,
isdisplayed
whenMUTE
buttonispressed
forsilence.
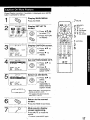
Display MAIN MENU.
Press ACTION.
2
Display
screen.
7 MUTE
__/2
SET UP TV
sETSELEC
Y :CH DowN
1) Press &V_i_,
to select 'q-V."
SELECT :A • _1 I,, KEY
SET
:ACTION KEY
_1:VOL DOWN
2) Press ACTION
to display.
ACTION
......
iNPUT
VIDEO
SELECT
ADJUST
:TUNER
I ......
SELECT:& SET• UPTV
KEY
SET
:_ KEY
END
:ACTION
KEY
Display
If _
/1t_l
rl _
CAPTION screen.
1) Press &V to
se,ect
2) Press I_ to
j L]
display.
Set CAPTION
.
J CC ON MUTE
:
CAP C1
/
/ SEI.,_:,I_
/ SET
:b
LEND
5
.......
1, KEY
KEY
:ACTION
CAPTION
CAP/IONMODE
©
KEY
.......
Select
: OFF
®(D
MODE
OFF.
1)Press &V
select.
to
2)Press
repeatedly to
select "OFF."
/
L
CC ON MUTE.
1) Press &V
to
select.
2) Press I_
repeatedly to
select desired
caption mode.
SELECT:&
• KEY
SET
:_ KEY
END
:ACTION
KEY
• Each press of it. will change the
display as shown at left.
• The caption may be broadcast
over CAP Cl or C2.
Return
to the normal
screen.
Press ACTION three times.
Mute sound, display
closed captioning.
Press MUTE to mute the
sound.
• To cancel, press MUTE again,
17
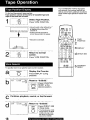
To find out the present tape position.
Tape position cannot be found for C.Cassette type and
tape of less than 60 minutes.
Detect Tape Position.
Press TAPE POSITION.
POSITION
0
[
Your Combination VCR is equipped
with several time saving features as
welt as convenient automatic functions
which make tape operation easier than
ever.
TAPE
F
I DETECTING
TAPE
POSITION
is displayed onlywhen first
] - "DETECTING
TAPE POSITION"
cassette in.
O
correct tape positionto appear.
• It takesseveral seconds for
1 TAPE
POSITION
• Indication is standard.
,,.
2
v
BEGIN
CkO OO:
END
a DISPLAY
(D"@-.qDj
Return to normal
screen.
Press TAPE POSITION.
POSITION
©
[
TAPE
®©@_.
qD®@
d ZERO/1
b
To quickly return to a specific tape counter location.
Display the Counter.
DISPLAY
©
b
PLAY
Press DISPLAY during
playback.
ABC
0:00:30
SP
12:00AM
Reset to "0:00:00,"
Press COUNTER
RESET at the
desired position.
COUNTER
©
RESET
C
Continue
playback,
rewind,
or fast forward.
x
d
STOP
12: OOAM
ABC
Return
SP
ZERO/
1 MIN
©
18
to "0:00:00."
-0:26:00
Press ZERO/1 MIN
in Stop mode.
• The Combination VCR
will go into FF or nEW
mode and stop at the
last point the Counter
was set to 0:00:00,
MiN
COUNTER
RESET
Settoseearecording
overandover,
1I %
Press
o,s+,°.+u
2
Display
screen.
ACTION.
SET UP VCR
@
%
Select
!) Press ,&V <111,.
to select "VCR."
2) Press ACTION
to display.
TIME
/
I
[
STAMP
SELECT:=
• KEY
SET
:P KEY
END
:ACTION
KEY
V :CH DOWN
b":VOL UP
,4 :VOLDOWN
REPEAT
PLAY.
l
l
1 ACTION
Q_O0
|
: ON I
2 SELECT/S
A :CH UP
-- .
CH
I..... -SET UPVCR"'--'-1
IT1 MER PROGRAM
Q@o
select.
2)
Press _"
1)Press
At to set
to
"ON" or "OFF."
o'e. di
® @'F"
@®£x
(tm
"ZERO/
1MfN
• Playback repeats when tape end is reached or unrecorded
portion over 30 seconds is detected,
• During playback, you may also press PLAY/REPEAT
repeatedly on lhe Combination VCR to setect REPEAT "ON"
or "OFF,"
End setup. "
Press ACTION twice.
•
Auto Shut Off
No broadcast signal in TV, NITE or Playback mode for 5
minutes .-.)Turn Power off automatically
• This feature is deactivated if any button is pressed during the
above mode.
•
Auto Playback
Insert a tape in Power off mode "-') Turn Power on
automatically
• Playback begins automatically if a tape has no record tab,
Auto Rewind
A tape reaches its end -) Rewind begins -) Stop
automatically
•
Combination VCR fast forwards over
60 seconds of recorded tape.
ZERO/
i MIN
•
Playback
Auto Eject (Repeat Play is "OFF")
A tape has no record tab reaches its end -) Rewind begins
Eject automatically
•
Memory Rewind off
Press POWER in REW mode -> Rewind is completed
Turn Power off automatically
©
Skip over 1 minute.
Press ZERO/I MIN in
Play mode,
-)
19
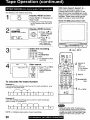
Go directly to the desired recording.
Display
INDEX
screen.
Press INDEX in Playback or
Stop mode.
VHS Index Search System is _.
Each time recording is made, an
invisible index mark is placed on the
tape. When timer recordings are made,
program index and information are also
included. These index marks can be
used to access or scan recordings.
Model VV-2009 unit is shown here.
• If there are no Timer Recordings
on the Program Index List, go to
step 3.
2
Display
iNDEX
PROGRAM
INDEX
INDEX
screen.
1) Press &V to
select "INDEX
SEARCH."
SEARCH
SELECT:&
• KEY
SET
:_ KEY
ENO
:INDEX
KEY
2) Press b. to
display.
• This screen appears
only if there are
Timer Recordings.
3
.....
Select the recording
number.
]NOEX
0 G) (!) Press
Q O C) NUMBERED
Q Q (D keys.
(_
• To calculate number,
see below.
2
04 1
FF/_
INDEX SEARCN 04
®
or
,r
SELECT/
SET
A :CH UP
• :CH DOWN
I_ :VOL UP
Press FF or REW.
• When search is
finished, playback
begins.
REWI(_
To calculate
'\
Q®®
Start search.
INDEX
t
4 REW
4 FF
INDEX
NUMBERED
keys
the Index Number
Example
1:
If you are watching recording 4 and you want to watch recording 2, enter
3 in step "3" and press REW.
FF or REW
I L1 = 13 14 tsl
6
17
Example 2:
If you are watching recording 2 and you want to watch recording 6,
enter 4 in step _3° and press FF.
1 12,
'I= 'l"
..............................
171
NOTE: $ indicates start points of each recording.
20
• Make each entry within 10 seconds, or
the Index Search mode will be canceled.
• If these VHS Index Search Systems are
started very close to an index mark, that
index mark may not be counted in the
search.
Model MY-2009 unit is shown here.
Choose a timer recorded program from a Program index List,
When the tape is ejected or normal recording is started, all
program index data are deleted.
Display INDEX screen.
Press INDEX in Playback or
Stop mode.
C PLAYIREPEAT
2
Display PROGRAM
INDEX screen.
INDEX
@
SELECT:A
• KEY
SET
:b KEY
END
:INDEX
KEY
STOP/EJ ECT
1) Press _,'t' to
select
"PROGRAM
INDEX
SEARCH."
iiiiiiiii_iiiiiiiiii!it
I
---
,_
I
P_._
t!
4
_NOEX
12:30P
MOVIE
SELECT:&
•
I
SEARCH:I_
KEY
!
END
:INDEX
KEY
KEY
NBC /
t) Press AT
select.
t
Q@O
to
2) Press b, to start
the forward or
rewind search.
• When search is
finished,playback
begins,
I
SELECTI
SET
& :CH UP
• :CH DOWN
I_ :VOL UP
Repeat steps 1 and 2 on previous
display INDEX screen.
_
C PLAY
page to
b
;tart the scan.
FF/_
1 INDEX
®®
@®®
In Play mode, the first 10 seconds of each recording can be
scanned (forward or reverse.)
b
I , \
Select the desired
1 recorded program.
O_
INDEX
_=BitiiiiWiiiil;iiiil
b .EVVb FF
2) Press b. to
display.
1"
.....
FF or REW
STOP
Press FF or REW.
or
REWI_
®
C
AUTO
INDEX
SEARCH
Cancel scan, start
playback.
PLAY
<Example>
Start
|
Press PLAY.
" TO stop,press
STOP.
1
l °°-_°°J
I STC,_
I I
, ,_ PrayIt_ about10 secor,ds}
i
,
--
Ft=_t FO_aKI
o_ Rewir<l
21
I
1%
Display MAIN
Press ACTION.
Display
screen.
©
%
MENU.
SET UP OH
1) Press AV41_
to select "CH."
LAY:OFF
I SELECT:A
v KEY
I SET
;_ KEY
[ END
:ACTION
KEY
/
_
!
|
J
_j'_
_
[_Check
[]
list before you begin.
You need a list of stations and the
channel numbers you receive them on.
2) Press ACTION
to display.
I....
sET
oCABLE
P0NANNEL
.... 1
CHANNEL
ANTENNA:
L/ Select
CAPTION.
_P
Channel Caption is ...
Station names, e.q. ABC, TNT, etc.
can be set so they will appear when a
channel is selected. Choose 24 preset
names (Preset Caption), or make up
to 10 names of your own (Manual
Caption.)
®o
2• SELECT/
SET
&
• :CH
:CH UP
DOWN
1) Press
select. &V to
41_ _1:VOL
:VOL DOWN
UP
2) Press _ to
d sp ay.
5
4fIieec'PRESE
CH--CAPTO
seeotPr
1 ACTION
MANUAL
/
•
KEY
2)
[ s_ ...::_c_,_,KEY
Press I_ to
display.
• To create your own
captions, go to
"Manual Caption" on
page 23.
1.... PRESET
CAP,,ON
captions.
-PBS
-".... ] GO with Ipreset
AV to
.BC -- HBO -select a station.
I
FOX
-ESPN
-/
@
'I SELECT:A
ces
--• KEY
CNN -|
11)Press
I SET :" KEY
/
2) movePress
b to to
cursor
L END
:ACTION
KEY
J
the right.
3) Press AV to
I
l
TNT
UPN
42
--
wa
ss TSN S2
OSC
--
CSC
CTN
number.
62
2 I
4) Press _ to set.
GLOB
| CLEAR
:AOD/DLT
KEY
} ....SELECT:= • KEY
SET
; 4 KEY
END :ACTION KEY
PRESET
CAPTION
---21
t
Repeat step 5 until
select
the Caption
channel
List is complete,
To Make Corrections
Press &V, then I_ to select channel number. Press
&V to change, or ADD/DLT to delete.
Press ACTION four times.
1
6
CAPTION
SELECT:_-
%
End setup.
ADD/DLT
_&tl
Do "Preset
Caption"
steps 1~3 (page 22.)
Select MANUAL
---
CHANNEL
CAPTION
CAPTION.
---
select,
1 SELECT:A
I SET
[ END
-
_t KEY
:_ KEY
:ACTIONKEY
1)Press
&Vto to
2)
Press I_
display.
Q
_¢r
Q®o
Nits
to"°;*"
@ Channel
' Pre
selectNUMBER.
CHs'"
I--'- _,.UALCAPT,O.
.... /
] iSelect
number.
SELECT/
SET
| SELECT:&T KEY
SET :P.KEY
• :CH
:CH DOWN
UP
T
L END :ACT,ON
KEY
t
J
2) Press
P' to to
move cursor
the right.
• Channels already set and channels
deleted from Channel Memory are
not displayed,
• You can set a total of ten channel
captions with up to four characters
each,
I_ :VOL UP
:VOL DOWN
5
,0o
ACTION
o,o
Q®®
ADDIDLT
t CH
NUMOER
CA_,,ON
/
q1)Press =T to
1
02
_'-- .... /] iEnter
@
1 caption.
select.
I....
_UAL CAP7,O.
your
I CLEAR :ADD/OLT
KEY
|
[ 2) Press I_ or _I
I SELECT:A
• KEY
|
[ sN% :_,C._,_EN¥,Ey J
[--*A--
1•
to enter.
Characters change in
the following order.
B--C ....... Z- BLANK"*9 ........ 2-1-0--/--!
- --&'-'-]
÷
• Press _11repeatedly to move the
cursor to "CH NUMBER." Repeat
steps 3 and 4 as desired.
To Make Corrections
Press _iI,V, then b' to select the channel number. Press
&V to change, or ADD/DLT to delete.
5
%
End setup.
Press ACTION four times.
23
_PCheck
list before
you begin.
[] The clock is set to correcttime.
[] The record tab is in place.
The Combination VCR writes program data (see example
below) about the first 10 seconds of every recording.
The information is then displayed the first t0 seconds of
playback. To change the data, see "Changing Time Stamp
Data" section on next page.
I Press
DisplayACTION,
MAIN MENU.
2
MAiN
Display
screen.
MENU
%
Select
! REPEAT
PLAY uP
SET
vCR
:
OFF ]
/
SELECT:A
Y KEY
SET
:_ KEY
/ END
:ACTION
Q@@
@
SELECT;&
• < I, KEY
SET
:ACTION
KEY
]
KEY
k
J
©
0®0
SET UP VCR
2•
1) Press AV4Ip,
to select "VCR."
2) Press ACTION
to display.
1
TIME STAMP.
1) Press AV
select.
to
2) Press I_ to set
"ON" or "OFF."
@®@
®@@
• When "OFF" is selected, the
program data is written on the
tape, but will not be displayed,
_r
4
Return to normal
screen.
Press ACTION twice.
<Time Stamp Example >
Normal/One
Touch Recording
Timer
Recording
When Clock is
not set...
24
SELECT/
SET
,i, :OHUP
• :CH DOWN
:VOL UP
:VOLDOWN
ACTION
Model VV-2009 unit is shown here.
You may change the time stamp data (Date, Time, Channet,
Category, and Notes) as desired.
Display Time Stamp
Data.
1) Insert cassette with
record tab.
2) Press PLAY.
2
Display TIME STAMP
EDIT.
Press PROG
while the data is
displayed in
playback mode.
Change
|BATE
/TIME:
:
12t27/1999
MeN
: 08 ARC
/CATEGORY
: MOVIE
| SELECT:A
v KEY
I SET
:4 _ KEY
I END
:PROG KEY
Data.
I
f--- TIM_STAMP
12:00PM
-ED,T--I:00PM ]
I
|OH
Time Stamp
1 PLAY/REPEAT
1) Press AV to
l
Q
I
|
|
_
Q®o
2) select.
Press I, or ,II
to enter and
continue.
Nrr_
3 SELECT/S
• Characters in
NOTES will change
in the following
order.
[--*A--
& :CH UP
• :CH DOWN
Ib :VOL UP
_1:VOL DOWN
-2 PROG
B--C ....... Z-- BLANK-- - --&_--j
"9 ....... 2 -1 - 0--/--!
_'-
OOO0
3) Repeat 1) and
2) as needed.
®®@@j
6]®
Q®®
To Make Corrections
Press _11_ to move to the
incorrect entry, then press &It
to make the correction.
_5N _5
[NOW
Wn,T,
NOT_E STAMP Write
- 1 PLAY
Press PROG.
the new data.
• After the data is writlen, the
Combination VCR automatically
goes into Stop mode.
• You cannot use POWER or REC
button while "NOW WRITING,
TIME STAMP" is displayed.
•
25
%
,_
Y
Model VV-2009 unit is shown here.
When "ON" is selected, picture is displayed even when
broadcast signal is weak or nonexistent.
1! %
2
MAIN
Display MAIN
Press ACTION.
MENU
1
Display
screen.
MENU.
SET UP CH
1) Press AV4_
to select "CH."
SET
:ACTION
KEY
J
%
2) Press ACTION
to display.
[
t ENO :ACTIO_
KEY
J
SIGNAL
Pres ,-Oseec
2) Press I_ to set
"ON" or "OFF."
/
• If Combination VCR is connected to equipment which has blue
back feature, selecting "ON" will have no effect on the other
equipment.
Return
to normal screen.
Press ACTION twice.
REC
VCR
LOCK ACTIVATED
®
To turn "ON"
In stop mode, hold
down REC on the
Combination VCR
without a cassette for
7 seconds.
To turn "OFF:'
Repeat above with or
without a cassette.
• VCR Lock is cancelled automatically
24 hours if clock is set,
26
after
• :CH UP
'IF :OH DOWN
I1_:VOL UP
<1 ;VOL DOWN
1 ACTION
®@
@®®
All operations are prohibited except Timer recording and tape
eject. Useful for families with small children.
_'_ SELECT!
SET
._
• "ON" = Picture is displayed regardless of signal condition, and
may not always be clearly visible.
=OFF"= Screen turns solid blue when signal is absent or weak.
4[
,_!,%iJJ,L,j
REC
ANTENNA
t UPC.ANNEL
CABLE
[....
SET
.... ]/ Select
WEAK
I_uToSET
DISPLAY.
SELECT;&
• KEY
l SET
:lb KEY
.......
;,;,;::,:,:_.
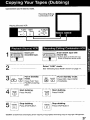
Connections you'll need to make.
Recording (Editing)
Combination VCR
Playing (Source) VCR
AUDIO VIDEO
OUT
IN O
IN FROM
ANT."
OUT TO
@
TV
@
Insert prerecorded tape.
Insert blank tape with
record tab.
• Dubbing tapes protected with Copy
Guard will have poor quality results.
O
3
Select
"LINE"
mode.
See "Selecting Input Mode" section on page 11.
PLAY
(_
PAUSE
Q
REC
mode.
PAUSE
PressinPLAY
then
j Put
Standby
PAUSE at starting
point.
Put in Standby
mode.
Press REC, then PAUSE
immediately.
Start dubbing.
PAUSE
5
Caution:
PAUSE
Start dubbing.
Press PAUSE.
@
Press
PAUSE.
S+0._JECTStop dubbing.
1St°p"u00'n0"
Press STOP/EJECT.
Press STOP/EJECT,
Unauthorized exchanging
and/or copying of copyrighted
recordings may be copyright infringement.
27
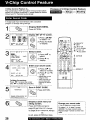
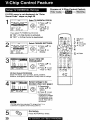
V-Chip Control Feature is...
The Combination VCR has built-in V-Chip Control which
allows you to block unwanted TV usage based on Motion
Picture and TV Parental Guide ratings.
Process
of V-Chip Control
Feature
_E>_:_>[Blocking]
A 4 digit code must be entered to view a blocked
program or change rating settings.
Display MAIN MENU.
Press ACTION.
2
Display SET UP TV screen.
@
%
1) Press _I,I' 4111_
to select "TV."
O
2) Press ACTION
to display.
SELECT/
SET
_
Select
[ ......
SET
t CA_Tt ON
|
.
INPUT
SELECT
r VIDEO
ADJUST
TV
.........
;ACTION
ENTER
LOCK
v
CODE
@
KEY
To Make Corrections
Press 41_ to move the cursor
and &V to make the correction.
5
2) Press _ to
display.
Enter your secret code.
.........
KEY
:ACTION
1) Press AV to
select.
LOCK
UP
DOWN
1 ACTION
OOOO
5
KEY
4-DIGIT
SELECT:A
END
'
•:CH
I':CH
I_.:VOL UP
<1:VOL DOWN
LOCK.
@
:TUNER
I SELECT:&
v KEY
| SET
:P, KEY
_, END
4
UP
.
1) Press
select
kV to
a number.
QG®!
@®Q
--
ADD/DLT
2) Press _" (or 'q )
to set.
• Repeat step 4 until
4-digit is tilled.
• Take care that you
are notobserved
entering the secret
code.
1 Save 4-DIGIT
CODE.
!
CHANGE CODE:ADO/DLT
KEY /
,CONTiNUE:ACTiON_KEY..
J
6I
Display LOCK
rating screen.
menu for
Change your secret code
Press ACTION and go to:
page 29 (MOTION PICT. Ratings),
or page 30 (TV PARENTAL Ratings)
Or,
to exit, press ACTION four times.
28
, You willneed yourcurrentcode.
Do steps 1-4. In step 5, press
ADD/DLT to clear current code.
Repeat steps 4 and 5 to enter new
code.
Process of V-Chip Control Feature
Blocking
If LOCK menu is not displayed, do "Enter
Secret Code" steps on page 28.
I-:-:
..........-';LOCK-
-.
] PICT.
Select STATUS.
MOTION
I_.%_A_T;_,_8_
:o+I_
I SELECT:A
[_
v
KEY
]
_Mf_N
K,Y
I+)Press
=V
(c'_ t tose+ct.
J _
--
Q®o
SELECT/
SET
tb 2)Press
b.
to set "ON"
& :CH UP
V :CH DOWN
or "OFF."
If you select MOTION PICT. STATUS:
--
3
--
5
b,:VOLUP
• "ON" -> V-Chip Control is activated.
• "OFF" -) V-Chip Control is deactivated.
2
LOCK
.........
MOTION
PLOT+
STATUS:OFF
Select CHANGE
SETTINGS.
TV_:OFF
CHANGE
SETTINGS
SELECT:A
• KEY
SET
:_ KEY
END
:ACTION
KEY
3
ACTION
0000
1) Press &V
o®++
l®Q
select.
2) to
Press
I_
to display.
Q®®
®@__+
Select VIEW NR
PROGRAMS?
PG
PG-13
R
1) Press AV
NC-17
X
select.
2) to
Press
I_
to set "YES"
or"NO."
SELECT:&
•
SET:_
END
;ACTION
KEY
NR (Not Rated) PROGRAMS
Some movies, such as old movies or foreign
movies usually have no ratings.
4
IENC
KE¥1EW
NR :ACTION
PROGRAMS?
PG-t3
PRGt3
: YES
Select ratings to be
blocked. (See right.)
1) Press
xNC-_7
select.
&V to
2) Press b
to set.
%
Redisplay LOCK
menu to continue
setup.
Press ACTION and
go to page 30 (TV
PARENTALRatings)
Or,
to exit, press ACTION
four times.
G
PG
I GENERAL AUDIENCE:
All ages admitted.
I PARENTAL GUIDANCE:
Some material may not be suitable
for children.
PG-13 i PARENTS CAUTIONED:
Some material may be
inappropriate for children under
13.
R I RESTRICTED:
Under 17 requires accompanying
_arent or adutt children.
NC-17 [ OVER AGE 17 ONLY:
No one 17 and under admitted.
X
ADULTS ONLY:
29
Process of V-Chip Control Feature
Enter Code
Blocking]
If LOCK menu is not displayed, do "Enter
Secret Code" steps on page 28.
1
Select TV PARENTALSTATUS.
.........
LOCK
MOTION PICT.
STATUS:OFF
CHANGE SETTINGS
@
SELECT:A
v KEY
SET
:_ KEY
ENO
:ACTION
KEY
1) Press &V
select.
to
2) Press I_ to
set"ON" or
"OFF."
If you select TV PARENTAL STATUS:
I
•
"ON" -) V-Chip Control is activated.
"OFF" -) V-Chip Control is deactivated.
Q
_clr
_rrE
SELECT/
SET
•
2
[---::1--MOTION
i
LOCK
STATUS:OFF| 1 Select CHANGE SETTINGS.
PICT,
•:CH UP
V :CH DOWN
--3
_:VOLUP
- 5
ACTION
)
/
SELECT:"
T KEY
[
END
•-ACTION
_
2) Press b. to
l ..............................
display.
t
I SET :,, KEY
KEY
___j
3
Select VIEW NR
PROGRAMS?
®
1) Press AV
select.
@@
to
2) Press I_ to set
"YES" or "NO."
NR (Not Rated) PROGRAMS
Some TV shows, such as news, sports, weather,
bulletins, emergency information usually have no ratings.
Select ratings to be
blocked. (See next page.)
FV
l
l
TV:PG
TV-14
_M,A
V
V
V
/ SELECT
:•
L END
:ACTION
•
S
S
S
L
L
L
SET :
KEY
O
O
select. J,V to
J l) press
Repeatedly
2) Press I_ to set.
• Ratings which are
highlighted in GREEN
will be blocked, when
not highlighted (white
letters), these will not
be blocked,
O
You may select from standard TV ratings (chart 1), or
customize to a specific content rating (chart 2.)
5
30
%
End setup.
Press ACTION four times.
@®®
Process of V-Chip Control
Enter Code
Feature
FOR ALL CHILDREN:
Content specifically geared
to young viewers ages 2-8.
FOR AGE 7 AND OLDER:
May contain mild physical or
comedic violence which may
frighten children under 7.
GENERAL AUDIENCE:
Contains little or no violence,
strong language, or sexual
dialogue or situations.
PARENTAL GUIDANCE:
May contain infrequent
coarse language, limited
violence, some suggestive
sexual dialogue and
situations.
PARENTS CAUTIONED:
May contain sophisticated
themes, sexual situations,
strong language, and more
intense violence.
MATURE AUDIENCE:
May contain mature themes,
_rofane language, graphic
violence, and sexual
situations.
<When V-Chip Control
is activated>
ABC
PROGRAM
RATING
EXCEEOED
RATING:PG-13
STOP
11:00AM
ABC
-0:12:34
$P
RATI NG:PG-t
3
• If V-Chip Control is activated,
and a program or movie
exceeds the ratings you have
set, a message will appear on
a black background and sound
is muted.
• If DISPLAY is 15ressed, even
when V-Chip control is
deactivated, rating is displayed
on-screen.
To Continue Viewing a
Blocked Program
After entering your 4 digit secret
code, go to step 1 on both pages
29 and 30 and select "OFF" to
deactivate V-Chip Control.
• The previousMOTION PICT, and
TV PARENTALsettings will be
restored.
Fantasy Violence
Violence
Sexual Situations
Adult language
Sexual Suggestive Dialog
31
1I
2
Display MAIN MENU.
Press ACTION.
Select the language
selection icon.
©
MENU
%
1) Press AV41_
to select.
EngSsh:LANGUAGE
Spanish:1DIOMA
French:LANGUE
2) Press ACTION
repeatedly to set.
SELECT/
SET
/
Q®o
•
• :CH UP
• :CH DOWN
b
I_
:VOL DOWN
UP
4 :VOL
C
3
@
%
1)Press
&,,l_
End
setup.
"EXIT."
toselect
a
2) Press ACTION to exit.
- !
a
%
b
Display MAIN MENU.
Press ACTION.
MArN
M_U
C_H
] 'SELECT:&
L SET
_1 _, KEY
:ACTION
KEY
oo®!
ooo
screen"
|
J
%
to select "CH."
1) Press AV41_
2) Press ACTION
to display.
C{ NEL....
ISe,°c,..,E...
select.
]CHANNEL
CAPTION
tWEAK
S I GNAL
D I SPLAY :OFF
{ SELECT:&
• KEY
| SET
:1=. KEY
/|
]
|
L END
J
:ACTION
KEY
dr
_
Jl)
&Tto to
2) Press
Press I_
select your
antenna system
("TV" or "CABLE.")
I
.... s_ uP C.ANNEL
.... l Select AUTO SET.
_:CAPT,ON
I
1) Press &"
select.
IWEAK SIGNAL
DI SPLAY:OFF
I SELECT:&
• KEY
I SET
:1_ KEY
l
|
I
L END
.1
:ACTION
e %
32
KEY
2) Press I_ to
start.
Press
ACTION twice.
a
b
Display SET UP OH
____1
•
'5 5 o_, 2
@@qD"
to
ACTION
1F% 1
Display MAIN MENU.
Press ACTION.
j
Display
screen.
r
_
SET
CLOCK
_. END
11,:VOL UP
.4 :VOL DOWN
©
%
2) Press ACTION.
1 ACTION
0000
MANUAL
screen.
1) Press &V
Q 0®
!
to
:0
--NUMBERED
Keys
- ADD/DLT
LOCK SET
t
TIME ZONE ADJUST
p SELECT:A
v KEY
| SET
'._ KEY
sETSELECT/
•• :CH
:CH UP
DOWN
SET CLOCK
1) Press &V41_
to select
"CLOCK."
Display
[..L_...
?
"MANUAL."
select
2) Press I_ to set,
: ACT I ON KEY
• For Auto Clock Set, select "AUTO CLOCK SET"
then press _' to set and CH • to start.
/J\
DST:ON
SELECT:A
• KEY
SET
:1_ KEY
END
:ACTION
KEY
manually.
SetPress
1)
the clock
,iV to
select the
month.
2) Press I_ to
set.
• Likewise set date, year, time,and DST. (DaylightSaving Time.)
To Make Corrections,
repeatedly press 41_ to move to error, then correct.
5
End setup.
Press ACTION twice to start
the clock and exit this mode.
Add or Delete a Channel
To add channel:
Select channel with NUMBERED
keys and press ADD/DLT.
CHANNEL
08
ADDED
To delete channel:
Select channel with CH At or
NUMBERED keys and press
ADD/DLT.
CHANNEL
O8 DELETED
33
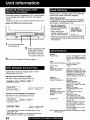
Use when moving Combination VCR to new location,
or if a mistake was made in the One Time Setup
section.
• Make sure a tape is not inserted in the Combination VCR.
Model VV.2009
unit is shown here.
Playing older or damaged
tapes may eventually
cause video heads to become clogged.
Head Clog Sensor
During playback this screen appears if clogging
is detected. To remove screen, press PLAY on
the remote or Combination
VCR.
• Use "dry" type head
cleaning cassette only.
(Part No. NV-TCL30PT is
recommended.)
I
• Follow cleaning tape
carefully. Excessive use of
tape can shorten head life,
I
o
4
l
®
PLEASE
CLEANtNG
INSERT
HEAD
CASSETTE
o_ REFERTOMANUAL
END:PLAY
KEY
• It head clog symptoms persist, contact your nearest
Factory Service Center or authorized Service Center,
(See page 37,)
Turn the Combination
VCR
Power
on.
Press and hold both the
PLAY and FF on the
Combination VCR for
more than 5 seconds.
• The power will shut off,
3
vNEED
I_)EO
HEADS
_Y
CLEANING
Display
Pictu re Tube:
13 inch (VV- 1309/VV- t319W)
20 inch (VV-2009) measured
diagonal 90° deflection Picture
Tube
Do "One Time Setup" Steps on page 6.
VCR
Video Recording
System:2 rotary heads helical
scanning system
1 track
Audio Track:
Tuner:
Broadcast Channels:
CABLE Channels:
Combination VCR auto adjusts clock for DST
(Daylight Saving Time.)
Spring (First Sunday
in April)
DST:ON ,-.) Sets clock ahead one hour.
I NORMAL TIME I t:0Oa'm"
DAYLIGHT
SAVING
TIME
I
General
Power Source:
Power Consumption:
2:00__a.m.
3:ooa.m.4: 0a.m.
Autumn (Last Sunday in October)
DST:ON "-')Turns clockbackone hour.
€
I SAVING
DAYLIGHT TIME
]l:0Oa.m,
I NORMAL TIME I
2:00 a,m.
1:00 a.m.
2:00 a,m.
• If your area does not observe Daylight Saving Time,
select DST: OFF.
• Keep these time changes in mind when programming
the Combination VCR for timer recordings.
34
VHF 2-13, UHF 14-69
Midband A through I (14~22)
Superbend J through W (23~36)
Hyperband AA~EEE (37-64)
Lowband A-5-A-1 (95~99)
Special CABLE channel 5A (01)
120V AC, 60 Hz
Approx. 69 watts
(VV-1309/VV-1319W)
Approx. 1 t0 watts (VV-2009)
Power (.O_ff.
Approx, 4.5 watts
Television System:
EIA Standard NTSC color
Speaker:
1 piece
Operating T(_mperatu re: 41°F-104°F (5°C~40°C)
Operating Humidity:
10%-75%
Weight:
26.4 Ibs. (12 Kg)
(VV-1309/VV- 1319W)
50.7 Ibs. (23 Kg) (VV-2O09)
Dimensions:
15-3/16" (W) X 15-3/16" (H) X
14-3/4" (D)
386 (W) X 385 (H) X 374 (D)
mm (VV- 1309NV-1319W)
20-5116" (W) X 19-7t8" (H) X
18-11/16" (D)
515 (W) X 505 (H) X 474 (D)
mm (VV-2009)
Note: Designs and specifications are subject to change
without notice.
©,
Function Status
Current time
I
Remaining i
(OTR mode
Rec Time
only
see
page 11 .)
When a function button is pressed (PLAY,
FF, etc.) or you change channels, the
Combination VCR mode or channel number
will be displayed.
(Some station names may also appear if
Channel Caption is set. See pages 22, 23.)
To display or remove
the overlay.
Press DISPLAY,
DISPLAY
Ec
0:25
12:00PM
O8
Channel Caption
ABC
)
ABC
-0 : 12 : 34 - --
Counter
SP
iI
Time Stamp Data
(see pages 24, 25.)
Whenever a blank section of a tape comes
up in Play mode, or when the selected
channel has no broadcast signal with the
"Weak Signal Display ON/OFF" (page 26)
set to "OFF," the TV screen will turn solid
blue.
TaPe Speed
These displays will alert you of a missed
operation or provide further instructions.
Warning and Instruction Displays
OSD
Caution
NO CH FOUND
PLEASE
CHECK
ANTENNA
CABLE CONNECTION
PUSH
THEN
CH UP KEY AGAIN
PLEASE sEr
BEFORE
CLOCK
PROGRAMMING
CHECK CASSErFE
RECORD
TAB
TO CANCEL TIMER REC
HOLD DOWN STOP KEY
FOR APPROX 3 SEC
If no active channels
are found for
CHANNEL
MEMORY,..
If you attempt to set or
review a Timer
Recording or set the
On-Timer and the
Clock is not sel...
If you press REC on
the remote control or
the Combination VCR,
and a cassette is
inserted with no record
tab...
It you press STOP
during a Timer
Recording.,.
OSD
Pg
Caution
'
(Pg
5
If you press PLAY, FF,
REW, or REC on the
remote control or the
Combination VCR without
a cassette inserted...
6
7
if the Combination VCR is
not in Stop mode or a
cassetle with record tab is 12
not inserted two minutes
13
before a Timer Recording
is about to begin...
NO CASSETTE
PLEASE
33
INSERT
A CASSETTE
PLEASE PREPARE
FOR TIMER REC
VIDEO HEADS MAY
NEED CLEANING
4
1 _
PLEASE INSERT HEAD
CLEANING
CASSETTE
OR REFER TO MANUAL
END:
If head cleaning becomes
necessary while playing
back a tape...
10
11
34
PLAY KEY
13 VCRLOCK
ACTIVATED
if you press a function
button other than
STOP/EJECT or POWER
while the Combination
VCR is in VCR Lock
mode...
26
35
Check the following points once again if you are having trouble with your Combination
VCR.
No picture or sound...
° Make sure your antenna system (TV or CABLE), is correctly set. (P.5)
• Completely insert Power Plug into an AC outlet.
• Check that POWER button is set to on.
Poor picture with normal sound,,.
• Adjust BRIGHTNESS,
menu. (P.9)
Poor sound with normal picture...
• Adjust VOLUME control. (P.8)
Poor "iV reception,,.
• Adjust SHARPNESS
No color or poor color...
• Adjust TiNT and COLOR controls in the SET UP TV menu, (P.9)
Ghost (multiple)
• Instarl a directional
images...
SHARPNESS,
and PICTURE
controls in the SET UP TV
and PICTURE controls in the SET UP TV menu, (P.9)
antenna.
TV programs cannot be watched...
• Make sure that the channel being received is in the Combination
memory. (P.32)
Channel cannot be selected,,.
• The design of this unit is such that only the channel being recorded can be viewed.
TM program cannot be recorded...
, Make sure your antenna system (TV or CABLE), is correctly set. (P.5)
• Make sure cassette record tab is intact. (P,4)
Timer recording cannot be
performed...
• Check clock is set to current time and date_
• Make sure DSSICABLE box (if used) is left on and tuned to channel to be
recorded.
• Set recording Start/Stop time correctly. (P.12-13)
• Timer recording may not be performed or continued if a power interruption of
more than 1 minute occurs before or during a Timer Recording, after power is
restored•
No playback picture, or the playback
picture is noisy or contains streaks.,.
• Adjust TRACKING control in either direction. (P.10)
• Try Head Cleaning. (P.34)
VCR cannot be controlled,..
• Make sure VCR LOCK is set to off. (P.26)
• Make sure unit is not in a Timer Record operation.
Combination
controlled...
VCR cannot be
VCR's
i iil,oiii iiil;iiiiii i
may cause signal interference,
Video cassette cannot be inserted...
• Insert the cassette window side up; record tab facing you.
Video cassette cannot be removed,,.
• Completety insert Power Plug into an AC outlet,
Eject does not function or insertion
cannot be done.,.
• Turn the POWER off and then on, and try ejecting or inserting the tape again,
Video cassette ejects when a
recording is started, or the power is
turned off for timer recording..,
• Make sure cassette record tab is intact, (PA)
In stop mode, the VCR motor
CYUNDER) continues to rotate,,,
• To enable Quick Play mechanism, the VCR cylinder will rotate for about 5
minutes. This reduces response time from Stop to Play mode and from Play to
Rewind Search mode,
VCR cannot be controlled...
• Make sure VCR LOCK is set to off. (P.26)
If you cannot resolve the problem, please call the Customer Satisfaction
assistance at 201-348.9090.
To locate an aulhorlzed servicenter call toll free 1-800-211-PANA(7262.)
JO
Center for product
1-800-332-5368 (Customer Orders Only)
• Panasonic Services Company 20421 84th Avenue South, Kent, WA 98032
(6 am to 5 pm Monday-Friday; 6 am to 10:30 am Saturday; PST)
(Visa, MasterCard, Discover Card, American Express, Check)
CALIFORNIA
GEORGIA
MICHIGAN
6550 Kate!la Avenue
Cypress, CA 90630
8655 Roswell Road
Suite 100
Atlanta, GA 30350
37048 Van Dyke
Avenue
Sterling Heights,
MI48312
800 Dubuque Avenue
S. San Francisco,
CA 94080
20201 Sherman Way
Suite t 02
Canoga Park, CA
91306
3878 Ruffin Road
Suite A
San Diego, CA 92123
'ILLINOIS
9060 Golf Road
Nites, fL 60714
1703 North Randall
Road Elgin, IL 60123
(Pick-up/Drop-off only)
MARYLAND
62 Mountain Road
Glen Burnie, MD21061
COLORADO
1640 South Abilene
Street
Suite D
Aurora, CO 80012
FLORIDA
3700 North 29= Avenue
Suite 102
Hollywood, FL 33020
MASSACHUSETTS
60 Glacier Drive,
Suite G
Westwood, MA 02090
MINNESOTA
7850-12 = Avenue South
Airport Business Center
Bloomington, MN 55425
OHIO
2236waycross
Road
Civic Center Plaza
Forest Park, OH 45240
TENNESSEE
3800 Ezetl Road Suite
806
Nashville, TN 37211 TEXAS
7482 Harwin Drive
Houston, TX 77036
13615 Welch Road
Suite 101
Farmers Branch,
TX 75244
WASHINGTON
PENNSYLVANIA
20425-84 _ Avenue
South Kent, WA 98032
2221 Cabot Blvd West
Suite B
Langhome, PA !9047
HAWAII
Chartiers Valley
Shopping Center
1025 Washington Pike
Bridgeville, PA 15017
99-859 Iwaiwa Street
Aiea, Hawaii 96701
Phone (808) 488-1996
Fax (808) 486-4389
As of April '98
37
Panasonic Consumer Electronics Company,
Division of Matsushita Electric Corporation of America,
One Panasonic Way
Secaucus, New Jersey 07094
Panasonic Sales Company,
Div!sion of Matsushita Electric of Puerto Rico, Inc.
AVE. 65 de Infanteria, Km. 9.5 San Gabriet
Industrial Park Carolina, Puerto Rico 00985
QUASAR Video Products
Limited
Warranty
Panasonic Consumer Electronics Company or Panasonic Sales Company (collectively referred to as "the
Warrantor") will repair this product with new or refurbished parts, free of charge, in the USA or Puerto Rico, in
the event of a defect in materials or workmanship as follows (all time periods commence from the date of the
odginal purchase):
LABOR_
CAMCORDER
VCR
NVMIXER
MONITOR-VCR
Monitor-VCR
ONE (1) YEAR, EXCEPT CCD IMAGE SENSOR
CCD IMAGE SENSOR- SIX(6)MONTHS
ONE(1)YEAR
NINETY (90) DAYS
NINETY (90) DAYS
ONE(1)YEAR
ONE(1)YEAR, EXCEPT CRT
CRT-TWO(2)
NINETY t90! DAYS
NINETY (90) DAYS
CRT - NINETY (90) DAYS
CUSTOMER PAYS ALL LABOR
CHARGES AFTER 90 DAYS
In-home
Monitor-VCR
or carry-in
Carry-in
YEARS"
Service:
Service:
22" (diagonal)
21" (diagonal)
NINETY (90) DAYS
CRT / LCD and Larger
CRT ! LCD and smaller
(if included) - New rechargeable batteries in exchange for defective rechargeable batteries for ten
(10) days. Non-rechargeable batteries are not warranted.
(if included) - New video cassette tape in exchange for a defective video cassette tape for five (5) days.
In-home, carry-in or mail-in service, as applicable, in the USA can be obtained during the warranty period by
contacting a Panasonic Services Company (PASC) Factory Servicenter listed in the Service Directory. Or call
toll free 1-800-211-PANA(7262),
to locate an authorized PASC Servicenter. Carry-in or mail-in service in
Puerto Rico can be obtained during the warranty period by calling the Panasonic Sales Company telephone
number listed in the Servicenter Directory.
This warranty is extended only to the original purchaser. A purchase receipt or other proof of the date of the
original purchase is required before warranty service is rendered.
This warranty only covers failures due to defects in materials and workmanship which occur during normal use
and does not cover normal maintenance, including, but not limited to, video and audio head cleaning. The
warranty does not cover damage which occurs in shipment, or failures which are caused by products not
supplied by the warrantor, or failureS which result from accident, misuse, abuse, neglect, mishandling,
misapplication, alteration, modification, faulty installation, set-up adjustments, improper antenna, inadequate
signat pickup, maladjustment of consumer controls, improper operation, power line surge, improper voltage
supply, lightning damage, commercial use such as hotel, office, restaurant, or other business or rental use of
the product, or service by anyone other than a PASC Factory Servicenter or a PASC authorized Servicenter,
or damage that is attributable to acts of God.
LIMITS AND EXCLUSJON,_
There are no express warranties except as listed above.
THE WARRANTOR SHALL NOT BE LIABLE FOR INCIDENTAL OR CONSEQUENTIAL DAMAGES
(INCLUDING, WITHOUT LIMITATION, DAMAGE TO TAPES) RESULTING FROM THE USE OF THIS
PRODUCTS, OR ARISING OUT OF ANY BREACH OF THE WARRANTY, ALL EXPRESS AND IMPLIED
WARRANTIES, INCLUDING THE WARRANTIES OF MERCHANTABILITY AND FITNESS FOR
PARTICULAR PURPOSE, ARE LIMITED TO THE APPLICABLE WARRANTY PERIOD SET FORTH ABOVE.
Some states do not allow the exclusion or limitallon of incidental or consequential damages, or limitations on
how long an implied warranty lasts, so the above exclusions or limitations may not apply to you.
This warranty gives you specific legal rights and you may also have other rights which vary from state to state.
If a probtem with this product develops during or after the warranty period, you may contact your dealer or
Servicenter. If the problem is not handled to your satisfaction, then write to the Customer Satisfaction Center
at the Panasonic Consumer Electronics Company address above.
SERVICE CALLS WHICH DO NOT INVOLVE DEFECTIVE MATERIALS OR WORKMANSHIP AS
DETERMINED BY THE WARRANTOR, IN ITS SOLE DISCRETION, ARE NOT COVERED. COSTS OF
SUCH SERVICE CALLS ARE THE RESPONSIBILITY OF THE PURCHASER.
warvid 10/20/'97
38
Desenganche la antena del televisor o de
la videograbadora que tuviera
anteriormente y conectela a la parte
trasera del registrador Combinaci6n de
VCR/TV, come se muestra en el diagrama.
Si el sistema de su antena tiene
conductores UHF y VHF separados, usted
necesita un mezclador de banda UHFNHF
(no viene con el equipo.)
•
Sin un decodificador
Mezclador de banda
UHFNHF (no est_ incluido)
Parte trasera
de la
combinaci6n
de VCR/TV
<Los dibujos
son para los
modelo VV2009>
(Plane) Cabte bifubular
de 300 ohmios
•
:_:::::::_
(nedondo)Cab!e_
-'_-_coa xial __]_}_-_jlr
_=de
75 ohmios _Z;..
desdeta
r_ ........
0
antena
_Transformador
de 300*75
ohmios (no est,_
incluido)"
"-
'
(Piano) Cable
bifubular de 300
ohmios
de TV cable
Parte trasera de la
combinaci6n de
VCRfI'V
PedrO.;
• grabar o ver canales sin codificar.
No Podra;
• grabar o ver canales codificados.
• ver otro canal que no sea el seleccionado
para cualquier tipo de grabaci6n.
• Con un decodificador de TV cable
Podr&;
• grabar
over
cualquier
canal
NOTA:
El canal deber_ ser seleccionado
incluso
los canales
en el decodificador
codificados.
de IV cable.
NO PedrO;
• • vet otto canal que no sea el seleccionado
para cualquier
ripe
de grabaci6n..
•hacer
una grabaci6n
con temporizader
de un canal a menos
que Io seleccione
en el decodificador
de TV cable.
Para ver y grabar un canal codificado/no
codificado
Sintonice e! canal del Registrador de la combinaci6n de vCRtTV en el canal de salida de
la caja convertidora de televisiSn per cable (per ejemple el canal 3.)
! Despu_s, seleccione e n el decodificador
de TV cable el canal que se quiera ver o grabar.
• Con un receptor DSS
PedrO;
• grabar
over
cualquier
canal
NOTA:
El canal deber& ser seleccionado
incluse
los canales
codificados.
Parte trasera de la
combinaci6n de
VCRfrV
en el receptor DSS.
No Podr,_;
• vet otro canal que no sea el seleccionado
tipo de grabaci6n,
° hacer una grabaci6n
con temporizador
que !o seleccione
en el receptor DSS.
NOTA:
para cualquier
de un canal
a menos
Receptor
DSS
El receptor DSS debe estar apagado para vet programas desde un
decodificador de TV cable o desde la antena. Consulte el manual del
receptor DSS para mds detalles.
*DSS _ es una marca registrada de DIRECTTV, INC., una unidad de
GM Hughea Electronics.
39
_-s_
a
Ajuste de la zone horaria.
xhiba el MENU PRINCIPAL.
Presione ACTION.
videograbador
combinado,
Presione POWER
pare encender el
/_!
SELECT
U_UAGE
PUSH
cH•
:E_H _h
Seleccione
lenguaje.
CH i': paraelingles
APP,
VOL+: para franc6s
VOL +
:FranC, ais
[ oPmuiRcHv :E_p_ol
CHV
b
F 1 ,JAR
:para espaRol
FIJAOION
AUT0.
(CNFIELOJ)ajuste automdtico
3r
Y SIESTA
d
AUTOMATICA
TERMINAR
:OPRIMIR
CH
RELOJ Ee AUTOMATICA
INCOMPLETe
IPIJACION
L PARA
EL
Si la hera exhibida
para su zona, ajuste
ELEGI R:i,
•
:ll,
2)
TERM I NAR;ACTION
zona
horaria"
en la
siguiente
p_gina.
AUTOMATICA
Presione li. pare
ajustar.
• De la misma manera, ajuste el dfa, el a_5o,la hera
y ta hera de ahorro de energia. (VERANO)
Pata hacer correcciones,
presionerepetidamente<ill. para moverse hasta el
error, luego corrijalo.
eEL
ES INCOMPLETO
RELOJ
-/]-_....... V_---_YY_--:-AC-T-1) Presione li_t' para
seleccionar el mes.
FIJAR
RELOJ
Presione ACTION para
salir de este mode.
Aluste el reloj
manualmente,
el reloj nuevamente
de acuerdo con la
secci6n "Ajuste de la
FIJACION
DIEL
ACTI_
FMAR
rio es la correcta
UP
,
Presione
inal del ACTION
ajuste. dos vece&
• El valor numddco ajustado aquf se vuelve "0" una
vez que ajuste manualmente el reloj.
OPRIMIR
]
"
•
Exhiba la pantalla
FIJAR RELOJ.
7/28f1999MAR12:00PM
I (Ajuste terminado)
HeRA
VERANII:C_:
ACT
I Presione CH i,
CANAL
PIJAOO
: CA
10
pare salir.
COMPLETe
t
E| ajuste del reloj es incomplete.
Ajuste el reloj manualmente.
A
ION
.
! Seleccione "AJUSTE
ZONA HERA."
J
Las siguientes inlormaciones aparecer(in
seguidamente:
* AUTOPROGRAMACION EN PROCESO
mil° AUTOPROGRAMACtON COMPLETe
° FIJAClON AUTOMATICA DEL RELOJ
EN PROCESO
F I JAG
PtJARRELOJ
.....
2) PresioneACTION para
exhibirla.
seleccionar.
FtJACION
AUTOMATICA2)
1) Presione
ii_l' para
F_JA_:.
,
Presione ,<1_
para
ELEGIR:/=
•
TERM_.A_:ACTJON
ajustar.
UNAC_AOE'rvPO.
CABLEajuste automatico
SINTONICE
AL CANAL
PBS
DE eU LOCAL
LUEGO..
del reloj.
CONECTE EL CABLE DE LA
de canales y el
PeRFAVOROPR,M_RCH_P
Presione CH i..
!
.....
1
; ACI" I ON
MANUAL
1c°°''°c'°'
USANOO
1) Presione i_'<ll_
para
seleccionar "RELOJ."
MENU
PRINCIPAL
ELEGIR:A
• < b.
C
ANTENA
Exhiba la panta|la
"FIJAR RELOJ".
(Ajuste sin terminar)
PARA FUAR EL RELOJ
OPRIMIR
ACTION
C
Presione
veces ACTION.
Final
del dos
ajuste.
NOTA IMPORTANTE PARA AJUSTE AUTOMATICO DEL RELOJ
• El ajuste automlttico del retoj sertt realizado al volver a
encenOer el videograbador combinado cada vez que Io
apague. Si usa un decodi{icader de TV cable y desea que la
funcibn de ajuste automiltico del reloj funCione, el
decodificador de TV cable debe queder encendido y
sintonizando el canal PBS en el memento en que seapaga
el videograbador combinaclo,
• Si usa un sintenizacfor de TV satelital, pare que funcione el
ajuste autom,:_tico del reloj, debe de estar apagado.
• Si usa un tome de audio/video pare conectar el
videograbada¢ combinede y el decodificador de TV cable o
el sintonizador de TV satelital, deberlt tambit_n conectar el
cable coaxial RF para pealer usar las funciones de ajuste
eutomdtico de reloj y ajuste autom_ltico de canal.
• Si per cualquier razSn se cambiara la hera manuelmente,
no se podr_l realizar la correcci6n automdtica de la hera.
40
Para fijar o fijar de nuevo el reloj
Encasede queelreloi esincorrectoo haocurridouncorteel_ctdco,
1 Optima ACTION para que parezca el MENU PRINCIPAL,
20prima
iAr _ili" para elegir "RELOJ". Luego,
oprima ACTION para que aparezca la pantalla de
la FIJAR RELOJ.
30prima iT
para elegir "MANUAL", y luego I_
pare que aparezca la pantalla de la FIJAR RELOJ,
4 Per favor continue con los pesos B y C de la
instrucci6n anterior (Case 2,)
•Inserte
El videograbador
un casete.combinado
enciende autom&ticamente_
Presione
Exhiba FIJAR PROGRAMACION.
Presione PROG.
se
• Si ya existe un programa en la memoria, presione
&v y I_ para seleccionar un numero de programa
PLAY.
sin user,
• La reproducci6n comienza
eutom_,ticamente si el casete no tiene la
lengt3eta para prevencion de grabaci6n.
•
Para encontrar una escena en particular
B0squeda hacia adelante --) Presione FF
B_squeda hacia atr&s -) Presione REW
• Pare vet en camera lenta --) Presione
SLOW
•Para
ver una imagen fija (congelada) -.)
Presione PAUSE
• Para ver ira&genes cuadro a cuadro --)
Presione SLOW en el modo de imagen
fija.
• Para parar ...) Presione STOP
• Pare rebobinar la cinta -) Presione REW
•Para
expulsar la cinta _ Presione EJECT
en el control remoto o STOP/EJECT en
el videograbador combinado.
2
I_O_'/t\
_
ELEO,R:- •
FtJAR :,,
2) Presione
ajustar.
TERM I NAR : PROG / ACTION
Fecha de hoy --
(._8--9 ........ 31-- 1 -- 2 ...... 6_. t
7
& / V Ordenpateelegir
DIAR_O
SEMANAL
SEMANAL
(SAB) ....... (LUN) --
SEMANALJ
{DOM)
Repita el paso 2 pare ajustar:
hora de comienzo, hera de parade, canal (o LINEA para una
luente exterior), categorfa [N/O (no aplicable), DEPORTE,
ClNE, COMEDIA, MUSICA, DRAMA}, velocidad (SP, LP, SLP)
Haga las anotaciones necesarias.
• Si no lueran necesarias, vaya at
ABeI paso 4,
/H_v/1\
1) Presione •para
hacedas.
2) Presione •T pare seleccionar.
• Loscaracterescambiaranen el
siguiente orden.
Presione
o fas teclas
SeleccioneCHelAV
canal.
num_ricas correspondiente.
la velocidad
I_ o 41 para
• 1 - 31 = Grabaci6n _nica
• DIARIO = ala misma hora de lunes a viemes
• SEMANAL = ala misma hora una vez ale semana
para
prevenci6n
grabado.
|nserte
un casete de
con
la leng_ieta
. El videograbadorcombinadose
enciende autom&ticamente,
Seleccione
la fecha
grabacibn.
I Ajuste
1) Presione
•V depara
_A
de
i
BiC
.......
:9 .......
BLANCOi
2--1--0--t--!
- i&_
'_-
Z--
grabacibn.
Presione SPEED.
3) Presione
ajustar.
SP = reproduccibn norma!
LP = reproducci6n large
SLP = reproduccion super large
• La velocidad seleccionada debe
aparecer en la pantalla.
4) Presione PROG
para finalizar.
Presione REC.
Comience
la grabac|on.
• Pera editarpartes no deseadasde una
grabacibn,presione PAUSE pare hacer
una pausedurante la grabaci6n.
• No podr&ver otrocanal durantela
grabaci6n,
•Para
parer --) Presione STOP.
•
El videograbador combinado
deja de grabar a una hora
prefijada, (Grabaci6n de un toque)
Presione REC repetidamente para
ajustar lahora de grabaci6n (30
rain - 4 horas.)
Grabaci6n
normal
_ 0:30--_ 1:00,,,)
:00._- 3:00,4=--2:004-- 1:30.._.,"
4
:_]ii-:ii(ii ii ::
TEP,M I NAR: PRC_ tAC"rlO_
5
Salga
_
o 4
para
(o ACTION)
Termine
el programa.
Presione
PROG
(o ACTION.)
Para introducir mds programas.
presione ,_'v y I_ pare seleccionar y
ajustar el n_mero de programa en
blenco, y luego repita los pasos 2 y 3.
de este modo.
Presione PROG (o ACTION.)
• Si est& usando un decodificador de TV cable, aseg_rese
que se encuentra en el canal deseado y que la alimentaci6n
queda conectada pare grabar con temporizador.
• El indicador PROG TIMER se enciende en e[
videograbador combinado.
41
Tower
Remote
Control
EJECT button:
When EJECT is pressed, the tape is ejected from Cassette Compartmenl.
If EJECT is pressed during recording, the Combination VCR wilt not respond to the command.
ON-TIMER
See page14,
EJEC3
See pages t0, 42.
NITE
See page 8.
POWER
See pages 6, 8.
SPEED
See page 11.
SLEEP
See page 14,
MUTE
See pages 8, 17.
RAPID TUNE
See page8.
CHANNEL UP/DOWN SELECT UPIDOWN-. ---i
See pages 6-9, 11-14, 16, 17, 19-26,
28-30, 32, 33,
ACTION
See pages 7, 9,11,16,17,
22~24,26,28-30,32,33.
:
See pages 6~9, 11-14,
PROGRAM
See pages 12, 13, 25.
t9,
ZEROI1 MINUTE SKIP
See pages 18, t9.
INDEX ...............
16, 17. 19-26,
28~30. 32, 33,
See pages tl,
DISPLAY
14, 18, 31,35.
)N
See page 18.
/
See pages 20, 21,
NUMBERED
KEY
See pages 8, 11,20,
TRACKING UP/DOWN
See page 10•
/
33.
REWIND/SEARCH
See pages 10, 20, 21.
PLAY
See pages 10, 21,25,34.
SLOW
See page 10.
PAUSE
See pages 10, 11.
See pages !3-15,
/
• /
/
ADD/DELETE
22, 23, 28, 33.
FAST FORWARD/SEARCH
See pages 10, 20, 21.
STOP
See pages 10, 11, 13, 21.
COUNTER RESET
See page 18.
REC
See page 11.
Models VV-1309/VV-1319W
AC Power Plug
When plugged into an AC
outlet, the Combination VCR
consumes 4.5 W of electric
power in OFF condition.
42
unit is shown here.
Easy-Grip-Handle
<Models VV-1309/Vv-1319W
only>
use when transporting the
Combination VCR.
VHF/UHF Antenna
Input Terminal
In from your Antenna or
Cable.
See page 5.
Model VV-2009 unit is shown here.
REWINE
ACTION
See pages
7,10,12,13,20,21.
Cassette Compartment
See pages 10, 11,25.
--PLAY/REPEATSee pages 8,10,19,
21,25,34.
STOP/EJ ECT
ACTION
See pages 7, 10~13, 21.
SEARCH
Seepages10,20,
21,34.
CHANNEL UP/DOWN
TRACKING UP/DOWN
SELECT UP/DOWN
See pages 6-8, 10~13, t5.
REC
See pages 11, 26.
VOLUME
SET
See pages 6~8, 12, 13.
TIMER
See page 15.
POWER
See pages 6, 8, 34.
Built-In Speaker
AudioNldeo In
Jacks
See page 27.
_PhonesJack
See page 8.
For Models
VV-1309/
VV- 1319W
REC Indicator
Lights during recording. In
Rec Pause or OTR Pause
mode, the indicator flashes.
See page 11.
PROG TIMER Indicator
Lights when the Comb{nation VCR
is set for Timer Recording. It flashes
when a Timer Recording has been
set with no tape inserted, the clock
is not set, or the tape is in motion.
See pages 11, 13.
Remote Sensor
ON TIMER Indicator
Lights when the On Timer is set.
See page 14.
43
Panasonic Consumer Electronics Company,
Division of Matsushita Electric Corporation of America
One Panasonic way Secaucus,
New Jersey 07094
Printed inJapan
VQTS3530B
Panasonic Sales Company,
Division of Matsushita Electric of
Puerto Rico, Inc. ("PSC")
Ave. 65 de Infanteria. Kin. 9.5
San Gabriel Industrial Park, CaroJina,
Puerto Rico 00985
Combination
P
VCR
OnS
Models
VV-I
ii i
......................................
ii_i_i
_I__iii_i
.......
__,,_
, .
_
_
........
_
_ _ ii!_ _
_?
ii
i
i
i
i
i
.%
important Safeguards and Precautions
READ AND RETAIN ALL SAFETY AND
OPERATING INSTRUCTIONS,
HEED ALL
WARNINGS IN MANUAL AND ON UNiT
INSTALLATION
1 POWER SOURCE CAUTION
Operate only from power sourceindicated on unit
or in thismanual ti uncertain, have an Electdc
UtilityService Company or Video Products Dealer
verify your home power Source
; POWER CORD PLUG
For safety, this unit comes with a poladzed
type plug (one wide blade), or a throe.wire
grounding type plug
POLARIZED PLUG
The plug fits into outlet one way. If it cannot be
fully inserted, try reversing it. If it still will not fit,
have an electhoian install the proper wall outlet.
Do not tamper with the plug.
GROUNDING
PLUG CAUTION:
The plug requires a Ihree-hole grounding outlet.
If necessary, have an electrician install the
proper DUffel. Do not tamper with the plug,
3 POWER CORD
Make sure power cords are routed so they
are not likely to have anything rest on
them,roll over them, or be in the way of
walking traffic An extension cord should have
the same type plug (polarized or grounding)
and must be securely connected Overloading
well outlets or extension cords may cause fire
hazard. Frayed COrds, damaged plugs, and
damaged or cracked wire insulation are
hazardous and should be replaced by a
qualified electrician.
4 DO NOT BLOCK VENTILATION HOLES
Ventilation openings in the cabinet release
heat generated during operation. If blocked,
heat build-up may result in a fire hazard or
heat damage to cassettes.
For your protection:
a. Never cover ventilation slots while unit is
ON, or operate unit while placed on a bed,
sofa. rug, or other SOft surface.
b. Avoid built-in installation, such as a book
case or rack, unless properly vemi_ated.
5 AVOID EXTREMELY HOT LOCATIONS OR
SUDDEN TEMPERATURE CHANGES
DO not place unit over Or near a heater or
regulator, in direct sunlight, etc. If unit is
suddenly moved from a cctd place to a warm
place, moisture may condense in unit and on
the tape causing damage.
6 TO AVOID PERSONAL INJURY
• Never place unit on support or stand that is
not firm, level and adequately strong. The
unit could fail causing serious injury to a
child or adult and damage to the unit.
• Move any apPliance and cart
combination with care.
Quick stops, excessive force.
and uneven audaces may
cause objects to overturn
= Carefully follow all operating instructions.
I
OUTD(3OR ANTENNA INSTALLATION
1 SAFE ANTENNA AND CABLE CONNECTION
An outside antenna Or cable system must be
property grounded to provide some protection
against built up static charges and voltage /
Section 810 of the National Electrical
/
Coda, ANSf/NFPA 70 (in Canada,
/
part I of the Canadian Electrical
Code) provides information
regardingPrepergroundingof the
mast and supporting structure,
_
"_
=u'='_/_
[_'_......._
_
;._
,...._,_
',,==
_.
_ _.._
_=.r
_¢ _o. ,_
/
_" ............
=,ou.D_m*
,
grounding of the lead-in wire to an
_-""_
__
antenna discharge unit, size of
_ou,,_a
grounding conductors, location of
.Ec ._'t,=_L_C'._ALCO_
_"eC*"_,"_"_
antenna discharge unit.
connection to grounding electrodes, and requirements for the grounding elecfrede
2
KEEP ANTENNA CLEAR OF HIGH VOLTAGE POWER LINES OR CIRCUITS
Locate an outside antenna system well away from power lines and electric Lightor
power circuits so it wUl never touch these power sources ShOuld it ever tall When
installing antenna, absolutely never touch power lines, circuits or other power
sources as this coold be fatal.
I
USING THE VIDEO UNIT
Before unit is brought out of storage or moved to a new location,
INSTALLATION section of these safeguards
1 KEEP UNIT WELL AWAY FROM WATER
bath tub, pool, and so on.
OR MOISTURE.
refer again to the
such as a kitchen sink,
2 IF EXPOSED TO RAIN, MOISTURE. OR STRONG IMPACT, unplug unit and have
it inspected by a qualified service technician before use
3 ELECTRICAL STORMS
During a lightning storm, or before leaving unit unused for extended periods of time.
disconnect atl equipment from the power source as well as the antenna and cable system.
4 WHEN UNIT IS PLUGGED IN
• Never expose to rain or water. DO NOT OPERATE if liquid has been spilled into
ur';_t.Immediately unplug unit, and have it inspected by a service technician. Fire
ar_ shock hazards can result from electrical shorts caused by liquid contact inside
• Never drop or push any object through openings in chit. Some internal parts carry
hazardous voltages and contact can cause electric shock or fire hazard
• Avoid placing unit directly On top or underneath a TV as this may cause electrical
interference. Keep all magnets away from electronic equipment.
5 USING ACCESSORIES
Use only accessories recommended by the manufacturer to avoid risk of fire,
shock, or other hazards,
• 6 CLEANING UNIT
Unplug unit. Use a clean, dry, chemically untreated cloth to gently remove dust or
debris. DO NOT USE cleaning fluids, aerosols, or forced air that could over-spray,
or seep into unit and cause electrical shock. Any substance, such as wax, adhesive
tape, etc. may mar the cabinet surface. Exposure to greasy, humid, or dusty areas
may adversely affect internal parts.
[
SERVICE
1 DO NOT SERVICE PRODUCT YOURSELF
If, after carefully following detailed operating instructions, the unit does not operate
propody, do not attempt to open or remove covers, or make any adjustments not
described in the manual. Unplug unit and contact a qualified service technician.
2 REPLACEMENTOF
PARTS
Make sure the cervice technician uses only parts specified by the manufacturer, or
have equal safe_y characteristics as original parts, The use Of unauthorized
substitutes may result in fire, electric shock, or other hazards,
3 SAFETY CHECK AFTER SERVICING
After unit is serviced or repaired, request that a thorough safety check be done as described
in the manufacturer*s service literatureto insure video unit is in safe operating condition
Safety Precautions
i Warning: TO prevent fire or shock hazard, do not expose th_s equipment to rain or moisture.
This video recorder, equipped with the HQ ( High Quality) System, is compatible with exis_ng VHS equipment.
Only use those tapes with the _
mark. It is recommended that onJy cassette tapes that have been tested and inspected for use in 2. 4, 6,
and 8 hour VCR machines be used,
t This television receiver provides display of television closed captioning in accordance with § 15.119 of the FCC rules.
FCC WARNING:
Any unauthorized
changes
or modifications
to this equipment
would
void the user's
authority
to operate.
This symbol warns the user that unineulated voltage within the unit may have
sufficient magnitude to cause electric shock. The[afore. it is dangerous to make any
kind of contact with any inside part of this unit.
This symbol alerts the user thai important literature concerning the operation
maintenance of this unit has been included.
Therefore, it shoutd be read carefully in order to avoid any problems.
and
,.J
2
Table of Contents
Important
Safeguards
and Precautions
....................
............ 2
Before Using .................... .......................................................
• Accessories ................................ 4
• Record/Playback Time .............. 4
Connections
{Outdoor Antenna Connections,
One Time Setup
(Language,
;4
• Loading the Batteries .................. 4
* Prevent Accidental Tape Erasure ..4
Channei, Clock)
DSS/Cable
Box Connections)
...............
..........
5
6, 7
, ....................
TV Operation
(NITE mode, Using the 100 key, Rapid Tune, Audio Mute, Phones, SELF-DEMO
Picture
Adjustment
Playback
Record
...............................................
a Tape (Slow
Motion,
Still Picture, Frame by Frame, Feat_Jres for Quality)
Timer Recording
............ 1!
8
_..................
On a Tape .................................................
° One Touch Recording
mode) ......
9
.,10
. ................ 11
• Selecting Input Mode ................ 11
............... . ..........................
;...................
12, 13
• Timer Recording Using
.-Review, Replace or Clear
Combination VCR Buttons ...... 12
Program Contents ...................... 13
TV Timer
Features
. .........................................................
° ON-TIMER with Alarm ............ 14
° SLEEP TIMER ........................ 14
Closed
Caption
System
..................................................
° Closed Caption Mode
Feature ................ _................... 16
Tape Operation
VCR Features
Copying
V-Chip
Your Tapes
Control
(Dubbing)
Feature
18 ~ 21
• Auto Operation Functions .......... 19
• One Minute Skip ........................ 19
-VHS Index Search System_20, 21
...........................................
• Channel Caption ................ 22, 23
• Time Stamp ...................... 24, 25
. ...... 22 ~ 26
• Weak Signal Display ON/OFF ..26
•VCR Lock .................................. 26
............................................
..................................................
• Enter or Change Secret .
Code ........................................ 28
• Setup MOTION PICT.
Ratings ................................ ..._29
On-Screen
27
28 ~ 31
° Setup TV PARENTAL Ratings ..30
.Blocking Message ...... ".......•......... 31
Reset Language, Channels, Clock ..................................
Unit Information ......................................................................
• Reset all Combination VCR
Memory Functions .................. 34
• DST (Daylight Saving Time)....34
16, 17
° Caption on Mute Feature .......... 17
..............................................................
• Tape Position Display .............. 18
• Zero Search .................... :....... 18
• Repeat Play ............................ 19
Special
14, 15
• INSTANT ALARM ...................... 15
32, 33
34
• Head Cleaning .................... ...... 34
°Specifications ................... "......... 34
Display (OSD) ......................................................
• VCR Status & Clock Display....35
° Channel & Function Display ....35
° Warning and Instruction
Displays ....................................
Before Requesting
Service ....................................................
Service Center List ................................................................
35
35
36
37
Warranty ...................................................................
............... 38
Spanish (EspaSol) Quick Use Guide ............................
39 ~ 41
Location
of Controls
........................................
................. 42, 43
3
Congratulations
on your purchase of one of the most sophisticated and
reliable products on the market today. Used properly, it will
bring you and your family years of enjoyment. Please fill in
the information bellow. The serial number is on the tag
located on the back of your Combination VCR.
}
Date of Purchase
Dealer Purchased From
Dealer Add ress
Dealer Phone No.
Model No.
Serial No.
2) Insert batteries
as marked.
Accessories
[]
Remote Control
VSQS1606
(VV- 1309/VV-2009)
VSQS1607
(VV-1319W)
3) Close
[]
Battery replacement
caution
• 0o not mix old and new batteries,
• Do not mix alkaline
[] Batteries
2 "AA"
with manganese
Break off the tab.
To order accessories,
.
call toll tree 1-800-332-5368,
Tab
Screw driver
To record again.
Only use tapes with the _
Tape Speed
Setting
; SP
i (Standard
Play)
LP
(Long Play)
SLP
(Super Long Play)
4
mark in this unit,
Type of Video Cassette
T60
r "'T'12-O-_
T160
1 Hour
2 Hours
2 Hours
40 minutes
2 Hours
4 Hours
5 Hours
20 minutes
3 Hours
6 Hours
8 Hours
the cover.
Cover
the hole
with cellophane
tape.
batteries.
Unhook the antenna from your
previous TV or VCR and
connect it to the back of the
Combination VCR as shown in
the diagram.
If your antenna system has
separate UHF and VHF leadins, you need a UHFNHF
Band Mixer (not supplied.)
UHF/VHF Band
Mixer (not supplied)
(Round
,,Ohm
coax,a,
|rom
]
Ant nn
e
•
Without
a Cable
Back of
Combination VCR
<Model VV-2009 unit
is shown here.>
300-75 ohm
Transformer
""
- -
,'_
a
(not supplied) L_
........
(Flat)Twin Lead
_ J I
300 Ohm Cable :;:;::::::::_-_-J
Combination VCR
Box
You can;
• record or view unscrambled
channels.
You cannot;
• record or view scrambled channels.
• view a channel other than the one
selected for any type of recording.
• With a Cable Box
You can;
• record or view any channel including scrambled
channels.
NOTE: Channel selection must be made at the cable box.
,
You cannot;
• view a channel
other
type of recording.
• do a Timer recording
at the cable box.
than the one selected
of a channel
unless
Combination
VCR
Combination
VCR
for any
you select
it
Note to CABLE System Installer
This reminder is provided to call the CABLE (Cable TV) System
Installers attention to Article 820-40 of the NEC that provides
guidelines for proper grounding and, in particular, specifies that
the cable ground shall be connected to the grounding system
ol the building, as close to the point ol cable entry as practical.
• With a DSS Receiver
You can;
• record or view
channels.
any channeJ
including
scrambled
NOTE: Channel selection must be made at the DSS Receiver.
You cannot;
• view a channel other
type of recording.
• do a Timer recording
at the DSS box.
than the one selected
of a channel
uniess
for any
you select
it
NOTE: The DSS receiver must be turned off to view programs from
a cable box or antenna. See the DSS manual for details.
"DSS ®is registered trademark of DIRECTV,
Hughed Electronics.
INC,, a unit of GM
DSS Receiver
5
Process of Setup
When the Combination VCR is turned on the
first time, setup mode is entered automatically.
1[
2
Press POWER on the
Combination
VCR.
PUSH
CH •
;EngliSh
0PRiMIR
CH •
:Espa_ol
APP,
VOL
+
1POWER
Select the language.
SELECT
LANGUAGE
#for
@
Eng,ish
for
:Fran_ais
?for
Spanish
VOLUME
UP
(Espa_°l)French
(Frang,_is)
) CHANNEL
" UP/DOWN
• If wrong language is set, do
=Reset all Combination VCR
Memory Functions" steps page 34.
• If you use a cable box, the cable
box must be left on.
3
3
C_NNELICL(X]R
AUTOSET Start Channel
Auto Set
and Clock Auto Set.
CONNECT ANTENNA CABLE
AND IF YOU USE A CABLE
BOX, TUNE IT TO YOUR
LOCAL
PBS CH
THEN,..
PLEASE
CH
PUSH
AUTO SET
CH UP
Press CH &.
KEY
PROCEEDING
J
f
AUTO CLOCKSET
I IIIIIIIIIIIIII
PROCEED
I NG
ICasell
(Setup completed)
(Setup incomplete)
7/28/1999
WED
12:00PM
SETTING
DST:ON
: OH 10
AUTO CLOCK
SET
COMPLETED
ENO
:
PUSH
CH UP KEY
Press CH A to exit.
• It your area observes
daylight saving time, but
you would like to turn the
DST feature off, do the
Reset Clock steps on
page 33 and set DST:OFF.
next page.
AUTO
CLOCK
SET
IS INCOMPLETE
I
I See Case 2
PUSH
ACT I ON TO
SET
CLOCK
• If your area observes daylight saving time
and DST is set to ON, but the time is
incorrect; do the Time Zone Adjust steps
on the next page,
IMPORTANT
NOTE FOR AUTO CLOCK SET
• Auto clock set is performed the first time when Combination VCR is turned off each day. If used, a cable box must be left
on and tuned to the PBS channel at the time Combination VCR power is turned off if you want auto clock set to be done,
• If used, a DSS receiver, it must be turned off for auto clock set.
• If Cable Box or DSS receiver is connected to Combination VCR via Audio/Video Jacks, an RF coaxial cable must also
be connected for auto clock set and channel auto sei features,
• If for any reason the time is changed manually, automatic time correction wiJI not occur.
6
ICase
1
1 I Set TIME ZONE ADJUST.
I
Press ACTION.
DispIay MAIN MENU.
_
SELECT/
SET
MAIN
MENU
Display
screen.
SET CLOCK
UP
• :CH DOWN
@
1) Press AV<I_
to select
"CLOCK."
%
2) Press ACTION
to display.
b
l_ :VOL UP
4 :VOLDOWN
1 ACTION
4
3-----,-c-.
Iie'''T'iEZO
a
[:T'_o CLOCKS_r
j_
(@
I SELECT:&
I SET
:,t
[
END
1) Press At
soleot.
2) Press l_
to
subtract or add
hour(s) as
• KEY
_. KEY
:ACTION
c
to
KEY
necessary,
End setup.
Press ACTION twice,
• TIME ZONE ADJUST returns to
"0" it clock is set manually.
m
I
_
Clock Setup is Incomplete.
Set the clock manually.
• This Combination VCR calendar is
accurately maintained its calendar up to
Dec. 31,2089, 11:59PM
• Channel auto set selects normal TV or
Cable channels depending on your
Combination VCR hookup.
a[OOL
I
b,-.CT.:..
..TO-,
......
IF
O
el'Pre'''"
tt'ec'°c'
se,ct
,.
Display
screen.
SET CLOCK
Press ACTION to
I S I NCOMPLETE
exit this mode.
PUSHACTIONTO SETCLOCK
--
Using
On Remote
_
month.
u
2) Press I_ to set.
° Likewise set date, year, time, and
DST (Daylight Saving Time.)
To Make Corrections,
repeatediy press 411. to move
to error, then correcL
c
End setup.
Press ACTION twice. (Clock
starts.)
--
AV <1_ keys--
• :CH DOWN
A :CH UP
b":VOLUME UP
4:VOLUME
DOWN
Whenever the menu or
rogram screen is
displayed, CHANNEL
LU LLI LTJI UP/DOWN and VOLUME
.....
I UP/DOWN function as
un unit
I &•,Ill.
only,
ACTION
key on the unit --
You can operate the menu
s'r_
r_._j_Jscreen using unit buttons.
I ""- II"J ITO display the menu, press
"--=_-'_-"='- I STOPtEJECT and REW
On Unit / together with no tape
" inserted.
To exit the menu, repeat above with or
without tape inserted.
7
1[
Press POWER on the
Combination
VCR.
_l_check
list before you begin.
[] All connectionsare made (see page5.)
[] Your CombinationVCR is pluggedin.
2
Select a channel.
08
ABC
or
OQQ
QQQ
©QQ
®®
3
Using CH AT
NUMBERED
keys.
or
Model MY-2009 unit is shown here.
Adjust volume.
PLAY/
REPEAT
24 tllllllllll
......................
=
1 2
--
PHONES
Jack
Color and picture intensity levels are adjusted so the screen is
easier on your eyes during night time use.
NITE
NITE
0
Set NITE mode.
Press NITE.
. NITE mode may be selected
when watching TV or playing
a tape.
To Cancel, press NITE.
• Previous settings are restored.
• NITE mode is cancelled when power is
turned off or power failure occurs.
__
POWER
MUTE i
TUNE
__
VOL UP/
DOWN
CH UP/
DOWN
• Using the 100 key
When selecting CABLE channels 100 to 125 with the
NUMBERED keys, first press the 100 key, and then enter the
remaining two digits.
•
Rapid Tune
Press R-TUNE to display the last channel you were watching.
• Audio
Mute
Press MUTE to instantly mute the sound.
Press again, to restore the previous sound level.
II Phones
Connect an earphone (not supplied) or headphones (not
supplied) to the Phones Jack.
• SELF-DEMO
Mode
With Power ON, hold down PLAY/REPEAT on the
Combination VCR for 5 seconds to display demo screen.
Repeat this to exit.
8
NUMBERED
Keys
100 --KEY
ACTION.
I Press
DisplayMAIN
2
Display
screen.
8
__EIMAIN
MENU
_EL_CT:A
• _I I- KEY
SET
:ACTION
KEY
|
/
J
MENU.
SET UP TV
@
%
1) Press &T<II_
to select "TV."
2) Press ACTION
to display.
2• SELECT/
SET
._'_
•
• :CH UP
V :CH DOWN
I_ :VOL UP
4 :VOL DOWN
LOCK
......
SET LIP TV ......
CAPT ION
1NPUT SELECT
: TUNER
_ELECT:A
v KEY
SET
;_ KEY
END
:ACTION
KEY
4
i£a]lb]=!
TINT
BRIGHTNESS
PICTURE
SHARPNESS
NORMAL
....... I ......
....... I ......
....... I ......
..............
4
....... I ......
SELECT:A
• KEY
ADJUST:4
_ KEY
END
:ACTION
KEY
COLOR
TINT
BRIGHTNESS
PICTURE
SHARPNESS
....... I ......
....... I ......
....... [......
..............
4
....... _......
SELECT:A
v KEY
SET
:_ KEY
END
:ACTION
KEY
Display
screen.
1) Press AT
select.
©
Adjust
1ACTION
VIDEO ADJUST
to
2) Press I_ to
display.
desired
©
To Reset
Controls
@®@
item.
1) Press Ai,_!' to
select on item.
(See below right.)
2) Press _lb, to
adjust.
Picture
Press AV and b, to select
and set "NORMAL."
All controls return to their
factory settings.
Picture Adjustment
COLOR Control
5{
Adjust color intensity.
End setup.
Press ACTION three times
to exit.
TINT Control
Adjust for natural flesh tones.
BRIGHTNESS Control
Adjust picture brightness.
PICTURE Control
Adjust picture intensity by adjusting
both contrast and color level in the
proper balance.
SHARPNESS Control
Adiust picture sharpness.
9
_l_check
Model VV-2009 unit is shown here.
list before you begin.
[]
All connections
[]
Your Combination
are made (see page 5,)
VCR is plugged in,
Insert a cassette.
, Combination VCR power
comes on automatically,
i
To prevent tape jam
L_-_
Inspect your cassette tapes and
remove any loose or peeling labels,
EJECT
PLAY
D
i!:
....
Press PLAY.
. Playback begins if cassett_
has no record tab.
i;
-TRACKING
• To Find a Particular Scene
Forward Search --->Press FF
Reverse Search -) Press REW
• For view Slow Motion -->
Press SLOW (To release,press SLOW)
• For view Still (Freeze) picture -.)
Press PAUSE (Torelease,pressPAUSE)
• For view Frame by Frame picture --)
Press SLOW in the Still mode
(To release, press PAUSE)
REW
- FP
SLOW --
-- STOP
After Combination VCR is in Still or Slow mode for 3 minutes, it
will switch to Stop mode automatically to protect the tape and
the video head.
/
PAUSE
• To stop -) Press STOP
• To rewind tape --) Press REW in stop mode
• To eject tape -> Press EJECT on the remote or
STOP/EJECT On the Combination VCR
You can operate on the Combination
VCR
(Model VV-2009 unit is shown here,)
1 Insert
acassette.
I
t
2
Press PLAY,
1 ,,,
• Press to stop and/or eject tape,
10
1
Dlqital Auto Tracking
Continuously analyzes the signal and adjusts for
optimum picture quality.
Manual Trackin_ Control (to reduce pictur_
Use during Playback and Slow Motion mode to reduce
picture noise.
Press the 3 or 6 NUMBERED key on the remote control
or CH ,_v on the Combination VCR until the picture
clears up,
To return to Auto Tracking, press POWER off, then on
again a few seconds later.
Black Tube <For Model VV-2009 only>
This Combination VCR uses a Black tube for better
color reproduction and picture contrast.
ModelVV-2009
unitis shownhere.
I_Check list beforeyou begin.
[] All connectionsare made (see page 5.)
[] YourCombination VCR is pluggedin.
r] Cassette with recordtab in place.
....
1
comes
ec_idt _i _
R
[_
_
ab
_
• Combination
OQ®
F
_
Q Q
or Q _b _
_
1
_
SE
• :CH DOWN
I_ :VOL UP
4 :VOL DOWN
.I select Channel.
Select Recording
speed (see page 4.)
Press SPEED.
SP
,)
= Standard
Play
LP
= Long Play
SLP = Super Long Play
,)
DIS
power
• To select 'LINE," see bottom
ot this page.
j
,t :CH UP
VCR
Press CH AT, or
NUMBERED keys.
(_ Q
3
on automatically,
Insert a cassette,
• Selected speed is displayed.
Start REC.
Recording.
Press
(_REC
4[
• To edit out unwanted
portions, press PAUSE to
pause and resume recording.
• You can not view another
channel during recording.
®©G
STOP
• To stop -) Press STOP
• One Touch Recording
PAUSE-J.
(OTR)
repeatedlyPress
RECto
_" Normal Rec-..,_0:30-....-_
1:00-_
set the recording
_'4:004--3:00_2:00"=-'1:304_"
length (30 min - 4 hours.)
• Combination VCR stops recording at a preset time.
• PROG TIMER indicator lights on the Combination VCR.
• After Combination VCR has been in Rec Pause mode for 5
minutes, it wilt stop automatically to protect the tape and
video head.
Method 1: Press CH ,Ik,V. The display will
change as follows.
(CABLE) (
E,,_._125
or
Method
2: a Press
b Press
then
ACTION
for MAIN
AV4_.
to select
press ACTION
MENU,
"TV",
• The remaining recording time of an OTR can be displayed
pressing DISPLAY.
by
You can operate on the Combination VCR
(Model VV-2009 unit is shown here.)
1 Insert
a cassette.
2
REC Indicator
for SET UP
TV screen,
c Press AV
Io select "INPUT
SELECT," and then press I_ to
select 'qrUNER" or "LINE."
d Press ACTION
mode.
twice
to exit this
• Press to stop.
4
11
You can set up to 8 programs to be recorded while you are away.
Display
2
START
SET PROGRAM.
[_Check
list before you begin.
[]
All connections
Press PROG.
[]
Your Combination VCR is plugged in.
are made (see page 5.)
• If a program is already in memory,
press &V, and • to select an
unused program number.
[]
The clock is set to correct time.
[]
The tape is long enough.
[]
The record tab is in place.
Set the recording
DATE.
1) Press &_!' to
select,
STOP
L@
2) Press I_ or <
to set.
SELECT:&
v KEY
SET
:_ KEY
END
:PROG/ACTION
SELECT/
SET
A :CH UP
3V'
:CH DOWN
• 1 _3t = One time
• DAILY = MON-FRI
• WEEKLY SUN-SAT
= Same time once a
week
KEY
I_ :VOL UP
< :VOL DOWN
Exa_
Today's -Date
-1 PROG
(_8-9 ........
31_ i i 2,,,,., 6i_
/
7 SELECTAf • _lect_o_ Order DNLY
LWEEKL,
WEEKLY WEEKLY
J
(SAT)...... tMON
) _
(SUN
1
4
Repeat step 2 to set:
. start time, stop time
• Channel (or LINE for outside source)
• Category [NiA (not applicable), SPORTS,
MOVIE, COMEDY, MUSIC, DRAMA]
• Speed (SP, LP, SLP)
3
START
STOP
Make the notes.
If not wanted, go to step 4.
begin.
1) Press A to
2) Press AV to
_
select. I_ or ,i
3) Press
to set.
4) Press PROG
(or ACTION) to
end.
• Characters wiltchange in the following order,
.[--_A--
Timer Recording Using
.....
C 6-_!5 i__t i6h-V C R- Bu_t o--n-_You can set the Timer Recording using
ACTION key on the Combination VCR
(see page 7.)
B-- C ....... Z-BLANK- -&_-]
-=9 .......
2 -1 --O--l--!"-.
Q
Continued
on the next page.
• If "PLEASE PREPARE FOR TIMER REC" appears and/or the
PROGRAM TIMER indicator flashes, check that a cassette with
record tab is loaded and the Combination VCR is in Stop mode.
• If the start times of two programs overlap, the rower numbered
program will have priority.
• If the start time for a Timer Recording comes up during a normal
recording or One Touch Recording (page 11), the Timer Recording
will not be performed,
• If there is a power interruption of more than one minute, the
recording may not be performed or continua.
• If "INCOMPLETE" appears after all items have been set, check all
entries and make necessary corrections.
12
VOL
CH
Press STOPIEJECT
STOPF_JECT R_
and REW
together without a tape to display
MAIN MENU.
:_ Press &'V' <lb. to select "VCR"
and STOP/EJECT
and REW
together to display SET UP VCR
screen.
Press
&V
to select"TIMER
., PROGRAM"
and I_ to display
TIMER PROGRAM
screen.
Repeat
steps
2~5.
the
End the program.
4
CANCEL:ADD/DLT
SELECT 1-8:A
v
ENTER ;_ KEY
L END
KEY
KEY
:PROGtACTtON
|
|
|
KEY
[(_
(or ACTION.)
(Recording is in progress)
Press PROG
Hold down STOP for a few
seconds to cancel the Timer
Recording.
J
To Enter More Programs
Press &V and I_ to se|ect and
set a blank program number, and
then repeat steps 2 and 3.
5 ol
a Timer
Recording:
j!!iiii !i!!i !i !:
|
|
|
- Cancel
, Any future daily or weekly
recordings wi[I be performed as
programmed.
Model VV-2009 unit is shown here.
Exit this mode.
Press PROG (or ACTION.)
o II you're using a cable box, make
sure that it is tuned to the desired
channel and the power is left on for
timer recording.
• PROG TIMER indicator lights on the
Combination VCR,
_eg_----
Display
PROGRAM
LIST.
•
PROG TIMER indicator
Press PROG.
b
IP DTSr.A.T.STO_._ SP?]Select
13
10
8:O0p
9:0Op
14 SU
9:00plO:0Op
| CANCEL:ADD/DLT
| SELECT 1-8:&
v
| ENTER :_ KEY
END
10
SP|
L
LP]
|
|
/
KEY
KEY
:PROG/ACTION
the desired
program.
Q@o
/ b
C
sETSELECT/
• :CH UP
•:CH DOWN
_" :VOL UP
KEY
4 :VOL
DOWN
C
To Replace
START
program...
STOP
ABC
SP
CATEGORY:MOViE
SELECT:A
v KEY
SET
:4 _ KEY
END
:PROGIACTION
_',._
KEY
a PROG
1) Press I_ to
display.
2) Press AT<I_
to
set new program
contents.
@@@.
3) Press PROG
(or ACTION.)
® ® _...
®®®!
C
a
@®@
C ADD/DLT
To Clear program...
Press ADD/DLT.
12
|3
8
10
14 SU
t0:00pt2:O0a125
8:OOp 9:O0p
9:0OplO:OOp
10
SP/
SP|
L
LP/
- STOP
| EN,E..KEY'E'EOT"O;'"
,_
|
dl
Exit this mode.
Press PROG (or ACTION.)
13
[_Check
Combination VCR can be set to automatically power on in one
of 2 modes (TV or Playback.) You can also combine the OnTimer with a one minute alarm that gradually increases in volume.
list before you begin,
[] The clockis set to correcttime.
Model MY-2009 unit is shown here.
Display ON TIMER
screen.
Press ON-TIMER.
2
Set the ON-TIMER
I 1) select•
Press _t,V to
1 2) Press I_ to set.
J • Make sure a tape is
insertedif Playback
mode is selected.
SRFCT:A
• KEY
SET
:l.- KEY
END
:ON-TIMER
3
- ... _
, AL,_:ON
1_
/
1
|
L
DATE,
.....
ABC
.......
CANCEL:ADOIDLT
KEY
SELECT : • • KEY
SET
:_l • KEY
END
:ON-TIMER
KEY
Set Alarm.
[ _-_,
? Press
AV
/ _(_
| select
"ON" or
/
tO
ON TIMER Indicator
1 ON-TIMER
When "'ON" is selected,
an alarm wilt gradually increase in volume for one minute or
until cancelled by pressing any button (including VOL 411,.)
To Make Corrections,
use At
and <lb to move back and correct as necessary.
--SLEEP
41 @ ,e,O.
/?
Press ON-TIMER•
•
O
®®@
\-
DISPLAY
®® ®
I1 no button on the remote or Combination VCR (incruding a button
used to turn off the alarm) is pressed within 60 minutes after
Combination VCR turns itsell on, it will turn itself back off.
Combination
VCR can be set for auto power off.
t
SLEEP
TIMER
30
,1_
SLEEP
SLEEP
TIMER
60
TIMER
90
,Ik
SLEEP
TIMER
I
14
•:CH UP
_" :CH DOWN
I_ :VOL UP
4 :VOL DOWN
. ON TIMER indicator lights on the
Combination VCR.
To cancel ON-TIMER set,
press ON-TIMER to redisplay the screen in step 3. Then, press
ADD/DLT to clear the time ("6" is flashing.) Now, press ON-TIMER
to end. "ON TIMER END" appears on-screen tor a few seconds.
SET
SELECT/
00
Set SLEEP
TIMER.
Press SLEEP repeatedly•
• Pressing DISPLAY with sleep
timer set displays remaining time.
To Cancel, press SLEEP
repeatedly until "SLEEP TIMER
00" appears.
:® @
-- ADD/DLT
Thefeature
allows
youtosetatimeralarmforupto60minutes,
Useful
forwhenyouarecooking
andneedtoleavethekitchen.
Model
screen.
i isplay INSTANT ALARM
Press TIMER on the
Combination VCR to display.
VV-2009
unit is shown
here.
i
I
2
•
Press CH At
on
the Combination
s:2o_v
I_//
Set Alarm.
! _
I VCR to select
c.,_:__:_DI0_TKEYO2:OOIt
J time (see below.)
sE-r:UN_T
•
•
KEY
one-minute
increase
i
until
_51:0o
20_100
25:oo
I
To cancel, press ADD/DLT.
4o;_
i
50:00
I
....
:::=_==.'[
i
2 c.-"
I
1T,MER
10:00
To increase timer in progress,
Press CH AV to restart
countdown rounded up to next 1,
5, or 10 minute interval
five-minute
increase
until 30:00
<Example>
• If current timeremainingis t2:'15,
countdown will restart from 15:00,
• If current time remaining is 9:15,
countdownwill restart from 10:00,
': 30:0O L'-": :.'-" :-"_
i
I
;
_.z
• Countdown starts 3 seconds after
alarm is set.
[ 2:00
E I
[ 3:0O
i
_i.........
J
!1:00 {onemlnut_l .....
i I
[ 9!oo
I
ten-minute
increase
until60:00
Q®o
00 (Max) ....
"1
The current time (if clock is set)
and time remaining display
change positions on the screen
every 10 seconds.
Remaining Time
OOOO
oo !
Q®
(?) (D (_
------
ADD/DLT
Alarm any
willbutton
go off
0:00.
Press
to at
stop.
• The volume e| the alarm gradually increases for one minute
and then continues to beep until any button is pressed,
Q
When watching TV while INSTANT ALARM is in progress, only use
CH &V onremote to change channels.
15
1%
2
Press
DisplayACTION.
MAIN MENU.
MAIN
Display
screen.
MENU
SET UP TV
O
@
SELECT :A • ,= I_ KEY
SET
:ACTION
KEY
%
Closed Caption is ...
This multl-use system not only allows
the hearing impaired to enjoy selected
programs, but also makes useful
information from TV stations availabre
to everyone.
1) Press At,Ill,
to select "TV."
eJECl
@@o
_nE
@@@
2) Press ACTION
to display.
2• SELECT/
SET
"
_ r_ & :CH UP
.,.:,• :CH DOWN
I_ :VOL UP
.ll :VOLDOWN
1 ACTION
Display
3
I INPUT
SELECT
I
ADJUST
V'DE0
:TUNER
_ END
.......
:ACTION
/
KEY
CAPTION
CCONMUTE
J
:
CAP
OOO0
® ® ®i
® @ ®:
@®@
u
Select
.......
screen.
select.
] 1)Press
&Vto to
2) Press I_
display.
I
/
I SELECT:A
• KEY
t SET
:_. KEY
CAPTION
CAPTION
........
MODE.
C1
select.
1 2)
1) Press li,
AV to
repeatedly to
select caption
mode.
SELECT:&
• KEY
SET
:_ KEY
END
:ACTION
KEY
(-._0FF-.--_CAP
C1-._
TEXTC2
TEXTC_
JL..1CA P C2<.l)
5I
Recording and Playing
Text Program
Closed Caption Modes
which to Choose
Return to the normal
screen.
PressACTION
Back a Closed
Record:
Record normally. Closed Caption/Text
recorded automatically.
three times.
Caption/
signal, if present, is
Playback:
Start playback. Do above steps to select desired caption mode.
16
From
Caption Mode: CAP Cl or C2
A narration of selected TV programs is
displayed.
Check TV program listings for C.C.
(Closed Caption) broadcasts.
Caption Mode: TEXT Cl or C2
The lower half of the screen will be
blocked out. When the TV station
broadcasts information, such as
program listings, it will appear in this
space.
Caption Mode: OFF
Closed Caption/Text narration wilt not
be displayed.
NOTE:
The closedcaption or text signal may be
broadcast over Cl, C2, or both. Also, text
contentscan vary so you may wishto try
ditferent settings.
Closed
Caption
narration,
ifavailable,
isdisplayed
whenMUTE
buttonispressed
forsilence.
Display MAIN MENU.
Press ACTION.
2
Display
screen.
7 MUTE
__/2
SET UP TV
sETSELEC
Y :CH DowN
1) Press &V_i_,
to select 'q-V."
SELECT :A • _1 I,, KEY
SET
:ACTION KEY
_1:VOL DOWN
2) Press ACTION
to display.
ACTION
......
iNPUT
VIDEO
SELECT
ADJUST
:TUNER
I ......
SELECT:& SET• UPTV
KEY
SET
:_ KEY
END
:ACTION
KEY
Display
If _
/1t_l
rl _
CAPTION screen.
1) Press &V to
se,ect
2) Press I_ to
j L]
display.
Set CAPTION
.
J CC ON MUTE
:
CAP C1
/
/ SEI.,_:,I_
/ SET
:b
LEND
5
.......
1, KEY
KEY
:ACTION
CAPTION
CAP/IONMODE
©
KEY
.......
Select
: OFF
®(D
MODE
OFF.
1)Press &V
select.
to
2)Press
repeatedly to
select "OFF."
/
L
CC ON MUTE.
1) Press &V
to
select.
2) Press I_
repeatedly to
select desired
caption mode.
SELECT:&
• KEY
SET
:_ KEY
END
:ACTION
KEY
• Each press of it. will change the
display as shown at left.
• The caption may be broadcast
over CAP Cl or C2.
Return
to the normal
screen.
Press ACTION three times.
Mute sound, display
closed captioning.
Press MUTE to mute the
sound.
• To cancel, press MUTE again,
17
To find out the present tape position.
Tape position cannot be found for C.Cassette type and
tape of less than 60 minutes.
Detect Tape Position.
Press TAPE POSITION.
POSITION
0
[
Your Combination VCR is equipped
with several time saving features as
welt as convenient automatic functions
which make tape operation easier than
ever.
TAPE
F
I DETECTING
TAPE
POSITION
is displayed onlywhen first
] - "DETECTING
TAPE POSITION"
cassette in.
O
correct tape positionto appear.
• It takesseveral seconds for
1 TAPE
POSITION
• Indication is standard.
,,.
2
v
BEGIN
CkO OO:
END
a DISPLAY
(D"@-.qDj
Return to normal
screen.
Press TAPE POSITION.
POSITION
©
[
TAPE
®©@_.
qD®@
d ZERO/1
b
To quickly return to a specific tape counter location.
Display the Counter.
DISPLAY
©
b
PLAY
Press DISPLAY during
playback.
ABC
0:00:30
SP
12:00AM
Reset to "0:00:00,"
Press COUNTER
RESET at the
desired position.
COUNTER
©
RESET
C
Continue
playback,
rewind,
or fast forward.
x
d
STOP
12: OOAM
ABC
Return
SP
ZERO/
1 MIN
©
18
to "0:00:00."
-0:26:00
Press ZERO/1 MIN
in Stop mode.
• The Combination VCR
will go into FF or nEW
mode and stop at the
last point the Counter
was set to 0:00:00,
MiN
COUNTER
RESET
Settoseearecording
overandover,
1I %
Press
o,s+,°.+u
2
Display
screen.
ACTION.
SET UP VCR
@
%
Select
!) Press ,&V <111,.
to select "VCR."
2) Press ACTION
to display.
TIME
/
I
[
STAMP
SELECT:=
• KEY
SET
:P KEY
END
:ACTION
KEY
V :CH DOWN
b":VOL UP
,4 :VOLDOWN
REPEAT
PLAY.
l
l
1 ACTION
Q_O0
|
: ON I
2 SELECT/S
A :CH UP
-- .
CH
I..... -SET UPVCR"'--'-1
IT1 MER PROGRAM
Q@o
select.
2)
Press _"
1)Press
At to set
to
"ON" or "OFF."
o'e. di
® @'F"
@®£x
(tm
"ZERO/
1MfN
• Playback repeats when tape end is reached or unrecorded
portion over 30 seconds is detected,
• During playback, you may also press PLAY/REPEAT
repeatedly on lhe Combination VCR to setect REPEAT "ON"
or "OFF,"
End setup. "
Press ACTION twice.
•
Auto Shut Off
No broadcast signal in TV, NITE or Playback mode for 5
minutes .-.)Turn Power off automatically
• This feature is deactivated if any button is pressed during the
above mode.
•
Auto Playback
Insert a tape in Power off mode "-') Turn Power on
automatically
• Playback begins automatically if a tape has no record tab,
Auto Rewind
A tape reaches its end -) Rewind begins -) Stop
automatically
•
Combination VCR fast forwards over
60 seconds of recorded tape.
ZERO/
i MIN
•
Playback
Auto Eject (Repeat Play is "OFF")
A tape has no record tab reaches its end -) Rewind begins
Eject automatically
•
Memory Rewind off
Press POWER in REW mode -> Rewind is completed
Turn Power off automatically
©
Skip over 1 minute.
Press ZERO/I MIN in
Play mode,
-)
19
Go directly to the desired recording.
Display
INDEX
screen.
Press INDEX in Playback or
Stop mode.
VHS Index Search System is _.
Each time recording is made, an
invisible index mark is placed on the
tape. When timer recordings are made,
program index and information are also
included. These index marks can be
used to access or scan recordings.
Model VV-2009 unit is shown here.
• If there are no Timer Recordings
on the Program Index List, go to
step 3.
2
Display
iNDEX
PROGRAM
INDEX
INDEX
screen.
1) Press &V to
select "INDEX
SEARCH."
SEARCH
SELECT:&
• KEY
SET
:_ KEY
ENO
:INDEX
KEY
2) Press b. to
display.
• This screen appears
only if there are
Timer Recordings.
3
.....
Select the recording
number.
]NOEX
0 G) (!) Press
Q O C) NUMBERED
Q Q (D keys.
(_
• To calculate number,
see below.
2
04 1
FF/_
INDEX SEARCN 04
®
or
,r
SELECT/
SET
A :CH UP
• :CH DOWN
I_ :VOL UP
Press FF or REW.
• When search is
finished, playback
begins.
REWI(_
To calculate
'\
Q®®
Start search.
INDEX
t
4 REW
4 FF
INDEX
NUMBERED
keys
the Index Number
Example
1:
If you are watching recording 4 and you want to watch recording 2, enter
3 in step "3" and press REW.
FF or REW
I L1 = 13 14 tsl
6
17
Example 2:
If you are watching recording 2 and you want to watch recording 6,
enter 4 in step _3° and press FF.
1 12,
'I= 'l"
..............................
171
NOTE: $ indicates start points of each recording.
20
• Make each entry within 10 seconds, or
the Index Search mode will be canceled.
• If these VHS Index Search Systems are
started very close to an index mark, that
index mark may not be counted in the
search.
Model MY-2009 unit is shown here.
Choose a timer recorded program from a Program index List,
When the tape is ejected or normal recording is started, all
program index data are deleted.
Display INDEX screen.
Press INDEX in Playback or
Stop mode.
C PLAYIREPEAT
2
Display PROGRAM
INDEX screen.
INDEX
@
SELECT:A
• KEY
SET
:b KEY
END
:INDEX
KEY
STOP/EJ ECT
1) Press _,'t' to
select
"PROGRAM
INDEX
SEARCH."
iiiiiiiii_iiiiiiiiii!it
I
---
,_
I
P_._
t!
4
_NOEX
12:30P
MOVIE
SELECT:&
•
I
SEARCH:I_
KEY
!
END
:INDEX
KEY
KEY
NBC /
t) Press AT
select.
t
Q@O
to
2) Press b, to start
the forward or
rewind search.
• When search is
finished,playback
begins,
I
SELECTI
SET
& :CH UP
• :CH DOWN
I_ :VOL UP
Repeat steps 1 and 2 on previous
display INDEX screen.
_
C PLAY
page to
b
;tart the scan.
FF/_
1 INDEX
®®
@®®
In Play mode, the first 10 seconds of each recording can be
scanned (forward or reverse.)
b
I , \
Select the desired
1 recorded program.
O_
INDEX
_=BitiiiiWiiiil;iiiil
b .EVVb FF
2) Press b. to
display.
1"
.....
FF or REW
STOP
Press FF or REW.
or
REWI_
®
C
AUTO
INDEX
SEARCH
Cancel scan, start
playback.
PLAY
<Example>
Start
|
Press PLAY.
" TO stop,press
STOP.
1
l °°-_°°J
I STC,_
I I
, ,_ PrayIt_ about10 secor,ds}
i
,
--
Ft=_t FO_aKI
o_ Rewir<l
21
I
1%
Display MAIN
Press ACTION.
Display
screen.
©
%
MENU.
SET UP OH
1) Press AV41_
to select "CH."
LAY:OFF
I SELECT:A
v KEY
I SET
;_ KEY
[ END
:ACTION
KEY
/
_
!
|
J
_j'_
_
[_Check
[]
list before you begin.
You need a list of stations and the
channel numbers you receive them on.
2) Press ACTION
to display.
I....
sET
oCABLE
P0NANNEL
.... 1
CHANNEL
ANTENNA:
L/ Select
CAPTION.
_P
Channel Caption is ...
Station names, e.q. ABC, TNT, etc.
can be set so they will appear when a
channel is selected. Choose 24 preset
names (Preset Caption), or make up
to 10 names of your own (Manual
Caption.)
®o
2• SELECT/
SET
&
• :CH
:CH UP
DOWN
1) Press
select. &V to
41_ _1:VOL
:VOL DOWN
UP
2) Press _ to
d sp ay.
5
4fIieec'PRESE
CH--CAPTO
seeotPr
1 ACTION
MANUAL
/
•
KEY
2)
[ s_ ...::_c_,_,KEY
Press I_ to
display.
• To create your own
captions, go to
"Manual Caption" on
page 23.
1.... PRESET
CAP,,ON
captions.
-PBS
-".... ] GO with Ipreset
AV to
.BC -- HBO -select a station.
I
FOX
-ESPN
-/
@
'I SELECT:A
ces
--• KEY
CNN -|
11)Press
I SET :" KEY
/
2) movePress
b to to
cursor
L END
:ACTION
KEY
J
the right.
3) Press AV to
I
l
TNT
UPN
42
--
wa
ss TSN S2
OSC
--
CSC
CTN
number.
62
2 I
4) Press _ to set.
GLOB
| CLEAR
:AOD/DLT
KEY
} ....SELECT:= • KEY
SET
; 4 KEY
END :ACTION KEY
PRESET
CAPTION
---21
t
Repeat step 5 until
select
the Caption
channel
List is complete,
To Make Corrections
Press &V, then I_ to select channel number. Press
&V to change, or ADD/DLT to delete.
Press ACTION four times.
1
6
CAPTION
SELECT:_-
%
End setup.
ADD/DLT
_&tl
Do "Preset
Caption"
steps 1~3 (page 22.)
Select MANUAL
---
CHANNEL
CAPTION
CAPTION.
---
select,
1 SELECT:A
I SET
[ END
-
_t KEY
:_ KEY
:ACTIONKEY
1)Press
&Vto to
2)
Press I_
display.
Q
_¢r
Q®o
Nits
to"°;*"
@ Channel
' Pre
selectNUMBER.
CHs'"
I--'- _,.UALCAPT,O.
.... /
] iSelect
number.
SELECT/
SET
| SELECT:&T KEY
SET :P.KEY
• :CH
:CH DOWN
UP
T
L END :ACT,ON
KEY
t
J
2) Press
P' to to
move cursor
the right.
• Channels already set and channels
deleted from Channel Memory are
not displayed,
• You can set a total of ten channel
captions with up to four characters
each,
I_ :VOL UP
:VOL DOWN
5
,0o
ACTION
o,o
Q®®
ADDIDLT
t CH
NUMOER
CA_,,ON
/
q1)Press =T to
1
02
_'-- .... /] iEnter
@
1 caption.
select.
I....
_UAL CAP7,O.
your
I CLEAR :ADD/OLT
KEY
|
[ 2) Press I_ or _I
I SELECT:A
• KEY
|
[ sN% :_,C._,_EN¥,Ey J
[--*A--
1•
to enter.
Characters change in
the following order.
B--C ....... Z- BLANK"*9 ........ 2-1-0--/--!
- --&'-'-]
÷
• Press _11repeatedly to move the
cursor to "CH NUMBER." Repeat
steps 3 and 4 as desired.
To Make Corrections
Press _iI,V, then b' to select the channel number. Press
&V to change, or ADD/DLT to delete.
5
%
End setup.
Press ACTION four times.
23
_PCheck
list before
you begin.
[] The clock is set to correcttime.
[] The record tab is in place.
The Combination VCR writes program data (see example
below) about the first 10 seconds of every recording.
The information is then displayed the first t0 seconds of
playback. To change the data, see "Changing Time Stamp
Data" section on next page.
I Press
DisplayACTION,
MAIN MENU.
2
MAiN
Display
screen.
MENU
%
Select
! REPEAT
PLAY uP
SET
vCR
:
OFF ]
/
SELECT:A
Y KEY
SET
:_ KEY
/ END
:ACTION
Q@@
@
SELECT;&
• < I, KEY
SET
:ACTION
KEY
]
KEY
k
J
©
0®0
SET UP VCR
2•
1) Press AV4Ip,
to select "VCR."
2) Press ACTION
to display.
1
TIME STAMP.
1) Press AV
select.
to
2) Press I_ to set
"ON" or "OFF."
@®@
®@@
• When "OFF" is selected, the
program data is written on the
tape, but will not be displayed,
_r
4
Return to normal
screen.
Press ACTION twice.
<Time Stamp Example >
Normal/One
Touch Recording
Timer
Recording
When Clock is
not set...
24
SELECT/
SET
,i, :OHUP
• :CH DOWN
:VOL UP
:VOLDOWN
ACTION
Model VV-2009 unit is shown here.
You may change the time stamp data (Date, Time, Channet,
Category, and Notes) as desired.
Display Time Stamp
Data.
1) Insert cassette with
record tab.
2) Press PLAY.
2
Display TIME STAMP
EDIT.
Press PROG
while the data is
displayed in
playback mode.
Change
|BATE
/TIME:
:
12t27/1999
MeN
: 08 ARC
/CATEGORY
: MOVIE
| SELECT:A
v KEY
I SET
:4 _ KEY
I END
:PROG KEY
Data.
I
f--- TIM_STAMP
12:00PM
-ED,T--I:00PM ]
I
|OH
Time Stamp
1 PLAY/REPEAT
1) Press AV to
l
Q
I
|
|
_
Q®o
2) select.
Press I, or ,II
to enter and
continue.
Nrr_
3 SELECT/S
• Characters in
NOTES will change
in the following
order.
[--*A--
& :CH UP
• :CH DOWN
Ib :VOL UP
_1:VOL DOWN
-2 PROG
B--C ....... Z-- BLANK-- - --&_--j
"9 ....... 2 -1 - 0--/--!
_'-
OOO0
3) Repeat 1) and
2) as needed.
®®@@j
6]®
Q®®
To Make Corrections
Press _11_ to move to the
incorrect entry, then press &It
to make the correction.
_5N _5
[NOW
Wn,T,
NOT_E STAMP Write
- 1 PLAY
Press PROG.
the new data.
• After the data is writlen, the
Combination VCR automatically
goes into Stop mode.
• You cannot use POWER or REC
button while "NOW WRITING,
TIME STAMP" is displayed.
•
25
%
,_
Y
Model VV-2009 unit is shown here.
When "ON" is selected, picture is displayed even when
broadcast signal is weak or nonexistent.
1! %
2
MAIN
Display MAIN
Press ACTION.
MENU
1
Display
screen.
MENU.
SET UP CH
1) Press AV4_
to select "CH."
SET
:ACTION
KEY
J
%
2) Press ACTION
to display.
[
t ENO :ACTIO_
KEY
J
SIGNAL
Pres ,-Oseec
2) Press I_ to set
"ON" or "OFF."
/
• If Combination VCR is connected to equipment which has blue
back feature, selecting "ON" will have no effect on the other
equipment.
Return
to normal screen.
Press ACTION twice.
REC
VCR
LOCK ACTIVATED
®
To turn "ON"
In stop mode, hold
down REC on the
Combination VCR
without a cassette for
7 seconds.
To turn "OFF:'
Repeat above with or
without a cassette.
• VCR Lock is cancelled automatically
24 hours if clock is set,
26
after
• :CH UP
'IF :OH DOWN
I1_:VOL UP
<1 ;VOL DOWN
1 ACTION
®@
@®®
All operations are prohibited except Timer recording and tape
eject. Useful for families with small children.
_'_ SELECT!
SET
._
• "ON" = Picture is displayed regardless of signal condition, and
may not always be clearly visible.
=OFF"= Screen turns solid blue when signal is absent or weak.
4[
,_!,%iJJ,L,j
REC
ANTENNA
t UPC.ANNEL
CABLE
[....
SET
.... ]/ Select
WEAK
I_uToSET
DISPLAY.
SELECT;&
• KEY
l SET
:lb KEY
.......
;,;,;::,:,:_.
Connections you'll need to make.
Recording (Editing)
Combination VCR
Playing (Source) VCR
AUDIO VIDEO
OUT
IN O
IN FROM
ANT."
OUT TO
@
TV
@
Insert prerecorded tape.
Insert blank tape with
record tab.
• Dubbing tapes protected with Copy
Guard will have poor quality results.
O
3
Select
"LINE"
mode.
See "Selecting Input Mode" section on page 11.
PLAY
(_
PAUSE
Q
REC
mode.
PAUSE
PressinPLAY
then
j Put
Standby
PAUSE at starting
point.
Put in Standby
mode.
Press REC, then PAUSE
immediately.
Start dubbing.
PAUSE
5
Caution:
PAUSE
Start dubbing.
Press PAUSE.
@
Press
PAUSE.
S+0._JECTStop dubbing.
1St°p"u00'n0"
Press STOP/EJECT.
Press STOP/EJECT,
Unauthorized exchanging
and/or copying of copyrighted
recordings may be copyright infringement.
27
V-Chip Control Feature is...
The Combination VCR has built-in V-Chip Control which
allows you to block unwanted TV usage based on Motion
Picture and TV Parental Guide ratings.
Process
of V-Chip Control
Feature
_E>_:_>[Blocking]
A 4 digit code must be entered to view a blocked
program or change rating settings.
Display MAIN MENU.
Press ACTION.
2
Display SET UP TV screen.
@
%
1) Press _I,I' 4111_
to select "TV."
O
2) Press ACTION
to display.
SELECT/
SET
_
Select
[ ......
SET
t CA_Tt ON
|
.
INPUT
SELECT
r VIDEO
ADJUST
TV
.........
;ACTION
ENTER
LOCK
v
CODE
@
KEY
To Make Corrections
Press 41_ to move the cursor
and &V to make the correction.
5
2) Press _ to
display.
Enter your secret code.
.........
KEY
:ACTION
1) Press AV to
select.
LOCK
UP
DOWN
1 ACTION
OOOO
5
KEY
4-DIGIT
SELECT:A
END
'
•:CH
I':CH
I_.:VOL UP
<1:VOL DOWN
LOCK.
@
:TUNER
I SELECT:&
v KEY
| SET
:P, KEY
_, END
4
UP
.
1) Press
select
kV to
a number.
QG®!
@®Q
--
ADD/DLT
2) Press _" (or 'q )
to set.
• Repeat step 4 until
4-digit is tilled.
• Take care that you
are notobserved
entering the secret
code.
1 Save 4-DIGIT
CODE.
!
CHANGE CODE:ADO/DLT
KEY /
,CONTiNUE:ACTiON_KEY..
J
6I
Display LOCK
rating screen.
menu for
Change your secret code
Press ACTION and go to:
page 29 (MOTION PICT. Ratings),
or page 30 (TV PARENTAL Ratings)
Or,
to exit, press ACTION four times.
28
, You willneed yourcurrentcode.
Do steps 1-4. In step 5, press
ADD/DLT to clear current code.
Repeat steps 4 and 5 to enter new
code.
Process of V-Chip Control Feature
Blocking
If LOCK menu is not displayed, do "Enter
Secret Code" steps on page 28.
I-:-:
..........-';LOCK-
-.
] PICT.
Select STATUS.
MOTION
I_.%_A_T;_,_8_
:o+I_
I SELECT:A
[_
v
KEY
]
_Mf_N
K,Y
I+)Press
=V
(c'_ t tose+ct.
J _
--
Q®o
SELECT/
SET
tb 2)Press
b.
to set "ON"
& :CH UP
V :CH DOWN
or "OFF."
If you select MOTION PICT. STATUS:
--
3
--
5
b,:VOLUP
• "ON" -> V-Chip Control is activated.
• "OFF" -) V-Chip Control is deactivated.
2
LOCK
.........
MOTION
PLOT+
STATUS:OFF
Select CHANGE
SETTINGS.
TV_:OFF
CHANGE
SETTINGS
SELECT:A
• KEY
SET
:_ KEY
END
:ACTION
KEY
3
ACTION
0000
1) Press &V
o®++
l®Q
select.
2) to
Press
I_
to display.
Q®®
®@__+
Select VIEW NR
PROGRAMS?
PG
PG-13
R
1) Press AV
NC-17
X
select.
2) to
Press
I_
to set "YES"
or"NO."
SELECT:&
•
SET:_
END
;ACTION
KEY
NR (Not Rated) PROGRAMS
Some movies, such as old movies or foreign
movies usually have no ratings.
4
IENC
KE¥1EW
NR :ACTION
PROGRAMS?
PG-t3
PRGt3
: YES
Select ratings to be
blocked. (See right.)
1) Press
xNC-_7
select.
&V to
2) Press b
to set.
%
Redisplay LOCK
menu to continue
setup.
Press ACTION and
go to page 30 (TV
PARENTALRatings)
Or,
to exit, press ACTION
four times.
G
PG
I GENERAL AUDIENCE:
All ages admitted.
I PARENTAL GUIDANCE:
Some material may not be suitable
for children.
PG-13 i PARENTS CAUTIONED:
Some material may be
inappropriate for children under
13.
R I RESTRICTED:
Under 17 requires accompanying
_arent or adutt children.
NC-17 [ OVER AGE 17 ONLY:
No one 17 and under admitted.
X
ADULTS ONLY:
29
Process of V-Chip Control Feature
Enter Code
Blocking]
If LOCK menu is not displayed, do "Enter
Secret Code" steps on page 28.
1
Select TV PARENTALSTATUS.
.........
LOCK
MOTION PICT.
STATUS:OFF
CHANGE SETTINGS
@
SELECT:A
v KEY
SET
:_ KEY
ENO
:ACTION
KEY
1) Press &V
select.
to
2) Press I_ to
set"ON" or
"OFF."
If you select TV PARENTAL STATUS:
I
•
"ON" -) V-Chip Control is activated.
"OFF" -) V-Chip Control is deactivated.
Q
_clr
_rrE
SELECT/
SET
•
2
[---::1--MOTION
i
LOCK
STATUS:OFF| 1 Select CHANGE SETTINGS.
PICT,
•:CH UP
V :CH DOWN
--3
_:VOLUP
- 5
ACTION
)
/
SELECT:"
T KEY
[
END
•-ACTION
_
2) Press b. to
l ..............................
display.
t
I SET :,, KEY
KEY
___j
3
Select VIEW NR
PROGRAMS?
®
1) Press AV
select.
@@
to
2) Press I_ to set
"YES" or "NO."
NR (Not Rated) PROGRAMS
Some TV shows, such as news, sports, weather,
bulletins, emergency information usually have no ratings.
Select ratings to be
blocked. (See next page.)
FV
l
l
TV:PG
TV-14
_M,A
V
V
V
/ SELECT
:•
L END
:ACTION
•
S
S
S
L
L
L
SET :
KEY
O
O
select. J,V to
J l) press
Repeatedly
2) Press I_ to set.
• Ratings which are
highlighted in GREEN
will be blocked, when
not highlighted (white
letters), these will not
be blocked,
O
You may select from standard TV ratings (chart 1), or
customize to a specific content rating (chart 2.)
5
30
%
End setup.
Press ACTION four times.
@®®
Process of V-Chip Control
Enter Code
Feature
FOR ALL CHILDREN:
Content specifically geared
to young viewers ages 2-8.
FOR AGE 7 AND OLDER:
May contain mild physical or
comedic violence which may
frighten children under 7.
GENERAL AUDIENCE:
Contains little or no violence,
strong language, or sexual
dialogue or situations.
PARENTAL GUIDANCE:
May contain infrequent
coarse language, limited
violence, some suggestive
sexual dialogue and
situations.
PARENTS CAUTIONED:
May contain sophisticated
themes, sexual situations,
strong language, and more
intense violence.
MATURE AUDIENCE:
May contain mature themes,
_rofane language, graphic
violence, and sexual
situations.
<When V-Chip Control
is activated>
ABC
PROGRAM
RATING
EXCEEOED
RATING:PG-13
STOP
11:00AM
ABC
-0:12:34
$P
RATI NG:PG-t
3
• If V-Chip Control is activated,
and a program or movie
exceeds the ratings you have
set, a message will appear on
a black background and sound
is muted.
• If DISPLAY is 15ressed, even
when V-Chip control is
deactivated, rating is displayed
on-screen.
To Continue Viewing a
Blocked Program
After entering your 4 digit secret
code, go to step 1 on both pages
29 and 30 and select "OFF" to
deactivate V-Chip Control.
• The previousMOTION PICT, and
TV PARENTALsettings will be
restored.
Fantasy Violence
Violence
Sexual Situations
Adult language
Sexual Suggestive Dialog
31
1I
2
Display MAIN MENU.
Press ACTION.
Select the language
selection icon.
©
MENU
%
1) Press AV41_
to select.
EngSsh:LANGUAGE
Spanish:1DIOMA
French:LANGUE
2) Press ACTION
repeatedly to set.
SELECT/
SET
/
Q®o
•
• :CH UP
• :CH DOWN
b
I_
:VOL DOWN
UP
4 :VOL
C
3
@
%
1)Press
&,,l_
End
setup.
"EXIT."
toselect
a
2) Press ACTION to exit.
- !
a
%
b
Display MAIN MENU.
Press ACTION.
MArN
M_U
C_H
] 'SELECT:&
L SET
_1 _, KEY
:ACTION
KEY
oo®!
ooo
screen"
|
J
%
to select "CH."
1) Press AV41_
2) Press ACTION
to display.
C{ NEL....
ISe,°c,..,E...
select.
]CHANNEL
CAPTION
tWEAK
S I GNAL
D I SPLAY :OFF
{ SELECT:&
• KEY
| SET
:1=. KEY
/|
]
|
L END
J
:ACTION
KEY
dr
_
Jl)
&Tto to
2) Press
Press I_
select your
antenna system
("TV" or "CABLE.")
I
.... s_ uP C.ANNEL
.... l Select AUTO SET.
_:CAPT,ON
I
1) Press &"
select.
IWEAK SIGNAL
DI SPLAY:OFF
I SELECT:&
• KEY
I SET
:1_ KEY
l
|
I
L END
.1
:ACTION
e %
32
KEY
2) Press I_ to
start.
Press
ACTION twice.
a
b
Display SET UP OH
____1
•
'5 5 o_, 2
@@qD"
to
ACTION
1F% 1
Display MAIN MENU.
Press ACTION.
j
Display
screen.
r
_
SET
CLOCK
_. END
11,:VOL UP
.4 :VOL DOWN
©
%
2) Press ACTION.
1 ACTION
0000
MANUAL
screen.
1) Press &V
Q 0®
!
to
:0
--NUMBERED
Keys
- ADD/DLT
LOCK SET
t
TIME ZONE ADJUST
p SELECT:A
v KEY
| SET
'._ KEY
sETSELECT/
•• :CH
:CH UP
DOWN
SET CLOCK
1) Press &V41_
to select
"CLOCK."
Display
[..L_...
?
"MANUAL."
select
2) Press I_ to set,
: ACT I ON KEY
• For Auto Clock Set, select "AUTO CLOCK SET"
then press _' to set and CH • to start.
/J\
DST:ON
SELECT:A
• KEY
SET
:1_ KEY
END
:ACTION
KEY
manually.
SetPress
1)
the clock
,iV to
select the
month.
2) Press I_ to
set.
• Likewise set date, year, time,and DST. (DaylightSaving Time.)
To Make Corrections,
repeatedly press 41_ to move to error, then correct.
5
End setup.
Press ACTION twice to start
the clock and exit this mode.
Add or Delete a Channel
To add channel:
Select channel with NUMBERED
keys and press ADD/DLT.
CHANNEL
08
ADDED
To delete channel:
Select channel with CH At or
NUMBERED keys and press
ADD/DLT.
CHANNEL
O8 DELETED
33
Use when moving Combination VCR to new location,
or if a mistake was made in the One Time Setup
section.
• Make sure a tape is not inserted in the Combination VCR.
Model VV.2009
unit is shown here.
Playing older or damaged
tapes may eventually
cause video heads to become clogged.
Head Clog Sensor
During playback this screen appears if clogging
is detected. To remove screen, press PLAY on
the remote or Combination
VCR.
• Use "dry" type head
cleaning cassette only.
(Part No. NV-TCL30PT is
recommended.)
I
• Follow cleaning tape
carefully. Excessive use of
tape can shorten head life,
I
o
4
l
®
PLEASE
CLEANtNG
INSERT
HEAD
CASSETTE
o_ REFERTOMANUAL
END:PLAY
KEY
• It head clog symptoms persist, contact your nearest
Factory Service Center or authorized Service Center,
(See page 37,)
Turn the Combination
VCR
Power
on.
Press and hold both the
PLAY and FF on the
Combination VCR for
more than 5 seconds.
• The power will shut off,
3
vNEED
I_)EO
HEADS
_Y
CLEANING
Display
Pictu re Tube:
13 inch (VV- 1309/VV- t319W)
20 inch (VV-2009) measured
diagonal 90° deflection Picture
Tube
Do "One Time Setup" Steps on page 6.
VCR
Video Recording
System:2 rotary heads helical
scanning system
1 track
Audio Track:
Tuner:
Broadcast Channels:
CABLE Channels:
Combination VCR auto adjusts clock for DST
(Daylight Saving Time.)
Spring (First Sunday
in April)
DST:ON ,-.) Sets clock ahead one hour.
I NORMAL TIME I t:0Oa'm"
DAYLIGHT
SAVING
TIME
I
General
Power Source:
Power Consumption:
2:00__a.m.
3:ooa.m.4: 0a.m.
Autumn (Last Sunday in October)
DST:ON "-')Turns clockbackone hour.
€
I SAVING
DAYLIGHT TIME
]l:0Oa.m,
I NORMAL TIME I
2:00 a,m.
1:00 a.m.
2:00 a,m.
• If your area does not observe Daylight Saving Time,
select DST: OFF.
• Keep these time changes in mind when programming
the Combination VCR for timer recordings.
34
VHF 2-13, UHF 14-69
Midband A through I (14~22)
Superbend J through W (23~36)
Hyperband AA~EEE (37-64)
Lowband A-5-A-1 (95~99)
Special CABLE channel 5A (01)
120V AC, 60 Hz
Approx. 69 watts
(VV-1309/VV-1319W)
Approx. 1 t0 watts (VV-2009)
Power (.O_ff.
Approx, 4.5 watts
Television System:
EIA Standard NTSC color
Speaker:
1 piece
Operating T(_mperatu re: 41°F-104°F (5°C~40°C)
Operating Humidity:
10%-75%
Weight:
26.4 Ibs. (12 Kg)
(VV-1309/VV- 1319W)
50.7 Ibs. (23 Kg) (VV-2O09)
Dimensions:
15-3/16" (W) X 15-3/16" (H) X
14-3/4" (D)
386 (W) X 385 (H) X 374 (D)
mm (VV- 1309NV-1319W)
20-5116" (W) X 19-7t8" (H) X
18-11/16" (D)
515 (W) X 505 (H) X 474 (D)
mm (VV-2009)
Note: Designs and specifications are subject to change
without notice.
©,
Function Status
Current time
I
Remaining i
(OTR mode
Rec Time
only
see
page 11 .)
When a function button is pressed (PLAY,
FF, etc.) or you change channels, the
Combination VCR mode or channel number
will be displayed.
(Some station names may also appear if
Channel Caption is set. See pages 22, 23.)
To display or remove
the overlay.
Press DISPLAY,
DISPLAY
Ec
0:25
12:00PM
O8
Channel Caption
ABC
)
ABC
-0 : 12 : 34 - --
Counter
SP
iI
Time Stamp Data
(see pages 24, 25.)
Whenever a blank section of a tape comes
up in Play mode, or when the selected
channel has no broadcast signal with the
"Weak Signal Display ON/OFF" (page 26)
set to "OFF," the TV screen will turn solid
blue.
TaPe Speed
These displays will alert you of a missed
operation or provide further instructions.
Warning and Instruction Displays
OSD
Caution
NO CH FOUND
PLEASE
CHECK
ANTENNA
CABLE CONNECTION
PUSH
THEN
CH UP KEY AGAIN
PLEASE sEr
BEFORE
CLOCK
PROGRAMMING
CHECK CASSErFE
RECORD
TAB
TO CANCEL TIMER REC
HOLD DOWN STOP KEY
FOR APPROX 3 SEC
If no active channels
are found for
CHANNEL
MEMORY,..
If you attempt to set or
review a Timer
Recording or set the
On-Timer and the
Clock is not sel...
If you press REC on
the remote control or
the Combination VCR,
and a cassette is
inserted with no record
tab...
It you press STOP
during a Timer
Recording.,.
OSD
Pg
Caution
'
(Pg
5
If you press PLAY, FF,
REW, or REC on the
remote control or the
Combination VCR without
a cassette inserted...
6
7
if the Combination VCR is
not in Stop mode or a
cassetle with record tab is 12
not inserted two minutes
13
before a Timer Recording
is about to begin...
NO CASSETTE
PLEASE
33
INSERT
A CASSETTE
PLEASE PREPARE
FOR TIMER REC
VIDEO HEADS MAY
NEED CLEANING
4
1 _
PLEASE INSERT HEAD
CLEANING
CASSETTE
OR REFER TO MANUAL
END:
If head cleaning becomes
necessary while playing
back a tape...
10
11
34
PLAY KEY
13 VCRLOCK
ACTIVATED
if you press a function
button other than
STOP/EJECT or POWER
while the Combination
VCR is in VCR Lock
mode...
26
35
Check the following points once again if you are having trouble with your Combination
VCR.
No picture or sound...
° Make sure your antenna system (TV or CABLE), is correctly set. (P.5)
• Completely insert Power Plug into an AC outlet.
• Check that POWER button is set to on.
Poor picture with normal sound,,.
• Adjust BRIGHTNESS,
menu. (P.9)
Poor sound with normal picture...
• Adjust VOLUME control. (P.8)
Poor "iV reception,,.
• Adjust SHARPNESS
No color or poor color...
• Adjust TiNT and COLOR controls in the SET UP TV menu, (P.9)
Ghost (multiple)
• Instarl a directional
images...
SHARPNESS,
and PICTURE
controls in the SET UP TV
and PICTURE controls in the SET UP TV menu, (P.9)
antenna.
TV programs cannot be watched...
• Make sure that the channel being received is in the Combination
memory. (P.32)
Channel cannot be selected,,.
• The design of this unit is such that only the channel being recorded can be viewed.
TM program cannot be recorded...
, Make sure your antenna system (TV or CABLE), is correctly set. (P.5)
• Make sure cassette record tab is intact. (P,4)
Timer recording cannot be
performed...
• Check clock is set to current time and date_
• Make sure DSSICABLE box (if used) is left on and tuned to channel to be
recorded.
• Set recording Start/Stop time correctly. (P.12-13)
• Timer recording may not be performed or continued if a power interruption of
more than 1 minute occurs before or during a Timer Recording, after power is
restored•
No playback picture, or the playback
picture is noisy or contains streaks.,.
• Adjust TRACKING control in either direction. (P.10)
• Try Head Cleaning. (P.34)
VCR cannot be controlled,..
• Make sure VCR LOCK is set to off. (P.26)
• Make sure unit is not in a Timer Record operation.
Combination
controlled...
VCR cannot be
VCR's
i iil,oiii iiil;iiiiii i
may cause signal interference,
Video cassette cannot be inserted...
• Insert the cassette window side up; record tab facing you.
Video cassette cannot be removed,,.
• Completety insert Power Plug into an AC outlet,
Eject does not function or insertion
cannot be done.,.
• Turn the POWER off and then on, and try ejecting or inserting the tape again,
Video cassette ejects when a
recording is started, or the power is
turned off for timer recording..,
• Make sure cassette record tab is intact, (PA)
In stop mode, the VCR motor
CYUNDER) continues to rotate,,,
• To enable Quick Play mechanism, the VCR cylinder will rotate for about 5
minutes. This reduces response time from Stop to Play mode and from Play to
Rewind Search mode,
VCR cannot be controlled...
• Make sure VCR LOCK is set to off. (P.26)
If you cannot resolve the problem, please call the Customer Satisfaction
assistance at 201-348.9090.
To locate an aulhorlzed servicenter call toll free 1-800-211-PANA(7262.)
JO
Center for product
1-800-332-5368 (Customer Orders Only)
• Panasonic Services Company 20421 84th Avenue South, Kent, WA 98032
(6 am to 5 pm Monday-Friday; 6 am to 10:30 am Saturday; PST)
(Visa, MasterCard, Discover Card, American Express, Check)
CALIFORNIA
GEORGIA
MICHIGAN
6550 Kate!la Avenue
Cypress, CA 90630
8655 Roswell Road
Suite 100
Atlanta, GA 30350
37048 Van Dyke
Avenue
Sterling Heights,
MI48312
800 Dubuque Avenue
S. San Francisco,
CA 94080
20201 Sherman Way
Suite t 02
Canoga Park, CA
91306
3878 Ruffin Road
Suite A
San Diego, CA 92123
'ILLINOIS
9060 Golf Road
Nites, fL 60714
1703 North Randall
Road Elgin, IL 60123
(Pick-up/Drop-off only)
MARYLAND
62 Mountain Road
Glen Burnie, MD21061
COLORADO
1640 South Abilene
Street
Suite D
Aurora, CO 80012
FLORIDA
3700 North 29= Avenue
Suite 102
Hollywood, FL 33020
MASSACHUSETTS
60 Glacier Drive,
Suite G
Westwood, MA 02090
MINNESOTA
7850-12 = Avenue South
Airport Business Center
Bloomington, MN 55425
OHIO
2236waycross
Road
Civic Center Plaza
Forest Park, OH 45240
TENNESSEE
3800 Ezetl Road Suite
806
Nashville, TN 37211 TEXAS
7482 Harwin Drive
Houston, TX 77036
13615 Welch Road
Suite 101
Farmers Branch,
TX 75244
WASHINGTON
PENNSYLVANIA
20425-84 _ Avenue
South Kent, WA 98032
2221 Cabot Blvd West
Suite B
Langhome, PA !9047
HAWAII
Chartiers Valley
Shopping Center
1025 Washington Pike
Bridgeville, PA 15017
99-859 Iwaiwa Street
Aiea, Hawaii 96701
Phone (808) 488-1996
Fax (808) 486-4389
As of April '98
37
Panasonic Consumer Electronics Company,
Division of Matsushita Electric Corporation of America,
One Panasonic Way
Secaucus, New Jersey 07094
Panasonic Sales Company,
Div!sion of Matsushita Electric of Puerto Rico, Inc.
AVE. 65 de Infanteria, Km. 9.5 San Gabriet
Industrial Park Carolina, Puerto Rico 00985
QUASAR Video Products
Limited
Warranty
Panasonic Consumer Electronics Company or Panasonic Sales Company (collectively referred to as "the
Warrantor") will repair this product with new or refurbished parts, free of charge, in the USA or Puerto Rico, in
the event of a defect in materials or workmanship as follows (all time periods commence from the date of the
odginal purchase):
LABOR_
CAMCORDER
VCR
NVMIXER
MONITOR-VCR
Monitor-VCR
ONE (1) YEAR, EXCEPT CCD IMAGE SENSOR
CCD IMAGE SENSOR- SIX(6)MONTHS
ONE(1)YEAR
NINETY (90) DAYS
NINETY (90) DAYS
ONE(1)YEAR
ONE(1)YEAR, EXCEPT CRT
CRT-TWO(2)
NINETY t90! DAYS
NINETY (90) DAYS
CRT - NINETY (90) DAYS
CUSTOMER PAYS ALL LABOR
CHARGES AFTER 90 DAYS
In-home
Monitor-VCR
or carry-in
Carry-in
YEARS"
Service:
Service:
22" (diagonal)
21" (diagonal)
NINETY (90) DAYS
CRT / LCD and Larger
CRT ! LCD and smaller
(if included) - New rechargeable batteries in exchange for defective rechargeable batteries for ten
(10) days. Non-rechargeable batteries are not warranted.
(if included) - New video cassette tape in exchange for a defective video cassette tape for five (5) days.
In-home, carry-in or mail-in service, as applicable, in the USA can be obtained during the warranty period by
contacting a Panasonic Services Company (PASC) Factory Servicenter listed in the Service Directory. Or call
toll free 1-800-211-PANA(7262),
to locate an authorized PASC Servicenter. Carry-in or mail-in service in
Puerto Rico can be obtained during the warranty period by calling the Panasonic Sales Company telephone
number listed in the Servicenter Directory.
This warranty is extended only to the original purchaser. A purchase receipt or other proof of the date of the
original purchase is required before warranty service is rendered.
This warranty only covers failures due to defects in materials and workmanship which occur during normal use
and does not cover normal maintenance, including, but not limited to, video and audio head cleaning. The
warranty does not cover damage which occurs in shipment, or failures which are caused by products not
supplied by the warrantor, or failureS which result from accident, misuse, abuse, neglect, mishandling,
misapplication, alteration, modification, faulty installation, set-up adjustments, improper antenna, inadequate
signat pickup, maladjustment of consumer controls, improper operation, power line surge, improper voltage
supply, lightning damage, commercial use such as hotel, office, restaurant, or other business or rental use of
the product, or service by anyone other than a PASC Factory Servicenter or a PASC authorized Servicenter,
or damage that is attributable to acts of God.
LIMITS AND EXCLUSJON,_
There are no express warranties except as listed above.
THE WARRANTOR SHALL NOT BE LIABLE FOR INCIDENTAL OR CONSEQUENTIAL DAMAGES
(INCLUDING, WITHOUT LIMITATION, DAMAGE TO TAPES) RESULTING FROM THE USE OF THIS
PRODUCTS, OR ARISING OUT OF ANY BREACH OF THE WARRANTY, ALL EXPRESS AND IMPLIED
WARRANTIES, INCLUDING THE WARRANTIES OF MERCHANTABILITY AND FITNESS FOR
PARTICULAR PURPOSE, ARE LIMITED TO THE APPLICABLE WARRANTY PERIOD SET FORTH ABOVE.
Some states do not allow the exclusion or limitallon of incidental or consequential damages, or limitations on
how long an implied warranty lasts, so the above exclusions or limitations may not apply to you.
This warranty gives you specific legal rights and you may also have other rights which vary from state to state.
If a probtem with this product develops during or after the warranty period, you may contact your dealer or
Servicenter. If the problem is not handled to your satisfaction, then write to the Customer Satisfaction Center
at the Panasonic Consumer Electronics Company address above.
SERVICE CALLS WHICH DO NOT INVOLVE DEFECTIVE MATERIALS OR WORKMANSHIP AS
DETERMINED BY THE WARRANTOR, IN ITS SOLE DISCRETION, ARE NOT COVERED. COSTS OF
SUCH SERVICE CALLS ARE THE RESPONSIBILITY OF THE PURCHASER.
warvid 10/20/'97
38
Desenganche la antena del televisor o de
la videograbadora que tuviera
anteriormente y conectela a la parte
trasera del registrador Combinaci6n de
VCR/TV, come se muestra en el diagrama.
Si el sistema de su antena tiene
conductores UHF y VHF separados, usted
necesita un mezclador de banda UHFNHF
(no viene con el equipo.)
•
Sin un decodificador
Mezclador de banda
UHFNHF (no est_ incluido)
Parte trasera
de la
combinaci6n
de VCR/TV
<Los dibujos
son para los
modelo VV2009>
(Plane) Cabte bifubular
de 300 ohmios
•
:_:::::::_
(nedondo)Cab!e_
-'_-_coa xial __]_}_-_jlr
_=de
75 ohmios _Z;..
desdeta
r_ ........
0
antena
_Transformador
de 300*75
ohmios (no est,_
incluido)"
"-
'
(Piano) Cable
bifubular de 300
ohmios
de TV cable
Parte trasera de la
combinaci6n de
VCRfI'V
PedrO.;
• grabar o ver canales sin codificar.
No Podra;
• grabar o ver canales codificados.
• ver otro canal que no sea el seleccionado
para cualquier tipo de grabaci6n.
• Con un decodificador de TV cable
Podr&;
• grabar
over
cualquier
canal
NOTA:
El canal deber_ ser seleccionado
incluso
los canales
en el decodificador
codificados.
de IV cable.
NO PedrO;
• • vet otto canal que no sea el seleccionado
para cualquier
ripe
de grabaci6n..
•hacer
una grabaci6n
con temporizader
de un canal a menos
que Io seleccione
en el decodificador
de TV cable.
Para ver y grabar un canal codificado/no
codificado
Sintonice e! canal del Registrador de la combinaci6n de vCRtTV en el canal de salida de
la caja convertidora de televisiSn per cable (per ejemple el canal 3.)
! Despu_s, seleccione e n el decodificador
de TV cable el canal que se quiera ver o grabar.
• Con un receptor DSS
PedrO;
• grabar
over
cualquier
canal
NOTA:
El canal deber& ser seleccionado
incluse
los canales
codificados.
Parte trasera de la
combinaci6n de
VCRfrV
en el receptor DSS.
No Podr,_;
• vet otro canal que no sea el seleccionado
tipo de grabaci6n,
° hacer una grabaci6n
con temporizador
que !o seleccione
en el receptor DSS.
NOTA:
para cualquier
de un canal
a menos
Receptor
DSS
El receptor DSS debe estar apagado para vet programas desde un
decodificador de TV cable o desde la antena. Consulte el manual del
receptor DSS para mds detalles.
*DSS _ es una marca registrada de DIRECTTV, INC., una unidad de
GM Hughea Electronics.
39
_-s_
a
Ajuste de la zone horaria.
xhiba el MENU PRINCIPAL.
Presione ACTION.
videograbador
combinado,
Presione POWER
pare encender el
/_!
SELECT
U_UAGE
PUSH
cH•
:E_H _h
Seleccione
lenguaje.
CH i': paraelingles
APP,
VOL+: para franc6s
VOL +
:FranC, ais
[ oPmuiRcHv :E_p_ol
CHV
b
F 1 ,JAR
:para espaRol
FIJAOION
AUT0.
(CNFIELOJ)ajuste automdtico
3r
Y SIESTA
d
AUTOMATICA
TERMINAR
:OPRIMIR
CH
RELOJ Ee AUTOMATICA
INCOMPLETe
IPIJACION
L PARA
EL
Si la hera exhibida
para su zona, ajuste
ELEGI R:i,
•
:ll,
2)
TERM I NAR;ACTION
zona
horaria"
en la
siguiente
p_gina.
AUTOMATICA
Presione li. pare
ajustar.
• De la misma manera, ajuste el dfa, el a_5o,la hera
y ta hera de ahorro de energia. (VERANO)
Pata hacer correcciones,
presionerepetidamente<ill. para moverse hasta el
error, luego corrijalo.
eEL
ES INCOMPLETO
RELOJ
-/]-_....... V_---_YY_--:-AC-T-1) Presione li_t' para
seleccionar el mes.
FIJAR
RELOJ
Presione ACTION para
salir de este mode.
Aluste el reloj
manualmente,
el reloj nuevamente
de acuerdo con la
secci6n "Ajuste de la
FIJACION
DIEL
ACTI_
FMAR
rio es la correcta
UP
,
Presione
inal del ACTION
ajuste. dos vece&
• El valor numddco ajustado aquf se vuelve "0" una
vez que ajuste manualmente el reloj.
OPRIMIR
]
"
•
Exhiba la pantalla
FIJAR RELOJ.
7/28f1999MAR12:00PM
I (Ajuste terminado)
HeRA
VERANII:C_:
ACT
I Presione CH i,
CANAL
PIJAOO
: CA
10
pare salir.
COMPLETe
t
E| ajuste del reloj es incomplete.
Ajuste el reloj manualmente.
A
ION
.
! Seleccione "AJUSTE
ZONA HERA."
J
Las siguientes inlormaciones aparecer(in
seguidamente:
* AUTOPROGRAMACION EN PROCESO
mil° AUTOPROGRAMACtON COMPLETe
° FIJAClON AUTOMATICA DEL RELOJ
EN PROCESO
F I JAG
PtJARRELOJ
.....
2) PresioneACTION para
exhibirla.
seleccionar.
FtJACION
AUTOMATICA2)
1) Presione
ii_l' para
F_JA_:.
,
Presione ,<1_
para
ELEGIR:/=
•
TERM_.A_:ACTJON
ajustar.
UNAC_AOE'rvPO.
CABLEajuste automatico
SINTONICE
AL CANAL
PBS
DE eU LOCAL
LUEGO..
del reloj.
CONECTE EL CABLE DE LA
de canales y el
PeRFAVOROPR,M_RCH_P
Presione CH i..
!
.....
1
; ACI" I ON
MANUAL
1c°°''°c'°'
USANOO
1) Presione i_'<ll_
para
seleccionar "RELOJ."
MENU
PRINCIPAL
ELEGIR:A
• < b.
C
ANTENA
Exhiba la panta|la
"FIJAR RELOJ".
(Ajuste sin terminar)
PARA FUAR EL RELOJ
OPRIMIR
ACTION
C
Presione
veces ACTION.
Final
del dos
ajuste.
NOTA IMPORTANTE PARA AJUSTE AUTOMATICO DEL RELOJ
• El ajuste automlttico del retoj sertt realizado al volver a
encenOer el videograbador combinado cada vez que Io
apague. Si usa un decodi{icader de TV cable y desea que la
funcibn de ajuste automiltico del reloj funCione, el
decodificador de TV cable debe queder encendido y
sintonizando el canal PBS en el memento en que seapaga
el videograbador combinaclo,
• Si usa un sintenizacfor de TV satelital, pare que funcione el
ajuste autom,:_tico del reloj, debe de estar apagado.
• Si usa un tome de audio/video pare conectar el
videograbada¢ combinede y el decodificador de TV cable o
el sintonizador de TV satelital, deberlt tambit_n conectar el
cable coaxial RF para pealer usar las funciones de ajuste
eutomdtico de reloj y ajuste autom_ltico de canal.
• Si per cualquier razSn se cambiara la hera manuelmente,
no se podr_l realizar la correcci6n automdtica de la hera.
40
Para fijar o fijar de nuevo el reloj
Encasede queelreloi esincorrectoo haocurridouncorteel_ctdco,
1 Optima ACTION para que parezca el MENU PRINCIPAL,
20prima
iAr _ili" para elegir "RELOJ". Luego,
oprima ACTION para que aparezca la pantalla de
la FIJAR RELOJ.
30prima iT
para elegir "MANUAL", y luego I_
pare que aparezca la pantalla de la FIJAR RELOJ,
4 Per favor continue con los pesos B y C de la
instrucci6n anterior (Case 2,)
•Inserte
El videograbador
un casete.combinado
enciende autom&ticamente_
Presione
Exhiba FIJAR PROGRAMACION.
Presione PROG.
se
• Si ya existe un programa en la memoria, presione
&v y I_ para seleccionar un numero de programa
PLAY.
sin user,
• La reproducci6n comienza
eutom_,ticamente si el casete no tiene la
lengt3eta para prevencion de grabaci6n.
•
Para encontrar una escena en particular
B0squeda hacia adelante --) Presione FF
B_squeda hacia atr&s -) Presione REW
• Pare vet en camera lenta --) Presione
SLOW
•Para
ver una imagen fija (congelada) -.)
Presione PAUSE
• Para ver ira&genes cuadro a cuadro --)
Presione SLOW en el modo de imagen
fija.
• Para parar ...) Presione STOP
• Pare rebobinar la cinta -) Presione REW
•Para
expulsar la cinta _ Presione EJECT
en el control remoto o STOP/EJECT en
el videograbador combinado.
2
I_O_'/t\
_
ELEO,R:- •
FtJAR :,,
2) Presione
ajustar.
TERM I NAR : PROG / ACTION
Fecha de hoy --
(._8--9 ........ 31-- 1 -- 2 ...... 6_. t
7
& / V Ordenpateelegir
DIAR_O
SEMANAL
SEMANAL
(SAB) ....... (LUN) --
SEMANALJ
{DOM)
Repita el paso 2 pare ajustar:
hora de comienzo, hera de parade, canal (o LINEA para una
luente exterior), categorfa [N/O (no aplicable), DEPORTE,
ClNE, COMEDIA, MUSICA, DRAMA}, velocidad (SP, LP, SLP)
Haga las anotaciones necesarias.
• Si no lueran necesarias, vaya at
ABeI paso 4,
/H_v/1\
1) Presione •para
hacedas.
2) Presione •T pare seleccionar.
• Loscaracterescambiaranen el
siguiente orden.
Presione
o fas teclas
SeleccioneCHelAV
canal.
num_ricas correspondiente.
la velocidad
I_ o 41 para
• 1 - 31 = Grabaci6n _nica
• DIARIO = ala misma hora de lunes a viemes
• SEMANAL = ala misma hora una vez ale semana
para
prevenci6n
grabado.
|nserte
un casete de
con
la leng_ieta
. El videograbadorcombinadose
enciende autom&ticamente,
Seleccione
la fecha
grabacibn.
I Ajuste
1) Presione
•V depara
_A
de
i
BiC
.......
:9 .......
BLANCOi
2--1--0--t--!
- i&_
'_-
Z--
grabacibn.
Presione SPEED.
3) Presione
ajustar.
SP = reproduccibn norma!
LP = reproducci6n large
SLP = reproduccion super large
• La velocidad seleccionada debe
aparecer en la pantalla.
4) Presione PROG
para finalizar.
Presione REC.
Comience
la grabac|on.
• Pera editarpartes no deseadasde una
grabacibn,presione PAUSE pare hacer
una pausedurante la grabaci6n.
• No podr&ver otrocanal durantela
grabaci6n,
•Para
parer --) Presione STOP.
•
El videograbador combinado
deja de grabar a una hora
prefijada, (Grabaci6n de un toque)
Presione REC repetidamente para
ajustar lahora de grabaci6n (30
rain - 4 horas.)
Grabaci6n
normal
_ 0:30--_ 1:00,,,)
:00._- 3:00,4=--2:004-- 1:30.._.,"
4
:_]ii-:ii(ii ii ::
TEP,M I NAR: PRC_ tAC"rlO_
5
Salga
_
o 4
para
(o ACTION)
Termine
el programa.
Presione
PROG
(o ACTION.)
Para introducir mds programas.
presione ,_'v y I_ pare seleccionar y
ajustar el n_mero de programa en
blenco, y luego repita los pasos 2 y 3.
de este modo.
Presione PROG (o ACTION.)
• Si est& usando un decodificador de TV cable, aseg_rese
que se encuentra en el canal deseado y que la alimentaci6n
queda conectada pare grabar con temporizador.
• El indicador PROG TIMER se enciende en e[
videograbador combinado.
41
Tower
Remote
Control
EJECT button:
When EJECT is pressed, the tape is ejected from Cassette Compartmenl.
If EJECT is pressed during recording, the Combination VCR wilt not respond to the command.
ON-TIMER
See page14,
EJEC3
See pages t0, 42.
NITE
See page 8.
POWER
See pages 6, 8.
SPEED
See page 11.
SLEEP
See page 14,
MUTE
See pages 8, 17.
RAPID TUNE
See page8.
CHANNEL UP/DOWN SELECT UPIDOWN-. ---i
See pages 6-9, 11-14, 16, 17, 19-26,
28-30, 32, 33,
ACTION
See pages 7, 9,11,16,17,
22~24,26,28-30,32,33.
:
See pages 6~9, 11-14,
PROGRAM
See pages 12, 13, 25.
t9,
ZEROI1 MINUTE SKIP
See pages 18, t9.
INDEX ...............
16, 17. 19-26,
28~30. 32, 33,
See pages tl,
DISPLAY
14, 18, 31,35.
)N
See page 18.
/
See pages 20, 21,
NUMBERED
KEY
See pages 8, 11,20,
TRACKING UP/DOWN
See page 10•
/
33.
REWIND/SEARCH
See pages 10, 20, 21.
PLAY
See pages 10, 21,25,34.
SLOW
See page 10.
PAUSE
See pages 10, 11.
See pages !3-15,
/
• /
/
ADD/DELETE
22, 23, 28, 33.
FAST FORWARD/SEARCH
See pages 10, 20, 21.
STOP
See pages 10, 11, 13, 21.
COUNTER RESET
See page 18.
REC
See page 11.
Models VV-1309/VV-1319W
AC Power Plug
When plugged into an AC
outlet, the Combination VCR
consumes 4.5 W of electric
power in OFF condition.
42
unit is shown here.
Easy-Grip-Handle
<Models VV-1309/Vv-1319W
only>
use when transporting the
Combination VCR.
VHF/UHF Antenna
Input Terminal
In from your Antenna or
Cable.
See page 5.
Model VV-2009 unit is shown here.
REWINE
ACTION
See pages
7,10,12,13,20,21.
Cassette Compartment
See pages 10, 11,25.
--PLAY/REPEATSee pages 8,10,19,
21,25,34.
STOP/EJ ECT
ACTION
See pages 7, 10~13, 21.
SEARCH
Seepages10,20,
21,34.
CHANNEL UP/DOWN
TRACKING UP/DOWN
SELECT UP/DOWN
See pages 6-8, 10~13, t5.
REC
See pages 11, 26.
VOLUME
SET
See pages 6~8, 12, 13.
TIMER
See page 15.
POWER
See pages 6, 8, 34.
Built-In Speaker
AudioNldeo In
Jacks
See page 27.
_PhonesJack
See page 8.
For Models
VV-1309/
VV- 1319W
REC Indicator
Lights during recording. In
Rec Pause or OTR Pause
mode, the indicator flashes.
See page 11.
PROG TIMER Indicator
Lights when the Comb{nation VCR
is set for Timer Recording. It flashes
when a Timer Recording has been
set with no tape inserted, the clock
is not set, or the tape is in motion.
See pages 11, 13.
Remote Sensor
ON TIMER Indicator
Lights when the On Timer is set.
See page 14.
43
Panasonic Consumer Electronics Company,
Division of Matsushita Electric Corporation of America
One Panasonic way Secaucus,
New Jersey 07094
Printed inJapan
VQTS3530B
Panasonic Sales Company,
Division of Matsushita Electric of
Puerto Rico, Inc. ("PSC")
Ave. 65 de Infanteria. Kin. 9.5
San Gabriel Industrial Park, CaroJina,
Puerto Rico 00985