1
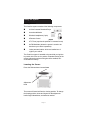
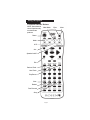
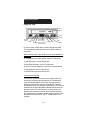
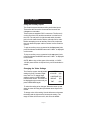
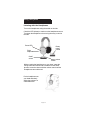
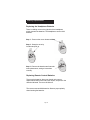
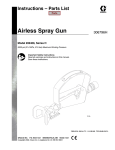
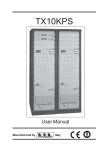
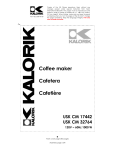
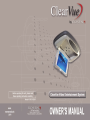
Table of Contents
Quick Reference Guide
3
Using the System
Getting Started
4
Lowering the Screen
4
Functional Remote Buttons
5
Using the VCR
6
Using the TV Tuner
7
Using the Auxiliary Inputs
8
Changing the Video Settings
8
Listening over the Vehicle Speakers
9
Listening to Auxiliary Audio Sources
9
Listening with the Headphones
10
Battery Replacement
Replacing the Headphone Batteries
11
Replacing the Remote Batteries
11
Frequently Asked Questions
Page 2
12
Quick Reference Guide
To lower the screen:
Release button
Press the release button as shown.
To watch a videotape:
Turn the ignition switch to the Run
or Acc position.
Press the POWER button on the remote.
Insert a videotape into the VCR. It will begin playing automatically, and the tape’s picture will appear on the screen.
To listen over the vehicle speakers:
Turn on the vehicle radio and tune it to 89.1 FM.
Press the POWER button on the remote.
Press and release the SPEAKER ON/OFF button on the remote
until “FM ON” is displayed on the screen.
If no sound is heard, try 88.7 FM.
To use an AUX source:
(such as an optional videogame or camcorder)
Connect the RCA audio and video outputs of the device to the
Line 2 Inputs on the front of the VCR.
Press and release the “MODE” button until “LINE 2” is displayed on the screen. The aux source image should now be
visible on the screen.
To watch broadcast television:
(requires the optional TV Antenna)
Turn the ignition switch to the Run or Acc position.
Press the POWER button on the remote.
Press and release the MODE button until ”CH___” and the
current channel number are displayed (for example, “CH 2”).
Use the PREV TRK and NEXT TRK buttons to change channels.
Page 3
Using the System
Getting Started
The ClearVue system consists of the following components:
n
A Video Cassette Recorder/Player
n
An overhead Monitor
n
Wireless Headphones (2 pair)
n
A Remote Control
n
A TV Tuner (requires the optional TV Antenna for use)
n
An FM Modulator (allows the system’s sound to be
heard over your vehicle’s speakers).
n
Other parts and cables which are installed out of
sight in your vehicle.
The ClearVue system is intended to be used with your ignition
key switch in the Run or Acc position. Extended viewing of the
system without the engine running should be avoided, as it
could drain the battery.
Lowering the Screen
Press the Release button located here.
Adjustment
Knob
The screen will lower itself into the viewing position. To change
the viewing position, insert two fingers into the adjustment
knob’s finger indentations, and rotate as needed.
Page 4
Using the System
Functional Remote Buttons
NOTE: Some buttons
control functions only
on other Rosen
products.
Video Menu
Power
Mode
VCP
Aux
Speaker On/Off
Exit
Previous Track
Next Track
Play/Pause
Slow
Rewind
Fast Forward
Stop
Page 5
Eject
Mute
Using the System
Using the VCR
Tape
Door
Line 2
inputs
Power
button
Stop
Eject
Record
Indicator Lights for
Power, Recording,
Rewind
SLP, and Heat/Dew
Modes; IR Remote eye
Play
Fast
Forward
In order to watch a video tape, insert the tape into the VCR.
The tape will begin playing and the picture will be visible on
the screen.
While viewing a video tape, these functions are available from
the remote:
To view the tape at a slower speed, use the SLOW button.
To rewind the tape, use the REW button.
To fast-forward the tape, use the FFWD button.
To pause or resume playback, use the PLAY/PAUSE button.
To stop playback, use the STOP button.
To eject the tape, use the EJECT button.
VCP Protection System
The VCR has a protection system which will prevent it from
operating in extreme high temperatures, or if condensation
(dew) is detected within the VCR itself. This helps prevent
damage to video tapes used in such conditions. If extreme
temperatures exist, or if moisture is detected, the VCR will not
load the tape, and the DEW/HEAT indicator will illuminate on
the face of the VCR. If this should occur, wait until the temperature has returned to a normal range, and any condensation has had time to evaporate, before using the system. Note
that while this mode is active, the TV Tuner function is not
available.
Page 6
Using the System
Using the TV Tuner
NOTE: While the TV Tuner is built into the system, the
optional TV Antenna is required for proper TV reception.
To activate the TV Tuner, press and release the MODE button
until “CH___” and the current channel number are displayed
(for example, “CH 2” ).
To change channels, use the PREV TRK and NEXT TRK
buttons on the remote.
Broadcast television reception varies with location, terrain,
distance from the broadcast tower, and other obstructions.
Please remember that in a moving vehicle, signal quality may
fluctuate - this is to be expected.
NOTE: The TV button on the remote is not active on the
ClearVue 6.8 system. Pressing this button will have no effect
on system functions - use the MODE button.
NOTE: When the VCR’s protection mode is active, the TV
Tuner function is not available. For more information, see
“Using the VCR” on the previous page.
Page 7
Using the System
Using the Auxiliary Inputs
The ClearVue system has two auxiliary audio/video inputs.
These allow the connection of external devices such as a
videogame or camcorder.
These inputs are standard “RCA” connectors. The first set is
on the rear of the VCR, and the second set is on the face of
the VCR. The red jack is for right-channel audio, the white
jack is for left-channel audio, and the yellow jack is for video.
Before attempting to use an auxilary source unit, make sure
that you obtain the proper cable to connect it to the ClearVue
system.
To play an auxilary source connected to the front-panel jacks,
press and release the MODE button until “LINE 2” is displayed
on the screen.
To play an auxilary source connected to the rear-panel jacks,
press and release the MODE button until “LINE 1” is displayed
on the screen.
NOTE: When using a video game in the vehicle, a 12VDC/
110VAC power inverter is required. Ask your Rosen dealer for
details.
Changing the Video Settings
The ClearVue system has adjustable
settings for Color, Contrast, Brightness, and Tint. To change these
settings, press the VIDEO MENU
button on the remote. The menu will
be displayed on the screen until you
press VIDEO MENU again.
***MENU***
>COLOR
(35)
CONTRAST (35)
BRIGHT
(35)
TINT
(35)
To select the setting to be changed: Move the cursor up and
down the menu list using the up and down arrow keys on the
remote.
To change value of the setting: Use the left arrow to decrease
the setting and the right arrow to increase the setting. The
range of values is from zero to 63, with 35 as the default.
Page 8
Using the System
Listening Over the Vehicle Speakers
The ClearVue system uses an FM Modulator to allow the
vehicle speakers to play sound from the video source. The FM
Modulator will generate a very-low-power FM signal on either
89. 1FM or 88.7 FM (two settings are available in case you
have a strong FM station in your area using one of these
frequencies).
To play ClearVue sound over the vehicle speakers:
Turn on the ClearVue system.
Turn on the radio and tune it to 89.1 FM.
If no ClearVue audio is heard, press and release the
SPEAKER ON/OFF button on the remote until “FM ON” is
displayed on the screen.
If no ClearVue audio is heard, set your radio to 88.7 FM.
To turn off ClearVue sound over the vehicle speakers:
Press and release the SPEAKER ON/OFF button until “FM
OFF” is displayed on the screen. This is useful when rear-seat
passengers are using the headphones.
Listening to Auxiliary Audio-only Sources
You can use auxiliary audio sources (such as portable CD,
MiniDiscTM, or MP3 players) with the ClearVue system.
Connect the source unit to the auxiliary line audio RCA inputs
(such as the red and white LINE 2 inputs on the front of the
VCR) and select the LINE 2 input with the MODE button.
Page 9
Using the System
Listening with the Headphones
Turn on the headphones using the switch on the side.
Check the LED (shown) to make sure the headphones are on.
Turn down the headphone volume using the rotary control on
the side.
Power LED
Rotary
tuning
control
Right
earpiece
On/off
switch
Rotary volume
control
WIthout putting the headphones on your head, rotate the
tuning control until faint sound is audible from the headphones. Lower the volume with the volume control until the
headphones cannot be heard.
Put the headphones on
your head and slowly
adjust the volume to a
comfortable level.
Page 10
Battery Replacement
Replacing the Headphone Batteries
There is a sliding cover on the right side of the headphone
which conceals the batteries. The headphones use two AAA
batteries.
Step 1 - Press on the cover release tab here.
Step 2 - Grasp the cover by
its sides and pull up.
Step 3 - Remove the batteries and insert the
new replacements, noting to insert them
correctly.
Replacing Remote Control Batteries
To access the batteries, place your thumb on the arrowshaped raised lines on the rear of the remote, and press in the
direction indicated. The cover will slide off.
The remote uses two AAA batteries. Observe proper polarity
when inserting the batteries.
Page 11
Frequently Asked Questions
Why don’t I hear ClearVue sound over my radio?
Try both 89.1 FM and 88.7 FM on your radio dial, and make
sure that the FM Modulator is on by pressing and releasing the
“SPEAKER ON/OFF” button on the remote until “FM ON” is
displayed on the screen.
Why doesn’t the TV button on the remote turn on
the TV Tuner?
Some buttons on your ClearVue remote are for other Rosen
systems and products. Use the MODE button to turn the TV
Tuner on with your system.
How do I change channels on the TV Tuner?
Use the PREV TRK and NEXT TRK buttons on the remote.
Why did the headphones stop working?
Check the power switch and the volume control. Check the
MUTE button on the remote.Then try new batteries.
Why did the remote stop working?
Try new batteries.
Why has picture quality worsened with the VCR?
The VCR probably needs cleaning with a good-quality head
cleaning kit.
Why do I have poor ClearVue sound quality sometimes over the speakers?
You may have a strong radio station using the same FM
frequency as the FM Modulator is set to - see your Rosen
dealer to have your frequency re-set.
Can I use ClearVue with an aftermarket audio
system that has an auxiliary input, instead of using
the ClearVue FM Modulator?
Yes, an optional cable is required - see your Rosen dealer.
For additional answers, see your Rosen dealer or visit
www.rosenproducts.com
Page 12