1
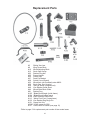
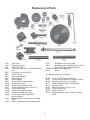
M
A
D
E
I
N
U .
S .
A .
Parts List, Operating &
Maintenance Manual for
Wells No. 5
Metal Cutting Bandsaws
M A D E I N U. S. A.
2829 N. Burdick St. • Kalamazoo, MI • 49004 • Phone: (269)345-1132 • Fax: (269)345-0095 • Web: www.wellsaw.com
Index
Specifications No. 5 .................................................. 2
Safety Instructions .................................................... 3
Installation, Operation & Maintenance...................... 6
Trouble Shooting ...................................................... 7
Replacement Parts .................................................. 8
Replacement Parts for Later Models ...................... 13
Replacement Parts - Blade Tensioning Device ...... 13
For Your Convenience
When contacting your WELLSAW supplier or the
Company for parts or service, it is helpful to have
both your saw Serial Number and Purchase Date
available. Jot them down her for handy reference.
Serial Number:
Wellsaw® Select-O-Chart..................................... 14
Purchase Date:
Specifications
Standard Capacity: Rectangular ....................................................... 5” x 10”
Rounds ................................................................. 5" dia.
Speeds:
Three Speed Saw –FPM ..............................60, 90, 130
Four Speed Saw - FPM.........................50, 90, 160, 250
Motor Size: ...........................................................................................1/3 HP
Swivel Vise: ........................................................................................... to 45°
Blade Size: .......................................................................... 8'3" x 1/2" x .025"
Height to top of bed: ........................................................................... 25-1/2"
Width of Bed .......................................................................................... 8-1/2”
Drive: ................................................................................................... “V" Belt
Floor Space required: ...................................................................... 21" x 50"
Shipping Weight, (approx). ................................................................ 365 lbs.
With Coolant....................................................... 420 lbs.
Blades are available for No. 5 Wells saw in a variety of tpi
2
SAFETY INSTRUCTIONS
Know your machine,
its safe and proper use!
DISCONNECT POWER before adjusting or servicing
the saw or changing a blade.
FOR ALL TOOLS
STAY CLEAR of all moving parts. Keep hands and
fingers away form the saw blade.
KEEP GUARD IN PLACE and in working order.
WHEN MOVING SAW, with hinged frame (saw head),
secure the head in its down position.
REMOVE ADJUSTING KEYS AND WRENCHES.
Form a habit. Check to see that all keys and wrenches
are removed from the tool before turning the tool on.
WHEN CUTTING MAGNESIUM, take special precautions. Use a sharp saw blade, make only dry cuts, prevent chip accumulation, and keep fire-fighting equipment nearby.
KEEP WORK AREA CLEAN. Cluttered areas and
benched invite accidents.
THIS SAW SHOULD BE GROUNDED WHILE IN USE
TO PROTECT THE OPERATOR FROM ELECTRICAL SHOCK.
AVOID DANGEROUS ENVIRONMENT. Do not use
power tools in damp or wet locations. Keep your work
area well lighted.
CORD CONNECTED TOOLS. If the saw is equipped
with an approved 3-conductor cord and a 3-prong
grounding type plug, it should only be connected to
a properly equipped and grounded receptacle. The
green conductor in the cord is the grounding wire.
Never connect the green wire to a live terminal.
KEEP CHILDREN AWAY. All visitors should be kept a
safe distance from work area.
MAKE WORKSHOP KID-PROOF with padlocks, master switches, or by removing starter keys form tools.
DON’T FORCE TOOL. It will do the job better and
safer at the rate for which it is designed
Use only a 3-wire extension cord having a 3-pronged
receptacle, a 3-pronged plug and ample amperage rating. Replace or repair a damaged or worn cord immediately.
USE RIGHT TOOL. Don’t use a tool a or attachment
to do a job for which it was not designed.
WEAR PROPER APPAREL. No loose clothing or jewelry to get caught in moving parts. Rubber-soled footwear is recommended for best footing.
PERMANENTLY CONNECTED TOOLS. The saw
should be connected to a grounded, metal-enclosed
wiring system or an equipment-grounding conductor
should be run with the circuit conductors and connected to the saw’s grounding terminal or lead.
USE SAFETY GLASSES. Also use face or dust mask
if operation is dusty.
To reset the manual starter after a power interruption,
return the switch to OFF and press the RESET button
before restarting.
SECURE WORK. Use clamps or a vise to hold work.
Provide adequate support to prevent injury from falling
work pieces.
3
INSTALLATION, OPERATION and MAINTENANCE
of the No. 5 WELLS METAL CUTTING BANDSAW
The No. 5 METAL CUTTING BANDSAW was designed for efficient performance, and with proper care will
give you many years of dependable service.
Each saw is completely assembled, checked thoroughly and subjected to a test run; no further adjustments
should be necessary.
This manual has been prepared to assist you in the proper installation, operation and maintenance of your
new Wells Metal Cutting Band Saw. If you should desire additional information or assistance, we suggest you
contact your dealer’s service representative.
Read this manual carefully. It was prepared to help you.
INSTALLATION
•
Upon receipt of machine, uncrate and check all parts.
Report to your carrier any damage to machine and file
Proof of Loss Claim with same.
•
•
•
•
Place motor in position on motor pivot post and
install V-Belt.
Be sure motor specifications correspond with your
power line.
Place machine so that each leg is carrying its
share of the load.
AUTOMATIC STOP
When the saw blade has completed the cut through
the material, the saw frame drops on a trigger to
which a rod is attached. This rod passes through
the frame of the machine to the switch on the opposite side, and opens the contacts, thereby stopping
the saw.
It will be necessary to raise saw frame clear of the
trigger before machine can he started.
Read instructions carefully.
OPERATION
•
•
•
•
screw until the blade is taut.
Start motor and tighten blade to proper operating
tension.
Make certain that the blade teeth point same way
blade is running; if not, this can he accomplished
turning the blade inside out.
Do not apply too much feed at first on new
blade.
Start cut carefully and the blade will last much
longer.
Make sure all four legs are in solid contact
with the floor.
Keep blade guides as close to both Vise Jaws
as possible.
FIXED VISE JAW
The two pins in the fixed vise jaw should be kept in
place in order to insure square cuts. When cutting
angles, these pins must be removed and the vise
jaws turned to desired position and tightened with
clamp bolts. These pins enable operators to quickly
relocate fixed vise jaw for 90° cutting. For final
adjustment, the vise jaw should be squared with
the blade.
PLACING BLADE ON SAW
•
•
•
•
The sliding vise jaw should be loosened and pushed
against fixed vise jaw and then tightened.
Raise frame to extreme height.
Remove blade guard on high side of frame.
Turn idler band wheel tension screw until the
blade will slide on wheels easily. With blade uncoiled, place in roller guides and between brushes, then over band wheels.
Grasp blade on frame side and push toward guide
bracket beam to hold in position, then turn tension
NEW BLADE TENSIONING DEVICE
On saws equipped with blade tensioning device,
tighten hand wheel tension screw until gauge bar is
flush with end of casting.
4
SLIDING VISE JAW
MAINTENANCE
The sliding vise jaw is equipped with a ratchet and
ratchet dog for quick action and with a hand wheel for
tightening work in vise.
Excessive pressure is not required to hold
material securely in the vise.
BLADE GUIDES
MAXIMUM CAPACITY
To obtain maximum vise capacity remove vise jaw
pins and move fixed vise jaw toward motor end. Make
sure stock in vise will not strike the ratchet arm.
DASH POT
Machines are equipped with a dash pot (frame check)
for the purpose of stabilizing the downward travel of
the saw frame, thereby protecting saw blade from
damage. The action is hydraulic and controlled by
flow of fluid being bypassed through an orifice in the
piston on the downward stroke. Only light hydraulic
oil should be used in the cylinder.
SWITCH
A “STOP-START” switch is installed across the line
to protect the wiring and brushes of the motor. A thermal coil is provided which breaks the circuit should an
overload occur in the line. The operator should allow
time for coil to cool before trying to start after the circuit has been broken.
Automatic shut-off operates when saw frame contacts
the switch trigger, which is attached to the frame rest.
BELT
Usually the weight of the motor holds the belt tight
enough, but in case it does not, the clamp on the
swivel post should be tightened.
SPEED SELECTION
Saws are equipped with step pulleys, which provide a
selection of speed ranges:
• Use the fast speed to cut thin-wall metal, tubing,
thin channels, aluminum, thin brass, or any metal
that will not burn the teeth.
• Use the medium speeds on general cutting such
as cold rolled, machine steels, heavy channels,
etc.
• Use the slow speed for cutting nickel steels or any
metals which require a slow speed on a lathe.
• Use beeswax when cutting brass. Brass should always be cut with a blade which has not previously
cut other metal.
•
If teeth wear off unusually fast, use slower speed.
Always keep the blade at proper blade tension
5
when cutting.
The blade guides are arranged to hold the blade in
alignment both vertically and horizontally.
Before making any adjustments, always try a new
blade to be sure that the old blade was not causing the difficulty.
To align the blade horizontally, be sure fixed vise is
square with bed, then square blade with vise. If out of
alignment, loosen one upper set screw In “Roller Adjuster” (M-92) and tighten opposite set screw, moving
blade in desired direction.
For the vertical alignment, raise frame until blade
just clears bed, then place edge of square on bed with
end against blade being careful not to contact tooth
set. Use feeler gauge not to exceed .002”, adjusting
blade so that feeler gauge will not enter at top or bottom between end of square and blade. If out of alignment, loosen one lower set screw in “Roller Adjuster”
(M-92) and tighten opposite set screw, moving blade
in desired direction. For this vertical alignment, check
blade at both front and rear guides.
Adjust the side roller guides (#100406-001) with
the eccentric axle until both rollers contact blade.
When this adjustment is made, the rollers should be
adjusted so that the path of the blade is straight
and blade is not forced to curve around the rollers.
The back edge of the blade should be even with the
top surface of the side rollers. The top roller guide
(#100406-001) should be in contact with back of blade
at all times.
Always keep set screws and thumb screws tight.
BLADE BRUSHES
Brushes should be cleaned frequently in kerosene
and reversed to take advantage of both rows of bristles.
For best results, replace worn, filled or sticky brushes
with new ones. In bolting brushes to angles, be sure
wire bristles are bent in same direction blade travels.
LUBRICATION
•
The correct and adequate lubrication is a very
important factor in determining the life and service to be obtained. It is imperative that all dust and
dirt should be removed before lubricating.
• Keep vise adjusting screw well lubricated with
a medium type of grease.
• The gears in the gear case are lubricated with
a metal penetrating type of grease that will not
channel. A small quantity of this lubricant can be
added through hole in side of gear case when
required.
• The electric motor has sealed-type ball bearings
and should be oiled at regular intervals according to standard practices, when repacking, a high
grade medium type of grease should be used.
• Keep internal ring gear and pinion well greased
with a good quality fiber type grease (medium
grade). For proper inspection and for greasing
these gears, it is necessary to remove the drive
wheel.
• Lubricate the motor pivot post with a few drops of
machine oil. If properly lubricated, the weight of
the motor will keep the belt tight, and allow easy
speed changes.
• Wheel ball bearings are lubricated by pressing
out the bearings and repacking them with a good
quality of ball bearing grease.
Keep machine clean and be sure no cuttings are
allowed to mix with lubricants, as this forms an
abrasive which is detrimental to the operation of
the machine.
Use only hydraulic oil for dash pot.
WHEEL PITCH ADJUSTMENT
Loosen Blade Before Making These Adjustments!
In case the blade runs too low, or off the idler wheel,
adjust the wheel block to which the wheel is mounted.
To do this, loosen the two cap screws marked “1”
one-half turn and tighten two cap screws marked “2”
an equal amount.
To make similar adjustment on drive wheel at motor
end, it is necessary to loosen the two cap screws at
“3”, then make pitch adjustment by loosening two hollow head set screws at “4” and tighten two hollow
head set screws at “3”. The four cap screws should
then be tightened to hold motor plate in a rigid and
fast position.
If there is too much pitch on the wheel the blade will
run too high. This will cause the blade to become
distorted and the back of the blade will be rolled over,
also the wheel rim flange will show excessive wear.
To correct this condition, loosen two cap screws at
“2”, tighten two cap screws at “1”. Loosen two
cap screws at “4”, then make pitch adjustment by
loosening two hollow headset screws at “3” and
tightening two hollow head set screws at “4”. The
four cap screws should then be tightened to hold
motor plate in a rigid and fast position.
FRAME WEIGHT ADJUSTMENT
Place weight on slide bar at motor end of slide and
remove dash pot, before adjusting frame spring under
motor end, The frame spring should be adjusted
for approximately 10 Ibs. Use slide weight to make
final feed adjustment. The cutting pressure,
which determines the feed, should not be increased
to a point where the blade starts to run sidewise while
cutting. Large stock will stand a heavier feed than
small stock.
6
Trouble Shooting
For Greater Service and Efficiency
Careful Operation - Blade Consideration
DIFFICULTY
REASON
REMEDY
Cutting out of line Too heavy a feed or worn blade
Guides in wrong position
Set as close to work as possible
Guides out of alignment
Follow adjustment instructions
Set worn on one side of blade
Keep brushes clean. Avoid teeth rubbing in cut by applying enough weight so
that each tooth is cutting a good chip
Starting cut on odd shape where
blade does not contact flat surface
Stripping teeth
Breaking
Excessive wear
Reduce feed rate by adjusting frame
weight or replace blade. Replace worn
guide bearings when they begin to show
excessive wear
Retard feed until blade has a good start
in the material
Blade teeth too coarse
Be sure that two or more blade teeth are
in contact with material being cut
Hard spots on material
Rotate stock, if possible. Do not put new
blade in cut at same angle
Guides out of alignment
Follow adjustment instructions.
Blade twisting
Adjust guides as close to work as possible. Be sure material being cut is held
firmly
Lack of blade tension
Always keep blade tight
Dash Pot malfunction
Check hydraulic fluid level and/or condition of cup leather
Blade speed too fast.
Follow recommended cutting speeds
Blade running off Lack of blade tension
wheel
Improper wheel pitch adjustment
Always keep blade tight
See instructions for wheel pitch adjustment
Always use a light feed on new blades!
7
Replacement Parts
A11
A14
A16
A17A
A17B
A19
A22
A31
A42
A86
A94
101172-1
Spring
Bed
Hand Wheel
Band Wheel, Drive (shown as A17)
Band Wheel, Idler (not shown)
Saw Frame
Ratchet Arm
Fixed Vise Jaw
Motor Plate
Internal Ring Gear
Motor Pulley (3 speed saw)
Motor Pulley (4 speed saw)
8
Replacement Parts
A4
A5
A6
A12
A15
A18
A34
A49
A50
A54
A62
A90
A101
A160
A163
A174
Vise Ratchet Dog
Vise Ratchet
Vise Slide Block with (A45) Vise Slide
Block Guide. For assembled unit order
both parts
*Wheel Slide Block (3 speed saw)
Leg
Guide Bracket Beam
Spring Adjuster Housing
Blade Guard
Frame Pivot Bar (shown on page 11)
Switch Rod used with Bryant No. 3972 (shown on page 12)
Stock Stop Bar
Roller Guide Bracket
Sliding Weight Bar
*Belt Guard (3 speed saw)
Bracket Thumb Screw (not shown) same as M163
Switch Rod used with CH No. 9115 (not shown)
*Refer to page 13 for replacement part number of later model saws.
9
Replacement Parts
A3
A9
A10
A13
A23
A25
A26
A27
A28
A35
A36
A38
A40
A46
A81
A103
A104
A108
A113
A132
A151
A2330
A157
Sliding Vise Jaw
Wing Screw Block
Wheel Adjusting Block
Stock Stop Gauge
Ratchet Dog Arm
Frame Handle
Frame Rest
Dash Pot Bracket
Switch Cover (Bryant)
Wheel Axle (not furnished) order M429
Stock Stop, Arm Housing
Take Up Screw (complete unit)
Vise Ratchet Guide Spool
Wheel Slide Block Guide
Ratchet Dog
*Blade Brush Angle (inside frame)
*Blade Brush (inside frame)
Short Eccentric Roller Axle
*Motor Pivot Post (3 speed saw)
Vise Ratchet Dog Hinge Pin
Clamp Nut Only
*V Belt, same as 2330
Cable, Motor to Switch (see page 12)
*Refer to page 13 for replacement part number of later model saws.
10
Replacement Parts
M13
M30
A50
M60
M65
M68
M76
M91
M92
M95
M105
M110
M111
M112
M138
M153
M159
3102
3972
8115
8504
Ball Bearing for Pinion Shaft
Ball Bearing for Upper End M111 or M171
Pulley Shaft; also for Band Wheels
100406-001 Blade Guide Bearings
M216
Spring
Gear Case
Frame Spring Arm
Frame Pivot Bar
*Vise Screw with M177 Collar Assembled
Unit
Fixed Vise Jaw Locking Pin
*Drive Pinion
Vise Screw Bracket
Roller Support
Roller Adjuster
*Driven Pulley (3 speed saw)
Rod Ratchet Lever
*Plastic Gear with M165 Hub
*Pulley Shaft and Pinion (.625 dia)
*Drive Pinion Shaft
Cylinder for Dash Pot (inner)
Cylinder for Dash Pot (outer)
Thumb Screw and Wing Nut for
Spring Adjuster
Ball Bearing for Lower End M111 Pulley
Shaft
Switch. Call factory with complete specs
The following parts are not shown:
M156
M167
M168
M171
M172
M181
M189
M190
3202
11
5/16 x 7/8 Thin Head Cap Screw
5/8 Nut with Set Screw for Frame Pivot Bar
Washer for Dash Pot Cup, leather
Pulley Shaft and Pinion .590 diameter
Spacer for A35
Switch Rod Post (CH No. 9115)
*Driven Pulley Key
Plastic Gear Key
Ball Bearings for Lower End M171 Pulley
Shaft
Replace Parts
M27
M29
M34
M44
M52
M53
M61
M64
M100
M102
M107
M141
M144
M147
M148
M155
A157
Cable, Motor to Switch, No. 5 Saw
SK2525 Wheel Ball Bearing (not furnished)
Replaced by two ND No. 8504 Bearings
and one M172 Spacer
M158 Cable, Complete, Motor to Outlet (not
furnished)
M163 Thumb Screw for Sliding Weight, used
with M100
M166 Dash Pot Cup Leather
Gear Case Cover
Switch Trigger
Switch Trigger Axle
Short Roller Axle
Motor Plate Pivot Pin
Motor Plate Pivot Pin Holder
Vise Screw Nut
7/8 x 9 LH Lock Nut for Vise Screw Hand
Wheel
Steel Sliding Weight (not furnished - order
No. M807 - cast)
Sliding Weight Post
Ratchet Rod Lever Collar
Dash Pot Piston Rod with M142 Piston,
assembled unit
Dash Pot Piston Rod End
Dash Pot Lower Bolt
Dash Pot Spring
Dash Pot Upper Stud
The following parts are not shown:
M54
M188
M198
M425
M426
M807
M857
12
Switch Rod
Driven Pulley Spacer
Blade Brush Bracket
Blade Brush Angle
Blade Brush
Cast Iron Sliding Weight
Sliding Weights Stop Spring
Replacement Parts for Later Model No. 5
Wells Metal Cutting Bandsaws
A12
Wheel Slide Block used on saws up to and
including Serial No. 5M-6841. Later model saws
order No. 101171.
A103
Blade Brush Angle (inside frame) used on saws
prior to Serial No. 2975. Later model saws use
M425 Blade Brush Angle.
A104
Blade Brush (inside frame) used on saws prior
to Serial No. 2975. Later model saws use
M-426 Blade Brush.
A113
Motor Pivot Post for 3 speed saw. Order 101157
Motor Pivot Post for 4 speed saw.
A160
Belt Guard for 3 speed saw. Order 101182 Belt
Guard for 4 speed saw.
M68
Drive Pinion used on saws up to and
including Serial No. 5M-7302 Order a 101643
Drive Pinion Shaft Assembly
(includes drive pinion, drive pinion shaft and
roll pin). Later model saws use 101645 Drive
Pinion drilled for roll pin.
M95
Driven Pulley used on 3 speed saws. For 4
speed saws order 101156 Driven Pulley.
M110
Plastic Gear with M165 Hub replaced with
M327 for all model saws.
Pulley Shaft and Pinion (.625 dia.) replaced
with one M171 Pulley Shaft & Pinion and one
3202 Ball Bearing for 3 speed saw. Order
101187 Pulley Shaft & Pinion for 4 speed saw.
M111
M112
A2330 V Belt used on 3 and 4 speed saws order No.
100066-5.
M60
Vise Screw with M177 Collar Assembled Unit
replaced with M307 for all model saws.
Drive Pinion Shaft used on saws up to
and including Serial No. 5M-7302. Order a
101643 Drive Pinion Shaft Assembly (includes
drive pinion, drive pinion shaft and roll pin).
Later model saws use 101644 Drive Pinion
Shaft.
M189 Driven Pulley Key for 3 speed saw. Order No.
100056-15 for 4 speed saw.
Replacement Parts - Blade Tensioning Device
101402
Tension Gauge Nut Assembly
100004-15 Cap Screw
S20
Tension Spring
1000410-1 Bearing
101171
Slide Block
101162
101167
Take Up Support
Take Up Screw Assembly
13
Wellsaw® Select-O-Chart
To assist in selecting the right blade and the right speed for your job!
Speed = Suggested blade speed in feet-per-minute
Feeding pressure: L = light, M = medium, H = heavy • T = teeth per inch
14