1
__e_sQ_
EMERSON
OF
TM
AND
EMERSON
THE
RADIO
GOLEF
CORR,
LOGO
ARE
PARSIPPANY,
REGISTERED
NEW
TRADEMARKS
JERSEY,
U.S.A.
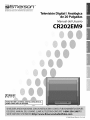
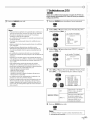
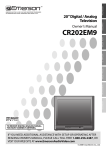
20" Digital / Analog
Television
Owner's Manual
CR202EM9
.¸¸¸¸¸¸¸¸¸¸¸¸¸¸¸¸¸¸¸¸¸¸¸¸¸¸¸¸¸%.
ii
i!
DB_
D|G|TAL
YOURECE'ME
MUST CONNECT
D'G'TAL/ANALOG
ANTENNA.S'GNAL,
I TO
I
_) 2008 Funai Electric Co., Ltd.
WARNING:TO
REDUCE THE RISK OF FIRE OR ELECTRIC SHOCK, DO NOT EXPOSE THIS
APPLIANCE TO RAIN OR MOISTURE.
CAUT,ON/ A
THIS SYMBOL INDICATES THAT DANGEROUS
VOLTAGE CONSTITUTING
SHOCK IS PRESENTWlTHIN
CAUTION:
TO REDUCE THE RISK OF ELECTRIC SHOCK,
THIS UNIT.
THIS SYMBOL INDICATES THATTHERE
DO NOT REMOVE COVER (OR BACK). NO USER SERVICEABLE
IMPORTANT
PARTS INSIDE. REFER SERVICING TO QUALIFIED
PERSONNEL.
INSTRUCTIONS
SERVICE
A RISK OF ELECTRIC
ARE
OPERATING AND MAINTENANCE
IN THE LITERATURE
ACCOMPANYINGTHE
APPLIANCE.
The important note is located on the rear of the cabinet.
Important
Safeguards
1. READ INSTRUCTIONS - All the safety and operating instructions
should be read before the appliance is operated.
2. RETAIN INSTRUCTIONS- The safety and operating instructions
should be retained for future reference.
3. HEED WARNINGS - All warnings on the appliance and in the
operating instructions should be adhered to.
4. FOLLOW INSTRUCTIONS- All operating and use instructions
should be followed.
5. CLEANING - Unplug TV from the wall outlet before cleaning. Do
not use liquid cleaners or aerosol cleaners. Use a damp cloth for
cleaning.
EXCEPTION: A product that is meant for uninterrupted
service and,
that for some specific reason, such as the possibility of the loss
of an authorization code for a CATV converter, is not intended to
6.
7.
be unplugged by the user for cleaning or any other purpose, may
exclude the reference to unplugging the appliance in the cleaning
description otherwise required in item 5.
ATTACHMENTS- Do not use attachments not recommended by
the TV manufacturer as they may cause hazards.
WATER AND MOISTURE - Do not use this TV near water, for
example, near a bath tub, wash bowl, kitchen sink, or laundry tub,
in a wet basement, or near a swimming pool, and the like.
8. ACCESSORIES- Do not place this TV on
PORTABLECART
w,ARNIN-_
an unstable cart, stand, tripod, bracket, or
table. The TV may fall, causing serious injury
to someone, and serious damage to the
appliance. Use only with a cart, stand, tripod,
bracket, or table recommended by the
manufacturer, or sold with the TV.
Any mounting of the appliance should follow
the manufacturer's instructions and should
10. POWER SOURCES - This TV should be operated only from the type
of power source indicated on the marking label. If you are not sure
of the type of power supply to your home, consult your appliance
dealer or local power company. For TVs intended to operate from
battery power, or other sources, refer to the operating instructions.
11. GROUNDING OR POLARIZATION - This TV is equipped with a
polarized alternating-current
line plug (a plug having one blade
wider than the other). This plug will fit into the power outlet only
one way. This is a safety feature. If you are unable to insert the plug
fully into the outlet, try reversing the plug. If the plug should still
fail to fit, contact your electrician to replace your obsolete outlet.
Do not defeat the safety purpose of the polarized plug.
12. POWER-CORD PROTECTION - Power-supply cords should be
routed so that they are not likely to be walked on or pinched by
items placed upon or against them, paying particular attention to
cords at plugs, convenience receptacles, and the point where they
exit from the appliance.
13. OUTDOOR ANTENNA GROUNDING - If an outside antenna or
cable system is connected to theTV, be sure the antenna or cable
system is grounded so as to provide some protection against
voltage surges and built-up static charges. Article 810 of the
National Electrical Code, ANSI/NFPA No. 70, provides information
with respect to proper grounding of the mast and supporting
structure, grounding of the lead-in wire to an antenna discharge
unit, size of grounding conductors, location of antenna-discharge
unit, connection to grounding electrodes, and requirements for
the grounding electrode. (Fig. A)
FIGUREA
EXAMPLE OF ANTENNA GROUNDING AS PER
NATIONAL ELECTRICAL CODE
use a mounting accessory recommended
by the manufacturer.
An appliance and cart combination
should be moved with care.
Quick stops, excessive force, and uneven surfaces may cause the
appliance and cart combination to overturn.
AMEUBLES - Cet appareil ne doit _tre
SYMBOLED
&_FTISSEMENTF_)IIR
LE C-_MpDSANTES
plac6 que sur un meuble (avec ou sans
_rP_'RE,LET_,EU_LE_RO"LETTES
roulettes) recommand6 par le fabricant. Si
vous I'installez sur un meuble a roulettes,
dGplacez les deux ensembles avec
precaution. Un arrGt brusque, I'utilisation
d'une force excessive et des surfaces
irrGguli_res risquent de dGstabiliser
I'ensemble et de le renverser.
g. VENTILATION - Slots and openings in the cabinet and the back
92898A
or bottom are provided for ventilation and to ensure reliable
operation of the TV and to protect it from overheating, these
openings must not be blocked or covered. The openings should
14. LIGHTNING - For added protection for this TV receiver during a
never be blocked by placing the TV on a bed, sofa, rug, or other
lightning storm, or when it is left unattended and unused for long
similar surface. This TV should never be placed near or over a
periods of time, unplug it from the wall outlet and disconnect the
radiator or heat register.ThisTV
should not be placed in a builtqn
antenna or cable system. This will prevent damage to the TV due to
installation such as a bookcase or rack unless proper ventilation is
lightning and power-line surges.
provided or the manufacturer's
instructions have been adhered to.
EN
15. POWER LINES - An outside antenna system should not be located
in the vicinity of overhead power lines or other electric light of
power circuits, or where it can fall into such power lines or circuits.
When installing an outside antenna system, extreme care should be
taken to keep from touching such power lines or circuits as contact
with them might be fatal.
16. OVERLOADING - Do not overload wall outlets and extension cords
as this can result in a risk of fire or electric shock.
17. OBJECT AND LIQUID ENTRY - Never push objects of any kind into
this TV through openings as they may touch dangerous voltage
points or short out parts that could result in a fire or electric shock.
Never spill liquid of any kind on the TV.
18. SERVICING - Do not attempt to service this TV yourself as opening
or removing covers may expose you to dangerous voltage or other
hazards. Refer all servicing to qualified service personnel.
19. DAMAGE REQUIRING SERVICE - Unplug this TV from the wall
outlet and refer servicing to qualified service personnel under the
following conditions:
a. When the power supply cord or plug is damaged or frayed.
b. If liquid has been spilled, or objects have fallen into the TV.
c. IftheTV has been exposed to rain or waten
d. If the TV does not operate normally by following the operating
instructions. Adjust only those controls that are covered by the
operating instructions, as improper adjustment of other controls
may result in damage and will often require extensive work by a
qualified technician to restore the TV to its normal operation.
e. If the TV has been dropped or damaged in any way.
f. When theTV exhibits a distinct change in performance, this
indicates a need for service.
20. REPLACEMENT PARTS - When replacement parts are required, be
sure the service technician uses replacement parts specified by the
manufacturer that have the same characteristics as the original part.
Unauthorized substitutions
may result in fire, electric shock, injury
to persons or other hazards.
21. SAFETY CHECK- Upon completion of any service or repairs to this
TV, ask the service technician to perform routine safety checks to
determine that theTV is in proper operating condition.
22. HEAT- This TV product should be situated away from heat sources
such as radiators, heat registers, stoves, or other products (including
amplifiers) that produce heat.
i!i!!
i !e
!r,
[] Precautions
CAUTION:
TO PREVENT ELECTRIC SHOCK, MATCH WIDE BLADE OF PLUG TO WIDE SLOT, FULLY INSER£
ATTENTION:
POUR EVITER LES CHOCS ELECTRIQUES, INTRODUIRE LA LAME LA PLUS LARGE DE LA FICHE DANS LA
BORNE CORRESPONDANTE DE LA PRISE ET POUSSER JUSQU'AU FOND.
FCC WARNING
RADIO-TV
INTERFERENCE
This equipment
has been
FCC Rules. These
This equipment
instructions,
occur
This equipment may generate or use radio frequency energy. Changes or modifications to this equipment
may cause harmful interference unless the modifications are expressly approved in the manual. The user
could lose the authority to operate this equipment if an unauthorized change or modification is made.
limits
generates,
installation.
by turning
and found
to comply
to provide
interference
radio
to radio
If this equipment
the equipment
with
reasonable
uses, and can radiate
may cause harmful
in a particular
determined
tested
are designed
the limits
for a Class B digital
protection
frequency
energy
does cause harmful
This
the dealer
Class B digital
Cet appareil
apparatus
num_rique
However,
radio/TV
complies
de la classe
with
technician
Canadian
B est conforme
there
interference
off and on, the user is encouraged
or an experienced
harmful
device,
to radio
to which
to Part 15 of the
in a residential
installation.
and used in accordance
is no guarantee
to try to correct
that
pursuant
interference
and, if not installed
communications.
following
measures:
1) Reorient
or relocate
the receiving
antenna.
2) Increase the separation
between
the equiprnent
and receiver.
3) Connect
the equipment
into an outlet
on a circuit
different
from
4) Consult
against
or television
the interference
the receiver
that
with
interference
reception,
the
will not
which
can be
by one or more
of the
is connected.
for help.
ICES-003.
_ la norme
NMB-003
du Canada.
i
Note to CATV system installer'.
This reminder is provided to call the CATV system installer's attention
for proper grounding
and, in particular,
to Article 820-40 of the NEC that provides guidelines
specifies that the cable ground should be connected
to the grounding
system of the
building as close to the point of cable entry as practical.
EN
LOCATION
For safe operation
and satisfactory
performance
of the unit, keep the following
• Shield it from direct sunlight
and keep it away from
• Avoid dusty or humid places.
sources of intense
in mind when
selecting
• Avoid places with insufficient
ventilation
for proper heat dissipation.
Do not block the ventilation
unit. Do not place the unit on a carpet because this will block the ventilation
holes.
• Install the unit
in a horizontal
a place for its installation:
heat.
holes at the top and bottom
of the
position.
• Avoid locations subject to strong vibration.
• Do not place the unit near strong magnetic
fields.
• Avoid moving the unit to locations where temperature
differences are extreme.
• Be sure to unplug the AC power cord from the outlet before carrying the unit.
TO AVOID
THE
HAZARDS
OF ELECTRICAL
• Do not handle the power
cord with
• Do not pull on the power
cord when disconnecting
• If, by accident,
for servicing.
water
is spilled
on the unit, unplug
directly
on top of the unit.
• Do not place anything
SHOCK
AND
FIRE
wet hands.
it from
an AC outlet.
Grasp it by the plug.
the power cord immediately
and take the unit to our Authorized
Service Center
The serial number of this product may be found on the back of the unit. No others have the same serial number as yours. You
should record the number and other vital information here and retain this book as a permanent record of your purchase to aid
identification
in case of theft.
dealerpurchasefrorn
Note about recycling:
This product's packaging
dealer phone No.
serial No.
model No.
dealer address
materials are recyclable and can be reused. Please dispose of any materials
in accordance
with
your local recycling regulations.
Batteries should never be thrown away or incinerated
chemical wastes.
[] Supplied
owner's
but disposed of in accordance with your local regulations
concerning
Accessories
manual
remote
(1 EMN23060)
control
(NE616UE)
* Batteries (AA x 2) for remote
not included.
• If you need to replace these accessories, please refer to the part No. with the illustrations
customer support line found on the cover of this manual.
• Depending
on your antenna
Contact your local electronics
[] Symbols
The following
Description
system, you may need different
EN
and call our toll free
(mixers) or separators
store for these items.
Used in this Manual
is the description
for the symbols
used in this manual.
refers to:
: Digital TV operation
• If neither
types of combiners
symbol
appears under the function
_':
heading,
operation
Analog
is applicable
TV operation
to both.
control
(splitters).
[] Contents
[]Features
/N TRODUCT ON
• DTV/TV/CATV
- You can use your remote control to select
channels which are broadcast in digital format
and
conventional
analog format. Also, cable subscribers
can access their cable TV channels.
• Information
Display
(DTV only)
- You can display the title, contents and other
information
of the current DTV program on the TV
screen.
• Auto Channel Scan
- This unit automatically
channels available
setup procedures.
scans and memorizes
in your area, eliminating
difficult
- This feature
allows you to block children's
access to
inappropriate
programs.
• Closed Caption Decoder
closed caption
decoder
closed caption supported
• Auto Shut Off Function
- If there
displays
text for
is no signal input from the antenna
terminal
the unit will turn
• Sleep Timer
- This feature
will automatically
turned
off the power
- Select your on-screen
Language
language:
English, Spanish or French.
• Stereo Sound Function
• PLL Frequency
Synthesized
Tuning
- Provides free and easy channel
selection
and lets
you tune directly to any channel using the channel
number buttons on the remote control,
• S-video Input
• AV Input
• Digital Audio
Coaxial Output
i
•
i izi!;il
Basic
Connection..................................................
ExternalDevice
Connection........................................
8
9
ii;:
iiii!;!;il
SE] r NG
Initial Setup.....................................................
MainMenu......................................................
AutoChannelScan...............................................
Language
Selection..............................................
10
10
11
11
ChannelSelection................................................
VolumeAdjustment..............................................
SwitchingEachMode.............................................
ScreenInformation ..............................................
TVScreenDisplay
Mode...........................................
SleepTimer.....................................................
12
12
13
13
14
14
iJ_i_
_
OPTIONAL
of the unit at a specific time.
• Choices for On-screen
i !_iiiil
_
VVY',TCHNG TV
programming,
and no operation for 15 minutes,
itself off automatically.
2
3
4
4
S
6
6
7
7
CONNEC[ Oq:
/NTAL
• V-chip
- Built-in
ImportantSafeguards.............................................
Precautions
......................................................
SuppliedAccessories
..............................................
SymbolsUsedinthis Manual .......................................
Features.........................................................
RemoteControlFunction
..........................................
Installingthe Batteries............................................
ControlPanel.....................................................
RearPanel.......................................................
SE_° NG
ChannelAdd/Delete..............................................
PictureAdjustment ..............................................
ClosedCaption...................................................
DTVClosedCaption...............................................
DI"VCC
Style.....................................................
V-chip ..........................................................
TROUBLESHOOT
15
16
16
17
18
19
NG
ii ¸
TroubleshootingGuide...........................................
Maintenance....................................................
22
23
INFORMATION
Glossary........................................................
CableChannelDesignations
.......................................
GeneralSpecifications............................................
Electrical
Specification............................................
OtherSpecifications.........................................
LimitedWarranty.........................................
24
24
24
24
24
Backcover
© 2008 Funai Electric Co., Ltd.
All rights reserved. No part of this manual may be reproduced, copied, transmitted, disseminated, transcribed, downloaded
or stored in any storage medium, in any form or for any purpose without the express prior written consent of Funai.
Furthermore, any unauthorized commercial distribution of this manual or any revision hereto is strictly prohibited.
Information in this document is subject to change without notice. Funai reserves the right to change the content
the obligation to notify any person or organization of such changes.
I_UNAIwith the _ design is a registered trademark of Funai Electric Co., Ltd and may not be
written consent of Eunai. All other trademarks used herein remain the exclusive property of
contained in this manual should be construed as granting, by implication or otherwise, any
trademarks displayed herein. Misuse of any trademarks or any other content in this manual
aggressively enforce its intellectual property rights to the fullest extent of the law.
herein without
used in any way without the express
their respective owners. Nothing
license or right to use any of the
is strictly prohibited. Funai shall
EN
ii:!!ili
[] Remote
Control
Function
1.
2.
POWER button (plO)
Press to turn the unit on and off.
7.
8.
Analog
major channel. (DTV)
4,
External
VOL •
/
through
or move
9.
Mode
the currently
selected external input
AUDIO button (pl 3)
mode.
Digital Mode (DTV only)
Press to select the audio
buttons(p12)
language.
10. CHANNEL RECALL button (pl 2)
Press to return to previous channel.
11.
MENU button (plO)
Press to display the main menu.
6.
Input
• Press to display
the main menu
Press to adjust the volume or move
right( _)/left(_) through the main
menu items.
5.
the channel
number.
CH A/V
buttons (p12)
Press to select channels and the
up/clown
items.
Mode (TV)
• Press to display
channels on the currently selected
input mode
INFO button (p13)
Digital Mode (DTV)
• Press to display the channel
number and the program
information.
• Press to select 100 or higher
channels. (CAW)
• Press to search if there are minor
external
the digital
mode (DTV) and analog mode
(TV).
from the major channel.
+ 100 button
3,
(pl 3)
Press to switch between
Number buttons(p12)
• Press to select channels.
-/ENT button
• Press to shift the minor channel
DTV/TV button
MUTE button (pl 2)
Press to turn the sound on and off.
12. SLEEP button
INPUT SELECT button (pl 3)
Press to access a connected
(p14)
Press to activate the sleep timer.
external device like a DVD player or
a VCR.
[] Installing
the Batteries
Install the batteries (AA x 2) matching the polarity indicated inside battery compartment
of the remote control.
Battery
Precautions:
• Be sure to follow the correct polarity
• Do not mix different
types of batteries
as indicated
together
• If the device is not to be used for a long period
• Do not try to recharge batteries;
EN
in the battery
(e.g., Alkaline
compartment.
of time, remove the batteries
they can overheat
Reversed batteries may cause damage
and Carbon-Zinc)
and rupture.
or old batteries
to prevent damage
to the device.
with fresh ones.
or injury from possible battery
leakage.
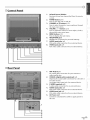
[] Control
Panel
1.
Infrared
Sensor Window
Receives infrared
2.
control.
POWER button
rays transmitted
from the remote
(plO)
Press to turn the unit on and off.
3.
4.
CHANNEL A/•
buttons 1p12)
Press to select channels or move up/down
the main menu items.
VOLUME
/_buttons(p12)
Press to adjust the volume
through
through
or move right(
_)/left(T)
the main menu items.
5.
MENU button
6.
Press to display the main menu.
HEADPHONE jack
Headphone
(pl0)
connection
for personal
listening.
7.
AUDIO input jacks (p9)
RCA audio cable connection
for an external
device.
8.
VIDEOinputjack
(p9)
RCA video cable connection
for an external
device.
ii!ii_!!_
1
2
3
4
5
6
7
8
ii iii:il
[] Rear Panel
ii !!i,i_iii
1.
2.
ANT. IN jack (p8)
RF coaxial cable connection
cable/satellite
box.
COAXIAL (digital audio)
for your antenna
output
for a decoder
Use digital audio input jack of an external
S-VIDEO input jack (p9)
device.
S-video cable connection
device.
for an external
4.
AUDIO input jacks (p9)
RCA audio cable connection
for an external
device.
5.
VIDEOinputjack
(p9)
RCA video cable connection
for an external
device.
6.
AC Power cord
Connect to a standard
this unit.
i
jack (p9)
Digital audio coaxial cable connection
an audio receiver.
3.
or
or
AC outlet to supply power to
2
3
4
5
6
EN
[] Basic
Connection
Thissectiondescribes
howto c0nnectthe unit toan antenna,cable/satellitebox,etc.
Note:
• Besure your an tenna or other device is connected properly before plugging in the power cord.
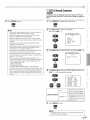
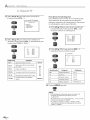
[Antenna
Cable Connection]
When connecting
Connect
the unit to an antenna
or cable TV company
(without
the RF coaxial cable on your home outlet to the antenna
cable/satellite
box)
input jack of this unit.
e.g.)
VH F / UHF'_
antenna
rear
of this
unit
_ "
RF coaxial
cable
cableTV
company
_Once connections
are completed,
turn on the unit and begin initial
Channel scanning is necessary for the unit to memorize
(Refer to"Initial
Setup"on page 10.)
all available
setup.
channels
in your area.
Note:
• Foryour safety and to avoid damage to device, please unplug the RFcoaxial cable from the an tenna input jack before moving the unit.
• If you use an antenna to receive analog TV,it should also work for DTV reception. Outdoor or attic antennas will be more effective than
settop versions.
• To easily switch your reception source between antenna and cable, install an antenna selector.
• fyou connect to the cable system directly, contact the CATVinstaller.
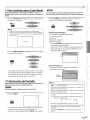
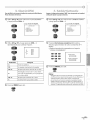
[Connection
Connect
to Cable Box or Satellite
Box]
the RF coaxial cable on your home outlet to the input jack of the cable/satellite
Use another
RFcoaxial
cable to connect
the antenna
input jack of the unit to the output
e.g.)
rear
satellite
dish
cable/satellite
box
RF OUT
coaxial
_Required cables and connecting
For more information,
EN
cable
RF coaxial
methods differ depending
please contact your cable/satellite
cable
on the cable/satellite
provider.
box.
box.
jack of the cable/satellite
of this
unit
box.
[] External
[S-video
Device
or Video
Connection
Cable Connection
(Rear)]
S-video connection offers good picture quality for video devices connected to the unit.
Video connection
offers standard picture quality for video devices connected to the unit.
Make the connection as illustrated below.
When the audio jack of the video device is monaural,
connect
the RCA audio cable to the audio L input jack.
RCA audio cable
_iill!ill
rear of this unit
l e.g.)
L
W AUDIO
R
OUT _
VFDEO
OUT
DVD player with
the S-video output jack
S-video cabl_
El
rear of this unit
ii!ii_!!_
ii :i:il
VCR
ICA audio cable
• To use the S-video
or video
[Video Cable Connection
input jack on the rear of this unit, press [INPUT SELECT] to select "VIDEO1 ".
(Front)]
Video connection
offers standard picture quality
Make the connection as illustrated below.
for video
devices connected
to the unit.
ii !!i,i_iii
When the audio jack of the video device is monaural,
connect
the RCA audio cable to the audio L input jack.
front of this unit
ii ¸
ii Ci_
_iEli
[
camcorder
vi
i i!i;iiii
i()
iTJ
RCA audio cable
ii:!!ill
• To use the video
input jack on the front of this unit, press [INPUT SELECT] to select"VlDEO2".
Note:
• fyou connect to the S-videojack and the video jack at the same time, the S-video connection will have priority.
[Digital Audio Output Connection
(for digital broadcasting
only)]
If you connect this unit to an external digital audio device, you can enjoy
broadcasting
sound.
rnulti-channel
audio like 5.1ch digital
rear of this unit
e°g .)
Dolby Digital decoder
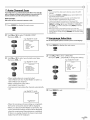
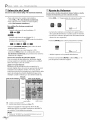
[] Initial
Setup
No te:
Thissectionwill guideyouthroughthe unit'sinitialsettingwhichincludes
selectinga languageforyouron-screenmenuand"AUTOPRESET
CH",which
automaticallyscansand memorizes
viewable channels,
Before youbegin:
Makesureif the unit isconnectedto antenna or cable.
1
After making
all the necessary
connections,
press
[POWER] to turn on the unit.
• This operation
may take a few moments.
• If you connect the cable system directly, contact the CATV
installer.
• If you press [POWER] or [MENU] during "AUTOPRESETCH",
this setting will be canceled.
• Theinitial auto channel scan function can be executed for
either TV/D TVor CATVonly once. If you wan t to scan both
TV/DTVand CATV,you need to select "CHANNELSETUP"in
the main menu to scan and memorize other channels after
initial presetting is completed. (Referto page 11.)
• Youcan cancel or exit the initial "AUTOPRESETCH" menu by
pressing [MENU].
• When no channel can be received by "AUTOPRESETCH",
"NO TV SIGNALS"is displayed on the TV screen.
• If there is no signal input from the an tenna terminal and
no operation for more than 5 seconds, "HELPFULHINTS"
appears. Follow the instructions listed on the TVscreen.
- HELPFUL HINTS 1 PLEASE CHECK TO SEE FF
THE ANTENNA / CABLE /
SATELLITE
iS PROPERLY
2
Use [CH •
/ V] or [VOL _] to select the on-screen
CONNECTED
language from the choices on the left side of the TV
screen. (ENGLISH / ESPANOL / FRAN_AIS)
SELECTLANGUAGE
ENGLISH
or
NEXT:PRESSCHA
ESPANOL
DESPUES:PRESIONECHT
OF
FRANQAJS
APRES:PRESSEZVOL
2
DIDYOU PERFORM
"AUTO PRESET CH"?
3
PLEASE
REFER
TO
PAGE OF THE
MANUAL
OR
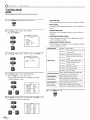
[] Main
FRONT
OWNER'S
REAR
FOR SUPPORT
iNFORMATiON
PANEL
LiNE
Menu
Thissectiondescribes
theoverviewofthe mainmenudisplayedwhenyou
press[MENU],
Formoredetails,seethe referencepageforeachitem,
Themainmenuconsistsofthefunctionsettingitemsbelow,
Press [MENU].
• Press [CH •]
for English.
e.g.) digital TV mode
• Press [CH V] for Spanish,
• Press [VOL ] for French.
- WSETUP
O
3
Use [CH •
/ V] to select"AUTO
PRESET CH(TV/DTV)"
for TV channels or "AUTO PRESET CH(CATV)" for CATV
channels,
then press [VOL
_ ].
V-CHIP SETUP
LANGUAGE
[ENGLISH]
CAPTION
[OPP]
DTV SETUP
• PICTURE
- INITIAL SETUP -
I PLEASE CONNECT ANTENNA
or
-
_" PICTURE
CHANNELSETUP
OR CABLE 0£ SATELLITE
TOTN]S UNIT
2 SET UP THE [TENS WITH
iN AND A BUTTON£
'> AUTO PRESET OH(TV,_DW)
You can adjust the picture quality,
(Refer to "Picture Adjustment"
on page 16,)
• CHANNEL SETUP
You can automatically
scan the viewable channels and
remove those that are undesired.
(Refer to"Auto Channel Scan"on page 1 I,)
AUTO PRESET OH(CAW)
• V-CHIP
• Scanning
start,
and memorizing
the channels automatically
SETUP
You can set the viewing limitations,
(Refer to "V-chip" on page 19,)
• LANGUAGE
CH 25
You can change the language (English, Spanish,
French) displayed on the main menu.
(Refer to "Language Selection" on page 11 .)
• CAPTION
AUTOPRESET
CH(T_DTV)
• When the scanning and memorizing
are completed,
the lowest memorized channel in the broadcasting
will be displayed.
You can change the display format for closed caption,
which displays the dialogue of a TV program or other
information
across the TV screen,
(Refer to "Closed Caption" on page 16.)
• DTV SETUP
You can set the screen display
or caption
in the DTV
mode,
(Refer to "DTV Closed Caption"
EN
on page 17.)
tTAuto
Channel
Scan
Note:
If you connect the cable system directly, contact the CATV
instafler.
If you switchwires(e.g.,betweenantennaand(ATV) or if you movethe
unit toa differentareaafter the initialsetting,or if you recoverthe DTV
channelyou deleted,you will needto performauto channelscan.
lf you press [POWER] or [MENU] during "AUTOPRESETCH",
the setting will be canceled.
When no channel can be received by "AUTOPRESETCH",
"NO TV SIGNALS"is displayed on the TVscreen.
Channel setting wifl be saved even if the power fails.
If you have Spanish or French menus and need English, press
[MENU]. Use[ON • /V] to select "IDIOMA" or "LANGAGE':
Press[VOL .'] to select "ENGLISH".Press[MENU] to remove
Beforeyoubegin:
Makesureiftheunitisconnected
toantennaorcable.
1
Press [MENU]
to display
the main menu.
the main
menu.
With regard only to the digital channel, even after the
scanning is complete if you unplug the AC power cord before
turning off the unit by pressing [POWER], the channel setting
may be lost.
2
Use [CH •
/ V] to select"CHANNEL
SETUP",
then press [VOL _].
[] Language
e.g.) digital TV mode
- TV SETUP PICTURE
CHANNEL SETUP
V-CHIP SETUP
or
LANGUAGE
CAPTION
DW SETUP
Selection
Youcan chooseEnglish,Spanish,or Frenchasyour on-screenlanguage.
1
[ENGLISH]
[OEFj
Press [MENU] to display the main menu.
O
ii!ii_!!_
!;b
ii :i:il
Use [CH •1 V] to select"LANGUAGE",
Use [CH •
/ V] to select your desired
then press [VOL "]
preset type,
repeatedly
e.g.) digital
then press [VOL "].
e.g.) digital TV mode
the setting.
!,p
TV mode
- TVSETUP PICTURE
-CHANNELSETUP-
or
ii_:i_ilil
to change
CHANNEL SETUP
V-CHIP SETUP
ADD_)ELETE(DTV)
AUTO PRESETCH(UT_
AUTO PRESETCH(T%OT_
AUTO PRESETCH(GATV)
or
LANGUAGE
CAPTION
UTV SETUP
[ENGUSH]
[OFF]
ii !!i'i_iii
! CAW takes approx _Omin
i i%
ii 115
• When aerial antenna
is connected,
select
"AUTO PRESET CH (TV)", "AUTO PRESET CH (DTV)" or
"AUTO PRESET CH (TV/DTV)'t
• When connected to CATV, select
[O
i?:J
"AUTO PRESET CH (CATV)'t
• Scanning
start.
and memorizing
the channels automatically
Press [MENU] to exit.
e.g.) digital TV mode
D25
AUTO PRESETCH{DW)
|
• When the scanning
and memorizing
the lowest memorized
channel
are completed,
will be displayed.
• When you selected "AUTO PRESET CH (TV/DTV)',
the
lowest memorized analog channel will be displayed
when the scanning and memorizing
are completed.
If there is no analog channel,
digital
channel
the lowest
memorized
will be displayed.
EN
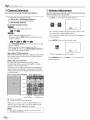
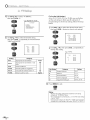
[] Channel
Selection
Selectchannelsbyusing[CH•/W]
[] Volume
or [the Numberbuttons],
Thissectiondescribes
howto adjust the volume,Themutefunction,which
turnsthe soundoff andon,isalsodescribed,
• To select the memorized channels,
use [CH • /V] or [the Number buttons].
• To select the non-memorized
channels,
use [the Number buttons].
To Use [the Number
-When
selecting
Use [VOL • / ]
VOLUME
Illlll
..........
12
• The volume
When selecting digital channel 12-1
Be sure to press l-lENT]
before entering
channel number.
the minor
Press [MUTE]
About digital TV broadcasting:
With its high definition
broadcast,
far surpasses analog broadcasting
and sound quality.
of the
disappear
to turn off and on the sound.
to
digital broadcasting
in both its picture
MUTE
Illlll
..........
• "MUTE" is displayed
What is the minor channel?
By using high compression technology, digital
broadcasting
offers a service that enables multiple
signals to send simultaneously.
Therefore, you can select more than one program per
major channel since digital broadcasting
technology
distinguishes
between multiple channels broadcast by
a single network.
NTSC (analog mode)
[AirTim,
18:00
ATSC(digital mode)
18:30
19:00
19:30
20:00
20:30
I__
major channel
l
T
I
minor channel
,_ : change automatically
_> : change manually by using [CH A/T ]
Although, you cannot watch the high definition TV
(HDTV) program, the unit converts the HDTV signal
to the standard
definition
TV signal.
Note:
•"NO SIGNAL"will appear on the TVscreen after the minor
channel broadcast is over.
volume.
20
on the TV screen.
Press [MUTE] again or use [VOL • / ]
original
EN
at the bottom
RECALL] to return to the previously
• When you select a channel larger than 100,
press [+100] first Then use [the Number buttons]
press the lower 2-digit numbers.
down
bar will be displayed
20
TV screen when adjusting the volume.
• The volume bar display will automatically
a few seconds.
-/ENT
• Press [CHANNEL
viewed channel.
to adjust the audio volume.
or
buttons]
analog channel
Adjustment
to recover the
in
[] Switching
i¸!7¸¸
i ,71_
Each Mode
Youcaneasilyswitchwith the remotecontroltothe DTV(ATSC)
andTV
In the digitalmode,the detailedbroadcasting
information for the current
(NTSC)orto accessan external devicewhentheyare connectedtothe unit.
channelsuchas programtitle, the programguides are displayed.
Press [DTV/TV]
repeatedly
to change
the analog TV or
the digital TV.
Press [INFO] repeatedly
display
to cycle through
the available
modes.
_/dSb
ii!i7
_i!ii!_!i
_
INFO
Note:
• When you switch the analog mode to the digital mode,
it may take a while until the digital channel selection is
completed. The following TV screen is displayed while
switching the mode.
[Broadcasting
Information]
• The following
information
I channel number
2 broadcast
is displayed.
iiii!
station
3 program title
4 audio language
NOWSCANNING
Press [AUDIO] repeatedly to cycle through
available audio languages.
the
("OTHER" is displayed when the audio language
Press [INPUT
SELECT] repeatedly
to cycle through
the
cannot be acquired, or the acquired languages are
other than English, Spanish or French.)
input modes.
INPUT
SELECT
i :iii!
[Program
Guide]
• The program
•To use the video or S-video
the unit, select "VIDE01 ".
• To use the video
select "VIDE02".
input jack on the rear of
information
guide added to broadcasting
is displayed.
i7 ¸
input jack on the front of the unit,
i iii!i_
guide
[] Screen
Information
Youcandisplaythe currentlyselectedchannelor otherinformationsuchas
the audiomodeontheTVscreen.
Inthe analog mode,the current channelnumberis displayed.
Press [INFO].
CH 25
Note:
• When the program guide consists of more than 6 lines, use
[VOL :/-]
to scroll
• "No description provided" is displayed when the program
guide is not provided.
• While the program guide is displayed, the dosed caption
function is interrupted.
• In external input mode, the following screen is displayed;
e.g.) When an external device is connected to S-video input
jack.
i
INFO
v_oEo_
]
•Available languages differ depending on the broadcast.
• Theinformation display will automatically disappear in a
few seconds when the closed caption is on.
• The current channel number is displayed
right corner of the TV screen.
• To clear the display, press [INFO] again.
at the top-
• Pressing [AUDIO] does not control external audio source.
[]TV
Screen
Display
Mode
[] Sleep Timer
2 typesof displaymodescan be selectedin the digitalmodewhen the
broadcastingstation is sending16:9video signal.
1
Press [MENU]
to display
the main menu.
Thesleeptimer canbeset toautomaticallyturnoffthe unit afteran
incrementalperiodoftime.
1
Press [SLEEP] to set the sleep timer.
@
2
Use [CH A/V]
[VOL _l.
to select"DTV
SETUP", then press
SLEEP
SLEEP OFF
e.g.) digital
TV mode
• Sleep timer display appears on theTV
screen.
- TVSETUP PECTURE
CHANNEL SETUP
or
V-CHFPSETUP
LANGUAGE
[ENGLISH]
CAPTEON
DTV SETUP
Press [SLEEP] repeatedly
time until shut off.
to change
the amount
of
[OFF]
SLEEP
SLEEP
Use [CH A/V]
120 MIN
to select "DTV DISPLAY", then use
[VOL _/]
to switch the desired TV aspect ratio.
• You can set the unit to turn off after a set period of
time (from 30 to 120 minutes).
- DWSETUP
-
or
DTV DISPLAY [LETTERBOX]
DTVCC
• Each press of [SLEEP] will increase the time by 30
minutes.
• After set up, the sleep timer display
for checking
by pressing
can be called up
[SLEEP].
To Cancel the Sleep Timer
or
Press [SLEEP] repeatedly
on the TV screen.
until "SLEEP OFF" is displayed
No te:
• Thesleep timer setting display will automatically disappear
in a few seconds.
• When you disconnect the unit from the AC outlet or when a
power failure occurs, the sleep timer setting will be canceled.
LETTERBOX
ZOOM
[LETTERBOX]
Display the digital-supported
program
in full-screen.
Black borders will spread in the upper and lower
screen.
[ZOOM]
Enlarge and display
supported
the center area of the digital-
program.
The right and left side of image will be cut off.
Press [MENU]
to exit.
Note:
• Youmay notswitch the display mode depending on the
program.
EN
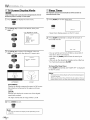
[] Channel
i ¸!7¸¸
i ,?i_
Add/Delete
Thechanneladd/deletefunctionletsyouaddthechannelthat wasnot
addedby theauto channelscandueto the receptionstatusat theinitial
setting. Youcan also deletethe unnecessarychannels.
i<b
1
Press [MENU]
2
Use [CH •
to display
the main menu.
/ Y] to select"CHANNEL
6
Note:
SETUP",
• "ADD/DELETE(DTV)"or "ADD/DELETE"menu will disappear
automatically in a few seconds.
• In the digital mode (DTV),you can add or delete channels
only for major channel
• Once you delete a DTV channel, you cannot recover the
channel without performing auto channel scan again.
(Refer to "Auto Channel Scan" on page 11.)
then press [VOL _].
e.g.) digital TV mode
- TV SETUP PICTURE
CHANNEL SETUP
V-CHIP SETUP
or
LANGUAGE
CAPTION
DW SETUP
Press [MENU] to exit.
[ENGLISH]
[OFF]
¸i77¸
ii!ii_!!_
!;b
ii 17
:il
3
Use [CH •
/V]
to select"ADD/DELETE(DTV)"
or
"ADD/DELETE", then press [VO/"].
e.g.) digital TV mode
-CHANNELSETUP_' ADD_DELETE(OW)
or
AUTO PRESETCH(DTV)
AUTO PRESETCH(TV_DTV)
AUTO PRESETCH(CATV)
! CAW takes appr0x 50rain
ii !!i,i_]i
17 ¸
ii 111!7
4
Select the channel
you want to add or delete.
(Refer to "Channel
Selection"
on page 12.)
e.g.) digital TV mode
D25
iO
! i71::
ii:_!!ii_i
ADDIDELETE: DTV
Use [VOL • / ]
to select"ADD"
or"DELETE".
or
• To add or delete another
channels,
repeat steps 4 to 5.
• Color of channel number
the TV screen indicates;
displayed
at the right top of
- Blue:The
selected channel
will be added.
- Red: The selected channel
will be deleted.
EN
[] Picture
Adjustment
[] Closed
Caption
Youcanadjustbrightness,contrast,color,tint and sharpness.
Youcanviewclosedcaptioning(co)forTVprograms,moviesandnews.
Closedcaptionrefertotext ofdialogueordescriptions
displayedon-screen
forthehearingimpaired.
1
1
Press [MENU]
to display
the main menu.
Press [MENU]
to display the main menu.
O
2
Use [CH A/Y]
to select"PICTURE",
then press [VOL _].
e.g.) digital TV mode
Use [CH A/V]
to select"CAPTION",
then use [VOL _/]
to change
- TVSETUP -
e.g.) digital
_"PICTURE
CHANNEL SETUP
or
PICTURE
CHANNEL SETUP
[ENGLISH]
[OFP]
V-CHIP SETUP
LANGUAGE
[ENGLISH]
CAPTION
DTV SETUP
or
3
Use [CH AI V] to select the picture
TV mode
- TVSETUP -
V-CHFPSETUP
LANGUAGE
CAPTION
DW SETUP
the setting.
quality type you
[OFF]
or
want to adjust.
or
[Caption Mode]
CAPTION1 (Cl)and
TEXT1 (T1);
are the primary caption and text services,
The captioning
or text is displayed in the same
Use [VOL "I
]
to adjust the quality,
language
as the program's
dialogue
(up to 4 lines of script on the TV screen, where it does
or
not obstruct
CAPTION2
Selection
BRIGHT
CONTRAST
COLOR
[VO/]
[VOL _]
relevant
parts of the picture).
(C2) and TEXT2 (T2);
are rarely available
and broadcasters
to decrease brightness
to decrease contrast
to increase brightness
to increase contrast
to decrease color
to brighten color
• There are 3 display modes according to programs:
Paint-on mode: Displays input characters on theTV
to add green
to make clear
Pop-on
TINT
to add red
SHARPNESS to make soft
screen immediately,
mode:
Once characters
memory,
once.
Press [MENU]
to exit,
Roll-up
mode:
Note:
• Thepicture odjustmentsetting
disappear in a few seconds.
display will automatically
are stored in
they are displayed
Displays the characters
by scrolling
EN
use them
only in special conditions, such as when "CAPTION I"
or "TEXTI" is not available,
all at
continuously
(max. 4 lines).
[] DTV Closed
+,?i_
Caption
In addition to the basicclosedcaptiondescribed
on page16,DTVhasits
ownclosedcaptioncalledDTVCC.
Usethismenuto changethesettings for
DTVCC,
Press
[MENU]
to exit.
1
2
Note:
• To show the dosed caption on your TVscreen, broadcast
signal must contain the dosed caption data.
Press [MENU]
Use [CH •I
then
press
to display
V]
the main menu.
to select"DTV
[VOL
SETUP",
_+
ill!ill
_].
e,g,) digital
• Not all TVprograms and cornmerdals
have the dosed
caption or all types of the dosed caption.
• Captions
• Changing
seconds.
and texts may not match
• Adjusting
or muting the volume
caption for a few seconds.
may delay
for a few
LANGUAGE
CAPTION
_" DTUSETUP
the dosed
• Abbreviations,
symbols and other grammatical
shortcuts
may be used in order to keep pace with the on-screen
action. This is not o problem with the unit.
• The caption or text characters will not be displayed while
the main menu or functions display is shown.
[ENGLISH]
[OFF]
ii!ii_!!_
Use [CH •I
V]
to select"DTVCC",
e.g.)
• lfa black boxappears
on the TVscreen, this means that
the dosed caption is set to the text mode. To dear the box,
select "C1 ", "C2" or "OFF".
then
digital
press
[VOL
_],
TV mode
- DWSETUP
-
DTVDtSPLSY [LETTERBOX]
_* DTUCC
• Iftbe unit receives poor quality television
signals, the
captions may contain errors, or there might be no captions
at oIL Some possible causes of poor quality signals are:
- Automobile
ignition noise
- Electric motor noise
- Weak signal reception
- Multiplex signal reception
+p,
PICTURE
CHANNEL SETUP
V-CHIP SETUP
the TV voice exactly.
channels may delay the dosed caption
TV mode
- TV SETUP -
(ghosts or screen flutter)
• The unit retains the closed caption
setting
if the power fails.
• When the unit receives o spedal effects playback signal (i.e.,
Search, Slow and Still) from a VCR's video output channel
(CH3 or CH4), the unit may not display the correct caption
or text.
Use [CH •
[VOI. •
Iv]
/]
to select"CAPTION
to change
SERVICE", then
use
the setting,
ii ¸
i+iii!i_
- CTVCC_*CAPTION SER/.qCE [OFF]
or
USERSETTING
CAPTIONSIZE
OFF
[OFF]
[MtDDLE]
PONTSTYLE
CHARACTEREDGE
POREOPACITY
PORECOLOR
£AGKOPACITY
[STYLEI!S]
[NONE]
[SOLID]
[WHITE]
[SOLID]
8AGKOOLOR
[BLACK1
SERVICE
SERVICE1-6
ii:_!!ili
before
changing any other item in
"CAPTION" menu. Choose
"SERVICE1/6" under
circumstances.
Press [MENU]
IO
Select if you do not want
DTVCC. This is the default.
Select one of these
CAPTION
i ;!iiiiii
normal
to exit.
@
No te:
• "CAPTION SERVICE" thatyou
on the broadcast
can switch differs depending
description.
iiii_ii:ii:
EN
[] DTVCC
Style
Youcanchangethestyleof DTVCCsuchasfont, colororsize,etc,
1
Press [MENU]
to display
the main menu.
• CAPTION
SIZE
Closed captioning
font size can be changed
as below.
• FONT STYLE
Font style of the displayed
below.
2
Use [CH •
/ V] to select'DTV
Edge type of the displayed
as below.
TV mode
CHANNEL SETUP
V-CHFPSETUP
Use [CH •
/ V] to select"DTVCC",
Text and background
opacity
can be switched as below.
FONT STYLE
CHARACTER
Use [CH • / V] to select "USER SETTING",
then use [VOL _/_]
to set to"ON".
• Items in the dotted box are available
"USER SETTING" is "ON".
EDGE
Proportional
font used in the
menu screen
STYLE2/8
Monospaced
STYLE3/8
Proportionally
serifs
STYLE4/8
Monospaced
STYLES/8
Proportionally
without
serifs
STYLE6/8
Casual font type
STYLE7/8
Cursive font type
STYLE8/8
Small capitals
only when
FORE COLOR
with
serifs
spaced with
with
serifs
spaced
NONE, RAISED, DEPRESSED, UNIFORM,
SHADOW
FORE OPACITY
caption
STYLE1/8
-
DW DISPLAY [LETTERBOX]
DWCC
of the displayed
MIDDLE, LARGE, SMALL
TV mode
- DWSETUP
or
SIZE
then press [VOL _].
e.g.) digital
caption
• FORE OPACITY, BACK OPACITY
[ENGLISH]
[OFF]
CAPTION
3
can be switched
Font and background color of the displayed
can be switched as below.
PICTURE
LANGUAGE
CAPTION
_- DTV SETUP
caption
LEFT, SHADOW
RIGHT
SOLID, TRANSLUCENT, FLASH
WHITE, BLACK, RED, GREEN, BLUE,
YELLOW, MAGENTA, CYAN, TRANSPARENT
BACK OPACITY
SOLID, TRANSLUCENT, FLASH
BACK COLOR
BLACK, RED, GREEN, BLUE, YELLOW,
MAGENTA, CYAN, TRANSPARENT, WHITE
- DTVCCCAPTION SERVECE [SERVICEIB]
FONT STYLE
[STYLEUS]
CHARACTER EDGE [NONE]
' FORE OPACITY
[SOLID]
FORE COLOR
BACK OPACITY
BACK COLOR
Use [CH•/•
to change
[WNETE]
[SOLID]
rBLACK]
for the item.
- DWCC-
EN
}
Press
;
] to select an item, then use [VOL •
the setting
as
• FORE COLOR, BACK COLOR
- TVSETUP -
or
can be switched
• CHARACTER EDGE
SETUP",
then press [VOL _].
e.g.) digital
caption
CAPTEONSERVICE
[SERVICEU6]
USER SETTENG
CAPTION SIZE
EONT STYLE
CHARACTER EDGE
EONE OPACETY
[ON]
[MIDDLE]
[STYLEU8]
[NONE]
[SOLID]
EONE COLOR
BACK OPACITY
[WHITE]
[SOLID]
BACK COLOR
FBLACK]
/]
[MENU]
to exit.
V-chiD
V-chip readsthe ratings for programs,then deniesaccessto the programs
which exceedthe rating level you set. With this function, you can block
certain programminginappropriate for children.
1
Press [MENU]
to display
the main menu.
3
Use [the Number
numbers
buttons]
to enter the 4-digit
for your password.
000
_i!ii!_!i
_
PASSWORD
2
Use [CH • / V] to select"V-CHIP
then press [VOL
SETUP",
_].
e.g.) digital
TV mode
- TVSETUP PECTURE
CHANNEL SETUP
_*V-CHIP SETUP
LANGUAGE
[ENGUSH]
CAPTEON
DTVSETUP
[OFF]
• When you have not set up your password,
• When the password
enter 0000.
is correct, the following
"V-CHIP
SETUP" menu is displayed.
See the following
description
for setting
each item.
e.g.) digital TV mode
A'""A.TV
Rating"
@ page 20
ii!ii_!,!_
!;b
B'""B. MPAA Rating"@
C'""C. Change
page 21
ii iiii:il
Password"
page 21
Note:
• "DOWNLOADABLERATING"will be available when the unit
receives a digital broadcast using the new rating system.
• When you select a rating and setit to "BLOCK",the higher
ratings will be blocked automatically. The lower ratings will
be available for viewing.
• When you set the highest rating to "VIEW;' all ratings turn
to "VIEW" automatically.
• If the "PROTECTEDPROGRAM"message appears during
your TV viewing, change to a channel that is not blocked.
Then, you can access "V-CHIPSETUP"menu and change the
setting to allow all TV viewing.
• To block any inappropriate programming, setyour limits in
both "TV RATING"and "MPAARATING".
• The V-chip setting will be retained after a power failure
(except the accesscode reverts to 0000).
! i!i:_
ii:_!!ii_i
EN
Use[CH •/V]
[To Set the Sub Ratings]
to select "TV RATING",
As for TV-Y7, TV-PG, TV-14 or TV-MA, you can further
set the sub ratings to block specific elements of
then press [VOL "].
e.g.) digital
TV mode
programming.
below.
-V- CHIP SETUP-
or
TV RATING
MPAA RATING
COWNLOADABLERATING
CHANGE PASSWORD
To set the sub ratings,
follow
the steps
1 Use [CH • / • ] to select the desired main rating,
then press [VOL _ ] twice to show its sub ratings.
or
Use [CH •
/ •]
to select the desired
then press [VOL _] repeatedly
"VIEW" and "BLOCK".
or
TV-Y
TV-Y7 (
TV-G
rating,
TV-PG (DLSV) [RLOCK]
TV-14 (DLSV) [BLOCK]
TV-MA(LSV)
[RLOCK]
to switch between
TV-Y
TV.Y7 (
TV-G
[VIEW]
) [VIEW]
[VIEW]
TV-PG(
TV-14 (
TV-MA(
) [VIEW]
) [VIEW
) [WEW]
2
Use [CH • / • ], then press [VOL _]
change the setting.
Category
TV-Y
Appropriate
for all children
TV-Y7
Appropriate
older
for all children
TV-G
General
audience
TV-PG
Parental
guidance
TV-14
Unsuitable
TV-MA
Mature
only
under 14
to
TV-PG
[BLOCK]
C
L
[BLOCK]
[BLOCK]
S
V
[BLOCK]
[BLOCK]
_
suggested
for children
audience
lower
7 and
repeatedly
e.g.) TV-PG
or
Rating
[VIEW]
) [WEW]
[VIEW]
Sub Rating
_
higher
Category
FV
FantasyViolence
V
Violence
S
Sexual Situation
L
Coarse Language
D
Suggestive
Press [MENU]
Dialogue
Rating
TV-Y7
TV-PG
TV-14
TV-MA
TV-PG, TV-14
to exit.
No te:
I
• Blocked sub ratings will appear beside the main rating
category in "TV RATING"menu.
I
• Youcannot block a sub rating (D,L, Sor V) if the main rating
is set to "VIEW'_
I
• Changing the category to "BLOCK"or "VIEW" automatically
changes all its sub ratings to the same ("BLOCK"or "VIEW").
EN
m:
_l, i_ _'°_,
'_.............
_'
'_
2_ _
MPAARatingisthe ratingsystem createdbyMPAA(Motion Picture
Associationof America).
Use [CH •
/ V] to select "MPAA RATING",
_
....
Althoughthedefault code "0000" is suppliedwith the unit, you can set
your ownpassword.
Use [CH • IV]
then press [VOL "].
_ _!iii
to select"CHANGE
.........
PASSWORD';
then press [VOL "].
e.g.) digital
TV mode
e.g.) digital
- V-CHIP SETUP-
or
- V- CHIP SETUP W RATING
or
TV RATING
MPAA RATING
DOWNLOADABLE
i if:_
TV mode
MPAA RATING
DOWNLOADABLERATING
_"CHANGE PASSWORD
RATING
CHANGE PASSWORD
ii:iill
iiiiiii
i:::i
i........
Use [CH •
change
/ V], then press [VOL "]
repeatedly
the setting.
to
Press [the Number
buttons]
enter the new 4-digit
• Enter password
G
PG
PG-13
or
password.
again in "CONFIRM
[BLOCK]
[BLOCK]
[BLOCK]
PASSWORD"
i;ii!!
NEW PASSWORD
CONFIRM
Rating
control to
space,
[VIEW]
[VIEW]
[VIEW]
_R
NOa7
X
on the remote
PASSWORD
Category
Press [MENU] to exit.
G
General audience
PG
Parental guidance
PG-13
Unsuitable
R
Restricted; under 17 requires accompanying
parent or adult guardian
NC-17
No one under 17 admitted
X
Mature audience
Press [MENU] to exit.
suggested
for children
only
under
13
No re:
• Make sure new password and confirm password must be
exactly the same. If they are different, the space is cleared
for reentering.
• Yourpassword will be erased and return to the default
(0000) when a power failure occurs. If you forget the
password, unplug the power cord for 10seconds to restore
the password to 0000.
EN
[]Troubleshooting
Guide
If the unit does not perform properly
once before calling for service.
No power
when operated
as instructed
in this owner's
manual,
check the following
Be sure the power cord is plugged in.
If a power failure occurs, unplug the power cord for 30 minutes
reset itself.
No picture
or sound
chart
to allow the unit to
• Check if the power is on,
• Check the outlet connection,
• Check the antenna or cable connection to the main unit.
• When the outside antenna is used, check the wire condition and connection,
• View other TV channels, The problem might be limited to the broadcasting
station.
• Turn off the power and wait for about 1 minute, then turn it on again,
No color
• Check the antenna or cable connection to the main unit.
• When the outside antenna is used, check the wire condition and connection,
• View other TV channels, The problem might be limited to the broadcasting
station.
• Adjust "COLOR" in "PICTURE" menu.
Sound
OK, picture
Picture
distorted
poor
• Check the antenna or cable connection to the main unit,
• When the outside antenna is used, check the wire condition and connection,
Electrical interference from nearby appliances may affect picture quality,
• Adjust "CONTRAST"and "BRIGHT" in "PICTURE" menu,
• View other TV channels, The problem might be limited to the broadcasting
station.
• When the outside antenna is used, check the wire condition and connection.
• View other TV channels, The problem might be limited to the broadcasting station.
• Check the antenna or cable connection to the main unit.
• When the outside antenna is used, check the wire condition and connection,
• Adjust "CONTRAST"and "BRIGHT" in "PICTURE" menu,
• View other TV channels, The problem might be limited to the broadcasting
station.
Weak picture
Lines or streaks
in picture
• When the outside antenna is used, check the wire condition and connection,
Electrical interference from nearby appliances may affect picture quality,
• View other TV channels, The problem might be limited to the broadcasting
station.
Picture
blurred
• When the outside antenna is used, check the wire condition and connection,
• View other TV channels, The problem might be limited to the broadcasting
station.
Ghosts
in picture
• Check the antenna or cable connection to the main unit.
• When the outside antenna is used, check the wire condition and connection,
Electrical interference from nearby appliances may affect picture quality,
• View other TV channels, The problem might be limited to the broadcasting
station.
Bars on TV screen
• When the outside antenna is used, check the wire condition and connection,
Electrical interference from nearby appliances may affect picture quality,
Picture
• When the outside antenna is used, check the wire condition and connection,
Electrical interference from nearby appliances may affect picture quality,
• View other TV channels, The problem might be limited to the broadcasting
station.
Different
screen
rolls vertically
color marks
Poor reception
channels
on TV
on some
Move the unit away from nearby electric appliances, Turn off the power and wait
30 minutes before turning it back on.
• View other TV channels, The problem might be limited to the broadcasting
station.
• Check the antenna or cable connection to the main unit.
• When the outside antenna is used, check the wire condition and connection,
Electrical interference from nearby appliances may affect picture quality,
• View other TV channels, The problem might be limited to the broadcasting station.
Picture OK, sound poor
• View other TV channels.
No reception
Make sure auto channel scan has been completed,
(Refer to "Auto Channel Scan"
on page 11.)
Auto channel scan must be completed when you set up the unit for the first time
or move it to a location where previously unavailable channels are broadcast.
• The selected channel may not be broadcasting.
• When auto channel scan is interrupted
and not completed, some channels will not
be received, Make sure to complete. (Refer to "Auto Channel Scan" on page 11 ,)
EN
of digital signals
The problem
might be limited to the broadcasting
station,
i ,i'i_
Theentered
channel
number Many
digital
channels
have
alternate
channel
numbers,
Theunitchanges
the
changes
automatically
numbers
automatically
totheones
signifying
thebroadcasting
stations,
These
are
thenumbers
used
foranalog
broadcasts,
Remote
control
does
notwork •Check
theantenna
orcable
connection
tothemain
unit,
•Check
thebatteries
oftheremote
control,
•Check
ifthereisanobstacle
between
theinfrared
sensor
window
andtheremote
control,
•Test
thesignal
output,
IfOK,thenpossible
infrared
sensor
trouble.
(Refer
to"IRSignal
Check"on
page
23.)
•Aimtheremote
control
directly
attheinfrared
sensor
window
onthefrontofthe
unit,
Reduce
thedistance
totheunit,
Re-insert
thebatteries
withtheirpolarities
(+/-signs)
asindicated.
Problems with Closed Caption Feature
Misspelled
displayed,
captions
are
• Closed captioning
production
companies may broadcast
correcting the misspelling in a live broadcast.
Captions are not entirely
displayed, or captions are
delayed behind the dialogue,
Captions are displayed as a
white box,
No caption is displayed in the
closed caption-supported
program,
iiii!
without
• Captions that are delayed a few seconds behind the actual dialogue are common for
live broadcasts. Most captioning production companies can display a dialogue to a
maximum of 220 words per minute. If a dialogue exceeds that rate, selective editing is
used to insure that the captions remain up-to-date with the current TV screen dialogue.
i_:!i
ii!ii_!!_
Interference from buildings or weather conditions may cause captioning
to be
incomplete,
Broadcasting station may shorten the program to insert advertisement,
The closed
caption decoder cannot read the information
of the shortened program,
No caption is displayed
when playing the videotape
containing
captions.
• The videotape may be illegally
read during copying.
Black box is displayed
TV screen.
• The text mode is selected for caption,
in the
programs
copied, or the caption
signal might
ii :i:il
not have been
Select "CI ", "C2" or "OFF".
Note:
• Some functions are not available in specific modes, but this is not a malfunction. Read the description in this owner's manual for more
details on correct operations.
[] Maintenance
•
o
"
",
ii
• Wipethe front panel and other exteriorsurfaces0fthe unit with a soft
cloth immersedin lukewarmwater and wrung dry.
• Neverusea solvent or alcohol. Donot spray insecticideliquid near the
unit. Suchchemicalsmay causedamageand discoloration to the exposed
surfaces.
Wipe the panel of the unit with a soft cloth. Beforecleaningthe panel,
disconnectthe power cord.
•
ii
•
•With an AM radio:
Tunethe AMradiostation to a n0n-broadcasting
frequency. Pointthe remotecontroltowards it,
pushany button and listen. If the soundfrom the
radioflutters, it isreceivingthe remotecontrol's
infrared signal.
•With a digital
Shouldyourunit becomeinoperative, do not try to correctthe problem
yourself.Thereare no userserviceablepartsinside.Turnoffthe unit,
unplug thepowercordand callourtollfree customersupport linefoundon
the coverofthismanualto locateanauthorizedservicecenter.
A degaussingcircuit inthis unit clearsupcolor errors on the TVscreen.
Colorerrors occurwhenthere isany excessmagnetismcloseto the unit.
Thiscircuitisdesignedto operateoncewhenthe unit isfirst plugged
in. If youseeminorcolor errorsonthe TV screen,unplugthe unit for
approximately30 minutes.Whenyou plugthe unitagain,the degaussing
circuitwill operateto clearerrors.Takethisstep any timetheTVscreenis
accidentallymagnetizedorwhen you movethe unit.
-
If the remotecontrol isnot working properly, you can usean AM radioor
digitalcamera(includinga cellular phonewith built-incamera)to seeif it
issendingoutan infraredsignal.
_
,_
__
camera
(including built-incell phonecameras):
Pointa digitalcameratowardsthe remotecontrol.
Pushanybuttonontheremotecontrolandlook
throughthe digitalcamera.If the infraredlight
appearsthroughthe camera,the remotecontrolis
working.
.........
EN
tTGIossary
ATSC
Dolby
Acronym that stands for Advanced Television
Systems Committee and the name of the
digital broadcasting standards.
The system developed
by Dolby
Laboratories
to compress digital sound. It
offers stereo sound (2ch) or multi-channel
audio.
Aspect Ratio
Password
Digital
(high
definition
HDTV
height. Conventional TVs are 4:3 (in other
words, theTV screen is almost square);
widescreen models are 16:9 (the TV screen
is almost twice aswide as its height).
Ultimate digital format that produces
resolution and high picture quality.
TV)
high
that stands for National
Systems Committee
current
analog
TV)
Offers higher quality images by delivering
each signal, color (c) and luminance (y)
independently of each other through
separate cables.
Television
and the name of the
broadcasting
definition
S-video
NTSC
Acronym
Channel
SDTV (standard
Standard digital format tbat is similar to tile
NTSC picture quality.
The width of a TV screen relative to its
[] Cable
A stored 4-digit number that allows access
to parental control features.
standards.
Designations
If you subscribeto cableTV,the channelsaredisplayedas1+135.Cablecompanies
often designatechannelswith letters or letter-number combinations.
Pleasecheckwith yourlocalcablecompany.
Thefollowingisa chartofcommoncablechanneldesignations.
TV D+spEay
1
2
3
4
5
6
TV D+spEay 22
23
24
25
26
27
7
8
9
10
11
12
28
29
30
31
32
33
w+l
TV DispEay
13
14
15
16
17
18
19
20
21
34
35
36
37
38
39
40
41
42
w+l
43
44
45
46
47
48
49
50
51
52
53
54
55
56
57
58
59
60
61
62
63
TV D+spEay 64
65
66
67
68
69
70
71
72
73
74
75
76
77
78
79
80
81
82
83
84
TV D+spEay 85
86
87
88
89
90
91
92
95
96
97
98
99
100
101
102
103
104
105
116
117
118
119
120
121
122
123
124
125
126
93
94
_+73,
_+7_
115
TV DispEay
106
107
108
109
110
111
112
113
114
TV DispEay
127
128
129
130
131
132
133
134
135
[] General
TV format:
Specifications
ATSC/ NTSOMTVstandard
Closed caption
system:
§15.122/FCC
(digitalCO) §15.119/FCC(anal0gCC)
Channel coverage (ATSC/NTSC):
Terrestrial
VHF: 2~13 UHF: 14~69
CATV
2~13, A~W, W+l ~W+94 (analogW+l ~W+84),
A-5~A-1, 5A
Tuning system: Channelfrequencysynthesizedtuningsystem
Channel access: Directaccesskeyboard,
Programmable
scan,and up/down
[] Electrical
Sound output:
Specification
1W,8flx2
• Designsandspecificationsare subjectto changewithout noticeand
without our legal obligation.
• If there is a discrepancybetween languages,the default languagewill
beEnglish.
EN
[] Other
Specifications
Terminals:
Antennainput: VHF/UHF/CATV
75[} unbalanced(F+type)
S-videoinput: Mini DIN4-pinjackx 1 Y: lVp-p (75[})
C:286mVp-p(75[})
Video input:
RCAjackx2
lVp-p (75_)
Audioinput:
RCAjackx 4
500mYrms
Coaxialdigital audiooutput:
RCAjackxl
500mVp-p(75_)
Headphone: % inches
(3.Smm)
Remote control: Digitalencodedinfraredlightsystem
Operating temperature:
41°F(5°C)to 104°F(40°C)
Power requirements:
120VAC+/- 10%,6OHz+/- 0.5%
Power consumption
(maximum):
79W
Picture tube:
20 inches
Dimensions:
H: 17 % inches
(435mm)
W: 19 ls/1+inches
(506mm)
D: 17 Is/l+inches
(455mm)
Weight:
44.1 Ibs.
(20.0kg)
i ,Ts
io
iS
i!}ii!{
ii!ii_!,!_
ii iii_
_il
ii :iii!
ii ¸
ii iii!i_
EN
Er/ e.FSCg/-/T
LIMITED WARRANTY
FUNAI CORP.will repair this product, free of charge in the USA in the event of defect in materials or
workmanship as follows:
DURATION:
PARTS:
LABOR:
FUNAI CORP.will provide parts to replace defective parts without charge for one (1) year
from the date of original retail purchase. Two (2) years for Picture Tube. Certain parts are
excluded from this warranty.
FUNAI CORP.will provide the labor without
date of original retail purchase.
charge for a period of ninety (90) days from the
LIMITS AND EXCLUSIONS:
THIS WARRANTY IS EXTENDED ONLYTOTHE ORIGINAL RETAIL PURCHASER. A PURCHASE RECEIPT OR
OTHER PROOF OF ORIGINAL RETAIL PURCHASE WILL BE REQUIRED TOGETHER WITH THE PRODUCTTO
OBTAIN SERVICE UNDER THIS WARRANTY.
This warranty
shall not be extended
to any other person or transferee.
This warranty is void and of no effect if any serial numbers on the product are altered, replaced, defaced,
missing or if service was attempted by an unauthorized
service center.This limited warranty does not
apply to any product not purchased and used in the United States.
This warranty only covers failures due to defects in material or workmanship which occur during
normal use. It does not cover damage which occurs in shipment, or failures which are caused by repairs,
alterations or products not supplied by FUNAI CORP.,or damage, which results from accident, misuse,
abuse, mishandling, misapplication,
alteration, faulty installation, improper maintenance, commercial use
such as hotel, rental or office use of this product, or damage which results from fire, flood, lightning or
other acts of God.
THIS WARRANTY DOES NOT COVER PACKING MATERIALS, ANY ACCESSORIES (EXCEPT REMOTE CONTROL),
ANY COSMETIC PARTS, COMPLETE ASSEMBLY PARTS, DEMO OR FLOOR MODELS.
FUNAI CORR AND ITS REPRESENTATIVESOR AGENTS SHALL IN NO EVENT BE LIABLE FOR ANY GENERAL,
INDIRECT OR CONSEQUENTIAL DAMAGES ARISING OUT OF OR OCCASIONED BYTHE USE OF OR THE
INABILITY TO USE THIS PRODUCT. THIS WARRANTY IS MADE IN LIEU OF ALL OTHER WARRANTIES, EXPRESS
OR IMPLIED, AND OF ALL OTHER LIABILITIES ON THE PART OF FUNAI, ALL OTHER WARRANTIES INCLUDING
THE WARRANTY OF MERCHANTABILITY AND FITNESS FOR A PARTICULAR PURPOSE, ARE HEREBY
DISCLAIMED BY FUNAI AND ITS REPRESENTATIVESIN THE UNITED STATES.
ALL WARRANTY INSPECTIONS AND REPAIRS MUST BE PERFORMED BY AN AUTHORIZED SERVICE CENTER.
THIS WARRANTY IS ONLY VALID WHEN THE UNIT IS CARRIED-IN TO AN AUTHORIZED SERVICE CENTER.
THE PRODUCT MUST BE ACCOMPANIED BY A COPY OF THE ORIGINAL RETAIL PURCHASE RECEIPT. IF NO
PROOF OF PURCHASE IS ATTACHED, THE WARRANTY WILL NOT BE HONORED AND REPAIRCOSTS WILL BE
CHARGED.
IMPORTANT:
THIS LIMITED WARRANTY GIVES YOU SPECIFIC LEGAL RIGHTS. YOU MAY HAVE OTHER RIGHTS THAT VARY
FROM STATETO STATE. IF,AT ANYTIME DURING THE WARRANTY PERIOD, YOU ARE UNABLE TO OBTAIN
SATISFACTION WITH THE REPAIR OF THIS PRODUCT, PLEASE CONTACT FUNAI CORP.
ATTENTION:
FUNAI CORR RESERVES THE RIGHT TO MODIFY ANY DESIGN OF THIS PRODUCT
WITHOUT PRIOR NOTICE.
WARRANTY
STATEMENT
REGARDING
NON AUTHORIZED
REPAIRS:
To obtain warranty service, you must take the product, or deliver the product freight prepaid, in either its
original packaging or packaging affording an equal degree of protection, to any AUTHORIZED SERVICE
CENTER. FUNAI CORP.will not reimburse you for any service done by unauthorized service providers
without prior written approval.
To locate your nearest AUTHORIZED SERVICE CENTER or for general
please contact us at:
FUNAI CORPORATION
Customer Service
Tel : 1-800-256-2487
service
inquiries,
http'//www.EmersonAudioVideo.com
19900
Printed
in Thailand
Van
Ness Avenue,
Torrance,
CA 90501
P7156UT
1EMN23060
_
ersom
EMERSON
Y EL LOGOTIPO
DE EMERSON
RADIO
CORR,
TM
G-CLEF
SON
PARSIPPANY,
MARCAS
REGISTRADAS
NEW JERSEY,
EE.UU.
Televisibn Digital / Anal6gica
de 20 Pulgadas
Manual del Usuario
CR202EM9
nn_
DiGiTAL
I DEBE
PARA CONECTAR
RECIBIR LA LA
SEI_IAL
ANTENA.
DIGITAL/ANALOGICA,
Q 2008 Funai Electric Co., Ltd.
ADVERTENCIA:
PARA REDUCIR EL RIESGO DE INCENDIO 0 DESCARGA
EXPONGA ESTE APARATO A LLUVlA 0 HUMEDAD.
EL¢CTRICA,
NO
CAUTION/ A
APARATO CONTIENE TENSION PELIGROSA CON
ESTE SfMBOLO INDICA QUE EL INTERIOR DEL
RIESGO DE DESCARGA ELECTRICA.
CUIDADO'PARAREDUCIRELRIESGODE DESCARGAELECTRICA,NO
RETIRE
LA CUBIERTA(NI LA PLACATRASERA),
EL INTERIORDE ESTEAPARATO
NOCONTIENEPIEZASREPARABLES
POREL USUARIO.DEJELA REPARACION
QUE ACOMPANA
ENMANOSDE PERSONALDESERVlCIOTECNICOCUALIFICADO.
FUNCIONAMIENTO
A ESTE APARATO CONTIENE
ESTE SiMBOLO INSTRUCCIONES
IMPORTANTES
IN DICA QUE LA DOCUMENTACION
DE
Y MANTENIMIENTO.
Lasnotasimp0rtantesest_n ubkadas en la parte traseradel mueble.
Importante
para su Seguridad
1. LEA LAS INSTRUCCIONES
2.
3.
4.
5.
6.
7.
8.
9.
- Deben leerse todas las instrucciones
alimentaci6n el6ctrica de su hogar, consulte con el distribuidor
de su aparato o con la empresa el_ctrica local. Para televisores
de seguridad y de funcionamiento
antes de utilizar el aparato.
CONSERVE LAS INSTRUCCIONES - Las instrucciones de seguridad
destinados a funcionar con alimentaci6n por pilas u otras fuentes,
consulte las instrucciones de funcionamiento.
y de funcionamiento
deben conservarse para futura consulta.
1 I. PUESTA A TIERRA 0 POLARIZACION - Este televisor esta
HAGA CASO DE LAS ADVERTENCIAS - Todas las advertencias que
aparezcan en el aparato yen las instrucciones de funcionamiento
equipaclo con un enchufe de linea de corriente alterna polarizada
deben ser tenidas en cuenta.
(un enchufe con un contacto plano ross ancho que el otro). Este
SIGA LAS INSTRUCCIONES - Deben seguirse todas las
enchufe encajara en la toma de corriente solarnente en un senticlo.
instrucciones de funcionamiento
y de uso.
Esto es una caracterfstica de seguridad. Si no puede insertar el
LIMPIEZA - Desenchufe el televisor de la toma de pared antes
enchufe totalmente en la toma, intente invertir la posici6n clel
de su limpieza. No utilice limpiadores liquidos ni limpiadores en
enchufe. Si el enchufe sigue sin encajar, p6ngase en contacto con
aerosol. Utilice un paho hQmedo para la limpieza.
un electricista para sustituir su toma obsoleta. No subestime la
EXCEPCION: Un producto destinado a su servicio interrumpido
finalidad de seguridad del enchufe polarizado.
12. PROTECCION DEL CABLE DE AUMENTACION
- Los cables de
y que, por alguna raz6n especifica, por ejemplo la posibilidad
de p_rdida de un c6digo de autorizaci6n para un convertidor de
alimentaci6n el_ctrica cleben extenderse de manera que resulte
CATV, no debe ser desenchufado
para su limpieza o cualquier
improbable que nadie los pise o que queden pinzados por
otro fin, puede excluir la referencia a desenchufar el aparato en la
elementos colocados encirna o contra ellos, prestando especial
descripci6n de limpieza requerida en el elemento 5.
atenci6n a enchufes de los cables, sus tomas de corriente y su
CONEXIONES- No utilice conexiones no recomendadas por el
punto de salida del aparato.
fabricante del televisor, dado que podrian provocar riesgos.
13. PUESTA A TIERRA DE ANTENA EXTERIOR - Si hay una antena
AGUA Y HUMEDAD - No utilice este televisor cerca de agua, por
exterior o un sistema de cable conectado al televisor, asegQrese
ejemplo, cerca de una bahera, un lavabo, un fregadero o una pila
de que la antena o el sistema de cable esta puesto a tierra de
de lavado de ropa, en un suelo hOmedo o cerca de una piscina o
manera que proporcione
protecci6n contra las subidas de tensi6n
lugares similares.
y las cargas de electricidad estatica acumulada. El articulo 810 del
ACCESORIOS- No coloque este televisor
AD?ER_NCIASOBREMLJEBLEIONRUED_S
National Electrical Code (C6digo El_ctrico Nacional), ANSI/NFPA
sobre un mueble con ruedas, un soporte,
nQmero 70, proporciona informaci6n con respecto a la adecuada
un tripode, un soporte vertical o una
puesta a tierra del m6stil y la estructura de soporte, puesta a tierra
mesa inestables. El televisor puede caerse,
del cable de entrada de corriente a una unidad de descarga de
provocando lesiones graves a alguien y
antena, tamaho de los conductores de puesta a tierra, ubicaci6n de
serios dahos en el propio aparato. Utilicelo
la unidad de descarga de antena, conexi6n a electrodos de puesta
solamente con un mueble con ruedas,
a tierra y requisitos para el electrodo de puesta a tierra. (Fig. A)
soporte, tripode, soporte vertical o mesa
FIGURAA
EJEMPLO DE PUESTA ATIERRA DE ANTENA
recomendados
por el fabricante o vendidos junto con el televisor.
SEGON EL CODIGO
EL_CTRICO
NACIONAL
Cualquier instalaci6n del aparato debe seguir las instrucciones del
fabricante y debe utilizar un accesorio de montaje recomendado
por el fabricante.
El con junto de aparato y mueble con ruedas debe moverse con
precauci6n.
Las paradas bruscas, la fuerza excesiva o las superficies irregulares
pueden provocar la caida del con junto de aparato y mueble con
ruedas.
VENTILAClON - El mueble y la parte trasera o inferior del aparato
EQUI_OD_
incluyen ranuras y aberturas para ventilaci6n; para garantizar un
SERVlClO
EL_CT_ICO
funcionamiento
fiable del televisor y para protegerlo de un posible
(NECSECTIONSIO21)
sobrecalentamiento,
dichas aberturas no deben bloquearse ni
taparse. Las aberturas no deben bloquearse nunca colocando el
televisor sobre una cama, un sofS, una alfombra u otra superficie
NEC NATIONAlELECTRICAL
CODE
_CODGO CT_ CONAC ONA)
PUESTA
ATIE_RADE_
similar. Este televisor no debe colocarse nunca cerca o encima de
SERVlClOELECTRICO
un racliador o una rejilla de aire caliente. Este televisor no debe
colocarse en una instalaci6n empotrada, por ejemplo una libreria o
estanteria, a menos que se facilite la ventilaci6n aclecuada o que se
hayan seguido las instrucciones del fabricante.
I O. FUENTES DE AUMENTACION
- Este televisor debe utilizarse
solamente con el tipo de fuente de alimentaci6n
indicada en la
etiqueta de fSbrica. Si no est_ seguro del tipo de suministro de
ES
$2898A
(N CA
T
A T
H)
14. RAYOS - Para protecci6n ahadida de este receptor de televisi6n
en caso de tormenta el_ctrica, o cuando permanezca desatendido
y sin utilizar durante largos periodos de tiempo, desenchOfelo de
la toma de corriente y desconecte la antena o el sistema de cable.
Esto impedira que se produzcan da6os en el televisor debido a
dahos provocados por rayos y sobretensiones de la linea el_ctrica.
15. LINEAS DE CONDUCCION
ELECTRICA - Un sistema de antena
c. Si el televisor ha estado expuesto a Iluvia o agua.
d. Si el televisor no funciona normalmente cuando se siguen
las instrucciones de funcionamiento.
Ajuste Onicamente
los controles a los que se refieran las instrucciones de
funcionamiento,
dado que el ajuste inadecuado de otros
controles puede provocar dafios y a menudo exigir_ una gran
cantidad de trabajo por parte de un t_cnico cualificado para que
el televisor pueda volver a funcionar normalmente.
e. Si el televisor se ha caido o ha suffido cualquier tipo de dafio.
f. Cuando el televisor deje de funcionar con normalidad, esto
indica que necesita una reparaci6n.
20. PIEZAS DE REPUESTO - Cuando se necesiten piezas de repuesto,
asegOrese de que el personal de servicio t_cnico utiliza piezas
de repuesto especificadas por el fabricante y de las mismas
caracteristicas que la pieza original.
Las sustituciones no autorizadas pueden provocar incendio,
descarga el_ctrica, lesiones personales u otros riesgos.
21. COMPROBACION DE SEGURIDAD - AI finalizar cualquier servicio
o reparaci6n de este televisor, pida al personal de servicio t_cnico
que realice unas comprobaciones
de seguridad de rutina para
determinar que el televisor est_ en condiciones correctas de
funcionamiento.
22. CALOR - Este televisor debe situarse lejos de fuentes de calor tales
como radiadores, rejillas de aire caliente, estufas u otros productos
(incluidos amplificadores) emisores de calon
exterior no debe colocarse en las proximidades de lineas de
conducci6n el_ctrica a_reas u otras lineas de conducci6n de
circuitos el6ctricos, o de manera que puedan caer sobre dichas
lineas o circuitos el_ctricos. Cuando se instale un sistema de antena
exterior, debe tenerse el m_ximo cuidado para no tocar dichas
lineas o circuitos el_ctricos, dado que el contacto podria resultar
mortal.
16. SOBRECARGA - No sobrecargue las tomas de pared ni los cables
alargadores, dado que esto puede suponer un riesgo de incendio o
descarga el_ctrica.
17. ENTRADA DE OBJETOS Y LiQUIDOS - No fuerce la entrada de
objetos de ning0n tipo en el interior de este televisor a trav_s de
sus aberturas, dado que pueden tocar puntos peligrosos de tensi6n
o provocar un cortocircuito, Io cual podfia dar lugar a incendio o
descarga el_ctrica.
Nunca derrame liquidos de ningOn tipo sobre el televisor.
18. REPARACION - No intente reparar usted mismo este televisor, ya
que el hecho de abrir o extraer las cubiertas puede exponerle a
tensi6n peligrosa u otros riesgos. Deje toda reparaci6n en manos de
personal de servicio t6cnico cualificado.
19. DAI_IOS QUE EXlGEN UNA REPARACION - Desenchufe este
televisor de la toma de pared y II_velo a un servicio de reparaci6n
cualificado en las situaciones siguientes:
a. Cuando el cable o el enchufe de distribuci6n
de corriente est_
dafiado o desgastado.
b. Si se ha derramado liquido
televisor.
o ban caido objetos en el interior
del
[] Precauciones
CUIDADO:
PARA EVITAR LA DESCARGA ELt_CTRICA, HAGA COINCIDIR EL CONTACTO ANCHO DEL
ENCHUFE CON LA RANURA ANCHA E INSERTE FIRMEMENTE.
ADVERTENCIA
DE LA FCC Este equipo puede generar o utilizar energia de radiofrecuencia. Los cambios o modificaciones
en este equipo pueden provocar interferencia perjudicial a menos que las modificaciones esten
expresamente aprobadas en el manual. El usuario podrfa perder la autorizaci6n para utilizar este
equipo si realiza cambios o modificaciones
INTERFERENCIA
para los que no tiene autorizaci6n.
DE RADIO-TELEVISION
Este
equipo
hasidoprobado
ydedarado
conforme
conlos,mites
deundi positivo
digital
Cla B
ed
, eacuerdo
conlaParte
lS
de las Normas
de la FCC. El objetivo
de estos
limites
es proporcionar
una protecci6n
razonable
contra
en una instalaci6n
residencial.
Este equipo genera, utiliza y puede emitir energia de radiofrecuencia
de acuerdo
con las instrucciones,
puede causar interferencias
perjudiciales
en las comunicaciones
existe
garantia
perjudicial
puede
intentar
1) Reorientar
2) Aumentar
3} Conectar
4) Solicitar
Este
de que no pueda
en la recepci6n
aparato
corregir
producirse
de radio
la interferencia
una interferencia
o television,
Io cual puede
mediante
en una instalaci6n
determinarse
concreta.
apagando
una o mas de las siguientes
interferencias
perjudiciales
y, si no se instala y se utiliza
por radio. No obstante,
no
Si este equipo
y encendiendo
provoca
el equipo,
interferencia
el usuario
medidas:
o reubicar
la antena receptora.
la separaci6n
entre el equipo y el receptor.
el equipo
la ayuda
digital
a una toma
del distribuidor
Clase
Nota para el instalador
Esta recordatorio
de corriente
en un circuito
o de un t_cnico
B es conforme
con
distinto
experirnentado
la norma
de aquel
en el que est_ conectado
el receptor.
de radio/televisi6n.
canadiense
ICES-O03.
del sistema CATV"
se facilita para Ilarnar la atenciOn de! instMador
del sistema CATV sobre el Artfculo
820-40 de la NEC, que
proporciona pautas para una apropiada puesta a tierra, yen particular especifica que la toma de tierra del cable debe estar
conectada al sistema de puesta a tierra del edificio Io mds cerca posible del punto de entmda del cable.
ES
i
i
•
UBICACION
Para un funcionamiento
seguro y un rendimiento
para su instalaci6n:
• Debe protegerlo
de la luz solar directa
y mantenerlo
• Evite lugares polvorientos
o hOmedos.
• Evite lugares con ventilaci6n
insuficiente
parte superior
e inferior
de la unidad.
satisfactorio
de la unidad,
apartado
para una disipaci6n
No coloque
la unidad
tenga en cuenta Io siguiente
de fuentes
a la hora de seleccionar
un lugar
de calor intenso.
de calor adecuada.
sobre una alfombra,
No bloquee
porque
los orificios
esto bloquear_
de ventilaci6n
los orificios
situados
en la
de ventilaci6n.
• Instale la unidad en posici6n horizontal.
• Evite lugares sometidos a intensas vibraciones.
• No coloque la unidad cerca de campos magn_ticos
intensos.
• Evite trasladar la unidad a lugares con diferencias extremas de temperatura.
• AsegQrese
PARA
de desenchufar
EVITAR
• No rnanipule
el cable de alimentaci6n
LOS RIESGOS
de CA de la toma de corriente
DE DESCARGA
el cable de alimentaci6n
ELECTRICA
antes de trasladar
la unidad.
E INCENDIO
con las manos hOmedas.
• No tire del cable de alimentaci6n
para desconectarlo
de una toma de CA. Ag_rrelo pot el enchufe.
• Si por accidente se derrama agua sobre la unidad, desenchufe el cable de alimentaci6n
inmediatamente
centro
de servicio
• No coloque
autorizado
ningOn
objeto
y Ileve la unidad
a nuestro
para su reparacibn.
directamente
encima
de la unidad.
El numero de serie de este producto puede encontrarse en la parte trasera de la unidad. Ningun otro producto tiene el
mismo nOmero de serie que el suyo. Debe anotar aqui el numero y otros datos esenciales y conservar este libro como registro
permanente
de su compra con el fin de ayudar a su identificaci6n
en caso de robo.
fecha de compra
n° de tel_fono del distfibuidor
n° de sefie
comprado en
n° de modelo
direcci6n del distfibuidor
Nota
sobre
reciclado:
Los materiales
de embalaje
acuerdo
con la normativa
Las pilas
nunca
residuos
qufmicos+
deben
tirarse
[] Accesorios
manual
de este producto
son reciclables
local sobre reciclado.
a la basura
ni incinerarse,
y pueden
ser reutilizados+
sino ser eliminadas
de acuerdo
Cualquier
material
debe
con las normativas
eliminarse
locales
del usuario
mando a distancia
(NE616UE)
+ Pilas (AA x 2) para el mando
no incluidas.
• Si necesita cambiar
tel&fono
estos accesorios,
gratuito
consulte el nOmero de pieza que aparece junto a las ilustraciones
de atenci6n
al cliente, que encontrar_
en la portada
Utilizados
festa es [a descripci6n
La descripci6n
: Funcionamiento
• Si no aparece
ES
ninguno
y Ilame a
o separadores
en este Manual
de los simbolos
se refiere
a distancia
de este manual.
• Segun su sistema de antena, puede necesitar tipos diferentes de combinadores
(mezcladores)
(divisores)+ Para obtener estos elementos, acuda a su establecimiento
de electr6nica local.
[] Simbolos
sobre
Suministrados
(1 EMN23060)
nuestro
de
utilizados
en este
manual.
a:
de TV digital
de los simbolos
Funcionamiento
bajo
el encabezamiento
de funci6n,
el funcionamiento
de TV anal6gica
es aplicable
a ambos+
[] Contenido
[] Caracteristicas
• DTV/TV/CATV
- Puede utilizar su mando a distancia para seleccionar
canales emitidos
anal6gico
en formato
convencionaL
digital y formato
Adem_s, los suscriptores
de
cable pueden acceder a sus canales de televisi6n
cable.
por
• Visualizaci6n de Informaci6n (solamente DTV
- Puede visualizar el titulo, el contenido
informaci6n del actual programa
del televisor.
• Exploraci6n
Autom_tica
y otra
DTV en la pantalla
• V-chip
- Esta funci6n
procedimientos
le permite
bloquear el acceso de los niffos
de subtitulos
texto de la programaci6n
• Funci6n de Apagado
incorporado
rnuestra el
que contiene subtitulos.
Autom_tico
- Si no hay entrada de seffal desde el terminal de
antena y no se realiza ninguna operaci6n durante
minutos,
la unidad se apagar_
• Temporizador
autom_ticamente,
de Apagado
- Esta funci6n apagar_ autom_ticamente
la unidad a
una hora especificada.
• Opciones
para Idioma de Pantalla
- Seleccione su idioma de pantalla:
Franc_s.
Ingles, Espaffol o
• Funci6n de Sonido Est_reo
• Sintonizaci6n
- Proporciona
de Frecuencia
PLL Sintonizada
una selecci6n de canales gratuita y
sencilla y le permite sintonizar directamente
con
cualquier canal mediante los botones de nOmero de
canal del mando a distancia,
• Entrada de S-video
• Entrada AV
• Salida de Audio Digital Coaxial
Conexi6nB_sica..................................................
Conexi6ndeDisp0sitivoExterno....................................
8
9
/",JUtST
de configuraci6n.
a programas inapropiados.
• Decodificador de Subtitulos
- El decodificador
2
3
4
4
5
6
6
7
7
i:
de Canales
- Esta unidad explora y memoriza autom_ticamente
los canales disponibles en su zona, eliminando
complicados
ImportanteparasuSeguridad......................................
Precauciones.....................................................
gccesorios
Suministrados..........................................
SimbolosUtilizados
enesteManual.................................
Caracteristicas
....................................................
Funci6ndeMandoa Distancia
......................................
Instalaci6nde lasPilas.............................................
Panelde Control..................................................
PanelTraser0.....................................................
15
ilii:
b! C/_L
Configuraci6nInitial .............................................
Men_Principal..................................................
Exploraci6nAutom_itica
deCanales................................
Selecci6ndeIdioma..............................................
AFV,
V
10
10
11
11
LA T L VC_.>N
12
12
13
13
14
14
:,) C/ONAL
Agregar/B0rrar(anales...........................................
Ajustede Imagen................................................
Subtitul0s......................................................
Subtitulosen DTV................................................
Estil0DTVCC
.....................................................
V-chip..........................................................
._C_LU_ ON D
15
16
16
17
18
19
OBL Mb,t:}
Gniade Solnd0nde Problemas
....................................
Mantenimiento..................................................
22
23
Glosario
.........................................................
DenominacionesdeCanalesde Cable..............................
Especificaciones
Generales........................................
Especificaci6n
El_ctrica...........................................
OtrasEspecificaciones
............................................
24
24
24
24
24
GarantiaLimitada......................................
•
j
• •
i !Z
Selecci6ndeCanal...............................................
AjustedeVolumen...............................................
ParaCambiarentre CadaModo....................................
Informaci6nde Pantalla..........................................
M0d0deVisualizaci6nde PantalladelTelevisor.....................
Temp0rizadordeApagad0........................................
k',JtJ!>;T
i
Tapatrasera
© 2008 Funai Electric Co., Ltd.
Todos los derechos reservados. No se permite la reproducci6n total o parcial de este manual, ni su copia, transmisi6n, difusi6n,
transcripci6n, descarga o almacenamiento en ning0n soporte de almacenamiento, en forma alguna o con fin alguno sin la
autorizaci6n expresa y previa pot escrito de Funai. Adem_s, toda distribuci6n comercial no autorizada de este manual o toda
revisi6n del mismo queda estrictamente prohibida.
La informaci6n contenida en este documento puede ser objeto de cambios sin previo aviso. Funai se reserva el derecho de
cambiar el contenido de este documento sin la obligaci6n de notificar dichos cambios a ninguna persona u organizaci6n.
F'UNAIcon el diseffo _ es una marca comercial registrada de Funai Electric Co., Ltd y no se puede utilizar en modo alguno sin la
autorizaciOn expresa por escrito de Funai. Todas las restantes marcas comerciales utilizadas en este documento siguen siendo
propiedad exclusiva de sus respectivos propietarios. Nada de Io contenido en este manual debe ser entendido como concesiOn,
implicita o de otro tipo, de cualquier licencia o derecho de uso de cualquiera de las marcas comerciales en el visualizadas. El uso
indebido de cualquier marca comercial o de cualquier otro contenido de este manual queda estrictamente prohibido. Funai hara
cumplir energicamente sus derechos de propiedad intelectual dentro de los limites maximos establecidos pot la ley.
ES
[] Funci6n
de Mando
a Distancia
1.
Bot6n POWER (p, I0)
7.
Presione para activar y desactivar
la unidad,
2.
modo digital (DTV) y el modo
anal6gico
8.
Bot6n -lENT
informaci6n
del programa,
Modo Anal6gico (TV)
• Presione para seleccionar el canal
• Presione para visualizar
nOmero de canal,
mayor actualmente
(DTV)
Modo
Botones CH • / •
Externa
seleccionado,
(p, 12)
canales o desplazarse
9.
I
los
arriba/
abajo por los elementos
men0 principal,
BotonesVOL_
de Entrada
el
• Presione para visua]izar el modo
de entrada externa actualmente
seleccionado,
Presione para seleccionar
del
(p. 12)
Presione para ajustar el volumen
y el mode de entrada
externo
o desplazarse a derecha (_)/
izquierda (T) por los elementos
del men0 principal,
6.
de canal y la
menor del canal mayor.
Bot6n +I00
• Presione para buscar si hay
canales menores en el canal
5.
para visualizar
el n0mero
100 o superiores, (CATV)
4.
(TV),
Bot6n INFO (p. 13)
Modo Digital (DTV)
• Presione
• Presione para separar el canal
3.
(p, 13)
Presione para cambiar entre el
Botones num_ricos (p, 12)
• Presione para seleccionar los
canales.
Bot6n DTVlTV
Bot6n AUDIO (p, 13)
Modo
Digital
(solamente
Presione para seleccionar
idioma de audio,
DTV)
el
10. Bot6n CHANNEL RECALL (p, 12)
Presione para volver al canal
anterior.
11. Bot6n MUTE (p, 12)
Presione para activar y desactivar
el sonido,
12. Bot6n SLEEP (p. 14)
Bot6n MENU (p, I0)
Presione para activar el
Presione para visualizar el men0
principal,
temporizador
de apagado,
Bot6n INPUT SELECT (p, 13)
Presione para acceder a un
dispositivo
externo conectado,
como un reproductor
DVD o
aparato de video (VCR),
[] Instalaci6n
de las Pilas
Instale las pilas (AA x 2) de manera que coincida la polaridad
a distancia.
indicada en el interior del compartimento
de las pilas del mando
Precauciones
sobre las Pilas:
•Asegdresede seguir la polaridad correcta seg_n Io indicado en et compartimento de las pilas. Unas pilas en position invertida pueden
causar daf_os en el dispositivo.
•No mezde diferentes tipos de pilas (por ejemplo, alcalinas y de carbono-zine) ni pilas viejas con pilas nuevas.
•Si el dispositivo no seva a usar duran te un periodo prolongado de tiempo, quite las pilas para evitar daf_os o lesiones por posibles fugas de
las pilas.
•No intente recargar taspilas; podrfan sobrecalentarsey romperse.
ES
[] Panel de Control
1.
Ventana
del Sensor
de Infrarrojos
Recibe los rayos infrarrojos
mando a distancia.
2.
3.
4.
transmitidos
desde el
Bot6n POWER (p. 10)
i
Presione
para activar y desactivar
Botones
CHANNEL
Presione
para seleccionar
A/•
la unidad.
(p. 12)
canales o desplazarse
arriba/abajo
pot los elementos del menO principal.
BotonesVOLUME
_/
(p. 12)
Presione
para ajustar el volumen
( _ )/izquierda
principal.
o moverse
(_) pot los elementos
a derecha
del menO
i ii_!
5.
Bot6n MENU (p. 10)
Presione para visualizar
Toma HEADPHONE
el menu principal.
6.
Conexi6n
para escucha personal.
de auriculares
7.
Tomas de entrada AUDIO (p. 9)
Conexi6n de cable de audio RCA para un dispositivo
externo.
8.
Toma de entradaVIDEO
(p. 9)
Conexidecable
n
devideoRCA
paraundispositivo
I
2
3
4
5
6
externo.
--7
8
[] Panel
Trasero
ix
1.
Toma ANT. IN (p. 8)
Conexibn de cable coaxial RF para su antena
cable/sat61ite.
2.
Toma de salida COAXIAL (audio digital
Conexi6n
o caja de
) (p. g)
de cable de audio digital coaxial para un
decodificador
o receptor de radio.
Utilice la toma de entrada de audio digital de un
dispositivo
3.
Toma de entrada
Conexi6n
externo.
4.
6.
AUDIO
(p. g)
de cable de audio RCA para un dispositivo
Toma de entradaVIDEO
Conexi6n
externo.
(p. 9)
de cable de video
Cable de Alimentaci6n
RCA para un dispositivo
de CA
Can_ctelo una toma est_ndar de CA para suministrar
alimentaci6n
el6ctrica a esta unidad.
2
3
4
5
6
i iiill
¸
iii_i_ii
S-VIDEO (p. 9)
de cable S-video para un dispositivo
Tomas de entrada
Conexi6n
externo.
5.
externo.
i!iiii_!
[] Conexi6n
B6sica
Enesta secci6nsedescribec6moc0nectarla unidada unaantena,cajade cable/sat_lite,etc.
Nota:
• Aseg_resede que su antena u otro dispositivo estd conectada correctamente antes de enchufar el cable de alimentaci6n.
[Conexi6n
de Cable de Antena]
Cuando
conecte
Conecte
el cable coaxial RF de su toma de corriente
la unidad a una antena o una empresa de televisi6n
por cable (sin caja de cable/sat_lite)
a la toma de entrada
de antena de esta unidad.
p. ej.)
parte
trasera
de la unidad
VHF/UHF _ "
empresa de
TV por cable
*Una vez completadas
las conexiones, encienda la unidad e inicie la configuraci6n
inicial.
La exploraci6n de canales es necesaria para que la unidad memorice todos los canales disponibles
(Consulte'Configuraci6n
In icial"en p,_gina 10).
en su zona.
Nota:
• Para su seguridady para evitar daf_os en el dispositivo, desenchufe el cable coaxial RFde la toma de entrada de antena antes de mover la
unidad.
• Si utiliza una antena para recibir televisi6n anal6gica, Ostadeberfa fundonar tambiOn para recepci6n de DT_ZLas antenas de exterior o de
tejado serdn mds eficacesque las de versiones de sobremesa.
• Para cambiar fddlmente su fuente de recepci6n entre antena y cable, instale un selector de antena.
• Si seconecta directamente al sistema de cable, p6ngase en contacto con elinstalador de CATV
[Conexi6n
a Caja de Cable o Caja de Sat_lite]
Conecte el cable coaxial RF de su toma de corriente a la toma de entrada de caja de cable/sat_lite.
Utilice otro cable coaxial RF para conectar
la toma de entrada de antena de la unidad a la toma de salida de la caja de cable/
sat_lite.
p. ej.)
parte
plato de
sat_lite
trasera
caja de cable/sat_lite
TV por cable
%os cables necesarios
Para me% informaci6n,
ES
y los m&todos
p6ngase
de conexi6n
en contacto
varian segOn la caja de cable/sat&lite.
con su proveedor
de cable/sat&lite.
de la unidad
©
[] Conexi6n
[Conexi6n
de Dispositivo
Externo
de Cable de S-video o de Video (Trasera)]
Conexi6n de S-video ofrece una buena calidad de imagen para dispositivos
de video conectados a la unidad.
Conexi6n de video ofrece una calidad normal de imagen para dispositivos
de video conectados a la unidad.
Haga la conexi6n segOn Io indicado en la ilustraci6n.
Cuando la toma de audio del dispositivo de video sea monoaural, conecte el cable RCA de audio a la toma de entrada
de audio L (izquierda).
cable RCA de audio
parte trasera de la unidad
p. ej.)
reproductor de DVD
con toma de salida S-video
cable S-video
m
ici_]
parte trasera de la unidad
iii_iii
i i>i¸
P" eJ'L
VCR
IoS_
iiiil;;i
i iTi
cable RCA de audio
• Para utilizar la toma de entrada
para seleccionar'AUX1
".
[Conexi6n
de S-video o de video
!C,
de la parte trasera de esta unidad,
presione
[INPUT SELECT]
_i!_iiiiiii
de Cable de Video (Delantera)]
Conexi6n de video ofrece una calidad normal de imagen
Haga la conexi6n segOn Io indicado en la ilustraci6n.
Cuando la toma de audio del dispositivo
de audio L (izquierda).
para dispositivos
de video conectados
a la unidad.
i Fi
de video sea monoaural,
conecte
el cable RCA de audio a la toma de entrada
i 7;i
parte delantera de la unidad
F
L
Rq
AUDIO
o
c_mara
devideo
OUT
OUT
VIDEO
V
iii_i_ii
E_r
i!ii>!
cable RCA de audio
• Para utilizar la toma de entrada
seleccionar "AUX2'I
de video de la parte delantera
de esta unidad,
presione
[INPUT SELECT] para
Nota:
• Si seconecta a la toma S-videoy a la toma de vfdeo al mismo tiempo, tendrd prioridad la conexi6n S-video.
[Conexi6n de Salida de Audio Digital (solamente para la emisi6n digital)]
Si conecta esta unidad a un dispositivo de audio digital externo, podr<i disfrutar
de emisiones digitales de 5+1 canales (5.1 ch).
p. ej.)
como el sonido
parte trasera de launidad
DIGITAL
decodificador
de audio muhicanal,
AUDIO
Dolby Digital
ES
[] Configuraci6n
Inicial
Estasecci6nle guiar_a tray,s delajusteinitial de la unidad,queincluyela
selectiondeun idiomaparasusmentisdepantallay"PREA.AUTOCA:',que
explora y memorizaautom_iticamenteloscanalesvisibles.
Antes de empezar:
Asegtirese
de que launidad est_iconectadoa laantena o al cable.
1
Despu&s de hacer todas las conexiones
presione
[POWER] para encender
• Esta operaci6n
2
Utilice [CH•
tardar_
IV]
de pantalla entre
pantalla
necesarias,
la unidad,
unos momentos,
o [VOL
_] para seleccionar
las opciones
el idioma
de la izquierda
Nota:
• Si se conecta directamente al sistema de cable, p6ngase en
contacto con el instalador de CATV.
• Si presiona [POWER] o [MENU] duran te "PREA.AUTOCA.",
secancetard este ajuste.
• La funddn de exploraddn autorndtica inicial de canales
puede ejecutarse, para TV/DTV o CATV,solamente una
vez. Si desea explorar ambos (TV/DTV y CATV),deberd
selecdonar "AJUSTEDE CANAL"en elmen _ principal para
explorar y memorizar otros canales una vez finalizado el
preajuste iniciaL (Consulte la pdgina 11.)
• Puede cancelar o salir del rnen_ initial "PREA.AUTO CA."
presionando [MENU].
• Cuando no pueda redbirse ning_n canal mediante
"PREA.AUTO CA.",en la pantalla del televisor aparece
"NO HAYSEfitALDE TV':
• Si no hay entrada de serial desde el terminal de antena y no
serealiza ninguna operaci6n durante mds de 5 segundos,
aparecerd "SUGERENCIAS
OTILES':Siga las instrucciones de
la pantalla del televisor.
de la
- SUGERENCIAS UTILES 1 VER!FIOUE ANTENA / CABLE /
SATELITE ESTA BIEN
CONECTADO
2 VERIFIQUE
PREA AUTO CA."
EST', BIEN AJUSTADO
3 LEA LA PAGINA FRONTAL
DEL MANUAL DEL USUARIO
0 PANEL TRASERO PARA EL
NO TEL DE AYUDA A LOS
CLIENTES
del televisor.
(ENGLISH/ESPANOL/F RAN(_AIS)
SELECTLANGUAGE
ENGLISH
NEXT:PRESSCHA
ESPA_JOL
DESPUES:PRESIONECHT
[] Mend
FRANQAJS
APRES:PRESSEZVO[
• Presione [CH •]
Enesta secci6nsedescribenlos aspectosgeneralesdel ment] principal que
apareceal presionar[MENU].
Param_sdetalles,consulte lap_ginade referenciade cadaelemento.
Elmentiprincipalsecompone
de lossiguienteselementosde ajustedefunci6n.
para Ingl_s,
• Presione [CH V] para EspaSol,
• Presione [VOL _]
Principal
para Franc_s,
Presione [MENU],
p, ej,) modo TV digital
3
Utilice [CH • I V] para seleccionar
"PREA, AUTO CA,(TV/DTV)"
- AJUSTEDELW
para canales de televisi6n
o
"PREA, AUTO CA,(CATV)" para canales de CATV, y luego
presione [VOL ],
AJUSTE DE BANAL
AJUSTE DE V-CHIP
@
IBlOMA
TITULO
AJUSTE BEL DTV
-INSTALACION
INIQALI CONEBTE
LAANTENA
0
CABLE0 SATELITE
EN
ESTAUNIOA[_
2 CONFIGURE
LOSELEMENTOS
CONLOS£OTONES
A_ty A
PREAAUTO
CA (TV;DTV)
PREAAUTO
CA (CAT_')
• Comienza autom,_ticamente
la exploraci6n
memorizaci6n
de los canales,
y la
CA 25
PREA AUTOCA(TViGTV)
I
• Cuando la exploraci6n y la memorizaci6n
han
finalizado, se muestra el canal memorizado
m,% bajo
de la emisi6n,
[ESPANOL]
[OFF]
• IMAGEN
Puede ajustar la calidad de la imagen.
(Consulte "Ajuste de Imagen" en p_gina 16.)
• AJUSTE DE CANAL
Puede explorar autom_ticamente
los canales visibles
y eliminar los no deseados,
(Consulte "Exploraci6n Automatica de Canales" en p_gina 1I.)
• AJUSTE DE V-CHIP
Puede ajustar las limitaciones de visi6n.
(Consulte "V-chip" en p_gina 19.)
• IDIOMA
Puede cambiar el idioma (Ingl&s, Espa_ol, Franc&s)
visualizado en el menO principal,
(Consulte "Selecci6n de Idioma" en p_gina 11,)
• TITULO
Puede cambiar el formato de visualizaci6n para
subtitulos, que muestran el di_logo de un programa de
televisi6n u otra informaci6n en la pantalla del televisor.
(Consulte "Subtitulos"
en p_gina 16.)
• AJUSTE DEL DTV
Puede ajustar la visualizaci6n
en el modo DTV,
(Consulte
ES
-
IMAGEN
"Subtitulos
de pantalla
y subtitulos
en DTV" en p,_gina 17,)
[] Exploraci6n
Autom_tica
Nota:
de Canales
Si seconecta directamente al sisterna de cable, p6ngase en
contacto con elinstalador de CATV
Si cambialoscables(potejemplo, entre antenay CAW)o si muevela
unidad a unazona diferentedespu_sdel ajuste initial,o si recuperael canal
DTVeliminado, tendr_ querealizar la exploracionautom_iticade canales.
Si presiona [POWER] o [MENU] durante "PREA.AUTO CA."se
cancelard este ajuste.
Cuando no pueda recibirse ningdn canal mediante la
"PREA.AUTOCA.",en la pantalla del televisor aparece
"NO HAYSEfilALDE TV'_
Antes de empezar:
Asegt_rese
de que launidad est_conectadoa laantena o al cable.
1
2
Presione [MENU]
para mostrar
Utilice [CH • /V]
y luego presione
El ajuste de canales seguardard induso aunque seproduzca
un torte de energfa.
Si tiene mends el ingl#s o en franc#s y necesita en espaSol,
presione [MENU]. Utilice [Cl-I• /V] para seleccionar
"LANGUAGE"o "LANGAGE'_
el menu principal.
para seleccionar"AJUSTE
Presione[VOL "1 para seleccionar "ESPANOL'_
Presione
[MENU] para eliminar el mend principal
Solamente con respecto al canal digital inctuso despu#s
de finalizar la exploraci6n, si desencbufa el cable de
alimentaci6n de CAantes de apagar la unidad presionando
[POWER], el ajuste de canales puede perderse.
DE CANAL",
[VOL _],
p. ej,) modo TV digital
- AJUSTEDELTV
-
IMAGEN
AJUSTE DE CANAL
AJUSTE DE V-CHIP
IDIOMA
TITULO
AJUSTE DEL DTV
[] Selecci6n
[ESPANOL]
[OFF]
Puedeelegir Ingles,Espafiolo Franc_s
comoidiomade pantalla.
1
Utilice [CH • / V] para seleccionar
presintonia
de Idioma
Presione
[MENU] para visualizar el menu
principal.
i _i¸
su tipo de
deseado, y luego presione
[VOL _].
p. ej,) modo TV digital
Utilice [CH • /V]
para seleccionar
presione
repetidamente
_i_i_ii_
"IDIOMA", y luego
- AJUSTEDECANAL-
AGREGA_BORRAR(OT_
PREAAUTOCA(DTV)
PREAAUTOCA(TV/DTV)
PREAAUTOCA_AT_
]CAW demo_ u_os50min
[VOL _]
para cambiar
el
ii/_!_
ajuste.
p. ej.) modo
TV digital
- AJUSTECELTV
i i¸¸:¸¸i:
-
IMAGEN
AJUSTE DE CANAL
AJUSTE
_ ICIOMA
• Cuando
"PREA.
"PREA.
• Cuando
"PREA.
TITULO
AJUSTE DEL DTV
tenga una antena a6rea conectada, seleccione
AUTO CA. (TV)", "PREA. AUTO CA. (DTV)" o
AUTO CA. (TV/DTV)".
est& conectado a CATV, seleccione
AUTO CA. (CATV)".
• Comienza autom_ticamente
la exploraci6n
memorizaci6n
de los canales.
If'T;
DE V-CHIP
[ESPA_IOk]
[OFF]
y la
p. ej,) modo TV digital
D25
Presione [MENU]
para salir,
PREA AUTOCA (DTV)
J|
J
J
• Cuando la exploraci6n y la memorizaci6n
han
finalizado, se muestra el canal memorizado
m_s bajo.
• Cuando haya seleccionado, "PREA. AUTO CA, (TV/DTV)",
se mostrar_ el canal anal6gico memorizado m_s
bajo cuando la exploraci6n y la memorizaci6n
hayan
finalizado.
Cuando no haya ningun
el canal digital
canal anal6gico,
memorizado
se mostrar_
m_s bajo.
ES
[] Selecci6n
de Canal
[] Ajuste
Selecci0ne10scanalesutilizand0[CH• / Y] 0 [losbotonesnumericos].
• Para seleccionar
utilice
• Para seleccionar
utilice
los canales memorizados,
[CH • /V]
o
Enesta secci6nsedescribec6moajustar elvolumen. Tambi_nsedescribe
la funci6n de silenciamiento, queactiva y desactivael sonido.
Utilice [VOL • I ]
para ajustar el volumen
de audio.
num_ricos].
los canales no memorizados,
[los botones
Para utilizar
[los botones
de Volumen
num_ricos],
[los botones
num_ricos]
VOLUMEN
IIIIII
..........
- Cuando seleccione
el canal anal6gico
20
12
• La barra de volumen se mostrar_ en la parte inferior
de la pantalla del televisor cuando ajuste el volumen.
• La barra de volumen
- Cuando seleccione
el canal digital
AsegOrese de presionar [-lENT]
el numero de canal menor.
12-1
dentro
desaparecer_
autom_ticamente
de unos segundos.
antes de introducir
Presione
[MUTE] para activar y desactivar
el sonido.
-/ENT
• Presione [CHANNEL RECALL] para volver al canal
anteriormente
visualizado.
• Cuando
presione
seleccione
[+100]
un canal superior
primero.
a 100,
A continuaci6n,
[los botones num_ricos]
inferiores de 2 d[gitos.
para presionar
los numeros
Acerca de la emisi6n de televisi6n digital:
Con su emisi6n de alta definici6n, la emisi6n digital
es muy superior a la emisi6n anal6gica en su calidad
tanto de imagen como de sonido.
_.Qu_ es el canal menor?
Mediante una tecnologia de alta compresi6n,
la
emisi6n digital ofrece un servicio que permite el env[o
simult_neo de mOltiples seffales. Por tanto, puede
seleccionar m_s de un programa por canal mayor, dado
que la tecnologia
de emisi6n digital distingue entre
multiples canales emitidos por una determinada
red.
[Nora de
NTSC(modo anal6gico) emisi6n]
18:00
ATSC (modo digital[
18:30
19:00
19:30
20:00
20:30
L.T J
canal mayor
[
_
J
canal menor
,,_ : cambia autom_ticamente
_> : cambia manualmente mediante [CN AI_]
Aunque no pueda ver el programa deTV de alta
definici6n (HDTV), la unidad convierte la seffal HDTV
en seffal deTV de definici6n est_ndar.
No ta:
•Aparecerd "SINSENAL"en la pantalla del televisor una vez
terrninada la ernisi6n del canal menor.
ES
MUDO
IIIIII
utilice
• "MUDO"aparece
Presione
en la pantalla
nuevamente
[MUTE]
para recuperar el volumen
20
..........
del televisor.
o utilice [VOL
original.
_I
]
VZ
[] Para
Cambiar
entre
Cada
Modo
Puedecambiarf_icilmente
entre DTV(ATSC)
yTV (NTSC)
o accedera un
dispositivoexternoconel mandoa distanciacuandoest_nconectados
a la
unidad.
Presione [DTV/TV]
anal6gica
repetidamente
para cambiar
el TV
oTV digital.
i !U!
Enel m0d0digital, se muestrala inf0rmaci6n detalladade emisi0n del
canalactual, p0r ejempl0 eltitul0 depr0grama y lasguias de pr0gramas.
Presione
[INFO] repetidamente
modos de visualizaci6n
_/_
para recorrer
los
disponibles.
Ico
INFO
,siON
INFOI
Nora:
• Cuando cambie del modo anal6gico al digital, puede
tardar un poco en finalizar Ia selecddn de canales digitales.
Durante et cambio de modo se muestra el siguiente pantalla
en el televisor.
[Informaci6n
de Emisi6n]
• Se muestra [a siguiente
1 n0mero de canal
informaci6n.
2 emisora
3 titulo de programa
4 idioma de audio
ESOANEANDO
Presione [AUDIO] repetidamente
para recorrer los
idiomas de audio disponibles.
(se muestra"OTRO"cuando
no puede obtenerse el
idioma de audio o si los idiomas obtenidos no son
Presione [INPUT SELECT] repetidamente
los modos de entrada.
para cambiar
Ingl_s, Espafiol o Franc@s.)
ICO
INPUT
SELECT
[Guia de Programas]
• Se muestra
informaci6n
• Para utilizar la toma de entrada
en la parte
posterior
a
seleccione'AUX1".
Guia de
programas-
ii I,_L,
de Pantalla
Puedevisualizar el canalactualmenteseleccionadou otra informaci6n,por
ejemplo el modode audio, en la pantalladeltelevisor.
Enel modoanal6gico,sevisualizael numerode canalactual.
Presione [INFO].
CA 25
Nota:
• Cuando Ia guia deprogramas tenga mds de 6 lineas, utilice
[VOL "/-;]
para desplazarse.
• SevisuaIiza "No seproporciona descripddn." cuando no se
facilita Ia guia de programas.
• Mientras sevisuaIiza Ia gu[a de programas se interrumpe la
funci6n de subdtulos ocultos.
• En el modo de entrada externa, semuestra la siguiente
pantaIIa.
p. ej.) Cuando se ha conectado un dispositivo extemo a Ia
toma de entrada S-video.
AUX I
INFO
• Se muestra el nOmero del canal actual en la esquina
superior
afiadida
de video o de S-video,
de la unidad,
• Para utilizar la toma de entrada de video en la parte
delantera de la unidad, seleccione'AUX2".
[] Informaci6n
la guia de programas
de emisi6n.
derecha
• Para borrar
de la pantalla
la pantalla,
presione
del televisor.
[INFO] nuevamente.
• Los idiomas disponibles difieren segdn Ia emisi6n.
• La pantalla de informaci6n desaparecerd automddcamente
dentro de unos segundos cuando los subt[tulos estdn
acdvados.
• AI presionar [AUDIO] no se controla la fuente de audio
extema.
ES
L
[] Modo de Visualizacibn
Pantalla del Televisor
de
[] Temporizador
de Apagado
Eltemp0rizadorde apagadopuedeconfigurarseparaapagar
autom_ticamentela unidaddespu_sde unperiodoincrementaldetiempo.
Enel mododigital puedenseleccionarse2tiposde modosdevisualizaci6n,
cuando laemisoraenvie una serial16:9.
1
Presione [MENU]
para mostrar
el menu principal.
1
Presione
[SLEEP] para ajustar el temporizador
de
apagado.
2
Utilice [CH •
y presione
Iv]
para seleccionar'AJUSTE
DEL DTV'_
SLEEP
[VOL _].
p. ej.) modo
REPOSAR OFF
TV digital
- AJUSTEDELTV
-
• La visualizaci6n
IMAGEN
AJUSTE DE CANAL
AJUSTE DE V-CHIP
D]OMA
TITULO
AJUSTE DEL [}TV
Utilice [CH • /V]
[OFF]
Presione
para seleccionar"PANTALLA
y luego use [VOL • / ]
aspecto
para activar
de apagado
del televisor.
[ESPANOL]
tiempo
3
del temporizador
aparece en la pantalla
la relaci6n
[SLEEP] repetidamente
que debe transcurrir
para cambiar
el
hasta el apagado.
DTV",
de
SLEEP
de TV deseada.
REPOSAR 120 MIN
- AJUSTEDELDW
PANTALLADTV
DWCC
• Puede preparar su unidad para que se apague
despues de transcurrir un periodo de tiempo (de 30 a
120 minutos).
-
[ANCHO BUZON]
•Cada presi6n
minutos.
de [SLEEP] aumentar_
el tiempo
en 30
• Despu_s del ajuste, puede visualizarse el
temporizador
de apagado, para su comprobaci6n,
presionando
Para Cancelar
[SLEEP].
el Temporizador
Presione [SLEEP] repetidamente
"REPOSAR OFF"en
ANCHO BUZON
[ANCHO BUZON]
Visualiza el programa
completa.
digital
en pantalla
Aparecen unas franjas negras en la parte superior
inferior de la pantalla.
[ZOOM]
e
Amplia y muestra la zona central del programa de
soporte digital.
Se recortan los lados izquierdo y derecho de la imagen.
Presione [MENU]
para salir.
Nota:
•Seg_n el programa, esposible que el modo de visualizaci6n
no cambie.
ES
hasta que aparezca
del televisor.
Nota:
• La visualizaci6n de ajuste del temporizador de apagado
desaparecerd automdticamente dentro de unos segundos.
• Cuando desconecte la unidad de la toma de CAo cuando
seproduzca un fallo de suministro el#ctrico, el ajuste det
ZOOM
de soporte
la pantalla
de Apagado
temporizador de apagado quedard anulado.
[] Agregar/Borrar
Canales
ii !iiii_!
Lafuncionde agregar/borrar canalesle permiteagregar elcanal queno
sehayaagregarmediantela exploration autom_iticade canalesdebido
al estado dela recepci6nen el ajusteiniciaI.Tambi_npuedeeliminar los
canalesinnecesarios.
1
Presione [MENU]
2
Utilice [CH • / V] para seleccionar"AJUSTE
y presione
para visualizar
el menu principal.
DE CANAL'_
[VOL _].
[MENU]
para salir.
Not_1:
• El menQ "AGREGAR/BORRAR (DTV)" o
"AGREGAR/BORRAR" desaparecerd
dentro de unos segundos.
p. ej.) modo TV digital
• En el modo digital (DTV), podrd
solamente en el canal mayor
- AJUSTE DELTV IMAGEN
_"AJUSTE DE CANAL
AJUSTE DE V-CHFP
IDIOMA
TITULO
AJUSTE DEL DTV
Presione
automdticamente
agregar
o borrar canales
• Una vez borrado on canal DTV, no podrd recuperar el canal
sin realizor nuevomente la exploraci6n outomdtica
de
canales. (Consulte "Exploraci6n Automdtica
de Canales" en
pdgina 11.)
[ESPANOL]
[OFF]
iii_iili
Utilice [CH•
IV]
para seleccionar
i _i¸
"AGREGAR/BORRAR (DTV)", o "AGREGAR/BORRAR", y
luego presione [VOI. _].
p. ej.) modo TV digital
-AJUSTEDECANALAGREGAR_BORRAR(OW)
PREAAUTOCA(DT_
PREAAUTOCA(TV_OTV)
PREAAUTOOA(CAT_
!CATVdemo_ unosSOmin
Seleccione el canal que desea agregar o borrar.
(Consulte "Selecci6n de Canal" en p_gina 12.)
p. ej.) modo TV digital
D25
AGREGAR_BORRAR: OTV
Utilice [VOL • / ]
"BORRAR".
• Para agregar
4-5.
para seleccionar"AGREGAR"o
o borrar otros canales, repita los pasos
• El color del numero
superior
derecha
de canal visualizado
de la pantalla
en la parte
del televisor
indica;
- Azul: Se agregar,_ el canal seleccionado.
- Rojo: Se borrar_ el canal seleccionado.
ES
[]Ajuste
[] Subtitulos
de Imacjen
Puedeajustar el brillo, el contraste,el color,el matiz y la nitidez.
Puedever lossubtitulos(co)paraprogramasde television,pelkulase
informativos.
Subtituloserefiereal texto dedi_logoo descripciones
visualizadasen
pantallaparapersonasconproblemasauditivos.
1
Presione [MENU]
1
2
Utilice [CH • / V] para seleccionar"lMAGEN",
presione
para visualizar
el menu principal.
y
Presione
[MENU]
para visualizar el menu
Utilice [CH • I V] para seleccionar
y luego utilice
[VOL _].
[VOL •
I ]
p. ej.) modo TV digital
- AJUSTEDELW
imagen
- AJUSTEDELTV
[ESPANOL]
TETULO
AJUSTE DEL DTV
[OFF]
el tipo de calidad
AJUSTE DE V-CHIP
D[OMA
[OFF]
de
para ajustar la calidad.
de Subtitulos]
SUBTIT1 (C1) yTEXTO1 (T1)_
son los servicios primarios de subtitulos y texto.
Los subtitulos o el texto se muestran en el mismo
idiorna que el di_logo
o
escritura
Selecci6n
[VOL ]
Para reducir el brillo
CONTRASTE Para reducir el contraste
Para reducir el color
Para agregar rojo
Para suavizar
[VOL _]
Para aumentar el brillo
Paraaumentar el contraste
Para intensificar el color
Para agregar verde
Para aclarar
SUBTIT2
del programa
sobre la pantalla
relevantes
MATIZ
AGUDEZA
[ESPANOL]
_- T[TULO
AJUSTE DEL OTV
que desea ajustar.
Utilice [VOL • I ]
COLOR
(hasta 4 lineas de
del televisor,
Presione [MENU]
para salir.
Nota:
• La visualizacidn de ajuste de imagen desaparecerd
automdticamente dentro de unos segundos.
sin tapar zonas
de la imagen).
(C2) y TEXTO2 (T2)_
est_n rararnente disponibles y las ernisoras los utilizan
solamente en condiciones
especiales, por ejemplo
cuando
"SUBTITI" o "TEXTOI" no est_n disponibles.
• Hay 3 rnodos de visualizaci6n seg0n los prograrnas:
Modo"Paint-on":
Visualiza inrnediatamente
en la
pantalla del televisor
introducidos.
ES
-
IMAGEN
AJUSTE DE CANAL
[Modo
CLARIDAD
el ajuste.
p. ej.) rnodo TV digital
-
IDIOMA
Utilice [CH • I V] para seleccionar
"TITU LO",
para cambiar
[NIAGEN
AJUSTE DE CANAL
AJUSTE DE V-CHIP
3
principal.
los caracteres
Modo"Pop-on":
Una vez que los caracteres
almacenados en memoria,
muestran todos a la vez.
Modo"Roll-up":
Muestra los caracteres
continuadamente
mediante
desplazamiento
4 lineas).
son
se
de lineas (m_ximo
[] Subtitulos
en DTV
Adem_sde los subtitulos b_isicosdescritosen la p_gina 16, DTVtiene sus
propios subtitulos denominadosDTVCC.
Utilice este menupara cambiar la
configuraci6nde DTVCC.
3
Presione [MENU]
Presione [MENU] para salir,
2
Nota:
• Para mostrar los subtftulos
en la pantalla de su televisor, la
serial de eraisidn debe contener
los datos de los subt[tulos.
• No todos los prograraas y an uncios
subt[tulos o todo tipo de subtftulos.
• Los subt[tulos y textos
la voz del televisor.
• El carabio
segundos.
pueden
[CH •
Iv]
para
presione
[VOL
el men0 principal,
seleccionar"AJUSTE
p, ej,) modo
TV digital
- AJUSTEDELW
no coincidir
exactaraen
te con
el voluraen
puede
retrasar
unos
DIOMA
[ESPANOL]
raientms se rauestren
fundones.
de texto
[OFF]
los subtftulos
• Pueden utilizarse abreviaciones,
s[rabolos y otras
abreviatums
graraaticales
para sincronizar
el texto con
la acci6n en pantalla.
Esto no supone
on probleraa
de la
unidad.
o caracteres
-
IMAGEN
AJUSTE DE CANAL
AJUSTE DE V-CHIP
TITULO
l* AJUSTE DELDTV
• Ajustar o silenciar
unos segundos.
DEL DTV",
_].
de TV contienen
de canales puede retrasar los subt(tulos
• Los subtftulos
Utilice
y luego
para visualizar
iii_iili
Utilice
[CH •
presione
Iv]
[VOL
para
seleccionar"DTVCC",
y luego
i >i¸
_].
no se visualizardn
el raen(l principal
o la visualizaci6n
p. ej.) modo TV digital
de
-
• Si aparece un recuadro negro en la pantalla det televisor,
esto significa que los subt[tulos cerrados estdn eonfigurados
en el modo texto. Para borrar ese recuadro, selecdone "C l'j
"C2" u "OFF".
AJUSTEOELOTV
PANTALLA DW
DTVCC
-
[ANCHO BUZON]
• Si la unidad redbe seriales de televisidn de calidad
deficiente, los subt[tulos podrdn contener errores, o es
posible que no aparezcan
los subtftulos.
Algunas posibles
causas de seriales de calidad defidente son:
- Ruido de ignici6n de autom6viles
- Ruido de motor el)ctrico
- Recepddn
de serial d_bil
- Recepddn de serial multiplex
fluctuaciones
en pantalla)
Utilice [CH • IV]
utilice [VOL,
(iradgenes
fantasmas
• La unidad conserva la configuraci6n
de subtftulos
produce un corte de surainistro
el_ctfico.
I]
para seleccionar"SERVlClOTITULO", y luego
repetidamente para cambiar el ajuste.
o
- DTVCC -
sise
,_-SERVICIOTffULO
CONFIG USUARD
ii Z_,
[OFF]
[OFF]
TAMANOTITULO
[MEDIANO]
ESTILO FUENTE
[ESTILOI]8]
BORDE GARAOTER [NINGUNO]
• Cuando la unidad recibe una serial de reproducd6n
con
efectos especiales
(es dedr, bdsqueda,
cdraara lenta e
iraagen congetada) del canal de salida de vfdeo det VCR
(CA3 o CA4), la unidad podr[a dejar de rnostrar el t[tulo o
texto correcto.
OPACO ADELANTE [RELLENA]
COLOR ADELANTE [BLANCO]
OPACO ATRAS
[RELLENA]
COLOR FONDO
Selecci6nelo
OFF
SERVICIO
[NEGRO]
si no desea
DTVCC. Este es el ajuste
_redeterminado.
Seleccione uno de ellos antes
TITULO
SIRVEI~6
de cambiar cualquier otro
elemento del menO "TITULO'(
Seleccione "SIRVE1/6" en
circunstancias normales.
Presione
[MENU]
para salir.
@
Nota:
• "SERVICIO TITULO" se puede cambiar
descripci6n de la emisi6n.
dependiendo
de la
ES
[] Estilo DTVCC
Puedecambiar elestilo de DTVCC,por ejempl0fuente, color 0 tamaffo,etc.
1
Presione [MENU]
para visualizar
el menu principal
• TAMAFIO
TITULO
El tamaffo
elegirse
de fuente
de los subtitulos
cerrados
puede
entre los siguientes.
• ESTILO FUENTE
2
Utilice [CH •
IV]
para seleccionar"AJUSTE
DEL DTV'_
y luego presione [VOL "].
p. ej.) modo TV digital
- AJUSTEDELTV
El estilo de fuente del subtitulo
elegirse entre los siguientes.
puede
• BORDE CARACTER
El tipo de borde del subtitulo
-
elegirse
IMAGEN
AJUSTE DE CANAL
AJUSTE DE V-CHIP
[ESPANOL]
[OFF]
mostrado
puede
entre los siguientes.
• COLOR ADELANTE,
DDMA
TITULO
AJUSTE DEL DTV
mostrado
El color de fuente
puede elegirse
COLOR FONDO
y de fondo
del subtitulo
mostrado
entre los siguientes.
• OPACO ADELANTE,
OPACO
ATRAS
La opacidad del texto y del fondo del subtitulo
mostrado puede elegirse entre las siguientes.
3
Utilice [CH • /V]
presione
para seleccionar"DTVCC"y
luego
TAMAI_IO TITULO
[VOL _].
p. ej.) modo
TV digital
- AJUSTEDELDTV
PANTALLADTV
DTVCC
-
y luego utilice
para seleccionar
[VOL • / ]
disponibles solamente
est_ en "ON".
"CONFIG. USUARID",
repetidamente
ajustarlo en "ON".
• Los elementos del recuadro
para
BORDE CARACTER
de puntos est,_n
cuando"CONFIG.
USUARID"
OPACO ADELANTE [RELLENA]
COLOR ADELANTE [BLANCO]
OPACO ATRAS
[RELLENA]
ESTILO3/8
Espacio proporcional
remates
ESTILO4/8
A un espacio
ESTILOS/8
Espacio proporcional
remates
ESTILO6/8
Tipo de fuente
informal
ESTILOT/8
Tipo de fuente
cursiva
ESTILO8/8
Min0sculas
con remates
utilice [VOL •
del elemento.
para cambiar el ajuste
- DWCCSERVCIO TffULO
CONRG USUARD
_. TAMA_IOTITULO
[SIRVEI_]
[ON]
[MEDIANO]
ESTILO FUENTE
BORCE CARACTER
OPACO ADELANTE
COLOR ADELANTE
OPACO ATR#,S
[ESTIL01/8]
[NINGUNO]
[R£LLENA]
[BLANCO]
[R£LLENA]
COLOR FONDO
rNEGRO]
NINGUNO,
con
con remates
sin
ELEVADO, HUNDIDO,
COLOR ADELANTE
BLANCO, NEGRO, ROJO, VERDE,
AZUL, AMARILLO, MAGENTA, CYAN,
TRANSPARENTE
OPACO ATRAS
RELLENA, TRANSLUCIDA,
COLOR FONDO
NEGRO, ROJO, VERDE, AZUL, AMARILLO,
MAGENTA, CYAN, TRANSPARENTE,
BLANCO
Presione
un elemento
ES
A un espacio
RELLENA, TRANSLUCIDA,
___NEGRO[_ _.
Utilice [CH • / V] para seleccionar
repetidamente
ESTILO2/8
OPACO ADELANTE
[SIRVEI/6]
ESTILO FUENTE
[ESTIL01/8]
BORCE CARACTER [NINGUNO]
/]
Fuente proporcional
utilizada
en la pantalla de men0
UNIFORME, SOMBRA IZQ., SOMBRA DER.
- OWCC SERVCIOTffULO
¢OLPR_ONh_
ESTILO1/8
[ANCHO BUZON]
ESTILO FUENTE
Utilice [CH • /V]
MEDIANO, GRANDE, PEQUEi_O
y luego
[MENU] para salir.
DESTELLO
DESTELLO
©
F V-chil
ii!iiii_!
V-chip lee las dases de los programas, y niega el acceso a los programas
que exceden el nivel de clasificaci6n establecido. Con esta funci6n, puede
bloquear determinados programas inapropiados para nifios.
1
Presione [MENU]
para visualizar
el menu principal.
3
Utilice
[los botones
num_ricos]
para introducir
numeros
de 4 digitos
de su contrasefia.
los
000
06DIGO
2
Utilice [CH • /V] para seleccionar
"AJUSTE DE V-CHIP", y luego presione
[VOL
_ ].
p. ej.) modo TV digital
- AJUSTECELW
-
IMAGEN
AJUSTE DE CANAL
AJUSTE DE V-CHIP
DIOMA
TITULO
AJUSTE DEL DTV
DE AOOE80
[ESPANOL]
[OFF]
• Cuando no haya configurado
su contrasefia,
introduzca 0000.
• Cuando la contrasefia sea correcta, se muestra el
siguiente menO de'AJUSTE DE V-CHIP't
Consulte la siguiente
elemento,
A """A.
Clase de TV"
B "-"B.
Clase de MPAA"
p_gina
=> p_gina
C """C.
Cambiar
para ajustar cada
p. ej.) modo
TV digital
20
- AJUSTE DE V-CHIP -
21
Contrasefia"
=> p_gina
descripci6n
i?
CLASE DE TV
CLASE DE MPAA
CLASE DESCARGACA
CAMBIAR CODIGO
A
i_
i (,i¸
B
I
C
21
Nora:
• "CLASE DESCARGADA" estar6 disponible cuando la unidad
reciba una emisiOn digital utilizando el nuevo sistema de
dasificaciOn.
• Cuando seleccione una clasificad6n y ta ajuste en "BLOQ."
las clasificaciones mds altas quedardn bloqueadas
automdticamente.
Las dasificaciones
mds bajas estardn
disponibles para su vision.
• Cuando setecdone la ctasificaciOn mds alta en "MIRAR',
todas las clases cambian automdticamente
a "MIRAR'_
• Si aparece el rnensaje "PROGRAMA PROHIBIDO" mientras estd
vienda la televisidn, cambie a an canal que no est6 bloqueado.
Entonces podrd acceder at men(; "AJUSTEDE V-CHIP" y carnbiar
et ajuste para poder ver todos los canates de tetevisi6n.
• Para bloquear eualquier programa inapropiado, estabtezca
sus tfmites tan to en "CLASE DE TV" coma en "CLASE DE MPAA'_
• El ajuste V-chip se mantendrd despu_s de praducirse un carte en el
suministro el_ctrica (pero el c6diga de acceso vuelve a 0000).
ES
Utilice
[CH•
/V] para seleccionar
y luego presione [VOL _].
"CLASE DE TV",
p. ej.) modo
[Para Ajustar las Subcategorias]
En Io referente a TV-Y7, TV-PG, TV-14 6 TV-MA, puede
seguir ajustando
TV digital
elementos
- AJUSTE DEV-CHIP-
las subcategorias,
CLASE DETV
CLASE DE MPAA
CLASE DESCARGAOA
OAMBIAR CODIGO
Utilice [CH • /V]
para seleccionar
deseada
y luego presione
cambiar
entre "MIRAR" y"BLOQ.".
{MIRAR]
) [MIRAR]
IMIRAR]
TV-PG{
TV-14 (
TV-MA(
) [MIRAR]
) [MIRAR]
) [MIRAR]
W-Y
[MIRAR]
TV-Y7 (
) [MIRAR]
TV-G
[MIRAR]
TV-PG (DLSV)[BLCO ]
TV-14 (DLSV) [BLCO]
TV-MA(LSV) [BLO0]
para
Utilice [CH• Iv] y luego presione [VOL
repetidamente
para cambiar el ajuste,
Apto
para todos
los niffos
TV-Y7
Apto para todos
los 7 atios
los niffos
TV-G
Todos los pOblicos
TV-PG
Se sugiere orientaci6n
rv-14
No apto nifros menores de 14 afros
Exclusivamente
adulto
para
TV-PG
[BLOQ]
O
L
S
V
[BLOQ]
[BLOQ]
[BLOQ]
[BLOQ]
inferior
desde
_
Subclasificaci6n
TV-MA
_]
p. ej.) TV-PG
Categoria
TV-Y
Para ajustar
siga los pasos indicados.
1 Utilice [CH • /V] para seleccionar la clasificaci6n
principal deseada y luego presione [VOL "] dos
veces para mostrar sus subcategorias,
repetidamente
TV-Y
TV.Y7 (
TV-G
para bloquear
de la programaci6n.
la clasificaci6n
[VO/"]
Clasificaci6n
las subcategorias
especificos
de los padres
pOblico
_ P
superior
Categoria
Clasificaci6n
FV
Fantasia Violencia
TV-Y7
V
Violencia
TV-PG
S
Situaci6n
sexual
TV-14
L
Lenguaje
grosero
TWMA
D
Di_logo sugerente
Presione
TV-PG,TV-14
[MENU] para salir.
Nota:
• Las subcategorfas bloqueadas aparecerdnjunto a la
categorfa de dasificaddn principal en el men_t
"CLASEDE TV".
• No podrd bloquear una subcategorfa (D,L, S o V) si la dase
principal estd ajustada en "MIRAR'_
• AI cambiar la categoria a "BLOQ"o "MIRAR',cambia
automdticamente
todas sus subcategorias a to mismo
('BLOQ."o "MIRAR").
ES
_i _. _.....%,_¸__'_
Clase
deMPAA
eselsistema
declasificaci6n
creado
porla MPAA(Motion
PictureAssociationof America).
Utilice [CI-I • IV]
y luego presione
pare seleccionar"CLASE
DE MPAA"
[VOL "].
i!iiii_!
Aunqueelc6digopredeterminado"OOOO"vieneincorporado
con la unidad,
usted puedeajustar supropiacontrase_a.
Utilice [CH •
y luego
Iv]
presione
para seleccionar"CAMBIAR
p. ej.) modo TV digital
p. ej.) modo TV digital
- AJUSTE DE V-CHIP -
repetidamente
para cambiar
- AJUSTE DE V-CHIP -
CLASEDETV
CLASEDE TV
CLASE DE MPAA
CLASEDESCARGADA
CAM£1ARCODIGO
CLASEDE MPAA
CLASEOESCARGAOA
CAMBIARCODIGO
Utilice [CH • / V], y luego presione
[VOI. _]
el ajuste.
CODIGO"
[VOL " ].
Presione
[los botones
distancia
para introducir
num_ricos]
del mando a
la nueva contraseSa
de 4
ii_i_ii!!ii
digitos.
G
PG
PG-13
_-R
NOq7
X
Clasificaci6n
• Vuelva a introducir la contraseEa
"CODIGO CONFIRMADO't
[MRAR]
[MiRAR]
[MRAR]
[BLOO]
[BLOO]
[BLOQ]
iI i_;_!
ii i;_i
en el espacio
_i!_i_i_,
i
C6DIGO
NUEVO
C6DIGO
CONFIRMADO
Categoria
G
Todos los pOblicos
PG
Se sugiere
PG-13
No apto para ni_ios menores
R
que estar acompa_iados
o un tutor adulto
NC-17
No apto para menores
X
Exclusivamente
orientaci6n
de los padres
Presione
[MENU]
para salir.
ilii!ii!_i:
Restringido;
Presione [MENU]
para salir.
menores
de 13 a_os
de 17 a_os tienen
pot un progenitor
de 17 a_os
para pOblico adulto
Note:
• Aseg(_resede que la nueva contraseha y la con traseffa de
confirmaciOn son exactamente iguales. Si son diferentes, el
espacio queda en blanco pare volver a introducirla.
• Su contraseha seborrard y volverd a la predeterminada
(0000) cuando seproduzca un fallo en la alimentaci6n. Si
olvida la contrasef_a, desenchufe elcable de afimentaddn
durante 10segundos pare restaurar la contraseha en 0000.
ES
ii _iiiill
Guia
de Solucibn
Si la unidad no funciona
siguiente
de Problemas
correctamente
tabla antes de llamar al servicio
No hay corriente
cuando
se siguen
las instrucciones
de este manual
del usuario, compruebe
t6cnico.
• AsegOrese de que el cable de alimentaci6n est,1 enchufado.
• Si se produce un corte de alimentaci6n, desenchufe el cable de alimentaci6n
minutos para permitir que la unidad se reinicie.
durante 30
No hay imagen ni sonido
• Compruebe si la unidad esta encendido.
• Compruebe la conexi6n el6ctrica.
• Compruebe la conexi6n de antena o de cable con la unidad principal.
• Cuando se utilice la antena exterior, compruebe el estado del cable y de la conexi6n.
•Vea otros canales de televisi6n. El problema podria limitarse a una emisora.
• Apague la unidad y espere aproximadamente
I minuto para volver a encenderlo.
No hay color
• Compruebe la conexi6n de antena o de cable con la unidad principal.
• Cuando se utilice la antena exterior, compruebe el estado del cable y de la conexi6n.
•Vea otros canales de televisi6n. El problema podria limitarse a una emisora.
• Ajuste "COLOR" en el menO "IMAGEN".
Sonido correcto, imagen
deficiente
• Compruebe la conexi6n de antena o de cable con la unidad principal.
• Cuando se utilice la antena exterior, compruebe el estado del cable y de la conexi6n.
• La interferencia el_ctrica de aparatos cercanos puede afectar a la calidad de la imagen.
• Ajuste "CONTRASTE"y'CLARIDAD"en el menu "IMAGEN".
•Vea otros canales de televisi6n. El problema podria limitarse a una emisora.
Imagen distorsionada
• Cuando se utilice la antena exterior, compruebe el estado del cable y de la conexi6n.
•Vea otros canales de televisi6n. El problema podria limitarse a una emisora.
Imagen d_bil
• Compruebe la conexi6n de antena o de cable con la unidad principal.
• Cuando se utilice la antena exterior, compruebe el estado del cable y de la conexi6n.
• Ajuste"CONTRASTE"y"CLARIDAD"en
el menO "IMAGEN".
•Vea otros canales de televisi6n. El problema podria limitarse a una emisora.
Lineas o rayas en la imagen
• Cuando se utilice la antena exterior, compruebe el estado del cable y de la conexi6n.
• La interferencia el_ctrica de aparatos cercanos puede afectar a la calidad de la imagen.
•Vea otros canales de televisi6n. El problema podria limitarse a una emisora.
Imagen borrosa
• Cuando se utilice la antena exterior, compruebe el estado del cable y de la conexi6n.
•Vea otros canales de televisi6n. El problema podria limitarse a una emisora.
Imagenes fantasmas en la
imagen
• Compruebe la conexi6n de antena o de cable con la unidad principal.
• Cuando se utilice la antena exterior, compruebe el estado del cable y de la conexi6n.
• La interferencia electrica de aparatos cercanos puede afectar a la calidad de la imagen.
•Vea otros canales de televisi6n. El problema podria limitarse a una emisora.
Barras en la pantalla del televisor
• Cuando se utilice la antena exterior, compruebe el estado del cable y de la conexi6n.
• La interferencia electrica de aparatos cercanos puede afectar a la calidad de la imagen.
La imagen se desplaza
verticalmente
• Cuando se utilice la antena exterior, compruebe el estado del cable y de la conexi6n.
• La interferencia el_ctrica de aparatos cercanos puede afectar a la calidad de la imagen.
•Vea otros canales de televisi6n. El problema podria limitarse a una emisora.
Marcas de diferente color en la
pantalla del televisor
• Separe la unidad de los aparatos el_ctricos cercanos. Apague la unidad y espere
aproximadamente
30 minutos para volver a encenderlo.
•Vea otros canales de televisi6n. El problema podria limitarse a una emisora.
Recepci6n deficiente en
determinados canales
• Compruebe la conexi6n de antena o de cable con la unidad principal.
• Cuando se utilice la antena exterior, compruebe el estado del cable y de la conexi6n.
• La interferencia el_ctrica de aparatos cercanos puede afectar a la calidad de la imagen.
•Vea otros canales de televisi6n. El problema podria limitarse a una emisora.
Imagen correcto, sonido
deficiente
•Vea otros canales de televisi6n.
No se reciben seflales digitales
• AsegOrese de que la exploraci6n automatica de canales ha finalizado. (Consulte
"Exploraci6n Automatica de Canales" en pagina 11).
La exploraci6n autom_tica de canales debe haberse finalizado cuando configure
la unidad por primera vez o cuando la traslade a un lugar donde se emitan canales
anteriormente no disponibles.
• Es posible que el canal seleccionado no se est_ emitiendo.
• Cuando la exploraci6n automatica de canales se interrumpe y no se finaliza, algunos
canales no se recibiran. Aseg0rese de finalizar. (Consulte'Exploraci6n
Automatica de
Canales"en pagina 11).
El nOmero de canal introducido
cambia autom_iticamente
• Muchos canales digitales tienen n0meros de canal alternativos. La unidad cambia dichos
n0meros autom_iticamente a los correspondientes a las emisoras activas. Estos son los
n0meros utilizados para emisiones anal6gicas.
ES
El problema
podria limitarse a una emisora.
la
©
ii !iiii_!
El mando a distancia no funciona
• Compruebe la conexi6n de antena o de cable con la unidad principal.
• Compruebe las pilas del mando a distancia.
• Compruebe si hay algOn obst_culo entre la ventana del sensor de infrarrojos y el mando
a distancia.
• Pruebe la salida de la sehal. Si es correcta, es posible que haya algun problema con el
sensor de infrarrojos.
(Consulte"Comprobaci6n
de la Sehal de Infrarrojos (IR)"en p_gina 23.)
• Con el mando a distancia, apunte directamente hacia la ventana del sensor de
infrarrojos en la parte delantera de la unidad.
• Reduzca la distancia con respecto a la unidad.
• Reinserte las pilas con sus polaridades (signos +/-) como indicadas.
Problemas con la Funci6n de Subtitulos
Aparecen subtitulos
ortografia,
con faltas de
• Las empresas de producci6n de subtitulos
ortografia en una emisi6n en directo.
pueden emitir programas sin corregir la
Los subtitulos no se muestran
enteros, o aparecen retrasados
con respecto al di_logo,
• Los subtitulos que se retrasan unos segundos con respecto al di_logo real son habituales en las
emisiones en directo. La mayoria de las empresas de producci6n de subtitulos pueden mostrar
un di_logo hasta un m_ximo de 220 palabras por minuto. Si un di_logo supera ese limite, se
utiliza una edicion selectiva para garantizar que los subtitulos se mantienen actualizados con
el di_logo de la pantalla del televisor en cada momento.
Los subtitulos aparecen en un
recuadro blanco,
No aparece ningOn subtitulo
en el programa de soporte de
subt[tulos cerrados.
• Las interferencias procedentes de edificios o condiciones climatol6gicas pueden hacer
que los subtitulos aparezcan incompletos.
• La emisora puede acortar el programa para insertar publicidad. El decodificador de
subtitulos no puede leer la informaci6n del programa acortado.
No aparece ningOn subtitulo
cuando se reproduce una cinta
de video con subtitulos.
• Es posible que la cinta de video se haya copiado ilegalmente
no se haya lefdo durante la copia.
Aparece un recuadro negro en la
pantalla del televisor.
• Se ha seleccionado
i _i¸
el modo texto para subt[tulos.
o que la sepal de subtitulos
Seleccione "Cl ","C2"u "OFF't
Noto:
• Algunas funciones no estdmdisponibtes en modos especfficos,pero esto no esun fallo de funcionamiento. Para md_sdetalles sobre las
operaciones correctas, lea la descfipci6n de este manual del usuario.
[] Mantenimiento
• Limpieel panel delanteroy otrassuperficiesexterioresde launidad con
untraposuaveinmersoenagua templaday bienescurrido.
• Noutilice nuncadisolventeni alcohol. Nosuelte liquidoinsecticidaen
aerosolcercade launidad. Estosproductosquimicospuedencausardafios
y decoloraci6n
en lassuperficiesexpuestas.
__1
I_I_11
Limpieel panel con un patio blando.Antesde limpiar el panel desconecte
el cablede la alimentaci6n.
L_,.
_ 1 _T_]
i1
Si suunidad deja de funcionar, no intente corregirel problema usted
mismo. Ensuinteriorno contienepiezasque puedanser reparadasporel
usuario.Apaguelaunidad, desenchufeel cabledealimentaci6n y Ilame
a nuestrotel_fono gratuito de atencional cliente, queencontrar_ien la
portada de este manual para Iocalizarun centrode servicioautorizado.
Si el mandoa distanciano funcionacorrectamente,puedeutilizar una
radioAM o una c_maradigital(inclusoun tel_fono m6vil con c_imara
incorporada)
para comprobarsi est_ienviando una
serialde infrarrojos.
• Con una radio AM:
Sintonicelaemisora de radioAMen una frecuencia _
de noemisi6n.Apuntecon el mandoa distancia
haciaella, presionecualquierbotony escuche.
Si elsonido de laradio fluctt'Ja,significa queest_i
recibiendo laserial deinfrarrojos delmando a
distancia.
f
• Con una c_mara digital
(incluidaslasc_marasincorporadas
en tel_fonosm6viles):
Apuntecon la c_maradigital haciael mandoa distancia.
Presionecualquierbot6n del mandoa distanciay mire en
el visorde la c_maradigital.
Si la luzinfrarroja apareceen lac_mara, el mandoa
distanciafunciona.
I D]_ITt_J_
Uncircuito de desmagnetizaci6ncorrigeloserroresde color en la
pantalla del televisor. Loserroresde colorseproducen cuandohay un
excesode magnetismo cercade la unidad. Estecircuito est_ disefiado
para funcionar la primeravez queseenchufa la unidad. Sive errores
de colormenoresen la pantalladel televisor,desenchufela unidad
durante unos30 minutos. Cuandovuelvaa enchufar la unidad, el
circuitode desmagnetizaci6n
funcionar_i
paracorregirloserrores.Aplique
este procedimientocadavezquela pantalladeltelevisorsemagnetite
accidentalmenteo cuandomuevade sitio la unidad.
ES
[] Glosario
ATSC
HDTV
Acr6nimo de Advanced Television Systems
Committee (Comit_ de sistemas avanzados
Reciente formato digital que produce una alta
est_ndar)
resoluci6n y una elevada calidad de imagen.
Formato digital est_ndar
de imagen de NTSC.
(televisi6n
de alta
definici6n)
de televisidn) y el nombre de unas normas de
emisi6n digital.
NTSC
Contvasel_a
Acr6nimo de National Television
Committee
(Comite de sistemas
Un nOmero alrnacenado
de 4 digitos que
permite el acceso alas funciones de control
de televisi6n)
de emisi6n
parental.
Relaci6n
Dolby Digital
Ofrece un sonido
o audio
estereo
(televisi6n
de definici6n
similar
a la calidad
S-video
Systems
nacionales
Ofrece im_genes de mayor calidad al
transmitir
cada se6al, color (c) y luminancia
de unas normas
anal6gica.
(y) de manera
independiente
entre s[ a
trav_s de cables separados.
de Aspecto
La anchura de una pantalla de televisi6n
con respecto a su altura. Los televisores
convencionales
son de 4:3 (en otras
palabras, la pantalla del televisor es casi
El sistema desarrollado por Dolby
Laboratories para comprimir el sonido
digital.
y el nombre
SDTV
(2 canales)
multicanal,
cuadrada); los modelos de pantalla ancha
son de 16:9 (la pantalla del televisor es casi
dos veces m_s ancha que alia).
[] Denominaciones
de Canales
de Cable
Si sesuscribe
a la televisionporcable,loscanalessemuestran como1-13£ Lasempresasde cablea menudodenominan loscanalesconletraso combinaciones
de letra-ntimero.Compruebe
estedetalleconsuempresalocaldecable.Latablasiguiente induyelasdenominaciones
decanalde cablehabituales.
Pa_talla
deT_
1
2
3
4
5
6
Pa/italla
deT_
22
23
24
25
26
27
7
8
9
10
11
12
28
29
30
31
32
33
w+_
13
14
15
16
17
18
19
20
21
34
35
36
37
38
39
40
41
42
w+_
Pa/_talla
deT_
43
44
45
46
47
48
49
50
51
52
53
54
55
56
57
58
59
60
61
62
63
Pa/italla
deT_
64
65
66
67
68
69
70
71
72
73
74
75
76
77
78
79
80
81
82
83
84
Par_talla
der_
85
86
87
88
89
90
91
92
93
94
95
96
97
98
99
100
101
102
103
104
lOS
Pa/italla
deT_
106
107
108
109
110
111
112
113
114
115
116
117
118
119
120
121
122
123
124
125
126
Pa/italla
deT_
127
128
129
130
131
132
133
134
135
[] Especificaciones
Generales
Formato de TV: ATSC
/ NTSC-MTVest_indar
Subtitulos cerrados (CC) sistema:
§15.122/FCC
(Subtituloscerradosdigitales)
§1£119/FCC(Subtitulos cerradosanalogicos)
Cobevtuva de canales (ATSC/NTSC):
ferrestre
VHF: 2~13 UHF: 14~69
CAfV
2~ 13,A~W, W+1 ~W+94 (anal6gicoW+1 ~W+84),
A-5~A-I, 5A
Sistema
desintonizaci0m
Sistemade sintonizaci6nsintetizada de
frecuenciade canales
Accesoa los canales: Tecladodeaccesodirecto, exploraci6n
programable yarribalabajo
[] Especificaci6n
El ctrica
Salida de sonido: lW, 8_ x 2
[] Otras
Especificaciones
Tevminales:
Entradadeantena:VHF/UHF/CATV
75_ desequilibrados(tipo
F)
Entrada
deS-video:
MinitomaDINde4 patillasx 1
Y:IVp-p (75_)
C:286mVp-p (75_)
Entradade video:TomaRCAx 2
1Vp-p(75£)
Entradadeaudio:Toma
RCAx4 500mV rms
Salidadeaudiodigitalcoaxial:
TomaRCAxl
Auricular:
% pulg.
Mando a distancia:
500mVp-p(75O)
(3,Smm)
Sistemade luzinfrarrojacodificadadigitalmente
de funcionamiento"
41°F(S°C)a 104°F(40°C)
Potencia"
120VAC+/- 10%,60Hz+/- 0.5%
Consumo de potencia (m_ximo):
79W
Tempevatura
Tubo de imagen:
Dimensiones"
Peso:
• Losdise6osy las especificacionespuedenset objeto de modificaciones
sin previoavisoysin obligacioneslegales pot nuestraparte.
• Siseproduceuna discrepanciaentre idiomas,el idioma predeterminado
serli el Ingles.
ES
20 pulg.
Altura:17% pulg.
Ancbura:
19 ls/1_pulg.
Profundidad:
17_s/_0
pulg.
44,1 Ibs.
(435mm)
(506mm)
(455mm)
(20,0kg)
ii!i!_ii
_i!_>i,_
_
i iii,_!i
ES
Erne.rsc]n
TM
GARANTiA LIMITADA
FUNAI CORP. reparar_
fabricaci6n,
del modo
este producto,
siguiente:
de forma
gratuita
en Estados Unidos,
en caso de defecto
de materiales
o
DURACION:
PIEZAS"
FUNAI CORP. suministrar_
piezas de repuesto de las piezas defectuosas de forma gratuita durante
un (I) a_o desde la fecha de compra minorista
original. Dos (2) a_os para tubo de imagen.
Determinadas
piezas est_n excluidas de esta garantia.
MANO DE OBRA:
FUNAI CORP. suministrar_
la mano de obra de forma
dias desde la fecha de compra minorista original.
gratuita
durante
un periodo
de noventa
(90)
LIMITES Y EXCLUSIONES:
ESTA GARANTIA SE EXTIENDE SOLAMENTE AL COMPRADOR MINORISTA ORIGINAL. UN RECIBO DE COMPRA U OTRA
PRUEBA DE COMPRA MINORISTA ORIGINAL SERA EXIGIDA JUNTO CON EL PRODUCTO PARA OBTENER SERVICIO
BAJO ESTA GARANTIA.
Esta garantia
no se extender_
a ninguna
otra persona
o beneficiario.
Esta garantia quedar_ invalidada y sin efecto en caso de alteraci6n,
sustituci6n,
borrado o p&rdida de los nOmeros
de serie del producto
o si se intent6 una reparaci6n
pot parte de un centro de servicio no autorizado.
Esta garantia
limitada no se aplica a ningOn producto
no comprado
y utilizado en Estados Unidos.
Esta garantia solamente
cubre los fallos debidos a defectos de material o fabricaci6n
que se produzcan
durante su
uso normal. No cubre da_os producidos
durante el transporte,
ni da_os ocasionados
pot reparaciones,
alteraciones
o productos
no suministrados
pot FUNAI CORP., o da_os resultantes
de accidente, uso indebido,
abuso, trato
indebido,
aplicaci6n indebida,
alteraci6n,
instalaci6n defectuosa,
mantenimiento
inadecuado,
uso comercial (pot
ejemplo, el uso de este producto
en hoteles, establecimientos
de alquiler u oficinas)o da_os resultantes
de incendio,
inundaci6n,
tormenta
el&ctrica o cat_strofes
naturales.
ESTA GARANTIA NO CUBRE LOS MATERIALES DE EMBALAJE, NINGON TIPO DE ACCESORIOS (EXCEPTO EL MANDO A
DISTANCIA), NINGUNA PIEZA DE ADORNO, PIEZAS DE MONTAJE COMPLETAS, MODELOS DE DEMOSTRACION 0 DE TALLER.
FUNAI CORP. Y SUS REPRESENTANTES 0 AGENTES NO SERAN EN NINGON
CASO CONSIDERADOS
RESPONSABLES
DE DAI_OS GENERALES, INDIRECTOS 0 CONSECUENCIALES, RESULTANTES DE 0 PROVOCADOS POR EL USO 0 LA
IMPOSIBILIDAD DE USO DE ESTE PRODUCTO. ESTA GARANTIA SUSTITUYE A CUALQUIER OTRA GARANTIA, EXPRESA
0 IMPLICITA, Y CUALQUIER
INCLUYA LA GARANTIA DE
EXCLUIDAS POR DE FUNAI
TODAS LAS INSPECCIONES
SERVICIO AUTORIZADO.
ESTA GARANTIA ESVALIDA
AUTORIZADO.
OTRA RESPONSABILIDAD CIVIL POR PARTE DE FUNAI, CUALQUIER OTRA GARANTIA QUE
COMERCIABILIDAD
E IDONEIDAD PARA UN FIN CONCRETO, QUEDAN POR LA PRESENTE
Y SUS REPRESENTANTES EN ESTADOS UNIDOS.
Y REPARACIONES BAJO GARANTIA DEBEN SER EFECTUADAS POR UN CENTRO DE
EXCLUSIVAMENTE
EL PRODUCTO DEBE IR ACOMPANADO
ADJUNTA
CUANDO
EL APARATO
SEA ENTREGADO A UN CENTRO DE SERVICIO
POR UNA COPIA DEL RECIBO DE COMPRA
PRUEBA DE COMPRA, LA GARANTfA
NO SE APLICARA Y SE COBRARAN
MINORISTA
ORIGINAL. SI NO SE
LOS COSTES DE LA REPARACION.
IMPORTANTE:
ESTA GARANT/A LIMITADA LE OTORGA DERECHOS LEGALES ESPECIFICOS. ES POSIBLE QUE SEA USTED BENEFICIARIO
DE OTROS DERECHOS QUE VARIEN DE UN ESTADO A OTRO. SI, EN CUALQUIER MOMENTO DURANTE EL PERIODO DE
GARANTIA, NO PUEDE USTED OBTENER SATISFACCION CON RESPECTO A LA REPARACION DE ESTE PRODUCTO, LE
ROGAMOS QUE SE PONGA EN CONTACTO CON FUNAI CORP.
ATENCION:
FUNAI CORP. SE RESERVA EL DERECHO DE MODIFICAR CUALQUIER DISENO DE ESTE PRODUCTO
SIN PREVlO AVlSO.
DECLARACION DE GARANT|A CON RESPECTOA REPARACIONES NO AUTORIZADAS"
Para obtener servicio de garantia, debe usted aceptar el producto,
o hacer entrega del producto
con portes
pagados, ya sea en su embalaje original o en un embalaje que proporcione
el mismo grado de protecci6n,
a
cualquier
CENTRO DE SERVICIO AUTORIZADO. FUNAI CORP. no efectuar_ reembolso
pot ningOn servicio realizado
pot proveedores
de servicio no autorizados
sin autorizaci6n
previa pot escrito.
Para localizar su CENTRO DE SERVICIO AUTORIZADO m_s pr6ximo
de servicio, puede ponerse en contacto con nosotros en:
o para solicitudes
generales
FUNAI CORPORATION
Servicio de atenci6n al cliente
Tel : 1-800-256-2487
htt p://www.EmersonAudioVideo.com
19900Van NessAvenue, Torrance, CA90501
P7156UT