1
Owner's Manual
Manual del Propietario
Canister Vacuum Cleaner
Aspiradora
Model, Modelo
721.24195S
Sears, Roebuck and Co., Hoffman Estates, IL 60179 U.S.A
www. sears, corn
Part No.: 3828FI3849S
Printed in CHINA
Before Using Your NewVacuum ............................2
Performance Features ............................................8
KenmoreApplianceWarranty..................................2
Changing The Dust Bag .........................................9
Important Safety Instructions..................................3
Parts and Features....................................................4
Cleaning Motor Safety Filter ..................................9
Assembly...................................................................6
Use and Care .............................................................
6
Storing Your Vacuum............................................10
How Your Vacuum Works ........................................6
Belt changing and brush cleaning ......................11
How to Start Your Vacuum .......................................6
Troubleshooting....................................................13
Parts List..........................................................
14-16
Cleaning Exteriorand Attachments....................10
CleaningAir-Turbine Brush Nozzle .....................11
Attachments..............................................................
7
AttachmentsUse Chart ............................................7
Master ProtectionAgreements............................17
Service....................................................Back Cover
VacuumingTips ........................................................
8
Please read this guide• it will help you assemble and operate your new Kenmore vacuum in the
safest and most effective way.
For more information about vacuum care and operation, call your nearest Sears store.
You will need the complete model and serial numbers when requesting information•
Your vacuum's model and serial numbers are located on the Model and Serial Number Plate.
Use the space below to recordthe model number and serial number of your new Kenmorevacuum.
Model No.
Serial No.
Date of Purchase
Keep this book and your sales check (receipt) in a safe place for future reference.
ONE YEAR LIMITED WARRANTY
When assembled,operatedand maintainedaccordingto all instructionssuppliedwiththe product, ifthis appliance
fails due to a defect in material or workmanship within one year from the date of purchase, return it to any
Sears store, Sears Parts & Repair Center or other Kenmore outlet for
free repair.
If this appliance is used for other than private family purposes, this warranty applies for only 90 days from
the date of purchase.
This warranty covers only defects in material and workmanship, Sears will NOT pay for:
1. Expendable items that can wear out from normal use, including but not limitedto filters, belts, lightbulbs,
and bags.
2. A service technician to instruct the user in correct product assembly, operation or maintenance.
3.A service technician to clean or maintain this product.
4. Damaqeto or failure of this product if it is not assembled operated or maintained accordingto all instructions
suppl _d w th the product.
5. Damage to or failure of this product resultingfrom accident, abuse, misuse or use for other than its intended
purpose.
6. Damage to or failure of this product caused by the use of detergents, cleaners, chemicals or utensils other
than those recommended in all instructions supplied with the product.
7. Damage to or failure of parts or systems resulting from unauthorized modifications made to this product.
Disclaimer of implied warranties; limitation of remedies
Customeris sole and exclusive remedy under this limitedwarranty shall be product repair as provided herein.
Impliedwarranties,includingwarrantiesof merchantabilityor fitnessfor a particularpurpose, are limitedto one year
or the shortest period allowed by law. Sears shall not be liable for incidental or consequential damages.
Some states and provinces do not allow the exclusion or limitation of incidental or consequential damages,
or limitations on the duration of implied warranties of merchantability or fitness, so these exclusions or
limitations may not apply to you.
This warranty applies only while this appliance is used in the United States and Canada.
This warranty gives you specific legal rights, and you may also have other rights which vary from
state to state.
Sears, Roebuck and Co., Dept. 817WA, Hoffman Estates, IL 60179
Sears Canada inc., Toronto, Ontario, Canada M5B 2B8
2
WARNING
Your safety is important to us. To reduce the risk of fire, electrical shock, injury to
persons or damage when using your vacuum cleaner, follow basic safety precautions
including the following:
Readthis manualbefore assemblingor using
your vacuum cleaner.
Useyour cleaneronly asdescribedinthis
manual.Useonly withsuppliedattachments.
To reducethe risk of electricalshock- Do not
use outdoors or on wet surfaces.
Disconnect electricalsupply beforeservicing
or cleaningout brush area. Failureto do so
could result in electricalshock or brush
suddenlystarting.
Always turn cleaneroff beforeconnectingor
disconnectingthe hose.
Always turn cleaneroff beforeunplugging.
Do not unplug by pulling on cord. To unplug,
grasp the plug, not the cord.
Hold plug when rewindingonto cord reel.
Do not allow plug to whipwhen rewinding.
Do not use with damagedcord or plug. If
cleaneris not working as it should, has been
dropped,damaged,left outdoors,or dropped
into water.
Do not pull or carry bycord, use cordas a
handle,closedoor on cord, or pullcordaround
sharpedgesor corners.Donot runcleanerover
cord. Keepcordawayfrom heatedsurfaces.
Do not leave cleanerwhen pluggedin. Unplug
fromoutlet whennot in use andbeforeservicing.
Do not allowto be usedasa toy. Closeattention
is necessarywhenusedbyor nearchildren.
Do not handle plug or cleanerwith wet hands.
Do not operate the cleanerwith a punctured
hose. Replaceif cut or worn. Avoid vacuuming
sharp objects.
Do not use with any openingblocked; keep
free of dust, lint, hair and anythingthat may
reduceair flow.
Keep hair, loose clothing,fingers, andall parts
of body away from openings and movingparts.
Do not use cleaner withoutdust bagand/or
filters in place.
Always changethe dust bag after vacuuming
carpet cleanersor freshener, powdersand fine
dust.These productsclog the bag, reduce
airflow and can cause the bagto burst. Failure
to changebag could cause permanentdamage
to the cleaner.
Do not use the cleanerto pick up sharp hard
objects,small toys, pins, paper,etc. They may
damagethe cleaneror dust bag.
Donot pickup anythingthatis burningor smoking,
suchas cigarettes,matches,or hot ashes.
Do not use vacuum cleaner
to pick up flammableor combustibleliquids
(gasoline,cleaningfluids, perfumes,etc.), or use
in areaswhere they may be present.Thefumes
from these substancescan createa fire hazard
or explosion.
Use extra care when cleaning on stairs. Donot
put on chairs,tables, etc. Keep on floor.
You are responsiblefor makingsure that your
vacuum cleaner is not used by anyoneunable
to operate it properly.
SAVE THESE INSTRUCTIONS
Proper assembly and safe use of your vacuum cleaner are your responsibilities. Your
cleaner is intended only for household use. Read this Owner's Manual carefully for
important use and safety information. This guide contains safety statements under warning
and caution symbols. Please pay special attention to these boxes and follow any
instructions given. WARNING statements alert you to such hazards as fire, electrical
shock, burns and serious personal injury. CAUTION statements alert you to such hazards as
moderate personal injury and/or property damage.
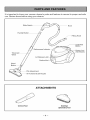
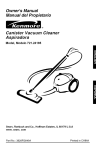
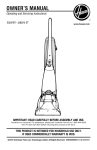
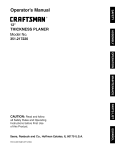
Itisimportant
toknow
yourvacuum
cleaner's
partsandfeatures
toassure
itsproper
andsafe
use.Review
thesebefore
using
yourcleaner.
Slide Switch
___
Hose
N
Handle Button
/
_/
...................
Fitting Hook
Cord Reel
Performance In
Telescopic _
/
Wand
/
/
//
Button Cord
Power
_
(Not Shown)
"/
Lid Release [
//
Wand
Button
._
_
....
,
Suction
/_/
Pile Adjustment
...........Air-Turbine Brush Nozzle
ATTACHMENTS
Crevice Tool
Dusting/
Upholstery Tool
-4-
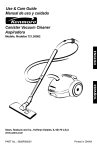
CANISTER
Before assembling your vacuum cleaner, be
sure you have all the parts shown in PARTS
AND FEATURES.
TELESCOPIC
1. Open the canister hood.
2. Check to see that the dust bag is properly
installed.See CHANGING THE DUST BAG
for instructions.
3. Check to see that the motor safety filter is
properly installed. See CLEANING
MOTOR SAFETY FILTER for instructions.
WAND
Hold spring latch
and pull out or push
in wand to
required length.
Spring Latch
Safety
Filter
AIR-TURBINE
'
HOSE
\
Fitting
1. Insert hose into canister until it snaps into
place.
To remove hose: Push hose fitting hook
down and pull out.
2. Slide the Pile Adjustment to the right for long
pile and to the left for short pile.
2. Insert wand into handle until lock button
djus
Long Pile
i
i
Motor
BRUSH NOZZLE
1. Insert wands
into the AirTurbine Brush
Nozzle until the
wand button
snaps into place
in the hole of
the tool.
_,
;_
snaps into place.
To remove handle: Press lock button in
turn the pipe and pull up on handle.
Short Pile
ATTACHMENTS
Open the accessory cover and pull out
accessory you want.
For proper use of accessory and best cleaning
results, see ATTACHMENT USE CHART.
Handle........
®
Lock Button
5
USE AND CARE
The vacuum cleaner creates suction that
picks up dirt. Rapidly moving air carries
the dirt to the dust bag through the air
flow passages. The dust bag lets the air
pass through, while it traps the dirt. For
best cleaning results, keep the airflow
passage open. Check the starred areas
occasionally for clogs. Unplug from
outlet before checking.
NOTE: Do not stand canister body on its
end while operating or you will block the
exhaust vents.
f
_I_
WARNING
Personal Injury and Product Damage
Hazard!
• DO NOT plug in if switch is in ON
position. Personal injury or damage
could result.
• The cord moves rapidly when rewinding.
Keep children away and provide a clear
path when rewinding the cord to prevent
personal injury.
• DO NOT use outlets above counters.
Damage to items in surrounding area
could occur.
NOTE: To reduce the risk of electric shock,
this vacuum cleaner has a polarized plug;
one blade is wider than the other. This plug
will fit in a polarized outlet only one way. If
the plug does not fit fully in the outlet,
reverse the plug. If it still does not fit, contact
a qualified electrician to install the proper
outlet. Do not change the plug in any way.
1. Pull out the power cord to the desired
length.
2. Plug power cord into a 120 Volt outlet
located near the floor.
Note: To rewind the cord when finished
vacuuming, first unplug the cleaner. Hold
the plug while rewinding to prevent
damage or injury from the moving cord.
Press on the cord reel button to rewind the
cord.
3. To start, push slide switch down toward
MAX. To stop, raise slide up to OFF.
OFF
-6-
ATTACHMENTS
ON HANDLE
ATTACHMENTS
1. Press handle button on wand and remove it
from handle.
ON WANDS
The crevice tool and dusting/upholstery
not have locking holes.
Put on attachments
See chart below.
tool do
as needed.
2. Push crevice tool onto handle.
The dusting/upholstery
tool has two options.
When the brush is removed the remaining part
can be used as an upholstery tool.
Upholstery_
3. Dusting/Upholstery
Brush
tool will fit onto extension
wand only.
CLEANING
ATTACHMENT
Crevice Tool
Dusting /
Upholstery
Tool
_/9
Furniture*
Between
Cushions*
Drapes*
X
X
X
X
X
X
X
X
X
X
X
Brush Nozzle
Air-Turbine
* Always clean attachments before using on fabrics.
Stairs
AREA
X
Bare
Floors
Carpeted
Walls
Floors/Rugs
X
Suggested
sweeping
pattern
For best cleaning action, the Air-Turbine
Brush Nozzle should be pushed straight
forward from you and pulled straight back.
This pattern should be continued across the
rug with slow, gliding motions.
Carpeted stairs need to be vacuumed
regularly. For best cleaning results, put the
slide switch on MAX.
For best cleaning results, keep the airflow
passage open. Check occasionally for clogs.
See HOW YOUR VACUUM WORKS
section. Unplug from outlet before
checking.
NOTE: Fast, jerky strokes do not provide
complete cleaning.
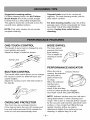
ONE-TOUCH
CONTROL
HOSE SWIVEL
The hose swivel
prevents the hose
from twisting.
This is helpful for
cleaning in small
areas.
The length of wand can be changed by one
touch quickly and easily.
Adjust the length of wand as shown.
PERFORMANCE
SUCTION CONTROL
The handle slide switch allows you to change
the vacuum suction for different fabric and
carpet weights.
Adjust the suction power with slide switch in
the handle.
OVERLOAD
INDICATOR
When the unit is
Indicator Window
running, the indicator
windows will be
green if there are
no clogs.
When the indicator
window turns
completely red,
check if the dust bag
is full or if other areas are clogged.
See HOW YOUR VACUUM WORKS.
NOTE: Indicator window may turn red when
using attachments or when cleaning new
carpet. This is due to reduced airflow caused
by the vacuum seal between attachment and
surface, or new carpet fuzz filling the bag
quickly. Restore airflow by raising
attachment slightly from surface you are
cleaning, or replace bag if it is full.
PROTECTOR
The motor has an overload protector.
If the cleaner starts but cuts off, unplug cord
from wall outlet and wait 20-25 minutes for
motor to cool and automatically reset.
-8-
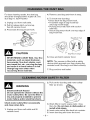
For best cleaning results, the dust bag
should be changed before it gets full. Use
dust bag no. 5231FI2390J
1. Unplug cord from wall outlet.
2. Pull lid release latch out and up,
then lift canister hood.
3. Press back the bag mount hook.
i_\
Lid Release
4. Remove used bag and throw it away.
5. To insert new dust bag:
• Press back the bag mount hook.
• Fit bottom edge of bag mount tab
onto bag mount ledge.
• Pull bag mount tab flush with suction
inlet hole.
• Secure bag mount hook over top edge of
bag mount tab.
Bag Mount Tab
Bag Mount
{_
_
_
'(
//
Hook_
_!_
CAUTION
NEVER REUSE A DUST BAG. Very fine
materials, such as carpet freshener,
face powder, fine dust, plaster, soot,
new carpet lint, etc., can clog the bag
and cause it to burst before it is full.
Change bag more often when
vacuuming these materials.
6. Close and latch canister hood.
NOTE: The vacuum is fitted with a safety
device which prevents you from closing the
canister hood if the bag is not fitted correctly.
7. Plug cord into wall outlet.
2. Pull out the dust bag and motor safety
filter as shown.
WARNING
Electrical Shock Hazard
Do not operate the cleaner without the
motor safety filter. Be sure the filter is
dry and properly installed to prevent
motor failure and/or electrical shock.
Check motor safety filter occasionally
and clean when dirty.
1. Unplug cord from wall outlet and lift
canister hood.
3. Wash filter in warm soapy water, rinse,
then dr,!. Do not clean in dishwasher
or
install while damp.
4. Insert motor safety filter back into canister.
5. Insert dust bag and close the hood.
1. Unplug cord from wall outlet. DO NOT
drip water on cleaner.
_I_
2. Clean vacuum exterior using a clean, soft
cloth that has been dipped in clean water,
then wrung out. Wipe dry after cleaning.
NOTE: Regular cleaning helps to reduce
static electricity and dust buildup on outer
surfaces of cleaner and attachments.
CAUTION
DO NOT use attachments if they are
wet. Damage to dust bag and motor
may occur.
Attachments used in dirty areas, such
as under a refrigerator, should not be
used on other surfaces until they are
washed since they could leave marks.
When not in use, attach wand assembly to canister by inserting nozzle clip into either the
bottom or back storage clip holder. See Fig.1 and Fig.2. Attach hose storage clip to handle.
Store wand assembly in upright position only.
7
Nozzle Clip
Back Storage
Clip Holder
Fig. 1
Fig. 2
-10-
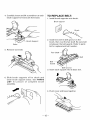
1. Press the button on the rear side of the
vaccum nozzle to remove air cover.
2. Use the dusting/upholstery tool
attachment to clean the brush and fan.
Fan
Hook
Air Cover
Brush
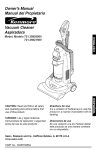
Disconnect cleaner from electrical outlet. Check and remove hair, string and lint build-up
frequently in the air-turbine brush and brush support areas. If build-up becomes excessive,
disconnect air-turbine brush nozzle from telescopic wand.
TO REMOVE BELT:
1. Turn air-turbine brush nozzle upside
down.
2. Unscrew the four air-turbine brush nozzle
cover screws.
3. Turn air-turbine brush nozzle right side up
and tilt cover forward from back until front
snaps free.
-11 -
4. Carefully insert and lift screwdriver at each
brush support to free brush from base.
TO REPLACE
BELT:
1. Install brush supports onto brush.
Brush support
2. Install new belt in belt groove on the
brush, then over the fan shaft. Be sure belt
is between the belt guards. Refer to parts
list for replacement belt number.
Support
Base
5. Remove worn belt.
Fan
Belt
Guard
Belt Groove
3. Insert each support into its base slot.
6. Slide brush supports off to check and
clean brush support areas. See PARTS
LIST for picture of complete
brush
assembly.
4. Push cover and base together.
-12-
Review this chart to find do-it-yourself solutions for minor performance problems. Any other
service needed should be performed by a Sears or other qualified service representative.
_
Disconnect electrical supply before servicing or cleaning the unit.
Electrical Shock Hazard
so could result in electrical shock or personal injury.
WARNING
Failure to do
PROBLEM
POSSIBLE
CAUSE
Cleanerwon'tstart. 1. Unplugged at wall outlet.
2. Tripped circuit breaker/blown fuse at
household service panel.
3. Loose hose electrical connections.
Poor job of dirt
pick-up.
1.
2.
3.
4.
5.
Full or clogged dust bag.
Clogged airflow passages.
Dirty filter.
Slide switch is on MIN.
Hole in hose.
6. Canister hood open.
Cleaner starts
but cuts off.
1. Hose or hood electrical connections.
2. Tripped overload protector in canister
POSSIBLE
SOLUTION
1. Plug in firmly,
push the handle slide switch.
2. Reset circuit breaker or
replace fuse.
3. Reconnect hose ends (p. 5).
1. Change bag (p. 9).
2. Clear airflow passages (p. 6).
3. Change filter (p. 9).
4. Adjust control (p. 8).
5. Replace hose.
6. Close and latch hood.
1. Check connections, reconnect hose
ends (p. 5).
2. Change dust bag, clear airflow
blockage (p. 9, 6).
3. Unplug cord from wall outlet and wait
20-25 minutes for motor to cool and
automatically reset.
Air-Turbine Brush
Nozzle will not run
when attached
1. Worn or broken belt
1. Check brush area for excessive lint
2. Dirty brush or brush supports.
build-up or jamming.
2. Clean brush and brush supports
(p 11, 12)
Performance
indicator, some
models, is red.
1. Full or clogged dust bag.
2. Dirty filter.
3. Clogged airflow passage.
1. Change bag (p. 9).
2. Change filter (p. 9).
3. Clear blockage from airflow passage
(p. 6).
Cleaner picks up
movable rugs, or
nozzle pushes too
hard.
1. Suction too strong.
1. Adjust control (p. 8).
Power cord won't
rewind.
1. Dirty power cord.
2. Power cord jammed.
1. Clean the power cord.
2. Pull out power cord and rewind.
-13-
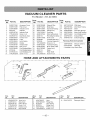
VACUUM
CLEANER
PARTS
For Model: 721.24195S
11
12
14
15
5
9
10
2O
21
i
19
25
33
28
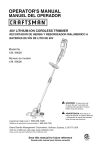
VACUUM CLEANER
PARTS
For Model • 721.24195S
Illust.
No. Part No.
DESCRIPTION
1
2
3
4
5
8
3550FI1759K
3550FI1758H
3550FI3868H
3123819L
4036FI4074A
1TPLO382418
Accessory Cover
Filter Cover
Indicator Cover
Indicator
Indicator Seal
Screw 3 x 8
7
8
9
5203FI2871A
5058FI3593A
4026FI3891G
Dust Brush Ass'y
Crevice Tool
Latch
10
11
12
4970FI4260A
3650FI2422A
4370FI3878A
Latch Spring
Handle
Handle Shaft
13
14
15
16
17
3550FI1757B
5020FI3806B
4170024A
4510FI2441A
1TPLO482818
BodyCover
CordWindingButton
CordWindingSpring
CordWindingLever
Screw 4 x 12
Illust.
No. Part No.
18
5230FI3558B
19
20
21
22
23
24
28
3040FI1525A
3920FI1289A
4661FI1OO8H
*5231FI239OJ
4480FI3752A
4123017A
3550FI1756B
DESCRIPTION
Illust.
No. Part No.
DESCRIPTION
Exhaust Filter
35
6871FX213OG PWBAss'y
Body Base
36
3920FI3766A MotorMountPacking
4681FI2373Y Motor
Dust Seal Packing 37
Wheel Ass'y
38
3940FI3646A Absorbing Sponge
Dust Bag
39
3920FI3859A Motor Seal Packing
Filter Setting Hook 40
4687FI1468H Cord Winding Ass'y
5230FI3557C
Exhaust Filter
FilterSettingHookSpring 41
Front Cover
42
3940FI3311B
ExhaustSponge
3123038G
Terminal PlateAss'y
Following Parts Not Illustrated
3123009L
Terminal Supporter
1TPLO402818 Screw 4x 12
3828FI3864S Manual, Owner's
4036FI3036A Terminal Packing
"5231FI239OJ
Dust Bag
8230FI3248F
Motor Safety Filter
* Available At Any Sears Store.
4441FI3608D CasterAss'y
4122017A
Roller
4122094A
Roller Shaft
1TPLO403318 Screw 4 x 20
26
27
28
29
30
31
32
33
34
HOSE AND ATTACHMENTS
PARTS
1
s SS
Illus.
No.
Part
No.
DESCRIPTION
1
2
3
4
5
AEM30953708
4940FI3431A
3800FI3617B
1TPL0302416
3550FI1511D
Hose Ass'y
Slide Knob
Switch Board
Screw 3 x 8
Handle Cover
6
3650FI1474F
Grip Handle
Illus.
Part
No.
No.
7
8
9
10
11
12
4930FI2360T
5200FI2357M
4123028A
3123013J
3550FI2358J
1TPL0302416
-15-
DESCRIPTION
Illus.
No.
Hose
13
Fitting Pipe
Hook Spring
Fitting Hook
F/Pipe Cover
Screw 3 x 8
Part
No.
5201FI2475C
DESCRIPTION
TelescopicWand
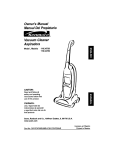
AIR-TURBINE
BRUSH
NOZZLE
PARTS
For Model' 721.24195S
7
8
21
12_\
11
10
15
16
13
Illus.
No.
1
2
3
4
5
6
7
8
Part
No.
3040FI1502B
3550FI1637B
4940FI3736A
5200FI2497B
1KZZFI3001B
4930FI2452B
5901FI2OO1A
4280FI3OO3A
DESCRIPTION
Nozzle Base
Nozzle Cover
Pile Adjustment
Suction Pipe
Key
Suction Pipe Holder
Fan Assembly
Bearing Ball
Illus.
No.
9
10
11
12
13
Part
No.
DESCRIPTION
4581FI3OO1A
4370FI3669A
4581FI3OO2A
4370FI3670A
3550FI2540B
14 4820FI239gB
15 5882FI2OO1A
16 4766FI3709A
-16-
Rollerassy
Shaft
Roller assy
Shaft
Cover Flow
Nozzle Bumper
Sweeper
Felt
Illus.
No.
17
18
19
20
21
22
Part
No.
3740FI3712A
3740FI3711A
4280FI3OO4A
5973FI2OO1A
4400FI3349A
1TPL0403116
DESCRIPTION
Protector(Mech)Belt
Protector(Mech)Belt
Bearing Ball
Brush
Belt
Screw4x16
Master
Protection
Agreement
Congratulations on making a smart purchase.
Your new Kenmore®product is designed and
manufactured for years of dependable operation.
But like all products, it may require preventive
maintenance or repair from time to time.
The Master Protection Agreement also helps
extend the life of your new product. Here's
what the Agreement* includes:
r_ Parts and labor needed to help keep
products operating properly under normal
use, not just defects. Our coverage goes
well beyond the product warranty. No
deductibles, no functional failure excluded
from coverage real protection.
I_ Expert service by a force of more than
10,000 authorized Sears service
technicians,
which means someone you
can trust will be working on your product.
Pti Unlimited service calls and nationwide
service, as often as you want us, whenever
you want us.
r_ "No-lemon"
guarantee
- replacement
Once you purchase the Agreement, a simple
phone call is all that it takes for you to schedule
service. You can call anytime day or night, or
schedule a service appointment online.
The Master Protection Agreement is a risk free
purchase. If you can-cel for any reason during
the product warranty period, we will provide a
full refund. Or, a prorated refund anytime after
the product warranty period expires. Purchase
your Master Protection Agreement today!
Some limitations and exclusions apply.
For prices and additional information in
the U.S.A. call 1-800-827-6655.
* Coverage in Canada varies on some
items. For full details call Sears Canada
at 1-800-361-6665.
Sears
of
your covered product if four or more product
failures occur within twelve months.
Product replacement
can't be fixed.
r_ Annual
Preventive
if your covered product
Maintenance
Check at
your request - no extra charge.
Fast help by phone - we call it Rapid
Resolution - phone support from a Sears
representative
on all products. Think of us
as a "talking owner's manual."
I_ Power surge protection
against electrical
damage due to power fluctuations.
I_1 $250 Food Loss Protection annually for any
food spoilage that is the result of mechanical
failure of any covered refrigerator or freezer.
I_1 Rental reimbursement
if repair of your
covered product takes longer than promised.
10% discount
Installation
Service
For Sears professional installation of home
appliances, garage door openers, water
heaters, and other major home items, in the
U.S.A. or Canade call 1-800-4-MY-HOME
®.
off the regular price of any
non- covered repair service and related
installed parts.
-17-
Antesde uaar au aapiradora nueva ...............2
Garantiade electrodom6sticoskenrnore .......2
Importantesinstrucciones
aobre seguridad...............................................
3
Partesy Caracteriaticas..................................4
Ensarnblaje.......................................................
5
Uao y cuidado...................................................
6
C6mofuncionasu aspiradora............................6
C6moechar a andar a su aspiradora.................6
Aditamentos.......................................................
7
Tabla para utilizaci6nde los aditamentos..........7
Consejos para aspirar ........................................ 8
Caractedsticas de rendimiento .......................... 8
Cambio de la bolsa para el polvo ....................... 9
Limpieza del filtro de seguridad del motor ......... 9
Limpieza del exterior y de los accesorios ........ 10
Almacenando su aspiradora ............................ 10
Limpieza de la tobera con cepillo a turbina
de aire ..............................................................
11
Cambio de la banda y limpieza del cepillo ....... 11
Localizaci6n de problemas ............................... 13
Contratos de protecci6n maestra ..................... 14
Porfavorleaesta guia.Leayudar_ta ensamblary aoperarsunuevaaspiradoraKenmorede la maneram&s
seguray efectiva.
Paramayorinformacionacercadel cuidadoy operacionde aspiradoras,Ilamea sualmacenSearsm_tscercano.
Parapedirinformaci6n,ustednecesitar_t
el nOmerodel modeloy el nt_merode serie.El nt_mero
del modeloy el
nQmerode seriede su aspiradoraesta.ncontenidosen laPlacadel Modeloy Numerode Serie.Utiliceel
siguienteespaciopararegistrarel nt_merodelmodeloy elnt_merode seriede sunuevaaspiradoraKenmore.
ModeloNo.
No.de aerie
Fechadecompra
Parareferenciafutura,guardeeste folletoy sucomprobantede pago(recibo)en un lugarseguro.
GARANTJA LIMITADA DE UN ANO
Si, tras ser montado, operado y mantenido segOnlas instrucciones
incluidas con el producto, este electrodomestico
sufriera una averia debido a un defecto de material o mano de obra, dentro del periodo de un afio desde
lafecha de compra, devu61valoa cualquiertienda Sears, repuestos Sears y Centro de servicio, o cualquieralmac6n
Kenmore para su reparacion gratuita. Si este electrodom6stico se utiliza con prop6sitos distintos a los fines
privados de una familia, esta garantia s61oser__aplicable durante 90 dias desde la fecha de compra.
Esta garantJa cubre _nJcamente los defectos de material y mane de obra. Sears NO cubrJr_:
1. Elementos consumlbles que pueden gastarse debido al uso normal, incluyendo de form a enunciativa
pero no limitativa, los filtros, correas, bombillas y bolsas de la unidad.
2. Un t6cnico de servicio para mostrar al usuario el montaje, funcionamientoo mantenimiento correcto del producto.
3. Un t6cnico de servicio para realizar labores de limpieza o mantenimiento del producto.
4. Dafios o averias en caso de no acatar las instrucciones de montaje, funcionamiento o mantenimiento
incluidas con el producto.
5. Dafios o avedas en caso de accJdente, abuso, uso inadecuado o uso con prop6sitos dJstintos a los fines
para los que fue disefiado.
6. Dairies o avedas en case de utilizar detergentes, limpiadores, sustancias quimicas o utensilios distintos
a los recomendados en las instrucciones incluidas con el producto.
7. Dafios o averias en las piezas o sistemas provocadas pot modificaciones del producto no autorizadas.
Clbusula de exenci6n de responsabilidad e garantias Jrnplicitas; limitaci6n de recursos
El _nico y exclusive recurso del cliente bajo esta garantia limitada serb,la reparaci6n del producto como se ha
mencionado. Las garantias implicitas, incluyendo garantias de comerciabJlidado idoneidad para un fin concreto,
est#,sIJmitadasa un afio o el periodo de tiempo m_.sreducido permitido per la ley. Sears no ser_.resl?onsable
de los dafios Jncidentales o derivados. Ciertos estados y provincias no permiten exclusiones o IJm_taciones
e dafios incidentaleso derivados,o limitacionesen relaciOna |a duraci6nde las garantias implidtas de comerciabilidad
o idoneidad, de tal forma que estas limitaciones o excepciones pueden no ser pertinentes para usted.
Esta garantia ser#. aplicable _nicamente mientras este electrodom6stJco sea utilizado dentro de los Estados
Unidos y Canad#,.
Esta garantia le otorga unos derechos legales especificos, e incluso puede conferirle otros derechos, distintos
dependiendo del estado en que se encuentre.
Sears, Roebuck and Co., Dept. 817WA, Hoffman Estates, IL 60179
Sears Canada Inc., Toronto, Ontario, Canad_ MSB 2B8
ADVERTENCIA
Nosotros consideramos
que su seguridad es muy importante.
AI usar su aspiradora,
para reducir el riesgo de fuego, de cheque electrico, de lesiones personales o de
da_os, observe las precauciones
basicas de seguridad incluyendo
las siguientes:
Lea este manualantesde ensamblaro de usarsu
aspiradora.
Use suaspiradorasolamentecome sedescribeen este
manual.Uselas61econ los aditamentossuministrados.
Para reducirel riesgede chequeelectrico- No la utilice
en exterioresnisobresuperficiesmojadas.
Desconectela alimentacionelectricaantes de hacerun
mantenimientoo de limpiarla zona delcepille.De no
hacerloasi, esposible quese produzcauncheque
electriceo queel cepilloarranquestJbitamente.
Siempre apaguelaaspiradoraantesde cenectaro
descenectarla manguera.
Siempre apaguelaaspiradoraantesde descenectarel
enchufe.
No desconecte el enchufetirandodelcable.Para
descenectarel enchufeagarreelenchufe,no el cable.
Sostengael enchufealvolvera enrellarelcable en su
carrete.
No permita queel enchufede latigazosalvolvera
enrollarel cable.
No la utilice si el cableo el enchufeest#.nda_ados.
No la jale nitransporteper mediodelcable,no use el
cablecome agarradera,no cierreunapuertacontrael
cableni tiredel cablealrededorde aristasafiladas nide
esquinas.No pase la aspiraderaper encimadelcable.
Mantengaelcable alejadede las superficiescalientes.
No abandone a la aspiraderacuandoeste conectada.
Desconecteladeltemacorrientecuande noeste en
use y antesde hacerleun mantenimiento.
No permita quese la utilicecome si fuera un juguete.
Sedebe prestarmuchaatenci6ncuandosea utilizada
per o cerca de los nihos.
No toque elenchufe nila aspiraderacuandotengalas
manesmojadas.
No haga funcionara laaspiradorasi la mangueraha
sideagujereada.Si est#.desgastadao cortada,
reempla.cela.Eviteaspirarobjetospuntiagudos.
No la utilice si algunade las aberturasse ha obstruido;
mantengalalibre de polvo,pelusas,cabellesy de
cualquiercosa que puedareducirelflujo delaire.
Mantengael cabello,laropa holgada,losdedos y
todas las partesdelcuerpo,lejosde lasaberturasy de
las piezasm6viles.
No use la aspiradorasin que la bolsaparael polvoy los
filtrosesten en su lugar.
Siemprereemplacela bolsaparael polvodespuesde
aspirarlimpiadoreso refrescadoresde alfombras,
pelvesy polvillos.Estosproductosproducenbloquees
en labelsa,reducenel flujo de airey puedenhacerque
labolsase reviente. Si no sela reemplazase podrfa
producirun da_opermanentea la aspiradora.
No utilice laaspiradorapara recogerobjetosafiladosy
duros,juguetespeque_os,alfileres,papel,etc. EIIos
puedenda_ara laaspiradorao a labolsa parael polvo.
No recejaningunacesaque seeste quemandoo
humeando,per ejemplocigarrillos,fosforoso cenizas
calientes.
No use la aspiradorapara recogerIfquidosinflamables
o combustibles(gasolina,Ifquidosde limpiar,perfumes,
etc.) ni lause en #.reasen que estospuedenestar
presentes.Los vaporesdeestas sustanciaspueden
crear un riesgode fuegoo de explosion.
Preste especial cuidadocuandohaga limpiezaen los
escalones.No lacoloquesobresillas,mesas,etc.
Mantengalasobreel piso.
Ustedtiene la responsabilidadde asegurarsede que
suaspiradorano sea utilizadaper ningunapersonaque
no sea capazde utilizarlacerrectamente.
GUARDE ESTAS INSTRUCCIONES
Ustedtienelaresponsabilidad
deensamblarcorrectamente
y de usarsu aspiradora
de unamanerasegura.Su
aspiradora
estadesignadaparausecaserosolamente.LeaconcuidadoesteManualdelPropietarioparaobtener
importantes
informaciones
acercadela utilizaci6n
y de laseguridad.
Estaguiacontienedeclaraciones
de
seguridad
debajode lossimbolosde advertencia
y deprecauci6n.
Perfavorprestemuchaatenci6na estos
recta.ngulos
y sigalasinstrucciones
queleproporcionan.
Lasdeclaraciones
de ADVERTENOIA
lealertana riesgos
talescomede fuego,de chequeelectrico,dequemaduras
y degraveslesionespersonales.
Lasdeclaraciones
de
PRECAUCION
lealertanariesgostalescomedelesionespersonales
moderadas
y / o dedaSoa lapropiedad.
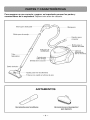
Para asegurar un uso correcto y seguro, es importante conocer las partes y
caracteristicas de la aspiradora. Repase esto antes de utilizarla.
Interruptor deslizable
__'_
Manguera
_o,_°
,..°
,°
.°n,,.
/?
//
//
/: /
T ubo
telescop,co
\,:_k..._...._/
.____----__
J
Indicador de
[/_2"
rendimiento
]_7
X /
/ /
/ /
Cerroio nara
Entrada de la s
Bot6n del tubo
_
........
c.o
_
Bot6n para el
car rate ae, cable
_//_,/
/'__/_'/;_'_
/ 'x>__
l'\
_
_
_
[[P_'/,-..J
_
Cable de
v- _-_._j_.,..2_
alimentaci6n
; Jy/_/_/.C_
(No se muestra
///.,/_
,]
,.t
_.__
Entrada de la succi6n
. -:::i"
Ajuste para hilo de alfombra
Tobera con cepillo a turbina de aire
ADITAM ENTOS
Herramienta para hendiduras
Herramienta para desenpolvafl
para tapiceria
-4-
RECIPIENTE
Antes de ensamblar su aspiradora, asegurese
de tener todas las partes mostradas en
PARTES Y CARACTER/STICAS.
1. Abra la cubierta del recipiente (ca.nister).
2. Verifique que la bolsa para el polvo este
instalada correctamente. Yea
CAMBIANDO LA BOLSA PARA EL
POLVO para obtener las instrucciones.
3. Verifique que el filtro de seguridad del
motor este instalado correctamente. Yea
LIMPIEZA DEL FILTRO DE SEGURIDAD
DEL MOTOR para obtener las
TUBO TELESCOPICO
Sostenga el cerrojo de
resorte y tire hacia
afuera o empuje el
tubo hacia adentro
hasta obtener la
Iongitud requerida.
Cerrojo
de resorte
TOBERA
CONCEPILL0
A TURBINA
DEAIRE
Filtro de
seguridad
del motor
1. Inserte el tubo
dentro de la tobera
con cepillo a turbina
de aire hasta que el
bot6n del tubo se
abroche en su
lugar, en el orificio
de la herramienta.
instrucciones.
,,/,
_ i
_/__
[
MANGUERA
Gancho para
conectar
2. Deslice el ajuste del hilo de la alfombra
hacia la derecha para hilo largo y hacia la
izquierda para hilo corto.
1,
Inserte la manguera dentro del recipiente
hasta que se abroche en su lugar.
Para quitar la manguera: Presione el
gancho para conectar la manguera hacia
abajo y jale hacia afuera.
2,
Inserte el tubo en la manija hasta que el
bot6n cerrojo se abroche en su lugar.
Para quitar la manija" Presione el bot6n
cerrojo hacia adentro y tire de la manija
hacia arriba.
ted
Hilo largo
Hilo corto
ADITAMENTOS
Abra lacubierta de losaccesoriosy saque el
accesoriodeseado.
Para el uso correcto de losaccesoriosy para
obtener los mejores resultadosde limpieza,vea la
TABLA PARA UTILIZACIONDE ADITAMENTOS.
Manija_
Bot6n cerrojo
5
USO Y CUIDADO
La aspiradoracreaunasucci6nque recogea la suciedad.
El airequese mueverapidamenteIlevala suciedadhacia
la bolsade polvoa travesde lospasajesde flujo delaire.
La bolsade polvodeja pasarelaire, mientrasqueatrapaa
lasuciedad.Paraobtenerlosmejoresresultadosde
limpieza,mantengadespejadoslospasajesde flujodel
aire.Chequeeocasionalmentelasa.reascon asteriscos
paraver si hay obstrucciones.Desconectedel
tomacorrienteantesde hacerloschequeos.
NOTA:Mientraseste en funcionamientono dejequeel
cuerpodel recipientesepare en suextremo.De Io
contrariosevan a bloquearlosrespiraderosde descarga.
_I_
ADVERTENCIA
iRiesgodelesion
corporal
ydedai_o
alproducto!
, NOenchufar
sielinterruptor
estaenlaposicion
de
ENCENDIDO.
Sepueden
producir
dai_os
olesiones
corporales.
, AIvolverse
aenrollar,
elcablesemueve
rapidamente.
Paraevitarunalesion
corporal,
al
enrollar
elcable,mantenga
lejosalosnii_os
y
proporcione
unpasolibre.
, NOusetomacorrientes
queest_nsituados
sobrelos
mostradores
delacocina.
Sepueden
producir
da_os
alosarticulos
queest_nenel_reacircundante.
NOTA: Esta aspiradora tiene un enchufe
polarizado para reducir el riesgo de choques
electricos; un contacto es ma.s ancho que los
otros. Este enchufe calzara, en un tomacorriente
polarizado s61o en una direcci6n. Si el enchufe no
calza completamente en el tomacorriente, de
vuelta al enchufe. Si todavia no calza, contacte a
un electricista calificado para que instale el
tomacorriente correcto. No modifique al enchufe
de ninguna manera.
-6-
1. Saque el cable de alimentaci6n hasta obtener
la Iongituddeseada.
2. Enchufe el cable de alimentaci6n en un
tomacorriente de 120voltios que este cerca del
piso.
Nora: Cuando termine de hacer la limpiezacon
la aspiradora, para volvera enrollar el cable,
primero desconecte a la aspiradora. Sostenga
el enchufe al volver a enrollar el cable para
evitar daSoso lastimadurascausadosper el
movimiento del cable. Para volver a enrollarlo,
presione el bot6n del carrete del cable.
3. Para hacer funcionar, mueva el interruptor
deslizable hacia abajo, hacia MAX. Para parar,
deslice el interrupterhacia arriba a la posici6n
de OFF (apagado).oF F
ADITAMENTOS
EN LA MANIJA
1. Presione el bot6n de la manija en el tubo y
retirelo fuera de la manija.
ADITAMENTOS
EN LOS TUBOS
La herramientaparahendidurasy la herramientapara
polvo/ paratapicerianotienenagujerosde sujeccion.
InstalelosaccesoriossegQnseanecesario.
Vealatablaquesigue.
2. Empuje la herramienta para hendiduras
en la manija.
La piezaparapolvo/ paratapiceriatiene2 opciones.
Cuandoseretiraelcepillofrontal,laparterestante
puedeser usadacomounaccesorioparatapiceria.
Accesorio para
tapicerfa
_
Cepillo para _---_,.
desenpolvar _
Accesoriopara
desenpolvar
/
paratapiceffa
cepillo a turbina
Tobera
de aire con
X
X
X
X
X
X
X
X
* Limpie siempre los accesorios antes de utilizarlos para limpiar telas.
X
Trayectoria
de barrido
sugerida
Para obtener la mejor acci6n de limpieza,la
Tobera con del cepillo a turbina de aire debe
set empujadahacia adelantey jalada hacia atra.s.
Se debe continuar de esta forma a pot toda la
alfombra,desliz_ndolacon movimientoslentos.
NOTA: Los movimientos ra.pidosy bruscos no
proporcionanuna limpiezacompleta.
CONTROL
DE UN TOQUE
Los escalones alfombrados debenset
aspirados regularmente.Para obtener los mejores
resultados de limpiezaponga el interruptor
deslizableen MAX.
Para obtenerlos mejores resultados de
limpieza, mantengadespejadoel paso del flujo
de aire. Chequeede vez en cuando para vet si
hay obstrucciones.Lea la secci6n COMO
FUNCIONASU ASPIRADORA.Antes de hacer
cualquier chequeo, desench_fela del
tomacorriente.
ACOPLEGIRATORIO
DE LAMANGUERA
La Iongitud del tubo se puede cambiar rapida
y facilmente con un toque.
Ajuste la Iongitud del tubo como se muestra.
El acople giratorio de la
manguera evita que ella se _
tuerza. Esto es Qtil para
_,,,'_
limpiar en Areas
/./,.,' ..__..__J_,_
estrechas.
INDICADOR
CONTROL
DE RENDIMIENTO
Cuando la unidad
Ventana
funciona, si no hay del indicador
taponamientos, el
indicador de ventana
muestra un color
verde. Cuando la
ventana indicadora se
pone completamente
roja verifique si la
bolsa para el polvo
esta Ilena o si existen taponamientos en
otras Areas. Lea COMO TRABAJA SU
ASPIRADORA.
DE SUCCION
El interruptor deslizable de la manija permite
cambiar la succi6n de la aspiradora para
diferentes grosores de telas y alfombras.
Ajuste la potencia de succi6n deslizando
interruptor deslizable situado en la manija.
OFF
PROTECTORPARASOBRECARGAS
El motor tiene un protector para
sobrecargas. Si la aspiradora se enciende
pero luego se apaga, desconecte el cable
del tomacorriente y espere de 20 a 25
minutos para que el motor se enfrie y se
rearme automaticamente.
-8-
NOTA: La ventana indicadora se puede
poner en rojo cuando se usan aditamentos o
al limpiar alfombras nuevas. Esto se debe a
la reducci6n del flujo de aire causado por el
sello del aire que se produce entre los
aditamentos y la superficie, o porque las
pelusas de una nueva alfombra pueden
hacer que la bolsa se Ilene rapidamente.
Restaure el flujo de aire levantando un poco
al aditamento de la superficie o
reemplazando la bolsa de polvo, siesta Ilena.
Para obtener los mejores resultados de limpieza,
la bolsa para polvo debe ser cambiada antes de
que se Ilene. Use la bolsa no. 5231FI2390J
1. Desconecteel cable del tomacorriente.
2. Jale el cerrojode la tapa hacia afuera y hacia
arriba, luegolevante la tapa del recipiente.
3. Presionehacia atra.selgancho de montaje de
la bolsa.
_
Cerrojo para
_Hberar
la tapa
4. Retire la bolsa usada y desechela.
5. Para insertar una nueva bolsa:
• Presione hacia atras el gancho de montaje
de la bolsa.
• Coloque el borde inferior de la lengeeta de
montaje de la bolsa en el borde de montaje.
• Tire de la lengeeta de montaje hasta que
quede al ras del orificio de entrada.
• Asegure el gancho de montaje de la bolsa
encima del borde superior de la lengeeta.
LengOeta de montaje de la bolsa
Borde de montaje de la bolsa
_I_
PRECAUCION
NUNCAVUELVAA USARLA BOLSAPARA
POLVO.Losmaterialesmuyfinos, talescomo
losrefrescantesdealfombras,el polvofacial,
yeso,hollin,pelusasde alfombranueva,etc.,
puedenobstruirla bolsay hacerquese
revienteantesde Ilenarse.
Cuandoaspireestosmaterialescambiela
bolsaconmasfrecuencia.
6. Cierre y asegure la tapa del recipiente.
NOTA: La aspiradora tiene un dispositivo de
seguridad que impide que usted cierre la
tapa del recipiente, si la bolsa no ha sido
colocada correctamente.
7. Conecte el cable de alimentaci6n.
2. Saque el filtro de seguridad como se
_I_
ADVERTENCIA
Peligro de choque electrico.
No utilice la aspiradora sin el filtro de
seguridad del motor. Asegurese de que
el filtro este seco y correctamente
instalado para evitar fallas del motor o
choques electricos.
De vez en cuando revise el filtro de seguridad
del motor y Iimpielo cuando estd sucio.
1. Desconecte el cable de alimentaci6n del
tomacorriente y retire la bolsa.
muestra, l
!! _
3. Laveelfiltroconaguacalientejabonosa,enjuaguelo,
luegosequelo.Nole laveen la lavadorade vajilla
nile instalemientrasest_humede.
4. Vuelvaacolocarelfiltroensuhgar dentrodel
recipiente.
5. Instalelabolsa.
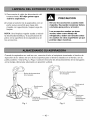
1.Desconecte
elcabledealimentaci6n
del
tomacorriente.
NOdejegotearagua
sobrelaaspiradora.
_'
PRECAUClON
2.Limpie
elexterior
delaaspiradora
conun
pa5osuave
escurrido
quehaya
sido
mojado
conagualimpia.
Seque
luego
de
limpiar.
NO use los accesorios cuando est_n
mojados. Se pueden ocasionar daSos
a la bolsa para polvo y al motor.
NOTA:
Unalimpieza
regular
ayuda
a reducir
laelectricidad
est&tica
y laacumulaci6n
de
polvoenlasuperficie
delaaspiradora
yen
losaccesorios.
sucias, tales como debajo del
refrigerador, deben ser lavados antes
en usarlos en otras superficies ya que
podrian dejar manchas.
Los accesorios usados en areas
Cuando la aspiradora no este en uso, conecte el tubo al recipiente insertando el broche de
sujecci6n de la tobera en uno de los soportes para el broche situados en el fondo yen la
parte posterior. Vea la Fig.1 y Fig.2. Conecte el broche de almacenamiento de la manguera
en la manija. Almacene solamente en posici6n vertical.
almacenamiento
de la manguera
de la manguera
_Broche parala
tobera
" rochepara la
tobera
3oporte para
broche de
almacenamiento
situado atras
portepara
broche de almacenarniento
en el fondo
Fig. 1
Fig. 2
-10-
1. Presione el bot6n en el lado posterior de
la tobera de la aspiradora para retirar la
cubierta del aire.
2. Use el accesorio para desenpolvar / para
tapiceria yaspire el cepillo y el ventilador.
Ventilador
Bot6ndel tubo
Cubierta del aire
Cepillo
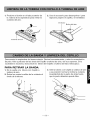
Desconecte la aspiradora del tomacorriente. Revise frecuentemente y retire la acumulaci6n
de pelo, hilos y pelusas de las Areas del Cepillo a turbina de aire y de sus soportes. Si la
suciedad es excesiva, desconecte la tobera del Cepillo a turbina del tubo telesc6pico.
PARA RETIRAR LA BANDA:
1. De la vuelta a la tobera con Cepillo a
turbina de aire.
2. Retire los cuatro tornillos de la cubierta al
fondo de la tobera.
3. Gire la tobera con Cepillo a turbina de aire
a su posici6n normal e incline la cubierta
levantandola de la parte de atras hasta
que la parte delantera quede libre.
-11 -
4. Cuidadosamente inserte y levante el
destornillador en cada uno de los soportes
del cepillo para liberarlo de la base.
PARA REEMPLAZAR LA BANDA:
1. Instale los soportes en el cepillo.
Soporte del cepillo
2. Instale la banda nueva en la ranura del
cepillo, luego sobre el eje del ventilador.
AsegQrese de que la banda quede entre
sus resguardos.
Iio
Base
5. Retire la banda desgastada.
Eje del ventilador
Banda
Resguardo
para la banda
Ranuraparala banda
3. Inserte cada soporte en su ranura de la
base.
6. Deslice los soportes del cepillo hacia
afuera para inspeccionar y limpiar las
Areas de los soportes. Vaya a la LISTA
DE PARTES para ver una figura del
ensamble completo del cepillo.
4. Presione juntos a la base y la cubierta.
-12-
Revise esta tabla para encontrar soluciones, que puede hacer usted mismo, a problemas
leves de rendimiento. Cualquier otro servicio de mantenimiento que sea necesario, debe ser
realizado per Sears o per algQn otro representante de mantenimiento calificado.
Desconecte la fuente de energia electrica antes de hacer un mantenimiento o de
limpiar
a la unidad.
ADVERTENCIA
Peligro de choque electrico
El no hacerlo puede dar como resultado choques electricos o heridas personales.
PROBLEMA
La aspiradoranose
enciende.
[vlaltrabajoal recoger
la suciedad.
POSIBLE CAUSA
1.Desconexi6ndeltomacorriente.
2, Disyuntorabiertoo fusiblequemado
en eltablerode serviciode la casa.
3, Conexionesel@tricasde la
mangueraflojas,
1.Bolsapara polvoIlenau obstruida.
2, Obstrucci6nde los pasajesdeflujo
delaire.
3. Filtrosucio.
4, El interruptordeslizableest,. en MIN.
5. Hay unagujeroen lamanguera.
6, Tapa delrecipienteabierta.
La aspiradorase
enciendeperose
apagainmediatamente
El cepilloa turbinade
airenofuncionacuando
seconecta
El indicadorde
rendimiento, algunos
modelos, est_en rojo
La aspiradora
recogea
las alfombrasmovileso
latolvaempujamuy
fuertemente.
El cablede
alimentacion nose
enrolla
1,Conexionesel@tricasen la
manguerao la tapa.
2, Protectorparasobrecargasactivado
en el recipiente
POSIBLE SOLUCION
1, Conectefirmemente,presioneel interruptor
deslizablede la manija.
2. Reinicieel disyuntoro reemplaceelfusible,
3, Reconectelos extremosde la manguera
(pag.5),
1, Cambiela bolsa(pag. 9).
2, Destapelos pasajesde flujodel aire(pag,6).
3, Cambieel filtro (p_.g.9).
4, Ajusteel control(p_.g.8),
5, Reemplacelamanguera.
6, Cierrey asegurea latapa.
1, Inspeccionelas conexiones,reconectelos
extremosde lamanguera(p_.g.5).
2, Cambiela bolsapara polvo,destapebloqueos
en el flujodel aire (pags.9, 6).
3, Desconectela aspiradoradeltomacorrientey
esperede20 a 25 minutospara queel motor
se enfriey se rearmeautom_.ticamente,
1,Banda rotao desgastada,
1,Yea si el Areadel cepillotiene una
acumulaci6nexcesivade pelusaso si se
atasca.
2, Cepilloo sussoportesest_.nsucios,
2, Limpieal cepilloy sus soportes (p_.gs.11,12)
1.Bolsapara polvoIlenau obstruida.
2, Filtrosucio.
3, Obstrucci6ndel pasodelflujo de
aire.
1. Cambiela bolsa(pag. 9).
2, Cambieel filtro (pag.9),
3, Despejelas obstruccionesalflujo de aire
(pag.6),
1,Succi6nmuyfuerte,
1,Ajusteel control(p_.g.8),
1.Cable de alimentacionsucio.
2. Cable de alimentaci6natascado.
1. Limpieel cablede alimentaci6n
2. Jale el cablede alimentaci6nhaciaafueray
vuelva a enrollar,
-13-
Contratos
de
proteccibnmaestra
Felicitaciones por su compra inteligente. Su nuevo
producto Kenmore®est,. diseflado y fabricado para
muchos afios de operacion confiable. Sin embargo,
al igual que todos los productos, puede requerir de
mantenimiento o reparacion preventivas de vez en
cuando. Es ahi cuando el contrato de proteccion
maestra le puede ahorrar dinero y molestias.
El Contrato de proteccion maestra tambien le ayuda
a ampliar la vida de su nuevo producto. Lo siguiente
es Io que se incluye en el contrato*:
r_ Piezas y mano de obra necesaria para ayudar
a mantener los productos en funcionamiento
adecuado bajo un uso normal, no solo defectos.
Nuestra cobertura va mucho mas alia de la
garantia del producto. Sin franquicia, ni falla
funcional excluidos de la cobertura: proteccion
real.
EJ Servicio experto otorgado por un grupo de m#.s
de 10.000 tecnicos de reparaci6n autorizados
de Sears, Io que significa que alguien en quien
usted confia trabajar#, con su producto.
Servicio ilimitadoa domicilioen toda la nacion,
cuantas veces quiera, cuando Io necesite.
[_ Garantia contra productos defectuosos:
reposicion de su producto cubierto si ocurren
cuatro o mas fallas del producto dentro de doce
meses.
[_j Reposicion del producto si el producto cubierto
no puede repararse.
[_j Revision anual de mantenimiento
a su solicitud: sin cargo adicional.
Una vez que adquiera el contrato, solo necesita realizar
una Ilamada telefonica para programar el servicio.
Puede Ilamar a cualquier hora del dia o de la noche, o
programar la citadel servicio por Internet.
El Contrato de proteccion maestra es una compra libre
de riesgo. Si la cancela por cualquier razon durante el
periodo de garantia del producto, le reintegraremos el
dinero en su totalidad. O un reintegro prorrateado despues
de que expire la garantia del producto, iAdquiera el
Contrato de proteccion maestra hoy mismo!
Existen ciertas limitaciones y exclusiones.
Para precios e informacion adicional, Ilame al
1-800-827-6655.
* La cobertura en Canada es diferente en algunos
items. Para mas detalles Ilame a Sears Canada al
1-800-361-6665.
Servicio de instalacibn de Sears
Para la instalacion profesional garantizada de Sears de
electrodomesticos, dispositivos para abrir puertas de
garaje,calentadores de agua y otros aparatos importantes
para el hogar, en los EE.UU. o Canad#,Ilame al
1-800-4-MY-HOME ®.
preventivo
[_ Ayuda telefonica rapida -Io Ilamamosresolucion
ra.pida- asistencia telef6nica de parte de un
tecnico Sears sobre todos los productos.
Pienseen nosotros como un "manual de usuario
que habla".
r_ Proteccion contra descargas etectricas para
dafios debido a fluctuaciones electricas.
[_j Proteccion por perdida de atimentos de $250
anualmente por alimentos que se hart echado a
perder por un mal funcionamientode refrigeradores
o freezers cubiertos por la garanfia.
[_j Reembolso pot alquiter si la reparacion del
producto cubiertotoma m&stiempo del prometido.
r_ 10% de descuento del preciocomQnde cualquier
reparacion no cubierta y piezas instaladas
relacionadas.
-14-
78017_Kenmore vac_SPv00
7/11/07
4:16 @Mh Page 48
Your Home
For repairin your home - of all major brand appliances,
lawn and garden equipment, or heating and cooling systems,
no matter who made it, no matter who sold it!
For the replacement parts, accessories and
owner's manuals that you need to do-it-yourself.
For Sears professional installation of home appliances
and items like garage door openers and water heaters.
1-800"4-MY-HOM E _
(1-800-469-4663)
Anytime,
day or night
(U.S.A. and Canada)
www.sears.com
www.sears.ca
Our Home
For repair of carry-in products like vacuums, lawn equipment,
and electronics, call or go on-line for the nearest
Sears Parts and Repair Center.
1-800-488-1222
Anytime,day or night (U.S.A.only)
www.sears.com
To purchase a protection agreement (U.S.A.)
or maintenance agreement (Canada) on a product serviced by Sears:
1-800-827-6655 (u.sx)
1-800-361-6665
Para pedir servicio de reparaci6n
a domicilio, y para ordenar piezas:
1-888-SU-HOGAR °
(Canada)
Au Canada pour service en fran_ais:
1-800-LE-FOYER Mc
(1-800-533-6937)
www.sears.ca
(I -888-784-6427)
© Sears Brands, LLC
Registered
Marca
Trademark
Registrada
MC Marque
/
de commerce
/
TM Trademark
TM Marca
/
/
de F_brica
MDMarque
SM Service
/
d_pos4e
SMMarca
Mark of Sears Brands,
de Servicio
de Sears Brands,
LLC
de Sears Brands, LLC
LLC