1
Owner's Manual
Manual Del Propietario
Vacuum Cleaner
Aspiradora
Model, Modelo
116.22822
116.22823
CAUTION:
Read and follow all
safety and operating
instructionsbefore first
use of this product.
CUIDADO:
Lea y sigatodas las
instruccionesde operaci6n
y seguridadantes del uso de
este producto.
Sears, Roebuck and Co., Hoffman Estates, IL 60179 U.S.A.
www.sears.com
Part No. COIZBRG20UOO-8192375
Printed in U,S.A.
Impreso en EUA
Before Using Your New Vacuum .......
Kenmore Vacuum Cleaner Warranty
Important Safety Instructions .........
Parts and Features .................
Assembly
Instructions
.............
2
...
Canister Care ......................
Cleaning Exterior and Attachments
Dust Bin Cleaning ..................
Filter Changing/Cleaning ...........
2
3
4-5
6-7
Use ................................
How to Start ........................
VacuumingTips ....................
Suggested Pile Height Settings ........
Attachments.......................
AttachmentUse Chart ...............
Performance Features ...............
How YourVacuum Works .............
Power-Mate ® Care
.....
13
13
14
15-16
..................
17
Belt Changing and AgitatorCleaning ,, 17-18
Light Bulb Changing .................
19
Agitator Servicing ...................
19
8
8
10
10
11
11
12
13
Troubleshooting
....................
Requesting Service ..........
20
Back Cover
Please read this guide. It will help you assemble and operate your new Kenmore vacuum in
the safest and most effective way.
For more information about vacuum cleaner care and operation, call your nearest Sears store,
You will need the complete model and serial numbers when requesting information, Your vacuum's model and serial numbers are located on the Model and Serial Number Plate.
Use the space below to record the model number and serial number of your new Kenmore
Vacuum.
Model No.
Serial No.
Date of Purchase
Keep this book and your sales check (receipt) in a safe place for future reference.
LIMITED ONEYEARWARRANTY
ON KENMORE VACUUM CLEANER
This warranty is for one year from the date of purchase, and includes only private household
vacuum cleaner use. During the warranty year, when this vacuum cleaner is operated and
maintained according to the owner's manual instructions,Sears will repair any defects in
material or workmanship free of charge.
This warranty excludes vacuum bags, belts, light bulbs, and filters, which are expendable
and become warn during normal use.
parts
For warranty service, return this vacuum cleaner to the nearest Sears Service Center in
the United States.
This warranty applies only while this product is in use in the United States. This warranty gives
you specific legal rights, and you may also have other rights which vary from state to state.
Sears, Roebuck and Co., D/817 WA, Hoffman
Estates, IL 60179
2
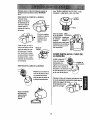
Your safety is important to us. To reduce the risk of fire, electrical shock, injury
to persons or damage when using your vacuum cleaner, follow basic safety pre-
cautions including the following:
Read thismanualbeforeassemblingor
usingyourvacuum cleaner,
Use your cleaneronlyas describedin this
manual.Use onlywithSears recommended
attachments.
To reducethe riskof electricalshock- Do
not use outdoorsor on wet surfaces.
Disconnect electrical supply before servicing or cleaning out brush area. Failure to
do so could result in electrical shock or
brush suddenly starting.
Do not operate the cleaner with a punctured hose. The hosecontainselectrical
wires. Replace if cut or worn. Avoid picking
up sharpobjects.
Do not use with anyopeningblocked; keep
free of dust, lint, hairand anythingthatmay
reduce air flow.
Keep hair, loose clothing, fingers, and all
parts of body away from openings and moving parts.
Always turn cleaner off before connecting
or disconnecting the hose or Power-Mate".
Do not use cleanerwithoutdust bin and/or
filters in place.
Always turn cleaner off before unplugging.
Always empty the dust bin after vacuuming
carpet cleaners or freshener, powdersand
fine dust.
' '_
Do not unplug by pulling on cord. To
unplug, grasp the plug, not the cord.
Hold plug when rewinding onto cord reel.
Do not allow plug to whip when rewinding.
Do not use the cleaner to pick up sharp
hard objects, small toys, pins, paper clips,
etc. They may damage the cleaner.
Do not use with damaged cord or plug. If
cleaner is not working as it should, has
been dropped, damaged, left outdoors, or
dropped into water, return it to a Sears
Service Center.
Do not pick up anything that is burning or
smoking, such as cigarettes, matches, or
hot ashes.
Do not pull or carry by cord, usecord as a
handle, closedoor on cord,or pull cord
around sharp edges or corners. Do not run
cleaner over cord. Keep cord away from
heated surfaces.
Do not use cleaner to pick up flammable or
combustible liquids (gasoline, cleaning fluids, perfumes, etc.), or use in areas where
theymay be present. The fumes from these
substances can create a fire hazard or
explosion.
Do not leave cleaner when plugged in.
Unplug from outlet when not in use and
before servicing.
Use extra care when cleaning on stairs. Do
not put on chairs, tables, etc. Keep on floor.
Do not allow to be used as a toy. Close
attention is necessary when used by or
near children.
You are responsible for making sure that
your vacuum cleaner is not used by anyone
unable to operate it pmpedy.
Do not handle plugor cleanerwithwet
hands.
Do not put any objects into openings.
SAVE THESE NSTRUCTIONS
Properassemblyand safe use of yourvacuumcleanerare your responsibUities.Your
cleaner
is intendedonly for householduse.Read thisOwner's Manualcarefully for importantuse and
safety information. This guide containssafety statementsunderwarningand caution symbols.
Please pay special attention to these boxes and follow any instructions given. WARNING
statementsalert you to such hazards as fire, electrical shock,,burnsand personal injury.
CAUTION statementsalert you to such hazards as personal Injury and/or property damage.
3
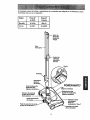
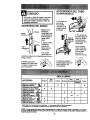
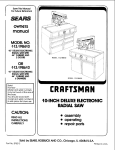
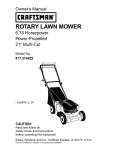
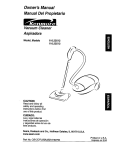
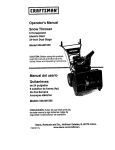
It is important to know your vacuum cleaner's parts and features to assure its proper and safe
use. Review these before using your cleaner.
Item
Part No.
Part No,
In U.S.
In Canada
Headlight Bulb
20-5240
596181
Belt
20-5201
20-40979
Quick
Release
Button
Telescoping
Wand
Wand
Length
Adjust
Button
Belt
Flange
POWER.MATE
Wand
Swivel
Wand
Quick
Release
Pedal
(Some Models)
Power-Mate _
Mode/P3erial Numbers
(On Bottom)
Handle
Release
Protector
ResetButton
(Not Shown)
4
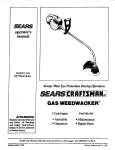
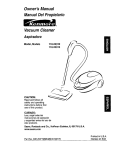
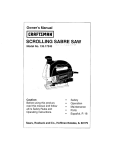
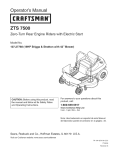
®
HOSE
Electronic
ATTACHMENTS
Touch
Power.Mate Jr."
(Some Models)
Control
Crevice
Tool
Combination
Brush _
Floor
Brush
t
HendI-Mate Jr.*
(Some Models)
NOTE: All models have one set of
attachments in the canister.Some
models have an additionalset,
which can be kept in the accessory
bag for garage use.
CANISTER
Item
Part No.
In U.S.
Part No.
In Canada
Exhaust Filter
20-86889
20-86889C
Cord Rewind
Button
(not shown)
,_
Carrying Handle.
Power-Mate"
Storage
Power-Mate Jr.=/
Handi-Mate Jr.•
Storage (Inside),
Cord
Exhaust Filter (Inside)
Attachment
5
Electrical Shock Hazard
Handle ._
DO NOT plug into electrical supply
until assembly is complete. Failure
to do so could result in electrical
shock or injury.
BU_nl_
Before assemblingvacuum, check the
PACKING LiST on the cover of the separate
Repair Parts List. Use this listto verifythat
you have received all the componentsof
your new Kenmorevacuum.
Handle
Quick
Handle
Release
Bu_on
I
1
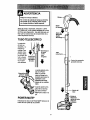
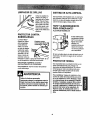
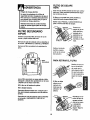
WAND -TELESCOPING
The wand length is
adjustable and
requires no assembly.
To adjust, simply push
down on the wand
adjust button and
m
slide the upper
wand to the desired
Wand
height.
Length
m
Adjust
Bu_on
Wand
Swivel
Lt
r-
Telescoping
Wand --
--
Hand
Above
This
Tab
Wand Length
Adjust Button
m.
1
The swivel, located on the PowerMate*, allows you
to turn the handle
to the left side to
reach farther
under low furniture.
i
1
,:-_-..-..J
When adjusting
the wand length
you may have to
holdthe PowerMate®with your
hand or foot.
Wand
Button
ReleasePedal
(SomeModels)
POWER-MATE ®
Insert wand into Power-Mate* until the wand
button snaps into place,
6
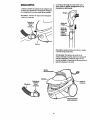
2. Insert handle into wand until lock
HOSE
button snaps in place. Be sure hose is
not twisted.
1, Line up the hose latch tab with notch in
canister and insert hose into canister until it
HandJe--
_
snaps in place.
To remove:
hose out.
Press hose latch tab and pull
Hose
Latch
Handle
Button
Tab
Handle
Quick
Release
Models)
(some ..._
Notch
To remove: Press Handle Quick
Release
button and pull up on handle.
To store: Disconnect hose from wands
and canister to preventstress on hose
during storage. Store hose in a loosely
coiled positionso the ho_e material is
not stressed.
Cover
"Dust Bin
Hose
Hose
Latch Tab
Attachment
Storage
!
Pile Height
Indicator
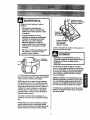
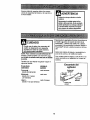
WARNING
Personal Injury and Product Damage
Hazard
Handle
Release
DO NOT plug in if switch is in ON
position. Personal injury or
damage could resulL
The cord moves rapidly when
rewinding.
Press cord rewind
with foot only. Keep children away
and provide a clear path when
rewinding the cord to prevent
personal injury.
Pile Height PedsJ
(Some Models)
3. Lower wand from uprightposition by
pressing the handle release pedal.
• DO NOT use outlets above
CAUTION
counters. Damage from cord to
items in surrounding area
could occur.
DO NOT leave the Power-Mate_
running in one spot in the upright
position for any length of time.
Damage to carpet may occur.
4. Select a pile height setting by pressing
the small pedal on the rear of the PowerMate". The pile height setting shows on the
indicator. See SUGGESTED PILE HEIGHT
SETTINGS.
Attention: Refer to your carpet manufacturers cleaning recommendations. Some
more delicate carpets may require that they
be vacuumed with the Power-Mate" agitator
turned off, to prevent carpet damage.
Button
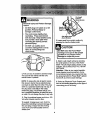
1. Pull cord out of canister to desired length.
The cord will not rewind untilthe cord
rewind buttonis pushed.
NOTE: To reduce the risk of electric shock,
this vacuum cleaner has a polarized plug;
one blade is wider than the other.This plug
will fit in a polarized outlet only one way. If
the plug does not fit fully in the outlet,
reverse the plug. If it stilldoes not fit, contact a qualified electrician to installthe proper outlet. Do not change the plug in any way
5. Select an ElectronicTouchControl position on the handle depending on the type of
vacuuming you will be doing.
.2. Plug the polarized power cord into a 120
Volt outlet located near the floor.
To rewind: Unplug power cord. Hold the
plug while rewinding to prevent damage to
the cord plug or injury from the moving
cord. Push cord rewind button down to
retract cord.
8
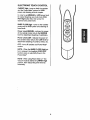
ELECTRONIC
TOUCH CONTROL
CARPET High - turns on both the canister
and the Power-Mate _ motors for HIGH
power and cleaning of most carpets.
In order to get MEDIUM or LOW power level
for carpet cleaning, you must press CARPET High button first, then press the
desired lower power level.
BARE FLOOR High - turns on the canister
motor only for HIGH power and cleaning of
bare floors.
Power Level MEDIUM - reduces the power
of the canister motor only to the MEDIUM
level for attachment cleaning of upholstery.
Power Level LOW - reduces the power of
the canister motor only to the LOW level for
attachment cleaning of curtains, blinds, etc.
OFF - turns off canister and Power-Mate •
motors.
NOTE - When the BARE FLOOR High button is pressed, the headlight DOES NOT
function since no electricity flows to the
Power-Mate _.
NOTE - When using Power-Mate Jr._ the
vacuum must be started in CARPET High
position, then reduce the power level as
necessary.
)
Suggested
sweeping
!
pattern.
For best cleaning action, the Power-Mate _
should be pushed straight away from you
and pulled straight back. At the end of each
pull stroke, the direction of the Power-Mate •
should be changed to point into the next
section to be cleaned. This pattern should
be continued across the rug with slow, gliding motions.
WARNING
Personal Injury and Product Damage
Hazard
• DO NOT run over power cord with
Power-Mate °, Personal Injury
or damage could result.
• DO NOT pull plug from wall by the
power cord. If there is damage to
the cord or plug, personal Injury
or property damage could result,
NOTE: Fast,
jerky strokes do
not provide
complete cleaning.
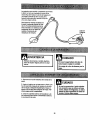
The hose swivel allows
the hose to turn without
moving the canister. This
is helpful for cleaning in
small areas. Check hose
for twistingbefore pulling
canister.
Carpeted stairs need to be vacuumed regularly.
WARNING
Personal Injury Hazard
Use care if canister is placed on
stairs. If it falls, personal injury or
property damage could result.
Product Damage Hazard
Use care if the Power-Mate®and
wand is left in the upright position as
It may tip over easily. Property
damage can occur If tipped.
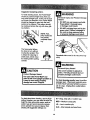
For best cleaning results, keep the airflow
passage open. Check each assembly area
in HOW YOUR VACUUM WORKS occasionally for clogs. Unplug from outlet before
checking.
For best deep down cleaning, use the XLO
setting.However, you may need to raise the
heightto make some jobs easier, such as
scatter rugs and some deep pile carpets,
and to preventthe vacuum cleaner from
shuttingoff.Suggested settings are:
HI - Shag, deep pile, or scatter rugs.
MED - Medium to deep pile.
LO - Low to medium pile.
XLO - Most carpets and bare floors.
10
!•
ATTACHMENTS ON WANDS
CAUTION
1. To remove
DO NOT attach or remove handle or
wands while cleaner is ON, This
could cause sparking and damage
the electrical contacts.
wands from
Power-Mates,
lockwands in
straight-up
position.
ATTACHMENTS ON HANDLE
Lock
Telescoping
NOTE: If the
Power-Mate_ is
attached, turn
cleaner off
before removing
handle from
wands.
,;;
, ,"
%,,
Is
,11
2. Press wand
quickrelease pedal
with foot and pull
the wands straight
up out of PowerMate®.
1. Press lock
button, then pull
to remove handle from wand.
The Power-Mate* plug
and cord do not have
to be removed to use
attachments on the
wands.
If your model
has the optional
feature of a handle release, press it in similarly.
_('_,
,\
3. Put attachments on
wands as needed. See
ATTACHMENT USE.
2. Slide attachments firm- _--_'_
ly on handle as needed.
See chart below.
_---___
_
CLEANING AREA
ATTACHMENT
Combination Brush
(Some Models)
Crevice Tool
(Some Models)
_
Floor Brush
(Some Models)
Power.Mate ®
(Some Models)
Handi-Mate Jr?
(Some Models)***
I_
Power-Mate Jr. =
(Some Models)"**
'_
Betw.n
Furnlture*Cushions*
X
X
Bare
Drapes'
Stain=
x
x
Floors
Carpeted
:loars_ugs
Walls
x
x
x
x
x**
X
x
X
X
x
x
*Alwaysdean attachments
beforeusingan fabrics. *"Use BAREFLOOR/HIGHsetting.
*'* Handi-Mate
Jr.=.andPower-Mate
Jr? attachment
instructions
areincludedwiththeproducts.
NOTE: When separating wands, depress lock button completely before pullingwands apart. If
,wandlock buttonis difficut.to depress_push the two wands more tightly together to line up
me lock buttonwith the hole. Depress lock button and then pull wands apaPt.
11
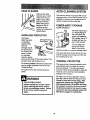
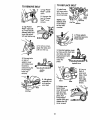
EDGE CLEANER
AUTO-CLEANING SYSTEM
Active brush edge
cleaners are on both
sides of the PowerMate_, Guide either
side of the PowerMate" along baseboards or next to
furniture to help
remove dirt trapped at
carpet edges.
This vacuum cleaner is equipped with a autocleaning system. Each time the power cord is
extended a cleaning cam located inside the
dust bin rotates and cleans the filter.
POWER-MATE ®STORAGE
SOME
MODELS
The lower wand has a
"U" shaped flange in
the area where the
OVERLOAD PROTECTOR
The PowerMate '_has builtin protection
power cord attaches.
The canister has a "U"
shaped slot near the
rear of the canister.
Overload Protecfor
Reset Button
against motor
and belt
damage should
the brush jam. If
the brush slows
with the canister
The slot allows the
wands and PowerMate ®to be stored
to conserve storage space.
The wand will slide into the slot as it is lowered for storage and will slip out of the slot
as it is lifted up for use.
down or stops,
the overload
protector button
pops up and shuts off the Power-Mate _.The
canister motor will continue to run.
THERMAL PROTECTOR
To correct problem: Removeany itemsthat
may be caughtorjammed, then reset (See
Troubleshooting).
This vacuum has a thermal protector which
automatically trips to protect the vacuum
from overheating. The thermal protector
turns the motor off automatically to allow the
motor to cool in order to prevent possible
damage to the vacuum.
To reset: Push in the overloadprotector
button.
To reset: Turn off and unplug the vacuum
from the outlet to allow the vacuum to cool.
Check for and remove any dogs. Also
check and replace any clogged filters.
Wait approximately 30 minutes and plug
the vacuum in and turn back on to see if
the thermal protector has reset, In some
cases, the unit may suddenly restart. DO
NOT leave plugged in unattended,
WARNING
Personal Injury Hazard
Always unplug the vacuum cleaner
before cleaning the brush area as
brush may suddenly restart. Failure
to do so can result In personal
injury.
12
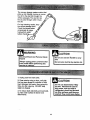
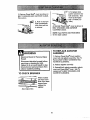
The vacuumcleanercreatessuction
that
picks up dirt. Rapidly moving air carries
the dirt to the dust bin through the
airflow passages. The dust bin lets
the air pass through, while it traps
the dirt.
For best cleaning results, keep
the airflow passage open.
Check the starred areas
occasionally for clogs.
Unplug from outlet
before checki_
Dust
WARNING
Electrical
Hazard
CAUTION
Shock And Personal Injury
Do not use dust bin handle
unit.
Always unplug power cord from electrical outlet before performing any
service on vacuum.
to carry
Do not carry dust bin by dust bin lid.
1. Unplug cord from wall outlet,
2. Clean exterior using a clean, soft cloth
that has been dipped in a solution of mild
liquid detergent and water, then wrung dry.
Wipe dry after cleaning. DO NOT drip
water on cleaner
Do not use attachments if they
are wet, Attachments used in
dirty areas, such as under a
refrigerator, should not be used
on other surfaces until they are
washed. They could leave marks.
3. To reduce static electricityand dust buildup, wipe outer surface of cleaner and
attachments.
13
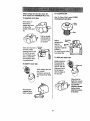
Alwaysempty the dust bin when dirt
level reachesthe "MAXIMUM FILU' line.
TO REMOVE
TO CLEAN FILTER
See 'To Clean Filter" under FILTER
CHANGINGICLEANING,
DUST BIN:
Press down on
the dust bin
release tab located above the
handle of the dust
bin.
Cover
Pull the handle
and lift dust bin
out of the vacuum cleaner.
Every time dust bin is
removed, rotate
cleaning knob on top
of dust bin at least
Before
replacing the
dust bin,
Secondary
FIKer,_
oust 81.
remove any
clogs that might be
located in
Cleaning
the dust bin port or the
secondary filter.
two complete revolutions to clean filter
and maintain clean_ng performance.
TO REPLACE
DUST BIN
Replace dust bin
lid assembly by
placing back on
dust bin with the
TO EMPTY DUST BIN:
r/b
alignment rib on
the lid aligned
with the edge on
the dust bin
While holding dust bin
over a trash
container, remove lid
from dust bin by lif'dng
off,
Place dust bin
back into vacuum
cleaner by inserting until the
dust bin release
button locks
dust bin secure(y in place.
Pour dust bin
contents into a
trash container,
14
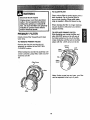
TO CLEAN
Electrical
Shock Hazard
Unplug power cord from electrical
outlet. Do not operate the cleaner
without the primary or exhaust illtens. Be sure the filters are properly
installed to prevent motor failure
and/or electrical shock.
Clean primary filter by gently tapping over a
trash container. Tap on several sides to
ensure best cleaning. Rinse with water
only as needed. Allow 24 Hours to dry.
When cleaning the filter no longer restores
vacuum suction to full power you need to
replace the filter.
TO REPLACE PRIMARY FILTER
Slide knocking cam inside the filter and
align UNLOCK arrow on lid with one of
four tabs located on the rim of the filter,
rotate clockwise until the tab on the filter
PRIMARY FILTER
Check primary filter frequently and clean
when dirty.
TO REMOVE PRIMARY
FILTER
FILTER
aligns with the LOCK arrow on the lid.
Remove the dust bin and dust bin lid
assembly as outlined in the DUST BIN
CLEANING section.
B
U
Unlock
Arrow
Filter
Lock
Arrow
While holding the dust bin lid assembly over
a trash container, grasp filter, rotate counterclockwise and lift
off.
Filter Cover
SIots
Note: Under normal use and care, your filter
can be expected to last up to 5 years.
Filter
15
EXHAUST
HEPA
r. WARNING
Electrical Shock Hazard
Do not operate the cleaner without
the motor safety filter. Be sure the filter is properly installed to prevent
motor failure and/or electrical shock.
Always unplug power cord from electrical outlet before performing any
service on vacuum,
SECONDARY FILTER
FOAM
Check secondaryfilter frequently and clean
when dirty.
FILTER
The exhaust filter must be replaced when
dirty. It should be replaced regularly
depending on use conditions,
The filter CANNOT be washed as it will
lose its dust trapping ability.
NOTE: See PARTS AND FEATURES
for the exhaust filter number.
Press release tab
on filter cartridge
and pull out of
canister.(Cover
not shown for
clarity).
Remove the dust bin as outlined in the
DUST BIN CLEANING section.
Remove filter
Remove secondary filter from vacuum cleaner.
from cartridge by
pushing out
through the slot in
the cartidge.
TO REPLACE FILTER
-Secondary
Filter
Slide new filter into
cartridge so that
the foam side will
face towards the
canister, as shown.
Wash the secondary filter in warm soapy
water, rinse and dry thoroughlyby squeezing the filter in your hand and letting it air
dry.
should be
placed into the
cartridge
The filter so
that the "A"
symbolsalign.
DO NOT wash in the dishwasher.
DO NOT install damp.
Replace dry secondaryfilter. Ensure filter is
properlyinstalled over filter opening.
Replace the
exhaust filter
catddge by placing tabs in slots
and pushingdown
untilcartridge
snaps into place.
Replace the dust bin as outined in the
DUST BIN CLEANING section.
16
Always follow all safety precautions when
cleaning and servicing the Power-Mate s.
Electrical Shock Or Personal Injury
Hazard
CAUTION
Disconnect electrical supply before
servicing or cleaning the unit.
Failure to do so could result in electrical shock or personal injury from
cleaner suddenly starting.
TO CLEAN AGITATOR:
Disconnect
NOTE: In order to keep cleaning efficiency
high and to prevent damage to your vacuum,
th_ agitator mu_=;tbe cleaned eve_ time the
belt is changed.
Check and remove hair, string and lint buildup frequently from the Power-Mate ® agitator
and end cap areas. If build-up becomes
excessive, disconnect Power-Mate e from
wand and follow the steps below.
The agitator must also be cleaned according
to the following schedule:
Vacuum Use
Clean Aaitator
HEAVY
every week
-
cleaner from electrical outlet.
Remove any dirt or debris in the belt path
area or in the brush roller area.
Carefully remove any string or debris located on the agitator or end caps.
(used daily)
MODERATE (used 2-3 Umes/week)
every month
LIGHT -
every 2 months
Exploded View
Agitator Assembly
(used 1 time/week)
Brush Unit
End
Cap
Belt Pulley
17
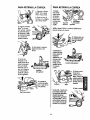
TO REPLACE BELT
TO REMOVE BELT
\
1. Install new
belt over motor
drive, then over
brush sprocket.
1. Turn PowerMate® upside
down.
2. Unscrew the
two (2) PowerMate ® cover
NOTE: See
screws.
PARTS AND
FEATURES
for the belt
number.
3. Turn PowerMate® right side
up. Press handle
release pedal and
lower the swivel.
Uft rear latches up.
End Cap
2. Place agitator
assemblyback into
Power-Mate®.
4. TO remove cover,
grasp the sides and
pull out, then up.
3. Reinstall agitator cover
by lining up the front tabs
and slots and rotating downward until
the latches
5. Depress tabs
on rear of
agitator cover
and rotate cover
forward to
release from the
Power-Mate ®
base and
remove.
Motor
Drive
snap into
place.
Tabs
===
Agitator Cover
4. Line up
front of
cover and
base. Rest
cover on
front edge
of base as
shown.
Agitator
Cover
6. Lift agitator
assembly out
and remove
worn belt.
5. Rotate cover
back, Press
cover firmly until
side and rear
tabs snap into
place. Turn
Power-Mate ®
upside down and
replace two (2)
cover screws.
End Cap
18
\
3. To replace bulb,
1. Remove Power-Mate ® cover as shown in
BELT CHANGING AND AGITATOR CLEANING section.
"_-"_,Push
push in and turn new
bulb clockwise. Bulb
In
AndTun
k.._. than t5 Watts(130
2. Push in and turn
bulb counterclockwise, then pull out
to remove.
Push In
And TurA
_
must not be higher
Volts).
4. Reinstall Power-Mate ® cover as shown in
BELT CHANGING AND AGITATOR
CLEANING section.
NOTE: See PARTS AND FEATURES
for the bulb number
TO REPLACE AGITATOR
ASSEMBLY
1. Remove Power-Mateq_'over,agitator
cover, belt and agitator assembly. See "To
Remove Belt" in BELT CHANGING AND
AGITATOR CLEANING.
Electrical Shock Or Personal Injury
Hazard
Disconnect electrical supply before
servicing or cleaning the unit.
Failure to do so could result in electrical shock or personal injury from
cleaner suddenly starting,
2. Replace agitator assembly.
3. Reinstall belt, agitator assembly, agitator
cover and Power-Mate ® cover. See "To
replace belt" in BELT CHANGING
AGITATOR CLEANING.
TO CHECK BRUSHES
_
-.._.-_..____
when
rushes
are worn to the
level of the base
support bars,
replace the
agitator.
Base Support
AND
Bats
19
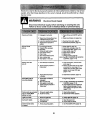
Review this chart to find do-it-yourself solutions for minor performance problems. Any service
needed, other than those described in this owner's manual, should be performed by a Sears
Service Center.
Cleanerwon't start.
1. Unplugged at wall outlet.
2. TrippeddrouJtbreaker/blown
fuse
at householdservicepanel.
3. Loose hoseelsctrical connections.
4. Trippedthermalprotectorin
canister.
Poorjob of dirt
pick-up.
1.
2,
3.
4.
5.
6.
7,
8.
9.
Fullor doggeddustbin.
Cloggedairflow passages.
Dirtyrdters.
Wrongpile heightsetting,
Open suctioncontrol.
Holein hose.
WornPower-Mate®brushes.
Wornor broken belt.
Dirtyagitatoror end caps.
Cleanerstarts but
cuts off.
1. Hoseetec&icelconnections.
2. Trippedoverloadprotectorin
Power-Mate".
3,
Power-Mate*will not
run when attached.
Trippedthermal protector
in canister.
1, Power-Mate• cerv,,ections
unplugged.
2. Wornor broken belt.
3. DHy agitatoror end caps.
4. Trippedovadoedprotectorin
Power-Mate_
1. Plugin firmly,push ON/OFF switchto
ON.
2. Resetcircuitbreakeror replecefuse.
3. Reconsecthoseends, (page7).
4. Resetthermal protector,(page 12).
1.
2.
3.
4.
5.
6.
7.
8 & 9.
Emptydustdin,(page 14).
Clear airflowpassages,(page 13).
Clean'changefilters,(page 15, 16)
Adjustsetting,(page10),
Adjustcontrol, (page 9).
Replacehose.
Changebrushes, (page 20).
See BELTCHANGINGANDAGITATOR
CLEANING,(pages 17-18).
Check connections,
reconnecthose
ends, (page7).
2. Removeany itemsthat may be caught
or jammed,then reset(page 12). If
cleanerstartsandstopsagain,clean
agitatorandend caps,then reset
(pages17-18).
t.
3. Resetthermal protector,(page 12).
1. Plug in firm/y,(page6).
2&3, See BELTCHANGINGAND AGITATOR
CLEANING,(pages 17-18).
4. Checkagitatorarea forexcessivelint
build-uporjamming(page12). and
Clean agitator,endcaps,thenreset,
(pages 17-1B).
Cleaner picks up moveable
rugs -or- Power-Mata•
pushes too hard,
1, Wrongpile heightsetting.
2. Sud,Jontoostrong.
1. Adjustsetting,(page8).
2. Adjustsuction
control,
(page9).
Ught won't work,
1. Burned
outlightbulb,
1. Changelight bulb, (page 19).
Cord won't rewind.
1. Dirtypowercord.
2. Cordjammed.
1. Clean the powercord.
2. Pulloutcordandrewind.
Cleaner leaves marks
on carpet.
t. Wrongvacuuming
pattern.
t, See VACUUMINGTIPS, (page 10).
20
Antesde usarsu aspiradoranueva .....
1
Garantia de la aspiradora de Kenmore...
Instrucciones importantes de
seguridad ............................
1
2
Piezas y caracteristicas
..............
Instrucciones de ensemblado .........
3-4
5-6
Uso ..................................
Paracomenzar .......................
Sugerenciespara aspirar ...............
Sugerenciassobreel ajustede nivelde
pelo de la alfombra ....................
Accesorios..........................
Uso de los accesorios .................
Caracteristicasde rendimiento...........
7
7
9
9
10
10
11
Funcionamientode su aspiradora.........
12
Cuidado del recept_culo ...............
12
Limpieza del exteriory de los accosorios .. 12
Limpiandoel cubode la basura...........
13
Cambio/Limpezadel fillro .............
14-15
Cuidado de la Power.Mate ® ............
Cambiode la correay limpleza
del agitador.......................
Cambiode la bombilla .................
Cuidadedel agitador ..................
16
t6-17
18
18
Reconocimiento de problemas .........
19
Informaci6n de serviclo .... PosteriorCubierta
Por favorlea esta guia que le ayudaraa assemblary operar su aspiradoranuevade Kenmoreen una manera
m_s seguray effectiva.
Para mas informaci6nacerca del cuidado y operaci6n de esta aspirador, Ilame e su tieh_laSears mas cercana.
Cuando prequnte por informaci_n osted necisitar& el mlmero completode serie y modelo de la aspiradora que
est_ Iocado en la placa de los n'_merosde modelo y serie.
Use el espaciode abajo para registrar el m_merode modelo y serie para su nueva aspiradora de Kenmore.
NOmemde Modelo.
N_mem de Ser_
Fecha de Compra ____
Matengaeste libro y su recibo en u lugarsegum para referanciasfuturas.
GARANTIA LIMITADA DE UN AI_O DE LA ASPIRADORA KENMORE
R
U
Esta garantlaes pot un aSodesde la fechade compra,e incluyesolamenteel usode le aspiradoraen
hogaresprivados.Duranteel afio de garantla,cuandola asplraderaes operaday mantenlda de acuerdo al
manualde Instrucctones
del dueSo,Searsmparard cualqulerdefectoen matedaleso fabdcacibn Ilbrede cargo.
Esta garantlaexcluyelas bolsasde coleccibncorreas lamparillas,y filtros,las cualesson partesgastablesque
se detedorancone/uso norma.
Para el serviclo de garantla, retome esta asplradora al Centro de Servlclo Sears m_s cercano en los
Estadoe Unidos.
Esta garantlase aplicasolamentemlentraseste productoest_ en us<)en los EetadosUnldos.Esta garantlale
da a ustedderechoslegalesespecfficos,y ustedpuedetener tambi6notrosderechosloscualesvariande
estadoa estado.
Seam, Roebuck and Co., DI817 WA, Hoffman Estates, IL 60179
Suseguddad
esmuyimportante
paranosotros.
ParareducireldesgodeIncendio,
cheque
elL_ctrtco,
lesi6n corporal o da_os al uUlizar su aspiradora, act_e de acuerdo con precauciones
b_slcas de seguddad, entre elias:
Lea estemanualantesde armaro utilizersuaspiredora.
No useta aspiradorasl la mangueraest_ rots.Ls
mangueracontiene elambresel_tricos. Cdrebielasi
est_ rotao desgastada.Evifaaspirerobjetos
agudes.
Use suaspiradora0nioareenteen la forreadescrita
en estemanualUse t_nicareente
conaccosodos
recoreendedos
;)or Seam,
Pars redudrel desgode chequeel6ctrico,no use
suasp'_dorael sire libra n[ sobresuper6c_es
reojadas.
No coloqueobJetosen lasaberturas.
No U_'l_'_le espiradomsi algur_ abertwaest_
queada;reantdngalafibrede polvo,pelusa,cabelios
y cualquieracosa que podr_adisreinuir
el flujode
aire.
Desconecteel cord6neV_'triooantesdecoreponor
o limpiarel drea del cepillo.De Io contrario,
el cepillo
xxIrlaarranoarde formimprevistao podda
)roducirseunchequeelL_trico.
Slerepredebe apagarla aspiradoraantesde
conectaro desconectarla reangueradefa PowerMate®.
Mantengael cabello,ropesuelta,dedosy todaslas
partesdelcuerpoalejadosde las aberturasy plazas
reec_nicas.
Sierepredebe apagarsuaspiradoraantes de desconectada.
No usela aspiradorasintenerel cube de la besura
ylo los nitros.
No desconectela aspirsderatirandodel cord6n
el_ctrico.Paradesconectafla,
hale el enchufe,noel
cordbn.
Carebiesierepre el cubede la basuradespu_sde
aspirarlirepiaderes
de alforebras
o desoderantes,
taleasy pelvesfines.
No use la aspiraderaparalevantarobjetesagudes,
juguetespequetlos,alfileres,sujetapapeles,
etc.
Podrianda_ar la aspiradora,
Su|eteel enchufeconla maneal enmflarel cord6n
el_ctrico.
Parsdesconectada,
hale en enchufe,no el
cord6n.
No usela aspiradorasiel oofd6no el enchufeesfa
da_ado.Si la aspiradoranoest_ fundonando adecuadamenteo sise ha dejado caer,est_ dai_ada,se
ha dejadoexpuestaala intereperieo se ha dejado
caerenagua,devu_lvalaaun Centrede serviciode
Sears.
No levante nlngunacoeaque se estOquemandoo
ereitiendohureo,come cigarrillos,cerUloso cenizas
calientes.
No hale ni _'ansporte_aaspiradoraper el cor_6n;no
useel cord6ncoreomango;nocierrepuertassobre
el corden;nohale el cmd6nsobrerebordesagudos
ni esquinas.No pasela aspiradorasobreel cord6n.
Mantengaelcord6nalejadode superficies
calientes.
No abandonela aspiradoracuandoestdconecfada.
DesconL=ctela
cuandono la estdusandoy antesde
dadeservicio,
No permitaque sea utilizadecoreojuguefa.Se
requiemteaermayorcuidadocuandosea utilizada
en la p_oxk_idedde nifioso per nl_e.
No toquela aspiradorani el enchufeconlasrnanos
mejades.
No use la aspiradorapara aspirarliquidosinflamab_eso corebus_les (gasolina.fiquidesparatimpieza, perfumes,etc,)nila useen lugaresdonde
_stos podrlanesterpresentes.Losvaporesde estas
sustanciaspuedenctearun peligrode incendioo
explosi6n.
Tangs cuidadoespecialal utilizerla aspiradomen
escalones.No la coloquecobre sillas,mesas, etc.
Mant6ngalaen el piso.
Ueted es responsal_e
de asegurarque su aspiredorano sea utilizadaper ningunapersonaquano
puedareanejarla correcfareente.
GUARDE ESTAS INSTRUCCIONES
El arreadoy usesegurode su aspirado_acon su responsabilidad.
Esta aspiradoraha side disefiada
exclusivareente
para ucodom_sUco.La aspiradoradeberdalmacenarseen un lugarsecoyen el interior.
Lea este Manual del propletario detenidemente, puesconUeneInformacl6n Importantesobreseguddady
use.Esta quia contiene lnformaci6n sobreseguridaddebajo de simbolosde advertienolaculdade.Per
favor pongaatenci6nespeciala estas Instrucciones
dedas. Advertencla: Este Informacl6nle alertardcon
el poligrode fuego, chequeselectricos, quemadas y lesiones. Culdado: Este informaclbnIs atertaraa
peligrosComeleslones)t detios de pmpledad.
2
Esimportante conocer las piezas y caracterfsticas de su aspiradora para asegurar su usoadecuado y seguro.
Examinelas antes de usar su aspiradora,
Objeto
Pieza No
en EUA
Pieza No
Canada
Bombilla
20-5240
596181
Correa
20-5201
20-40979
MANGUERA
ACCESORIOS
Power-Mate Jr._
(Algunos modelos)
Herramlenta
pard
hendiduras
Control electr6nlco digital
I
Cepfllo para
j_
combinaci6n _
_"
_
Cepillo para pisos
(Algunos modelos)--_
Handi-Mate Jr.*
(Algunos modelos)
NOTA: Todoslos modelos cuentancon
un juego de accesoriosen el recept&cuIo. Algunos modeloscuentancon un juego adicionat que puedealmacenarseen
la bolsapara accesorios de uso e en el
garaje.
Disposltivo giratorio
de la manguera
RECEPTACULO
Item
Part No.
In U.S.
Part No.
In Canada
Filtrode escape 20-86889
20-86889C
Mango
Almacenaje del Power-Mate Jr.*/
Handi-Maf=
FIItro de
escape (dentrc
Bot6n de
enorollaHo
1
jTapa
y almacenamlento
para Power.Mate e
Cord6n
eldctr/co
la basura
ADVERTENCIA
Peligro de choque el6ctrlco
No conecte la asplradora hasta que termine
de armada. De Io eontrado podrla causar
un choque el_etdco o lesl6n corporal.
Bot6n
Antes de armar la aspiradora,chequeela LISTA
DE EMBALAJE en la cubiertaseparadade la Lista
de Partespara Reparaci6n. Use esta listapara verificar qua ha recibidotodas lascomponentesde su
nuevaaspiraderaKenmore.
Bot6n de_
Ilberacl6n
rdplda
del mango--_
TUBO TELESC6PICO
La extensi6n
del tubo es
ajustable y no
requeire el
montaje.Para
ajustar, empuje hacia abajo
en el bot6n del
tubo y mueva
el tubo superior a la posici_ dedeada
6
m
m
6ngase
la mano
arriba
esta
lengiJeta
Control de
extensl6n
adjustable
del tubo
Tubo
"\
m
m
Control de extensi6n
ajustable del tubo
La parte giratoria, situada en el PowerMate=',le permite
mover el mangoa la
izqulerdapara pasar la
aspiradoraa una
extensi6nm_s larga
debajode los muebles
bajos.
Cuando ajuste la Iongitud de la vara hay
que tenet el PowerMate*oonla mano o el
pie.
m
m
€_
POWER-MATE®
Bot6n del
fubo
liberacl6n
rdpldadel tubo
(Algunos
modalos)
Introduzcalos tubesen la Power-Mate
'_haste que el
bot6n del tubo quede fijoan posici6n.
5
1
MANGUERA
2. Introduzcael mangoen el tubohastaque el
bot6nquede en poslcl_. Aseg_reaa de que la
manguera no eat6 torclda.
t. Alinee la pesta_ade sujecibnde la mangueracon
la ranurade la aspiradorae introduzcala manguera
en el receptdculobasra que quade flja en posicibn.
Para retirar: Presione el seguro de la manguera
y saque la manguera,
PestafJa de
sujecJ6n
dela
manguera
Bot6n del
Bot6n do
liberacl6n
rdplda del
mango
(Algunos
Ranura
Para retlrar: optimael botbnpara liberarel mango
y tire del mango hacia arriba.
Para Guardar: Para prevenirla precibnde ta
mangua mientras se guarda, desunala mangua del
tubode la aspiradora.Guardela magua en una
posici6nenrollada y flojamentede tal manera que la
tapa de la manguano se estire.
Mango
Cubierta
PestafJa de
suJecl6n
dela
manguera
la basura
para aocesorlos
6
Indlcador de nlvel
de pelo de la effombra
Pellgro de leslbn personal y daAo al
producto
• NO enchufe la asplradora sl el
interruptor es_ en la poslcibn ON.
Podda causar teel6n persona{o da_o
al pmducto.
Pedal de
liberael6n
• El cordbn el6ctdco se mueve
r_pidamente durante el enrollamlento.
Presione el rebobinado del cable
ele)ctdco con el pie solamente.
Mantenga alejados a los niAos y
asegure espacl,o |ibre sufictante para
evitar lesiones parsonaies al enrollar
el cordbn.
Pedal de _eleccl6n
de nlvel de pelo
de la alfombra
(AIgunos modelos)
3. Baje el tubodesde la poslci6n verticalpisando el
pedalde liberacidndel mango.
• NO use los enchufes Iocalizados sobre
los muebles. Los objetos cercanos
podrian resultar da6ados.
_
!
CUIDADO
NO deje ta Power-Mate_funcionandoen
poslci6n vertical en un lugar durante ning_n
espaclo de tlempo: se puede da_ar la
alfombra.
Bot_n de
4. Seleccione una alturade pelode la alfombra
usando el pedal pequeiioubicadoen la parle posterior de la Power-Mate_. El nivelde pelola affombra
se muestraen el indicador.ConsulteSUGERENCIAS SOBRE EL AJUSTE DE NIVEL DE PELO m=mm
DE LA ALFOMBRA.
_l_
enorollaHo
U
1.Tire del cordonpara sacarlodel recept,tculohasta
tenet la Iongituddeseada,El cordonno se enmllar_
hastaque opdmala botbnpara enroUarlo.
Atencl6n: Refi_rasealas recomendaciones
del
fabdcante para limplarsu elfombra.Algunasalfombras m_s delicadaspuedenrequedrel uso de la
aspiradoracon el agitadorPower-Mate_'desconectado para prevenirque la elfombra sea da5eda.
NOTA:Parareducirel riesgo de choqueelL,ctrico,
esta aspiradoracuentacon unac]avijapolarizada;
:uno de loscontactoses rodsanchoque el otro.La
clavija s6fopuedeintrodudrsede una maneraen el
enchufe.St ta o{avijano capebienen el enchufe,
invi_rtala. Si aOnno cabe, flamea un electdcista
para que instaleun enchufecorrecto.No altere la
clavijade ningunamanera.
6. Seleccioneuna posicibnde ControlElectr0nico
Digitalen el mangode acuerdoal tipode aspirado
que desee realizar.
2. Conecteel cordon eldctrico polarizadoen un
enchufede 120 voltiosque se encoentre cercadel
piso,
Para enrollar: desconectela aspiradom.Sujete el
enchufemientrasenroflael cordonpara impodir
da_o o lesion corporal por el movimientodel cordbn.
Empuje la botbn pare enrellar el cordonel_ctdco.
7
CONTROL ELECTR(_NICO
)
DIGITAL
ALFOMBRA ALTO - enclendelos motoresdel
contenedor y de la Power-Mate®para obteneralto
poderde Umpiezapara la mayorla de alfombras.
Para obtenernivel de poder MEDIO o BAJO para
limpie,za de alfombras, apriete el bot6n de ALFOMBRA ALTO primero,yen seguida aprieteel nivel
deseado de pealerm._sbajo.
PISO RASO ALTO - enciende el motor del contenedort_nicamente
para poder ALTO y limpiezade
pisosrasos(sin alfombms).
Nlvel de poder MEDIO - reducela fuerza del motor
del contenedors61oal nivel MEDIO para limpieza,
con accesodos,de tapiceria.
Nivel de poder BAJO - reduce la fuerza del motor
del contenedorexclusivamenteal nivelBAJO para
limpiezacon accesoriosde cortinas,perslanas,etc.
APAGADO- apaga k_smotores det contenedor y de
la Power-Mate
®.
NOTA- Cuando el botbn de PISO RASO Alto est',
apretado, el farol no funcionan porqueno la electriddad no fluye al Power-Mate
®.
NOTA: Cuandouseet Power-MateJr_ la aspiradora
debe serencendida en la posicion CARPET
High, luego reduciret nivelde potenciasegunsea
necesario.
v
Estilo de limpieza sugerido.
ADVERTENClA
Pars obtenerla mejoraccibnde limpiezase recomiendaempujarla Power-Mate®en direcci6ndirectamenteopuestaa ustedy jalarla en linea recta.Af
final de cadapasada de regreso, cambie la direcci6n de la Power-Mate
® hacia la siguientesecci6na
limpiar.Contin6easia lravesde toda la alfombrade
una maneralenta y deslizante.
NOTA:las pasadas r&pidasy
jalonadasno
Iogranuna limpieza completa.
El dispositivogiratoriode la
manguerapermiteque 6sta
giresin necesidad de moverel
recep_culo.Estoes muy 6til
para timplar en _reas pequefias.AsegOresede que la
manguerano estbtorcida
antes de jalar el recept_culo.
Los escalones alfombrade£_requierenlimpieza
perk_lica.
ADVERTENClA
Peligro de lesidn persona[
Tenga culdado sl coloca el recept_culo
sobre escalones. SI se cae, podda causar
lesl6n personal o da_o a la propledad.
Risque de dommages au produit
Tenga cuidado sl el Power-Mate®y la
manguera se dejan en poslcl6n vertical
pues peuden caerse f_cllmente. SI se
vottean peude hsber dafio de propiedad.
Mantenga el paso de aim abierto pare Iograr los
mejores resultados de Ilmpieza. Examinede
vez en cuandocada una de las_,reas de uni6n
en FUNCIONAMIENTODE SU ASPIRADORA
para asegurarsede que no estdn bloqueadas.
Desconecte la asplradora antes de revlsar.
Use el ajusteXLO (bajo)pars obtener la mejorlimpieza a rondo. Por otra parte,quizdsse requiem elevar el nivelpara facilitar algunastareas, comopor
ejemplocuandose tmta de tapetesy algunasalfombias de pelolargo,y pare impedirque la aspiradora
se apague.Se sugierenlos siguientesajustes:
HI - Pelo muy largoy suelto,tapetes, alfombras
muy acojinadas.
MED - Pelo mediano a largo.
LO - Pelo cortoa medlano.
XLO - La mayoria de las alfomlxasy pises
descublertos.
9
ACCESORIOS DEL TUBO
CUIDADO
ALGUNOS MODELOS
ACCESORIOS DEL MANGO
NOTA: Si tiene
instaledala
Power-Mate
*, apa9ue la asplradora
antesde qultar el
mangode los
tubos.
Bot6n
m
m
Tub(>
telescSplcc
m
1. Para retirarlos
tubosde la
Power-Mate®,
colaquelosen la
posicianvertical
de bloquao.
2. Pise el pedalde
liberaci_ rbpidadel
tuboy tire del tubo
haciaarriba para
desprenderlode la
Power-Mate
*.
1. Optima el botan
de bloqueoy
luegotire del
mangopara quitado del tubo.
No es necesario
retirarel enchufey
cordan el_ctricode
la Power-Mate
e
para usar los
accesoriosdel tubo.
I
SI su modelo
cuentacon la caracteristicaadicionalde un dispositivopara liberarel
mango,oprimalo.
3. Coloquael accesedo
deseadosobreel tubo.Consuite la U$O DE LOS
A¢CESORIOS.
2. Desliceel accesorio
deseadecon firmeza sobre
el mango.Consulteel cuadroa continuacian.
AREA A LIMPIAR
ACCESORIO
Cepllloparacombinactan
(Algunos modelos)
(_
Herramlenta
parahendlduras
(Algunos modeloe) _
(;eplllo para plsos
(Algunos modelos) €;_
Power-Mate•
(Ngunos modalos)
Handi-mate Jr.•
(Algunos modelos)*** I_
P_er,.mate dr."
_
(Algunos modelos)**"
Entre
PIsos
Pi_s
g.eubles* cojines* Cortinas' Er,calonesdezcubiertol
alfombradosParedes
Alfornbras
X
X
X
X
X
X
X
X
x**
x
x
x
x
x
x
"Sk)mpm Imple Io=aco3sod_ an_s de usatr,obmtela_ " Uso ta posi_ BAREFLOOR(pisodescut_).
"** LSHan0_4ate Jr.* y la Poww-MateJr., Ind_/_ sus pmplasInsL-ucciones
parsusode a_
.NOTA:Cua.ndos.epare.Io..s.
tu.bos._
op.rimacomp!etamenteel bot_ de bloqueoantesde se.pararlos
po_compleX: _,=_ le el;Icalllllllllta
o_=mLrel botbn,Juntamas =ostucospara a,near el botancon el ortficlo,updma el botany
oespues separa ms [UDOS.
10
LIMPIADOR DE ORILLAS
Active los cepilloslimpiadoresde orillasa
cada lado de la PowerMate®.Pass la PowerMate_ junto alas paredes o juntoa los muebles para ayudara eliminarla tierraacumulada en las orUlasde la
alfombra.
SISTEMA DE AUTO-LIMPIEZA.
Est:_aspiradora esta equipadacon un sistema de
auto-limpieza.Cada vez que se extiende el cable
el_ctrico una leva de limpieza situada dentro dei
cubode la basura gira y limpia el filtro.
TAPA Y ALMACENAMIENTO
PARA POWER.MATE®
ALGUNOS MODELOS
PROTECTOR CONTRA
SOBRECARGAS
La Power-Mate®
Protector €onba
cuentacon protecsobrecargasBot6n dej
cibnincorporada
contra dafio del
motory la correa
en casode atascamiento del cepillo.
$i el cepillopierde
velocidado se detiene,el bot6ndel
protector contra sobrecargas se activay apaga la Power-Mate
F'.El motor del recept_culo continuar_ funclonando.
Para correglr el problema: Consulte el
RECONOCIMIENTO DE PROBLEMAS.
Para restablecer: Oprima el bot6ndel protector
contra sobrecarga.
Pellgro de lesiones personales
Desconecte stempre la asplradora antes de
liropiar las _reas de los ceplllos pues dstos
podrian arrancar de roanera Iroprevista. El
ho hacedo, podda resultar en leslones personales.
El tuboinferiortiene
un roborde en forma
de "U" en la zonade
fijaci6n del cordbn
el6ctrico.La
aspiradora tiene una
ranura en forma de
"U" cerca la posterior
de la aspiradora.
El tubo se desliza dentro de _sta al bajarlo para almacenado y se sale de la ra_ura al ser levantado
para usarlo.
PROTECTOR TERMAL
Esta aspiradoratiene un protectortermalque se
ejustaautomdticamentepara proteger a la
aspiradora del sobrecalentamiento.
El protector
termal apaga el motorautomaticamentepara
permitir quoel motorse enfde a fin de evitar
posibles dafiosa la aspiradora.
Para restablecen Apaguela aspiradoray desenchufeel cord6n del tomacordentepare permitir que la aspiradorase enfr{e.Busque y saque
las obstrucclones, sl es necesado. Examine
tambl,_ny reeroplace cualquler filtro obstruldo, Espere aproxlmadamente 30 roinutos y
enchufs la aspiradora y volt6ela para vet si el
protector del motor se ha reajustado. En
algunos casos, Is unidad puede volver a
arrancar stlbltaroente, NO LA DEJE desatendlda.
11
U
Laaspiradora
c_ea
succibn
oaspirad6n
que levanta
la tierra.La tierraes impulsadaa trav_sde las
vlas de flujo aire hasta el cubode la baseurapor
una r_pida corrientede aire. El cubode la
baseurabolsapara polvopermileel flujo de
aire, peroatrapa la tier=a.
ParaIograrlos mejores resultadosde
limpteza, mantengaablertaslas vlas
de aire.Examineperi_licamente las
breas lndicadas con astedscospara
asegurarse de que no est_nbloqueadas. Desconede del
receptdculode revisarlo.
ADVERTENCIA
CUIDADO
No use la agarradera del abo de
basura para cargar la unidad.
No carge el cubo de basura por la
tapa.
t. Desconecte el cordenel_ctdcode la clavijade la
pared.
CUIDADO
2. Limpieel exteriorcon un traposuavey limpio,que
ha sidoexprimidodespu_sde remojaren una solud6n de agua y detergenteliquidoligero.Seque el
exteriorcon un traposecodespu6sde limpiar.NO
choree agua sobre la aspiradora.
No use los accesodos si est4n mojados.
Los accesodos qua se uttllcen en 4mas
suclas, debajo del refdgerador, no deben
usame en otras superficiessin antes ser
lavados. Podrlan dejar mamas.
3. Limpie la suparflcieextedordel recept:_culo
y de
losaccesoriospara redudrla electricidad est_ticay
la acumuladbnde polvo.
12
Siempre vacie el cubo de la basura cuando el
nivel de basura alcanza la linea "MAXIMUM
FILL."
Vea "PAPA LIMPIAR
CAMBIO / LIMPIEZA
EL FILTRO" bajo
DEL FILTRO.
PARA SACAR EL CUBO DE LA BASURA:
Presione hacia
de/filtro
abajo en el seguro
de desbloquearel
cubo de la basura
situado sobre la
manija del cubo de
la basura.
Antes de instalar Filtro
el cuo de basura
compartimien-PorUllodel
to, remueva
cubo de la
cualquier
obst_culoque puedaestar
Iocalizadoen la entradadel
cubode la basurao en el
fittrosecundario.
Tire de la manija y
levante el cubo de
la basura de la
caja de la aspiradora.
Cada vez que se saca el
cubo de la basura, rote el
botSn de arriba del cubo
Perllla de
de basura pot Io menos
dos revoluciones completas para acfivar et sistema
de limpiar el filtro, y para
mantener el funcionamiento de limpieza.
COMO INSTALAR EL CUBO DE
LA BASURA
Instal6 la tapa del
cubo de la basura
colocandola de
regreso en el cubo de I_
basura con la costilla de
PARA VACIAR EL CUBO DE LA BASURA:
la alineacl6n
alineacibn y la alineaci6n de
la tapa alineadas
en el cubo de la basura
Mientras que sostiene el
cubo de la basura sobre
un envase de basura,
quite la tapa del cubo de
la basura levantandola,
m
B
Coloque el cubo de la basura nuevamenteden-l_r'_J_
tro de la aspiradora insertandolohasta que el
bot6n de segum del cubo ,,_-_-_
de la basura Io ase
gure en su lugar, __
Vacle el contenido
del cubode la
basura adentm
del tarrode
basura.
13
_"_4P
LIMPAR EL FILTRO
Limpieel filtroprimariogolpedndolosuavementecon
sus manos sobre un contenedorde basura.Golpe_lo
suavementeen diferentesladospara botenermejor
limpieza.EnJuaguecon agua solo cuando Io nece*
site. Dejelo secar por 24 horas.
Peligrodechoque
el_ctrico
Desenchufe
elcabledepoderdeltomacoro
riente.Nooperela llmpiadora
sinelfiltm
pdmadoo elfiltrodeescape.
Est6seguro
queelflltmsest6Instalado
proplamente
paraprevenlr
falladelmotory/osacudida
Una vez que haya limpiadoel firm, la aspiradora
perdera la potencla maxima de succi6n,nesecitara
reemplazar el filtro.
el6ctdca.
PARA REEMPLAZAR EL FILTROPRIMARIO
FILTRO PRIMARIO
Deslice la leva limpiadoradentin del filtro y alinee
la flecha de "UNLOCK" en la tapa con una de cuatro situadas en el horde del filtro,gire el flltroa la
derecha hasta que la flecha en el flttro se alinee
con la flecha de "LOCK" en la tapa.
Examineel filtro primariode vez en cuandoy limpie
cuandoest6 sucio.
PARA SACAR EL RLTRO PRIMARIO
Remuevael cubode la basuray el ensamblede la
tapa del cubode la basuracomose describe en la
secci6n LIMPIANDOEL CUBO DE LA BASURA.
Cublerta
de filtro_
Mientras que sostieneel ensamble de la tapa
sobre un envase de basura agarre el filtro,gire a
la derecha y levantelo.
Flecha de
"Unlock"
Flecha de
"Lock"
Cubierta
de filtro
Filtro
_.Ranuras
NOTA: Bajouso y cuidadonormal, su filtro puede Ilegar a durar hasta5 aSos.
F/Itro
14
FILTRO DE ESCAPE
HEPA
Este cartuchodel filtroescapese tiene que cambiar
est_ sucio.Debe camblarseperi_icamente seg_n
las condicionesde uso.
Peltgro de choque el_,ctrico
No opere la asplradora sin el flltro de
seguridad del motor, Aseg_urese de que el
filtro est_ seco e Instalado adecuadamente
para Impedir que el motor falle y/o que se
produzca un choque el6ctrico.
El flltro no se puede lavar pues perded,_su
capactdad para atrapar altrapar polvo.
NOTA:V6ase PIF-.ZASy CARACTER[STICAS
para el ndmero del filtro de escape.
Slempm desconecte el cord6n _lectdco
antes de reparar alguna parte de la asplradora,
Presione el
seguro an el cartuchodel filtro y
seq=3elode la
aspiradora.(La
cublerta no se
muestra pot claddad).
FILTROSECUNDARIO
ESPUMO
Examineel secondaryfilterdel motorde vez en
cuandoy limplecoando est6 sucio.
Remuevael cube de la basuracomose describeen
la secci6n LIMPIANDO EL CUBO DE LA BASURA.
Remuevael filtrosecundadode la espiradora de
polvo.
Quite el cartucho
de filtro presionando en la ranura
del cartucho.
PARA RETIRAR EL FILTRO
Secondarlo
Deslise el nuevo filtro en el cartucho
de modo que la
cara espumo de] illtro yea hacia adentro de la aspiradora,
segt_n Io mostrado.
Lave el filtrosecundadoconagua calientey jab6n,
enju_gueloy s6quelobienapret_ndolocon la mano
y dejandoque se seque al aire libre.
El filtro se debe
colocar en el
cartucho de
NO Io lave an la lavadora de platos,
modo que los
simbolos"&"
alineen,
NO Io Instale htimedo.
Reemplacefiltrosecundario
seco. Asegureque el
filtroest_ instaladopmpiamentesobrela abertura
del filtro.
Reemplaceel cubode la besura comose describe
en la secoi6n LIMPIANDO EL CUBO DE LA
BASURA.
Substituyael cartucho de filtrode
escape colocandolo en la ranura
y empujando
hasta que el
seguro Ilegu6 a
su lugar,
15
Siempm deber_n seguirse todas las precauciones de seguddad al limplar y dar servicio a
la Power-Mate*.
Pellgro de choque el_ctrlco o lesl6n
corporal
Desconecte la unidad antes de llmo
plada o darle servlclo. De Io contrado
podrla pmduclrse un choque el6ctdco
o causar leslbn corporal sl la asplradora arranca de manera Imprevista,
!
Oesconecte la asplradora. Examinefrecuentemente
CUIDADO
el cepilloy I_s Areas de soportedel mismode la
Power-Mate y eliminetodocabello,hilo y petusa
acumulada.Si la acumulacibnes excesiva,separe la
Power-Mate del tuboy realicelos pasosa continuaci6n.
Puede que al retirar los soportes del
cepillo se desprenda una peque_a
arandela de metal de cada extremo.
NO plerda estas arandelas.
Retire todo indicio de basura o suciedad de la
zona de la correa y del rodillo del cepillo,
NOTA: Para mantener una alta eficiencia de
limpieza y evitar el daSo a la aspiradora, hay
oue limoiar el aQitador cada vez oue se cambia
Con cuidado quite las tapas y quite el hilo o los
restos ubicados en el agitadoro en la tapa del
extremo.
tacorrea.
Tambi6n hay que limpiar el agitador segOn et
siguiente horario:
El uso de la
Umole el
Frecuente (usada dirariamente)
cada semana
Moderado (usada 2 e 3 veces
por semana)
cada rues
Ensamble del
agitador
Unldaddel
agltador
Ligero cada 2 meses
(usada 1 vez por semana)
I- Tapadel
I
_- Polea
para
CDIT_
16
PARA RETIRAR LA CORREA
PARA RETIRAR LA CORREA
1. Instale
una correa
nuevasobre
el impulsor
del motor y
luego sobre
la rueda dentada del
cepillo,
1. Co_equela PowerMate con la parte
inferior hada arriba.
2. Quite los dos (2)
tornillosen la cub_rta
de la Power-Mate'= .
3: Co_oquela PowerMate en la posici6n vertical. Apriete
el pedal del mango
de liberaci6n y baje
la articulacl6n giratoria. Levante los
pestillos traseros
del ceplllo
A Itador
NOTA:V6ase PIEZAS y CARACTER[STICAS
para el nt_merode correa.
2. Coloqueoh'avez
la untdaddel agitadot e.qla PowerMate`=`"
4. Para quitar la cubierta,
agarre los ladosy tire
afuera.
5. Aprieta las
lengGetasen la
parte trasera de la
cubiertadel agitadory gire hacia
adelante para liberar de la base=de
la Power-Mate_y
quite la curbierta del agitador.
Tapa del
extreme
3, Reinstalela
cublertadel agitador,alinee las
lengOetas
delanterasy las
ranurasy gire
haclaabajo
hastaque los
pesUllosenciarren seguramente.
Cubierla del agltador
Cublerta
del agltador
6. Levante la
unidaddel agitadory quite la correa gastada.
Cublerfa
4. Alinee la parte
frontal de la
cubiertacon la
base.
cubiertasobreel
bordedelantero€
la ba
muestra.
5. Rote
haciaarras. Apdetecon
pocafuerza hasta que
las leng0etaslateralesy
tmsems enderren
seguramenta._.,oloque
la Power-Mate
'="con la
parle inferiorhacla arribay insertelos dos (2)
tornlllosen la cublerta.
Tapa del extremo
17
1. Quite la cubiertade la Power-Mate® come se
describe en la secct6nCAMBIO DE LA CORREA Y
LIMPIEZA DEL AGITADOR,
/,_dadentroy glre I
Empujehacla I
2. Empujehaciaadentroy gire la bembiUaen
el sentidosonlrarioal
de las agujasdel reloj,
luego tire hacia afuera
para sacar.
3. Empujebaciaadentro
y gireen el sentidocontrario at de las agujas
del reloj para reemplacer. La bombillano debe
ser m:_sde 15 vatios
( 130 voltios/).
4, Relnstalela cubierta de la Power-Mate® come se
describe en la secci6nCAMBIO DE LA CORREAY
LIMPIEZA DEL AGITADOR.
NOTA:V_ase PIEZAS y CARACTER{STICAS
para el n0mem de bombilla.
PARA CAMBIAR LA UNIDAD
DEL AGITADOR
1. Quite la cubiertade la Power-Mate®, la cubierta
del agitador,la correa y la unidaddel agitador.
V_ase "Paracambiarla correa"en la secciSnde
CAMBIODE LA CORREAY LIMPIEZADEL
AGITADOR.
Peligro de choque el6ctrlco o lesldn corporal
Desconecte la unldad antes de limpiarla o
darle serviclo, De Io contrado podria pro.
ducirse un choque el6ctrico o causar
lesi6n corporal sl la aspiradora arranca de
manera imprevista.
2. Cambiar el ensamble del agitador
3. Reinstalela correa, la unidad del agitador, la ®
cubierta del agitador y la cubierta de Power-Mate .
V_ase "Paracambiar la correa"en la secci6n
CAMBIO DE LA CORREAY LIMPIEZA DEL
AGITADOR.
PARA REVISAR LA UNIDAD DEL
AGITADOR
tados los cepiUos
al nivel de las barras de soporte en
la base, cambie la
uandoest6n gasunidaddel agitado_.
_.._._
Barra de soporte
de la base
18
Consulteeste cuadropara encontrarsoluc_ones
que ustedmismo puedereafizarcuandotenga problemas
menores de rendimiento.Cualquierservicioque necesiteaparte de otrosdescritosen este manualtienenqua
ser hechosporun represetante de servicioautorizadoSears.
La asplmdora no arranca,
No aspira
satisfactoriamente.
1. Est_desconectad_
2. Cortackcuitos
botadeo fusitdequemade
en el ta_o de se_do de la reeldencia.
3. Conexloneseldcbicasde Larnanguera
sueltas.
4, Proteoletermelen el receptacul_
1. C(:,".ecle
bien.optimaselectorde encendid_
apagade a Is posidbnON.
2. Re=ablezcael cortadrcuit=o camt_ el
fusible.
3. Vuelvaa conedar losexb'emdede Is manguere
(peoinae).
4. Raslab/_ezca
el proteolor
termel.{p_gina11).
t.
2.
3.
4,
1.
2.
3.
4.
5.
6.
7.
8.
9.
La aspiradora atranc.s.
pem se apaga,
Cubode la bas_,raIlenao atascada.
Viasde fluio de aire atascadas.
Fil_ossuaos.
Ajusleincorrectode nivelde pelode
la alfcmb_a.
Controlde ==spiracide
ablerlo.
Manguerarota.
Cepillosde la Power-Mate*"
desgastados.
Corneadesgestadao rota.
Capilloo soportesde este suaos.
1. Conexionesel_--'tricasde la manguem.
2. Protect_ contrasobrecargasde la
Powsr-Mate*botado.
La PowerANlat_no
funciona cuando est_
instalade,
5.
6.
7.
S,&9.
Cubode ta basura[enpto(p,_jina13).
Limpielasv?asdeflujodeaire.(p_gina 12).
I.Jrn_et camb_elos_tros, (p_,gina14, 15).
Ajusteel nivel,(p_gkla9).
AJusteel control, (p_glna 6),
Cambie la mangeera.
Camble los cepillos. (p69ina 19).
CoP,suite CAMBIO DE LA CORREA y LIMPIF..Z
DEL CEPILLO, (pli3inas 16-17),
Examine_asconexionesel_cb'k:as,vuelvaa c_
ecta[tosextremo_;
de fa rnangeera.(_gina 6).
2, Relirec_mlquier
objeloatoradeo atascado.
bege restablezca(page 11).Si la aspkadora
arrar_a pesose vuek,e a apag_, limpieel
cepllloy los soportes de _,ste,luegorestel_ezc_
(p_ginas16-18).
1.
3. Protec_xtefmalen el mcept_culo.
3. Restatdezcael pmiectortermal.(p_gi_ 11),
1. Conexionesde _ Power.Mate':
des_'_<;tadas.
2. Coneadesgeeladao rota.
3. Cepilloo sop_'tesde 6ste suctos,
4. Pm[ecto¢contra$o_ecarg_ de fa
Pow_.Mate* bc(ado.
1. Conectebien,(p;tgina5).
2,&3. Corm_Jlte
CAMBIODE LA CORREAY
LIMPIEZA DELCEPILLO.(p_ginas16-17).
4. Ex_mineel t_u_adel cep_lopa_ det_ar
d hay acumulacl_n
e:cecJvao bloqueode
pelusa(p_gina11),
Lk_e el cep_o y su$soge_es,luego
restat_k_ca,(p_ginast6.17).
La asplnidornle_tantatapetes
-o- e$ dificUempuJar
a Power,Mate'*.
1. Ajusteinco_ectode nlvelde pe_de
I= aliombra.
2. Asp_
demasiadepotente.
1. A_Jsteel nMd,(p_91_87).
Lal,JBnofundona.
1. Bomblflafundide.
1. Camblelal_.(p_gk..a18).
El ¢_d6n no =e enmlla.
1. Cord6nel6ctricosuolo.
2. Co_atascado.
1. L_p_eelcord_el6ct_o.
2. TIredelcordbnydespu_senr_
Laasplmdom
deJamamas
enlaalfombra.
t, Est_lode fln_.a
1. C_sulte SUGERENCIASPARAASPIRAR,
I,con-e_a.
19
2. Ajusteel controlde aspen,
(p_gina8).
Your Home
:::::::::::::::::::::::::
::::::_;:::;:::::::::::
::::::::::::::::
:::.:::.:.::
:::::::::
:::::_::::::::::
iii:iiiiiiiiii_ii
'_
ii_i;i!i;i!ii:i:
.......
:¢::.::::.:
.::¢:.::::
>;+::.:.:.:
:.x._x.:::
:+:+::::.
::::::::
::.::::::
:::::<::
:+::::::
:.x:::::
::::::::::::::::
:::::.:::
::::x:::
::x::::
::;:;::::
:;:::;:::;::::::
:::::::
:::::::::
.::::::::
:;;::::::
:;:::;:;:;55;
:::::::::
.:.;.;;::::
::::;:::::::::
::::::55;;::
_ea_ Parisand:Re_tr Center.
:::::::
:;:;::%%::
:.::;:+;:
::;:::::::::::;:
::::;:::::::::;::
To pu_
a pK_lion _
:::;::::
:::::::::::::
(U,S.A.)
:.:.:.:..:.:
:::;::::::::::::
::::::::
555:;:;:
::::::::
::::::::
;:::;:;::::;:;:
;:::;:::::::::::
::::::::::::::
:::::::;:;::::
:::::::::
::.>:::::
>_::.:.:.x
_:_i::_
.......
"_'_
....... _ ....................................................................................................................
--..........
::.::.:::
::::::,::::::;
:::,: :,:,:::
.x.:.:.:;::.
:+:.:,:::.:.:.:
......,
.. ....