1
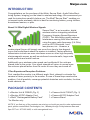
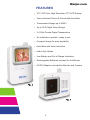
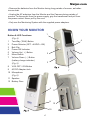
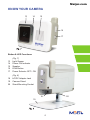
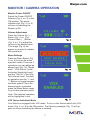
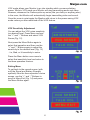
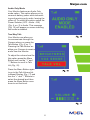
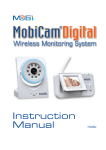
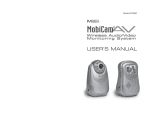
Meijer.com
wireless
audio/video
monitor
Complete Compatible with… Operating
Compatible with… Instructions
70294
Meijer.com
TABLE OF CONTENTS
pg
Introduction 1
Package Contents 1
Features 2
Consumer Guide to Product Safety 3-4
Know Your Monitor 4
Know Your Camera 5
Powering Up 6
Monitor/Camera Operation 7-10
Troubleshooting 11
Radio Interference Advice 12
Warranty 13
LIST OF FIGURES
Fig. 1 – Signal Strength Fig. 2 – Secure Start Monitor Fig. 3 – Secure Start Camera Fig. 4 – Secure Start Monitor – Left / Front View Fig. 5 – Secure Start Monitor – Right / Front View Fig. 6 – Secure Start Monitor – Rear View Fig. 7 – Secure Start Camera – Right / Front View Fig. 8 – Secure Start Camera – Rear View with Stand
Fig. 9 – Volume Adjustment Menu Display Fig.10 – Operations Display – Brightness Highlighted Fig.11 – VOX Enabled Display Fig.12 – Operations Display – VOX Sense Highlighted
Fig.13 – VOX Sensitivity Adjustment Display Fig.14 – Operations Display – Menu Exit Highlighted Fig.15 – Audio Mode Only Display Fig.16 – Operations Display – Talk Vol Highlighted Fig.17 – Talk Volume Adjustment Display Fig.18 – Operations Display – Brightness Highlighted Fig.19 – Brightness Adjustment Display Fig.20 – Other Screen Indicators pg
1
2
2
6
6
6
7
7
9
9
10
10
10
11
12
11
13
12
12
13
Meijer.com
INTRODUCTION
Congratulations on the purchase of the Mobi® Secure Start™ Audio/Video Monitoring System, bringing you the latest in wireless technology. We recommend you
read the instructions carefully before use. The Mobi® Secure Start™ enables you
to transmit audio wirelessly, which is ideal for monitoring babies, young children,
housebound seniors, or pets.
About 2.4 GHz Digital Wireless Signals
Secure Start™ is an innovative, digital
wireless solution integrating advanced
Frequency Hopping Spread Spectrum
(FHSS). This technology greatly reduces
interference coming from other devices
using the same radio frequency (2.4 GHz),
such as WIFI, Bluetooth, cordless phones, etc.. However, a
weaker signal (lag or still image) can occur from time to time depending on the environment where the system is installed. Factors affecting
transmission include use near microwave ovens or other high frequency
electromagnetic waves, as well as reinforced concrete walls, large scale
metal products and metal furniture.
Additionally your wireless router speed can be affected if the units are
placed close to the router. Your signal strength will return to normal once
the units are placed farther from the router or once they are turned off.
If You Experience Reception Problems
First, readjust the monitor to a different angle. Next, attempt to relocate the
camera in closer proximity to the monitor. If none of these steps resolves the
problem, if at all possible, rearrange potential obstacles such as desks, furniture,
metal cabinets, etc.
PACKAGE CONTENTS
1 x Camera Unit # 70294T (Fig. 3)
1 x Camera AC/DC Adapter Cord
1 x Camera Stand
1 x Monitor Unit # 70294R (Fig. 2) 1 x Monitor AC/DC Adapter Cord
1 x Mobi® Rechargeable Battery Pack *
*for Monitor only
NOTE: If you find any of the contents are missing or should you need to order replacement
parts, please contact Mobi Technologies, Inc., Monday through Friday between 8am and
5pm PST at 1.877.662.4462, or visit www.getmobi.com.
1
Meijer.com
FEATURES
• 2.0” LCD Color High Resolution TFT LCD Display
• Voice Activated Picture & Sound with Auto Mute
• Transmission Range up to 400Ft
• Up to 20 Ft Night Vision Range
• 2.4 GHz Private Digital Transmission
• No installation needed—ready to use
• Compact design for easy portability
• Auto Mute with Voice Activation
• Audio Only Option
• Low Battery and Out of Range Indicators
• Rechargeable Batteries Included for the Monitor
• AC/DC Adaptors included for Monitor and Camera
2
Meijer.com
CONSUMER GUIDE TO PRODUCT SAFETY
Please read this instruction manual before using your Mobi® Secure Start™ system. When using electrical appliances, basic safety precautions should always
be followed.
Note: Please keep this manual for future reference.
• This product is not intended to be used as a medical monitor and its use should
not replace adult supervision.
• Periodically examine this product for damage to the cord, housing
or other parts that may result in the risk of fire, electric shock or injury.
Do not operate any product with a damaged cord or plug. If the Color
Wireless Monitor malfunctions, or is damaged in any manner, please
contact the manufacturer for examination and repair to avoid a hazard.
• Never use the Camera and/or the Monitor near water (i.e. bathtub,
sink, etc.).
• The AC adaptors are not toys.
• Always use the Camera and the Monitor where there is adequate ventilation. To
prevent overheating keep the Camera and the Monitor away from heat sources
such as radiators, heat registers, stoves, or other appliances that produce heat.
• Use only a dry cotton cloth to keep the units free of dust. Do not use a damp
cloth, water, or liquid cleaner of any kind.
3
Meijer.com
• Remove the batteries from the Monitor during long periods of nonuse, as batteries can leak.
• Unplug the AC adaptors from the Monitor and the Camera during periods of
nonuse. To disconnect from the power supply, grip the transformer and pull from
the power socket. Never pull by the cord.
• Only use the Monitoring System with the supplied power adaptors.
KNOW YOUR MONITOR
1
Button & LED Functions:
(Fig. 4)
1 Two-Way (TALK) Button
2 Power Selector (OFF • AUDIO • ON)
3 Belt Clip
4 Power ON Indicator
5 Volume Up ( + ) Button
6 Menu Button
7 Volume Down ( - ) Button
(battery charge indicator)
(Fig. 5)
4
2
5
3
6
8 VOX OFF / ON Button
9 AC/DC Adapter Jack
10 Microphone
7
(Fig. 6)
11 Speaker
12 Battery Door
8
9
10
4
11
12
Meijer.com
KNOW YOUR CAMERA
13
14
15
16
17
Button & LED Functions:
(Fig. 7)
13
14
15
16
17
Light Sensor
Power ON Indicator
Speaker
LINK Button
Power Selector OFF / ON
(Fig. 8)
18
AC/DC Adapter Jack
19
Camera Stand
20
Stand Mounting Socket
20
18
19
5
Meijer.com
POWERING UP
The Mobi® Secure Start™ Camera is powered by an AC/DC Adapter while the
Monitor can be powered by either rechargeable batteries or an AC/DC Adaptor
(both provided).
Using the AC/DC Adaptors:
• Plug the connector of the AC/DC Adaptors into the DC Jacks on the Monitor
and Camera units (Fig. 5; no. 9 and Fig. 6; no. 18). Both AC/DC Adapters are
the same and are interchangeable between the Monitor and the Camera.
• Plug the adapter power cords into a standard AC outlet.
• To check the Monitor, switch the Power ON/OFF Selector to the ON position
(Fig. 5; no. 2).
• To check the Camera, switch the ON/OFF Selector to the ON position (Fig. 7;
no. 17).
• The power indicator lights will illuminate indicating that the units are ON
(Fig. 4; no. 4 and Fig. 7; no. 14).
Using Batteries:
• Remove the battery door (Fig. 6, no. 12) on your Monitor using a screwdriver
and insert the Mobi® rechargeable batteries.
• Return the battery cover to the original position and secure the screw with a
screwdriver and allow the batteries to charge with the AC/DC Adapter connected.
• The battery indicator light is green when charged and will turn red when batteries are low.
Note: One battery charge goes between 3-4 hours. When monitoring over long
periods and, in particular, overnight, it is recommended to use the AC/DC Adaptor for the Monitor.
Warnings:
1. Replace rechargeable batteries with Mobi® rechargeables ONLY.
2. When using non-rechargeables do not mix old and new batteries.
3. Do not mix alkaline, standard or rechargeable batteries.
4. Remove the batteries during long periods of non-use.
5. Please dispose of old, defective batteries in an environmentally
friendly manner, in accordance with the relevant legislation.
6. Use only the AC/DC Adaptors supplied with the system.
Note: Camera only functions while its AC/DC Adapter is connected.
6
Meijer.com
MONITOR / CAMERA OPERATION
Monitor Power ON/OFF
Switch the Power ON/OFF
Selector (Fig. 4, no. 2) to the
ON position. The power
indicator light (Fig. 4, no. 4)
will turn on indicating the
Monitor is ON.
Volume Adjustment
Press the Volume Up ( + )
Button (Fig. 4; no. 5) or
Volume Down ( - ) Button
(Fig. 4; no. 7) to adjust the
volume to the desired level.
This image (Fig. 9) will
appear on screen to indicate
the sound level.
Menu Settings
Press the Menu Button (Fig.
4; no. 6) to enter the menu
operation mode. There are 3
operations you can adjust as
shown here (Fig. 10): “Bright
ness”, “VOX Sense” (Voice
Activation Sensitivity Level)
and the “Talk Vol” (Two-Way
Talk Volume) level. To select
an operation use the “+” and
“-” Buttons to toggle between
the three options. Once the
desired option is selected
press the Menu Button again
to go to that operation mode.
Note: The selected operation
will be highlighted in red.
VOX (Voice Activation) Mode
Your Monitor is equipped with VOX mode. To turn on this feature switch the VOX
button (Fig. 5; no. 8) to the ON position. The following message (Fig. 11) will appear on screen indicating the feature is enabled.
7
Meijer.com
VOX mode allows your Monitor to go into standby which conserves battery
power. While in VOX mode your Monitor will stop transmitting audio and video.
However, whenever the Camera picks up noise (like your baby or anything else)
in the room, the Monitor will automatically begin transmitting video and sound.
Once the room is quiet again the Monitor with return to the power-saving VOX
mode unless you have switched off the VOX feature.
VOX Sensitivity Adjustment
You can adjust the VOX noise sensitivity
to a desired level. Press Menu and use
the “+” and “-” Buttons and select VOX
Sense (Fig. 12).
Next press the Menu Button again to
select that operation and then use the
“+” and “-” Buttons again to adjust the
sensitivity to the desired level (Fig. 13)
...Lo, Med, or Hi sensitivity to noise.
Press the Menu button once more to
select that sensitivity level and return to
the three operation choices.
Exiting Menu
To get back to the normal screen (with
only the Signal and Battery Strength
symbols) from the three operation choice
screen, use the “+” and “-” Buttons to
scroll to Menu Exit (Fig. 14) and press
the Menu Button again.
8
Meijer.com
Audio Only Mode
Your Monitor features an Audio Only
mode option. This option allows you to
conserve battery power while transmitting and receiving only audio, leaving the
video off. To select this option switch the
Power Selector (OFF • Audio • ON)
(Fig. 4; no. 2) to Audio. This message
(Fig. 15) will appear on screen indicting
this mode is enabled.
Two-Way Talk
Your Monitor can allow you
to communicate through the
Camera when you press the
Talk Button (Fig. 4; no. 1).
Pressing the Talk Button enables your Camera to receive
audio from the Monitor.
To adjust the volume level for
this option press the Menu
Button and use the “+” and
“-” Buttons to scroll to Talk
Vol (Fig, 16).
Press the Menu Button again
to go to the Talk Volume Adjustment Display (Fig. 17) and
use the “+” and “-” Buttons to
select the desired level then
press the Menu Button once
more to set that level.
9
Meijer.com
Brightness Level
To adjust the brightness level on your
Monitor press the Menu Button and use
the “+” and “-” Buttons to select Brightness (Fig. 18).
Press the Menu Button again to select
that option which shows the Brightness
level scale (Fig. 19). Use the “+” and “-”
Buttons to select the desired level and
then the Menu Button again to set the
level.
Link Button
If your Camera and Monitor should lose
their link place both units near each
other and press the LINK Button (Fig. 7,
no. 16) to relink them.
Note: Secure Start™ is a single Camera
system and does not support multiple
cameras.
Other Screen Indicators
Your Monitor will always indicate your
battery level and signal strength on
screen (Fig. 20).
Signal Strength
Battery Level
10
Meijer.com
TROUBLESHOOTING
Problem Solution
Monitor will not turn on
• Check AC/DC Connection
• Confirm power outlet is working properly.
• Charge Battery Pack
Monitor does not show
• Confirm audio only mode is not selected
an image
• Confirm VOX mode if OFF
• Confirm there are no obstructions in front
of Camera
Monitor only transmitting • Confirm audio only mode is not selected
audio
Camera will not turn on
• Check AC/DC Connection
• Confirm power outlet is working properly.
Battery does not recharge • AC/DC adaptor has not been connected
• Check battery pack connection to Monitor.
• Confirm power outlet is working properly.
• Confirm batteries are placed correctly in Monitor.
Connection is lost • Confirm Monitor and Camera are ON.
• Confirm AC/DC adaptor is connected properly.
• Place Camera and Monitor near each other and press camera link button
11
Meijer.com
RADIO INTERFERENCE ADVICE
FCC Statement
15.19: This device complies with part 15 of the FCC Rules. Operation is subject
to the following two conditions: (1) This device may not cause harmful interference and (2) This device must accept any interference received, including interference that may cause undesired operation.
15.21: Changes or modifications not expressly approved by the party responsible
for compliance could void the user’s authority to operate the equipment.
FCC Radiation Exposure Statement
This equipment complies with FCC radiation exposure limits set forth for uncontrolled environment. This equipment should be installed and operated with
minimum distance 20cm between the radiator and your body. This Camera must
not be co-located or operating in conjunction with any other antenna or Camera.
This equipment complies with FCC RF radiation exposure limits set forth for an
uncontrolled environment. This device and its antenna must not be co-located
or operating in conjunction with any other antenna or Camera. This device has
been tested for compliance with FCC RF Exposure (SAR) limits in the typical
laptop computer configuration and this device can be used in desktop or laptop
computers with side mounted USB slots. This device and its antenna must not be
co-located or operated in conjunction with any other antenna or Camera.
IC STATEMENT
Operation of this device is subject to the following two conditions:
1. This device may not cause interference, and 2. This device must accept any
interference, including interference that may cause undesired operation of the
device.
12
Meijer.com
WARRANTY
Mobi Technologies, Inc. warrants this product to be free from defects in material and workmanship for a period of ninety (90) days from the date of purchase.
Should this product prove to be defective at any time during the warranty period,
Mobi Technologies, Inc. will, at its option, either replace or repair it without
charge. After the warranty period, a service charge will be applied for replacement of parts or labor for repair. To obtain warranty service, please return the
product to Mobi Technologies, Inc. along with a dated sales receipt from the
place of purchase. Purchaser is responsible for shipping the product to Mobi
Technologies, Inc. at the address indicated below and for all associated freight
and insurance costs. This warranty does not cover damage caused by accident,
misuse, abuse, improper maintenance, unauthorized modification, or connection
to an improper power supply. A charge will be made for repair of such damage.
This warranty excludes all incidental or consequential damages and any liability
other than what is stated above.
© 2012 Mobi Technologies, Inc. All Rights Reserved.
Mobi Technologies, Inc.
5913 Blackwelder St
Culver City CA 90232
Toll Free Number (877) 662-4462
www.getmobi.com
Please register your product at:
www.getmobi.com/registerproduct.php
13
Meijer.com
Mobi Technologies, Inc.
5913 Blackwelder St
Culver City CA 90232
Toll Free Number (877) 662-4462
www.getmobi.com
Mobi and Secure Start are registered
trademarks of Mobi Technologies, Inc.
© 2012 Mobi Technologies, Inc. All Rights Reserved