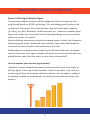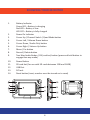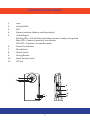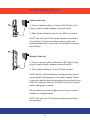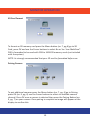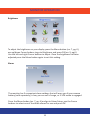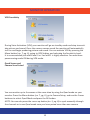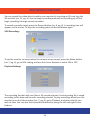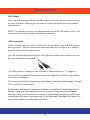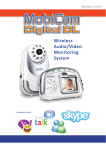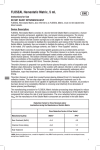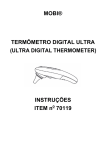
1
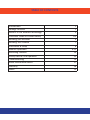
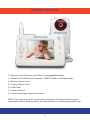
®
Digital DXR
Wireless Audio/Video
Monitoring System
compatible with...
Compatible with… 70204
monitoring
made easy
TABLE OF CONTENTS
Introduction
1
Package Contents
2
About 2.4 GHz Wireless Technology
3
Consumer Guide to Product Safety
4-5
Knowing your Receiver
6
Knowing Your Camera
7
Installation & Setup
8
Monitor Operation
9-13
Recording Function
14
Audio/Video & USB Operation
15
Troubleshooting
16
Radio Interference Advice
17
Warranty
18
Notes
19
INTRODUCTION
Congratulations on the purchase of the MobiCam® Digital DXR Monitoring
System, which brings you the latest in wireless technology. We are sure that you
will be pleased with the quality and features of this product but recommend
that you read these instructions carefully before use in order to fully benefit
from its many features.
The MobiCam® Digital DXR enables you to transmit picture and sound wirelessly, which is ideal for many situations such as monitoring a baby, young children,
pets, or elderly. Additionally it can also be used for household security or as an
office or warehouse surveillance system.
1
PACKAGE CONTENTS
1 x Monitor Unit (Receiver) plus built-in rechargeable battery
1 x Camera Unit (Additional Cameras - #70205, battery sold separately)
1 x Montor Power Cord
1 x Camera Power Cord
1 x USB Cable
1 x Camera Mount
1 x Set of mounting screws and anchors
NOTE: If you find any of the contents are missing or should you need to order
replacement parts, please contact the manufacturer or visit www.getmobi.com.
2
ABOUT DIGITAL WIRELESS TECHNOLOGY
About 2.4 GHz Digital Wireless Signal
This innovative digital wireless solution integrates advance Frequency Hopping Spread Spectrum (FHSS) technology. This technology greatly reduces the
interference that comes from other devises using the same radio frequency
(2.4 GHz), e.g. WIFI, Bluetooth, cordless phones, etc. However, a weaker signal
(lag or still image) can occur from time to time depending on the environment
where the system is installed.
Factors affecting transmission include microwave ovens or other high frequency
electromagnetic waves. Reinforced concrete walls, large scale metal products
and metal furniture should not be located near the units.
Additionally your wireless router speed can be affected if the units are placed
close to the router. Your signal strenght will return to normal once the units are
placed farther away from the router or once they are turned off.
How to improve your wireless signal quality?
If possible, remove obstacles between the camera and receiver that might affect the signal. These can include furniture, cabinets and walls. If you feel the
wireless signal does not improve, place the montor at a new angle or readjust
its position to make an improvement, or simply place the camera close to the
monitor.
3
CONSUMER GUIDE TO PRODUCT SAFETY
Please read this instruction manual before using your MobiCam® Digital DXR
System. When using electrical appliances, basic safety precautions should always be followed. Also please keep this manual for future reference.
• This product is not intended to be used as a medical monitor and its use
should not replace adult supervision.
• Periodically examine this product for damage to the cord, housing or other
parts that may result in the risk of fire, electric shock or injury. Do not operate any product with a damaged cord or plug. If the Color Wireless Monitor
malfunctions or is damaged in any manner please contact the manufacturer
for examination and repair to avoid a hazard.
• Never use transmitter and receiver near water (i.e. bathtub, sink, etc.).
• The AC adaptor cords are not toys.
4
CONSUMER GUIDE TO PRODUCT SAFETY
• Always use transmitter and receiver where there is adequate ventilation.
To prevent overheating, keep away from heat sources such as radiators,
heat registers, stoves, or other appliances that produce heat.
• Use only a dry or very lightly dampened cotton cloth to keep the Camera
and Monitor units free of dust. Do no use a fully moisened cloth, water,
or liquid cleaner of any kind.
• Unplug the AC adaptors from the Monitor and Camera during periods of
non-use. To disconnect from the power supply, grip the transformer and
pull from the power socket. Never pull by the cord.
• Replace battery with the same equivalent type. Please dispose of old, de
fective batteries in an environmentally friendly manner in accordance
with the relevant legislation.
• Only use the Monitoring System with the supplied power adaptors.
5
KNOWING YOUR MONITOR
1.
2.
3.
4.
5.
6.
7.
8.
9.
Battery Indicator
Green LED = Battery is charging
Red LED = Battery is low
LED OFF = Battery is fully charged
Power On Indicator
Cursor Up / Channel Switch / Quad Mode button
Cursor Left / Volume Down button
Cursor Down / Audio Only button
Cursor Right / Volume Up button
Menu / Esc button
Record / Delete button
Two-Way Audio Button / OK (confirm) button (press and hold button to
engage two-way mode)
10.
11.
12.
13.
14.
Power Button
SD card slot (for use with SD cards between 1GB and 16GB)
USB Port
DC Jack
Reset button (inset, monitor must be turned on to reset)
6
KNOWING YOUR CAMERA
1.Lens
2.
Infrared LEDs
3.
EDS
4.
Battery Indicator (battery sold separately)
5.
Link Indicator
Blinking LED = LED will blink indicating camera is ready to be paired
Blue LED = Camera is paired to the receiver
LED OFF = Camera is on standby mode
6.
Power On Indicator
7.
Microphone
8.
Power Switch
9.
Pairing Button
10.
Reset button (inset)
11.
DC Jack
7
INSTALLATION & SETUP
Camera Start-Up
1. Connect power cable to Camera’s DC IN jack, then
plug its power supply adapter into wall outlet.
2. Slide [Power Button] once to turn ON the camera.
NOTE: Use only the 5V/1A power adaptor provided in
the package. To operate without power cable visit
www.getmobi.com to purchase the optional rechargeable battery.
Monitor Start-Up
1. Connect power cable to Monitor’s DC IN jack, then
plug its power supply adapter into wall outlet.
2. Press [Power Button] to turn ON the monitor.
NOTE: Built-in Lithium battery charging process starts
automatically by plugging in the power supply. Please
charge the battery before operating the monitor for portable use. Battery indicator will flash red three minutes
before charging is needed.
When [Battery Indicator] lights up red, plug in power
adapter to charge battery.
NOTE: Use only the 5V/1A power adaptor provided in
the package.
8
MONITOR OPERATION
Time Setting
To set the time and date on your monitor, press the Menu button (no. 7, pg. 6),
use the Cursor buttons to go to System Setup and press the OK button to enter
the Time Setting, use the Cursor buttons to change the setting and press OK
again to save.
Power Saving
By setting the Power Saving mode on your monitor, you can conserve battery
power. The monitor will turn Off after 2 minutes of it being idle.
To set this mode press the Menu button (no. 7, pg. 6), use the Cursor buttons to
go to Power Saving and press OK to enter, use the Cursor buttons to change the
setting and press OK to save. To turn on monitor press the on/off button.
9
MONITOR OPERATION
SD Card Format
To format an SD memory card press the Menu button (no. 7, pg.6) go to SD
Card, press OK and use the Cursor buttons to select No or Yes. Your MobiCam®
DXR is formatted to be used with 2GB to 16GB SD memory cards (not included
with the system).
NOTE: Its strongly recommended that your SD card be formatted before use.
Pairing Camera
To pair additonal cameras press the Menu button (no. 7, pg. 6) go to Pairing
press OK (no. 9, pg. 6) use the Cursor buttons to select an available camera
channel. Press OK once a camera is selected then press the Pairing Button (no.
9, pg. 7) on your camera. Once pairing is complete an image will appear on the
display to confirm this.
10
MONITOR OPERATION
Brightness
To adjust the brightness on your display press the Menu button (no. 7, pg. 6),
use up/down Curser buttons to go to Brightness and press OK (no. 9, pg.6).
Use the left and right Cursor buttons to adjust. Once the brightness has been
adjusted press the Menu button again to exit this setting.
Alarm
The monitor has 3 convenient alarm settings that will warn you if your camera
battery (sold separately) is low, you are out of range, or if VOX mode is engaged.
Press the Menu button (no. 7, pg. 6) and go to Alarm Setup, use the Cursor
buttons to select one of the three alarms for use and press OK.
11
MONITOR OPERATION
VOX Sensitivity
During Voice Activation (VOX) your monitor will go on standby mode and stop transmitting picture and sound. Once the camera senses sound the monitor will automatically
turn on and begin producing picture and sound. You can activate VOX by pressing the
Menu button (no. 7, pg. 6), going to VOX Setting, and selecting the Sensitivity Level.
It is recommended you select level 2 or 3 as level 1 is highly sensitive. You must have
power-saving mode ON during VOX mode.
Quad Screen and
Camera Scan Period
You can monitor up to 4 cameras at the same time by using the Quad mode on your
monitor. Press the Menu button (no. 7, pg. 6), go to Camera Setup, and use the Cursor
buttonss to select Quad Mode and press the OK button.
NOTE: You can also press the cursor up button (no. 3, pg. 6) to cycle manually through
the channels or to use Quad mode once you have paired more than one camera.
12
MONITOR OPERATION
Camera ON/OFF
Once you have paired extra cameras to your monitor, you can turn off any camera
you do not wish to scan. Press the Menu button (no.7, pg. 6), go to Camera Setup,
and use the Cursor buttons to select a camera you wish to turn off and press OK.
Factory Default
To reset your monitor to factory settings press the Menu button (no.7, pg. 6), go to
System Setup and select No or Yes.
13
RECORDING FUNCTION
You can record live video directly within your monitor by inserting an SD card into the
SD card slot (no. 11, pg. 6). You can begin recording manually or by setting up VOX to
begin recordings through sound activation.
To record manually simply press the Record button (no. 8, pg. 6). A recording icon will
appear on the screen. To stop the recording press the Record button again.
VOX Recordings
To set the monitor to record when the camera senses sound, press the Menu button
(no. 7, pg. 6), go to VOX setting, and use the Cursor buttons to select ON or OFF.
Playback Settings
The recording function will save files in 30 second intervals. Each recording file is saved
according to the date and time the recording started. To play recordings directly on the
monitor press the Menu button (no. 7, pg. 6), go to Playback, and select the file you
wish to view. You can also fast forward and rewind by using the left and right Cursor
buttons.
14
USB OPERATION
USB Output
Your monitor is equipped with a USB output so you can connect your monitor
to your computer allowing you to capture video and sound from the camera
transmission.
NOTE: The monitor screen turns off automatically when USB cable is used. The
screen will turn back on when the cable is removed.
USB Connection
NOTE: You will need to install a USB devise driver before using the USB connection to your PC. Visit our website at www.getmobi.com and go to our support
page to download the devise driver.
Use the included Standard-to-Mini USB cable to connect your monitor to your
PC once the driver is installed.
The USB output is located on the left side of the monitor (no . 12, page 6).
Once you have installed the device driver your MobiCam® DXR can be utilized
as a wireless webcam.
The unit can be used in conjunction with Skype®, Windows Messenger®, Google
Talk® and Yahoo Messenger®.
Additionally, MobiCam® Anywhere Software is available for download free of
charge. Once you have registered your unit, you will recieve your activation
code via email. You can set your monitor for scheduled recordings, continuous
recording and remote viewing via any PC or Windows® enabled cell phone. For
more information visit www.getmobi.com
15
TROUBLESHOOTING
Problem
Solution
System shows “ No Signal”
•
•
•
•
Low or unstable signal
•
•
•
Check the power cord connection
and the battery power.
Pair your camera
Place the camera close to the monitor
If possible remove major obstacles
between camera and monitor.
Adjust camera and monitor position
Keep WIFI router away from camera
or monitor
Keep working motors (hair dryer, air
conditioner, water pump) or microwave away from the camera and/or
monitor.
Recording does not work
•
•
•
Insert SD card into SD card slot
Unlock the SD card
Turn on VOX sensitivity and VOX
recording.
Only sound is working
•
Press the Audio only button for 3
seconds to turn off the function
16
RADIO INTERFERENCE ADVICE
FCC Compliance Statement:
This device complies with Part 15 of the FCC rules. Operation
is subjected to the following two conditions:
(1) this device may cause harmful interference, and
(2) this device must accept any interference received,
including interference that may cause undesired operation.
FCC Warning
This equipment has been tested and found to comply with imits for a Class B
digital device, pursuant to Part 15 of the FCC rules and ETSI (EN) 300 328. The
limits are designed to provide reasonable protection against harmful interference in residential installations. This equipment generates, uses, and can radiate radio frequency energy, and if not installed and used in accordance with the
instructions, may cause harmful interference to radio communications.
However, there is no guarantee that interference will not occur in a particular
installation. If this equipment does cause interference to radio or television
equipment reception, which can be determined my turning off and on, the user
is encouraged to try to correct the interference by one or more of the following
measures:
-Reorient or relocate the antenna
-Move the equipment away from the receiver
-Plug the equipment into an outlet on a circuit different from the receiver
-Consult your dealer or an experienced radio/television technician for addi
tional suggestions.
You are cautioned that any change of modifications to the equipment not
expressly approved by the party responsible for compliance could void your
authority to operate such equipment.
17
WARRANTY
Mobi Technologies, Inc. warrants this product to be free from defects in material and workmanship for a period of ninety (90) days from the date of purchase. Should this product prove to be defective at any time during the warranty period, Mobi Technologies, Inc. will, at its option, either replace or repair
it without charge. After the warranty period, a service charge will be applied
for replacement of parts or labor for repair. To obtain warranty service, please
return the product to Mobi along with a dated sales receipt from the place of
purchase. Purchaser is responsible for shipping the product to Mobi Technologies, Inc. at the address indicated below and for all associated freight and insurance costs. This warranty does not cover damage caused by accident, misuse,
abuse, improper maintenance, unauthorized modification, or connection to
an improper power supply. A charge will be made for repair of such damage.
This warranty excludes all incidental or consequential damages and any liability
other than what is stated above.
Mobi Technologies, Inc.
5913 Blackwelder St
Culver City CA 90232
Toll Free Number (877) 662-4462
www.getmobi.com
Mobi® and MobiCam® are registered trademarks of Mobi Technologies, Inc.
Skype®, Windows Messenger®, Google Talk®, and Yahoo Messenger® are
registered trademarks of their respective owners and are not affiliated with or
owned by Mobi Technologies, Inc.
© 2011 Mobi Technologies, Inc. All Rights Reserved
Please register your product at: www.getmobi.com/registerproduct.php
18
NOTES
19
Mobi Technologies, Inc.
5913 Blackwelder St
Culver City CA 90232
Toll Free Number (877) 662-4462
www.getmobi.com
Mobi® and MobiCam® are registered
trademarks of Mobi Technologies, Inc.
© 2011 Mobi Technologies, Inc. All Rights Reserved