1
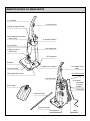
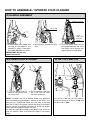
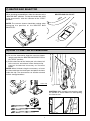
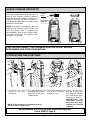
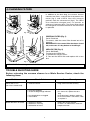
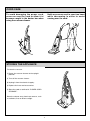
Operating Instructions
Vacuum Cleaner
S183, S184
Please carefully study these Operating Instructions before attempting to operate the
unit and note the listed Important Safety Instructions.
IMPORTANT SAFETY INSTRUCTIONS
When using this vacuum cleaner, basic precautions should always be followed , including the following:
READ ALL INSTRUCTIONS BEFORE USING THIS VACUUM CLEANER
WARNING
To reduce the risk of fire, electric shock, or injury:
• Do not leave vacuum cleaner unattended when it is plugged in. Unplug it from the outlet when not in use
and before servicing.
• Electric shock could occur if used outdoors or on wet surfaces.
• Do not allow to be used as a toy. Close attention is necessary when used by or near children.
• Use only as described in this manual. Use only manufacturer’s recommended attachments.
• Do not use with damaged cord or plug. If the vacuum cleaner is not working as it should, has been
dropped, damaged, left outdoors, or dropped into water, bring it to a service center.
• Do not pull or carry by cord, use the cord as a handle, close a door on the cord, or pull the cord around
sharp edges or corners. Do not run the vacuum cleaner over the cord. Keep the cord away from heated
surfaces.
• Do not unplug by pulling on cord. To unplug, grasp the plug, not the cord.
• Do not handle the plug or vacuum cleaner with wet hands.
• Do not put any object into the openings. Do not use with any opening blocked. Keep openings free of
dust, lint, hair, and anything that may block or reduce air flow.
• Keep hair, loose clothing, fingers, and all parts of body away from openings and moving parts.
• Do not pick up anything that is burning or smoking, such as cigarettes, matches or hot ashes.
• Do not use without dust bag and/or filters in place.
• Turn off all controls before unplugging.
• Use extra care when cleaning on stairs.
• Do not use to pick up flammable or combustible liquids such as gasoline or use in areas where they
may be present.
SAVE THESE INSTRUCTIONS
THIS VACUUM CLEANER IS INTENDED FOR HOUSEHOLD USE ONLY
Notice- Before you plug in your Vacuum Cleaner, make sure that the voltage indicated on the rating plate
located at the rear of the vacuum cleaner is the same as your local supply.
2
IDENTIFICATION OF MAIN PARTS
A-1) Handle
B-2) Cord clip
H) Bag change indicator
D) Variable power control
(S184 only)
C) ON/OFF Switch
Carry handle
Dust bag cover
J) Exhaust cover
HEPA filter
E) Foot pedal
Bumper
Cleaning head
F) Beater bar selector
Head-light (S184 only)
A-3) Upper cord
hook
B-1) Power cord
A-2) Hose clip
A-3) Lower
cord hook/
Carrying
handle
I) Dust bag
Hose clip
Extension tube
Crevice nozzle
Dusting brush
3
Hose
HOW TO ASSEMBLE / OPERATE YOUR CLEANER
A) HANDLE ASSEMBLY
Upper cord hook
Hose clip
Lower
cord hook/
Carrying
handle
1) Insert the base of the handle into
the top of the body of the
machine as shown. Push down
the handle and tighten the screw.
2) Set the hose around the hose
clip.
3) Turn the upper cord hook to
the upright position and wind
the power cord around the
upper and lower cord hooks.
IMPORTANT: Do not over
tighten the screw.
B) POWER CORD STORAGE
1) Turn the upper hook to
release the power cord
for instant use.
C) ON / OFF SWITCH
2) Set the power cord into
the cord clip to help
secure it during use
NOTE: To reduce the risk of electric shock, this appliance
has a polarized plug (one blade is wider than the other). This
plug will fit in a polarized outlet only one way. If the plug
does not fit fully in the outlet, reverse the plug. If it still does
not fit, contact a qualified electrician to install the proper
outlet. Do not change the plug in any way.
To avoid any possible damage to the power cord, never run
over the cord or allow it to become caught in the rotary
brush.
4
To start or stop the vacuum cleaner,
push the switch to “I” to turn it ON, and
to “O” to turn it OFF.
D) VARIABLE POWER CONTROL (S184 Only)
This vacuum cleaner incorporates a variable power control to allow you to select the power most suitable
for your cleaning needs.
MIN: To clean curtains and soft furnishings
with tool attached.
MAX: To continuously clean with
high suction power.
E) USING THE FOOT PEDAL TO ADJUST THE VACUUM HEIGHT
To lower the body of the cleaner, step on the pedal at the left rear corner of the vacuum cleaner.
1. Upright position
The handle should be in an
upright
position
when
cleaning tools are used.
2. Middle position
For normal cleaning, press the
foot pedal and pull back the
handle to a comfortable angle.
5
3. Low position
For cleaning under furniture,
press the pedal a second
time. The handle may now be
lowered almost to the floor as
shown.
F) BEATER BAR SELECTOR
BEATER BAR ON OR OFF
B
A
E
TE
R R
NOTE: The vacuum cleaner should be running when
changing the position of the BEATER BAR
SELECTOR.
B
When cleaning carpeted floor, slide the selector to the
“BEATER BAR” position. To stop the beater bar while
using accessories, slide the selector to the “STOP”
position.
A
S
TO
P
G) HOW TO USE THE ACCESSORIES
1) To use the accessories keep the vacuum cleaner
upright and slide the BEATER BAR SELECTOR to
the “STOP” position.
2) Pull the hose out of the intake port a the lower left
of the vacuum, and release it from the hose clip.
Connect the desired accessory as illustrate
below.
NOTE: When finished using the accessory, re-insert
the hose end into the intake port and place the hose
under the clip. The accessories can also be returned
to their storage locations.
Hose clip
CAUTION: While using the accessories, hold
the handle as shown above to avoid pulling
the cleaner over.
6
H) BAG CHANGE INDICATOR
The bag change indicator located on the
front of your cleaner normally indicates
when the dust bag should be changed. In
order to maintain the best efficiency, it
should be changed when the yellow mark
appears in the window.
Yellow
mark
Bag change
indicator
NOTE: if the yellow mark appears after the
bag has been replaced, check to see if the
hose or suction tube is clogged (see
BLOCKAGES). Due to the smaller intake,
the yellow mark may also appear when
using the crevice tool.
CAUTION: DISCONNECT THE CLEANER FROM THE OUTLET BEFORE
PERFORMING THE OPERATIONS BELOW
I) REPLACING THE DUST BAG
1) Remove the dust 2) Grip the handle of the 3) Close dust bag tab to 4) Install the new dust
cover by pulling it
dust bag and pull the
avoid dust leakage
bag by placing the
forwards.
bag out of the dust
and put it away.
hole over the exhaust
compartment.
port and pressing it
into place as shown.
IMPORTANT: For
maximum vacuum
efficiency, dust bags
NOTE: If the dust bag is installed incorrectly,
should be changed
the dust cover will not close.
regularly.
We recommend the use of genuine Miele dust bags only
Part # 5294740 Type Z
7
J) CHANGING FILTERS
In addition to the dust bag, the vacuum cleaner
contains two filters; a central filter that protects the
motor (fig.1) and a HEPA filter that removes
particles from the exhausted air (fig.2). The HEPA
filter should be changed every six months or
whenever it becomes dirty. The central filter should
be changed or rinsed out whenever the HEPA filter
is replaced.
Fig. 1
CENTRAL FILTER (Fig. 1)
Part # F0391100
To remove, slide the central filter forward out of its
housing.
IMPORTANT: If the central filter has been rinsed
out, make sure it is dry before re-installing it.
HEPA FILTER (Fig. 2)
Part # S02Z6000
To change the HEPA filter.
1) Remove the exhaust cover.
2) Take out the HEPA filter and replace with a new
one.
Fig. 2
IMPORTANT: Do not forget to re-install the filters before use.
TROUBLE SHOOTING GUIDE
Before returning the vacuum cleaner to a Miele Service Center, check the
following items:
Problem
Check Point
Cause / Remedy
Motor doesn’t run.
(no noise is heard at all)
• Cord connection.
• Plug cord into outlet correctly.
Motor runs but no suction.
• Hose inlet clogged.
• Check the bag change indicator.
• I If there is a clog, remove it.
• If it shows full, replace the dust
bag.
• If the dust bag is broken, replace it.
• If the central filter is full of dust, clean
or replace it.
• Dust bag broken or clogged.
• Central filter.
Beater bar does not rotate.
• Beater bar selector.
• Beater bar / housing.
• Belt broken or loose.
• Select the correct position.
• If there is an obstruction, remove it.
• Replace the belt.
8
IMPORTANT NOTE: Before replacing any part always,
DISCONNECT THE CLEANER FROM THE ELECTRICAL SUPPLY.
BLOCKAGES
If your cleaner stops picking up dust, or the Bag Change Indicator shows "Full" while the dust bag
is still empty, a blockage may have occurred.
To remove the obstruction, proceed as follow:
Remove the hose from the suction inlet by turning the hose to the right and pulling it out (Fig. 1). Clear any
obstruction from the hose and/or suction inlet using a blunt instrument, taking care not to damage the hose.
If the obstruction occurs in the suction pipe, it can be removed with care as shown in Fig. 2.
Suction pipe inlet
Fig. 1
Fig. 2
MAINTENANCE FOR THE BEATER BAR
DO NOT USE YOUR FINGERS OR HANDS TO
REMOVE OR CLEAN THE BEATER BAR.
When it is necessary to remove thread, string, hair
etc., which has wound around the beater bar, cut
across them with a pair of scissors, making sure
not to cut the brush.
REMOVE PLUG BEFORE
REMOVING THIS COVER
REMOVE PLUG BEFORE
REMOVING THIS COVER
9
SERVICING AND REPAIRS
Use only genuine Miele replacement parts.
DISCONNECT THE CLEANER FROM THE ELECTRICAL SUPPLY
If you have any questions, contact your local dealer / service agent.
Any service needed other than that described in these Operating Instructions should be
performed by a Miele Service Center, only.
To replace any of the following parts, place the vacuum cleaner in the horizontal position
by using the pedal. Then turn it over exposing the underside.
HOW TO REPLACE - DRIVE BELT
(Part # S01Z6000) AND BEATER BAR
ASSEMBLY (Part # R98Z6064)
RE
BEFO R
VE
PLUG IS CO
VE
TH
REMO VING
REMO
1. Remove the 4 screws from the base plate and
lift it off. (Fig. 1)
2. Release the belt from the motor shaft and lift
the beater bar assembly to remove the belt.
(Fig. 2)
3. To reassemble the beater bar, return the belt to
the motor shaft and beater bar pulley.
Re-insert the bar into its supports and turn the
beater bar to ensure that the belt is seated
correctly. (Fig. 3)
4. Replace the base plate, and re-fasten the
screws securely.
Fig. 2
Fig. 1
HOW TO REPLACE - BEATER BAR / SIDE
BRUSHES / SHAFT SUPPORT A-B
Fig. 3
Screw
A
Rotary brush
1. First remove the base plate, drive belt and
beater bar assembly (as illustrated above).
2. Remove the 2 screws at both ends of the
beater bar assembly and separate the different
parts as shown in the exploded view.
3. Replace any damaged part and reassemble in
the reverse order.
B
Side
Brush
Shaft
support
REPLACING THE HEAD-LIGHT BULB
(S184 only)
Shaft
support
1. Remove the base plate, release the head-light
assembly and lift it off. (Fig. 1)
2. Remove the old bulb, and replace it with a new
one (Fig. 2)
(Consult your dealer / service agent for a
suitable replacement bulb).
3. Re-insert the head-light assembly and the
base plate.
Fig. 1
10
Screw
Side
Brush
Fig. 2
CORD CARE
To avoid damaging the power cord,
never run over the cord or allow it to
become caught in the beater bar when
using the vacuum cleaner.
Hold any excess cord in your free hand
while vacuuming in order to avoid
running over the cord.
STORING THE APPLIANCE
To store the vacuum:
1) Return the vacuum cleaner to the upright
position.
2) Turn off the vacuum cleaner.
3) Unplug it from the electrical supply.
4) Replace the hose and accessories.
5) Store the cord as outlined in “POWER CORD
STORAGE”.
Store the cleaner away from heat sources, such
as radiators, fires or direct sunlight.
11
National Headquarters
MIELE, INC.
9 INDEPENDENCE WAY
PRINCETON, NJ 08540
Phone: (609) 419-9898
or
(800) 843-7231
Fax:
(609) 419-4298
www.miele.com
Showroom Locations
National Headquarters
Miele, Inc.
9 Independence Way
Princeton, NJ 08540
Phone: (609) 419-9898
Fax:
(609) 419-4298
Southern California
Miele, Inc.
Southern California Showroom
189 North Robertson Blvd
Beverly Hills, CA 90211
Phone: (310) 855-9470
Fax:
(310) 358-0238
New England
Miele, Inc.
New England Showroom
555 Washington Street
Wellesley, MA 02482
Phone: (781) 431-2225
Fax:
(781) 431-0003
Toll free (Wellesley area only):
(877) 53 MIELE (64353)
Southwest
Miele, Inc.
1400 Turtle Creek Boulevard
Suite 177
Dallas, TX 75207
Phone: (214) 752-9000
Fax:
(214) 752-6307
MidWest
Miele, Inc.
3100 West Dundee Road
Suite 901
Northbrook, IL 60062
Phone: (847) 714-9433
Fax:
(847) 714-9434
Southeast
Miele, Inc.
7680 Nort Federal Highway
Boca Raton, FL 33487
Phone: (561) 995-8030
Fax:
(561) 995-8083
Canadian Head Office
MIELE, LTD
55G East Beaver Creek Road
Richmond Hill
Ontario, L4B 1ES
Téléphone: (800) 565-6435
Téléphone: (905) 707-1171
Fax:
(905) 707-0177
Showroom Locations
Quebec
Miele, Ltd
400 Laurier Ave, West
Suite 600
Montreal, Quebec H2V 2K7
Téléphone: (877) 635-4353
ou
(514) 277-1818
Fax:
(514) 277-1838
British Columbia
West Coast
Sierra Showroom
Sobel Building
680 Eighth Street
Suite 169-A
San Francisco, CA 94103
Phone: (415) 241 68 20
Fax:
(415) 241 73 17
Z07Z6090
Miele, Ltd
3731 North Fraser Way
Unit 200
Burnaby, British Columbia V5J 5J2
Téléphone: (604) 434-1300
Fax:
(604) 434-1309
Printed in Spain