1
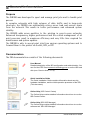
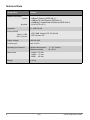
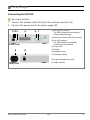
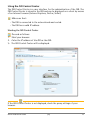
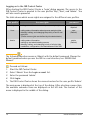
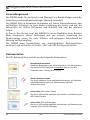
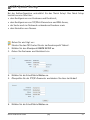
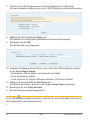
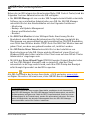
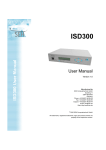
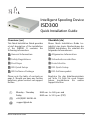
Intelligent Spooling Device
ISD300
Quick Installation Guide
Overview [en]
Überblick [de]
This Quick Installation Guide provides
a brief description of the installation
of the ISD300. It contains the
following information:
Dieser Quick Installation Guide beinhaltet eine kurze Beschreibung der
ISD300 Installation. Sie erhalten die
folgenden Informationen:
General Information
Allgemeine Information
Safety Regulations
Sicherheitsvorschriften
First Steps
Erste Schritte
ISD Quick Setup
ISD Quick Setup
ISD Software Package
ISD-Softwarepaket
Please note the table of contents on
page 3. Should you have any further
questions, please contact our support
hotline.
℡
@
Monday - Thursday
Friday
+49 (0)521 94226-44
Beachten Sie das Inhaltsverzeichnis
auf Seite 19. Falls Sie noch Fragen
haben, kontaktieren Sie unsere
Support-Hotline.
8:00 a.m. to 4:45 p.m. and
8:00 a.m. to 3:15 p.m. (CET)
[email protected]
Quick Installation Guide
1
Date of Manufacture
The serial number includes the date of manufacture.
The serial number can be found on the type plate.
2
Quick Installation Guide
2 General Information . . . . . . . . . . . . . . . . . . . . . . . . 4
Purpose. . . . . . . . . . . . . . . . . . . . . . . . . . . . . . . . . . . . . . . .4
Documentation . . . . . . . . . . . . . . . . . . . . . . . . . . . . . . . .4
Scope of Supply . . . . . . . . . . . . . . . . . . . . . . . . . . . . . . . .5
Technical Data . . . . . . . . . . . . . . . . . . . . . . . . . . . . . . . . .6
Table of Contents
2 Safety Regulations. . . . . . . . . . . . . . . . . . . . . . . . . . 7
2 First Steps . . . . . . . . . . . . . . . . . . . . . . . . . . . . . . . . . . 9
Connecting the ISD300 . . . . . . . . . . . . . . . . . . . . . . . . .9
Switching the ISD300 On/Off . . . . . . . . . . . . . . . . . 10
ISD300- Assigning TCP/IP Parameters . . . . . . . . . 11
Using the ISD Control Center . . . . . . . . . . . . . . . . . 13
2 ISD Quick Setup . . . . . . . . . . . . . . . . . . . . . . . . . . . 15
2 ISD Software Package. . . . . . . . . . . . . . . . . . . . . . 17
Quick Installation Guide
[en]
3
General Information
Purpose
The ISD300 was developed to spool and manage print jobs and to handle print
queues.
In complex networks with high volumes of data traffic and in large-scale
structures, the ISD300 can substantially relieve server load and remove strain
from the network. This results in better performance and enhanced system
stability.
The ISD300 adds server qualities to the printing in peer-to-peer networks.
Enhanced transparency, higher performance and the central management of all
print processes result in maximum efficiency and very little time required for
maintenance and system updates.
The ISD300 is able to accept print jobs from various operating systems and to
forward them to the printer via Socket, LPD, or IPP.
Documentation
The ISD documentation consists of the following documents:
PD
F
User Manual
Detailed description of the ISD configuration and administration. You
can find the PDF file at www.seh-technology.com or on the ISD hard
disk (see: 'Service-Area'
5).
Online Help (SEH ISD Manager)
The Online Help contains detailed information about how to use the
software tool 'SEH ISD Manager'.
L
HT
M
Online Help (ISD Control Center)
The Online Help contains detailed information about how to use the
ISD Control Center.
HT
M
L
Pr
in
t
PD ed
F
Quick Installation Guide
The Quick Installation Guide contains information about security,
hardware installation, and the initial operation procedure of the ISD.
(This document)
4
[en]
Quick Installation Guide
Scope of Supply
Please check the package content before getting started.
ISD300
Intelligent Spooling Device 300
Quick Installation Guide
The Quick Installation Guide contains information about security,
hardware installation, and the initial operation procedure of the
ISD. (This document)
Power cord
Power supply cable
Service-Area
The service area is a defined memory area on the ISD hard disk.
The service area contains:
- ISD300 User Manual
- Quick Installation Guide ISD300 (this document)
- SEH ISD Manager
- SEH Print Monitor
- ISD Printer Driver Wizard
- Driver Wizard Plugin 'CSR DLL'
Displaying the service area
The service area can be displayed via the ISD Control Center.
Start the ISD Control Center with the user profile 'Admin' and select
'Manuals & Tools'.
Note: To start the ISD Control Center follow the instructions in the
9.
chapter 'First Steps'
Quick Installation Guide
[en]
5
Technical Data
Properties
Values
Network connector
logical:
physical:
6
- 10BaseT Ethernet (IEEE 802.3)
- 100BaseTX Fast Ethernet (IEEE 802.3)
- 1000BaseT Gigabit Ethernet Ethernet (IEEE 802.3)
- RJ-45 (STP cat. 5)
Interfaces
2 x USB 2.0 HS
Print protocols
Client
ISD:
ISD
printer:
- LPD, SMB, Socket, IPP, ThinPrint®
- LPD, Socket, IPP
Supply voltage
100-240 VAC
Current input
max. 0.25 A
Operating environment
Ambient temperature:
Relative humidity
Dimensions
- Length: 215 mm
- Height: 47 mm
- Width: 186 mm
Weight
1,450 g
[en]
5 - 30 °Celsius
20 - 80 %
Quick Installation Guide
Safety Regulations
Before starting the initial setup procedure and during the operation of the ISD,
please note the following safety regulations. Their purpose is to protect yourself
and others from personal injuries, and avoid damage to the equipment.
CAUTION: Failure to follow these directions could result in bodily harm
or loss of life.
Basic Personal Security Precautions
Read the documentation and make sure that your system meets the
requirements listed therein.
The ISD300 must only be connected to the mains and to the network by
qualified personnel.
Do not open the housing of the device. The ISD300 may only be connected and
operated if the housing is not opened and if the ISD300 is in perfect condition.
Do not put objects on top of the housing.
Unauthorised modifications to the device can affect the product certification
and are forbidden.
Operating Environment Prerequisites
The ISD300 must be placed on a solid surface with no vibration.
The ISD300 must not be operated in dusty places and direct sunlight.
Avoid contact with humidity or liquids.
The ISD300 may only be connected and operated if the installation location
meets the ambient conditions.
Ambient temperature: 5 - 30 °Celsius
Relative humidity:
20 - 80 %
Position the ISD300 in a way that guarantees that the socket for the
connection of the power cord is in the proximity of the device and is easily
accessible. Make sure that the device can be separated easily from the
network.
Quick Installation Guide
[en]
7
Security Precautions for Cabeling and Power Cords
Make sure that no-one steps on or stumbles over the cables.
If the supplied power cord cannot be used in your country, acquire an
appropriate power cord that suits national provisions. For more information,
please consult your retailer.
A damaged power cord must be replaced immediately. For more information,
please consult your retailer.
The ISD300 must be connected to a socket with protective contact.
Do not connect a telephone cable to the RJ-45 connector. The RJ-45
connector may only be connected to SELV voltages. For the connection to the
RJ-45 connector only STP cabling (category 5 or better) may be used. The
shielding must fit flushly to the connector.
Only use a certified USB Hi-Speed cable for the connection to the printer. You
will find a list of certified cables at www.usb.org!
Power Supply Provisions
This device may only be operated according to the power supply provisions
stated on the type plate.
line voltage / AC input:
100 - 240 V, 47 - 63 Hz, max. 0,25 A
This equipment is designed for connection to a grounded outlet. The
grounding type plug is an important safety feature. To reduce the risk of
electrical shock or damage to the equipment, do not disable this feature.
8
[en]
Quick Installation Guide
First Steps
Connecting the ISD300
Proceed as follows:
1. Connect the network cable (RJ-45) to the network connector (2).
2. Connect the power cord to the power supply (8).
1234
5
1) Activity LED (yellow):
The LED indicates the exchange of
network data packages.
6 7
2) Network connector (RJ-45 connector)
3) Link LED (green):
The LED indicates a (physical)
connection to the network.
Front view
4) Power LED
8
5) Display
9
6) Navigation keys
7) Soft power switch
8) Power supply/power switch
9) USB connector
Rear view
Quick Installation Guide
[en]
9
Switching the ISD300 On/Off
Switching the Device On
Proceed as follows:
1. Switch on the power switch.
The ISD300 system software boots automatically if the device receives the
power it needs.
Switching the Device Off
Print jobs that are processed while the ISD shuts down cannot be completed.
Print jobs that are stored in a queue will be completed when the device reboots.
To avoid loss of data, shutdown the system software before you switch off the
power switch.
Proceed as follows:
1. Keep the soft power switch
pressed for five seconds.
The system software shuts down.
2. Switch on the power switch.
The device is shut down.
Booting/Shutting down the System Software
The system software can be booted/shut down manually.
Make sure that:
- The power switch is switched on.
To boot the software, press the soft power switch for a short moment.
To shut down the software, keep the soft power switch pressed for
five
seconds.
What Happens in the Case of a Power Failure?
When the ISD receives again the necessary power, it takes on the same status as
before the power failure.
10
[en]
Quick Installation Guide
ISD300- Assigning TCP/IP Parameters
TCP/IP network protocols require the storing of the IP address in the ISD so that
the device can be addressed within the network and be configured via the ISD
Control Center.
You can assign the TCP/IP parameter manually or have it assigned automatically
via DHCP (Dynamic Host Configuration Protocol). The manually assignment is
default.
Assigning TCP/IP Parameters Manually
Use the navigation keys at the front of the device to assign the TCP/IP
parameters.
Proceed as follows:
1. Press . The display shows:
IP Setup
>
Cancel
<
2. Press .
The display shows the current IP configuration ('Manual' or 'DHCP'):
IP Configuration
Manual
3. Select 'Manual' via
The display shows:
or
and press
to confirm.
IP Address:
000.000.000.000
4. Enter the IP address.
Use
to navigate to individual numerical values within the IP address.
You can change the numerical values via
.
5. Press
to confirm. The display shows:
Netmask:
000.000.000.000
6. Enter the netmask.
7. Press
to confirm. The display shows:
Gateway:
000.000.000.000
8. Enter the gateway.
Quick Installation Guide
[en]
11
9. Press
to confirm. The display shows:
> Apply
< Back
10. Press
to confirm. The display shows:
Applying Network
Settings ...
The settings will be saved.
Assigning TCP/IP Parameters Automatically (DHCP)
Make sure that:
- An active DHCP server is integrated into the network.
Use the navigation keys at the front of the device to assign the TCP/IP
parameters via DHCP.
Proceed as follows:
1. Press . The display shows:
IP Setup
>
Cancel
<
2. Press .
The display shows the current IP configuration ('Manual' or 'DHCP'):
IP Configuration
Manual
3. Select 'DHCP' via
or
and press
to confirm. The display shows:
> Apply
< Back
4. Press to confirm.
The settings will be saved.
Upon booting DHCP will be applied automatically. TCP/IP parameters are assigned
by a DHCP server.
12
[en]
Quick Installation Guide
Using the ISD Control Center
The ISD Control Center is a user interface for the administration of the ISD. The
ISD Control Center is stored in the ISD and can be displayed on a client by means
of an Internet browser (Internet Explorer, Firefox, Safari).
Make sure that:
- The ISD is connected to the network and was booted.
- The ISD has a valid IP address.
Starting the ISD Control Center
Proceed as follows:
1. Start your browser.
2. Enter the IP address of the ISD as the URL.
The ISD Control Center will be displayed.
If the ISD Control Center is not displayed, check the proxy settings of your
browser.
Quick Installation Guide
[en]
13
Logging on to the ISD Control Center
After starting the ISD Control Center a 'login' dialog appears. The access to the
ISD Control Center is granted to the user profiles ’Any’, ’User’, and ’Admin’. You
will also need a password.
The table shows which access rights are assigned to the different user profiles.
User profile
Access rights
password
Any
- calling status information about queues and print jobs
no password
required
User
- calling status information about queues and print jobs
- deleting, halting, and changing the priority of one’s own
print jobs
(These access rights are defined by the administrator.)
user
(Default)
Admin
- calling status information
- setting up and administrating queues
- deleting, halting, and changing priority of all print jobs
- installation, configuration, and maintenance of the ISD
admin
(Default)
The following describes access as 'Admin' with the default password. Change the
default password when you use the ISD in a real situation; see: ISD300 User
Manual.
1.
2.
3.
4.
Proceed as follows:
Start the ISD Control Center.
Select 'Admin' from the Login account list.
Enter the password 'admin'.
Click Login.
The ISD Control Center shows the menu structure for the user profile 'Admin'.
The main menu is displayed at the top of the dialog. After selecting a menu item,
the available submenu items are displayed on the left side. The content of the
menu is displayed in the middle of the dialog.
14
[en]
Quick Installation Guide
ISD Quick Setup
The 'Quick Setup' assists you with the initial configuration. The Quick Setup
involves four steps:
the configuration of the host name and device time,
the configuration of the TCP/IPv4 parameters and DNS server,
the search for available printers in the network, and
the setting up of queues.
Proceed as follows:
1. Start the ISD Control Center with the user profile 'Admin'.
2. Select QUICK SETUP.
3. Enter the host name and the device time.
4. Click Next.
5. Verify the TCP/IP parameters and change them, if required.
6. Click Next.
Quick Installation Guide
[en]
15
7. Define search parameters for the search for printers in the network.
You can search a maximum of 255 IP addresses.
8. Click Next.
The number of the printers found in the network is displayed.
9. Click OK to confirm.
The printer list is displayed.
10. Assign names to the queues (that are not resolved via DNS) in the Queue
name column.
- letters, numbers, hyphens and underscores are allowed
- no space characters are allowed
- no more than 32 characters (Windows 98 max. 15 characters) are allowed
11. Click Install.
The names of the queues will be shown in the column Queue name.
12. Click Finish setup to confirm.
The settings will be saved.
Further information on the configuration and administration can be found in the
ISD300 User Manual.
16
[en]
Quick Installation Guide
ISD Software Package
Apart from the integrated user interface (ISD Control Center), the following tools
are available for the administration of the ISD:
The SEH ISD Manager is a software that has been developed by SEH
Computertechnik GmbH for a simple administration of the ISD. The SEH ISD
Manager offers the following features to assist you in your work:
- monitoring
- backup and update management
- queues and printer drivers
- restart
The SEH Print Monitor is an SEH-specific extension for the printing service of
a Windows operating system. The software ensures the transfer of
unencrypted and encrypted (SSL/TLS) print data from the client to the ISD by
means of direct TCP/IP ports. The SEH Print Monitor can be installed on every
client intended for printing.
The ISD Printer Driver Wizard helps you to install printer drivers on the ISD.
For this purpose the Wizard will be installed on a client running Windows 2000
or later. The client must be specified as 'Printer Administrator' on the ISD.
The Driver Wizard Plugin (CSR DLL) is used to check if original printer drivers
support CSR. The printer drivers are then configured in such a way that the
client will be automatically able to spool the rendered print job to the ISD
according to the CSR principle.
All ISD tools are available on the service area (see
5) and at www.sehtechnology.com. For further information; see: ISD300 User Manual.
Product Update
We recommend the use of the SEH ISD Manager to keep your product up-to-date.
The SEH ISD Manager automatically searches for current software packages. You
will be automatically informed if SEH Computertechnik GmbH deploys a new
software package for your product. You can then download the current software
package via the SEH ISD Manager and install it to your device.
Quick Installation Guide
[en]
17
18
[en]
Quick Installation Guide
2 Allgemeine Informationen . . . . . . . . . . . . . . . . . 20
Inhaltsverzeichnis
Verwendungszweck . . . . . . . . . . . . . . . . . . . . . . . . . .
Dokumentation . . . . . . . . . . . . . . . . . . . . . . . . . . . . . .
Lieferumfang . . . . . . . . . . . . . . . . . . . . . . . . . . . . . . . .
Technische Daten . . . . . . . . . . . . . . . . . . . . . . . . . . . .
20
20
21
22
2 Sicherheitsvorschriften . . . . . . . . . . . . . . . . . . . . 23
2 Erste Schritte . . . . . . . . . . . . . . . . . . . . . . . . . . . . . . 25
ISD300 anschließen . . . . . . . . . . . . . . . . . . . . . . . . . .
ISD300 ein-/ausschalten . . . . . . . . . . . . . . . . . . . . . .
ISD300 TCP/IP-Parameter zuweisen . . . . . . . . . . .
ISD Control Center verwenden. . . . . . . . . . . . . . . .
25
26
27
29
2 ISD Quick Setup . . . . . . . . . . . . . . . . . . . . . . . . . . . 31
2 ISD-Softwarepaket. . . . . . . . . . . . . . . . . . . . . . . . . 33
Quick Installation Guide
[de]
19
Allgemeine Informationen
Verwendungszweck
Das ISD300 wurde für das Spoolen und Managen von Druckaufträgen sowie die
Verwaltung von Druckerwarteschlangen (Queues) entwickelt.
Das ISD300 trägt in komplexen Netzwerken mit hohen Datenaufkommen oder
weitläufigen Strukturen zu einer starken Entlastung des Servers und ggf. des
Datennetzes bei. Höhere Performanz und Stabilität sind zwei der positiven
Folgen.
In Peer-to-Peer-Netzen sorgt das ISD300 für Server-Qualitäten beim Drucken.
Mehr Transparenz, höhere Performanz und eine zentrale Verwaltung der
Druckvorgänge sorgen für mehr Effizienz und geringeren Zeitaufwand bei
Wartung und Systempflege.
Das ISD300 kann Druckaufträge von unterschiedlichen Betriebssystemen
annehmen und an Drucker via Socket-, LPD- oder IPP-Printing weiterleiten.
Dokumentation
Die ISD-Dokumentation besteht aus den folgenden Dokumenten:
PD
F
Benutzerdokumentation
Detaillierte Beschreibung der ISD-Konfiguration und -Administration.
Sie finden die PDF-Datei unter www.seh.de oder auf der ISDFestplatte (siehe: 'Service-Area'
21).
Online Hilfe (SEH ISD Manager)
Die Online Hilfe enthält detaillierte Informationen zur Bedienung des
Software-Tools 'SEH ISD Manager'.
L
HT
M
Online Hilfe (ISD Control Center)
Die Online Hilfe enthält detaillierte Informationen zur Bedienung des
ISD Control Centers.
HT
M
L
Pr
PD int
F
Quick Installation Guide
Der Quick Installation Guide beinhaltet Informationen zur Sicherheit,
Hardwareinstallation sowie zur Inbetriebnahme des ISD.
(Dieses Dokument)
20
[de]
Quick Installation Guide
Lieferumfang
Bitte überprüfen Sie den Packungsinhalt auf Vollständigkeit bevor Sie die
Installation beginnen.
ISD300
Intelligent Spooling Device 300
Quick Installation Guide
Der Quick Installation Guide beinhaltet Informationen zur
Sicherheit, Hardwareinstallation sowie zur Inbetriebnahme des
ISD. (Dieses Dokument)
Netzkabel
Stromversorgungskabel
Service-Area
Die Service-Area ist ein definierter Speicherbereich auf der ISDFestplatte. Die Service-Area beinhaltet:
- Benutzerdokumentation ISD300
- Quick Installation Guide ISD300 (dieses Dokument)
- SEH ISD Manager
- SEH Print Monitor
- ISD Printer Driver Wizard
- Driver Wizard Plugin 'CSR DLL'
Service-Area anzeigen
Die Service-Area kann über das ISD Control Center angezeigt werden.
Starten Sie das ISD Control Center im Benutzerprofil 'Admin' und wählen
Sie 'Dokumentation & Tools' an.
Hinweis: Um das ISD Control Center zu starten, beachten Sie die
Handlungsanleitungen aus dem Kapitel 'Erste Schritte'
25.
Quick Installation Guide
[de]
21
Technische Daten
Eigenschaften
Netzwerkanschluss
logisch:
physisch:
Werte
- 10BaseT Ethernet (IEEE 802.3)
- 100BaseTX Fast Ethernet (IEEE 802.3)
- 1000BaseT Gigabit Ethernet Ethernet (IEEE 802.3)
- RJ-45 (STP Cat. 5)
Schnittstellen
2 x USB 2.0 HS
Druckprotokolle
Client
ISD:
ISD
Drucker:
- LPD, SMB, Socket, IPP, ThinPrint®
- LPD, Socket, IPP
Versorgungsspannung
100-240 VAC
Stromaufnahme
max. 0.25 A
Betriebsumgebung
Umgebungstemperatur:
5 - 30 °Celsius
Relative Luftfeuchtigkeit: 20 - 80 %
Abmessungen
- Länge: 215 mm
- Höhe:
47 mm
- Breite: 186 mm
Gewicht
1450 g
22
[de]
Quick Installation Guide
Sicherheitsvorschriften
Beachten Sie vor Inbetriebnahme und beim Betrieb des ISD300 die folgenden
Sicherheitsvorschriften, um sich und andere vor Personenschäden zu schützen
sowie Beschädigungen am Gerät zu vermeiden.
VORSICHT: Nichtbeachtung dieser Anweisungen kann zu schweren
körperlichen Schäden führen oder tödlich sein.
Grundlegende persönliche Sicherheitsvorkehrungen
Lesen Sie die Dokumentation und stellen Sie sicher, dass Ihr System den
aufgeführten Anforderungen entspricht.
Das ISD300 darf nur von qualifiziertem Fachpersonal angeschlossen und mit
dem Netzwerk verbunden werden.
Öffnen Sie nicht das Gehäuse des Gerätes. Das ISD300 darf nur bei ungeöffnetem
Gehäuse und in unversehrtem Zustand angeschlossen und betrieben werden.
Stellen Sie keine Gegenstände auf das Gehäuse.
Eigenmächtige konstruktive Veränderungen am Gerät können die
Produktzertifizierung beeinträchtigen und sind verboten.
Anforderungen an die Betriebsumgebung
Das ISD300 muss auf einer stabilen, vibrationsarmen Oberfläche stehen.
Das ISD300 darf nicht an staubigen Orten oder Orten mit direkter
Sonneneinstrahlung aufgestellt werden.
Das Gerät darf nicht mit Feuchtigkeit oder Flüssigkeiten in Berührung kommen.
Das ISD300 darf nur betrieben werden, wenn am Aufstellort die aufgeführten
Umgebungsbedingungen erfüllt werden.
Umgebungstemperatur: 5 - 30 °Celsius
Relative Luftfeuchtigkeit: 20 - 80 %
Stellen Sie das ISD300 so auf, dass die Steckdose für den Anschluss des
Netzkabels in der Nähe des Gerätes und leicht zugänglich ist. Das Gerät muss
leicht vom Netz zu trennen sein.
Quick Installation Guide
[de]
23
Verkabelungs- und Netzkabel-Sicherheitsvorkehrungen
Verlegen Sie alle Kabel so, dass niemand darauf treten oder darüber stolpern kann.
Falls das beiliegende Netzkabel für Ihr Land nicht einsetzbar ist, beschaffen Sie
ein passendes Netzkabel mit der jeweiligen nationalen Zulassung. Fragen Sie
hierzu Ihren Fachhändler.
Ein beschädigtes Netzkabel muss sofort ersetzt werden. Fragen Sie hierzu Ihren
Fachhändler.
Das ISD300 muss an eine Steckdose mit Schutzkontakt angeschlossen werden.
Schließen Sie keine Telefonleitungen an dem RJ-45-Stecker an. An diesen darf
nur Sicherheitskleinspannung angeschlossen werden. Verwenden Sie für den
Anschluss an den RJ-45-Stecker nur STP-Kabel (Kategorie 5 oder besser).
Kabelschirm und Steckerschirm des Kabels müssen flächig verbunden sein.
Verwenden Sie für die Verbindung zum Drucker ein zertifiziertes USB-HiSpeed-Kabel. Eine Liste der zertifizierten Kabel finden Sie unter www.usb.org!
Anforderungen an die Stromversorgung
Dieses Gerät darf ausschließlich mit der auf dem Produkttypenschild
ausgewiesenen Stromversorgung betrieben werden.
Netzspannung / AC-Input:
100 - 240 V, 47 - 63 Hz, max. 0,25 A
Dieses Gerät ist für die Einspeisung aus einer geerdeten Netzverbindung
ausgelegt. Der Netzstecker mit Erdungsvorrichtung ist ein wichtiger
Sicherheitsschutz. Zum Schutz vor elektrischem Schlag oder Sachschäden am
Gerät die Erdung nicht abschalten.
24
[de]
Quick Installation Guide
Erste Schritte
ISD300 anschließen
Gehen Sie wie folgt vor:
1. Verbinden Sie das Netzwerkkabel (RJ-45) mit dem Netzwerkanschluss (2).
2. Verbinden Sie das Netzkabel mit der Stromversorgung (8).
1234
5
1) Netzwerk-Aktivität-LED (gelb):
Die LED signalisiert den Austausch
von Netzwerkdatenpakten.
6 7
2) Netzwerkanschluss (RJ-45-Stecker)
3) Link-LED (grün):
Die LED signalisiert eine (physische)
Verbindung zum Netzwerk.
Vorderansicht
4) Power-LED
8
5) Display
9
6) Navigationstasten
7) Softpower-Schalter
8) Stromversorgung/Netzschalter
9) USB-Anschluss
Rückansicht
Quick Installation Guide
[de]
25
ISD300 ein-/ausschalten
Gerät einschalten
Gehen Sie wie folgt vor:
1. Betätigen Sie den Netzschalter.
Die ISD300-Systemsoftware fährt automatisch hoch, nachdem das Gerät mit
Strom versorgt wird.
Gerät ausschalten
Druckaufträge, die während des Ausschaltvorgangs bearbeitet werden, können
nicht fertiggestellt werden. Die Bearbeitung der in der Warteschlange
gespeicherten Druckaufträge wird fortgesetzt, sobald die Systemsoftware wieder
vollständig hochgefahren ist.
Um Datenverlust zu vermeiden, fahren Sie die Sytemsoftware herunter, bevor Sie
den Netzschalter betätigen.
Gehen Sie wie folgt vor:
1. Halten Sie den Softpower-Schalter
Die Systemsoftware fährt herunter.
2. Betätigen Sie den Netzschalter.
Das Gerät ist ausgeschaltet.
5 Sekunden lang gedrückt.
Systemsoftware hoch-/herunterfahren
Die Systemsoftware kann manuell hoch- bzw. heruntergefahren werden.
Stellen Sie folgende Punkte sicher:
- Der Netzschalter ist aktiviert.
Zum Hochfahren betätigen Sie den Softpower-Schalter
Zum Herunterfahren halten Sie den Softpower-Schalter
gedrückt.
kurzzeitig.
5 Sekunden lang
Was passiert bei Stromausfall?
Nachdem das ISD erneut mit Strom versorgt wird, nimmt das ISD den Status an,
der zur Zeit eines Stromausfalls vorlag.
26
[de]
Quick Installation Guide
ISD300 TCP/IP-Parameter zuweisen
Im Rahmen des TCP/IP-Netzwerkprotokolls ist es erforderlich, eine IP-Adresse im
ISD zu speichern, damit das Gerät im Netzwerk angesprochen und über das ISD
Control Center konfiguriert werden kann.
Sie können die Parameter sowohl manuell zuweisen als auch automatisch über
das DHCP (Dynamic Host Configuration Protocol) zuweisen lassen. Die manuelle
Zuweisung ist voreingestellt.
TCP/IP-Parameter manuell zuweisen
Betätigen Sie zur Eingabe die Navigationstasten an der Gerätefront, um die
TCP/IP-Parameter zuzuweisen.
Gehen Sie wie folgt vor:
1. Betätigen Sie . Das Display zeigt:
IP Setup
>
Cancel
<
2. Betätigen Sie .
Das Display zeigt die aktuelle IP-Konfiguration ('Manual' bzw. 'DHCP') an:
IP Configuration
Manual
3. Wählen Sie 'Manual' mit
Das Display zeigt.
oder
und bestätigen Sie mit
.
IP Address:
000.000.000.000
4. Geben Sie die IP-Adresse ein.
Navigieren Sie mit
Zahlenwerte. Mit
innerhalb der IP-Adresse auf die einzelnen
ändern Sie die Zahlenwerte.
5. Bestätigen Sie mit . Das Display zeigt:
Netmask:
000.000.000.000
6. Geben Sie die Netzwerkmaske ein.
7. Bestätigen Sie mit . Das Display zeigt:
Gateway:
000.000.000.000
8. Geben Sie das Gateway ein.
Quick Installation Guide
[de]
27
9. Bestätigen Sie mit
. Das Display zeigt:
> Apply
< Back
10. Bestätigen Sie mit . Das Display zeigt:
Applying Network
Settings ...
Die Einstellungen werden gespeichert.
TCP/IP-Parameter automatisch zuweisen (DHCP)
Stellen Sie folgende Punkte sicher:
- Ein aktiver DHCP-Server ist im Netzwerk vorhanden.
Betätigen Sie zur Eingabe die Navigationstasten an der Gerätefront, um die
TCP/IP-Parameter über DHCP zuzuweisen.
Gehen Sie wie folgt vor:
1. Betätigen Sie . Das Display zeigt:
IP Setup
>
Cancel
<
2. Betätigen Sie .
Das Display zeigt die aktuelle IP-Konfiguration ('Manual' bzw. 'DHCP') an:
IP Configuration
Manual
3. Wählen Sie 'DHCP' mit
zeigt:
oder
und bestätigen Sie mit . Das Display
> Apply
< Back
4. Bestätigen Sie mit .
Die Einstellungen werden gespeichert.
Beim nächsten Bootvorgang wird DHCP angewandt. Die TCP/IP-Parameter
werden über einen DHCP-Server zugewiesen.
28
[de]
Quick Installation Guide
ISD Control Center verwenden
Das ISD Control Center ist eine Benutzeroberfläche zur Administration des ISD.
Das ISD Control Center ist in dem ISD gespeichert und kann auf einem Client mit
einem Internet-Browser (Internet Explorer, Firefox, Safari) dargestellt werden.
Stellen Sie folgende Punkte sicher:
- Das ISD ist an das Netzwerk angeschlossen und hochgefahren.
- Das ISD hat eine gültige IP-Adresse.
ISD Control Center starten
Gehen Sie wie folgt vor:
1. Starten Sie Ihren Browser.
2. Geben Sie als URL die IP-Adresse des ISD ein.
Das ISD Control Center wird dargestellt.
Falls das ISD Control Center nicht angezeigt wird, überprüfen Sie die ProxyEinstellungen Ihres Browsers.
Quick Installation Guide
[de]
29
Auf dem ISD Control Center einloggen
Nach dem Start des ISD Control Centers wird ein 'Login'-Dialog angezeigt. Der
Zugriff auf das ISD Control Center ist durch die Benutzerprofile 'Any', 'User' und
'Admin' reglementiert. Der Zugang erfolgt in Kombination mit einem Passwort.
Die Tabelle zeigt, welche Zugriffsrechte den jeweiligen Benutzerprofilen
zugewiesen sind.
Benutzerprofil
Zugriffsrechte
Password
Any
- Statusinformationen zu Queues und Druckaufträgen
abrufen
User
- Statusinformationen zu Queues und Druckaufträgen
abrufen
- eigene Druckaufträge löschen, anhalten, Priorität ändern
(Diese Zugriffsrechte werden durch den Administrator
definiert.)
user
(Standard)
- Statusinformationen abrufen
- Queues einrichten und verwalten
- alle Druckaufträge löschen, anhalten, Priorität ändern
- Installation, Konfiguration und Wartung des ISD
admin
(Standard)
Admin
kein Passwort
notwendig
Der Ablauf beschreibt den Zugang zum Benutzerprofil 'Admin' mit dem StandardPasswort (Werkseinstellung). Ändern Sie das Standard-Passwort, sobald Sie das ISD
in einer Live-Umgebung einsetzen; siehe: ISD300-Benutzerdokumentation.
1.
2.
3.
4.
Gehen Sie wie folgt vor:
Starten Sie das ISD Control Center.
Wählen Sie in der Liste Anmeldekonto den Eintrag 'Admin'.
Geben Sie als Passwort 'admin' ein.
Wählen Sie die Schaltfläche Anmelden an.
Das ISD Control Center zeigt die Menüstruktur für das Benutzerprofil 'Admin‘.
Im oberem Bereich des Dialogs wird das Hauptmenü angezeigt. Nach dem
Anwählen eines Menüpunktes, erscheinen Untermenüpunkte im linken Bereich.
In der Dialogmitte wird der Menüinhalt dargestellt.
30
[de]
Quick Installation Guide
ISD Quick Setup
Bei der Erstkonfiguration unterstützt Sie das 'Quick Setup'. Das Quick Setup
besteht aus vier Schritten:
dem Konfigurieren von Hostname und Gerätezeit,
dem Konfigurieren von TCP/IPv4-Parametern und DNS-Server,
der Suche nach im Netzwerk vorhandenen Druckern sowie
dem Einrichten von Queues.
Gehen Sie wie folgt vor:
1. Starten Sie das ISD Control Center im Benutzerprofil 'Admin'.
2. Wählen Sie den Menüpunkt QUICK SETUP an.
3. Geben Sie Hostname und Gerätezeit ein.
4. Wählen Sie die Schaltfläche Weiter an.
5. Überprüfen Sie die TCP/IP-Parameter und ändern Sie diese bei Bedarf.
6. Wählen Sie die Schaltfläche Weiter an.
Quick Installation Guide
[de]
31
7. Definieren Sie die Suchparameter für die Druckersuche im Netzwerk.
Es kann maximal ein Bereich von bis zu 255 IP-Adressen durchsucht werden.
8. Wählen Sie die Schaltfläche Weiter an.
Die Anzahl der im Netzwerk gefundenen Drucker wird angezeigt.
9. Bestätigen Sie mit OK.
Die Druckerliste wird angezeigt.
10. Vergeben Sie Namen für die Queues (die nicht über DNS aufgelöst wurden)
in der Spalte Queue-Name.
- Buchstaben, Ziffern, Binde- und Unterstrich erlaubt
- keine Leerzeichen erlaubt
- nicht mehr als 32 Zeichen (Windows 98 max. 15 Zeichen) erlaubt
11. Wählen Sie die Schaltfläche Installieren an.
Die Namen der Queues werden in der Spalte Queue-Name angezeigt.
12. Bestätigen Sie mit Setup beenden.
Die Einstellungen werden gespeichert.
In der ISD300-Benutzerdokumentation erhalten Sie weiterführende Information
zur Konfiguration und Administration.
32
[de]
Quick Installation Guide
ISD-Softwarepaket
Neben der im ISD integrierten Benutzeroberfläche (ISD Control Center) sind die
folgenden Tools zur Administration des ISD verfügbar:
Der SEH ISD Manager ist eine von der SEH Computertechnik GmbH entwickelte
Software zur vereinfachten Administration von ISD. Der SEH ISD Manager
unterstützt Sie bei den Arbeitsabläufen mit den folgenden Funktionen:
- Monitoring
- Backup- und Update-Management
- Queues und Druckertreiber
- Neustart
Der SEH Print Monitor ist eine SEH-spezifische Erweiterung für den
Druckdienst eines Windows-Betriebssystems. Die Software ermöglicht die
Übertragung von unverschlüsselten und verschlüsselten (SSL/TLS) Druckdaten
vom Client zum ISD über direkte TCP/IP-Ports. Der SEH Print Monitor kann auf
jedem Client, von dem aus gedruckt werden soll, installiert werden.
Der ISD Printer Driver Wizard unterstützt Sie bei der Installation von
Druckertreibern auf das ISD. Hierzu wird der Wizard auf einem Client mit
Windows 2000 oder höher installiert. Der Client muss auf dem ISD als 'Printer
Administrator' eingetragen sein.
Mit Hilfe des Driver Wizard Plugin (CSR DLL) werden Original-Druckertreiber
auf ihre CSR-Fähigkeit überprüft und so eingestellt, dass der Client
automatisch in die Lage versetzt wird, nach dem CSR-Prinzip den Druckjob
selbst komplett gerendert an das ISD zu spoolen.
Alle ISD-Tools sind in der Service-Area (siehe
21) und unter www.seh.de
verfügbar. Für weitere Informationen, siehe: ISD300-Benutzerdokumentation.
Produktaktualisierung
Damit Ihr Produkt auf dem neusten Stand bleibt, empfehlen wir die Verwendung
des SEH ISD Managers. Der SEH ISD Manager überprüft automatisch, ob aktuelle
Softwarepakete verfügbar sind. Stellt die SEH Computertechnik GmbH ein neues
Softwarepaket für Ihr Produkt bereit, werden Sie automatisch informiert. Sie haben
dann die Möglichkeit, das aktuelle Softwarepaket über den SEH ISD Manager
herunterzuladen und auf Ihr Gerät zu installieren.
Quick Installation Guide
[de]
33
The latest version of the EC declaration of conformity can be downloaded from
the homepage of SEH Computertechnik GmbH:
http://www.seh-technology.com/services/ce-notification.html
34
Quick Installation Guide
VCCI クラス A
Quick Installation Guide
35
Manufactured by:
SEH Computertechnik GmbH
Suedring 11
Scan this QR code (meCard)
using your smart phone.
33647 Bielefeld
Germany
Phone: +49 (0)521 94226-29
Fax: +49 (0)521 94226-99
Support: +49 (0)521 94226-44
Email: [email protected]
Web: http://www.seh.de
Document:
Type: Quick Installation Guide
Title: ISD300
Version: 2.8 (für ISD300 > Hardware3.0)
Order number: MHAB-QI-ISD300
Online Links to important Internet Resources:
Support Contacts and Information:
Sales Contacts and Information:
http://www.seh-technology.com/support
http://www.seh-technology.com/sales
© 2013 SEH Computertechnik GmbH
All trademarks, registered trademarks, logos and product names are property of their respective owners.
This product uses ’Open Source Software’. For further information, please contact http://www.seh.de.
The product documentation gives you valuable information about your product.
Keep the documentation for further reference during the life cycle of the product.
36
Quick Installation Guide