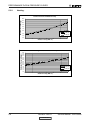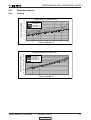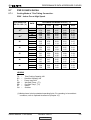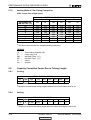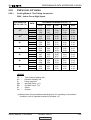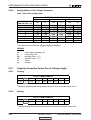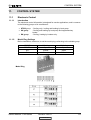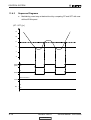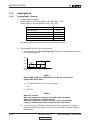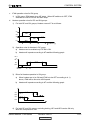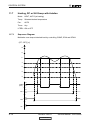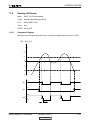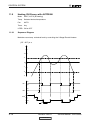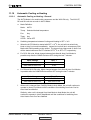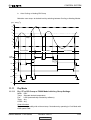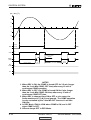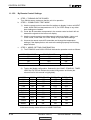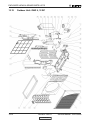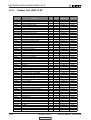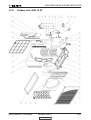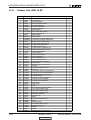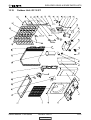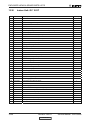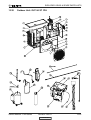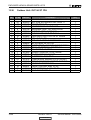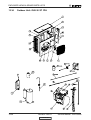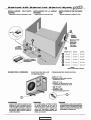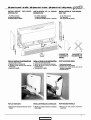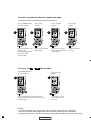
1
PXD Series R410A Indoor Unit Outdoor Unit PXD9 ONG9 ST/RC PXD12 ONG12 ST/RC PXD15 ONG14 ST/RC PXD18 GC18 ST/RC PXD18 GC18 ST/RC 3PH PXD24 OU7-24 ST/RC PXD24 OU7-24T ST/RC PXD30 OU8-30 ST/RC PXD30 OU8-30T ST/RC REFRIGERANT R410A COOLING ONLY HEAT PUMP SEPTEMBER - 2005 CONTENT LIST OF EFFECTIVE PAGES LIST OF EFFECTIVE PAGES Note: Changes in the pages are indicated by a “Revision#” in the footer of each effected page (when none indicates no changes in the relevant page). All pages in the following list represent effected/ non effected pages divided by chapters. Dates of issue for original and changed pages are: Original ....... 0 ........ August 2005 Total number of pages in this publication is 149 consisting of the following: Page No. Revision No. # Page No. Revision No. # Page No. Revision No. # Title ....................... 0 A ........................... 0 i ............................. 0 1-1 - 1-3 ................ 0 2-1 - 2-9 ................ 0 3-1 ........................ 0 4-1 - 4-3 ................ 0 5-1 - 5-32 .............. 1 6-1 ........................ 0 7-1 - 7-4 ................ 0 8-1 - 8-2 ................ 0 9-1 - 9-4 ................ 0 10-1 ...................... 0 11-1-11-37............. 0 12-1-12-2 .............. 0 13-1-13-40 ............ 0 14-1 – 14-6 ........... 0 Appendix -A ...........0 • Zero in this column indicates an original page. *Due to constant improvements please note that the data on this service manual can be modified with out notice. **Photos are not contractual. A Revision Y05-01 CONTENT Service Manual - PXD Series TABLE OF CONTENTS Table of Contents 1. INTRODUCTION ...................................................................................................1-1 2. PRODUCT DATA SHEET ......................................................................................2-1 3. RATING CONDITIONS ..........................................................................................3-1 4. OUTLINE DIMENSIONS .......................................................................................4-1 5. PERFORMANCE DATA & PRESSURE CURVES ................................................5-1 6. ELECTRICAL DATA ..............................................................................................6-1 7. WIRING DIAGRAMS .............................................................................................7-1 8. ELECTRICAL CONNECTIONS .............................................................................8-1 9. REFRIGERATION DIAGRAMS .............................................................................9-1 10. TUBING CONNECTIONS......................................................................................10-1 11. CONTROL SYSTEM .............................................................................................11-1 12. TROUBLESHOOTING ..........................................................................................12-1 13. EXPLODED VIEWS AND SPARE PARTS LISTS .................................................13-1 14. OPTIONAL ACCESSORIES .................................................................................14-1 15. APPENDIX A .........................................................................................................15-1 Service Manual - PXD Series Revision Y05-01 i INTRODUCTION 1. INTRODUCTION 1.1 General The PXD split floor and ceiling units range comprise the ST (cooling only) and RC (heat pump) models, as follows: • Cooling Only PXD9ST, PXD12ST, PXD15ST, PXD18ST, PXD24ST, PXD30ST • Heat Pump PXD9RC,PXD12RC,PXD15RC, PXD18RC, PXD24RC, PXD30RC 1.2 Main Features The PXD series benefits from the most advanced technological innovations, namely : 1.3 • R410A • Microprocessor control. • Infrared remote control, and on unit. • Possibility for treated air distribution to adjacent room (Accessory kit). • High COP. • Easy access to the interconnecting tubing and wiring connections. • Possibility to connect a condensate pump kit with an integral over flow protection (Accessory kit). • Automatic treated air sweep (horizontal and vertical) • Low indoor and outdoor noise levels. • Easy installation and service. Indoor Unit The indoor unit can be mounted as floor or celling type, no special adjustment are needed. it can be easily fitted to many types of residential and commercials applications. It includes: • Casing with inlet and outlet grilles. 1.4 • Motorized flaps (Horizontal and vertical). • Advanced electronic control box assembly (storm 10V7). • Coated indoor coil. • Mounting plate Filtration The PXD series presents several types of air filters: • Easily accessible, and re-usable pre-filters (mesh) • Active carbon filter. Service Manual - PXD Series Revision Y05-01 CONTENT 1-1 INTRODUCTION 1.5 Control The microprocessor indoor controller, and an infrared remote control, supplied as standard, provide complete operating function and programming. The unit is designed with an on unit control board as well. For further details please refer to the Operation Manual, Appendix A. 1.6 Outdoor Unit The PXD outdoor units can be installed as floor or wall mounted by using a wall supporting bracket. The metal sheets are protected by anti- corrosion paint work allowing long life resistance. All outdoor units are pre-charged. For further information please refer to the Product Data Sheet, Chapter 2. It includes : 1.7 • A Rotary Compressor mounted in a soundproofed compartment. • Axial fan. • Outdoor coil with hydrophilic louver fins for RC units. • Outlet air fan grill. • Service valves” flare” type connection. • Interconnecting wiring terminal block. Tubing Connections Flare type interconnecting tubing to be produced on site. For further details please refer to the Installation Manual, Appendix A 1.8 Accessories ASK (All Season Kit): For low ambient working conditions in cooling, an ASK can be installed inside the outdoor unit. This kit allows cooling operation down to outdoor temp of -10 ºC by gradually controlling the outdoor fan speed motor. RCW Wall Mounted Remote Control The RCW remote control is mounted on the wall, and controls the unit either as an infrared remote control or as a wired controller. The wired controller can control up to 10 Indoor units with the same program settings and adjustments. For further details please refer to Optional Accessories, Chapter on this manual. 1.9 Inbox Documentation Each unit is supplied with its own installation and operation manuals. 1-2 Revision Y05-01 CONTENT Service Manual - PXD Series INTRODUCTION 1.10 Matching Table 1.10.1 R410A INDOOR UNITS OUTDOOR UNITS REF’ K9 ONG9 ST MODEL R410A √ K11 K15 K18 WNG9 WNG12 WNG14 WNG18 PXD9 PXD12 PXD15 PXD18 ONG12 ST R410A ONG14 ST R410A ONG9 RC R410A ONG12 RC R410A ONG14 RC R410A GC18 ST R410A √ √ √ GC18 RC R410A √ √ √ √ √ √ √ √ √ √ √ √ √ √ √ √ √ √ √* √ √* - the outdoor unit of this combination cannot be matched to other indoor units. INDOOR UNITS OUTDOOR UNITS MODEL REF’ KN24 KN30 WNG24 WNG30 OU724ST R410A √ √ √ OU724T ST R410A √ √ √ √ OU724 RC R410A √ √* √ √ OU724T RC R410A √ OU830 ST R410A √ √ √ √ OU830T ST R410A √ √ √ √ OU830 RC R410A √ √ √ √ OU830T RC R410A √ √ √ √ √* PXD24 PXD30 DNG24 DNG30 √ √ √ √* - the outdoor unit of this combination cannot be matched to other indoor units. The above tables lists outdoor units and PXD indoor units, which can be matched together. In addition the listed outdoor units can be matched with other types of indoor units such as Ducted,Wall Mounted, and Cassettes . For further information please refer to the relevant Service Manual. Service Manual - PXD Series Revision Y05-01 CONTENT 1-3 PRODUCT DATA SHEET 2. PRODUCT DATA SHEET 2.1 R410A Model Indoor Unit Model Outdoor Unit Installation Method of Pipe Characteristics Capacity Units Btu/hr kW kW W/W (1) Power input (1) EER (Cooling) or COP(Heating) (1) Energy efficiency class Power supply Rated current Starting current Circuit breaker rating Fan type & quantity Fan speeds Air flow (2) External static pressure Sound power level (3) Sound pressure level(4) Moisture removal Condensate drain tube I.D Dimensions Weight Package dimensions Packaged weight Units per pallet Stacking height Refrigerant control Compressor type, model Fan type & quantity Fan speeds Air flow Sound power level Sound pressure level(4) Dimensions Weight Package dimensions Packaged weight Units per pallet Stacking height Refrigerant type V/Ph/Hz A A A INDOOR H/M/L H/M/L Min-Max H/M/L H/M/L WxHxD WxHxD OUTDOOR H/L H/L H/L H/L WxHxD RPM m3/hr dB(A) dB(A) mm kg mm kg Units units WxHxD Refrigerant chargless distance kg/m 1kg/7.5m Additional charge per 1 meter g/m In.(mm) In.(mm) m. 7.5m<Lin<15m:+10g/m 1/4"(6.35) 3/8"(9.53) Max.15 m. Max.7 Connections between units Liquid line Suction line Max. tubing length Max. height difference Operation control type Heating elements Others (1) (2) (3) (4) RPM m3/hr Pa dB(A) dB(A) l/hr mm mm kg mm kg units units PXD-9 ONG-9 Flared Cooling Only Cooling 9080 9080 2.66 2.66 0.825 0.825 3.22 3.22 A A 220-240V/Single/50Hz 3.7 3.7 18.7 10 Centrifugal x 2 740/650/600 370/330/290 0 50/49/47 39/37/35 1.1 16 820x630x190 21 890x710x280 25 14 7 levels Capillary tube Rotary,LG GK113PAG Propeller(direct) x 1 780 1780 58 60 48 49 795x610x290 34 35 945x655x395 38 39 9 3 levels R410A Heating 9520 2.79 0.86 3.24 C 4.0 Remote control kW Rating conditions in accordance with ISO 5151 and ISO 13253 (for ducted units) and EN 14511. Airflow in ducted units; at nominal external static pressure. Sound power in ducted units is measured at air discharge. Sound pressure level measured at 1 meter distance from unit. Service Manual - PXD Series Revision Y05-01 CONTENT 2-1 PRODUCT DATA SHEET Model Indoor Unit Model Outdoor Unit Installation Method of Pipe Characteristics Units Btu/hr kW kW W/W Capacity (1) OUTDOOR INDOOR Power input (1) EER (Cooling) or COP(Heating) (1) Energy efficiency class Power supply Rated current Starting current Circuit breaker rating Fan type & quantity Fan speeds Air flow (2) External static pressure Sound power level (3) Sound pressure level(4) Moisture removal Condensate drain tube I.D Dimensions Weight Package dimensions Packaged weight Units per pallet Stacking height Refrigerant control Compressor type, model Fan type & quantity Fan speeds Air flow Sound power level Sound pressure level(4) Dimensions Weight Package dimensions Packaged weight Units per pallet Stacking height Refrigerant type Refrigerant chargless distance Additional charge per 1 meter Connections between units Operation control type Heating elements Others (1) (2) (3) (4) V/Ph/Hz A A A H/M/L H/M/L Min-Max H/M/L H/M/L RPM m3/hr Pa dB(A) dB(A) l/hr mm mm kg mm kg units units WxHxD WxHxD H/L H/L H/L H/L WxHxD RPM m3/hr dB(A) dB(A) mm kg mm kg Units units WxHxD Liquid line Suction line Max. tubing length Max. height difference kg/m g/m In.(mm) In.(mm) m. PXD-12 ONG-12 Flared Cooling Only Cooling Heating 12010 12010 12620 3.52 3.52 3.7 1.155 1.155 1.15 3.05 3.05 3.22 B B C 220-240V/Single/50Hz 5.2 5.2 5.2 24 15 Centrifugal x 2 830/770/710 420/390/350 0 56/53/51 45/41/38 1.5 16 820x630 x190 22 890x710x280 26 14 7 levels Capillary tube Rotary, Toshiba PA145X2C-4FT Propeller(direct) x 1 810 1850 62 64 52 53 795x610x290 35 36 945x655x395 39 40 9 3 levels R410A 1.23kg/7.5m 1.27kg/7.5m 7.5m<Lin<15m:+15g/m 1/4"(6.35) 3/8"(9.53) Max.15 m. Max.7 Remote control kW Rating conditions in accordance with ISO 5151 and ISO 13253 (for ducted units) and EN 14511. Airflow in ducted units; at nominal external static pressure. Sound power in ducted units is measured at air discharge. Sound pressure level measured at 1 meter distance from unit. 2-2 Revision Y05-01 CONTENT Service Manual - PXD Series PRODUCT DATA SHEET Model Indoor Unit Model Outdoor Unit Installation Method of Pipe Characteristics Units Btu/hr kW kW W/W Capacity (1) Power input (1) EER (Cooling) or COP(Heating) (1) Energy efficiency class Power supply Rated current Starting current Circuit breaker rating Fan type & quantity Fan speeds Air flow (2) External static pressure Sound power level (3) Sound pressure level(4) Moisture removal Condensate drain tube I.D Dimensions Weight Package dimensions Packaged weight Units per pallet Stacking height Refrigerant control Compressor type, model Fan type & quantity Fan speeds Air flow Sound power level Sound pressure level(4) Dimensions Weight Package dimensions Packaged weight Units per pallet Stacking height Refrigerant type Refrigerant chargless distance Additional charge per 1 meter V/Ph/Hz A A A INDOOR H/M/L H/M/L Min-Max H/M/L H/M/L WxHxD WxHxD H/L H/L H/L H/L WxHxD OUTDOOR Connections between units RPM m3/hr dB(A) dB(A) mm kg mm kg Units units WxHxD Liquid line Suction line Max. tubing length Max. height difference Operation control type Heating elements Others (1) (2) (3) (4) RPM m3/hr Pa dB(A) dB(A) l/hr mm mm kg mm kg units units kg/m g/m In.(mm) In.(mm) m. PXD-15 ONG-14 Flared Cooling Only Cooling Heating 13990 13990 15350 4.1 4.1 4.5 1.355 1.355 1.380 3.03 3.03 3.26 B B C 220-240V/Single/50Hz 6.4 6.4 6.5 30 15 Centrifugal x 2 1000/780/720 510/390/350 0 57/53/49 48/43/38 1.9 16 820x630 x190 22 890x710x280 26 14 7 levels Capillary tube Rotary, MITSUBISHI RN165VHSMT Propeller(direct) x 1 920 2160 63 64 53 54 795x610x290 4105 42.2 945x655x395 45.5 46.5 9 3 levels R410A 1.34kg/7.5m 7.5m<Lin<15m:+25g/m 1/4"(6.35) 1/2"(12.7) Max.15 m. Max.7 Remote control kW Rating conditions in accordance with ISO 5151 and ISO 13253 (for ducted units) and EN 14511. Airflow in ducted units; at nominal external static pressure. Sound power in ducted units is measured at air discharge. Sound pressure level measured at 1 meter distance from unit. Service Manual - PXD Series Revision Y05-01 CONTENT 2-3 PRODUCT DATA SHEET Model Indoor Unit PXD-18 Model Outdoor Unit GC-18 Installation Method of Pipe Flared Characteristics Capacity (1) Power input (1) EER (Cooling) or COP(Heating) (1) Units Cooling Only Cooling Heating Btu/hr 18770 18770 19620 kW 5.5 5.5 5.75 kW 1.82 1.82 1.77 W/W 3.02 3.02 3.25 B C Energy efficiency class B Power supply V/Ph/Hz Rated current A Starting current A Circuit breaker rating A 220-240V/Single/50Hz 8.2 INDOOR Centrifugal x 2 Fan speeds H/M/L RPM 1100/1000/900 Air flow (2) H/M/L m3/hr 930/820/700 Min-Max Pa 0 Sound power level (3) H/M/L dB(A) 65/60/56 Sound pressure level(4) H/M/L External static pressure dB(A) 51/48/45 Moisture removal l/hr 1.9 Condensate drain tube I.D mm 16 mm 1200x630x190 kg 30 mm 1270x710x280 kg 35 Dimensions WxHxD Weight Package dimensions WxHxD Packaged weight Units per pallet units 7 Stacking height units 7 levels Refrigerant control Capillary tube Compressor type, model Rotary,LG GJ208PAA Fan type & quantity Propeller(direct) x 1 Fan speeds H/L RPM 815 Air flow H/L m3/hr 2480 Sound power level H/L dB(A) 68 Sound pressure level(4) H/L dB(A) 58 WxHxD mm 846x690x302 kg 56 WxHxD mm 990x470x430 Dimensions Weight Package dimensions Packaged weight kg 60 61 Units per pallet Units 9 Stacking height units 3 levels kg/m 1.6kg/7.5m Refrigerant type R410A Refrigerant chargless distance Additional charge per 1 meter Connections between units g/m 7.5m<Lin<25m:+25g/m Liquid line In.(mm) 1/4"(6.35) Suction line In.(mm) 1/2"(12.7) m. Max.25 m. Max.15 Max. tubing length Max. height difference Operation control type Heating elements 7.9 15 Fan type & quantity OUTDOOR 8.2 43 Remote control kW Others . (1) (2) (3) (4) Rating conditions in accordance with ISO 5151 and ISO 13253 (for ducted units) and EN 14511. Airflow in ducted units; at nominal external static pressure. Sound power in ducted units is measured at air discharge. Sound pressure level measured at 1 meter distance from unit. 2-4 Revision Y05-01 CONTENT Service Manual - PXD Series PRODUCT DATA SHEET Model Indoor Unit Model Outdoor Unit Installation Method of Pipe Characteristics Units Btu/hr kW kW W/W Capacity (1) Power input (1) EER (Cooling) or COP(Heating) (1) Energy efficiency class Power supply Rated current Starting current Circuit breaker rating Fan type & quantity Fan speeds Air flow (2) External static pressure Sound power level (3) Sound pressure level(4) Moisture removal Condensate drain tube I.D Dimensions Weight Package dimensions Packaged weight Units per pallet Stacking height Refrigerant control Compressor type, model Fan type & quantity Fan speeds Air flow Sound power level Sound pressure level(4) Dimensions Weight Package dimensions Packaged weight Units per pallet Stacking height Refrigerant type Refrigerant chargless distance V/Ph/Hz A A A INDOOR H/M/L H/M/L Min-Max H/M/L H/M/L RPM m3/hr Pa dB(A) dB(A) l/hr mm mm kg mm kg units units WxHxD WxHxD OUTDOOR H/L H/L H/L H/L WxHxD RPM m3/hr dB(A) dB(A) mm kg mm kg Units units WxHxD kg/m Additional charge per 1 meter Connections between units g/m Liquid line Suction line Max .tubing length Max. height difference Operation control type Heating elements Others (1) (2) (3) (4) In.(mm) In.(mm) m. PXD-18 GC-18 3PH Flared Cooling Only Cooling Heating 18760 18760 19600 5.5 5.5 5.75 1.77 1.77 1.69 3.12 3.12 3.41 B B B 380/3/50Hz 3.1 3.1 3 26 15 Centrifugal x 2 1100/1000/900 930/820/700 0 65/60/56 51/48/45 1.9 16 1200x630x190 30 1270x710x280 35 7 7 levels Capillary tube Rotary ,Mitsubishi NN21YDAMT Propeller(direct) x 1 815 2480 68 58 846x690x302 56 990x770x430 60 61 9 3 levels R410A 1.89kg/7.5m 4m≤Length≤10m +0g 10m≤Length≤18m +240g 18m≤Length≤25m +560g 1/4"(6.35) 1/2"(12.7) Max.25 m. Max.15 Remote control kW All Season kit factory option Rating conditions in accordance with ISO 5151 and ISO 13253 (for ducted units) and EN 14511. Airflow in ducted units; at nominal external static pressure. Sound power in ducted units is measured at air discharge. Sound pressure level measured at 1 meter distance from unit. Service Manual - PXD Series Revision Y05-01 CONTENT 2-5 PRODUCT DATA SHEET Model Indoor Unit Model Outdoor Unit Installation Method of Pipe Characteristics INDOOR OUTDOOR Sound pressure level(4) Moisture removal Condensate drain tube I.D Dimensions Weight Package dimensions Packaged weight Units per pallet Stacking height H/M/L H/M/L Min-Max RPM m3/hr Pa H/M/L H/M/L dB(A) dB(A) l/hr mm mm kg mm kg units units 64/62/59 53/51/48 2.7 16 1200x630x190 33 1270x710x280 38 7 7 levels WxHxD H/L H/L H/L H/L WxHxD RPM m3/hr dB(A) dB(A) mm kg mm kg Units units WxHxD kg/m Additional charge per 1 meter Connections between units Operation control type Heating elements Others 23300 6.83 2.27 3.01 B V/Ph/Hz A A A WxHxD Refrigerant control Compressor type ,model Fan type & quantity Fan speeds Air flow Sound power level Sound pressure level(4) Dimensions Weight Package dimensions Packaged weight Units per pallet Stacking height Refrigerant type Refrigerant chargless distance Cooling Only 23300 6.83 2.27 3.01 B 220-240V/Single/50Hz 9.7 63 20 Centrifugal x 2 1200/980/840 1000/900/780 0 Capacity (1) Power input (1) EER (Cooling) or COP(Heating) (1) Energy efficiency class Power supply Rated current Starting current Circuit breaker rating Fan type & quantity Fan speeds Air flow (2) External static pressure Sound power level (3) Units Btu/hr kW kW W/W PXD-24 OU7-24 Flared Cooling g/m Liquid line Suction line Max .tubing length Max .height difference In.(mm) In.(mm) m. m. 9.7 Heating 24000 7.03 2.13 3.03 C 8.4 Capillary tube +Restrictor Rotary, Mitsubishi NN27VBAMT Propeller(direct) x 1 850 3100 67 58 900x680x340 74 985x730x406 77 6 2 levels R410A 2.16kg/12.5m 12.5m<Add 430g<25m 25m<Add 530g<30m 3/8"(9.53) 5/8"(15.88) Max.30 Max.15 Remote control kW All Season kit factory option . (1) (2) (3) (4) Rating conditions in accordance with ISO 5151 and ISO 13253 (for ducted units) and EN 14511. Airflow in ducted units; at nominal external static pressure. Sound power in ducted units is measured at air discharge. Sound pressure level measured at 1 meter distance from unit. 2-6 Revision Y05-01 CONTENT Service Manual - PXD Series PRODUCT DATA SHEET Model Indoor Unit PXD-24 Model Outdoor Unit OU7-24T Installation Method of Pipe Flared Characteristics Capacity (1) Power input (1) EER (Cooling) or COP(Heating) (1) Units Cooling Only Cooling Heating Btu/hr 23300 23300 24000 kW 6.83 6.83 7.03 kW 2.27 2.27 2.13 W/W 3.01 3.01 3.03 B B C Energy efficiency class Power supply V/Ph/Hz Rated current A Starting current A Circuit breaker rating A Fan type & quantity INDOOR 3x7 3x7 3x16 Fan speeds H/M/L RPM 1200/980/840 Air flow (2) H/M/L m3/hr 1000/900/780 Min-Max Pa 0 Sound power level (3) H/M/L dB(A) 64/62/59 Sound pressure level(4) H/M/L dB(A) 53/51/48 Moisture removal l/hr 2.7 Condensate drain tube I.D mm 16 WxHxD mm 1200x630x190 kg 33 WxHxD mm 1270x710x280 kg 38 Dimensions Weight Package dimensions Packaged weight Units per pallet units 7 Stacking height units 7 levels Refrigerant control Capillary tube +Restrictor Compressor type ,model Rotary, Mitsubishi NN27VBAMT Fan type & quantity Propeller(direct) x 1 Fan speeds H/L RPM 850 Air flow H/L m3/hr 3100 Sound power level H/L dB(A) 67 Sound pressure level(4) H/L dB(A) 58 WxHxD mm 900x680x340 kg 74 WxHxD mm 985x730x406 kg 77 Dimensions Weight Package dimensions Packaged weight Units per pallet Units 6 Stacking height units 2 levels Refrigerant chargless distance kg/m 2.16kg/12.5m Additional charge per 1 meter g/m 12.5m<Add 430g<25m 25m<Add 530g<30m Refrigerant type Connections between units R410A Liquid line In.(mm) 3/8"(9.53) Suction line In.(mm) 5/8"(15.88) m. Max.30 Max .tubing length Max .height difference m. Operation control type Heating elements Max.15 Remote control kW Others (1) (2) (3) (4) 3x7 55 Centrifugal x 2 External static pressure OUTDOOR 400/3/50 All Season kit factory option Rating conditions in accordance with ISO 5151 and ISO 13253 (for ducted units) and EN 14511. Airflow in ducted units; at nominal external static pressure. Sound power in ducted units is measured at air discharge. Sound pressure level measured at 1 meter distance from unit. Service Manual - PXD Series Revision Y05-01 CONTENT 2-7 PRODUCT DATA SHEET Model Indoor Unit Model Outdoor Unit Installation Method of Pipe Characteristics Capacity Units Btu/hr kW kW W/W (1) OUTDOOR INDOOR Power input (1) EER (Cooling) or COP(Heating) (1) Energy efficiency class Power supply Rated current Starting current Circuit breaker rating Fan type & quantity Fan speeds Air flow (2) External static pressure Sound power level (3) Sound pressure level(4) Moisture removal Condensate drain tube I.D Dimensions Weight Package dimensions Packaged weight Units per pallet Stacking height Refrigerant control Compressor type, model Fan type & quantity Fan speeds Air flow Sound power level Sound pressure level(4) Dimensions Weight Package dimensions Packaged weight Units per pallet Stacking height Refrigerant type Refrigerant chargless distance V/Ph/Hz A A A H/M/L H/M/L Min-Max H/M/L H/M/L RPM m3/hr Pa dB(A) dB(A) l/hr mm mm kg mm kg units units WxHxD WxHxD H/L H/L H/L H/L WxHxD RPM m3/hr dB(A) dB(A) mm kg mm kg Units units WxHxD kg/m Additional charge per 1 meter Connections between units Operation control type Heating elements Liquid line Suction line Max .tubing length Max .height difference g/m 30 In.(mm) In.(mm) m. 3/8"(9.53) 5/8"(15.88) Max.30 m. Max.15 Remote control kW Others (1) (2) (3) (4) PXD-30 OU830 Flared Cooling Only Cooling Heating 29,100 29,100 29,500 8.52 8.52 8.65 2.99 2.99 2.79 2.85 2.85 3.10 C C D 220-240V/Single/50Hz 12.2 12.2 11.3 80 25 Centrifugal x 2 1360/1200/1010 1020/895/700 N/A 68/64/60 56/53/49 3.4 16 1200x630x190 32 1270x710x280 36 7 7 Levels Capillary Rotary, Mitsubishi NN33VAAMT Propeller(direct) x 1 850 3150 69 59 900x860x340 78 985x907x435 82 6 2 Levels R410A 2.42kg/15m Crankcase heater (50W) Rating conditions in accordance with ISO 5151 and ISO 13253 (for ducted units) and EN 14511. Airflow in ducted units; at nominal external static pressure. Sound power in ducted units is measured at air discharge. Sound pressure level measured at 1 meter distance from unit. 2-8 Revision Y05-01 CONTENT Service Manual - PXD Series PRODUCT DATA SHEET Model Indoor Unit Model Outdoor Unit Installation Method of Pipe Characteristics Capacity Units Btu/hr kW kW W/W (1) OUTDOOR INDOOR Power input (1) EER (Cooling) or COP(Heating) (1) Energy efficiency class Power supply Rated current Starting current Circuit breaker rating Fan type & quantity Fan speeds Air flow (2) External static pressure Sound power level (3) Sound pressure level(4) Moisture removal Condensate drain tube I.D Dimensions Weight Package dimensions Packaged weight Units per pallet Stacking height Refrigerant control Compressor type, model Fan type & quantity Fan speeds Air flow Sound power level Sound pressure level(4) Dimensions Weight Package dimensions Packaged weight Units per pallet Stacking height Refrigerant type Refrigerant chargless distance V/Ph/Hz A A A H/M/L H/M/L Min-Max H/M/L H/M/L RPM m3/hr Pa dB(A) dB(A) l/hr mm mm kg mm kg units units WxHxD WxHxD H/L H/L H/L H/L WxHxD RPM m3/hr dB(A) dB(A) mm kg mm kg Units units WxHxD kg/m Additional charge per 1 meter Connections between units Operation control type Heating elements Liquid line Suction line Max .tubing length Max .height difference g/m 30 In.(mm) In.(mm) m. 3/8"(9.53) 5/8"(15.88) Max.30 m. Max.15 Remote control kW Others (1) (2) (3) (4) PXD-30 OU830T Flared Cooling Only Cooling Heating 28300 28300 28,300 8.30 8.30 8.30 2.77 2.77 2.63 3.00 3.00 3.15 C C D 400V/3/50 3x5.2 3x5.2 3x5.1 35 3x16 Centrifugal x 2 1360/1200/1010 1020/895/700 N/A 68/64/60 56/53/49 3.4 16 1200x630x190 32 1270x710x280 36 7 7 Levels Capillary Rotary, Mitsubishi NN33VAAMT Propeller(direct) x 1 850 3150 69 59 900x860x340 78 985x907x435 82 6 2 Levels R410A 2.42kg/15m Crankcase heater (50W) Rating conditions in accordance with ISO 5151 and ISO 13253 (for ducted units) and EN 14511. Airflow in ducted units; at nominal external static pressure. Sound power in ducted units is measured at air discharge. Sound pressure level measured at 1 meter distance from unit. Service Manual - PXD Series Revision Y05-01 CONTENT 2-9 RATING CONDITIONS 3. RATING CONDITIONS Standard conditions in accordance with ISO 5151, ISO 13253 (for ducted units) and EN 14511. Cooling: Indoor: 27oC DB 19oC WB Outdoor: 35 oC DB Heating: Indoor: 20oC DB Outdoor: 7oC DB 6oC WB 3.1 Operating Limits R410A Indoor Cooling Heating Voltage Service Manual - PXD Series Upper limit Lower limit Upper limit Lower limit 1PH 3PH o Outdoor o 32 C DB 23 C WB 46 C DB o o 21oC DB 21 C DB 15 C WB 27oC DB 24oC DB 18oC WB 20oC DB -9oC DB -10oC WB 198 – 242 V 360 – 440 V Revision Y05-01 CONTENT o 3-1 OUTLINE DIMENSIONS 4. OUTLINE DIMENSIONS 4.1 Indoor Unit : PXD 9, 12, 15 R410A 4.2 Indoor Unit : PXD 18, 24, 30 R410A Service Manual - PXD Series Revision Y05-01 CONTENT 4-1 OUTLINE DIMENSIONS 4.3 4.4 4-2 Outdoor Unit : ONG 9, 12, 14 Outdoor Unit : GC 18 Revision Y05-01 CONTENT Service Manual - PXD Series OUTLINE DIMENSIONS 4.5 Outdoor Unit : OU7-24 4.6 Outdoor Unit : OU8-30 Service Manual - PXD Series Revision Y05-01 CONTENT 4-3 PERFORMANCE DATA & PRESSURE CURVES 5. PERFORMANCE DATA 5.1 PXD9 ONG9 R410A 5.1.1 Cooling Mode at 7.5m Tubing Connection. 230V : Indoor Fan at High Speed. ENTERING AIR DB OU COIL (°C) 15(1) 20(1) 25 30 35 40 46 ENTERING AIR WB/DB ID COIL ( °C) DATA TC SC PI TC SC PI TC SC PI TC SC PI TC SC PI TC SC PI TC SC PI 15/21 17/24 19/27 21/29 23/32 2.80 1.85 0.59 2.71 1.81 0.64 2.57 1.77 0.69 2.40 1.71 0.74 2.22 1.63 0.80 2.02 1.53 0.87 1.75 1.41 0.95 2.90 1.93 0.59 2.86 1.91 0.64 2.77 1.88 0.70 2.61 1.82 0.76 2.41 1.75 0.82 2.20 1.65 0.88 1.92 1.51 0.96 2.97 2.01 0.59 2.95 1.99 0.64 2.91 1.98 0.70 2.82 1.93 0.76 2.66 1.89 0.83 2.40 1.79 0.89 2.11 1.63 0.98 3.04 2.06 0.59 3.02 2.05 0.65 3.00 2.03 0.70 2.92 1.99 0.77 2.79 1.94 0.84 2.62 1.84 0.91 2.33 1.69 1.00 3.09 2.09 0.60 3.07 2.09 0.65 3.07 2.07 0.71 3.01 2.03 0.78 2.93 1.98 0.84 2.76 1.88 0.91 2.51 1.72 1.01 LEGEND TC SC PI WB DB ID OU – – – – – – – Total Cooling Capacity, kW Sensible Capacity, kW Power Input, kW Wet Bulb Temp., (oC) Dry Bulb Temp., (oC) Indoor Outdoor (1) Marked area is below standard operating limits. For operating in low ambient conditions, refer to Optional Accessories (Chapter 15). Service Manual - PXD Series Revision Y05-01 CONTENT 5-1 PERFORMANCE DATA & PRESSURE CURVES 5.1.2 Heating Mode at 7.5m Tubing Connection. 230V : Indoor Fan at High Speed. ENTERING AIR DB ID COIL ( °C) 20 15 ENTERING AIR WB OU COIL ( °C) -10 -7 -2 2 6 10 15 20 25 TH PI TH PI TH PI 1.46 1.58 1.67 2.04 2.87 3.12 3.38 3.56 0.69 0.71 0.71 0.75 0.80 0.85 0.89 0.91 1.41 1.52 1.62 1.95 2.79 3.04 3.29 3.47 0.73 0.74 0.76 0.80 0.86 0.91 0.95 0.99 1.35 1.46 1.56 1.87 2.69 2.96 3.21 3.38 0.77 0.78 0.80 0.84 0.91 0.97 1.01 1.07 * the above chart includes the weighted deicing infleuence. LEGEND TH PI WB DB ID OU – – – – – – Total Heating Capacity, kW Power Input, kW Wet Bulb Temp., (oC) Dry Bulb Temp., (oC) Indoor Outdoor 5.2 Capacity Correction Factor Due to Tubing Length 5.2.1 Cooling 3m 1.02 7.5m 1 TOTAL TUBING LENGTH 10m 15m 20m 25m 30m 0.961 0.950 ------- 40m --- 50m --- * Minimum recommended tubing length between indoor and outdoor units is 3m. 5.2.2 Heating 3m 1.04 7.5m 1 10m 0.975 TOTAL TUBING LENGTH 15m 20m 25m 30m 0.961 ------- 40m --- 50m --- * Minimum recommended tubing length between indoor and outdoor units is 3m. 5-2 Revision Y05-01 CONTENT Service Manual - PXD Series PERFORMANCE DATA & PRESSURE CURVES 5.3 Pressure Curves. 5.3.1 Cooling. Suction Pressure VS.Outdoor Temp Suction Pressure (Bar[g]) 12.0 15/21(WB/DB 17/24(WB/DB 19/27(WB/DB 21/29(WB/DB 23/32(WB/DB 11.0 10.0 ºC) ºC) ºC) ºC) ºC) 9.0 8.0 7.0 6.0 5.0 15 20 25 30 35 40 46 o Outdoor Temp.(DB C ) Discharge Pressure (Bar[g]) Discharge Pressure VS.Outdoor Temp 40 38 36 34 32 30 28 26 24 22 20 18 16 14 12 10 15/21(WB/DB 17/24(WB/DB 19/27(WB/DB 21/29(WB/DB 23/32(WB/DB 15 20 ºC) ºC) ºC) ºC) ºC) 25 30 35 40 46 o Outdoor Temp.(DB C ) Service Manual - PXD Series Revision Y05-01 CONTENT 5-3 PERFORMANCE DATA & PRESSURE CURVES 5.3.2 Heating. Suction Pressure VS.Outdoor Temp Suction Pressure(Bar[g]) 12.0 11.0 10.0 9.0 8.0 7.0 15 DB (ºC) 6.0 20 DB (ºC) 5.0 25 DB (ºC) 4.0 3.0 -10 -5 0 5 o 10 15 20 Outdoor Temp.( WB C ) Discharge Pressure(Bar[g]) Discharge Pressure VS.Outdoor Temp 40 38 36 34 32 30 28 26 24 22 20 18 16 14 12 10 25 DB (ºC) 20 DB (ºC) 15 DB (ºC) -10 -5 0 5 o 10 15 20 Outdoor Temp.( WB C ) 5-4 Revision Y05-01 CONTENT Service Manual - PXD Series PERFORMANCE DATA & PRESSURE CURVES 5.4 PXD12 ONG12 R410A 5.4.1 Cooling Mode at 7.5m Tubing Connection. 230V : Indoor Fan at High Speed. ENTERING AIR DB OU COIL (°C) 15(1) 20(1) 25 30 35 40 46 ENTERING AIR WB/DB ID COIL ( °C) DATA TC SC PI TC SC PI TC SC PI TC SC PI TC SC PI TC SC PI TC SC PI 15/21 17/24 19/27 21/29 23/32 3.71 2.40 0.82 3.59 2.35 0.89 3.40 2.29 0.96 3.18 2.22 1.04 2.94 2.11 1.12 2.67 1.99 1.21 2.32 1.83 1.32 3.84 2.50 0.82 3.78 2.48 0.90 3.67 2.43 0.97 3.46 2.36 1.06 3.19 2.26 1.14 2.91 2.14 1.23 2.54 1.96 1.34 3.93 2.60 0.83 3.90 2.58 0.90 3.86 2.56 0.98 3.74 2.51 1.07 3.52 2.45 1.16 3.18 2.32 1.25 2.79 2.11 1.37 4.03 2.66 0.83 4.00 2.66 0.90 3.97 2.64 0.98 3.87 2.58 1.07 3.70 2.52 1.17 3.47 2.39 1.27 3.08 2.19 1.39 4.09 2.71 0.83 4.06 2.71 0.91 4.07 2.69 0.99 3.98 2.63 1.08 3.87 2.57 1.18 3.65 2.44 1.28 3.32 2.24 1.41 LEGEND TC SC PI WB DB ID OU – – – – – – – Total Cooling Capacity, kW Sensible Capacity, kW Power Input, kW Wet Bulb Temp., (oC) Dry Bulb Temp., (oC) Indoor Outdoor (1) Marked area is below standard operating limits. For operating in low ambient conditions, refer to Optional Accessories (Chapter 15). Service Manual - PXD Series Revision Y05-01 CONTENT 5-5 PERFORMANCE DATA & PRESSURE CURVES 5.4.2 Heating Mode at 7.5m Tubing Connection. 230V : Indoor Fan at High Speed. ENTERING AIR DB ID COIL ( °C) 20 15 ENTERING AIR WB OU COIL (°C) -10 -7 -2 2 6 10 15 20 25 TH PI TH PI TH PI 1.94 2.09 2.22 2.70 3.81 4.14 4.48 4.72 0.92 0.94 0.95 1.00 1.08 1.14 1.18 1.22 1.87 2.02 2.15 2.59 3.70 4.03 4.37 4.61 0.98 0.99 1.01 1.06 1.15 1.21 1.28 1.32 1.79 1.94 2.07 2.48 3.57 3.92 4.26 4.48 1.03 1.05 1.07 1.13 1.22 1.30 1.36 1.43 * the above chart includes the weighted deicing infleuence. LEGEND TH PI WB DB ID OU – – – – – – Total Heating Capacity, kW Power Input, kW Wet Bulb Temp., (oC) Dry Bulb Temp., (oC) Indoor Outdoor 5.5 Capacity Correction Factor Due to Tubing Length 5.5.1 Cooling TOTAL TUBING LENGTH 3m 1.03 7.5m 1 10m 0.961 15m 0.948 20m — 25m — 30m — 40m — 50m — * Minimum recommended tubing length between indoor and outdoor units is 3m. 5.5.2 Heating TOTAL TUBING LENGTH 3m 1.05 7.5m 1 10m 15m 20m 25m 30m 40m 50m 0.975 0.963 — — — — — * Minimum recommended tubing length between indoor and outdoor units is 3m. 5-6 Revision Y05-01 CONTENT Service Manual - PXD Series PERFORMANCE DATA & PRESSURE CURVES 5.6 Pressure Curves. 5.6.1 Cooling. Suction Pressure VS.Outdoor Temp Suction Pressure (Bar[g]) 12.0 15/21(WB/DB 17/24(WB/DB 19/27(WB/DB 21/29(WB/DB 23/32(WB/DB 11.0 10.0 ºC) ºC) ºC) ºC) ºC) 9.0 8.0 7.0 6.0 5.0 15 20 25 30 35 40 46 o Outdoor Temp.(DB C ) Discharge Pressure (Bar[g]) Discharge Pressure VS.Outdoor Temp 40 38 36 34 32 30 28 26 24 22 20 18 16 14 12 10 15/21(WB/DB 17/24(WB/DB 19/27(WB/DB 21/29(WB/DB 23/32(WB/DB 15 20 ºC) ºC) ºC) ºC) ºC) 25 30 35 40 46 o Outdoor Temp.(DB C ) Service Manual - PXD Series Revision Y05-01 CONTENT 5-7 PERFORMANCE DATA & PRESSURE CURVES 5.6.2 Heating. Suction Pressure VS.Outdoor Temp Suction Pressure(Bar[g]) 12.0 11.0 10.0 9.0 8.0 7.0 6.0 15 DB (ºC) 5.0 20 DB (ºC) 25 DB (ºC) 4.0 3.0 -10 -5 0 5 o 10 15 20 Outdoor Temp.( WB C ) Discharge Pressure(Bar[g]) Discharge Pressure VS.Outdoor Temp 40 38 36 34 32 30 28 26 24 22 20 18 16 14 12 10 25 DB (ºC) 20 DB (ºC) 15 DB (ºC) -10 -5 0 5 o 10 15 20 Outdoor Temp.( WB C ) 5-8 Revision Y05-01 CONTENT Service Manual - PXD Series PERFORMANCE DATA & PRESSURE CURVES 5.7 PXD15 ONG14 R410A 5.7.1 Cooling Mode at 7.5m Tubing Connection. 230V : Indoor Fan at High Speed. ENTERING AIR DB OU COIL (°C) 15(1) 20(1) 25 30 35 40 46 ENTERING AIR WB/DB ID COIL ( °C) DATA TC SC PI TC SC PI TC SC PI TC SC PI TC SC PI TC SC PI TC SC PI 15/21 17/24 19/27 21/29 23/32 4.32 2.74 0.96 4.18 2.69 1.04 3.96 2.62 1.12 3.70 2.54 1.21 3.43 2.41 1.31 3.11 2.27 1.41 2.70 2.09 1.54 4.48 2.86 0.96 4.41 2.83 1.04 4.27 2.78 1.13 4.03 2.70 1.23 3.72 2.59 1.33 3.39 2.45 1.43 2.95 2.24 1.56 4.58 2.97 0.96 4.55 2.95 1.05 4.49 2.93 1.14 4.35 2.87 1.24 4.10 2.80 1.35 3.70 2.65 1.46 3.25 2.42 1.60 4.69 3.05 0.96 4.65 3.04 1.05 4.63 3.01 1.15 4.51 2.95 1.25 4.31 2.88 1.36 4.05 2.73 1.47 3.59 2.50 1.62 4.76 3.10 0.97 4.73 3.09 1.05 4.74 3.07 1.15 4.64 3.01 1.26 4.51 2.94 1.37 4.25 2.79 1.49 3.87 2.56 1.64 LEGEND TC SC PI WB DB ID OU – – – – – – – Total Cooling Capacity, kW Sensible Capacity, kW Power Input, kW Wet Bulb Temp., (oC) Dry Bulb Temp., (oC) Indoor Outdoor (1) Marked area is below standard operating limits. For operating in low ambient conditions, refer to Optional Accessories (Chapter 15). Service Manual - PXD Series Revision Y05-01 CONTENT 5-9 PERFORMANCE DATA & PRESSURE CURVES 5.7.2 Heating Mode at 7.5m Tubing Connection. 230V : Indoor Fan at High Speed. ENTERING AIR DB ID COIL ( °C) 15 ENTERING AIR WB OU COIL (°C) -10 -7 -2 2 6 10 15 20 20 25 TH PI TH PI TH PI 2.36 2.54 2.70 3.29 4.64 5.04 5.45 5.74 1.10 1.13 1.15 1.20 1.29 1.36 1.42 1.46 2.27 2.45 2.61 3.15 4.50 4.91 5.31 5.60 1.18 1.19 1.21 1.28 1.38 1.46 1.53 1.59 2.18 2.36 2.52 3.02 4.34 4.77 5.18 5.45 1.24 1.26 1.28 1.35 1.47 1.56 1.63 1.71 * the above chart includes the weighted deicing infleuence. LEGEND TH PI WB DB ID OU – – – – – – Total Heating Capacity, kW Power Input, kW Wet Bulb Temp., (oC) Dry Bulb Temp., (oC) Indoor Outdoor 5.8 Capacity Correction Factor Due to Tubing Length 5.8.1 Cooling TOTAL TUBING LENGTH 3m 1.02 7.5m 1 10m 15m 20m 25m 30m 40m 50m 0.984 0.946 --- --- --- --- --- * Minimum recommended tubing length between indoor and outdoor units is 3m. 5.8.2 Heating TOTAL TUBING LENGTH 3m 1.04 7.5m 1 10m 0.995 15m 0.971 20m --- 25m --- 30m --- 40m --- 50m --- * Minimum recommended tubing length between indoor and outdoor units is 3m. 5-10 Revision Y05-01 CONTENT Service Manual - PXD Series PERFORMANCE DATA & PRESSURE CURVES 5.9 Pressure Curves. 5.9.1 Cooling. Suction Pressure VS.Outdoor Temp Suction Pressure (Bar[g]) 12.0 15/21(WB/DB 17/24(WB/DB 19/27(WB/DB 21/29(WB/DB 23/32(WB/DB 11.0 10.0 ºC) ºC) ºC) ºC) ºC) 9.0 8.0 7.0 6.0 5.0 15 20 25 30 35 40 46 o Outdoor Temp.(DB C ) Discharge Pressure (Bar[g]) Discharge Pressure VS.Outdoor Temp 40 38 36 34 32 30 28 26 24 22 20 18 16 14 12 10 15/21(WB/DB 17/24(WB/DB 19/27(WB/DB 21/29(WB/DB 23/32(WB/DB 15 20 ºC) ºC) ºC) ºC) ºC) 25 30 35 40 46 o Outdoor Temp.(DB C ) Service Manual - PXD Series Revision Y05-01 CONTENT 5-11 PERFORMANCE DATA & PRESSURE CURVES 5.9.2 Heating. Suction Pressure VS.Outdoor Temp Suction Pressure(Bar[g]) 12.0 11.0 10.0 9.0 8.0 7.0 15 DB (ºC) 6.0 20 DB (ºC) 5.0 25 DB (ºC) 4.0 3.0 -10 -5 0 5 10 15 20 o Outdoor Temp.( WB C ) Discharge Pressure(Bar[g]) Discharge Pressure VS.Outdoor Temp 40 38 36 34 32 30 28 26 24 22 20 18 16 14 12 10 25 DB (ºC) 20 DB (ºC) 15 DB (ºC) -10 -5 0 5 10 15 20 o Outdoor Temp.( WB C ) 5-12 Revision Y05-01 CONTENT Service Manual - PXD Series PERFORMANCE DATA & PRESSURE CURVES 5.10 PXD18 GC18 R410A 5.10.1 Cooling Mode at 7.5m Tubing Connection. 230V : Indoor Fan at High Speed. ENTERING AIR DB OU COIL (°C) 15 (1) 20(1) 25 30 ENTERING AIR WB/DB ID COIL ( °C) DATA TC SC PI TC SC PI TC SC PI TC SC PI TC SC PI 35 TC SC PI TC SC PI 40 46 15/21 17/24 19/27 21/29 23/32 5.80 3.94 1.29 5.61 3.86 1.40 5.31 3.76 1.51 4.96 3.64 1.63 4.59 3.46 1.76 4.18 3.26 1.90 3.62 3.01 2.08 6.00 4.11 1.29 5.91 4.07 1.41 5.73 3.99 1.52 5.40 3.87 1.66 4.99 3.71 1.79 4.55 3.51 1.93 3.96 3.22 2.11 6.15 4.27 1.30 6.10 4.24 1.41 6.02 4.21 1.53 5.84 4.11 1.67 5.50 4.02 1.82 4.96 3.80 1.96 4.36 3.47 2.16 6.29 4.37 1.30 6.24 4.36 1.42 6.21 4.33 1.54 6.05 4.24 1.68 5.78 4.14 1.83 5.43 3.92 1.99 4.82 3.59 2.19 6.39 4.45 1.31 6.35 4.44 1.42 6.36 4.41 1.56 6.22 4.32 1.70 6.05 4.22 1.84 5.71 4.00 2.01 5.19 3.67 2.21 LEGEND TC SC PI WB DB ID OU – – – – – – – Total Cooling Capacity, kW Sensible Capacity, kW Power Input, kW Wet Bulb Temp., (oC) Dry Bulb Temp., (oC) Indoor Outdoor (1) Marked area is below standard operating limits. For operating in low ambient conditions, refer to Optional Accessories (Chapter 15). Service Manual - PXD Series Revision Y05-01 CONTENT 5-13 PERFORMANCE DATA & PRESSURE CURVES 5.10.2 Heating Mode at 7.5m Tubing Connection. 230V : Indoor Fan at High Speed. ENTERING AIR DB ID COIL ( °C) 20 15 ENTERING AIR WB OU COIL (°C) -10 -7 -2 2 6 10 15 20 25 TH PI TH PI TH PI 3.02 3.25 3.45 4.20 5.92 6.44 6.96 7.33 1.42 1.45 1.47 1.54 1.65 1.75 1.82 1.88 2.90 3.13 3.34 4.03 5.75 6.27 6.79 7.16 1.51 1.53 1.56 1.64 1.77 1.87 1.96 2.04 2.79 3.02 3.22 3.85 5.55 6.10 6.61 6.96 1.58 1.61 1.65 1.73 1.88 2.00 2.09 2.19 * the above chart includes the weighted deicing infleuence. LEGEND TH PI WB DB ID OU – – – – – – Total Heating Capacity, kW Power Input, kW Wet Bulb Temp., (oC) Dry Bulb Temp., (oC) Indoor Outdoor 5.11 Capacity Correction Factor Due to Tubing Length 5.11.1 Cooling 3m 1.02 7.5m 1 TOTAL TUBING LENGTH 10m 15m 20m 25m 0.990 0.975 0.960 0.945 30m --- 40m --- 50m --- * Minimum recommended tubing length between indoor and outdoor units is 3m. 5.11.2 Heating TOTAL TUBING LENGTH 3m 1.03 7.5m 1 10m 15m 20m 25m 30m 40m 50m 1 0.997 0.992 0.988 --- --- --- * Minimum recommended tubing length between indoor and outdoor units is 3m. 5-14 Revision Y05-01 CONTENT Service Manual - PXD Series PERFORMANCE DATA & PRESSURE CURVES 5.12 Pressure Curves. 5.12.1 Cooling. Suction Pressure Vs.Outdoor Temp Suction Pressure (Bar[g]) 12.0 15/21(WB/DB 17/24(WB/DB 19/27(WB/DB 21/29(WB/DB 23/32(WB/DB 11.0 10.0 ºC) ºC) ºC) ºC) ºC) 9.0 8.0 7.0 6.0 5.0 15 20 25 30 35 40 46 40 46 o Outdoor Temp.(DB C ) Discharge Pressure (Bar[g]) Discharge Pressure Vs.Outdoor Temp 40 38 36 34 32 30 28 26 24 22 20 18 16 14 12 10 15/21(WB/DB 17/24(WB/DB 19/27(WB/DB 21/29(WB/DB 23/32(WB/DB 15 20 ºC) ºC) ºC) ºC) ºC) 25 30 35 o Outdoor Temp.(DB C ) Service Manual - PXD Series Revision Y05-01 CONTENT 5-15 PERFORMANCE DATA & PRESSURE CURVES 5.12.2 Heating. Suction Pressure Vs.Outdoor Temp Suction Pressure(Bar[g]) 12.0 11.0 10.0 9.0 8.0 7.0 15 DB (ºC) 6.0 20 DB (ºC) 5.0 25 DB (ºC) 4.0 3.0 -10 -5 0 5 10 15 20 o Outdoor Temp.( WB C ) Discharge Pressure(Bar[g]) Discharge Pressure Vs.Outdoor Temp 40 38 36 34 32 30 28 26 24 22 20 18 16 14 12 10 25 DB (ºC) 20 DB (ºC) 15 DB (ºC) -10 -5 0 5 o 10 15 20 Outdoor Temp.( WB C ) 5-16 Revision Y05-01 CONTENT Service Manual - PXD Series PERFORMANCE DATA & PRESSURE CURVES 5.13 PXD18 GC18 3PH R410A 5.13.1 Cooling Mode at 7.5m Tubing Connection. 230V : Indoor Fan at High Speed. ENTERING AIR DB OU COIL (°C) 15 (1) 20(1) 25 30 35 40 46 ENTERING AIR WB/DB ID COIL ( °C) DATA TC SC PI TC SC PI TC SC PI TC SC PI TC SC PI TC SC PI TC SC PI 15/21 17/24 19/27 21/29 23/32 5.80 4.09 1.25 5.61 4.01 1.36 5.31 3.91 1.47 4.96 3.79 1.59 4.59 3.60 1.71 4.18 3.39 1.85 3.62 3.13 2.02 6.00 4.27 1.26 5.91 4.23 1.37 5.73 4.15 1.48 5.40 4.02 1.61 4.99 3.86 1.74 4.55 3.65 1.88 3.96 3.35 2.05 6.15 4.43 1.26 6.10 4.41 1.37 6.02 4.37 1.49 5.84 4.28 1.63 5.50 4.18 1.77 4.96 3.95 1.91 4.36 3.61 2.10 6.29 4.55 1.26 6.24 4.53 1.38 6.21 4.50 1.50 6.05 4.40 1.64 5.78 4.30 1.78 5.43 4.08 1.93 4.82 3.73 2.13 6.39 4.63 1.27 6.35 4.62 1.38 6.36 4.58 1.51 6.22 4.49 1.65 6.05 4.38 1.79 5.71 4.16 1.95 5.19 3.81 2.15 LEGEND TC SC PI WB DB ID OU – – – – – – – Total Cooling Capacity, kW Sensible Capacity, kW Power Input, kW Wet Bulb Temp., (oC) Dry Bulb Temp., (oC) Indoor Outdoor (1) Marked area is below standard operating limits. For operating in low ambient conditions, refer to Optional Accessories (Chapter 15). Service Manual - PXD Series Revision Y05-01 CONTENT 5-17 PERFORMANCE DATA & PRESSURE CURVES 5.13.2 Heating Mode at 7.5m Tubing Connection. 230V : Indoor Fan at High Speed. ENTERING AIR DB ID COIL ( °C) 15 ENTERING AIR WB OU COIL (°C) -10 -7 -2 2 6 10 15 20 20 25 TH PI TH PI TH PI 3.02 3.25 3.45 4.20 5.92 6.44 6.96 7.33 1.35 1.39 1.40 1.47 1.58 1.67 1.74 1.79 2.90 3.13 3.34 4.03 5.75 6.27 6.79 7.16 1.44 1.46 1.49 1.56 1.69 1.78 1.88 1.94 2.79 3.02 3.22 3.85 5.55 6.10 6.61 6.96 1.51 1.54 1.57 1.66 1.79 1.91 1.99 2.10 * the above chart includes the weighted deicing infleuence. LEGEND TH PI WB DB ID OU – – – – – – Total Heating Capacity, kW Power Input, kW Wet Bulb Temp., (oC) Dry Bulb Temp., (oC) Indoor Outdoor 5.14 Capacity Correction Factor Due to Tubing Length 5.14.1 Cooling TOTAL TUBING LENGTH 3m 1.02 7.5m 1 10m 0.990 15m 0.975 20m 0.960 25m 0.945 30m --- 40m --- 50m --- * Minimum recommended tubing length between indoor and outdoor units is 3m. 5.14.2 Heating TOTAL TUBING LENGTH 3m 1.03 7.5m 1 10m 1 15m 0.997 20m 0.992 25m 0.988 30m --- 40m --- 50m --- * Minimum recommended tubing length between indoor and outdoor units is 3m. 5-18 Revision Y05-01 CONTENT Service Manual - PXD Series PERFORMANCE DATA & PRESSURE CURVES 5.15 Pressure Curves. 5.15.1 Cooling. Suction Pressure Vs.Outdoor Temp Suction Pressure (Bar[g]) 12.0 15/21(WB/DB 17/24(WB/DB 19/27(WB/DB 21/29(WB/DB 23/32(WB/DB ºC) ºC) ºC) ºC) ºC) 20 25 11.0 10.0 9.0 8.0 7.0 6.0 5.0 15 30 35 40 46 40 46 o Outdoor Temp.(DB C ) Discharge Pressure (Bar[g]) Discharge Pressure Vs.Outdoor Temp 40 38 36 34 32 30 28 26 24 22 20 18 16 14 12 10 15/21(WB/DB 17/24(WB/DB 19/27(WB/DB 21/29(WB/DB 23/32(WB/DB 15 20 ºC) ºC) ºC) ºC) ºC) 25 30 o 35 Outdoor Temp.(DB C ) Service Manual - PXD Series Revision Y05-01 CONTENT 5-19 PERFORMANCE DATA & PRESSURE CURVES 5.15.2 Heating. Suction Pressure Vs.Outdoor Temp Suction Pressure(Bar[g]) 12.0 11.0 10.0 9.0 8.0 7.0 6.0 15 DB (ºC) 5.0 20 DB (ºC) 25 DB (ºC) 4.0 3.0 -10 -5 0 5 10 15 20 o Outdoor Temp.( WB C ) Discharge Pressure(Bar[g]) Discharge Pressure Vs.Outdoor Temp 40 38 36 34 32 30 28 26 24 22 20 18 16 14 12 10 25 DB (ºC) 20 DB (ºC) 15 DB (ºC) -10 -5 0 5 10 15 20 o Outdoor Temp.( WB C ) 5-20 Revision Y05-01 CONTENT Service Manual - PXD Series PERFORMANCE DATA & PRESSURE CURVES 5.16 PXD24 OU7-24 & 24T R410A 5.16.1 Cooling Mode at 7.5m Tubing Connection. 230V : Indoor Fan at High Speed. ENTERING AIR DB OU COIL (°C) 15 (1) 20(1) 25 30 35 40 46 ENTERING AIR WB/DB ID COIL ( °C) DATA TC SC PI TC SC PI TC SC PI TC SC PI TC SC PI TC SC PI TC SC PI 15/21 17/24 19/27 21/29 23/32 7.20 5.02 1.61 6.97 4.92 1.75 6.59 4.80 1.89 6.16 4.65 2.04 5.71 4.42 2.20 5.19 4.16 2.37 4.50 3.84 2.59 7.46 5.24 1.61 7.34 5.19 1.75 7.12 5.09 1.90 6.71 4.94 2.07 6.19 4.74 2.23 5.65 4.48 2.41 4.92 4.11 2.63 7.63 5.44 1.62 7.57 5.41 1.76 7.48 5.37 1.91 7.25 5.25 2.08 6.83 5.13 2.27 6.16 4.85 2.45 5.41 4.43 2.69 7.81 5.58 1.62 7.75 5.56 1.77 7.71 5.52 1.93 7.51 5.40 2.10 7.17 5.28 2.29 6.74 5.01 2.48 5.98 4.58 2.73 7.93 5.68 1.63 7.88 5.67 1.77 7.89 5.63 1.94 7.73 5.51 2.12 7.51 5.38 2.30 7.09 5.11 2.50 6.44 4.68 2.76 LEGEND TC SC PI WB DB ID OU – – – – – – – Total Cooling Capacity, kW Sensible Capacity, kW Power Input, kW Wet Bulb Temp., (oC) Dry Bulb Temp., (oC) Indoor Outdoor (1) Marked area is below standard operating limits. For operating in low ambient conditions, refer to Optional Accessories (Chapter 15). Service Manual - PXD Series Revision Y05-01 CONTENT 5-21 PERFORMANCE DATA & PRESSURE CURVES 5.16.2 Heating Mode at 7.5m Tubing Connection. 230V : Indoor Fan at High Speed. ENTERING AIR DB ID COIL ( °C) 20 15 ENTERING AIR WB OU COIL (°C) -10 -7 -2 2 6 10 15 20 25 TH PI TH PI TH PI 4.06 4.37 4.64 5.65 7.24 7.87 8.51 8.96 1.70 1.75 1.77 1.85 1.99 2.10 2.19 2.26 3.91 4.21 4.49 5.41 7.03 7.66 8.30 8.75 1.81 1.84 1.87 1.97 2.13 2.25 2.36 2.45 3.75 4.06 4.33 5.18 6.78 7.45 8.08 8.51 6.29 6.41 6.54 6.89 7.47 7.93 8.30 8.72 * the above chart includes the weighted deicing infleuence. LEGEND TH PI WB DB ID OU – – – – – – Total Heating Capacity, kW Power Input, kW Wet Bulb Temp., (oC) Dry Bulb Temp., (oC) Indoor Outdoor 5.17 Capacity Correction Factor Due to Tubing Length 5.17.1 Cooling TOTAL TUBING LENGTH 4m 7.5m 10m 15m 20m 25m 30m 40m 50m 1.01 1 0.98 0.97 0.96 0.95 0.94 --- --- * Minimum recommended tubing length between indoor and outdoor units is 3m. 5.17.2 Heating TOTAL TUBING LENGTH 4m 7.5m 10m 15m 20m 25m 30m 40m 50m 1.02 1 0.99 0.99 0.98 0.97 0.97 --- --- * Minimum recommended tubing length between indoor and outdoor units is 3m. 5-22 Revision Y05-01 CONTENT Service Manual - PXD Series PERFORMANCE DATA & PRESSURE CURVES 5.18 Pressure Curves. 5.18.1 Cooling. Suction Pressure Vs.Outdoor Temp Suction Pressure (Bar[g]) 12.0 15/21(WB/DB 17/24(WB/DB 19/27(WB/DB 21/29(WB/DB 23/32(WB/DB 11.0 10.0 ºC) ºC) ºC) ºC) ºC) 9.0 8.0 7.0 6.0 5.0 15 20 25 30 35 40 46 40 46 o Outdoor Temp.(DB C ) Discharge Pressure (Bar[g]) Discharge Pressure Vs.Outdoor Temp 40 38 36 34 32 30 28 26 24 22 20 18 16 14 12 10 15/21(WB/DB 17/24(WB/DB 19/27(WB/DB 21/29(WB/DB 23/32(WB/DB 15 20 ºC) ºC) ºC) ºC) ºC) 25 30 35 o Outdoor Temp.(DB C ) Service Manual - PXD Series Revision Y05-01 CONTENT 5-23 PERFORMANCE DATA & PRESSURE CURVES 5.18.2 Heating. Suction Pressure Vs.Outdoor Temp Suction Pressure(Bar[g]) 12.0 11.0 10.0 9.0 8.0 7.0 15 DB (ºC) 6.0 20 DB (ºC) 5.0 25 DB (ºC) 4.0 3.0 -10 -5 0 5 10 15 20 o Outdoor Temp.( WB C ) Discharge Pressure(Bar[g]) Discharge Pressure Vs.Outdoor Temp 40 38 36 34 32 30 28 26 24 22 20 18 16 14 12 10 25 DB (ºC) 20 DB (ºC) 15 DB (ºC) -10 -5 0 5 o 10 15 20 Outdoor Temp.( WB C ) 5-24 Revision Y05-01 CONTENT Service Manual - PXD Series PERFORMANCE DATA & PRESSURE CURVES 5.19 PXD30 OU8- 30 R410A 5.19.1 Cooling Mode at 7.5m Tubing Connection. 230V : Indoor Fan at High Speed. ENTERING AIR DB OU COIL (°C) 15 (1) 20(1) 25 30 35 40 46 ENTERING AIR WB/DB ID COIL ( °C) DATA TC SC PI TC SC PI TC SC PI TC SC PI TC SC PI TC SC PI TC SC PI 15/21 17/24 19/27 21/29 23/32 8.98 5.68 2.12 8.69 5.57 2.30 8.22 5.42 2.49 7.69 5.25 2.68 7.12 5.00 2.89 6.47 4.71 3.12 5.62 4.34 3.41 9.30 5.92 2.12 9.16 5.87 2.31 8.88 5.76 2.50 8.37 5.58 2.72 7.72 5.36 2.94 7.05 5.07 3.17 6.14 4.65 3.46 9.52 6.15 2.13 9.45 6.12 2.32 9.33 6.07 2.52 9.04 5.94 2.75 8.52 5.80 2.99 7.69 5.49 3.22 6.75 5.00 3.54 9.75 6.31 2.13 9.67 6.29 2.33 9.61 6.24 2.54 9.36 6.11 2.77 8.95 5.97 3.01 8.41 5.66 3.26 7.46 5.18 3.59 9.89 6.42 2.14 9.84 6.41 2.33 9.85 6.36 2.55 9.64 6.23 2.79 9.37 6.08 3.03 8.84 5.78 3.30 8.04 5.29 3.63 LEGEND TC SC PI WB DB ID OU – – – – – – – Total Cooling Capacity, kW Sensible Capacity, kW Power Input, kW Wet Bulb Temp., (oC) Dry Bulb Temp., (oC) Indoor Outdoor (1) Marked area is below standard operating limits. For operating in low ambient conditions, refer to Optional Accessories (Chapter 15). Service Manual - PXD Series Revision Y05-01 CONTENT 5-25 PERFORMANCE DATA & PRESSURE CURVES 5.19.2 Heating Mode at 7.5m Tubing Connection. 230V : Indoor Fan at High Speed. ENTERING AIR DB ID COIL ( °C) 15 ENTERING AIR WB OU COIL (°C) -10 -7 -2 2 6 10 15 20 20 25 TH PI TH PI TH PI 5.00 5.38 5.71 6.95 8.91 9.69 10.47 11.03 2.23 2.29 2.32 2.43 2.61 2.75 2.87 2.96 4.81 5.19 5.52 6.66 8.65 9.43 10.21 10.77 2.38 2.41 2.46 2.58 2.79 2.94 3.10 3.21 4.61 5.00 5.33 6.38 8.35 9.17 9.95 10.47 2.50 2.54 2.59 2.73 2.96 3.15 3.29 3.46 * the above chart includes the weighted deicing infleuence. LEGEND TH PI WB DB ID OU – – – – – – Total Heating Capacity, kW Power Input, kW Wet Bulb Temp., (oC) Dry Bulb Temp., (oC) Indoor Outdoor 5.20 Capacity Correction Factor Due to Tubing Length 5.20.1 Cooling TOTAL TUBING LENGTH 4m 1.01 7.5m 1 10m 15m 20m 25m 30m 40m 50m 0.98 0.97 0.96 0.95 0.94 --- --- * Minimum recommended tubing length between indoor and outdoor units is 3m. 5.20.2 Heating 4m 1.02 7.5m 1 TOTAL TUBING LENGTH 10m 15m 20m 25m 30m 0.99 0.99 0.98 0.97 0.97 40m --- 50m --- * Minimum recommended tubing length between indoor and outdoor units is 3m. 5-26 Revision Y05-01 CONTENT Service Manual - PXD Series PERFORMANCE DATA & PRESSURE CURVES 5.21 Pressure Curves. 5.21.1 Cooling. Suction Pressure Vs.Outdoor Temp Suction Pressure (Bar[g]) 12.0 15/21(WB/DB 17/24(WB/DB 19/27(WB/DB 21/29(WB/DB 23/32(WB/DB 11.0 10.0 ºC) ºC) ºC) ºC) ºC) 9.0 8.0 7.0 6.0 5.0 15 20 25 30 35 40 46 40 46 o Outdoor Temp.(DB C ) Discharge Pressure (Bar[g]) Discharge Pressure Vs.Outdoor Temp 40 38 36 34 32 30 28 26 24 22 20 18 16 14 12 10 15/21(WB/DB 17/24(WB/DB 19/27(WB/DB 21/29(WB/DB 23/32(WB/DB 15 20 ºC) ºC) ºC) ºC) ºC) 25 30 35 o Outdoor Temp.(DB C ) Service Manual - PXD Series Revision Y05-01 CONTENT 5-27 PERFORMANCE DATA & PRESSURE CURVES 5.21.2 Heating. Suction Pressure Vs.Outdoor Temp Suction Pressure(Bar[g]) 12.0 11.0 10.0 9.0 8.0 7.0 15 DB (ºC) 6.0 20 DB (ºC) 5.0 25 DB (ºC) 4.0 3.0 -10 -5 0 5 10 15 20 o Outdoor Temp.( WB C ) Discharge Pressure(Bar[g]) Discharge Pressure Vs.Outdoor Temp 40 38 36 34 32 30 28 26 24 22 20 18 16 14 12 10 25 DB (ºC) 20 DB (ºC) 15 DB (ºC) -10 -5 0 5 10 15 20 o Outdoor Temp.( WB C ) 5-28 Revision Y05-01 CONTENT Service Manual - PXD Series PERFORMANCE DATA & PRESSURE CURVES 5.22 PXD30 OU8- 30T R410A 5.22.1 Cooling Mode at 7.5m Tubing Connection. 230V : Indoor Fan at High Speed. ENTERING AIR DB OU COIL (°C) 15 (1) 20(1) 25 30 35 40 46 ENTERING AIR WB/DB ID COIL ( °C) DATA TC SC PI TC SC PI TC SC PI TC SC PI TC SC PI TC SC PI TC SC PI 15/21 17/24 19/27 21/29 23/32 8.75 5.53 1.96 8.46 5.42 2.13 8.01 5.28 2.30 7.49 5.12 2.49 6.93 4.87 2.68 6.31 4.59 2.89 5.47 4.23 3.16 9.06 5.77 1.97 8.92 5.72 2.14 8.65 5.61 2.32 8.15 5.44 2.52 7.52 5.22 2.73 6.86 4.94 2.94 5.98 4.53 3.21 9.27 5.99 1.97 9.20 5.96 2.15 9.09 5.91 2.34 8.81 5.78 2.54 8.30 5.65 2.77 7.49 5.34 2.99 6.58 4.87 3.28 9.49 6.14 1.98 9.42 6.13 2.16 9.37 6.08 2.35 9.12 5.95 2.56 8.72 5.81 2.79 8.19 5.51 3.02 7.27 5.04 3.33 9.64 6.26 1.99 9.58 6.24 2.16 9.59 6.20 2.37 9.39 6.07 2.59 9.13 5.93 2.81 8.61 5.63 3.05 7.83 5.16 3.36 LEGEND TC SC PI WB DB ID OU – – – – – – – Total Cooling Capacity, kW Sensible Capacity, kW Power Input, kW Wet Bulb Temp., (oC) Dry Bulb Temp., (oC) Indoor Outdoor (1) Marked area is below standard operating limits. For operating in low ambient conditions, refer to Optional Accessories (Chapter 15). Service Manual - PXD Series Revision Y05-01 CONTENT 5-29 PERFORMANCE DATA & PRESSURE CURVES 5.22.2 Heating Mode at 7.5m Tubing Connection. 230V : Indoor Fan at High Speed. ENTERING AIR DB ID COIL ( °C) 15 ENTERING AIR WB OU COIL (°C) -10 -7 -2 2 6 10 15 20 20 25 TH PI TH PI TH PI 4.79 5.16 5.48 6.66 8.55 9.30 10.04 10.58 2.10 2.16 2.18 2.29 2.46 2.60 2.71 2.79 4.61 4.98 5.30 6.39 8.30 9.05 9.79 10.33 2.24 2.27 2.31 2.43 2.63 2.77 2.92 3.02 4.43 4.79 5.11 6.12 8.01 8.80 9.55 10.04 2.35 2.40 2.45 2.58 2.79 2.97 3.10 3.26 * the above chart includes the weighted deicing infleuence. LEGEND TH PI WB DB ID OU – – – – – – Total Heating Capacity, kW Power Input, kW Wet Bulb Temp., (oC) Dry Bulb Temp., (oC) Indoor Outdoor 5.23 Capacity Correction Factor Due to Tubing Length 5.23.1 Cooling TOTAL TUBING LENGTH 4m 1.01 7.5m 1 10m 15m 20m 25m 30m 40m 50m 0.98 0.97 0.96 0.95 0.94 --- --- * Minimum recommended tubing length between indoor and outdoor units is 3m. 5.23.2 Heating TOTAL TUBING LENGTH 4m 1.02 7.5m 1 10m 15m 20m 25m 30m 40m 50m 0.99 0.99 0.98 0.97 0.97 --- --- * Minimum recommended tubing length between indoor and outdoor units is 3m. 5-30 Revision Y05-01 CONTENT Service Manual - PXD Series PERFORMANCE DATA & PRESSURE CURVES 5.24 Pressure Curves. 5.24.1 Cooling. Suction Pressure Vs.Outdoor Temp Suction Pressure (Bar[g]) 12.0 15/21(WB/DB 17/24(WB/DB 19/27(WB/DB 21/29(WB/DB 23/32(WB/DB 11.0 10.0 ºC) ºC) ºC) ºC) ºC) 9.0 8.0 7.0 6.0 5.0 15 20 25 30 35 40 46 40 46 o Outdoor Temp.(DB C ) Discharge Pressure (Bar[g]) Discharge Pressure Vs.Outdoor Temp 40 38 36 34 32 30 28 26 24 22 20 18 16 14 12 10 15/21(WB/DB 17/24(WB/DB 19/27(WB/DB 21/29(WB/DB 23/32(WB/DB 15 20 ºC) ºC) ºC) ºC) ºC) 25 30 35 o Outdoor Temp.(DB C ) Service Manual - PXD Series Revision Y05-01 CONTENT 5-31 PERFORMANCE DATA & PRESSURE CURVES 5.24.2 Heating. Suction Pressure Vs.Outdoor Temp Suction Pressure(Bar[g]) 12.0 11.0 10.0 9.0 8.0 7.0 6.0 15 DB (ºC) 20 DB (ºC) 5.0 25 DB (ºC) 4.0 3.0 -10 -5 0 5 10 15 20 o Outdoor Temp.( WB C ) Discharge Pressure(Bar[g]) Discharge Pressure Vs.Outdoor Temp 40 38 36 34 32 30 28 26 24 22 20 18 16 14 12 10 25 DB (ºC) 20 DB (ºC) 15 DB (ºC) -10 -5 0 5 10 15 20 o Outdoor Temp.( WB C ) 5-32 Revision Y05-01 CONTENT Service Manual - PXD Series ELECTRICAL DATA 6. ELECTRICAL DATA 6.1 Single Phase Units MODEL Power Supply Max Current, A Circuit Breaker Power Supply Wiring No. X Cross Section mm2 PXD 9 PXD 12 PXD 15 PXD 18 To indoor 1PH-230V-50Hz 7.1 10 To indoor 1PH-230V-50Hz 7.6 10 To indoor 1PH-230V-50Hz 10.4 15 To Indoor To outdoor 1PH-230V-50Hz 12 15 3x1.5 mm2 3x1.5 mm2 3x1.5 mm2 2 2 2 3x2.5 mm2 2 Interconnecting Cable RC Model 5x1.5 mm2 +2x0.5 mm2 5x1.5 mm +2x0.5 mm 5x1.5 mm +2x0.5 mm 5x2.5 mm2 +2x0.5 mm2 6x1.5 mm2 +2x0.5 mm2 (OCT sensor) (OCT sensor) (OCT sensor) No. X Cross Section mm2 (OCT sensor) (OCT sensor) Interconnecting Cable ST Model 4x1.5 mm2 4x1.5 mm2 4x1.5 mm2 4x2.5 mm 5x2.5 mm No. X Cross Section mm2 MODEL PXD 24 To Outdoor To outdoor Power Supply Max Current, A Circuit Breaker Power Supply Wiring No. X Cross Section mm2 Interconnecting Cable RC Model No. X Cross Section mm2 Interconnecting Cable ST Model No. X Cross Section mm2 6.2 PXD 30 To outdoor 1PH-230V-50Hz 1PH – 230V – 50 Hz 15 20 17 25 3x2.5 mm2 3 X 4 mm2 5x2.5 mm2 +2x0.5 mm2 (OCT sensor) 6 X 1.5 mm2 + 2 X 0.5 mm2 (OCT Sensor) 6x2.5 mm2 +2x0.5 mm2 (OCT sensor) 4x2.5 mm2 5 X 1.5 mm2 + 2 X 0.5 mm2 (OCT Sensor) 5x2.5 mm2 Three Phase Units MODEL Power Supply Max Current, A Circuit Breaker Power Supply Wiring No. X Cross Section mm2 Interconnecting Cable RC Model No. X Cross Section mm2 Interconnecting Cable ST Model No. X Cross Section mm2 PXD 18 PXD 24T PXD 30T To outdoor 3PH-400V-50Hz To outdoor 3PH – 400V – 50 Hz To Outdoor 3PH – 400V – 50 Hz 4.2 3 x 7.5 3 x 10 3 x 9.2 5 x 1.5 mm2 5 X 2.5 mm2 6x1.5 mm +2x0.5 mm (OCT senser) 6 X 1.5 mm2 + 2 X 0.5 mm2 (OCT Sensor) 6 X 1.5 mm2 + 2 X 0.5 mm2 (OCT Sensor) 5x1.5 mm2 5 X 1.5 mm2 + 2 X 0.5 mm2 (OCT Sensor) 5 X 1.5 mm2 + 2 X 0.5 mm2 (OCT Sensor) 6 5x1.5mm2 2 Service Manual - PXD Series 2 Revision Y05-01 CONTENT 3 x 16 6-1 WIRING DIAGRAMS 7. WIRING DIAGRAMS 7.1 Indoor Unit: PXD 9, 12, 15 7.2 Indoor Unit: PXD 18, 24, 30 1PH/3PH Service Manual - PXD Series Revision Y05-01 CONTENT 7-1 WIRING DIAGRAMS 7.3 Outdoor Unit: ONG 9, 12, 15 C R 7.4 S Outdoor Unit: GC 18 LEGEND: OPTIONAL: WIRING DIAGRAM ---Heat Pump Model BK-Black BU-Blue BN-Brown OG-Orange RD-Red WH-White GN/YE-Yellow/Green 1.CONNECTED ONLY FOR ALL SEASON UNIT 2.SP--Pressure Control Electronic ( for all season) 3.PTCH--PTC heater for draining water 4.HPS--High Pressure Switch (Only for GC-30RC) CAP.--Capacitor COMP.--Compressor DEICER TEMP. SENSOR RT3 BK 8 6 BK BK 5 6 OG 5 8 9 9 XT3 BK SP U BN(GC-18RC) BK(GC-22/24RC) P BK BN HPS BN 4 4 4-WAY VALVE BN BN 3/N BN N BU PTCH WH WH BN/BK RD L 2/N BU RD BU 1/L GN/YE GN/YE BU BK CAP OG O.U. TERMINAL I.U. TERMINAL BU VT BU WH GN/YE RUN CAP. BN RD WH M~ 6 8 RD KM RD CONTACTOR RD 0 BU 4 BN 2 VT BN BU C S R N L COMP.HEATER Supply power: 230V/50Hz COMP ~ M GN/YE FAN MOTOR GN/YE 4525772/01 7-2 Revision Y05-01 CONTENT Service Manual - PXD Series WIRING DIAGRAMS 7.5 Outdoor Unit: GC 18 3PH WIRING DIAGRAM OF OUTDOOR UNIT 9 XT3 8 DEICER TEMP. SENSOR RT3 ANTI-PHASE PROTECTOR U RD V 6 BN WH BU BN A W BN N BU BU RD RD BK L1 P OG TERMINAL BK TERMINAL OG L1 L2 B B BK L2 L3 BU BN L3 3PH BK BK BN BN BU BN WH RD BK BN BK WH L N BU WH RD BU BU BU 4-W VALVE BK WH RD PTCH N BU 380~400V 50Hz N BN 4 BK 5 INDICATOR LIGHT BK 3 A1 BU 5 21 CAP OG TERMINAL A2 BN-GC18RC BK-GC24RC RD 6 22 VT COMP.HEATER RD BN BU 2 WH BK ~ M GN/YE 4 2 VT WH 3 4 5 6 8 7 RELAY GN/YE GN/YE A/C CONTACTOR KM GN/YE A RD BN WH BU U/T 1 V/T 2 W/T 3 ~ M GN/YE LEGEND: YE-YELLOW BK-BLACK GND-GROUND BU-BLUE CAP-CAPACITOR BN-BROWN COMP-COMPRESSOR OG-ORANGE GN/YE-YELLOW/GREEN RD-RED P-PRESSURE SWITCH WH-WHITE ---OPTINONAL PTCH--- PTC HEATER FOR DRAINING WATER GN/YE COMPRESSOR P/N: 4527498/01 7.6 FAN MOTOR Outdoor Unit: OU7-24 / OU8-30 1PH Service Manual - PXD Series Revision Y05-01 CONTENT 7-3 WIRING DIAGRAMS 7.7 Outdoor Unit: OU8-30 1PH (with soft starter) 7.8 Outdoor Unit: OU7-24 / OU8-30 3PH 7-4 Revision Y05-01 CONTENT Service Manual - PXD Series ELECTRICAL CONNECTIONS 8. ELECTRICAL CONNECTIONS 8.1 PXD 9, 12, 15, 18, 24 8.2 PXD 18, 24,30 (Power Supply to Outdoor) Service Manual - PXD Series Revision Y05-01 CONTENT 8-1 ELECTRICAL CONNECTIONS 8.3 8-2 PX 18, 24, 30 3PH Revision Y05-01 CONTENT Service Manual - PXD Series REFRIGERATION DIAGRAMS 9. REFRIGERATION DIAGRAMS 9.1 Heat Pump Models 9.1.1 PXD 9, 12, 15, 18 R410A OUTDOOR UNIT INDOOR UNIT Service port Reverse valve Capillary tube Outdoor coil Sensor Compressor Sensor Strainer Valves Flared connection Capillary tube Indoor coil Check valve Strainer COOLING MODE OUTDOOR UNIT INDOOR UNIT Service port Sensor Compressor Sensor Reverse valve Valves Flared connection Capillary tube Capillary tube Outdoor coil Strainer Indoor coil Check valve Strainer HEATING MODE Service Manual - PXD Series Revision Y05-01 CONTENT 9-1 REGRIGERATION DIAGRAMS 9.1.2 9-2 PXD 24 R410A Revision Y05-01 CONTENT Service Manual - PXD Series REFRIGERATION DIAGRAMS 9.1.3 PXD 30 R410A Service Manual - PXD Series Revision Y05-01 CONTENT 9-3 REGRIGERATION DIAGRAMS 9.2 Cooling Only Models 9.2.1 PXD 9, 11, 15, 18 OUTDOOR UNIT INDOOR UNIT Service port Sensor Compressor Sensor Valves Capillary tube Outdoor coil 9.2.2 9-4 Flared connection Indoor coil Strainer PXD 24, 30 Revision Y05-01 CONTENT Service Manual - PXD Series TUBING CONNECTIONS 10. TUBING CONNECTIONS TUBE (Inch) ¼” ⅜” ½” ⅝” ¾” 11-13 13-20 11-13 40-45 13-20 11-13 60-65 18-25 11-13 70-75 18-25 11-13 80-85 40-50 11-13 TORQUE (Nm) Flare Nuts Valve Cap Service Port Cap 1. 2. 3. 4. 5. 6. 7. 8. Valve Protection Cap-end Refrigerant Valve Port (use Allen wrench to open/close) Valve Protection Cap Refrigerant Valve Service Port Cap Flare Nut Unit Back Side Copper Tube When the outdoor unit is installed above the indoor unit an oil trap is required every 5m along the suction line at the lowest point of the riser. Incase the indoor unit is installed above the outdoor, no trap is required. Service Manual - PXD Series Revision Y05-01 CONTENT 10-1 CONTROL SYSTEM 11. CONTROL SYSTEM 11.1 Electronic Control 11.1.1 Introduction The electronic control information is designed for service applications, and is common to the following groups of air-conditioners: ST/RC group SH group RH group 11.1.2 -Cooling only / cooling and heating by heat pump. -Cooling and heating by heat pump and supplementary heater. -Cooling, heating by heaters only. Model Plug Settings Before installation, make sure to set the model plug conforming to the suitable group. GROUP ST / RC SH RH J6 Setting Open Closed Closed J2 Setting Open Open Closed Model Plug Service Manual - PXD Series Revision Y05-01 CONTENT 11-1 CONTROL SYSTEM 11.1.3 Remote Control DIP Switch Settings SETTING SWITCH STATUS DEFINITION SW. NO. 1 OFF ON OFF ON -- SW. NO. 2 OFF OFF ON ON -- SW. NO. 3 ----OFF SW. NO. 4 ------ -- -- ON -- -- -- -- OFF TIMER & CLOCK 12H AM, PM -- -- -- ON TIMER & CLOCK 24H RC3 RC4 RC-ALL MODES OF OPERATION STD-COOL, FAN, DRY, ACTIVE HEAT-COOL, FAN, DRY, ACTIVE AUTO FAN (AF) TEMP. DISPLAY IN C DEGREES TEMP. DISPLAY IN F DEGREES VERTICAL SWING ONLY HORIZONTAL & VERTICAL SWING FUNCTIONS TOGETHER DISABLE LCD & KEY ILLUMINATION ENABLE LCD & KEY ILLUMINATION Reset operation - Press the 4 buttons simultaneously: “CLEAR “, “SET”, "HR +”, ”HR -” for 5 seconds LEGEND SW1, SW2 - Selection of RC/ST SW3 – Selection of Display C or F in RC3 or swing function in RC4 SW4 – Selection of Time Display 12H AM/PM or 24H in RC3 or illumination in RC4 OFF = 0 ON = 1 NOTE After setting the DIP switches perform reset operation. 11-2 Revision Y05-01 CONTENT Service Manual - PXD Series CONTROL SYSTEM 11.1.4 Main PCB Controller Service Manual - PXD Series Revision Y05-01 CONTENT 11-3 CONTROL SYSTEM 11.1.5 Display Board :LEXAN 11.1.6 Display Board : Assembly 11.1.7 Legend : A) Heating LED B) Cooling LED C) Fan LED D) Operation LED E) Timer LED F) Filter LED G) Temp’ Set Point Indication H) Fan Speed H,(High) I,(Medium) J,(Low) K,(AUTO) L) Reset M) STB’Y LED 11-4 Revision Y05-01 CONTENT Service Manual - PXD Series CONTROL SYSTEM 11.2 Control Function 11.2.1 Abbreviations AC - Alternate Current A/C ANY CLOCK COMP CPU CTV HE HPC H/W ICP ICT IF, IFAN IR LEVEL1 LEVEL2/3 LEVEL4 Max Min min NA OCP OCT OF, OFAN OPER Para. RAT RC R/C RCT RH RT RV SB, STBY sec Sect SH SPT ST S/W TEMP W/O - Air-Conditioner - ON or OFF status - ON/OFF Operation Input, (dry contact) - Compressor - Central Processing Unit - Compensation Temperature Value - Heating Element - High Pressure Control - Hardware - Indoor Condensation Pump - Indoor Coil Temperature (RT2) sensor - Indoor Fan - Infrared - Normal Water Level - Medium/High Waterlevel - Overflow Level - Maximum - Minimum - Minute (time) - Not Applicable - Outdoor Condensation Pump - Outdoor Coil Temperature (RT3) sensor - Outdoor Fan - Operate - Paragraph - Return Air Temperature (RT1) sensor - Reverse Cycle (Heat Pump) - Remote Control - Remote Control Temperature - Resistance Heater - Room Temperature (i.e. RCT in IFEEL mode, RAT otherwise) - Reversing Valve - Stand-By - Second (time) - Section - Supplementary Heater - Set Point Temperature - Standard (Model with Cooling Only) - Software - Temperature - Without T - The difference between SPT and RT. in Heat Mode: T = SPT - RT in Cool/Dry/Fan Mode: T = RT – SPT Service Manual - PXD Series Revision Y05-01 CONTENT 11-5 CONTROL SYSTEM 11.3 General Functions 11.3.1 COMP Operation a. For each Mode including POWER OFF & SB, a Min time delay of 3 min before COMP restarting, excluding DEICING Mode (see para. 14.12.2). b. The Min operation time of COMP under different operating conditions is: Operation Mode Heat, Cool, HP protection or Auto Modes Fan, Dry, Overflow, Protection Modes, or Mode Change 11.3.2 Min Operation Time of COMP 3 min. Ignored IFAN operation a. Min time interval between IFAN speed change in AUTOFAN Mode is 30 sec. b. Min time interval between IFAN speed change in H/M/L Mode is 1 sec. c. IFAN speed in Heat/Cool AUTOFAN Mode is determined according to the following chart: IFAN speed H M L 1 2 3 4 T [oc] Where in Heat Mode: T = SPT - RT in Cool Mode: T = RT- SPT 11.3.3 OFAN Operation Min time interval between OFAN ON/OFF state changes is 30 sec. 11.3.4 11-6 HE Operation a. Min Heaters ON or OFF time is 30 sec. b. Heaters can never be in operation while IFAN is OFF. c. In RH group, HE-1 and HE-2 will be activated only when COMP is not operating, except in Dry Mode. Revision Y05-01 CONTENT Service Manual - PXD Series CONTROL SYSTEM 11.3.5 11.3.6 Protections a. High pressure protection is applicable to all operating modes. b. Deicing control is valid in Heat and Auto Heat Modes only. c. Defrosting control is valid in Dry, Cool, and Auto Cool Modes. Thermistors Operation a. Return air Temp. is detected by RAT in normal Mode, or by RCT (R/C sensor) in I-FEEL Mode. b. Indoor Coil Temp. is detected by ICT. c. Outdoor Coil Temp. is detected by OCT. d. Definition of thermistor faults: e. 1) Thermistor is disconnected - the thermistor reading is below – 30OC. 2) Thermistor is shorted - the thermistor reading is above 75OC. 3) Thermistor Temp reading doesn’t change a) This test is performed only once after a unit is switched from OFF/STBY to operation. At the first occurrence of 10 min continuous COMP operation, the current ICT are compared with those when the COMP was switched from OFF to ON 10 min before. If the T is less than 3OC, the thermistor is regarded as defective. b) The ICT no-change error can be disabled together by connecting a 4.7k resistor (5%) to the ICT connector. These resistors are equivalent to a thermistor 48+/-1OC. Cases for disabling ICT thermistor disconnected detection: 1) The detection of thermistor faults a. and b. above is disabled when Deicer Protection is started. The detection will be enabled again only after (1) the deicing is completed, and (2) COMP has been restarted and operated for 30 sec. 2) When all the following conditions are fulfilled: a) 4.7k resistor is connected to the OCT. b) IFAN is OFF. c) Compressor is ON. d) ICT < -30 (disconnected). Service Manual - PXD Series Revision Y05-01 CONTENT 11-7 CONTROL SYSTEM 11.3.7 RV Fault This test is applied only in compressor units where 4.7k resistor is not connected to the OCT. The test is performed every time the unit is switched from OFF/STBY to OPER in Heat mode or changes operation mode from COOL/DRY to HEAT or (this applies also in AUTO COOL/HEAT mode). If ICT is lower than 35ºC at the time of mode change, then at the first occurrence of 15 min continuous COMP operation, ICT is compared with ICT reading when the COMP was switched from OFF to ON 15 min before. RV fault is defined when ICT decreases more than 5ºC. In this case, the COMP will stop and the SB LED will blink. The fault is reset after switching to SB or after mode change. 11.3.8 11-8 General Features a. Allowed (control target) range for RAT is SPT +/-1ºC. b. Whenever the unit is changed from COOL/DRY/STBY mode to HEAT mode or vice versa, the procedures below are followed: Stop COMP for 3 min Change RV state Start COMP if necessary. Revision Y05-01 CONTENT Service Manual - PXD Series CONTROL SYSTEM 11.4 Cooling Mode 11.4.1 Cooling Mode – General a. Mode Definition Mode: COOL, AUTO (at Cooling) Temp: Selected desired temperature. Fan: HIGH, MED, LOW, AUTO. Timer: Any I-FEEL: ON or OFF b. Room Temperature, RT, is detected by: RAT in normal operation, or RCT (R/C sensor) in I-FEEL mode. 11.4.2 c. Indoor Coil Temp is detected by ICT. d. Outdoor Coil Temp is detected by OCT. Control Functions a. COMP Operation COMP ON OFF 0 b. 1 RT-SPT OFAN Operation In normal operation OFAN operates together with the COMP. c. IFAN Operation IFAN will operate in ANY speed regardless the ICT or COMP state. IFAN speed will be determined according to user selection or AUTO-FAN logic d. RV and HEATERS outputs RV and HEATERS are in OFF state in COOL mode. Service Manual - PXD Series Revision Y05-01 CONTENT 11-9 CONTROL SYSTEM 11.4.3 Sequence Diagrams a. Maintaining room temp at desired level by comparing RT and SPT with user defined IFAN speed. (RT - SPT) [oc] +3 +2 +1 0 -1 -2 ON COMP (WVL) OFF ON OFAN OFF USER FAN SPEED IFAN ON RV 11-10 OFF Revision Y05-01 CONTENT Service Manual - PXD Series CONTROL SYSTEM b. Maintaining room temp at desired level by comparing RT and SPT with AUTO-IFAN. +4 +3 +2 +1 0 -1 -2 (RT - SPT) [oc] ON COMP (WVL) OFF ON OFAN OFF H IFAN M L ON RV OFF Service Manual - PXD Series Revision Y05-01 CONTENT 11-11 CONTROL SYSTEM 11.5 Heating Mode 11.5.1 Heating Mode - General a. Compensation Procedure When I-FEEL is OFF during HEAT mode: RT= RAT – CTV. When I-FEEL is ON during HEAT mode: RT= RCT. Type of Indoor Wall Mounted Mobiles / Floor Ceiling Square /Window Ducted Cassettes CTV +3 oC +0 oC +2 oC +4 oC +4 oC No compensation will be activated in Forced operation modes b. IFAN operation rules for RC and SH groups: 1) As a general rule for RC and SH groups, IFAN will be switched ON according to the following graph: IFAN ANY Note 1 LOW Ducted OFF General: Window: 30 17 32 20 40 25 ICT NOTE 1 When COMP is ON (except WAX Model), IFAN will change from LOW to OFF either when: a) ICT<28 and IFAN is on for 5 min or longer. Or, b) ICT<20 NOTE 2 When ICT is faulty: When the compressor switches from OFF to ON (excluding deicing), IFAN will be on in ANY speed. When the compressor switches from ON to OFF, the IFAN will change to LOW speed for 30 seconds and then it will be off. 2) 11-12 In SH or RC group, IFAN will operate for Min 30 sec according to 1) above after HEs are turned off, where in a case it has to be OFF, it will be forced to LOW speed. Revision Y05-01 CONTENT Service Manual - PXD Series CONTROL SYSTEM c. IFAN operation rules for RH group 1) d. In RH group, IFAN starts when HE starts. When HE switches to OFF, IFAN switches to LOW for 30 sec and then stops. Heaters operation rules for RC and SH groups: 1) For both RC and SH groups, Heaters versus T is as follows: ON HE1 OFF ON HE2 OFF 1 2) 2 3 4 T=SP-RT [oc] Operation rules for Heaters in RC group: a) Heaters can be enabled only if IFAN is ON. b) Heaters will operate according to T and the following graph: HE-1 & HE- 2 ON OFF General: Window: 3) 20 15 32 20 45 50 ICT Rules for Heaters operation in SH group: a) When heaters are to be ON and IFAN is to be OFF according to d. 1) above, IFAN will be forced to LOW speed. b) Heaters will operate according to T and the following graph: ON HE -1 OFF ON HE - 2 OFF 37 4) 42 45 50 ICT For both RC and SH groups, excluding deicing, HE1 and HE2 can be ON only when the compressor is ON. Service Manual - PXD Series Revision Y05-01 CONTENT 11-13 CONTROL SYSTEM e. Heaters operation rules for RH groups: 1) In RH group, HE operation is according to the difference between RAT and SPT. ON H E2 O FF ON H E1 O FF -1 f. 0 2 T=SP-R T [ o c] OFAN Operation for RC and SH groups 1) As a general rule for RC and SH groups, excluding protection modes, OFAN starts with the compressor. 2) When OFAN is ON it will operate according to the following conditions: a) OFAN operates together with the compressor. b) When ( RT SPT 2) and ICT 50 and the 4.7k resistor is not connected to the OCT, OFAN will operate according to the following curve: ON O FAN O FF 0 11-14 3 OCT Revision Y05-01 CONTENT Service Manual - PXD Series CONTROL SYSTEM 11.6 Heating, RC or SH Group Mode: HEAT, AUTO (at heating) Temp: Selected desired temperature Fan: HIGH, MED, LOW Timer: Any I-FEEL: ON or OFF 11.6.1 Sequence Diagram Maintains room temp. at desired level by comparing RAT or RCT to SPT. (RT - SPT) [oc] +2 +1 0 -1 -2 -3 -4 ON COMP (WVL) OFF ON HE1 OFF ON HE2 OFF ON RV OFF Service Manual - PXD Series Revision Y05-01 CONTENT 11-15 CONTROL SYSTEM 11.7 Heating, RC or SH Group with Autofan Mode: HEAT, AUTO (at heating) Temp: Selected desired temperature Fan: AUTO Timer: Any I-FEEL: ON or OFF 11.7.1 Sequence Diagram Maintains room temp at desired level by controlling COMP, IFAN and OFAN. (RT - SPT) [oc] +2 +1 0 -1 -2 -3 -4 ON COMP (WVL) OFF ON HE1 OFF ON HE2 OFF ON RV 11-16 OFF Revision Y05-01 CONTENT Service Manual - PXD Series CONTROL SYSTEM 11.8 Heating, RH Group Mode: HEAT, AUTO (at Heating) Temp: Selected desired temperature Fan: HIGH, MED, LOW Timer: Any I-FEEL: ON or OFF 11.8.1 Sequence Diagram Maintains room temp at desired level by controlling Heating Elements: HE1 or HE2. (RT - SPT) in oc +2 +1 0 -1 -2 -3 ON HE1 OFF ON HE2 OFF H/M/L IFAN L OFF 30 sec Service Manual - PXD Series Revision Y05-01 CONTENT 11-17 CONTROL SYSTEM 11.9 Heating, RH Group, with AUTOFAN Mode: HEAT, AUTO (at Heating) Temp: Selected desired temperature Fan: AUTO Timer: Any I-FEEL: ON or OFF 11.9.1 Sequence Diagram Maintains room temp. at desired level by controlling the 2-Stage Electric Heaters. (RT - SPT) in oc +2 +1 0 -1 -2 -3 ON HE1 OFF ON HE2 OFF H IFAN M L OFF -4 -2 -3 -1 30 sec 11-18 Revision Y05-01 CONTENT Service Manual - PXD Series CONTROL SYSTEM 11.10 Automatic Cooling or Heating 11.10.1 Automatic Cooling or Heating - General The AUTO Mode is for models with compressor and the WVL-RH only. The WVL-ST, RC and SH units do not work in AUTO Mode. a. Mode Definition Mode: AUTO Temp: Selected desired temperature Fan: Any Timer: Any I-FEEL: ON or OFF b. Switching-temperature between Cooling and Heating is SPT 3OC. c. When the AUTO Mode is started with SPT +/-0 OC, the unit will not select Auto Heat or Auto Cool mode immediately. Instead, the unit will be in a temporary FAN Mode with IFAN operating at low speed. The proper Auto Heat mode or Auto Cool will be started whenever the RT reaches SPT-1OC or SPT+1OC respectively. d. For RC & SH units, Mode change between Auto Heat & Auto Cool Modes is possible only after the COMP has been OFF during the last T minutes. e. f. Mode Change Time, T Auto Cool to Auto Heat 3 min Auto Heat to Auto Cool 4 min For RH and WVL-RH units, Mode change between Auto Heat & Auto Cool Modes is possible after the COMP/HEs have been OFF during the last T minutes. Mode Change Time, T Auto Cool to Auto Heat Auto Heat to Auto Cool COMP off for 3 min HEs off for 3 min When unit is changed form Cool/Dry Mode to Auto Mode, the unit will continue to operate in (Auto) Cool Mode until the conditions for switching from Auto Cool to Auto Heat are satisfied. Similarly, when unit is changed from Heat Mode to Auto Mode, the unit will continue to operate in (Auto) Heat Mode until the conditions for switching from Auto Heat to Auto Cool are satisfied. Service Manual - PXD Series Revision Y05-01 CONTENT 11-19 CONTROL SYSTEM 11.10.2 Sequence Diagrams a. Auto Cooling or Heating, RC or SH Groups Maintains room temp. at desired level by selecting between cooling and heating modes. (RT - SPT) [oc] +3 +2 +1 0 -1 -2 -3 -4 Auto Heat Mode ON COMP & OFAN Auto Cool Mode Auto Heat Mode > 4 min > 3 min (3) (3) OFF ON HE1 OFF ON HE2 OFF H/M/L/OFF USER FAN SPEED H/M/L/OFF IFAN > 3 min ON RV 11-20 > 2 min (4) (4) OFF Revision Y05-01 CONTENT Service Manual - PXD Series CONTROL SYSTEM b. Auto Cooling or Heating RH Group Maintains room temp. at desired level by selecting between Cooling or Heating Modes. (RT - SPT) [oc] +3 +2 +1 0 -1 -2 -3 Auto Heat Mode Auto Cool Mode Auto Heat Mode ON COMP & OFAN OFF > 3 min > 3 min (2) (2) ON HE1 OFF ON HE2 OFF H/M/L IFAN L OFF 30 sec (1) RV OFF 11.11 Dry Mode 11.11.1 Dry, ST or RC Group or P2000 Model with Any Group Settings Mode: Temp: Fan: Timer: I-FEEL: DRY Selected desired temperature LOW (automatically selected by software) Any Any Control function Reduce room humidity with minimum temp. fluctuations by operating in Cool Mode with LOW speed IFAN. Service Manual - PXD Series Revision Y05-01 CONTENT 11-21 CONTROL SYSTEM (RT - SPT) [ oc] +2 +1 0 10 20 40 30 50 Time [min] -1 -2 DRY-ON DRY DRY-OFF LOW IFAN OFF 5 minutes COMP ON time ON COMP OFAN OFF Max 15 minutes ON HE1 & HE2 3.5 min Note1 Max 15 minutes 6 min Note 2 OFF ON RV OFF NOTES 1. When DRY is ON, the COMP is forced OFF for 3.5 min (longer than the 3 min Min COMP- OFF time) after every 15 min of continuous COMP operation. 2. When DRY is OFF, the COMP is forced ON for 6 min (longer than the 3 min Min COMP- ON time) after every 15 min of continuous COMP OFF time. 3. When DRY is changed from ON to OFF or vice versa, the limits mentioned in (1) & (2) are ignored. The COMP operation is only controlled by the 3 min Min OFF time and 1 min Min ON time. 4. In DRY Mode, IFAN is LOW when COMP is ON, and is OFF when COMP is OFF. 5. HEs are always OFF in DRY Mode. 11-22 Revision Y05-01 CONTENT Service Manual - PXD Series CONTROL SYSTEM 11.11.2 DRY, SH or RH group Mode: DRY Temp: Selected desired temperature Fan: LOW (automatically selected by software) Timer: Any I-FEEL: Any Control function Reduces room humidity with minimum temp. fluctuations by operating in Cool Mode with LOW speed IFAN and HE. (RT - SPT) [ oc] +2 +1 0 10 20 30 40 50 Time [min] -1 -2 LOW IFAN OFF ON COMP & OFAN OFF ON HE1 OFF ON HE2 OFF ON RV OFF Service Manual - PXD Series Revision Y05-01 CONTENT 11-23 CONTROL SYSTEM 11.12 Protection 11.12.1 Cooling Mode Protections a. Indoor Coil Defrost Mode: COOLING, DRY, AUTO Temp: Selected desired temp. Fan: Any Timer: Any I-FEEL: ON or OFF Control Function Protects the indoor coil from ice formation at low ambient temperatures. ICT [oc] +14 +5 +2 +1 0 -1 t1 t2 t3 t1 ON OFAN OFF ON COMP OFF ON IFAN OFF t1 = 5 min minimum for each COMP starting. t2 = OFAN cycling (alternate between ON and OFF every 30 sec) for 20 min maximum. t3 = COMP and OFAN stops for 10 min minimum. 11-24 Revision Y05-01 CONTENT Service Manual - PXD Series CONTROL SYSTEM b. High Pressure Protection Mode: (AUTO) COOLING or DRY Temp: Selected desired temperature Fan: Any Timer: Any I-FEEL: ON or OFF Control Function To protect the COMP from the high pressure build-up in the outdoor coil during normal cooling operation, by switching OFF the IFAN and COMP. OCT [oc] For all models except WAX & P2000 For WAX & P2000 models 68 66 61 55 52 Any COMP OFF COMP is forced OFF COMP is forced OFF OFAN is forced ON OFAN is forced ON Any OFAN ON OFAN follow operation of COMP Any IFAN L IFAN forced to LOW ON OPER LED Blink NOTE The ICT is also monitored during COOL and DRY modes, in case the RV control circuit is faulty. Whenever ICT reaches 70oC, which indicates a high pressure in the indoor coil, the COMP will be forced OFF automatically. The COMP can be turned ON again only after the ICT is under 70oC again and after the 3 min COMP ON delay time. The OPER LED will not blink in this case. Service Manual - PXD Series Revision Y05-01 CONTENT 11-25 CONTROL SYSTEM 11.12.2 Heating Mode Protections a. Outdoor Coil Deicing (excluding RH Group) Mode: HEATING, AUTO (at heating) Temp: Selected desired temperature Fan: Any Timer: Any I-FEEL: Any Control function To protect the outdoor coil from ice formation by controlling COMP & RV operation. 1) 11-26 Deicer Activation Algorithm a) Static deicer threshold is -5°C b) Dynamic deicer threshold changes of 3°C in 3 minutes in the OCT temperature c) In first COMP activation (after SB or OFF), if OCT < 0°C, min time to first deicer is 10 min else 40 min. d) In a case of reading 3 successive OCT values below –10°C and previously 3 successive OCT values of 43°C (4.7 K) , the unit will activate deicing procedure. Revision Y05-01 CONTENT Service Manual - PXD Series CONTROL SYSTEM 2) Deicing procedure OCT [oc] 12 DOC 0 DST (DDT) 3 min 3 min 36s max 12 min. 36s ON COMP OFF DI (note 1) DI (note 2) ON OFAN OFF 30s 30s ON RV OFF DT RC or WAX units all SH units except WAX ANY IFAN L IFAN is forced to Low Speed ON HE ANY HEs are forced ON ANY IFAN OFF Note 3 ANY HE OFF HEs are forced OFF ON OPER LED BLINK NOTES 1. In the following Deicing cycles, the time interval between two Deicing cycles activation is between 30 to 80 min. 2. For RC group, IFAN is forced OFF. 3. For SH group, HEs are forced ON and IFAN is forced to operate at LOW speed, regardless of the ICT and difference between RAT & SPT. 4. When jumper J7 is set, the DST value is -2°C. Service Manual - PXD Series Revision Y05-01 CONTENT 11-27 CONTROL SYSTEM b. High Pressure Protection (excluding RH Group) Mode: (AUTO) HEATING Fan: Any Timer: Any I-FEEL: ON or OFF Control Function Protects the compressor from high pressure by switching OFF the OFAN and COMP. ICT [oc] For all models except WAX For WAX model 67 66 61 55 52 Any COMP Off COMP is forced OFF COMP is forced OFF Any OFAN Off OFAN is force Off ON OPER LED 11-28 BLINK Revision Y05-01 CONTENT Service Manual - PXD Series CONTROL SYSTEM 11.12.3 Condensation Pump (ECC/K model) Mode: Cool, Dry, Auto Temp: Selected desired temperature Fan: Any Timer: Any I FEEL: Any Control function: Prevent Condensed water from Overflowing. Overflow when unit is ON Overflow Water Level Overflow when unit is OFF Normal ON OPER LED OFF BLINK ON COMP (WVL) COMP/WVL is forced OFF OFF ON PUMP OFF 8 min 8 min 1 min Notes: 1. The switch used for water level detection is closed under normal condition, and is open when water overflow. 2. For the NEC version of MCU, the "Over Flow" & “Normal” condition are indicated by logic “0” & “1” at the LEVEL4 input pin respectively. 3. For the Fujitsu version of MCU, the "Over Flow" & “Normal” condition are indicated by logic “1” & “0” at the LEVEL4 input pin respectively. 4. The “Overflow” condition can activate the water pump in SB and operating modes. Service Manual - PXD Series Revision Y05-01 CONTENT 11-29 CONTROL SYSTEM 11.13 Forced Operation (Excluding PRX & PXD Models) a. Forced operation allows units to start, stop and operate in cooling or heating in preset temp. according to the following table: Forced Operation Mode Cooling Heating Pre-set Temp for : MBX, P2000, PX Models 20 ºC 25 ºC Pre-set Temp for : FCD, RWK ,ELD, ECC, WAX, WNX, WMN Models 22 ºC 28 ºC NOTES 1. While under the forced operation, the temperature compensation schedule is disabled. 2. The forced operation is activated when the mode button on the Display Board is used to switch the unit to COOL or HEAT mode. 3. The IFAN is always set to Autofan Speed in forced operation. Temp: Set – desired temperature selected Fan: Any Timer: Interact with Sleep Timer I-FEEL: ON or OFF The Sleep mode is activated by using the SLEEP button on the R/C. In Sleep Mode, the unit will automatically adjust the SPT to turn up/down the room temperature (RT) gradually to provide maximum comfort for the sleeping user. Sleep is treated as TIMER function. Therefore, the TIMER LED is activated similar to TIMER function. 11-30 Revision Y05-01 CONTENT Service Manual - PXD Series CONTROL SYSTEM 11.14 SPT Adjustment in Sleep Mode In COOL, AUTO COOL or DRY modes, the SPT adjustment is positive (from 0 to +3oC). In HEAT or AUTO HEAT modes, the SPT adjustment is negative (from 0 to -3oC). In other modes, there is no SPT adjustment. The SPT adjustment is cancelled when the Sleep mode is cancelled. RT 7 Hours Sleep operation for Normal Sleep Mode Unit is turned to SB after Sleep SPT+3 Cool, Dry modes SPT+2 SPT+1 SPT SPT-1 SPT-2 Heat mode SPT-3 Start Sleep 1 2 3 4 5 6 7 8 Time [Hr] NOTE If OFF-timer is active, the unit may go to SB before or after 7 hours of sleep operation. Service Manual - PXD Series Revision Y05-01 CONTENT 11-31 CONTROL SYSTEM 11.14.1 Time Adjustment in SLEEP Mode In 10V4, the user can make use of the Off-Timer to extend the Sleep Time from 7 hours to 12 hour (max). The operation of the new “Extended Sleep Mode” is illustrated by the graphs below. Case 1 is the Standard Sleep Mode, which is the only sleep mode in the previous version of MCU. The A/C unit simply works for 7 hours, then goes to SB. Case 2 is the new Extended Sleep Mode. If an active Off-Timer is set to turn off the A/C between 7-12 hour, relative to the starting of Sleep, the Sleep time is extended. And, instead of going to SB at the 7th hour, the A/C will work until reaching the Offtime. Case 3 is an exception to case 2. The Sleep Mode will not be extended to the OffTime when the Off-Timer is preceded by an On-Timer, which is also between 7-12 hour. Case 1 : Standard Sleep Mode Condition : Off-timer is not set or is beyond 12 hour. Oper SB Start Sleep 2 4 6 7 8 10 6 7 8 10 12 Time [Hr] 12 Time [Hr] 12 Time [Hr] Case 2 : Extended Sleep Mode Condition : Off-timer is set at 7-12 hour. Oper SB Start Sleep 2 4 Off-timer Case 3 : Exception to Case 2 Condition : Off-timer is set at 7-12 hour On-timer is set at 7-12 hour and before Off-timer Oper SB Start Sleep 11-32 2 4 6 7 8 10 On-timer Revision Y05-01 CONTENT Off-timer Service Manual - PXD Series CONTROL SYSTEM 11.15 Controller Self-Test Procedure 11.15.1 By Shorting Test Jumper J1 SELF-TEST FLOW CHART FOR CONTROLLER (VERSION 4V5 OR HIGHER) Step 1 SHORT JUMPER J1 (CONTROL PCB) RC/ST TEST MODEL CONFIGURATION TEST Step 2 PRESS ON POWER BUTTON STEP MOTOR TEST FREQUENCY TEST Step 3 PRESS ON MODE BUTTON STANDBY LEDS OFF OPERATE LEDS ON TEST TIMER AUTO RELAY TEST COOL HEAT INDOOR FAN SPEED TEST COMPRESSOR OUTDOOR FAN Step 4 PRESS ON RESET BUTTON BUZZER TEST (ONE BEEP SOUND) Step 5 PRESS ON FAN BUTTON ON THE REMOTE CONTROL REMOTE CONTROL TO CPU COMUNICATION (TWO BEEPS SOUNDS) R.V. LOW MEDIUM Step 6 PRESS ON MODE BUTTON THERMISTOR ANALOG VOLTAGE CHECKING Step 7 PRESS ON MODE BUTTON EEPROM MEMORY TEST Step 8 DISCONNECT JUMPER J1 END OF SELF TEST Service Manual - PXD Series Revision Y05-01 CONTENT HIGH 11-33 CONTROL SYSTEM 11.15.2 By Remote Control Settings: a. STEP 1: TURNING ON THE POWER. Turn ON the power, make sure that the unit is in operation. b. STEP 2 : ENABLE SELF-TEST MODE c. 1) Use the remote control to send the first settings to display / indoor unit HEAT mode, HIGH IFAN, set temperature to 16 ºC, no I-FEEL Sleep or any other timer settings are needed. 2) Cover the IR transmitter components in the remote control so that it will not transmit the signals to the indoor unit display. 3) Use the remote control to send the second settings to display / indoor unit COOL mode, LOW IFAN, no I-FEEL Sleep or any other timer settings. 4) Uncover the remote control IR transmitter and change the temperature settings. If the display/indoor unit receive the settings properly the following steps will start: STEP 3: MODEL SETTING CONFIRMATION 1) The STAND-BY and COOL LEDS will indicate the operation mode as follows: OPERATION MODE ST RC SH RH 2) STAND-BY LED ON OFF OFF ON COOL LED OFF OFF ON ON Testing the Model configuration. Selected by the COMP, STAND-BY, TIMER LEDS and FILTER will indicate the model configuration as follows (the relevant line for this manual is highlighted): MODEL WNG MBX WNX PRX WMN1 EMD/LS ECC-K WMN 4 PXD WMN 2/WHX WMN 3 COMP ON ON ON ON ON ON ON OFF OFF OPERATE LED OFF OFF OFF ON ON ON ON OFF OFF TIMER LED OFF OFF ON OFF OFF ON ON ON ON FILTER LED OFF ON OFF OFF ON OFF ON OFF ON OFF ON OFF ON OFF ON ON ON In this term the step motor will turn to HOME POSITION. 11-34 Revision Y05-01 CONTENT Service Manual - PXD Series CONTROL SYSTEM d. STEP 3: AUTO LED WALK TEST. 1) All the LEDS will turn OFF. 2) All the LEDS will turn ON for 1 second one by one in the following sequence: STAND-BY Ö OPERATE Ö TIMER Ö FILTER Ö COOL Ö HEAT. 3) e. In PRX all the LEDS will turn ON for 1 second one by one in the following sequence : 18 °c Ö 20 °c Ö 22 °c Ö 24 °c Ö 26 °c Ö 28 °c Ö 30 °c Ö High IFAN Ö Auto IFAN Ö Med IFAN Ö Low IFAN Ö STAND-BYÖ TIMER Ö FILTER ÖCOOLÖ HEAT. STEP 4: AUTO REALY WALK TEST: All relays will energize one by one in the following sequence: COMPRESSOR Ö OUTDOOR FANÖR. V. Ö HEATER 1 Ö HEATER 2 Ö INDOOR WATER PUMP Ö SWING or OUTDOOR WATER PUMP Ö INDOOR FAN: LOW Ö MID Ö HIGH. When the relay walk test is completed, the next test will start automatically. f. STEP 5: FREQUENCY TESTING: If the frequency measuring process fails the COOL LED will turn ON. In order to move to the next step, press ON/OFF button on the remote control. g. STEP 6: INPUT TEST. The test purpose is to check the analog real time indicators (thermistors, LEVEL and clock) according to the table below. LED Indicator STBY LED OPER LED TIMER LED FILTER LED COOL LED HEAT LED h. Condition for LED to be ON Room thermistor 25°c Indoor coil thermistor 25°c Outdoor coil thermistor 25°c Clock LEVEL 2&3 LEVEL 4 STEP 7: TIMING RESET TEST (WATCH DOG). The test purpose is to verify that the CPU rise time after power failure is between 1 to 3 sec, test results are indicated on the LEDS : STAND-BY,OPER, TIMER and FILTER turning ON one by one. The results of the test are coded as follows: Pass condition: 1 sec - STAND-BY and OPER are turned ON 2 sec - STAND-BY, OPER and TIMER are turned ON Service Manual - PXD Series Revision Y05-01 CONTENT 11-35 CONTROL SYSTEM Fail condition: 0 sec - STAND-BY is turned ON 3 sec - STAND-BY, OPER, TIMER and FILTER are turned ON When the timing reset test is completed, the next test will start automatically. i. STEP 8: MEMORY TEST (EEPROM) The test purpose is to check if the memory is functioning correctly. The test result is reported by using the STAND-BY and FILTER LEDS: LED Indicator STAND-BY LED FILTER LED Condition for LED to be ON Test passed Test failed AT THIS POINT THE SELF-TEST IS COMPLETED. In order to terminate Self-Test mode the User can change the unit setting from COOL Mode, LOW FAN to COOL Mode, MED FAN or to wait without using the remote control for 60 sec. Values of Sensors Temperature VS. Voltage (DC) Temp. (°C) -20 -19 -18 -17 -16 -15 -14 -13 -12 -11 -10 -9 -8 -7 -6 -5 -4 -3 -2 -1 0 1 11-36 Voltage (V) 4,554 4,529 4,502 4,475 4.446 4.417 4.386 4.354 4.322 4.287 4.252 4.216 4.178 4.14 4.1 4.059 4.017 3.974 3.93 3.885 3.839 3.792 Temp. (°C) 2 3 4 5 6 7 8 9 10 11 12 13 14 15 16 17 18 19 20 21 22 23 Voltage (V) 3.744 3.695 3.646 3.595 3.544 3.492 3.439 3.386 3.332 3.278 3.223 3.168 3.113 3.058 3.002 2.946 2.89 2.833 2.777 2.722 2.666 2.61 Temp. (°C) 24 25 26 27 28 29 30 31 32 33 34 35 36 37 38 39 40 41 42 43 44 45 Voltage (V) 2.555 2.5 2.445 2.391 2.338 2.284 2.232 2.18 2.128 2.077 2.027 1.978 1.929 1.881 1.834 1.798 1.742 1.698 1.654 1.611 1.569 1.527 Revision Y05-01 CONTENT Temp. (°C) 46 47 48 49 50 51 52 53 54 55 56 57 58 59 60 61 62 63 64 65 66 67 Voltage (V) 1.487 1.447 1.409 1.371 1.334 1.298 1.263 1.228 1.195 1.162 1.13 1.099 1.069 1.04 1.011 0.983 0.956 0.929 0.904 0.879 0.854 0.831 Service Manual - PXD Series CONTROL SYSTEM 11.16 System Diagnostics Pressing Mode button for 5-10 seconds in SB or any other operation mode will activate the DIAGNOSTICS mode, acknowledged by 3 short beeps and lighting of COOL and HEAT LEDs. In DIAGNOSTICS mode, system failures will be indicated by the blinking of HEAT & COOL LEDs. The coding method is as follows: HEAT LED blinks 5 times in 5 seconds, and then turns off for the next 5 seconds. COOL LED blinks during the same 5 seconds according to the following table: No. 1 2 3 4 5 6 7 8 9 10 11 12 Problem RT1 is disconnected RT1 is shorted RV fault RT2 is disconnected RT2 is shorted (Reserved) RT2 temp reading doesn’t change RT3 is disconnected RT3 is shorted (Reserved) RT3 temp reading doesn’t change RT2 & RT3 temp reading doesn’t change 1 2 3 4 5 LEGEND - ON, - OFF NOTES 1. If faults occur in more than one thermistor (except case number 12 in table above), only one fault will be indicated according to the following order: RT3, RT2, RT1. 2. A/C will return to normal mode when sending a command by the R/C during system DIAGNOSTICS mode. If the command from the R/C contains a Group ID, the ID will become the new Group ID of the ELCON unit. Service Manual - PXD Series Revision Y05-01 CONTENT 11-37 TROUBLESHOOTING 12. No. TROUBLESHOOTING SYMPTOM PROBABLE CAUSE 1 Power supply indicator (Red LED) does not light up. No power supply. 2 Unit does not respond to remote control command. Remote control command did not reach the indoor unit. 3 Unit responds to remote control command but operate indicator (Green LED) does not light up. Indoor fan does not start (louvers are opened and Green LED lights up). Problem with display PCB. 4 5 Change to COOL MODE and check. Problem with PCB or capacitor. Change to HIGH speed and check power supply to motor is higher than 130 VAC. If OK replace capacitor, if not OK replace controller. Replace controller. PCB problem. Compressor stops during operation and Green LED remains on. Compressor is ON but outdoor fan does not work. Electronic control or power supply problem. 9 Unit works in wrong mode (cool instead of heat or heat instead of cool). Electronics or power connection to RV. 10 All components are operating properly but no cooling or heating. Refrigerant leak. 7 8 Service Manual - PXD Series Check power supply. If power supply is OK, check display and display wiring, if OK, replace PCB. Check remote control batteries. If batteries are OK, check display and display wiring, if OK, replace PCB. Replace display PCB. Unit in HEAT MODE and coil is still not warm. Indoor fan works when unit is OFF, and indoor fan speed is not changed by remote control command. Compressor does not start. 6 CORRECTIVE ACTION Electronics control problem or protection. Problem with outdoor electronics or outdoor fan capacitor. Revision Y05-01 CONTENT Perform diagnostics, and follow the actions described below. Perform diagnostics, and follow the actions described below. Switch unit to COOL mode, HIGH speed with 16 degrees set point (summer) or HEAT mode high speed with 30 degrees set point (winter). Check power supply to motor is higher than 130 VAC. If OK replace capacitor, if not OK replace controller. Check RV power connections. If OK, check RV operation with direct 230 VAC power supply, if OK, replace outdoor controller. Check refrigeration system. 12-1 TROUBLESHOOTING No. SYMPTOM 11 One of the protections is activated and compressor is stopped with no apparent reason. Compressor motor is noisy and no suction is present. Control problem or refrigeration system problem. Perform diagnostics to detect active protection, and take action accordingly. Wrong phase order to compressor. Check compressor phase order. Water leakage from indoor unit. Freezing of outdoor unit in HEAT Mode and outdoor unit base is blocked with ice. Unit operates with wrong fan speeds or wrong frequency. Filter LED comes ON after 512 hours of operation Indoor unit drainage tube is blocked. Check and open drainage tube. Connect base heater. Wrong jumper settings. Perform diagnostics to obtain unit model or if operating by EEPROM parameters. Replace air-filter. Press the RESET button. 12 13 14 15 16 12-2 PROBABLE CAUSE Clogged air-filter Revision Y05-01 CONTENT CORRECTIVE ACTION Service Manual - PXD Series EXPLODED VIEWS & SPARE PARTS LISTS 13. EXPLODED VIEWS & SPARE PARTS LISTS 13.1 Indoor Unit: PXD 9, 12, 15, 18 Service Manual - PXD Series Revision Y05-01 CONTENT 13-1 EXPLODED VIEWS & SPARE PARTS LISTS 13.2 No. 13 25 22 7 1 14 30 6 19 18 21 21 11 17 12 4 20 2 24 23 28 27 9 16 9 10 29 3 8 29 None None 5 15 13-2 Indoor Unit: PXD 9 Item Code 221555 234213 263034 293321 307979 307981 311036 323425 370281 371257 372338 372339 372341 373244 373245 373247 375209-16 382334 391508 436665 438082 438413 4520158 4520429 4520929 4521029 4524613 452731900 452816100 452837700 452837700 452837700R 455000600 484001 Item Desc FILTER (SMALL) DISPLAY BOX PXD EHK: 906-041-02 SWING MOTOR CENTRIFUGAL FAN (SMALL) BACK PANEL (SMALL) FRONT PANEL (SMALL) STORM METAL PANEL MOTOR SUPPORT LENGTH 99 AIR OUTLET FRAME (SMALL) VERTICAL LOUVER CONNECTOR HORIZONTAL LOUVER FRONT (SMALL) HORIZONTAL LOUVER BACK (SMALL) FAN COVER (SMALL) RIGHT PANEL Side Plate / Left FAN FRAME(SMALL) DISPLAY PANEL ASSY.---ELECTRA BASE EPS (SMALL) CABLE DISPLAY STEP MOTOR Thermistor Indoor ROOM Sensor MOTOR PXD 9-12-15 MOTOR WIRE ---PXD Motor Assy. for PXD9-12-15 CLIP STORM DST-8 10V7_W 916-355-13 ENG. VER. Evap. assy. Transformer STORM-1 (PXD & K)916-355-18 STORM-1 (PXD & K)916-355-18 STORM-1 (PXD & K)916A355-18 Capacitor With Screw for fan motor AIR INLET ASSY (SMALL) Revision Y05-01 CONTENT Quantity 2 1 1 2 1 1 1 1 1 10 1 1 2 1 1 1 1 1 1 1 1 1 1 1 1 2 1 1 1 1 1 1 1 1 Service Manual - PXD Series EXPLODED VIEWS & SPARE PARTS LISTS 13.3 No. 25 22 1 14 6 19 21 17 4 9 16 9 27 28 23 24 2 20 15 5 None None 29 3 29 8 12 21 30 18 13 7 10 11 Indoor Unit: PXD 12 Item Code 234213 263034 307979 307981 323425 370281 372339 373244 373247 4520929 4520429 4520158 438413 438082 436665 391508 382334 375209-16 484001 455000600 452837700R 452837700 452837700 452791200 4524613 4520933 373245 372338 311036 371257 221555 293321 4521029 372341 Item Desc DISPLAY BOX PXD EHK: 906-041-02 SWING MOTOR BACK PANEL (SMALL) FRONT PANEL (SMALL) MOTOR SUPPORT LENGTH 99 AIR OUTLET FRAME (SMALL) HORIZONTAL LOUVER BACK (SMALL) RIGHT PANEL FAN FRAME(SMALL) Motor Assy. for PXD9-12-15 MOTOR WIRE ---PXD MOTOR PXD 9-12-15 ROOM Sensor Thermistor Indoor STEP MOTOR CABLE DISPLAY BASE EPS (SMALL) DISPLAY PANEL ASSY.---ELECTRA AIR INLET ASSY (SMALL) Capacitor With Screw for fan motor STORM-1 (PXD & K)916A355-18 STORM-1 (PXD & K)916-355-18 STORM-1 (PXD & K)916-355-18 Evap. assy. STORM DST-8 10V7_W 916-355-13 ENG. VER. Auto-transformer Side Plate / Left HORIZONTAL LOUVER FRONT (SMALL) STORM METAL PANEL VERTICAL LOUVER CONNECTOR FILTER (SMALL) CENTRIFUGAL FAN (SMALL) CLIP FAN COVER (SMALL) Service Manual - PXD Series Revision Y05-01 CONTENT Quantity 1 1 1 1 1 1 1 1 1 1 1 1 1 1 1 1 1 1 1 1 1 1 1 1 1 1 1 1 1 10 2 2 2 2 13-3 EXPLODED VIEWS & SPARE PARTS LISTS 13.4 No. 13 25 22 7 1 14 30 6 19 18 21 21 11 17 12 4 20 2 24 23 28 27 10 29 9 3 29 None None 5 15 13-4 Indoor Unit: PXD 15 Item Code 221555 234213 263034 293321 307979 307981 311036 323425 370281 371257 372338 372339 372341 373244 373245 373247 375209-16 382334 391508 436665 438082 438413 4521029 4524613 4524925 452808900 452837700 452837700 452837700R 455000600 484001 Item Desc FILTER (SMALL) DISPLAY BOX PXD EHK: 906-041-02 SWING MOTOR CENTRIFUGAL FAN (SMALL) BACK PANEL (SMALL) FRONT PANEL (SMALL) STORM METAL PANEL MOTOR SUPPORT LENGTH 99 AIR OUTLET FRAME (SMALL) VERTICAL LOUVER CONNECTOR HORIZONTAL LOUVER FRONT (SMALL) HORIZONTAL LOUVER BACK (SMALL) FAN COVER (SMALL) RIGHT PANEL Side Plate / Left FAN FRAME(SMALL) DISPLAY PANEL ASSY.---ELECTRA BASE EPS (SMALL) CABLE DISPLAY STEP MOTOR Thermistor Indoor ROOM Sensor CLIP STORM DST-8 10V7_W 916-355-13 ENG. VER. Motor Assy. for PXD15 Evap. assy. STORM-1 (PXD & K)916-355-18 STORM-1 (PXD & K)916-355-18 STORM-1 (PXD & K)916A355-18 Capacitor With Screw for fan motor AIR INLET ASSY (SMALL) Revision Y05-01 CONTENT Quantity 2 1 1 2 1 1 1 1 1 10 1 1 2 1 1 1 1 1 1 1 1 1 2 1 1 1 1 1 1 1 1 Service Manual - PXD Series EXPLODED VIEWS & SPARE PARTS LISTS 13.5 Indoor Unit: PXD 18, 24, 30 Service Manual - PXD Series Revision Y05-01 CONTENT 13-5 EXPLODED VIEWS & SPARE PARTS LISTS 13.6 No. 14 25 22 8 1 15 30 7 19 18 21 21 12 17 13 4 20 2 24 23 28 27 9 11 9 6 10 29 3 29 None None 5 16 13-6 Indoor Unit: PXD 18 Item Code 221554 234213 263034 293322 307980 307982 311036 323422 370280 371257 372336 372337 372340 373244 373245 373246 375209-16 382333 391508 436665 438082 438413 4520159 4520429 4520931 4520934 4521029 4524613 4527244 452837700 452837700 452837700R 455000604 484002 Item Desc FILTER PXD (BIG) DISPLAY BOX PXD EHK: 906-041-02 SWING MOTOR CENTRIFUGAL FAN (BIG) BACK PANEL £¨BIG£© FRONT PANEL (BIG) STORM METAL PANEL MOTOR SUPPORT LENGTH 132 AIR OUTLET FRAME (BIG) VERTICAL LOUVER CONNECTOR HORIZONTAL LOUVER FRONT (BIG) HORIZONTAL LOUVER BACK (BIG) FAN COVER (BIG) RIGHT PANEL Side Plate / Left FAN FRAME (BIG) DISPLAY PANEL ASSY.---ELECTRA BASE EPS (BIG) CABLE DISPLAY STEP MOTOR Thermistor Indoor ROOM Sensor MOTOR PXD 24-28 MOTOR WIRE ---PXD Motor Assy. for PXD24-28 Auto-transformer CLIP STORM DST-8 10V7_W 916-355-13 ENG. VER. Evaporator PXD18 R410A STORM-1 (PXD & K)916-355-18 STORM-1 (PXD & K)916-355-18 STORM-1 (PXD & K)916A355-18 Capacitor With Screw 1.5uF AIR INLET ASSY (BIG) Revision Y05-01 CONTENT Quantity 2 1 1 2 1 1 1 1 1 12 1 1 2 1 1 1 1 1 1 1 1 1 1 1 1 1 2 1 1 1 1 1 1 1 Service Manual - PXD Series EXPLODED VIEWS & SPARE PARTS LISTS 13.7 No. 14 25 22 8 1 15 30 7 19 18 21 21 12 17 13 4 20 2 24 23 28 27 9 11 9 6 10 29 29 None None 3 5 16 Indoor Unit: PXD 24 Item Code 221554 234213 263034 293322 307980 307982 311036 323422 370280 371257 372336 372337 372340 373244 373245 373246 375209-16 382333 391508 436665 438082 438413 4520159 4520429 4520931 4520934 4521029 4524613 452837700 452837700 452837700R 452907300 455000602 484002 Item Desc FILTER PXD (BIG) DISPLAY BOX PXD EHK: 906-041-02 SWING MOTOR CENTRIFUGAL FAN (BIG) BACK PANEL £¨BIG£© FRONT PANEL (BIG) STORM METAL PANEL MOTOR SUPPORT LENGTH 132 AIR OUTLET FRAME (BIG) VERTICAL LOUVER CONNECTOR HORIZONTAL LOUVER FRONT (BIG) HORIZONTAL LOUVER BACK (BIG) FAN COVER (BIG) RIGHT PANEL Side Plate / Left FAN FRAME (BIG) DISPLAY PANEL ASSY.---ELECTRA BASE EPS (BIG) CABLE DISPLAY STEP MOTOR Thermistor Indoor ROOM Sensor MOTOR PXD 24-28 MOTOR WIRE PXD Motor Assy. for PXD24-28 Auto-transformer CLIP STORM DST-8 10V7_W 916-355-13 ENG. VER. STORM-1 (PXD & K)916-355-18 STORM-1 (PXD & K)916-355-18 STORM-1 (PXD & K)916A355-18 EVAPRATOR ASSY Capacitor With Screw for fan motor AIR INLET ASSY (BIG) Service Manual - PXD Series Revision Y05-01 CONTENT Quantity 2 1 1 2 1 1 1 1 1 12 1 1 2 1 1 1 1 1 1 1 1 1 1 1 1 1 2 1 1 1 1 1 1 1 13-7 EXPLODED VIEWS & SPARE PARTS LISTS 13.8 No. 13 25 22 7 1 14 30 6 18 17 20 21 11 16 12 4 19 2 24 26 23 27 28 10 8 9 29 None None 3 5 15 13-8 Indoor Unit: PXD 30 Item Code 221554 234213 263034 293322 307980 307982 311036 323422 370280 371257 372336 372337 372340 373244 373245 373246 375209-16 382333 391508 391726 436665 438082 438413 4520429 4520932 4521029 452837700 452837700 452837700R 453154800 455000602 484002 Item Desc FILTER PXD (BIG) DISPLAY BOX PXD EHK: 906-041-02 SWING MOTOR CENTRIFUGAL FAN (BIG) BACK PANEL £¨BIG£© FRONT PANEL (BIG) STORM METAL PANEL MOTOR SUPPORT LENGTH 132 AIR OUTLET FRAME (BIG) VERTICAL LOUVER CONNECTOR HORIZONTAL LOUVER FRONT (BIG) HORIZONTAL LOUVER BACK (BIG) FAN COVER (BIG) RIGHT PANEL Side Plate / Left FAN FRAME (BIG) DISPLAY PANEL ASSY.---ELECTRA BASE EPS (BIG) CABLE DISPLAY Power Supply STEP MOTOR Thermistor Indoor ROOM Sensor MOTOR WIRE ---PXD Motor Assy. for PXD32 CLIP STORM-1 (PXD & K)916-355-18 STORM-1 (PXD & K)916-355-18 STORM-1 (PXD & K)916A355-18 Evaporator Assy. Capacitor With Screw for fan motor AIR INLET ASSY (BIG) Revision Y05-01 CONTENT Quantity 2 1 1 2 1 1 1 1 1 12 1 1 2 1 1 1 1 1 1 1 1 1 1 1 1 2 1 1 1 1 1 1 Service Manual - PXD Series EXPLODED VIEWS & SPARE PARTS LISTS 13.9 Outdoor Unit: ONG 9, 12 ST Service Manual - PXD Series Revision Y05-01 CONTENT 13-9 EXPLODED VIEWS & SPARE PARTS LISTS 13.10 Outdoor Unit: ONG 9 ST Item Code 433218 433219 433221 433223 4519251 4519250 433215 4527203 4526747 433217 455000503 4519611 4524176 4524177 455000001 4514588 204107 4527281 4527362 452799601 4510677 4527008 4524230 4516826 4516825 4514089 433229 433234 4519606 4527279 4527280 433228 433216 4527155 4519614 4519300 433225 4519607 4514091 13-10 Item Desc Front Panel A Front Panel A1 Air Inlet Ring-420 Painting Insulation Plate Axial Fan OD=400 Fan Motor YDK30-6V Motor Support Motor Support Base Painting Assy. Partition Plate Compressor Capacitor With Screw Electric Panel Painting Plate 1/4 Liqiud Valve(R410A) 3/8 Gas Valve(R410A) single patch Capacitor for fan 5 Poles terminal block Cable clip Nylon Capillary Assy Charge tube TP2 6.35x0.8 Compressor Jacket ONG3-9 Nut With Flange M8 -D=24 Wire assy Compressor assy. GK113PAG Rubber washer Cover Terminal Nut hex cover valve Clamp Right side panel (painting plate) Discharge Tube Assy 2 £¨9ST) Suction Tube 1 Back Side Net Bridge condensor Soldering assy Painting Top Cover Nut M5 L Handle Left Side Panel Painting Plate Grommet Quantity 1 1 1 1 1 1 1 1 1 1 1 1 1 1 1 1 1 1 1 1 1 1 1 1 1 1 1 1 1 1 1 1 1 1 1 1 1 1 1 Revision Y05-01 CONTENT Drawing Number 1 1 2 3 4 5 6 6 7 8 9 10 11 12 13 14 15 19 20 21 24 25 26 27 28 29 30 31 32 33 34 35 36 38 39 40 41 42 230 Effective From 05-Mar-04 05-Mar-04 05-Mar-04 05-Mar-04 05-Mar-04 05-Mar-04 05-Mar-04 05-Mar-04 05-Mar-04 05-Mar-04 05-Mar-04 05-Mar-04 05-Mar-04 05-Mar-04 05-Mar-04 05-Mar-04 05-Mar-04 05-Mar-04 05-Mar-04 05-Mar-04 05-Mar-04 05-Mar-04 05-Mar-04 05-Mar-04 05-Mar-04 05-Mar-04 05-Mar-04 05-Mar-04 05-Mar-04 05-Mar-04 05-Mar-04 05-Mar-04 05-Mar-04 05-Mar-04 05-Mar-04 05-Mar-04 05-Mar-04 05-Mar-04 05-Mar-04 Effective To Active 05-Mar-04 Active Active Active Active 05-Mar-04 Active Active Active Active Active Active Active Active Active Active Active Active Active Active Active Active Active Active Active Active Active Active Active Active Active Active Active Active Active Active Active Active Service Manual - PXD Series EXPLODED VIEWS & SPARE PARTS LISTS 13.11 Outdoor Unit: ONG 12 ST Item Code 433218 433219 433221 433223 4519251 4519692 433215 4527203 4519601 4526747 452772500 433217 4517993 455000504 4519611 4524176 4524595 4524177 4517990 455000001 455000108 4514588 204107 236179 4516637 4525210 4524923 4526848 4525650 4527362 4519600 4527007 4527058 4519610 4514091 4516357 4510677 4519987 4527008 4519987 4524232 4526452 4516359 4516826 4516358 4516825 4514089 4516360 433229 433234 4518950 4519606 4526790 4525081 4526791 433228 433216 433235 4525529 4526806 4526804 4519614 4519300 433225 4519607 4525080 Item Desc Front Panel A Front Panel A1 Air Inlet Ring-420 Painting Insulation Plate Axial Fan OD=400 Fan Motor (810rpm) Motor Support Motor Support Base Painting Assy. Base Painting Assy. Base Plate Painting Assy. Partition Plate Cap. 35uF/450V Compressor Capacitor With Screw Electric Panel Painting Plate 1/4 Liqiud Valve(R410A) 1/2 Gas Valve for ONG R410A 3/8 Gas Valve(R410A) Cap. 2uF/450V single patch Capacitor for fan Double patch Capacitor for fan 5 Poles terminal block Cable clip Nylon 2 Poles terminal block Out sensor Black Restrictor (031) Capillary 2.6*1.6*800 Capillary Assy. (OD2.6xID1.6x1000) Charge tube Charge tube TP2 ¦?6.35x0.8 Compresssor Jacket Comp. Jacket Comp. Jacket Compressor Isolation. Top Cover Grommet Rubber Cushion 1K15910311 Nut With Flange M8 -D=24 Wire assy Wire assy Wire assy Compressor assy. GK151PAD Comp. Assy GMCC PA145X2C-4FT Terminal Packing 1K14720130 Rubber washer Terminal Cover 1K14720012 Cover Terminal Nut hex Terminal Nut 1K14300710 Valve Cover Clamp Filter Drier BFK-053S Right side panel (painting plate) Discharge Tube Assy. Suction Tube 12.7*0.8*1090 Suction Tube Assy Back Side Net Bridge SPACER A 22*1 condensor Soldering assy condensor Soldering assy condensor Soldering assy Painting Top Cover Nut M5 L Handle Left Side Panel Painting Plate Discharge Tube 9.53*0.8*470 Service Manual - PXD Series Drawing Quantity Number Effective From 1 1 15-Nov-03 1 1 13-Jan-04 1 2 15-Nov-03 1 3 15-Nov-03 1 4 15-Nov-03 1 5 15-Nov-03 1 6 15-Nov-03 1 6 16-Feb-04 1 7 15-Nov-03 1 7 15-Nov-03 1 7 16-Feb-04 1 8 15-Nov-03 1 9 15-Nov-03 1 9 29-Dec-03 1 10 15-Nov-03 1 11 15-Nov-03 1 12 15-Nov-03 1 12 13-Jan-04 1 13 15-Nov-03 1 130 08-Jan-04 1 13 09-Feb-04 1 14 15-Nov-03 1 15 15-Nov-03 1 16 15-Nov-03 1 17 15-Nov-03 1 18 15-Nov-03 1 19 15-Nov-03 1 19 13-Jan-04 1 20 15-Nov-03 1 20 13-Jan-04 1 21 15-Nov-03 1 21 13-Jan-04 1 21 16-Feb-04 1 22 15-Nov-03 3 23 15-Nov-03 3 23 15-Nov-03 3 24 15-Nov-03 1 25 15-Nov-03 1 25 13-Jan-04 1 25 16-Feb-04 1 26 15-Nov-03 1 26 15-Nov-03 1 27 15-Nov-03 1 27 15-Nov-03 1 28 15-Nov-03 1 28 15-Nov-03 1 29 15-Nov-03 1 29 15-Nov-03 1 30 15-Nov-03 1 31 15-Nov-03 1 31 15-Nov-03 1 32 15-Nov-03 1 33 15-Nov-03 1 42 15-Nov-03 1 34 15-Nov-03 1 35 15-Nov-03 1 36 15-Nov-03 1 37 15-Nov-03 1 47 15-Nov-03 1 38 13-Jan-04 1 38 16-Feb-04 1 39 15-Nov-03 1 40 15-Nov-03 1 41 15-Nov-03 1 42 15-Nov-03 1 43 15-Nov-03 Revision Y05-01 CONTENT Effective To 13-Jan-04 Active Active Active Active Active 16-Feb-04 Active 15-Nov-03 16-Feb-04 Active Active 29-Dec-03 Active Active Active 13-Jan-04 Active 08-Jan-04 09-Feb-04 Active Active Active 16-Feb-04 16-Feb-04 13-Jan-04 13-Jan-04 Active 13-Jan-04 Active 13-Jan-04 16-Feb-04 Active 13-Jan-04 15-Nov-03 Active Active 13-Jan-04 16-Feb-04 Active 15-Nov-03 Active Active 15-Nov-03 Active 15-Nov-03 15-Nov-03 Active Active Active 13-Jan-04 Active Active 15-Nov-03 Active Active Active 16-Feb-04 13-Jan-04 16-Feb-04 Active Active Active Active Active 15-Nov-03 13-11 EXPLODED VIEWS & SPARE PARTS LISTS 13.12 13-12 Outdoor Unit: ONG 9, 12 RC Revision Y05-01 CONTENT Service Manual - PXD Series EXPLODED VIEWS & SPARE PARTS LISTS 13.13 Outdoor Unit: ONG 9 RC Item Code 433218 433219 433221 433223 4519251 4519250 4527203 4526747 433217 455000503 4519611 4524176 4524177 455000108 4514588 204107 236179 4516637 4527444 4527127 4527362 452799601 4514091 4510677 4527008 4524230 4516826 4516825 4514089 433229 433234 4519606 4527135 433228 433216 4527155 4519614 4519300 433225 4519607 Item Desc Front Panel A Front Panel A1 Air Inlet Ring-420 Painting Insulation Plate Axial Fan OD=400 Fan Motor YDK30-6V Motor Support Base Painting Assy. Partition Plate Compressor Capacitor With Screw Electric Panel Painting Plate 1/4 Liqiud Valve(R410A) 3/8 Gas Valve(R410A) Double patch Capacitor for fan 5 Poles terminal block Cable clip Nylon 2 Poles terminal block Out sensor Black Restrictor (029) Capillary Assy Charge tube TP2 6.35x0.8 Compressor Jacket ONG3-9 Grommet Nut With Flange M8 -D=24 Wire assy Compressor assy. GK113PAG Rubber washer Cover Terminal Nut hex cover valve Clamp Right side panel (painting plate) 4-Way Valve & Tube Assy Back Side Net Bridge condensor Soldering assy Painting Top Cover Nut M5 L Handle Left Side Panel Painting Plate Service Manual - PXD Series Quantity 1 1 1 1 1 1 1 1 1 1 1 1 1 1 1 1 1 1 1 1 1 1 1 1 1 1 1 1 1 1 1 1 1 1 1 1 1 1 1 1 Revision Y05-01 CONTENT Drawing Number 1 1 2 3 4 5 6 7 8 9 10 11 12 13 14 15 16 17 18 19 20 21 23 24 25 26 27 28 29 30 31 32 33 34 35 36 37 38 39 40 Effective From 05-Mar-04 05-Mar-04 05-Mar-04 05-Mar-04 05-Mar-04 05-Mar-04 05-Mar-04 05-Mar-04 05-Mar-04 05-Mar-04 05-Mar-04 05-Mar-04 05-Mar-04 05-Mar-04 05-Mar-04 05-Mar-04 05-Mar-04 05-Mar-04 05-Mar-04 05-Mar-04 05-Mar-04 05-Mar-04 05-Mar-04 05-Mar-04 05-Mar-04 05-Mar-04 05-Mar-04 05-Mar-04 05-Mar-04 05-Mar-04 05-Mar-04 05-Mar-04 05-Mar-04 05-Mar-04 05-Mar-04 05-Mar-04 05-Mar-04 05-Mar-04 05-Mar-04 05-Mar-04 Effective To Active 05-Mar-04 Active Active Active Active Active Active Active Active Active Active Active Active Active Active Active Active 11-Mar-04 Active Active Active Active Active Active Active Active Active Active Active Active Active Active Active Active Active Active Active Active Active 13-13 EXPLODED VIEWS & SPARE PARTS LISTS 13.14 Outdoor Unit: ONG 12 RC Item Code 433218 433219 433221 433223 4519251 4519692 4526591 4527203 452772500 4526747 433217 455000504 455000502 4519611 4524176 4524177 455000108 455000000 4514588 204107 236179 4516637 4526847 4526617 4527362 4527058 452799600 4516357 4514091 4510677 4519987 4527375 4526452 4526578 4526601 4516359 4514088 4516358 4516824 4516360 4514089 433229 433234 4519606 4526745 4526604 4527308 4526748 433228 433216 4526804 4526605 4519614 4519300 433225 4519607 4516114 13-14 Item Desc Front Panel A Front Panel A1 Air Inlet Ring-420 Painting Insulation Plate Axial Fan OD=400 Fan Motor (810rpm) Motor YYK30Z-6 Motor Support Base Plate Painting Assy. Base Painting Assy. Partition Plate Compressor Capacitor With Screw Compressor Capacitor 35uF With Screw Electric Panel Painting Plate 1/4 Liqiud Valve(R410A) 3/8 Gas Valve(R410A) Double patch Capacitor for fan single patch Capacitor for fan 5 Poles terminal block Cable clip Nylon 2 Poles terminal block Out sensor Black Valve-Capillary Assy one way valve soldering Charge tube TP2 Comp. Jacket Compressor Jacket ONG3-7 Rubber Cushion 1K15910311 Grommet Nut With Flange M8 -D=24 Wire assy Compressor Wire Comp. Assy GMCC PA145X2C-4FT Compressor Assy. LG GK086P Compressor LG GK086P Terminal Packing 1K14720130 Gasket Terminal Cover 1K14720012 Cover Terminal Terminal Nut 1K14300710 Nut hex Valve Cover Clamp Right side panel (painting plate) 4-way Valve Welding Assy. 4-way Valve Welding Assy. PCB Support Low-Temp. Controller Back Side Net Bridge condensor Soldering assy condensor Soldering assy Painting Top Cover Nut M5 L Handle Left Side Panel Painting Plate 2-W Valve coil Drawing Quantity Number Effective From 1 1 05-Mar-04 1 1 05-Mar-04 1 2 05-Mar-04 1 3 05-Mar-04 1 4 05-Mar-04 1 5 05-Mar-04 1 5 12-Mar-04 1 6 05-Mar-04 1 7 05-Mar-04 1 7 12-Mar-04 1 8 05-Mar-04 1 9 05-Mar-04 1 9 12-Mar-04 1 10 05-Mar-04 1 11 05-Mar-04 1 12 05-Mar-04 1 13 05-Mar-04 1 13 12-Mar-04 1 14 05-Mar-04 1 15 05-Mar-04 1 16 05-Mar-04 1 17 05-Mar-04 1 19 05-Mar-04 1 19 12-Mar-04 1 20 05-Mar-04 1 21 05-Mar-04 1 21 12-Mar-04 3 23 05-Mar-04 3 23 12-Mar-04 3 24 05-Mar-04 1 25 05-Mar-04 1 25 12-Mar-04 1 26 05-Mar-04 1 26 12-Mar-04 1 26 12-Mar-04 1 27 05-Mar-04 1 27 12-Mar-04 1 28 05-Mar-04 1 28 12-Mar-04 1 29 05-Mar-04 1 29 12-Mar-04 1 30 05-Mar-04 1 31 05-Mar-04 1 32 05-Mar-04 1 33 05-Mar-04 1 33 12-Mar-04 1 34 11-Mar-04 1 35 11-Mar-04 1 36 05-Mar-04 1 37 05-Mar-04 1 38 05-Mar-04 1 38 12-Mar-04 1 39 05-Mar-04 1 40 05-Mar-04 1 41 05-Mar-04 1 42 05-Mar-04 1 43 11-Mar-04 Revision Y05-01 CONTENT Effective To Active 05-Mar-04 Active Active Active 12-Mar-04 Active Active 12-Mar-04 Active Active 12-Mar-04 Active Active Active Active 12-Mar-04 Active Active Active Active Active 12-Mar-04 Active Active 12-Mar-04 Active 12-Mar-04 Active Active 12-Mar-04 Active 12-Mar-04 Active 12-Mar-04 12-Mar-04 Active 12-Mar-04 Active 12-Mar-04 Active Active Active Active 12-Mar-04 Active Active Active Active Active 12-Mar-04 Active Active Active Active Active Active Service Manual - PXD Series EXPLODED VIEWS & SPARE PARTS LISTS 13.15 Outdoor Unit: ONG 14 ST Service Manual - PXD Series Revision Y05-01 CONTENT 13-15 EXPLODED VIEWS & SPARE PARTS LISTS 13.16 Outdoor Unit: ONG 14 ST Item Code 433219 433218 433221 433223 4519251 4520171 4527203 4527255 4527202 455000503 4519611 4524176 4524595 455000108 4514588 204107 236179 4516637 4526918 4526919 4527362 4527058 4527287 4510677 4519987 4526453 4527289 4527285 4527286 433229 433234 4519606 4526794 4526797 4526798 4526911 4526903 433228 433216 4526808 4526809 4526796 4519614 4519300 433225 4519607 13-16 Item Desc Front Panel A1 Front Panel A Air Inlet Ring-420 Painting Insulation Plate Axial Fan OD=400 Fan Motor (910rpm) Motor Support Base Painting Assy. Partition Plate Compressor Capacitor With Screw Electric Panel Painting Plate 1/4 Liqiud Valve(R410A) 1/2 Gas Valve for ONG R410A Double patch Capacitor for fan 5 Poles terminal block Cable clip Nylon 2 Poles terminal block Out sensor Black Valve & Capillary Assy Capillary Assy ID1.6x600 Charge tube TP2 ¦?6.35x0.8 Comp. Jacket Grommet Nut With Flange M8 -D=24 Wire assy Compressor Assy. RN165VHSMT Terminal Packing Terminal Cover SC01D024 Terminal Nut valve cover Clamp Right side panel (painting plate) 4-way Valve Welding Assy. Discharge Tube Assy. ASuction Tube A Distribution Capillary Assy Collection tube Assy Back Side Net Bridge condensor assy condensor assy condensor Soldering assy Painting Top Cover Nut M5 L Handle Left Side Panel Painting Plate Quantity 1 1 1 1 1 1 1 1 1 1 1 1 1 1 1 1 1 1 1 1 1 1 3 3 1 1 1 1 1 1 1 1 1 1 1 1 1 1 1 1 1 1 1 1 1 1 Revision Y05-01 CONTENT Drawing Number 1 1 2 3 4 5 6 7 8 9 10 11 12 13 14 15 16 17 19 19 20 21 23 24 25 26 27 28 29 30 31 32 33 33 34 35 36 37 38 39 39 39 40 41 42 43 Effective From 01-Mar-04 15-Mar-04 01-Mar-04 01-Mar-04 01-Mar-04 01-Mar-04 01-Mar-04 01-Mar-04 01-Mar-04 01-Mar-04 01-Mar-04 01-Mar-04 01-Mar-04 01-Mar-04 01-Mar-04 01-Mar-04 01-Mar-04 01-Mar-04 01-Mar-04 01-Mar-04 01-Mar-04 01-Mar-04 01-Mar-04 01-Mar-04 01-Mar-04 01-Mar-04 01-Mar-04 01-Mar-04 01-Mar-04 01-Mar-04 01-Mar-04 01-Mar-04 01-Mar-04 01-Mar-04 01-Mar-04 01-Mar-04 01-Mar-04 01-Mar-04 01-Mar-04 01-Mar-04 01-Mar-04 25-Aug-04 01-Mar-04 01-Mar-04 01-Mar-04 01-Mar-04 Effective To 15-Mar-04 Active Active Active Active Active Active Active Active Active Active Active Active Active Active Active Active Active 01-Mar-04 Active Active Active Active Active Active Active Active Active Active Active Active Active 01-Mar-04 Active Active Active Active Active Active 01-Mar-04 25-Aug-04 Active Active Active Active Active Service Manual - PXD Series EXPLODED VIEWS & SPARE PARTS LISTS 13.17 Outdoor Unit: ONG 14 RC Service Manual - PXD Series Revision Y05-01 CONTENT 13-17 EXPLODED VIEWS & SPARE PARTS LISTS 13.18 Outdoor Unit: ONG 14 RC No. 1 1 2 3 4 5 5 6 7 7 8 8 9 9 10 10 11 12 12 13 14 15 16 17 19 19 20 21 23 23 24 25 26 26 27 27 28 28 29 29 30 31 32 33 33 35 36 37 38 38 38 39 39 40 41 42 43 13-18 Item Code 433219 433218 433221 433223 4519251 4519692 4520171 4527203 452772500 4527255 433217 4527202 455000504 455000503 4519611 453013500 4524176 4524177 4524595 455000108 4514588 204107 236179 4516637 4526847 4526918 4527362 4527058 4516357 4527287 4510677 4519987 4526452 4526453 4516359 4527289 4516358 4527285 4516360 4527286 433229 433234 4519606 4526745 4526794 4526911 4526903 433228 433216 4526804 4526298 4526808 4526793 4519614 4519300 433225 4519607 Item Desc Front Panel A1 Front Panel A Air Inlet Ring-420 Painting Insulation Plate Axial Fan OD=400 Fan Motor (810rpm) Fan Motor (910rpm) Motor Support Base Plate Painting Assy. Base Painting Assy. Partition Plate Partition Plate Compressor Capacitor With Screw Compressor Capacitor With Screw Electric Panel Painting Plate Electric Panel Painting Plate 1/4 Liqiud Valve(R410A) 3/8 Gas Valve(R410A) 1/2 Gas Valve for ONG R410A Double patch Capacitor for fan 5 Poles terminal block Cable clip Nylon 2 Poles terminal block Out sensor Black Valve-Capillary Assy Valve & Capillary Assy Charge tube TP2 ¦?6.35x0.8 Comp. Jacket Rubber Cushion 1K15910311 Grommet Nut With Flange M8 -D=24 Wire assy Comp. Assy GMCC PA145X2C-4FT Compressor Assy. RN165VHSMT Terminal Packing 1K14720130 Terminal Packing Terminal Cover 1K14720012 Terminal Cover SC01D024 Terminal Nut 1K14300710 Terminal Nut Valve Cover Clamp Right side panel (painting plate) 4-way Valve Welding Assy. 4-way Valve Welding Assy. Distribution Capillary Assy Collection tube Assy Back Side Net Bridge condensor Soldering assy Bridge condensor assy condensor Soldering assy Painting Top Cover Nut M5 L Handle Left Side Panel Painting Plate Revision Y05-01 CONTENT Qty 1 1 1 1 1 1 1 1 1 1 1 1 1 1 1 1 1 1 1 1 1 1 1 1 1 1 1 1 3 3 3 1 1 1 1 1 1 1 1 1 1 1 1 1 1 1 1 1 1 1 1 1 1 1 1 1 1 Service Manual - PXD Series EXPLODED VIEWS & SPARE PARTS LISTS 13.19 Outdoor Unit: GC 18 ST Service Manual - PXD Series Revision Y05-01 CONTENT 13-19 EXPLODED VIEWS & SPARE PARTS LISTS 13.20 Indoor Unit: GC 18 ST NO. Part No. Description Quantity 1 4517144 FAN COVER PP+UV 1 2 452795700 PAINTED LEFT CABINET ASSY 1 3 452989200 Base welding plate assy. 1 4 4516786 PAINTED RIGHT CABINET ASSY 1 5 4516985 Partition Plate 1 6 455000506 Compressor Capacitor With Screw 45uF (CBB65) 1 7 455000104 Double patch Capacitor for fan motor 4uF (CBB61S) 1 8 204107 Cable clip Nylon 2 9 4521744 3 Poles Terminal Block (4mm2) 1 10 4522469 4 LEVEL TERMINAL BLOCK 1 11 4521733 3 Poles Terminal Block ( 6mm2) 1 12 4521340 Controller Box 1 13 4525427 Clip for capacitance(d=50) 1 14 453089900 Compressor Assy.PA200X2CS-4KU1 1 15 4519000 Spring of compressor heater 1 16 4517345 COMPRESSOR WIRE ASSY. 2.5mm2 1 17 4526922 heater for compressor 1 18 4516766 PAINTED VALVE PLATE ASSY 1 19 4526530 LOW PRESS VALVE (R410A) 1 20 4526531 High press valve(R410A) 1 21 4526931 filter welding assy. 2 1 22 4526839 filter welding assy. 1 23 4523145 R.lifter 1 24 452821900 Capillary assy. for cooling 1 25 4523338 Accumulator assy. 1 26 452977200 Low pressure pipe 1 27 452976200 Suction pipe 1 1 28 4526291 Muffler 1 29 4525938 PAINTED RIGHT-BACK CABINET ASSY 1 30 452977000 Condenser pipe assy. 1 31 452976800 Discharge pipe 2 1 32 4517028 PAINTED LEFT-BACK GRILL 1 33 4516758 SMALL HANDLE 1 34 452976000 Discharge pipe 1 1 35 452821300 Condenser-Distributing Soldering Assy.GC-18ST R410A 1 36 452988800 Insulation for compressor PA215/240 1 37 4526509 MOTOR BRAKECT (new) 1 38 4526864 motor YYK85E-6 1 39 4526585 connect for motor backet 1 40 4526510 FAN D=460mm (3 blade) 1 41 4523141 Hexagon locked nut M10 1 42 4516788 PAINTED TOP COVER ASSY 1 13-20 Revision Y05-01 CONTENT Service Manual - PXD Series EXPLODED VIEWS & SPARE PARTS LISTS 13.21 Outdoor Unit: GC 18 RC Service Manual - PXD Series Revision Y05-01 CONTENT 13-21 EXPLODED VIEWS & SPARE PARTS LISTS 13.22 NO. 1 2 3 4 5 6 7 8 9 10 11 12 13 14 15 16 17 18 19 20 21 22 23 24 25 26 27 28 29 30 31 32 33 34 35 36 37 38 39 40 41 42 43 44 45 46 47 13-22 Outdoor Unit: GC 18 RC Part No. 4517144 452795700 452989200 4516786 4516985 455000506 455000104 204107 4524907 4521744 4522469 4521733 4521340 4525427 453089900 4519000 4517345 4526922 4516766 4526530 4526531 4526931 4526839 4523145 4526840 4523338 452976500 452976600 452976400 4526291 4525938 4526522 4526589 452976100 452987800 4517028 4516758 452976000 452796500 452988800 452976200 4526509 4526862 4526585 4526510 4523141 4516788 Description COVER PP+UV PAINTED LEFT CABINET ASSY Base welding plate assy. PAINTED RIGHT CABINET ASSY Partition Plate Compressor Capacitor With Screw 45uF (CBB65) Double patch Capacitor for fan motor 4uF (CBB61S) Cable clip Nylon contactor (CJX9B-25S/01) 3 Poles Terminal Block (4mm2) 4 LEVEL TERMINAL BLOCK 3 Poles Terminal Block ( 6mm2) Controller Box Clip for capacitance(d=50) Compressor Assy.PA200X2CS-4KU1 Spring of compressor heater COMPRESSOR WIRE ASSY. 2.5mm2 Heater for compressor PAINTED VALVE PLATE ASSY LOW PRESS VALVE (R410A) High press valve(R410A) filter welding assy. 2 filter welding assy. R.lifter Single-way welding assy. Accumulator assy. Suction pipe 2 Low pressure pipe Condenser pipe assy. Muffler PAINTED RIGHT-BACK CABINET ASSY FOUR-WAY VALVE R410A 4-Way Valve Coil FOR R410A Discharge pipe 2 4-way welding assy. for GC18RC R410A PA200 PAINTED LEFT-BACK GRILL SMALL HANDLE Discharge pipe 1 Condenser-Distributing Soldering Assy.GC-18RC R410A Insulation for compressor PA215/240 Suction pipe 1 MOTOR BRAKECT (new) motor YYK85E-6B for GC18RC connect for motor backet FAN D=460mm (3 blade) M10 Hexagon locked nut M10 PAINTED TOP COVER ASSY Revision Y05-01 CONTENT Quantity 1 1 1 1 1 1 1 2 1 1 1 1 1 1 1 1 1 1 1 1 1 1 1 1 1 1 1 1 1 1 1 1 1 1 1 1 1 1 1 1 1 1 1 1 1 1 1 Service Manual - PXD Series EXPLODED VIEWS & SPARE PARTS LISTS 13.23 Outdoor Unit: OU7-24 RC 1PH Service Manual - PXD Series Revision Y05-01 CONTENT 13-23 EXPLODED VIEWS & SPARE PARTS LISTS 13.24 Outdoor Unit: OU7-24 RC 1PH No. SP No. Part No. 1 13 190443 2 22 402283 3 17 402495 4 7 433285 5 15 433288 6 16 433291 7 14 433293 8 6 433294 9 44 433816 10 9 434062 11 19 434716 12 3 436357 13 11 436358 14 1 437045 15 5 437091 16 24 437229 17 21 437274 18 4 439329 19 12 439342 20 18 442007 21 20 442016 22 33 442466 23 8 4529604 13-24 Description HEATER CRANKCASE MITSUBISHI CO SUCTION ACCUMULATOR 3"x5/8" 3. BOARD TPHN 5B COIL OU7-24 HDR CAPILLARY ASSY OU7-24 R410A TUBING ASSY OU7 R410A COMPRESSOR NN27VBAMT NEW BASE ASSY OU 2005 EXPORT SUCTION ASSY OU7 R410A MOTOR 86W,2S,OU7-24 THERMISTOR+CAP WTH CONNECTOR L SMALL ELECTRICAL COVER OU OU LEADING HANDLE UPPER COVER EL13 OU LARGE OU SQUARE FAN GUARD ELECTRICAL BOX TPHN COMPRESOR WIRING OU7/8-1PH MIT FRONT COVER/COLLECTOR OU7-35/9 MOTOR SUPPORT OU7 CAPACITOR 6mF 400V P1/P2 CAPACITOR 55mF 400V P1/P2 VALVE COIL L700 MOLEX-SANHUA AXIAL FAN D493*143 Revision Y05-01 CONTENT Qty 1 1 1 1 1 1 1 1 1 1 1 1 1 1 1 1 1 1 1 1 1 1 1 Service Manual - PXD Series EXPLODED VIEWS & SPARE PARTS LISTS 13.25 Outdoor Unit: OU7-24 ST 1PH *Optional Service Manual - PXD Series Revision Y05-01 CONTENT 13-25 EXPLODED VIEWS & SPARE PARTS LISTS 13.26 Outdoor Unit: OU7-24 ST 1PH No. SP No. Part No. 1 13 190443 2 22 402283 3 17 402495 4 14 433293 5 6 433705 6 44 433816 7 16 433817 8 15 433845 9 7 433846 10 45 433847 11 9 434062 12 19 434716 13 3 436357 14 11 436358 15 1 437045 16 5 437091 17 24 437229 18 21 437274 19 4 439329 20 12 439342 21 18 442007 22 20 442016 23 8 4529604 13-26 Description HEATER CRANKCASE MITSUBISHI CO SUCTION ACCUMULATOR 3"x5/8" 3. BOARD TPHN 5B COMPRESSOR NN27VBAMT NEW BASE ASSY OU 2005 LOCAL SUCTION ASSY OU7 R410A TUBING ASSY OU7 ST R410A CAPILLARY ASSY OU7-24 ST R410A COIL OU7-24 ST GAS VAVE ASSY OU7 ST R410A MOTOR 86W,2S,OU7-24 THERMISTOR+CAP WTH CONNECTOR L SMALL ELECTRICAL COVER OU OU LEADING HANDLE UPPER COVER EL13 OU LARGE OU SQUARE FAN GUARD ELECTRICAL BOX TPHN COMPRESOR WIRING OU7/8-1PH MIT FRONT COVER/COLLECTOR OU7-35/9 MOTOR SUPPORT OU7 CAPACITOR 6mF 400V P1/P2 CAPACITOR 55mF 400V P1/P2 AXIAL FAN D493*143 Revision Y05-01 CONTENT Qty 1 1 1 1 1 1 1 1 1 1 1 1 1 1 1 1 1 1 1 1 1 1 1 Service Manual - PXD Series EXPLODED VIEWS & SPARE PARTS LISTS 13.27 Outdoor Unit: OU7-24 RC 3PH Service Manual - PXD Series Revision Y05-01 CONTENT 13-27 EXPLODED VIEWS & SPARE PARTS LISTS 13.28 Outdoor Unit: OU7-24 RC 3PH No. SP No. Part No. 1 13 190443 2 22 402283 3 17 402494 4 7 433285 5 15 433288 6 16 433291 7 6 433294 8 14 433753 9 44 433816 10 9 434062 11 19 434716 12 3 436357 13 11 436358 14 1 437045 15 5 437091 16 24 437229 17 21 437278 18 4 439329 19 12 439342 20 25 439795 21 18 442007 22 33 442466 23 8 4529604 13-28 Description HEATER CRANKCASE MITSUBISHI CO SUCTION ACCUMULATOR 3"x5/8" 3. BOARD TPHN 3C COIL OU7-24 HDR CAPILLARY ASSY OU7-24 R410A TUBING ASSY OU7 R410A NEW BASE ASSY OU 2005 EXPORT COMPRESSOR NN27YDAMT SUCTION ASSY OU7 R410A MOTOR 86W,2S,OU7-24 THERMISTOR+CAP WTH CONNECTOR L SMALL ELECTRICAL COVER OU OU LEADING HANDLE UPPER COVER EL13 OU LARGE OU SQUARE FAN GUARD ELECTRICAL BOX TPHN COMPRESSOR WIRING OU7/8-3PH MI FRONT COVER/COLLECTOR OU7-35/9 MOTOR SUPPORT OU7 3PH MOTOR PROTECTOR CAPACITOR 6mF 400V P1/P2 VALVE COIL L700 MOLEX-SANHUA AXIAL FAN D493*143 Revision Y05-01 CONTENT Qty 1 1 1 1 1 1 1 1 1 1 1 1 1 1 1 1 1 1 1 1 1 1 1 Service Manual - PXD Series EXPLODED VIEWS & SPARE PARTS LISTS 13.29 Outdoor Unit: OU7-24 ST 3PH *Optional Service Manual - PXD Series Revision Y05-01 CONTENT 13-29 EXPLODED VIEWS & SPARE PARTS LISTS 13.30 No. 1 2 3 4 5 6 7 8 9 10 11 12 13 14 15 16 17 18 19 20 21 22 23 24 25 13-30 Outdoor Unit: OU7-24 ST 3PH SP No. 1 2 3 4 5 6 7 8 9 10 11 12 13 14 15 16 17 18 19 21 22 24 25 44 45 Part No. 437045 433280 436357 439329 437091 433705 433846 4529604 434062 433281 436358 439342 190443 433753 433845 433817 402494 442007 434716 437278 402283 437229 439795 433816 433847 Description LARGE UPPER COVER CUE SIDE PANEL OU7-24 R410A SMALL ELECTRICAL COVER CUE COVERAIR COLLECTOR OU SQUARE FAN GUARD NEW BASE ASSY OU 2005 LOCAL R410 COIL OU7-24 ST AXIAL FAN D493*143 MOTOR 86W,2S,OU7-24 SIDE GUARD OU7-24 R410 TRANSPORT HANDLE CUE MOTOR BASE OU7 HEATER CRANKCASE MITSUBISHI COMP COMPRESSOR NN27YDAMT CAPILLARY ASSY OU7-24 ST R410A TUBING ASSY OU7 ST R410A BOARD TPHN 3C CAPACITOR 6mF 400V P2 THERMISTOR L1050 (for coil) MITSUBISHI R410A ELECTRICAL BOX TPHN BOARD 3PH PROTECTOR SUCTION ASSY OU7 R410A GAS VAVE ASSY OU7 ST R410A Revision Y05-01 CONTENT Qty 1 1 1 1 1 1 1 1 1 1 1 1 1 1 1 1 1 1 1 1 1 1 1 1 1 Service Manual - PXD Series EXPLODED VIEWS & SPARE PARTS LISTS 13.31 Outdoor Unit: OU8-30 RC 1PH Service Manual - PXD Series Revision Y05-01 CONTENT 13-31 EXPLODED VIEWS & SPARE PARTS LISTS 13.32 Outdoor Unit: OU8-30 RC 1PH Item Code 437045 402930 436357 439929 437091 433294 433807 4529604 434062 403996 436358 439775 190443 433297 433822 433829 402495 442007 434716 442016 437274 402284 439928 437229 439656 442466 13-32 Item Description UPPER COVER EL13 OU LARGE SIDE PANEL OU8-33 SMALL ELECTRICAL COVER OU FRONT PANEL/COLLECTOR OU8-30 OU SQUARE FAN GUARD NEW BASE ASSY OU 2005 EXPORT COIL OU8-30 GR HDR R410A AXIAL FAN D493*143 MOTOR 86W,2S,OU7-24 SIDE GUARD OU8-33Z OU LEADING HANDLE MOTOR SUPPORT OU8 HEATER CRANKCASE MITSUBISHI COMPRESSOR NN33VAAMT CAPILLARY ASSY OU8-30 R410A RC TUBING ASSY OU8-30 R410A BOARD TPHN 5B CAPACITOR 6mF 400V P1/P2 THERMISTOR+CAP WTH CONNECTOR CAPACITOR 55mF 400V P1/P2 COMPRESOR WIRING OU7/8-1PH SUCTION ACCUMULATOR 5" x 3/4" OUTLET PLASTIC RING OU8 ELECTRICAL BOX TPHN SIDE COVER OU-8/10 VALVE COIL L700 MOLEX-SANHUA Revision Y05-01 CONTENT Drawing Quantity Number 1 1 1 2 1 3 1 4 1 5 1 6 1 7 1 8 1 9 1 10 1 11 1 12 1 13 1 14 1 15 1 16 1 17 1 18 1 19 1 20 1 21 1 22 1 23 1 24 1 28 1 33 Service Manual - PXD Series EXPLODED VIEWS & SPARE PARTS LISTS 13.33 Outdoor Unit: O8-30 RC 1PH Soft Starter Item Code 437045 402930 436357 439929 437091 433294 433807 4529604 434062 403996 436358 439775 190443 433297 433822 433829 402495 442007 434716 442016 437292 402284 439928 437229 439656 442466 433607 433296 442022 Item Description UPPER COVER EL13 OU LARGE SIDE PANEL OU8-33 SMALL ELECTRICAL COVER OU FRONT PANEL/COLLECTOR OU8-30 OU SQUARE FAN GUARD NEW BASE ASSY OU 2005 EXPORT COIL OU8-30 GR HDR R410A AXIAL FAN D493*143 MOTOR 86W,2S,OU7-24 SIDE GUARD OU8-33Z OU LEADING HANDLE MOTOR SUPPORT OU8 HEATER CRANKCASE MITSUBISHI COMPRESSOR NN33VAAMT CAPILLARY ASSY OU8-30 R410A RC TUBING ASSY OU8-30 R410A BOARD TPHN 5B CAPACITOR 6mF 400V P1/P2 THERMISTOR+CAP WTH CONNECTOR CAPACITOR 55mF 400V P1/P2 COMPRESSOR WIRING OU7/8-1PH SUCTION ACCUMULATOR 5" x 3/4" OUTLET PLASTIC RING OU8 ELECTRICAL BOX TPHN SIDE COVER OU-8/10 VALVE COIL L700 MOLEX-SANHUA CHOCK FOR SOFT STARTER SOFT STARTER SOFT STARTER CAPACITOR 161-193 Service Manual - PXD Series Revision Y05-01 CONTENT Drawing Quantity Number 1 1 1 2 1 3 1 4 1 5 1 6 1 7 1 8 1 9 1 10 1 11 1 12 1 13 1 14 1 15 1 16 1 17 1 18 1 19 1 20 1 21 1 22 1 23 1 24 1 28 1 33 1 38 1 39 1 41 13-33 EXPLODED VIEWS & SPARE PARTS LISTS 13.34 13-34 Outdoor Unit: OU8-30 ST 1PH Revision Y05-01 CONTENT Service Manual - PXD Series EXPLODED VIEWS & SPARE PARTS LISTS 13.35 Outdoor Unit: OOU8-30 ST 1PH Item Code 437045 402930 436357 439929 437091 433705 433834 4529604 434062 403996 436358 439775 190443 433297 433830 433833 402495 442007 434716 442016 437274 402284 439928 437229 439656 Item Description UPPER COVER EL13 OU LARGE SIDE PANEL OU8-33 SMALL ELECTRICAL COVER OU FRONT PANEL/COLLECTOR OU8-30 OU SQUARE FAN GUARD NEW BASE ASSY OU 2005 LOCAL COIL OU8-30 ST GR R410A AXIAL FAN D493*143 MOTOR 86W,2S,OU7-24 SIDE GUARD OU8-33Z OU LEADING HANDLE MOTOR SUPPORT OU8 HEATER CRANKCASE MITSUBISHI COMPRESSOR NN33VAAMT CAPILLARY ASSY OU8-30 R410A ST TUBING ASSY OU8-30 ST R410A BOARD TPHN 5B CAPACITOR 6mF 400V P1/P2 THERMISTOR+CAP WTH CONNECTOR CAPACITOR 55mF 400V P1/P2 COMPRESOR WIRING OU7/8-1PH SUCTION ACCUMULATOR 5" x 3/4" OUTLET PLASTIC RING OU8 ELECTRICAL BOX TPHN SIDE COVER OU-8/10 Service Manual - PXD Series Revision Y05-01 CONTENT Drawing Quantity Number 1 1 1 2 1 3 1 4 1 5 1 6 1 7 1 8 1 9 1 10 1 11 1 12 1 13 1 14 1 15 1 16 1 17 1 18 1 19 1 20 1 21 1 22 1 23 1 24 1 28 13-35 EXPLODED VIEWS & SPARE PARTS LISTS 13.36 Outdoor Unit: OU8-30 ST 1 PH Soft Starter Drawing Item Code Item Description Quantity Number 437045 UPPER COVER EL13 OU LARGE 1 1 402930 SIDE PANEL OU8-33 1 2 436357 SMALL ELECTRICAL COVER OU 1 3 439929 FRONT PANEL/COLLECTOR OU8-30 1 4 437091 OU SQUARE FAN GUARD 1 5 433705 NEW BASE ASSY OU 2005 LOCAL 1 6 433834 COIL OU8-30 ST GR R410A 1 7 4529604 AXIAL FAN D493*143 1 8 434062 MOTOR 86W,2S,OU7-24 1 9 403996 SIDE GUARD OU8-33Z 1 10 436358 OU LEADING HANDLE 1 11 439775 MOTOR SUPPORT OU8 1 12 190443 HEATER CRANKCASE MITSUBISHI 1 13 433297 COMPRESSOR NN33VAAMT 1 14 433830 CAPILLARY ASSY OU8-30 R410A ST 1 15 433833 TUBING ASSY OU8-30 ST R410A 1 16 402495 BOARD TPHN 5B 1 17 442007 CAPACITOR 6mF 400V P1/P2 1 18 434716 THERMISTOR+CAP WTH CONNECTOR 1 19 442016 CAPACITOR 55mF 400V P1/P2 1 20 437292 COMPRESSOR WIRING OU7/8-1PH 1 21 402284 SUCTION ACCUMULATOR 5"x3/4" 1 22 439928 OUTLET PLASTIC RING OU 8 1 23 437229 ELECTRICAL BOX TPHN 1 24 439656 SIDE COVER OU-8/10 1 28 433607 CHOCK FOR SOFT STARTER 1 38 433296 SOFT STARTER 1 39 442022 SOFT STARTER CAPACITOR 161-193 1 41 13-36 Revision Y05-01 CONTENT Service Manual - PXD Series EXPLODED VIEWS & SPARE PARTS LISTS 13.37 Outdoor Unit: OOU8-30 RC 3PH Service Manual - PXD Series Revision Y05-01 CONTENT 13-37 EXPLODED VIEWS & SPARE PARTS LISTS 13.38 Outdoor Unit: OU8-30 RC 3PH Item Code 437045 402930 436357 439929 437091 433294 433807 4529604 434062 403996 436358 439775 190443 433298 433822 433829 402494 442007 434716 437278 402284 439928 437229 439795 439656 442466 13-38 Item Description UPPER COVER EL13 OU LARGE SIDE PANEL OU8-33 SMALL ELECTRICAL COVER OU FRONT PANEL/COLLECTOR OU8-30 OU SQUARE FAN GUARD NEW BASE ASSY OU 2005 EXPORT COIL OU8-30 GR HDR R410A AXIAL FAN D493*143 MOTOR 86W,2S,OU7-24 SIDE GUARD OU8-33Z OU LEADING HANDLE MOTOR SUPPORT OU8 HEATER CRANKCASE MITSUBISHI COMPRESSOR NN33YCAMT CAPILLARY ASSY OU8-30 R410A RC TUBING ASSY OU8-30 R410A BOARD TPHN 3C CAPACITOR 6mF 400V P1/P2 THERMISTOR+CAP WTH CONNECTOR COMPRESSOR WIRING OU7/8-3PH SUCTION ACCUMULATOR 5" x 3/4" OUTLET PLASTIC RING OU8 ELECTRICAL BOX TPHN 3PH MOTOR PROTECTOR SIDE COVER OU-8/10 VALVE COIL L700 MOLEX-SANHUA Revision Y05-01 CONTENT Drawing Quantity Number 1 1 1 2 1 3 1 4 1 5 1 6 1 7 1 8 1 9 1 10 1 11 1 12 1 13 1 14 1 15 1 16 1 17 1 18 1 19 1 21 1 22 1 23 1 24 1 25 1 28 1 33 Service Manual - PXD Series EXPLODED VIEWS & SPARE PARTS LISTS 13.40 Outdoor Unit: OU8-30 ST 3PH Service Manual - PXD Series Revision Y05-01 CONTENT 13-39 EXPLODED VIEWS & SPARE PARTS LISTS 13.40 Outdoor Unit:OU8-30 ST 3PH Item Code 437045 402930 436357 439929 437091 433705 433834 4529604 434062 403996 436358 439775 190443 433298 433830 433833 402494 442007 434716 437278 402284 439928 437229 439795 439656 13-40 Item Description UPPER COVER EL13 OU LARGE SIDE PANEL OU8-33 SMALL ELECTRICAL COVER OU FRONT PANEL/COLLECTOR OU8-30 OU SQUARE FAN GUARD NEW BASE ASSY OU 2005 LOCAL COIL OU8-30 ST GR R410A AXIAL FAN D493*143 MOTOR 86W,2S,OU7-24 SIDE GUARD OU8-33Z OU LEADING HANDLE MOTOR SUPPORT OU8 HEATER CRANKCASE MITSUBISHI COMPRESSOR NN33YCAMT CAPILLARY ASSY OU8-30 R410A ST TUBING ASSY OU8-30 ST R410A BOARD TPHN 3C CAPACITOR 6mF 400V P1/P2 THERMISTOR+CAP WTH CONNECTOR COMPRESSOR WIRING OU7/8-3PH SUCTION ACCUMULATOR 5" x 3/4" OUTLET PLASTIC RING OU8 ELECTRICAL BOX TPHN 3PH MOTOR PROTECTOR SIDE COVER OU-8/10 Revision Y05-01 CONTENT Drawing Quantity Number 1 1 1 2 1 3 1 4 1 5 1 6 1 7 1 8 1 9 1 10 1 11 1 12 1 13 1 14 1 15 1 16 1 17 1 18 1 19 1 21 1 22 1 23 1 24 1 25 1 28 Service Manual - PXD Series OPTIONAL ACCESSORIES 14. OPTIONAL ACCESSORIES 14.1 RCW Wall Mounted Remote Control 14.1.1 The RCW wall mounted remote control can be fitted to a large range and models, It can be used as IR (wirless mode) or wired controler.the RCW can control up to15 indoor units using the same settings (on its wired aplication), The max wiring length between the controller to the last indoor unit is 300m. for application on WNG LED indoor units an additional interface PCB is needed. Ordering code no’: RCW – 436195 WNG add’ PCB - SP000000290. ENGLISH REMOTE CONTROL 1. START / STOP button 2. Operation mode selection 15 button COOLING, HEATING, AUTO COOL / HEAT, DRY, FAN. 14 3. LOCAL temperature sensing button 4. FAN SPEED and 5 AUTO FAN button 5. Room temperature UP button 6 6. Room temperature DOWN Button 7. NIGHT button 2 8. Airflow direction MANUAL positioning con 9. Airflow direction AUTO-CONTROL button 7 10. TIMER button 11. TIMER UP button 16 12. TIMER DOWN button 13. LCD operation display 3 14. LOCAL sensor 15. Infrared signal transmitter 9 16. ROOM temperature button 17. TIMER SET button 18. TIMER CLEAR button 19. Transmission sign Service Manual - PXD Series o C 15 ON OFF 1 2 WK 19 AUTO LOCAL 13 4 1 10 8 Revision Y05-01 CONTENT 18 17 12 11 14-1 OPTIONAL ACCESSORIES 14.2 RCW2 Wall Mounted Remote Cntrol 14.2.1 The RCW2 wall mounted remote controler is a wired controler that can provide affective controling management up to 15 different settings and temp’ zones. The RCW2 can be connected up to a max’ of 32 units,allowing a max wiring length of 1000m. for application on WNG LED indoor units an additional interface PCB is needed. Ordering code no’: RCW2 – SP000000081 WNG add’ PCB - SP000000290 1 2 3 1 4 2 3 4 14-2 Revision Y05-01 CONTENT Display screen. Keys for raising and lowering the set temperature. Ventilation mode selection : Low speed. Medium speed. High speed. AUTO : Automatic speed selection. ON / Standby. Accessing the time setting mode. Advancing the time setting. Retarding the time setting. Clearing memory of programmed time settings in programming mode. Day of the week selection key or sending “I feel” local temperature setting. Programming mode key. “Copy” key, enabling zone parameters to be duplicated for other zones. Operating mode selection. Day /Night key. Current zone setting: zone above. Current zone setting: zone below. Louver : step by step or horizontal. Louver : vertical. Service Manual - PXD Series OPTIONAL ACCESSORIES 14.3 RCW/RCW2 Wiring Connections as Shown on Kit Service Manual - PXD Series Revision Y05-01 CONTENT 14-3 OPTIONAL ACCESSORIES All Season Kit Installation Instruction Switch off power supply to the unit A Fig.1 ● Remove: – Cover A; – Power panel handle B; – Side cover C (if it exist). B C Fig.1 Fig.2 ● Mount the Fan speed controller on the partition of the compressor compartment in the holes provided, using four supplied screws . Note: ● In outdoor models OU8, the Fan Speed Controller should be mounted on the partition toward the outdoor fan motor side. OU7 OU10 OU8 Fig.2 Service valve cap Fig.3 ● Unscrew the cap of the provided service valve D and connect to the T-valve, supplied in the kit. Use Copper sealing gasked between the flare nut and it’s connection to service valve D. E Note: ● The “T-valve” supplied in the kit is installed between valve D and capillary E offering the possibility of an additionall pressure connecting output for service. D Cooper sealing gasket T-valve Additional pressure output Fig.3 1 14-4 Revision Y05-01 CONTENT Service Manual - PXD Series OPTIONAL ACCESSORIES Fig.4 Flare nut D E ● Connect capillary E to T-valve. Use Copper sealing gasket between the flare nut and the connection to T-valve. Note: ● Installing the Copper sealing gasket is mandatory in order to avoid refrigerant leak. T-valve Cooper sealing gasket Fig.4 Fig.5 TB2 Electrical connections for 1PH units: ● Disconnect the wire from point “6” on main terminal outdoor PCB Typhoon and isolate it with isolation tape. ● Disconnect the JP1 and JP2 wires from tabs TB2; TB4; TB5 on PCB Typhoon. Connect the Red Wire from Fan Speed Controller to tab “TB4” on PCB Typhoon. ● Connect Green Wire from Fan Speed Controller to tab “TB2” on PCB Typhoon. ● Connect Y/Green wire from Fan Speed Controller to ground screw on units partition. ● Return “JP1” wire, previously disconnected, to tab “TB2”. TB4 TB5 Ground screw TB2 TB4 TB5 Fig.5 Fig.6 Electrical connections for 3PH units: ● Disconnect the wire from point “6” on main terminal PCB Typhoon and isolate it with isolation tape. ● Disconnect the JP1 and JP2 wires from tabs TB1; TB8; TB9 on PCB Typhoon. ● Connect Red Wire from Fan Speed Controller to tab “TB8” on PCB Typhoon. ● Connect Green Wire from Fan Speed Controller to Tab “TB1” on PCB Typhoon. ● Connect Y/Green wire from Fan Speed Controller to ground screw on units partition. ● Return “JP1” wire, previously disconnected, to TB9 TB8 TB1 Ground screw TB9 TB8 TB1 Fig.6 2 Service Manual - PXD Series Revision Y05-01 CONTENT 14-5 OPTIONAL ACCESSORIES Fig.7 ● Verify the wiring to electrical diagram. 1PH Unit 3PH Unit Capillary loop Fig.8 ● Arrange the wires and capillary tube together with plastic ties, don’t fold or break the capillary tube,keep a large loop for extra length of capillary tube. ● Check for refrigerant leaks. Plastic tie Fig.8 ● Re-assemble the previously removed elements. 3 14-6 Revision Y05-01 CONTENT Service Manual - PXD Series Service Manual - PXD Series CONTENT Revision Y05-01 Disconnect the wires between the PXD and the top: • Display cable (clear insulated cable). • Vertical louver motor wires (red and blue with connectors). • Horizontal louver motor wires (black). Take care to separate the wire to help re-instalation. 6 Unhook the unit top 5 Remove the 3 screws holding the unit top 4 Remove the side panels by pulling down 3 Unhook the grille by pulling upwards 2 Remove the end screws Unscrew the middle screw without removing it 1 Open the return air grille by pulling both edges KIT INSTALLATION : (Fig.1) MAKE SURE THAT AIR CONDITIONER IS DISCONNECTED FROM THE MAINS 1 electric heater with wiring 2 metal supports + screws 2 screws to fix heater 1 foam insulation block 2 foam insulation squares 1 sticky back wiring diagram to place in the side panel above the unit wiring diagram - 1 configuration plug (heatpump = 243213 ) - KIT DETAILS : TH 3263 E - 399529 Fig.1 3 2 1 Electric heating for PXD 12 - 15 - 18 - 24 - 28 - 32 SX SP 9 - 12 - 15 - 18- -24 - 30 6 5 4 OPTIONAL ACCESSORIES Installation Instruction for Electrical Heaters ( as shown on Kit ) 14-7 14-8 Revision Y05-01 CONTENT Blue wire to N'1 Violet wire to HE2 Black wire to HE1 wiring - Connect the wires with 6.35 connectors directly to the control board as shown MODELS PXD 12 - 15 - 18 - 24 - 28 - 32 - Place the wiring in the corner so that the unit top can be replaced ELECTRICAL CONNECTIONS 5 Fix the heater assembly to the supports with the supplied screws 4 Slide the heater assembly into the PXD 3 Cover the metal supports with the foam squares (to avoid air by-pass) 2 Fix the supports with the supplied screws 1 Insert the metal support in the slots (push to break the polystyrene behind the slot) KIT INSTALLATION: (Fig.2) Fig.2 OPTIONAL ACCESSORIES Service Manual - PXD Series - Connect the wires with 6.35 connectors directly to the control board as shown MODELS SXSP 9 - 12 - 15 - 18 - 24 - 30 Service Manual - PXD Series Black wire to 7 Violet wire to 7 Blue wire to 8 SXSP 9 - 12 - 15 - 18 - 24 - 30 OPTIONAL ACCESSORIES Revision Y05-01 CONTENT 14-9 14-10 bloc mousse wiring - On the unit top : • Using flat pliers break the plastic A (for the heater cable) • Place the foam insulation in the groove (to prevent air by-pass) KIT INSTALLATION : (Fig.3) Fig.3 A OPTIONAL ACCESSORIES Revision Y05-01 CONTENT Service Manual - PXD Series 24 3213 Heatpump with heaters Service Manual - PXD Series PXD- SH PXD- RC CONTENT - A label "DO NOT COVER" is supplied with the kit. Place it on the rear of the discharge frame as shown below. THE DISCHARGE PORT OF THE APPLIANCE MUST NEVER BE COVERED OR OBSTRUCTED BY A CURTAIN, CLOTH, ETC... CAUTION - Reconnect the wiring between the PXD and the unit top - Re install the unit top on the unit taking care to pass the wires in the groove as shown below - Stick the wiring diagram in the side panel above the existing wiring diagram - Replace the unit top screws then the sides and return air grille REASSEMBLY 24 3211 Heatpump without heaters • Remove the plug marked PXD-RC (heapump) and replace it with the plug marked PXD-SH (heatpump with supplementary heaters) (fixed on the control board) - Your unit is configured as HEATPUMP without electric heating - To configure as HEATPUMP with electric heating - On the electric board KIT INSTALLATION : (Fig.4) PXD 12 - 15 - 18 - 24 - 28 - 32 Fig.4 PXD 12 - 15 - 18 - 24 - 28 - 32 (metal panel) Towards the metal panel The plug has a small arrow to indicate the correct orientation. The side with the arrow must be towards the back of the unit. WARNING: OPTIONAL ACCESSORIES Revision Y05-01 14-11 APPENDIX A APPENDIX A INSTALLATION AND OPERATION MANUAL Service Manual - PXD Series Revision Y05-01 CONTENT 15-1 CONTENT CONTENT CONTENT CONTENT CONTENT CONTENT CONTENT CONTENT CONTENT CONTENT CONTENT CONTENT CONTENT CONTENT CONTENT CONTENT CONTENT CONTENT CONTENT CONTENT CONTENT CONTENT CONTENT CONTENT CONTENT CONTENT CONTENT Øœ 17/2/00 18:42 Page 1 C M Y CM MY CY CMY K REMOTE CONTROL PROGRAMMING AND OPERATING MANUAL CONTENT ENGLISH ı RC4 433066 ITAL/0 18/2/00 9:37 Page 1 C M Y CM MY CY CMY K INDICE TELECOMANDO 1 USO DEL TELECOMANDO 2 MODO DI FUNZIONAMENTO E CARATTERISTICHE 3 ISTRUZIONI PER L'USO 5 Accensione del condizionatore 5 Ventilazione 5 Raffreddamento 5 Raffreddamento con ventilazione automatica 5 Riscaldamento 5 Riscaldamento con ventilazione automatica 5 Raffreddamento/riscaldamento automatici 6 Deumidificazione 6 Selezione della temperatura 6 Funzionamento a sensore individuale 6 Funzione notte 6 Funzionamento a temporizzatore 7 MODI DI FUNZIONAMENTO A TEMPORIZZATORE 8 Direzione del flusso dell'aria 11 Display della temperatura ambiente 11 Spegnimento del condizionatore 11 Regolazione dell'ora 11 Funzione lock 11 CONTENT SE IL VOSTRO CONDIZIONATORE FUNZIONA PER IL SOLO RAFFREDDAMENTO, SIETE INVITATI AD IGNORARE LE ISTRUZIONI CHE SI RIFERISCONO ALL'USO DEL CONDIZIONATORE PER RISCALDAMENTO. LEGGERE ATTENTAMENTE QUESTE ISTRUZIONI PRIMA DI AVVIARE IL CONDIZIONATORE D'ARIA. pg1 RC4 433066 ENG 17/2/00 18:31 Page 1 C M Y CM MY CY CMY K REMOTE CONTROL 1 START/STOP button 2 Operation mode selection button COOLING HEATING AUTO COOL / HEAT DRY FAN I FEEL temperature 3 sensing mode button 4 FAN SPEED and AUTO FAN button 5 Room temperature UP button 6 Room temperature DOWN Button 7 SLEEP button Airflow direction 8 MANUAL positioning control button 9 Airflow direction AUTOCONTROL button 10 TIMER button 11 TIMER UP button 12 TIMER DOWN button 13 LCD operation display 14 I FEEL sensor 15 Infrared signal transmitter 16 ROOM temperature button 17 TIMER SET button 18 TIMER CLEAR button Note: Open the cover to reach the control buttons. 19 LOCK button 20 Transmission sign CONTENT 1 pg2 RC4 433066 ENG 17/2/00 18:32 Page 1 C M Y CM MY CY CMY K USE OF WIRELESS REMOTE CONTROL PRIOR TO OPERATION Prior to operating your air conditioner, make sure that: ● The red tab protecting the remote control battery has been removed. ● For WIRELESS REMOTE CONTROL PUTS ALL FUNCTIONS AT YOUR FINGERTIPS REMOTE CONTROL HOLDER ● ● ● Aim at the infrared signal receiver on the room air conditioner when operating. The remote control signal can be received at a distance of up to about 8 m. Ensure that there are no obstructions between the remote control and the signal receptor. ● Do not drop or throw the remote control. ● Do not place the remote control in a location exposed to direct sunlight, or next to a heating unit, and/or other heat source. ● Do not expose the air conditioner signal receiver to a strong light such as fluorescent lamp or sunlight REMOTE CONTROL BATTERY CHANGE ● Remove the batteries from the remote control as shown. ● Use two 1.5 volt size AAA batteries ● For protecting the enviroment, please, return used batteries for recycling process. 2 clock setting see page 11. CONTENT Use the remote control holder when unit is not in use. Remote control can be slipped in or out its holder. pg3 RC4 433066 ENG 17/2/00 18:33 Page 1 C M Y CM MY CY CMY K MODES OF OPERATION, FUNCTIONS AND FEATURES COOL Cools, dehumidifies and filters the room air. Maintains desired room temperature. HEAT Heats and filters the room air. Maintains desired room temperature. AUTO Automatically switches from COOLING to HEATING or from HEATING to COOLING, maintaining the desired temperature according to the room conditions. DRY Dehumidifies and softly cools the room In DRY Mode, the air conditioner operates at an increased dehumidifying power. This function is recommended to be used when temperature is rather low but the humidity is high. FAN AUTO FAN I FEEL TIMER SLEEP Recirculates and filters the room air. Maintains constant air movement in the room. The air conditioner automatically selects the FAN speed in accordance with the room temperature. At the start, the unit operates at high fan speed. As the room air approaches to the desired temperature, the fan switches to a lower speed for quieter operation. Switches the temperature sensing point to the place where the remote control is located. (Generally the temperature sensor is located behind the intake grille of the air conditioner). This function is designed to provide a personalized environment by transmitting the temperature control command from the location next to you. The communication between the Remote Control and the unit is done by infra-red signal. Therefore, in using this function, the Remote Control should always be aimed, without obstructions, at the air conditioner. Real time control and display, automatically turns the air conditioner ON and OFF according to the time of day setting, ensuring comfort conditions before returning home, without wasting electricity. It turns the air conditioner off automatically when sleeping. Designed to create comfortable sleeping conditions. When in COOLING mode, the temperature rises one degree centigrade after each consecutive hour, up to three hours, from the start of the mode. The temperature rise prevents the feeling of over-cooling while sleeping (when your body is at rest). In HEATING mode the reverse occurs; the air conditioner lowers its temperature one degree every hour. When in SLEEP mode, the air conditioner will be automatically turned off after seven hours. The result is a more comfortable and invigorating sleep, which leaves you feeling fresh and energetic in the morning. CONTENT 3 pg4 RC4 433066 ENG 17/2/00 18:34 Page 1 C %RH HUMIDITY MEASUREMENT (OPTIONAL) AUTO LOUVRE VERTICAL AIR SWING M Y CM MY CY CMY K Measures and displayes relative humidity between 30% and 90% at a temperature range of 15ºC to 45º C. The air louvre is automatically positioned for the most suitable blow-out angle, when COOL, HEAT, DRY or FAN modes are selected. When the air conditioner is turned off, the flap will close automatically for an aesthetic appearance. Automatic swing of supply air in vertical direction. The flap moves automatically in upward and downward direction to spread the conditioned air evenly throughout the room. Note: Applicable on some models only. Option 1 Manual positioning of the air flap to provide desirable air flow angle. AIR DIRECTION Note: Applicable on some models only. POSITIONING Option 2 Automatic swing and manual positioning of the air blades to provide required air HORIZONTAL flow angle in horizontal direction. The air blades move automatically from left to AIR BLADES right direction, to diffuse the conditioned air evenly throughout the room. CONTROL ROOM Measures and displays room temperature. TEMPERATURE LOCK Freezes the last operation setting on the remote control. When LOCK is activated, the remote control will not be able to control the air-conditioner. ILLUMINATED KEYPAD AND By pressing any button in dark environment, the keypad and the LCD display LCD DISPLAY will be illuminated (OPTIONAL) 4 CONTENT pg5 RC4 433066 ENG 17/2/00 18:34 Page 1 C M Y CM MY CY CMY K OPERATION PROCEDURE TURNING ON THE AIR CONDITIONER Press START/STOP button (1) to turn the air conditioner on. The operation indicator on the air conditioner will light up, indicating that the unit is in operation. Note that the LCD operation display (13) will always show the last mode of operation and previous function used. Follow the instructions if you choose to change the control settings; otherwise, the air conditioner will start and operate in the same mode and functions prior to being turned off. VENTILATING OPERATION Select the ventilating mode by pressing MODE button (2). Switch to the desired fan speed by pressing FAN speed button (4). COOLING OPERATION Select the COOLING mode by pressing MODE button (2). Switch to the desired FAN SPEED or to AUTO FAN by pressing button (4). Select suitable temperature setting. By selecting the COOLING mode, the air flap will move automatically to horizontal air delivery position, optimal for cooling. COOLING OPERATION WITH AUTO FAN MODE This operation starts with the highest air flow in order to quickly lower the room temperature. It will then automatically switch to the low air flow to quietly maintain the selected temperature. HEATING OPERATION Select the HEATING mode by pressing MODE button (2). Switch to the desired FAN SPEED or to AUTO FAN by pressing FAN button (4). Select suitable temperature setting. By selecting the HEATING mode, the air flap will move automatically to vertical air delivery position, optimal for heating.The HOT KEEP function is provided. The fan will be turned off when the indoor coil temperature is not sufficiently hot to prevent uncomfortable cold air drafts. In some models the HOT KEEP function is operating in AUTO FAN mode only. HEATING OPERATION WITH AUTO FAN MODE This operation starts with the highest air flow in order to quickly raise the room temperature. It will then automatically switch to a lower air flow to quietly maintain the selected temperature. CONTENT 5 pg6 RC4 433066 ENG 17/2/00 18:35 Page 1 C M Y CM MY CY CMY K AUTO COOLING / HEATING OPERATION Select the AUTO mode by pressing MODE button (2). Switch to the desired FAN SPEED or to AUTO FAN by pressing button (4). Select suitable temperature setting. The air flap will automatically move to either horizontal air delivery for cooling or to vertical air delivery for heating. At start, the air conditioner will select its mode of operation according to the room temperature and the temperature setting. DRY OPERATION Select the DRY mode by pressing MODE button (2). Select the suitable temperature setting. While in DRY mode, the air conditioner will operate at low fan speed, regardless of the fan setting on the LCD operation display. Fan might terminate operation from time to time to prevent from over cooling. By selecting the mode, the air flap will move automatically to optimal horizontal air delivery position. SELECTING THE TEMPERATURE Press TEMP buttons (5) or (6) to change the temperature setting in the LCD operation display (13). The temperature setting is shown in degrees centigrade. A higher number indicates a higher room temperature. A lower number indicates a lower room temperature I FEEL FUNCTION Press I FEEL button (3) to activate the I FEEL function. Thermometer sign will appear on the LCD operation display (13). Select suitable temperature setting. Make sure that the remote control unit is aimed at the air conditioner, with the I FEEL sensor (14) in front. Prevent the I FEEL sensor from being affected by heat sources such as lamps, heaters, direct sun, etc. or from being directly affected by the air conditioner air flow. These may cause the sensor to transmit the wrong temperature data, thereby disturbing the performance of the I FEEL function. SLEEP FUNCTION Press SLEEP button (7) to select the SLEEP function. The sleep icon light while the sleep OFF time icon and the time which is 7 hours after current time blink as deafult. The default setting can be changed from 3 hr. to 12 hr. by pressing up and down buttons HOUR+ (11) and HOUR- (12) respectively.(The sleep timer will display the default time or the setting time plus the current time initially in the display). For example : currrent time is 23:00 and the sleep mode is set , the sleep mode OFF time will be 6:00 . If the sleep off time is set to 10 hr, then the sleep mode OFF time will be 9:00.All other timers will temporarily be suspended during the activation of the sleep timer. The other timers will resume operation at the end of the SLEEP time. To cancel the SLEEP function press one of the following: START / STOP button (1) SLEEP button (7) NOTE: In some models the SLEEP icon lights only and the OFF time is set for seven hours as default. 6 CONTENT p7 RC4 433066 ENG 17/2/00 18:36 Page 1 C M Y CM MY CY CMY K TIMER OPERATION There are four timers that can be selected on the remote control.Two daily timers (designated as T1,T2) ,and two optional weekend timers (designated as WKTI, WKT2) .Each timer can be selected by pressing TIMER button (10). To set each timer use time adjust up and down buttons Hour+ (11) and Hour- (12) respectively. SET button (17) to enable the timer and/or CLEAR button (18) to disable the timer. Indicator (c) on the air conditioner will light up during timer operation. NOTE: After a power, failure the timer operation is cancelled, timer indicator on the air conditioner will blink, the unit will be automatically turned to stand-by mode and STAND-BY indicator lights. To resume the timer operation, follow the instructions below. A. DAILY TIMER The daily timers T1 and T2 can be set for ON and OFF separately for two different time periods. Once the timer is set it will resume operation when initiated. B. WEEKEND TIMER (OPTIONAL) The weekend timers WKT1 and WKT2 can be set for ON and OFF separately for two different time periods for two days only. It will be effective on the day of setting and on the day after only. At 24:00 on the second day, the WK timer will not be effective anymore and the daily timer will resume its effectiveness. WKTI - effective on the setting day WKT2 - effective one day after the setting day. NOTE: 1. During the weekend timer operation, the daily timers will be disabled. 2. The WK timers must be reactivated before every weekend. C. SELECTING A TIMER Press the TIMER button (10) to select a timer. Each time the TIMER button (10) is pressed, one of the four following timer icons will appear on the LCD display. 2 1 Icon 1 of Timer T1 will blink Press TIMER button to select weekend timer WKT1 Press TIMER button to select daily timer T2. Press TIMER button to select daily timer T1. 3 Icon 2 of Timer T2 will blink CONTENT Press TIMER button to select weekend timer WKT2 4 Icons 1 and WK will blink Icons 1 and WK will blink. 7 p8 RC4 433066 ENG 17/2/00 18:36 Page 1 C M Y CM MY CY CMY K TIMER OPERATING MODES SETTING THE ON TIMER Undertake the following steps after selecting a timer - T1,T2 or WKT1, WKT2, to set a timer for the start time of operation. Press the SET. EXAMPLE: Turning the air button. conditioner ON at 10:30. 1 Set the hours and minutes. 2 The ON icon & ON time digits will blink Press the SET button 4 3 1.Set the ON time at 10:30 . 2.Press the (HOUR+) up button to advance the time, and press the (HOUR-) down button to retract. Press the CLEAR button. 1. The ON time is activated at 10:30 (the time ON icon will light) 2. Time OFF icon & OFF time digits will blink. Timer OFF is cleared. SETTING THE OFF TIMER Undertake the following steps after selecting a timer - T1,T2 or WKT1, WKT2, to set a timer for the stop time of operation. EXAMPLE: Turning the air conditioner OFF at 18:30. 1 Press the SET. button. Press the CLEAR button. 2 The ON icon & ON time digits will blink. Set the hours and minutes. 3 1. The ON time is cleared. 2. OFF time icon & OFF time digits will blink. Press the SET button 4 1.Set the OFF time at 18:30 . 2.Press the (HOUR+) up button to advance the time, and press the (HOUR-) down button to retract OFF time is activated at 18:30 (the (timer OFF icon will light) NOTES: 1.The default setting for the timers are 7:00 and 18:00 for ON and OFF, respectively. 2. The timer mode will display always the last ON and OFF settings on the LCD display 8 CONTENT p9 RC4 433066 ENG 17/2/00 18:37 Page 1 C M Y CM MY CY CMY K SETTING THE ON AND OFF TIMERS Undertake the following steps after selecting a timer - T1,T2 or WKT1, WKT2, to set a timer for the start and stop time of operation. EXAMPLE: Turning the air conditioner ON at 10:30 and OFF at 18:30. Press the SET button Set the hours and minutes. 2 1 The ON icon & ON time digits will blink. Press the SET button Set the hours and minutes. Press the SET. button. 3 4 5 1. Set the ON time at 10:30. 2.Press the (HOUR+) up button to advance the time, and press the(HOUR-) down button retract. 1.The ON time is activated at 10:30 (the time ON icon will light) 2.Timer OFF icon & OFF time digits will blink. 1. Set the OFF time at 18:30. 2.Press the (HOUR+) up button to advance the time, and press the (HOUR-) down buttton retract. OFF time is activated at 18:30 (the timer OFF icon will light) Change the setting time to 9:20 by Press the SET pressing on button to save the HOUR-. new setting. Press the SET button to confirm the previous timer OFF setting TO CHANGE THE TIME SETTING EXAMPLE: To change the ON time setting from 10:30 to 9:20 (while preserving the OFF time setting) 1 Press the TIMER button until the selected timer icon blinks. Press the SET button to enter edit mode 2 3 Note that the corresponding formerly set timer digits will display without blinking. ON icon & ON time digits blink CONTENT 4 ON icon & ON time digits blink 5 ON icon & ON time digits light while OFF icon & OFF time digits blink. ON & OFF icons and time digits of the consequent timer light 9 TO CANCEL THE TIMER SETTING FOR A PARTICULAR TIMER To cancel the ON time while keeping the OFF time setting. Press TIMER button to select a timer. 1 Press SET button . 2 The selected timer icon blinks & the correspending previous timer ON, OFF settings light. Press CLEAR button 4 3 ON icon & ON time digits blink. Press SET button ON time is cleared, OFF icon & OFF time digits blink. Confirm the new setting. TO CANCEL THE ON & OFF TIME SETTINGS Press TIMER button to select a timer. Press CLEAR button 2 1 The selected timer icon blinks & the corrensponding previous time ON, OFF settings light . All settings of the selected timer are cleared. NOTES: 1 .The default settings for the timers are 7:00 and 18:00, for ON and OFF respectively. 2. The timer mode will always display the last ON and OFF settings on the LCD display. 3. Pressing CLEAR button (18) for 5 seconds will cancel all timer settings and clear timer display. 10 CONTENT pg11 RC4 433066 ENG 17/2/00 18:39 Page 1 C M Y CM MY CY CMY K AIR DIRECTION OPERATION 1. Automatic Vertical Air Swing Press button (9) to activate the auto air swing. Press button (9) again to deactivate this function 2. Air Direction Positioning (See Option 1 on page 2) Press button (8) to position the air flap to any desired angle. 3. Horizontal air flow control (See Opion 2 on page 2) A. AUTOMATIC HORIZONTAL AIR SWING Press button (8) to activate the auto swing The horizontal swing icon will light on the LCD display B. MANUAL AIR DIRECTION POSITIONING Press button (8) once again to position the air blades at any desired TURNING OFF THE AIR CONDITIONER Press START/STOP button (1) to turn off the air conditioner. Indicator (B ) on the air conditioner will be turned off. Indicator (A) will stay lit, indicating that the air conditioner is in STAND-BY mode and ready to accept any new command from the remote control. The remote control LCD will display the clock time. The last operating set-up will be kept for the next operation. ROOM TEMPERATURE DISPLAY By pressing on ROOM temperature, button (16), the measured room temperature and the room temperature sign will be displayed. To cancel the ROOM Temperature display press on one of the following: ● Press again on ROOM temperature button (16). ● Change of MODE button (2) NOTE: Room temperature range is between 0°C and 36°C in 1°C increments. Display should show "HI" or "LOW" to represent temperature that is above 36°C or below 2°C. CURRENT CLOCK TIME SET Clock setting is performed when batteries are inserted. The remote control displays the setting and the clock display will blink "0:00" or "12:00" AM (AM sign will blink, too) till a new time is set. For clock setting, use buttons (11) and (12) for setting the hours and minutes, respectively, and then press timer SET button (17). The clock setting can be also performed by pressing timer SET button (17) for 5 seconds. The clock display will blink, for new setting follow the steps described above. LOCK FUNCTION By pressing LOCK button (19), the remote control will lock the last operation program. All the function buttons will be inoperative, including START/STOP button. By pressing LOCK button (19) again the remote control will be released from its locked position. When lock mode is functioning, the transmission sign (20) will be on. 11 11 CONTENT