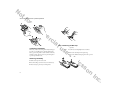
1
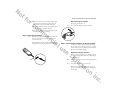
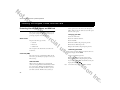
No tf or co m CF768 User Manual m er ci 6/99 - PBM al This manual is published by Ericsson Inc., without any warranty. Improvements and changes to this manual necessitated by typographical errors, inaccuracies of current information, or improvements to programs and/or equipment, may be made by Ericsson Inc., at anytime and without notice. Such changes will, however, be incorporated into new editions of this manual. All rights reserved. Ericsson Inc., 1998. Publication Number: AE/LZT 123 4716 R3 Printed in the U.S.A. us e -E ric ss on In c. No tf CF768 Menu Structure Some menus/features are operator dependent. or co m RecallName Store Indicates the Reduced Menu. For more information on menus, see chapter Navigating the Menu System. Start Here: Read Mm Voice Mail Menu Size Missed Call Set Alarm lists missed calls m EditPh.Bk Name: Forward? Speech→Fax al Settings Locks Ring Vol er ci clock displayed Ear Volume Ring Type Edit Melody Set Clock Language Answ Mode MasterReset Line 2? Greetings Call Wait Call Info Data Menus Key Lock Key Sound No: us Next Call e CardLock PhoneLock CallCards -E ric Tot Out Last Send Mm Networks lists networks Area Mm Customize Area Info EditMenus? Reset? Fwd L1 Barring Outgoing Incoming CancelAll? Info ... Fwd L2 Fwd Data Activate? Cancel? GetStatus? Fwd Fax Activate? Cancel? GetStatus? All Calls Unanswered All Calls Unanswered Speech? Speech>Fax Fax>Speech Fax? Data? ss New Options on In c. No tf or co m m er ci al us e -E ric ss on In c. No tf or co m Some menus/features are operator dependent. Table of Contents Guidelines for Safe and Efficient Use . . . . . i ([SRVXUHWR5DGLR)UHTXHQF\(QHUJ\ L (IILFLHQW3KRQH2SHUDWLRQ L (OHFWURQLF'HYLFHV LL +HDULQJ$LGV LLL 9HKLFOHV LLL 3RVWHG)DFLOLWLHV LLL $LUFUDIW LLL &KLOGUHQ LY %ODVWLQJ$UHDV LY 3RWHQWLDOO\([SORVLYH$WPRVSKHUHV LY )RU9HKLFOHV(TXLSSHGZLWKDQ$LU%DJ LY 3URGXFW&DUH LY %DWWHU\,QIRUPDWLRQ Y m er ci al Assembly Instructions . . . . . . . . . . . . . . . . . 1 3UHSDULQJ<RXU3KRQH²6L[6WHSV What the Phone’s Display Tells You . . . . . . 5 7KH'LVSOD\ /HDUQLQJDERXW<RXU3KRQH 'LVSOD\0HVVDJHV 6SHFLDO&KDUDFWHUV 7KH,QGLFDWRU/LJKW Making and Receiving Calls . . . . . . . . . . . . . 9 0DNLQJDQG5HFHLYLQJ&DOOV $ERXW&DOOLQJ/LQH,GHQWLILFDWLRQ&/, &DOOLQJ9RLFH0DLO &RQIHUHQFH&DOOLQJ 7UDQVIHUULQJ&DOOV us Useful Information While Talking . . . . . . . 14 Navigating the Menu System . . . . . . . . . . . 15 e $ERXWWKH0HQX6\VWHP 0RYLQJ7KURXJKWKH0HQXV -E Creating Your Own Phone Book . . . . . . . . 18 ric $ERXWWKH3KRQH%RRN Personalizing Your Phone . . . . . . . . . . . . . 22 ss &KDQJLQJWKH5LQJ9ROXPH &KDQJLQJ(DU9ROXPH &KDQJLQJWKH5LQJ7\SH on In c. No tf or co m Some menus/features are operator dependent. &KDQJLQJWKH.H\6RXQG 9LHZLQJWKH&ORFN 8VLQJWKH$ODUP $ERXW'LVSOD\/DQJXDJH $ERXW$QVZHULQJ0RGHVZLWK+DQGVIUHH $ERXWWKH*UHHWLQJ $ERXW&DOO:DLWLQJ $ERXW&DOOLQJ,QIRUPDWLRQ m er ci Forwarding Calls . . . . . . . . . . . . . . . . . . . . . 26 $ERXW)RUZDUGLQJ&DOOV )RUZDUGLQJIURP5HGXFHG0HQX )RUZDUGLQJIURP([WHQGHG0HQX 9LHZLQJ6WDWXVRI&DOO)RUZDUG &DQFHOLQJ&DOO)RUZDUG al Protecting Your Keypad, Phone, and SIM Card . . . . . . . . . . . . . . . . . . . . . . . . 28 3URWHFWLQJ<RXU.H\SDG3KRQHDQG6,0&DUG Barring (Restricting) Calls . . . . . . . . . . . . . 31 Sending and Receiving Text Messages. . . 32 $ERXW7H[W0HVVDJHV &KHFNLQJ<RXU6XEVFULSWLRQ Receiving Area Information . . . . . . . . . . . . 34 $ERXW$UHD,QIRUPDWLRQ $FWLYDWLQJWKH$UHD,QIRUPDWLRQ Knowing the Price and Duration of Your Calls . . . . . . . . . . . . . . . . . . . . . . . . . . 36 $ERXW&RVWDQG'XUDWLRQRI&DOOV Specific Data Menus . . . . . . . . . . . . . . . . . . 38 $ERXW+DYLQJ'DWD0HQXV2Q Other Networks . . . . . . . . . . . . . . . . . . . . . . 40 $ERXW&KRRVLQJD1HWZRUN us Making Your Personal Ring Signal . . . . . . 42 e 0XVLFDO.H\SDG -E Other Things You Should Know . . . . . . . . 44 3UREOHPV<RX&DQ6ROYH ric ss on In c. No tf or co m . Guidelines for Safe and Efficient Use The design of your phone complies with the FCC guidelines (and those standards). Since its introduction in the mid 1980s the mobile phone is one of the most exciting and innovative products ever developed. Your phone can help you to stay in touch with your office, your home, emergency services and others. m er ci Exposure to Radio Frequency Energy al Your wireless handheld portable telephone is a low power radio transmitter and receiver. When it is ON, it receives and also sends out radio frequency (RF) signals. In August, 1996, the Federal Communications Commission (FCC) adopted RF exposure guidelines with safety levels for handheld wireless phones. Those guidelines are consistent with the safety standards previously set by both US and international standards bodies: • ANSI C95.1 (1992)* • NCRP Report 86 (1986)* • ICNIRP (1996)* Those standards were based on comprehensive and periodic evaluations of the relevant scientific literature. For example, over 120 scientists, engineers, and physicians from universities, government health agencies, and industry reviewed the available body of research to develop the ANSI Standards (C95.1). * American National Standards Institute: National Council on Radiation Protection and Measurements; International Commission on Non-Ionizing Radiation Protection. Efficient Phone Operation us How to use your phone for optimum performance with minimum power consumption: e Hold the phone as you would any other telephone. While speaking directly into the mouthpiece, angle the antenna in a direction up and over your shoulder. If the antenna is extendable/retractable, it should be extended during a call. -E Do not hold the antenna when the phone is in use. Holding the antenna affects call quality, may cause the phone to operate at a higher power level than needed and shortens talk and standby times. Antenna Care: ric ss • Use only the supplied or an approved replacement antenna. Unauthorized antennas, modifications, or attachments could damage the phone and may violate FCC regulations. on i In c. No tf or co m • Do not take notes or look up phone numbers while driving. • Don’t continue to twist the antenna after it has been inserted. Excess twisting will damage the antenna. • Dial sensibly and assess the traffic; if possible, place calls when you are not moving or before pulling into traffic. • Be cautious if removing your antenna. A detached antenna may be a choking hazard for children. m Phone Operation: Hold the phone as you would any other telephone with the antenna pointed up and over your shoulder. • Do not engage in stressful or emotional conversations that may be distracting. Tips on Efficient Operation: For your phone to operate most efficiently: • Use you wireless phone to help others in emergencies. er ci • Do not touch the antenna unnecessarily when the phone is in use. Contact with the antenna affects call quality and may cause the phone to operate at a higher power level than otherwise needed. al Driving Check the laws and regulations on the use of wireless telephones in the areas where you drive. Always obey them. Also, if using your phone while driving, please: • Get to know your wireless phone and its features such as speed dial and redial. • Use your wireless phone to call for help. • Call roadside assistance or a special wireless nonemergency assistance number when necessary. • Give full attention to driving. • Pull off the road and park before making or answering a call if driving conditions so require. us e Electronic Devices • When available, use a handsfree device. • Position your wireless phone within easy reach. • Suspend conversations during hazardous driving conditions or situations. ii Pacemakers -E Most modern electronic equipment, for example equipment in hospitals and cars, is shielded from RF energy. However, certain electronic equipment may not be shielded against RF signals from your wireless phone. ric ss The Health Industry Manufacturers Association recommends that a minimum separation of six (6”) inches be maintained between a handheld wireless phone and a pacemaker to avoid potential interference with the pace- on In c. No tf or co m . do so. Hospitals or health care facilities may be using equipment that could be sensitive to external RF energy. maker. These recommendations are consistent with the independent research by and recommendations of Wireless Technology Research. Persons with pacemakers: • Should ALWAYS keep the phone more than six inches from their pacemaker when the phone is turned ON. m er ci Vehicles RF signals may affect improperly installed or inadequately shielded electronic systems in motor vehicles. Check with the manufacturer or its representative regarding your vehicle. You should also consult the manufacturer of any equipment that has been added to your vehicle. • Should not carry the phone in a breast pocket. • Should use the ear opposite the pacemaker to minimize the potential for interference. If you have any reason to suspect that interference is taking place, turn your phone OFF immediately. al Hearing Aids Some digital wireless phones may interfere with some hearing aids. In the event of such interference, you may want to consult your service provider (or call the customer service line to discuss alternatives). Other Medical Devices If you use any other personal medical device, consult the manufacturer of your device to determine if it is adequately shielded from external RF energy. Your physician may be able to assist you in obtaining this information. • Turn your phone OFF in health care facilities when any regulations posted in these areas instruct you to us Posted Facilities e Aircraft Turn your phone OFF in any facility where posted notices so require. -E ric • FCC regulations prohibit using your phone while in the air. • Switch OFF your phone before boarding an aircraft. ss on iii In c. No tf or co m Children where you would normally be advised to turn off your vehicle engine. Do not allow children to play with your phone. It contains small parts that could be detached and create a choking hazard, and children could hurt themselves or others, or could accidentally damage the phone. Blasting Areas m er ci To avoid interfering with blasting operation, turn your phone OFF when in a “blasting area” or in areas posted: “Turn off two-way radio.” Obey all signs and instructions. Potentially Explosive Atmospheres al Turn your phone OFF when in any area with a potentially explosive atmosphere and obey all signs and instructions. Sparks in such areas could cause an explosion or fire resulting in bodily injury or even death. Areas with a potentially explosive atmosphere are often, but not always, clearly marked. They include fuelling areas such as gasoline stations; below deck on boats; fuel or chemical transfer or storage facilities; vehicles using liquefied petroleum gas (such as propane or butane); areas where the air contains chemicals or particles, such as grain, dust, or metal powders; and any other area iv For Vehicles Equipped with an Air Bag An air bag inflates with great force. DO NOT place objects, including both installed or portable wireless equipment, in the area over the airbag or in the air bag deployment area. If in-vehicle wireless equipment is improperly installed and the air bag inflates, serious injury could result. Product Care us e • Do not expose your mobile phone to moisture or extreme temperatures. • Do not use any other accessories but Ericsson originals. Failure to do so may result in loss of performance, fire, electric shock or injury, and will void the warranty. -E • Do not attempt to disassemble the product. Doing so will void warranty. This product does not contain consumer serviceable components. Service should only be performed by Authorized Service Centers. ric ss • Do not allow objects to fall on, or liquids to spill on, products. on In c. No tf or co m . Battery Information • Do not let the metal contacts on the battery touch another metal object such as keys in your pocket. This could short-circuit and damage the battery. Recycling Your Battery • Do not attempt to take a battery apart. Your phone manufacturer is a member of the Rechargeable Battery Recycling Corporation (RBRC), a nonprofit public service organization designed to assist in the recycling of rechargeable batteries. • Do not expose a battery to open flame. This could cause the battery to explode. m er ci • Turn your phone OFF before removing the battery. • Use only the AC/DC adapter supplied with your battery charger. Using a different adapter could be dangerous and will void your phone warranty. Many areas require the recycling of rechargeable batteries. In the U.S., call 1-800-822-8837 to find out how to recycle your battery. Outside the U.S., contact your local retailer for recycling instructions. Battery Use and Care al A rechargeable battery has a long service life if treated properly. A new battery, or one that has not been used for a long period of time, should be conditioned before using your phone. Avoid recharging a fully-charged or almost fully-charged battery. This can result in the memory effect, which causes the battery to charge to less than its full capacity. If your phone shuts off due to low battery power, you should charge the battery within 24 hours for the battery to reach full capacity. • Do not leave your battery where it may be subjected to extremely hot or cold temperatures. This could reduce the battery’s capacity. • Never charge a battery when the ambient room temperature is below 50° F (10°C) or above 105°F (40°C). us • Do not allow the battery to be placed into the mouth. Battery electrolytes may be toxic if swallowed. e • Connect AC (power supply) only to designated power sources as marked on the product. -E • To reduce risk of damage, remove the electrical cord from the outlet by pulling the AC adapter rather than the cord. ric • Make sure the electric cord is located so that it will not be stepped on, tripped over, or otherwise subjected to damage or stress. ss • To reduce risk of electric shock, unplug the unit from the power source before attempting any cleaning. Once unplugged, use a soft cloth lightly dampened with water for cleaning. on v In c. No tf or co m • DANGER - Never alter the AC cord or plug. If the plub will not fit into the outlet, have a power outlet installed by a qualified electrician. Improper connection can result in risk of electric shock. m er ci al us e -E ric ss vi on In c. No tf or co m Some menus/features are operator dependent. Assembly Instructions This chapter describes how you assemble the phone, what the Subscriber Identity Module (SIM) Card is, and how you handle the battery. Step 1: Inserting the SIM Card Note! m About the SIM Card er ci Place the gold side down, clipped corner to left Contact your service provider if your phone is not equipped with a SIM card. The SIM Card is a computer circuit that keeps track of your phone number, the services that you have ordered from the service provider, and your phone book information. al Your SIM Card is supplied with a PIN (Personal Identification Number) that you may need to enter into the phone to gain access to the phone and network. Follow the six steps below to assemble your CF768. Preparing Your Phone – Six Steps 1 Insert the SIM Card (if not previously inserted). 2 Connect the battery to the phone. 3 Attach the belt clip to the phone (optional). 4 Connect the charger to the phone charger connector. 5 Connect the charger to a standard electrical outlet. 6 Turn the phone ON. us Removing the SIM Card e -E ric Step 2: Attaching the Battery About the Battery ss Your phone is supplied with a Nickel Metal Hydride (NiMH) battery. The battery is not charged before shipment, but there might be enough power to turn the phone on. on 1 In c. No tf or co m Some menus/features are operator dependent. m er ci Conditioning the Battery al The battery needs to be recharged and fully discharged 2-3 times to reach full capacity. To fully discharge the battery, operate the phone as usual until the low battery warning is issued. You hear a low beep and the light on top of the phone flashes red. Removing the Battery 1 Make sure the phone is turned off. 2 Press the locking catch on the bottom of the battery. 3 Lift the battery up and away from the phone. 2 us Step 3: Attaching the Belt Clip (optional) e Note! You will need a small phillips head screwdriver. 1 Remove the belt clip from the plastic bag. -E 2 Remove the flexible rubber plug from the top of the clip. ric ss on In c. No tf or co m Some menus/features are operator dependent. Disconnecting the Charger 3 Making sure that the screw is going through both the plastic clip and the metal support guide, insert the screw into the opening on the back of the phone. Lift the plug up and pull it out. Note! 4 Using the screwdriver, turn the screw clockwise until it is secure. Do not overtighten the screw. Do not twist the charger during disconnection. m 5 Insert the two smaller prongs first and replace the flexible rubber plug at the top of the clip. Step 4: Connecting the Charger Note! er ci Have the battery attached to the phone and connect the charger as shown below. Use the power plug that fits your electrical outlet. al With the lightning bolt on the charger, and the phone, facing upward, insert the plug in the hole on the right. Step 5: Connecting the Charger to an Electrical Outlet us e Connect the cord to the charger and plug the charger into an electrical outlet. The phone now starts to charge the battery and you can see the battery meter in the display empty and fill while charging. -E About the Charging Function When you connect external power to the phone, the battery begins charging. When the battery is fully charged, the charging stops. ric Note! You cannot overcharge your battery when using Ericsson accessories. Note! Your phone will still charge if powered OFF. ss When you are charging the battery, you can use your phone as you usually would; however, the charging time will be longer. on 3 In c. No tf or co m Some menus/features are operator dependent. Step 6: Turning ON the Phone Press and hold down the NO key until you hear a beep. You may be prompted to enter your PIN (the security code that follows your SIM Card). If 3,1, 3HONE /OCK, or /OCK&ODE appear in the display, enter your PIN and press YES. Note! m If your phone uses a retractable antenna, always remember to fully extend the antenna before using the phone Turning Off the Phone er ci Press and hold the NO key until you hear a beep and the display is dark. al us e -E ric ss 4 on In c. No tf or co m Some menus/features are operator dependent. What the Phone’s Display Tells You This section describes what your phone’s display indicates about your battery status and signal strength, and your service availability. The Display The forward arrow indicates that the phone has forward active. The arrows correspond to the line that is forwarded. m er ci The Silent Ring Signal indicates that no ring signal will sound when a call is incoming. The icons visible in the display are defined below. Not all icons will be visible at all times. al You have received a short text message or area information. us You are currently on a call. e 1ETWORK Indicates which line is activated. These icons only show if you have two lines on your SIM card. -E The Alarm Clock is set. The name of the network currently being used. The received signal strength in five steps- more bars indicate more strength. Current battery strength - more bars indicate more strength. ric You have received a voice mail message. ss on 5 In c. No tf or co m Some menus/features are operator dependent. Learning about Your Phone ➊ ➋ ➍ Display Messages ➊ Antenna ➋ Indicator Light ➌ Speaker ➍ Side Volume Keys ➌ ➎ Display ➏ ON/OFF Key ➎ ➐ Keypad ➏ ➑ Flip ➒ Microphone Channel ➐ ➊ Belt clip mounting area ➋ SIM release ➌ Battery ➍ Accessory Connector ➎ Battery Release m er ci al ➊ ➑ ➒ Message Meaning 1O1ETWORK This indicates that no network is in range. You are not covered by a network or the received signal is too weak. You should move to obtain a sufficiently strong signal. Do you want to check your voice mail messages? &HECK" us 5EAD" e ➋ Do you want to read your SMS messages? &ALL7RANSF ➌ ➎ ➍ 6 Text messages that may appear in the display are explained in the table below. /AST A conference call feature that indicates that a held and active call connected. You are no longer part of the call. -E Time spent on previous call. Will return to standby mode after 5 seconds. ric ON+OLD Call 1 is on hold. ON+OLD Call 2 is on hold. ss on In c. No tf or co m Message Some menus/features are operator dependent. 1O$CCESS A network is in range, but you are not allowed to use it. You may, however, call the emergency number 911, if it is available. 2NLY A network is in range, but you are not allowed to use this network. You may, however, call the emergency number 911, if it is available. 6EARCHING 6,0(RROR 8NBLOCK" ,NSERT&ARD Message Meaning :RONG3,1 The PIN has been entered incorrectly. This message is followed by the prompt (NTER Meaning m er ci al The phone is looking for a network, but you may call the emergency number 911, if it is available. The SIM card is permanently disabled after the unblocking code has been entered incorrectly ten times. Contact your service provider. This message appears if the PIN has been entered incorrectly three times in succession. Press YES, and enter Personal Unlocking Key (PUK) to unlock phone. No SIM card is inserted in the phone or the inserted SIM is not accepted. 3,1 &0'(RROR You have tried to activate a feature that is not supported by your network. 1OT$VAIL The feature or service is not available. 3HONE/OCK us &MD5EJECT e 1ETW3ROBL Followed by/OCK&ODE. To unlock, enter your security code and press # or YES. Command Reject. The command you gave was rejected. The cause of the error was a system failure. -E :RONG&ARD You have inserted the wrong SIM card. 3LEASE:AIT Your phone is processing. Please wait. ric 3WD(RROR Password Error. The password you sent was wrong. &ARD/OCK3,1 Enter your 4-to-8 digit PIN code and press YES. ss on 7 In c. No tf or co m Some menus/features are operator dependent. Special Characters Light Press and hold down the appropriate key to access the special characters. */P is used for inserting pauses in numerical sequences and when making your own ring signal melodies. m er ci 0/+ is used for international calling. #/¤ is used for storing numbers into the phone’s memory. P al The status indicator light at the top of the phone tells you the current state of the phone. There are six states. Light 8 Green - steady The battery is charging and the phone is ON. Red - blinking Your battery power is low. Red - steady The phone is OFF and the battery is charging. No light The phone is OFF, or the phone is ON, but no signal is available. us e The Indicator Light Indicates Green - slow blink The phone is ready to make and receive calls. Green - fast blink There is an incoming call. Indicates -E ric ss on In c. No tf or co m Some menus/features are operator dependent. Making and Receiving Calls &ONNECTING will be displayed briefly. Once the call is connected, the call counter (shown in minutes and seconds), and the phone icon will appear in the display. Making and Receiving Calls m This chapter describes how to make and receive calls, how to make emergency calls, how to show or hide your phone number when calling CLI (Calling Line Identification), and how to handle two calls simultaneously. Making a Call er ci al 1 Turn the telephone ON (press NO until the display comes on). 2 If the phone is equipped with a retractable antenna, fully extend the antenna. 3 Use the keypad to enter the number you wish to dial. As you press the number keys, the numbers appear in the display. Note! Note! If the number is longer than 10 digits, additional digits to scroll through will be appear as an arrow. Use the number. To erase a digit, press CLR. To erase an entire phone number, press and hold CLR, or press NO. 4 Press YES. The word &ALLING will briefly appear in the display while you are connecting the call. Holding the Phone With the flip open, put the earpiece to your ear for optimum speech and reception quality. Fully extend your antenna. Ending a Call us Press NO to end the call. Making an Emergency Call e You can call 911 (a common emergency service number in the U.S.) at any time (if the service is available in your area). -E Retry Function ric If the call connection fails, the display shows 5ETRY" Press YES to redial the number, otherwise press NO. Receiving a Call ss When you receive a call, the phone rings and the indicator light on the top of the phone blinks green rapidly. The display shows: $NSWER" on 9 In c. No tf or co m Some menus/features are operator dependent. About Calling Line Identification (CLI) Answering a Call Press YES to answer the call. When the call is finished, press NO to end the call. The Calling Line Identification service (CLI) shows the caller’s phone number when you receive a call (you may have to order this service). If the caller’s name and corresponding number is stored in your phone book, the name is displayed instead of the number. Rejecting a Call m Press NO or press either volume key twice when the phone rings. The display now shows: %USY7ONE er ci A busy tone will be sent to the system. If Call Forwarding is activated, the number will transfer to the designated number (such as voice mail). Sending Your Phone Number If your subscription normally hides your number/ID when calling, you can show the number on a designated call. If the calls are not forwarded, the caller will hear a busy tone. al If you have been unable to answer an incoming call, or if you have rejected a call, the calling line identification (caller id) of unanswered calls will be shown in the missed calls list until you press CLR (this is dependent on your subscription). Press YES to view the missed calls list. 1 Enter the number you wish to call. us 2 Press . The display shows 6END,D" 3 Press YES to make the call and send your phone number. e Hiding Your Phone Number Putting a Call on Hold If you are engaged in a call, you can put it on hold by pressing YES. ;ON+OLD (where ; is the call identity) will appear in the display. To retrieve the held call, press YES again. To mute the call, press and hold CLR. Release to resume conversation. This mutes the microphone so that you can have a private conversation without the person at the other end hearing. 10 - E If your subscription normally sends your number when calling, you can hide your number on a designated call. 1 Enter the number you wish to call. 2 Press ric twice. The display shows Hide Id? 3 Press YES to make the call and hide your phone number. ss on In c. No tf or co m Some menus/features are operator dependent. Handling Two Calls Making a Second Call While a Call Is in Progress Your phone can handle two calls simultaneously. This allows you to hold one call and make or receive another. You can then switch between the two calls. In order to receive a second call, you must activate the Call Wait function (see chapter “Personalizing Your Phone”). m er ci Enter the second phone number and press YES. The first call is put on hold and 2N+OLD appears in the display. Receiving a Third Call If you are engaged in one call and have a second one on hold, you may receive a third call. You will hear a tone in the ear piece, and &ALL:AIT is shown in the display. Receiving a Second Call While a Call Is in Progress When you receive a second call, you will hear a tone in the earpiece and the display shows &ALL:AIT. al You can only have one call on hold at a time, so you need to end the first or second call before you answer the call. 1 Press YES to answer the second call. The current call is put on hold. The display now shows: 2N+OLD 2 To reject the second call, press 0 (zero) followed by YES. 3 Ignore the call. Switching between Two Calls Press YES to switch between the two calls. Ending the Current Call and Returning to the Held Call 1 Press NO to end the current call. The display shows 5ETRIEVE" and you hear two beeps. 2 Press YES within three seconds to return to the held call. Note! If you do not press YES within three seconds, the held call is automatically ended. You can do one of the following: us • Press 0 (zero) followed by YES to reject the third call. e • End the first call, retrieve the held call, and answer the incoming call. • End both calls. The phone rings and the question $NSWER"appears in the display. Press YES to answer the call. -E • Ignore the third call. ric Making a Calling Card Call Before making a calling card call, you must first enter your calling card access number and your verification number. For more information, refer to “CallCards”. Steps 2 and 3 may be reversed depending on your calling card service. ss on 1 Dial the number you wish to call. 11 In c. No tf or co m Some menus/features are operator dependent. To Initiate a Conference Call 2 Press and hold down YES for three seconds. &ARD&ALL will appear 6END&ALLED1O" will 1 Call the first person you wish to talk to in the conference call. appear. 2 Place the person on hold by pressing YES. 3 Wait for prompt (tone or voice) to enter the number. 3 Call the second person. 4 Press YES. 6END9ER1O" will appear. After the prompt, press YES to send verification number. m Your call is now connected. Calling Voice Mail 4 Press 3, followed by YES to join the two people to the conversation. er ci Note! al If you have voice mail, the phone will automatically call your voice mailbox number when you select the voice mail menu. The number must be stored on your SIM card to use this feature. Contact your service provider for this number. Conference Calling Note! This service may not be available on all networks. In addition, a special subscription may be required to use the service. The Conference Call function allows you to have a joint conversation with up to five other people. You can put the conference group on hold and then add a third member by repeating steps 3 and 4. You can add up to five members using the same method. To Have a Private Conversation with One of the Members us e If you wish to have a private conversation with one of the members, you can put the other members on hold by pressing 2, the member’s number, and YES. For example, to talk to member No. 3, enter 2, 3, and YES. To join member No. 3 to the conference again, press 3 and YES. -E To Release One of the Members For example, to release member No. 1, enter 1, 1, and YES. This is also referred to as a Multiparty call. You may put an individual or a group of conference members on hold while you add other people to the conference call. You may also put members of the conference on hold while you talk to an individual. 12 ric 1 Press 1, the member’s number, and YES. ss 2 To end the conference call, press NO. on In c. No tf or co m Some menus/features are operator dependent. Transferring Calls This service may not be available on all networks. In addition, a special subscription may be required to use the service. If you have one active call and another call on hold, you can connect the two calls by pressing 4 and then YES. You are then disconnected from both calls. m er ci al us e -E ric ss on 13 In c. No tf or co m Some menus/features are operator dependent. Useful Information While Talking provider supports that service (see chapter “Knowing Price and Duration of Calls”). During a call, you can change the volume of the earpiece, use the display as a scratch pad, send DTMF tones, and check the duration of the current call. Changing Volume while Talking m Receiving a Second Call er ci You will hear a tone in the earpiece and the display will read &ALL:AIT. Press YES to answer the second call. To reject the second call, press 0 (zero) followed by YES, or simply ignore the call. During a call, you can use the volume keys on the side of the phone to increase or decrease the earpiece volume. Using the Phone as a Scratch Pad al 1 Enter a phone number on the keypad while talking. When you end the call, the number remains in the display. 2 Press YES to call the number in the display. Sending Tone Signals During a call, you can press keys 0 – 9, *, and # to send DTMF tones. This can be used for banking by phone or to control an answering machine. Checking Time or Cost of Calls When you start a call (incoming or outgoing), the airtime is counted in minutes and seconds and shown on the display, like this: If you want the phone to keep track of the cost, you need to set that specifically. Also check if your service 14 us e -E ric ss on In c. No tf or co m Some menus/features are operator dependent. Navigating the Menu System Note! This chapter describes how you navigate through the menu system to get maximum use of your phone, and how you can customize your reduced menu structure by adding or deleting different menus and submenus. Availability of some menu functions is dependent on your subscription. Some menus may be hidden if you do not subscribe to the feature. Enter: Key in letters or numbers from the keypad. See the menu structure diagram on the inside front cover of this User’s Guide. Extended Menu: The extended menu contains all functions and settings available from the phone. About the Menu System m er ci al You use a menu system to control the functions of your phone. There are two sizes of the menu system: 1 The reduced 2 The extended Note! Each time the phone is powered ON it activates the menu you last used. Glossary These terms will be used throughout this manual. Scroll: Press or to move between the menus. Select: Scroll to a menu and then press YES. Reduced Menu: The reduced menu consists of those functions and settings used most frequently. Customized Menu: The reduced menu system can be customized by adding or deleting other menus or submenus. us Moving Through the Menus e Use these keys to scroll through the menu system and to access the different menus. When you reach the desired menu, press YES to choose the menu. -E ric ss on 15 In c. No tf or co m Some menus/features are operator dependent. To: Confirm a setting or a selection Reject a setting or a function Return to the standby display Scroll to the right in the menu system Scroll to the left in the menu system several times until you reach the Menu Size 2 Press menu. 3 Press YES. Press this: Note! YES m 4 Press YES at the (XTEND" or 5EDUCE" prompt. NO e rc i Customizing Your Reduced Menu CLR The Reduced Menus About Customizing Menus al The reduced menu consists of those functions and settings used most frequently. This menu system can be personalized to fit your specific needs. When you personalize the system, menus and sub-menus are moved from the extended menu system to the reduced menu system. The Extended Menus The extended menu contains all functions and settings available from the phone. Selecting the Menu Size 1 Press CLR to clear the display. 16 You are now in the Menu Size menu where you can switch to the Extended menu mode. The reduced menu system can be customized by adding or deleting other menus or submenus. us When you are scrolling through the menus in customize mode, the menu names will be either blinking or stable, meaning that you may either add or delete (respectively) the menu from the reduced system. e Adding Menus -E 1 Select the Customize menu. 2 Select the Edit Menus submenu. 3 Scroll to, and select, the menu or submenu that you want to add (a menu where the name and icons are blinking). ric 4 Press and hold YES for three seconds. ss 5 $CCEPT3OS" appears. Press YES to accept the position (if you wish to change the position, see Changing Menu Position below). on 6 Repeat steps 3 and 4 to add more menus. In c. No tf or co m Some menus/features are operator dependent. 7 Press NO to end session. The reduced menu structure is reset to its original positions. 8 Press YES to update. Resetting All Functions to Factory Defaults Changing Menu Position Press NO when the $CCEPT3OS" prompt appears. The display could now show: 6TORE!" To reset all features (except numbers stored in the phone’s memory) to factory defaults, press: 73738 ) from standby mode. m This display above advises that the menu you want to add will be in the fourth (04) position to the right (>) in the reduced menu system. er ci Use the keypad to change the position number if the current position is not suitable. Deleting Menus 1 Select the Customize menu. 2 Select the Edit Menus submenu. al 3 Scroll to the menu you want to delete (a menu where the name is not blinking). 4 Press YES for three seconds. Note! The menu name is blinking; it no longer appears in the reduced menu system. 5 Repeat steps 3 and 4 to delete more menus. 6 Press NO or CLR to end session. 7 Press YES to update. Resetting Menus to Original 1 Choose the Customize menu. 2 Choose Reset. us e -E ric ss on 17 In c. No tf or co m Some menus/features are operator dependent. Creating Your Own Phone Book twice until 6TORE is shown and press This chapter describes how you can store phone numbers both on your SIM Card and in your phone’s own memory. About the Phone Book 2 Press twice. m er ci You can store your phone numbers both on your SIM Card and in your phone’s own memory. The difference between the two is you can remove the SIM Card and use those telephone numbers in other phones with SIM slots, while phone’s memory always stays the same no matter which SIM Card is inserted. al You can store up to 97 phone numbers in the phone memory. The number of phone numbers you can store on your SIM Card is SIM Card dependent. Speed Dialing The phone numbers that you store in positions 1–9 on the SIM Card can be called by entering the position number and then pressing YES. You should, therefore, save positions 1–9 for important numbers. The number of available positions is dependent on your SIM card. Enter the first letter of the name by pressing the appropriate numeric key as many times as required. Keys Press the corresponding key this many times to get the symbol. For example, press 2, 5 times to get Ä. 1 us 2 3 4 5 6 7 8 9 10 11 12 ) 1 1 space - ? ! , . : “ ‘ ( 2 A B C Å Ä Æ à Ç 2 Γ 3 D E F è É 3 ∆ ϑ 4 G H I ì 4 5 J K L 5 6 M N O Ñ 7 P Q R S 8 T U V Ü e -E ric Λ Ö Ø ò 6 β 7 P Σ ù 8 Storing Numbers on the SIM Card 1 Enter the phone number you wish to store. 18 YES ss on In c. No tf 9 0 # or co m W X Y Z 9 0 + & @ / # * Some menus/features are operator dependent. Storing Numbers in the Phone’s Memory $ % £ Θ Ξ Ψ Follow the the same procedure as storing a phone number on the SIM Card through step 4. When you are prompted to set the storage position number, press # once to enter the ¤ character (which indicates storage in phone memory) and twice to have the phone suggest the first available storage position. Ω m er ci Press YES to confirm the storage. Note! Enter the next letter when the cursor has moved to the next letter position. The number of letters the name field can contain is SIM Card dependent. al 3 Press YES after entering the name. The next available position will appear. 4 Press YES to confirm the position. 6TORED will appear. Note! If you have chosen a position number that is already occupied, 2VERWRITE" is displayed. Press YES to overwrite or NO to return to the position number and change it. 5 If you want to store the number in a different position, press CLR to erase the position number displayed. 6 Enter another number using the keypad. 7 Press YES. 6TORE will appear. 8 Press YES to end session. If you want to store the number in a different position, press CLR to erase the position number displayed and enter another number. About Recalling Phone Numbers us e You can recall a phone number any time from either the SIM Card or the phone memory. You can recall the phone number by either the name or the storage position number. Recalling by Name -E 1 Press CLR to erase any digits from the display. 2 Select the RecallName menu. You are prompted to enter a name. ric 3 Enter either the full name or the first letter, and press YES. ss The first name that matches the letter string is displayed. If necessary, scroll to the name you want. on 19 In c. No tf or co m Some menus/features are operator dependent. The selected name and number will blink on the display. You may press the * key to briefly display the position number. Note! Changing a Phone Book Entry 4 Press YES to call the number. 1 Select the EditPhBook menu. m Recalling by Number – Speed Dialing 2 Enter either the full name or the first letter and press YES. 1 Press CLR to erase any digits from the display. er ci The first name that matches the letter string is displayed. If necessary, scroll to the desired name and press YES. 2 Enter a position number between 1 and 9. 3 Press YES to make the call. Note! For quick access to the phone book, press 1, # and scroll through list. Position Recall From the SIM Card 1 Enter the position number and press #. 2 Press YES to call the number, or scroll until you find the number you want to call and press YES. 3 Press CLR to return to the standby display with the number showing. al 3 Scroll through the name to change it letter by letter and press YES. The phone number is displayed. us 4 Scroll through the phone number to change it digit by digit and press YES. The position number is displayed. 5 Enter a new position number and press YES. e 6 If the new position is already occupied, you will be asked to 2VERWRITE" the position. Press YES to confirm, and NO to change the position. -E Deleting Storage Position 4 Press NO to return to the standby display. 1 Select the RecallName menu. From the Phone’s Memory 2 Scroll through the list and choose the name you want to delete. Press and hold CLR. 1 Press and hold # until the ¤ symbol is shown. 3 Press YES at the Erase prompt. Erased will appear. 2 Enter the position number. 3 Press # to recall the number. 4 Press YES to call the number, or scroll until you find the number you want to call and press YES. 20 If a number is stored under multiple names, the phone will find the first alphabetical occurrence. ric About Last Dialed Numbers ss on Your phone can store a maximum of the 10 last dialed numbers. In c. No tf or co m Some menus/features are operator dependent. Recalling From the List of Last Dialed Numbers 1 Press CLR to erase any digits from the display. 2 Press YES. The number last called is shown. 3 Press YES to call the number or scroll to the number you want to call. About Unanswered Calls m er ci Sometimes you are unable to answer a call. The phone keeps track of your latest missed calls in the MissedCall menu. Checking Unanswered Calls al 1 Select the MissedCall menu to see the time of the missed call. 2 Press YES to see who the call is from (CLI). 3 Press and hold YES to call the displayed number. 4 Press CLR to erase the call. Note! Press YES when &ALLS; is displayed to go directly to the missed calls list. us e -E ric ss on 21 In c. No tf or co m Some menus/features are operator dependent. Personalizing Your Phone This chapter describes all the different ways you can personalize your phone. Changing the Ring Volume er ci 3 Press YES when you are finished. 2 Scroll to the desired ring volume, and press YES. al Changing the Ring Type Use the volume keys on the side of the phone to scroll silently. Turning Off the Ring Volume 1 Select the Ring Vol menu. 2 Press until no squares are lit and press This does not affect the current call. 2 Press to increase the volume or to decrease the volume, or use the buttons on the side of the phone. m 1 Select the Ring Vol menu. Note! Note! YES. The standby display now shows: us You can choose between different types of ring signals. You also have the opportunity to choose a melody that you have created yourself. See chapter “Making Your Personal Ring Signal”. e 1 Select the Settings menu. 2 Select the Ring Type submenu. The display now shows the current setting. -E 3 Press the or to listen to the different ring types. Use the volume keys to scroll silently. ric 4 Press YES to select your preferred ring type. Changing Ear Volume 1 Select Ear Volume in the Settings menu. The display now shows the current setting. 22 Changing the Key Sound ss 1 Select the Settings menu. 2 Select the Key Sound submenu. on In c. No tf or co m Some menus/features are operator dependent. 3 Scroll through the menus until you find the desired key sound. Using the Alarm 4 Press YES to select. Viewing the Clock Setting the Alarm 1 Select the Set Alarm menu. The last alarm time is shown. m 2 Enter the alarm time. If you want to view the time on your phone, press one of the volume keys on the side of the phone. Setting the Clock 1 Select the Settings menu. er ci al 2 Select the Set Clock submenu. The display shows the time: AM. 3 Follow the instruction table below on how to set the clock (set hours before the minutes). To Change This: Do This: Hours & Minutes Press the number keys. Use and to change only the hours. AM or PM Press the * button to toggle. 12-Hours or 24-Hours Press the # to toggle. 4 Press YES to set the time. 3 Press YES. Note! Your alarm works even though the phone is turned off. When the Alarm Rings 1 Press any key and the 7URN2FF prompt appears. us 2 Press YES to turn it off completely or any other key to activate the snooze function (9 minutes). Turning Off the Alarm e 1 Select the Set Alarm menu. The Off prompt appears. 2 Press YES. -E About Display Language ric Your phone supports multiple languages you can choose for your display. Note! ss When you change languages, you change all display texts immediately. on 23 In c. No tf or co m Some menus/features are operator dependent. Changing Display Language Note! 1 Select the Settings menu. Turning off the handsfree option, choose Off in the Answ Mode submenu. 2 Select the Language submenu. 3 Scroll to the language you want to view in your display texts. About the Greeting m 4 Press YES to select the language. Resetting Display Language to English 1 Clear the display. 2 Enter the digit string Note! er ci 0000. 3 Press YES. About Answering Modes with Handsfree This feature is dependent on your subscription. If the greeting is not programmed, the default will be (RICSSON. Off: No text is displayed at startup. al Two additional answering modes are available when your phone is connected to handsfree equipment. The two modes are: On: :ELCOME or your own message is displayed at startup. Making Your Own Greeting us 1 Select the Settings menu. 2 Select the Greetings submenu. The display now shows: e 1 Automatic: The phone answers the call automatically after two ring signals. 3 Select New Text. -E 4 Enter the new text from your keypad using the table below and press YES. 2 Any key: You answer by pressing any key, except NO, on the phone’s keypad. Changing the Answering Mode 1EW7EXT Keys 1 Select the Settings menu. 2 Select the Answ Mode submenu. 3 Select the option you wish to have for your handsfree equipment. 24 1 ric Press the corresponding key this many times to get the symbol. For example, press 2, 5 times to get Ä. 1 2 3 4 space - ? ! ss 5 6 7 8 9 , . : “ ‘ 10 11 on ( ) 12 1 In c. No tf 2 3 or co m Some menus/features are operator dependent. A B C Å Ä Æ à Ç D E F è É 3 ∆ ϑ Activating/Deactivating the Call Waiting Function Γ 1 Select the Settings menu. 2 Select the Call Wait submenu. 3 Select either Activate or Cancel. G H I ì 4 5 J K L 5 Λ 6 M N O Ñ Ö Ø ò 7 P Q R S β 7 P 8 T U V Ü ù 8 9 W X Y Z 9 0 0 + & @ / # # * 4 2 m $ % About Calling Information er ci This function lets you present call information in either time or cost. To set the cost and time counter, see chapter “Knowing Price and Duration of Calls”. 6 Σ £ al Θ Ξ Ψ Ω About Call Waiting The call waiting function, when activated, allows you to handle two calls at a time. You may need to order this feature from your service provider. To handle two calls, see chapter “Handling Two Calls”. Activating Calling Information us 1 Select the Settings menu. 2 Select Call Info. e 3 Select the calling information (cost or time) you want displayed and press YES. -E ric ss on 25 In c. No tf or co m Some menus/features are operator dependent. Forwarding Calls This chapter describes the Forward function when you have not turned on the data menus. About Forwarding Calls m er ci Note! Forwarding from Reduced Menu When supported by your service provider, you can use the Forward menu to forward your calls to another number, such as your voice mailbox number or home phone number. Note! Forwarded calls are indicated by an arrow. al If your SIM Card and your service provider support two lines, you need to set each line separately. Here we assume you have one line. The Forward service lets you forward: • All calls: whether your telephone is turned on or off. • Unanswered calls: if you do not answer within 30 seconds, if your phone is busy, turned off, or out of reach of a network. You can forward calls both from the reduced and extended menu. In the reduced menu you can only forward calls to one phone number; while in the extended menu, you define how you want your calls forwarded, i.e. which number and which type of calls. 1 Select the Forward? menu. 2 You are prompted to enter a number (if you have not previously entered a number). Or you can press the us key to enter a name. 3 Enter the desired number (or name) at the prompt and press YES. e 4 There may be a short delay before the network responds and your display will read: 3LEASEWAIT FOLLOWED by a Forward message and phone number. Note! The Forward? menu changes into FwdOff? when the Forward is active. -E ric Forwarding from Extended Menu ss 1 Select the FwdL1 or FwdL2 menu. 2 Select a Forward option. 3 Choose Activate and press YES. 26 on In c. No tf or co m Some menus/features are operator dependent. You may now do one of the following: 2 Select the Forward option you wish to cancel and choose Cancel. • Enter a number at the prompt where you want your calls to be Forwarded, including the area code, and press YES. There may be a short delay before the network responds, but your display will advise that your forward is cancelled. • Press the to enter a name from your phone book and press YES. m • Use the phone number that is suggested and press YES. er ci You will only get a number suggested if you have previously activated the forward function. There may be a short delay before the network responds to your Forward option, and your display will advise you when the Forward is active (on or off). Viewing Status of Call Forward al 1 Select the FwdLine menu. 2 Select the Forward option you wish to view and choose GetStatus. There may be a short delay before the network responds, and your display will advise you which Forward is active (on or off). Canceling Call Forward 1 Select the FwdLine menu. us e -E ric ss on 27 In c. No tf or co m Some menus/features are operator dependent. Protecting Your Keypad, Phone, and SIM Card Protecting Your Keypad, Phone, and SIM Card enter to gain access to and activate your subscription. PIN 2, which may also be obtained, is used with special functions, such as price. m This chapter describes the different locks that you can use to protect your phone. These are the only ways of protecting your phone in case of theft. About Locks er ci Your phone has three types of locks: • Card lock • Phone lock • CallCard lock 1 Select the Locks menu. 2 Select the CardLock submenu. al The card, phone, and callcard locks are found in the Locks menu . Card Lock (SIM) 3 Select NewPIN. 4 Enter the old PIN at the prompt and press YES. 5 Enter the new PIN and press YES. us 6 Repeat the new PIN at the prompt and press YES. e Unblocking with PUK If you have entered the PIN incorrectly three times in a row, the display will show: 38.: -E The card lock protects your SIM Card. When the card lock is active, you will always be prompted to enter your PIN at startup. 1 Enter your PUK and press YES. PINs and PUKs If you entered both the PUK and the PIN correctly, the display will read: 1EW3,1 When you buy your SIM Card, you will normally obtain a 4 to 8-digit PIN (Personal Identification Number) and an 8-digit PUK (Personal Unblocking Key) from your carrier. If your SIM card allows it, you can turn off the card lock. The PIN is the code that you 28 Changing your PIN 2 Enter a new PIN at the prompt and press YES. ric 3 Repeat the new PIN at the prompt and press YES. Note! ss Some carriers may require a new PUK to unblock. on In c. No tf or co m Some menus/features are operator dependent. Phone Lock The phone lock protects the phone from unauthorized use. The phone lock is not activated when you buy the phone. To unlock the phone, choose Unlock in the Locks menu. CallCard Lock • Autolock: you must enter the phone lock code every time you change the SIM Card in the phone. The CallCard Lock stores your calling card access phone number and your verification code and protects your calling card against unauthorized use. There are two submenus in the CallCard Lock menu: • Full lock: you must enter the phone lock code every time you turn on the phone. • Security - use this submenu to change your security code; and to turn your cards on and off. These are the two types of phone locks: m er ci Changing the Phone Lock Code 1 Select the Locks menu. 2 Select the PhoneLock submenu. 3 Select New Code. al 4 Enter 0000 at the prompt (the factory default code) or your own code and press YES. 5 Key in a 4 to 8-digit personal code at the prompt and press YES. 6 Repeat the new code at the prompt and press YES. Locking and Unlocking the Phone 1 Select the Locks menu. • Positions - use this submenu to select which card will be the active card and to store your access numbers and verification numbers. There are two positions: Card1 and Card2. us Accessing CallCards e 1 From the Lock menu, select CallCards. 2 Select Security. 3 Enter your security code (0000 is the default). -E Note! This security code will be changed separately from the phone lock code. It can be between 4 and 8 digits. ric Changing Code 2 Select the Phone Lock submenu. 1 From the Security submenu, choose Change Codes. 3 Select the desired lock option, Auto Lock, for example. 2 Enter your new code. Press YES. 4 Enter 0000 (the factory default code) or your own phone lock code at the prompt and press YES. 3 Repeat your new code for verification. Press YES. ss 1EW&ODE will be displayed. on 29 In c. No tf or co m Some menus/features are operator dependent. Turning Cards ON and OFF From the Security submenu, choose Cards ON or Cards OFF. Changing Positions 1 From the Locks menu, select CallCards. 2 Select Positions. m 3 Enter your security code. er ci 4 Choose Position 1 or Position 2 by pressing YES. Use to toggle between position numbers. Note! If one card is currently active the display will read &ARD ; (On). 5 At the prompt, enter your Access Number (calling card service telephone number). Press YES. al 6 At the prompt, enter your verification number (calling card PIN) and press YES. 7 Select which order the numbers should be sent. &ALLD refers to the number you are calling. &ALLD!9ER" or9ER!&ALLD" Note! Refer to your calling card carrier for the appropriate sequence. 8 Press YES to store this information. 6TOREDwill appear. 9 If the card you are editing is not already selected as your active card, 6EL&ARD; will appear. 10 Press YES to accept that position. 11 Press NO to keep the original setting. 30 us e -E ric ss on In c. No tf or co m Some menus/features are operator dependent. Barring (Restricting) Calls Activating Call Barring for Any Call Type This chapter describes how you can bar (restrict) calls to and from your phone. This feature is available in your phone, but it may not be supported in your subscription. About Barring Calls 1 Select the Barring menu. m er ci 2 Select either Incoming or Outgoing call bar. 3 Select the desired barring option. 4 Select Activate. 5 Enter your password (provided with your subscription) and press YES. The call barring service allows you to control which kind of calls can be made to or from your phone. This feature is convenient if you lend your phone to somebody else. Note! This feature is GSM 1900 service dependent. Barring Options al Your phone supports the following barring options (but your subscription may not support all): • all outgoing calls – you cannot make any calls. • all outgoing international calls – you cannot make any international calls. • all outgoing international calls except to your home country – you cannot make any international calls except to the SIM Card home country. • all incoming calls – you will not receive any calls. • all incoming calls when you are roaming – you will not receive any calls when abroad. To activate any of the barring functions, you need a password that comes with your subscription. Note! us There may be a short delay before the network responds. Your display will show you which call bars have been activated. Press CLR to stop the responses from the network. e Canceling Call Barring 1 Select the Barring menu. -E 2 Select the Cancel All option. 3 Enter your password at the prompt and press YES. 4 Press CLR to stop the responses from the network. ric ss on 31 In c. No tf or co m Some menus/features are operator dependent. Sending and Receiving Text Messages This chapter describes Short Message Service (SMS), what you need to do before you can send messages, how you send messages, and how you read messages. This service is network dependent. About Text Messages m er ci al After a message is received, it remains in the phone’s memory, which works similar to a computer’s working memory. It remains in the phone’s memory until you read it. You can even turn off the phone and the message will remain intact. If you, on the other hand, change the SIM Card, you will lose the unread message because messages are considered personal. 32 Call your service provider to see which services your subscription supports, or check the service provider’s manual. Setting Service Center Address The SMS function allows you to send and receive text messages that contain up to 160 characters. Text messages can be received when the phone is in standby mode, when you are engaged in a call, or when incoming calls are forwarded to another phone number. Also, if your phone is turned off, the network will keep track of the message and send it to your phone soon after it is turned on. Note! Checking Your Subscription You need to set the service center number before you can send any messages. If you only want to receive messages, you do not need to do anything. 1 Check the service center address (number) for your service provider. 2 Select Options in the Send menu. us 3 Select Serv Cent. e Note! 4 Enter the service center address (number) and press YES. Most systems will require the international prefix at the beginning of the number. Press and hold zero (0) to get the + symbol. -E Sending a Message (SMS) ric 1 Select the Send menu. 2 Select the New submenu. ss 3 Enter your message and press YES. You can also enter a phone number. 4 Enter the phone number, or press to enter a name you want to send to and press YES. The display now shows: 6ENT on In c. No tf or co m Some menus/features are operator dependent. Setting the Duration of the Message Receiving a Message You will also hear a beep as loud as the ring signal and the green light on top of the phone will flash. You will receive the text message: 5EAD 1 Select the Send menu. 2 Select the Options submenu. 3 Select Valid Per. 4 Select how long you want the message to be repeated. Reading an Incoming Message The service center repeats the message for the set duration or until the receiver can receive it. 1 Press YES when you have received a message. m About Other Message Types er ci The display will show the date of the incoming SMS, you can see the time by pressing *. 2 Press YES. The display will show from which phone number the message is sent, or the name if stored in your phone book. If your service supports it, you can send an SMS from the phone to the service center and the service center can change the message into the following types : al • E-Mail (the address cannot contain more than 20 characters) • Telex • Fax (Both group 3 and 4) • X400 • Voice Changing the Message Type 1 Select the Send menu. 2 Select the Options submenu. 3 Select Msg Type. 4 Select the desired message type. 3 Press to read the message. us After Reading an Incoming Message 1 Call a phone number in the message by pressing YES. e 2 Erase the message by pressing YES at the erase prompt. 3 Reply to the message if your service supports it. -E 4 Store the message by pressing NO at the erase prompt (you may get a reply prompt if the sender has requested a reply). Press YES at the Store prompt and the message is stored on the SIM. ric Erasing a Message Press CLR any time during the message and press YES . ss Reading an Old Message 1 Select the Read menu. on 2 Scroll to the message you want to read and press YES. 33 In c. No tf or co m Some menus/features are operator dependent. Receiving Area Information This chapter describes how you can make your phone available for Area Information (AI). This service is network dependent. About Area Information 3 Press m er ci to find the first empty position and press al Code us Index 010 Flashes 020 022 Activating the Area Information 1 From the Area menu, select Area Info submenu. Title 000 By default, AI is turned OFF. e Hospitals -E Doctors Pharmacy 030 Long distance road reports 032 Local road reports 034 Taxis Adding a Code 34 ric 024 2 Select ON. 1 Select the Area Info submenu. YES. 4 Enter a new code and press YES. The following message types are default for some networks: While the SMS function is a personal service with messages directed to you, the Area Information is a broadcast type message that is sent to all subscribers in an area, for example a section of a city, at the same time. You can set your phone to receive only those types of messages you want to listen to, e.g.: the local weather forecast or the local traffic report. Each message is identified by a 3digit code. Check with your service provider for which message types are available in your network. Note! 2 Select EditList. ss on In c. No tf or co m Code 040 050 Some menus/features are operator dependent. 2 Select Edit List. Title 3 Scroll to the position (to the left in the display) you wish to change and press YES. Weather District 4 Scroll to New Code and press YES. 5 Enter the new code and press YES. m 052 Network information 054 Operator services 056 Directory inquiries (national) 057 Directory inquiries (international) 058 Customer care (national) 059 Customer care (international) er ci al Erasing a Code 1 Select the Area Info submenu. 2 Select Edit List. 3 Scroll to the position (to the left in the display) you wish to erase and press YES. 4 Press YES at the erase prompt. Changing a Code 1 Select the Area Info submenu. us e -E ric ss on 35 In c. No tf or co m Some menus/features are operator dependent. Knowing the Price and Duration of Your Calls The duration of the call appears in the display after a call is finished. The total time of all calls is recorded in the phone and is the default setting. This chapter describes how you can keep track of the cost and duration of your calls. m About Cost and Duration of Calls er ci Setting Calling Information 1 Select the Settings menu. Your phone is capable of keeping track of the following: • Total Calls: This feature shows the total time of all calls, in hours and minutes, since the meter was last set. al • Outgoing Calls: This feature tracks the time of all your outgoing calls, in hours and minutes, since the meter was last set. • Last Call: This feature tracks the duration of your last call, in minutes and seconds. • Cost: This feature shows the total cost of all calls (incoming or outgoing) in the currency of your choice. The maximum cost that can be shown is 9999999 in any currency. The default setting for the phone is the time keeper, while the cost meter can be set if your network supports that feature (you will need a PIN 2 to activate the cost meter). The cost meter can be set in a currency of your choice. Note! Not all service providers support the cost function. 2 Select the Call Info submenu. 3 Select either Cost or Time Info menu. Viewing Calling Information us There are two ways to view the calling information: e 1 Look in the display for the duration or cost of your last call when it has ended. 2 Select the Info menu to view all options. -E Resetting a Call Meter ric 1 Select the Info menu. 2 Scroll to the meter option you want to reset and press YES. ss 3 Press YES at the Reset prompt. Setting the Cost Counter 1 Select the Settings menu. 36 on In c. No tf or co m Some menus/features are operator dependent. 2 Select the Call Info. menu. 3 Select Cost? 4 Select Info. menu. 5 Select the Set Price submenu. The display shows the current currency and price: &URR86' m 6 Press CLR to delete the currency name. 7 Enter a new currency name and press YES. er ci The new currency and the old price will appear in the display: &$' 8 Press YES again to enter a new price. al The display will now show the new currency name and a blank space: &$'@ 9 Enter a new price (press * to get a decimal mark). 10 Enter PIN2 at the prompt. 11 Press YES. The display will show the new currency name and price. us e -E ric ss on 37 In c. No tf or co m Some menus/features are operator dependent. Specific Data Menus • Fax calls This chapter describes the different data menus that you can turn on to enable you to receive data and fax calls. You will also learn to forward the different calls. m About Having Data Menus On er ci • Data calls • All numbers (including speech calls) Forwarding Data Calls 1 Make sure the Data menus are on. 2 Select the ForwData menu. Your phone is prepared to send and receive data and fax messages in connection with an Ericsson Mobile Office solution. You need to activate the data menus to send data and faxes. Note! al Instructions on how to use the Speech>FAX and Next Call menus are contained in the Ericsson Mobile Office Solution. Activating Data Menus 1 Select the Settings menu. 3 Select Activate. You may now do one of the following: us 4 Enter a number where you want your calls to be forwarded, including the area code, and press YES. e 2 Select the Data Menus submenu. 3 Select the On option. Your phone will now have a new menu structure in the extended mode. Note! 5 Press to enter a name from your phone book and press YES. 6 Use the phone number that is suggested to you and press YES. You will only get a number suggested when you have previously activated the forward function before. -E Forwarding Fax Calls About Forwarding Fax and Data Calls You can choose to divert the following, each to a different telephone number if you wish: 38 ric There may be a short delay before the network responds to your forward option. ss 1 Make sure the Data menus are on. 2 Select the Forward Fax menu. 3 Select Activate. on In c. No tf or co m Some menus/features are operator dependent. You may now do one of the following: 4 Enter a number where you want your calls to be forwarded, including the area code, and press YES. 5 Press to enter a name from your phone book and press YES. m 6 Use the phone number that is suggested to you and press YES. You will only get a number suggested if you have activated the divert function before. Note! er ci There may be a short delay before the network responds to your divert option. al us e -E ric ss on 39 In c. No tf or co m Some menus/features are operator dependent. Other Networks This chapter describes how you select a different network when you are out of range of your home service provider’s network. About Choosing a Network Display m er ci When you turn on the phone, it selects its home network. If this is not within range, you might not be able to get any reception. You can choose a different network, provided your service provider has an agreement allowing you to use the network. This is called roaming. al When you select the Networks menu, the phone automatically searches for all networks present in the area you are in. For each network that is found, a status indicator tells you whether the network is available or forbidden. See the list below for a description of the status indication: 'ISPLAY0EANING Display Meaning Network and # home network Network and * currently used network 40 Meaning Network and A other available networks Network and S other available network (given priority by your home service provider) Network and F forbidden networks us Auto automatic network search e Auto is the basic setting for the network search and selection. This setting means that your phone takes care of all the network search and selection. -E Selecting a Network 1 Select the Networks menu. ric The phone performs a network search and the display shows the current network followed by the network list. ss 2 Scroll through the network list to see which networks are available. on In c. No tf or co m Some menus/features are operator dependent. 3 Press YES to select a network. When you have made a network selection, Networks? is shown whenever the phone cannot contact the desired network. You can now either: 4 Select a new network or set the phone in automatic search mode. m er ci Setting the Phone to perform an Automatic Network Search 1 Select the Networks menu. 2 Scroll, after the search, to Auto and press YES. al us e -E ric ss on 41 In c. No tf or co m Some menus/features are operator dependent. Making Your Personal Ring Signal This chapter describes how you can make your own ring signal. You will find one example of how to make a simple melody and one example of a more complex melody. You will also find a table of sample melodies that you can use. Press This: m To: er ci 1-9 Insert notes where 1 gives a C and 9 a high D. # Increase or decrease the pitch in half tone steps. Press once to get a sharp (#), twice for a flat (B), or three times to get the normal pitch. * Insert a short pause. Scroll within the melody. Press and hold to get to the beginning or end of the melody. 0 Get either a higher or lower octave for the note you have inserted. You know it is higher if a plus sign is added in front of the note name. 42 Press This: To: Erase the note to the left of the cursor, If you press and hold CLR, the whole melody is erased. CLR Musical Keypad al us This musical illustration helps you understand which key corresponds with which note on the keypad. e -E ric ss on In c. No tf or co m Some menus/features are operator dependent. Simple Melody 8 Press the 4 key twice. The simple melody is Do-Re-Me. This song corresponds to the C, D, and E tones on a music scale. 9 Press the 3 key twice. Making Do-Re-Me 11 Press and hold down the 1 key until a C+ appears. 10 Press the 2 key twice. 1 Select Edit Melody in the Settings menu. 12 Press YES to test the melody. 2 Press the 1 key. The display will now show a c. 13 Press YES to store the melody as an alternative in the Ring Type menu. 3 Press the 2 key. m 4 Press the 3 key. er ci Note! Slow down a melody by adding pauses between each key press. 5 Press YES to test the melody. The phone plays the melody and asks you if you want to save the melody. al 6 Press YES to save the melody as an alternative in the Ring Type menu. Complex Melody The complex melody is Twinkle, Twinkle Little Star — first section. This section corresponds to F, F, C, C, D and C tones on a music scale. Making Twinkle, Twinkle Little Star 1 Select the Settings menu. 2 Select the Edit Melody submenu. 3 Press the 1 key twice. 4 Press the 5 key twice. 5 Press the 6 key twice. 6 Press the 5 key once. 7 Press the * key once. us e -E ric ss on 43 In c. No tf or co m Some menus/features are operator dependent. Other Things You Should Know Note! This section contains additional information you may find helpful when using your phone, as well as a troubleshooting section. m er ci Purchasing Accessories To purchase Ericsson Original Accessories, in the US, call 800-ERICSSON (800-374-2776); outside the US, call 1-919-472-7908. In Canada, call 800-661-4201. The color code for your phone and accessories is yellow and the phone series reference is CF 700. Master Reset al To reset your phone to the factory defaults, enter the fol73738 from standby mode. lowing sequence: Master Language Reset To reset the language to the default (English), enter the 0000 following sequence: Key Associated DTMF Tones 2 A B C 3 D E F 4 G H I K L N O us 5 J 6 M 7 P 8 T 9 W e DTMF Tones for Data Entry Your phone automatically sends DTMF tones during a call whenever you press a key, regardless of most other phone settings. When entering letters into an electronic system in the U.S., the DTMF tones correspond to the following keys: 44 The DTMF tones may not match the letters indicated on the phone keypad. -E Q R U V X Y Questions and Inquiries S ric Z ss If the Problems You Can Solve section does not address your specific question, please contact 800-ERICSSON (North American); or 1-919-472-7908 (all other on In c. No tf or co m Some menus/features are operator dependent. You’ve Forgotten your Security Codes countries). 1-305-755-6789 (Latin America). Contact your dealer. Your SIM is Locked Problems You Can Solve If you are missing menus Enter your 4 to 8-digit PIN and press YES. m For more information on SIM Lock see chapter “Protecting Your Keypad, Phone, and SIM Card”. er ci Some menu/features are SIM dependent. Check with your service provider to learn more about available features. Your phone will not power ON al Your battery may need recharging or replacing. Allow your phone to charge several minutes before attempting to power ON. Your Phone is Locked Enter your personal 4-to 8-digit security code and press # or YES. For more information on Phone Lock, see chapter “Protecting Your Keypad, Phone, and SIM Card”. You Cannot Find all Menus Discussed in the Manual Some menus may not be available on your network or you may have your menus set to reduced mode. To expand your menus, choose Menu Size and choose Extend? The Indicator Light Blinks Red This indicates that the battery is becoming exhausted and needs recharging or replacing. You’ve Lost Your SIM us Contact your dealer. e -E ric ss on 45 In c. No tf or co m Some menus/features are operator dependent. m er ci al us e -E ric ss 46 on In c. No tf or co m Index A $ODUP $UHD,QIRUPDWLRQ $VVHPEO\ m al F )D[ )RUZDUGLQJ&DOOV GDWD ID[ Y us LY C 'DWD0HQXV 'LDJUDP 'LVSOD\ LFRQV ODQJXDJH G *UHHWLQJ -E H ric I +DQGVIUHH +ROG D e LY ss ,QGLFDWRU/LJKW Y &DOO5HWU\ &DOO:DLWLQJ &DOOLQJ&DUG&DOOV &DOOLQJ,QIRUPDWLRQ &DOOLQJ/LQH,QGHQWLILFDWLRQ&/, &DOOV DQVZHULQJ (DU9ROXPH (PHUJHQF\&DOOV (QGLQJ ([WHQGHG0HQXV er ci E B %DUULQJ5HVWULFWLQJ&DOOV %DWWHU\ DWWDFKLQJ FRQGLWLRQLQJ UHF\FOLQJ UHPRYLQJ XVHDQGFDUH %HOW&OLS %ODVWLQJ FDQFHOLQJFDOOIRUZDUG FRQIHUHQFH GXUDWLRQ HPHUJHQF\ HQGLQJ IRUZDUGLQJ PDNLQJ SULFH UHFHLYLQJ UHMHFWLQJ WUDQVIHUULQJ &KDUJHU FRQQHFWLQJGLVFRQQHFWLQJ &KLOGUHQ &/, &ORFN &RQIHUHQFH&DOOLQJ on In c. No tf K or co m 1HWZRUNV L O /DVW'LDOHG/LVW /RFNV FDOOFDUGV SKRQHORFN M 0DNLQJ&DOOV 0HQX6\VWHP DERXW FXVWRPL]LQJ H[WHQGHG JORVVDU\ QDYLJDWLQJ UHGXFHG UHVHWWLQJWRGHIDXOW 0HVVDJHV HPDLO ID[ WHOH[ YRLFHO [ 0XVLFDO.H\SDG 5HFHLYLQJ&DOOV 5HGXFHG0HQXV 5HPRYLQJ 5HVWULFWLQJ%DUULQJ&DOOV 5LQJ6LJQDO 5LQJ7\SH 5LQJ9ROXPH N .H\6RXQG m 212)) P er ci 3DFHPDNHUV L L 3HUVRQDO5LQJ6LJQDO 3KRQH GLDJUDP KROGLQJ 3KRQH%RRN DERXW FUHDWLQJ GHOHWLQJHQWULHV UHFDOOLQJQDPHV UHFDOOLQJQXPEHUV 3,1 3UREOHPV<RX&DQ6ROYH 3URGXFW&DUH L Y 38. al R 5HFDOOLQJ1DPHV 5HFDOOLQJ1XPEHUV S us 6DIHW\*XLGHOLQHV L 6KRUW0HVVDJH6HUYLFH606 6SHFLDO&KDUDFWHUV 6ZLWFKLQJ T e 7H[W0HVVDJHV 7UDQVIHUULQJ&DOOV 7URXEOHVKRRWLQJ 7ZR&DOOV -E U ric 8QDQVZHUHG&DOOV V 9RLFH0DLO ss on In c. t f o N o Changing Ring Volume Setting the Alarm Or press L until no squares are lit to eliminate the ring. Select Ring Vol menu. Scroll to desired ring level. Press YES. ERICSSON Z r c o m Select the Set Alarm menu. Enter the alarm time. Calls Press YES. a l Press CLR, release to resume. Muting Press YES at Turn OFF? When the Alarm Sounds Recalling Numbers From Phone Book Enter the phone number you wish to store. Press L twice until Store appears. Press YES twice. Enter the name using the keypad. Press YES to enter. Press # twice to enter ¤¤ (indicates phone book). Press YES. Storing Numbers in Phone Book Press and hold # until ¤ is shown. Enter the position number. Press # to recall the number. Press YES to call the number. Some menus/features are operator dependent. Enter position number and press #. Press YES to call. Recalling Numbers From SIM Enter the phone number you wish to store. Press L twice until Store appears. Press YES twice. Enter the name using the letters on the keypad. Press YES to enter. Press YES to confirm position. Storing Numbers on SIM Call the first person. Press YES to put person 1 on hold. Call the second person. Press 3, then YES to join all. Conference Calling Press YES when you receive the message. Press YES to see the senders name or number. Press R to read the message. Receiving an SMS Select the Send menu. Select the New submenu. Enter your message and press YES. Enter the phone number. Press YES to send. Sending an SMS u s e e r c i m E I n c . s o n r i c s QUICK REFERENCE CF768