1
MODEL
AM-400
DIGITAL MULTIFUNCTIONAL SYSTEM
ONLINE GUIDE
1. Installation
2. Copying
3. Sending Faxes
4. Receiving Faxes
5. Special Fax Functions
6. Printing
7. Scanning
8. Printing Lists
9. Maintenance
10. Troubleshooting
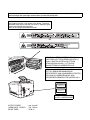
CAUTION:
For a complete electrical disconnection pull out the mains plug.
VORSICHT:
Zur vollständigen elektrischen Trennung vom Netz den Netzstecker ziehen.
ATTENTION:
Pour obtenir une mise hors-circuit totale, débrancher la prise de courant secteur.
AVISO:
Para una desconexión eléctrica completa, desenchufar el enchufe del tomacorriente.
VARNING:
För att helt koppla från strömmen, dra ut stickproppen.
ATTENZIONE:
Per un totale scollegamento elettrico rimuovere la spina di corrente.
"The mains outlet (socket-outlet) shall be installed near the equipment and shall be easily accessible."
"De aansluiting op de stroomvoorziening (stopkontakt) moet nabij het apparaat zijn aangebracht en moet
gemakkelijk bereikbaar zijn."
Ett nätuttag (vägguttag) bör befinna sig nära utrustningen och vara lätt att tillgå.
La presa di corrente deve essere installata vicino all'apparecchio, e deve essere facilmente accessibile.
El tomacorriente principal se debe encontrar cerca del aparato y debe ser fácil de acceder a él.
"Die Netzsteckdose (Wandsteckdose) sollte in der Nähe des Geräts installiert werden und leicht zugänglich sein."
Stikkontakten skal være placeret nær faxen og være let tilgængelig.
Pääpistoke (pistokkeen poisto) tulee asentaa lähelle laitetta ja tulee olla helposti poistettavissa.
Stikkontakten må være montert i nærheten av utstyret og den må være lett tilgjengelig.
La prise de courant principale (d'alimentation) doit être située près de l'appareil et facilement accessible.
This equipment complies with the requirements of Directive 1999/5/EC.
Dieses Gerät entspricht den Anforderungen der EU-Richtlinie 1999/5/EG.
Cet appareil est conforme aux exigences de la directive 1999/5/CE.
Este aparato satisface las exigencias de las Directiva 1999/5/CE.
Quest’apparecchio è conforme ai requisiti delle direttiva 1999/5/CE.
Dit apparaat voldoet aan de eisen van de richtlijn 1999/5/EG.
Este equipamento obedece às exigências da directiva 1999/5/CE.
Η συσκευή αυτή ανταποκρίνεται στις απαιτήσεις των οδηγια 1999/5/ΕK.
Denna utrustning uppfyller kraven enligt direktiv 1999/5/EC.
Dette udstyr overholder kravene i direktiv 1999/5/EF.
Dette produktet oppfyller kravene i direktiv 1999/5/EC.
Tämä laite täyttää direktiivi 1999/5/EY.
This is a facsimile product operating in German, Austrian, Swiss, France, Italy, Sweden, Finland, Norway,
Denmark, Spain, Portugal, Greece, Hungary and Poland analogue public switched telephone networks which
follow the TBR21 Standard.
The Declaration of Conformity can be viewed at the following URL address.
http://www.sharp.de/doc/AM-400.pdf
(U.K. Only)
MAINS PLUG WIRING INSTRUCTIONS
This equipment is fitted with a moulded type mains plug which incorporates a detachable
fuse cover, under no circumstances should the plug be used without the fuse cover fitted.
In the unlikely event of the socket outlet in your home not being compatible with the plug
supplied, cut off the mains plug and fit an appropriate type observing the wiring code
below.
DANGER: The fuse from the cut-off plug should be removed and the plug should be
disposed of in a safe manner. Under no circumstances should the cut-off plug be
inserted into a socket outlet as a serious electric shock may occur.
If you are not sure how to do this, get help from a qualified electrician.
IMPORTANT
The wires in this mains lead are coloured in accordance with the following code:
GREEN-AND-YELLOW:
Earth
BLUE:
Neutral
BROWN:
Live
As the colours of the wires in the mains lead of this apparatus may not correspond with
the coloured markings identifying the terminals in your plug, proceed as follows:The wire
which is coloured GREEN-AND-YELLOW must be connected to the terminal in the plug
which is marked by the letter E, or by the safety earth symbol
or coloured green or
green-and-yellow.The wire which is coloured BLUE must be connected to the terminal
which is marked with the letter N or coloured black.The wire which is coloured BROWN
must be connected to the terminal which is marked with the letter L or coloured red.
This apparatus must be protected by a 13A fuse in the mains plug or distribution board.
"WARNING: THIS APPARATUS MUST BE EARTHED"
This equipment complies with the requirements of Directive 1999/5/EC.
Dieses Gerät entspricht den Anforderungen der EU-Richtlinie 1999/5/EG.
Cet appareil est conforme aux exigences de la directive 1999/5/CE.
Este aparato satisface las exigencias de las Directiva 1999/5/CE.
Quest’apparecchio è conforme ai requisiti delle direttiva 1999/5/CE.
Dit apparaat voldoet aan de eisen van de richtlijn 1999/5/EG.
Este equipamento obedece às exigências da directiva 1999/5/CE.
Η συσκευή αυτή ανταποκρίνεται στις απαιτήσεις των οδηγια 1999/5/ΕK.
Denna utrustning uppfyller kraven enligt direktiv 1999/5/EC.
Dette udstyr overholder kravene i direktiv 1999/5/EF.
Dette produktet oppfyller kravene i direktiv 1999/5/EC.
Tämä laite täyttää direktiivi 1999/5/EY.
This is a facsimile product operating in British and Irish analogue public switched telephone networks which
follow the TBR21 Standard.
The Declaration of Conformity can be viewed at the following URL address.
http://www.sharp.de/doc/AM-400.pdf
(Poland Only)
Deklaracja zgodności według ISO/IEC guide 22 nr 1
Dostawca: SHARP Electronics GES.M.B.H. Sp. z o.o. Oddział w Polsce
02-844 Warszawa, ul. Puławska 469 tel. (+48 22) 545 81 00
OSTRZEŻENIE:
Zasilanie urządzenia jest całkowicie wyłączone tylko po wyjęciu wtyczki z kontaktu.
Gniazdko elektryczne, do którego podłączony jest telefaks, powinno się znajdować
w pobliżu, w łatwo dostępnym miejscu.
Urządzenie to speinia wymagania dyrektywy 1999/5/EC.
Ten telefaks pracuje w polskiej publicznej sieci telekomunikacyjnej zgodnie z
wymaganiami norm PN-T-83001 i PN-76/T-05051.
(Russian Only)
Внимание!
Во исполнение Статьи 5 Закона Российской Федерации "О защите прав
потребителей", а также Указа Правительства Российской Федерации №720 от
16 июня 1997 г. устанавливается срок службы данной модели – 7 лет с
момента производства при условии использования в строгом соответствии с
инструкцией по эксплуатации и применяемыми техническими стандартами.
Следующие данные являются дополнительной информацией, необходимой
для обеспечения требований Государственного Стандарта «Информация для
покупателей», введенного в действие с 1 июля 1998г.
Остальная обязательная информация уже отражена в руководстве по
эксплуатации.
Страна-изготовитель: Произведено в Таиланде
Фирма-изготовитель: ШАРП Корпорейшн
Юридический адрес изготовителя:
22-22 Нагайке-чо, Абено-ку,
Осака 545-8522, Япония
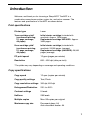
Introduction
Welcome, and thank you for choosing a Sharp MFP! The MFP is a
combination monochrome printer, copier, fax, and colour scanner. The
features and specifications of the MFP are shown below.
Print specifications
Printer type
Laser
Toner cartridge yield*
(continuous printing,
5% page coverage,
A4 paper)
Initial starter cartridge (included with
machine): Approx. 1500 pages
Replacement cartridge AM-30DC: Approx.
3000 pages
Drum cartridge yield*
(continuous printing,
5% page coverage,
A4 paper)
Initial starter cartridge (included with
machine): 20,000 pages (average)
Replacement cartridge (AM-90DR): 20,000
pages (average)
PC print speed
12 ppm (pages per minute)
Resolution
600 × 600 dpi (dots per inch)
*The yields may vary depending on coverage and operating conditions.
Copy specifications
Copy speed
12 cpm (copies per minute)
Copy quality settings
Text, Photo
Copy resolution settings
300 dpi, 600 dpi
Enlargement/Reduction
25% to 400%
Contrast settings
5 levels
Halftone
256 levels
Multiple copies
Max. 99 copies per original
Maximum copy size
Document glass: A4
Auto document feeder: A4
1
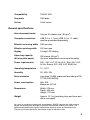
Fax specifications
Automatic dialling
100 Speed Dial numbers
Modem speed
33,600 bps with automatic fallback to lower
speeds (lowest speed 2400 bps).
Transmission time*
Approx. 3 seconds
Communication method
Super G3, G3
Compression scheme
MMR, MR, MH
Applicable telephone line Analog public switched telephone network
(TBR21)
Memory size*
2 MB (approx. 125 average A4 pages)
Resolution
Horizontal: 8 lines/mm
Vertical:
Standard: 3.85 lines/mm
Fine /Halftone: 7.7 lines/mm
Super fine: 15.4 lines/mm
Halftone
256 levels
Reception modes
FAX ONLY, EXT. TEL
*Based on Sharp Standard Chart at standard resolution, excluding time for
protocol signals (i.e., ITU-T phase C time only).
Scanning specifications
2
Scanner type
CIS (Contact Image Sensor)
Resolution
300/600 x 300 dpi, 300/600 x 600 dpi
Scan speed
Black and white:
300/600 x 300 dpi: 6 sec/page
300/600 x 600 dpi: 12 sec/page
Colour and grayscale:
300/600 x 300 dpi: 18 sec/page
300/600 x 600 dpi: 36 sec/page
Compatibility
TWAIN, WIA
Grayscale
256 levels
Colour
24-bit colour
General specifications
Auto document feeder
A4 size: 20 sheets max. (80 g/m2)
Computer connection
USB 2.0 or 1.1 port (USB 2.0 or 1.1 cable
must be purchased separately)
Effective scanning width
208 mm max.
Effective printing width
202 mm max.
Display
16-digit LCD display
Paper tray capacity
(A4-size plain paper)
250 sheets (80 g/m2)
(At room temperature and normal humidity)
Power requirements
220 - 230 V AC, 50 Hz (U.K., Eire: 230 V AC,
50 Hz; Russia: 220 -240 V AC 50/60 Hz)
Operating temperature
10 - 30°C
Humidity
20 - 85% RH
Noise emission
Less than 70 dBA (measured according to EN
27779 (DIN 45635))
Power consumption
Idle: 9 W
Maximum: 870 W
Dimensions
Width: 475 mm
Depth: 420 mm
Height: 370 mm
Weight
Approx. 12.7 kg (including trays and toner and
drum cartridges)
As a part of our policy of continuous improvement, SHARP reserves the right to make
design and specification changes for product improvement without prior notice. The
performance specification figures indicated are nominal values of production units.
There may be some deviations from these values in individual units.
3
Important safety information
• Do not disassemble this machine or attempt any procedures not described
in this manual. Refer all servicing to qualified service personnel.
• Do not install or use the machine near water, or when you are wet. For
example, do not use the machine near a bath tub, wash bowl, kitchen sink
or laundry tub, in a wet basement, or near a swimming pool. Take care not
to spill any liquids on the machine.
• Unplug the machine from the power outlet and consult a qualified service
representative if any of the following situations occur:
- Liquid has been spilled into the machine or the machine has been
exposed to rain or water.
- The machine produces odors, smoke, or unusual noises.
- The power cord is frayed or damaged.
- The machine has been dropped or the housing damaged.
• Do not allow anything to rest on the power cord, and do not install the
machine where people may walk on the power cord.
• This machine must only be connected to a 220 - 230 V, 50 Hz, earthed
outlet (U.K., Eire: 230 V, 50 Hz; Russia: 220 - 240 V, 50/60 Hz). Connecting
it to any other kind of outlet will damage the machine.
• Never insert objects of any kind into slots or openings on the machine. This
could create a risk of fire or electric shock. If an object falls into the machine
that you cannot remove, unplug the machine and consult a qualified service
representative.
• Do not place this machine on an unstable cart, stand or table. The machine
could be seriously damaged if it falls.
• Never install telephone wiring during a lightning storm.
• Never install telephone sockets in wet locations unless the socket is
specifically designed for wet locations.
• Never touch bare telephone wires or terminals unless the telephone line
has been disconnected at the network interface.
• Use caution when installing or modifying telephone lines.
• Avoid using a telephone (other than a cordless type) during an electrical
storm. There may be a remote risk of electric shock from lightning.
• Do not use a telephone to report a gas leak in the vicinity of the leak.
• The power outlet must be installed near the equipment and must be easily
accessible.
4
Trademark information
• Sharpdesk is a trademark of Sharp Corporation.
• Microsoft, Windows and Internet Explorer are trademarks of Microsoft
Corporation in the U.S.A. and other countries.
• Acrobat and Adobe are trademarks of Adobe Systems Incorporated.
• Eastman Software is a trademark of Eastman Kodak Company.
• All other company names and product names appearing in this manual are
the trademarks of their respective owners.
5
Table of Contents
A Look at the Operation Panel
1. Installation
Unpacking Checklist . . . . . . . . . . . . . . . . . . . . . . . . . . . . . . . . . . . . .
Installation . . . . . . . . . . . . . . . . . . . . . . . . . . . . . . . . . . . . . . . . . . . .
Installing the Toner Cartridge and Drum Cartridge. . . . . . . . . . . . . .
Loading Printing Paper . . . . . . . . . . . . . . . . . . . . . . . . . . . . . . . . . . .
Installing the Software . . . . . . . . . . . . . . . . . . . . . . . . . . . . . . . . . . .
Using the Machine as a Shared Printer on a Network . . . . . . . . . . .
Entering Your Name and Fax Number . . . . . . . . . . . . . . . . . . . . . . .
Setting the Date and Time . . . . . . . . . . . . . . . . . . . . . . . . . . . . . . . .
General Machine Settings . . . . . . . . . . . . . . . . . . . . . . . . . . . . . . . .
2. Copying
Making a Copy . . . . . . . . . . . . . . . . . . . . . . . . . . . . . . . . . . . . . . . . .
Selecting Temporary Copy Settings . . . . . . . . . . . . . . . . . . . . . . . . .
Permanent Copy Settings. . . . . . . . . . . . . . . . . . . . . . . . . . . . . . . . .
Using the Auto Document Feeder . . . . . . . . . . . . . . . . . . . . . . . . . .
Copying onto Envelopes and Cards . . . . . . . . . . . . . . . . . . . . . . . . .
3. Sending Faxes
Sending a Fax . . . . . . . . . . . . . . . . . . . . . . . . . . . . . . . . . . . . . . . . .
Storing a Number for Speed Dialling . . . . . . . . . . . . . . . . . . . . . . . .
Selecting Temporary Fax Settings . . . . . . . . . . . . . . . . . . . . . . . . . .
Other Fax Transmission Settings . . . . . . . . . . . . . . . . . . . . . . . . . . .
Using an Extension Phone to Send a Fax . . . . . . . . . . . . . . . . . . . .
Broadcasting (Sending a Fax to Multiple Destinations) . . . . . . . . . .
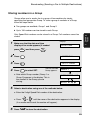
Timer Transmission . . . . . . . . . . . . . . . . . . . . . . . . . . . . . . . . . . . . .
4. Receiving Faxes
Selecting the Reception Mode . . . . . . . . . . . . . . . . . . . . . . . . . . . . .
Using FAX ONLY Mode . . . . . . . . . . . . . . . . . . . . . . . . . . . . . . . . . .
Using EXT. TEL Mode . . . . . . . . . . . . . . . . . . . . . . . . . . . . . . . . . . .
Substitute Reception to Memory . . . . . . . . . . . . . . . . . . . . . . . . . . .
6
8
11
11
12
18
23
25
34
44
46
48
53
53
56
59
62
64
67
67
72
77
79
85
87
91
95
95
96
97
99
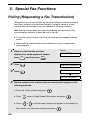
5. Special Fax Functions
100
Polling (Requesting a Fax Transmission) . . . . . . . . . . . . . . . . . . . . 100
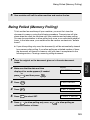
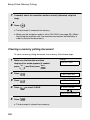
Being Polled (Memory Polling) . . . . . . . . . . . . . . . . . . . . . . . . . . . . 101
6. Printing
103
Printing a Document From an Application . . . . . . . . . . . . . . . . . . . 103
Selecting Print Settings . . . . . . . . . . . . . . . . . . . . . . . . . . . . . . . . . . 104
Printing on Envelopes and Cards . . . . . . . . . . . . . . . . . . . . . . . . . . 108
7. Scanning
110
Scanning From a TWAIN Application . . . . . . . . . . . . . . . . . . . . . . . 110
Scanning From a WIA Application (Windows XP/Me only) . . . . . . . 114
Scanning From the Scanner Wizard (Windows XP/Me only) . . . . . 117
Scanning From the Operation Panel. . . . . . . . . . . . . . . . . . . . . . . . 118
8. Printing Lists
128
9. Maintenance
133
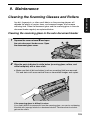
Cleaning the Scanning Glasses and Rollers. . . . . . . . . . . . . . . . . . 133
Replacing the Toner Cartridge . . . . . . . . . . . . . . . . . . . . . . . . . . . . 136
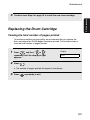
Replacing the Drum Cartridge . . . . . . . . . . . . . . . . . . . . . . . . . . . . 137
10. Troubleshooting
140
Problems and Solutions . . . . . . . . . . . . . . . . . . . . . . . . . . . . . . . . . 140
Messages and Signals . . . . . . . . . . . . . . . . . . . . . . . . . . . . . . . . . . 145
Clearing Paper Jams . . . . . . . . . . . . . . . . . . . . . . . . . . . . . . . . . . . 148
Index
152
7
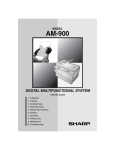
A Look at the Operation Panel
1
2
3
4
5
6
QUALITY
7
8
9
CONTRAST
MENU
E-SORT
ZOOM
COPY
SCAN
FAX
REDIAL
Z
A
BROADCAST
!
DUPLEX SCAN PRINT STOP
ENTER
SPEED
HELP
10
11 12 13
14
15
16
17
18
19
20
21
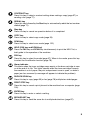
1
Display
This displays messages and prompts to help you operate the machine.
2
ZOOM key
Press this key to select an enlargement or reduction setting when making a
copy (page 56).
3
E-SORT key
Press this key when making multiple copies to have the copies collated
(sorted into sets with the pages ordered 1, 2, 3..., 1, 2, 3..., etc.) (page 58).
4
QUALITY key
When making a copy, press this key to select the type of original you are
copying (TEXT or PHOTO) (page 57). When sending a fax, press this key to
select a resolution setting (page 77).
5
Right/left arrow keys: When making a copy, press either of these keys after
selecting an enlargement/reduction setting with the ZOOM key to increase or
decrease the setting by 1% (page 56). When sending a fax, press either of
these keys to search through your auto-dial fax numbers (page 69).
6
MENU key
Press this key, followed by the left or right arrow key, to access special
functions and settings.
8
7
CONTRAST key
Press this key to select a contrast setting when making a copy (page 57) or
sending a fax (page 77).
8
REDIAL key
Press this key followed by the Start key to automatically redial the last number
dialled (page 71).
9
Stop key
Press this key to cancel an operation before it is completed.
10
COPY key
Press this key to select copy mode (page 53).
11
SCAN key
Press this key to select scan mode (page 122).
12
HELP (FAX key and SCAN key)
Press the FAX key and SCAN key simultaneously to print the HELP list, a
brief guide to the operation of the machine.
13
FAX key
Press this key to select fax mode (page 67). When in fax mode, press this key
to select the Line Monitor function (page 78).
14
Alarm indicator
This blinks when the toner cartridge nears empty or the drum cartridge is near
or at the end of its life. This lights steadily when the toner cartridge is empty,
the machine is out of paper, the print compartment cover is open, or when a
paper jam has occurred (a message will appear to indicate the problem).
15
DUPLEX SCAN key
Press this key to copy (page 58) or fax (page 78) multiple two-sided pages.
16
PRINT STOP key
Press this key to cancel a print job sent to the machine from a computer (page
103).
17
ENTER key
Press this key to enter or select a setting.
18
BROADCAST key
Press this key to send the same fax to multiple destinations (page 87).
9
19
SPEED key
Press this key to dial a fax number using an abbreviated 2-digit Speed Dial
number (page 69).
20
Number keys
Use these keys to enter the number of copies, dial fax numbers, and enter
numbers and letters when storing auto-dial numbers.
21
Start key
Press this key when you are ready to begin copying, faxing, or scanning. The
key can also be pressed in the date and time display of fax mode to show the
percentage of memory currently used.
10
1. Installation
1. Installation
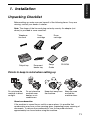
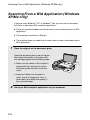
Unpacking Checklist
Before setting up, make sure you have all of the following items. If any are
missing, contact your dealer or retailer.
Note: The shape of the line cord plug varies by country. An adapter (not
shown) is provided in some countries.
Telephone
line cord
Output tray
Toner
cartridge
Document
feeder tray
Drum
cartridge
Setup
Guide
CD-ROM
Points to keep in mind when setting up
Do not place the
machine in direct
sunlight.
Do not place the
machine near
heaters or air
conditioners.
Keep dust away from
the machine.
Keep the area
around the
machine clear.
About condensation
If the machine is moved from a cold to a warm place, it is possible that
condensation may form on the scanning glass, preventing proper scanning of
documents. To remove the condensation, turn on the power and wait
approximately two hours before using the machine.
11
Installation
Installation
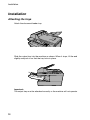
Attaching the trays
Attach the document feeder tray.
Slide the output tray into the machine as shown. When it stops, lift the end
slightly and push in so that the tray locks in place.
Important:
The output tray must be attached correctly or the machine will not operate.
12
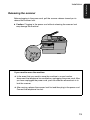
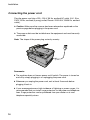
Releasing the scanner
Before plugging in the power cord, pull the scanner release toward you to
release the scanner lock.
♦ Caution: Plugging in the power cord without releasing the scanner lock
may damage the machine.
If you need to move the machine:
♦ In the event that you need to move the machine to a new location,
disconnect the telephone line cord before unplugging the power cord. After
you have unplugged the power cord, push the scanner release back in to
lock the scanner.
♦ After moving, release the scanner lock first and then plug in the power cord.
Connect the telephone line last.
13
1. Installation
Installation
Installation
Connecting the power cord
Plug the power cord into a 220 - 230 V, 50 Hz, earthed AC outlet (U.K., Eire:
230 V, 50 Hz, earthed (3-prong) outlet; Russia: 220-240 V, 50/60 Hz, earthed
outlet).
♦ Caution: Make sure the scanner has been released as explained on the
previous page before plugging in the power cord.
♦ The power outlet must be installed near the equipment and must be easily
accessible.
Note: The shape of the power plug varies by country.
Comments:
♦ The machine does not have a power on/off switch. The power is turned on
and off by simply plugging in or unplugging the power cord.
♦ Whenever you unplug the power cord, wait at least 5 seconds before
plugging it back in.
♦ If your area experiences a high incidence of lightning or power surges, it is
recommended that you install surge protectors for the power and telephone
lines. Surge protectors can be purchased from your dealer or at most
telephone specialty stores.
14
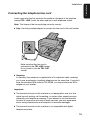
Connecting the telephone line cord
Insert one end of the line cord into the socket on the back of the machine
marked TEL. LINE. Insert the other end into a wall telephone socket.
Note: The shape of the line cord plug varies by country.
♦ Italy: Use the provided adapter to connect the line cord to the wall socket.
TEL.
LINE
TEL.
SET
Make sure that the line cord is
inserted into the TEL LINE socket.
Do not insert it into the TEL. SET
socket!
♦ Germany:
In Germany, the machine is supplied with a N-coded line cable, enabling
you to use an extension (cordless) telephone on the same line. If you don't
have the standard NFN-outlet of TELEKOM, you can purchase an NFNadapter at your retailer.
Important:
♦ The facsimile function of this machine is not designed for use on a line
which has call waiting, call forwarding, or certain other special services
offered by your telephone company. If you attempt to use the facsimile
function in conjunction with any of these services, you may experience
errors during transmission and reception of facsimile messages.
♦ The facsimile function of this machine is not compatible with digital
telephone systems.
15
1. Installation
Installation
Installation
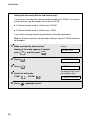
Setting the dial mode (Russia and Poland only):
If you are on a tone dial line, the dial mode must be set to TONE. If you are on
a pulse dial line, the dial mode must be set to PULSE.
♦ In Russia the dial mode is initially set to PULSE.
♦ In Poland the dial mode is initially set to TONE.
If you need to change the dial mode setting, follow the steps below.
Note: In all other countries, the dial mode setting is fixed at TONE and cannot
be changed.
1
Make sure that the date and time
display of fax mode appears (if needed
press
) and then press
MENU
FAX SETTING
.
2
Press
.
1: DATE&TIME SET
3
Press
.
1:TONE
4
Select the dial mode:
TONE:
5
16
FAX
Display:
Press
PULSE:
repeatedly to exit.
The display briefly shows
your selection, then:
4: RINGER VOLUME
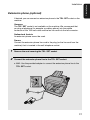
Extension phone (optional)
If desired, you can connect an extension phone to the TEL. SET socket on the
machine.
Germany:
The TEL. SET socket is not available on the machine. We recommend that
you plug a telephone (for example a cordless phone) into the middle
connector of the TAE wall outlet and the fax line cord into the left connector.
Switzerland, Austria:
An extension phone cannot be used.
France:
Connect the extension phone line cord to the plug (on the line cord from the
machine) that is inserted in the wall telephone socket.
1
Remove the seal covering the TEL. SET socket.
2
Connect the extension phone line to the TEL. SET socket.
• U.K.: Use the provided adapter to connect the extension phone line to the
TEL. SET socket.
TEL.
LINE
TEL.
SET
17
1. Installation
Installation
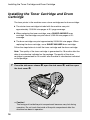
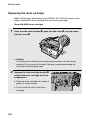
Installing the Toner Cartridge and Drum Cartridge
Installing the Toner Cartridge and Drum
Cartridge
The laser printer in the machine uses a toner cartridge and a drum cartridge.
♦ The starter toner cartridge included with the machine can print
approximately 1,500 A4-size pages at 5% page coverage.
♦ When replacing the toner cartridge, use a SHARP AM-30DC toner
cartridge. One cartridge can print about 3,000 A4-size pages at 5%
coverage.
♦ The drum cartridge can print approximately 20,000 A4-size pages. When
replacing the drum cartridge, use a SHARP AM-90DR drum cartridge.
Follow the steps below to install the toner cartridge and the drum cartridge.
Note: The quality of the toner cartridge is guaranteed for 18 months after the
date of manufacture indicated on the package. The quality of the drum
cartridge is guaranteed for 24 months after the date of manufacture indicated
on the package.
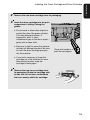
1
Press the side cover release ➊, open the side cover ➋, and then open
the front cover ➌.
1
3
2
• Caution!
The fusing unit inside the print compartment becomes very hot during
operation. Do not touch the inside of the print compartment after the
machine has been in operation.
18
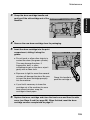
2
Remove the new drum cartridge from its packaging.
3
Insert the drum cartridge into the print
compartment, sliding it along the
guides.
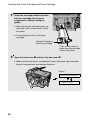
• Do not touch or allow other objects to
contact the drum (the green cylinder).
This may damage the drum. If
fingerprints, dust, or other
contaminants get on the drum, wipe it
gently with a clean cloth.
• Exposure to light for more than several
minutes will damage the drum. Be sure
to insert the drum cartridge promptly
into the machine.
Grasp this handle to
push the cartridge in
• If you find it necessary to leave the
cartridge out of the machine for more
than several minutes, wrap the
cartridge in black paper.
4
Remove the new toner cartridge from
its packaging. Shake the cartridge side
to side four or five times to distribute
the toner evenly within the cartridge.
19
1. Installation
Installing the Toner Cartridge and Drum Cartridge
Installing the Toner Cartridge and Drum Cartridge
5
Grasp the cartridge handle and insert
the toner cartridge into the print
compartment, sliding it along the
guides.
• After inserting the cartridge, press on
the arrow mark to make sure it “clicks”
into place.
• Do not touch the roller in the toner
cartridge.
Grasp this handle to
insert the cartridge
Press on this mark to
make sure the cartridge
“clicks” into place
6
Close the front cover ➊ and then the side cover ➋.
• Make sure the side cover is completely closed. Otherwise, light may enter
the print compartment and damage the drum.
Display:
TONER EXCHANGED?
2
1
20
1 = YES, 2 = NO
7
If you installed a new toner cartridge,
NEW TONER?
press
to select YES (this will
reset the toner counter to zero).
OK: PRESS START
• If you temporarily removed and then replaced an old toner cartridge for
maintenance or other reason, press
to continue using the previous
toner count. (Note: Be sure to press
or the machine will not alert you
when the toner cartridge is out of toner.)
8
Press
9
If you installed a new drum cartridge, reset the drum counter as
explained below.
.
Resetting the drum counter
Each time you install a new drum cartridge, follow the steps below to reset the
drum counter to zero.
1
Press
Display:
MENU
and then
Z
or
A
repeatedly until the display at right
appears.
2
Press
.
LIFE
CLEAR: START KEY
DRUM COUNTER
3
Press
.
4
Press
repeatedly to exit.
1: LIFE COUNTER
21
1. Installation
Installing the Toner Cartridge and Drum Cartridge
Installing the Toner Cartridge and Drum Cartridge
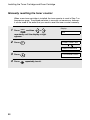
Manually resetting the toner counter
When a new toner cartridge is installed, the toner counter is reset in Step 7 on
the previous page. The procedure below is normally not necessary; however,
it can be used in the event that you need to reset the toner counter manually.
Display:
1
Press
MENU
and then
Z
or
A
LIFE
repeatedly until the display at right
appears.
2
Press
.
CLEAR: START KEY
TONER COUNTER
22
3
Press
.
4
Press
repeatedly to exit.
3: CLR DRUM COUNT
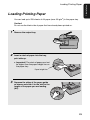
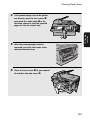
Loading Printing Paper
You can load up to 250 sheets of A4 paper (max. 80 g/m2) in the paper tray.
Caution!
Do not use the blank side of paper that has already been printed on.
1
Remove the output tray.
2
Insert a stack of paper into the tray,
print side up.
• Important! The stack of paper must not
be higher than the paper height line on
the paper tray.
Paper height line
3
Squeeze the sides of the paper guide
as shown and slide it to the slot for the
length of the paper you are loading
(A4).
23
1. Installation
Loading Printing Paper
Loading Printing Paper
4
Replace the output tray.
Russia only: Using letter/legal size paper (setting the paper
size)
The paper size is normally fixed at A4.
In Russia, if you need to use letter or legal size paper, contact your dealer to
have the machine adjusted to accept letter/legal paper. Once the machine has
been adjusted, use the following procedure to specify whether you are using
letter or legal size paper. The initial setting is LETTER.
Note: When the machine has been adjusted to use letter/legal size paper, A4
paper cannot be used.
Display:
COPY
1
Press
2
Press
3
Select the paper size:
LETTER:
4
24
Press
(or
SCAN
) and then
MENU
.
COMMON SETTING
1:LETTER
.
LEGAL:
repeatedly to exit.
The display briefly shows
your selection, then:
2: AUTO CLEAR
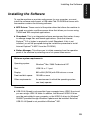
Installing the Software
To use the machine as a printer and scanner for your computer, you must
install the software and connect a USB cable.The CD-ROM that comes with
the machine contains the following software:
♦ MFP Drivers: These consist of the printer driver that allows the machine to
be used as a printer, and the scanner driver that allows you to scan using
TWAIN and WIA compliant applications.
♦ Sharpdesk: This is an integrated software environment that makes it easy
to manage image files and launch applications. (Note that Internet
Explorer® 5.5 or higher is required to install Sharpdesk; if this is not
installed, you will be prompted during the installation procedure to install
Internet Explorer® 6.0SP1 from the CD-ROM.)
♦ Button Manager: This allows you to initiate scanning from the operation
panel of the machine by selecting one of six preset scan menus.
Minimum system requirements
Operating system:
Windows® Me / 2000 Professional/ XP
Port
USB 2.0 or 1.1 port
Display:
800 x 600 (SVGA) with 256 colours or more
Free hard-disk space:
150 MB or more
Other requirements:
An environment in which the operating system
can freely operate.
Comments:
♦ USB 2.0 Hi-Speed is only possible if your computer has a USB 2.0 port and
you are using a USB 2.0 cable. In addition, the Microsoft USB 2.0 driver
must be preinstalled in your computer, or the USB 2.0 driver for Windows®
2000/XP provided through Windows Update must be installed. Note that
USB 2.0 Hi-Speed is not possible in Windows® ME.
25
1. Installation
Installing the Software
Installing the Software
♦ To scan the maximum document length (356 mm) using the auto document
feeder at 1200 dpi in full colour, at least 1 GB of memory is required. In
addition, at least 600 MB or more of free hard disk space is required on the
drive where your operating system is installed. In Windows® Me, it is not
possible to scan an A4 size document at 1200 dpi in full color or grayscale
(a lower resolution or a smaller scanning area must be selected).
♦ Note for Windows® Me: In the Power Management settings in the
Control Panel, System standby must be set to Never. In addition, do not
use the standby feature that appears when you shut down Windows.
Installing the software
♦ A USB cable is required to connect the machine to your computer. Please
purchase a USB 2.0 or USB 1.1 cable. The USB cable will be connected
during the software installation procedure. (If you wish to use USB 2.0 HiSpeed mode and your system meets the requirements for Hi-Speed mode,
purchase a USB 2.0 cable. A USB 2.0 certified cable is recommended.)
♦ To install the software on Windows® 2000/XP using the installer, you must
log in with administrator’s rights.
♦ The windows shown in the following procedure appear in Windows® XP.
The windows that appear in other versions of Windows may be slightly
different.
Note: In the following instructions, “Windows 2000” indicates Windows 2000
Professional (the software cannot be installed on Windows 2000 Server).
1. Make sure that the USB cable is not connected to your computer. (The
cable will be connected in Step 10.)
♦ If the USB cable is connected, a Plug and Play window will appear. Click
the Cancel button to close the window and disconnect the cable.
2. Insert the Sharp CD-ROM into your computer’s CD-ROM drive.
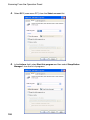
3. In Windows® XP, click the start button, click My Computer, and then doubleclick the CD-ROM icon.
In Windows® Me/2000, double click My Computer on the desktop and then
double-click the CD-ROM icon.
4. Double-click the setup icon (
26
) in the CD-ROM window.
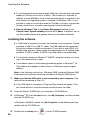
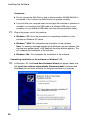
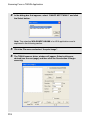
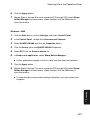
5. Follow the instructions in the windows that appear.
♦ When the Setup Type Selection window appears, select Standard to
install all software components (this should normally be selected). If you
only wish to install certain components, select Custom and then select the
components that you wish to install.
Note: If you wish to select the folder where Sharpdesk and/or Button
Manager are installed, select Custom.
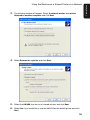
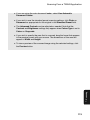
♦ In Windows® 2000/XP, if a warning message appears at any time regarding
the Windows logo test or digital signature, be sure to click Continue
Anyway or Yes.
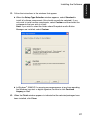
6. When the Finish window appears to indicate that the selected packages have
been installed, click Close.
27
1. Installation
Installing the Software
Installing the Software
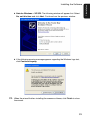
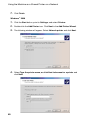
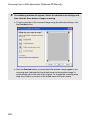
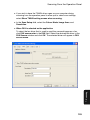
7. If the installation was a Standard installation, the following window will
appear. Click OK.
♦ If you installed the MFP drivers using a Custom installation and did not
install Sharpdesk, the following window will appear. Click OK and go to
Step 10.
8. The following window will appear. Click Yes to restart your computer.
28
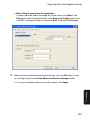
9. The Search Setup Wizard will appear. Follow the on-screen instructions to
create an index database for Sharpdesk.
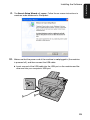
10. Make sure that the power cord of the machine is not plugged in (the machine
is powered off), and then connect the USB cable.
♦ Insert one end of the USB cable into the USB port on the machine and the
other end into your computer’s USB port.
29
1. Installation
Installing the Software
Installing the Software
Comments:
♦ Do not connect the AM-400 to a hub to which another AM-300/AM-400 is
connected. If this is done, the AM-400 will not operate correctly.
♦ If you find that your computer does not recogize the machine or operation is
unstable, try connecting the USB cable to a different USB port on your
computer, or try a different USB cable (use the shortest possible cable).
11. Plug in the power cord of the machine.
♦ Windows® XP: Go to the procedure for completing installation of the
software on Windows XP below.
♦ Windows® 2000: This completes the installation of the software.
Note: If a warning message regarding the Windows logo test appears (the
warning may appear twice), click Yes each time the window appears. This
will complete the installation of the software.
♦ Windows® Me: This completes the installation of the software.
Completing installation of the software on Windows® XP
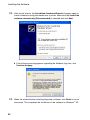
12. In Windows® XP, the Found New Hardware Wizard will appear. Make sure
that Install the software automatically (Recommended) is selected and
click Next (this will install software for using the machine as a scanner).
30
♦ Note for Windows ® XP SP2: The following window will appear first. Select
No, not this time and click Next. Continue from the previous window.
♦ If the following warning message appears regarding the Windows logo test,
click Continue Anyway.
13. When the wizard finishes installing the scanner software, click Finish to close
the wizard.
31
1. Installation
Installing the Software
Installing the Software
14. After a brief interval, the Found New Hardware Wizard will appear again to
install software for using the machine as a printer. Make sure that Install the
software automatically (Recommended) is selected and click Next.
♦ If the following warning appears regarding the Windows logo test, click
Continue Anyway.
14. When the wizard finishes installing the printer software, click Finish to close
the wizard. This completes the installation of the software on Windows® XP.
32
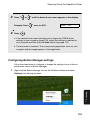
Sharpdesk online guide
For information on using Sharpdesk, view the Sharpdesk online guide on the
CD-ROM. To view the online guide, open the Manual folder and then the
EnglishA folder on the CD-ROM, and double-click SDUG_Enu.pdf.
Removing the software
In the event that you need to remove the software from your computer, first
disconnect the USB cable from your computer and the machine. Open the
Control Panel and select Add or Remove Programs (or Add/Remove
Programs). Select SHARP AM-400 Series MFP Driver (or Sharpdesk) from
the list, and click the Change/Remove button (or the Add/Remove button).
When prompted to confirm the removal, click OK.
33
1. Installation
Installing the Software
Using the Machine as a Shared Printer on a Network
Using the Machine as a Shared Printer on a
Network
If the computer to which the machine is connected is on a network, the
machine can be used as a shared printer by other computers on the network.
To use the machine as a shared printer on a network, you must:
1. Configure settings on the computer (the server) that is directly connected to
the machine.
2. Install the printer driver using Add Printer on all other computers (the
clients) that will use the machine as a printer.
♦ If you have not yet installed the software on the server and connected the
machine to the server with a USB cable, do so as explained in the previous
section (beginning on page 25) before completing the procedures in this
section.
Note: The clients (the computers that are not connected directly to the
machine) must be running the same version of Windows or a version that is
older than the server.
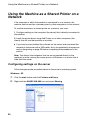
Configuring settings on the server
Follow the appropriate procedure below for the server’s operating system.
Windows® XP
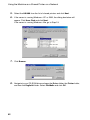
1. Click the start button and click Printers and Faxes.
2. Right-click the SHARP AM-400 icon and select Sharing.
34
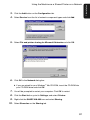
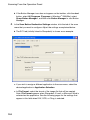
3. The following window will appear. Click Network Setup Wizard to run the
wizard.
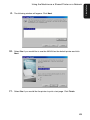
4. After running the wizard, the following window will appear. Select Share this
printer.
♦ If you would like to change the name, enter a new name (this must be 8
characters or less to allow sharing with Windows® Me computers).
35
1. Installation
Using the Machine as a Shared Printer on a Network
Using the Machine as a Shared Printer on a Network
5. Click OK.
Windows® 2000
1. Click the Start button, point to Settings, and select Printers.
2. Right-click the SHARP AM-400 icon and select Sharing.
3. The following window will appear. Click Shared as.
♦ If you would like to change the name, enter a new name (this must be 8
characters or less to allow sharing with Windows® Me computers).
4. Click OK.
Windows® Me
1. Click the Start button, point to Settings, and select Control Panel.
2. Double-click the Network icon. The Network dialog box will appear. On the
Configuration tab, see if File and Printer Sharing for Microsoft Networks
appears in the list of installed network components. If it appears, click the OK
button and go to Step 8. If it does not appear, continue from Step 3.
36
3. Click the Add button on the Configuration tab.
4. Select Service from the list of network component types and click Add.
5. Select File and printer sharing for Microsoft Networks and click OK.
6. Click OK in the Network dialog box.
♦ If you are asked for your Windows® Me CD-ROM, insert the CD-ROM into
your CD-ROM drive and click OK.
7. You will be prompted to restart your computer. Click OK to restart.
8. Click the Start button, point to Settings, and select Printers.
9. Right-click the SHARP AM-400 icon and select Sharing.
10. Select Shared as on the Sharing tab.
37
1. Installation
Using the Machine as a Shared Printer on a Network
Using the Machine as a Shared Printer on a Network
♦ If you would like to change the name, enter a new name (this must be 8
characters or less).
11. Click OK.
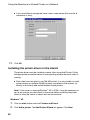
Installing the printer driver on the clients
The printer driver must be installed on each client using Add Printer. Follow
the appropriate procedure below for the operating system that each client is
running.
♦ Each client can only print to one AM-400 printer. It is not possible to install
printer drivers for multiple AM-400 printers connected to the network (or
directly to the client) and switch between those printers.
Note: If the server is running Windows® XP or 2000, it may be necessary to
set up an account for each client on the server before installing the printer
driver to allow the clients to select and use the machine.
Windows® XP
1. Click the start button and click Printers and Faxes.
2. Click Add a printer. The Add Printer Wizard will appear. Click Next.
38
3. The following window will appear. Select A network printer, or a printer
attached to another computer and click Next.
4. Select Browse for a printer and click Next.
5. Select the AM-400 from the list of shared printers and click Next.
6. Select Yes if you would like to use the AM-400 as the default printer and click
Next.
39
1. Installation
Using the Machine as a Shared Printer on a Network
Using the Machine as a Shared Printer on a Network
7. Click Finish.
Windows® 2000
1. Click the Start button, point to Settings, and select Printers.
2. Double-click the Add Printer icon. Click Next in the Add Printer Wizard.
3. The following window will appear. Select Network printer and click Next.
4. Select Type the printer name, or click Next to browse for a printer and
click Next.
40
5. Select the AM-400 from the list of shared printers and click Next.
6. Select Yes if you would like to use the AM-400 as the default printer. Click
Next.
7. Click Finish.
Windows® Me
1. Click the Start button, point to Settings, and select Printers.
2. Double-click the Add Printer icon. Click Next in the Add Printer Wizard.
3. The following window will appear. Select Network printer and click Next.
4. The following window will appear. Click Browse.
41
1. Installation
Using the Machine as a Shared Printer on a Network
Using the Machine as a Shared Printer on a Network
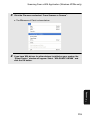
5. Select the AM-400 from the list of shared printers and click Next.
6. If the server is running Windows® XP or 2000, the dialog box below will
appear. Click Have Disk and click Next.
If the server is running Windows® Me, go to Step 10.
7. Click Browse.
8. Navigate to your CD-ROM drive and open the Driver folder, the Printer folder,
and then the EnglishA folder. Select WinMe9x and click OK.
42
9. The following window will appear. Click Next.
10. Select Yes if you would like to use the AM-400 as the default printer and click
Next.
11. Select Yes if you would like the printer to print a test page. Click Finish.
43
1. Installation
Using the Machine as a Shared Printer on a Network
Entering Your Name and Fax Number
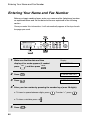
Entering Your Name and Fax Number
Before you begin sending faxes, enter your name and fax (telephone) number
as explained below and set the date and time as explained in the following
section.
Once you enter this information, it will automatically appear at the top of each
fax page you send.
MENU
QUALITY
CONTRAST
MENU
E-SORT
REDIAL
Z
ZOOM
COPY
SCAN
FAX
A
BROADCAST
!
DUPLEX SCAN PRINT STOP
ENTER
SPEED
FAX
ENTER
1
Make sure that the date and time
display of fax mode appears (if needed
press
FAX
) and then press
FAX SETTING
MENU
2
Press
.
1: DATE&TIME SET
3
Press
.
ENTER FAX NUMBER
4
Enter your fax number by pressing the number keys (max. 20 digits).
• To insert a space between digits, press
• To clear a mistake, press
5
44
Display:
Press
ENTER
.
Z
.
. To enter “+”, press
.
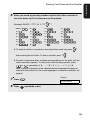
6
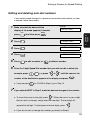
Enter your name by pressing number keys for each letter as shown in
the chart below. Up to 24 characters can be entered.
Example: SHARP = 7777 44 2 777
A
7
G=
N=
A=
H=
O=
V=
B=
I =
P=
W=
C=
J=
Q=
X=
D=
K=
R=
Y=
E=
L=
S=
Z=
F=
M=
T=
SPACE =
U=
♦ To enter two letters in succession that require the same key, press
after entering the first letter. To clear a mistake, press
Z
A
.
♦ To enter a lower case letter, continue pressing the key for the letter until the
lower case letter appears. To enter one of the following symbols, press
repeatedly: # @ . - _ / ! $ % & ’ ( ) + , : ; = ? [ ] { } +
or
Note: National characters of the selected display language will appear at
the end of the symbol list. (For some languages, no national characters will
appear.)
Display:
7
Press
8
Press
ENTER
.
3: DIAL MODE
repeatedly to exit.
45
1. Installation
Entering Your Name and Fax Number
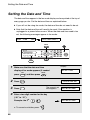
Setting the Date and Time
Setting the Date and Time
The date and time appear in the fax mode display and are printed at the top of
every page you fax. Set the date and time as explained below.
♦ If you will not be using fax mode, the date and time do not need to be set.
♦ Note that the date and time will need to be reset if the machine is
unplugged or a power failure occurs. When the date and time need to be
set, the following messages appear in fax mode:
01/01 12:00
FAX
DATE/TIME UNSET
MENU
QUALITY
CONTRAST
MENU
E-SORT
ZOOM
COPY
SCAN
FAX
REDIAL
Z
A
BROADCAST
!
DUPLEX SCAN PRINT STOP
ENTER
SPEED
FAX
ENTER
1
Make sure that the date and time
display of fax mode appears (if needed
press
FAX
) and then press
MENU
Press
.
3
Press
.
4
Enter a two-digit number for the day
(“01” to “31”).
1: DATE&TIME SET
The currently set
date appears:
Example: the 5th
46
FAX SETTING
.
2
• To correct a mistake, press
Display:
DATE 01-01-2005
DATE 05-01-2005
Z
.
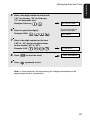
5
6
7
Enter a two-digit number for the month
(“01” for January, “02” for February,
“12” for December, etc.).
Example: February
DATE 05-02-2005
Enter the year (four digits).
The currently set time
appears (example):
Example: 2005
TIME 00:00
Enter a two-digit number for the hour
(“00” to “23”) and a two-digit number
for the minute (“00” to “59”).
Example: 9:25
05-FEB 09:25
8
Press
2: OWN MNUMBER
9
Press
ENTER
to start the clock.
repeatedly to exit.
Note: In some countries, the time setting will change automatically at the
beginning and end of summertime.
47
1. Installation
Setting the Date and Time
General Machine Settings
General Machine Settings
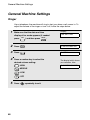
Ringer
Like a telephone, the machine will ring to alert you when a call comes in. To
adjust the volume of the ringer or turn it off, follow the steps below.
1
Make sure that the date and time
display of fax mode appears (if needed
press
FAX
) and then press
FAX SETTING
.
2
Press
.
1: DATE&TIME SET
3
Press
.
1: HIGH
4
Press a number key to select the
desired volume setting:
: HIGH
: MIDDLE
: LOW
: OFF
5
48
MENU
Display:
Press
repeatedly to exit.
The display briefly shows
your selection, then:
5: ALARM VOLUME
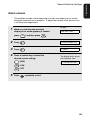
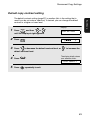
Alarm volume
The machine sounds a three-beep alarm to alert you when an error occurs
during fax transmission or reception. To adjust the volume of the alarm or turn
it off, follow the steps below.
1
Make sure that the date and time
display of fax mode appears (if needed
press
FAX
) and then press
MENU
Display:
FAX SETTING
.
2
Press
.
1: DATE&TIME SET
3
Press
.
1: HIGH
4
Press a number key to select the
desired volume setting:
: HIGH
The display briefly shows
your selection, then:
1: DATE&TIME SET
: LOW
: OFF
5
Press
repeatedly to exit.
49
1. Installation
General Machine Settings
General Machine Settings
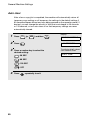
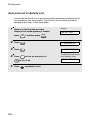
Auto clear
After a fax or copy job is completed, the machine will automatically return all
temporary copy settings or all temporary fax settings to the default settings if
60 seconds elapses without any keys being pressed on the operation panel. If
desired, you can change the amount of time that must elapse to 30 seconds
or 120 seconds, or turn auto clear off so that temporary settings are never
automatically cleared.
Display:
COPY
1
Press
2
Press
3
Press a number key to select the
desired setting:
(or
SCAN
) and then
.
: 30 SEC
: 60 SEC
: 120 SEC
: OFF
4
50
Press
repeatedly to exit.
MENU
.
COMMON SETTING
1: 30 SECONDS
The display briefly shows
your selection, then:
3: KEY TONE
Key tone off
The machine normally sounds a beep (key tone) each time you press a key on
the operation panel. If you wish to turn off the key tone, follow the steps below.
Display:
COPY
1
Press
2
Press
.
3
Press
to turn on the key tone or
4
Press
repeatedly to exit.
(or
SCAN
) and then
MENU
.
COMMON SETTING
1: ON, 2: OFF
to turn off the key tone.
51
1. Installation
General Machine Settings
General Machine Settings
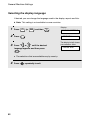
Selecting the display language
If desired, you can change the language used in the display, reports and lists.
♦ Note: This setting is not available in some countries.
1
Press
2
Press
3
Press
Display:
COPY
(or
SCAN
) and then
MENU
.
.
Z
or
1: ENGLISH
A
until the desired
language appears and then press
ENTER
.
• The selections that are available vary by country.
4
52
Press
COMMON SETTING
repeatedly to exit.
The display briefly shows
your selection, then:
1: PAPER SIZE
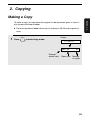
2. Copying
To make a copy, you can place the original on the document glass or insert it
into the auto document feeder.
♦ The auto document feeder allows you to load up to 20 A4-size originals at
once.
1
Press
COPY
Display:
to select copy mode.
∗∗ COPY ∗∗
100% A4
Enlarge/
reduce ratio
Paper size
01
Number
of copies
53
2. Copying
Making a Copy
Making a Copy
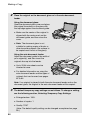
2
Place the original on the document glass or in the auto document
feeder.
Using the document glass:
Open the document glass cover and place
the original face down on the glass with
the top edge against the document guide.
• Make sure the centre of the original is
aligned with the centre mark on the
document guide, and then close the
cover.
• Note: The document glass is not
suitable for making copies of books or
other bound documents (the surface to
be copied must lie flat on the glass).
Using the auto document feeder:
Adjust the document guide to the width of
your original(s), and then insert the
originals face up into the feeder.
• Up to 20 A4-size sheets can be
inserted at once.
• For detailed information on using the
auto document feeder and the types of
originals that can be used, see pages
62 to 64.
Note: If an original is placed in both the auto document feeder and on the
document glass, the original in the auto document feeder will be copied.
3
The default temporary copy settings are as follows. To change a setting,
see the following section, Selecting Temporary Copy Settings.
• Enlarge/reduce: 100%
• Number of copies: 1
• Quality: TEXT
(Note: The default quality setting can be changed as explained on page
59.)
54
Making a Copy
• Contrast: Medium (bar at mid-point)
2. Copying
(Note: The default contrast setting can be changed as explained on page
61.)
• E-Sort (collating sets of copies): OFF
• Duplex Scan: OFF
Note: After temporary copy settings are selected, the settings will revert to the
above default settings if the auto clear time elapses without any keys being
pressed on the operation panel (see page 50). You can also press
to
reset the settings to the default settings.
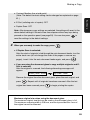
4
When you are ready to make the copy, press
.
• If Duplex Scan is selected:
After the stack of originals is fed through the auto document feeder, turn the
entire stack over (do not change the order of the pages or remove any
pages), insert it into the auto document feeder again, and press
.
• If you are using the document glass to copy multiple originals and ESort is selected:
After the original is scanned, the following alternating messages will
appear:
[START] NEXT SCAN
[#] START PRINT
Remove the original from the document glass, place the next original, and
press
. Repeat until all originals have been scanned. After the last
original has been scanned, press
to begin printing the copies.
Maximum original size when using the document glass
The maximum original size that can be used on the document glass is A4.
The maximum scanning width is 208 mm, and the top and bottom 4 mm of
the original cannot be scanned.
55
Selecting Temporary Copy Settings
If MEMORY IS FULL appears...
If the memory becomes full while multiple originals are being scanned using
the auto document feeder, MEMORY IS FULL will appear in the display.
♦ Press
if you want to make copies of only the originals that have
already been scanned. The remaining originals will be ejected from the
feeder.
♦ Press
if you want to cancel the copy job.
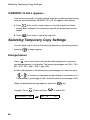
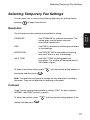
Selecting Temporary Copy Settings
You can adjust one or more of the following temporary copy settings before
pressing
to begin copying.
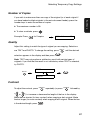
Enlarge/reduce
ZOOM
Press
one or more times until the desired enlargement or reduction
percentage appears in the display. The preset percentages are 100%, 78%,
64%, 50%, 25%, 400%, 200%, and 129%.
♦ After selecting one of the above preset percentages, you can also press
Z
or
A
to increase or decrease the percentage in increments of 1%.
The maximum percentage is 400% and the minimum percentage is 25%.
When the desired percentage appears, press the
ENTER
key.
ZOOM
Example: Press
COPY RATIO:
56
3 times and then
64%
ENTER
64% A4
to select 64%
01
Selecting Temporary Copy Settings
Number of Copies
2. Copying
If you wish to make more than one copy of the original (or of each original if
you have loaded multiple originals in the auto document feeder), press the
number keys to enter the number of copies.
♦ The maximum number is 99.
♦ To clear a mistake, press
Example: Press
.
for 5 copies
100% A4
05
Quality
Adjust this setting to match the type of original you are copying. Selections
QUALITY
are TEXT and PHOTO. To change the setting, press
selection appears in the display and then press
ENTER
until the desired
.
Note: TEXT may not produce a satisfactory result with certain types of
originals. If you find that the result is not satisfactory when TEXT is selected,
try PHOTO.
TEXT
QUALITY
ENTER
PHOTO
Contrast
CONTRAST
To adjust the contrast, press
Z
or
A
CONTRAST
repeatedly (or press
followed by
) to increase or decrease the length of the bar in the display.
Make the bar shorter (for less contrast) when copying a dark original. Make
the bar longer (for more contrast) when copying a faint original. When the bar
is the desired length, press
ENTER
.
57
Selecting Temporary Copy Settings
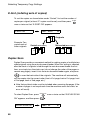
E-Sort (collating sets of copies)
To sort the copies as shown below under “Sorted”, first set the number of
copies per original (at least “2” copies must be set), and then press
E-SORT
once or twice so that “E-SORT ON” appears.
E-SORT ON
100% SORT
A
Example: Two
copies each of
three originals
B C
A
C
Originals
Not sorted (MULTI COPY)
Sorted (SORT COPY)
A
B
02
B C
A
A
B
B
C
C
Duplex Scan
Duplex Scan provides a convenient method for making copies of multiple twosided originals using the auto document feeder. When this setting is selected,
after the stack of originals is fed through the auto document feeder the first
time, you simply turn the stack over (do not change the order of the pages or
remove any pages), insert it into the auto document feeder again, and press
to scan the back side of the originals. The machine will automatically
sort the copies into the correct order (front of 1st page, back of 1st page, front
of 2nd page, back of 2nd page, etc.).
♦ Note that any blank sides must be included when scanning the pages (if the
number of pages is not equal each time the machine scans the stack, an
error will result).
To select Duplex Scan, press
ON” appears, and then press
DUPLEX SCAN ON
58
DUPLEX SCAN
ENTER
once or twice so that “DUPLEX SCAN
.
100% A4
01
Permanent Copy Settings
The following copy settings remain in effect until they are changed. These
settings do not revert to the default settings when the auto clear time elapses
or when
is pressed.
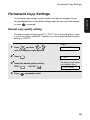
Default copy quality setting
The default quality setting (page 57) is “TEXT” (this is the setting that is used
if you do not make a selection). If desired, you can change the default quality
setting to “PHOTO”.
Display:
1
Press
MENU
and then
Z
or
A
COPY SETTING
until the display at right appears.
2
Press
3
Select the default quality setting:
TEXT:
4
Press
.
1: TEXT
PHOTO:
The display briefly shows
your selection, then:
2: COPY RESO.
repeatedly to exit.
59
2. Copying
Permanent Copy Settings
Permanent Copy Settings
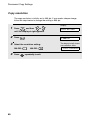
Copy resolution
The copy resolution is initially set to 300 dpi. If you need a sharper image,
follow the steps below to change the setting to 600 dpi.
Display:
1
Press
MENU
and then
Z
or
A
COPY SETTING
until the display at right appears.
2
Press
3
Select the resolution setting:
300 DPI:
4
60
Press
.
1: 300 DPI
600 DPI:
repeatedly to exit.
The display briefly shows
your selection, then:
3: COPY CONTRAST
Permanent Copy Settings
Default copy contrast setting
2. Copying
The default contrast setting (page 57) is medium (this is the setting that is
used if you do not make a selection). If desired, you can change the default
contrast to a higher or lower level.
Display:
1
Press
MENU
and then
Z
or
A
COPY SETTING
until the display at right appears.
2
Press
3
Press
Z
.
-[ ■ ■ ■
to decrease the default contrast level, or
A
]+
to increase the
default contrast level.
4
Press
ENTER
.
The display briefly shows
your selection, then:
1: COPY QUALITY
5
Press
repeatedly to exit.
61
Using the Auto Document Feeder
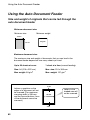
Using the Auto Document Feeder
Size and weight of originals that can be fed through the
auto document feeder
Minimum document size:
Minimum size
Minimum weight
148 mm
182 mm
52 g/m²
Maximum document size:
The maximum size and weight of documents that you can load in the
document feeder depend on how many sheets you load.
Up to 20 sheets at once:
1 sheet at a time (manual feeding):
Size: A4 (210 x 297 mm)
Max. weight: 80 g/m2
Max. size: 216 x 356 mm
Max. weight: 157 g/m2
4 mm
Letters or graphics on the
edges of a document will not
be scanned.(The maximum
scanning width is 208 mm,
and the top and bottom 4 mm
of the document cannot be
scanned.)
208 mm
4 mm
62
Letters in the
shaded area will
not be scanned.
Using the Auto Document Feeder
Other restrictions
♦ Ink, glue, and correcting fluid on documents must be dry before they pass
through the document feeder.
♦ All clips, staples, and pins must be removed from documents before loading
in the feeder. If these are not removed, they may damage the machine.
♦ Documents which are patched, taped, torn, smaller than the minimum size,
carbon backed, easily smudged, or have a slippery coated surface should
be copied or faxed from the document glass.
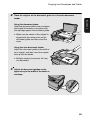
Loading the Document
Up to 20 A4 size sheets can be placed in the auto document feeder at once.
The sheets will automatically feed into the machine starting from the top
sheet.
♦ If you need to send or copy more than the maximum number of sheets,
place the additional sheets gently and carefully in the feeder under the last
sheet while the last sheet is being scanned. Do not try to force the sheets
in, as this may cause double-feeding or jamming.
♦ If your document consists of several large or thick sheets which must be
loaded one at a time, insert each sheet into the feeder as the previous
sheet is being scanned. Insert gently to prevent double-feeding.
1
Adjust the document guides to the
width of your document.
63
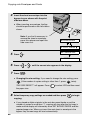
2. Copying
♦ The scanner cannot recognise yellow, greenish yellow, or light blue ink.
Copying onto Envelopes and Cards
2
Insert the document face up into the
document feeder. The top edge of the
document should enter the feeder first.
• DOCUMENT READY will appear briefly
in the display.
• You can now continue with a copy, fax,
or scan operation.
Copying onto Envelopes and Cards
To copy onto envelopes, cards, and other special sizes of paper, use the
bypass tray on the side of the machine.
The bypass tray can be used to copy onto the following sizes:
Letter (216 x 279 mm)
Legal (216 x 356 mm)
A4
A5
Envelope #10 (ENVELOPE:COM10) (105 x 241 mm)
Envelope Monarch (ENV.:MONARCH) (98 x 191 mm)
Envelope DL (ENV.:ISO DL) (110 x 220 mm)
A6 (European postcard) (105 mm x 148 mm)
♦ Only one sheet (envelope, card, etc.) can be inserted at a time in the
bypass tray.
1
Press
COPY
Display:
to select copy mode.
∗∗ COPY ∗∗
100% A4
64
01
Copying onto Envelopes and Cards
Place the original on the document glass or in the auto document
feeder.
2. Copying
2
Using the document glass:
Open the document glass cover and place
the original face down on the glass with
the top edge against the document guide.
• Make sure the center of the original is
aligned with the center mark on the
document guide, and then close the
cover.
Using the auto document feeder:
Adjust the document guide to the width of
your original, and then insert the original
face up into the feeder.
• Multiple originals (maximum A4 size)
can be placed.
3
Adjust the document guides on the
bypass tray to the width of the sheet or
envelope.
65
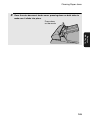
Copying onto Envelopes and Cards
4
Insert the sheet or envelope into the
bypass tray as shown with the print
side face down.
• When inserting an envelope, the flap
should be positioned on the left side as
shown.
Note: If you find it necessary to
remove the sheet or envelope,
press this release and open the
side cover first.
BYPASS PAPER!
IF COPY, PRESS
5
SET PAPER SIZE
A
Press
.
1: LETTER
6
Press
7
Press
Z
or
ENTER
A
until the correct size appears in the display.
.
• Changing the size setting: If you need to change the size setting, press
(if the number of copies setting is other than 1, press
“PAP. SIZE RESET?” will appear. Press
twice).
to select YES and then reset
the paper size.
8
Select temporary copy settings as needed and then press
to begin
copying.
• If you placed multiple originals in the auto document feeder or set the
number of copies to more than “1”, copying will stop after the first copy is
made and the display will alternately show SET BYPASS PAPER and the
required paper size. When you insert the next sheet or envelope in the
bypass tray, the next copy will start automatically.
66
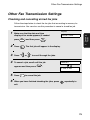
3. Sending Faxes
Sending a Fax
Follow the steps below to send a fax. To dial the fax number of the receiving
machine, you can either directly enter the number with the number keys
(Direct Keypad Dialling), or press
SPEED
and enter a two-digit Speed Dial
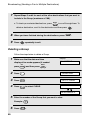
♦ To use a Speed Dial number, you must first store the number in the
machine as explained on page 72.
♦ You can perform the following procedure even when the machine is already
busy sending or receiving a fax. In this case, the fax transmission will be
stored in the machine’s memory and performed once all previously stored
jobs have been completed.
1
Make sure that the date and time
display of fax mode appears (if needed
press
FAX
Display:
∗∗ FAX ∗∗
).
10/03 11:37
Date and
time
FAX
Reception
mode
(page 95)
67
3. Sending
Faxes
number (Speed Dialling).
Sending a Fax
2
Place the original on the document glass or in the auto document
feeder.
Using the document glass:
Open the document glass cover and place
the original face down on the glass with
the top edge against the document guide.
• Make sure the centre of the original is
aligned with the centre mark on the
document guide, and then close the
cover.
Using the auto document feeder:
Adjust the document guide to the width of
your original(s), and then insert the
originals face up into the feeder.
• Up to 20 A4-size sheets can be
inserted at once.
• For detailed information on using the
auto document feeder and the types of
originals that can be used, see pages
62 to 64.
♦ If an original is placed in both the auto document feeder and on the
document glass, the original in the auto document feeder will be faxed.
♦ When the document glass is used to send a fax, the document image
printed by the receiving machine may be reduced slightly more than when
the auto document feeder is used, and there may be a slightly larger
margin at the bottom of the page (this will depend on the size of paper
used by the receiving machine).
68
Sending a Fax
3
The default temporary fax settings are as follows. To change a setting,
see Selecting Temporary Fax Settings on page 77.
• Resolution: STANDARD
(Note: The default resolution setting can be changed as explained on page
84.)
• Contast: NORMAL
3. Sending
Faxes
• Duplex Scan: OFF
• Line monitor: OFF
(Note: The default Line Monitor setting can be changed as explained on
page 85.)
Note: After temporary fax settings are selected, the settings will revert to the
above default settings if the auto clear time elapses without any keys being
pressed on the operation panel (see page 50). You can also press
to
reset the settings to the default settings.
4
Enter the number of the receiving machine using one of the following
methods:
• Direct Keypad Dialling: Press the number keys to enter the fax number.
Note: If a pause is required between any of the digits to access a special
service or an outside line, press
REDIAL
. The pause will appear as a hyphen.
Several pauses can be entered in a row.
• Speed Dialling: Press
SPEED
and enter the 2-digit Speed Dial number that
has been stored for the receiving fax machine (see page 72).
Example: Speed Dial 01:
SPEED
• Search Dialling: If you cannot remember which Speed Dial number you
stored a destination in, you can press
Z
or
A
until the destination
appears in the display (the name programmed for the destination will
appear, or the fax number if no name was programmed).
69
Sending a Fax
5
Check the display. If the name or number shown is correct, press
• If you made a mistake when entering a number, press
.
to backspace
and clear one digit at a time, and then re-enter the correct digit(s).
6
Scanning of the original(s) will begin.
• If you are using the auto document feeder:
After the originals are scanned, the machine will dial the receiving machine
and send the fax. If the machine is busy with a previously stored job, the fax
job will be stored in memory and then transmitted once the machine is free.
• If Duplex Scan is selected: After the stack of originals is fed through the
auto document feeder, turn the entire stack over (do not change the order of
the pages or remove any pages), insert it into the auto document feeder
again, and press
. After scanning is finished, the machine will dial the
receiving machine and send the fax. If the machine is busy with a
previously stored job, the fax job will be stored in memory and then
transmitted once the machine is free.
• If you are using the document glass:
After the original is scanned, the following alternating messages will
appear:
START: CONT. READ
# KEY: END OF SET
Remove the original from the document glass, place the next original, and
press
. Repeat until all originals have been scanned. After the last
original has been scanned, press
to end scanning. The machine will
dial the receiving machine and send the fax. If the machine is busy with a
previously stored job, the fax job will be stored in memory and then
transmitted once the machine is free.
Note: If no keys are pressed for one minute after the original is scanned,
fax transmission will begin automatically (or the job will be stored).
70
Sending a Fax
• If the transmission is completed successfully, the machine will beep once.
• If an error occurs, the machine will beep three times and print a
Transaction Report to inform you of the problem (see page 130).
If the memory becomes full while the document is being scanned, MEMORY
IS FULL will appear in the display.
♦ Press
if you want to transmit the pages which have been stored up to
that point in memory. If you are using the auto document feeder, the
remaining pages will feed out without being scanned. After transmission,
the memory will be cleared and you can transmit the remaining pages. You
will also need to transmit the page which was being scanned when the
memory filled up.
♦ Press
if you want to cancel the entire transmission.
Using the REDIAL key
When sending a fax, you can also automatically redial the last number
dialled by the machine. Follow the fax sending procedure on the previous
pages. In Step 4, press
REDIAL
, make sure the number that appears in the
display is the number you wish to dial, and then press
. Scanning of
the originals will begin (see Step 6).
71
3. Sending
Faxes
If the memory becomes full...
Storing a Number for Speed Dialling
Storing a Number for Speed Dialling
You can dial a fax number by pressing
SPEED
and entering a two-digit number.
This is called Speed Dialling.
♦ To use Speed Dialling, you must first store the full fax number in the
machine and select a two-digit Speed Dial number for it. One hundred
Speed Dial numbers are available (00 to 99).
1
Make sure that the date and time
display of fax mode appears (if needed
press
FAX
) and then press
MENU
Display:
FAX SETTING
.
2
Press
.
1: SPEED DIAL
3
Press
.
1: NEW, 2: CHANGE
4
Press
.
ENTER FAX NUMBER
5
Enter the fax number by pressing the number keys (max. of 60 digits).
(Note: A space cannot be entered.)
• To clear a mistake, press
Z
.
• If a pause is required between any of the digits to access a special service
or an outside line, press
REDIAL
. The pause appears as a hyphen. Several
pauses can be entered in a row.
6
72
Press
ENTER
.
Storing a Number for Speed Dialling
Enter a name by pressing number keys for each letter as shown in the
chart below. Up to 20 characters can be entered. (If you do not wish to
enter a name, go directly to Step 8.)
Example: SHARP = 7777 44 2 777
SPACE =
A=
A
7
G=
N=
U=
H=
O=
V=
B=
I =
P=
W=
C=
J=
Q=
X=
D=
K=
R=
Y=
E=
L=
S=
Z=
F=
M=
T=
3. Sending
Faxes
7
♦ To enter two letters in succession that require the same key, press
after entering the first letter. To clear a mistake, press
Z
A
.
♦ To enter a lower case letter, continue pressing the key for the letter until the
lower case letter appears.
♦ To enter one of the following symbols, press
or
repeatedly:
#@.-_/!$%&’()+,:;=?[ ]{ }+
Note: National characters of the selected display language will appear at
the end of the symbol list. (For some languages, no national characters will
appear.)
8
Press
ENTER
.
SUPER G3
1: ON, 2: OFF
73
Storing a Number for Speed Dialling
9
Press
if you want the machine to
use Super G3 mode (the fastest
transmission mode) when using this
STORED #01 OK?
number. Press
if you do not want
the machine to use Super G3 mode.
NO: SET SPEED #
• Press
YES: PRESS ENTER
for OFF if line errors
frequently result when Super G3 mode
is used.
Note: “#01” is shown as
an example above.
• Note that even when ON is selected,
Super G3 mode is used only if the other
machine also supports Super G3
mode.
10
The display will show the next available Speed Dial number. If that
number is acceptable, press
number and press
11
ENTER
ENTER
. If not, enter the desired two-digit
.
Return to Step 4 to store another number, or press
repeatedly to
exit.
• To confirm that an auto-dial number has been stored correctly, print out the
Telephone Number List as explained on page 129.
74
Storing a Number for Speed Dialling
Editing and deleting auto-dial numbers
If you need to make changes to a previously stored auto-dial number, or clear
a number, follow these steps:
Display:
Make sure that the date and time
display of fax mode appears (if needed
press
FAX
) and then press
MENU
FAX SETTING
.
3. Sending
Faxes
1
2
Press
.
1: SPEED DIAL
3
Press
.
1: NEW, 2: CHANGE
4
Press
.
1: EDIT, 2: CLEAR
5
Press
6
Enter the 2-digit Speed Dial number that you wish to edit or delete (for
to edit a number, or
example, press
), or press
to delete a number.
Z
or
A
until the name or fax
number of the destination appears in the display and press
• If you pressed
7
ENTER
.
for CLEAR in Step 5, go to Step 12.
If you selected EDIT in Step 5, make the desired changes to the number.
• To move the cursor to the right, press
A
. When the cursor is over a digit
that you wish to change, simply enter the new digit. The new digit will
replace the old digit. To backspace and clear digits, press
Z
.
• If you do not wish to change the number, go directly to Step 8.
75
Storing a Number for Speed Dialling
8
Press
9
Make the desired changes to the name.
ENTER
.
• To move the cursor to the right, press
A
. When the cursor is over a letter
that you wish to change, press the appropriate number key repeatedly until
the desired letter appears (see Step 7 on page 73). The new letter will
replace the old letter. To backspace and clear letters, press
Z
.
• If you do not wish to change the name, go directly to Step 10.
10
Press
ENTER
.
SUPER G3
1: ON, 2: OFF
11
Press
press
12
76
if you want the number to use Super G3 mode. Otherwise
.
Return to Step 4 to edit or delete another number, or press
repeatedly to exit.
Selecting Temporary Fax Settings
Selecting Temporary Fax Settings
You can adjust one or more of the following temporary fax settings before
pressing
to begin transmission.
Resolution
STANDARD
Use STANDARD for ordinary documents. This
setting gives you the fastest and most
economical transmission.
FINE
Use FINE for documents containing small letters
or fine drawings.
SUPER FINE
Use SUPER FINE for documents containing
very small letters or very fine drawings.
HALF TONE
Use HALF TONE for photographs and
illustrations. The original will be reproduced in
256 shades of gray.
3. Sending
Faxes
The following resolution settings are available for faxing:
QUALITY
To select a resolution setting, press
the display and then press
ENTER
until the desired setting appears in
.
Note: The resolution and contrast settings are only effective for sending a
document. They are not effective for receiving a document.
Contrast
Three contrast settings are available for faxing: LIGHT (for dark originals),
NORMAL, and DARK (for faint originals).
CONTRAST
To adjust the contrast, press
display and then press
ENTER
until the desired setting appears in the
.
77
Selecting Temporary Fax Settings
Duplex Scan
Duplex Scan provides a convenient method for faxing multiple two-sided
originals using the auto document feeder. When this setting is selected, after
the stack of originals is fed through the auto document feeder the first time,
you simply turn the stack over (do not change the order of the pages or
remove any pages), insert it into the auto document feeder again, and press
to scan the back side of the originals. The machine will automatically
transmit the pages in the correct order (front of 1st page, back of 1st page,
front of 2nd page, back of 2nd page, etc.).
♦ Note that any blank sides must be included when scanning the pages (if the
number of pages is not equal each time the machine scans the stack, an
error will result).
To select Duplex Scan, press
ON” appears, and then press
DUPLEX SCAN
ENTER
once or twice so that “DUPLEX SCAN
.
Line Monitor
Select this setting when you wish to listen to the line (hear the dial tone, fax
tones, etc.) through the machine’s speaker during a fax transmission. This is
useful when you wish to make sure that the receiving machine is responding
correctly.
To select Line Monitor, press
FAX
one or more times until MONITOR ON
appears in the display.
♦ The Line Monitor setting automatically reverts to the default setting after the
fax transmission is finished.
78
Other Fax Transmission Settings
Other Fax Transmission Settings
Checking and cancelling stored fax jobs
Follow the steps below to check the fax jobs that are waiting in memory for
transmission. You can also use this procedure to cancel a stored fax job.
Make sure that the date and time
display of fax mode appears (if needed
press
FAX
) and then press
MENU
2
Press
3
Press
4
To cancel a job, scroll until the job
Display:
FAX SETTING
3. Sending
Faxes
1
.
. The first job will appear in the display.
Z
or
A
to scroll through the jobs.
appears and then press
ENTER
CANCEL?
.
1: YES, 2: NO
5
Press
6
When you have finished checking the jobs, press
to cancel the job.
repeatedly to
exit.
79
Other Fax Transmission Settings
Automatic redialling when the line is busy
If you use Direct Keypad Dialling, Speed Dialling, or Search Dialling to send a
fax and the line is busy, the machine will automatically redial the number. The
machine will make two redial attempts at intervals of five minutes.
♦ To cancel a job that is waiting for automatic redialling, follow the procedure
in Checking and cancelling stored fax jobs on page 79. (When you scroll to
the job during the procedure, the number or name of the destination will
alternate with RECALL: BUSY in the display.)
♦ Under certain conditions (for example if a person answers the call on a
telephone), automatic redialling may stop before the set number of redial
attempts are made.
Recall interval for automatic redialling when the line is
busy
If desired, you can change the interval at which the machine makes automatic
redialling attempts when the line is busy.
♦ The initial setting is “05” minutes.
1
Make sure that the date and time
display of fax mode appears (if needed
press
FAX
) and then press
MENU
Display:
FAX SETTING
.
2
Press
.
1: AUTO RECALL
3
Press
3 times.
ENTER (01 - 15) 05
RECALL INTERVAL
4
Press the numeric keys to enter the
desired interval in minutes (any 2-digit
number from 01 to 15; 04 to 15 in
Poland).
Example: 1 minute
80
The display briefly shows
your selection, then:
2: RECALL TIMES
Other Fax Transmission Settings
5
Press
repeatedly to exit.
Recall times for automatic redialling when the line is busy
3. Sending
Faxes
If desired, you can change the maximum number of automatic redialling
attempts made when the line is busy.
♦ The initial setting is “02” times.
1
Make sure that the date and time
display of fax mode appears (if needed
press
FAX
) and then press
MENU
Display:
FAX SETTING
.
2
Press
.
1: AUTO RECALL
3
Press
twice.
1: RECALL INTERV.
4
Press
.
ENTER (00 - 14) 02
RECALL TIMES
5
Press the numeric keys to enter the
desired number of recall attempts (any
2-digit number from 00 to 14; 00 to 09
in Poland).
The display briefly shows
your selection, then:
1: RECALL INTERV.
Example: 5 attempts
6
Press
repeatedly to exit.
81
Other Fax Transmission Settings
Automatic redialling after a line error
If you use Direct Keypad Dialling, Speed Dialling or Search Dialling to send a
fax and a line error occurs during the transmission, the machine will
automatically redial the number and attempt to complete the transmission.
Retransmission will begin from the page which was being transmitted when
the error occurred. The machine will make one attempt at retransmission after
an interval of two minutes.
♦ To cancel a job that is waiting for automatic redialling, follow the procedure
in Checking and cancelling stored fax jobs on page 79. (When you scroll to
the job during the procedure, the number or name of the destination will
alternate with RECALL: ERROR in the display.)
Recall interval for automatic redialling after a line error
occurs
If desired, you can change the interval after which the machine makes an
automatic redialling attempt when a line error occurs.
♦ The initial setting is “02” minutes.
1
Make sure that the date and time
display of fax mode appears (if needed
press
FAX
) and then press
MENU
Display:
FAX SETTING
.
2
Press
.
1: AUTO RECALL
3
Press
.
1: RECALL [BUSY]
4
Press
.
1: RECALL INTERV.
5
Press
.
ENTER (01 - 15) 02
RECALL INTERVAL
82
Other Fax Transmission Settings
7
Press the numeric keys to enter the
desired interval in minutes (any 2-digit
number from 01 to 15; 04 to 15 in
Poland).
Example: 1 minute
Press
The display briefly shows
your selection, then:
2: RECALL TIMES
repeatedly to exit.
Recall times for automatic redialling after a line error
occurs
You can select “0” or “1” for the number of automatic redialling attempts after a
line error occurs.
♦ The initial setting is “1”.
1
Make sure that the date and time
display of fax mode appears (if needed
press
FAX
) and then press
MENU
Display:
FAX SETTING
.
2
Press
.
1: AUTO RECALL
3
Press
.
1: RECALL [BUSY]
4
Press
twice.
ENTER (0 - 1) 1
RECALL TIMES
5
Press the numeric keys to enter the
desired number of recall attempts (0 or
1).
The display briefly shows
your selection, then:
1: RECALL INTERV.
Example: 0 attempts
6
Press
repeatedly to exit.
83
3. Sending
Faxes
6
Other Fax Transmission Settings
Default resolution for faxing
The default resolution for faxing is initially set to STANDARD. If desired, you
can change the default resolution to FINE or SUPER FINE.
1
Make sure that the date and time
display of fax mode appears (if needed
press
FAX
) and then press
2
Press
.
3
Press
.
4
Select the resolution setting:
MENU
: STANDARD
: FINE
: SUPER FINE
5
84
Press
repeatedly to exit.
Display:
FAX SETTING
.
1: AUTO RECALL
The display briefly shows
your selection, then:
3: LINE MONITOR
Using an Extension Phone to Send a Fax
Default Line Monitor setting
The default setting for Line Monitor (listening to the line and fax tones through
the speaker during a fax transmission) is initially MONITOR OFF. If desired,
you can change the default setting to MONITOR ON.
Make sure that the date and time
display of fax mode appears (if needed
FAX
press
) and then press
MENU
Display:
FAX SETTING
.
3. Sending
Faxes
1
2
Press
twice.
1: MONITOR ON
3
Press
to select MONITOR ON or
The display briefly shows
your selection, then:
to select MONITOR OFF.
4
Press
4: TIMER SEND
repeatedly to exit.
Using an Extension Phone to Send a Fax
If you have connected an extension phone as explained on page 15, you can
use the extension phone to send a fax.
♦ Using an extension phone to send a fax allows you to listen to the line and
talk to the other party before faxing.
♦ This procedure cannot be used when the machine is busy with another job.
Note that if the transmission is not sucessful because the line is busy or a
line error occurs, automatic redialling will not take place.
1
Make sure that the date and time display of fax mode appears (if needed
press
FAX
).
85
Using an Extension Phone to Send a Fax
2
Place the original on the document glass or in the auto document
feeder.
• If the document glass is used, only one page can be transmitted.
• If needed, select the resolution and/or contrast.
3
Pick up the extension phone, listen for the dial tone, and dial the fax
number of the receiving machine using the keypad of the extension
phone.
4
Depending on the setting of the other machine, you will either hear a fax
tone or the other person will answer.
• If the other person answers, ask them to press their Start key. This causes
the other machine to issue a fax tone.
5
When you hear the fax tone, press
on the machine.
6
Press
1:SEND, 2:RECEIVE
to select SEND. Replace the extension phone.
• Transmission will begin.
86
MANUAL MODE
Broadcasting (Sending a Fax to Multiple Destinations)
Broadcasting (Sending a Fax to Multiple
Destinations)
This function allows you to send the same fax to as many as 100 different
destinations in just one operation.
♦ When sending to multiple destinations, only destinations that have been
1
Make sure that the date and time display of fax mode appears (if needed
FAX
press
2
).
Place the original on the document glass or in the auto document
feeder.
• If needed, select temporary fax settings such as the resolution and
contrast.
3
Press
BROADCAST MODE
BROADCAST
ENTER SPEED # OR
SELECT BY
4
,
Select a destination using one of the methods below.
• Enter the 2-digit Speed Dial number of the destination.
• Press
Z
or
A
until the name of the destination appears in the display
(if no name was stored, the number will appear).
5
Press
ENTER
to store the destination.
87
3. Sending
Faxes
stored as Speed Dial numbers can be selected (full fax numbers cannot be
dialled).
Broadcasting (Sending a Fax to Multiple Destinations)
6
Repeat Steps 4 and 5 for each of the other destinations to which you
wish to send the fax (maximum of 100).
• To check your selected destinations, press
MENU
to scroll through them. To
delete a destination, scroll to the destination and then press
7
When you are ready to begin transmission, press
.
.
• A Transaction Report is automatically printed out after Broadcasting is
completed. Check the "Note" column of the report to see if any of the
destinations are marked "Busy" or have a communication error code. If so,
send the document to those destinations again.
Broadcasting using a Group Key
If the fax machines to which you want to broadcast have all been programmed
into a Group (see Storing numbers in a Group which follows), you can perform
the broadcasting operation using the following simplified procedure:
1
Make sure that the date and time display of fax mode appears (if needed
press
2
FAX
).
Place the original on the document glass or in the auto document
feeder.
• If needed, select temporary fax settings such as the resolution and
contrast.
88
3
Press
4
Press
A
once or twice to display Group 1 or Group 2.
. Transmission will begin.
Broadcasting (Sending a Fax to Multiple Destinations)
Storing numbers in a Group
Groups allow you to send a fax to a group of fax machines by simply
specifying the appropriate Group. To store a group of numbers in a Group,
follow the steps below.
♦ Two groups are available, Group 1 and Group 2.
♦ Up to 100 numbers can be stored in each Group.
1
Display:
Make sure that the date and time
display of fax mode appears (if needed
press
FAX
) and then press
MENU
FAX SETTING
.
2
Press
.
1: SPEED DIAL
3
Press
.
1: SET, 2: CLEAR
4
Press
to select SET.
The first available
Group appears:
• Note which Group number (Group 1 or
Group 2) appears in the display. This is
the number of the Group you are
storing.
5
3. Sending
Faxes
Only Speed Dial numbers can be stored in a Group. Full numbers cannot be
stored.
GROUP 1
ENTER SPEED # OR
SELECT BY
,
Select a destination using one of the methods below.
• Enter the 2-digit Speed Dial number of the destination.
• Press
Z
or
A
until the name of the destination appears in the display
(if no name was stored, the number will appear).
6
Press
ENTER
to store the destination.
89
Broadcasting (Sending a Fax to Multiple Destinations)
7
Repeat Steps 5 and 6 for each of the other destinations that you want to
include in the Group (maximum of 100).
• To check your selected destinations, press
MENU
to scroll through them. To
delete a destination, scroll to the destination and then press
8
When you have finished storing the destinations, press
9
Press
ENTER
.
.
repeatedly to exit.
Deleting a Group
Follow the steps below to delete a Group.
1
Display:
Make sure that the date and time
display of fax mode appears (if needed
press
FAX
) and then press
MENU
FAX SETTING
.
2
Press
.
1: SPEED DIAL
3
Press
.
1: SET, 2: CLEAR
4
Press
to select CLEAR.
GROUP CLEAR
ENTER GROUP #
5
Enter the number of the Group that you want to clear.
Example:
6
90
Press
ENTER
.
Timer Transmission
7
Press
repeatedly to exit.
The Timer function allows you to store a fax job to be transmitted
automatically at a specified time. Up to four timer fax jobs can be stored at
once, and the time of each can be specified up to a week in advance.
♦ You can use this function to take advantage of off-peak rates without having
to be there when the fax is sent.
Note: If a power failure occurs or the machine’s power cord is unplugged after
a timer transmission job is stored, the job will be cleared from memory. When
the power is restored, a MEMORY CLEAR report will be printed to inform you
that the job was cleared. If this happens, store the job again.
1
Make sure that the date and time display of fax mode appears (if needed
press
FAX
).
2
Place the original on the document glass or in the auto document
feeder.
3
Press
4
Press
.
1: AUTO RECALL
5
Press
.
1: SET, 2: CLEAR
Display:
MENU
.
FAX SETTING
91
3. Sending
Faxes
Timer Transmission
Timer Transmission
6
Press
to select SET.
• Note which Timer number (Timer 1, 2,
3, or 4) appears in the display. This is
the number of the Timer job you are
storing.
7
The first available
Timer number appears:
TIMER NUMBER=1
ENTER TIME
Enter the time at which you want the fax to be sent.
• Enter two-digits for the hour (“00” to “23”) and two-digits for the minute (“00”
to “59”).
Example: 9:25
8
Enter a number as follows to select the day of the operation (skip this
step if the fax will be sent within the next 24 hours):
Sunday
Monday
Tuesday
Wednesday
Thursday
Friday
Saturday
9
92
Press
ENTER
.
ENTER STATION #
Timer Transmission
Specify the destination using one of the methods below:
• Press
press
• Press
SPEED
, enter the 2-digit Speed Dial number of the destination, and
ENTER
Z
.
or
A
until the name of the destination appears in the display
(if no name was stored, the number will appear), and press
• Enter the full fax number of the destination and press
ENTER
ENTER
3. Sending
Faxes
10
.
.
11
If needed, select temporary fax settings such the the resolution and
contrast.
12
Press
. The original is scanned and the timer job is stored.
93
Timer Transmission
Cancelling a timer job
If you need to cancel a timer job before it is performed, follow the steps below.
♦ You will need to know the timer number assigned to the job in order to
cancel it. If you don’t remember the number (it appears in the display when
you store the job), print out the Timer List. (See page 128.)
1
Make sure that the date and time
display of fax mode appears (if needed
press
FAX
) and then press
MENU
Display:
FAX SETTING
.
2
Press
.
1: AUTO RECALL
3
Press
.
1: SET, 2: CLEAR
4
Press
to select CLEAR.
ENTER TIMER #
TIMER CLEAR
5
Enter the number of the timer job that you want to clear.
Example:
6
94
Press
repeatedly to exit.
4. Receiving Faxes
Selecting the Reception Mode
The machine has two modes for receiving faxes:
FAX ONLY mode:
Select this mode when you only want to receive faxes on your line. The
machine will automatically answer all calls on one ring and receive incoming
faxes. (“FAX” will appear in the fax mode display.)
EXT. TEL mode:
Select this mode when you have connected an extension phone as explained
on page 17 and you want to receive both faxes and voice calls on the line
connected to the machine. All calls, including faxes, must be answered by
picking up the extension phone. (“TEL” will appear in the fax mode display.)
4. Receiving
Faxes
To select the reception mode, follow the steps below.
♦ The reception mode is initially set to FAX ONLY mode.
1
Make sure that the date and time
display of fax mode appears (if needed
press
FAX
) and then press
MENU
Display:
FAX SETTING
.
2
Press
.
1:RECEPTION MODE
3
Press
.
1: FAX ONLY
4
Select the reception mode:
: FAX ONLY
5
Press
: EXT. TEL
The display briefly shows
your selection, then:
2: NUMBER OF RING
repeatedly to exit.
Fax mode display when
FAX ONLY is selected:
10/03 11:37
FAX
Fax mode display when
EXT. TEL is selected:
10/03 11:37
TEL
95
Using FAX ONLY Mode
Using FAX ONLY Mode
When the reception mode is set to FAX ONLY, the machine will automatically
answer all calls on one ring and receive incoming faxes.
♦ The number of rings on which the machine answers can be changed as
explained below.
♦ When the reception mode is set to FAX ONLY mode, the machine will
receive faxes automatically no matter whether it is in copy, fax, or scan
mode.
Changing the number of rings
If desired, you can change the number of rings on which the machine answers
incoming calls in FAX ONLY mode. Any number from 0 to 5 can be selected.
♦ To have the machine answer without ringing, enter 0.
1
Make sure that the date and time
display of fax mode appears (if needed
press
FAX
) and then press
2
Press
.
3
Press
.
MENU
Display:
FAX SETTING
.
1:RECEPTION MODE
ENTER (0-5) (1)
NUMBER OF RING
4
Enter the desired number of rings (any
number from 1 to 5), or enter 0 to have
the machine answer without ringing.
Example: 3 rings
5
96
Press
repeatedly to exit.
The display briefly shows
your selection, then:
3: RECEIVE RATIO
Using EXT. TEL Mode
Using EXT. TEL Mode
When the reception mode is set to EXT. TEL, you must answer all calls (even
faxes) by picking up an extension phone that is connected as explained on
page 17.
1
When the machine and extension phone ring, make sure that the date
and time display of fax mode appears (if needed press
FAX
on the
machine) and then pick up the extension phone.
• Important! The machine must be in fax mode before you pick up the
extension phone, or fax reception will not be possible.
If you hear a fax tone, press
on
MANUAL MODE
4. Receiving
Faxes
2
the machine.
• If the other party first speaks with you
1:SEND, 2:RECEIVE
and then wants to send a fax, press
after speaking. (Press
before the sender presses their Start
key.)
3
Press
to select RECEIVE. Replace the extension phone.
• RECEIVING will appear in the display and reception will begin.
97
Using EXT. TEL Mode
Reception Ratio
The machine has been set at the factory to automatically reduce the size of
received documents to fit the size of the printing paper. This ensures that data
on the edges of the document are not cut off. If desired, you can turn this
function off and have received documents printed at full size.
♦ If a document is too long to fit on the printing paper, the remainder will be
printed on a second page. In this case, the cut-off point may occur in the
middle of a line.
♦ Automatic reduction may not be possible if the received document is too
large, contains too many fine graphics or images, or is sent at high
resolution. In this case, the remainder of the document will be printed on a
second page.
1
Make sure that the date and time
display of fax mode appears (if needed
press
FAX
) and then press
FAX SETTING
.
2
Press
.
1:RECEPTION MODE
3
Press
.
1: AUTO
4
Press
(AUTO) to select automatic
reduction, or
size printing.
5
98
MENU
Display:
Press
(100%) to select full-
repeatedly to exit.
The display briefly shows
your selection, then:
4: POLLING
Substitute Reception to Memory
Substitute Reception to Memory
In situations where printing is not possible, such as when the machine runs
out of paper, the toner cartridge needs replacement, or the paper jams,
incoming faxes will be received to memory. Incoming faxes will also be
received to memory if a sheet of paper or envelope is inserted in the bypass
tray (fax reception cannot take place on paper in the bypass tray).
When you have received a fax in memory, FAX RX IN MEMORY will appear in
the display, alternating with a message that indicates the problem. When you
resolve the problem, the stored faxes will automatically print out.
♦ If you received faxes in memory because the machine ran out of paper, be
Caution!
♦ When faxes are stored in memory, do not turn the power off. This will erase
all of the contents.
♦ If faxes received in memory are lost due to a power failure or other
interruption in the power supply, a CLEAR REPORT will be printed out
when the power is restored. This provides information about the receptions
lost, including the fax numbers of the transmitting machines if they are
available.
99
4. Receiving
Faxes
sure to add paper which is the same size as the paper previously used. If
not, the document print-out size may not match the size of the printing
paper.
5. Special Fax Functions
Polling (Requesting a Fax Transmission)
Polling allows you to call another fax machine and have it send a document
(previously loaded in the machine’s feeder or stored in memory) to your
machine without assistance from the operator of the other machine.
Hint: Polling is useful when you want the receiving fax machine, not the
transmitting fax machine, to bear the cost of the call.
♦ To use the polling function, the other machine must be capable of being
polled.
♦ Before polling, make sure the other machine is set up to receive your
polling request.
1
Display:
Make sure that the date and time
display of fax mode appears (if needed
press
FAX
) and then press
MENU
FAX SETTING
.
2
Press
.
1:RECEPTION MODE
3
Press
.
POLLING
ENTER STATION #
4
Dial the number of the machine that you want to poll using one of the
following methods:
• Enter the full fax number and press
• Press
• Press
SPEED
Z
.
, enter a 2-digit Speed Dial number, and press
or
A
until the name of the party appears in the display (or
the number if no name was stored), and press
100
.
.
Being Polled (Memory Polling)
5
Your machine will call the other machine and receive the fax.
Being Polled (Memory Polling)
To let another fax machine poll your machine, you must first store the
document in memory using the following procedure. Transmission will take
place when the other fax machine calls your machine and activates polling.
You can choose whether to allow polling only once, or an unlimited number of
times. In the latter case, your machine can be used as an electronic "bulletin
board".
♦ If you allow polling only once, the document(s) will be automatically cleared
1
Place the original on the document glass or in the auto document
feeder.
2
Make sure that the date and time
display of fax mode appears (if needed
5. Special
Functions
from memory after polling. If you allow polling an unlimited number of times,
the document will remain in memory until you clear it as explained in the
following section, Clearing a memory polling document.
Display:
press
FAX
) and then press
MENU
FAX SETTING
.
3
Press
.
1: AUTO RECALL
4
Press
.
1: SET, 2: CLEAR
5
Press
to select SET.
1: ONCE, 2: REPEAT
6
Press
to allow polling only once, or
to allow polling an
unlimited number of times.
101
Being Polled (Memory Polling)
7
If needed, select the resolution and/or contrast (otherwise, skip this
step).
8
Press
.
• The document is scanned into memory.
• Make sure the reception mode is set to FAX ONLY (see page 95). (When
the polling fax machine calls, the machine must answer automatically in
order to transmit the document.)
Clearing a memory polling document
To clear a memory polling document from memory, follow these steps:
1
Display:
Make sure that the date and time
display of fax mode appears (if needed
press
FAX
) and then press
MENU
FAX SETTING
.
2
Press
.
1: AUTO RECALL
3
Press
.
1: SET, 2: CLEAR
4
Press
to select CLEAR.
M. POLL CLEAR
PRESS ENTER KEY
5
Press
ENTER
.
• The document is cleared from memory.
102
6. Printing
Printing a Document From an Application
♦ To use the machine as a printer, the machine must be connected to your
computer with a USB cable, and the printer driver must be installed on your
computer (see page 25).
1. When you are ready to print a document from an application on your
computer, select Print from the File menu.
The Print dialog box appears.
2. If you need to select a special size of paper or adjust any of the other print
settings, click Properties, Setup, or Printer in the Print dialog box (the name
of the button varies depending on the application).
The SHARP AM-400 Printing Preferences (“SHARP AM-400 Properties” in
some versions of Windows) appear. Adjust the settings as desired (see page
104), and then click OK.
Note: Do not use the keys on the machine to adjust print settings. The
machine keys are only for copying and faxing.
4. Select the print range and adjust any other settings as desired in the Print
dialog box.
Note: When you adjust the print settings as explained above in Step 2, your
changes will only remain in effect while you are using the application. To make
permanent changes, see page 104.
Cancelling a print job
To cancel a print job that the machine has received, press
PRINT STOP
on the
machine. The display will show the following message:
CANCEL PRINTING?
Press
1: YES, 2: NO
to cancel the print job.
103
6. Printing
5. When you are ready to begin printing, click Print or OK in the Print dialog box.
Selecting Print Settings
Selecting Print Settings
The print settings are selected in the SHARP AM-400 Printing Preferences
(“SHARP AM-400 Properties” in some versions of Windows).
♦ To make temporary changes to the print settings, open the SHARP AM-400
Printing Preferences from an application as explained in Step 2 on page
103. The settings will remain in effect only while the application is running.
♦ To make permanent changes to the print settings, open the SHARP AM400 Printing Preferences from the Printers and Faxes folder (the
Printers folder in Windows® Me/2000) as explained below:
Windows® XP: Click the start button, click Control Panel, click Printers
and Other Hardware, and then click Printers and Faxes. In the Printers
and Faxes window, click on the SHARP AM-400 icon and select Printing
Preferences from the File menu.
Windows® 2000: Click the Start button, point to Settings, and select
Printers. In the Printers window, click on the SHARP AM-400 icon and
select Printing Preferences from the File menu.
Windows® Me: Click the Start button, point to Settings, and select
Printers. In the Printers window, click on the SHARP AM-400 icon, and
select Properties from the File menu.
104
Selecting Print Settings
Page Setup tab
• Select the Paper Size and Paper Source.
• In Page Layout, normally 1 Page per Sheet is selected. If you wish to print
two reduced pages on each sheet of paper, select 2 Pages per Sheet.
• For a normal document, set the Orientation to Portrait. If the document is
oriented so that the width is longer than the height (like a landscape
painting), select Landscape.
• If you set Copies to a number greater than 1, use Output Order to select
how the copies are ordered. The displayed page order changes depending
on whether or not Collate is selected.
Note: When printing from an application that has settings such as “Collate”,
the application settings may override the above printer driver settings.
105
6. Printing
When the Paper Source is set to Tray, the Paper Size can be set to A4.
When the Paper Source is set to BypassTray, the Paper Size can be set
to Letter, Legal, A4, A5, Envelope #10 (105 x 241 mm), Envelope
Monarch (98 x 191 mm), Envelope DL, or A6.
Selecting Print Settings
Advanced tab
The Advanced tab is used to specify how the printed image is scaled to the
paper. Normally Match Page Size is selected so that the image size matches
the paper size selected on the Page Setup tab (the image is not reduced).
106
Selecting Print Settings
• If you wish to scale the image to a smaller size, select Auto Scaling. The
6. Printing
paper size setting on the Page Setup tab will appear in Current Page Size.
Select the size to which you wish to scale the image in Output Size. The
amount of the reduction will be shown in the page image. The following
example shows reduction of an A4-size image to A5 size:
107
Printing on Envelopes and Cards
Printing on Envelopes and Cards
To print on envelopes, cards, and other special sizes of paper, use the bypass
tray on the side of the machine.
The bypass tray can be used to print on the following sizes:
Letter (216 x 279 mm)
Legal (216 x 356 mm)
A4
A5
Envelope #10 (105 x 241 mm)
Envelope Monarch (98 x 191 mm)
Envelope DL (110 mm x 220 mm)
A6 (European postcard) (105 mm x 148 mm)
♦ Only one sheet (envelope, card, etc.) can be inserted at a time in the
bypass tray.
♦ Be sure to select the correct envelope or paper size in the Page Setup tab
of the SHARP AM-400 Printing Preferences (or “Properties”) before
printing. (Select Properties, Setup, or Printer from the Print dialog box to
open the SHARP AM-400 Printing Preferences.)
1
108
Adjust the document guides on the bypass tray to the width of the sheet
or envelope.
Printing on Envelopes and Cards
2
Insert the sheet or envelope into the bypass tray as shown with the print
side face down.
• When inserting an envelope, the flap should be positioned on the left side
as shown.
Note: If you find it
necessary to remove the
sheet or envelope, press
this release and open
the side cover first.
♦ After the sheet is inserted, the display will show the alternating messages
“BYPASS PAPER! / IF COPY, PRESS
copying and can be disregarded.
Select Print from the File menu of your application to open the Print
dialog box. Click “Properties”, “Setup”, or “Printer” (the name of the
button varies depending on the application) in the dialog box to open
the SHARP AM-400 Printing Preferences (or “Properties”). Set the
“Paper Source” to “Bypass Tray” on the “Page Setup” tab and then
select the appropriate paper size.
• Select other settings as needed and click OK. Click Print or OK in the Print
dialog box to begin printing.
• Do not use the keys on the machine to adjust print settings. The machine
keys are only for copying and faxing.
• If you are printing multiple copies or pages, printing will stop after the first
copy/page is printed. When you insert the next sheet or envelope in the
bypass tray, printing will resume automatically.
109
6. Printing
3
“. The messages are only for
7. Scanning
The machine can be used to scan documents to your computer. Both colour
and black and white scanning are possible. You can either begin scanning
from a TWAIN- or WIA-compliant software program, or from the operation
panel of the machine.
♦ To use the machine as a scanner, the machine must be connected to your
computer with a USB cable, and the scanner driver and utility software
(Sharpdesk and Button Manager) must be installed on your computer (see
page 25).
♦ Depending on your system and the application being used, it may take
considerable time to for an image scanned at high resolution to appear on
your monitor. During this time your computer will not respond.
Scanning From a TWAIN Application
You can scan a document into Sharpdesk or any other TWAIN-compliant
software program.
♦ The machine does not need to be in scan mode to scan a document from a
TWAIN application.
1
Place the original on the document glass or in the auto document
feeder.
Using the document glass:
Open the document glass cover and place
the original face down on the glass with
the top edge against the document guide.
• Make sure the centre of the original is
aligned with the centre mark on the
document guide, and then close the
cover.
• Important: Make sure the glass is
clean. Any dirt, fingerprints, hair, or
other debris may affect the quality of
the scanned image.
110
Scanning From a TWAIN Application
• Note: The document glass is not
suitable for scanning books or other
bound documents (the surface to be
copied must lie flat on the glass).
Using the auto document feeder:
Adjust the document guide to the width of
your original(s), and then insert the
originals face up into the feeder.
• Up to 20 A4-size sheets can be
inserted at once. Note that some
applications may only allow you to scan
one page at a time.
• For detailed information on using the
auto document feeder and the types of
originals that can be used, see pages
62 to 64.
2
Start your TWAIN-compliant application on your computer.
3
Click the File menu and select “Select Scanner”.
7. Scanning
• The File menu of Sharpdesk is shown below.
111
Scanning From a TWAIN Application
4
In the dialog box that appears, select “SHARP MFP TWAIN I” and click
the Select button.
Note: The selection WIA-SHARP AM-400 is for WIA applications and is
explained in the following section.
5
Click the File menu and select “Acquire Image”.
6
The TWAIN scanner driver window will appear. Select settings as
desired (see the next page) and then click the Scan button to begin
scanning.
112
Scanning From a TWAIN Application
• If you are using the auto document feeder, select Use Automatic
Document Feeder.
• If you wish to use the standard preset scanning settings, click Photo or
Document as appropriate for the original in the Standard Preset field.
• The Advanced Controls can be adjusted as needed. Note that the
Contrast and Brightness settings only appear when Colour Type is set to
Colour or Grayscale.
• If you wish to specify the area that is scanned, drag the frame that appears
in the preview screen with your mouse. The dimensions of the area will
appear in Width and Height.
• To view a preview of the scanned image using the selected settings, click
7. Scanning
the Preview button.
113
Scanning From a WIA Application (Windows XP/Me only)
Scanning From a WIA Application (Windows
XP/Me only)
If you are using Windows® XP or Windows® Me, you can scan a document
into Paint or any other WIA-compliant application.
♦ The auto document feeder cannot be used to scan a document into a WIA
application.
♦ The maximum resolution is 600 dpi.
♦ The machine does not need to be in scan mode to scan a document from a
WIA application.
1
Place the original on the document glass.
Open the document glass cover and place
the original face down on the glass with
the top edge against the document guide.
• Make sure the centre of the original is
aligned with the centre mark on the
document guide, and then close the
cover.
• Important: Make sure the glass is
clean. Any dirt, fingerprints, hair, or
other debris may affect the quality of
the scanned image.
2
114
Start your WIA-compliant application on your computer.
Scanning From a WIA Application (Windows XP/Me only)
3
Click the File menu and select “From Scanner or Camera”.
• The File menu of Paint is shown below.
If you have WIA drivers for other devices installed on your system, the
“Select Device” window will appear. Select “WIA-SHARP AM-400” and
click the OK button.
7. Scanning
4
115
Scanning From a WIA Application (Windows XP/Me only)
5
The following window will appear. Select the desired scan settings and
then click the Scan button to begin scanning.
• To view a preview of the scanned image using the selected settings, click
the Preview button.
• After the Preview button is pressed and the preview image appears, the
scanning area (indicated by the dotted frame on the preview image) is
automatically set to the size of the original. To change the scanning area,
drag any of the four corners of the dotted frame with your mouse.
116
Scanning From the Scanner Wizard (Windows XP/Me only)
Scanning From the Scanner Wizard
(Windows XP/Me only)
If you are using Windows® XP/Me, you can also scan from the Scanner and
Camera Wizard.
Place the original on the document glass (the auto document feeder cannot
be used). Click the start button, click Control Panel, click Printers and Other
Hardware, and then click Scanners and Cameras. (In Windows Me, click the
Start button, point to Settings, select Control Panel, and then double-click
Scanners and Cameras).
In the window below, right-click the SHARP AM-400 icon and select Get
picture using Scanner Wizard (select Use Wizard in Windows Me).
7. Scanning
The Scanner and Camera Wizard will open. Follow the instructions in the
wizard to scan the original and save the image to your computer.
117
Scanning From the Operation Panel
Scanning From the Operation Panel
You can scan directly from the machine by selecting scan mode and then one
of six scan menus on the operation panel.
♦ To scan from the operation panel, Button Manager must be installed on
your computer and must be running. Button Manager starts automatically
when you start your computer and runs in the background. The Button
Manager icon appears on the Windows taskbar.
♦ Before you can scan from the operation panel, Button Manager must be
selected to handle scanner events as explained on the following page.
Six scan menus (SC1 to SC6) are available on the machine. Each scan menu
is linked to an application on your computer. When you begin scanning after
selecting one of the scan menus, the application linked to that scan menu
automatically starts on your computer and the image is scanned into that
application.
The scan menus are initially linked to the following applications:
SC1:
SC2:
SC3:
SC4:
SC5:
SC6:
Sharpdesk
E-mail
FAX
OCR (Optical Character Recognition)
Microsoft Word
Filing (save to a file on your hard disk)
Important:
♦ To use the FAX application, you must have a fax driver installed on your
computer. The fax driver must be specified in the scan menu settings in
Button Manager as explained on page 125.
♦ To use the OCR application, you must have an OCR program installed on
your computer. The OCR program must be specified in the scan menu
settings in Button Manager as explained on page 126.
118
Scanning From the Operation Panel
Selecting Button Manager to handle scanner events
To scan from the operation panel, you must first select Button Manager as the
program on your computer that handles scanner events from the machine.
Follow the appropriate procedure below and on the following pages for your
operating system.
Windows® XP/Me
1. Click the start button, click Control Panel, and double-click Scanners and
Cameras.
Windows® Me: Click the Start button, point to Settings, select Control
Panel, and then double-click Scanners and Cameras.
♦ If Scanners and Cameras does not appear in the Control Panel in
Windows® Me, click view all Control Panel options.
2. Right-click the SHARP AM-400 icon and select Properties.
7. Scanning
3. The SHARP AM-400 Properties appear. Click on the Events tab.
119
Scanning From the Operation Panel
4. Select SC1 (scan menu SC1) from the Select an event list.
5. In the Actions field, select Start this program and then select Sharp Button
Manager I from the list of programs.
120
Scanning From the Operation Panel
6. Click the Apply button.
7. Repeat Steps 4 through 6 for each of events SC2 through SC6 (select Sharp
Button Manager I for each event). When finished, click the OK button to
close the window.
Windows® 2000
1. Click the Start button, point to Settings, and select Control Panel.
2. In the Control Panel, double-click Scanners and Cameras.
3. Select SHARP AM-400 and click the Properties button.
4. Click the Events tab in the SHARP AM-400 Properties.
5. Select SC1 from the Scanner events list.
6. In Send to this application, select Sharp Button Manager I.
♦ If other applications appear in the list, make sure that none are selected.
7. Click the Apply button.
8. Repeat Steps 5 through 7 for each of events SC2 through SC6 (select Sharp
Button Manager I for each event). When finished, click the OK button to
close the window.
♦ To make the new scanner event settings take effect, you must restart your
7. Scanning
computer.
121
Scanning From the Operation Panel
Scanning a document from the operation panel
1
Press
SCAN
Display:
to select scan mode.
The currently selected
scan menu appears
2
∗∗ SCAN ∗∗
SCAN : SC1
Place the original on the document glass or in the auto document
feeder.
Using the document glass:
Open the document glass cover and place
the original face down on the glass with
the top edge against the document guide.
• Make sure the centre of the original is
aligned with the centre mark on the
document guide, and then close the
cover.
• Important: Make sure the glass is
clean. Any dirt, fingerprints, hair, or
other debris may affect the quality of
the scanned image.
Using the auto document feeder:
Adjust the document guide to the width of
your original(s), and then insert the
originals face up into the feeder.
• Up to 20 A4-size sheets can be
inserted at once. Note that some
applications may only allow you to scan
one page at a time.
• For detailed information on using the
auto document feeder and the types of
originals that can be used, see pages
62 to 64.
Note: If an original is placed in both the auto document feeder and on the
document glass, the original in the auto document feeder will be used.
122
Scanning From the Operation Panel
3
Press
Z
or
Example: Press
4
Press
A
until the desired scan menu appears in the display.
A
once for SC2:
SCAN
: SC2
.
• If the selected scan menu has been set to display the TWAIN driver
settings on your computer (page 125), adjust the settings as desired on
your computer and then click the Scan button (see page 112).
• The document is scanned. The corresponding application starts on your
computer and the image appears in that application.
Configuring Button Manager settings
Follow the steps below to configure or change the settings of any of the six
preset scan menus of Button Manager.
1. Right-click the Button Manager icon on the Windows taskbar and select
7. Scanning
Settings from the pop-up menu.
123
Scanning From the Operation Panel
♦ If the Button Manager icon does not appear on the taskbar, click the start
button, select All Programs (Programs in Windows® 2000/Me), select
Sharp Button Manager I, and then click Button Manager to start Button
Manager.
2. In the Scan Button Destination Settings window, click the tab of the scan
menu that you want to configure. Adjust the settings as explained below.
♦ The SC1 tab (initially linked to Sharpdesk) is shown as an example.
• If you wish to assign a different application to the scan menu, select the
desired application in Application Selection.
• In File Format, select the format of the image file that will be created.
Note: File Format appears when Sharpdesk, E-mail, or Microsoft Word is
selected as the application. See the following pages for the settings that
appear in this field when FAX, OCR, or Filing is selected.
124
Scanning From the Operation Panel
• If you wish to have the TWAIN driver open on your computer during
scanning from the operation panel to allow you to select scan settings,
select Show TWAIN setting screen when scanning.
• In the Scan Setup field, select the Colour Mode, Image Area, and
Resolution.
• When FAX is selected as the application
7. Scanning
To select the fax driver that is used to send the scanned image as a fax,
click FAX source refer in the FAX field. Select the desired fax driver in the
FAX Source window and click OK. The selected driver will appear in FAX
source name.
125
Scanning From the Operation Panel
• When OCR is selected as the application
To select the OCR program to be used, click Refer in the OCR field. Select
the desired program in the Application window and click OK. The selected
program will appear in Start-Up Application. Select the Start-Up Option
and File Format.
126
Scanning From the Operation Panel
• When Filing is selected as the application
To select the folder where the image file will be saved, click Refer in the
Filing field. Select the desired folder in the Browse for Folder window and
click OK. The selected folder will appear in Path. Select the File Format.
3. When you have finished configuring the settings, click the OK button to save
your settings and close the Scan Button Destination Settings window.
7. Scanning
• To save your settings without closing the window, click Apply.
127
8. Printing Lists
You can print lists showing settings and information entered in the machine,
and recent fax transactions. The lists are described below. To print a list,
follow these steps.
Display:
1
Press
MENU
and then
Z
or
A
REPORT&LIST
until the display at right appears.
2
Press
3
Press
4
Press
ENTER
Z
or
ENTER
1. ACTIVITY LIST
.
A
until the desired list appears in the display.
once.
Activity List
This list shows information on your most recent 30 fax transactions. The
report is divided into two parts: the SEND REPORT, which shows information
on fax transmissions, and the RECEIVE REPORT, which shows information
on fax receptions.
♦ All information is erased after a report is printed out. If information on 30 fax
transactions accumulates, the information on the oldest transaction will be
deleted each time a new transaction takes place.
♦ You can have the Activity List printed out automatically each time
information on 30 fax transactions accumulates. See page 132.
♦ The Activity List contains the same headings as the Transaction Report.
See page 130 for an explanation of the headings.
128
8. Printing
Lists
Printing Lists
Telephone Number List
This list shows the fax numbers that have been stored for automatic dialling.
Group List
This list shows the fax numbers that have been stored in each Group Key.
Setup List
This list shows your current selections for the MENU key settings. The list also
shows your name and fax number as entered in the machine, and a sample of
the header printed at the top of every page you transmit (HEADER PRINT).
Timer List
This shows the timer transmission jobs that are currently stored.
Help List
This list provides a brief guide to the operation of the machine. To print this
list, press
SCAN
and
FAX
simultaneously.
129
Printing Lists
Transaction Report
This report is printed out automatically after an operation is completed to
allow you to check the result. The machine is set at the factory to print out the
report only when an error occurs.
♦ The Transaction report cannot be printed on demand.
Headings in the Transaction Report
SENDER/
RECEIVER
The name or fax number of the other machine involved in the
transaction.
START
The time at which transmission/reception started.
TX/RX TIME
Total time taken for transmission/reception.
PAGES
Number of pages transmitted/received.
NOTE
(One of the following notes will appear under NOTE in the
report to indicate whether the transaction was successful,
and if not, the reason for the failure.)
OK - Transmission/reception was successful.
P.FAIL - A power failure prevented the transaction.
JAM - The printing paper or document jammed, preventing
the transaction.
BUSY - The fax was not sent because the line was busy.
COM.E-X - (Where “X” is a number.) A telephone line error
prevented the transaction. See Line error on page 140.
CANCEL - The transaction was cancelled because the
STOP key was pressed, no document was in the feeder, or
the other machine requested transmission using a function
which your fax machine does not have. If you were
attempting to fax, make sure a document is in the feeder. If
you were receiving, contact the faxing party to see how they
are trying to send to you.
130
8. Printing
Lists
Printing Lists
Transaction Report print condition
You can change the condition under which a Transaction Report is printed out.
Follow the steps below.
1
Display:
Make sure that the date and time
display of fax mode appears (if needed
press
FAX
) and then press
FAX SETTING
MENU
2
Press
.
1:TX/RX REPORT
3
Press
.
1: ALWAYS PRINT
(Selections appear alternately)
4
Press a number from
to
to select the condition for printing.
ALWAYS PRINT
A report will be printed after each
transmission, reception, or error.
SEND ONLY
A report will be printed after each
transmission.
ERROR ONLY
A report will be printed only when an error
occurs.
NEVER PRINT
A report will never be printed.
The display briefly shows
your selection, then:
5
Press
2: ACTIVITY LIST
repeatedly to exit.
131
Printing Lists
Auto print-out of Activity List
You can set the Activity List to print automatically whenever information on 30
fax transactions has accumulated. (The Activity List can still be printed on
demand at any time.) Follow these steps:
1
Make sure that the date and time
display of fax mode appears (if needed
FAX
press
) and then press
Display:
FAX SETTING
MENU
2
Press
.
1:TX/RX REPORT
3
Press
.
1: AUTO PRINT:YES
4
Press
to turn on auto print, or
to turn it off.
5
132
Press
repeatedly to exit.
The display briefly shows
your selection, then:
1:TX/RX REPORT
Cleaning the Scanning Glasses and Rollers
Any dirt, fingerprints, or other small debris on the scanning glasses will
degrade the quality of copies, faxes, and scanned images, and increase
scanning time. Clean the document glass and the scanning glass in the auto
document feeder regularly as explained below.
Cleaning the scanning glass in the auto document feeder
1
Squeeze the cover release ➊ and open
the auto document feeder cover. Open
the document glass cover.
2
Wipe the parts indicated in white below (scanning glass, rollers, and
white backplate) with a clean cloth.
1
• Make sure that all dirt and stains (such as correcting fluid) are removed.
Dirt and stains will cause vertical lines on transmitted images and copies.
If the scanning glass is difficult to clean
If you find it difficult to remove dirt from the scanning glass, you can try moistening
the cloth with isopropyl alcohol or denatured alcohol. Take care that no alcohol
gets on the rollers.
133
9. Maintenance
9. Maintenance
Maintenance
3
Close the auto document feeder cover, pressing down on both sides to
make sure it clicks into place.
Press down
on the marks
Cleaning the document glass
Open the document glass cover and clean the document glass by wiping it
with a soft, dry cloth (be sure not to use a cloth that will scratch the glass). If
needed, moisten the cloth with isopropyl alcohol or denatured alcohol.
134
Maintenance
Clean the print rollers frequently to prevent smudges or other dirt from
appearing on your output. To clean the rollers, press the side cover release to
open the side cover, and then clean the rollers indicated below with a clean
cloth.
Cleaning the housing
Wipe the external parts and surface of the machine with a dry cloth.
Caution!
♦ Do not use benzene or thinner. These solvents may damage or discolor the
machine.
135
9. Maintenance
Cleaning the print rollers
Maintenance
Replacing the Toner Cartridge
When the toner cartridge nears empty (about 200 pages can still be printed),
TONER NEAR EMPTY will appear in the display. When the toner cartridge is
empty, TONER EMPTY will appear in the display.
♦ While TONER EMPTY appears, printing will be possible (although the
output will be increasingly faint) until a fax is received. Once a fax is
received, it will be held in memory and printing will no longer be possible.
Replace the toner cartridge with the following cartridge:
Sharp AM-30DC toner cartridge
1
Press the side cover release ➊, open the side cover ➋, and then open
the front cover ➌.
1
3
2
• Caution!
The fusing unit inside the print compartment becomes very hot during
operation. Do not touch the inside of the print compartment.
2
Squeeze the toner cartridge handle ➊
and pull the toner cartridge out of the
compartment.
• Dispose of the old toner cartridge
according to local regulations. If in
doubt, contact your local waste disposal
agency.
136
1
Maintenance
Continue from Step 4 on page 19 to install the new toner cartridge.
9. Maintenance
3
Replacing the Drum Cartridge
Viewing the total number of pages printed
To maintain excellent printing quality, we recommend that you replace the
drum cartridge after 20,000 pages have been printed. Follow these steps to
view the total number of pages printed:
1
Press
MENU
and then
Z
or
A
repeatedly until the display at right
appears.
2
Press
Display:
LIFE
.
• The number of pages printed will appear in the display.
3
Press
repeatedly to exit.
137
Maintenance
Replacing the drum cartridge
When 20,000 pages have been printed, DRUM LIFE OVER will appear in the
display. Replace the drum cartridge with the following cartridge:
Sharp AM-90DR drum cartridge
1
Press the side cover release ➊, open the side cover ➋, and then open
the front cover ➌.
1
3
2
• Caution!
The fusing unit inside the print compartment becomes very hot during
operation. Do not touch the inside of the print compartment except as
instructed in the following steps.
2
Squeeze the toner cartridge handle ➊
and pull the toner cartridge out of the
compartment.
• Place the toner cartridge on a sheet of
paper on a level surface.
• Do not touch the roller in the toner
cartridge.
138
1
Maintenance
Grasp the drum cartridge handle and
gently pull the old cartridge out of the
machine.
4
Remove the new drum cartridge from its packaging.
5
Insert the drum cartridge into the print
compartment, sliding it along the
guides.
9. Maintenance
3
• Do not touch or allow other objects to
contact the drum (the green cylinder).
This may damage the drum. If
fingerprints, dust, or other
contaminants get on the drum, wipe it
gently with a clean cloth.
• Exposure to light for more than several
minutes will damage the drum. Be sure
to insert the drum cartridge promptly
into the machine.
Grasp this handle to
push the cartridge in
• If you find it necessary to leave the
cartridge out of the machine for more
than several minutes, wrap the
cartridge in black paper.
6
Replace the toner cartridge and close the front cover and then the side
cover (see Steps 5 and 6 on page 20). When finished, reset the drum
cartridge counter as explained on page 21.
139
10. Troubleshooting
Problems and Solutions
Line error
Problem
LINE ERROR appears in
the display.
Solution
A line error occurs when your machine cannot
communicate correctly with the other fax machine.
The error is usually due to a problem on the phone
line.
Try the transaction again. If the error persists, check
the following:
• Check the connection. The cord from the TEL.
LINE socket to the wall socket should be no longer
than two meters.
• Make sure there are no modem devices sharing the
same telephone line.
• Check with the other party to make sure their fax
machine is functioning properly.
• Have your telephone line checked for line noise.
• Try connecting the machine to a different telephone
line.
• If the problem still occurs, your machine may need
service.
140
Problems and Solutions
Dialling and fax transmission problems
Solution
No dial tone when you
pick up an extension
phone connected as
explained on page 17, or
use the line monitor
function.
• Make sure that the telephone line is properly
connected to both the TEL. LINE socket and the wall
socket (see page 15).
Dialling is not possible.
• Make sure the power cord is properly plugged into a
power outlet.
• Make sure that the telephone line is good.
• Make sure that the telephone line is properly
connected to both the TEL. LINE socket and the wall
socket (see page 15).
The power is on, but no
transmission takes place.
• Make sure that the receiving machine has paper.
• Make sure that the telephone line cord is plugged into
the TEL. LINE socket, and not the TEL. SET socket.
• If the receiving machine is in manual mode with no
attendant, reception will not be possible.
• Check the display for error messages.
• If an extension phone is connected as explained on
page 17, pick up the phone and check for a dial tone.
Dial the receiving machine using the phone and make
sure that it is responding (you should hear a fax tone).
If an extension phone is not connected, use the Line
Monitor function (see page 78).
Nothing is printed at the
receiving end.
• Make sure that the document for transmission is
placed face down if you are using the document glass,
or face up if you are using the auto document feeder.
A distorted image is
received at the other end.
• Noise on the telephone line may cause distortion. Try
sending the document again.
• Make a copy of the document on your machine. If the
copy is also distorted, your machine may need
service.
141
10.. Troubleshooting
Problem
Problems and Solutions
Fax reception problems
Problem
Solution
The machine doesn't
receive faxes
automatically.
• Make sure that the reception mode is set to FAX
ONLY (see page 95).
The power is on, but
reception does not take
place.
• Make sure that the telephone line cord is plugged into
the TEL. LINE socket, and not the TEL. SET socket.
The paper comes out
blank when you receive a
fax.
• Make sure that the document is loaded properly in the
feeder of the transmitting machine. Make a copy or
print a report to confirm the printing ability of your
machine.
The received document is
faint.
• Ask the other party to send higher contrast
documents. If the contrast is still too low, your
machine may need service. Make a copy or print a
report to check your machine’s printing ability.
• The toner cartridge may need replacement.
Received images are
distorted.
• Noise on the telephone line may cause distortion.
Have the other party try sending the document again.
• Make a copy or print a report on your machine. If the
copy or report is also distorted, your machine may
need service.
When a fax is received,
the size of the printed
document image does not
match the size of the
paper.
• Make sure that an appropriate reception ratio setting
has been selected (see page 98).
No reception occurs when
polling is attempted.
• Make sure the transmitting machine is in automatic
reception mode.
• If the transmitting machine has polling security, make
sure that your fax number has been entered both in
your machine (see page 44) and in the transmitting
machine.
142
Problems and Solutions
Copying problems
Solution
The quality of copies is
poor and/or dark vertical
lines appear when the
document feeder is used.
• Any dirt or material on the scanning glasses will
cause spots or lines to appear on copies (and on
transmitted faxes and scanned images). Clean the
scanning glasses as explained on page 133.
The paper comes out
blank when you make a
copy.
• If you are using the document feeder, make sure the
original is placed face up in the feeder.
• If you are using the document glass, make sure the
original is placed face down on the glass.
The size of the printed
document image does not
match the size of the
paper.
• Make sure an appropriate enlarge/reduce setting is
selected (see page 56).
Dots appear at regular
intervals on copies.
• The drum cartridge may be damaged. Replace the
drum cartridge.
A copy is faint.
• Adjust the contrast setting (see page 57).
• If output is generally faint, the toner cartridge may
need replacement.
143
10.. Troubleshooting
Problem
Problems and Solutions
General problems
Problem
Nothing appears in the
display.
Solution
• Make sure the power cord is properly plugged into a
power outlet.
• Connect another electrical appliance to the outlet to
see if it has power.
The machine does not
respond when you press
any of its keys.
• If a beep sound is not made when you press the keys,
unplug the power cord, wait at least 5 seconds, and
then plug it in again.
Automatic document
feeding does not work .
• Check the size and weight of the document (see page
62).
Dots appear at regular
• The drum cartridge may be damaged. Replace the
intervals on printed output.
drum cartridge.
The machine makes an
abnormal grating sound
when the power cord is
plugged in.
144
• Unplug the power cord immediately and make sure
that the scanner lock has been released (see page
13).
Messages and Signals
Messages and Signals
ADD PAPER
Check the printing paper. If the tray is empty, add
paper. If there is paper in the tray, make sure it is
inserted correctly (take out the stack, align the edges
evenly, and then reinsert it in the tray). Printing will
resume automatically when the output tray is
replaced.
BYPASS MISFEED
The paper is not inserted correctly in the bypass tray.
Remove the paper and insert it again.
BYPASS PAPER! /
IF COPY, PRESS
(alternating messages)
Paper has been inserted in the bypass tray. If the
paper has been inserted for a copy job, press
A
to
set the paper size. If the paper is for a print job, the
message can be disregarded.
CHK SCANNER LOCK /
PLS RETURN POWER
(alternating messages)
Make sure that the scanner lock has been released
(see page 13) and then unplug the power cord, wait
at least 5 seconds, and plug it back in.
COVER OPEN
One or both of the print compartment covers are
open. Make sure both covers are closed.
DATE/TIME UNSET
The date and time need to be set (see page 46). Note
that the date and time settings will be lost if the
machine is unplugged or a power failure occurs.
DOCUMENT JAMMED
The original document is jammed. See the following
section, Clearing Paper Jams. Document jams will
occur if you load more than 20 pages at once or load
documents that are too thick (see page 62). The
document may also jam if the receiving machine
doesn’t respond properly when you attempt to send a
fax.
DOCUMENT READY
A document has been inserted in the auto document
feeder and the machine is waiting for you to begin
faxing or copying.
145
10. Troubleshooting
Display messages
Messages and Signals
DRUM LIFE OVER
This appears when the drum cartridge needs
replacement.
FAX RX IN MEMORY
A fax has been received in memory because the
toner cartridge needs replacement, you have run out
of printing paper, the paper is jammed, or paper is
inserted in the bypass tray. The fax will print out
automatically when the problem is fixed.
GRP. SPACE FULL
This appears if you attempt to store a Group when
both Groups are already programmed.
LINE ERROR
Transmission or reception was not successful. Press
the STOP key to clear the message and then try
again. If the error persists, see Line error on page
140.
MEMORY IS FULL
If faxes have been received to memory because
printing is not possible (an additional message will
indicate the problem), resolve the problem so that
printing can continue (see Substitute Reception to
Memory on page 99).
If you are attempting to send a fax, see If the memory
becomes full on page 71.
If you are copying, see If MEMORY IS FULL appears
on page 56.
NO # STORED
This appears if you attempt to search for a Speed Dial
number when none have been stored.
OFF HOOK
This appears when an extension phone connected as
explained on page 17 is lifted. Only
can be
pressed in fax mode when this message appears.
OUTPUT TRAY OFF
The output tray is not attached correctly. Attach it as
explained on page 12. The machine will not operate if
the output tray is not attached correctly.
PAPER JAMMED
The printing paper is jammed. See page 150.
PAPER MISMATCHED
This appears after printing if the size of the printed
image did not match the paper size on some pages of
the job. Check the printed pages and reprint as
needed.
146
Messages and Signals
A fax has been received to memory because paper is
inserted in the bypass tray (faxes cannot be printed
while paper is in the bypass tray). Remove the paper
from the bypass tray to allow the fax to be printed.
SYSTEM ERROR [XX]
(a number appears in
“XX”)
If this message appears, unplug the power cord, wait
about 10 seconds, and then plug it back in. If the
message still appears, unplug the power cord and call
for service.
SET BYPASS PAPER /
SIZE: XXXX
(alternating messages; a
paper size appears in
“XXXX”)
Paper must be inserted in the bypass tray for a print
job or copy job that requires use of the bypass tray.
Insert the indicated size of paper in the tray.
TONER EMPTY
The toner cartridge must be replaced. Printing will be
possible (although the output will be increasingly
faint) until a fax is received. Once a fax is received, it
will be held in memory and printing will not be
possible until the toner cartridge is replaced.
TONER NEAR EMPTY
The toner cartridge is almost out of toner
(approximately 200 pages can be printed).
TOTAL PAGE(S) 01
Number of fax pages transmitted or received.
10. Troubleshooting
REMOVE /
BYPASS PAPER
(alternating messages)
Audible signals
Continuous tone
3 seconds
Indicates the end of fax transmission or
reception.
Intermittent tone
(3 beeps)
5 seconds
(1 second on, 1
second off)
Indicates incomplete fax transmission
or reception.
Rapid intermittent
tone
35 seconds
(0.7 seconds on,
0.3 seconds off)
Indicates that an extension phone
connected as explained on page 17 is
off hook.
147
Clearing Paper Jams
Clearing Paper Jams
Clearing a jammed document
If the original document doesn’t feed properly during transmission or copying,
or DOCUMENT JAMMED appears in the display, first try pressing
. If
the document doesn't feed out, open the auto document feeder cover and
remove it.
Important:
Do not try to remove a document without opening the auto document feeder
cover. This may damage the feeder mechanism.
1
Squeeze the cover release ➊ and open
the auto document feeder cover. Open
the document glass cover.
2
Remove the document.
1
• The document can be removed from either the top or the bottom slot,
whichever is easiest.
148
Clearing Paper Jams
Close the auto document feeder cover, pressing down on both sides to
make sure it clicks into place.
Press down
on the marks
10. Troubleshooting
3
149
Clearing Paper Jams
Clearing jammed printing paper
1
Press the side cover release ➊ and then open the side cover ➋.
1
2
2
Push the two heater roller release
levers down to release the heater roller.
• Caution!
The fusing unit (indicated in white at
right) becomes very hot during
operation. Do not touch the fusing unit.
3
If the jammed page is protruding from
the side of the machine, gently pull it
out. Take care not to tear the paper or
leave any torn pieces of paper in the
print compartment.
• If this clears the jam, go to Step 5.
• If you are unable to clear the jam in this
way, go to Step 4.
• Take care not to touch or allow other
objects to contact the drum (the green
cylinder). This may damage the drum.
150
Clearing Paper Jams
4
If the jammed page cannot be pulled
out directly, open the front cover ➊
and rotate the white knob ➋ in the
direction shown to feed the jammed
page out into the output tray.
10. Troubleshooting
2
1
5
After the jammed page has been
removed, push the two heater roller
release levers back up.
6
Close the front cover ➊ (if you opened
it) and then the side cover ➋.
2
1
151
Index
A
Activity List, 128
Activity List, Auto Print Out, 132
Alarm volume, 49
Audible signals, 147
Auto clear, 50
Auto document feeder
Document restrictions, 63
Document sizes, 62
Loading document, 63
Automatic redialling
Line busy, 80
Line error, 82
B
Broadcasting, 87
Button Manager settings, 123
C
Cancelling a fax job, 79
Cancelling a print job, 103
Cards
Copying on, 64
Printing on, 108
Checking a fax job, 79
Collating sets of copies, 58
Contrast, copy, 57
Contrast, default for copying, 61
Contrast, fax, 77
Copies, making, 53
Copies, number of, 57
Copy settings, default, 54
Copying on cards, 64
Copying on envelopes, 64
D
Date, setting, 46
Dialling
Direct Keypad, 69
152
Search, 69
Speed, 69
Direct Keypad Dialling, 69
Display messages, 145
Document glass, cleaning, 134
Document guides, 63
Document guides, bypass tray, 65
Document, maximum scanning size, 62
Drum cartridge
Installing, 18
Replacing, 137
Duplex Scan, 58, 78
E
Enlarging a copy, 56
Envelopes
Copying on, 64
Printing on, 108
E-Sort, 58
EXT. TEL reception mode, 97
Extension phone
Connecting, 17
Using to send a fax, 85
F
FAX ONLY reception mode, 96
Fax settings, default, 69
G
Group Keys, 89
Group List, 129
H
Halftone setting, 77
Housing, cleaning, 135
J
Jams, clearing, 148
Index
K
Key tone off, 51
L
Language used in display, 52
Letters, entering, 45, 73
Line error, 140
Line Monitor, 78
Loading printing paper, 23
M
Memory, substitute reception to, 99
N
Number of rings in FAX ONLY reception
mode, 96
P
Paper jams, clearing, 148
Paper size setting, 24
Paper, loading, 23
Polling, 100
Power cord, 14
Print job, cancelling, 103
Print settings, 104
Printing from an application, 103
Printing on cards, 108
Printing on envelopes, 108
Q
Quality setting, 57
Quality setting, default, 59
R
Recall interval
Line busy, 80
Line error, 82
Recall times
Line busy, 81
Line error, 83
Reception mode
EXT. TEL mode, 97
FAX ONLY mode, 96
Reception Ratio setting, 98
Reducing a copy, 56
Resolution, copy, 60
Resolution, default for fax, 84
Resolution, fax, 77
Ringer volume, 48
S
Scanning
From a TWAIN application, 110
From a WIA application, 114
From the operation panel, 118
Scanner and Camera Wizard, 117
Scanning glass, cleaning, 133
Search Dialling, 69
Sender’s name and number, entering, 44
Setup List, 129
Software, installing, 25
Speed Dialling, 69
T
TEL. LINE socket, 15
TEL. SET socket, 17
Telephone line cord, 15
Telephone Number List, 129
Time, setting, 46
Timer List, 129
Toner cartridge
Installing, 18
Replacing, 136
Transaction Report, 130
Setting print condition, 131
153
Beim Anschalten dieses Gerätes an Datenverabeitungsanlagen ist sicherzustellen, daß die
Gesamtanlage den jeweiligen technischen Vorschriften entspricht.
Caution
This product contains a low power laser device. To ensure
continued safety do not remove any cover or attempt to gain
access to the inside of the product.
Refer all servicing to qualified personnel.
or
VAROITUS! LAITTEEN KÄYTTÄMINEN MUULLA
KUIN TÄSSÄ KÄYTTÖOHJEESSA MAINITULLA
TAVALLA SAATTAA ALTISTAA KÄYTTÄJÄN
TURVALLISUUSLUOKAN 1 YLITTÄVÄLLE
NÄKYMÄTTÖMÄLLE LASERSÄTEILYLLE.
VARNING - OM APPARATEN ANVÄNDS PÅ ANNAT
SÄTT ÄN I DENNA BRUKSANVISNING
SPECIFICERATS. KAN ANVÄNDAREN UTSÄTTAS
FÖR OSYNLIG LASERSTRÄLNING, SOM
ÖVERSKRIDER GRÄNSEN FÖR LASERKLASS 1.
CLASS 1
LASER PRODUCT
LASER KLASSE 1
LUOKAN 1 LASERLAITE
KLASS 1 LASERAPPARAT
OUTPUT POWER
LASER WAVE - LENGTH
PULSE-TIMES
: max. 4.0 mW
: 770 - 795 nm
: 72.58 ns
SHARP ELECTRONICS (UK) LTD.
Sharp House, Thorp Road, Newton Heath, Manchester, M40 5BE
SHARP ELECTRONICS (EUROPE) GMBH
Sonninstrasse 3, 20097 Hamburg, Germany
Phone: (040) 2376-0
Zweigniederlassung Österreich
Handelskai 342, 1020 Wien, Austria
Telefon: (01) 7 27 19-0
Poland:Infolinia 0-801-601-609
(koszt połączenia: impuls/minuta)
SHARP ELECTRONICS (SCHWEIZ) AG
Langenwiesenstrasse 7, 8108 Dällikon, Switzerland
Phone: (01) 846-6111
SHARP ELECTRONICS ITALIA S.p.A.
Via Lampedusa 13, 20141 Milano, Italia
Telefono: +39 0289595-1
SHARP ELECTRONICS FRANCE S.A.
22, Avenue des Nations, BP 52094
95948 ROISSY CDG Cedex, France
Téléphone: +33 0 802 856 333
SHARP ELECTRONICS (NORDIC) AB
Box 14098 Gustavslundsvägen 12 S-167 14 Bromma, Sweden
Phone: (08) 634 3600
SHARP ELECTRONICS BENELUX BV
Meidoornkade 10, 3992 AE, Houten, Netherlands
Phone Helpdesk: 0900 - 7427747
SHARP CORPORATION
Ver. 1.0