1
OPERATO£'S MANUAL
FOR QUESTIONS,
CALL 1-800-345-8746
1-800-668-1238
in CANADA
in U.S. or
www.TrimmerPlus.com
IMPORTANT
MANUAL
DO NOT THROW AWAY
THANK
YOU
Thank you for buying this quality product. This modern
outdoor power tool will provide many hours of useful
service. You will find it to be a great labor-saving device.
This operator's manual provides you with easy-tounderstand operating instructions. Read the whole
manual and follow all the instructions to keep your new
outdoor power tool in top operating condition.
PRODUCT
REFERENCES,
SPECIFICATIONS
ILLUSTRATIONS
AND
All information, illustrations and specifications in this
manual are based on the latest product information
available at the time of printing. We reserve the right to
make changes at any time without notice.
Copyright ©2001 MTD SOUTHWEST INC
All Rights Reserved.
TrimmerPlus® is a registered trademark of
MTD SOUTHWEST INC
SERVICE INFORMATION
Service on this unit both within and after the warranty
period should be performed only by an authorized and
approved service dealer.
Dial:
• 1-800-345-8746 in the United States
Or
• 1-800-668-1238 in Canada to obtain the listing of
the authorized service dealer nearest you.
DO NOT RETURN THE UNIT TO THE RETAILER.
Rules for Safe Operation ...................
A. Important Safety Information ..............
B. Safety and International Symbols ..........
C. Know Your Unit ........................
II.
Assembly Instructions .....................
A. Installing The Blade .....................
B. Installing And Adjusting The Shoulder Harness
III. Operating Instructions .....................
A. Assembling the Coupler ................
B. Operating The Pruner ...................
C. Pruning Tips ..........................
THIS PRODUCT IS COVERED BY ONE OR MORE US
PATENTS. OTHER PATENTS PENDING.
The purpose of safety symbols is to attract your
attention to possible dangers. The safety symbols, and
their explanations, deserve your careful attention and
understanding. The safety warnings do not by
themselves eliminate any danger. The instructions or
warnings they give are not substitutes for proper
accident prevention measures.
SYMBOL
,_
10
10
10
10
10
11
Vl. Warranty ................................
12
CONTENTS OF CARTON
This unit should consist of the following:
TP720r Tree Pruner Add-On
Blade & Blade Cover
Blade Clamp Screw and Lock Washer
Boom Extension
Hanger
9/64" Allen Wrench
Shoulder Harness
Operator's Manual
Product Registration Card
NOTE: This product has been rated for use on both gas
and electric powerheads.
2
Read the Operator's Manual(s) and follow all
warnings and safety instructions.
Failure to do
so can result in serious injury to the operator
and/or bystanders.
I,_
,_
MEANING
danger, warning, or caution. Attention is
SAFETY ALERT SYMBOL: Indicates
required in order to avoid serious personal
injury. May be used in conjunction with other
symbols or pictographs.
NOTE: Advises you of information or instructions vital
to the operation or maintenance of the equipment.
6
6
6
7-9
7
8
9
IV. Maintenance and Repair Instructions .........
A. Pruner Blade Replacement ...............
B. Cleaning ..............................
C. Storage ..............................
D. Accessories/Replacement
Parts .........
V. Specifications ............................
NOTE: PROOF OF PURCHASE WILL BE REQUIRED
FOR WARRANTY SERVICE.
Make sure this manual is carefully read and understood
before starting or operating this equipment.
3-5
3-4
4-5
5
l_lb
will result in serious injury to yourself or to
others. Always follow the safety precautions
to reduce the risk of fire, electric shock, and
ANGER:injury.
Failure to obey a safety warning
personal
WARNING: Failure to obey a safety warning
can result in injury to yourself and others.
Always follow the safety precautions to
reduce the risk of fire, electric shock, and
personal injury.
may result in property damage or personal
injury to yourself or to others. Always follow
the
safety precautions
to reduce
thewarning
risk of
AUTION:
Failure to obey
a safety
fire, electric shock, and personal injury.
• IMPORTANT
SAFETY INFORMATION
READ ALL INSTRUCTIONS
J_i,
BEFORE
SPECIAL SAFETY WARNINGS
FOR ELECTRIC
POWERHEADS
AND TREE PRUNERS
WARNING: To reduce the risk of electrical
shock, use only extension cords approved for
, outdoor use, such as an extension cord of cord
type SW-A, SOW-A, STW-A, STOW-A, SJW-A,
SJOW-A, SJTW-W or SJTOW-A. Extension
cords are available from your local retailer. Use
only round-jacketed extension cords approved
for outdoor use.
rules must be followed. For your own safety
and that of bystanders, please read these
WARNING:
instructions before
When using
operating
the unit,
the unit.
the safety
Please
keep the instructions safe for later use.
OPERATING
• Carefully read and understand the operator's manual
of the unit that powers this attachment.
• Read this operating instruction manual carefully. Be
thoroughly familiar with the controls and the proper use
of the equipment. Know how to stop the unit and
disengage the controls quickly.
• Do not operate this unit when tired, ill, or under the
influence of alcohol, drugs, or medication.
• Never allow children to operate the equipment. Never
allow adults unfamiliar with the instructions to use the
unit. Never allow adults to operate the equipment
without proper instruction.
• All guards and safety attachments must be installed
properly before operating the unit.
• Inspect the unit before use. Ensure the blade is
installed correctly and secure.
• Keep bystanders, especially children and pets, at least
50 ft (15 m) away.
•
• CORD SETS: Make sure your cord set is in good
condition. When using a cord set, be sure to use a
cord that is heavy enough to carry the current that your
unit will draw. An undersized cord set will cause a drop
in line voltage resulting in loss of power and
overheating. See the operator's manual for the unit that
will power this add-on for the recommended cord size.
• Inspect all extension cords and the unit power
connection periodically. Look closely for deterioration,
cuts or cracks in the insulation. Also inspect the
connections for damage. Replace the cords if any
defects or damage appear.
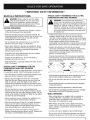
• Prevent disconnection of the tree pruner powerhead
from extension cord during operation by using a plugreceptacle retaining strap, connector, or by making a
knot as shown below:
Extension
Tree Pruner
Cord
Extension
Cord
Tree Pruner
Cord
SPECIAL SAFETY WARNINGS
FOR GAS
POWERHEADS
AND TREE PRUNERS
WARNING:
Gasoline is highly flammable, and its vapors
can explode if ignited. Take the following precautions:
• Store fuel only in containers specifically designed and
approved for the storage of such materials.
• Always stop the engine and allow it to cool before
filling the fuel tank. Never remove the cap of the fuel
tank, or add fuel, when the engine is hot. Never
operate the unit without the fuel cap securely in place.
Loosen the fuel tank cap slowly to relieve any pressure
in the tank.
• Mix and add fuel in a clean, well-ventilated area
outdoors where there are no sparks or flames. Slowly
remove the fuel cap only after stopping engine. Do not
smoke while fueling or mixing fuel. Wipe up any spilled
fuel from the unit immediately.
• Avoid creating a source of ignition for spilled fuel. Do
not start the engine until fuel vapors dissipate.
• Move the unit at least 30 feet (9.1 m) from the fueling
source and site before starting the engine. Do not
smoke. Keep sparks and open flames away from the
area while adding fuel or operating the unit.
• Never start or run the unit inside a closed room or
building. Breathing exhaust fumes can kill. Operate this
unit only in a well ventilated area outdoors.
• Avoid dangerous environments. Never operate your unit in
damp or wet conditions. Moisture is a shock hazard.
• Do not use the unit in the rain. Do not use in or around
water.
• Do not handle the plug or unit with wet hands or standing
on any wet surfaces.
• Keep pruner away from power lines or electrical wires.
• Do not leave the unit plugged in when not in use, changing
attachments or add-on& or while being serviced.
WHILE OPERATING
• Wear safety glasses or goggles that are marked as
meeting ANSI Z87.1 standards, and ear/hearing
protection when operating this unit. Wear a face or
dust mask if the operation is dusty.
• Wear heavy, long pants, boots, gloves and a long
sleeve shirt. Do not wear loose clothing, jewelry, short
pants, sandals or go barefoot. Secure hair above
shoulder level.
• Use the unit only in daylight or good artificial light.
• Do not force unit. It will do thejob better and with less
likelihood of injury at a rate for which it was designed.
3
• Toreducethe riskofelectricalshock,keepthepruner
frompowerlinesor electricalwires.
• Use the right tool. Use this unit only as described in
this manual. Do not use for any job except that for
which is intended.
• Use only genuine MTD replacement parts and
accessories for this unit. These are available from
your authorized service dealer. Use of any non-MTD
parts or accessories could lead to serious injury to the
user or damage to the unit, and void your warranty.
OTHER
• Do not overreach. Always keep proper footing and
balance.
• Always hold the unit with both hands when operating.
Keep a firm grip on both the front and rear handle or grips.
• A coasting blade can cause injury while it continues
to moves after the unit is stopped. Maintain proper
control of the unit until the blade has completely
stopped moving.
SAFETY
WARNINGS
• Allow the unit to cool before storing or transporting.
sure to secure the unit while transporting.
Be
• Store the unit inside in a dry place, either locked up or
up high to prevent unauthorized use or damage. Keep
out of the reach of children.
• Never douse or squirt the unit with water or any other
liquid. Keep handles dry, clean and free from debris.
Clean after each use, see Cleaning and Storage
instructions.
• Keep hands, face, and feet at a distance from all
moving parts. Do not attempt to touch or stop the
blade when it is moving.
• Keep these instructions. Refer to them often and use
them to instruct other users. If you loan someone this
unit, also loan them these instructions.
• Do not operate the unit faster than the speed
needed to prune. Do not run the unit at high speed
when not pruning.
• Only qualified personnel should perform any repairs
or maintenance procedures that are not described
in this manual.
• Always stop the unit when work is delayed or when
walking from one cutting location to another.
• If you strike or become entangled with a foreign object,
stop the engine immediately and check for damage.
Have any damage repaired before attempting further
operations. Do not operate unit with a bent, cracked or
dull blade. Discard blades that are bent, warped,
cracked or broken.
• Check shear bolts, engine mounting bolts and other
bolts at frequent intervals for proper tightness to be
sure the equipment is in safe working condition.
• Stop the unit IMMEDIATELY if you feel excessive
vibration. Vibration is a sign of trouble. Inspect
thoroughly for loose nuts, bolts or damage before
continuing. Repair or replace affected parts as
necessary.
• Do not attempt to repair the machine unless you have
the proper tools, and instructions for disassembly and
repair of the machine.
• Always refer to the Operator's Manual instructions for
important details if the unit is to be stored for an
extended period.
SAVE THESE INSTRUCTIONS
• Stop and switch the unit to off for maintenance,
repair, or for changing add-ons attachments.
SAFETY
AND INTERNATIONAL
SYMBOLS
This operator's manual describes safety and international symbols and pictographs that may appear on this product.
Read the operator's manual for complete safety, assembly, operating and maintenance and repair information.
SYMBOL
,_
MEANING
Indicates danger, warning, or caution.
• SAFETY
pictographs.ALERT SYMBOL
• WARNING
- READ OPERATOR'S
May be used in conjunction
with other symbols
MANUAL
Read the Operator's Manual(s) and follow all warnings and safety instructions,
can result in serious injury to the operator and/or bystanders.
WEAR
EYE AND HEARING
or
Failure to do so
PROTECTION
WARNING: The operation of any power tool can be the source of thrown objects and loud
noise which can cause severe eye injury and hearing loss. Always wear safety glasses or
goggles eye protection meeting ANSI Z87.1 standards and ear protection when operating this
unit. Use a full face shield when needed.
4
SYMBOL
MEANING
A
KEEP BYSTANDERS
WARNING: Keep all bystanders,
from the operating area.
THROWN
/
AWAY
OBJECTS
especially
children and pets, at least 50 feet (15 m)
AND RECIPROCATING
BLADE
WARNING: Inspect the unit before use. Do not operate
Keep away from the blade.
j/-_
SHARP
CAN CAUSE
SEVERE
unit with a bent, cracked
INJURY
or dull blade.
BLADE
WARNING: Sharp blade, do not touch. To prevent serious injury, always wear gloves when
changing or handling the blade,
@
• WEAR
HEAD PROTECTION
WARNING: Falling objects can cause severe head injury. Wear head protection
operating this unit.
To prevent serious injury, do not use more than one boom extension
• WARNING:
BOOM EXTENSIONS
pruner attachment.
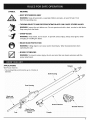
APPLICATIONS
With Pruner Add-On:
when
with the
Hangers
• For pruning limbs and branches up to 4 inches in
diameter.
Shaft Housing
Gear Housing
Blade and
Blade Cover
Boom Extension
Shoulder Harness
Foot
Blade Clamp
Screw and Lock
Washer
Coupler
5
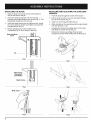
INSTALLING
THE BLADE
1. Slide the blade cover past the end of the blade to
expose the hole for the pin.
2.
Insert the blade through the end of the pruner
housing and install the blade over the pin (Fig. 1). The
blade teeth should face the foot side.
3.
Install the blade clamp over the blade and pin. Install
the screw with lock washer and tighten securely with
the allen wrench (Fig. 2).
4.
Before operating unit, remove blade cover
completely (Fig. 3). Store away for later use.
INSTALLING
HARNESS
AND ADJUSTING
THE SHOULDER
1.
Push the strap through the center of the buckle.
2.
Pull the strap over the cross bar and down through
the slot in the buckle (Fig. 4).
3.
Snap it on to the support fitting (Fig. 5).
4.
While standing in the operating position adjust length
to fit the operator's size.
Lengthen the harness by pulling down on the strap
and lifting the buckle end up (Fig. 6).
Shorten the harness by pulling the strap back
through the buckle while holding the buckle (Fig. 6).
Blade and Blade
Cover
Pin
I
0
0
Fig. 1
Fig. 4
'\
\
\
Blade Clamp -..
Screw and
_
Lock Washer
Blade Clamp
o
o
Fig. 2
Fig. 5
Fig. 3
Fig. 6
Blade Cover
6
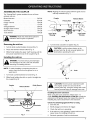
ASSEMBLING
THE COUPLER
The TrimmerPlus® system enables the use of these
optional add-ons.
Blower/Vacuum
..........................
BV720r
Cultivator ...............................
GC720r
Hedge Trimmer ...........................
Edger ...................................
Sweeper/Blower ..........................
Straight Shaft Trimmer .....................
Snow Thrower ............................
HS720r
LE720r
SB720r
SS725r
ST720r
Turbo Blower
TB720r
............................
NOTE: Aligning the release button with the guide recess
will help installation (Fig. 7).
Coupler
Release Button
'\
\
Primary
Hole
\\
\
I
Lower Shaft
Housing
Upper Shaft
Housing
Knob /
manual for add-on prior to operation.
WARNING: Read and understand operator's
1,_
Removing
the
add-on:
Fig. 8
3.
1. Turn the knob counterclockwise to loosen (Fig. 7).
2.
3. While firmly holding the upper shaft housing, pull the
tree pruner attachment out of the coupler (Fig. 8).
[,_
the
]
CAUTION: Lock the release button in the
primary hole (Fig. 8) and securely tighten the
knob before operating this unit.
Press and hold the release button (Fig. 7).
Installing
Turn the knob clockwise to tighten (Fig. 9).
add-on:
/
and damage to the unit, shut unit off before
WARNING:
avoid serious
removing or TO
installing
add-ons.personal injury
zz
NOTE: To make installing or removing the add-on
easier, place the unit on the ground or on a
work bench.
1. Turn knob counterclockwise
0
_Knob
to loosen (Fig. 7).
2. While firmly holding the add-on, push it straight into
the coupler (Fig. 8).
Fig. 9
]
Coupler
'
x\\\\
Guide Recess
Release Button
l_Ib
\\
\
\\\
\
I
the coupler system is to be used in the
primary hole only. Using the wrong hole could
CAUTION: The tree pruner attachment with
|
lead to personal injury or damage to the unit.
Installing the boom extension:
When using the boom extension, follow steps 1-3
under Installing the Attachment or Add-ons. Install the
extension to the power head, then repeat the steps for
installing the pruner attachment to the extension.
Check Flex Shaft Engagement Prior to Using
1. Start the unit.
Counterclockwise
Knob
Fig. 7
2.
Briefly engage and release the trigger.
3.
Check that add-on is operating.
4.
If the add-on is not operating, remove add-on and
repeat steps for installing the add-on.
5.
Recheck operation of add-on attachment.
7
OPERATING
_b
THE PRUNER
body protection to reduce the risk of injury
ARNING: Always wear eye, hearing, foot and
when operating this unit.
Before operating the unit, stand in the operating position
(Figs. 10 & 11). Check for the following:
1.
When operating the pruner, rest the foot of the pruner
against the tree limb that is being cut
(Fig. 12).
2.
Make the first cut one (1) foot (30.5 cm) from where
the final cut will be (Fig. 13).
3.
Cut to the outside of the branch collar to avoid
damage to the tree (Fig. 14)
• The operator is wearing a face shield, head protection
and proper clothing.
• Harness is adjusted to proper position.
• The handle is adjusted to provide the best grip.
• The operator has a firm grip on both the throttle grip
and handle.
Foot
Fig. 12
Fig. 10
Fig. 13
Fig. 14
Fig. 11
8
PRUNINGTIPS
WhyPrune?
Trees need to be trained. If they are not, they may grow
into a tangled and potentially dangerous area of the yard.
Pruning is useful for sizing, shaping, removing
broken branches and maintaining the health of the tree.
How to Prune Correctly
• Don't cause damage to the trunk bark by cutting too
close to the trunk.
• Cut the branch so that the wound is as small as
possible.
When to Prune?
• Don't leave a long branch stub. It can lead to rot or
insect infestation.
Pruning can be done at any time during the year. But, the
best time is during the dormant (winter) season.
• Use a sharp blade to make cuts that are clean and
smooth.
What to Look for?
Finding problem areas in a tree can be difficult. Look for
and remove:
• Dead or dying branches. Cut them back to a healthy
branch or trunk because they may carry insects or
diseases.
• Branch stubs. These occur when a prior pruning was
done incorrectly or if a branch broke off during a storm.
Cut the stubs back to the closest healthy branch or
trunk.
• Future growth. If a tree limb is growing towards a fence
or building, remove it early. The older the tree, the
longer it takes for cutting wounds to heal.
9
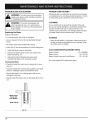
PRUNER
BLADE
REPLACEMENT
always
wear gloves
while
handling,
removing
WARNING:
To avoid
serious
personal
injury,
or installing the blade.
_
PRUNER
GEAR HOUSING
All internal parts are lubricated at the factory and require
no maintenance. Do not disassemble the pruner. Contact
an authorized service dealer for any internal repairs.
CLEANING
after
long periods
of use. housing
To avoidgets
serious
WARNING:
The pruner
hot
personal injury, do not touch the housing until
it has cooled.
,_
Replacing
the Blade
Use a small brush to clean offthe outside of the unit.
Do not use strong detergents. Household cleaners that
contain aromatic oils such as pine and lemon, and
solvents such as kerosene, can damage plastic housing
or handle. Wipe off any moisture with a soft cloth.
Replace the blade if:
• it is missing teeth, dull, bent or damaged.
STORAGE
• you are required to force the moving blade through
wood.
• Store the unit inside in a dry place, either locked up or
up high to prevent unauthorized use or damage. Keep
out of the reach of children.
• the engine slows excessively while cutting.
• every one (1) hour (accumulative) of actual cutting time.
1.
Install the blade cover on the blade.
ACCESSORIES/REPLACEMENT
2.
Remove the blade clamp screw, lock washer and
blade clamp (Fig. 15).
Blade (2 pack) .......................
3.
Reinstall the blade following the steps under
Installing the Blade in the assembly section.
the Blade
• Clean the blade after each use to remove pitch, gum,
sap, etc.
• Clean the blade with commercially available saw blade
cleaners. Available at your local hardware store.
• Discard the blade if it is missing teeth, dull, bent or
damaged in any way.
• Always install the blade cover on the blade when not in
use.
Blade Clamp
Screw and \
Lock Washer "_
Blade Clamp -©
Fig. 15
10
©
791-180966B
Blade Clamp .........................
Blade Clamp Screw and Lock Washer
Use only original MTD replacement
Cleaning
PARTS
.....
parts.
791-181155
791-181156
Unit Weight (Without Boom Extension)
Unit Weight (Boom Extension)
.......................................................
Unit Length (Without Boom Extension
Length of Boom Extension
Blade Length (Maximum
Strokes per Minute
Shoulder Harness
..................................................
and Blade) .......................................
.........................................................
cut diameter)
...............................................
....................................................................
.....................................................................
3 Ibs. (1.36 kg.)
1.5 Ibs. (0.68 kg.)
33 inches (0.84 m)
26 inches (0.66 m)
4 inches (10.16 cm)
Up to 2000
Quick Snap
11
MANUFACTURER'S
LIMITED WARRANTY FOR:
Trimmer :
The limited warranty set forth below is given by MTD
SOUTHWEST INC ("MTD") with respect with new
merchandise purchased and used in the United States, its
possessions and territories.
MTD warrants this product against defects in material and
workmanship for a period of two (2) years commencing on the
date of original purchase and will, at its option, repair or
replace, free of charge, any part found to be defective in
material or workmanship. This limited warranty shall only apply
if this product has been operated and maintained in
accordance with the Operator's Manual furnished with the
product, and has not been subject to misuse, abuse,
commercial use, neglect, accident, improper maintenance,
alteration, vandalism, theft, fire, water, or damage because of
other peril or natural disaster. Damage resulting from the
installation or use of any accessory or attachment not
approved by MTD for use with the product(s) covered by this
manual will void your warranty as to any resulting damage.
This warranty is limited to ninety (90) days from the date of
original retail purchase for any MTD product that is used for
rental or commercial purposes, or any other incomeproducing purpose.
HOW TO OBTAIN SERVICE: Warranty service is available,
WITH PROOF OF PURCHASE THROUGH YOUR LOCAL
AUTHORIZED SERVICE DEALER. To locate the dealer in your
area, please check for a listing in the Yellow Pages or contact
the Customer Service Department of MTD SOUTHWEST INC
by calling 1-800-345-8746 or writing to 550 N 54th Street,
Chandler, Arizona 85226 or if in Canada call 1-800-668-1238.
No product returned directly to the factory will be accepted
unless prior written permission has been extended by the
Customer Service Department of MTD SOUTHWEST INC.
This limited warranty does not provide coverage in the
following cases:
A. Wear items - Blade
B.
MTD does not extend any warranty for products sold or
exported outside of the United States of America, its
possessions
and territories, except those sold through
MTD's authorized channels of export distribution
MTD reserves the right to change or improve the design of
any TrimmerPlus® Product without assuming any obligation
to modify
any product
previously
manufactured.
SAVE THESE INSTRUCTIONS
No implied warranty, including any implied warranty of
merchantability
or fitness for a particular purpose,
applies after the applicable period of express written
warranty above as to the parts as identified. No other
express warranty or guaranty, whether written or oral,
except as mentioned above, given by any person or
entity, including a dealer or retailer, with respect to any
product shall bind MTD. During the period of the
Warranty, the exclusive remedy is repair or replacement
of the product as set forth above. (Some states do not
allow limitations on how long an implied warranty lasts, so
the above limitation may not apply to you.)
The provisions as set forth in this Warranty provide the
sole and exclusive remedy arising from the sales. MTD
shall not be liable for incidental or consequential loss or
damages including, without limitation,
expenses
incurred for substitute or replacement
lawn care
services, for transportation or for related expenses, or
for rental expenses to temporarily replace a warranted
product. (Some states do not allow limitations on how long
an implied warranty lasts, so the above limitation may not
apply to you.)
In no event shall recovery of any kind be greater than the
amount of the purchase price of the product sold. Alteration of
the safety features of the product shall void this Warranty. You
assume the risk and liability for loss, damage, or injury to you
and your property and/or to others and their property arising
out of the use or misuse or inability to use the product.
This limited warranty shall not extend to anyone other than
the original purchaser, original lessee or the person for
whom it was purchased as a gift.
How State Law Relates to this Warranty: This warranty
gives you specific legal rights, and you may also have other
rights which vary from state to state.
To locate your nearest service dealer dial
1-800-345-8746 in the United States or
1-800-668-I 238 in Canada.
MTD SOUTHWEST
INC
550 N. 54th Street
Chandler, AZ 85226 U.S.A.
FOR FUTURE
FOR QUESTIONS CALL 1-800-345-8746
OR 1-800-668-1238
IN CANADA
OPERATOR'S MANUAL PART NO. 792-10736
PRINTED IN U.S.A.
°
REFERENCE.
IN U.S.
REV. P00
11/01