1
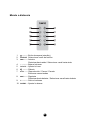
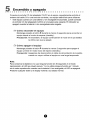
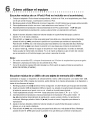
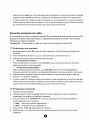
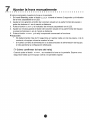
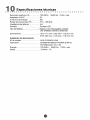
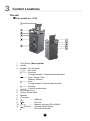
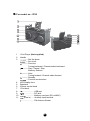
1 Índice de contenidos ○ ○ ○ ○ ○ ○ ○ ○ ○ ○ ○ ○ ○ ○ ○ ○ ○ ○ ○ ○ ○ ○ ○ ○ ○ ○ ○ ○ ○ ○ ○ ○ ○ ○ ○ ○ ○ Gracias por adquirir este equipo. Por favor, lea atentamente el manual de instrucciones antes de comenzar a utilizar el equipo y guárdelo en un lugar seguro para futuras consultas. Índice de contenidos 1. Índice de contenidos ............................................................................................ 1 2. Precauciones ...................................................................................................... 2 3. Ubicación de los controles ................................................................................ 3 El equipo .............................................................................................................................3 Mando a distancia ................................................................................................................ 5 4. Instalación de las pilas....................................................................................... 6 5. Encendido y apagado ........................................................................................ 7 6. Cómo utilizar el equipo ...................................................................................... 8 Escuchar música de un i-Pod (i-Pod no incluido en el suministro): ................................................................ 8 Escuchar música de un dispositivo USB o de una tarjeta de memoria (SD o MMC): ............................... 8 Escuchar difusiones de radio: .............................................................................................................................. 9 Escuchar música de un dispositivo auxiliar: .................................................................................................... 10 7. Ajustar la hora manualmente ........................................................................................ 11 8. Ajustar la alarma .............................................................................................................. 12 9. Resolución de incidencias ............................................................................................. 13 10. Especificaciones técnicas ........................................................................................... 14 11. Accesorios ..................................................................................................................... 15 12. Instrucciones para la eliminación de pilas ............................................................... 16 1 2 Precauciones ○ ○ ○ ○ ○ ○ ○ ○ ○ ○ ○ ○ ○ ○ ○ ○ ○ ○ ○ ○ ○ ○ ○ ○ ○ ○ ○ ○ ○ ○ ○ ○ ○ ○ ○ ○ ○ Antes de comenzar a utilizar el equipo, compruebe que el voltaje del equipo y del suministro local sean idénticos. Si no va a usar el equipo durante una temporada, desconéctelo de la toma de corriente. Para desconectar el cable, tire de él agarrándolo por el enchufe. Prohibido abrir la carcasa por personal no cualificado, peligro de descarga eléctrica. El interior no contiene partes que puedan ser reparadas por el usuario. En caso de que el equipo falle, desenchufe el cable de alimentación y consulte a su distribuidor. La ventilación debe funcionar perfectamente, no obstruya las aberturas de ventilación con objetos, como por ejemplo, periódicos, manteles, cortinas, etc. Evite exponer el equipo a goteras o salpicaduras, y no coloque encima del mismo ningún objeto que contenga líquidos, como por ejemplo, jarrones. Para evitar incendios o cortocircuitos, no exponga el equipo al calor, la lluvia, la humedad, o el polvo. Cuando esté utilizando el equipo, evite acercarse a fuentes de agua como bañeras, máquinas de lavado, lavavajillas o lavadoras; tampoco utilice este equipo en bases húmedas, cerca de piscinas o similares. No coloque el equipo cerca de campos magnéticos de gran intensidad. No coloque el equipo cerca de un humidificador o la humedad afectará negativamente a la vida útil del cabezal láser. Si transporta el equipo directamente desde un entorno frío a un entorno cálido, o lo coloca en una habitación demasiado húmeda, la humedad podría condensarse en las lentes que se encuentran en el interior del equipo. Si esto ocurriese, el equipo dejaría de funcionar correctamente. Retire el disco y deje el equipo encendido durante aproximadamente una hora, hasta que la humedad se haya evaporado. En caso de que alguna sustancia sólida o líquida entre en el equipo, desconéctelo y deje que lo revise personal cualificado antes de volver a utilizarlo. Antes de limpiar el equipo, desconéctelo de la toma de corriente. No emplee limpiadores líquidos o aerosoles (p. ej. insecticidas). Puede utilizar un paño limpio para limpiar el equipo. Por favor, utilice el cable de conexión para conectar el equipo. No emplee accesorios adicionales que no hayan sido recomendados por el fabricante ya que podría causar una descarga eléctrica al utilizarlos. No exponga las pilas a una fuente de calor excesivo como el sol, el fuego o similar. Si el enchufe tomacorriente se emplea como dispositivo desconectado, éste deberá permanecer listo para su uso. 2 Mando a distancia 1 2. 3. --------- Botón de espera (standby) SOURCE Seleccionar modo de función H ------ Anterior Sintonizar hacia atrás / Seleccionar canal hacia atrás Bajar el volumen Ajustar la hora Silencio Reproducción / Pausa / Parada Emisoras memorizadas 8. G ------ Siguiente Sintonizar hacia delante / Seleccionar canal hacia delante 9. + ---------- Subir el volumen 10. ALARM -- Ajustar la alarma 4. 5. 6. 7. - ---------CLOCK --------BF ----- 5 4 Instalación de las pilas ○ ○ ○ ○ ○ ○ ○ ○ ○ ○ ○ ○ ○ ○ ○ ○ ○ ○ ○ ○ ○ ○ ○ ○ ○ ○ ○ ○ ○ ○ ○ ○ ○ ○ ○ ○ ○ Precaución: Tenga cuidado si presiona sólo con las uñas la ranura del compartimento de las pilas, ya que podría rompérselas. 1. Presione el cierre del compartimento de las pilas. 2. Presione la ranura del compartimento de las pilas. 3. Extraiga el compartimento de las pilas. 4. Coloque correctamente las nuevas pilas (tamaño 2025), y vuelva a insertar el compartimento de las pilas en su posición original. * Las pilas contienen sustancias químicas, por lo que deben eliminarse adecuadamente. Cómo utilizar el mando a distancia Un uso incorrecto puede causar corrosión o fuga en las pilas, y derivar en lesiones físicas o daños materiales, incluyendo peligro de fuego. Retire las pilas del mando a distancia cuando no vaya a utilizarlo en una larga temporada. En caso contrario, podría resultar dañado debido a una fuga en las pilas. Para evitar posibles daños, lea atentamente las presentes instrucciones y maneje el mando a distancia correctamente. No deje caer ni golpee el mando a distancia. No derrame agua ni líquido alguno sobre el mando a distancia. No coloque el mando a distancia sobre un objeto húmedo. No coloque el mando a distancia bajo la incidencia directa de los rayos del sol o cerca de fuentes que irradien un calor excesivo. No emplee limpiadores cáusticos (limpiadores de porcelana, acero inoxidable, baños, hornos etc.) para limpiar el mando a distancia, o podría resultar dañado. 6 12 Instrucciones para la eliminación de las pilas ○ ○ ○ ○ ○ ○ ○ ○ ○ ○ ○ ○ ○ ○ ○ ○ ○ ○ ○ ○ ○ ○ ○ ○ ○ ○ ○ ○ ○ ○ ○ ○ ○ ○ ○ ○ ○ Este producto contiene pilas incluidas en la Directiva 2006/66/CE, que no pueden eliminarse con el resto de residuos domésticos. Por favor, infórmese acerca de la normativa local en referencia a la recogida especial de pilas. La correcta eliminación de las pilas ayuda a evitar consecuencias potencialmente negativas para el medioambiente y la salud de las personas. 16 41007599 1 Table of Contents ○ ○ ○ ○ ○ ○ ○ ○ ○ ○ ○ ○ ○ ○ ○ ○ ○ ○ ○ ○ ○ ○ ○ ○ ○ ○ ○ ○ ○ ○ ○ ○ ○ ○ ○ ○ ○ Thank you for purchase this unit. Please read this owner’s manual carefully before use and keep it at a safe place for your future reference. Table of Contents 1. Table of Contents ............................................................................................... 1 2. Precautions ........................................................................................................ 2 3. Control Locations ............................................................................................. 3 The unit ................................................................................................................................ 3 Remote control ..................................................................................................................... 5 4. Installation Batteries ......................................................................................... 6 5. Turning the Power On and Off ......................................................................... 7 6. Using the Unit .................................................................................................... 8 Listening to music from an i-Pod (i-Pod player is not supplied): .............................................. 8 Listening to music from an USB or Memory card (SD or MMC): ........................................... 8 Listening to Radio Broadcasts: ............................................................................................. 9 Listening to music from an auxiliary device: .......................................................................... 10 7. Setting the Clock Manually .............................................................................. 11 8. Setting the Alarm .............................................................................................. 12 9. Trouble shooting .............................................................................................. 13 10. Technical Specifications ................................................................................ 14 11. Accessories ...................................................................................................... 15 12. Notes for battery disposal ............................................................................. 16 1 2 Precautions ○ ○ ○ ○ ○ ○ ○ ○ ○ ○ ○ ○ ○ ○ ○ ○ ○ ○ ○ ○ ○ ○ ○ ○ ○ ○ ○ ○ ○ ○ ○ ○ ○ ○ ○ ○ ○ Before operating this unit, check the voltage of this unit to see if it is identical with the voltage of your local power supply. Unplug the unit from the wall outlet if it is not used for a long time. To disconnect the cord, pull it out by grasping the plug. To avoid electric shock, do not open the cabinet by unqualified personnel. There is no user serviceable parts inside. In case of unit failure, unplug the power cord and consult your dealer The ventilation should not be impeded by covering the ventilation openings with items such as newspaper, table-cloths, curtains etc. The apparatus shall not be exposed to dripping or splashing and that no objects filled with liquids, such as vases, shall be placed on the apparatus. To prevent fire or shock hazard, do not expose this equipment to hot places, rain, moisture or dust. Don’t get close to the water source when using this unit, such as near bathtub, bath slot, ish-washing slot, washing machine to use it; also, don’t use this unit on damp plinth or nearby swimming pool or similar close to the water source. Do not place this unit close to strong magnetic field. Don’t place this unit close to the damper, or the moisture will affect the life of the laser head. If the unit is brought directly from a cold to a warm location, or is placed in a very damp room, moisture may condense on the lens inside the unit. Should this occur, the unit will not operate properly. Remove the disc and leave the unit turned on for about an hour until the moisture evaporates. Should any solid object or liquid fall into the unit, unplug the unit and have it checked by qualified personnel before operating it any further. Before cleaning this unit, unplug the unit from the wall outlet first. Don’t use the cleaner which is with liquid or aerosol (e.g. pesticide). You can use a clean cloth to clean this unit. Please use the connection cable to connect to unit. Don’t use accessorial equipment recommended by non manufacturer. It may course an electric shock by using this equipment. Batteries shall not be exposed to excessive heat such as sunshine, fire or the like. Where the Mains plug is used as the disconnect device, the disconnect device shall remain readily operable. 2 3 Control Locations ○ ○ ○ ○ ○ ○ ○ ○ ○ ○ ○ ○ ○ ○ ○ ○ ○ ○ ○ ○ ○ ○ ○ ○ ○ ○ ○ ○ ○ ○ ○ ○ ○ ○ ○ ○ ○ The unit For model no.: IP10 1 2. 3. i-Pod Player (Not supplied) Handle -- Set the alarm --- Set clock --------- Previous Tuning backward / Channel select backward --------- Play / Pause / Stop Memory Stations --------- Next Tuning forward / Channel select forward --------- Standby -- Function mode select 4. LED Display lens 5. Volume control knob 6. Speaker 7. i-Pod dock ..................... USB port 8. .................. DC jack 9. .............. Memory card port (SD or MMC) 10. (Line in) ..... Auxiliary input terminal 11. ........................ FM Antenna Socket 3 For model no.: IP20 1 2. 3. i-Pod Player (Not supplied) Handle -- Set the alarm --- Set clock --------- Previous Tuning backward / Channel select backward --------- Play / Pause / Stop Memory Stations --------- Next Tuning forward / Channel select forward --------- Standby -- Function mode select 4. LED Display lens 5. Speakers 6. Volume control knob 7. i-Pod dock ..................... USB port 8. .................. DC jack 9. .............. Memory card port (SD or MMC) 10. (Line in) ..... Auxiliary input terminal 11. ........................ FM Antenna Socket 4 Remote control 1 2. 3. --------- Standby SOURCE Function mode select H ------ Previous Tuning backward / Channel select backward Volume down Set clock Mute Play / Pause / Stop Memory Stations 8. G ------ Next Tuning forward / Channel select forward 9. + ---------- Volume up 10. ALARM -- Set the alarm 4. 5. 6. 7. - ---------CLOCK --------BF ----- 5 4 Installation Batteries ○ ○ ○ ○ ○ ○ ○ ○ ○ ○ ○ ○ ○ ○ ○ ○ ○ ○ ○ ○ ○ ○ ○ ○ ○ ○ ○ ○ ○ ○ ○ ○ ○ ○ ○ ○ ○ Caution: Be careful when you press the slot of the battery compartment with your fingernails only as this might break them. 1. Press the lock on the battery compartment. 2. Press the slot on the battery compartment. 3. Pull out the battery compartment. 4. Replace a new battery (size 2025) correctly and fully insert the battery compartment back to the original position. * Batteries contain chemical substances, so they should be disposed of properly. Handling the Remote Control Improper use could cause corrosion or battery leakage and may result in physical injury and/or property damage including fire. Remove the battery from remote control handset when it is not to be used for a long period. Otherwise it can be damaged due to leakage of battery. To avoid possible failure, read the following instructions and handle the remote control property. Do not drop or cause impact to the remote control. Do not spill water or any liquid on the remote control. Do not place the remote control on a wet object. Do not place the remote control under the direct sunlight or near sources of excessive heat. Do not use caustic cleaners (porcelain, stainless steel, toilet, or oven cleaner etc.) on the remote, as it may suffer damage. 6 5 Turning the Power On and Off ○ ○ ○ ○ ○ ○ ○ ○ ○ ○ ○ ○ ○ ○ ○ ○ ○ ○ ○ ○ ○ ○ ○ ○ ○ ○ ○ ○ ○ ○ ○ ○ ○ ○ ○ ○ ○ Insert the AC/DC adapter’s DC plug into the unit, then insert one side of AC power cord into a wall outlet, and your unit is at your command! * This unit has a built-in Recharge Li-lon battery, you can also insert the AC/DC adapter’s DC plug into the unit for charging, the indicator will light up. The indicator will turn off when the built-in Recharge Li-lon battery is full power . Turning the Unit On Press the button for 2 seconds or more to turn the unit on from standby mode. Caution: When turning the unit on, the unit will continue in the mode it was in when it was turned off last time. Turning the Unit Off Press the button for 2 seconds or more to turn the unit off and go to standby mode. Caution: Be sure to unplug the power cord from the outlet when the unit is not in use for an extended period of time. Note: For saving power, If you don’t use any function of the unit for about 30 seconds in playing mode, the LED will turn drak. And if you don’t use any function of the unit for about 1 minute in playing mode when using the built-in Recharge Li-lon battery, the LED will turn off. Press any one button to returns to the original display. 7 6 Using the Unit ○ ○ ○ ○ ○ ○ ○ ○ ○ ○ ○ ○ ○ ○ ○ ○ ○ ○ ○ ○ ○ ○ ○ ○ ○ ○ ○ ○ ○ ○ ○ ○ ○ ○ ○ ○ ○ Listening to music from an i-Pod (i-Pod player is not supplied): 1. Place the appropriate corresponding universal i-Pod adaptor, included with i-Pod, into this unit i-Pod docking location, then connect your i-Pod. 2. Press the button for 2 seconds or more. A LED will indicate that the unit is on. 3. Press the button repeatedly to select “ ” source. 4. The i-Pod player stored music will be played automatically, press the (BF) button to temporarily stop the playing, press the button again, it will continue to play. 5. Adjust volume using the volume control knob on the front of the unit or +/- buttons on the remote. 6. Press the (H) button once or more to skip previous one or more tracks of the disc. Press and hold the (H ) button to search for the position that you intend to start playing. Press the (G) button once or more to skip forward one or more tracks of the disc. Press and hold the (G ) button to search for the position that you intend to start playing. 7. Press the button on the remote in playing mode, all sound will be muted. Press the button again or +/- buttons on the remote or rotate the volume control knob on the front of unit to resume sound. Note: * * * In DC power on mode, directly dock your i-Pod player in the docking for charging. Select and play music through your i-Pod controls. For the purpose of saving power, recharging of your i-Pod is NOT SUPPORTED when the main set is in the STANDBY MODE. Listening to music from an USB or Memory card (SD or MMC): By connecting a USB mass storage device (including USB flash memory, USB flash players or memory cards) to the unit, you can enjoy the device's stored music through the speakers of the unit. 1. Press the button for 2 seconds or more. A LED will indicate that the unit is on. port on the rear of the unit or insert the 2. Insert the USB device's USB plug into the port on the rear of the unit. memory card into the 3. Press the button repeatedly to select “ ” or “ ” source. 4. The i-Pod player stored music will be played automatically, press the (BF) button to temporarily stop the playing, press the button again, it will continue to play. Press and hold the (BF ) button for 2 seconds or more to stop the playing. 5. Adjust volume using the volume control knob on the front of the unit or +/- buttons on the remote. 6. Press the (H) button once or more to skip previous one or more tracks of the disc. Press and hold the (H ) button to search for the position that you intend to start playing. 8 Press the (G) button once or more to skip forward one or more tracks of the disc. Press and hold the (G ) button to search for the position that you intend to start playing. 7. Press the button on the remote in playing mode, all sound will be muted. Press the button again or +/- buttons on the remote or rotate the volume control knob on the front of unit to resume sound. Listening to Radio Broadcasts: This unit has built-in FM antenna. If reception is poor, please connect the supplied FM antenna to the FM antenna socket on the rear of the unit, then adjust the position of the FM antenna for the best reception. Caution: Disconnect the audio cable when using the FM antenna. Tuning in a Station 1. Press the button for 2 seconds or more. A LED will indicate that the unit is on. button repeatedly to select “ ” source. 2. Press the 3. Select a station using one of the following methods. Manual Tuning Repeatedly press the , ( H , G ) buttons to move from frequency to frequency until you find the station you want. Auto Tuning Press and hold the , (H ,G ) buttons for 2 second or more, the frequency changes down, or up, automatically until a station is found. 4. Adjust volume using the volume control knob on the front of the unit or +/- buttons on the remote. button on the remote in playing mode, all sound will be muted. Press 5. Press the the button again or +/- buttons on the remote or rotate the volume control knob on the front of unit to resume sound. Presetting Stations 1. Tune in the desired station. 2. Press and hold the (BF) button for 2 seconds or more, the preset number will blink on the display and the frequency will be displayed. 3. Press the , (H,G) buttons once by once to select the preset number, you can preset up to 10 stations. (H) Decreases the preset number by 1 (G) Increases the preset number by 1 4. Press the (BF ) button to store the station. 5. Repeat above steps 1 to 4 for each station you want to store in memory with a preset number. 9 Note: The operating time of every step shouldn’t be longer than 5 seconds or it will return to the original display. If the unit is unplugged or if a power failure occurs, the preset stations will not be erased. Preset Tuning (Possible only after presetting stations) Repeatedly press the (BF ) buttons to select the desired preset number. Its frequency will displayed. Listening to music from an auxiliary device: The unit includes a 3.5mm audio cable for connection to any analog music unit with a 3. 5mm output. Caution: Disconnect the supplied FM antenna when using an audio cable. 1. 2. 3. 4. 5. Connect the auxiliary device to the unit using the supplied 3.5mm audio cable. Press the button for 2 seconds or more. A LED will indicate that the unit is on. button repeatedly to select “ ” source. Press the Control music playback through the auxiliary device. Adjust volume using the volume control knob on the front of the unit or +/- buttons on the remote. button on the remote in playing mode, all sound will be muted. Press 6. Press the the button again or +/- buttons on the remote or rotate the volume control knob on the front of unit to resume sound. 10 7 Setting the Clock Manually ○ ○ ○ ○ ○ ○ ○ ○ ○ ○ ○ ○ ○ ○ ○ ○ ○ ○ ○ ○ ○ ○ ○ ○ ○ ○ ○ ○ ○ ○ ○ ○ ○ ○ ○ ○ ○ The built-in clock shows the time on the display. button for 2 seconds or more, the hour indicator 1. In standby mode, press the will blink on the LED. 2. Set the hour with rotate the volume control knob on the front of the unit or +/- buttons on the remote. button, minute indicator will blink on the LED. 3. Press the 4. Set the minute with rotate the volume control knob on the front of the unit or +/- buttons on the remote. button, the built-in clock starts operating. 5. Press the Caution: * The operating time of every step shouldn’t be longer than 10 seconds or it will return to the time display. * If there is a power failure or the units power is turned off, the clock will lose its setting. To confirm the clock time When you press the button, the clock time is displayed. Wait for a few seconds until the display returns to the original display. 11 8 Setting the Alarm ○ ○ ○ ○ ○ ○ ○ ○ ○ ○ ○ ○ ○ ○ ○ ○ ○ ○ ○ ○ ○ ○ ○ ○ ○ ○ ○ ○ ○ ○ ○ ○ ○ ○ ○ ○ ○ 1. 2. 3. 4. 5. 6. 7. 8. 9. The alarm time indicator “ ” is displayed of the LED display when you turn the alarm on, however the clock must be set correctly for the timer function to work. button for 2 seconds or more to enter In standby mode, press and hold the alarm set mode. Rotate the volume control knob on the front of the unit or +/- buttons on the remote to adjust the hour setting. button to save this setting and enter the alarm minute set mode. Press the Rotate the volume control knob on the front of the unit or +/- buttons on the remote to adjust the minute setting. button to save this setting and enter the alarm source mode. Press the Rotate the volume control knob on the front of the unit or +/- buttons on the remote to select the alarm source: , , , or . button to save this setting and enter the alarm daily frequency Press the mode). mode (except for NOTE: * If you wish to wake up to a specific song on your i-Pod, dock your i-Pod on the unit, ” as your alarm source. select the song on your i-Pod, and then select “ ” as your alarm source, the alarm will play the last * If you have selected “ radio station selected. button to save this setting and enter the alarm volume mode Press the Rotate the volume control knob on the front of the unit or +/- buttons on the remote to set the alarm volume. Exit the Alarm Set mode Press the button to exit the Alarm Set mode. The unit will also automatically exit the Alarm Set mode after 10 seconds of inactivity. To confirm the Alarm Set When the alarm time will be set, press the “ ” in standby mode. button to switch “ ” or Note 1. When exiting the Alarm Set mode, the alarm is automatically turned off. To turn button. on the alarm, press the 2. This Altec Lansing Moondance Home system features a built-in backup battery unit to provide continuous clock settings in the event of a power failure. If a power failure occurs or the AC cord is accidentally disconnected, the display will not remain lit and the alarm will not function, but the current time will be maintained. 3. If “i-Pod” (or USB, CARD) is selected as the alarm source but no i-Pod (or USB, CARD) is inserted when the alarm goes on, the unit will turn on automatically without sound. 4. When you use the button on the unit to set the alarm, the unit will enter the clock setting mode first. 12 9 Trouble shooting ○ ○ ○ ○ ○ ○ ○ ○ ○ ○ ○ ○ ○ ○ ○ ○ ○ ○ ○ ○ ○ ○ ○ ○ ○ ○ ○ ○ ○ ○ ○ ○ ○ ○ ○ ○ ○ Troubles Reasons Solutions The unit can’t be turned on. (AC Operation) AC/DC adapter isn’t plugged into a wall outlet or the connector isn’t plugged into the power supply jack on the back of the unit. Wall outlet is not functioning The unit can’t be turned on. (Battery Operation) Built-in Recharge Li-lon battery’s power is enhausted. Plug the AC/DC adapter into a wall outlet and plug the connector into the power supply jack on the back of the unit. Plug another device into the same outlet to confirm the outlet is working. Connect the AC/DC adapter to the unit for charging. No sound. Volume is at minimum. Incorrect source selection Poor radio reception The antenna is disconnected Remote control can’t work The FM wire antenna is not properly extended and positioned Battery is weak The remote control is not pointed toward the unit. i-Pod doesn’t dock properly Using the wrong adapter for i-Pod or no adapter i-Pod didn’t install properly i-Pod didn’t charge i-Pod is not installed properly i-Pod is locked up AC/DC adapter isn’t plugged into a wall outlet or the connector isn’t plugged into the power supply jack on the back of the unit. 13 Adjust the volume. Ensure that the correct source is selected. Reconnect the antenna securely Extend FM wire antenna to the best reception position Replace current battery with a new battery. Point the remote control toward the unit and make sure there is a clear pathway between the remote control lens and the unit. Make sure the dock adapter is the proper fit for your i-Pod. Remove your i-Pod from the dock and check for obstruction on the connectors in the dock and on your i-Pod. Then reset it in the dock. Remove your i-Pod from the dock and check for obstruction on the connectors in the dock and on your i-Pod. Then reset it in the dock. Please make sure your i-Pod is working properly before docking into the unit. Please refer to your i-Pod manual for details. Plug the AC/DC adapter into a wall outlet and plug the connector into the power supply jack on the back of the unit. 10 Technical Specifications ○ ○ ○ ○ ○ ○ ○ ○ ○ ○ ○ ○ ○ ○ ○ ○ ○ ○ ○ ○ ○ ○ ○ ○ ○ ○ ○ ○ ○ ○ ○ ○ ○ ○ ○ ○ ○ AC Power supply ............................ 100-240V~ 50/60 Hz 0.25A Max. AC/DC Adapter ............................... 5V Power consumption ......................... 5W FM frequency range ....................... 87.5 - 108 MHz Speaker Impedance ........................ 4Ω Display ............................................ LED display Battery type .................................... Bulit-in Recharge Li-lon Battery (unit) Lithium CR2025 (remote) Dimension ....................................... IP10: 111(W) × 242(H) × 118(D) mm IP20: 264(W) × 185(H) × 118(D) mm Power Adapter Model No. ........................................ XKD-C1000IC5.0-5W Manufacturer ................................... SHENZHEN MOSO POWER SUPPLY TECHNOLOGY CO. LTD Input ................................................ 100-240V~ 50/60 Hz 0.25A Max. 1A Output ............................................. 5.0V 14