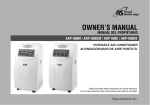
1
PORTABLE
ACONDICIONADOR
AIR CONDITIONER
DE AIRE PORTA TIL
Read and retain these instructions for future reference
Lea y tenga presente estas instrucciones
para futuras consu/tas
BEFORE USE
GENERAL
SAFETY
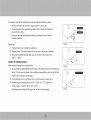
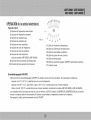
• Only use in the upright position on a flat, level surface at least 20"/50cm from any object (FIG 1 & 4)
• Do not place objects on the unit or restrict air Inlet / outlet (FIG. 2).
• Closely supervise children and pets while unit is in use.
ELECTRICAL
SAFETY
• For indoor use only.
• Turn off and unplug the unit when it is not in use.
• Do not use in wet environments
(FIG. 3).
• Do not pull the unit by the cord.
• If the supply cord is damaged, it must be replaced
by an electrician
or qualified person, to avoid
hazard or Injury.
FOR MAXIMUM
EFFICENCY
• Do not exceed the recommended
feet.
FIG.1
FIG.2
FIG.3
FIG.4
room size of 300 sq
• Close doors and windows.
• Keep curtains or blinds closed during the sunniest
part of the day.
• Keep filters clean.
• Once room has reached the desired conditions,
temperature
and ventilation
reduce
settings.
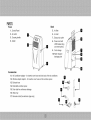
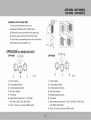
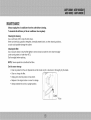
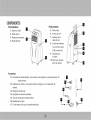
PABTS
Front
Back
1. Control Panel
5.
Air filter
2, Air outlet
6,
Air inlet
3. Carrying handle
7.
Exhaust air outlet
4, Caster
8.
Power cord with
LCDI breaker plug
and reset buttons.
9.
Cord storage
10. Water stopper /
drainage point
Accessories
11. Air Conditioner
adaptor - for insertion over hose and into back of the air conditioner.
12, Window adaptor adaptor - for insertion over hose and into window spacer.
13, Exhaust hose
14. Extendable window spacer.
15, Drain tube for continuous
drainage
16, Water tray
17. Remote control (for electronic type only)
f
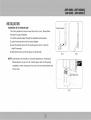
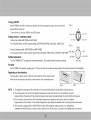
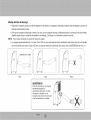
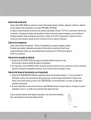
iNSTALLATiON
Installation
of the exhaust
pipe
This unit is portable and may be moved from room to room.
Please follow
the steps for proper installation:
1, Feed the outward adapter through the extendable window spacer.
2, Screw the exhaust hose into the outward adapter.
3. Insert the window spacer into the window gaps as shown. Adjust its
length if necessary.
4, Slide window across so that the spacer is held securely.
FIG.6
FIG.5
NOTE: Install window vent vertically or horizontally depending
on window style.
Window Spacer may be cut to fit. If window spacer does not fill opening
completely a custom made spacer from your local home improvement
can be made.
store
FIG.7
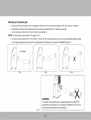
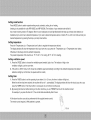
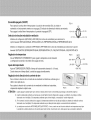
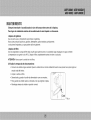
Mounting
of the exhaust
pipe
• Using only the hose provided,
screw unit adapter to exhaust hose then clip the unit adaptor to the back of the air conditioner.
• Avoid kinks and bends in the exhaust hose as this will cause expelled moist air to build up causing the
unit to overheat and shut down. (Fig 8 & 9 show correct position).
NOTE: For best results do not exceed a 45 ° angle.( Fig 10)
• The hose may be extended from 1-5 ft/300mm
It is not recommended
-1500mm but for maximum efficiency use the shortest straightest length possible.
to exceed 5 feet for this will diminish the efficiency of the unit. See WARNING
f
_.
Figure 11
f
i_ i
FIG.8
FIG.9
#
FIG.11
FIG.IO
WARNING
The length of the exhaust pipe is specially designed according to the
specification of this product. Do not replace or lengthen it with your own
hose as this will cause the unit to malfunction.
...........
............
.......................................................
Installation
of the carbon
filter
1. Remove the filter frame from the unit.
2. Separate the filter fixer from the filter frame.
3. Remove the active carbon filter from its plastic bag.
4. Insert the active carbon filter into the filter frame.
5. Fix the filter by reassembling
the fixer to the filter frame.
6. Re-fit the filter frame inside the unit.
OPERATIONfor mechanical unit
ARP-900DM
FIG.12
FIG.13
1. Power indicator
1. Power indicator
2. Fan operating indicator
2. Fan operating indicator
3. Cooling operating indicator
4. 'Full water' indicator
3. Cooling operating indicator
4. 'Full water' indicator
5. Thermostat
5. Heating operating indicator
6. Thermostat
6. Speed switch with options for - LOW FAN,
HIGH FAN, LOW COOL, HIGH COOL
7. Timer (1-8 hours)
as well as ON/OFF switch
7. Speed switch with options for - FAN, LOW COOL, HIGH COOL,
LOW HEAT, HIGH HEAT.
8. Timer (1-8 hours)
as well as ON/OFF switch
Turning
ON/OFF
Set the TIMER to the ON for continuous
operation (the unit will operate as long as it is not turned off).
FIG.14
Power indicator comes on.
"_
To turn off the unit, turn the TIMER to the OFF position.
Setting
function
/ ventilation
speed
Cooling only models (ARP-900M
Turn the speed switch
and ARP-900E)
to select required setting: LOW FAN, HIGH FAN, LOW COOL, HIGH COOL
FIG.15
S_EED
Cooling & heating models
(ARP-900DM
and ARP-900DE)
Turn the speed switch to select required setting: FAN, LOW COOL, HIGH COOL, LOW HEAT, HIGH HEAT HZGHHEAT=--_
-'-
Setting temperature
LO_,HEa'r=,-% _
Turn the THERMOSTAT
to regulate the temperature
desired: The cooling intensity increases clockwise.
F_
_-t
................
LC,_'_
cool
HIG_ COOL
Set timer
Set the TIMER to the desired operating time (1 to 8 hours). When the set time has been reached, the machine will shut off automatically.
Regulating
air flow
direction
;;
Turn the roller on the air vent to control the air flow direction of the vertical louvers.
k,/
Move
/I.,
the
air
vent
directly
to
adjust
the
air
flow
direction
of
the
horizontal
louvers.
FIG.16
NOTE:
1. To lengthen the compressor's
......
, , _.,_f_.
I
,
......
_',_b_._.
FIG.17
life, when the unit is turned off wait at least 3 minutes before turning it back on.
2. The cooling system will turn off if the ambient temperature is lower than the set one. The ventilation, however,
keeps workingon the set level. If the ambient temperature rises above the selected level, the cooling function will resume.
3. On the contrary, the heat will turn off if the ambient temperature is higher than the set one (still, the ventilation
keeps working on the set level). As the ambient temperature drops below the selected level, the heating function will resume.
4. This machine is equipped with an ANTI-FROST function. While using the heating function in low temperatures,
sometimes the heat will stop for a while in order to melt the frost. As this occurs, just wait for the heating function to resume.
OPERATION
for electronicunit
Control panel
1. 'Set temperature'
indicator
2. 'Room temperature' indicator
3. Low ventilation indicator
FIG.18
4. High ventilation indicator
5. Automatic mode indicator
11. 'Temperature
up' button
6. Cooling mode indicator
7. Fan mode indicator
12. 'Temperature
down' button
8. Heating mode indicator
14. Mode (function) option button
(For ARP-900DE
13. Speed (ventilation)button
and ARP-900DM
15. Timer button
models only)
16. ON/OFF (power) button
9. Timer operation indicator
17. Display window
10. Compressor operation indicator
Turning
ON/OFF
Press ON/OFF button, the unit will start automatically.
- Higher than 75 °F/24
If the ambient temperature
is
°C, the unit will work in cooling mode.
- Higher than 68 °F / 20 °C, but below or equal to 75 °F / 24 °C, the unit will work in ventilation
- Below 68 °F / 20 °C, the unit will work in heating mode
Indicators of the functions in progress will be lit. *NOTE: The COMPRESSOR
The display window shows the ambient room temperature.
To turn the unit off, press the ON/OFF button again.
mode.
(Only for units ARP-900 DM and ARP-900 DE)
indicator will only light up when the compressor
is in operation.
Setting
mode/function
Press MODE button to select required working mode: automatic, cooling, fan or heating,
(heating is only available for units ARP-900DE
and ARP-900DM).
The indicator of your selected mode will be lit.
Auto mode is factory preset at 75 degrees. When in auto mode(auto and cool light illuminated)
disabled and you cannot set a desired temperature.
desired temperature
Setting
the temp up and temp down buttons are
above or below 75 run unit in cool mode and set your
by pressing the temp up or temp down buttons.
temperature
Press the 'Temperature
up' or 'Temperature
The display window will show the temperature
Otherwise,
down' button to regulate the temperature
desired.
which you have set as you press the 'Temperature
up' or 'Temperature
down' button.
it will always show the ambient temperature.
The preset temperature
Setting
If you want a desired temperature
ventilation
of this machine is: 75 °F/24
speed
1. Press the SPEED button to choose the ventilation
ventilation
°C / for cooling, 68 °F / 20 °C for heating.
speed needed, high or low. The indicator of high or low
will light up at the same time.
2. If the unit is in AUTO mode, it will choose the ventilation speed automatically
according to the ambient temperature
(the related
indicators will light up: at this time, the speed switch is invalid).
Setting
timer
1. Press the TIMER button to set the operating hours desired (1 to 12 hours, the timer
When the set time has been reached, the machine will turn oft
automatically.
indicator will light on).
The display window will show the hour(s) you set as you
press the TIMER button. If the timer button is not pressed, the unit will work continuously.
2. By pressing the timer but without turning on the other functions,
you can PRESET the time for the machine to start.
For example, if you press the timer to '2', the unit will start automatically
after 2 hours.
All the above functions can also be performed with the supplied remote control.
The remote control requires 2 AAA batteries to operate.
FIG.19
Regulating
air flow direction
Turn the roller on the air vent to control the air flow direction of the vertical louvers.
Move the air vent directly to adjust the air flow direction of the horizontal louvers.
NOTE:
t. To lenghten the compressor's
life, after turning off the unit, please wait at
FIG.20
FIG.21
least 3 minutes before turning it back on.
2. The cooling system will switch off if the ambient temperature is lower than the set one. The ventilation,
set level. If the ambient temperature rises above the selected level, the cooling function will resume.
3. On the contrary, the heat will switch off if the ambient temperature
set level). As the ambient temperature
however, keeps working at the
is HIGHER than the set one (still, the ventilation
drops below the selected level, the heating function
keeps working at the
will reume.
4. This machine is equipped with ANTI-FROST function. While using the heating function in low temperatures,
stop for a while in order to melt the frost. As this occurs, just wait for the heating function to resume.
sometimes the heat will
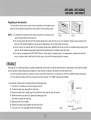
DBAINAGE
Although the unit is self evaporating,
during high humidity levels excess water may fill the internal water tray. Depending
on how high the humidity
and the duration of high humidity levels will depend on how often the unit needs to be drained. When the reservoir full :
a. For the mechanical model, the compressor will stop, only the fan will continue to circulate the air. The 'FULL WATER' indicator will light up.
b. For the electronic model, both of the compressor and motor will stop. The COMP. indicator light will flash.
To resume the cooling function, empty the water by the following steps:
1. Turn off the air conditioner and avoid moving it when full.
wa_eFno_e
2. Position the water tray underneath the drain hole.
3. Remove the drain knob & rubber plug from the drain hole and allow the water to drain out.
4. When the water tray is almost full, replace the rubber plug in the
drain hole and empty the water tray.
5. Repeat until the unit is emptied.
6. Replace the rubber plug and tighten the drain knob firmly.
7. Turn on the unit - the comp light should not be flashing.
IU_@1
FIG.22
OIL
drain knob water tray
Ifyouwishtooperate
theunitwithout
theneed
toempty
thewater
tank,
please:
• Remove
thedrain
knob
andrubber
plugandretain
forfuture
use.
• Connect
thedrain
tubesupplied
tothewater
outlet
asshown
andlocate
the
other
endintoadrain.
• Thedrain
tubemaybeextended
byadding
anextension
tubeandusing
a
suitable
connector.
Please
note
1.Thedrain
must
beatorbelow
theoutlet
level.
2.Flashing
comp
/ 'full water' indicator will not function
/
FIG.23
in this mode of drainage.
3. If you want to extend the water tube, you can connect it with another tube
(OD: .7"/18mm)
Caution
for heating
function:
J
While using the heating function, please note:
1. In heat mode the exhaust MUST be exhausted to the outside just as in air conditioning
mode. The unit works in reverse of air conditioning
mode with the warm air out the front
and cold air is exhausted out the back.
2. Fix the drainage to be a continuous
one (i.e. drain the water by water tube).
3. Working range for heating function is 41°F - 80.6°F (5° - 27 °C) and for the
_
cooling function, it is 64°F - 89°F (18°C - 32 °C).
For temperatures
outside of this range, the unit will not work properly.
....
J
FIG.25
MAINTENANCE
Always unplug the airconditionerfrom the outletbefore cleaning.
To maximize the efficiencyofthe airconditionerclean regularly.
Cleaning the housing
Use a soft, damp cloth to wipe the body clean.
Never use chemicals, gasoline, detergents, chemically
as such could possible damage the cabinet.
Cleaning the
Use a vacuum
under running
Dry thoroughly
NOTE:
treated cloths, or other cleansing solutions,
filter
cleaner or tap the filter lightly to remove loose dust and dirt, then rinse thoroughly
water (no hotter than 40°C).
before replacing.
Never operate the unit without the filters.
End of season storage
•
Drain any water from the unit. Operate the unit fan mode only for a few hours to thoroughly
• Clean or change the filter.
•
Unplug and store the power cord as shown
•
Replace in the original carton or cover for storage.
• Always maintain the unit in an upright position.
FIG.26
dry the inside.
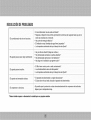
TROUBLE SHOOTING
• Is the air conditioner
The air conditioner
plugged in?
• Reset plug breaker by pressing reset buttons until green light is illuminated
• Is there a power failure?
does not run:
on plug.
- Is the comp / 'full water' indicator flashing?
• Is the room temperature below the set temperature?
...........
/he macnlne seems to ao lime:
I
• Are too many windows or doors open?
• Are there too many people in the room?
• Is there something
in the room producing heat?
• Is the filter dusty or contaminated?
The machine seems to do nothing:
• Is the air intake or output blocked up?
• Is the room temperature
,
/oo noisy:
below your selected temperature?
• Is the machine positioned unevenly Creating Vibration?
• Is the floor underneath the machine uneven?
I
The compressor
doesn't run:
* Never try to repair or dismantle
• It is possibl e that the overheat protection
temperature to drop.
the unit yourself
of the compressor
is on. Just wait for the
SPECiFiCATiON
FORARP-900UNITS
Model
ARP-900M
Cooling
capacity
Heating
capacity
ARP-900DM
I
consumption
for cooling
Power/Ampere
consumption
for heating
;
10000 BTU's
I
N/A
680Wl
N/A
EER
650W/6.3A
N/A
tl
Air volume (max. speed)
I
350m3/h
Humidity
I
18L/day
Recommended
room size
I
Power supply
300
t 15V/60Hz/1 phase
Compressor
I
Rotary
Refrigerant
:
R-22
:
470 g / 11bs
load
Fan speed
I
Timer
Dimension
!
'
Noise Level
NOTE:
1. Heating capacity is only for the models with the heating function,
2. Measuring condition for above is:
Cooling - RT 80.6 °F (27 °C), RH60%
Heating - RT 68 °F (20 °C), RH60%
'
i-i2
hours
64 - 89-°F / 18 - 32-°C
Net Weight
64 (Ibs) / 29 (kgs)
16X 15 x 29 (in)400
x 377 x 750 (mm)
54.i dB(A)
i.e. model no. ARP-900DM
BTU's
650W/6.3A
2
1-8 hours
Thermostat
10000
sq. ft
:
Refrigerant
'
6.8 A
i
removal capacity
ARP-900DE
9000 BTU's
N/A
Power/Ampere
ARP-900E
& ARP-900DE.
FULLONEYEARWARRANTY
Royal Sovereign warrants each Portable Air Conditioner to be free from defects in material and workmanship. Our obligation under this warranty is limited to
the repair or replacement, free of charge, when delivered to an authorized Royal Sovereign service center, of any defective part(s) thereof, other than parts
damaged in transit. This warranty is in effect to the original purchaser, for a period of one year from the date of purchase and is not transferable. This warranty
shall apply only if the air conditioner
is used on Alternating
Current (AC) circuit, in accordance
with the factory provided instructions
which accompany
it.
LIMITEDFiVEYEARWARRANTY(CONPRESSOR)
For a period of five years from the date of purchase,
instruction manual provided
determined to be defective
freight, insurance, and any
to avoid shipping damages,
THIS WARRANTY
when this Royal Sovereign
Portable Air Conditioner
is operated
and maintained
according to the
with the product, Royal Sovereign will supply a replacement compressor (part only), free of charge, if the original compressor is
in workmanship or material. If repair becomes necessary, please contact our customer service center. You will be responsible for all
other transportation charges to get the unit to our factory or service center. If shipping is required, be sure to pack the unit properly
as we will not be responsible for such damages.
IS VALID THROUGHOUT
THE UNITED STATES AND PUERTO RICO ONLY
EXCLUSIONS
This warranty excludes and does not cover defects, malfunctions or failures of your Royal Sovereign Portable Air Conditioner
caused by repairs by
unauthorized persons or service centers, mishandling, improper installation, modification or unreasonable use including incorrect voltage, acts of god, or failure
to provide reasonable and necessary maintenance.
This warranty is in lieu of any and all expressed warranties. In no event shall Royal Sovereign be liable for consequential or incidental damages. Some states do
not allow the exclusion or limitation of incidental or consequential damages, so the above limitation or exclusion may not apply to you. This warranty gives you
specific legal rights and you may also have other rights which vary from state to state.
ROYAL SOVEREIGN
INTERNATIONAL,
Royal Centurian Inc.
2 Volvo Drive, Rockleigh, NJ 07647 USA
TEL : +1) 201-750-1020,
RS International
+1) 800-397-1025
Australia
INC.
FAX : +1) 201-750-1022
PTY. LTD.
30 Prime Drive, Seven Hills, NSW 2147, AUSTRALIA
Royal Sovereign
Canada
164 Oakdale Road, Toronto, Ontario M3N 2S5 CANADA
TEL : +61) 2-9674-2127
TEL: +1) 416-741-8400
www.royalsovereign.com
FAX : +61) 2-9674-2027
/info@
royalsovereign.com
FAX: +1) 416-741-8185
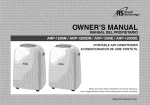
ACONDICIONADOR
DE AIRE PORTATIL
Lea y tenga presente estas instrucciones
para futuras consultas
f
ANTES DE USAR LA UNIDAD
ANTES
DE USAR
LA UNIDAD
• La unidad debe usarse s61o en posici6n vertical sobre una superficie
objetos (FIG. 1 a 4).
• No coloque objetos sobre la unidad ni restrinja la entrada/salida
• Vigile atentamente
SEGURIDAD
horizontal lisa y separada pot los menos 20"/50cm de otros
de aire (FIG. 2)
a los niKios y mascotas mientras la unidad esta funcionando.
ELECTRICA
• La unidad debe usarse s61o en interiores.
• Apague y desenchufe la unidad cuando no se usa.
• No la use en ambientes hLimedos (FIG 3).
• No arrastre la unidad tirando del cord6n de alimentaci6n
el_ctrica.
• Si el cord6n de alimentaci6n
reemplazarlo
lesiones.
el_ctrica esta dahado, edbe
un electricista competente
para evitar riesgos o
FIG.2
PARA
LOGRAR
EL RENDIMIENTO
• No exceda el tamaho recomendado
M.A,XIMO
de la habitaci6n:
300 pies cuadr ados.
• Cierre puertas y ventanas.
• Mantenga ventanas y persianas cerradas durante las horas
mdls soleadas.
• Mantenga limpios los filtros.
• Cuando la habitaci6n
alcance las condiciones
reduzca los valores fijados de temperatura
deseadas
y ventilaci6n.
FIG.3
FIG.4
CGMPGNENTES
Parte
delantera
Parte
posterior
1. Panel de Control
5.
Filtro de aire
2. Salida de aire
6,
Entrada de aire
3. Manija para transporte
7.
Descarga de la
salida de aire
8,
Corddn de alimentaci
4. Rueda giratoria
con enchufe de disyu
LCDI y botones de
9.
Depdsito para
el cord6n
10. Tapdn para el agua/
punto de drenaje
Accesorios
11. Ad aptador de acondicionador
- para conectar a la manguera y a la parte posterior del
acondicionador
12. Adaptador
de ventana - para insertar sobre la manguera yen el espaciador
ventana.
13. Manguera de descarga
14, Espaciador de ventana extensible.
15. Tubo de drenaje para drenaje continue
16. Bandeja para el agua
17. Control remoto (stile para el modelo electr6nico)
de
f
INSTALACH)N
Instalacion del tubo de descarga
Cstaes una unidad portatil
y se puede desplazarde una habitaci6na otra.
Sfrvase seguir estos pasos para una instalaci6n correct
1. Pase el adaptador exterior a tray,s del espaciador de ventana extensible.
2. Atornille la manguera de descarga al adaptador exterior.
3. Inserte el espaciador
de ventana en las aberturas de la ventana como se
muestra en la ilustraci6n. Ajuste la Iongitud si es necesario.
4. Deslice la ventana sobre el espaciador
J
para que _ste se fije firmemente.
FIG.6
FIG.5
NOTA: Instalar el respiradero verticalmente
estilo de ventana.
o horlzontalmente
dependiendo
del
El espaciador de la ventana se puede cortar a la medida. Si el espaciador
no Ilena la abertura
/50 cm
i
FIG.7
Montaje
del tubo de descarga
• Utilizando la manguera provista, atornille el adaptador de la unidad a la manguera de descarga y despues sujete el adaptador a la parte de
atras del acondicionador
de aire.
• Evite que la manguera de descarga se tuerza o se curve, ya que cualquiera de estas condiciones provoca la acumulaci6n
expelido causando que la unidad se sobrecaliente y se detenga. (Las Figuras 8 _9 muestran la posici6n correcta).
NOTA:
del aire hQmedo
Para mejores resultados no exceda 45 ° grades de angulo
• La manguera puede extenderse de 1 a 5 pies / 300 a 1500 mm, pero para Iograr el mdlximo rendimiento
No se recomienda
useel tramo recto mdls corto posible.
usar mdts de 5 pies (1500 mm), ya que esto disminuirdl la eficiencia de la unidad. Vea la ADVERTENCIA
de la Fig. 11.
f
x
FIG.8
FIG.9
ADVERTENCIA
El tubo de descarga tiene una Iongitud
determinada adaptada a la
especificaci6n del producto. No debe
reemplazarlo o alargarlo con una
manguera propia ya que esto provocara
el mal funcionamiento de la unidad.
FIG.10
i
Instalacion
del filtro
de carbon
1. Retire de la unidad el bastidor del filtro.
2. Separe el fijador del bastidor del filtro.
3. Retire el filtro de carb6n activado de la bolsa de plastico.
4. Inserte el filtro de carb6n activado en el bastidor.
5. Fije el filtro volviendo a montar el fijador en el bastidor.
6.Vuelva
a introducir el bastidor del filtro en la unidad.
0PERACi0Nde la unidad mec nica
ARP-g00DM
ARP-900M
FIG.12
1.
Indicador de alimentaci6n
_,
7
el_ctrica
1. Indicador de alimentaci6n
FIG,13
electrica
2. Indicador de funcionamiento
de la ventilaci6n
2. Indicador de funcionamiento
de la ventilaci6n
3. Indicador de funcionamiento
de la refrigeraci6n
3. Indicador de funcionamiento
de la refrigeraci6n
4. Indicador de 'Bandeja de agua Ilena'
5. Termostato
4. Indicador de 'Bandeja de agua Ilena'
5. Indicador de funcionamiento de la calefacci6n
6. Llave de velecidades con opciones para VENTILACION
BAJA - VENTILACION ALTA, REFRIGERACION
BAJA,
REFRIGERACION
ALTA
6. Termostato
7. Temporizader
(1-8 heras) y Ilave de encendido/apagado
(ON/OFF)
7. Llave de velocidades con opciones para VENTILACION,
REFRIGERACION
BAJA, REFRIGERACION ALTA, CALEFACCION
BAJA, CALEFACCION ALTA.
8. Temporizador
(1-8 horas) y llave de encendido/apagado
(ON/OFF)
Encendido/apagado
(ON/OFF)
Para operaci6n continua Ileve el temporizador a la posici6n de encendido (ON), (la unidad se
mantendr_, en funcionamiento mientras no se apague). El indicador de alimentaci6n electrica se enciende.
Para apagar la unidad Ileve el temporizador a la posici6n de apagado (OFF).
Seleccion
de funcion/velocidad
de ventilacion
Modelos s61o refrigeraci6n (ARP-900M y ARP-900E! Gire la Ilave de velocidades
opci6n deseada: VENTILACION BAJA, VENTILACION ALTA, REFRIGERACION
Modelos con refrigeraci6n
y calefacci6n
deseada: VENTILACION,
REFRIGERACION
Regulacion
(ARP-900DM
y ARP-900DE)
para seleccionar la
BAJA, REFRIGERACION
Gire la Ilave de velocidades
BAJA, REFRIGERACION
ALTA, CALEFACCION
ALTA
para seleccionar
la opci6n
BAJA, CALEFACCION
de temperatura
FIG.15
Gire el TERMOSTATO (THERMOSTAT) para regular la temperatura
La refrigeraci6n aumenta en el sentido de las agujas del reloj.
Ajuste
FIG.14
ALTA
SPEED
al valor deseado:
del temporizador
HIGN COOL
Ajuste el TEMPORIZADOR
(TIMER) al tiempo de funcionamiento deseado (1 a 8 horas).
Cuando transcurre el tiempo fijado, la unidad se apaga automaticamente.
Regulacion
de la direccion
de la corriente
de aire
Para controlar la direcci6n de la corriente de aire mediante los deflectores verticales
cilindro de la rejilla de aire.
Para ajustar la direcci6n de la corriente de aire mediante los deflectores
simplemente desplace la rejilla de aire.
ATENCl0N:
gire el
......
:1
......
horizontales,
FIG.16
FIG.17
1. Cuando apague la unidad espere por Io rnenos 3 rninutos antes de volver a encenderla para prolongar a vida Qtildel compresor.
2. Cuando la ternperatura arnbiente es rnas baja que el valor fijado la funcion refrigeraci6n se apaga. La ventilaci6n, sin embargo, continQa
funcionando en el nivel fijado. Si la temperatura arnbiente supera el nivel elegido, se reanudara la funci6n refrigeraci6n.
3. Por el contrario, la funci6n calefacci6n se apagara si la ternperatura arnbiente es mas alta que la fijada (no obstante, la ventilacion continua
funcionando en el nivel fijado). Si la ternperatura arnbiente cae por debajo del nivel elegido, se reanuda la funci6n calefacci6n.
4. La unidad posee una funci6n ANTICONGELANTE (ANTI-FROST). A veces, cuando se usa la funcion calefaccion en ternperaturas rnuy bajas
la calefacci6n se detiene durante un corto periodo para derretir el hielo. Cuando esto ocurre, debe esperar que se reanude la calefaccion.
OPERACiONde la unidad electr6nica
Panel de control
1. Indicador de 'temperatura
seleccionada'
2. Indicador de 'temperatura
ambiente'
3. Indicador de ventilacidn baja
4. Indicador de ventilacidn alta
FIG,18
!4,
if8
12. Bot6n de 'Disminuci6n
13. Botdn de velocidades
8. Indicador de modo calefaccidn
de temperatura'
(ventilaci6n)
14. Botdn de opcidn de modo (funcidn)
(s61o para modelos ARP-900DE y ARP-900DM)
Encendido/apagado
13
11. Bot6n de 'Aumento de temperatura'
6. Indicador de modo de refrigeracidn
7. Indicador de modo de ventilaci6n
10. Indicador de funcionamiento
1e
!2
5. Indicador de modo automatico
9. Indicador de funcionamiento
11
del temporizador
del compresor
15. Botdn del temporizador
16. Botdn de encendido apagado (ON/OFF) (alimentacidn
17. Indicador visual
el@ctrica)
(ON/OFF)
Oprima el bot6n de encendido/apagado
(ON/OFF); la unidad arrancara en forma autom_tica.
Si la temperatura
ambiente es:
- Superior a los 75 °F/24 °C, la unidad funciona en el modo refrigeracidn.
- Superior a los 68 °F/20
°C, pero inferior o igual a 75°F/24°C,
la unidad funciona en el modo ventilacidn.
- Inferior a los 68 °F/20 °C, la unidad funciona en el modo calefaccidn (solamente
los modelos ARP-900 DM/DE y ARP-900
Los indicadores de las funciones que est6.n en curso se iluminan. *NOTA: El indicador COMPRESOR (COMPRESSOR)
cuando el compresor esta en funcionamiento.
El indicador visual muestra la temperatura ambiente de la habitacidn.
Para apagar la unidad, oprima nuevamente el botdn ON/OFF.
DM/DE)
s61o se ilumina
Seleccion
del modo/funcion
Oprima el bot6n MODO (MODE) para seleccionar el modo de funcionamiento deseado: automdttico, refrigeraci6n, ventilaci6n o calefacci6n
(el modo calefacci6n s61o esta disponible en los modelos ARP-900DE y ARP-900DM).
El indicador del modo seleccionado se ilumina.EI modo automatico estdt prefijado en fabrica a 75°AF/24°AC. Cuando estdt en este modo (luz
de automdttico y enfriamiento encendidas) estan desactivados los botones de aumento y bajada de temperatura y no se puede fijar una
temperatura deseada. Si desea una temperatura pot encima o pot debajo de 75°AF/24°AC, haga funcionar la unidad en el modo de
enfriamiento y fije la temperatura deseada oprimiendo los botones de aumento y bajada de temperatura.
Seleccion
de la temperatura
Optima el bot6n 'Aumento de temperatura' o 'Disminuci6n de temperatura' para regular la temperatura deseada.
El indicador visual muestra la temperatura seleccionada. Si dichos botones no se oprimen el indicador visual
muestra la temperatura ambiente. Los valores predeterminados de temperatura son: 75°F/24°C para refrigeraci6n,
68°F/20°C para calefacci6n..
Seleccion
de la velocidad
de ventilacion
1. Oprima el bot6n VELOCIDAD (SPEED) para elegir la velocidad de ventilaci6n necesaria, alta o baja.
AI mismo tiempo se ilumina el indicador de ventilaci6n correspondiente.
2. Si la unidad esta en modo AUTOM,_TICO (AUTO), ella elige la velocidad de ventilaci6n en forma autom6.tica de acuerdo a la temperatura
ambiente (los indicadores correspondientes se iluminan: en este momento la Ilave de velocidades no actOa).
Seleccion
del tiempo de funcionamiento
con el temporizador
1. Oprima el bot6n TEMPORIZADOR
(TIMER) para seleccionar el tiempo de funcionamiento deseado (1 a 12 horas, el indicador del
temporizador se ilumina). Una vez transcurrido el tiempo seleccionado, la unidad se apaga automdtticamente. El indicador visual
muestra la hora(s) seleccionada(s) al oprimir el bot6n TEMPORIZADOR.
Si el bot6n temporizador no se oprime, la unidad seguirdt
funcionando continuamente.
2. Si oprime el temporizador sin activar las otras funciones, puede PREFIJAR el tiempo de arranque del aparato. Por ejemplo, si oprime el
temporizador y Io fija en '2', la unidad arrancardt automaticamente despu@s de 2 horas..
Todas las funciones anteriores tambien pueden set ejecutadas
Para su funcionamiento el control remoto utiliza 2 pilas AAA.
con el control remoto suministrado.
...........
FIG.19
Regulacion
de la direccion
de la corriente
de aire
Para controlar la direcci6n de la corriente de aire mediante los deflectores verticales,
gire el cilindro de la rejilla de aire.
Para ajustar la direcci6n de la corriente de aire mediante los deflectores horizontales,
simplemente desplace la rejilla de aire.
ATENClON:
1. Cuando apague la unidad espere por Io menos 3 minutos antes de volver a encenderla
FIG.20
FIG.21
para prolongar la vida Qtil del compresor.
2. Cuando la temperatura ambiente es mdts baja que el valor fijado la funcion refrigeraci6n se apaga. La ventilaci6n sin embargo,
contint_a funcionando en el nivel fijado. Si la temperatura ambiente supera el nivel elegido, se reanudara la funci6n refrigeracion.
3. Por el contrario, la funci6n calefacci6n se apagardt si la temperatura ambiente es M,_,S ALTA que la fijada (no obstante, la ventilaci6n contintJa
funcionando en el nivel fijado). Si la temperatura ambiente cae por debajo del nivel elegido, se reanuda la funci6n calefacci6n.
4. La unidad posee una funcion ANTICONGELANTE
(ANTI-FROST).
A veces, cuando se usa la funci6n calefacci6n en temperaturas muy bajas la
calefacci6n
se detiene durante un corto periodo para derretir el hielo. Cuando esto ocurre, debe esperar que se reanude la calefacci6n.
DRENAJE
Aunque la unidad es de autoevaporaci6n, durante altos niveles de humedad el exceso de agua puede Ilenar la bandeja de agua interior. La
frecuencia con que se desee drenar la unidad dependera de Io elevada que sea la humedad y la duraci6n de estos altos niveles de humedad.
Cuando el dep6sito est_ Ileno
a. En el modelo mecanico, el compresor se detiene, y s61o el ventilador continuardt haciendo circular el aire. El indicador 'BANDEJA DE AGUA
LLENA' ('FULL WATER') se ilumina.
b. En el modelo electr6nico, se detienen el compresor y el motor. La luz del indicador COMP.
parpadea.
Para reanudar la funci6n refrigeraci6n se debe descargar el agua mediante los siguientes pasos
1. Apague el acondicionador de aire y evite moverlo mientras est_ Ileno.
2. Coloque la bandeja del agua debajo del orificio de drenaje.
3. Retire la perilla y el tap6n de goma del orificio de drenaje y deje que salga el agua.
4. Cuando la bandeja del agua est_ casi Ilena, vuelva a colocar el tap6n de goma en el
orificio de drenaje y vacfe la bandeja.
5. Repita hasta que la unidad se vac[e.
6. Vuelva a colocar el tap6n de goma y apriete firmemente la perilla de drenaje.
7. Encienda la unidad - la luz COMP no debe parpadear.
FIG.22
_'_at e r no_e
d¢a_n kr_ob
water
tray
Si desea operar la unidad sin tenet que vaciar el tanque de agua:
• Retire la perilla y el tap6n de goma del drenaje y conservelos
• Conecte el tube de drenaje suministrado
coloque el otto extreme en un desag0e.
para usarlos en el futuro.
a la salida del agua come se muestra y
E==!
• El tube de drenaje puede alargarse agregdtndole un tubo de extensi6n mediante
conector adecuado
un
FIG.23
Tenga en cuenta:
1. El drenaje debe estar al nivel de la salida o por debajo del mismo.
2. En el mode de drenaje, el indicador COMP./'bandeja
de agua llena' no parpadea.
3. Si desea extender el tubo del agua puede conectarlo con otro tubo
(diametro exterior: .7" / 18mm)
Precaucion
especial
con la funcion
AI usar la funci6n calefacci6n,
1. En el mode de calefacci6n,
aire acondicionado.
calefaccion:
J
tenga en cuenta:
FIG.24
la descarga debe hacerse al exterior como en el modo de
La unidad funciona a la inversa del acondicionamiento
de aire con
la descarga de agua caliente per la parte delantera y la de aire frfo per la parte trasera.
2. AsegLirese que el drenaje sea continuo
(es decir, que el agua drene per el tube de drenaje).
3. El range operativo de la funci6n calefacci6n es 41°F - 80.6 °F (5 °C - 27 °C) y el
de la funci6n refrigeraci6n es 64 °F - 89 °F (18 °C - 32°C). Para temperaturas fuera
de este tango, la unidad no funciona correctamente.
....
J
FIG.25
MANTENIMIENTO
Siempre desenchufe elacondicionador de airedel tomacorriente antes de lalimpieza.
Para lograrelrendimiento maximo del acondicionador de airelimpielocon frecuencia.
Limpieza delgabinete
Use un patio suave y humedecido para limpiar el gabinete.
Nunca use productes qufmicos, gasolina, detergentes, patios tratados quimicamente,
o soluciones limpiadoras, ya que pueden da_ar el gabinete.
Limpieza del filtro
Use una aspiradora e ponga el filtro bajo un grife para quitar el polve y la suciedad, luege enjuague con agua corriente
(a temperatura no superior a los 40°C). Seque el filtro completamente antes de volver a celocarlo.
ATENClON:
Nunca opere la unidad sin los filtros.
AI finalizar la temporada
•
de almacenamiento:
Drene de la unidad el agua residual. Opere la unidad s61o en modo ventilaci6n durante unas pocas horas para Iograr un
secado total del interior.
• Limpie o cambie el filtro.
•
Desenchufe y guarde el cord6n de alimentaci6n
•
Para guardar la unidad vuelva a colocarla en la caja original o t6.pela.
come se muestra.
•
Mantenga siempre la unidad en posici6n normal.
FIG.26
RESOLUCiONDEPROBLEJViAS
I
• El acondicionador de aire esta. enchufado?
• Reajuste el disyuntor del enchufe oprimiendo
El acondicionador
de aire no funciona:
los botones de reajuste hasta que la luz
verde se encienda en el enchufe.
• Hay certe de energia electrica?
• El indicador comp./'bandeja de agua Ilena' parpadea?
• La temperatura ambiente esta. por debajo del valor fijado?
•
•
•
•
El aparato parece tener bajo rendimiento:
Hay
Hay
Hay
Hay
luz diurna directa? (Baje las cortinas.)
demasiadas ventanas o puertas abiertas?
demasiadas personas en la habitacion?
algo en la habitaci6n que genere calor?
I
El aparato parece inactive:
• La entrada/salida de aire est.. bloqueada?
• La temperatura ambiente est.. por debajo del valor fijado?
El aparato es demasiado
• El aparato esta. desnivelado y origina vibraciones?
• El piso sobre el cual est.. colocado el aparato esta desnivelado
El compresor
ruidoso:
no funciona:
* Nunca intente reparar o desmontar
' • Es posible que la protecci6n contra sobrecalentamiento
Espere que la temperatura
la unidad por sus propios medios
baje.
del compresor este activada.
SPECiFiCATiON
FORARP-900UNITS
Modelo
N°
ARP-900M
Capacidad
de refrigeraci6n
Capacidad
de calefacci6n
de potencia/amperios
Consumo
de potencia/amperios
Relaci6n rendimiento-energfa
Volumen
ARP-900E
10000 BTU's
recomendado
N/A
para Calefacci6n
N/A
(eer)
de la habitacidn
650W/6.3A
N/A
:
t 1
'
350m3/h
'
115voltios/60
ciclos/monof_.sica
I
Rotativo
:
R-22
Carga refrigerante
'
470 g/libra
Velocidades
;
Refrigerante
del ventilador
'
2
1-8 horas
Termostato
1-12 horas
64 - 89°F / 18 - 32°C
Peso neto
I
64 libras / 29 kgs
Dimensiones
i6 x 15 X 29 (pulgadas)400
Nivel de ruido
1.
2,
x 377 x 750 mm
54.1 dB(A)
La capacidad de calefacci6n se refiere solamente a los modelos que poseen dicha funci6n
Las condiciones de medicion para los datos anteriores
son las siguientes:
Calefacci6n
650W/6.3A
300 pies cuadrados
'
Compresor
NOTA:
i0000 BTU's
t8L/dia
electrica
Temporizador
'
680W / 6.8 A
de eliminaci6n de humedad
Alimentaci6n
ARP-900DE
9000 BTU's
'
para refrigeraci6n
de aire (a velocidad mdtxima)
Capacidad
TamaSo
:
N/A
Consumo
ARP-900DM
Refrigeraci6n
- Ternperatura
- Temperatura
ambiente
80.6 °F (27 °C), Hurnedad
arnbiente 68 °F (20 °C), Humedad relativa 60%
o sea
relativa 60%
los modelos N ° ARP-900DM
y ARP-900DE.
GABANTiACOMPLETA POB UN ANO
Royal Sovereign garantiza que los Acondicionadores
de Aire Portdttiles no presentan defectos de materiales o mano de obra.
limita a la reparaci6n o reemplazo, sin cargo, siempre que se entreguen a un centro de servicios Royal Sovereign autorizado,
Acondicionadores
de Aire Portatiles, que no se hayan dahado en el transporte. Esta garantia tiene validez para el cornprador
partir de la fecha de cornpra y no es transferible. Esta garantia s61o tendrdt validez si el acondicionador
se utiliza en un circuito
acuerdo con las instrucciones provistas por la fdtbrica que acompahan a la unida
Nuestra responsabilidad legal se
de toda pieza defectuosa de los
original, por el periodo de un a_o, a
de corriente alterna (CA), de
GABANTJALIIVIITADA
POB CINCOANOS (CONPBESOB)
El compresor del Acondicionador de Aire Portatil Royal Sovereign posee una garantia de cinco aiios a partir de la fecha de compra, si el acondicionador
de aire
se opera y mantiene de acuerdo al manual de instrucciones provisto con el producto. Royal Sovereign surninistrara sin cargo un cornpresor de reernplazo
(solamente el repuesto), si se deterrnina que el cornpresor original presenta defectos de materiales o mano de obra. Si se deben efectuar reparaciones, contacte
al servicio de atencion al cliente. Los fletes, seguros y todos los cargos de transporte necesarios para que la unidad sea entregada en nuestra fabrica o centro de
atenci6n al cliente corresponden al cornprador. Para despachar la unidad la misrna debe ernbalarse adecuadamente para evitar dahos durante el transporte, ya
que Royal Sovereign no asume responsabilidad por tales daSos.
ESTA GARANTIA TIENE VALIDEZ SOLAMENTE
PARA EE. UU. Y PUERTO RICO
EXCEPCIONES
La garantia excluye y no cubre defectos, funcionamiento defectuoso o fallae del Acondicionador de Aire Portatil Royal Sovereign ocasionadas por reparaciones
efectuadas por personas o centros de atenci6n no autorizadoe, real manejo, inetalaci6n incorrecta, modificaeionee o ueo incorrecto, incluyendo voltaje
inapropiado, casos de fuerza mayor o falta de mantenimiento. Esta garanfia reemplaza cualquier otra garantl'a expresa. En ning{Jn caso Royal Sovereign sera
responeable por dahos consecuentes o incidentales. Algunoe estadoe no permiten la excluei6n o limitaci6n de daiios incidentales o coneecuentes, por Io cual la
limitaci6n anterior puede no eer aplicable en su caeo. Eeta garantia le otorga derechos legalee especificos pero, ademas, ueted puede tener otroe derechos que
varian seg{Jn el estado.
ROYAL SOVEREIGN
INTERNATIONAL,
Royal Centurian
Inc.
2 Volvo Drive Reckleigh, NJ 07647 USA
TEL : +1) 201-750-1020, +1) 800-397-1025
RS International
Australia
INC.
FAX : +1) 201-750-1022
PTY. LTD.
30 Prime Drive, Seven Hills, NSW 2147, AUSTRALIA
Royal Sovereign
Canada
164 Oakdale Road, Toronto, Ontario M3N 2S5 CANADA
TEL : +61) 2-9674-2127
TEL: +1) 416-741-8400
www.royalsovereign.com
FAX : +61) 2-9674-2027
/[email protected]
FAX: +1) 416-741-8185