1
kaleidescape
Programming Crestron
Controllers
for a Kaleidescape System
May 2015
Contents
Who Should Use This Document
8
Getting Started with Crestron
8
Overview of Kaleidescape Modules and Templates
8
Touch Panels and Keypads
9
Touch panels
Touch panel variations
9
9
OSD control with a video window
10
OSD control without a video window
10
Standalone touch panel (SATP) control
11
Layout for touch panel user interface
12
Keypads
Using Music Presets
Music items in the Kaleidescape System
13
13
14
Random and repeat
15
Tags and the Preset ID
15
Zones
16
Saving presets
16
Preset browsing
16
Preset feedback
16
Collection browsing
17
Programming
Kaleidescape command protocol
18
18
Device ID
19
Kaleidescape music zones
19
Kaleidescape modules
20
OSD module (Onscreen display control)
20
SATP module (Standalone touch panel control)
20
Keypad Presets module
21
Keypad Music Collections module
21
Programming Crestron Controllers for a Kaleidescape System
Page 2
Controller Zone Name module
Importing modules
21
22
Downloading and extracting Kaleidescape modules and templates for
Crestron
22
Module contents
22
Automatic import
23
Module version number
24
Updating the modules
25
Scalability
26
System builder
26
Connection methods
26
Programming options
27
Command routing
28
Command routing via TCP/IP
28
Command routing via RS-232
29
Setting the Control Protocol Device ID (CPDID)
29
CPDID addressing example
30
Music zone control
33
Naming music zones
33
Controlling music zones
34
Music zone selection
34
OSD module music zone selection
35
Controlling a movie zone with both SATP and OSD control
38
Calibrating the touch interface
38
Power control
39
Power control for the Movie Player (KPLAYER-2000, KPLAYER-2500)
39
Power control for the 1080p Player, 1080p Mini Player, Music Player, and
Movie Player 2
40
Power control for Cinema One (1st generation)
40
Power control for M-Class players
40
Power control for Alto and Cinema One (2nd generation)
41
Programming Crestron Controllers for a Kaleidescape System
Page 3
Sample Installation
41
Assigning static IP addresses
42
Configuring TCP/IP clients
43
Configuring touch panels
47
Programming TCP/IP clients
48
Programming touch panels
48
Adding Kaleidescape modules
50
Programming Kaleidescape modules
52
Indicating System Readiness
53
Screen masking and anamorphic lenses
53
CinemaScape mask
54
Lighting and shades
54
Secondary SATP control
55
Volume control
55
Troubleshooting
56
User program commands
56
Nothing is working
58
Music is not changing (SATP controlled zone)
58
Cannot make selections with a touch panel with a video window
58
No video on the touch panel with a video window
59
Video on the touch panel is black and white
59
Getting additional support
59
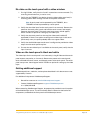
Appendix A: Screen Shots for UI Layouts
60
OSD control with a video window — Music
60
OSD control with a video window — Movies
61
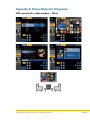
OSD control without a video window — Music
62
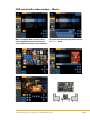
OSD control without a video window — Movies
63
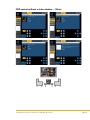
Standalone touch panel
64
Appendix B: RS-232 Port Configuration and Cable Pinout
Programming Crestron Controllers for a Kaleidescape System
65
Page 4
Port configuration
65
M500 Player, Music Player, and Cinema One (1st generation)
65
1U, 3U, and 5U Servers
65
RS-232 port pinouts
Appendix C: OSD Module v8.4.0 Parameters and I/O
Parameters
65
66
66
Control Protocol Device ID (CPDID)
66
Time Update Interval
66
Using a Controlled Mask
66
Kaleidescape App for iPad Volume Ability
66
Inputs
66
Transports
66
Navigation
68
OSD menu control
69
Movie playback
71
Music playback
72
Volume control
73
Keyboard/Keypad
73
Screen masking
73
Script control
74
Power
74
Music zone control
75
Outputs
75
Transports
75
Navigation
75
OSD menu control
75
Movie playback
77
Music playback
78
Playback information
78
Volume control
79
Details page
80
Programming Crestron Controllers for a Kaleidescape System
Page 5
Keyboard/Keypad
80
CinemaScape
81
Screen masking
81
Lighting cues
82
Video mode
83
Script control
84
Power
84
System Readiness State
84
Music zone control
84
Child commands
Appendix D: SATP Module v8.4.0 Parameters and I/O
Parameters
85
86
86
Control Protocol Device ID (CPDID)
86
Zone ID
86
Time Update Interval
86
List Window Length
86
Kaleidescape App for iPad Volume Ability
86
Inputs
86
Transports
87
Playback control
87
Volume control
87
List control
87
List window
88
Keyboard
88
Power
89
Outputs
89
Transports
89
Playback control
89
Playback information
90
Volume control
90
List control
90
Programming Crestron Controllers for a Kaleidescape System
Page 6
List window
91
Keyboard
92
System Readiness State
92
Appendix E: Keypad Presets Module v7.1.0 Parameters and I/O
Parameters
93
93
Control Protocol Device ID (CPDID)
93
Zone ID
93
Preset ID
93
Hold Time
93
Inputs
93
Outputs
94
Appendix F: Music Collection Module v7.1.0 Parameters and I/O
Parameters
96
96
Control Protocol Device ID (CPDID)
96
Zone ID
96
Collection
96
Inputs
96
Outputs
96
Appendix G: Controller Zone Name Module v8.3.0 Parameters and I/O
Parameters
Controller_Zone_Name_X
98
98
98
Inputs
98
Outputs
98
Appendix H: Revision History
99
Crestron OSD module
99
Crestron SATP module
101
Crestron Keypad module
103
Crestron Controller Zone Name (CZN) module
104
Crestron touch panel templates
104
Programming Crestron Controllers for a Kaleidescape System
Page 7
Who Should Use This Document
This document explains how to configure a Crestron control system for a
Kaleidescape System. Kaleidescape provides modules and templates specifically
designed for controlling Kaleidescape Systems using Crestron controllers.
The installer must be familiar with the Crestron SIMPL Windows programming
environment, Crestron VisionTools Pro-e, and Kaleidescape products.
This document revision corresponds to kOS version 6.1, Kaleidescape OSD and
SATP modules version 8.4.0, Zone Name module version 8.3.0, and Keypad
modules 7.1.0.
Getting Started with Crestron
Kaleidescape provides both control modules and touch panel templates for
Crestron controllers.
Before setting up a Kaleidescape System for a Crestron system, the Kaleidescape
modules and templates for Creston controllers must be downloaded and extracted.
See Downloading and extracting Kaleidescape modules and templates for Crestron
on page 22 for information on downloading and importing the Kaleidescape
module and templates.
For information on installing and configuring the Kaleidescape System, refer to the
Kaleidescape Installation Guide (www.kaleidescape.com/go/install) on the
Kaleidescape website (www.kaleidescape.com).
Overview of Kaleidescape Modules and
Templates
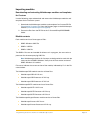
Kaleidescape provides five Crestron control modules.
Onscreen display (OSD) module for controllers with and without video
o
OSD Video template — Displays the Kaleidescape System OSD on the
touch panel, along with other controls.
o
OSD No Video template — Shows text-based details, replicating the
details pages for movies or albums.
SATP module (standalone touch panel)
o
Provides text-based music controls on touch panels in rooms without
video displays.
Keypad Presets module
Keypad Music Collections module
Controller Zone Name module
Programming Crestron Controllers for a Kaleidescape System
Page 8
o
Used with instances of the Kaleidescape App for iPad configured
with a controller zone name to receive volume commands and send
volume feedback.
Kaleidescape modules are designed to provide the flexibility required for many
types of installations. System control can be as simple as using a single RS-232
port to control a single movie zone, or as complicated as a large system using
multiple TCP/IP clients with complex signal routing to control several movie and
music zones.
Touch panel controls are an integral part of the Kaleidescape experience.
Kaleidescape touch panel control templates can be incorporated into Crestron
projects without major modifications. These templates are complex and any
modification can remove important functions or introduce bugs.
The following Kaleidescape templates are available for touch panels:
OSD Video
OSD No Video
SATP
Touch Panels and Keypads
Touch panels
Kaleidescape modules use the full screen on a touch panel and incorporate a large
video window to provide complete consistency even when a separate video display
is unavailable. Only the buttons required for a particular feature are displayed. For
example, the keyboard is displayed only when alphanumeric input is required.
After text entry is complete, the keyboard vanishes. Pop-up windows are used
sparingly to simplify the user experience and to manage secondary and tertiary
controls. The upper right corner of the layout is intentionally left open so a
programmer can add buttons to tie into other whole-house sources and controls.
Touch panel variations
Kaleidescape offers three types of touch panel controls.
OSD control WITH a video window
OSD control WITHOUT a video window
Standalone touch panel (SATP)
OSD with a video window provides the richest user experience and is the
Kaleidescape preferred implementation. When choosing which variation to use for
a particular installation, consider whether or not a video display is present, what
the technical capabilities of the touch panel are, and whether a movie or music
zone is to be controlled. Most installations need to implement several touch panel
variations to provide quality control in every zone.
Programming Crestron Controllers for a Kaleidescape System
Page 9
Touch panel variations are packaged separately and available as downloadable VTP
files. Each file is constructed as a single page with sub-pages to manage secondary
and tertiary controls within each variation. The corresponding Kaleidescape
module must also be downloaded.
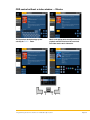
The touch panel variations in Figures 1 through 3 are screenshots taken from the
1024 × 768 pixel template for the Crestron TPS-15. Refer to Appendix A: Screen
Shots for UI Layouts on page 60 for more sample screen shots of all three
variations.
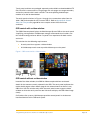
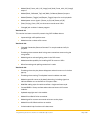
OSD control with a video window
The OSD Video template displays the Kaleidescape System OSD on the touch panel
simplifying user operation. Kaleidescape strongly recommends that installers use
this interface configuration to deliver a superior user experience for both movies
and music.
This solution has the following requirements:
A touch panel that supports a video window
A Kaleidescape movie zone to provide video output to the panel
Figure 1: OSD control with a video window
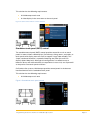
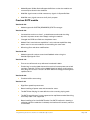
OSD control without a video window
Instead of the video window, the OSD No Video template delivers text-based
details for the content currently selected in the OSD. The touch panel replicates the
movie details page or album details page for the selected movie or album in any
OSD view. Use this variation only when the touch panel cannot support a video
window or when the touch panel has too little area to display the OSD video image
clearly.
On Premiere line systems, Kaleidescape provides control panels in the browser
interface identical to this OSD touch panel.
Programming Crestron Controllers for a Kaleidescape System
Page 10
This solution has the following requirements:
A Kaleidescape movie zone
A video display in the same room as the touch panel
Figure 2: OSD Control without a video window
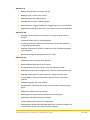
Standalone touch panel (SATP) control
The standalone touch panel (SATP) control provides control for music on touch
panels in rooms without video displays, like hallways, dining rooms, and patios, or
touch panels with display areas too small to support a large video window. This
simple, text-based interface is a powerful browsing tool, ideal for small LCD
displays (320 × 240 pixels). Although this configuration is an effective way to
browse a library and make selections, the experience is not as rich, nor as powerful
as the previous two touch panel variations.
On Premiere line systems, Kaleidescape provides control panels in the browser
interface identical to this standalone touch panel.
This solution has the following requirement:
A Kaleidescape music zone
Figure 3: Standalone touch panel control
Programming Crestron Controllers for a Kaleidescape System
Page 11
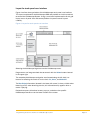
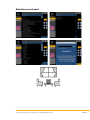
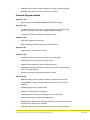
Layout for touch panel user interface
Figure 4 outlines the organization of the Kaleidescape touch panel user interface.
This layout complements the Kaleidescape OSD and provides an intuitive method
to control the Kaleidescape System. Using a consistent implementation of this grid
layout across all panel sizes and control platforms improves overall system
usability.
Figure 4: Layout for touch panel user interface
Selecting the Kaleidescape logo accesses the Kaleidescape menu.
Programmers can integrate whole-house controls with the Volume buttons located
in the upper right.
The secondary Kaleidescape navigation area (located along the left side), has
buttons for selecting the movie or music views: List, Covers, and Collections.
The Now Playing information (located in the lower left corner) is always visible when
browsing music; when browsing movies, this information only appears when a
movie is playing.
Playback transports, directional arrows, pop-ups, and other view-specific
Kaleidescape controls are on the lower section of the screen.
Programming Crestron Controllers for a Kaleidescape System
Page 12
Keypads
Keypad commands provide a method for controlling music playback from any zone
on any Kaleidescape player without requiring control feedback. Although keypad
commands were created for keypads, these commands can use any button-like
input, a button on a keypad or touch panel, a motion sensor, or any other input
device.
Kaleidescape provides two different types of keypad commands.
Presets
Music collections
With the keypad presets commands, a keypad can be programmed to play a
predetermined music item that can be easily changed by the user.
With the music collections commands, a keypad can be programmed so users can
cycle through music items within a music collection.
Using Music Presets
A preset ties a music item in the Kaleidescape System to a keypad button or other
input trigger. Any music item can be saved as a preset, and there is no limit to the
number of presets that can be used in a system. The same music presets can be
used throughout an installation, or each zone can have a separate set of presets.
Presets can be set in any manner useful for the installation. For example, a button
designated My Music can be set in the family room that plays the same music preset
as any other My Music button in the installation.
Alternately, every keypad in an installation can have unique presets assigned to
each individual button. In this scenario, setting a music preset to the first button in
the family room does not affect buttons on the kitchen keypad. These approaches
can be combined. A set of rooms can share a set of presets. For example, the
breakfast nook, hallway, and entryway can all share one set of presets, while each
child’s room has unique presets.
Programming Crestron Controllers for a Kaleidescape System
Page 13
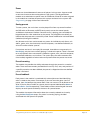
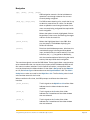
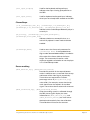
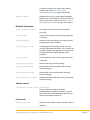
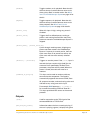
Music items in the Kaleidescape System
The Kaleidescape System treats several different music items as playable. The
following table defines these items and the effect of the random and repeat settings
on each item.
Table 1: Music items
Item
Description
Example
Random
Repeat
Single track
Any single track on
any album
Hey Bulldog by
the Beatles
Only the
single track
plays
Can be
repeated
Album
Any single album
Abbey Road by
the Beatles
Can be
played
randomly
Can be
repeated
Mix album
User-defined album
that can contain any tracks
or albums
My Favorite Jazz
Can be
played
randomly
Can be
repeated
Artist
All music tracks performed
or composed by the artist,
no matter what album
the track is on
The Beatles
Always
random
Always
repeats
Classical
Composer
All music tracks composed
by the artist, no matter
what album the track is on
Maurice Ravel
Always
random
Always
repeats
Classical work Single classical work,
incorporates all tracks into
a single music item
Piano Concerto in Can be
played
G Major by
Maurice Ravel
randomly
User-defined
collection
All tracks from any albums, My favorites
mix albums, artists, genres,
or classical composers in a
user-defined collection
Genre
All music tracks in the
genre
All music
All music on all albums
Jazz
Programming Crestron Controllers for a Kaleidescape System
Can be
repeated
Always
random
Always
repeats
Always
random
Always
repeats
Always
random
Always
repeats
Page 14
Random and repeat
In the Kaleidescape System, some music items always play in random order and
repeat. These music items include any genre, artist, composer, user-defined
collection, and all music.
When any of these items are saved to a preset and played, the item plays in
random order starting with a random track. If the preset is selected again, a new
random track plays. This setting removes the requirement to use a next track
button to skip a track within the selection. For example, if a preset button is
programmed to play the Jazz genre every time that button is pressed, a randomly
selected Jazz track starts playing. If the user does not care for the current track, the
user can simply press the button again to hear a different track. A Beatles button, a
Mozart button, a My Favorites button, or an All Music button behaves the same
way.
The most recent random and repeat settings in a Kaleidescape zone control how
albums, mix albums, and single tracks play from a preset. To control how these
items are played back, the random and repeat settings of the zone can be changed
with the SATP interface, the OSD interface, or through the programming interface.
Tags and the Preset ID
Most radio tuners have presets, typically using numbered buttons to define each
one. For instance, Button 1 can be WKRP, Button 2 can be WNPR, and so forth. The
Kaleidescape System uses a text tag instead of a physical button. Each preset is
defined by a tag associated with a music item in a system-wide table.
To simplify creating of presets, the Keypad Presets module uses a Preset ID
parameter to generate tags. A Preset ID can refer to a location or function. For
instance, a Preset ID like Kitchen can be used to create presets for the kitchen music
zone. A module with a Preset ID like Country can be used to program the same
button on all keypads in the installation to play Country music. For example, a
Preset ID named My Favorites can be used to create a My Favorites music button on
multiple keypads. This means the user can set the type of music the button plays.
The user can set the preset to play the genre Jazz, the sub-genre Dixieland, or even
a favorite mix album.
The Preset ID is appended with the module preset channel number to create the
final tag used by the module. In other words, if the module is programmed with the
Preset ID Kitchen, the module’s first preset channel uses the tag Kitchen1, the
second preset input uses Kitchen2 and so forth. For two virtual devices to share the
same presets, simply give the virtual devices the same Preset ID. To create separate
presets for each virtual device, assign different Preset IDs.
Tags are currently not visible to end users, but might be displayed on the onscreen
display or browser interface someday, so be sure to name Preset ID appropriately.
Programming Crestron Controllers for a Kaleidescape System
Page 15
Zones
Presets are shared between all zones on all players in the system. A preset saved
on one music zone can be used anywhere in the system. The Keypad Presets
module must to be tied to a specific zone. A CPDID and a Zone ID must be assigned
in the module to associate the presets with a player and zone in the system. See
Programming on page 18 for more information.
Saving presets
To save a preset, the music item must be played first from any control interface —
the OSD with an IR remote, an SATP touch panel, or even the control panels
available on the browser interface. Once the music is playing, press and hold the
keypad button for a few seconds to set the preset. The playback mutes briefly to
indicate that the preset was successfully saved. Preset modification can be disabled
(locked out) through the module.
Any discrete music item can be saved as a preset. An individual track, album, mix
album, genre, artist, classical work, classical composer, user-defined collection, or
all music can be saved to a preset.
If more than one item is set to play (for example, three albums are queued up in
Now Playing), only the item currently playing is saved to the preset. There is no need
to re-save presets when new content is added to a genre, artist, classical composer,
user-defined collection, or mix album. The system plays the entire contents each
time recalled, regardless of what tracks were present when the preset was saved.
Preset browsing
The module also provides the ability to browse through the presets in numerical
order. There are three controls provided for this activity: first, next, and previous. If
a specific preset has not been defined, that preset is skipped and the next defined
preset is activated.
Preset feedback
Each preset in the module is associated with a descriptive text label identifying
what is saved to that preset. For example, if the user saves the genre Jazz to a
preset, then Jazz becomes the preset label. If the user saves music by Queen or the
Alice in Chains album Facelift to a preset, then the preset label becomes Queen or
Alice in Chains – Facelift respectively. These labels can be used on keypad character
displays or touch panels to identify the status of a preset button.
The module also reports information about the currently selected music entity
using the Now Playing Item output. If a preset is currently playing, the label
associated with that preset is displayed.
Programming Crestron Controllers for a Kaleidescape System
Page 16
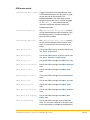
Collection browsing
A set of buttons can be programmed to browse through the items in a music
collection. Any music collection (Albums by Artist, Albums by Title, Artists, Genres,
Mix Albums, Classical Composers, Classical Works, New, or any user-defined
collection) can be specified. The module provides three controls for browsing: first,
next, and previous. These controls step through the collection in the order
displayed on the OSD.
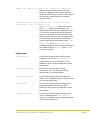
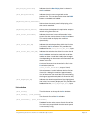
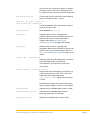
Music collections currently available in the Kaleidescape System are described in
the following table.
Table 2: Current Kaleidescape music collections
Item
Description (of system
contents)
Alphabetical sort order
Albums by Artist
All albums
Artist name, then album All music
title
Albums by Title
All albums
Album name
All music
Artists
All artists
Artist name
All music
Classical
composers
All classical composers
Composer name
All classical
music
Classical works
All classical works
Work name
All classical
music
Genres
Top 40 genres
Genre name
All music
Mix Albums
All user-defined mix
albums
Mix album name
First mix
album
New
Most recently imported Album name
albums. The time period
for considering an album
new can be set in the
browser interface.
User-defined
Collection of any music
items defined by the
user
Item name
First tem
First new
album
All in this
collection
As more music collections are added to the Kaleidescape System, the keypad
commands are also able to browse the collections.
Programming Crestron Controllers for a Kaleidescape System
Page 17
Example
If the user wants to step through every album in the Kaleidescape System, define a
set of buttons to step through the Albums by Artist collection. When the user
presses the First Album button, all music plays. This is because the first item on the
Albums by Artist collection is All music. If the user subsequently presses the Next
button, the first album by the first artist plays, since the collection is sorted
alphabetically by artist name.
The controls in the keypad music collections module operate independently from
other methods for choosing music to play. When a user presses the Next button for
a collection, the next item relative to the last item played from the keypad, always
plays. For example, the system has three artists, ABBA, The Beatles, and The Cars.
While listening to ABBA, the user presses the Next Artist button on the keypad to
skip from ABBA to The Beatles. A little while later, the user selects ABBA from the
onscreen display. The next time the user presses Next Artist on the keypad, The Cars
starts playing, even though the user might expect The Beatles to start playing.
Programming
Kaleidescape command protocol
Kaleidescape System control is based on bidirectional ASCII string commands. All
Kaleidescape components respond to commands from a Crestron controller and
provide feedback in ASCII format. Although understanding the details of
Kaleidescape command protocol is not required for Crestron programming, it is
important to understand how these commands are routed in the Kaleidescape
System.
Note: All string examples in this document are formatted for a Crestron
program, i.e., \r = hex; 0D = carriage return.
The first field in the command string identifies the Kaleidescape component to
which the command is being sent or from which feedback is being received. This
device field can have two variables that also appear in module settings and settings
made in the browser interface.
The first variable is the device id, which identifies the Kaleidescape
component. On Premiere line systems, this is usually the Control Protocol
Device ID(CPDID) or may also be the serial number of the component. Alto
and Cinema One (2nd generation) do not support CPDIDs
Note: The Crestron modules only support CPDID routing.
The second variable is Zone ID, which identifies the movie or music zone to
be controlled.
Note: There are a few commands intended for a 1U, 3U or 5U Server, but
these commands are generally limited to IP address recovery commands,
and are not useful for the Crestron system.
Programming Crestron Controllers for a Kaleidescape System
Page 18
Device ID
Every command and response begins with a device ID which can be a Control
Protocol Device ID (CPDID) or the serial number of the component to be controlled.
In installations that do not require command routing, the default CPDID None (01 in
the ASCII command) is used for all Kaleidescape components. Do not change the
default CPDID None unless the installation requires command routing.
The CPDID routes commands to the intended zone. The Kaleidescape module
verifies receipt of a valid response from the targeted zone by comparing the CPDID
of the command and response.
For example, if CPDID 02 is assigned to an M500 Player, the PLAY command has the
following format.
02/1/PLAY:\r
A command beginning with CPDID 01 (None) always controls the component that
receives the command directly, either via the RS-232 port or TCP/IP, regardless of
the CPDID setting of the component.
If the installation requires command routing, a unique CPDID for each controlled
component must be set in the browser interface. Kaleidescape modules include a
field for entering corresponding CPDIDs.
Kaleidescape music zones
Some Kaleidescape components have more than one music zone. For example, the
Kaleidescape Music Player incorporates four music zone outputs, each of which
must be controlled independently.
To control the four music zones, the device field includes a Zone ID (01–04) that
identifies the music zone to which the command is targeted. Each music zone
behaves as a separate endpoint. Commands that target Zone ID 01 do not usually
affect Zone ID 02 and so on. (Power on/off commands affect all four zones.)
For example, if CPDID 06 is assigned to a Music Player, the PLAY command
intended for Zone ID 03 has the following format.
06.03/1/PLAY:\r
Music commands addressed to the single zone of a M500 Player always use
Zone ID 01.
Kaleidescape modules that control music zones include a field for entering a CPDID
and a field for entering the Zone ID.
Programming Crestron Controllers for a Kaleidescape System
Page 19
Kaleidescape modules
Kaleidescape provides five different types of control modules:
OSD module (Onscreen display control)
SATP module (Standalone touch panel control)
Keypad Presets module
Keypad Music Collections module
Controller Zone Name module
All modules can use either RS-232 or TCP/IP for control. (See Appendix B: RS-232
Port Configuration and Cable Pinout on page 65 for RS-232 pinout.) Always
download the latest versions of the modules before beginning a project or revising
an existing program.
OSD, SATP, and Keypad Presets modules each contain a set of transports: PLAY,
STOP, PAUSE, FAST FORWARD, REWIND, NEXT, and PREVIOUS.
These commands behave differently with the SATP and Keypad Presets module
than with the OSD module. For example, in the OSD module, the STOP input clears
the screen saver if running, clears a pop-up if showing, or stops music when Now
Playing is shown on the active screen. With the SATP or Keypad Presets modules,
the STOP input always stops the music no matter what is shown on the OSD.
Basically, transport commands in the OSD module control the OSD, which then
controls movies and music. Transport commands in the SATP and Keypad Presets
modules only control the music currently playing.
OSD module (Onscreen display control)
The Kaleidescape OSD module works with either the OSD Video or OSD No Video
template and is used to control a Kaleidescape movie zone. Kaleidescape
recommends using a touch panel with video for the best user experience. For more
information on the inputs, outputs, and parameters of the OSD module, see
Appendix C: OSD Module v8.4.0 Parameters and I/O on page 66.
SATP module (Standalone touch panel control)
The Kaleidescape SATP module provides standalone touch panel control when a
display is not visible or the user wants to play music without turning one on. In
these cases, the touch panel provides a standalone interface for a music zone.
When used with a zone that supports both movies and music (for example, the
single zone from an M500 Player) this module does not affect the OSD and
provides a completely independent method for controlling the zone. The SATP
module is designed to work with the SATP template.
The Kaleidescape SATP module does not control movie selection or playback. This
module cannot be used with players that do not support music playback. For more
Programming Crestron Controllers for a Kaleidescape System
Page 20
information on the inputs, outputs and parameters of the SATP module, see
Appendix D: SATP Module v8.4.0 Parameters and I/O on page 86.
Keypad Presets module
The Keypad Presets module provides simple control for music playback from a
keypad. The Keypad Presets module associates music items in the system with
keypad buttons. Although designed for keypads, any input can be used to trigger a
preset and presets can be incorporated into touch panel designs. This module
cannot be used with players that do not support music playback. For more
information on the inputs, outputs, and parameters of the Keypad Presets module,
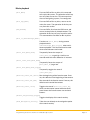
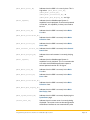
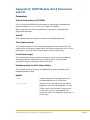
see System Readiness State
[System_Ready]
Indicates that the Kaleidescape system is ready.
[System_Becoming_Ready]
Indicates that the Kaleidescape system is
becoming ready from an idle state.
[System_Not_Ready]
Indicates that Kaleidescape system is idle.
Appendix E: Keypad Presets Module v7.1.0 Parameters and I/O on page 92.
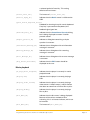
Keypad Music Collections module
The Keypad Music Collections module allows a user to browse through a collection
with three simple controls: FIRST, NEXT, and PREVIOUS. This module cannot be
used with players that do not support music playback. For more information on the
inputs, outputs, and parameters of the Keypad Music Collections module, see
[System_Ready]
Indicates that the Kaleidescape system is ready.
[System_Becoming_Ready]
Indicates that the Kaleidescape system is
becoming ready from an idle state.
[System_Not_Ready]
Indicates that Kaleidescape system is idle.
Appendix F: Music Collection Module v7.1.0 Parameters and I/O on page 95.
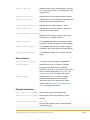
Controller Zone Name module
The Controller Zone Name module works with instances of the Kaleidescape App
for iPad that have been configured with a controller zone name. Use of a controller
zone name allows volume commands to be easily routed to multiple zones
(individually or simultaneously) by determining the iPad on the local network that
sent the command. For More information on the inputs, outputs and parameters of
the Controller Zone Name module, see Appendix G: CZN Module v 8.4.0
Parameters and I/O on page 96.
Programming Crestron Controllers for a Kaleidescape System
Page 21
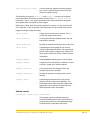
Importing modules
Downloading and extracting Kaleidescape modules and templates
for Crestron
Use the following steps to download and extract the Kaleidescape modules and
templates for the Crestron system:
1. Download the Kaleidescape modules and templates for Crestron ZIP file
(Download all Crestron files) from the Support page on the Kaleidescape
website (www.kaleidescape.com/support).
2. Extract the files from the ZIP file to the C:\Crestron\Simpl\PROGRAMS\
folder.
Module contents
Each module consists of three types of files.
SIMPL Windows UMC file
SIMPL+ USP file
SIMPL+ USH file
The SIMPL+ files are not intended for direct use in a program, but are used as a
processor for the accompanying UMC file.
Note: Kaleidescape modules for Crestron are designed to be used with the
latest version of SIMPL Windows. Verify that the most recent version of
SIMPL Windows is installed.
File names indicate the current version of the module, indicated by X’s in the file
names below.
The Kaleidescape OSD module consists of three files.
Kaleidescape OSD vX.X.X.umc
Kaleidescape OSD Processor vX.X.X.usp
Kaleidescape OSD Processor vX.X.X.ush
The Kaleidescape SATP module consists of three files.
Kaleidescape SATP vX.X.X.umc
Kaleidescape SATP Processor vX.X.X.usp
Kaleidescape SATP Processor vX.X.X.ush
The Kaleidescape Keypad Presets module consists of three files.
Kaleidescape Presets vX.X.X.umc
Kaleidescape Presets Processor vX.X.X.usp
Programming Crestron Controllers for a Kaleidescape System
Page 22
Kaleidescape Presets Processor vX.X.X.ush
The Kaleidescape Keypad Music Collections module consists of one file.
Kaleidescape Music Collections vX.X.X.umc
The Kaleidescape Controller Zone Name module consists of nine files.
Kaleidescape Multiple Zone Volume vX.X.X .umc
Kaleidescape Initializer for CZN volume control vX.X.X.usp
Kaleidescape Zone Volume Pre-Processor vX.X.X.usp
Kaleidescape Zone Volume event Processor vX.X.X.usp
Kaleidescape Zone Volume feedback Processor vX.X.X.usp
Kaleidescape Initializer for CZN volume control vX.X.X.ush
Kaleidescape Zone Volume Pre-Processor vX.X.X.ush
Kaleidescape Zone Volume event Processor vX.X.X.ush
Kaleidescape Zone Volume feedback Processor vX.X.X.ushIt is not necessary to
import the module to use the sample programs.
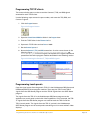
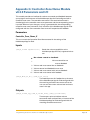
Automatic import
The import mechanism in SIMPL Windows can be used without unzipping the file.
Select File, then Import an Archived Program as shown in the following figure.
Figure 5: SIMPL Windows import mechanism
Programming Crestron Controllers for a Kaleidescape System
Page 23
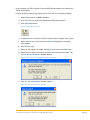
The user module and SIMPL+ program must be copied to the same directory as
shown in the following figure.
Figure 6: Module location
Module version number
The module version number identifies changes both internally and in the interface.
The version number of a module is presented in the following format:
(major).(minor).(patch)
The major version number references major API changes, such as the removal or
addition of signals to the module.
The minor version number changes with any change to the behavior of the
module, or if there are minor modifications to the interface. Changes in the minor
version number indicate that the program might need modification when updating
to this module.
Changes to the patch number indicate that there are no outward changes to the
module and updating the module should not require any program changes.
Example
Consider a module with the version number of 9.2.0. This module can have a
different interface than version 8 or earlier, and will probably require changes in the
program if updating from an earlier version. If version 9.2.1 were released,
upgrading from 9.2.0 should be easy and there should be no outward changes. If
version 9.3.0 were released, updating from either 9.2.0 or 9.2.1 might require
program changes.
Kaleidescape strives to minimize interface changes. Most changes are new inputs
or outputs or slight name changes on existing inputs or outputs.
Programming Crestron Controllers for a Kaleidescape System
Page 24
Updating the modules
Changes in the major or minor revision number are likely to have interface changes
that can affect an existing program, and new inputs and outputs might need
reconciling. Depending on the subset of the signals used in the installation, these
new controls can often be ignored.
After updating, open up the program in SIMPL Windows and choose Project and
Re-Synch Program to get the new changes.
To update old modules, copy the signals from the existing modules to an instance
of the new module. Use the following steps to update OSD modules. The same
process can be used to update SATP and Keypad Presets modules.
1. Open the Crestron Project and OSD Demo.smw file with the new OSD module.
2. Use the Copy and Paste commands to add a new OSD module for every OSD
module in the project.
3. Right-click on the module to be updated and drag the module over the new
OSD module.
4. Select Copy All Signals/Parameters from the pop-up menu.
5. Click OK in the confirmation dialog box.
6. Delete the old module.
7. Repeat steps 3 through 6 for all the OSD modules to be updated.
Programming Crestron Controllers for a Kaleidescape System
Page 25
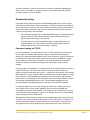
Scalability
The complexity of the Kaleidescape modules is demanding on a Crestron
processor. A single, dedicated Crestron CP2E can support the following modules:
Up to 15 OSD modules;
Up to 15 SATP modules with five users actively browsing; OR
Over 90 keypad modules.
System builder
Imported modules are not currently compatible with System Builder. To be used in
System Builder, the modules and templates must be modified. To make this
process easier, virtual connection logic and device support definitions have been
included in the modules.
Connection methods
All Kaleidescape players can be controlled via a TCP/IP connection over Ethernet —
some can also be controlled via an RS-232 connection. Alto, Cinema One (2nd
generation), and Kaleidescape Mini Players such as the KPLAYER-300 and
KPLAYER-M300 do not have an RS-232 port and must be controlled via IR or TCP/IP
connection. In a Crestron control system, the Kaleidescape modules do not
distinguish between these two connection methods; the protocol is identical.
Kaleidescape recommends using TCP/IP over Ethernet for control connection in
most cases. TCP/IP over Ethernet offers several advantages over RS-232:
Very high bandwidth compared to RS-232
Error detection and correction
Standard Cat5/5e/6 cable and pinout (simple standard termination) usage
Longer cable runs possible
Only a single network port required
No extra COM port cards needed
Bandwidth can be a key issue, especially in multi-zone systems. Text-based
feedback from several zones can cause noticeable response latency over an RS-232
connection. This is especially critical when using command routing to control
multiple Kaleidescape components through a single RS-232 port.
There are some installations that require RS-232. If controlling the power state of
an older Movie Player is an issue, RS-232 might be the only option. M-Class
players, the 1080p Player, 1080p Mini Player, Movie Player 2, Music Player, Cinema
One, and Alto can be powered on from TCP/IP over Ethernet commands. For more
information on controlling power states, see Power control on page 38.
RS-232 control can be used if the Crestron processor does not have an Ethernet
port or the optional Ethernet card.
Programming Crestron Controllers for a Kaleidescape System
Page 26
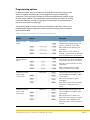
Programming options
In addition to direct physical connections through RS-232 or Ethernet ports, there
are other methods of combining Crestron programming with Kaleidescape
commands. There are several methods of connecting Kaleidescape module signals
to other device modules. The Kaleidescape control protocol also allows for routing
commands indirectly, through a single physical connection, to any Kaleidescape
player or server (command routing).
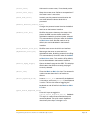
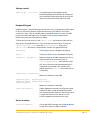
The following table illustrates how physical connections work with Crestron and
Kaleidescape programming options (listed in order from highly recommended to
least recommended).
Table 3: Connections between Crestron and Kaleidescape
Method
Diagram
Description
Multiple TCP/IP
clients
Recommended
Each player is associated with the
Kaleidescape module through the
player’s individual TCP/IP client.
Pros: Good control flexibility and
throughput
Cons: Several TCP/IP clients to
manage. Cannot power on the older
KPLAYER-2000 or KPLAYER-2500.
Multiple RS-232
ports
Each player has a direct connection
to an RS-232 port on the controller.
Pros: Best control flexibility and fair
throughput.
Cons: Limited distances, might
require additional RS-232 ports.
Command routing
with a single
TCP/IP client
Kaleidescape module signals are
jammed together through a single
TCP/IP client.
Pros: Easier to program, good
throughput.
Cons: Places extra load on Crestron
processor. Cannot power on a
player.
Command routing
with a single
RS-232 port
Kaleidescape module signals are
jammed together through a single
RS-232 port.
Pros: Single RS-232 connection.
Cons: Places extra load on Crestron
processor. Poor throughput and
limited distances. Cannot power on
a player.
Programming Crestron Controllers for a Kaleidescape System
Page 27
All of the methods in Table 3 can be used in the same installation depending on
factors such as the cable run length to players, the Crestron processor, and the
number of players in the installation.
Command routing
Command routing allows control of multiple Kaleidescape players with only one
connection to the controller. This can be either a TCP/IP or an RS-232 connection to
almost any player or server in the system. While command routing can be the best
solution for some installations, there are also inherent limitations and should be
used only if required by the installation.
If the Crestron controller has a dedicated RS-232 port for each Kaleidescape
player or if direct TCP/IP communication can be established with each
player, command routing is not required.
If several players must be controlled through a single RS-232 port, or a
single IP address must be used for Crestron communications with the
Kaleidescape System, command routing is required.
Command routing via TCP/IP
In some installations, it is impossible to make a TCP/IP connection to each player.
For example, the network administrator may have isolated the Kaleidescape
System on a separate network behind a NAT router and only a single IP connection
is available. Or, maybe the network administrator has only provided for a single
static IP address, and all other components are using dynamically assigned IP
addresses (addresses potentially changing with each power cycle or power
outage).
For these types of installations, it is possible to route all communications through a
single TCP/IP client. This forces the Crestron processor to work harder than
necessary and can slow down the system — especially if the program uses multiple
SATP modules. Using a single IP address and command routing introduces a single
point of failure. If the Kaleidescape component with connection to the controller
loses power or if replaced by a new component with the wrong IP address, control
of the entire Kaleidescape System is lost. These network topologies are not
recommended for Kaleidescape Systems and should be avoided if possible.
If a single IP address must be used, change the TX$ of every module to use the
same signal name (jamming them together). Do the same for the RX$ and
Connection-F signals of every module. Then configure one TCP/IP client to use the
same TX$, RX$, and Connection-F signals. This change routes all the TX$ and RX$
signals through that one TCP/IP client.
Although the TCP/IP client can connect to any Kaleidescape player to control any or
all zones in the system, control of those zones is lost if that player is turned off. To
avoid this potential problem, connect directly to a server when using command
routing because the server generally stays powered on all the time. If there are
Programming Crestron Controllers for a Kaleidescape System
Page 28
multiple servers in the system, the additional servers can be left out of the control
programming.
Command routing via RS-232
Instead of using a TCP/IP client, all the communications can be routed through a
single RS-232 port. As above, connecting through the Kaleidescape server is
recommended. However, command routing through the RS-232 control port can
cause latency in some cases because of the limited bandwidth of the RS-232 port
and is not recommended.
If a single RS-232 connection must be used, change the TX$ of every module to use
the same signal name (jamming them together). Do the same for the RX$ and
signals of every module. Then configure one RS-232 port to use the same TX$ and
RX$ signals. This routes all the TX$ and RX$ signals through that one RS-232 port.
Setting the Control Protocol Device ID (CPDID)
CPDIDs are set for Kaleidescape Premiere line components on the component
settings page of the browser interface. The CPDID of the OSD, SATP, or Keypad
module must also be set to match the player being controlled. Do NOT assign the
same CPDID to more than one device. Valid CPDID numbers for command routing
range from 02 to 99. Setting CPDID None in the browser interface means that
command routing is not being used for that device. Kaleidescape players set to
CPDID None must have a direct connection to the controller (via RS-232 or TCP/IP).
The Crestron module must then be set to CPDID None to communicate with the
device directly connected.
For example, if using command routing via an RS-232 connection to a 3U Server,
the server responds to requests sent to CPDID None and routes commands with
other CPDIDs to the components with assigned unique CPDIDs.
CPDIDs are not a feature of Alto or Cinema One (2nd generation).
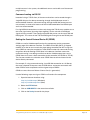
Use the following steps to assign a CPDID to a Premiere line component.
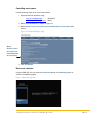
1. Open the browser interface using:
http://my-kaleidescape/ (Windows)
http://my-kaleidescape.local/ (Mac)
2. Select the SETTINGS tab.
3. Click on COMPONENTS in the second row of tabs.
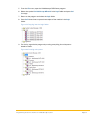
4. Click on the Settings button for the player.
Programming Crestron Controllers for a Kaleidescape System
Page 29
Figure 7: Component Settings button
Click on Settings
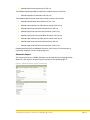
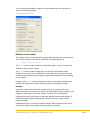
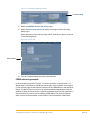
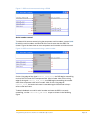
5. Select the CONTROL tab from the Settings page.
6. Select the Control Protocol Device ID (None, 02 through 99) from the dropdown menu.
Select None only if command routing is NOT used for this device as shown
in the following figure.
Figure 8: Control tab
Select None
7.
8. Click OK. The device does not have to be rebooted.
CPDID addressing example
In the example illustrated in Figure 9, a Crestron controller is connected to a 1U
Server either via Ethernet or the RS-232 control port. Unique CPDIDs are assigned
(in the installer pages of the browser interface) to four M500 Players and one Music
Player. The Music Player has four music zones controlled independently with the
addition of Zone IDs. Because the 1U Server connected to the Crestron controller is
the local device, the server uses the default CPDID None. The second 1U Server
does not have to be controlled, so that CPDID is left at the default CPDID None.
Programming Crestron Controllers for a Kaleidescape System
Page 30
Figure 9: CPDID addressing example
Each of the M500 Players is controlled from a Kaleidescape OSD module. The OSD
modules must be configured to match the CPDIDs assigned to the players in the
browser interface. The field for the CPDID is near the bottom of the module.
Figure 10: Configuring the module CPDID
If the controller directs the M500 Player to play a selected movie, the OSD module
sends the following text command to the server:
02/1/PLAY:\r
The server receives the command and reroutes the command to the player with the
CPDID 02 via TCP/IP over Ethernet. The response from the player is directed
through the server back to the OSD module with the CPDID 02.
With the Music Player, a separate SATP or keypad module must be used for each
controlled zone as shown in Figure 11. All SATP and keypad modules for the same
player are assigned the same CPDID (06 in the example) but the Zone ID (01
through 04) must also be set. The SATP and keypad modules send every command
with the CPDID followed by the Zone ID. This identifies each music zone as a
separate, routable endpoint.
Programming Crestron Controllers for a Kaleidescape System
Page 31
Figure 11: Configuring the module CPDID with Zone ID
If the controller directs the Music Player to play the selected music in zone 3, the
SATP module sends the following text command:
06.03/1/PLAY:\r
The 1U Server receives the command and reroutes the command to the Music
Player (CPDID 06) via TCP/IP over Ethernet. The Music Player identifies the Zone ID
of the command and plays back music in zone 3. The response is directed through
the 1U Server back to the SATP module for zone 3.
Note: If command routing is not used, the Zone ID must still be set for the
zone that the SATP or keypad module will be controlling.
This example has the Crestron processor connected to the 1U Server, but this
process works just as well if the Crestron processor is attached to one of the M500
Players.
Note that CPDID 01 always sends commands to the directly connected device. If the
Crestron processor were connected to the M500 Player with CPDID 02, any
messages sent with CPDID 01 are captured by that player and not routed to any
others. In this case, both 01 and 02 are correct values for the module CPDID
parameter. A direct connection to the controller is the only way to communicate
with a component whose CPDID is set to None.
For more information, see the Kaleidescape System Control Protocol Reference
Manual on the Support page of the Kaleidescape website
(www.kaleidescape.com/support).
Programming Crestron Controllers for a Kaleidescape System
Page 32
Music zone control
Music zone control provides control for any music zone in a Premiere line system
from the OSD for a movie zone. Setting music zone control in the browser interface
allows the user to select any zone from the movie zone onscreen display. Now
Playing shows what is playing in the currently selected zone.
Music zone control is not supported on Cinema One (2nd generation).
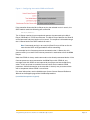
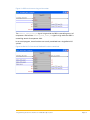
Naming music zones
Music zone names appear in the OSD to identify the controlled music zone. It is
important to give the music zones names that can be easily understood by the user,
like Den, Living Room, or Patio.
Use the following steps to name music zones.
1. Open the browser interface using:
http://my-kaleidescape/ (Windows)
http://my-kaleidescape.local/ (Mac)
2. Select the SETTINGS tab.
2. Click on COMPONENTS in the second row of tabs.
3. For each component, enter a music zone name in all Zone # Name (for music)
field and then click OK to save. Each name must be saved before the music
name for the next component can be entered.
Note: If a zone is named Unused, that zone does not appear as an
option on the OSD selection.
Figure 12: Components Settings page
Select
Children’s Zone
Programming Crestron Controllers for a Kaleidescape System
Page 33
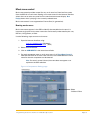
Controlling music zones
Use the following steps to set music zone control.
1. Open the browser interface using:
http://my-kaleidescape/
http://my-kaleidescape.local
(Windows)
(Mac)
2. Select the SETTINGS tab as shown in Figure 13.
3. Select Any music zone in the system can be controlled from the onscreen display radio
button.
Figure 13: General Setting’s page
Select
Any music zone in
the system can be
controlled from the
onscreen display
4. Click Save Changes.
Music zone selection
Using the OSD, the user can select the Control Zone option in the Now Playing view as
shown in the following figure.
Figure 14: Now Playing view
Programming Crestron Controllers for a Kaleidescape System
Page 34
When the user selects Control Zone, the Select Music Zone dialog box appears with all
the available music zones in the system, labeled with the names assigned in the
Kaleidescape browser interface.
Figure 15: Select Music Zone dialog box
If the OSD is not controlling the local zone when the user selects new music for
playback, a reminder that control is for a different music zone will appear. The user
then has the option to confirm playback or to select another music zone.
OSD module music zone selection
The zone that the OSD is controlling can be set in the Kaleidescape OSD module.
Control can be specified by using either the CPDID or serial number of the
component. Note that this feature functions whether or not the CPDID is set.
Because either CPDID or serial number can be used, the module also provides
feedback using both CPDID and serial number when stating which music zone the
OSD is currently controlling as shown in the following figure.
Figure 16: OSD module music zone control
CPDID control
To select which zone to control using the component CPDID instead of the serial
number, simply substitute the CPDID for the serial number in the strings, and take
the feedback from the [Controlling_CPDID.Zone$] output of the module. For
instance, to control zones 1 and 2 of a Music Player with CPDID 05, use the
numbers in the following figure.
Programming Crestron Controllers for a Kaleidescape System
Page 35
Figure 17: OSD music zone control using a CPDID
Serial number control
To select which zone to control using the component serial numbers, setup a Serial
I/O with the serial numbers and Zone ID of the music zones that the OSD is to
control. Figure 18 shows how to use a component serial number to initiate control.
Figure 18: OSD music zone control using a serial number
On the rising edge of the signal Control_1234_zone1, the OSD begins controlling
music of the first zone of the component with serial number 1234. On the rising
edge of the signal Control_1234_zone2, the OSD begins controlling the second
zone of the component with serial number 1234. On the rising edge of
Control_Local, the local movie zone is controlled again. Note that 01 always
refers to the local zone.
To obtain feedback as to which serial number and zone the OSD is currently
controlling, use the Controlling_SN.Zone$ output as shown in the following
figure.
Programming Crestron Controllers for a Kaleidescape System
Page 36
Figure 19: OSD music zone using serial number
The Control_1234_zone1_fb signal is high while the OSD is controlling zone 1 of
component 1234 and the Control_1234_zone2_fb signal is high while the OSD is
controlling zone 2 of component 1234.
In an actual program, these functions are usually combined into a single Serial I/O
symbol.
Figure 20: Serial I/O Control and Feedback functions combined
Programming Crestron Controllers for a Kaleidescape System
Page 37
Controlling a movie zone with both SATP and OSD control
To use both the standalone touch panel (SATP) and the onscreen display (OSD)
interface to control a movie zone, like the single zone output of an M500 Player, the
user can select music from a touch panel without turning on the video display. The
best approach for this scenario is to imagine that the single zone is actually two
different devices: one is an OSD-controlled movie zone which can play movies or
music, and the other is an SATP-controlled music-only zone. Both SATP and OSD
No Video templates must be loaded onto the touch panel. These templates are
designed as a single page to allow the templates to reside on the same touch
panel. The single page design makes it easier to integrate Kaleidescape templates
into a larger user interface file on the touch panel.
Both modules can use the same connection with TX$ and RX$ signals jammed
together, but the better method is to isolate the two different modules onto
individual TCP/IP clients. In this case, the two TCP/IP clients use the same IP
address, and the modules use the same CPDID.
Use buffers or other methods to separate devices on a touch panel. Remember to
add a Make String Permanent symbol to keep the serial strings that are not routed in
memory.
Calibrating the touch interface
If using the OSD Video template, the touch panel interface must be calibrated to
enable the user to touch the video feed. This calibration is in addition to the
calibration of the Crestron touch panel itself.
Once the system is functioning, press the Kaleidescape logo in the upper left corner
of the OSD touch panel to bring up the Kaleidescape menu. On a Premiere line
system, highlight System, select Status and then use the left/right arrows to select
System Setup. On Alto and Cinema One (2nd generation), highlight System then select
Settings and then use the up/down arrows to select Advanced. From there, select the
Calibrate Touch Panel entry and follow the instructions.
Calibration information is stored in the player itself. Each zone used for OSD Video
control must be calibrated.
Programming Crestron Controllers for a Kaleidescape System
Page 38
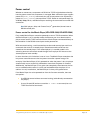
Power control
Whether to connect to a component via RS-232 or TCP/IP might be determined by
how the power state of the component is managed. Both connection types support
power off (ENTER_STANDBY) commands, but not all components can respond to a
power on (LEAVE_STANDBY) command over TCP/IP. Power on commands work for
all M500, 1080p, Music, and Movie Players receiving the command from an RS-232
connection.
Note: Mini players, Alto, and Cinema One (2nd generation) do not have an
RS-232 control port.
Power control for the Movie Player (KPLAYER-2000, KPLAYER-2500)
Early model Movie Players cannot be powered on over a TCP/IP connection. When
the Movie Player is put in standby mode, the Ethernet port shuts down and the
player cannot receive TCP/IP communications. Movie Players connected directly to
the controller via the RS-232 control port can be powered on.
With command routing, a serial connection can be made to one player and issue
commands that route to a second player. Routed commands travel over the
network to the second player. If the second player is in standby mode in this
scenario, power on commands routed through the first player will not cause the
second player to leave standby.
In some situations, this limitation is not an issue. The Movie Player remembers the
last power state and resumes that last power state after a power outage. For
example, if the Movie Player is fully powered on when the power is lost, the player
automatically returns to the fully powered on state when the power is restored.
Additionally, the Movie Player is very quiet (not completely silent because the fan
runs as needed) and the noise is usually not noticeable when the player is in a
cabinet. In many installations, the Movie Player is always fully powered on.
If the Movie Player has to be powered on from the Crestron controller, there are
two options.
Use RS-232 control without command routing (cable directly connected to
the player).
Use an infrared (IR) emitter to send the IR POWER ON command, but use
TCP/IP for all other commands.
Programming Crestron Controllers for a Kaleidescape System
Page 39
Power control for the 1080p Player, 1080p Mini Player, Music Player,
and Movie Player 2
The Ethernet port for the 1080p Player, 1080p Mini Player, Music Player, and Movie
Player 2 is powered while in standby — but in a limited mode.
If the ENTER STANDBY command is sent to the component over TCP/IP, initially
there is no response. After a moment, the network connection drops, and is then
re-established. The component is now in limited mode and responds only to a
limited set of commands.
When a LEAVE_STANDBY command is received, the component powers on. The
network connection drops momentarily and then reconnects. The component is
now ready to respond to commands normally. Command routing cannot be used
to power on these components. When using TCP/IP, a direct connection must be
made to the component to turn the component on.
ENTER/LEAVE_STANDBY commands sent to the Music Player affect all four music
zones.
Power control for Cinema One (1st generation)
The standby mode on Cinema One only affects the movie zone and the first music
zone of the component. Standby does not affect the second and third music zones.
When in standby mode, commands that affect the movie zone or first music zone
return error code 020, indicating that the component is in standby mode.
When the ENTER_STANDBY command is sent to Cinema One, the system responds
with a DEVICE_POWER_STATE event message indicating the new power state and
turns off the movie zone and first music zone. Similarly, Cinema One responds to
the LEAVE_STANDBY command by immediately returning to the fully powered-on
state and sending another DEVICE_POWER_STATE message.
Unlike the components listed in the previous section, Cinema One does not drop
the TCP/IP connection when entering or leaving standby mode.
Power control for M-Class players
The standby mode on Kaleidescape M-Class players is similar to that of Cinema
One (1st generation). If the ENTER_STANDBY command is sent to an M-Class player,
the player responds with a DEVICE_POWER_STATE event message indicating the
new power state and shuts off.
Similarly, the player responds to the LEAVE_STANDBY command by immediately
returning to the fully powered-on state and sending another DEVICE_POWER_STATE
message. An M-Class player does not drop the TCP/IP connection when entering or
leaving standby mode.
Programming Crestron Controllers for a Kaleidescape System
Page 40
Power control for Alto and Cinema One (2nd generation)
The default standby behavior is similar to Cinema One (1st generation): it responds
to ENTER_STANDBY and LEAVE_STANDBY commands, and sends
DEVICE_POWER_STATE events to indicate a change in power state.
Alto and Cinema One (2nd generation) also have a user-selectable option for low
power standby mode. If this option is selected, standby mode acts like a full power
OFF state and the device will not respond to ENTER_STANDBY or
LEAVE_STANDBY commands. When configured to power off these players can be
put into and taken out of standby using IR or the front panel power button.
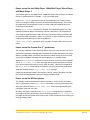
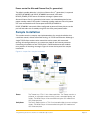
Sample Installation
This section contains a step-by-step implementation of a sample installation that
uses direct control, without command routing, via TCP/IP over Ethernet. Although a
single TCP/IP client can be used to control the entire system with command
routing, this configuration puts an unnecessary load on the Crestron processor.
Connecting all modules to one TCP/IP client is inefficient because each module
must process all incoming messages. Figure 21 shows the layout of the sample
installation.
Figure 21: Layout for a sample installation
Theater
The Theater has a TPS-15 with video capabilities. The Theater contains a
projector, an adjustable screen masking system, controlled lighting, and
shades. The M500 Player will be controlled using the OSD module and
OSD Video template
Family Room
The Family Room also has a TPS-15 and controlled lights but no masking or
shades. The M500 Player will be controlled using the OSD module and
OSD Video template.
Programming Crestron Controllers for a Kaleidescape System
Page 41
Bedroom and
Sunroom
The Bedroom and Sunroom each have a TPS-4L to control music zones 2
and 3 of the Music Player. Each music zone will be controlled with a
separate SATP module.
Master Bedroom
The Master Bedroom uses a universal remote to control the local M500
Player.
Kitchen
The Kitchen has a TPS-12, but a video cable could not be wired to that
location, so the OSD No Video template will be used. The M500 Player will
be controlled using the OSD module and OSD Video template.
The Kitchen touch panel will also control the dining room music using the
music zone control feature.
This installation requires a total of five virtual devices to be defined.
Three for OSD control of the three M500 Players
Two for two of the Music Player zones
Music zone 1 from the Music Player is unused in this installation.
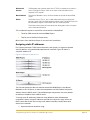
Assigning static IP addresses
For Crestron processor TCP/IP communications, each player is assigned a separate
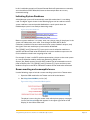
static IP address using the Kaleidescape browser interface. Figure 22 shows a
sample IP address list.
Figure 22: Sample IP address list
The Crestron processor does not need to control the M500 Player in the Master
Bedroom or the 1U Server, so these two components are left to obtain a dynamic
address from the DHCP server. These Kaleidescape components are set by default
to obtain an IP address from a DHCP server.
To assign static IP addresses, follow the steps below for each Kaleidescape
component. Always assign IP addresses outside of the dynamic range set on the
DHCP server. Be careful not to assign an IP address already used by some other
device in the network.
1. Open the browser interface using:
Programming Crestron Controllers for a Kaleidescape System
Page 42
http://my-kaleidescape/ (Windows)
http://my-kaleidescape.local/ (Mac)
2. Select the SETTINGS tab.
3. Click on Components in the second row of tabs.
4. Click on the Settings button for the component.
5. Select the NETWORK tab. Information about the current network
configuration for the component is displayed.
Figure 23: Static IP address assignment under the NETWORK tab
Select
Use the following IP
configuration
6. Select the Use the following IP configuration radio button.
7. Enter a static IP address and related fields.
8. Click OK.
Repeat steps 4 through 8 for each component with a movie or music zone to
control.
Note: Each component with new network settings will have to be restarted
for the settings to take effect.
Configuring TCP/IP clients
TCP/IP clients must be added to the Crestron program. The sample installation
requires two for connecting to music zones 3 and 4 of the Music Player, and three
for connecting to each of the M500 Players controlled from touch panels.
Each of the clients must be named and have an IP address assigned corresponding
to a M500 Player or Music Player. The M500 Player in the Master Bedroom will be
controlled with the IR remote and does not require Crestron programming.
Note: The Kaleidescape sample Crestron programs must be imported
BEFORE continuing. See Importing modules on page 22 for details.
Programming Crestron Controllers for a Kaleidescape System
Page 43
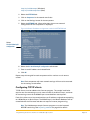
Use the following steps to add TCP/IP clients to the Crestron program.
1. Open SIMPL Windows and click the Configure button to enter the Configure
view.
Figure 24: Configure button
2. Drag five TCP/IP clients into the program from the Device Library Ethernet
Control Modules/Ethernet Intersystem/Device Communications folder.
Figure 25: Device Communications folder
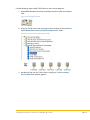
3. Double-click the icon for TCP/IP client to configure. The Device Settings:
Crestron TCP/IP Client window appears.
Programming Crestron Controllers for a Kaleidescape System
Page 44
Figure 26: Device Settings: Crestron TCP/IP Client window
4. Enter a descriptive name for the music zone or movie zone TCP/IP client in
the Device Name text box, for example, KMUSIC Z3.
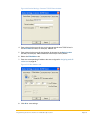
5. Enter a descriptive name for the location of the zone in the Device Location
text box, for example, KMusic-Bedroom and KPlayer-Family Room.
6. Select the IP Net Address tab.
7. Enter the corresponding IP address that was assigned in Assigning static IP
addresses on page 42.
Figure 27: IP Net Address tab
8. Click OK to save settings.
Programming Crestron Controllers for a Kaleidescape System
Page 45
9. Repeat steps 3 through 8 for each TCP/IP client. Remember that music
zones 3 and 4 share the IP address of the Music Player (192.168.1.54). The
TCP/IP clients are now labeled with the device names.
Figure 28: Named devices
Programming Crestron Controllers for a Kaleidescape System
Page 46
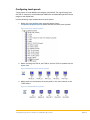
Configuring touch panels
Touch panels must be added to the program and named. The signal names from
the TPS-15 samples in the Kaleidescape OSD Demo and Kaleidescape SATP Demo
programs are copied later.
Use the following steps to add and name touch panels.
1. While still in the Configure view, open the Device Library
Touchpanels/Touchpanels (Cresnet) folder and find the touch panel symbols.
Figure 29: Touch panel symbols
2. Select and drag two TPS-4L, one TPS-12, and two TPS-15 symbols into the
System view.
Figure 30: Selected touch panel symbols
3. Select each icon and rename the touch panels in the same manner as the
TCP/IP clients.
Figure 31: Renamed touch panels
Programming Crestron Controllers for a Kaleidescape System
Page 47
Programming TCP/IP clients
The communication port must be set and the Connect-F, TX$, and RX$ signals
renamed for each TCP/IP client.
Use the following steps to enter the port number, and name the TX$, RX$, and
Connect-F signals.
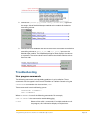
1. Click the Program button.
Figure 32: Program button
2. Open the Central Control Modules folder in the Program view.
3. Find the TCP/IP client in the Ethernet slot list.
4. Open each TCP/IP client and set Port to 10000.
5. Set the Connect input to 1.
6. Name the Connect-F, TX$, and RX$ connections. Use the names shown in the
following figure, Kaleidescape_Connect-F, Kaleidescape_TX, and
Kaleidescape_RX, so that the signals correspond to the signals copied and
pasted from the Demo program modules described in the following section.
Figure 33: Naming the Connect-F, TX$, and RX$ signals
Programming touch panels
Copy the signal names from the generic TPS-15 in the Kaleidescape OSD Demo and
Kaleidescape SATP Demo program modules. Then copy the TPS-12 and TPS-15
signals from the OSD Demo program and the TPS-4L signals from the SATP Demo
program.
The signals from the TPS-15 in the Kaleidescape OSD Demo program can be
applied to any touch panel symbol with video capabilities. In this example, the TPS15 signals from the OSD Demo program are used for both the TPS-15 and the
TPS-12 touch panels. The signals from the TPS-15 symbol in the Kaleidescape
SATP Demo program are for touch panels controlling music in zones without video
displays.
Programming Crestron Controllers for a Kaleidescape System
Page 48
In this example, the TPS-15 signals from the SATP Demo program are used for the
TPS-4L touch panels.
Use the following steps to copy signal names from TPS-15 in the demo modules.
1. Open a new instance of SIMPL Windows.
2. From the File menu, open the Kaleidescape OSD Demo program.
3. Click the Program button.
Figure 34: Program button
4. In the Detail view, scroll to the TPS-15 symbol. Copy the digital input signals.
5. Select the first input signal and press Shift-End to highlight all the digital
input signals.
6. Press Ctrl-C to copy.
7. Return to the program and open the Kitchen touch panel in the Detail view.
8. Select the first digital input signal and press Ctrl-V to paste the signals. The
Preserve Unconnected Signals? window appears.
Figure 35: Preserve Unconnected Signals? window
9. Click Yes. The Expand Symbol? window appears.
Figure 36: Expand Symbol? window
Programming Crestron Controllers for a Kaleidescape System
Page 49
10. Click Yes. If a prompt appears to name unconnected signals, click No.
11. Return to the Kaleidescape OSD Demo program and repeat steps 4 through
10 for the remaining input and output signals: digital, analog, and serial.
12. Copy all the signals from the Kitchen TPS-12 that was just created.
a. Select the touch screen symbol in the Program view.
b. Right-click and drag the symbol over the Family Room symbol. A menu appears.
Figure 37: Copy/Move menu
c.
Select Copy All Signals/Parameters.
d. Repeat for the Theater touch panel.
The Bedroom and the Sunroom touch panels use the signals from the SATP Demo
program. The procedure is the same except that the SATP Demo program must be
opened to copy the signals from the TPS-15 symbol. Note that the signal set is
different.
When finished copying the signals to either the Bedroom or Sunroom touch panel, use
the right-click technique described above to copy the signals to the other SATP
touch panel.
Adding Kaleidescape modules
Use the following steps to add the sample OSD and SATP modules from the
Kaleidescape Demo programs to the SIMPL program.
1. From the File menu, open the Kaleidescape SATP Demo program.
2. Select the symbol S-1: Kaleidescape SATP v8.4.0 and press Ctrl-C to copy the
symbol.
Figure 38: Copying the SATP Demo module
3. Return to the program and select the Logic folder.
4. Press Ctrl-V twice to paste two copies of the module in the Logic folder. If an
error appears stating Could not paste symbol, verify that the Kaleidescape
Demo programs were imported correctly. See Importing modules on page
22.
Programming Crestron Controllers for a Kaleidescape System
Page 50
5. From the File menu, open the Kaleidescape OSD Demo program.
6. Select the symbol S-2: Kaleidescape OSD v8.4.0 in the Logic folder and press CtrlC to copy.
7. Return to the program and select the Logic folder.
8. Press Ctrl-V three times to paste three copies of the module in the Logic
folder.
Figure 39: Copying into the Logic folder
9. For clarity, organize the program by moving everything into subsystems
based on zones.
Figure 40: Creating subsystems
Programming Crestron Controllers for a Kaleidescape System
Page 51
Programming Kaleidescape modules
Each module must be made unique by modifying the signal names of the sample
modules.
Use the following steps to modify signal names.
1. Select the Bedroom subsystem (music zone 3) and press F9. The Search and
Replace window appears.
Figure 41: Search and Replace window
2. For all the Inputs and Outputs, replace Kaleidescape_ with KMusicZ3_.
3. Click OK.
4. Repeat steps with the Sunroom subsystem (music zone 4) using the name
KMusicZ4_ and also with the Theater (KPlayer3_), Family Room (KPlayer2_) and
Kitchen (KPlayer1_).
5. Open the SATP module for the Bedroom, and scroll to the bottom.
6. Set the Zone ID to 03d (this is the third music zone of the Music Player).
7. Change the List Window Length to 06d (the TPS-4L only supports six lines of
text.
Figure 42: Setting Zone ID and List Window Length
8. Repeat these steps for the Sunroom SATP module using Zone ID 04.
9. Use these same steps to rename the signals of the touch panel modules.
Programming Crestron Controllers for a Kaleidescape System
Page 52
In this installation example, all Control Protocol Device ID parameters are correctly
set to the default CPDID None(01d ) because the example does not use any
command routing.
Indicating System Readiness
A Kaleidescape system will automatically enter idle mode when it is not being
used. The digital signals shown in the following figure can be used to track the
system readiness state and provide feedback on a touch panel when the
Kaleidescape system is not ready or becoming ready.
Figure 43: System Readiness
Because system readiness is a system state, not a player state, all the players in the
system will indicate the same state. Even though the OSD, SATP, Music
Collections, and Music Presets module each have system readiness outputs, only
the signals from one module per system need to be defined.
The [[{{RX$}}]] and [[{{Connect-F}}]] inputs on the music collection module are
optional and do not need to be connected if the system readiness outputs on the
music collections module are not going to be used.
For example, if there is an SATP module connected to a player on the same system
as a music collection module, the System_Becoming_Ready and
System_Not_Ready outputs from the SATP module can be connected to a touch
panel to display text. The [[{{RX$}}]] and [[{{Connect-F}}]] inputs and the system
readiness outputs on the Music Collections module do not need to be connected.
Screen masking and anamorphic lenses
Use the following steps to include a screen masking system in the Theater room.
1. Open the OSD module for the Theater and scroll to the bottom.
2. Set Using a Controlled Mask, to Yes [1d].
Figure 44: Using a Controlled Mask option
The player is now using the screen mask which places pop-up messages
(such as the Paused wedge that appears in the upper right corner of the
display) in the visible screen area.
Programming Crestron Controllers for a Kaleidescape System
Page 53
3. Find the [Mask …] output signals in the Masking_Data roll-up. These outputs
go high to indicate the type of picture being shown.
Figure 45: Mask output signals
4. Tie these outputs directly to a Serial I/O symbol to use with the masking
system.
If the projector in this installation used an anamorphic lens, the projector
can be controlled using the anamorphic outputs in the Video_Mode roll-up.
Figure 46: Anamorphic outputs
CinemaScape mask
If CinemaScape mode has been enabled, use the CinemaScape Mask output to
control screen masking. Sample logic has been included in the Kaleidescape OSD
Demo program.
Lighting and shades
In rooms that are primarily for movie watching, for example, the Theater and
Family Room, lights can dim or turn off when the movie starts, brighten or turn on
during intermission, and turn on again at the end credits.
The OSD module provides outputs in the Lighting_Cues roll-up to set this feature.
Figure 47: Lighting Cues
The signals go high for half a second for each of these events. The signals are also
buffered to allow for jamming events together (as shown). For IR controlled lighting
systems, no additional logic is required. Simply tie these signals to the appropriate
Programming Crestron Controllers for a Kaleidescape System
Page 54
IR commands. For more complex lighting systems, tie these signals to the logic or
module being used to control the lights.
Secondary SATP control
In the sample installation, the owner decides to add a second SATP touch panel in
the Bedroom, for example, a TPMC-8X. The SATP template for the TPMC-8X uses
16 lines of text for display, instead of the 6 lines on the TPS-4L. The best approach
in this situation is to include an SATP module per touch panel size controlling each
stream, each with a separate TCP/IP client.
To support our two-panel sample scenario, add another TCP/IP client pointing to
the IP address of the Music Player and duplicate the entire control chain for the
Bedroom. Copy the SATP module for the Bedroom and change all the signals to a
unique name, for example, KMusicZ3.1_. Change the [List Window Length]
parameter on the new module to 16. Now the touch panels can browse
independently of each other. One touch panel can be looking through the Now
Playing information while the other is adding new content to play from the genre
list.
This method of control does not work properly with command routing because the
modules are not able to isolate individual feedback. A dedicated direct TCP/IP
connection must be used for each SATP module.
In larger, more complex installations, this method becomes problematic. If there
are a large number of touch panels that need to control a large number of zones,
creating a module for each zone-to-touch-panel combination is unworkable. To
support more complex scenarios, the SATP module has an analog input for [List
Window Length] in the List_Control roll-up as shown in the following figure.
Figure 48: SATP analog input for List Window Length
This input allows changing the list length at run time as needed. When the length
changes the module refreshes the list with the new length.
For installations like this, remember to add a Make String Permanent symbol to keep
the nonrouted serial strings in memory.
Volume control
Use the following steps to enable volume control and feedback when using the
Kaleidescape App for iPad configured without a controller zone name.
1. Select the appropriate combination of control and feedback from the drop
down menu.
Programming Crestron Controllers for a Kaleidescape System
Page 55
2. Connect the [Volume Up], [Volume Down], [Volume Mute] signals on
the output side of the Kaleidescape module to the module of the device
controlling volume.
3. Connect the mute feedback and volume level from the module of the device
controlling volume to [Mute_On_fb] and [Vol_Level] inputs on the
Kaleidescape module. The Kaleidescape App for iPad displays the volume
as a percent. The volume level from the device should be scaled to values
from 0 to 100.
Troubleshooting
User program commands
The following commands can help debug problems in an installation. These
commands must be typed in the Crestron ViewPort or Toolbox Console using the
USERPROGCMD command or the short version, UCMD.
These commands have the following syntax.
USERPROGCMD "<COMMAND>"
UCMD "<COMMAND>"
Where <COMMAND> is one of the following commands. For example,
UCMD "K DEBUG" is the command to enable debugging.
K HELP
Shows all the valid K commands. If multiple modules are in
the program, this information displays multiple times.
Programming Crestron Controllers for a Kaleidescape System
Page 56
K DEBUG
Enables debugging on all modules at run time. All modules
report that debugging is turned on.
K DEBUG <CPDID>
Enables debugging on only the modules controlling a player
with the matching CPDID. This command is helpful in
installations using command routing.
K STOP DEBUG
Stops debugging output on all modules.
K ID
Makes all modules report the CPDID of the component the
modules are controlling. If the component CPDID is set to
None, the module reports 01.
K VER
Reports the version number of the module. If multiple
modules are in the program, this information displays
multiple times.
Programming Crestron Controllers for a Kaleidescape System
Page 57
Nothing is working
1. If using TCP/IP, open up ViewPort or the Toolbox Console and type est to
check the Ethernet status. Verify that the TCP/IP client is connected.
If the TCP/IP client is not connected,
Verify that TCP/IP client is attempting to connect to the proper IP
address.
Verify that a 1 has been placed on the Connect input of the TCP/IP
client.
Verify that port 10000 is being used on the TCP/IP client.
Verify that the Crestron controller can successfully ping the
Kaleidescape component by typing ping followed by the
component IP address. If this action fails, check the network
connections and settings.
2. If using RS-232, check the cable connections, pinouts, and communication
parameters. See Appendix B: RS-232 Port Configuration and Cable Pinout
on page 65 for more information.
3. Verify that the CPDID setting on the module matches the component CPDID
set on the installer pages of the browser interface.
4. Verify that the Zone ID matches the audio output for listening (SATP).
5. Verify that there are no attempts to control the Kaleidescape 1U, 3U or 5U
Server.
6. Open up ViewPort or the Toolbox Console, type ucmd “k debug” and try to
use the interface. Module errors are shown in the window as errors occur
and can provide useful information about what the problem could be.
7. Open up Test Manager and verify that touch panel signals are reaching the
module, and the module TX$ signal is reaching the communication port.
Verify that the communication port RX$ signal is reaching the module.
Music is not changing (SATP controlled zone)
Verify that control is for the intended music zone (audio output).
Cannot make selections with a touch panel with a video
window
The zone touch panel interface is not calibrated correctly. See Calibrating the touch
interface on page 38.
Programming Crestron Controllers for a Kaleidescape System
Page 58
No video on the touch panel with a video window
1. If using S-Video, verify that the Y and C connections are not reversed. (Try
reversing the connections, just to be sure.)
2. Verify that the TPS/IMPC (the device where the video cables terminate) is
receiving power either through Cresnet or the power connector.
Note: A touch panel can be powered by the TPS/IMPC, but a
TPS/IMPC cannot be powered by a touch panel.
3. Verify that the video input for the touch panel is set correctly. Remove the
power to the touch panel, touch and hold the touch screen, and reapply
power to the touch panel. The touch panel setup menu should appear,
which includes an option for setting up the video input.
4. Verify that the touch panel has the requisite video card installed (if
applicable). If there is no option to configure the video input in the touch
panel setup menu, the panel probably does not support video.
5. Verify that the Kaleidescape movie zone is configured to provide the video
output that the touch panel requires.
6. If more than one video input is available on the touch panel, verify that the
input is correct.
Video on the touch panel is black and white
The video input for the touch panel is set incorrectly (using S-Video and the touch
panel expects composite, or vice-versa). Remove the power to the touch panel,
touch and hold the touch screen, and reapply power to the touch panel. The touch
panel setup menu should appear which includes an option for setting up the video
input.
Getting additional support
Kaleidescape drivers, modules, and templates described in this document are not
supported by Crestron.
For additional help contact Kaleidescape Support.
See online resources at www.kaleidescape.com/support.
Contact Kaleidescape Support at [email protected]
or +1 (650) 625-6160
When contacting Kaleidescape Support, be prepared to provide the serial number
of the Kaleidescape server. The serial number label is located on the back of all
components, and behind the front panels of Kaleidescape servers.
Programming Crestron Controllers for a Kaleidescape System
Page 59
Appendix A: Screen Shots for UI Layouts
OSD control with a video window — Music
Programming Crestron Controllers for a Kaleidescape System
Page 60
OSD control with a video window — Movies
Music can be playing while selecting a movie to
watch. The playback status box in the lower left
corner feeds back either movie or music information.
This layout shows the keyboard pop-up after selecting
the SEARCH… button.
Programming Crestron Controllers for a Kaleidescape System
Page 61
OSD control without a video window — Music
Programming Crestron Controllers for a Kaleidescape System
Page 62
OSD control without a video window — Movies
This layout shows the keyboard pop-up after
selecting the SEARCH… button.
Music can be playing while selecting a movie. The
playback status box in the lower left corner feeds
back either movie or music information.
Programming Crestron Controllers for a Kaleidescape System
Page 63
Standalone touch panel
Programming Crestron Controllers for a Kaleidescape System
Page 64
Appendix B: RS-232 Port Configuration and
Cable Pinout
Port configuration
M500 Player, Music Player, and Cinema One (1st generation)
If the RS-232 port is used to communicate with a Kaleidescape player or Cinema
One, use the following default communication parameters:
Baud rate
Data bits
Stop bits
Parity
Flow control
19200
8
1
N
N
RS-232 communication parameters can be changed on the installer pages of the
browser interface.
1U, 3U, and 5U Servers
If the RS-232 port is used to communicate with a Kaleidescape server, server
default communication parameters cannot be changed.
Baud rate
Data bits
Stop bits
Parity
Flow control
115200
8
1
N
N
RS-232 port pinouts
The pinouts for the RS-232 port are illustrated below.
Most Crestron controllers require a crossover (null-modem) cable.
Note: The older KPLAYER-2000 also has a female DB-9 service port that
cannot be used for Crestron control.
Programming Crestron Controllers for a Kaleidescape System
Page 65
Appendix C: OSD Module v8.4.0 Parameters
and I/O
Parameters
Control Protocol Device ID (CPDID)
This must match the CPDID of the component as set through the Kaleidescape
browser interface (http://my-kaleidescape/ ). None is the default.
When using None, the Crestron processor must be directly connected to the
designated component.
Time Update Interval
This indicates whether the component should update the time remaining. If the title
or chapter location, remaining, or level signals are used, this parameter must be set
to 1. If this information is not used, set this parameter to 0 to conserve Crestron
processing.
Using a Controlled Mask
If using an automated screen masking system, set this to 1 (yes) to ensure that
system messages are not shown in the masked area. If using a fixed mask or no
masking, set this to 0 (no) to allow those messages to appear at the top or bottom
of the visible area.
Kaleidescape App for iPad Volume Ability
This indicates which volume buttons and feedback will be displayed on the
Kaleidescape App for iPad when configured without a controller zone name.
Inputs
{{Rx$}}
Used for connection to the RX$ of the connected
RS-232 port or TCP/IP client.
{{Connect-F}}
Resends the startup messages to get the module
feedback in sync with the component. If using
TCP/IP, tie this to the Connect-F output of the
TCP/IP client in order to re-sync the feedback if
the connection cycles. If using RS-232, simply put
a 1 on this input.
Transports
[Play], [Pause], [Pause_On], [Pause_Off]
Performs the associated transport action.
[Stop]
Performs the associated transport action. On
some screens this also acts as [Cancel].
Programming Crestron Controllers for a Kaleidescape System
Page 66
[Fast_Forward], [Rewind]
Performs the associated transport action. Each
press steps through different speeds. [Play]
resumes the content at normal speed.
[Instant_Replay]
Skips backward five seconds on each rising edge.
[Skip_Forward], [Skip_Reverse]
Moves to the next or previous chapter. On some
screens this also acts as [Page_Up] or
[Page_Down].
[Intermission_Toggle]
Activates the intermission if not currently active.
If intermission is already active, deactivates.
Activating intermission pauses the content,
displays the cover art and cues the lighting
system (if configured). When in intermission,
[Play] resumes the content and [Stop] halts
playback and returns the user to the
Kaleidescape onscreen display.
[Intermission_On]
Like [Intermission_Toggle], but only
activates intermission. Does nothing if
intermission is already active.
[Intermission_Off]
Like [Intermission_Toggle], but only
deactivates intermission. Does nothing if
intermission is not active.
[Bluray_Special_Stop]
During Blu-ray Disc™ playback, sends the Bluray STOP command to the disc playing. For all
other content, the command behaves as the
[Stop] command.
USING THIS COMMAND CAN TRAP THE USER.
Depending on how the disc was authored, this command
does not always return the user to a Kaleidescape movie
place. Some discs use this command to access special
features. If used as the only STOP command, the controller
MUST provide another mechanism to return to the
Kaleidescape menu or a Kaleidescape movie place.
Programming Crestron Controllers for a Kaleidescape System
Page 67
Navigation
[Up], [Down], [Left], [Right]
OSD navigation controls. Can be held down to
speed the user through whatever list or menu
currently being navigated.
[Page_Up], [Page_Down]
For OSD screens showing a list, scrolls the list up
or down by several lines at a time. Can be held
down to speed the user through whatever list or
menu currently being navigated. Not required for
basic navigation.
[Select]
Selects the option currently highlighted, finishes
keypad input, clears error and warning messages
and can re-sort the movie list.
[Child_Select]
Selects the highlighted item in the OSD. Also
puts the player in Child Mode displaying the
child user interface.
[Cancel]
Dismisses the Kaleidescape menu, dismisses the
movie details page, halts keypad or keyboard
input, and dismisses the movie overlay. For most
functions, the [Stop] key performs identically,
with the noted exception of dismissing the movie
overlay. Not required for basic navigation.
The next three signals are used for OSD Video. These signals allow a touch overlay
to be created where the user can touch any aspect of the Kaleidescape OSD or the
disc menu to make a selection. For this feature to function, a transparent slider
must be placed over the video window. On the slider’s Design tab, set the Dimension
to 2-D, the Indicator Type to None and ensure that Signed Feedback is Off. The Slider’s
Analog Join must be set as well as the Digital Press Join. The first Analog value is the X
value and the second is the Y value.
When used for the first time, the OSD prompts to calibrate the video touch
interface.
[Touch_Channel]
Tie this signal to the Digital Press Join of the slider.
Indicates that the video window has been
touched.
[Touch_X]
Tie this signal to the X value of the slider.
Indicates the X coordinate of the video window
that was selected.
[Touch_Y]
Tie this signal to the Y value of the slider.
Indicates the Y coordinate of the video window
that was selected.
Programming Crestron Controllers for a Kaleidescape System
Page 68
OSD menu control
[Kaleidescape_Menu_Toggle] Toggles the display of the Kaleidescape menu.
The Kaleidescape menu can be used as a guide
to take the user to any location in the
Kaleidescape OSD. This menu pops up over
whatever activity the user is currently engaged
in. The [Menu_x] commands below are
shortcuts to different selections within the
Kaleidescape menu.
[Kaleidescape_Menu_On]
Like [Kaleidescape_Menu_Toggle], but only
causes the Kaleidescape menu to pop up. If the
Kaleidescape menu is already onscreen, this
command has no effect.
[Kaleidescape_Menu_Off]
Like [Kaleidescape_Menu_Toggle], but only
causes the Kaleidescape menu to close. If the
menu is not onscreen, this command has no
effect.
[Menu_Movie_Place]
Causes the OSD to return to the last movie view
(List, Covers, or Collections).
[Menu_Music_Place]
Causes the OSD to return to the last music view
(List, Covers, Collections, or Now Playing).
[Menu_Movie_List]
Causes the OSD to change to the Movie List view.
[Menu_Movie_Collections]
Causes the OSD to change to the Movie Collections
view.
[Menu_Movie_Covers]
Causes the OSD to change to the Movie Covers
view.
[Menu_Parental_Control]
Causes the OSD to change to the Parental Control
view.
[Menu_Music_List]
Causes the OSD to change to the Music List view.
[Menu_Music_Covers]
Causes the OSD to change to the Music Covers
view.
[Menu_Music_Collections]
Causes the OSD to change to the Music Collections
view.
[Menu_Music_Now_Playing]
Causes the OSD to change to the Music Now
Playing view.
[Menu_System_Status]
Causes the OSD to change to the System Status
view. This last menu selection is not often used,
but the command is available for completeness.
Programming Crestron Controllers for a Kaleidescape System
Page 69
[Screen_Saver]
Activates the screen saver, if not already active.
[Screen_Saver_Stop]
Stops the screen saver. Performs no operation if
the screen saver is not active.
[Child_Safe_Level]
Instantly sets the parental control level to the
next level below the lowest level with a
password.
[Default_Parental_Control_Level]
Changes the parental control level to the default
level set on the browser interface.
[Shuffle_Cover_Art]
Shuffles the covers shown on the screen. Also
places the OSD into the shuffle mode if the
alphabetize mode has previously been selected.
This command only functions when in the Movie
or Music Covers view. Shuffle mode is on by
default, but can be disabled in the browser
interface.
[Child_Shuffle_Cover_Art]
Shuffles cover art on the child user interface.
[Alphabetize_Cover_Art]
Rearranges the cover art onscreen into
alphabetical order, disabling automatic shuffling.
This command only functions when in the Movie
or Music Covers view. This mode is off by default,
but can be enabled in the browser interface.
[Details_Popup_Toggle]
Opens the details page on the OSD. This displays
details about the content currently playing or
currently selected.
[Filter_List]
Filters the Movie or Music List view. Text entered is
used to narrow down the list of movies or
albums.
[Filter_Keyboard_Clock]
Issues a Filter_List command if the keyboard
is not active, and issues a Cancel if the keyboard
is active. This has the effect of toggling the
keyboard on and off while in the Movies or Music
List view.
[Quick_Search_Keyboard_Clock]
Pulse this input to toggle the
[Quick_Search_Keyboard_Active] feedback.
This input is used to show and hide the quick
search keyboard. The quick search keyboard
should only have keys a through z on it.
Programming Crestron Controllers for a Kaleidescape System
Page 70
Movie playback
[Disc_Menu]
For most DVD or Blu-ray discs, this command
calls up the disc menu. The operation of this key
can vary from disc to disc. This command can
also cue the lighting system, if so configured.
[Disc_Top_Menu]
For most DVD or Blu-ray discs, returns to the
main disc menu. The operation of this key can
vary from disc to disc.
[DVD_Resume]
For most DVDs, dismisses the DVD menu and
returns to the previously viewed content. The
operation of this key can vary from disc to disc.
This command has no effect on Blu-ray discs.
[Disc_or_Kaleidescape_Menu]
Functions as [Disc_Menu] during content
playback and as
[Kaleidescape_Menu_Toggle] when not in
content playback. This command can be used
when control buttons are limited.
[Force_Disc_Menu_mode]
Temporarily forces the output of
[Disc_Menu_fb] to go high. Useful as an
override when the menu detection is incorrect.
[Force_clear_Disc_Menu_mode]
Temporarily forces the output of
[Disc_Menu_fb] to go low.
[Force_Disc_Menu_mode_toggle]
Temporarily toggles the state of
[Disc_Menu_fb].
[Favorite_Scene_Set_Start] Sets the beginning of the favorite scene. If not
set, this defaults to the beginning of the content.
[Favorite_Scene_Set_End]
Sets the end of the favorite scene. If not set, this
defaults to the end of the content.
[Favorite_Scene_clock]
Toggles the state of [Favorite_Scene_fb],
which can be used to control when the touch
panel shows the favorite scene start and end
buttons.
[Status_and_Settings_Toggle]
Toggles the display of the movie overlay.
[Show_Navigation_Overlay]
Takes the user directly to the navigation option
of the movie overlay.
Programming Crestron Controllers for a Kaleidescape System
Page 71
[Start_Chapter_Entry]
Used to enter a chapter number during content
playback. Use the [Select] command as an
enter key.
[Start_Chapter_Entry_Clock]
This activates the [Start_Chapter_Entry] or
[Cancel] command in the OSD depending on
the state of [Keypad_Active]. This command
toggles the chapter entry on and off during
playback.
[Audio_Next]
During movie playback, changes to the next
audio stream. At other times this command has
no effect.
[Subtitles_Next]
During movie playback, changes to the next
subtitle stream. At other times this command has
no effect.
[Angle_Next]
During movie playback, selects the next available
angle. At other times this command has no
effect.
[Angle_Prev]
During movie playback, selects the previous
available angle. At other times this command has
no effect.
[Red_Button], [Green_Button], [Blue_Button], [Yellow_Button]
During Blu-ray disc playback, performs the disc
actions associated with that color button. These
actions are defined by the disc itself and can vary
from disc to disc. Kaleidescape recommends that
these buttons are displayed to the user in a row,
in the order of Red – Green – Blue – Yellow.
Note: These buttons can be used only when the movie is started with
Play Disc. If the movie was started from the bookmark (using Play Movie), the
movie must be restarted with Play Disc to use these special features.
Music playback
[Random_Toggle]
Toggles random music playback. Note that this
command does not always function because
some music always plays back in random order.
See Music items in the Kaleidescape System on
page 14 for details.
[Repeat_Toggle]
Toggles repeat music playback. Note that this
command does not always function because
some music always repeats. See Music items in
the Kaleidescape System on page 14 for details.
Programming Crestron Controllers for a Kaleidescape System
Page 72
Volume control
[Mute_On_fb], [Vol_Level]
The module passes this feedback to the
Kaleidescape App for iPad when not configured
with a controller zone name so that the user can
see the current volume level and mute state.
Keyboard/Keypad
Keyboard input is used for filtering movie or music lists, jumping to a specific place
in the list, for naming favorite scenes and for naming mix albums. If any nonnumeric (a-z) key is sent to the OSD when in the Movie or Music List view, the OSD
jumps to the item that begins with that letter in the currently sorted column.
Numeric keys start the passcode entry dialog.
To filter the movie or music list, the [Filter_List] command must be sent first.
Once given, all keyboard keys (a-z, 0-9) are can be used for the filter. If using the
[Filter_Keyboard_Clock] input and [Keyboard_Active] output, the
[Filter_List] command is automatically issued at the appropriate time.
[Backspace]
The Backspace key for a keyboard or keypad.
[Enter]
The Enter or Select key for a keyboard or keypad.
[Keypad_0] … [Keypad_9]
Sends this digit to the OSD. Keypad input (0-9) is
solicited from various functions such as
[Start_Chapter_Entry], passcode entry and
UPC entry. Entering unsolicited keypad input is
interpreted as passcode entry. Various entry
modes require the [Select] input to be used as
an Enter key.
[Keyboard_A] … [Keyboard_Z]
Sends this character to the OSD.
[Keyboard_space], [Keyboard_period],
[Keyboard_comma], [Keyboard_apostrophe],
[Keyboard_hyphen]
Sends this character to the OSD.
[Other_Key_Inputs$]
If other keyboard characters are required, create
a Serial I/O (SIO) symbol and populate the SIO
with the desired keys. Each key should only send
a single character at a time. Do not use the
Crestron keyboard symbol with this input.
Screen masking
[Calibrate_Masking]
Causes the OSD to change to the Calibrate Masking
screen. This screen is used to calibrate
Programming Crestron Controllers for a Kaleidescape System
Page 73
[Mask_Calibrated_Top] and
[Mask_Calibrated_Bottom] values.
[Calibrate_Masking_Overscan]
Causes the OSD to change to the Calibrate Masking
Overscan screen. This screen is used to indicate
the position of the overscan onto the
Kaleidescape movie zone. This overscan data is
used in calculating the
[Mask_Calibrated_Top] and
[Mask_Calibrated_Bottom] values.
Script control
[Play_Script$]
Use a Serial I/O (SIO) symbol to send the name
of the script to play to this input. Every time this
text changes, the module sends the command to
play the script. The same script can be triggered
more than once. The name is case sensitive. If
the script name does not exist, a message
appears on the OSD.
[Demo]
Plays the script named Demo button, if Demo
button exists. Otherwise, plays all favorite scenes
in order.
[Demo_Loop]
Plays the script named Demo button loop, if Demo
button loop exists. Otherwise, plays all favorite
scenes in an infinite loop.
Power
[Power_on]
Turns the component on. See Power control on
page 38 for additional notes on this input. While
held high, the module attempts to keep the
component turned on.
[Power_off]
Turns the component off. When A/C power is
interrupted, a component always returns to the
last power state. See Power control on page 38
for more information.
[Command_To_Player$]
This input can be used to send any arbitrary
command to the component. The module
automatically adds the correct CPDID, sequence
number, and terminating colon and line feed to
any string sent to this input. For example,
attaching a Serial I/O (SIO) symbol to this signal
and sending PLAY would send 03/1/PLAY:\n to
the component with CPDID 03. This input
provides direct access to the control protocol.
Programming Crestron Controllers for a Kaleidescape System
Page 74
Music zone control
[Zone_to_Control$]
Sets the local movie zone to control a (possibly
remote) music zone. Input can define the device
to control either by serial number or by CPDID. A
01.01 always returns to local control. See Music
zone control on page 33 for more information.
Outputs
{{Tx$}}
Used for connection to the TX$ signal of the
connected RS-232 or TCP/IP client.
[Player_Name$]
This output provides the name of the connected
movie zone as defined in the installer pages of
the browser interface.
Transports
[Play_fb], [Stop_fb], [Pause_fb], [Fast_Forward_fb], [Rewind_fb]
Indicates feedback state for these functions.
[Intermission_fb]
This signal is active when in the intermission
state.
Navigation
[Arrow_Keys_Active]
Indicates that the OSD is in a state where the
arrow keys are required.
[Page_Keys_Active]
Indicates that the OSD is in a state where the
page keys can be used.
OSD menu control
[UI_Page_OSD_Menu]
Indicates that the player is currently showing the
Kaleidescape OSD (as opposed to when a movie
is playing).
[Kaleidescape_Menu_fb]
This output is high as long as the Kaleidescape
menu is showing on the OSD.
[Menu_Movie_Place_fb]
Indicates that the OSD is in a movie place. This is
high when [Menu_Movie_List_fb],
[Menu_Movie_Collections_fb],
[Menu_Movie_Covers_fb],
[Menu_Parental_Control_fb], or
[Menu_Movie_Playing_fb] are high.
Programming Crestron Controllers for a Kaleidescape System
Page 75
[Menu_Music_Place_fb]
Indicates that the OSD is in a music place. This is
high when [Menu_Music_List_fb],
[Menu_Music_Covers_fb],
[Menu_Music_Collections_fb], or
[Menu_Music_Now_Playing_fb] are high.
[Movie_Capable]
Indicates that the Kaleidescape System is
capable of movie playback. As of control protocol
version 6.2, this capability is always assumed to
be true.
[Menu_Movie_List_fb]
Indicates that the OSD is currently in the Movie
List view.
[Menu_Movie_Collections_fb]
Indicates that the OSD is currently in the Movie
Collections view.
[Menu_Movie_Covers_fb]
Indicates that the OSD is currently in the Movie
Covers view.
[Menu_Parental_Control_fb] Indicates that the OSD is currently in the Parental
Control view.
[Menu_Movie_Playing_fb]
Indicates that movie content is currently playing
back.
[Music_Capable]
Indicates that the Kaleidescape System is
capable of music playback. This is assumed to be
true when the Kaleidescape System reports a
control protocol version of 5 or higher.
[Menu_Music_List_fb]
Indicates that the OSD is currently in the Music
List view.
[Menu_Music_Covers_fb]
Indicates that the OSD is currently in the Music
Covers view.
[Menu_Music_Collections_fb]
Indicates that the OSD is currently in the Music
Collections view.
[Menu_Music_Now_Playing_fb]
Indicates that the OSD is currently in the Music
Now Playing view.
[Menu_System_Status_fb]
Indicates that the OSD is currently displaying the
System Status page.
[Screen_Saver_fb]
Indicates that the screen saver is currently being
displayed. The screen saver can be configured on
the browser interface to start automatically after
Programming Crestron Controllers for a Kaleidescape System
Page 76
a selected period of inactivity. This setting
defaults to five minutes.
[Screen_Saver_fb*]
The inverse of [Screen_Saver_fb].
[Details_Popup_fb]
Indicates that the Details screen is visible on the
OSD.
[Quick_Search_Keyboard_Active]
Feedback for showing the quick search keyboard.
If any key is pressed on the keyboard, this
feedback signal goes low.
[Passcode_Entry_fb]
Indicates that the Parental Control Passcode dialog
box is being displayed onscreen. Used for
parental control.
[Simple_Question_fb]
Indicates a dialog box containing a simple
question is onscreen.
[Information_Message_fb]
Indicates that a dialog box with an information
message is onscreen.
[Warning_Message_fb]
Indicates that a dialog box with a warning
message is onscreen.
[Error_Message_fb]
Indicates that a dialog box with an error message
is onscreen.
[Play_Button_Available]
Indicates that the PLAY button should be
displayed to the user.
Movie playback
[UI_Page_Movie_Playback]
Indicates that the player is currently in movie
playback mode.
[Playing DVD]
Indicates that the player is currently playing a
DVD.
[Playing_Video_Stream]
Indicates that the player is currently playing a
video stream. A video stream is movie content
that does not come from a DVD or Blu-ray disc.
[Playing_BluRay]
Indicates that the player is currently playing a
Blu-ray disc.
[Disc_Menu_fb]
Indicates that the disc menu is being displayed.
Because of the various methods of disc
authoring, this is an inexact indicator, which can
be incorrect.
[Disc_Menu_fb*]
The inverse of [Disc_Menu_fb].
Programming Crestron Controllers for a Kaleidescape System
Page 77
[Main_Content_fb]
Indicates that the main video content is playing.
This is low during trailers, special features, and
the disc menu.
[Ending_Credits_fb]
Indicates that the end credits are being shown.
[Favorite_Scene_fb]
Indicates that the touch panel should display the
favorite scene start and end buttons.
[Status_and_Settings_fb]
Indicates that the movie overlay is active.
[Popup_Status_fb]
Indicates that the movie overlay is active and
displaying the status option.
[Popup_Navigation_Overlay_fb]
Indicates that the movie overlay is active and
displaying the navigation option.
[Angle_Available]
This feedback goes high if an alternate angle is
available in the current position of the playback.
[Number_Camera_Angles]
This feedback indicates the number of angles
available in the current position of the playback.
[Current_Camera_Angle]
This feedback indicates the currently selected
angle.
Music playback
[Music_Playback_Active]
This signal is active during music playback.
[Random_Status]
Indicates that music is currently in random
playback mode. Note that this condition
sometimes remains as some music always plays
back in random order. See Music items in the
Kaleidescape System on page 14 for details.
[Repeat_Status]
Indicates that music is currently in repeat
playback mode. Note that this condition
sometimes remains as some music always
repeats. See Music items in the Kaleidescape
System on page 14 for details.
Playback information
[Now_Playing_Title_Name$]
Name of the content currently playing.
[Now_Playing_Artist_Name$] Name of the artist for the content currently
playing.
[Now_Playing_Album_Name_or_Chapter$]
Name of the chapter or album for the content
currently playing.
Programming Crestron Controllers for a Kaleidescape System
Page 78
[Now_Playing_Cover_URL$]
A touch panel that supports dynamic graphics
can use this signal to display cover art for the
content currently playing.
The following nine signals [Title_x] and [Chapter_x] can be used to display
information about the content currently playing. If the Time Update Interval
parameter is set to 1, the signals update once per second, otherwise the signals
only update when the chapter or title changes.
Note that on a DVD, each title usually contains full content, i.e., the movie will be
on its own title, as will an episode. Title information can be used to show overall
progress through a piece of content.
[Title_Length]
Length of the current title in seconds. This is
usually the length of the movie.
[Title_Location]
Current position of the playback within the title,
expressed in seconds.
[Title_Remaining]
Number of seconds remaining in the current title.
[Title_Level]
A percentage of the elapsed time in the title
(actually expressed as 0-65535). This percentage
can be used to place a progress bar (slider) on a
touch panel to show the current relative position
in playback.
[Chapter_Number]
Analog feedback indicating the current chapter.
[Chapter_Length]
Length of the current chapter in seconds. Usually
a movie is made up of several chapters.
[Chapter_Location]
Current position of the playback within the
chapter, expressed in seconds.
[Chapter_Remaining]
Number of seconds remaining in the current
chapter.
[Chapter_Level]
A percentage of elapsed time in the current
chapter (actually expressed as 0-65535). This
percentage can be used to place a progress bar
(gauge) on a touch panel to show the current
relative position within the chapter.
Volume control
[Volume_Up], [Volume_Down], [Volume Mute]
These outputs pulse to indicate the player
received Kaleidescape IR volume commands or
volume commands from the Kaleidescape App
for iPad without a controller zone name.
Programming Crestron Controllers for a Kaleidescape System
Page 79
Details page
[Details_Visible]
Used to drive the details page on the touch
panel. This is high when the details can be
displayed and low when details have been made
obsolete by an onscreen change. Details should
not be displayed when this is low.
[Details_Text$]
A complete description of the item currently
highlighted in the OSD, formatted to be similar to
the text of the details page of the item on the
OSD.
[Details_Title$]
The title of the content that is currently
highlighted in the OSD.
[Details_Cover_URL$]
The URL of cover art image for the highlighted
item (movie or music). A touch panel that
supports dynamic graphics can display the
image at this URL.
[Movie_Details_Visible]
Same as [Details_Visible], except that this
signal and the next one specify the aspect ratio
of the cover art for the touch panel. A high signal
indicates that the details should be displayed,
and that the cover art being reported through
[Details_Cover_URL$] is a movie, and that the
touch panel should use the 10:7 aspect ratio for
cover art.
[Music_Details_Visible]
Same as [Details_Visible], except that this
signal and the previous one specify the aspect
ratio of the cover art for the touch panel. A high
signal indicates that the details should be
displayed, and that the cover art being reported
through [Details_Cover_URL$] is a CD, and
that the touch panel should use the 1:1 aspect
ratio (square) for cover art.
Keyboard/Keypad
[Keyboard_Active]
Feedback indicating that keyboard input is
expected. This should be used to show an A-Z, 09 keyboard on a touch panel.
[Keypad_Active]
This feedback indicates that keypad input is
being solicited. This should be used to show a
0-9 keypad on the touch panel.
Programming Crestron Controllers for a Kaleidescape System
Page 80
[User_Input_Prompt$]
Used for the keyboard and keypad input.
Indicates what input is being prompted for on
the OSD.
[User_Input_Text$]
Used for keyboard and keypad input. Indicates
what input has already been entered on the OSD.
CinemaScape
[1.78_(CinemaScape_Off)_fb], [CinemaScape_2.35_Anamorphic_fb],
[CinemaScape_2.35_Letterbox_fb], [CinemaScape_Native_2.35_fb]
Indicates which CinemaScape Mode the player is
currently in.
[No_Scaling], [CinemaScape_Scale_Mode_Anamorphic],
[CinemaScape_Scale_Mode_Zoom]
Indicates whether an anamorphic lens, or a
native 2.35 projector’s zoom mode should be
enabled.
[CinemaScape_Mask]
Used to return the frame ratio parameter for
[CinemaScape Mode]. A zero-padded threedigit number between 000 and 999, in hundreths
of the ratio of the frame width to the frame
height. The command will receive a valid
response regardless of whether or not the player
is in a CinemaScape mode.
Screen masking
[Mask_Absolute_Top], [Mask_Absolute_Bottom]
Describe the position for the top and bottom
masks in absolute terms, measured from the top
and bottom of the video signal, respectively.
These values are expressed as Crestron
percentage values. A [Mask_Absolute_Top]
value of 20%, for example, means that the top
mask should cover the top 20% of the video
signal. These values do not account for overscan.
[Mask_Calibrated_Top], [Mask_Calibrated_Bottom]
Once the masking system is calibrated through
the OSD, these signals display the same
information as [Mask_Absolute_Top] and
[Mask_Absolute_Bottom], but in the values
obtained mathematically from the calibration.
The calibration will account for overscan.
Programming Crestron Controllers for a Kaleidescape System
Page 81
[Mask_1.33], [Mask_1.66], [Mask_1.78], [Mask_1.85], [Mask_2.35]
Indicate the actual aspect ratio of the video
content (as opposed to the full-frame content
stored on the DVD or Blu-ray disc). These signals
can be used to recall presets on a masking
system or scaler.
[Conservative_1.33], [Conservative_1.66], [Conservative_1.78],
[Conservative_1.85], Conservative_2.35]
The [Conservative_x] signals are similar to
the [Mask_x] signals, but represent a more
conservative estimate of the image aspect ratio.
This value will never go too far into the actual
picture. For instance, if a 2.35 movie were a bit
taller than 2.35 and a true 2.35 mask would crop
the image a bit, the conservative information
would suggest the next most open value: 1.85 [Mask_2.35] and [Conservative_1.85]
would both be active. Do not use these signals in
conjunction with the [Mask_x] signals — use
one set or the other.
Lighting cues
[Lights_Movie]
Pulses for 0.5 seconds when entering movie
playback. This uses the [Main_Content_fb]
signal and has the same restrictions. This is
buffered so that it can be jammed with a touch
panel button.
[Lights_Intermission]
Pulses for 0.5 seconds when entering
Intermission. This is buffered so it can be
jammed with a touch panel button.
[Lights_End_Credits]
Pulses for 0.5 seconds when end credits are
shown. This is buffered so that it can be jammed
with a touch panel button.
[Lights_Menu]
Pulses for 0.5 seconds when returning to the
Kaleidescape OSD from playback. This is
buffered so that it can be jammed with a touch
panel button.
[Lights_Disc_Menu]
Pulses for 0.5 seconds when entering the disc
menu as indicated by the [Disc_Menu_fb]
signal. This is buffered so that it can be jammed
with a touch panel button.
Programming Crestron Controllers for a Kaleidescape System
Page 82
Video mode
[Frame_4x3], [Frame_16x9]
Indicate the full-frame aspect ratio of the video
content output by the movie zone. This allows for
adjustments for any external scaling that gets
applied to the video frame. If the video output is
configured to correct for 16:9, then
[Frame_16x9] will remain high and black bars
will be put in the image to correct any 4:3
content. Similarly, when correcting for 4:3; black
bars will be put in the image to correct any non4:3 content.
[16x9_Frame_with_2.35_Image]
Indicates that the movie playing has a 16:9 frame
and has an aspect ratio of 2.35:1. Use to control
the positioning of the anamorphic lens used with
2.35 screens.
[16x9_Frame_with_Non-2.35_Image]
Indicates that the movie playing has a 16:9 frame
and has an aspect ratio that is not 2.35:1. Use to
control the positioning of the anamorphic lens
used with 2.35 screens.
[Composite_x], [Component_x], [HDMI_x]
Used to describe the precise video mode and
aspect ratio of each output. These signals
provide similar information to that presented in
the [Frame_x] feedback above. The specific
meanings of the different suffixes are provided
below.
[x_No_Output]
When this feedback is high, the video output x is
turned off. This happens on a secondary output
when the primary output is showing a mode that
this output is not configured for. For example, if
HDMI is configured as the primary video output,
and the HDMI can display 576i but the composite
video is configured without 576i, then when a
576i signal is shown, the composite output is
disabled.
[x_480i]
NTSC interlaced
[x_576i]
PAL interlaced
[x_480p]
NTSC progressive
[x_576p]
PAL progressive
[x_720p60]
720p HD (North America)
Programming Crestron Controllers for a Kaleidescape System
Page 83
[x_720p50]
720p HD
[x_1080i60]
1080i (North America)
[x_1080i50]
1080i HD
[x_1080p60]
1080i (North America)
[x_1080p50]
1080i HD
[x_1080p24]
1080i HD
[x_4x3]
4:3 output
[x_16x9]
16:9 output
[x_64x27]
64:27 output
Script control
[Script_User_Command$]
A script can contain a step that sends a string to
the control system. That string appears in this
output and can be matched with a Serial I/O (SIO)
symbol to trigger custom programming.
Power
[Power_on_fb]
Indicates that power to the component is on.
While held high, the module attempts to keep the
component turned on.
[Power_off_fb]
Indicates that power to the component is off.
System Readiness State
[System_Ready]
Indicates that the Kaleidescape system is ready.
[System_Becoming_Ready]
Indicates that the Kaleidescape system is
becoming ready from an idle state.
[System_Not_Ready]
Indicates that Kaleidescape system is idle.
Music zone control
[Controlling_SN.Zone$]
Indicates (by serial number) which music zone
the local movie zone is controlling. When the
local music zone is controlled, this will match the
serial number (plus .01) of the local device. See
Music zone control on page 33 for more
information.
[Controlling_CPDID.Zone$]
Indicates (by CPDID) which music zone the local
movie zone is controlling. When the local music
zone is controlled, this will match the CPDID
Programming Crestron Controllers for a Kaleidescape System
Page 84
(plus .01) of the local device. See Music zone
control on page 33 for more information.
Child commands
[Child_Play]
If child user interface is already active, performs
the associated transport action. If not, activates
child user interface if the child user interface is
not active.
[Child_Stop]
[Child_Pause]
[Child_Up], [Child_Down], [Child_Left], [Child_Right]
If already in child user interface, navigates the
covers view. If not, activates the child user
interface.
[Child_Shuffle_Cover_Art]
If the child user interface is already active,
shuffles cover art on the child user interface. If
not, activates the child user interface.
[Enter_Child_Mode]
Puts the player in Child Mode and displays the
child user interface.
[Leave_Child_Mode]
Takes the player out of Child Mode and displays
Covers view.
[Child_Mode_FB]
Indicates that the child user interface is active.
Programming Crestron Controllers for a Kaleidescape System
Page 85
Appendix D: SATP Module v8.4.0 Parameters
and I/O
Parameters
Control Protocol Device ID (CPDID)
This must match the CPDID of the component as set through the Kaleidescape
browser interface (http://my-kaleidescape). None is the default.
When using None, the Crestron processor must be directly connected to the
designated component.
Zone ID
This indicates which zone output to control on the Kaleidescape player.
Time Update Interval
This indicates whether or not the component updates the time remaining. If the
song position, remaining or progress level are used this needs to be set to 1. If this
information is not used, set this to 0 to conserve Crestron processing.
List Window Length
This indicates the number of indirect text fields on the touch panel available for
displaying selections while browsing or searching music. This can also be
overridden using the analog input of the same name.
Kaleidescape App for iPad Volume Ability
This indicates the volume buttons and feedback that will be displayed on the
Kaleidescape App for iPad.
Inputs
{{Rx$}}
Used for connection to the RX$ signal of the
connected RS-232 port or TCP/IP client.
{{Connect-F}}
Resends startup messages to get the module
feedback in sync with the component. If using
TCP/IP, tie this to the Connect-F output of the
TCP/IP client to re-sync the feedback if the
connection cycles. If using RS-232, simply put a 1
on this input.
Programming Crestron Controllers for a Kaleidescape System
Page 86
Transports
[Play], [Stop], [Pause],
[Pause_On], [Pause_Off],
[Fast_Forward], [Rewind],
[Skip_Forward], [Skip_Reverse]
Performs the associated transport action.
[Play_or_Pause]
Performs a play action or pause action
depending on the current playback state. If music
is playing, this input pauses music playback. If
music is stopped or paused, this input resumes
playback.
Playback control
[Random]
Toggles random music playback. Note that this
feature does not always function because some
music always plays back in random order. See
Music items in the Kaleidescape System on page
14 for details.
[Repeat]
Toggles repeat music playback. Note that this
feature does not always function because some
music always repeats. See Music items in the
Kaleidescape System on page 14 for details.
Volume control
[Mute_On_fb], [Vol_Level]
The module passes this feedback to the
Kaleidescape App for iPad when not configured
with a controller zone name so that the user can
see the current volume level and mute state.
List control
[Browse_Select]
Causes the Browse view to be shown in the List
window. If the Browse view is already shown in
the List window, this input takes the user to the
top of the tree (home).
[Now_Playing_Select]
Causes the Now Playing information to be shown
in the List window.
[List_Begin]
Causes the List window to go to the top of the list
that is showing. If showing the Browse view, this
input takes the user to the top of the tree (home).
If showing the Now Playing view, this input takes
the user to the beginning of the list or, if music is
playing, to the item currently playing.
Programming Crestron Controllers for a Kaleidescape System
Page 87
[List_Back]
Causes the List window to show the previous list.
The back information between the Now Playing
view and Browse view are independent.
[Keyboard_Search]
Activates the keyboard pop-up to allow a search
string to be entered.
[List_Scroll_Bar_Act]
An analog input to allow the list to scroll.
[List_Up]
Moves the List window up one page.
[List_Down]
Moves the List window down one page.
[List_Highlight_Act]
An analog input to allow the highlight to scroll
through the list.
[List_Window_Length]
Allows the number of indirect text fields used to
display results to be modified at run time.
[List_Highlight_Up]
Moves highlight up one item.
[List_Highlight_Down]
Moves highlight down one item.
[List_Highlight_Select]
Selects currently highlighted item.
List window
[List_Select1], [List_Select20]
Selects one of the specific lines of the list
window.
Keyboard
[View_Search_Result]
Displays the results of the search to be browsed
by the user.
[Keyboard_Enter]
If multiple matching items are found, the results
are displayed to be browsed by the user. If a
single matching item is found, the item is
selected for playback.
[Keyboard_Backspace]
Removes the last character entered from the
queue built using Keyboard_Input.
[Keyboard_Clear]
Removes all characters entered from the queue
built using Keyboard_Input.
[Keyboard_Cancel]
Aborts the current search.
[Keyboard_Space]
[Keyboard_A] through [Keyboard_Z]
[Keyboard_0] through [Keyboard_9]
Sends this character to perform search functions.
For a standard QWERTY keyboard, each button
on the keyboard triggers a single character.
Programming Crestron Controllers for a Kaleidescape System
Page 88
[Alphapad_x]
For a smaller, predictive text (cell phone style)
keyboard, each button can represent multiple
characters. For example, the 2 button can trigger
[2ABC], which would then match any item with
either a 2, A, B or C in that position.
[Other_Key_Inputs$]
If other keyboard characters are required, create
a Serial I/O (SIO) symbol and populate the
symbol with the required keys. Each key should
only send a single character at a time to this
input.
Power
[Power_On] and [Power_Off] Places the component in or out of standby mode.
These inputs affect all four music zones of a
Music Player. If [Power_On] is held high, the
module attempts to keep the component
powered on.
[Command_To_Player$]
This input can be used to send any arbitrary
command to the component. The module
automatically adds the correct CPDID, Zone ID,
sequence number, and terminating colon and
line feed to any string sent to this input.
For example, PLAY would become
01.01/1/PLAY:\n
for a module controlling CPDID 01 Zone ID 01.
This input provides direct access to the control
protocol.
Outputs
{{Tx$}}
Used for connection to the TX$ signal of the
connected RS-232 or TCP/IP client.
[Zone_Name$]
This output provides the name of the connected
music zone as defined in the installer pages of
the browser interface.
Transports
[Play_fb], [Stop_fb], [Pause_fb],
[Fast_Forward_fb], [Rewind_fb]
Transport feedback. Only one of these signals is
active at any given time.
Playback control
[Random_Status]
Indicates that music is being played back
randomly. Note that this will sometimes remain
Programming Crestron Controllers for a Kaleidescape System
Page 89
on because some music always plays back in
random order. See Music items in the
Kaleidescape System on page 14 for details.
[Repeat_Status]
Indicates that music is playing back repeatedly.
Note that this will sometimes remain on because
some music always repeats. See Music items in
the Kaleidescape System on page 14 for details.
Playback information
[Music_Playback_Active]
This signal is active while music playback is
occurring.
[Song_Length]
Length of the song currently playing, expressed
in seconds.
[Song_Remaining]
Amount of time remaining in the song currently
playing, expressed in seconds.
[Song_Progress_Level]
A percentage of the elapsed time in the song
(actually expressed as 0-65535). This can be used
to place a progress bar (gauge) on a touch panel
to show the current relative position in the
playback.
[Song_Position]
Current position of the current song, expressed
in seconds.
[Now_Playing_Title$]
Name of the song currently playing.
[Now_Playing_Album$]
Name of the album associated with the song
currently playing.
[Now_Playing_Artist$]
Name of the artist associated with the song
currently playing.
[Now_Playing_Cover_URL$]
Indicates the URL of the cover art for the content
currently playing.
Volume control
[Volume_Up], [Volume_Down], [Volume Mute]
Pulse to indicate the player received
Kaleidescape IR volume commands or volume
commands from the Kaleidescape App for iPad
without a controller zone name.
List control
[Browse_Selected]
Indicates that the Browse view is shown in the List
window.
Programming Crestron Controllers for a Kaleidescape System
Page 90
[Now_Playing_Selected]
Indicates that the Now Playing view is shown in
the List window.
[List_Back_Available]
Indicates that the user can go back to the
previous list. This can be used to show the BACK
button as enabled or disabled.
[Keyboard_Search_Available]
Active when the touch panel is displaying a list
that can be searched.
[Keyboard_Search_Active]
Active when the keyboard is required to accept a
search string from the user.
[List_Scroll_Available]
Indicates that there is more information in the
current list than can be shown in the List window.
This can be used to display the scroll bar
dynamically.
[List_Scroll_Bar_FB]
Indicates the relative position within the list that
is shown in the List window. This provides the
feedback for the [List_Scroll_Bar_Act] input.
[List_Scroll_Bar_Size_FB]
Indicates the relative size of the list to the size of
the List window and can be used with scroll bar
modes to show a scroll bar handle that changes
size depending on the amount of information not
shown in the list.
A value of 0 means that the entire list fits in the
List window (and the
[List_Scroll_Available] output is low).
Values between 1 and 9 indicate relative list bar
sizes with 1 being the smallest (approximately
10% of the entire size scroll bar size) and 9 being
the largest (approximately 90% of the entire size).
[List_Highlight_FB]
Indicates the absolute position of the highlighted
line in the list currently displayed. This provides the
feedback for the [List_Highlight_Act] input.
List window
[List_Title$]
The title shown at the top of the List window.
[List_Text1$], [List_Text20$]
Text for each line of the List window.
[List_Selected1], [List_Selected20]
Feedback for the select status of each line of the
list. Leave any output blank that the touch panel
is not actually using.
Programming Crestron Controllers for a Kaleidescape System
Page 91
[List_Queue_Status1], [List_Queue_Status20]
Feedback to show the queue status of each line
of the list. These values will either be 1 (playing),
2 (paused) or 3 (in the queue). This should be
used to show a small icon adjacent to each line
in the List window.
Keyboard
[Keyboard_Title$]
Text describing the current function of the
keyboard. For example, while searching for an
artist, this will contain Search Artists.
[Keyboard_Text$]
This field contains the text that has been entered
on the search keyboard.
[Search_Mini_Result$]
This field contains an abbreviated version of the
search results. For example, while 43 items
match the query, this string would read 43
Entries. If the search has been narrowed down to
a single item, this string will display that item (for
example, “The Beatles”).
System Readiness State
[System_Ready]
Indicates that the Kaleidescape system is ready.
[System_Becoming_Ready]
Indicates that the Kaleidescape system is
becoming ready from an idle state.
[System_Not_Ready]
Indicates that Kaleidescape system is idle.
Programming Crestron Controllers for a Kaleidescape System
Page 92
Appendix E: Keypad Presets Module v7.1.0
Parameters and I/O
Parameters
Control Protocol Device ID (CPDID)
This must match the CPDID of the component as set through the Kaleidescape
browser interface (http://my-kaleidescape/). None is the default.
When using None, the Crestron processor must be directly connected to the
designated component.
Zone ID
This indicates which zone output to control on the Kaleidescape player.
Preset ID
A text identifier used for the set of presets. The Preset ID can be unique among all
preset modules, or multiple instances of the module can use the same Preset ID to
manipulate the same set of presets.
Hold Time
This sets the amount of time to hold one of the [Preset#] inputs, must be held in
order to save the preset.
Inputs
{{Rx$}}
Used for connection to the RX$ of the connected
RS-232 port or TCP/IP client.
{{Connect-F}}
Resends the startup messages to get the module
feedback in sync with the component. If using
TCP/IP, tie this to the Connect-F output of the
TCP/IP client in order to re-sync the-feedback if
the connection cycles. If using RS-232, simply
enter a 1 on this input.
[Play], [Stop], [Pause],
[Fast_Forward], [Rewind],
[Skip_Forward], [Skip_Reverse]
Performs the associated transport action.
[Play-Pause]
Performs a play action or pause action
depending on the current playback state. If music
is playing, this input pauses music playback. If
music is stopped or paused, this input resumes
playback.
Programming Crestron Controllers for a Kaleidescape System
Page 93
[Random]
Toggles random music playback. Note that this
does not always function because some music
always plays back in random order. See Music
items in the Kaleidescape System on page 14 for
details.
[Repeat]
Toggles repeat music playback. Note that this
does not always function because some music
always repeats. See Music items in the
Kaleidescape System on page 14 for details.
[Preset_Lock]
When this input is high, saving any preset is
disabled.
[Preset_First]
Triggers the first defined preset, starting at
preset 1 and moving forward from there. Any
preset not stored in the Kaleidescape System is
skipped.
[Preset_Next], [Preset_Previous]
Cycles through module presets, skipping any
presets not been stored in the Kaleidescape
System. If a preset is currently active, then the
cycle starts there. If no presets are active, the
cycle starts with the most recently selected
preset.
[Preset1] - [Preset10]
Triggers or sets the preset. If the [Lock] input is
low and the input remains high (held) for the
amount of time specified by the Hold Time
parameter, the preset will be saved. When the
preset is saved, the audio will mute for a
moment.
[Command_To_Player$]
This input can be used to send any arbitrary
command to the component. The module
automatically appends the correct CPDID, Zone
ID, sequence number, and terminating colon and
line feed to any string sent to this input.
For example, PLAY becomes 01.1/1/PLAY:\n
for a module controlling CPDID 01 Zone ID 1.
This input provides direct access to the control
protocol.
Outputs
{{Tx$}}
Used for connection to the TX$ signal of the
connected RS-232 or TCP/IP client.
[Now_Playing_Item$]
Information about the item currently playing. If
the user is playing a genre, it displays the genre
Programming Crestron Controllers for a Kaleidescape System
Page 94
name. If the user is playing an album, it displays
the album name. If the user is playing all music
by a particular artist, the artist name is displayed.
[Now_Playing_Track$]
The title and artist for the track currently playing
given in the format <title> - <artist>.
[Play_fb], [Stop_fb], [Pause_fb],
[Fast_Forward_fb], [Rewind_fb]
Transport feedback. Only one of these signals is
active at any given time.
[Play-Pause_fb]
Same feedback as [Play_fb].
[Random_fb]
Indicates that the music is playing back
randomly. Note that this sometimes remains on
because some music always plays back in
random order. See Music items in the
Kaleidescape System on page 14 for details.
[Repeat_fb]
Indicates that the music is playing back
repeatedly. Note that this sometimes remains on
because some music always repeats. See Music
items in the Kaleidescape System on page 14 for
details.
[Preset1_fb] – [Preset10_fb]
Indicates when the associated preset is currently
active. Multiple presets can be active
simultaneously, if the presets are set to the
music entity.
[Preset1_Label$] – [Preset10_Label$]
Displays the name of the genre, artist, album, or
track that the preset is set to. This is the same
information that is displayed in the
[Now_Playing_Item$] signal when the preset
is active.
Automatically updates to the latest information
when a preset changes, as well as at connection.
[System_Ready]
Indicates that the Kaleidescape system is ready.
[System_Becoming_Ready]
Indicates that the Kaleidescape system is
becoming ready from an idle state.
[System_Not_Ready]
Indicates that Kaleidescape system is idle.
Programming Crestron Controllers for a Kaleidescape System
Page 95
Appendix F: Music Collection Module v7.1.0
Parameters and I/O
Parameters
Control Protocol Device ID (CPDID)
This must match the CPDID of the component as set through the Kaleidescape
browser interface (http://my-kaleidescape/). None is the default.
When using None, the Crestron processor must be directly connected to the
designated component.
Zone ID
This indicates which zone output to control on the Kaleidescape player.
Collection
The music collection that this module will cycle through. Default collections
include:
Albums by Artist
Albums by Title
Genres (top 40 genres in the music library)
Mix Albums (user-defined mix albums)
New (most recently imported albums, the time is defined in the browser
interface)
User-defined collections can also be specified.
Inputs
{{Rx$}}
Used for connection to the RX$ signal of the
connected RS-232 port or TCP/IP client.
{{Connect-F}}
Resends startup messages to get the module
feedback in sync with the component. If using
TCP/IP, tie this to the Connect-F output of the
TCP/IP client to re-sync the feedback if the
connection cycles. If using RS-232, simply put a 1
on this input.
[First], [Next], [Previous] Play the first, next or previous item in the
collection.
Outputs
{{Tx$}}
Used for connection to the TX$ signal of the
connected RS-232 or TCP/IP client.
Programming Crestron Controllers for a Kaleidescape System
Page 96
[System_Ready]
Indicates that the Kaleidescape system is ready.
[System_Becoming_Ready]
Indicates that the Kaleidescape system is
becoming ready from an idle state.
[System_Not_Ready]
Indicates that Kaleidescape system is idle.
Programming Crestron Controllers for a Kaleidescape System
Page 97
Appendix G: Controller Zone Name Module
v8.3.0 Parameters and I/O
This module provides an interface for volume commands and feedback between
your program and instances of the Kaleidescape App for iPad configured with a
controller zone name. The controller zone name in the received command is
checked against the controller zone name parameter and the corresponding output
is pulsed. When an input changes a string is generated with the corresponding
controller zone name parameter. Only instances of the Kaleidescape App for iPad
configured with the same controller zone name will respond to the feedback.
Parameters
Controller_Zone_Name_X
This must match the Controller Zone Name entered in the settings of the
Kaleidescape App for iPad.
Inputs
[CZN_X_Volume Capabilities]
0
1
Sends the volume capabilities to the
Kaleidescape App for iPad, supported values
are:
No volume control or feedback
Volume control but no
mute or feedback
3
Volume and mute control but no feed back
5
Volume control and feedback but no mute
7
Volume and mute control with volume feedback
15
Volume and mute control with feedback
[CZN_X_Mute_On_fb], [CZN_X_Vol_Level]
The module passes this feedback to an instance
of the Kaleidescape App for iPad configured with
the matching controller zone name so that the
user can see the current volume level and mute
state in the app.
Outputs
[CZN_X_Volume_Up], [CZN_X_Volume_Down], [CZN_X_Volume Mute]
These outputs pulse to indicate volume
commands were received from an instance of the
Kaleidescape App for iPad configured with the
matching controller zone name.
Programming Crestron Controllers for a Kaleidescape System
Page 98
Appendix H: Revision History
Crestron OSD module
Version 8.4.0
Added support for SYSTEM_READINESS_STATE messages
Version 8.3.0
Added support for Scale Mode
Increased the maximum size of _symbolInstance and made the sizing
dynamic to prevent errors when deeply nesting the module.
Changed the CPDID text field to a drop down menu.
Added “Don’t send volume capabilities” to the volume capabilities drop
down menu in case two modules are controlling the same zone.
Minor bug fixes and other modifications.
Version 8.2.0
Added support for CinemaScape mode and CinemaScape Mask.
Added support for volume control and feedback when using the
Kaleidescape App for iPad.
Version 8.1.0
Added child commands.
Version 8.0.0
Added support for Blu-ray discs.
Fixed a bug causing spurious messages to be dumped to the log.
Minor bug fixes and other modifications.
Version 7.0.1
Added support for Cinema One (1st generation).
Significant speed improvements.
Better handling of power state and connection status.
Added [Zone_to_Control$] input and [Controlling_SN.Zone$] and
[Controlling_CPDID.Zone$] outputs.
Version 7.0
Module reorganized to use signal roll-ups.
Added keyboard and keypad inputs.
Programming Crestron Controllers for a Kaleidescape System
Page 99
Added [16x9_Frame_with_2.35_Image] and [16x9_Frame_with_2.35_Image]
outputs.
Added [Mask_Calibrated_Top] and [Mask_Calibrated_Bottom] outputs.
Added [Random_Toggle] and [Repeat_Toggle] inputs for music playback.
Added power status signals: [Power_on_fb] and [Power_off_fb].
[Now_Playing_Cover_URL] can also return movie cover URLs.
Changed join numbers in demo program.
Version 6.3.1
This version has been successfully tested using CUZ 4.0 Beta release.
Improved high traffic performance.
Added version number to file names.
Version 6.3.0
Changed Connection_Reset to Connect-F in sample code to clarify its
purpose.
Fixed bug where content detail strings were sometimes overrunning the
string buffer.
Added signal to activate lighting when in the DVD menu.
Added override capability for handling NAT for cover art URLs.
Minor formatting and spelling corrections in code.
Version 6.2.0
Fixed bug where the play button disappears when the new music choices
pop up.
Fixed bug where setting Time Update Interval to 0 does not work.
Added support for cover art for details browsing, including signals to
indicate whether to use the DVD or CD aspect ratios.
Modified coding style of module to reflect a single consistent style.
Created SIMPL+ library to allow code to be used across all Crestron
modules.
Updated copyright text in the module.
Added Virtual Serial Driver to module.
Added signal for custom commands to be sent to the player.
Added Virtual GUI Device driver to module.
Linked module help function to this document.
Programming Crestron Controllers for a Kaleidescape System
Page 100
Added System Builder Device Support definitions so that the module can
more easily be found in the database.
Modified signal names to hide unnecessary signals in System Builder.
Modified many signal names to clarify their purpose.
Crestron SATP module
Version 8.4.0
Added support for SYSTEM_READINESS_STATE messages
Version 8.3.0
Increased the maximum size of _symbolInstance and made the sizing
dynamic to prevent errors when deeply nesting the module.
Changed the CPDID text field to a drop down menu.
Added “Don’t send volume capabilities” to the volume capabilities drop
down menu in case two modules are controlling the same zone.
Minor bug fixes and other modifications.
Version 8.2.0
Added support for volume control and feedback when using the
Kaleidescape App for iPad.
Version 8.1.0
Fixes an out-of-bounds array reference introduced in 8.0.0.
Fixed a bug in version 8.0.0 that could cause the Crestron processor to lock
up when used with CUZ 4.x prior to 4.003. Note that lockup usually takes a
fairly long time to occur. All users of SATP 8.0.0 are strongly encouraged to
update to 8.1.0.
Version 8.0.0
Fixed the buffer overrun bug.
Version 7.0.1
Significant speed improvements.
Better handling of power state and connection status.
The SATP Now Playing list now defaults to the currently playing track.
The SATP search button is now suppressed on top Browse node. Searching
on the top node is not supported.
Better handling of an invalid SATP node. If an SATP interface is showing a
collection while the collection is deleted, the interface will correctly move to
a valid node.
Programming Crestron Controllers for a Kaleidescape System
Page 101
Version 7.0
Module reorganized to use signal roll-ups.
Added version number to file names.
Added keyboard and keypad inputs.
Changed join numbers in demo program.
Added [Random_Toggle] and [Repeat_Toggle] inputs for music playback.
Added [Zone_Name$] to return the name of the currently controlled zone.
Version 6.3.0
Changed Connection_Reset to Connect-F in sample code to clarify its
purpose.
Corrected system name in sample program.
Fixed bug where the module would sometimes not initialize properly if
using command redirection.
Modified nomenclature inside the module to clarify the browse protocol
implementation.
Minor formatting and spelling corrections in code.
Version 6.2.0
Added help text to Crestron SATP module.
Removed deprecated signals from module.
Fixed bug where too many search results were being returned.
Modified parsing routines to significantly improve module performance.
Modified coding style of module to reflect a single consistent style.
Created SIMPL+ library to allow code to be used across all Crestron
modules.
Updated copyright text in the module.
Enabled signal containing URL for the cover art of the currently playing
album.
Added Virtual Serial Driver to module.
Added signal for custom commands to be sent to the player.
Added Virtual GUI Device driver to module.
Linked module help function to this document.
Added System Builder Device Support definitions so that the module can
more easily be found in the System Builder database.
Programming Crestron Controllers for a Kaleidescape System
Page 102
Modified signal names to hide unnecessary signals in System Builder.
Modified many signal names to clarify their purpose.
Crestron Keypad module
Version 7.1.0
Added support for SYSTEM_READINESS_STATE messages
Version 7.0.3
Increased the maximum size of _symbolInstance and made the sizing
dynamic to prevent errors when deeply nesting the module.
Changed the CPDID text field to a drop down menu.
Version 7.0.2
Significant speed improvements.
Better handling of power state and connection status.
Version 7.0.1
Added version number to file names.
Version 7.0.0
Changed Connection_Reset to Connect-F in sample code.
Added signals to output labels for each preset.
Added First/Next/Previous inputs to browse presets.
Added Now Playing item output to display a plain text string indicating
what is currently playing.
Minor formatting and spelling corrections in code.
Version 6.2.0
Modified coding style of module to reflect a single consistent style.
Created SIMPL+ library to allow code to be used across all Crestron
modules.
Update copyright text, Crestron code.
Added Virtual Serial Driver to module.
Added signal for custom commands to be sent to the player.
Linked module help function to this document.
Added System Builder Device Support definitions so that the module can
be more easily found in the database.
Modified signal names to hide unnecessary signals in System Builder.
Programming Crestron Controllers for a Kaleidescape System
Page 103
Modified many signal and variable names to clarify their purpose.
Version 6.1.0
Initial implementation of keypad API.
Crestron Controller Zone Name (CZN) module
Version 8.3.0
Initial release of the module to parse volume commands coming from the
Kaleidescape App for iPad configured with a Controller Zone Name.
Crestron touch panel templates
Versions Dated 2011-03-01
Added search and jump to collections page.
Versions Dated 2010-04-29
Added Blu-ray disc color buttons to templates.
References to DVD replaced by generic references to “Disc.”
Removed favorite scenes buttons.
Changed select button to OK button.
Removed the alphabetize button.
Versions Dated 2008-08-08
Changed join numbers.
Added repeat and random buttons to OSD-no-Video.
Updated templates for current generation of Crestron touch panel hardware
(e.g., TPS-15 instead of TPS-6000).
Version 6.2.0
Fixed bug where the Now Playing view was not showing Paused status.
Updated the copyright text.
Fixed bug where the play button disappears when the new music choices
pop up.
Added dynamic graphics object to OSD No Video details sub-pages. Split
sub-page into two pages to handle different aspect ratios. This allows the
cover art for the selection currently highlighted on the OSD to be displayed
on the touch panel.
Added dynamic graphics object to the now playing music bug for SATP and
OSD to show the cover art for the currently playing music album.
Programming Crestron Controllers for a Kaleidescape System
Page 104
Placed a PLAY button over the browse cover on OSD No Video touch panel
templates.
Programming Crestron Controllers for a Kaleidescape System
Page 105
Notices
Document Name: Programming Crestron Controllers for a Kaleidescape System
Document Number: 101-0130-00
Permanent Link: www.kaleidescape.com/go/programming-crestron-controllers
Publication Date: May 2015
This document revision corresponds to kOS version 6.1, Kaleidescape OSD and
SATP modules version 8.4.0, Zone Name module 8.3, and Keypad modules 7.1.0.
This document is for informational purposes only. Kaleidescape makes no
representations or warranties, express or implied, regarding the accuracy or
completeness of the information contained herein and Kaleidescape shall have no
obligation to provide updates to this information in the future.
Copyright © 2009–2015 Kaleidescape, Inc. All rights reserved. Kaleidescape and the
Kaleidescape logo are trademarks of Kaleidescape, Inc. and are registered in the
United States and certain other jurisdictions. iPad and Mac are trademarks of Apple
Inc. Other trademarks and trade names are owned by third parties and may be
registered in some jurisdictions.