1
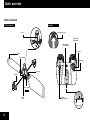
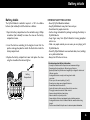
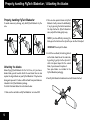
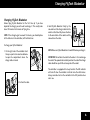
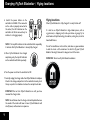
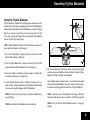
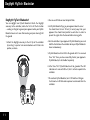
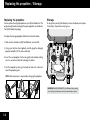
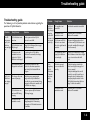
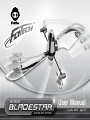
User Manual
Item No. 4055 | Ages 8+
Contents
Introduction Package contents
p2
Dogfight FlyTech Bladestar!
p11
p3
Flight school Hovering
p12
Quick overview
Battery details
p4
Properly handling FlyTech Bladestar
p5
Attaching the blades
p5
Charging FlyTech Bladestar
p6
Flying locations
p7
Operating FlyTech Bladestar p8
Flight modes
About Autopilot Mode
p9
p10
1
Tips and tricks for Autopilot Mode
Direction control
Replacing the propellers
p13
Storage
p13
Troubleshooting guide
p14
Tips and tricks
p17
Limited warranty
p18
Introduction / Package contents
Thank you for purchasing FlyTech Bladestar™
from WowWee®!
FlyTech Bladestar™ is an AI masterpiece only from WowWee®!
Changing helicopter flight as we know it, FlyTech Bladestar has
exclusive Autopilot Mode with sensor-based navigation. Watch it glide
itself through the air avoiding ceilings and flying away from obstacles,
or take full control using the 3 channel digital IR controller. Faceoff two FlyTech Bladestars - attach the Dogfight accessory to the
controller, and press the Fire button to take down your opponent,
when in range! Made from light “high-flex” materials and designed to
be crash-resistant, FlyTech Bladestar is built for indoor use.
Package Contents
• 1 x FlyTech Bladestar
• 1 x Controller
• 1 x Dogfight accessory
• 4 x Blades
• 2 x Spare propellers
• 1 x User manual
• 1 x Carrying case
Charge FlyTech Bladestar by connecting it to the controller using
the built-in charger cable, then take this revolutionary indoor flying
machine to the skies!
Take a few minutes to look through this user manual to get your
FlyTech Bladestar up and flying!
NOTE: When using FlyTech Bladestar, adult supervision is required,
especially when changing batteries.
IMPORTANT: Do not use outdoors.
2
Quick overview
Quick overview
FlyTech Bladestar
Controller
Dogfight accessory
Sensor
Charger cable
compartment
LED charge and
speed indicator
Fire button
Blade
LED indicator
Direction pad
Blade clip
Propeller
Power switch
ON
OFF
OFF
Charge
socket
Throttle
(power/ height)
Charge
ON
Power switch
3
Battery details
Battery details
IMPORTANT SAFETY PRECAUTIONS
The FlyTech Bladestar controller requires 6 x “AA” size alkaline
batteries (not included). Install the batteries as follows:
1. Open the battery compartment on the controller using a Phillips
screwdriver (not included) to remove the screw on the battery
compartment cover.
2. Insert the batteries according to the diagram. Ensure that the
positive and negative polarities match the illustrations inside the
battery compartment.
3. Replace the battery compartment cover and replace the screw
using the screwdriver. Do not over-tighten.
• Never fly FlyTech Bladestar outdoors.
• Keep FlyTech Bladestar away from faces and eyes.
• Do not launch at people or animals.
• Use the charger included in this package to recharge the battery in
FlyTech Bladestar.
• Keep fingers away from FlyTech Bladestar’s moving propellers
when in use.
• Make sure people around you are aware you are playing with
FlyTech Bladestar.
• Do not fly FlyTech Bladestar near overhead cables, trees, buildings
or any other obstructions.
• Always turn OFF when not in use.
Attention: Important Battery Information
Battery
Compartment
1.5V
LR6
UM3
“AA”
1.5V 1.5V 1.5V 1.5V 1.5V
LR6 LR6 LR6 LR6 LR6
UM3 UM3 UM3 UM3 UM3
“AA” “AA” “AA” “AA” “AA”
• Use only fresh batteries of the required size and recommended type
• Do not mix old and new batteries, different types of batteries
[standard (Carbon-Zinc), Alkaline or rechargeable] or rechargeable batteries of
different capacities
• Rechargeable batteries are only to be charged under adult
supervision
• Please respect the correct polarity, (+) and (-)
• Do not try to recharge non-rechargeable batteries
• Do not throw batteries into the fire
• Replace all batteries of the same type/brand at the same time
•The supply terminals are not to be short-circuited
• Remove exhausted batteries from the toy
• Batteries should be replaced by adults
• Remove batteries if the toy is not going to be played with for some time
• Rechargeable batteries are to be removed from the controller before being
charged
•This user manual should be kept because it contains important information
4
Properly handling FlyTech Bladestar / Attaching the blades
Properly handling FlyTech Bladestar
To avoid unnecessary damage, only hold FlyTech Bladestar by the
core.
2. There are two separate blades on FlyTech
Bladestar. Gently remove the old blade(s),
if any, by pressing the button located on
the clip attached to FlyTech Bladestar’s
core, and pull the blade gently away.
NOTE: If you have difficulty removing the
blade, press the button on the clip with a pen or other thin object IMPORTANT: Do not pull the blade.
Attaching the blades
Before flying FlyTech Bladestar for the first time, or if you have a
broken blade, you will need to attach the new blades. You can also
replace the original blades on your FlyTech Bladestar if they become
damaged or you want it to have a different look. Two spare blades are
included in the FlyTech Bladestar package.
To attach the blades follow the instructions below:
1. Make sure the controller and FlyTech Bladestar are turned OFF.
5
3. Install the new blade, the lettering printed
on the blade should be on the under side,
by pushing it gently into the clip until it
clicks into place. Repeat for the second
blade, if you also want to replace it.
Two spare blades are included in the
FlyTech Bladestar packaging.
4. Your FlyTech Bladestar should now have both blades attached.
Charging FlyTech Bladestar
Charging FlyTech Bladestar
Before flying FlyTech Bladestar for the first time (or if you have
depleted the charge) you will need to recharge it. This usually takes
about 10 minutes for 5 minutes of flying time.
NOTE: If the charge begins to exceed 15 minutes, you should replace
all the batteries in the controller, with fresh batteries.
3. Hold FlyTech Bladestar firmly by the
core and insert the charger cable into the
socket as illustrated. Pay close attention
to the orientation of the socket and the
connector on the cable.
To charge your FlyTech Bladestar:
1. On the right side of the controller twist
the cap a quarter turn counter-clockwise
to open the compartment where the
charger cable is stored.
NOTE: Make sure FlyTech Bladestar is turned OFF before you charge it.
IMPORTANT: Do not force the cord into the socket – this can damage
the socket. The exposed silver contact points on the side of the charger
cable should line up with the cut-away side of the socket.
The controller is equipped with a sleep function. The LED indicator
will turn off when the controller is idle for more than 30 minutes.
Always remember to turn the controller to the OFF position when
not in use.
2. Pull out the cable.
5
6
Charging FlyTech Bladestar / Flying locations
Flying locations
4. Switch the power button on the
controller to CHARGE. If the connector
on the cable is properly connected to
the socket, the LED indicators on the
controller will blink consecutively to
indicate it is charging properly.
When FlyTech Bladestar is fully charged it is ready for take-off!
CHARGE
NOTE: If the top LED indicator on the controller blinks repeatedly,
it indicates that FlyTech Bladestar is already fully charged.
5. When FlyTech Bladestar has charged
completely, only the top LED indicator
on the controller will blink repeatedly.
6. Turn the power switch on the controller to OFF.
7. Carefully unplug the charger cable from FlyTech Bladestar and place
it back in the storage compartment in the controller. Securely twist
the cap a quarter turn clockwise to close the compartment door.
IMPORTANT: Do not turn FlyTech Bladestar on until you have
removed the charger cable.
NOTE: You will know when the charge is almost depleted because
the sound of the motor will lower in tone. FlyTech Bladestar will
also fly lower, and become less responsive.
7
It is best to use FlyTech Bladestar in large indoor spaces, such as
a gymnasium, a shopping mall, inside your home or garage. Try to
avoid rooms with pitched ceilings, chandeliers, ceiling fans, or similar
household fixtures.
Turn off air conditioner units and fans, and close any open windows
in order to create a still environment in which to fly your FlyTech
Bladestar. You might also want to keep pets out of the room.
IMPORTANT: Do not use FlyTech Bladestar outdoors.
Operating FlyTech Bladestar
Operating FlyTech Bladestar
FlyTech Bladestar responds best to slow, gentle movements on the
controller. This will help you avoid losing control of FlyTech Bladestar.
Always point the controller at FlyTech Bladestar, even when it is flying
high. Try to remain at least 3 feet (1 meter) away from it so that
it can easily receive the IR signal. You can control FlyTech Bladestar
from up to 10 feet (3 meters) away.
NOTE: FlyTech Bladestar defaults to RC Mode when turned on. To
learn more about modes, refer to page 9.
1. Turn on the controller by setting the power switch to ON. The
bottom LED indicator will light up.
2. Turn on FlyTech Bladestar by setting the switch to ON. The LED
signal indicator on FlyTech Bladestar’s core will light up.
3. Move the throttle to full power and then down to initialize the
controller, and now you are ready to fly!
5. On the controller push the throttle slowly to control the height
and power, press and hold the direction buttons to direct FlyTech
Bladestar left, right, forwards and backwards.
4. Launch FlyTech Bladestar from a smooth, flat surface such as a
table, or floor. On the controller, push the throttle to about halfway
to increase the height and power of FlyTech Bladestar.
The controller works in relation to you -- the left direction pad will
always make FlyTech Bladestar move left, no matter where you are
in relation to it. Always point the controller at FlyTech Bladestar.
NOTE: The sensor on the core must be facing the controller when
you start flying.
NOTE: Do not throw FlyTech Bladestar when launching.
NOTE: If you leave your FlyTech Bladestar hovering in RC Mode
without control for more than 2 seconds, it will fall to the ground.
NOTE: Do not try to catch FlyTech Bladestar when it is flying or
landing.
8
Flight modes / About Autopilot Mode
Flight modes
Flytech Bladestar has two flight modes, described below:
4. FlyTech Bladestar will spin slowly on the spot to indicate that it is
in Autopilot Mode.
• RC Mode
Take full control in RC Mode (Remote Controller Mode) using the
throttle to control height and power, and the direction pad to
control left, right, forwards and backwards.
5. Move the throttle to full power and then down to initialize the
controller.
• Autopilot Mode
Choose Autopilot Mode and FlyTech Bladestar will use its sensorbased navigation to detect obstacles. You can still control
movement, but FlyTech Bladestar will avoid flat ceilings, walls and
other obstacles, including your hands or a piece of blank paper.
NOTE: FlyTech Bladestar defaults to RC Mode when turned on.
About Autopilot Mode
If you want to use Autopilot Mode you must activate it before you
initialize the controller. To do so:
1. Turn on the controller by setting the power switch to ON. The
bottom LED indicator will light up.
2. Turn on FlyTech Bladestar by setting the switch to ON. The LED
indicator on FlyTech Bladestar’s core will light up.
3. Point the controller at FlyTech Bladestar and press and hold the Fire
button on the controller for approximately two seconds.
9
6. Control FlyTech Bladestar as usual.
In Autopilot Mode, FlyTech Bladestar will be able to detect and fly away
from obstacles using its sensor-based navigation, however you can still
control its movements using the controller. FlyTech Bladestar’s sensorbased navigation is dependent on reflection. It can detect highly
reflective surfaces, such as white walls or ceilings, more easily and
from greater distances than matte or dark surfaces.
The ideal environment for using FlyTech Bladestar in Autopilot Mode
is a large room with a flat ceiling. Ceiling fans, chandeliers or similar
fixtures can confuse FlyTech Bladestar.
NOTE: FlyTech Bladestar cannot detect windows. Try to avoid rooms
with pitched ceilings, chandeliers, ceiling fans, or similar household
fixtures.
NOTE: If you leave FlyTech Bladestar hovering in Autopilot Mode for
more than 10 seconds, without sending a command from the remote
controller, FlyTech Bladestar will fall to the ground.
Tips and tricks for Autopilot Mode
Tips and tricks for Autopilot Mode
• Take note of the ceiling height. Do not fly FlyTech Bladestar in a
room with a ceiling higher than 10 feet (3 meters).
NOTE: If FlyTech Bladestar hovers on the ceiling, immediately
reduce the throttle completely and allow FlyTech Bladestar to land.
• For the best response in Autopilot Mode, use the throttle on the
controller to control the climb rate as FlyTech Bladestar rises. This
allows FlyTech Bladestar more time to detect obstacles. Try to
climb at less than 1.5 feet (0.5m) per second. In an average room
of approximately 8 feet (2.4m) this should take approximately 4.5
seconds.
• FlyTech Bladestar uses its onboard sensors to detect obstacles such
as ceilings. When it is close to the ceiling try not to change the
throttle position, or press the direction pad as this will interfere with
the onboard navigation system.
• If the walls or obstacles in FlyTech Bladestar’s flying enviroment are
dark or nonreflective, FlyTech Bladestar will not easily detect them.
Flat ceiling
Light colored walls
less than
10 feet
(3 meters)
• Try guiding FlyTech Bladestar with your hands -- slowly place two
hands together, or a piece of blank paper, in front of FlyTech Bladestar
for a few seconds, and it will fly away from your hands!
• If you want to turn the sensor-based navigation off, use RC Mode. To
reactivate RC Mode turn FlyTech Bladestar off and then on again.
Rising at approximately
1.5 feet (0.5m) per second
10
Dogfight FlyTech Bladestar
Dogfight FlyTech Bladestar!
2. You can use RC Mode or select Autopilot Mode.
You can dogfight two FlyTech Bladestars! Attach the Dogfight
accessory to the controller, and be the first to hit the Fire button
-- sending an IR signal to ground your opponent while your FlyTech
Bladestar hovers on its own. Take too long and yours too might hit
the ground!
3. Set FlyTech Bladestar flying, as your opponent does the same!
You should stand at least 10 feet (3 meters) away from your
opponent. You should stand parallel to each other in order to
prevent the signals from the two controllers crossing paths.
1. Attach the Dogfight accessory to the left tip of the controller
by twisting it a quarter turn counter-clockwise until it slots into
position, as shown.
4. Aim the controller at your opponent’s FlyTech Bladestar, press and
hold the Fire button on the controller while your FlyTech Bladestar
hovers autonomously.
5. FlyTech Bladestar will not fall to the ground until it has received
three “hits”. Once you have successfully fired at your opponents
FlyTech Bladestar, it will shudder temporarily.
6. After three “hits” FlyTech Bladestar will be grounded. The LED
indicator on its core will still be lit, but it will not respond to the
controller.
7. To reactivate FlyTech Bladestar, turn it OFF and then ON again.
It will now be in RC Mode and responsive to commands from the
controller.
11
Flight school / Hovering / Direction control
Flight school
The following is a list of useful things to remember when controlling
FlyTech Bladestar:
• Always point the controller at FlyTech Bladestar.
• To launch FlyTech Bladestar, ensure that the controller is pointing
at the sensor located on the core. This is on the opposite side to the
power switch and LED indicator.
Hovering
• Always point the controller at FlyTech Bladestar.
• Slide the throttle to about halfway to launch FlyTech Bladestar.
• When it reaches the height you want, slowly slide the throttle
down a little.
• Adjust accordingly, with slight movements, in order to hover. It
might drift vertically while hovering.
• Always keep the controller at the same height as FlyTech Bladestar
or tilt it accordingly, so that it can receive IR signal easily.
• Don’t move the throttle too quickly -- slow, smooth movements
work best.
• Try to stay at least 3 feet (1 meter) away from FlyTech Bladestar. The
IR signal can reach up to approximately 10 feet (3 meters).
• If you are in Autopilot Mode, FlyTech Bladestar will automatically
move away from obstacles including ceilings. A slow climb is best
in order that FlyTech Bladestar has time to detect the ceiling as it
climbs.
• If FlyTech Bladestar hits an obstacle in flight, allow it to return to a
stable hover before using the controller again. If it does not respond
well to control, try landing and check that the blades and propellers
are in good condition and correctly attached.
• In Autopilot Mode FlyTech Bladestar will move away from obstacles
it detects. During this time, it will not respond to directions from the
controller. Wait for it to move away from the obstacle before trying
to control it.
Direction control
• Always point the controller at FlyTech Bladestar
• Press and hold the appropriate direction button. The controller is
relative to you so left is always left, and so on, no matter where you
are in relation to FlyTech Bladestar.
• If you want to change the power and height while moving left,
right, forwards or backwards, slowly move the throttle up or down.
Continue to hold the direction button.
• Avoid steering FlyTech Bladestar too close to walls.
12
Replacing the propellers / Storage
Replacing the propellers
Storage
You can replace the original propellers on your FlyTech Bladestar if the
original one(s) becomes damaged. Two spare propellers are included in
the FlyTech Bladestar package.
To safely store your FlyTech Bladestar, remove the blades, and replace
it carefully in its protective carrying case.
To replace the damaged propeller, follow the instructions below:
1. Make sure the controller and FlyTech Bladestar are turned off.
2. Using a pair of pliers (not supplied), carefully grasp the damaged
propeller and pull it off the axle as indicated.
3. Insert the new propeller into the axle gently and carefully, making
sure it is secure. Be careful not to damage the motor.
4. Test the propeller by turning it manually to make sure it does not
touch the propeller guard.
NOTE: Adult supervision is required when changing the propellers.
IMPORTANT: ALWAYS RECHARGE FlyTech Bladestar before storing.
Severe battery depletion may result in permanent battery failure.
13
Troubleshooting guide
Troubleshooting guide
The following is a list of possible problems and solutions regarding the
operation of FlyTech Bladestar:
Problem
Likely Cause
Solution
The LED
indicator on
my FlyTech
Bladestar
does not light
up…
FlyTech Bladestar is not
turned on.
Turn the power switch on FlyTech
Bladestar’s core to ON.
FlyTech Bladestar is not
fully charged.
Charge FlyTech Bladestar. (Refer to page
5 of this user manual).
The batteries in the
controller have been
depleted, i.e. FlyTech
Bladestar is not charged.
Try replacing the 6 x “AA” alkaline
batteries in the controller, then charge
FlyTech Bladestar.
FlyTech Bladestar thinks
its propellers are blocked.
Verify that the propellers are not
obstructed, and remove any obstructions.Turn FlyTech Bladestar OFF and
ON again.
The charger cable is not
connected properly.
Verify that you are connecting the
charger cable to FlyTech Bladestar’s
core with the correct orientation. During
charging, the LEDs on the controller will
blink to indicate charging.
FlyTech Bladestar was
not turned OFF during
charging.
Make sure you turn FlyTech Bladestar
OFF during charging.
The batteries in the
controller are weak.
If your FlyTech Bladestar has still not
charged properly after 15 minutes, try
replacing the 6 x “AA” alkaline batteries in
the controller.
My FlyTech
Bladestar is
not charging
properly…
Problem
Likely Cause
Solution
My FlyTech
Bladestar is
fully charged,
turned on
and the LED
indicator is lit,
but I cannot
make it fly…
The controller is not
turned ON.
Check that the controller is turned ON.
The batteries in the
controller are weak.
Try replacing the 6 x “AA” alkaline
batteries in the controller.
The IR sensor on FlyTech
Bladestar’s core cannot
detect the signal from the
controller.
When you start flying make sure that
the IR sensor on FlyTech Bladestar’s core
is facing the controller. (Refer to page 8
of this user manual).
The environment you are
flying FlyTech Bladestar
in is too bright.
Try flying FlyTech Bladestar in a slightly
darker environment. Avoid direct sunlight
because it can interfere with the IR
signal.
The blades or propellers are not attached
correctly.
1. Verify that you have attached the
blades correctly. (Refer to page 5 of
this user manual).
2. Verify that both propellers are still
attached, correctly. If one of them is
damaged, replace it with one of the
two spare propellers included in the
FlyTech Bladestar package. (Refer to
page 13 of this user manual).
The batteries in the
controller are weak.
Try replacing the 6 x “AA” alkaline
batteries in the controller.
I have
charged my
FlyTech
Bladestar for
15 minutes
but it does
not fly
properly…
14
Troubleshooting guide
Problem
Likely Cause
Solution
Problem
Likely Cause
Solution
My FlyTech
Bladestar is
fully charged
but I cannot
control it
using the
controller….
The controller is not
turned ON.
Verify that the controller is turned ON.
The throttle is on full
power.
The batteries in the
controller are weak.
Try replacing the 6 x “AA” alkaline
batteries in the controller.
My FlyTech
Bladestar is
flying too
high, it keeps
hitting the
ceiling…
The IR sensor on FlyTech
Bladestar’s core cannot
detect the signal from the
controller.
When you start flying make sure that
the IR sensor on FlyTech Bladestar’s core
is facing the controller. (Refer to page 8
of this user manual).
1. Reduce the throttle by sliding the
throttle down, using gentle and slow
movements.
2. Try activating Autopilot Mode. FlyTech
Bladestar will use sensor-based
navigation to detect and avoid a flat
ceiling (refer to page 9).
3. Refer to the Flight School section on
page 12 of this instruction manual to
learn how to master FlyTech Bladestar.
My FlyTech
Bladestar
cannot
climb…
FlyTech Bladestar is not
fully charged.
1. Check that you are charging FlyTech
Bladestar correctly. (Refer to page 6 of
this user manual).
2. Charge FlyTech Bladestar fully and
only unplug it when only the top LED
indicator on the controller is blinking.
3. If it still does not fly very high, try
changing all of the 6 x “AA” alkaline
batteries in the remote controller.
My FlyTech
Bladestar
seems
unstable in
flight…
The IR signal from the
controller is not being
received properly.
Point the controller at FlyTech Bladestar
when controlling it.
The environment you are
flying FlyTech Bladestar
in is too bright.
Try flying FlyTech Bladestar in a slightly
darker environment. Avoid direct sunlight
because it can interfere with the IR
signal.
The blades are damaged.
Replace the blades. (Refer to page 5 of
this user manual).
The propellers are damaged or missing.
Replace the propellers. (Refer to page 13
of this user manual).
The blades or propellers
are not attached properly
15
Verify that the blades and propellers are
attached properly, and are not damaged.
(Refer to pages 5 and 13 of this user
manual).
Troubleshooting guide
Problem
Likely Cause
Solution
I keep losing
control of my
FlyTech
Bladestar
while flying
it…
FlyTech Bladestar can not
receive the IR signal from
the controller because it
is out of range.
1. Always point the controller directly at
FlyTech Bladestar.
2. Try to remain at least 3 feet (1
meter) away from FlyTech Bladestar
while controlling it. The signal can be
received up to 10 feet (3 meters). If
it flies out of range you will have to
move closer to it to control it.
My FlyTech
Bladestar
drops after it
starts flying…
The IR signal is weak.
Try replacing the 6 x “AA” alkaline
batteries in the controller.
The environment you are
flying in is too bright.
Try flying FlyTech Bladestar in a slightly
darker environment. Avoid direct sunlight
because it can interfere with the IR signal.
FlyTech Bladestar does
not have enough power.
Try charging FlyTech Bladestar. If you
have charged for 15 minutes and still
have the same problem, replace the 6 x
“AA” alkaline batteries in the controller,
and charge FlyTech Bladestar.
The IR signal from the controller is not being received
properly.
Point the controller at FlyTech Bladestar
when controlling it.
The environment you are
flying in is too bright.
Try flying FlyTech Bladestar in a slightly
darker environment. Avoid direct sunlight
because it can interfere with the IR signal.
You are in Autopilot
Mode -- the sensor-based
navigation is activated.
While in Autopilot Mode, A slow climb
is best, as it gives FlyTech Bladestar time
to detect the celing. Leave the throttle
at about halfway and allow FlyTech
Bladestar to climb slowly.
In Autopilot Mode
Problem
Likely Cause
Solution
My FlyTech
Bladestar
cannot detect
ceilings or my
hands when it
is in Autopilot
Mode…
Verify that you are in
Autopilot Mode.
To learn how to activate Autopilot Mode
refer to page 9.
The environment you are
flying FlyTech Bladestar
in is too bright.
Try flying FlyTech Bladestar in a slightly
darker environment. Avoid direct sunlight
because it can interfere with the IR
signal.
FlyTech Bladestar is
climbing too quickly.
While in Autopilot Mode, A slow climb
is best, as it gives FlyTech Bladestar time
to detect the celing. Leave the throttle
at about halfway and allow FlyTech
Bladestar to climb slowly.
FlyTech Bladestar can not
detect a small surface
area.
Try placing your hands together, slowly
move them towards FlyTech Bladestar so
that it has time to detect them.
Alternatively use a piece of blank paper.
16
Troubleshooting guide / Tips and tricks
During Dogfight
Tips and tricks
• Recharge your FlyTech Bladestar only when the charge is fully
depleted. You will know when the charge is almost depleted because
the sound of the motor will lower in tone. FlyTech Bladestar will
also fly lower, and become less responsive.
Problem
Likely Cause
Solution
I can
control my
opponent’s
FlyTech
Bladestar
during
Dogfights…
Your opponent’s IR signal
is crossing the IR signal
from your controller.
Avoid directly facing your opponent
during dogfights, and do not point the
two controllers at each other.
I can not
ground my
opponent’s
FlyTech
Bladestar
even though
I am pressing
the fire button on the
controller…
Your opponent’s FlyTech
Bladestar is not properly
receiving the IR signal
from your controller.
Point the remote controller directly at
your opponent’s FlyTech Bladestar when
pressing the Fire button.
The environment in which
you are flying FlyTech
Bladestar is too bright.
Try flying FlyTech Bladestar in a slightly
darker environment. Avoid direct sunlight
because it can interfere with the IR
signal.
• Get together with a friend and face-off two FlyTech Bladestars in
a Dogfight.
The IR signal is weak.
Try replacing the 6 x “AA” alkaline
batteries in the controller.
• The carrying case is equipped with a compartment for storing a
spare set of batteries. FlyTech Bladestar requires 6 x “AA” alkaline
batteries (not included).
• Always point the controller directly at FlyTech Bladestar. If it is
flying high, tilt the controller accordingly so that the IR signal can
be transmitted easily.
• Try to keep at least 3 feet (1 meter) away from FlyTech Bladestar
when controlling it, so that it can easily receive signal from the
controller. FlyTech Bladestar can receive signals from the controller
up to 10 feet away (3 meters)!
• Occasionally smooth out the foil on the tips of the blades.
17
Limited warranty
Limited warranty
For more information on FlyTech Bladestar, go to
www.flytechonline.com
For more tips and tricks, or if you have any questions that are
not answered in this manual, refer to
www.wowweesupport.com
To see the full range of WowWee products, go to
www.wowwee.com
Register at
www.registerwowwee.com
WowWee Group Limited. warrants to the original consumer that purchases
FlyTech Bladestar (“Product”) will be free from defects in material and/or
workmanship under normal use for a period of 30 days, from the date of purchase.
This Warranty is in lieu of all other express or implied warranties that might arise
with respect to this Product, including the warranties of merchantability or
fitness for a particular purpose.
IN ADDITION, INCIDENTAL AND CONSEQUENTIAL DAMAGES ARE HEREBY
EXCLUDED BOTH FOR PROPERTY AND TO THE EXTENT PERMITTED BY LAW, FOR
PERSONAL INJURY DAMAGE.
Some states do not allow the exclusion of limitation of incidental and
consequential damages.
Should you experience any difficulty with your Product, please return it to the
place of purchase, along with an original proof of purchase, and either the original
box or the UPC Code label from the box. You will receive a replacement for the
Product, or be issued a refund for the purchase amount of the Product in the
event a replacement is not available at the place of purchase.
This warranty does not cover damage resulting from accident, abuse, or use other
than as intended and described in the product instruction manual.
NOTE: This warranty is automatically void in the case of hardware modifications
(including tampering or disassembly), accidental damage, damage outside what
is considered normal use, or abuse.
This warranty does not cover any hardware, software or other add-on
components installed by the end-user.
Valid only in U.S.A.
18
Manufactured and distributed by ©2007 WowWee
Group Limited. Product names, designations, and
logos are trademarks or registered trademarks of
WowWee Group Limited. All rights reserved.
WowWee Group Limited.
Energy Plaza, 3/F, 92 Granville Road
T.S.T. East, Hong Kong
WowWee Canada Inc.
3500 de Maisonneuve West, Suite 800
Montreal, QC H3Z 3C1, Canada
Consumer Hotline: 1-800-310-3033
Customer Service: www.wowweesupport.com
www.wowwee.com
We recommend that you retain our address for
future reference.
Product and colors may vary.
Packaging printed in China.
This product is not suitable for children under 3
years because of small parts - choking hazard.
MADE IN CHINA.
4055US04TOP
This device complies with Part 15 of the FCC Rules. Operation is subject to the
following two conditions: (1) This device may not cause harmful interference, and (2)
This device must accept any interference received, including interference that may
cause undesired operation.
NOTE
This equipment has been tested and found to comply with the limits for a class
B digital device, pursuant to part 15 of the FCC rules. These limits are designed
to provide reasonable protection against harmful interference in a residential
installation. This equipment generates, uses and can radiate radio frequency energy
and, if not installed and used in accordance with the instructions, may cause harmful
interference to radio communications.
However, there is no guarantee that interference will not occur in a particular
installation. If this equipment does cause harmful interference to radio or television
reception, which can be determined by turning the equipment off and on, the user
is encouraged to try and correct the interference by one or more of the following
measures:
- Reorient or relocate the receiving antenna
- Increase the separation between the equipment and receiver
- Connect the equipment into an outlet on a circuit different from that to which the receiver is connected
- Consult the dealer or experienced radio/TV technician for help
WARNING: Changes or modifications to this unit not expressly approved by the
party responsible for compliance could void the user’s authority to operate the
equipment.
Please keep these instructions as they contain important information.