1
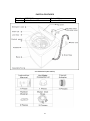
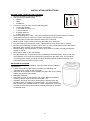
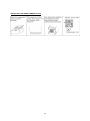
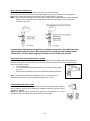
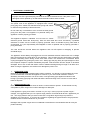
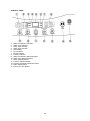
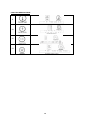
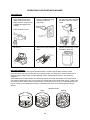
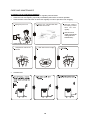
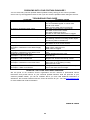
INSTRUCTION MANUAL Model Number: SPP55AW SMART SERIES PORTABLE WASHER BEFORE USE, PLEASE READ AND FOLLOW ALL SAFETY RULES AND OPERATING INSTRUCTIONS. TABLE OF CONTENTS Appliance Safety 3 Important Safeguides 3 Parts, Features, and Accessories 5 Important Safety Instructions 6 Installation Instructions 7 Before Using Your Portable Washer 7 Selecting a Location 7 Adjusting the Adjustable Foot 8 Installing the Noise Damper Plate 8 Connecting the Water Supply Hoses / Sink Faucet Connection 9 – 10 Disconnecting the Water Supply Hoses / Positioning the Drain Hose 10 Electrical Connection / Extension Cords 11 Control Panel / Functions Description 12 Operation Your Portable Washer 13 13 – 14 Preparation / Before Washing Operating Instructions 15 Manual Function (Custom Washing Cycle) /Automatic Wash Program 15 – 16 Wash Program Time Chart 16 – 17 Delayed Start (Preset) Setting / Child-Proof Setting 17 Care and Maintenance 18 Problems with Your Portable Washer 19 Troubleshooting Guide / Service for Your Portable Washer 19 Your Versonel Portable Washer Warranty / What is not Covered 20 2 APPLIANCE SAFETY Your safety and the safety of others are very important. We have provided many important safety messages in this manual and on your appliance. Always read and obey all safety messages. This is the Safety Alert Symbol. This symbol alerts you to potential hazards that can kill or injure you and others. All safety messages will follow the Safety Alert Symbol and either the words “DANGER”, “WARNING” or “CAUTION”. Danger means that failure to heed this safety statement may result in severe personal injury or death. Warning means that failure to heed this safety statement may result in extensive product damage, serious personal injury, or death. Caution means that failure to heed this safety statement may result in minor or moderate personal injury, or property or equipment damage. All safety messages will alert you do what the potential hazard is, tell you how to reduce the chance of injury, and let you know what can happen if the instructions are not followed. 3 IMPORTANT SAFEGUIDES Before the appliance is used, it must be properly positioned and installed as described in this manual, so read the manual carefully. To reduce the risk of fire, electrical shock or injury when using the appliance, follow basic precaution, including the following: Plug into a grounded 3-prong outlet, do not remove grounding prong, do not use an adapter, and do not use an extension cord. Replace all panels before operating. It is recommended that a separate circuit, serving only your appliance be provided. Use receptacles that cannot be turned off by a switch or pull chain. Never clean appliance parts with flammable fluids. These fumes can create a fire hazard or explosion. And do not store or use gasoline or other flammable vapors and liquids in the vicinity of this or any other appliance. The fumes can create a fire hazard or explosion. Before proceeding with cleaning and maintenance operations, make sure the power line of the unit is disconnected. Do not connect or disconnect the electric plug when your hands are wet. Unplug the appliance or disconnect power before cleaning or servicing. Failure to do so can result in electrical shock or death. Do not attempt to repair or replace any part of your appliance unless it is specifically recommended in this material. All other servicing should be referred to a qualified technician. FOLLOW WARNING CALL OUTS BELOW ONLY WHEN APPLICABLE TO YOUR MODEL Use two or more people to move and install appliance. Failure to do so can result in back or other injury. To ensure proper ventilation for your appliance, the front of the unit must be completely unobstructed. Choose a well-ventilated area with temperatures above 60°F (16°C) and below 90°F (32°C). This unit must be installed in an area protected from the element, such as wind, rain, water spray or drips. The appliance should not be located next to ovens, grills or other sources of high heat. The appliance must be installed with all electrical, water and drain connections in accordance with state and local codes. A standard electrical supply (110~127V AC only, 60 Hz), properly grounded in accordance with the National Electrical Code and local codes and ordinances is required. Do not kink or pinch the power supply cord of appliance. The fuse (or circuit breaker) size should be 15 amperes. It is important for the appliance to be leveled in order to work properly. You may need to make several adjustments to level it. Never allow children to operate, play with or crawl inside the appliance. Do not use solvent-based cleaning agents of abrasives on the interior. These cleaners may damage or discolor the interior. Do not use this apparatus for other than its intended purpose. 4 PARTS & FEATURES Models: Capacity: SPP55AW Cubic Feet: 1.65 Color: White Pounds: 12 Lbs ACCESSORIES (INCLUDED) 5 IMPORTANT SAFETY INSTRUCTIONS To reduce the risk of fire, electrical shock, or injury when using your portable washer, follow these basic precautions: WARNING Read all instructions before using the portable washer. Do not wash articles that have been previously cleaned in, washed in, soaked in, or spotted with gasoline, dry-cleaning solvents, or other flammable or explosive substances, as they give off vapors that could ignite or explode. Do not add gasoline, dry-cleaning solvents, or other flammable or explosive substances to the wash water. These substances give off vapours that could ignite or explode. Under certain conditions, hydrogen gas may be produced in a hot-water system that has not been used for 2 weeks or more. HYDROGEN GAS IS EXPLOSIVE. If the hot-water system has not been used for such a period, before using a washing machine, turn on all hot-water faucets and let water flow from each for several minutes. This will release any accumulated hydrogen gas. As the gas is flammable, do not smoke or use an open flame during this time. DANGER or WARNING: Risk of child entrapment. Child entrapment and suffocation are not problems of the past. Junked or abandoned appliances are still dangerous . . . even if they will “just sit in the garage a few days.” Before you throw away your old portable washer: Take off the lid. Never allow children to operate, play with, or crawl inside the portable washer. Close supervision of children is necessary when the washer is used near children. Do not reach into the washer if the agitator or inner tub is moving. Do not tamper with controls. Do not repair or replace any part of the washer or attempt any servicing unless specifically recommended in the user-maintenance instructions or in published user-repair instructions. Never clean portable washer parts with flammable fluids. The fumes can create a fire hazard or explosion. Do not place the washer in steamy rooms or where the washer is directly exposed to rain. Moisture may destroy the electrical insulation causing an electrical shock hazard. Do not store, use gasoline, or any other flammable vapors and liquids in the vicinity of this or any other portable washer. The fumes can create a fire hazard or explosion. If the power cord is damaged, it must be replaced by the manufacturer or its service agent or a similar qualified person in order to avoid a hazard. -Save these instructions- This appliance is not intended for use by persons (including children) with reduced physical, sensory, or mental capabilities. This appliance should not be operated by those with a lack of experience or knowledge of its use or operation, unless they have been given instructions concerning and/or are supervised during the use of the appliance by a person responsible for their safety. This appliance is not intended for use by children. To avoid any possible type of injury or damage to the unit and or personal property all children should be supervised to ensure they do not play with the appliance. 6 INSTALLATION INSTRUCTIONS BEFORE USING YOUR PORTABLE WASHER SCREWDRIVER Remove the exterior and interior packing. You will need the following tools: Wrench Pliers Screwdriver Check to be sure you have all of the following parts: PLIERS WRENCH 1 Instruction Manual 1 Hot Water Connector Lid 1 Faucet Adapter 2 Rubber Washers 2 Water Inlet Hoses Remove shipping brace. Note - It should be saved and used (to prevent damage to washer components) whenever washer is moved or transported to a new location. Clean the interior surface with lukewarm water using a soft cloth. Allow 2 inches of space between the back and sides of the appliance. Put your laundry into the washer evenly. Uneven laundry may cause noise or vibration. DO NOT use excessively hot water (122ºF / 50°C or more). Plastic parts may be deformed or damaged. Also, clothing may be deformed or bleached. Before washing, check all pockets. If nails or pins remain in pockets, they may damage the washer or clothes. Never splash water on the control panel. Plug the washer into an exclusive properly installed-grounded wall outlet. Do not under any circumstances cut or remove the third (ground) prong from the power cord. Any questions concerning power and/or grounding should be directed toward a certified electrician or an Authorized Versonel Products service center. SELECTING A LOCATION Before you install the portable washer, select a location with the following characteristics: A hard level surface (if the surface is uneven, see Adjusting The Adjustable Foot section on the next page). Away from direct sunlight. Direct sunlight may affect the acrylic coating, plastic and electrical components. Adequate ventilation. Away from sources of heat such as coal or gas. Make sure that the washing machine does not stand on its power cord. Ventilation openings must not be obstructed by carpeting when the portable washer is installed on a carpeted floor. It is recommended that you place your portable washer on a hard material floor such as tile, concrete, linoleum and to avoid if at all possible placement on wooden floors or carpeted areas. 7 INSTALLING THE NOISE DAMPER PLATE 8 CONNECTING THE WATER SUPPLY HOSES The water supply hose must be connected to the washing machine at one end and to the water faucet at the other. Do not stretch the water supply hose. If the hose is too short and you do not wish to move the water faucet, replace the hose with a longer, high-pressure hose. Select appropriate faucet as shown in the figures below. If none of these faucets are available, use the faucet adapter provided. The end of faucet spout should be longer than 10mm (0.4”), or the connector cannot be fixed properly. Water leakage could develop. Note: The Hot Water Connector Lid is inside the accessories bag; If only cold water is supplied, take the Hot Water Connector Lid from the accessories bag and screw it onto the “Hot Water Connector” If you have both cold and hot water supplied, connect the inlet hoses by matching cold to cold and hot to hot. 9 SINK FAUCET CONNECTION For normal kitchen-sink tap only use the inlet hose with cold water inlet. Connect the inlet hose to the male hose thread adapter by turning it clockwise to be fixed tightly. Make sure to insert the rubber ring enclosed. Then connect tightly to your sink. Note: Some faucets may require you to also use the female hose thread adapter between the male adapter and your sink faucet as shown below. Make sure the rubber ring is inserted and connect to your sink. If water leaks from faucet connection or washer connection, turn off water and tighten fully using a wrench. Be careful not to overtighten and damage water connection. Turn on water supply and make sure no leaks are present. DISCONNECTING THE WATER SUPPLY HOSES Dismantling the hose directly may cause water to splash due to the possible high water pressure in the hose, even after the faucet has been turned off. Please take off the hose as per following steps, even if the faucet is closed: Turn off the faucet. Turn on the power and let the machine run for about 5 seconds then turn it off. Remove the connecting nuts from the faucet and washing machine. CONNECTING NUT Note: If the washing machine is frequently used, it is not necessary to dismantle the inlet hose to avoid possible damage to the screws. POSITIONING THE DRAIN HOSE Connect the drain hose to the water outlet of the washing machine then fasten it with a cable tie. Since only up drainage is available, drain hose can be hung in the basin or bathtub. NOTE: The highest point of the drain hose must be in the height of 2 ¼ – 4 feet above floor level, otherwise, the washer cannot work normally. 10 ELECTRICAL CONNECTION Warning Improper use of the grounded plug can result in the risk of electrical shock. If the power cord is damaged, have it replaced by an authorized Versonel Products service center. This appliance should be properly grounded for your safety. The power cord of this appliance is equipped with a threeprong plug which mates with standard three prong wall outlets to minimize the possibility of electrical shock. Do not under any circumstances cut or remove the third ground prong from the power cord supplied. For personal safety, this appliance must be properly grounded. This appliance requires a standard 110~127 Volt AC ~/60Hz electrical ground outlet with three-prong. Have the wall outlet and circuit checked by a qualified electrician to make sure the outlet is properly grounded. When a standard 2-prong wall outlet is encountered, it is your responsibility and obligation to have it replaced with a properly grounded 3prong wall outlet. The cord should be secured behind the appliance and not left exposed or dangling to prevent accidental injury. The appliance should always be plugged into its own individual electrical outlet which has a voltage rating that matches the rating label on the appliance. This provides the best performance and also prevent overloading house wiring circuits that could cause a fire hazard from overheated. Never unplug the appliance by pulling the power cord. Always grip the plug firmly and pull straight out from the receptacle. Repair or replace immediately all power cords that have become frayed or otherwise damaged. Do not use a cord that shows cracks or abrasion damage along its length or at either end. When moving the appliance, be careful not to damage the power cord. EXTENSION CORD Because of potential safety hazards under certain conditions, it is strongly recommended that you do not use an extension cord with this appliance. However, if you must use an extension cord it is absolutely necessary that it be a UL/CUL-Listed, 3-wire grounding type appliance extension cord having a grounding type plug and outlet and that the electrical rating of the cord be 115 volts and at least 10 amperes. SURGE PROTECTOR Most electrical appliances use a series of electric control boards to operate. These boards are very susceptible to power surges and could be damaged or destroyed. If the appliance is going to be used in an area or if your city / country is prone to power surges / outages; it is suggested that you use a power surge protector for all electrical devices / appliances you use. The surge protector that you select must have a surge block high enough to protect the appliance it is connected to. If you have any questions regarding the type and size of surge protector needed contact a licensed electrician in your area. Damages due to power surges are not considered a manufacturer covered defect and will void your product warranty. 11 CONTROL PANEL 1. 2. 3. 4. 5. 6. 7. 8. 9. 10. 11. 12. 13. 14. 15. Water Temperature Indicator Water Level Indicator Delay Time Indicator Wash Time Indicator LED Display Hour Indicator Minute Indicator Function Indicator Water Temperature Selection Button Water Level Selection Button Delay Selection Button Function Selection Button Program (Automatic) Selection Button Start / Pause Button Power ON / OFF Button 12 FUNCTION DESCRIPTIONS 9 10 12 13 13 OPERATING YOUR PORTABLE WASHER PREPARATION 1. Connect the water inlet hose 3. Insert the plug into the to the water faucet. Don’t socket. For safety the plug switch on the power if the should have ground water pressure is lower than connection. 0.05MPa and higher than 0.5MPa. sh load into ose the ction with lid as to be spin 4) Insert the end of the drain hose into the hook shelf, and hang the drain hose over a drain outlet. 0.7m~1.2m inlet hose and Please set the plug into the 2. 3)Open the water faucet. ucet, Don t switch socket. For safety the plug if water pressure should have ground connection. .05 Mpa and 5 Mpa. cet. 4. Insert the end of drain hose into the hook shelf, and hang the drain hose over a drain outlet. OPERATION INSTRUCTIONS 5. Put the wash load into the tub evenly. 6. Add the suitable quantity 7. Close the lid. Otherwise the detergent into the detergent washer will not wash or spin, 7.Close wash lidalarm completely. 6.Add case. suitable detergent and will sound. 5.Put suitable wash load according to the wash into the inner tub. load volume into the box 6) Add the suitable of powder laundry quantity detergent detergent . into the detergent dispenser. (or else, it will not to spin and give alarm.) Operation BEFORE WASHING Prepare the wash load. Mix large and small articles in a load to get the best washing results. Step one:loosely Switchinto on the supply. Drop articles thepower inner tub. Do not pack articles in or wrap them. Articles should move the power button indicatorresults. will light Articles as shownshould below. rollover, sink and then freely throughPress the wash water for and bestthe cleaning reappear. When washing very large articles, do not fill inner tub as full as with other loads. The water level in your washer should fit the size of your wash load. Small load will use lower water levels. There must be enough water in the inner tub to allow articles to move and turn over freely. Overloading the inner tub can result in poor washing and rinsing. Overloading may also cause wrinkling and tearing of articles. LEV 1 LEV 2 Step two: Choose wash temperature control panel WATER LEVEL WATER LEVEL Right you can choose to inlet cold Wrong Press the water supply button, water and/or hot water. When the cold-water indicator and the hot-water indicator turn on simultaneously, which means you chose the warm water. Note: Hot water only: Hot water can result in better cleaning effects. But it is not suitable for all articles. It is best for washing whites and colorfast articles, heavily soiled articles and diapers. Warm water only: Warm water can reduce the chance of fading. It suits for washing light and moderate soils clothes, dark color clothes, silks, woolens, nylon, and acrylic. Cold water only: Cold water is less effective in cleaning compared with hot or warm water, but it does minimize wrinkling and fading. Use it for washing extra sensitive clothes and for the rinse. NOTE: The washing machine will provide a cold rinse14 in all TEMPERATURE setting. IMPORTANT: There is not heating element in the washing machine. A single hose system does not allow the washing machine to automatically (choose)regulate incoming water BEFORE WASHING Make sure that you follow all manufacturer instructions for washing: 15 OPERATING INSTRUCTIONS PRESS THE POWER BUTTON. PRESS THE WATER LEVEL BUTTON. Choose appropriate water level according to wash load quantity. WATER TEMPERATURE CHOICE. Press the water temperature selection button, you can choose to from cold, warm, and/or hot water. NOTE: The washer will provide a cold rinse in all TEMPERATURE settings. Indicator Light Shown COOL HOT WARM Description This means that you have selected to use COOL or cold water. The washing machine will only use water supplied by the cold water inlet. This means that you have selected to use HOT water. The washing machine will only use water supplied by the HOT water inlet. This means that you have selected to use WARM water. The washing machine will use water supplied by both the COLD and HOT water inlets simultaneously. IMPORTANT: A single cold hose system does not allow the washing machine to automatically (select) regulate incoming water temperatures to match those listed on the control panel such as WARM or HOT. PRESS THE FUNCTIONS SELECTION BUTTON. Choose the desired function and then the corresponding indicator blink. PRESS DOWN START/PAUSE BUTTON ONCE AND THE MACHINE WILL BEGIN OPERATION. Please press this button to stop the normal operation, if it continues to work, press it again. Water level can be reset during the normal operation. If the higher water level is selected, the machine will operate after refilling the water level selected. MANUAL FUNCTIONS SELECTION (CUSTOM WASHING CYCLE) SOAK – For dirty laundry Press down the power button. Press the function button until the SOAK indicator is ON. Press the water temp button to select the water temperature. Press the water level button to select the appropriate water level setting. Press the START/PAUSE to start the course. And the LED display will show the remaining time of the entire course. WASH ONLY Press down the power button. Press the function button to until only the WASH indicator is ON. Press the water temp button to select the water temperature. Press the water level button to select the appropriate water level setting. Press the START/PAUSE to start the course. And the LED display will show the remaining time of the entire course. WASH AND RINSE Press down the power button. Press the function button until the WASH & RINSE indicators are ON. Press the water temp button to select the water temperature. Press the water level button to select the appropriate water level setting. Press the START/PAUSE to start the course. And the LED display will show the remaining time of the entire course. 16 RINSE AND SPIN Press down the POWER button. Press the function button until the RINSE & SPIN indicators are ON. Press the water level button to select the appropriate water level setting. Press the START/PAUSE to start the course. And the LED display will show the remaining time of the entire course. Note: At this function, the water temp can’t be chosen, the default water temp is COOL. SPIN ONLY Press down the power button. Press the function button to select the SPIN function until only SPIN indicator is ON. Press the START/PAUSE to start the course. And the LED display will show the remaining time of the entire course. AUTOMATIC WASH PROGRAMS HEAVY – For extremely dirty laundry Press down the power button. Press the program button to select the HEAVY program until the HEAVY indicator is ON. (HEAVY is the default program) Press the water temp button to select the water temperature. Press the water level button to select the appropriate water level setting. (The default water level is 10 water level) Press the START/PAUSE to start the course. And the LED display will show the remaining time of the entire course. JEANS – For JEANS laundry Press the power button. Press the program button to select the JEANS program until the JEANS indicator is ON. Press the water temp button to select the water temperature. Press the water level button to select the appropriate water level setting. Press the START/PAUSE to start the course. And the LED display will show the remaining time of the entire course. NORMAL – For normal laundry Press down the power button. Press the program button to select the NORMAL program until the NORMAL indicator is ON. Press the water temp button to select the water temperature. Press the water level button to select the appropriate water level setting. Press the START/PAUSE to start the course. And the LED display will show the remaining time of the entire course. (At the NORMAL program, SOAK function cannot be selected) GENTLE – For delicate laundry Press down the power button. Press the program button to select the GENTLE program until the GENTLE indicator is ON. Press the water temp button to select the water temperature. Press the water level button to select the appropriate water level setting. Press the START/PAUSE to start the course. And the LED display will show the remaining time of the entire course. WASH PROGRAM TIME CHART Each wash program is pre-programmed in the computer; see the details for each in the wash program chart below: SOAK WASH RINSE SPIN TOTAL TIME FUNCTION (Optional) (Approx.) HEAVY 5 Min 18 Min 2 Cycles 5 Min. 57 Min. JEANS 5 Min 12 Min 2 Cycles 5 Min. 44 Min. NORMAL 11 Min 1 Cycle 5.5 Min. 32Min. GENTLE 5 Min 12 Min. 2 Cycles 3.5 Min. 43 Min. 17 Note: The default function is WASH, RINSE and SPIN, if you need the SOAK function, please press the function button to choose the SOAK function. Close the lid, or the washing machine will buzz during wash and spin cycle. In the event the clothing loaded becomes unbalanced, the safety switch will be triggered causing the washing machine to automatically refill with water to adjust the imbalance. Note: Clothes easily discolored should be washed separately so as to prevent inter-dyeing. If you want to change a selected program, please press the START/PAUSE button first, then press the Program button before pushing START/PAUSE button. When the Rinse and Spin functions are ON, do not use detergent. If you want to drain water during washing, press the START/PAUSE button, then select the Rinse program. Press START/PAUSE button again to restart. DELAY START (PRESET) SETTING Select this option when you would like to load the washer but not run the wash cycle until a later time. Note: As washing machines and other appliances are considered to present a potential child entrapment danger; you should never run a wash cycle when you are not present for either the entire or major portion of the cycle. Press down the power button. Load the washing machine and select the appropriate wash program. Press PRESET button continuously to select the delay start time. (From 1 hour to 24 hours) Close the lid completely. Press START/PAUSE button to start the course. CHILD-PROOF SETTING Your washing machine is equipped with a child safety setting that will once activated sound an alarm and drain the wash water in the event the lid is opened during operation. If after the child safety setting is activated, the lid is opened during operation a loud alarm will sound. If the lid is not closed within 10 seconds, the wash water will be drained automatically. If you have small children, it is recommended that you activate this setting every time you use the washing machine as children can be attracted to and enticed to play with the washing machine. Select the desired washing program as described previously in this manual Select the appropriate program and press START/PAUSE button to start the washing machine. Press and hold both the PRESET and PROGRAM buttons together to activate the Child-Proof Lock. The digital indicator will show and the remaining wash time. Note: When set up Child-Proof Lock, if the lid is opened while the machine is running, all operations will be stopped immediately and an alarm will sound, and will automatically drain all water if the lid is not closed in 10 seconds. To resume operation, close the lid. As a default when Child-Proof Lock is not activated, if you open the lid while the machine is running, all operations will be stopped within 10 seconds and will automatically drain water in 30 seconds and sound an alarm. To resume operation, close the lid. Note: As washing machines and other appliances are considered to present a potential child entrapment danger; you should never run a wash cycle when you are not present for either the entire or major portion of the cycle. 18 CARE AND MAINTENANCE CLEANING YOUR PORTABLE WASHER Clean the surface of your portable washer regularly with soft fabric. Clean the inner tub regularly, especially immediately after starch or bleach operation. Clean the filter in the inlet valve or inlet hose regularly in order to prevent it from clogging. Unplug the power cord. Remove the inlet hose and clean the filter with a brush. Clean the surface of the washing machine with a soft cloth regularly. Clean the inner tub regularly, especially after washing starched or bleached laundry. Clean the lint filter. Pull upward to remove the lint filter. Clean and rinse it thoroughly. Vacation time 19 PROBLEMS WITH YOUR PORTABLE WASHER? You can solve many common portable washer problems easily, saving you the cost of a possible service call. Try the suggestions below to see if you can solve the problem before calling the servicer. TROUBLESHOOTING GUIDE PROBLEM Washer does not operate. No water or insufficient water supply. The washing machine does not drain. Washing machine vibrates or is too noisy. Washing machine does not spin. Display shows Error Code “E 1” Description: Malfunction in the Water Supply Valve Display shows Error Code “E 2” Description: Malfunction in the Water Level Display shows Error Code “E 3” Description: Top Cover is Open Display shows Error Code “E 4” Description: Unit is unbalanced Display shows Error Code “E 5” Description: Malfunction in the Drain Valve Display shows Error Code “E 6” Description: Water Level Sensor POSSIBLE CAUSE Not plugged in. The circuit breaker tripped or a blown fuse. The lid is not closed. Make sure the water source is turned on. The water source faucet is not turned on. The water source hose is frozen. The water intake hose is bent. The filter on the water intake hose is clogged. The drain hose is squashed or bent. Check to assure that the washer is level. The washing machine is touching another object. The laundry load is not balanced. The lid is not closed. The washer is not on a level surface. No water, Water supply valve time-out, Water valve is clogged. Water level exceeds limit of high or low water level. During operation the top is open. Close the top. Unit becomes unbalanced during operation. Stop the unit, shift the load evenly, restart Drain valve is clogged, Drain motor is not operating normally Drain time-out occurs. During the self – check procedure, the zero point error of the water level is too high. SERVICE FOR YOUR PORTABLE WASHER We are proud of our customer service organization and the network of professional service technicians that provide service on your Versonel portable washers. With the purchase of your Versonel portable washer, you can be confident that if you ever need additional information or assistance, the Versonel Customer Service Team will be here for you. Just visit www.versonel.com for more details and contact information. MADE IN CHINA 20