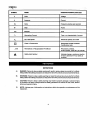
1
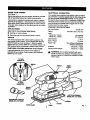
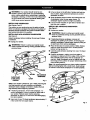
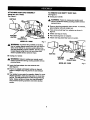
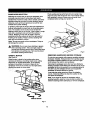
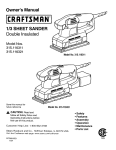
Owner's Manual
II::RRFTSMRN'I
1/3 SHEET SANDER
Double Insulated
Model Nos.
315.116310
315.116320
ModelNo.315.116310
Save this manual for
future reference
Model No. 315.116320
CAUTION:
Read and
follow all Safety Rules and
Operating Instructions before
first use of this product.
• Safety
• Features
• Assembly
• Operation
• Maintenance
Customer Help Line: 1-800-932-3188
Sears Roebuck and Co., Hoffman Estates,
IL 60179 USA
Visit the Craftsman web page: www.sears.com/craftsman
972000-506
12-98
• Parts List
(_o
NRTL
TABLE O_ CONTENTS
Is' General Safety Rules .................................................................................................................................................
2-3
•
SpecificSafety Rules/Symbols ...............................................................................................................................
•
Features ......................................................................................................................................................................
5-6
•
Assembly....................................................................................................................................................................
7-9
• "Operation....................................................................................................................................................
..3-4
;............. 9:;10
•
Maintenance................................................................................................................................................................
11
•
Accessories .................................................................................................................................................................
11
•
ExplodedView And Repair Parts List ....................................................................................................................
•
Parts Ordering / Service ..............................................................................................................................................
A
WARNING: Read end understand all Instructions. Failure to follow all instructions listed
•
below, may result in electric shock, fire and/or
serious personal injury.
Don't expose power tools to rain or wet conditions. Water entedng a power tool will increase
the dsk of electdc shock.
carry the tools or pull the plug from an outlet.
Keep cord away from heat, o11,sharp edges or
moving parts. Replace damaged cords Immedlafely. Damaged cords increase the risk of
electdc shock.
Work Area
•
Keep your work area clean and well lit. Gluttered benches and dark areas invite accidents.
•
Do not operate power tools I_n explosive
atmospheres, such as in the presence of
flammable liquids, gases, or dust. Power tools
create sparks which may ignite the dust or fumes.
•
•
Keep bystanders, children, and vleltore away
while operating • power tool. Distractions can
cause you to lose control.
Personal Safety
Double Insulated tools are equipped with a
poladsed plug (one blade is wider than the
other.) This plug will fit In a polarized outlet
only one way. If the plug does not fit fully in
the outlet, reverse the plug. If It atlll does not
fit, contact a qualified electrician to Install a
polarized outlet. Do not change the plug In
any way. Double insulation [] eliminates the
need for the three wire grounded power cord and
grounded power supply system.
Avoid body contact with grounded surfaces
such as pipes, radiators, ranges and refdgeratore. There is an increased risk of electric shock
if your body is grounded.
2
When operating a power tool outside, use an
outdoor extension cord marked "W-A" or "W".
These cords are rated for outdoor use and reduce
the risk of electdc shock.
•
Stay alert, watch what you are doing and use
common sense when operating a power tool
DO not use tool while tired or under the Influonce of drugs, alcohol, or medication. A
moment of inattention while operating power tools
may result in serious personal injury.
•
Dress properly. Do not wear loose clothing or
jewelry. Contain long hair. Keep your hair,
clothing, and gloves away from moving parts,
Loose clothes, jewelry, or long hair can be caught
in moving parts.
•
Avoid accidental starting. Be sure switch Is
off before plugging In. Carrying tools with your
finger on the switch or plugging in tools that have
the switch on invites accidents.
Electrical Safety
•
16
Do not abuse the cord. Never use the cord to
SAVE THESE INSTRUCTIONS
i
14-15
•
Remove adjusting keys or wrenches before
turning the tool on. A wrench or a key that is left
attached to a rotating part of the tool may result
in personal injury.
•
Store Idle tools out of reach of children end
other untrained persons. Tools are dangerous
in the hands of untrained users.
•
Do not overreach. Keep proper footing end
balance at ell tlmee. Proper footing and balance
enables better control of the tool in unexpected
situations.
•
Maintain tools with care. Keep cuffing tools
sharp and clean. Pmpedy maintained tools, with :
sharp cutting edges are less likely to bind and are
easier to control.
•
Use safety equipment. Always wear eye
protection. Dust mask, nonskid safety shoes,
hard hat, or hearing protection must be used for
appropriate conditions.
•
Check for mlsallgnment or binding of moving
parts, breakage of parts, and any other oondition that may affect the tools operstlon. If
damaged, have the tool serviced before using.
Many accidents are caused by poorly maintained
tools.
•
Use only accessodes that are recommended
by the manufacturer for your model. Accessodes that may be suitable for one tool, may become hazardous when used on another tool.
•
Use clamps or other practlcel way to secure
end support the workplece to a stable platform. Holding the work by hand or against your
body is unstable and may lead to loss of control.
Do not force tool. Use the correct tool for
•
•
your application. The correct tool will do the job
better and safer at the rate for which it is designed.
Do not usa tool if switch does not turn It on or
Tool service must be performed only by
qualified repair personnel. Service or maintenance performed by unqualified personnel could
result in a risk of injury.
(_)ff.Any tool that cannot be Controlled with the
S_'itch is dangerous and must be repaired.
•
When servicing • tool, usa only Identical
replacement parts. Follow Inatructlons In
Maintenance section of this manual. Use of
Tool Use and Care
•
•
SERVICE
Disconnect the plug from the power source
before meldng any edJuatments, changing
accessories, or atorlng the tool. Such preventive safety measures redUce risk of starting the
tool accidentally.
unauthodzed parts or failure to follow Maintenance Instructions may create a risk of electric
shock or injury.
3
SpecificSafetyRulesfor Sanders
•
parts, mounting, and any other conditions that
may affect Its operation. A guard or other part _
that Is damaged should be progerly repaired or
replaced by an authorized service center.
Following this rule will reduce the risk of electric
shock, fire, or serious injury.
Never use this or any power sander for wet
sanding or liquid polishing. Failure to comply
will increase the risk of electrical shock.
Additional Rules for Safe Operstlon
•
Know your power tool. Read operator's
manual carefully. Learn Its applications and
limitations, as well as the specific potential
hazards related to this tool. Following this rule
will reduce the risk of electric shock, fire, or
serious injury.
•
Always wear safety glasses. Everyday eyeglasses have only Impact-resiatant lenses;
they are NOT safety glasses. Following this rule
will reduce the risk of personal injury.
•
Protect your lungs. Wear a face or dust mask
if the operation Is dusty. Following this role will
reduce the risk of personal injury.
•
Don't abuse cord. Never carry the tool by the
cord or yank It to disconnect It from the
receptacle. Keep cord away from heat, oil,
and sharp edges. Following this rule will reduce
the risk of electric shock or fire.
•
Make sure your extension cord Is In good
condition. When using an extension cord, be
sure to use one heavy enough to carry the
current your product will draw. A wire gage
size (A.W.G.) of at least 16 Is recommended
for an extension cord 100 feet or less In
length. A cord exceeding 100 feet is not
recommended. If in doubt, use the next
heavier gage. The smaller the gage number,
the heavier the cord. An undersized cord will
•
Protect your hearing. Wear hearing protection
during extended periods of operation. Fo$$owing this rule will reduce the risk of personal injury.
•
Inspect tool cords periodicelly and, If damaged, have rspelrsd at your nearest Factory
Service Center or other Authorized Service
•
Organization.
Constantly stay aware of cord
location. Following this rule will reduce the risk
of electric shock or fire.
Inspect for and remove all nails from lumber
before sanding. Following this rule will reduce the
risk of personal injury.
•
Check damaged parts. Before further use of
the tool, a guard or other part that Is damaged
should be carefully checked to determine that
It will operate properly and perform Its Intended function. Check for alignment of movIng parts, binding of moving parts, breakage of
Drugs, alcohol, medication. Do not operate tool
while under the Influence of drugs, alcohol, or
any medlcetlon.
Following this rule wI!l reduce the
risk of electnc shock, fire, or personal injury.
•
Savethese Inatructions. Refer tothem frequently
and use them to Instruct others who may use
this tool. If you loan someone this tool, loan
them these Inatructlons also. This will reduce the
•
cause a drop in line voltage resulting in loss of
power and overheating.
risk of fire, shock, and injury.
SYMBOLS
•.
SYMBOL
NAME
DESIGNATION/EXPLANATION
V
Volts
Voltage
A
Amperes
Current
Hz
Hertz
Frequency(cycles per second)
W
Watt
Power
min
Minutes
Time
AlternatingCurrent
Type or a characteristicof current
no
No Load Speed
Rotational speed, at no load
[]
Class II Construction
Designates Double Insulated
Constructiontools
.../min
Revolutionsor ReciprocationPer Minute
Revolutions,strokes,
surface speed, orbits etc. per minute
_k
Safety Alert Symbol
Indicatesdanger, warning or caution.
It means attentionU!Your safety is
involved.
DEFINITIONS
A)
DANGER: Failure to obey a safety waming will result in seriousinjuryto yourselfor to others.
Always followthe safety precautionsto reducethe riskoffire, electricshockand personalinjury.
B)
WARNING: Failureto obey a safety warning can result in serious injuryto yourselfor to others.
Always followthe safetyprecautionsto reducethe riskoffire, electricshockand personalinjury.
C)
CAUTION: Failure to obey a safety waming may result in propertydamage or personal injury
to yourself or to others. Always follow the safety precautionsto reduce the risk of fire, electric
shock and personal injury.
D)
NOTE: Advisesyou of informationor instructionsvital to the operation or maintenance of the
equipment.
KNOWYOURSANDER
ELECTRICAL
See Figure 1.
Your sander has a precisionbuiltelectric motor.It should
be connected to a power supply that Is 120 volts, 80 Hz,
AC only (normal household current). Do not operate
this tool on directcurrent (DC). A substantialvoltage drop
will cause a foss of power and the motorwilt overheat, if
your tool does not operate when plugged intoan outlet,
double-checkthe power supply.
Before attempting to use your sender, familiarize yourself
with all operatingfeatures and safety requirements.
Your sender is suitable for sending with coarse, medium,
and fine gilt sandpaper. It will produce a fine scratchfree
finish when used to send with the grain on wood surfaces.
It has also been designedso that sanding flush to comers
is possible.
CONNECTION
PRODUCT SPECIFICATIONS
APPLICATIONS
No Load Speed
(Use only for the purposes listed below)
Rating
Input
Model No. 116310
Model No. 116320
•
Sanding on wood surfaces.
•
Removing rust from and sandingsteel surfaces.
SW_CH
This tool is equipped with a slide switch located on the
rear handle of your sander. To tum sander ON, slide the
switch forward as shown in Figure 1. Stide the sw_tch
back to turn your sander OFF. Be sure sander switch is in
OFF positionbefore connectingto power supplysource.
DUSTLESS
1/16 in.
Size of Paper
113sheet
Non-AdhasiveSandpaper
Adhesive Sandpaper
Model No. 116320
Dustless
Vacuum Hose Adaptor
A dust bag assemblyand a vacuumhose adapteris
Includedwith yoursender. Each providea dust collection
systemfor yoursander.
1.8 Amperes
2.0 Amperes
Orbit Diamter
Paper Type
FEATURE (Model No. 315.116320)
12,000 opm
120 Volts,60 Hz, AC only
Model No. 116320
_IL WARNING: Do not allow familiaritywith your
sender to make you careless. Remember that a
careless fraction of a second is sufficientto inflict
severe injury.
TOTURN
SANDERON
SWITCH
SWITCH
REAR
HANDLE
TOTURN
SANDEROFF
DUSTBAGASSEMBLY
(MODELNO.315,116320)
HANDLE
VACUUMHOSEADAPTER
(MODELNO,315.116320)
CUSHION
PAPERCLAMP
LEVER
6
Fig. 1
_
WARNING: Your sander should never be connected to power supply when you are assembling
parts, making adjustments,assemblingor replacing
sandpaper, cleaning, or when not in use. Disconnecting your sander will prevent accidental starting that
could cause serious personal injury.
INSTALLING
SANDPAPER
See Figures 2 and 3.
The cushionon yoursandergivesyou the optionof using
eithernon-adhesivesandpaperthat damps to the platen;or
adhesivebacked sandpaper with pressuresensitiveadhesivebackingthat sticksto the cushion.
INSTALLING NON-ADHESIVE
See Figure 2.
•
Unplugyour sander.
_k
WARNING: Failure to unplugyour sander could
result in accidental starting causing possiblesadous
' personal injury.
SLOT
PosmoN
• Wrap sandpaper around cushionand insertloose end
of sandpaper under the rear paper clamp. Fit
sandpaperagainst cushion as tightas possible.
• Lift up on lever located on right side of sander and
lock into slot in platen.
INSTALLING ADHESIVE
See Figure 3.
SANDPAPER
• Unplug your sender.
WARNING: Failure to unplugyour sander could
result in accidental starting causing possiblesadous
personal injury.
SANDPAPER
Inspectsandpaper before installing.Do not usa if broken
or defective.
PAPERCLAMP
IN UNLOCKED
• Lift up on lever on the left side of sander and lock into.
slot on platen. Apply downwardpressureto conform
sandpaper to platen.
•
If replacing adhesive sandpaper, remove old
sandpaper by peeling it off cushion. If removingnonadhesive sandpaper, release paper clamp by liftingup
on each lever, then remove sandpaper.
•
Place levers back in locked position. Note: Always
check to make sure levers are in locked position
before turning sander on.
• Carefully peel adhesive backing from new 1/3 sheet
sandpaper.
• : Position sandpaper, making sure front edge of
sandpaper is aligned with front edge of the cushion,
then carefully press sticky side of sandpaper on
cushion. Note: Sandpaper must be aligned with the
front edge of the cushion for proper functioning of the
flush sanding feature.
Note: It is recommended that you clean cushionoccasionally by brushinglightlywith a small brush. Dust butid-uP
on cushioncould cause sandpaperto not stick propsdy:
NON-/_HE_VIE
SANDPAPER
LEVER
Fig.2
Note: If yoursander iSModel No. 315.116320, removingthe
dust bag assemblywillmake installingnon-adhesive
sandpaper easier. Always remember to replace the dust
bag assemblybeforebeginningoperation.
•
If replacingsandpaper,remove old sandpaper. To
remove sandpaper, a lever is located on each side of
your sender. Release paper clamps secudng
sandpaper by liftingup on each lever end disengaging
from slot in platen.
•
Insert end of new 1/3 sheet sandpaper approximately11
2 inch under the front paper clamp.
ADHESIVE
SANDPAPER
Fig. 3
ATTACHINGDUSTBAGASSEMBLY
(ModelNo.315.116320)
TO REMOVE AND EMPTY DUST BAG
See Figure 5.
See Figure 4.
•
DUSTSAG
Unplugyoursander.
WARNING: Failure to unplugyour sander could
resultin accidental starting causing possiblesedous
personalinjury.
•
Remove dust bag assembly from sander. To remove,
grasp adapter and pull straight out.
•
Then remove dust bag from adapter as shown in
figure 5.
• Shake dust bag to empty.
DUSTBAG
ADAPTER
•
• Attach dust bag assembly back on sander.
EXHAUSTHOLE
MODELNO, 116320
Fig. 4
_1= WARNING: To preventthe possibil_ of sanding
dust or foreignobjectsbeing thrown intoyour face or
,eyes,never attemptto use your sander without the
dust bag assembly properlyinstalled. Sanding dust or
foreignobjects being thrown into your face could
resultin possibleserious personal injury.
•
_lb
Place dust bag back on adapter,
Unplug your sender.
WARNING:
Failure to unplug your sender could
result in accidental starting causing possible serious
personal injury.
•
Insertdust bag adapter intodust exhaust hole.
See Figure 4.
•
Push in on adapter until raised notches on top and
bottomof adapter snap intogrooves in dust exhaust
bole.
•
Your sender is now ready for operation. Note: For more
efficientoperation,empty dust bag when no more than
half full. This will permitthe air to flow throughthe bag
better. Always empty and clean dust bag thoroughly
when finishedsandingoperation and before storing
sander.
DUSTBAG
/
DUSTBAG
ADAPTER
DUST
EXHAUSTHOLE
MODELNO. 116320
Fig. 5
ATTACHING
VACUUMHOSEADAPTER
(ModelNo,315.116320)
WARNING: Always wear safety gogglesor safety
glasses with side shields when operating your
sander. Failure to do so could result in foreign
objectsbeing thrown into youreyes, resultingin
possiblesedous injury. If the sanding operationis
dusty, also wear a face or dust mask.
See Figure6.
A vacuum hose adapter is packed with sander Model No.
315.116320. This adapter easily attachesto your sander if
you decide to connectyour sander to a vacuum.
•
Unplugyoursander,
PREPARING
FOR OPERATION
_1= WARNING: Failure to unplug your sander could
resultin accidental starting causing possiblesedous
personal injury.
,_
TO ATTACH:
SANDING
•
Clamp or otherwise secure the work to prevent itfrom
moving under your sander.
Remove dust bag assembly from sander. To remove,
grasp adapter and pull straight out.
M insert vacuum hose adapter into dust exhaust hole.
•
Push in on adapter until raisednotch on top and bottom
of adapter snap into groove in dust exhaust hole.
M Snugly attach vacuum hose adapter to vacuum hose.
B Connect vacuum hose to cleaner.
VACUUMHOSE
ADAPTER
CAUTION:
air vents.
Be careful not to let your hand cover the
_1= WARNING: Unsecured work could be thrown
towards the operator causing injury.
Hold your sander in front and away from you, keeping it
clear of the workpiece. Start your sander by slidingthe
switchbutton to the on position and lettingthe motorbuild
to its maximum speed. Gradually loweryour sander on
the work with a slight forward movement.See Figure 7.
Move it slowly usingforward and backwardstrokes.
RAISED
NOTCH
EXHAUSTHOLE
MODEL NO. 116320
--'
Fig. 6
Fig. 7
Do not force. The weight of the unitsupplies adequate
pressure, so let the sandpaper and sander do the work.
Applyingadditional pressure only slows the motor, rapidly
wears sandpaper and greatly reduces sander speed.
Excessive pressure will overloadthe motorcausing
possibledamage from motor overheatingand can resultin
infedor work.Any finish or resin on wood may soften from
the frictional heat. Do not allow sanding on one spot too
long as the sander's rapid action may remove too much
material, making the surface uneven.
SANDPAPER
SELECTION
selecting
thecorrectsizegdtandtypesandpaper
isan
extremely importantstep in achievinga high quality
sanded finish.Aluminumoxide, siliconcarbide, and other
syntheticabrasivesare best for power sanding. Natural
abrasives, such as flint and garnet are too soft for economical use in power sanding.
Flush sanding can be performedwith your sander. See
Figure 9. Every side except the rear of your sander allows
flush sanding in comers. Always remove sander from
workplece before turning your sander off.
.ha
In general, coarse gdt will remove the most material and .
finer grit will producethe best finish in all sanding operafions. The condition of the surface to be sanded will
determine which gdt will do the job. If the surface is rough,
start with a coarse grit and sand until the surface is
uniform.Medium grit may then be used to remove
scratches left by the coarser grit and finer gdt used for
finishingof the surface.Always continue sandingwith
each grit untilsurface is uniform.
Note: Do not use sander without sandpaper. Doing so
will damage the cushion.
,_
WARNING: Do not wear loose clothingor jewelry
,whenoperatingsander. They could get caught in
moving parts causing sedous injury. Keep head away
from sander and sanding area. Hair could be drawn
intosander causing serious injury.
Fig. 9
REMOVING SANDPAPER
ORBITAL MOTION
See Figure 8.
BEFORE STORAGE
Do not store your sander with pressure sensitiveadhesive
sandpaper installed. Heat generated from sanding causes
the pressuresensitive adhesive to flow and form a tight
bend between the cushionand sandpaper.
Orbital motion is ideal for fast cutting actionwhen
removingold finishes,smoothingroughwood, cutting
stock downto required dimensions,or for finishing
surfaces to be painted. As shown in figure B. the
sandpaper moves in tiny circlesat a very high speed,
allowingthe sander to move easily.
_::_" _Jr
Removingthe sandpaper soon after you have finisheda
sanding operation avoids letting the adhesive set up. If the
sandpaper Is left on the cushionfor an extended pedod of
time after use, the adhesive will set up and cause the
sandpaper to become difficultto remove.
It may also tear when removing.When this situation
occurs, It becomes difficultto clean the cushionfor the
next piece of sandpaper.
Note: If you forget to remove the sandpaper after a
sanding operation, sand for a few minutesto soften the
adhesive backing before attempting to remove sandpaper.
ORBITALMOTION
Fig. 8
10
_IL WARNING: When servicing use only Identical
Craftsmen replacement parts, Use of any other
parts may create a hazard or cause productdamage.
GENERAL
All parts represent an importantpart of the double
insulationsystem and shouldbe servicedonly by a
qualified Sears service technician.
Avoid using solventswhen cleaning plasticpads. Most
plastics are susceptibleto damage from various types of
commercial solventsand may be damaged by their use.
Use clean clothsto remove dirt, carbon dust, etc.
A
WARNING: Do not at any time let brake fluids,
gasoline, patroleum-besed products,penetrating oils,
etc. come in contactwith plasticpads. They contain
chemicals that can damage, weaken, or destroy
plastic.
it has been found that electrictoolsare subjectto
accelerated wear and possiblepremature failure when
they are used on fiberglassboats, sportscars, wallboard,
spacklingcompounds, or piaster. The chips and gdndings
from these matedais are highlyabrasive to electrictool
pads such as beadngs, brushes, commutators,etc.
Consequently, it is not recommendedthat this tool be
used for extended work on any fiberglassmaterial,
wallboard, spacklingcompounds, or plaster. Dudng any
use on these materials it is extremely importantthat the
tool is cleaned frequentlyby blowingwith an air jet.
EXTENSION
CORDS
The use of any extension cord willcause some loss of
power. To keep the loss to a minimum and to preventtool
from overheating,use an extension cord that is heavy
enough to carry the current the tool will draw.
A wire gage size (A.W.G,) of at least 16 is recommended
for an extension cord 100 feet or less in length.When
workingoutdoors,use an extension cord that is suitable
for outdoor use. The cord'sjacket willbe marked WA.
_l
CAUTION: Keep extension cords away from the
sanding area and positionthe cord so that it will not
get caught on lumber, tools, etc., during sanding.
_1= WARNING: Check extension cords before each
use. If damaged replace immediately.Never use tool
with a damaged cord since touchingthe damaged
area could cause electdcal shock resultingin serious
injury.
Extensioncords suitable for use with your sander are
available at your nearest Sears Retail Store.
WARNING: Always wear safety goggles or safety
glasses with side shields dudng power tool operation
or when blowingdust. If operation is dusty, also wear
a dust mask.
LUBRICATION
All of the beadngs in this tool are lubricatedwith a
sufficientamount of high grade lubricantfor the life of the
unit under normal operating conditions.Therefore, no
further lubdcationis required,
The followingrecommendedacoessodesare currentlyavailable at Sears Retail Stores.
ALUMINUM OXIDE SHEETS
NON LOADING ALUMINUM OXIDE
(3-2/3 In. x 9 In.)
ADHESIVE BACKED (3-2/3 In. x 7-1/8 In.)
Extra Fine
Fine
Fine
Medium
Medium
Coarse
Coarse
_1= WARNING:
_t
The use of attachments or accessories not listedmight be hazardous.
WARNING:
The operation of any sander can result in foreign objectsbeing thrown into your eyes, which can
resultin severe eye damage. Before beginning power tool operation,always wear safety goggles or
safety glasses with side shields and a full face shield when needed. We recommend Wide Vision
Safety Mask for use over eyeglasses or standard safety glasses with side shields, available at Sears
Retail Stores.
11
WARRANTY
FULLONEYEARWARRANTY
ONCRAFTSMAN
SANDER
MODEL
NO.316.116310
IfthisCRRFTSNAN
Sanderfailstogivecomplete satisfactionwithin one year from the date of purchase, RETURN IT TO
THE NEAREST SEARS STORE IN THE UNITED STATES, and Seam will replace it, free of charge.
If this CRAFT$MRH Sander is used for commercialor rental purposes, this warrantyapplies for only 90 days from the
date of purchase.
This warranty gives you specific legal rights,and you may also have other dghtswhich vary from state to state.
Sears, Roebuck end Co., Dept. 817WA, Hoffmen Estates, IL 60179
WARRANTY
FULL ONE YEAR WARRANTY ON CRAFTSMAN SANDER MODEL NO, 315.116320
If this rRRFrSNRN Sander fails to give completesatisfactionwithin one year from the date of purchase, RETURN IT TO
THE NEAREST SEARS STORE IN THE UNITED STATES, and Sears will repair it, free of charge.
If this CRAFTSMAN Sander is used for commercial or rental purposes,this warrantyapplies for only 90 days from the
date of purchase.
This warranty gives you specificlegal dghts, and you may also have other rightswhich vary from state to state.
Sears, Roebuck and Co., Dept. 817WA, Hoffman Estates, IL 60179
12
NOTES:
13
CRAFTSMAN SANDER - MODEL NOS. 315.116310 AND 315.116320
SEE NOTE "A" PAGE 15
1
I
!
I
,
L--_7
4
14
CRAFTSMAN
[
SANDER - MODEL NOS. 315.116310 AND 315.116320
The
in allmodelnumberwillbe
correspondence regardingyour
found on a plate
SANDER
attaohodtothe
or when orderingrepair
motor housing,Alwaysmention
parts.
the model number
I
SEE BACK PAGE FOR PARTS ORDERING INSTRUCTIONS
PARTS LIST
Key
No.
Part
Number
Description
1
977307-001
977271-001
Data Plate (Model No, 315.116310) ........................ 1
Date, Plate (Model No. 315,116320) ........................ 1
2
977308-001
977272-001
Logo Plats (Model No. 315.116310) ....................... 1
Logo Plate (Model No, 315.116320) ....................... 1
3
977265-001
Dust Shield (Model No. 315.116320) ...................... 1
4
977266-001
Paper Clamp............................................................ 2
5
623019-004
Rubber Plug............................................................. 1
6
977267-001
Platen ....................................................................... 1
7
617966-028
Screw (#8-10 x 1/2 in. Pan Hd.) .............................. 4
8
977268-001
977268-002
Cushion (Model No. 315.116320) ........................... 1
Cushion (Model No. 315.116310) ........................... 1
9
"**
10
976967-002
Vacuum Hose Adapter (Model No. 315.116320) .... 1
11
989919-005
Ball Beadng .............................................................
12
977270-001
Dust Bag Assembly(Model No, 315.116320) ......... 1
972000-506
Owner's Manual
Quan.
Sandpaper
1
NOTE: "A"- The assembly shown represents an Important part of the Double Insulated System. To avoid
the posslblllty of alteration or damage to the system, servlce should be performed by your
nearest Sears Repalr Center. Contact your nearest Sears Retell Store for Barvlce Center
Information.
* Standard Hardware Item - May Be Purchased Locally
*** Complete Assortment Available At Your Nearest Sears Retail Store
i
i
15
For in-home
major brand repair service:
Call 24 hours a day, 7 days a week
1-800-4-MY-HOME
Para pedir servicio
de reparacibn
s" (1-800-469-4663)
a domicilio - 1-800-676-5811
In Canada for all your service and parts needs call
- 1-800-665-4455
Au Canada pour tout le service ou les pi_ces
For the repair or replacement
parts you need:
Call 6 am - 11 pm CST, 7 days a week
PartsDirects.
1-800-366-PART
Para ordenar
piezas con entrega
(1-800-366-7278)
a domicilio
- 1-800-659-7084
For the location of a Sears Parts and Repair Center in your area:
Call 24 hours a day, 7 days a week
1-800-488-1222
For information on purchasing a Sears Maintenance Agreement
or to inquire about an existing Agreement:
Call 9 am - 5 pm, Monday - Saturday
1-800-827-6655
The Service Side of Sears