1
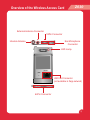
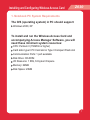
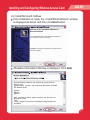
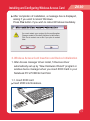
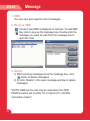
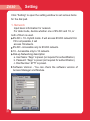
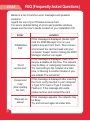
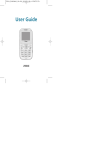
Z030 Z030 Contents Caution for Safety…………………………………………………………………… Package Includes… ………………………………………………………………… Overview of the Z030… …………………………………………………………… Introduction…………………………………………………………………………… Installing and Configuring the ZO30… ………………………………………… 1. Notebook PC System Requirements… ………………………………………… 2. Installing the Z030 Manager onto Notebook PCs (Windows 2000 and XP) 3. Z030 Card Insertion and Device Initialization… ……………………………… Using Z030 Manager………………………………………………………………… Message… …………………………………………………………………………… 1. SMS… ……………………………………………………………………………… 2. Receive SMS… …………………………………………………………………… 3. Delete … …………………………………………………………………………… Connecting to the internet… ……………………………………………………… 1. Connecting to the Internet………………………………………………………… Setting… ……………………………………………………………………………… FAQ (Frequently asked Questions)… …………………………………………… Technical Information… …………………………………………………………… 3 4 5 6 7 7 8 13 17 18 18 18 18 19 19 20 22 23 Caution for Safety Z030 Z030 DO NOT disassemble or modify the Card The risk of electric shock or fire may result. Do not use any detergent or chemicals such as alcohol, benzene or sniffer to clear your card. It may cause the failure or equipment or the risk of explosion. DO NOT use this equipment where the place prohibited using your card such as in hospital or in aircraft. RF energy may effect on the medical devices or aircraft. If you use any other personal medical device, maintain a proper distance between your card and the device. Your card may affect to the devices using all kinds of radio frequencies (RF) energies. DO NOT expose this equipment to rain or spilled beverages. Do not use this equipment in an extreme environment where high temperature or high humidity exists. Do not use hair dryer, heating, or microwave to dry the wetted PCMCIA Card. It may cause the malformation of the PCMCIA Card or explosion. Z030 Z030 Package Includes •W ireless Access Card (model No.Z030) •Installation CD (Including Access Manager software and complete User Guide as PDF document) Z030 Z030 Overview of the Wireless Access Card External Antenna Connector 18Pin Connector Internal Antenna Ear-Microphone Connector LED Lamp UIM Card Connector (not available in Zapp network) 64Pin Connector Z030 Z030 Introduction Install the Z030 Manager Software and Z030 drivers before using the PCMCIA card. Please do NOT insert the Z030 PCMCIA card into the laptop before following the installation steps provided below, in this user guide. Please check the contens of the purchased package. IMPORTANT ! 1.The Z030 Manager Software is available only in English language. 2.The options of the Z030 Manager Software which are not described in this user guide, are not available with the Z030 in the Zapp network. Installing and Configuring Wireless Access Card Z030 Z030 1. Notebook PC System Requirements The O/S (operating system) in PC should support Windows 2000, XP To install and run the Wireless Access Card and accompanying Access Manager Software, you will need these minimum system resources: CPU: Pentium II (150MHz or higher) Card slots: type II PC Card slot or Type II Compact Flash slot Communication Ports: 1 port available Disk Drive: CD-ROM I/O Resource: 1 IRQ, 32 bytes I/O space Memory: 64MB Disk Space: 23MB Z030 Z030 Installing and Configuring Wireless Access Card 2. Installing Z030 Manager onto Notebook PCs (Windows 2000 and XP) Insert the installation CD into your CD-ROM drive. The installation Wizard will launch and guide you through the installation process. Use the Next and Back buttons to navigate through the wizard, noting the following: In order to continue with the installation, you click Yes to accept the terms of the License Agreement Using the default setting for destination Folder and Program Folder is recommended. If you need to install the software to a different folder, click Browse, select the folder into which you would like to install the program, and then click next, to continue. 2-1. Install Access Manager Insert the installation CD into your CD-ROM drive. The Setup program should launch automatically. If the system is ready, the <Z030 Manager setup> window is displayed. Note : Don’t insert PCMCIA Card in your notebook Installing and Configuring Wireless Access Card Z030 Z030 Press Next Button Welcome to the Access Manager Setup program. This program will instal Access Manager on your computer. It strongly recommended that you exit all Windows programs before running this Setup program. Click Cancel to quit Setup and then close any programs you have running Click Next to continue with the Setup program. WARNING: This program is protected by copyright law and international treaties. Unauthorized reproduction or distribution of this program, or any portion of it, May result in severe civil and criminal penalties, and will be prosecuted to The maximum extent possible under law. Press Next Button Setup now has enough infomaion to start installing Access Manager. Click Back to make any changes before contiuing. Click Cancel to exit Setop. Z030 Z030 Installing and Configuring Wireless Access Card If Z030 Manager is completely installed, click Close. (in case the specific window is displayed) Setup is complete and Access Manager is now installed! Click Close to end the Setup D uring the installation process, the following screen will appear stating the Z030 driver is not Windows XP certified. Click on Continue Anyway to continue with installation. The software you are installing has not passed Windows Logo Testing to verify it’s compatibility with WindowsXP. 〔Tell me why This testing is important〕 Continuing your installation of this software may impair Or destabilize the correct operation of your system either immediately or in the future. Microsoft strongly Recommends that you stop this installation now and Contact the software vendor for software that has Passed Windows Logo testing 10 10 Installing and Configuring Wireless Access Card Z030 Z030 2-2 Install Microsoft Hotfixes If the installation is ready, the <InstallShield Wizard> window is displayed As below. and then click Next button Welcome to the Installshield Wizard for Microsoft Hotfixes The InstallShled(R) Wizard will install Microsoft Hotfixes on your computer. To continue, click Next. WARNING: This program is protected by copyright law and international treaties. <Readme Information>Window is displayed, Click Next HotfixInstaller detects the operating syscem and SP Version and appropriately installs the following Microsoft hotfixes For PCMCIA cards: Q318213 Q813820 Q813707 More information about these hotfixes can be found on Microsoft’s web Site... http://support.microsoft.com/default.aspx?scid=kb;enus;328213 11 11 Z030 Z030 Installing and Configuring Wireless Access Card Installation is pop up, and then press Install button Ready to Install the program The wizard is ready to begin installation. If you want to review or change any of you installation settings, click Back. Click Cancel to exit the wizard. If Microsoft Hotfixes is completely installed, click Finish InstallShield Wizard completed The InstallShield Wizard has successfully installed Microsoft Hotfixes, Click Finish to exit the wizard. 12 12 Installing and Configuring Wireless Access Card Z030 Z030 A fter completion of installation, a message box is displayed, asking if you wish to reboot Windows. Press Yes button if you wish to reboot Windows imediately. You must restart your system for the configuration Changes made to Microsoft Hotfixes to take effect. Click Yes to restart now or No if you plan to restart later. 3. Wireless Access Card Insertion and Device Initialization 1. After Access manager driver install, 5 Devices driver automatically set up by “New Hardware Wizard” program in window device manager when you insert Z030 Card in your Notebook PC’s PCMCIA Card Slot. 1-1. Insert Z030 card Insert Z030 into Notebook. 13 13 Z030 Z030 Installing and Configuring Wireless Access Card 1-2. Ubiquam UM-300 Multifunction Parent W indows 2000, XP: Check Install the software automatically and press Next Welcome to the Found New Hardware Wizard This wizard helps you install software for. Ubiquam UM-300 Multifunction parent If your hardware come with an installation CD or floppy disk, insert it now. What do you want the wizard to do? Install the software automatically(Recommended) Install from a list or specific location(Advanced) Click Next to continue. 1-3. Ubiquam UM-300 serial drive (Function 1) W indows 2000, XP: Check Install the software automatically and press Next Welcome to the Found New Hardware Wizard This wizard helps you install software for. Ubiquam UM-300 Function 1 If your hardware come with an installation CD or floppy disk, insert it now. What do you want the wizard to do? Install the software automatically(Recommended) Install from a list or specific location(Advanced) Click Next to continue. 14 14 Installing and Configuring Wireless Access Card Z030 Z030 1-4. Ubiquam UM-300 USB Interface (Function 0) W indows 2000, XP: Check Install the software automatically and press Next Welcome to the Found New Hardware Wizard This wizard helps you install software for. Ubiquam UM-300 Function 0 If your hardware come with an installation CD or floppy disk, insert it now. What do you want the wizard to do? Install the software automatically(Recommended) Install from a list or specific location(Advanced) Click Next to continue. 1-5. Ubiquam CDMA 2000 Composite Device W indows 2000, XP: Check Install the software automatically and press Next Welcome to the Found New Hardware Wizard This wizard helps you install software for. Ubiquam CDMA2000 Composite Device. If your hardware come with an installation CD or floppy disk, insert it now. What do you want the wizard to do? Install the software automatically(Recommended) Install from a list or specific location(Advanced) Click Next to continue. 15 15 Z030 Z030 Installing and Configuring Wireless Access Card 1-6. Ubiquam CDMA 2000 Drive W indows 2000, XP: Check Install the software automatically and press Next Welcome to the Found New Hardware Wizard This wizard helps you install software for. Ubiquam CDMA2000 If your hardware come with an installation CD or floppy disk, insert it now. What do you want the wizard to do? Install the software automatically(Recommended) Install from a list or specific location(Advanced) Click Next to continue. 2. After Installed 5 devices, UM-300 is inserted correctly; the LED on the module is blinking as Red to Green. Then the LED show the service status (No service: Blinking as Red-Green-off-Red-Green, Service connected : Blinking as Green-off-Green) "NOTE: If Windows does not automatically detect the necessary drivers, you can manually select them from the following location: C:/Program Files/Zapp/Z030 Manager/Driver" 3. To make internet connection, User click one-touch icon of internet connection on the Access manager. Then connection window is popped up, user click the setting name in the window. If the network setting has not been accomplished before, User should set first the network setting in the connection window. (Please refer “Setting” Chapter (12 page) W hen the internet connection has been succeeded, the Connect Icon is 16 changed into Disconnect Icon. 16 Z030 Z030 Using Z030 Manager 5 4 3 2 6 1 7 8 9 18 17 16 15 10 11 12 13 14 1. Connect/ Disconnect 2. Window Close 3. Window Minimize 4. Message Incoming 5. R SSI(Receiving Signal Strength Indicator) 6. Date/Time 7. Status 8. Setting 9. Message 10. Call History 11. Volume Control 12. Send 13. Clear 14. End 15. Dial Pad 16. Phonebook 17. Speed Dial 18. Dial Pad On/Off 17 17 Z030 Z030 Message 1. SMS You can view and organize short messages. 2. Receive SMS Arrival of new SMS is displayed on indicator. To read SMS Key click to pop up the message box. Double-click the message you want to read from the message box to open the mail. 3. Delete 1) After selecting messages from the message box, click button to delete messages. 2) Or click “Delete” in the open message window to delete messages. "NOTE: SMS service can only be used when the Z030 PCMCIA card is set to either 1X or Hybrid (1X + EVDO) connection modes" 18 18 Connecting to the Internet Z030 Z030 1. Connecting to the Internet Then press connect button, it will automatically connected to the Internet. If it is connected to the Internet, then icon will appear. When user is ready to disconnect from the Internet, press button to end the connection. 19 19 Z030 Z030 Setting Click “Setting” to open the setting window to set various items for the dial pad. 1. Network Input basic information for network. For data mode, decide whether one of EV-DO and 1X, or both of them is used. E V-DO + 1X- Hybrid mode. It will access EV-DO network first. If it’s not possible, it will access 1Xnetwork. E V-DO - Accessible only to EV-DO network. 1 X - Accessible only to 1X network. D ial-up Networking description a. User Name: “Zapp” is preset (not required for authentification). b. Password: “Zapp” is preset (not required for authentification). c. Dial Number: #777 is preset. S oftware Version - You can check the software version of Access Manager and Module. 20 20 Setting Z030 Z030 2. Advanced P hone lock enable - You can select whether “Phone lock” is used or not, and change “LockCode.” 21 21 Z030 Z030 FAQ (Frequently Asked Questions) Below is a list of common error messages and possible solutions regard the use of your Wireless Access Card. For amore detailed listing of errors and possible solutions, please see the User’s Guide located on your installation CD. Error “Initialization Fail“ “Out of service area“ 22 22 solution If this message is displayed, please right click the Z030 Manager icon on your system tray and click “Exit”. Then remove and reinsert the card and wait until your computer “beeps” before clicking the Z030 Manager shortcut icon again If this message is displayed, there is no service available at this time. The network may be Busy or undergoing maintenance. Try Connecting to the network at a later time, or Moving to another location if you are outside The enhanced “please insert Card“ (After inserting the card) If this message is displayed after inserting the Card, verify inserted in your computer ’s Type ll PC Card or Type ll Compact Flash sot. If the message still exists, please remove and reinsert the card. “There was no answer“ If this message appears, the network may be Busy. Try and connect again at a later time. Technical information Standard Z030 Z030 Transmit(Tx) CDMA 1X450MHz 453~457.5MHz EV-DO 453~457.5MHz Receive(Rx) 463~467.5MHz 463~467.5MHz Maximum Data Transmission 153.6kbps 2.4576Mbps Simultaneously in forward and reverse links Operating Voltage 3.3V Note : TX,RX frequency band is basically I band. Notice: This manual is written to help users. The supplier can upgrade the software to improve the performance without a notice. Please keep in mind that displays can be changed by the upgrade of the software. 23 23 DECLARATION OF CONFORMITY We, SC TELEMOBIL SA, Romania, j. Ilfov, Bucharest Way no 2B bis, registration number at the Registry of Commerce no: 1596697, assure, guarantee and declare at ours own risk, in conformity with the 5 th article from the Government Resolution nr 1022 / 2002 regarding the guidance of products and services which could risk the life, health or the work and environment security that the following product: Z030 CDMA 450 SINGLE BAND PCMCIA MODEM CARD, UM 300 made in Korea by UBIQUAM CO., LTD, 272-3, Yatap3-dong, Bundang-gu, Sungnam City, Kyuonggi do, at which this Declaration is regarding to, will not put in danger the life, the health or the safety of the work, also will not have a negative impact on the environment and it is in conformity with the following: - ETSI EN 301 908-1 - 2.2.1(2003-10) ETSI EN 301 908-4 - 2.2.1(2003-10) ETSI EN 301 489-01 - 1.5.1(2004.11) ETSI EN 301 489-25 - 2.3.2(2004.07) EN 60950-1:2001 (IEC 60950-1:2001(lst Edition)) Directives 99/5/EEC, 89/336/EEC, 73/23/EEC, (as in MET Laboratories Report - 2006) - Declaration Of Conformity of the producer - The card is CE 0980 marked This Declaration is written down in conformity with the express stipulations of SR EN 45014-2000, HG 567/2002, HG1022/2002 and HG 1032/2001 and further updates. 26.09.2006 Balotesti, Ilfov