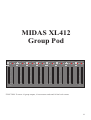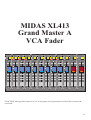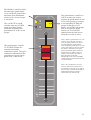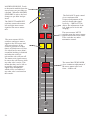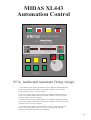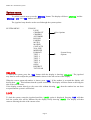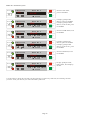
1
XL4
OPERATORS MANUAL
Telex Communications (UK) Ltd,
Klark Teknik Building,
Walter Nash Road,
Kidderminster.
Worcestershire.
DY11 7HJ.
England.
Tel:+44 1562 741515
Fax:+44 1562 745371
Website: www.midasconsoles.com
MIDAS XL4 audio mixing console
DOC02-XL4 Issue 1.0 - February 2005
© Telex Communciations (UK) Ltd.
In line with the company’s policy of continual improvement, specifications and function may be
subject to change without notice. This Operators Manual was correct at the time of writing. E&OE.
MIDAS XL4
LIVE PERFORMANCE CONSOLE
Contents
Introduction
Features
Overview and Statistics
Technical Specification
Block Diagrams
Rear Panel
Midas XL402 Input Pod
Midas XL401 Input Module
Midas XL405 Stereo Input Pod
Midas XL404 Stereo Input Module
Midas XL403 Input VCA Fader
Midas XL414 Group Module
Midas XL412 Group Pod
Midas XL413 Grand Master A VCA Fader
Midas XL421 Master Module
Midas XL422 Master Pod
Midas XL431 Communications Module
Midas XL441 Matrix Module
Midas XL443 Automation Central Control
1
3
7
9
13
15
19
21
25
29
33
38
41
Introduction to the XL4
The XL4 was born out of a dream to design an analogue state of the art live mixing
and recording console with unparalleled performance/features intrinsic with intuitive
layout and operation. The vision required the analogue sound path to be controlled in
the digital domain via a high degree of signal routing and moving fader automation
enabling the live sound engineer whether in a touring or theatre production
environment to utilise automation functions in order to enhance mix efficiency and
performance to performance consistency.
The benchmark for the XL4 was the XL3 console which during production since 1990
gained a worldwide reputation for unequaled sonic performance and system
transparency culminating in its award for best live sound mixing console 1993 and
1994.
Bob Doyle, Midas Sales & Marketing Director, spent ten months finalising the XL4
specification, discussing its concept with world class sound engineers and rental
company heads as well as theatrical production designers and artists alike. The criteria
was to develop a mixing environment which enhanced the creativity of the mixing
engineer by automating the repetitive functions of specific mix and cue requirements,
thus leaving he or she free to concentrate on the main thrust of live mixing by
reproducing the Artist’s music as it should be.
In our opinion, the XL4 combines all these criteria in a coherent, easy to operate
mixing aid with unsurpassed sound and sonic quality.
Bob Doyle
Special thanks to:
Mick Anderson
Chris Beale
Tim Boyle
Gary Bradshaw
Lars Brogaard
David Bryson
Robert “Cubby” Colby
Robert Collins
Ralph Collins
Alex Cooper
Charlie Davies
Keith Davies
Steve Flewin
Bryan Grant
Chris Hill
Paul Haseldine
Rocky Holman
Mick Hughes
Robbie McGrath
Paul Newman
Paul Owen
John Penn
Clay Powers
Chris Rogers
Ivan Schwartz
Sophie Webster
Mike Spratt
Yan Stile
Steve Sunderland
Phil Wilkie
Robin Whittaker
Wladyslav Wygnanski
Peter Ratcliffe
Bob Goldstein
Gottfried Duren-Fisgus
Christian Gobbel
Input Pots Aux Send Masters
16 mic/line
level returns
Masters & Comms
Modules
16 Audio Sub Groups
24 Input channels each with
direct output, 4band parametric
e/q, 16 mono aux (post panpot)
8 stereo groups and stereo masters
10 VCA sub groups
on moving faders
2 Grand Masters
20 x 8
Matrix
24 Input
Channels
Automation package capable of
memorising:audio, VCA,
mute group routing,status of
all input channel switches,
plus: midi, smpte, RS-232 ports
Midas XL4 Features
48 Mic Inputs.
The XL4 features a new mic amplifier which further improves on the XL3 design giving increased
gain range and lower distortion whilst retaining the XL3's constant HF bandwidth topology which
assures excellent amplifiers stability, RF rejection and noise performance at all gains.
Direct Outputs.
Every input module is fitted with a direct output as standard with its own level control and front
panel switching which selects the source from post fader, pre fader or pre insert and equaliser.
16 audio sub groups.
The 16 main audio groups can be assigned to any of the 8 automute groups and to VCA control
from any combination of the 2 motorised grand master faders. A safe switch is again included for
each group. The input for the groups is normally derived from the 16 group busses but for monitor
applications the fader change over routes the 16 mono aux busses to the group faders.
Line inputs.
A separate Hi Z line input with its own dedicated gain control is incorporated which is ideal for
playback of recorded material. Global change over from mic (record) to line (playback) is easy
because it is under automation control.
Equaliser.
The sonic performance of the legendary XL3 equaliser is maintained including the full parametric
mid's and traditional Midas bass and treble shelving responses. In addition the treble and bass
sections now have an extended frequency range and are switchable to full parametric operation.
Inserts.
Each channel has a half normalised fully balanced insert send and return point which can be
switched in or out from the front panel and set as either pre or post equaliser.
Input metering.
These peak reading meters cover a 60dB range in 3dB steps and can be switched globally to
monitor pre fader signals or pre insert and equaliser signals.
Audio busses.
Each channel can be routed to any combination of 42 audio busses comprising of 16 mono aux'es,
8 stereo aux'es, 16 stereo groups and 2 stereo masters. All this is switchable on the module front
panel but also via the automation control.
VCA and mute busses.
Each channel can be controlled by any combination of the 10 motorised VCA master faders and 8
mute masters. Assignment of these busses is again switchable on the module front panel or by the
automation control. A safe switch disconnects the channel from all mute groups and an isolate
switch removes the channel from all VCA control.
Group aux inputs.
An additional 16 inputs with treble and bass equalisation can be routed directly to the groups or via
a pan to the masters mix and can be further controlled by assignment to any of the 10 VCA masters.
Master.
The stereo master module provides the main left and right console outputs plus 4 more record
outputs and a mono output. A solo to master facility is incorporated on the left, right and mono
outputs to aid the engineer at sound checks.
Matrix.
As standard the 8 matrix outputs derive their signals from the 16 audio groups, left and right
masters creating a 18 X 8 matrix. The module also houses the stereo aux masters which have their
own outputs at all times but which can be routed directly into the matrix giving an additional 48 X
8 matrix sourcing direct from the input channels.
Output meters.
28 peak reading meters (each covering a 60dB range in 3dB steps) are used to monitor all the main
outputs i.e. 16 groups, 8 matrix, 2 masters and 2 local outputs. They and can be switched globally
to monitor pre fader or post fader signals and can also be used to monitor the 24 aux outputs.
Automutes.
The 8 automute masters can be assigned to any input or audio group and act on pre fader and post
fader signals. Apart from assignment the operation of these mutes is entirely independent of the
automation system.
10 input VCA faders.
10 motorised VCA master faders control the channel and aux inputs whilst a further 2 VCA grand
master faders control the audio groups. Each VCA master has a solo switch which gives the
engineer an opportunity to monitor the signals within the VCA subgroup. Also incorporated is a
VCA mute which act on post fader signals only and effectively adds a further 12 automute scenes
to the existing dedicated automutes.
Automation.
The automation system can store and recall up to 2000 scenes. All channel routing and major
functions are automated as well as all major output mutes. The 12 motorised VCA master faders
give dynamic control of signal levels within the console and all automation information can be
exported or imported in a variety of different mediums for storage or console and system linking.
XL4 Specification Overview and Statistics.
1. The XL4 is a 45 buss console with an additional 18 X 8 output matrix. The busses are as
follows:16 mono aux
=
16
16 audio sub groups =
16
4 stereo aux
=
8
1 stereo master
=
2
1 stereo AFL
=
2
1 mono PFL
=
1
TOTAL
=
45
2. The XL4 has 8 automute sub groups, 10 input channel VCA sub groups which include VCA sub
group muting and 2 grand master VCA sub groups with VCA sub group muting.
3. The XL4 has 48 input channels with separate line and mic inputs plus an additional 16 aux line
returns.
4. The XL4 has a total XLR input count of 171 as follows:48 channel line inputs
48channel mic inputs
24aux bus inject inputs
16 audio group bus inject inputs
16aux line returns inputs
8matrix bus inject inputs
3solo bus inject inputs
2master bus inject inputs
1comms mic input ( headset )
1comms input ( and output )
1talk mic input
1talk bus inject input
1midi input
5. The XL4 has a total XLR output count of 111 as follows:48input channel direct outputs
24aux outputs
16audio group outputs
8matrix outputs
4record outputs
3master outputs
3solo outputs
2local outputs
2midi outputs
1talk output
6. The XL4 has a total bantam jack field count of 158 as follows:56input channel insert sends ( 8 spare for stereo module up grades )
56input channel insert returns ( 8 spare for stereo module up grades )
16audio group insert sends
16audio group insert returns
8matrix insert sends
8 matrix returns
8parallel links ( 2 sets of 4 )
3 master insert sends
3master insert returns
7. The XL4 has 12 motorised moving faders for the VCA masters.
8. The XL4 has a total of 2539 automated switch functions as follows:960input channel aux send on off switches
480input channel VCA sub group assign switches
384input channel audio sub group assign switches
384input channel mute sub group assign switches
48input channel EQ on off switches
48input channel stereo master on off switches
48input channel phase switches
48input channel insert on off switches
48input channel mic line switches
48input channel mute switches
16audio sub group mute switches
16aux line return mute switches
8matrix mute switches
3master mute switches
9. The XL4 has a total of 77 peak program meters with 20 LED segments each and monitoring 282 signal points w
XL4 Technical Specification.
Input Impedance
Input Gain
( all faders at 0dB )
Maximum Input Level
CMR at 1KHz
Frequency Response
( 20 to 20KHz )
Noise ( 20 to 20KHz )
System Noise
( 20 to 20KHz )
Summing Noise
Mic
2K Balanced
Line
20K Balanced
Mic
Continuously variable from
+ 15dB to + 70dB
Mic + Pad
Continuously variable from
- 5dB to + 50dB
Channel
Line Input
Continuously variable from
- 20dB to + 20dB
All other Line Inputs
0dB
Mic
+ 6dBu
Mic + Pad
+ 26dBu
Channel Line inputs
+ 26dBu
All other Line Inputs
+ 21dBu
Mic ( gain + 60dB )
> 70dB
Mic + Pad
( gain + 40dB )
> 50dB
Line
> 60dB
Mic to Mix
( gain + 60dB )
+ 0dB to - 1dB
Line to Mix
+ 0dB to - 1dB
Mic EIN ref. 150 Ohms
( gain + 60dB )
- 129dBu
Line EIN ref. 150 Ohms
( gain + 10dB )
- 100dBu
Summing Noise
( 12 channels routed
with faders down )
- 86dB
Line to Mix Noise
( 12 channels routed
at 0dB, pan centre )
- 81dB
( 48 channels routed
with faders down )
- 80dB
Line to Mix Noise
( 48 channels routed
at 0dB, pan centre )
- 75dB
Distortion at 1KHz
Crosstalk at 1 KHz
Output Impedance
Maximum Output Level
Nominal Signal Level
Headroom at all stages
Metering
Mic to Mix ( + 60dB
gain, 0dBu output )
< 0.03%
Line to Mix ( 0dBu )
< 0.03%
Channel to Channel
< - 100dB
Mix to Mix
< - 90dB
Channel to Mix
< - 90dB
Maximum Fader
attenuation
> 90dB
All Line Outputs
50 Ohms Balanced Source to
drive > 600 Ohms
Headphones
To drive > 8 Ohms Unbalanced
Comms ( Bi - directional )
600 Ohms Nominal Unbalanced
All Line Outputs
+ 21dBu
Headphones
+ 21dBu ( 8W into 8 Ohms )
Comms ( Bi directional )
- 10dBu
Mic
- 70dBu to + 5dBu
Channel
Line Inputs
- 20dBu to + 5dBu
All other Line
Inputs and outputs
0dBu
Headphones
+ 10dBu
Comms
- 20dBu
Comms and Talk Mic
- 50dBu to - 20dBu ( auto gain )
Comms, Talk
and Headphone
> 10dB
All other signals
> 20dB
Type
20 led peak reading
Range
- 36dBu to + 21dBu
Colour Green
Up to + 9dBu Normal signal
Colour Yellow
+ 12dBu to + 15dBu High signal
Colour Red
Over + 18dBu Signal Too High
Quantity
77 ( Monitoring all main
Inputs and outputs )
Equaliser
Low pass slope
12dB / Oct.
Low pass frequency
Continuously variable
-3dB point from 1K to 40K
Hi pass slope
12dB / Oct.
Hi pass frequency
Continuously variable
3dB point from 10Hz to 400Hz
Treble Gain
Continuously variable
+ 15 dB to - 15 dB
Centre detent = 0dB
Treble Shelving Freq.
Continuously variable
- 3dB point from 1K to 20K
Treble Bell Freq.
Continuously variable
centre from 1K to 20K
Treble Bell Bandwidth
Continuously variable
0.1 Oct. to 2 Oct.
Centre detent = 0.5 Oct.
Hi Mid Gain
Continuously variable
+ 15 dB to - 15 dB
Centre detent = 0dB
Hi Mid Freq.
Continuously variable
centre from 400Hz to 8K
Hi Mid Bandwidth
Continuously variable
0.1 Oct. to 2 Oct.
Centre detent = 0.5 Oct.
Lo Mid Gain
Continuously variable
+ 15 dB to - 15 dB
Centre detent = 0dB
Lo Mid Freq.
Continuously variable
centre from 100Hz to 2K
Lo Mid Bandwidth
Continuously variable
0.1 Oct. to 2 Oct.
Centre detent = 0.5 Oct.
Bass Gain
Continuously variable
+ 15 dB to - 15 dB
Centre detent = 0dB
Bass Shelving Freq.Continuously variable
3dB point from 20Hz to 400Hz
Bass Bell Freq.
Continuously variable
centre from 20Hz to 400Hz
Bass Bell Bandwidth
Continuously variable
0.1 Oct. to 2 Oct.
Centre detent = 0.5 Oct.
XL4 INPUT BLOCK DIAGRAM
pre fade
pre ins. & eq.
DIRECT
OUTPUT
TO POD
pre
XL401 INPUT MODULE
BLOCK DIAGRAM
ON
AUXILIARY
SEND
1 OF 16
0
+10
direct o/p
INPUT
FROM POD
aux 1
INS
insert
pre eq
+6
+
+
_
INSERT POINT
-
SEND
c
pre
RETURN
ON
EQ
l
pan r
STEREO
AUXILIARY
SEND
1 OF 4
0
TEST
INPUT
(SERVICE
USE ONLY)
+6
st aux 1&2
ST
FOUR BAND FULLY PARAMETRIC EQUALISER
0
0.1
15
bass
60
PRE FADER
SIGNAL
TO POD
20
0
width
6 0.3
6
400
0.1
15
lo-mid
300
160
freq
2
+/-
15
bell
100
15
0.1
2
15
15
hi-mid
800
1k
3k
2k
400
freq8k
freq
16
6 0.3
1
0.1
2
2
+/-
15
treble
3k
mute
width
width
6 0.3
16
+/-
0
0
width
6 0.3
1 6
STEREO
GROUP
SEND
1 OF 8
FADER START RELAY
+/-
15
STEREO
MASTERS
SEND
SOLO
SWITCH
SOLO LEFT
8k
1k freq 20k
bell
SOLO RIGHT
PRE FADER
LISTEN
VCA FADER
PHANTOM
GAIN
+35
+25
HI-PASS
FILTER
30
LO-PASS
FILTER
100 3k
10k
1
MIC / LINE
SELECT
PHASE
REVERSE
/
O
48V
+15
TRANSFORMER
BALANCING
OPTION
mic
+70
10
400 1k
hi-pass
40k
lo-pass
1&2
3
5&6
line
4
7&8
5
-20
9&10
-
6
11&12
00
TRANSFORMER
BALANCING
OPTION
-20
+20
PEAK
TRANSFORMER
BALANCING
OPTION
+
+21
+18
+15
+12
+9
+6
+3
0
-3
-6
-9
-12
-15
-18
-21
-24
-27
-30
-33
-36
1
2
3&4
ASSIGN SWITCHES
MAY FUNCTION IN
ANY ONE OF THREE
WAYS AS SHOWN.
FUNCTION IS
DEPENDANT ON
ASSIGN MASTER
SWITCHES.
7
13&14
METER PRE
AUTOMATION
1
9
iso
MUTE
2
AUTOMATION
TO POD
XL402 INPUT POD
BLOCK DIAGRAM
SIGNAL PATH KEY
= ANALOGUE SIGNALS
= D.C. SIGNALS
= AUTOMATION SIGNALS
safe
µP
4
0
5
5&6
3
5
7&8
4
6
9&10
5
solo
7
11&12
6
8
13&14
7
10
group
assign
switches
3
3&4
8
15&16
DIR
ECT
5
2
1&2
8
MUTE
GROUP
9
15&16
AUDIO
GROUP
10
VCA
GROUP
AUTOMATION PARALLEL BUS
XL403 INPUT FADER MODULE
BLOCK DIAGRAM
SOLO
CLEAR
XL4 MATRIX MODULE BLOCK DIAGRAM
STEREO AUX
LEFT
INJECT
STEREO AUXILIARY SECTION
stereo
aux
STEREO AUX
BUS LEFT
-
0
∑
∑
METER POST LEFT
METER POST RIGHT
MUTE
o
o
NOISE REF BUS
+10
+
master
TALK TO AUX
STEREO AUX
LEFT
OUTPUT
+
STEREO AUX RIGHT
OUTPUT
-
STEREO AUX
BUS RIGHT
∑
∑
STEREO AUX
RIGHT
INJECT
METER PRE LEFT
∑
STEREO AUX
TO MATRIX
SOLO
METER PRE RIGHT
MTX
∑
TALK TO MATRIX
TALK
MATRIX
LEFT
INJECT
∑
SOLO LEFT
SOLO RIGHT
INS
o
o
MASTER
LEFT
-
+6
masters left
o
o
+
_
INSERT POINT
SEND
0
MASTER
RIGHT
mute
RETURN
5
+6
VCA
0
o
o
ON
global pre
SOLO
LOGIC
+
-
masters right
GROUP 1
(1 OF 16 PRE
SHOWN) POST
PFL
solo
+
0
MATRIX
LEFT
OUTPUT
0
+6
METER POST
RIGHT
5
mix 1
METER PRE
RIGHT
∑
TALK TO MATRIX
TALK
MATRIX
RIGHT
INJECT
INS
∑
solo
+
-
INSERT POINT
SEND
+
_
AUTOMATION
RETURN
+
0
MASTER
LEFT
o
o
5
+6
masters left
o
o
MASTER
RIGHT
0
0
+6
5
masters right
VCA
-
mute
MATRIX
RIGHT
OUTPUT
METER POST LEFT
0
GROUP 1
(1 OF 16 PRE
SHOWN) POST
o
o
METER PRE LEFT
ON
global pre
+6
mix 1
XL441 MATRIX MODULE
BLOCK DIAGRAM
+21+
+18+
+15+
+12+
+9+
+6+
+3+
0
-3-6-9-12-15-18-21-24-27-30-33-36-
matrix
change over
METER PRE
IN METER
BRIDGE
∑
0
MASTER AUX
BUS RIGHT
5
5
aux i/p mutes
0 VOLTS
∑
∑
l
r
masters
balance
c
solo in place
MASTER AUX
BUS LEFT
MASTER
RIGHT
INJECT
MASTER
BUS RIGHT
NOISE REF BUS
(FOR FIELD
REJECTION)
TALK TO MASTER M
MASTER
BUS LEFT
TALK TO MASTER L
MASTER
LEFT
INJECT
SOLO
RIGHT
SOLO
LEFT
SOLO
ON
METER
PRE
∑
∑
∑
METER PRE
-
+
-
+
-
+
IN METER
BRIDGE
SEND
+21
+18
+15
+12
+9
+6
+3
0
-3
-6
-9
-12
-15
-18
-21
-24
-27
-30
-33
-36
RETURN
+
_
RETURN
INSERT POINT
SEND
+
_
+
_
RETURN
INSERT POINT
SEND
INSERT POINT
5
0
5
mono
+21
+18
+15
+12
+9
+6
+3
0
-3
-6
-9
-12
-15
-18
-21
-24
-27
-30
-33
-36
∑
INS
INS
INS
VCA
record 2
+10
0
record 1
+10
0
VCA
VCA
VCA
+21
+18
+15
+12
+9
+6
+3
0
-3
-6
-9
-12
-15
-18
-21
-24
-27
-30
-33
-36
+18
+15
+12
+9
+6
+3
0
-3
-6
-9
ON
RECORD METERS READS HIGHEST
LEVEL OF LEFT OR RIGHT
+18
+15
+12
+9
+6
+3
0
-3
-6
-9
SOLO
mute all
-
+
-
+
-
+
-
+
-
+
-
+
-
+
matrix
send pre
RECORD 2
RIGHT
OUTPUT
RECORD 2
LEFTT
OUTPUT
RECORD 1
RIGHT
OUTPUT
RECORD 1
LEFT
OUTPUT
AUTOMATION
MASTER
RIGHT
OUTPUT
MASTER
MONO
OUTPUT
MASTER
LEFT
OUTPUT
MATRIX RIGHT
MATRIX LEFT
HEADPHONES RIGHT
HEADPHONES LEFT
AFL RIGHT
AFL LEFT
PFL
SOLO I/P
MUTE ALL
XL4 MASTERS MODULE BLOCK DIAGRAM
3
MATRIX BUS INPUTS
4
5
6
6
7
8
MONITORING BUS OUTPUTS
LOCAL L
SOLO R
PFL
MIDAS XL402
SOLO L
MIDAS XL402
MASTER R
MIDAS XL402
1
1
15
15
15
MIDAS XL402
direct
output
line
input
microphone
input
14
14
14
MIDAS XL402
direct
output
line
input
microphone
input
13
13
13
MIDAS XL402
direct
output
line
input
microphone
input
12
12
12
MIDAS XL402
direct
output
line
input
microphone
input
11
11
11
MIDAS XL402
direct
output
line
input
microphone
input
2
2
2
MIDAS XL402
direct
output
line
input
microphone
input
1
1
1
MIDAS XL402
direct
output
line
input
microphone
input
DC LINK
OUTPUT
DC LINK
INPUT
SOLO LOGIC
OUTPUT
SOLO LOGIC
INPUT
RS232-2
RS232-1
MIDI
OUT
THRU
IN
TEST
INPUT
DIM
LAMPS
POWER
SUPPLY
MIDI THRU
8
8
MIDAS XL402
direct
output
line
input
microphone
input
6
6
MIDAS XL402
direct
output
line
input
microphone
input
AUTOMATION
MIDI IN
MIDI OUT
7
7
MIDAS XL402
direct
output
line
input
microphone
input
8
PARALELL 2
47 46 45 44 43 42 41 RIGHT- MONO-LEFT
STEREO INPUT INSERT RETURNS RIGHT MASTER INSERT RETURNS
48
1
1
8
2
3
4
5
6
MATRIX INSERT RETURNS
2
7
7
2
2
3
4
5
6
MATRIX INSERT RETURNS
3
4
5
6
MATRIX INSERT SENDS
1
1
24
24
23 22 21 20 19 18 17
STEREO INPUT INSERT RETURNS RIGHT
23 22 21 20 19 18 17
STEREO INPUT INSERT SENDS RIGHT
16
16
16
16
15
15
15
15
MIDAS XL402
direct
output
line
input
SPARE
14
14
14
14
13
13
13
13
OUTPUT
12
12
12
INPUT
3
3
MIDAS XL402
direct
output
line
input
11
11
11
16
16
MIDAS XL402
direct
output
line
input
microphone
input
15
15
MIDAS XL402
direct
output
line
input
microphone
input
MONITORING BUS INPUTS
SOLO R
SOLO L
PFL
1
1
MIDAS XL402
direct
output
line
input
microphone
input
13
13
MIDAS XL402
direct
output
line
input
microphone
input
6
6
7
8
9
10
GROUP INSERT RETURNS
7
8
9
10
GROUP INSERT SENDS
6
7
8
9
10
GROUP INSERT RETURNS
6
MASTER BUS INPUTS
MASTER L
MASTER R
14
14
MIDAS XL402
direct
output
line
input
microphone
input
7
8
9
10
GROUP INSERT SENDS
COMMS
2
2
MIDAS XL402
direct
output
line
input
microphone
input
11
microphone
input
12
STEREO AUXILIARY BUS INPUTS
4
5
TALK
microphone
input
STEREO AUXILIARY OUTPUTS
4
5
MIDAS XL402
direct
output
line
input
microphone
input
XL4 STANDARD PATCH PANEL
3
3
3
MIDAS XL402
direct
output
line
input
microphone
input
PARALELL 1
7
4
4
4
MIDAS XL402
direct
output
line
input
microphone
input
3
4
5
6
MATRIX INSERT SENDS
5
5
5
MIDAS XL402
direct
output
line
input
microphone
input
47 46 45 44 43 42 41 RIGHT- MONO-LEFT
MASTER INSERT SENDS
STEREO INPUT INSERT SENDS RIGHT
8
PARALELL 2
RIGHT- MONO-LEFT
MASTER INSERT RETURNS
7
6
6
6
MIDAS XL402
direct
output
line
input
microphone
input
48
8
7
AUXILIARY LINE INPUTS
9
8
PARALELL 1
7
GROUP BUS INPUTS
9
8
MIDAS XL402
direct
output
line
input
microphone
input
7
MIDAS XL402
direct
output
line
input
microphone
input
GROUP OUTPUTS
9
8
MIDAS XL402
direct
output
line
input
microphone
input
RIGHT- MONO-LEFT
MASTER INSERT SENDS
10
10
10
MIDAS XL402
direct
output
line
input
microphone
input
Please Note: XL4s are wired to take stereo channels in positions 17-24 and 41-48 as standard.
Depth
Nett Weight
16
16
16
MIDAS XL402
direct
output
line
input
microphone
input
1120mm
229kg / 505lb
MIDAS XL402
direct
output
line
input
microphone
input
MASTER BUS OUTPUTS
MASTER L
MASTER M
2
2
MIDAS XL402
direct
output
line
input
microphone
input
Other Dimensions:
LOCAL R
3
MATRIX OUTPUTS
4
5
MIDAS XL402
line
input
direct
output
7
line
input
direct
output
MIDAS XL402
line
input
direct
output
8
direct
output
MIDAS XL402
line
input
microphone
input
line
input
microphone
input
direct
output
microphone
input
line
input
microphone
input
microphone
input
direct
output
microphone
input
2176 mm.
MIDAS XL4 REAR PANEL
5
5
5
5
RECORD 2R
12
12
MIDAS XL402
direct
output
line
input
microphone
input
10
10
MIDAS XL402
direct
output
line
input
microphone
input
4
4
4
4
3
3
3
3
ANCILLARY MASTER OUTPUTS
RECORD 1R
RECORD 2L
11
11
MIDAS XL402
direct
output
line
input
microphone
input
MIDAS XL402
direct
output
line
input
microphone
input
2
2
2
2
RECORD 1L
1
1
1
1
AUXILIARY SEND BUS INPUTS
8
9
AUXILIARY SEND OUTPUTS
8
9
MIDAS XL402
direct
output
line
input
microphone
input
7
7
MIDAS XL402
direct
output
line
input
microphone
input
6
6
MIDAS XL402
direct
output
line
input
microphone
input
5
5
MIDAS XL402
direct
output
line
input
microphone
input
4
4
MIDAS XL402
direct
output
line
input
microphone
input
3
3
MIDAS XL402
direct
output
line
input
microphone
input
2
2
MIDAS XL402
direct
output
line
input
microphone
input
1
1
MIDAS XL402
direct
output
line
input
microphone
input
420 mm.
Typical Remote Patch Bay Option Panels
INPUTS
41 - 48
INPUTS
33 - 40
MASTERS
LINKS
MATRIX
1-8
INPUTS
25 - 32
INPUTS
17 - 24
XL4
INPUTS
9 - 16
INPUTS
1-8
GROUPS
9 - 16
GROUPS
1-8
INPUTS
9 - 16
INPUTS
1-8
GROUPS
9 - 16
GROUPS
1-8
Edac Mono Inputs Panel
INPUTS
41 - 48
INPUTS
33 - 40
MASTERS
LINKS
MATRIX
1-8
INPUTS
25 - 32
INPUTS
17 - 24
STEREO
INPUTS
RIGHT
17- 24
STEREO
I NPUTS
RIGHT
41- 48
Edac Mono & Stereo Inputs Panel
CON 1
CON 2
GROUPS
1 - 16
CON 4
CON 5
INPUTS
1 - 16
INPUTS
17 - 32
CON 6
INPUTS
33 - 48
MATRIX &
MASTERS
XL4
Harting Mono Inputs Panel
Typical All Connections Multi-Pin
CON 1
CON 2
CON 3
CON 4
CON 5
CON 6
CON 7
CON 8
CON 9
CON 10
XL4
Using Siemens remote all connections
CON 11
CON 12
SOLO LOGIC
INPUT
SOLO LOGIC
OUTPUT
DC LINK
INPUT
DC LINK
OUTPUT
AUTOMATION
MIDI IN
MIDI OUT
RS232-2
RS232-1
MIDI
SPARE
OUT
THRU
IN
OUTPUT
TALK
TEST
INPUT
DIM
LAMPS
COMMS
2
SOLO R
1
1
MASTER L
MASTER BUS OUTPUTS
MASTER M
2
1
1
2
2
15
15
15
15
15
MONITORING BUS INPUTS
SOLO L
PFL
16
16
16
16
16
Center Rear View
OSC OUTPUT
INPUT
3
STEREO AUXILIARY BUS INPUTS
4
5
6
7
8
MIDI THRU
3
STEREO AUXILIARY OUTPUTS
4
5
MASTER R
6
SOLO L
7
PFL
8
MONITORING BUS OUTPUTS
LOCAL B
SOLO R
3
MATRIX BUS INPUTS
4
5
6
7
8
LOCAL A
3
MATRIX OUTPUTS
4
5
6
7
8
13
13
13
12
12
12
11
11
11
13
13
RECORD 2R
12
12
POWER
SUPPLY
10
10
10
10
10
ANCILLARY MASTER OUTPUTS
RECORD 1R
RECORD 2L
11
11
Right Rear View
MASTER BUS INPUTS
MASTER L
MASTER R
14
14
Left Rear View
14
14
14
RECORD 1L
6
6
6
6
6
5
5
5
5
5
MIDAS XL402
MIDAS XL405
RIGHT DIRECT
OUTPUT
3
3
3
3
3
LEFT DIRECT
OUTPUT
RIGHT
INPUT
LINE
INPUT
DIRECT
OUTPUT
LEFT
INPUT
4
4
4
4
4
MICROPHONE
INPUT
Mono
Input Pod
Rear View
7
AUXILIARY SEND BUS INPUTS
8
9
7
AUXILIARY LINE INPUTS
8
9
7
7
GROUP BUS INPUTS
8
9
AUXILIARY SEND OUTPUTS
8
9
7
GROUP OUTPUTS
8
9
REAR PANEL DETAIL
1
1
1
1
1
Stereo
Input Pod
Rear View
2
2
2
2
2
MIDAS +25
+35
-20
48V
+15
mic
+70
+21
+18
0
+15
+12
+9
+6
+20
+3 -20
0
-3
-6
-9
-12
line
-15
10k
3k
-18
-21
-24
-27
1k
40k
-30
lo-pass
-33
30
100
-36
/
O
XL402
10
MIDAS XL402
Input Pod
400
hi-pass
FUNCTION: To control microphone and line input levels with phantom and phase reverse
facility plus incorporating high and low pass filters.
1
The PAD switch gives 20dB
of attenuation to the mic
signal and will allow the
connection of high output
microphones or line level
signals. If the mic amp is
transformer coupled ( option )
the pad greatly reduces the
risk of saturation at very low
frequencies.
The 48V switch connects 48
volt phantom power to the
mic input suitable for a
condenser microphone or DI
box.
The METER monitors the
peak signal level of the input
channel pre fader. When the
GLOBAL METER CHANGE
OVER switch on the
COMMS module is activated
the meter monitors the mic
amp or line amp output
(which ever is in use ).
The PHASE switch activates
a 180 degrees phase change
on both the mic and line
inputs. This switch is under
automation control.
2
MIDAS +25
+35
-20
48V
The MIC control gives
continuous adjustment of the
mic amp gain from + 15dB to +
70dB.
+15
+70
mic
+21
+18
0
+15
+12
+9
+6
+20
+3 -20
0
-3
-6
-9
-12
line
-15
10k
3k
-18
-21
-24
-27
1k
40k
-30
lo-pass
-33
30
100
-36
/
O
XL402
10
400
hi-pass
The LINE control gives
continuous adjustment of the
line amp gain from - 20dB to +
20dB.
The LINE switch connects the
line input to the signal path and
disconnects the mic amplifier.
This switch is under automation
control.
The LO PASS filter control acts
on the mic input only and is
continuously adjustable from
1K to 40K. When the filter is
set to 40K there is no loss at
20K.
The HI PASS filter control acts
on the mic input only and is
continuously adjustable from
10Hz to 400Hz. When the filter
is set to 10Hz there is no loss at
20Hz.
MIDAS
XL401
input
pre ins. & eq.
0
pre fade
+10
direct o/p
0
width
6
15
1
0.1
2
+/-
15
treble3k
bell
8k
1k freq 20k
0
width
6
15
6 0.3
6 0.3
1
0.1
2
+/-
15
hi-mid
1k
3k
EQ
0
400
freq8k
width
6 0.3
6
1
2
0.1
15
lo-mid
+/-
15
insert 300
pre eq
0
100
800
freq 2k
width
6 0.3
6
1
2
0.1
15
bass
bell
+/-
15
60
20
160
freq
400
0
ON
pre
aux 1
+6
0
ON
pre
aux 2
+6
0
ON
pre
aux 3
+6
0
ON
pre
aux 4
+6
0
ON
pre
aux 5
+6
0
ON
pre
aux 6
+6
0
ON
pre
aux 7
+6
0
ON
pre
aux 8
MIDAS XL401
Input Module
+6
0
ON
pre
aux 9
+6
0
ON
pre
+6
aux10
0
ON
pre
+6
aux11
0
ON
pre
+6
aux12
0
ON
pre
+6
aux13
0
ON
pre
+6
aux14
0
ON
pre
+6
aux15
0
ON
pre
+6
aux16
ON
pre
0
+6
st aux 1&2
0
ON
pre
+6
st aux 3&4
0
ON
pre
+6
st aux 5&6
0
ON
pre
+6
st aux 7&8
c
l
pan r
INS
ST
mute
MIDAS
XL401
3
The PRE INS & EQ switch re
configures the direct output to
derive signal from the input
channel pre insert and
The PRE FADE switch re
configures the direct output to
derive signal from the input
channel pre fader.
The treble WIDTH ( dual
concentric bottom ) control
gives continuous adjustment
of bandwidth from 0.1 to 2
octaves with a 0.5 octave
centre detent. This only
operates when the BELL
switch is activated.
The treble BELL switch
converts the treble equaliser
from traditional MIDAS
shelving response to full
parametric operation.
The HI MID ( dual concentric
top ) control gives continuous
adjustment of boost and cut
from + 15dB to - 15dB with a
0dB centre detent.
The EQ switch connects the
equaliser in the input channel
signal path and is under
automation control.
The LO MID ( dual
concentric top ) control gives
continuous cut from + 15dB
to - 15dB with a 0dB centre
detent.
The INSERT PRE EQ
arranges the input channel
signal to pass through the
insert point before the
equaliser when activated and
after the equaliser when not
activated.
The BASS ( dual concentric
top ) control gives continuous
adjustment of boost and cut
from + 15dB to - 15dB with a
0dB centre detent.
The bass BELL switch
converts the bass equaliser
from traditional MIDAS
shelving response to full
parametric operation.
4
MIDAS
XL401
input
pre ins. & eq.
0
pre fade
+10
direct o/p
0
width
6
15
1
0.1
2
+/-
15
treble3k
bell
width
6 0.3
1
0.1
2
+/-
15
hi-mid
3k
EQ
0
400
6
lo-mid
freq8k
width
6 0.3
1
0.1
2
15
+/-
insert 300
pre eq
0
100
6
15
The treble FREQ control gives
continuous adjustment of the
frequency range that the treble
equaliser acts on from 1K to
20K.
The hi mid WIDTH ( dual
concentric bottom ) control
gives continuous adjustment of
bandwidth from 0.1 to 2 octaves
8k
1k
15
The TREBLE ( dual concentric
top ) control gives continuous
adjustment of boost and cut
from + 15dB to - 15dB with a
0dB centre detent.
1k freq 20k
0
6
15
6 0.3
The DIRECT output control
gives continuous adjustment of
the direct output level from +
10dB to off. The output is
derived from the input channel
post fader signal.
bass
bell
800
freq 2k
width
6 0.3
1
0.1
2
15
+/-
60
20
160
freq
400
The hi mid FREQ control gives
continuous adjustment of the
frequency range that the hi mid
equaliser acts on from 400Hz to
8K.
The lo mid WIDTH ( dual
concentric bottom ) control
gives continuous adjustment of
bandwidth from 0.1 to 2 octaves
with a 0.5 octave centre detent.
The lo mid FREQ control gives
continuous adjustment of the
frequency range that the lo mid
equaliser acts on from 100Hz to
2K.
The bass WIDTH ( dual
concentric bottom ) control
gives continuous adjustment of
bandwidth from 0.1 to 2 octaves
with a 0.5 octave centre detent.
This only operates when the
BELL switch is activated.
The bass FREQ control gives
continuous adjustment of the
frequency range that the bass
equaliser acts on from 20Hz to
400Hz.
The mono aux ON switches
(1 to 16) connect signals from
the input channel to the mono
aux busses and are under
automation control.
The mono aux PRE switches
change the signal sent to the
mono aux busses from post
fader to pre fader.
0
ON
pre
aux 1
+6
0
ON
pre
aux 2
The mono AUX controls ( 1 to
16 ) give continuous adjustment
of the level sent from the input
channel to the aux busses. The
level adjustment is from + 6dB
to off.
+6
0
ON
pre
aux 3
+6
0
ON
pre
aux 4
+6
0
ON
pre
aux 5
+6
0
ON
pre
aux 6
+6
0
ON
pre
aux 7
1 - 16
+6
0
ON
pre
aux 8
+6
0
ON
pre
aux 9
+6
0
ON
pre
+6
aux10
0
ON
pre
+6
aux11
0
ON
pre
+6
aux12
5
The stereo aux ON switches
(1-4) connect signals from the
input channel to the stereo aux
busses and are under
automation control.
The stereo aux PRE switches
(1-4) change the signal sent to
the stereo aux busses from post
fader to pre fader whilst
retaining the post pan stereo
image.
0
ON
pre
+6
st aux 1&2
0
ON
pre
+6
st aux 3&4
0
ON
pre
+6
st aux 5&6
0
ON
pre
The ST AUX controls (1 to 8)
give continuous adjustment of
the level sent from the input
channel (post pan) to the stereo
aux busses. The level
adjustment is from + 6dB to
off.
ST AUX OPTION:- Consoles
can be ordered with dual
concentric controls to give
independent adjustment of the
levels sent from the input
channel (pre pan) to the stereo
busses. The top control gives
adjustment of left signals from
+6dB to off while the bottom
control adjusts the right signal
levels.
+6
st aux 7&8
c
The INS switch connects the
input insert return signal to the
input channel before or after
the equaliser (see insert pre eq
switch on page 4) and is under
automation control.
The ST switch connects the
input channel post fader signal
to the stereo master buss via
the pan control and is under
automation control.
6
l
The PAN control places the
input channel within a stereo
mix and has a constant power
law i.e. - 3dB at the centre
position.
pan r
INS
ST
mute
MIDAS
XL401
The MUTE switch mutes the
input channel at all points
except the insert send and pre
insert / eq direct output. This
switch is under automation and
auto mute group control.
MIDAS +25
+35
-25
48V
+15
+18+
+15+
+12+
+9+
+6+
+3+
0
-3-6-9-25-
mic
+70
C
/
O
left
/
O
right
XL405
l
r
MIDAS XL405
Stereo Input
Pod
balance
30
100
10
400
hi-pass
7
The PAD switch gives 25dB of
attenuation to the mic signals
and will allow the connection
of high output microphones or
line signals. If the mic amps
are transformer coupled
(option) the pad greatly
reduces the risk of saturation at
very low frequencies.
The 48V switch connects 48
volt phantom power to both
mic inputs as required for
condenser microphones etc.
The METERS monitors the
peak signal level of the left
and right input channels pre
fader. When the GLOBAL
METER CHANGE OVER
switch on the COMMS
module is activated the meters
monitor the left and right
mic/line amp outputs.
The left PHASE switch
activates a 180 degrees phase
change on the left mic/line
input.
The right PHASE switch
activates a 180 degrees phase
change on the right mic/line
input.
MIDAS +25
+35
The MIC control gives
continuous adjustment of left
and right mic amp gains from
+15dB to +70dB.
-25
48V
+15
+18+
+15+
+12+
+9+
+6+
+3+
0
-3-6-9-25-
mic
+70
C
/
O
left
/
O
right
The HI PASS switch connects
the high pass filter into the left
and right signal path.
XL405
l
r
balance
30
100
The HI PASS filter control is
continuously adjustable from
10Hz to 400Hz.
10
400
hi-pass
The stereo input pod provides a left and right
DIRECT OUTPUT which can be internally
linked as pre or post insert/eq.
8
The BALANCE control gives
continuous and reciprocal
adjustment of the stereo left
and right signal levels by
+10dB to -10dB. This allows
fine adjustment of the left and
right signal levels and
imaging.
MIDAS
XL404
stereo input
0
6
6
treble
15
15
10k
5k
freq
2k
0
20k
6
6
15
hi
mid
15
1k
3k
400
0.6
8k
1.3
freq
width
0 0.3
2
6
6
lo
mid
15
15
300
800
100
0.6
2k
1.3
freq
EQ
width
0 0.3
2
6
6
15
bass
15
50
20
100
freq
200
0
ON
pre
aux 1
+6
0
ON
pre
aux 2
+6
0
ON
pre
aux 3
+6
0
ON
pre
aux 4
+6
0
ON
pre
aux 5
+6
0
ON
pre
aux 6
+6
0
ON
pre
aux 7
+6
0
ON
pre
aux 8
+6
0
ON
pre
aux 9
+6
0
ON
pre
+6
aux10
MIDAS XL404
Stereo Input
Module
0
ON
pre
+6
aux11
0
ON
pre
+6
aux12
0
ON
pre
+6
aux13
0
ON
pre
+6
aux14
0
ON
pre
+6
aux15
0
ON
pre
+6
aux16
ON
pre
0
+6
st aux 1&2
0
ON
pre
+6
st aux 3&4
0
ON
pre
+6
st aux 5&6
0
ON
pre
+6
st aux 7&8
c
l
pan
c
r l
pan
r
INS
ST
mute
MIDAS
XL404
9
MIDAS
XL404
stereo input
The TREBLE control gives
continuous adjustment of left
and right shelving filters boost
and cut from +15dB to -15dB
with a 0dB centre detent.
0
6
6
treble
15
15
5k
10k
2k
20k
freq
The HI MID control gives
continuous adjustment of left
and right boost and cut from
+15dB to -15dB with a 0dB
centre detent.
0
6
6
15
hi
mid
15
1k
3k
400
0.6
8k
1.3
freq
width
The LO MID control gives
continuous adjustment of left
and right boost and cut from
+15dB to -15dB with a 0dB
centre detent.
0 0.3
6
6
lo
mid
15
15
300
800
100
0.6
2k
1.3
freq
The EQ switch connects the
left and right equalisers in the
input channel signal paths and
is under automation control.
The BASS control gives
continuous adjustment of the
left and right shelving filters
boost and cut from +15dB to 15dB with a 0dB centre detent.
2
EQ
width
0 0.3
6
15
2
6
bass
15
50
20
10
100
freq
200
The treble FREQ control
gives continuous
adjustment of the frequency
range that the treble
equalisers act on from 2K
to 20K.
The hi mid FREQ control
gives continuous
adjustment of the frequency
range that the hi mid
equalisers act on from
400Hz to 8K.
The hi mid WIDTH control
gives continuous
adjustment of the filter
bandwidths from 0.3 to 2
octaves with 1 octave being
the centre position.
The lo mid FREQ control
gives continuous
adjustment of the frequency
range that the lo mid
equalisers act on from
100Hz to 2K.
The lo mid WIDTH control
gives continuous
adjustment of the filter
bandwidths from 0.3 to 2
octaves with 1 octave being
the centre position.
The bass FREQ control
gives continuous
adjustment of the frequency
range that the bass
equalisers act on from 20Hz
to 200Hz.
The mono aux ON switches
connect signals from the input
channel to the mono aux
busses and are under
automation control.
0
ON
pre
aux 1
+6
0
ON
pre
aux 2
The mono aux PRE switches
change the signal sent to the
mono aux busses from post
fader to pre fader.
+6
0
ON
pre
aux 3
The mono AUX controls (1 to
16) give continuous
adjustment of the level sent
from the input channel to the
aux busses. The signal is a
mono sum of the left and right
signals and the level
adjustment is from + 6dB to
off.
+6
0
ON
pre
aux 4
+6
0
ON
pre
aux 5
+6
0
ON
pre
aux 6
+6
0
ON
pre
aux 7
+6
0
ON
pre
aux 8
+6
0
ON
pre
aux 9
+6
0
ON
pre
+6
aux10
0
ON
pre
+6
aux11
0
ON
pre
+6
aux12
11
The stereo aux ON switches
connect signals from the input
channel to the stereo aux
busses and are under
automation control.
0
ON
pre
+6
st aux 1&2
0
ON
pre
+6
st aux 3&4
0
ON
pre
The stereo aux PRE switches
change the signal sent to the
stereo aux busses from post
fader to pre fader whilst
retaining the post pan stereo
image.
+6
st aux 5&6
0
ON
pre
+6
st aux 7&8
c
The INS switch connects the
left and right input insert
return signals to the input
channel and is under
automation control.
The ST switch connects the
input channel post fader
signals to the stereo master
buss via the pan controls and is
under automation control.
l
pan
c
r l
pan
r
INS
ST
mute
MIDAS
12
The ST AUX controls (1 to 8)
give continuous adjustment of
the level sent from the input
channel (post pan) to the stereo
aux busses. The level
adjustment is from + 6dB to
off.
XL404
The left and right PAN
controls are used to place the
input channel signals within a
stereo mix. As well as image
placement, the controls can
also adjust the image width
from stereo through mono to
reverse stereo (left and right
crossed over). The controls
have a constant power law i.e.
-3dB at the centre position.
The MUTE switch mutes the
input channel at all points
except the insert send and pre
insert/eq direct output. This
switch is under automation and
auto mute group control.
MIDAS XL403
Input VCA Fader
isolate
isolate
solo
safe
1
1&2
2
3&4
3
5&6
10
5
0
4
7&8
5
9&10
6
7
8
15&16
5
10
group
assign
switches
1
1&2
2
3&4
3
5&6
10
5
0
7&8
5
9&10
6
20
30
7
13&14
8
15&16
5
10
dB
10
group
assign
switches
solo
safe
1
1&2
2
3&4
3
5&6
10
5
0
7&8
5
9&10
6
20
30
7
13&14
8
15&16
5
10
dB
10
group
assign
switches
solo
safe
1
1&2
2
3&4
3
5&6
10
5
0
7&8
5
9&10
6
20
30
7
13&14
8
15&16
5
10
dB
10
group
assign
switches
solo
safe
1
1&2
2
3&4
3
5&6
10
5
0
7&8
5
9&10
6
20
30
7
13&14
8
15&16
5
10
dB
10
group
assign
switches
solo
safe
1
1&2
2
3&4
3
5&6
10
5
0
7&8
5
9&10
6
20
30
7
13&14
8
15&16
5
10
dB
10
group
assign
switches
solo
safe
1
1&2
2
3&4
3
5&6
10
5
0
7&8
5
9&10
6
20
30
7
13&14
8
15&16
5
10
dB
10
group
assign
switches
1
1&2
2
3&4
3
5&6
10
5
0
7&8
5
9&10
6
5
10
11&12
20
30
9
40
50
60
solo
safe
4
11&12
9
40
50
60
isolate
4
11&12
9
40
50
60
isolate
4
11&12
9
40
50
60
isolate
4
11&12
9
40
50
60
isolate
4
11&12
9
40
50
60
isolate
4
11&12
9
10
solo
safe
4
11&12
13&14
isolate
7
13&14
8
15&16
20
30
9
40
50
60
dB
MIDAS
10
group
assign
switches
40
50
60
dB
XL403
FUNCTION: Fader control of 48 input levels to stereo bus, audio sub groups and VCA sub
groups with solo and mute group assign.
13
The ISOLATE switch
disconnects the input channel
from automation scene recall.
Scene storage is still active.
The SAFE switch disconnects
the input channel mute from
the 8 auto mute busses.
The GROUP ASSIGN
SWITCHES 1 to 10 are under
automation control and
perform 3 major functions:-
isolate
1
1&2
2
i. They are used to assign the
input channel post fader
signal to the 16 AUDIO
groups via the pan control.
ii. They are used to assign the
input channel to the 10 VCA
sub groups.
iii. They are used to assign
the input channel to the 8 auto
MUTE groups.
The function of these
switches is globally selected
by pressing the large AUDIO,
VCA or MUTE switches on
the AUTOMATION
CENTRAL CONTROL
panel. A fourth large switch
LOCK is used to disable all
the input channel group
assign switches throughout
the console so as to avoid
accidental operation. It is still
possible to view the switch
status of all three group types
when in this mode.
solo
safe
3&4
3
5&6
10
5
0
4
7&8
5
9&10
6
5
10
11&12
7
13&14
8
15&16
20
30
9
10
group
assign
switches
40
50
60
dB
MIDAS
14
The SOLO switch sends the
input channel signal to the PFL
mono and AFL stereo busses. If
the switch is pressed for a short
time it will latch on or off, but,
if it is held on for more than 1
second the latching is disabled
and when the switch is released
the channel solo will turn off.
The VCA INPUT fader gives
continuous adjustment of the
input channel level from +
10dB to off.
XL414
MIDAS
0
0
+10
aux sends
MUTE
+10
MUTE
SOLO
SOLO
fader
fader
C/O
C/O
1
1
2
2
3
3
4
4
v
c
5 a
6
6
7
7
g
r
o
u
p
8 s
g
r
o
u
p
8 s
9
9
10
10
0
0
+15 -15
-15
+15
treble
0
0
+15 -15
-15
bass
+48
+15
+48
+20 0
0
-30
+20
+50 -30
gain
c
r
pan
+50
gain
c
l
v
c
a
5
l
r
pan
MUTE
MUTE
SOLO
SOLO
SUB
SUB
grand master vca's
A
A
B
B
1
2
3
4
5
6
1
7
l
a
u
t
o
m
4 u
t
e
5
g
r
6 o
u
a
u
t
o
m
u
t
e
g
r
o
u
2
3
p
s
8
8
SAFE
TALK
TALK
INS
INS
ST
ST
c
c
pan
p
s
7
SAFE
r
l
pan
MIDAS XL414
Group Module
r
mute mute
solo
solo
10
5
0
5
10
20
30
40
50
60
dB
group
MIDAS
XL414
15
AUX SENDS
The aux send SOLO switches
send mono aux bus signals to
the PFL and AFL busses. If a
switch is pressed for a short
time it will latch on or off, but
if it is held on for more than 1
second the latching is
disabled and when the switch
is released the solo will turn
off.
The FADER CHANGE
OVER switches swap the
mono aux busses with the
audio group busses so that the
console can be used for
monitor applications.
MIDAS
XL414
0
+10
0
aux sends
+10
MUTE
MUTE
SOLO
SOLO
fader
fader
C/O
C/O
1
1
2
2
3
3
4
5
6
7
8
v
c
a
g
r
o
u
p
s
4
5
6
7
8
9
9
10
10
The aux send MUTE switches
mute the aux bus outputs.
The VCA GROUP switches
assign the mic/line returns to
v
c
a
g
r
o
u
p
s
MIC/LINE RETURNS
16
The AUX SEND controls give
continuous adjustment of the
mono aux bus output levels
from + 10dB to off.
MIC/LINE RETURNS
The BASS Controls give
continuous adjustment of
boost and cut from +15dB to 15dB with a 0dB centre
detent. The frequency is
fixed at 100Hz.
0
0
+15 -15
-15
treble
0
The 48V switches connect 48
volt phantom power to the
mic/line inputs as required for
condenser microphones etc.
The mic/line return PAN
controls place the return
signals within the stereo
master mix and have a
constant power law i.e. -3dB
at the centre position.
The SUB switches disconnect
the mic/line returns from the
stereo master buss and route
the signals to the audio sub
groups directly below,
without passing through the
pan control.
+15
0
+15 -15
-15
bass
+48
0
+20 0
-30
+50 -30
gain
pan
+15
+48
+20
+50
gain
c
c
l
The TREBLE controls give
continuous adjustment of boost
and cut from +15dB to -15dB
with a 0dB centre detent. The
frequency is fixed at 10KHz.
r
l
pan
MUTE
MUTE
SOLO
SOLO
SUB
SUB
The GAIN controls give
continuous adjustment of the
mic/line return gains from
+50dB to -30dB. The special
input circuits maintain full
headroom from mic level to
line level without the use of a
pad.
The mic/line return MUTE
switches mute the return
signals and are under
automation control.
The mic/line return SOLO
switches send the return
signals to the mono PFL and
stereo AFL busses. If a switch
is pressed for a short time it
will latch on or off, but if it is
held on for more than 1 second
the latching is disabled and
when the switch is released the
solo will turn off.
r
grand master vca's
A
A
B
B
1
1
2
The AUTO MUTE GROUP
switches assign the audio sub
groups to the 8 auto mute
groups.
3
4
5
6
7
The SAFE switches
disconnect the audio sub
group mutes from the auto
mute busses.
a
u
t
o
m
u
t
e
g
r
o
u
p
s
2
3
4
5
6
7
8
8
SAFE
SAFE
a
u
t
o
m
u
t
e
g
r
o
u
p
s
GROUPS
The GRAND MASTER VCA
switches assign the audio sub
groups to the 2 grand master
vca sub groups.
17
The INS switches connect the
group insert return signals to
the audio sub groups.
TALK
TALK
INS
INS
The ST switches connect the
post fader audio sub group
signals to the stereo master
bus via the pan controls.
ST
ST
c
c
l
The group MUTE switches
mute the audio groups at all
points except the insert send
and are under automation and
automute group control.
pan
r
l
pan
The TALK switches connect the
audio sub groups to the
COMMS module. When the
TALK TO GROUPS switch on
the COMMS module is
activated it is then able to route
its oscillator, pink noise,
external input, talk mic or
comms mic to the audio sub
groups.
r
mute mute
solo
solo
10
5
The GROUP FADERS give
continuous adjustment of the
audio sub group levels from +
0
5
10
20
30
40
50
60
dB
group
MIDAS
18
The group PAN controls place
the audio groups within the
stereo master mix and have a
constant power law i.e. -3dB at
the centre position.
XL414
The group SOLO switches send
the group input signals to the
mono PFL and stereo AFL
busses. If a switch is pressed for
a short time it will latch on or
off, but if it is held on for more
than 1 second the latching is
disabled and when the switch is
released the solo will turn off.
MIDAS XL412
Group Pod
group
aux
sends
returns
+21+
+18+
+15+
+12+
+9+
+6+
+3+
0
-3-6-9-12-15-18-21-24-27-30-33-36-
mix groups
group
aux
sends
returns
+21+
+18+
+15+
+12+
+9+
+6+
+3+
0
-3-6-9-12-15-18-21-24-27-30-33-36-
mix groups
group
aux
sends
returns
+21+
+18+
+15+
+12+
+9+
+6+
+3+
0
-3-6-9-12-15-18-21-24-27-30-33-36-
mix groups
group
aux
sends
returns
+21+
+18+
+15+
+12+
+9+
+6+
+3+
0
-3-6-9-12-15-18-21-24-27-30-33-36-
mix groups
group
aux
sends
returns
+21+
+18+
+15+
+12+
+9+
+6+
+3+
0
-3-6-9-12-15-18-21-24-27-30-33-36-
mix groups
group
aux
sends
returns
+21+
+18+
+15+
+12+
+9+
+6+
+3+
0
-3-6-9-12-15-18-21-24-27-30-33-36-
mix groups
group
aux
sends
returns
+21+
+18+
+15+
+12+
+9+
+6+
+3+
0
-3-6-9-12-15-18-21-24-27-30-33-36-
mix groups
MIDAS
group
aux
sends
returns
+21+
+18+
+15+
+12+
+9+
+6+
+3+
0
-3-6-9-12-15-18-21-24-27-30-33-36-
mix groups
XL412
FUNCTION: To meter 16 group outputs, 16 aux master sends and 16 line level returns.
19
The AUX switch changes the
function of the left and right
meters so that they monitor
the aux send outputs in place
of the audio group outputs.
The METERS monitor the
peak signal level of the group,
aux or returns as described
above but when the GLOBAL
METER CHANGE OVER
switch on the COMMS
module is activated the
meters monitor the group bus,
aux bus or line return input
amplifiers ( which ever is
selected ).
group
aux
sends
returns
+21+
+18+
+15+
+12+
+9+
+6+
+3+
0
-3-6-9-12-15-18-21-24-27-30-33-36-
mix groups
MIDAS
20
The RETURN switch changes
the function of the left and right
meters so that they monitor the
post fader line return signals. If
the AUX switch is not activated
the meters return to monitoring
the audio group outputs
regardless of the RETURN
switch position.
MIDAS XL413
Grand Master A
VCA Fader
1
i so
mute
2
i so
solo
mute
3
i so
solo
mute
4
i so
solo
mute
5
i so
solo
mute
6
i so
solo
mute
7
i so
solo
mute
8
i so
solo
mute
9
i so
solo
mute
i so
solo
mute
B
A
10
i so
solo
mute
i so
solo
mute
10
10
10
10
10
10
10
10
10
10
10
10
5
5
5
5
5
5
5
5
5
5
5
5
0
0
0
0
0
0
0
0
0
0
0
0
5
5
5
5
5
5
5
5
5
5
5
5
10
10
10
10
10
10
10
10
10
10
10
10
20
20
20
20
20
20
20
20
20
20
20
20
30
30
30
30
30
30
30
30
30
30
30
30
40
50
60
40
50
60
40
50
60
40
50
60
40
50
60
40
50
60
40
50
60
40
50
60
40
50
60
40
50
60
40
50
60
40
50
60
dB
dB
dB
dB
dB
dB
dB
dB
dB
dB
dB
dB
MIDAS
solo
XL413
FUNCTION: Moving fader control of 10 VCA sub groups and 2 grand masters with facility to meter and
solo listen.
21
The ISOlate switches
disconnect the vca sub group
faders and mutes from
automation screen recall.
Screen storage is still active.
1
i so
The vca MUTE switches
mute any post fader input
channel signals which are
assigned to the corresponding
mute
solo
Note i. If large numbers of inputs are
assigned to one vca sub group, there
will be a higher than usual signal level
sent to the solo busses when the vca
solo is active (+ 6 to + 10 dB approx.).
10
The VCA GROUP faders are
motorised and under
automation control. They give
continuous adjustment of the
vca sub group gains from
+10dB to off.
Note ii. When vca solo switches are
active the PFL buss also receives
signals from the vca sub group inputs
but it will NOT be a true
representation of the relative levels
within the vca sub group. This feature
is however useful as it allows
confirmation of signal present and
signal quality when the vca fader is
down or the vca sub group is muted. It
is therefore important to know the
status of the PFL MONITOR switch
on the COMMS module before using
the vca solo switches.
5
0
5
10
Note iii. If a vca solo switch is pressed
for a short time it will latch on or off,
but if it is held on for more than 1
second the latching is disabled and
when the switch is released the solo
will turn off.
20
30
40
50
60
dB
MIDAS
22
The vca SOLO switches are
used to monitor VCA sub
groups by creating a
corresponding AUDIO sub
group on the stereo AFL busses.
All input channels and line
returns that are assigned to a
specific vca sub group will be
summed onto the solo busses
when that vca solo is active.
The ISOlate A and B switches
disconnect the grand master
vca A and B sub group faders
and mutes from automation
screen recall. Screen storage
is still active.
The vca MUTE A and B
switches mute any AUDIO
group post fader signals
which are assigned to the
grand master A or B vca sub
groups.
A
i so
mute
10
The grand master A and B
VCA GROUP faders are
motorised and under
automation control. They give
continuous adjustment of the
grand master vca sub group
gains from +10dB to off.
5
0
5
10
20
solo
The grand master A and B vca
SOLO switches are used to
monitor the grand master A and
B VCA sub groups by creating
a corresponding AUDIO sub
groups on the stereo AFL
busses. All AUDIO sub groups
that are assigned to grand
master vca A or B will be
summed onto the solo busses
when the vca solo is active.
Note i. When a grand master vca solo
switch is active the PFL buss also
receives signals but they are NOT a
true representation of the relative
levels within the grand master vca sub
group. This feature is however useful
as it allows confirmation of signal
present and signal quality when the
grand master vca fader is down or
muted. It is therefore important to
know the status of the PFL
MONITOR switch on the COMMS
module before using the grand master
vca solo switches.
Note ii. If a grand master vca solo
switch is pressed for a short time it
will latch on or off, but if it is held on
for more than 1 second the latching is
disabled and when the switch is
released the solo will turn off.
30
40
50
60
dB
23
24
MIDAS
XL421
+18
+15
+12
+9
+6
+3
0
-3
-6
-9
0
+10
record 2
mute
+18
+15
+12
+9
+6
+3
0
-3
-6
-9
0
+10
record 1
mute
mute all
solo in place
INS
VCA
mute
SOLO
10
5
+21
+18
+15 0
+12
+9
0
+6
+3 5
MIDAS XL421
Master Module
-3
-6
-9 10
-12
-15
-18
-21
-24 20
-27
-30
-33 30
-36
40
50
60
dB dB
mono
output
aux i/p mutes
ON
matrix
send pre
INS
left
INS
right
c
l
r
balance
mute mute
solo
solo
10
5
0
5
10
20
30
40
50
60
dB
masters
MIDAS
XL421
25
MIDAS
XL421
0
The record METERS monitor
the peak signal level of the
left and right record outputs
(which ever is the highest ).
+18
+15
+12
+9
+6
+3
0
-3
-6
-9
+10
record 2
The RECORD controls ( 1 and
2 ) give continuous adjustment
of the stereo record outputs
from + 10dB to off. The record
signals are derived from the pre
insert master left and right
signals.
The record MUTE switches
mute the record outputs.
mute
0
+18
+15
+12
+9
+6
+3
0
-3
-6
-9
+10
record 1
mute
The MUTE ALL switch
effectively switches the
console off by muting all
outputs.
mute all
solo in place
26
The SOLO IN PLACE switch
disconnects the three pre insert
master signals ( left, mono and
right ) and replaces them with
the stereo AFL solo busses.
This does not effect the master
to matrix feeds which means the
matrix mixes can be "solo in
placed" on the master outputs.
The mono INS switch
connects the mono insert
return signal to the mono mix.
The VCA switch connects the
mono vca fader to the stereo
master fader so that the mono
output tracks any changes of
the stereo master fader.
The mono SOLO switch
sends the mono master signal
to the PFL and AFL solo
busses. If the switch is
pressed for a short time it will
latch on or off, but if it is held
on for more than 1 second the
latching is disabled and when
the switch is released the solo
will turn off. The master mix
signal can not be sent to the
solo busses while any other
solo is active.
The mono METER monitors
the peak level of the post
fader mono signal. When the
GLOBAL METER CHANGE
OVER switch on the
COMMS module is activated
the meter monitors the mono
bus summing amplifier
output.
INS
The mono MUTE switch mutes
the mono output but not the
mono insert send. This switch is
under automation control.
VCA
SOLO
mute
10
+21 5
+18
+15
+12
+9 0
+6
+3
0
-3
-6 5
-9
-12
-15
-18 10
-21
-24
-27
-30 20
-33
-36
The mono FADER gives
continuous adjustment of the
mono output level from + 10dB
to off.
30
40
50
60
dB dB
mono
output
aux i/p mutes
The AUX I/P MUTE mutes
every aux line return input on
the GROUP modules.
27
MATRIX SEND PRE. Feeds
to the matrix modules from the
stereo busses are post fader as
a default. When the MATRIX
SEND PRE is active, the feed
changes to pre fader and pre
insert.
ON
matrix
send pre
INS
left
INS
right
The INS LEFT and RIGHT
switches connect the master
left and right insert return
signals to the stereo master
mix.
c
l
r
balance
The stereo master SOLO
switches send stereo master
signals to the PFL mono and
AFL stereo busses. If the
switch is pressed for a short
time it will latch on or off, but
if it is held on for more than 1
second the latching is disabled
and when the switch is
released the solo will turn off.
The master mix signal can not
be sent to the solo busses while
any other solo is active. This
means that they can be left on
to provide a stereo master
signal in the headphones
which will be overridden if
any other solo is activated on
the console.
mute mute
solo
The stereo master MUTE
switches mute the stereo master
outputs but not the insert sends.
These switches are under
automation control.
solo
10
5
The stereo MASTER FADER
gives continuous adjustment of
the stereo master mix level
from + 10dB to off.
0
5
10
20
30
40
50
60
dB
masters
MIDAS
28
The BALANCE (pan) control
gives continuous and
reciprocal adjustment of the
stereo left and right signal
levels by + 3dB to off. This
allows fine adjustment of the
left, right power levels and
imaging.
XL421
MIDAS XL422
Master Pod
l
r
l solo r
change over
change over
change over
change over
+21+
+18+
+15+
+12+
+9+
+6+
+3+
0
-3-6-9-12-15-18-21-24-27-30-33-36-
+21+
+18+
+15+
+12+
+9+
+6+
+3+
0
-3-6-9-12-15-18-21-24-27-30-33-36-
+21+
+18+
+15+
+12+
+9+
+6+
+3+
0
-3-6-9-12-15-18-21-24-27-30-33-36-
+21+
+18+
+15+
+12+
+9+
+6+
+3+
0
-3-6-9-12-15-18-21-24-27-30-33-36-
+21+
+18+
+15+
+12+
+9+
+6+
+3+
0
-3-6-9-12-15-18-21-24-27-30-33-36-
+21+
+18+
+15+
+12+
+9+
+6+
+3+
0
-3-6-9-12-15-18-21-24-27-30-33-36-
masters
MIDAS
XL422
pfl
local
1
2
matrix
3
4
matrix
5
6
matrix
7
matrix
8
FUNCTION: Metering for master stereo, solo, PFL and local busses plus matrix outputs and stereo aux
send outputs.
29
Master Stereo Bus Metering
r
l
The METERS monitor the
peak signal levels of the
stereo master left and right
outputs.
When the GLOBAL METER
CHANGE OVER switch on
the COMMS module is
activated the meters monitor
the master left and right bus
amplifiers.
+21+
+18+
+15+
+12+
+9+
+6+
+3+
0
-3-6-9-12-15-18-21-24-27-30-33-36-
master
MIDAS
30
XL422
Solo, PFL and Local Metering
l solo r
+21+
+18+
+15+
+12+
+9+
+6+
+3+
0
-3-6-9-12-15-18-21-24-27-30-33-36-
pfl
The meters monitor the peak
signal level of the stereo AFL
left and right solo busses or the
PFL and local output level.
The change over is automatic
as part of the PFL Monitor
switch on the COMMS
module.
local
31
Matrix and Stereo Master Aux Send Metering
change over
+21+
+18+
+15+
+12+
+9+
+6+
+3+
0
-3-6-9-12-15-18-21-24-27-30-33-36-
1
2
matrix
32
The CHANGE OVER switches
change the function of the left
and right meters so that they
monitor the stereo aux send
outputs in place of the matrix
outputs.
The METERS monitor the peak
signal level of the matrix or
stereo aux outputs as described
above but when the GLOBAL
METER CHANGE OVER
switch on the COMMS module
is activated the meters monitor
the matrix bus or stereo aux bus
amplifiers ( which ever is
selected ).
MIDAS
XL431
call
300
1k
OSC
external
10k
100
ON
freq
0
PINK
level
+6
TALK
to auxes
TALK
to groups
TALK
to matrix
TALK
to mono
TALK
to left
TALK
to right
0
ON
LINK
+6
comms
talk mic
0
talk
level
+6
talk
1
2
a
u
t
o
m
u
t
e
g
r
o
u
p
MIDAS XL431
Communications Module
3
4
5
m
a
s
t
e
r
s
6
7
8
SOLO
add mode
C/O
global
metering
PFL
monitor
local output
fader
0
C/O
MUTE
+10
level
headphone
mute
solo on/clear
10
5
0
5
10
20
30
40
50
60
dB
comms
MIDAS
XL431
33
MIDAS
XL431
call
The OSC switch connects the
oscillator to the talk system.
The EXTERNAL ON switch
connects the external talk
input and output to the talk
system.
300
1k
OSC
external
100
10k
ON
freq
0
The PINK noise switch
connects pink noise to the talk
system.
PINK
The TALK TO AUXES
switch sends the talk system
signals to ALL the aux
busses.
TALK
to auxes
TALK
to groups
TALK
to matrix
TALK
to mono
TALK
to left
TALK
to right
The TALK TO MATRIX
switch sends the talk system
signals to any matrix buss
which have their MATRIX
module TALK switch active.
The TALK TO LEFT switch
sends the talk system signals
to the left master bus.
The COMMS ON switch
sends the comms headset mic
amplifier signal to the comms
The LINK switch connects
the talk system into the
comms system so that talk
mic, headphones and local
output can send and receive
( respectively ) "clearcom"
signals as well as the headset.
The TALK switch activates
the talk mic on the talk
system and dims the local
outputs by 20dB to stop howl
round. When in LINK mode
the COMMS ON switch
activates the talk mic on the
comms system and the side
tone cancel circuit stops howl
round.
34
level
+6
comms
talk mic
+6
talk
The FREQ control gives
continuous adjustment of the
oscillator frequency from
100Hz to 10K.
The talk LEVEL control gives
continuous adjustment of all the
talk inputs except the talk mic
and has a range from + 6dB to
off.
The TALK TO GROUPS switch
sends the talk system signals to
any group buss which have their
GROUP module TALK
switches active.
The TALK to MONO switch
sends the talk system signals to
the mono master bus.
The COMMS control gives
continuous adjustment of the
"clearcom" signal levels sent to
the headset, headphones and
local output. The level
adjustment is from + 6dB to off.
The TALK XLR socket accepts
balanced 150 Ohm microphone
signals from - 50dBu to - 20dBu
and uses an auto ranging gain
system to bring the level to
nominal 0dBu line level.
0
talk
level
i. It illuminates when an
incoming "clearcom" call is
expected.
ii. It fires a DC pulse when
pressed to signal "clearcom"
devices (by illuminating their
call lamps) that an outgoing call
is to be made.
The TALK TO RIGHT switch
sends the talk system signals to
0
ON
LINK
+6
The CALL switch and indicator
has two functions:-
The TALK control gives
continuous adjustment of the
talk mic amplifier signal from +
6dB to off. The talk control
does not act on signals sent to
the comms system in LINK
mode.
1
a
u
t
o
m
u
t
e
g
r
o
u
p
The SOLO ADD MODE
switch allows multiple
channel access to the solo
busses. When the solo add
mode is off the action of
pressing a solo switch will
cancel any other active solo
except for the master solo
switches where the canceling
effect is only temporary ( see
XL421 Master Module on
page 28 ).
The PFL MONITOR switch
sends the mono PFL solo bus
signal to the headphones and
local outputs in place of the
stereo AFL solo bus signals.
m
a
s
t
e
r
s
2
3
The AUTO MUTE GROUP
MASTER switches ( 1 to 8 )
activate the mute circuits on any
appropriately mute group
assigned input channel or audio
group.
4
5
6
7
8
SOLO add mode
C/O
global
metering
PFL
monitor
The GLOBAL METER
CHANGE OVER switch
changes the operation of every
meter on the console except the
comms meters and the record
meters. The "normal" meter
operation is to monitor pre fader
on input channels and post fader
on all other signals. When the
global meter change over is
active the meters change to
monitor input amplifiers or bus
amplifiers ( as appropriate ) on
all signals.
35
The FADER CHANGE
OVER switch swaps the local
output level control and mute
with the headphone fader and
mute.
local output
fader
0
C/O
MUTE
The local output MUTE
switch mutes the local
The local output LEVEL
control gives continuous
adjustment of the local output
+10
level
The HEADPHONE MUTE
switch mutes the headphone
outputs.
headphone
mute
solo on/clear
The SOLO ON / CLEAR
switch and indicator has two
functions:i. It illuminates when any solo
switch (except a master solo
switch) is active.
ii. When pressed it clears any
active solo switches (except
master solo switches).
10
5
The HEADPHONE fader gives
continuous adjustment of the
headphone level from + 10dB to
0
5
10
20
30
40
50
60
dB
comms
MIDAS
36
XL431
37
MIDAS
XL441
stereo
aux
MUTE
0
SOLO
+10
o
o
MTX
master
0
0
+6
o
o
o
o
+6
mix 1
0
0
+6
o
o
o
o
+6
mix 2
0
0
+6
o
o
o
o
+6
mix 3
0
0
+6
o
o
o
o
+6
mix 4
0
0
+6
o
o
o
o
+6
mix 5
0
0
+6
o
o
o
o
+6
mix 6
0
0
+6
o
o
o
o
+6
mix 7
0
0
+6
o
o
o
o
+6
mix 8
0
0
+6
o
o
o
o
+6
mix 9
0
0
+6
o
o
o
o
+6
mix 10
0
0
+6
o
o
o
o
+6
mix 11
0
0
+6
o
o
o
o
+6
mix 12
0
0
+6
o
o
o
o
+6
mix 13
0
0
+6
o
o
o
o
+6
mix 14
0
0
+6
o
o
o
o
+6
mix 15
0
0
+6
o
o
o
o
+6
mix 16
global pre
0
0
+6
+6
o
o
o
o
ON
0
0
+6
+6
o
o
o
o
masters left
masters right
TALK
TALK
INS
INS
mute mute
solo
solo
10
5
0
5
10
20
30
40
50
60
dB
matrix
38
MIDAS
XL441
MIDAS XL441
Matrix Module
MIDAS
o
o
0
0
+6
+6
mix 1
0
+6
+6
o
o
0
mix 2
0
+6
+6
o
o
0
0
0
+6
+6
o
o
o
o
mix 3
0
0
+6
+6
o
o
o
o
mix 4
0
0
+6
+6
o
o
o
o
mix 5
0
0
+6
+6
o
o
o
o
mix 6
+6
+6
0
0
+6
+6
o
o
o
o
mix 9
0
+6
+6
o
o
0
mix 10
0
+6
+6
o
o
0
mix 11
0
+6
+6
o
o
0
mix 12
0
+6
+6
o
o
0
mix 13
0
+6
+6
o
o
0
mix 14
0
0
+6
+6
o
o
o
o
o
o
o
o
o
o
0
mix 8
o
o
o
o
0
o
o
o
o
mix 7
mix 15
0
+6
+6
o
o
0
mix 16
ON
+10
master
o
o
o
o
MTX
o
o
The MIX controls ( 1 to 16 )
give continuous adjustment of
the audio sub group levels
sent to the matrix mixes from
+ 6dB to off. If the FADER
CHANGE OVER switch on
the GROUP module is active
the mono aux bus will route
to the matrix mix in place of
the audio sub group.
0
The STEREO AUX MASTER
control gives continuous
adjustment of the stereo aux
output level from + 10dB to off.
SOLO
o
o
The stereo aux SOLO switch
sends stereo aux signals to the
PFL mono and AFL stereo
busses. If the switch is
pressed for a short time it will
latch on or off, but if it is held
on for more than 1 second the
latching is disabled and when
the switch is released the solo
will turn off.
stereo
aux
MUTE
o
o
The stereo aux MUTE switch
mutes the stereo aux outputs.
XL441
The MTX switch sends the pre
fader stereo aux bus signals to
the matrix mix directly below
so that the console can be used
for monitor applications.
The GLOBAL PRE ON switch
changes the audio sub group
signals that are routed via the
mix controls to the matrix from
post fader to pre fader.
global pre
39
0
+6
+6
o
o
o
o
0
masters left
0
0
+6
+6
o
o
o
o
The MASTER LEFT controls
give continuous adjustment of
master left signals that are
sent to the matrix mixes. The
adjustment is from + 6dB to
off.
masters right
The TALK switches connect
the matrix busses to the
COMMS module. When the
TALK TO MATRIX switch
on the COMMS module is
activated it is then able to
route its oscillator, pink noise,
external input, talk mic or
comms mic to the matrix mix.
TALK
TALK
INS
INS
mute mute
solo
solo
10
5
The MATRIX FADERS give
continuous adjustment of the
matrix levels from + 10dB to
off.
0
5
10
20
30
40
50
60
dB
matrix
MIDAS
40
XL441
The MASTER RIGHT controls
give continuous adjustment of
master right signals that are sent
to the matrix mixes. The
adjustment is from + 6dB to off.
The INS switches connect the
matrix insert return signals to
the matrix mixes.
The matrix MUTE switches
mute the matrix outputs but not
the insert sends. These switches
are under automation control.
The matrix SOLO switches
send signals to the PFL mono
and AFL stereo busses. If the
switch is pressed for a short
time it will latch on or off, but
if it is held on for more than 1
second the latching is disabled
and when the switch is
released the solo will turn off.
These solo switches can not be
operated if the console is
being used in SOLO IN
PLACE mode. This is a safety
feature which prevents matrix
output signals from being
routed back to their inputs via
the master matrix feed.
MIDAS XL443
Automation Control
group assignment mode
audio
vca
mute
safe
automation system
by
out board electronics
scene name
scene number
internal
a1
alt. scenes
memory
external
main
point
hours
mins
secs
time code
frames
a2
program
store
memory
system
last
now
next
recall
VCA, Audio and Automute Group Assign
1. The AUDIO switch changes the function of every GROUP ASSIGN SWITCH
and its corresponding LED indicator on the INPUT channels so that AUDIO
group assignment can be viewed or changed.
2. The VCA switch changes the function of every GROUP ASSIGN SWITCH
and its corresponding LED indicator on the INPUT channels so that VCA group
assignment can be viewed or changed.
3. The MUTE switch changes the function of every GROUP ASSIGN SWITCH
and its corresponding LED indicator on the INPUT channels so that MUTE group
assignment can be viewed or changed.
4. The SAFE switch changes the function of the audio, vca, and mute switches
above so that the groupings can be viewed only. i.e. all GROUP ASSIGN
SWITCH on the INPUT channels will be disabled.
41
MIDAS
XL4 Automation system
System operation
while every effort has been made to ensure it is accurate, there may be changes dependent on the software
version. This has been writen for Version 25.A
Should you find an error, or you find a section ambiguous, please let MIDAS know so that we may
correct the problem.
Midas XL4 Automation system
Information about this manual
In this document the following colours have been used to aid the text:
Descriptions of what can be seen on the Alpha-numeric displays are in green, such as
‘OVERSTORE’.
When a button is referred to, its name is in blue, such as ‘STORE’.
Functions or operation names are in red, such as ‘SCENE NAME’.
Warnings and important notes have their headings in magenta, such as ‘WARNING’.
Page 2
Midas XL4 Automation system
Contents
Introduction.
5
5
6
7
7
7
7
8
8
9
9
9
10
10
10
10
10
10
10
10
11
11
11
11
11
11
11
11
11
11
Automation system overview.
The Central control unit.
Operating the system.
Input fader mode control.
System Start Up
Unlock The Automation System
Scene Storage
Scene Recall
System menu
Unlock
Lock
Chmidiout
Chmidin
Automidi
RSLink
Faders
Mutes
Matrix
Contacts
XL4 Size
Mem Size
Format
Test 1
Test 2
Test 3
Test 4
Open
Restrict
Totclear
Total Clear Format Procedure
12
Store Menu
15
15
16
16
16
16
16
16
16
16
17
17
17
New Scene
Overstoring
X-FADE (Crossfade).
Expand
Insert.
Delete.
Copy.
Edit.
Edit scene name.
Edit MIDI In
Midi Clear
Edit midi Out
Page 3
Midas XL4 Automation system
Contents Cont.
Memory menu.
18
18
18
18
18
18
Toggle
Internal.
External.
Copy all.
Clear all.
Alternate Buttons
19
Using the system - general hints and tips.
19
Page 4
Midas XL4 Automation system
Introduction.
Automation system overview.
The MIDAS XL4 is an ‘intelligent’ live mixing console. It utilises microprocessor technology to
provide the operator with unprecedented features for a live console, whilst remaining easy to use and
retaining the familiar look of a normal console.
The update speed of the MIDAS XL4 automation was a high priority of the system design, the
entire console is capable of updating itself over fifty times a second. Thus the delay between pressing the
‘RECALL’ button and the desk update is negligible.
Some sound engineers harbour concerns about giving control of a sound system over to
computers, in the case of the MIDAS XL4 these concerns are unfounded. For one thing, the MIDAS XL4
is a ‘computer assisted’ console. Most of the audio functions may be controlled without the aid of
microprocessors, and all audio functions may be controlled without the central control CPU.
With the exception of the central controller CPU, the microprocessor chips used are ‘single chip
micro’s’ or ‘microcontrollers’. The CPU, program memory, RAM, data converters and timers are all
housed in a single chip. This gives the utmost in reliability as the ‘computer’ itself is protected from the
outside world by it’s input/output ports.
Fifty microprocessors (in a standard 48 input console) split the workload, resulting in high speed
operation and also providing the large degree of protection required for live performances. Should one
microprocessor ‘fall over’ the others will continue to operate normally.
In addition, the system has been designed is such a way that if a microprocessor does fail, the
audio circuits controlled by that unit will usually remain active in the state last recalled. The chances of a
microprocessor failing in such a way as to reconfigure its audio control circuits are extremely remote. The
most likely indication that a microprocessor has failed will be that it fails to respond to the central control
CPU. The audio circuits will continue to work.
Important controls such as the MUTE switch, whilst they can be over-ridden by microprocessor
control, will work without the intervention of a microprocessor.
Each input channel has its own microprocessor, the VCA master section has one and the final
microprocessor is in the central control section.
All the microprocessors are located in the fader bay of the XL4. No audio passes through the fader
bay, allowing a high degree of immunity to digital breakthrough to be achieved.
The use of multiple processors also means that the software, instead of being one large program, is
broken up into a number of small programs which are easier to test and debug, minimising the chances of
software problems.
Page 5
Midas XL4 Automation system
The Central control unit.
The MIDAS XL4 Automation is controlled from the central control CPU mounted to the right of
the VCA Master faders.
The top four switches, labelled ‘AUDIO’, ‘MUTE’, ‘VCA’ & ‘LOCK’ are not directly part of the
central control CPU, these switches directly control the operating mode of the input fader automation.
(See Input fader mode control, later).
The central controller CPU has been developed by OUTBOARD ELECTRONICS Ltd. in
conjunction with MIDAS. The operation of the MIDAS XL4 Automation system is based on the control
system used on the OUTBOARD ELECTRONICS SS20 Moving fader system. Many operators used to
the SS20 will find operating the MIDAS XL4 Automation system very familiar.
Control of the system is achieved with eight buttons and a ‘jogwheel’. Operator feedback is done with
two displays, a four character ‘scene number’ display and an eight character ‘scene name’ display.
Auxiliary functions are accessed through a series of menus.
The main 1 Meg of internal memory is battery backed up and may also be downloaded on to a memory
card.
Page 6
Midas XL4 Automation system
Operating the system.
Input fader mode control
The top four switches of the central control unit, labelled ‘AUDIO’, ‘MUTE’, ‘VCA’ & ‘LOCK’
directly control the operating mode of the input fader automation.
With the ‘AUDIO’ mode enabled, the fader bay switch bank controls the audio group routing.
Only switches 1-8 are used. Switches 9 & 10 are used to trigger a input moving fader calibration on the
input channel (when fitted, if no moving fader is fitted the function will time out). To use this function
press switch 9. The LEDs associated with switches 9 & 10 will flash. This indicates that the clear function
is ‘armed’. Pressing switch 10 will clear the channel.
If switch 9 is pressed, arming the calibrate function, and it is not desired to calibrate the channel,
pressing switch 9 again will disarm the clear function.
With the ‘MUTE’ mode enabled, the fader bay switch bank controls the automute assignments.
Only switches 1-8 are used for automutes. Switches 9 & 10 are used for the channel clear function.
The channel clear function resets all computer controlled settings on that channel to off. To use
this function press switch 9. The LEDs associated with switches 9 & 10 will flash. This indicates that the
clear function is ‘armed’. Pressing switch 10 will clear the channel.
If switch 9 is pressed, arming the clear function, and it is not desired to clear the channel, pressing
switch 9 again will disarm the clear function.
With the ‘VCA’ mode enabled, the fader bay switch bank controls the VCA assignments.
When the system is ‘locked’ (with the ‘LOCK’ switch illuminated) the three operating modes may
be called up, allowing the state of the switches to be seen, but the switches will not operate. This is to
prevent accidental operation of the fader bay switches.
SystemStart up
Following power up, the alpha-numeric display will briefly show the software release version,
followed by ‘READY’. This indicates that the initialisation is complete and the system is ready for use.
The system powers up in the ‘locked’ state. In this state scenes may be recalled but not stored. All
functions which modify the stored data are disabled until the system has been unlocked.
Unlocking The System
To unlock the system after start up the following procedure must be followed. Press the SYSTEM
button and UNLOCK will be displayed in the right hand screen. Press the YES button and the left hand
window will change to read 1200, using the jog wheel alter this screen until the correct password is
displayed. This password is found on the insert provided with this manual or can be obtained from Midas.
Page 7
Midas XL4 Automation system
Scene storeage
Storing scenes may only be done when the system is unlocked.
To store a scene, first display the position you wish to store the scene in on the left hand window
by using the jog wheel. Scene 0000 is a preset scene and can not be overstored. Once the required position
is displayed press the ‘STORE’ button. The display will respond with ‘NEW’, if the scene does not yet
exist or ‘OVERSTORE’ if the scene does exist.
Following a scene store operation, the scene number is incremented by 1 or 0.1 depending on wether the
scene was expanded previously.
Scene recall
Recalling scenes is achieved using the ‘LAST’, ‘NOW’ and ‘NEXT’ buttons, and also using the
jogwheel.
Pressing the ‘NEXT’ button causes the system to step to the next scene number in memory and
recall it to the console. After the last scene has been recalled, pressing ‘NEXT’ will cause the display to
show ‘END’ and no other operation will occur.
Pressing the ‘LAST’ button causes the system to step to the previous scene number in memory
and recall it to the console. After the first scene has been recalled, pressing ‘NEXT’ will cause the display
to show ‘START’ and no other operation will occur.
Pressing ‘NOW’ will recall the scene number currently shown in the left hand section of the
display. This number may be adjusted using the jogwheel.
When the system is locked the jogwheel will only use the numbers of scenes that exist in memory.
No operations other than recall are available while the system is locked.
When the system is unlocked the jogwheel adjust the scene number in increments of one whether
the scene exists or not. Attempting to recall a scene number which does not exist will result in the
message ‘EMPTY’.
Page 8
Midas XL4 Automation system
System menu.
To call the system menu, press the ‘SYSTEM’ button. The display will show ‘SYSTEM’ and the
‘SYSTEM’, ‘NO’ and ‘YES’ buttons will flash.
The jogwheel may then be used to scroll through the system options.
SYSTEM MENU
–
UNLOCK
LOCK
CHMIDOUT
CHMIDIN
AUTOMIDI
RS-LINK
FADERS
MUTES
MATRIX
CONTACTS
XL4_SIZE
MEM.SIZE
FORMAT?
TEST- 1
TEST- 2
TEST- 3
TEST- 4
TEST- 5
OPEN
RESTRICT
TOTCLEAR
User Options
System Set up
Options
UNLOCK
To unlock the system, press the ‘YES’ button while the display is showing ‘UNLOCK’. The jogwheel
may then be used to adjust the password number shown in the left section of the display.
When the correct password number is shown, press ‘YES’. If the number is accepted the display will
briefly show ‘OK’. This indicates that the system is unlocked. The display will then return to showing the
title of the current scene.
If the display returns directly to the scene title without showing ‘OK’ then the number has not been
accepted and the system is still locked.
LOCK
To lock the system, rotate the jogwheel until the ‘LOCK’ option is displayed. Pressing ‘YES’ will then
lock the system, this will be indicated by the display briefly showing ‘DONE’. The display will then
return to showing the title of the current scene.
Page 9
Midas XL4 Automation system
CHMIDOUT
This option allows the output MIDI Channel to be selected. To set the channel number, press the ‘YES’
button while the display is showing ‘MIDI CH’. The jogwheel can then be used to select the required
channel. When the required channel number is displayed, press the ‘YES’ button to enter it.
CHMIDIN
This option allows the input MIDI Channel to be selected. This is the channel down which program
changes can be sent that the XL4 will respond to when set up in the edit menu, see store menu. To set the
channel number, press the ‘YES’ button while the display is showing ‘MIDI CH’. The jogwheel can then
be used to select the required channel. When the required channel number is displayed, press the ‘YES’
button to enter it.
AUTOMIDI
This function when enabled automatically places a midi out message with every scene stored (0 to 99
only). This message is sent out on the midi channel selected using the MIDI CH selection. For example if
scene 0100 is stored after automidi is enabled, when recalled a program change one will be sent from the
midi out port on the midi channel selected in MIDI CH.
RS-LINK
This function allows you to enable and disable the RS link on the rear of the console (RS232-2). Pressing
the ‘YES’ button when this is displayed in the left hand display will then allow you to choose YES or NO
using the jog wheel. Once you have choosen pressing ‘YES’ will save your choice and drop you back out
of the menu. This function is used when 2 XL4s are linked, enabling the one consoles automation to
follow the others. You can either make one the consoles a master slave combination by disabling the
RS232 in one console or control the recall of the automation from either console if they are both enabled.
FADERS
This option is not used. However if the memory has been corrupted for some reason (during servicing for
example) this value should be set to zero. This procedure is decribed in the total clear and format
procedure.
MUTES
This option is not used. However if the memory has been corrupted for some reason (during servicing for
example) this value should be set to zero. This procedure is decribed in the total clear and format
procedure.
MATRIX
This option is not used. However if the memory has been corrupted for some reason (during servicing for
example) this value should be set to zero. This procedure is decribed in the total clear and format
procedure.
CONTACTS
This option is not used. However if the memory has been corrupted for some reason (during servicing for
example) this value should be set to zero. This procedure is decribed in the total clear and format
procedure.
Page 10
Midas XL4 Automation system
XL4 SIZE
This number should be set to 48. However if the memory has been corrupted for some reason (during
servicing for example) this value should be set to zero. This procedure is decribed in the total clear and
format procedure.
MEM SIZE
This number should be set to 31. However if the memory has been corrupted for some reason (during
servicing for example) this value should be set to zero. This procedure is decribed in the total clear and
format procedure.
FORMAT
Once the system settings have been entered, this option is used to format the memory
ready for use. This is done by pressing ‘YES’ when the display is showing ‘FORMAT’.
Test 1
This sets the speed of Test 2 and 3
Test 2
This cycles through the scenes at a speed set by Test 1.
Test 3
This is a continuous read/write test as a speed set by Test 1.
Test 4
This is a system memory test, the automation control system will write and read to each bit of
memory individually and check for any errors. This test is extreamly time consuming and special
equipment is needed to see any results as there is no decipherable error messages are shown on the display
if a fault is found.
WARNING!
During the test modes, the motorised faders should be disabled using the ‘ISOLATE’ switch.
Allowing the faders to attempt to keep up with the test function for long periods may damage the servo
drivers.
OPEN
This allows you to enter the password which then enables access to the RESTRICT function in the
menu. To access this press the YES button the left hand screen will then change to read 3200, using the
jog wheel enter the correct password and press the YES button. This password is found on the insert
provided with this manual or the separate password pdf provided.
RESTRICT
This function is only accessible after the correct password has been entered into the OPEN option.
This function allows Midas to look at the last 8 operations of the automation control system and aws
placed in for software debugging purposes.
Total Clear
This function allows you to do a complete low level format of the automation control system
memory. This procedure is shown next : WARNING if this procedure is carried out all user information
will be lost.
Page 11
Midas XL4 Automation system
Total Clear and Format Procedure
C O N F IR M b u tto n
T O TA L C L E A R A N D F O R M A T P R O C E D U R E
P re ss S Y S T E M b u tto n o n
C P U panel
S c ro ll to T O T C L E A R a n d
p re ss C O N F IR M (la rg e
g re e n b u tto n )
D isp la y p ro m p ts R U S U R E ,
p re ss C O N F IR M
T h e n a t PA S S W O R D ?
p ro m p t, sc ro ll to 2 3 4 5 a n d
C O N F IR M
Page 12
Midas XL4 Automation system
D isp la y p ro m p ts T O TA L
C L E A R , th en WA IT, th e n
DONE
R e se t th e c o n so le b y tu rn in g p o w e r o ff/o n o r b y p ressin g th e re set b u tto n w ith in th e
v en t b elo w th e ca rd so ck e t.
Page 13
D isp la y p ro m p ts FA D E R S
th e n 0 0 0 S E T U P, P ress
C O N F IR M
S cro ll to 2 3 4 5 , P re ss
D isp la y p ro m p ts 2 2 2 2
PA S S W O R D ?
P re ss S Y S T E M , S c ro ll to
FA D E R S , P re ss C O N F IR M
S cro ll to M U T E S ,P ress
C O N F IR M , d isp la y
p ro m p ts 0 0 0 S E T U P, p ress
C O N F IR M
S cro ll to M AT R IX , P re ss
C O N F IR M , d isp la y
p ro m p ts 0 0 0 S E T U P, p ress
C O N F IR M
S cro ll to C O N TA C T S ,
P re ss C O N F IR M , d isp la y
p ro m p ts 0 0 0 S E T U P, p ress
C O N F IR M
Midas XL4 Automation system
If d isp lay p ro m p ts 0 3 1
S E T U P, p re ss C O N F IR M
If d isp lay p ro m p ts 0 0 0
S E T U P, scro ll to 0 3 1 , p ress
C O N F IR M
S cro ll to F O R M AT, P ress
C O N F IR M
S cro ll to M E M S IZ E , P ress
C O N F IR M
If d isp lay p ro m p ts 0 4 8
S E T U P, p re ss C O N F IR M
If d isp lay p ro m p ts 0 0 0 0
S E T U P, scro ll to 0 4 8 , p ress
C O N F IR M
S cro ll to X L 4 S IZ E ,
p ress C O N F IR M
D isp la y p ro m p ts WA IT,
th en D O N E , th en d isp lay s
S TA RT
It is ad v isa b le to rep eat th is p ro ce d u re at th e b e g in n in g o f ea c h n e w p ro d u ctio n , first m ak in g su re th at
y o u h av e sa v e d y o u r d ata to y o u r e x te rn al m e m o ry d ata card .
Page 14
Midas XL4 Automation system
Store Menu
There are 2 possible menus available when the ‘STORE’ button is pressed dependent on whether
you are storeing a new scene or editing an existing one.
If no scene is present in the location you are trying to store to (displayed in the left hand window) the
menu you may access is shown below.
STORE –
NEW
X-FADE
If a scene has previously been stored in the location you are trying to store to (displayed in the left hand
window)
Overstore -
OVERSTORE
X FADE
EXPAND
INSERT
DELETE
EDIT SC.NAME
MIDI_IN ------Midi CLR
MIDI OUT -----
Program Number ***
1-Ch No-
Prog
Note on
Note Off
8-Ch No-
Prog
Note On
Note Off
9- Exit
New scene.
If the scene number does not yet exist, the display will respond with ‘NEW’. To create the scene
press ‘YES’. The scene will be created and the current status of the console will be stored in it.
The scene number may be adjusted using the jog wheel before pressing ‘STORE’. The scene
number may be adjusted before or after setting the desired console configuration.
Should ‘STORE’ be pressed in error, the ‘NO’ button will exit the procedure without taking any
further action.
Page 15
Midas XL4 Automation system
Overstoring
If the scene number does exist, the display will respond with ‘OVERSTORE’. To update the scene
press ‘YES’. The existing scene will be replaced with the current status of the console.
Pressing ‘NO’ will abandon the store procedure without taking any further action.
X-FADE (Crossfade).
This allows the faders crossfade speed to be adjusted from 0.5 to 10 seconds in 99 equal steps.
The speed is set using the jogwheel, pressing ‘YES’ then stores the scene.
WARNING When editing the crossfade speed it is important to note that the speed you leave set in the
left hand window will be applied to any scene stored or overstored after.
Expand.
This is used to set the scene number increment value to use the decimal places. This is used when the
number of expected scenes is greater than 99. It causes the auto-increment to step in 0.1 steps instead of 1.
Insert
This option allows extra scenes to be inserted between existing scenes. To insert a new scene dial up the
number of the scene that you wish to come after the new scene. The scene will be inserted before the
scene displayed.
The new scene will be given the number of the previous scene plus point five.
Once an extra scene has been added, decimal place numbered scenes will be accessible between the
previous scene with a whole number and the next scene with a whole number.
This can occur to two levels, that is scenes may be stored between decimal place numbered scenes using
the ‘hundredths’ digit as well.
Delete
This option is used to delete the current scene from memory. There is currently no way to restore a scene
once it has been deleted, so this function should be used with caution.
Edit
EDIT calls up a further sub-menu for editing facilities.
Sc. NAME
To enter or edit a scene name, dial up this option and press ‘YES’.
The character in the left hand position of the scene name display may then be adjusted using the
jogwheel. When the desired character is visible, press ‘YES’ again and the character will be stored. The
next character on the right may then be adjusted. Continue until all eight characters have been entered,
when the normal system operation will resume. To leave a character as it is, press ‘YES without moving
the jogwheel.
Page 16
Midas XL4 Automation system
MIDI IN
This function allows you to edit the midi program change that the scene will be recalled by when
received. The XL4 will monitor the midi channel set in the CH.MIDI in located in the SYSTEM Menu.
MIDI CLR
This function allows you to clear all the mikdi information associated with the particular scene you are
on.
This function is used to set up a MIDI message which will be transmitted whenever the scene
containing the message is recalled.
MIDI OUT
This function allows you to edit the 8 possible midi out messages the console can send out when a scene
is recalled.
To program the multiple-midi outputs the following procedure must be followed.
1/ Press STORE and scroll the screen using the jogwheel until EDIT is seen, press the YES button.
2/ Scroll the screen until MIDIOUT is seen, press the YES button.
3/ You may now select one of the eight midiout messages for editing. This may be done using the
jogwheel. When the required message number is displayed in the left hand window press the YES button.
4/ In the left hand window the midi channel the message is sent out on will be displayed. This may be
changed using the jogwheel, when the required channel is selected press YES.
5/ Using the jogwheel you may choose one of the following to edit in the right hand display NOTEOFF,
NOTEON, PROGRAM and CLEAR when the required perameter is displayed press YES. CLEAR will
delete that particular message from the group sent with that scene change.
6/ The chosen perameter may then be changed using the jogwheel and selected by pressing YES when the
required value is displayed.
7/ When all the midi out messages have been edited to exit scroll through the message list until 9 EXIT is
displayed and press YES.
NB:
This Function edits the Midi information for the last scene recalled using the Now, Next or Last
button.
Page 17
Midas XL4 Automation system
Memory menu
Memory – Mem Tog
Internal
External
Copy All
Clear All
Mem Tog (Memory Toggle)
This allows you to swap from the memory you are currently working on to other. For example if you are
working on Internal memory mode choosing YES to Mem Tog will switch over to External memory.
Internal
This setting sets the system operation to operate with the central control unit’s internal memory.
External
This setting sets the system operation to operate with the RAM card memory .
Copy all
This function copies the data to and from the RAM card.
If INTERNAL memory is active, the data will be copied from internal memory to the RAM card.
If EXTERNAL memory is active, the data will be copied from the RAM card to the internal
memory.
Clear all
This function clears the data in the memory or RAM card.
If INTERNAL memory is active, the data will be cleared from internal memory .
If EXTERNAL memory is active, the data will be cleared from the RAM card.
WARNING!
Use this function with care! Although future software releases may feature an UNDO function, the
current software does not. Once erased there is no way to retrieve the data unless you have saved it to a
RAM card which has been kept somewhere safe.
Page 18
Midas XL4 Automation system
Alt Scene Buttons A1 and A2
These buttons allow the recall of a scene assigned to the switch with a single button push. To assign a
scene to either ALT1 or ALT2, recall the scene you wish to assign. Press the STORE button, the right
hand screen will now read either NEW or OVERSTORE. Press the ALT button that you wish to assign
the scene to, the screen will read OK. The scene will now be recalled when ever that ALT button is
pressed. To place a different scene to the button follow the above procedure and the new scene will
automatically be overstored to the ALT button pressed.
Using the system - general hints and tips.
Setting up a console can be a laborious process, setting it up separately for multiple scenes could
be worse!
Make use of the facilities to minimise the work. If you have already programmed in a scene which
is similar to the one you wish to create, RECALL it, make the required alterations then dial up the number
of the new scene you wish to create and STORE it.
Backing up.
At the end of a rehearsal session it is good practice to save the data entered to the RAM card. By
using three or four RAM cards and rotating them you will always have the last three or four sessions
saved ready to be reloaded in an emergency.
Page 19