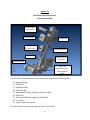
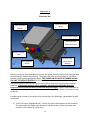
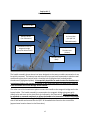
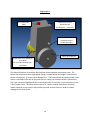
1
***** SAFETY NOTICE *****
This equipment makes use of very powerful rare earth magnets. Great care should be
exercised when disassembling the unit or moving the magnetic bridge to prevent damage to
either the operator or equipment. Maintenance work should always be carried out on a
wooden bench (as opposed to a metal bench). All tools should be kept well away from the
magnetic bridge until required.
This equipment should only be handled and operated by personnel who have received the
necessary training from MFE ENTERPRISES, INC. Should it be necessary to unpack the
transportation case prior to any training, please note that this equipment uses very powerful
magnets that can be hazardous if mishandled and the equipment itself can be damaged. The
magnetic bridge is mounted to a keeper plate in the transportation case for shipping purposes
and should not be disturbed prior to the arrival of the MFE-trained personnel.
This equipment contains sealed lead acid batteries that are both leak proof and can be placed
in any orientation. This type of battery is not regarded as hazardous for purposes of shipping.
Do not use any battery chargers other than the ones provided to charge this equipment.
Using any other battery chargers may result in electrolyte leakage, generation of heat, and
potentially rupture of the battery. It is strongly recommended to fully charge the unit prior to
use.
***** SAFETY NOTICE *****
1
MFE Mark III Mapping Scanner
Operation and Maintenance Manual
2
Table of Contents
Section 1: Introduction…………………………………………………………………………………………………… 4
Section 2: Magnetic Flux Leakage…………………………………………………………………………………… 5
Section 3: MFE Mark III Scanner General Description……………………………………………………… 6
Section 4: MFE Mark III Mapping Scanner General Description………………………………………. 7
Section 4.1: MFE Mark III Mapping Scanner Illustrated Assembly……………………….. 8
Section 4.1.1: Magnetic Bridge………………………………………………………………… 9
Section 4.1.2: Sensor Bar…………………………………………………………………………. 11
Section 4.1.3: Electronics Box………………………………………………………………….. 13
Section 4.1.4: Battery Box #1 (Power Supply for Electronics Box)……………. 15
Section 4.1.5: Handle Assembly………………………………………………………………. 17
Section 4.1.6: Motor Box…………………………………………………………………………. 18
Section 4.1.7: Battery Box #2 (Power Supply for Motor)…………………………. 19
Section 4.1.8: Control Box (Front View)…………………………………………………… 21
Section 4.1.9: Control Box (Rear View)……………………………………………………. 23
Section 4.1.10: Laptop Holder…………………………………………………………………. 24
Section 4.1.11: Cables……………………………………………………………………………… 25
Section 4.2: MFE Mark III Mapping Scanner Additional Parts List……………………….. 26
Section 5: Mapping Scanner Unpacking Instructions………………………………………………………. 28
Section 6: Mapping Scanner Initial Setup………………………………………………………………………… 30
Section 7: Mapping Scanner Operation…………………………………………………………………………… 34
Section 8: Mapping Scanner Maintenance……………………………………………………………………… 39
Section 9: MFE Real Time Display……………………………………………………………………………………. 40
Section 10: MFE Studio Software Quick-Start Guide……………………………………………………….. 51
Section 10.1: Vision Helper Quick-Start Guide…………………………………………………….. 55
Section 11: Manual Scanner Illustration and Setup…………………………………………………………. 58
Section 11.1: Manual Scanning……………………………………………………………………………. 59
Section 12: Ultrasonic Prove Up……………………………………………………………………………………… 60
Section 13: Battery Management…………………………………………………………………………………….68
Section 14: Scanner Adjustments……………………………………………………………………………………. 69
Section 15: Non-Disclosure Agreement…………………………………………………………………………… 70
3
SECTION 1
Introduction
This manual has been written to ensure that properly trained operators of the MFE
Mark III Scanner have all the information necessary to carry out the best possible examination
of any given tank floor. It is strongly recommended that any technician intending to use this
equipment read this document in its entirety prior to carrying out any inspections. Any
operator using this equipment should be capable of demonstrating a full understanding of the
inspection principles involved. Ultrasonic prove-up should only be carried out by personnel
who are adequately trained, certified, and experienced in the evaluation of corrosion type
indications. Improper ultrasonic evaluation can result in significant defects being missed.
This manual is NOT a substitute for the MFE Mark III Training Seminar that is
necessary for the proper use of the MFE Mark III Scanner. This training seminar covers the
theoretical principles behind magnetic flux leakage detection, and provides practical hands-on
operation and maintenance routines for the MFE Mark III Scanner.
For additional information on the MFE Mark III Training Seminar, please contact
MFE Enterprises, Inc. at (281)441-8284.
4
SECTION 2
Magnetic Flux Leakage
This equipment uses Magnetic Flux Leakage as a detection tool. The powerful magnetic
bridge introduces a magnetic flux into the material to be inspected. The strength of the
magnetic bridge allows for near saturation of the inspected material. Any localized reduction in
the thickness of the inspected material will result in a flux leakage at the surface. A series of
sensors are placed between the poles of the magnetic bridge to detect these leakage fields.
The strength of the leakage field is a function of volume loss and is not a reliable indication of
remaining wall thickness. Although the amplitude of the signal generated by the sensors gives
some relative severity information, it is not recommended that amplitude alone be used for
accept/reject criteria purposes. Flux leakage should only be used as a detection tool.
Quantitative information can only be obtained using ultrasonic assessment of the areas
identified by the magnetic flux leakage scanner.
5
SECTION 3
MFE Mark III Scanner
General Description
The MFE Mark III Scanner is sold in various formats. Before continuing, it is important
to identify which MFE Mark III Scanner you purchased. For your convenience, we have placed
your company name, unit description, and your unit’s unique ID number here:
Company ABC
MFE Mark III Mapping Scanner
Unit# 000
The MFE Mark III Scanner is offered in three models:
1) Manual Scanner (Basic)
2) Stop-On-Defect Scanner (Intermediate)
3) Mapping Scanner (Advanced)
The MFE Mark III Scanner is designed so that the more advanced models can be manually
converted to the less-advanced models. For instance, if the MFE Mark III Mapping Scanner was
purchased, it can be quickly converted to a MFE Mark III Stop-On-Defect Scanner or a MFE
Mark III Manual Scanner. However, if the MFE Mark III Manual Scanner was purchased, it
cannot be converted to a MFE Mark III Stop-On-Defect Scanner or a MFE Mark III Mapping
Scanner without the appropriate conversion kit.
For additional information on Mark III Conversion Kits, please contact MFE Enterprises, Inc. at
(281)441-8284.
6
Section 4
MFE Mark III Mapping Scanner General Description
The MFE Mark III Mapping Scanner is specifically designed to efficiently and accurately create a
color-coded map of the metal loss (typically caused by some form of corrosion) in an above
ground storage tank floor. The process for creating this “corrosion map” begins with using the
MFE Studio Software to draw the tank floor layout. Once a “blank floor map” is created, the
next step is to use the MFE Mark III Mapping Scanner to scan the floor for metal loss while
using the MK III Real Time Display Software to record each scan. Since it is important the
scanning speed remains constant and that the distance scanned is accurately measured as the
signals are recorded, an encoder is used in conjunction with a motor unit to propel the mapping
scanner across the tank floor. After each individual scan is complete, it is assigned to its proper
place on the floor map. Once the corrosion map is complete, it can be used to determine the
ideal repair strategy for the tank floor.
It is also important to note that this scanner has the ability to be operated in a Stop-On-Defect
Mode. In this mode, a signal threshold is set on the Real Time Display. Any signal amplitude
greater than the set threshold will trigger an alarm that will “freeze” the signal on the screen
and simultaneously disengage the motor so that the unit stops on top of the defect. The motor
cannot be re-engaged until the alarm is reset. Since the manual scanner requires constant
visual contact from the operator (looking away for even a few seconds during a scan could
result in missed defects), this Stop-On-Defect Mode offers an advantage in that if the operator
looks away for a few seconds then the unit will still stop once it detects a defect. Not only will
the scanner stop moving forward, but the signal will freeze on the screen so the operator can
quickly locate the defect.
The mapping scanner can also be converted into a Manual Scanner. It basically requires the
removal of the Motor Box, Motor Battery Box, and the Control Box. An illustration of the
Manual Scanner can be found in Section 11. In the Manual Scanning Mode, the scanner is
pushed “manually” by the operator. Since the signal response is speed dependant, it is
important to push the scanner at a relatively fast pace. In this mode, the defects can be quickly
located by “rocking” the scanner back and forth over the defect. This mode of operation is
discussed in more detail in Section 11.2.
7
Section 4.1
MFE Mark III Mapping Scanner
Illustrated Assembly
Laptop Holder
With Laptop
Electronics Box
Control Box
Battery Box #1
(For Electronics)
Handle Assembly
Motor Box
Battery Box #2
(For Motor)
Magnetic Bridge
Sensor Bar
(Hidden From View –
Under Magnetic
Bridge)
The MFE Mark III Mapping Scanner illustrated above consists of the following items:
1)
2)
3)
4)
5)
6)
7)
8)
9)
Magnetic Bridge
Sensor Bar
Handle Assembly
Electronics Box
Battery Box #1 (Power Supply for Electronics Box)
Motor Box
Battery Box #2 (Power Supply for Motor Box)
Control Box
Laptop Holder with Laptop
The next sections will cover each of these items in more detail.
8
Section 4.1.1
Magnetic Bridge
Front Wheels
Aluminum
Top Plate
Pivot Block
(For Motor Box)
Magnet
While the entire above illustrated assembly is referred to as the magnetic bridge, the actual
magnetic bridge is highlighted in red. The rest of the magnetic bridge assembly includes:
1) Four (4) Front Wheels – The bridge uses 5” diameter wheels.
2) Aluminum Cover Plate – Attaches the magnetic bridge to the handle assembly. Also
indicates the channel numbers (channels 1 – 12) along the front of the bridge, indicates
the scanner generation (MFE Mark III), and indicates the presence of strong magnets
(not illustrated above).
3) Pivot Block (For Motor Box) – This pivot block serves two purposes. It provides a pivot
point for the handle assembly so that the magnetic bridge can be quickly and easily
broken away from the inspected material. It also provides the attachment points for the
motor box. This pivot block is held in place by four (4) stainless steel bearings and
washers (not illustrated above).
9
The magnetic bridge provides the necessary flux levels to achieve saturation of the plate
thickness to be inspected. It is supported on four low-rolling resistant, durable wheels, one at
each corner, allowing easy maneuverability of the scanning head.
10
Section 4.1.2
Sensor Bar
Wing Nut
(Blue)
24-Pin Connector
(Red)
Sensor Bar
(Solid Gray)
The sensor bar is captured in the above illustration. Notice that the magnet bridge assembly is
almost completely transparent so that the sensor can be clearly seen. The 24-pin connector
(highlighted in red) is a connection point for the signal cable (which is also connected to the 24pin connector on the Electronics Box as illustrated in Section 4.1.3).
The sensor bar contains an array of sensors across the full width of the scanning head. These
sensors detect the leakage fields generated by the inspection process. It is suspended and
spring mounted within the magnetic bridge by six studs. Two of the studs use wing nuts
(highlighted blue in the above illustration) to quickly adjust the height of the sensor bar from
the inspection surface. The remaining four studs are simply there to better stabilize the sensor
bar while in operation.
11
It is important to note that the 24-pin signal cable cannot be disconnected from the sensor
bar unless the sensor bar is completely removed from the magnetic bridge. Attempts to
remove the signal cable while the sensor bar is still connected to the magnetic bridge will result
in damage to the signal cable (the strain relief will get twisted and the wires will be damaged).
There is no known reason to disconnect the signal cable from the sensor, other than to replace
a damaged signal cable. In the event of a damaged signal cable, disconnect the signal cable
from the Electronics Box (refer to Section 4.1.3), lean the scanner back until the handle
assembly is resting on the floor, remove the two wing nuts located on top of the bridge that
hold the sensor bar in place (highlighted blue in illustration on previous page), and carefully pull
out the sensor bar from the underside of the bridge. The signal cable can now be safely
disconnected from the sensor bar.
12
Section 4.1.3
Electronics Box
USB (B) Connector
(Blue)
8-Pin Connector
(Yellow)
Electronics Box Handle
Electronics Box
Attachment Plate
24-Pin Connector
(Red)
Electronics Box
Power Switch
(Orange)
2-Pin Connector
(Green)
The electronics box illustrated above processes the signals from the sensors and relays the data
to the laptop for additional processing. The power switch for this box contains a red LED to
indicate on/off status (highlighted orange). THIS POWER SWITCH MUST BE TURNED ON FOR
THE UNIT TO OPERATE PROPERLY! If this switch is turned off, the laptop will not receive any
data and the scanner will not operate (no signals will be seen when scanning the inspected
material). If this power switch is left on overnight, the electronics will slowly drain the
battery which can cause the battery to become deep-discharged. Caution should be taken to
routinely monitor the power status of the electronics box to prevent these circumstances from
occurring.
Considering the number of connections this module has, the following is a breakdown for each
connection:
1) 24-Pin Connector (highlighted red) – The 24-pin signal cable attaches to this connector.
The other end of the signal cable attaches to the sensor bar’s 24-pin connector (see
section 4.1.2 for details on sensor bar).
13
2) 2-Pin Connector (highlighted green) – The 2-pin power cable attaches to this connector.
The other end of the 2-pin power cable attaches to the battery box for the electronics
(see section 4.1.4 for details on Battery Box #1). It is strongly recommended that the 2pin power cable is disconnected from the electronics box while the scanner is being
stored or transported between locations.
3) USB (B) Connector (highlighted blue) – The USB cable attaches to this connector. The
other end of the USB connector attaches to the laptop’s USB port (see section 4.1.10 for
details on laptop connection).
4) 8-Pin Connector (highlighted yellow) – The 8-pin data cable attaches to this connector.
It is only used for the Stop-On-Defect Scanner and the Mapping Scanner. The other end
of the 8-pin data cable attaches to the control box’s 8-pin connector (see section 4.1.9
for details on control box). This connector is not used on the Manual Scanner.
5) Electronics Box Attachment Plate (shown in illustration) – This is used to attach the
electronics box to the handle assembly. It is connected to the handle assembly via
shoulder bolts and adjustable thumbscrews (see section 4.1.5 for details on the handle
assembly). The electronics box is attached to the handle assembly so that the
connectors face toward the ground (as shown in illustration).
14
Section 4.1.4
Battery Box #1
(Power Supply for Electronics Box)
2-Pin Connector
(Red)
Battery Box
(12V Battery)
Battery Box
Attachment Plate
(Blue)
Above is an illustration of the battery box for the electronics. The battery is contained in the
aluminum case and is connected to the Electronics Box via the 2-pin power cable (2-pin
connection point is highlighted in red). This box attaches to the handle assembly via the
attachment plate (highlighted in blue). This attachment plate slides onto a shoulder bolt and an
adjustable thumbscrew. The thumbscrew should be tightened (and checked periodically that it
remains tightened) to ensure the box stays mounted to the handle during operation and
especially during transportation of the unit via the transportation container.
The battery box (for the electronics) contains a 12 volt, 5 amp hour, rechargeable, sealed lead
acid battery that is both leak proof and can be placed in any orientation. This type of battery
is not regarded as hazardous for shipping purposes (exemption document should be located in
the operations manual folder). Fully charged, the battery can provide power for the system for
at least 12 hours of continuous use. A 3 amp fuse is located under the top cover to prevent any
15
damage to the battery or electronics should a short occur within the power supply wiring. The
battery box can be quickly and easily removed from the scanner for recharging at a remote
location.
This battery is recharged using a 12V, 1.5 amp, maintenance charger (provided with the
scanner). This charger is easily identified by its 2-pin connector. Do not use any battery
chargers other than the ones provided to charge this equipment. Using any other battery
chargers may result in electrolyte leakage, generation of heat, and potentially rupture of the
battery. It is strongly recommended to fully charge the battery prior to use.
THE VOLTAGE READOUT FOR THIS BATTERY BOX IS FOUND ON THE REAL TIME DISPLAY IN
THE BOTTOM LEFT CORNER OF THE SCREEN! SEE SECTION 9 (PAGE 40) FOR DETAILS ON
WHERE THE VOLTAGE READOUT IS FOUND.
16
Section 4.1.5
Handle Assembly
Electronics Box
Attachment Points
to Control Box
(Via 3/8"-16
Flathead Screws)
Battery Box #1
(For Electronics)
Attachment Points to
Magnetic Bridge
(Via Quick Release Pins)
Adjustable
Thumbscrews
(Yellow)
Shoulder Bolts
(Red)
The handle assembly shown above has been designed so that every module connected to it can
be quickly removed. The battery box and electronics box are both connected via stainless steel
attachment plates that interlock with a shoulder bolt (highlighted red) and adjustable
thumbscrew (highlighted yellow). It is especially important to make certain the thumbscrews
are tightened before the scanner is shipped or the aluminum boxes can potentially separate
from the handle and cause damage to the scanner.
The other two critical attachment points connect the handle to the magnetic bridge and to the
laptop holder. The handle assembly is connected to the magnetic bridge using two quick
release pins and rests on the pivot block (as indicated in the illustration). The pivot block can
be adjusted or removed completely to allow the handle to be lowered or raised to any height.
The laptop holder is attach using four 3/8”-16 flathead screws that are inserted through the
side of the handle and secured into the 3/8"-16 threaded holes found on the control box
(approximate location shown in the illustration).
17
Section 4.1.6
Motor Box
5-Pin Connector
(Red)
Attachment Point to
Battery Box #2
(Via Wing Nut – not shown)
Shoulder Bolt (Acts as a
pivot point for the
Handle Assembly)
Motor Drive Wheels
Attachment Point (Yellow) to
Pivot Block
(Via Two Quick Release Pins –
not shown)
The above illustration of the Motor Box indicates three important attachment areas. The
Motor Box Attachment Block (highlighted yellow) is connected to the Bridge’s Pivot Block (as
shown in Section 4.1.1) via two Quick Release Pins. The battery box that supplies power to the
motor is attached to the rear of the motor box via a wing nut (location shown in illustration).
The 5-pin connector (highlighted red) is connected to the Control Box’s 5-pin connector via the
5-Pin Encoder Cable. The motor drives a pair of 6” rubber-covered steel wheels that help
reduce vibration to the scanner and provide improved surface contact in order to reduce
slippage of the drive wheels.
18
Section 4.1.7
Battery Box #2 (Power Supply for Motor Box)
3-Pin Connector
(Red)
Attachment Point to
Motor Box
Attachment Point (Yellow)
to Motor Lift Assembly
(Via Clevis Pin)
As shown in the above illustration, Battery Box #2 (also referred to as the Motor Battery Box) is
attached to the rear of the Motor Box (see Section 4.1.6 for more details on this attachment
point). The 3-Pin Power Cable attaches to the battery box’s 3-pin connector (highlighted red).
The other end of the 3-Pin Power Cable attaches to the Control Box’s 3-pin connector (see
section 4.1.9). There is also an attachment point (highlighted yellow) on the battery box that
connects to a steel wire via a clevis pin. This steel wire is part of the Motor Lift Assembly that
allows the user to lift the Motor off the floor for easier maneuvering of the scanner (see section
4.1.8 for more details on how to properly use the Motor Lift Assembly).
This battery box (for the motor) contains a 12 volt, 18 amp hour, rechargeable, sealed lead
acid battery that is both leak proof and can be placed in any orientation. This type of battery
is not regarded as hazardous for shipping purposes (exemption document should be located in
the operations manual folder). A 30 amp fuse is located under the top cover to prevent any
damage to the battery should a short occur with the power supply wiring. The battery box can
be quickly and easily removed from the scanner for recharging at a remote location. All
mapping and stop-on-defect scanners come with a spare battery box (for the motor). This
19
allows for continuous use of the scanner, since while one battery is being used, the other can
be recharged.
This battery is recharged using a 12 volt, 4 amp, maintenance charger (provided with the
scanner). This charger is easily identified by its 3-pin connector. Do not use any battery
chargers other than the ones provided to charge this equipment. Using any other battery
chargers my result in electrolyte leakage, generation of heat, and potentially rupture of the
battery. It is strongly recommended to fully charge the battery prior to use.
20
Section 4.1.8
Control Box (Front View)
Thumb-Switch (Place thumb
here to engage motor –
Remove thumb to disengage)
Motor Lift Assembly Lever
Power Button – Only works when
Master Power Switch is On
(Located on rear of Control Box)
Digital Display for
Motor Speed
Motor Speed Adjustment Buttons
(Up-Increases Speed, DownDecreases Speed)
Motor Direction Buttons
(Up – Forward, Down – Reverse)
Digital Display for
Power Supply Voltage
(for Motor – Battery
Box #2)
The above illustration shows the front panel of the Control Box. The motor is controlled using
the front panel touchpad. The power button turns the front panel on/off (once the master
power button is turned on – located in the rear of the Control Box). Two buttons are used to
control the adjustment of the speed of the motor (press and hold down to quickly adjust the
motor speed), while two more buttons are used to control the direction (forward or reverse).
LEDs are present on the front panel to indicate the direction that the motor will travel once the
motor is engaged. To engage the motor, your thumb must be placed inside the thumb-switch
(highlighted red). Removing your thumb from this switch will instantly disengage the motor.
This thumb-switch system was chosen as a safety feature to prevent the scanner from
somehow breaking away from the operator and colliding into another object. Two digital
displays are present on the front panel. One keeps track of the power supply voltage for the
motor (Battery Box #2), while the other displays the motor speed (represented as a percentage,
ranging from 00 to approximately 97). Since a stalled motor generates a significant amount of
back current, the lower speed percentages have been curved upward (00% speed value does
21
not translate into a zero velocity). It is also recommended that the motor is not kept engaged if
the scanner is stuck in a position that does not allow the wheels to turn.
The Motor Lift Assembly Lever (highlighted yellow) is used to lift the motor off the ground for
easy maneuvering of the scanner. DO NOT USE THIS LEVER UNTIL YOU HAVE A CLEAR
UNDERSTANDING OF HOW THE MOTOR LIFT ASSEMBLY WORKS! While it will hold the weight
of the motor and battery box, using it improperly will cause it to break.
The Motor Lift Assembly consists of a lift lever (highlighted yellow) that is attached to a 1/8”
steel wire. At the other end of this steel wire is a clevis pin assembly that is used to connect to
Battery Box #2 (see section 4.1.7).
To use the Motor Lift Assembly, follow these instructions:
1) Tilt the scanner back using the Handle Assembly’s handle bars. You will tilt the scanner
back until the Handle Assembly rests on the Motor Box’s two shoulder bolts (see section
4.1.6) and hold it in place while you perform step 2. This action is similar to the way the
scanner is levered off a plate.
2) Twist the Lift Lever (highlighted yellow) to unlock it and then pull to full length and relock it into place.
3) Lower the magnetic bridge back on the plate.
The idea behind this Motor Lift Assembly is that the tension in the steel wire will prevent the
Motor Drive Wheels from making contact with the floor. This allows the operator to quickly
pivot and maneuver the scanner on the front wheels. The scanner can even be slightly tilted
back to allow even better maneuvering on the back two front wheels.
In the event that the Motor Drive Wheels are still in contact with the floor after performing
steps 1-3, then the clevis assembly must be disconnected from Battery Box #2 and the path of
the steel wire must be altered to take out more of the slack in the wire. Typically this can be
achieved by having the steel wire travel over the top of Battery Box #1 in order to reach the
connection point on Battery Box #2.
While the Motor Lift Assembly can be setup many different ways, it is important that the
operator DOES NOT try to pull the Lift Level while there is tension in the steel wire. The only
time the Lift Lever should be pulled is when there is slack in the steel wire (typically caused by
lowering the handle assembly as laid out in step 1).
22
Section 4.1.9
Control Box (Rear View)
Fuse Holder (30 amp fuse)
5-Pin Connector
(Yellow)
8-Pin Connector
(Red)
Master Power Switch
(Green)
3-Pin Connector
(Blue)
The above illustration shows the rear view of the Control Box. The Master Power Switch for the
Control Box allows powers to the motor control board. If the master power switch is left on,
the control boards inside this box will drain the battery, even if the front panel is turned off.
For this reason it is important to make sure this switch is turned off after each use of the
scanner.
The 3-Pin Connector (highlighted blue) connects to the 3-Pin Connector on Battery Box #2 (see
Section 4.1.7) via the 3-Pin Power Cable. The 8-Pin Connector (highlighted red) connects to the
8-Pin Connector on the Electronics Box (see Section 4.1.3) via the 8-Pin Data Cable. The 5-Pin
Connector (highlighted yellow) connects to the 5-Pin Connector on the Motor Box (see Section
4.1.6) via the 5-Pin Encoder Cable.
Also note the fuse holder, which contains a 30 amp fuse in case of an electrical short in the
system.
23
Section 4.1.10
Laptop Holder
Laptop
(Blue)
Touch Screen
USB (A) Port
(Red)
Stylus Pen
Location
(Hidden)
Laptop Holder
AC Adaptor Port
(Yellow)
The above illustration shows how the laptop (highlighted blue) is contained in the laptop
holder. The top of the laptop holder is open, allowing for the easy removal of the laptop. The
aluminum case is lined in foam to minimize vibration and to help protect the laptop from
impact forces. The above illustration is useful in pointing out the locations of the USB port
(highlighted red) and AC Adaptor Port (highlighted yellow). Both ports have protective
coverings over them that must be pulled back to reveal the actual plug-in port. While the Stylus
Pen isn’t visible from this angle, its general location should be noted. For additional
information on how the laptop holder is attached to the handle assembly see Section 11 for the
Manual Scanner and Section 4.1.5 for the Stop-On-Defect and Mapping Scanners.
24
Section 4.1.11
Cables
This section is designed to help hook up the cables for the Mapping Scanner. There are a total
of six cables that must be hooked up before the mapping scanner can be properly operated. All
cables have matching plugs with the exception of the USB Cable (which has an A-Plug on one
end and a B-Plug on the other end). All cables with the exception of the USB Cable are mill-spec
cables. The six cables used by the mapping scanner are:
1)
2)
3)
4)
5)
6)
Signal Cable (24-Pin Connectors) – Connects Sensor Bar to Electronics Box
Power Cable #1 (2-Pin Connectors) – Connects Battery Box #1 to Electronics Box
Power Cable #2 (3-Pin Connectors) – Connects Battery Box #2 to Motor Box
Encoder Cable (5-Pin Connectors) – Connects Control Box to Motor Box
Data Cable (8-Pin Connectors) – Connects Electronics Box to Control Box
USB Cable (A to B Connectors) – Connects Electronics Box to Laptop
Power Cable #1 is also referred to as the Electronics Power Cable. Power Cable #2 is also
referred to as the Motor Power Cable. All cables are also referred to generically by the number
of pins on a single end (i.e. the “24-pin cable “refers to the Signal Cable).
This illustration shows an overview of the connection points between modules.
25
Section 4.2
MFE Mark III Mapping Scanner
Additional Parts List
The scanner is shipped in a custom transportation case that contains the following:
1) MFE Mark III Mapping Scanner – The scanner is secured in place via a keeper plate that
attaches itself to the magnetic head of the scanner. See Section 4.1 for a complete list
of modules that make up the mapping scanner.
2) Function Test Plate – The function test plate is contained in the lid of the transportation
case. Properly packaged, a layer of foam is placed between the function test plate and
the scanner. This layer of foam fits securely in the lid and must be removed to reveal
the function test plate. Once the foam is removed, two retaining wing nuts become
visible. These wing nuts must be removed in order to remove the function test plate
from the lid. The function test plate is 1/4" thick and contains three 1/2"-base defects,
one 3/8”-diameter thru-hole, and one slot that runs the entire width of the plate. The
three 1/2"-base defects are approximately 20% deep (80% remaining wall thickness),
40% deep (60% remaining wall thickness), and 60% deep (40% remaining wall
thickness).
3) Laptop AC Adaptors – The scanner comes with two ac adaptors. One plugs into a
110VAC wall socket, while the other has an automobile adaptor for use in vehicles.
4) Battery Chargers – The scanner comes with three battery chargers.
a. Battery Box #1 Charger: A 12 volt, 1.5amp maintenance battery charger for
Battery Box #1 (the battery that supplies power to the Electronics Box). The 2pin plug connects with the 2-pin connector located on Battery Box #1 (see
section 4.1.4 for more details). This charger can be plugged into either 110VAC
or 220VAC sockets. DO NOT PLUG THIS CHARGER DIRECTLY INTO THE
ELECTRONICS BOX! IT CAN CAUSE DAMAGE TO THE ELECTRONICS THAT WILL
RESULT IN THE PURCHASE OF A NEW ELECTRONICS BOX!
b. Battery Box #2 Charger: A 12 volt, 4 amp maintenance battery charger for
Battery Box #2 (the battery that supplies power to the Motor). The 3-pin plug
connects with the 3-pin connector located on Battery Box #2 (see Section 4.1.7
for more details). This charger can be plugged in either 110VAC or 220VAC
sockets. DO NOT PLUG THIS CHARGER DIRECTLY INTO THE CONTROL BOX! IT
CAN CAUSE DAMAGE TO THE CONTROL BOARD THAT COULD RESULT IN THE
PURCHASE OF A NEW CONTROL BOX!
c. External Laptop Battery Charger – This charger is used to charge the laptop
battery externally (outside the laptop). It is important not to confuse this part
with the Laptop AC Adaptor (which recharges the laptop battery inside the
laptop). This allows the operator to make use of a spare laptop battery. In the
event that the laptop power runs out, a fully charged spare battery can be
quickly inserted into the laptop. The discharged battery that was removed can
now be recharged using this External Laptop Battery Charger. It is important to
note that the External Laptop Battery Charger requires a Laptop AC Adaptor to
operate.
26
5) Spare Laptop Battery – This spare battery can be used in the event that the laptop runs
out of power during a job.
6) Tool Kit – Contains a 9/16” Combination Wrench (open and closed), a 9/16” Ratcheting
Wrench, a Reversible Screwdriver (contains both phillips and slotted attachments), and
a Hex Key Set (assorted sizes).
7) Operation & Maintenance Manual
8) Cables – 24-Pin Signal Cable, 8-Pin Data Cable, 5-Pin Encoder Cable, 3-Pin Power Cable,
2-Pin Power Cable, and USB Cable (A to B)
There are a lot of parts shipped with the mapping scanner. It is important that these parts are
taken out of the transportation case while the case is laid horizontal on the ground, lid facing
up (lid is parallel to the ground). If the case is opened in the vertical position, parts can fall out
of the case, possibly causing damage to the scanner or the parts themselves. It is equally
important that these parts are packed properly in the transportation case for shipping, so
that they do not rattle around and cause damage to the mapping scanner.
27
Section 5
Mapping Scanner Unpacking Instructions
In order to properly remove the MFE Mark III Mapping Scanner from the transportation
container, follow these instructions (read them in their entirety before attempting to remove
the mapping scanner):
1) Take a moment to understand that the transportation case packaged with the mapping
scanner weighs approximately 300 pounds. Take the appropriate steps when dealing
with a package of this weight. The transportation case has wheels on it. Used in
combination with the extendable handle, the case can act as a dolly.
2) Lay the transportation case horizontal on the ground (lid facing up, parallel to the
ground). DO NOT USE THE HANDLES ATTACHED TO THE LID TO PICK UP OR MOVE THE
CASE! THEY ARE ONLY USED IN THE REMOVAL OF THE LID ITSELF!
3) Unlatch all four attachment latches on the transportation case.
4) Carefully remove the lid (preferably with help from another person) and set it on the
ground away from the transportation case. Keep in mind that the lid containers a
carbon steel function test plate that weighs over 50 pounds on its own. There is also a
lightweight removable piece of foam inside the lid. Do not be alarmed if the foam piece
falls out of the lid. This is normal and is of no harm to the scanner or operator. There
are handles on the lid to help carry the lid.
5) Now that the lid is off, you will notice the mapping scanner tucked inside the case. You
will first need to remove additional pieces of foam that are used to hold the batteries
and motor in place. It is important to note the location of these foam peices and to
keep them for re-packaging the scanner. If you are unfamiliar with the various modules
of the scanner, please refer to Sections 4.1.1 through 4.1.11 for more details. Once the
foam pieces are removed, you can remove the motor box and both motor battery boxes
and set them aside for now.
6) Remove all parts that have been packaged around the mapping scanner. Section 4.2
contains a full list of the content inside the transportation case. Some of these items
may be located under the handle assembly. In those cases, the handle assembly can be
lifted up in order to facilitate removing these items. Ideally place these items away from
the case since you will need space to remove the mapping scanner.
7) Now that the scanner is the only thing left inside the container, using the extended
handle discussed in step 1, carefully lift the case up so that it is now perpendicular to
the ground. It may be necessary to gently place a hand on the handle assembly so that
it does not fall out of the case as the case is being set perpendicular to the ground.
8) Take the handle bar and gently pull back on it and begin to remove it from the case until
it stops pivoting. It will pivot backwards from where it’s attached to the magnetic
bridge. The magnetic bridge is being held in place by a steel keeper plate.
9) The next to last step is to apply a constant force (typically in the form of leaning one’s
own body weight) downward on the handle assembly (be sure you are griping the black
no-slip handle bars when doing this). You are basically using the handle assembly as a
lever to remove the magnetic bridge from the keeper plate. Once enough force is
28
applied, the magnetic bridge will pivot away from the keeper plate. Keep pressing down
until the handle assembly is approximately 6 inches (~18 cm) from the ground.
10) Now pull the scanner out of the case (rolling on its back wheels). It should roll away
from the case, but in some cases the bridge may attach itself to the keeper plate again.
If this happens, it might require another person to hold the case in place while the
scanner is pulled from the case. Be sure there is room for the unit to back up (remove
all tripping hazards, etc.). Now the unit is out of the case and ready to be fully
assembled (see Section 4.1.11 for details on how to hook up all the cables).
29
Section 6
Mapping Scanner Initial Setup
The initial setup of the MFE Mark III Mapping Scanner is critical to operate the scanner
properly. This section assumes the scanner has already been properly removed from the
transportation case (see Section 5 for more details on removing the scanner from the
transportation case).
The following steps are recommended to complete the initial setup of the mapping scanner:
1) At this point, you will want to attach the Motor Box to the pivot block via two quick
release pins (see Sections 4.1.6 and 4.1.1 for more details on this attachment).
2) Next securely connect Battery Box #2 (see Section 4.1.7 for more details on this module)
to the Motor Box via a black wing nut. It is important to securely tighten this black
wing nut into place.
3) Plug in all six cables (24-Pin, 8-Pin, 5-Pin, 3-Pin, 2-Pin, & USB Cables) into their proper
connectors (see Section 4.1.11 for more details on where cables are connected).
4) Locate and remove the Function Test Plate from the transportation container’s lid (via
the removal of two wing nuts holding the plate in place). Place the test place on the
ground with the defects facedown towards the ground. Make a note of which end of
the plate has the slotted defect. The proper starting location for the mapping scanner
on this test plate is at the opposite end of the slotted defect, so that its scanning path
will scan the slotted defect last.
5) Fully power up the mapping scanner. To do this, the following four power switches
must be activated:
a. Laptop Power Button – Located at the top left corner of the laptop. This power
button slides side-to-side. Once you slide the power button to one side and
release it, it will return to its initial position. It is important to give the computer
time to power up. Do not slide the power button back and forth repeatedly, as
this can cause an improper shutdown of the computer (see Laptop
Manufacturer’s Operation Manual for more details).
b. Control Box Master Power Switch – Located on the rear of the Control Box (see
Section 4.1.9). When this power switch is in the “on” position, the switch lights
up red. This makes it easy to determine if the power is turned on or off to the
control box.
c. Electronics Box Power Switch – Located on the rear of the Electronics Box (see
Section 4.1.3). When this power switch is in the “on” position, the switch lights
30
6)
7)
8)
9)
up red. This makes it easy to determine if the power is turn on or off to the
electronics box.
d. Control Box Front Panel Power Switch – Located on the front touch-panel of the
Control Box (see Section 4.1.8). When this power button is pressed, all the
digital displays will light up (indicating the power is on). It is important to note
that this power button can be pressed too quickly or too slowly. If the power
button is pressed too quickly, no response or a quick flicker of the digital displays
might be seen. If the power button is pressed and held down for too long, the
digital displays may flicker on/off quickly. This causes no damage to the system
and can be addressed by simply repressing the button at a more casual rate.
Now that the mapping scanner is fully powered up, drive the mapping scanner onto the
function test plate. Keep in mind that the scanner will need to be tilted back (via the
handle assembly) to keep the magnetic bridge away from the test plate until the
scanner is in the proper location to start a test scan. Once you have the scanner in the
proper location, the magnetic bridge can be lowered onto the plate (all four front
wheels should be touching the test plate).
Properly adjust the Sensor Bar. Using the two black wing nuts on the bridge cover plate
(see Section 4.1.1), lower the sensor bar until the bar rests on the surface. Tension each
wing nut and then add an additional one full turn on each to lift the sensor bar just
above the surface of the plate. Additional turns on each of the wing nuts can be made if
the sensor is scraping against the floor during inspection. It is important to minimize the
distance between the inspection surface and the sensor bar. At some point, the sensor
bar can be lifted high enough that it can miss small defects while scanning. This critical
distance varies based on a number of variables, so it is important that any changes
made to the sensor bar height during inspection are re-qualified using the function
test plate.
Open up the Mark III Real Time Display Software. With the computer powered up, using
either the Laptop’s Stylus Pen or your fingertip, double-touch the desktop icon labeled
“MKIII RTD.” This is the shortcut for the MFE Mark III Real Time Display Software. The
computer will ask for confirmation. Touch the “Yes” button to proceed. The real time
display should now be visible and taking up the full screen (with the exception of the
taskbar which should always remain visible). If you get a message that says “Device not
detected” then most likely the USB cable still needs to be plugged in. If you get this
message, you will need to restart the software before it will work properly.
Verify that all voltages are well above 12 volts. There are two voltage readout locations.
The voltage readout for the Motor Battery Box is located on the Control Box Front
Panel. The voltage readout for the Electronics Box is located on the Real Time Display.
A minimum of 12 volts is required to power each system. If the scanner is at rest and
31
either voltage readout is below 12 volts, the scanner will not operate properly and
should not be used for inspection! Note that the voltmeter for the Motor Battery Box
will drop below 12 volts when the motor is engaged. This is normal and no cause for
concern. It’s important that the scanner is at rest when determining if there is sufficient
battery voltage to perform a proper scan. If the resting voltage is lower than 12 volts,
remove the battery box in question for recharging and discontinue the following steps
until either the batteries are properly recharged or until the battery box is swapped out
with a proper backup battery box (as in the case with the spare motor battery box).
10) Adjust the gain on the real time display to 50 and adjust the speed on the Control Box
Front Panel to 50.
11) Engage the motor via the thumb-switch (as shown in Section 4.1.8) and scan the entire
plate. You should notice four defect signals followed by a signal from the slotted defect
that should light up all 12 channels to the top of the screen. Of all the signals, it is the
slotted defect that is the most important at this point. If all 12 channels do not light up,
then there is a problem and troubleshooting must be done to the scanner before the
inspection can begin! The most common areas to troubleshoot are:
a. Check that the Laptop’s USB Cable is properly connected at both locations AND
Restart the Real Time Display Software
b. Check that the 24-Pin Signal Cable is plugged into the Electronics Box
c. Check that all the power buttons are turned on (Step# 3)
d. Check that all the cables are properly plugged in.
e. Check for damage to cables (check for both “pinched” cable sections AND for
bent pins on each plug end)
12) If you can see all 12 channels light up to the full screen height then you are ready to
proceed to test the scanner’s alarm feature. First, put the scanner in reverse and back it
up to its original location. On the Real Time Display (see Section 9), set the adjustable
threshold to approximately mid-screen (this feature is found above the text “Threshold”
on the Real Time Display). Next press the “Alarm Enable” button. This should cause a
solid color bar to light up beneath the channel numbers on the Real Time Display. Be
sure to set the motor direction in the forward direction, and then engage the motor.
The scanner will move across the function test plate until a signal amplitude crosses the
set threshold. Once this happens, three things should happen: The scanner stops
moving (the motor is disengaged and cannot be re-engaged right now) AND the signal
that crossed the threshold will be frozen on the screen AND there will be a flashing red
light indicating the alarm was triggered. These three states will remain until the “Alarm
Reset” button is pressed. Once the reset is pressed, the signal will disappear, the alarm
light will stop flashing, and the motor can be engaged again. Continue scanning the
plate until you reach the slotted defect. Once you have completed this step, press the
32
“Alarm Enabled” button again (the lighted bar at the bottom of the screen should
disappear). If the alarm is currently triggered (i.e. flashing red bar) when you disabled
the alarm, you will still need to press the alarm reset button.
13) Now that you have tested out the alarm feature of your scanner, it is time to test the
recording feature. Put the scanner in reverse and back it up to its original location and
perform a second scan, but this time using the record feature. To do this, press the
Record button on the Real Time Display. This will open up the Recording Window. In
this new window, press the record button to ready the scanner to record. Since the
scanner will not start recording until the motor is engaged, there is no rush to quickly hit
record and begin scanning. Engage the motor and run the same scan as in Step #9. The
scan preview will show up to indicate the progress of your scan. This scan preview will
give you an idea of what the recorded scan will look like. You can quickly check this scan
preview to see if the recording functions are working properly. For more information on
the recording features of the Mark III RTD Software, please see Section 9.
14) The final step involves checking the accuracy of the Distance Counter in the Recording
Window (see Section 9). This can be easily accomplished by:
a. Mark the initial position of the scanner on the plate.
b. Reset the Distance Counter (by touching it)
c. Engage the motor to move an unspecified distance (the further, the better)
d. Mark the final position of the scanner on the plate (be sure to mark the same
reference point used in step a)
e. Determine if the distance measured is the same as the distance on the Distance
Counter. If it is not, then refer to Section 9 on how to make the necessary
adjustments. It should also be taken into consideration that this test is most
likely not going to be performed exactly perfect, so anything within an inch
should be considered acceptable.
At this point, the scanner has passed the initial setup test and is ready to begin inspection.
33
Section 7
Mapping Scanner Operation
These instructions assume that the goal is to map the tank floor using the mapping scanner.
Phase 1: Creating a Blank Floor Map
Using the provided MFE Studio Software, create a blank floor map of the tank to be inspected.
It is strongly recommended that you use Microsoft Visio 2007 on the laptop to help create
this map. Consult the Visio Helper Quick-start Guide under Section 10.1 for additional
information on how to use Visio in conjunction with the MFE Studio Software. It is also
recommended that you read the MFE Studio Quick-start Guide under section 10. Together
these guides will help to quickly and efficiently create a floor map. It is also important to note
that there is a sample floor map provided that can be located under the desktop folder named
MFE Samples. Please remember that all MFE software uses unit-less numbers so that it can
accept any type of measurement system the end user desires (Section 9 will cover this in more
detail).
The process for creating this map consists of identifying the following information:
1)
2)
3)
4)
5)
6)
7)
8)
9)
Tank Radius (or diameter)
Plate ID# (used to assign each plate a unique ID number)
Plate Width (refers to the horizontal dimension on a tank drawing)
Plate Height (refers to the vertical dimension on a tank drawing)
Reference Corner on Plate: This reference point will be used for two tasks: placing the
plate on the x,y co-ordinate system within the tank map, AND marking the spot from
which all measurements will be taken when recording scans with the scanner. In terms
of a 2D drawing of a rectangular plate, the choices are “left/bottom,” “left/top,”
“right/bottom,” and “right/top.”
X-Coordinate: The distance horizontally from the reference corner to the center of the
tank. The Visio helper program is designed to make this calculation for you.
Y-Coordinate: The distance vertically from the reference corner to the center of the
tank. The Visio helper program is designed to make this calculation for you.
Row of Plate: Gives the plate a row number (i.e. plate is in row 1, column 2)
Column of Plate: Gives the plate column number
Once you have entered this information into the MFE Studio Software (see Sections 10 & 10.1
for more details), you can begin recording scans on each individual plate. Since you will be
taking measurements from each plate’s reference corner while in the tank, it is critical to
know where the reference corner is on each plate. It is also critical to know the Plate ID
Number for each plate. Having a standard procedure on how to choose reference corners is
34
recommended. It also helps having a printout of the floor map with the corner references and
plate id numbers.
Phase 2: Recording Scans
Briefly, it should be mentioned that the mapping scanner was designed to be taken apart into
modules small enough to be carried into the tank by hand. This manual goes into great detail
on each module in order to help facilitate the disconnecting and re-assembling of the scanner.
This process consists of performing scans similar to the ones in the initial setup (Section 6). It is
important to properly setup the sensor bar again, so that it is as close as possible to the floor
without scraping against the floor while performing scans. While the distance between the
sensor bar and the floor can vary, it should be in the range of ~1/8” to ~1/4”. If the sensor bar
is lifted beyond a 1/4” off the floor, it will start to lose sensitivity of detecting defects. Any
distance greater than 1/2” is cause for serious concern and may result in missed defects during
the scan. On the Real Time Display, access the Recording Window (be sure that the alarm is
disabled). The next steps will be repeated for each recorded scan:
1) Place the scanner where you want to begin scanning. It is important that you scan in a
direction that is parallel to one of the sides of the rectangular plate.
2) Press the Properties button in the Recording Window. The software will ask for the
following information:
a. Plate Number – Enter the same unique id number when you created the floor
map. It is important to note that you can press the “cell phone” icon next to
the appropriate entry box and this will pop up a large number pad for easy
data entry without using the keyboard.
b. Plate Xo – This value is the distance horizontally (on the floor map) from the
reference corner (referred to as Xo) to the center of the sensor bar (the center of
the sensor bar is the default location and can be changed under configurations,
see Section 9). This value will most likely change for each new scan!
c. Plate Yo – This value is the distance vertically (on the floor map) from the
reference corner (referred to as Yo) to the center of the sensor bar (the center of
the sensor bar is the default location and can be changed under configurations,
see Section 9). This value will most likely change for each new scan!
d. Track Number – Each recorded scan is considered a track. For instance, a single
plate can require 10 scans to completely map the plate. In this example, there
would be 10 tracks (the first scan labeled as Track 1, second scan as Track 2,
etc.). It is up to the end user if they want to assign a unique number for each
35
recorded scan or if they want to restart the track numbering on each plate. For
instance, you could be inspecting Plate# 10 and about to perform the first scan
of this plate. You have the option of labeling the track as number 1 (the first
scan of plate 10) or you could label it as number 73 (the 73 rd scan in that tank).
e. Track Direction – Options are “Away from Xo,Yo” or “Towards Xo,Yo.” Xo,Yo
refers to the reference corner. The software is wanting to know if the operator
will be scanning in a direction that is moving away from the reference corner
(Away from Xo,Yo) or if the operator will be scanning in a direction that is
moving towards the reference corner (Towards Xo,Yo). In most cases the
operator will be scanning away from the reference corner, since regardless of
which direction you scan, the measurements from Xo,Yo have to be determined.
And in most cases, it will be easier to measure those distances when you are
closer to the reference corner.
f. Track Orientation – Options “Horizontal” and “Vertical.” Referring back to the
blank floor map, the operator will either be scanning horizontally across the
plate or vertically.
g. Project Folder – This button should be pressed to determine the location of
where the recorded scans will be saved. It is strongly recommended that you
store all the recorded scans in a single folder (ideally in the same folder as your
tank floor map file). To create this new folder without using a keyboard, click the
“New Folder” button on the “Select Output Folder” window that is presented
when you hit the “Project Folder” button. This will create a new folder icon and
will prompt you to enter in the folder name. Click once where the cursor is
blinking and you will see a “pen” icon appear (give it a second to appear). Click
this “pen” icon and a full size keyboard will appear on the screen. Use this
keyboard to enter in the folder name and hit enter to finish. Next you will need
to hit the “Select” button with your new folder highlighted. The software gives
each scan file a name that uses both the plate number and track number (i.e. 1-1
is the file name for scan of Plate 1, Track 1). It is also important to note that the
software will NOT record over an existing scan with the same name. Instead it
will add a number in parentheses next to the file name. For instance, if you
saved a scan of Plate 1, Track 2 (file name is 1-2) and then decided to rescan
using the same plate number and track number, the software would not
overwrite the 1-2 file. Instead it will create a new file with a name of 1-2(1). If
you repeated this process, you would create a file named 1-2(2). Whenever you
re-scan a track, it is important that you eventually delete the old track! The
software will render both the old scan and the new scan.
36
h. Once you have taken care of the above entries, you can choose to save the scan
data by pressing “OK.”
3) Press the Record button in the Recording Window and begin scanning by engaging the
motor. Manually disengage the motor once you have reached the end of the plate (by
removing your thumb from the thumb-switch).
4) Press the Stop button and the same “Properties” window will appear with all your
information that you entered. This is another chance to verify that you entered in the
information correctly before you save the scan. Once you are satisfied with the entered
information, press “OK” to save the file. If you press “Cancel” the software will prompt
a confirmation question to make sure you do not want to save the scan. If you confirm
this prompt, the scan data is not saved and is permanently lost.
5) Repeat steps 1 through 4 for each scan that will be recorded. After the first few scans,
it is always a good idea to open up MFE Studio and view the scans you have
performed on the tank map.
Phase 3: Create Corrosion Page (continued on next page)
37
Phase 3: Create Corrosion Map
Once you have recorded all the scans for each plate, open up MFE Studio and select the open
project folder icon shown in the below illustration (located between the save and print icons) :
Open Project
Folder Icon
It will ask you to select the folder with all your scan data and your map (it must all be in the
same folder for this one-click feature to work). The software will then render the corrosion
map. It is then recommended to save the file as a Studio file (under file -> save as).
You can now make adjustments to the filters to amplify signals, reduce background noise, etc.
For more details on this, see the MFE Studio Quick-start Guide, Section 10.
38
Section 8
MFE Mark III Maintenance
This equipment incorporates proprietary information and trade secrets and is subject of a
“Restricted use, Nondisclosure and Non circumvention agreement” signed by each purchaser of
this equipment. In order not to breach this agreement please take note of the following
restrictions.
The scanner has been designed to be as maintenance free as possible and is extremely ruggedly
constructed. The inspection environment is often extremely dirty and dusty and therefore the
bulk of the maintenance required involves cleaning and removal of magnetic debris and
product residue.
Performing any of the following actions will INVALIDATE THE WARRANTY:
*DO NOT SPRAY WATER OR DETERGENT ON ANY PART OF THE SCANNER!
*DO NOT REMOVE THE STAINLESS STEEL COVER PLATES ON THE MAGNETIC BRIDGE!
*DO NOT ATTEMPT TO OPEN THE ELECTRONICS BOX!
*DO NOT ATTEMPT TO DISMANTLE THE SENSOR BAR other than for removal and replacement
of the sensor protector.
Should any of the above underlined items require attention they must be returned to the
manufacturer for service.
The scanner can easily be dismantled with the use of the hand tools provided and the individual
parts cleaned using a cloth rag (with the exception of the Laptop Display which requires a towel
made for computer monitors in order to avoid scratching the display).
It is recommended that all maintenance and cleaning operations carried out on the bridge be
conducted on a wooden or non magnetic surface for safety reasons.
The wheel bolt threads should be lubricated with an anti-seize compound monthly to ease
removal when required.
39
Section 9
MFE Mark III Real Time Display (RTD)
Voltage Readout for
Battery Box# 1
Battery Voltage: 12.25 Volts
The above illustration shows the Real Time Display exactly as it appears on the laptop. The
next few pages will cover the various functions and features of the MKIII RTD software.
IT IS IMPORTANT TO NOTE THE LOCATION OF THE VOLTAGE READOUT FOR BATTERY BOX #1
(POWER SUPPLY FOR THE ELECTRONICS BOX). IF THE VOLTAGE DROPS BELOW 12 VOLTS, THE
ELECTRONICS WILL NOT FUNCTION PROPERLY! THIS SAME AREA WILL ALSO ALERT YOU IF
THE BATTERY BOX IS DISCONNECTED OR IF THE BATTERY IS TOO LOW.
40
Gain Display
Increase/Decrease
Gain by Single Digits
Increase/Decrease Gain by Larger
Amounts. Press anywhere along
this slider bar to quickly change
gain from 0 to 100
This area is where signals will
appear, each under their
corresponding channel. They
appear in a segmented bargraph
format identical to the Mark II
scanners
These channel numbers
correspond to the channels
engraved into the front of the
bridge (used to locate position of
the defect)
The above illustration identifies the various ways to change the gain. The gain is an important
feature of the RTD, as it allows the operator to amplify or de-amplify all the signals that come
across the screen.
It is important to understand that gain does not increase sensitivity of the unit for finding
defects! It only amplifies a discrete signal. To first get a discrete signal, the proper mechanical
setup must be used. In the event that the signals being displayed (of a known defect) are too
small, it is important to first verify that the sensor bar is properly adjusted as close to the
floor as possible and that the correct wheels are being used on the magnetic bridge (smaller
wheels lower the magnetic bridge closer to the floor, thus increasing the flux field). Once
these items are addressed, then the gain can be used to amplify the signal.
41
Press to Reset Alarm
This slider bar can be adjusted
up and down to adjust the
threshold at which the alarm
triggers.
Press to enable/disable alarm
Appearance of this bar indicates that alarm is enabled. Once
alarm is trigger it will turn red and continuously blink on/off.
The above illustration shows the RTD after the alarm feature has been enabled. The alarm is an
important feature of the MKIII scanner. It is used in conjunction with an adjustable threshold
(shown in the illustration). Any signal amplitude that crosses the threshold will cause three
events to occur:
1) The solid bar at the bottom of the RTD will turn red and continuously blink on/off until
the alarm is reset.
2) The signal that crossed the threshold will remain frozen on the screen until the alarm is
reset.
3) The motor will disengage and cannot be re-engaged until the alarm is reset (only
available on Stop-On-Defect and Mapping Scanners)
By adjusting the gain and motor speed (in combination with the adjustable threshold), virtually
any threshold desired is achievable. The segmented bargraph where the signals are displayed
can be even further modified under the configuration menu (discussed on the next page).
42
It should be noted that by touching the screen for 3 seconds and then releasing (you will see
the animation of a white circle forming), you can enter into the configuration screen for
additional customization options (without using the keyboard). This can also be achieved by
right-clicking the RTD screen with the mouse.
The following options are located in the configuration screen:
1) Bargraph Maximum: Unit-less number that defines the maximum height of the display’s
bargraph. Lowering this value will increase the size of all signals displayed. Raising this
value will decrease the size of all signals displayed. The “sensitivity” gained by lowering
this value is NOT a substitute for proper mechanical setup (i.e. proper sensor bar
height, etc)! It can be used as a tool when the gain amplification/de-amplification is not
enough for the operator. The default value is 500.
2) Bargraph Minimum: Unit-less number that defines the minimum height of the
bargraph. DO NOT SET THIS VALUE ABOVE ZERO UNLESS YOU KNOW WHAT YOU ARE
DOING!!! This setting allows the operator to chop off the bottom of all signals by raising
the bargraph minimum value. This setting can be useful when the noise generated by a
43
3)
4)
5)
6)
7)
rough surface is taking up too much of the display. By raising it, it will allow for more
useable display space above the noise level. Adjusting this value too high can result in
missed defects! The default value is zero (0).
Bargraph Refresh Period: Adjusts the speed at which the real time display refreshes.
Lowering this value will cause the signals to render quicker. It is not advisable lowering
this value below 40 as it may cause signals to be rendered faster than the eye can
detect them! Raising this value will cause the signal to be displayed on the screen
longer. If the value is raised too high, it will cause signals you are seeing to start
overlapping since new signal data is coming in while old signal data is being held on the
screen. Some operators may wish to slightly modify the bargraph refresh period in
order to try and obtain a similar signal response to their Mark II Real Time Displays.
Default value is 40.
Digital I/O Period: DO NOT ADJUST THIS VALUE. Default value is 100.
Distance per Counter Click: This value adjusts the Distance Counter in the Recording
Window so that the system of measurement and the distance resolution can be
adjusted. While this value can be adjusted for different measurement systems, it is
strongly recommended that once this value is set that it is not changed again without
serious consideration! Changing this value will render previously created floor maps
incompatible with the new recorded scans. The default value is 0.188 when using
inches and 4.78 when using centimeters. The 0.188 value sets the distance counter so
that each “tick” (a single digit change) represents one tenth of an inch (0.1”). The 4.78
value sets the distance counter so that each “tick” represents one centimeter (1 cm).
These values should be verified during the initial setup of the scanner (as specified in
the Mark III Initial Setup, Section 6).
Measurement X Offset: This value is the distance from the center of the sensor bar
(where the 24-pin connector is located) to some alternate point that is to the front or
rear of the scanner. A positive value puts this alternate point in front of the sensor bar’s
center point. A negative value puts this alternate point behind the sensor bar’s center
point. This value is setup based on the current unit of measurement (default as either
tenths of inches or centimeters). So for inches, a value of 60 equals 60 tenths of an
inch (or 6 inches). For centimeters, a value of 60 equals 60 centimeters. The software
has been designed to account for changes in orientation and direction that are
identified under the Properties Window in the recording software. Default value is zero.
Measurement Y Offset: This value is the distance from the center of the sensor bar
(where the 24-pin connector is located) to some alternate point that is to the left or
right of the scanner. A positive value puts this alternate point to the left of the sensor
bar’s center point (this “left” is defined as the left side of a person who is using the
scanner – facing in the direction of the scan). A negative value puts this alternate point
44
to the right of the sensor bar’s center point (this “right” is defined as the right side of a
person who is using the scanner – facing in the direction of the scan). This value is
setup based on the current unit of measurement (default as either tenths of inches or
centimeters). So for inches, a value of 60 equals 60 tenths of an inch (or 6 inches). For
centimeters, a value of 60 equals 60 centimeters. The software has been designed to
account for changes in orientation and direction that are identified under the Properties
Window in the recording software. Default value is zero.
8) Width of Sensor Bar: DO NOT CHANGE THIS VALUE UNLESS YOU ARE CHANGING THE
SYSTEM OF MEASUREMENT. This value is the width of the sensor bar. Using tenths of
inches, the default value is 127 (for 12.7 inches). Using centimeters, the default value is
32 (32 cm).
9) Voltage Scale Factor: This value fine tunes the voltage being measured by the software.
It is strongly recommended not to change this value from its default value. Default
value can vary based on slight variations in voltage measurement during initial setup by
manufacturer.
10) RT Display Scale: This value adjusts the maximum size of the preview scan during
recording operations. It is strongly recommended that this value is set below 600.
Default value is 500.
11) Distance Units Label: Indicates the distance being measured by the distance counter
and hence the recorded scans. This is only a label! To actually change the system of
measurement you must modify the “Distance Per Counter Click” value! Default value
is “Tenths of an Inch” or “Centimeters”.
45
Channel Numbers for
referencing the
preview scan
Distances are
displayed along here
Press to Open
Recording Window
Press to Close
Recording Window
This area will display a
“preview scan” of the scan
that is being recorded.
Press to Access
Properties Window
Zoom In/Out of the
Preview Scan
Distance Counter
(Touch to Reset)
Universal DVD Recording PanelPower, Pause, Stop, Record, and Eject
The above illustration shows the Recording Window that is accessed through the RTD via the
Record Button. The Recording Window has the following functions/features:
1) A large portion of the recording window is dedicated to previewing the scan as it is
being recorded. There are channel numbers and distance markers along each axis for
reference when viewing the preview scan. There are also Zoom Buttons for zooming in
and out of the preview scan since the length of the scan can vary greatly from plate to
plate.
2) Distance Counter – This counts off distance whenever the motor is engaged. The units
being measured have been preset and are either in inches or centimeters, unless
another unit of measurement was specified when the scanner was purchased. This
counter can be reset to zero by touching the counter.
3) Properties Window – This button opens up the properties window. This window is
illustrated and discussed in more detail in the next section.
46
4) Universal DVD Recording Panel – From left to right, the buttons are:
a. Power Button – Press this button to close the Recording Window
b. Pause Button – Press this button to pause the recording.
c. Stop Button – Once the recorded scan is complete, press this button to save the
scan. You will be prompted with the Properties Window to either enter in the
required information or to verify the information that has already been entered.
If you change your mind about saving the scan, you can press Cancel in the
Properties Window and it will ask for a confirmation. If you confirm this action,
the scan will not be saved and all data from the scan will be lost.
d. Record Button – This button starts the recording process. Keep in mind that the
recording function works in conjunction with the encoder. So unless the motor
is engaged, the scanner will not be recording data. Whenever the motor is
subsequently disengaged, the recording will pause until the motor is re-engaged.
e. Eject Button – Use this button only when you want to quickly erase/restart the
scan that is currently being recorded. This button will prompt a confirmation
that you want to reset the scan and lose all recorded data. This would most
commonly be used in the event where the scan was not properly recorded (such
as when the motor wheels lose traction during a scan, the scan was not
performed in a straight line, etc.).
47
The above illustration shows the Properties Window which requires that the following
information is entered for each recorded scan:
a. Plate Number – Enter the same unique id number when you created the floor
map. It is important to note that you can press the “cell phone” icon next to
the appropriate entry box and this will pop up a large number pad for easy
data entry without using the keyboard.
b. Plate Xo – This value is the distance horizontally (on the floor map) from the
reference corner (referred to as Xo) to the center of the sensor bar (this is the
default location and can be changed under configurations, see Section???). This
value will most likely change for each new scan!
c. Plate Yo – This value is the distance vertically (on the floor map) from the
reference corner (referred to as Yo) to the center of the sensor bar (this is the
default location and can be changed under configurations, see Section???). This
value will most likely change for each new scan!
d. Track Number – Each recorded scan is considered a track. For instance, a single
plate can require 10 scans to completely map the plate. In this example, there
48
would be 10 tracks (the first scan labeled as Track 1, second scan as Track 2,
etc.). It is up to the end user if they want to assign a unique number for each
recorded scan or if they want to restart the track numbering on each plate. For
instance, you could be inspecting Plate# 10 and about to perform the first scan
of this plate. You have the option of labeling the track as number 1 (the first
scan of plate 10) or you could label it as number 73 (the 73 rd scan in that tank).
e. Track Direction – Options are “Away from Xo,Yo” or “Towards Xo,Yo.” Xo,Yo
refers to the reference corner. The software is wanting to know if the operator
will be scanning in a direction that is moving away from the reference corner
(Away from Xo,Yo) or if the operator will be scanning in a direction that is
moving towards the reference corner (Towards Xo,Yo). In most cases the
operator will be scanning away from the reference corner, since regardless of
which direction you scan, the measurements from Xo,Yo have to be determined.
And in most cases, it will be easier to measure those distances when you are
closer to the reference corner.
f. Track Orientation – Options “Horizontal” and “Vertical.” Referring back to the
blank floor map, the operator will either be scanning horizontally across the
plate or vertically.
g. Project Folder – This button should be pressed to determine the location of
where the recorded scans will be saved. It is strongly recommended that you
store all the recorded scans in a single folder (ideally in the same folder as your
tank floor map file). To create this new folder without using a keyboard, click the
“New Folder” button on the “Select Output Folder” window that is presented
when you hit the “Project Folder” button. This will create a new folder icon and
will prompt you to enter in the folder name. Click once where the cursor is
blinking and you will see a “pen” icon appear (give it a second to appear). Click
this “pen” icon and a full size keyboard will appear on the screen. Use this
keyboard to enter in the folder name and hit enter to finish. Next you will need
to hit the “Select” button with your new folder highlighted. The software gives
each scan file a name that uses both the plate number and track number (i.e. 1-1
is the file name for scan of Plate 1, Track 1). It is also important to note that the
software will NOT record over an existing scan with the same name. Instead it
will add a number in parentheses next to the file name. For instance, if you
saved a scan of Plate 1, Track 2 (file name is 1-2) and then decided to rescan
using the same plate number and track number, the software would not
overwrite the 1-2 file. Instead it will create a new file with a name of 1-2(1). If
you repeated this process, you would create a file named 1-2(2). Whenever you
49
re-scan a track, it is important that you eventually delete the old track! The
software will render both the old scan and the new scan.
h. Once you have taken care of the above entries, you can choose to save the scan
data by pressing “OK.”
50
Section 10
MFE Studio Software Quick-start Guide
MFE Scan Studio is designed to manage data collected during tank floor integrity surveys made using
MFE Enterprises Inc Tank Floor Scanning Systems. It allows you to gather and organize the data, view
the results, and generate custom reports of the findings.
The basic functions of the program are to:
1.
2.
3.
4.
5.
6.
7.
8.
Load data files that contain data about the tank and the bottom plates;
Load data gathered electronically by the Tank Floor Scanning Systems;
Generate displays summarizing the measurements made during the survey;
Import and define annotations and other graphics for reports;
Edit this data;
Import tank weld integrity surveys;
Analyze statistics of the defects identified during the survey; and
Generate standard graphics and reports of the survey
51
Installation
The Setup program for MFE Scan Studio will have set up a Samples folder during installation that
contains all the example files for this Quickstart, Tutorial and Demonstration.
1.
MFE Scan Studio Tank Dimensions File
This file is called "Demo Tank.tkd". It is a plain text file, with comments to explain its contents, and you
can open it with Notepad or other Windows editor to see its format. See Help for File Formats to
understand how it is built.
2.
Annotations File
This file is called "Demo Annotation.tka". It is also a plain text file, with comments to explain its contents,
and you can open it with Notepad or other Windows editor to see its format. See Help for File Formats to
understand how it is built.
3.
Digital Floorscan Survey
A sample survey, consisting of a number of *.srv files, one for each plate, is stored in the folder called
"Survey Data". You rarely need to examine these files manually, but you can open them with Notepad or
other Windows editor to see their format.
Load Data
Start MFE Scan Studio, and select File->New if there is already data loaded in the program. You will see
three main areas on the Main Window: the largest on the right is the Drawing Area; at the top left is the
View Options control; and at the lower left is the Navigator.
Select File->Import->Dimensions and open the example "Demo Tank.tkd". You will immediately see an
updated picture of the tank and all its floor plates in the Drawing Area. Also, the scale rulers will be set
correctly so that the position of the mouse and crosshairs in the Drawing Area measures the precise
physical location. This is also reported numerically in the Status Bar.
Note that the Units of Length of this data file are arbitrarily Tenths of Inch. This has to be consistent with
all other measurements that are used later in the project. You will see that the tank has a radius of 6,000
- meaning 600 inches, 50 feet - so a diameter of 100 feet. However, this could easily have been any
system accurate enough to use whole numbers: hundredths of inch, millimeters, centimeters, etc.
Any Annular Plates can be defined using Edit->Annular Data. This asks for the number of annular plates
around the circumference, the angle to the first annular plate's corner, and also the radial edge length of
each annular plate. Try this with some round numbers, like: 12 annulars; first angle at 60 degrees; and
an edge length of 220 (which is 22 inches). Be sure to select Show Annulars in the View Options control
to see them.
Graphics and Navigation
You can zoom in on any part of the tank using the Navigator. First, try expanding the zoom using the
slider to the right of the Navigator. Then, you can move up/down in the tank using the slider to its left,
and right/left using the slider beneath it. At any stage, the current viewport (extent of the Drawing Area) is
outlined in the Navigator with a red box.
You also select the "Active" plate by clicking on it in the Navigator. It will be highlighted in red, and the
corresponding plate in the Drawing Area will also be outlined in red. Double-click on the plate in the
Navigator to go to Plate View, and see a detailed picture of the Active Plate.
52
Note how now the rulers are set with their origin at the Reference Corner of the plate. Likewise,
measurements are reported in the Status Bar relative to this corner. You can return to Tank View mode
by clicking on the tab at the top of the View Options control.
Load Survey
Go to File->Import Survey to select the "Survey Data" folder where the survey files are kept. You will then
be able to see the defects color-coded to show their severity. Note that this survey is entirely synthetic! It
was built to demonstrate the features of the program and no real-life tank will really show similar readings.
The View Options control allows you to show or hide a number of items from the survey. Track Outlines
show the edges of tracks where data was acquired, and Track Coverage fills the backgrounds of the
tracks in light gray. This is relevant since perhaps not all of the tank floor was surveyed, and missing
areas remain white. Note that every survey is run with a Minimum Threshold for the instrument, and for
the sample survey this is 20%. Therefore, there may well be track coverage with no readings at all - they
are simply all below 20%.
Left-click on any defect to see a popup with its severity and precise location.
The coloring of the defects against a Color Scale (or Color "Bar") is very flexible. The current scale is
shown above the Drawing Area to help interpretation. However, you can go to Edit->Color Bar to set any
set of colors and ranges. See Help for Color Bar for more details. You can also either view defects
individually, or you can color each entire plate with its maximum value. This is useful in Tank View to
highlight the problem plates.
You use the sliders on the View Options control to set the Minimum and Maximum display thresholds.
The Minimum sets the value below which no defects are shown at all. Notice how the program does not
allow you to set this below the survey minimum - in this example, 20%. All defects above the Maximum
are set to 100%, and also the Color Bar is compressed so that all colors are "squeezed" linearly.
Annotations
Select File->Import->Annotation and open the example "Demo Annotation.tka". This file contains a
sample of every kind of annotation available in MFE Scan Studio so it is useful as a first illustration. Be
sure to click on Show Annotation in the View Options control to see them.
You will be able to see and modify any of the characteristics of the annotation using the Edit Menu. You
can also add your own: for example, place the mouse somewhere in the tank to add some text, and rightclick to show the Popup Menu. The second item is "Add Annotation" and select this. Your mouse now
becomes a mimic of a textbox with a callout, anchored at the point you first clicked. Move the mouse to
position the text. Then, in the popup dialog, you can set the text to display.
Go to Edit->Annotation and you will see your newly-added text as the last row of the table. Here you can
set a precise X, Y position, callout length, and change the text. Most other graphics can be added and
modified in the same way.
Weld Inspection
A Weld Inspection view is selected using the tab at the top of the View Options control. It starts by
showing the whole tank, and here you can add a radial weld defect (at the circumference of the tank) by
using the Popup Menu. Position the mouse near the tank edge at the start of the flaw, and right-click.
The last item on the menu is Draw Radial Weld Defect. When you select it, the mouse expands and
contracts a radial line that covers the affected area.
Similarly, you can select any plate by double-clicking on it in the Navigator. Right-click near one of the
edges of the plate where you would like to place the defect. Then, your mouse expands and contracts a
53
rectangle that covers the affected area. You can return to Tank Weld View simply by clicking on the Weld
Inspection tab on the View Options control again.
You go to Edit->Weld Inspection to refine and edit these annotations, at any time.
Comparison Views
There are two tabs on the View Options control that allow you to compare Tanks and Plates. First, you
should set the display in the Drawing Area to be whatever will become the fixed "Reference" image in the
lower half of the split screen.
You can then select Compare Plates. This splits the Drawing Area in two, and copies the current image
to the bottom half. Selecting any other plate using the Navigator will change the display in the top half.
Return to View Tank, and then Compare Tanks. This splits the Drawing Area in two, and copies the
current image to the bottom half. It also opens the "Open Project" dialog, asking for which project file to
put in the top half. For this demonstration, you can simply use the same "Demo.tkp" file which is included
with the samples.
Reporting
At any stage you can Save the Drawing Area or Copy it to the Windows Clipboard. The File->Print
function will save it to a JPEG file which you can then either hardcopy using Windows Preview, or insert in
a report. Edit->Copy will copy the graphics to the clipboard so that you can paste it into Word,
PowerPoint or other MS Office program.
An important reporting tool is the statistical histogram of defects, under View->Statistics. This shows a
frequency distribution of the defects in the survey. It, too, can be printed to file or copied to the clipboard.
There is also a standard report, under View->Report. It allows you to set a number of text fields to fill in
titles and page headers/footers. You can then preview it on the screen, or print it to PDF. It contains all
the main graphics in MFE Scan Studio, organized over several pages.
54
Section 10.1
MFE Studio – Visio Helper
MFE Scan Studio includes a helper that uses MS Visio to prepare the input Tank Dimension Files.
Very often, the survey of the tank only includes a drawing and measurements of the width and height of
each plate. The actual X, Y coordinates of each plate within the tank may not be available. In these
cases you can use Visio and some pre-packaged macros to draw the tank with its plates and calculate
their X, Y coordinates.
The Helper includes:
(1)
(2)
(3)
(4)
A special Shape Stencil called MFE Scan Studio
A Drawing Template called Tank Drawing
An Example text file with a dimensions survey containing only plate widths and heights
This Quickstart Guide
Installation
You will only have to go through these installation steps once, and Visio should remember your setting
from then on.
1.
MFE Scan Studio Shape Stencil
This file is called "MFE Scan Studio.vss". When you installed Visio, it created a folder within your
Documents folder called "My Shapes". Copy "MFE Scan Studio.vss" to "My Shapes".
55
2.
Tank Drawing Template
This file is called "Tank Drawing.vst". You can copy this to your Documents folder, or any other
convenient location.
3.
Start Visio
From within Visio, select File -> New -> New Drawing from Template...
Choose the Tank Drawing Template from step 2, and click OK. You should see a wide page scaled
1:200 in thousands of inches, and the MFE Scan Studio Shape Stencil on the left.
If you do not see the Shape Stencil for any reason, select File -> Shapes -> Open Stencil. Select the
MFE Scan Studio Stencil from step 1 and click OK.
4.
Microsoft Office Security Warnings
Both the Stencil and the Template include several macros, and by default Microsoft Office will issue
repeated security warnings and/or disable active content. You can simply choose to acknowledge and
allow active content each time the Template is used. Alternatively, you can use the Office Trust Center
and allow all files from your Documents folder to run active content:
(1)
(2)
(3)
Select Tools -> Trust Center...
Click Trusted Locations on the left bar
Click Add New Location... to add your Documents folder, and check All Subfolders
Description
The Shape Stencil contains only two shapes:
(1)
A Tank shape. Any drawing only needs one of these, and its only property is its radius
(2)
A Plate shape. A drawing will usually have many of these. You define the Width and Height of
the plate using the Shape Data window. You also need to assign a unique ID, and the Row and Column
where the plate lies within the tank.
The Drawing Document includes five control buttons and a list box:
(1)
Insert Tank drops a tank shape and centers it for you automatically. You can then set its radius
using the Shape Data window at the bottom right of the screen.
(2)
Read Plates will open a simple text file with the ID, Row, Column, Width and Height of each plate.
It will then automatically drop and try to arrange the plates as best it can in the drawing.
(3)
Paste Plates is similar. If you are using Excel or other Microsoft Office tool to gather the plate
data, you can select the cells or region containing the ID, Row, Column, Width and Height of each plate,
and Copy it to the Clipboard (Control-C). Paste Plates will then automatically drop and try to arrange the
plates as best it can in the drawing.
(4)
Write MFE File will write out a file using all the data in the drawing, in the format that can be
loaded into MFE Scan Studio.
(5)
At any stage during the preparation of the drawing, Refresh List will re-generate the list of all
current plates, with their current ID, Row, Column, Width and Height.
Note also the Shape Data window, usually at the lower right of the Visio drawing. This is visible by
default - but can be toggled on/off by selecting View -> Shape Data Window. You arrange the position of
the Tank and Plates by dragging them on the drawing itself. However, you set fixed data like ID, Width
and Height from the Shape Data window.
56
Example
An example text file is included called "VS Tank.txt" to help illustrate a fully automatic workflow. Open
this file using Notepad to see its format. You will see 4 columns in free format, representing (1) Row; (2)
Column; (3) Width; and (4) Height for each plate. It is a good idea to keep each plate on a separate line.
Use a consistent set of units - inches will scale best on the drawing, which is already set up at 1:200
scale.
(1)
Define the tank. Press the Insert Tank button, and a tank shape will be dropped and centered on
the page. It has a default radius of 500 inches. Change this to 600 inches.
(2)
Load the file. Press the Read Plates button, and select the example file, "VS Tank.txt". The
plates will be drawn and arranged as best it can within the tank. You can, however, re-arrange these
plates by selecting and dragging if they are not placed exactly right.
(3)
Write out the data. Press Write MFE File and specify a file name for the data.
You can now go to MFE Scan Studio, and load this data by selecting File -> Import -> Tank Dimensions.
You will see exactly the same plates as in the Visio drawing. Note how at this stage all the reference
corners have defaulted to Lower-Left. You can easily edit this during the Scan Survey using Edit -> Plate
Data. Note also how each plate ID has been set automatically. You can also edit this for any reason
using Edit -> Plate Data.
(4)
Press the Refresh List button. You will then also be able to see a list of all the plates that were
defined.
(5)
You can also load these plates from the Windows Clipboard. Clear the drawing by selecting all
the shapes (not the control buttons!) and deleting them. Repeat step 1 to re-insert a tank. Then, open
VS Tank.txt using Notepad, and Select All / Copy. Return to the Visio drawing, and press the Paste
Plates button. This will produce exactly the same result as step 2, just using the Clipboard instead of a
text file.
In practice, you could have Copied the data from anywhere - Excel, Word, a Database - so long as the
columns are the same order: (1) Row; (2) Column; (3) Width; and (4) Height; by row for each plate.
Manual Usage
It is probably more efficient, and less prone to error, to work in practice with files just like the example text
file, or Excel with similar columns that you Copy/Paste.
However, Write MFE File will write out whatever is currently on the drawing, regardless of how it was
placed there. If you are comfortable with Visio, you can drop exactly one Tank shape from the stencil,
and set its radius. You can then drop any number of Plate shapes, setting their ID, Row, Column, Width
and Height in the Shape Data window. Re-arrange them on the drawing as necessary and, when ready,
write the dimension file.
57
Section 11
MFE Mark III Manual Scanner
Illustrated Assembly
Electronics Box
Laptop Holder
With Laptop
Battery Box
(For Electronics)
Handle Assembly
Magnetic
Bridge
Sensor Bar
(Hidden From View Under Magnetic Bridge)
The MFE Mark III Manual Scanner consists of the following modules:
1)
2)
3)
4)
5)
6)
Magnet Bridge
Sensor Bar
Battery Box #1 (Power Supply For Electronics Box)
Handle Assembly
Electronics Box
Laptop Holder with Laptop – Connects Directly to the Handle Assembly via Two 1/4"20 Flathead Screws
7) Cables
a. Signal Cable (24-Pin Connectors) – Connects Sensor Bar to Electronics Box
b. Power Cable (2-Pin Connectors) – Connects Battery Box to Electronics Box
c. USB Cable (A to B Connector) – Connects Electronics Box to Laptop
58
Section 11.1
Manual Scanning
The scanner has been optimized for a medium walking pace. Faster scanning speeds will
result in higher signal amplitudes due to the sensor characteristics; however the operator must
be careful not to scan so fast that they cannot interpret the incoming signal data.
Slower speeds however will result in lower signal amplitudes, and it is recommended
that when it is found necessary to scan at lower speeds, e.g. in confined spaces, the system gain
must be increased to compensate.
Maximum coverage of the floor area is achieved using overlapping scans on a plate-byplate basis. The scanner is extremely maneuverable and can be rotated around its axis and
easily lifted from the plate onto the neoprene wheels for quick and easy relocation purposes.
Do not attempt to pull or push the unit over the lap welds without first tipping the unit back
onto the rear wheels. “Ramming” the unit over lap welds can result in damage to the Sensor
Bar and Magnetic Bridge.
Any given floor will generate a level of noise dependent on the top surface condition of
the plate. This will be displayed as a general low level signal across the display. The level of this
noise will dictate the achievable sensitivity of the inspection.
As soon as discreet signals are noted they must be proved up using Ultrasonics. This will
give the operator the information required as far as the system sensitivity is concerned and
allow the determination of an adequate scanning sensitivity for the remainder of the floor. The
channels are numbered from left to right 1 - 12 and correspond to a twelve-inch scan width.
The system can be rocked backwards and forwards over the indication for accurate location
purposes. Lines drawn at the center of the array and the channel number of the indication will
intersect within an inch of the cause of the indication.
All indications determined to be significant by the operator must be marked up for
subsequent prove up. When it is apparent from the display that a large area of lake type
corrosion is present, the boundaries of such an area can be quickly determined using the
scanner and the most significant indications within that area marked up for prove up.
Amplitude alone must not be used solely as the criteria for prove up purposes. The operator
must use all the information available from the display to determine the relative significance of
any given indication.
It is therefore recommended that the provided alarm function is NOT used as
the basis of accept/reject decisions but rather as an alarm for the operator in the
event that his attention is distracted from the display whilst scanning.
59
SECTION 12
Ultrasonic Prove Up
Magnetic Flux Leakage is an excellent detector of under floor corrosion but can give no
truly accurate assessment of remaining wall thicknesses due to the limitations imposed by the
inspection environment. Accurate quantitative assessment is obtained using Ultrasonic prove up.
It is important that the operator who carries out this assessment is adequately trained and
experienced in this type of indication analysis. This is not just "thickness measurement ". In
order to arrive at accurate remaining wall thickness it is necessary for the operator to use
equipment which is capable of giving the information that is needed as well as the application of
the correct technique. The following type of prove up equipment and technique is strongly
recommended:
A. It is essential that a good quality A-scan display is used for the assessment of any
corrosion detected. The equipment must be capable of determining location, size and the
accurate quantification of remaining wall thickness.
B. A good quality 5 Megahertz twin crystal focused contact transducer of either 0.375" or
0.500" diameter.
C. Surprisingly enough ordinary water and plenty of it provides the best coupling media in
most cases.
D. The amplitude of the signal from the corroded back wall must be raised to at least the
same screen height as the calibration reflector.
E. Elevated gates tied to a digital read out are not recommended as this technique invariably
underestimates the severity of the indication.
F. The nearest facet of the reflection must be identified and the true remaining wall
thickness read from the timebase.
60
ULTRASONIC PROVE UP IN SUPPORT OF
MAGNETIC FLUX LEAKAGE
TANK FLOOR INSPECTIONS
INTRODUCTION
It is generally recognized that Magnet Flux Leakage is only a truly qualitative technique and that
indications detected using MFL must be assessed using a more quantitative method. Invariably this task falls to
Ultrasonics for the accurate assessment of indication severity.
Over the last ten years the author has witnessed many ultrasonic methods and techniques for the
evaluation of corrosion in support of MFL Tank Floor Inspections ranging from the sublime to the ridiculous and
from the appalling to the ingenious. A very large percentage of the methods witnessed were severely flawed and it
was apparent from questioning the technicians involved that they did not have a real understanding of what was
required. There is a very big difference between “Thickness Measurement” and “Corrosion Assessment”.
Localized pitting corrosion is sometimes very difficult to find and measure using compression wave
Ultrasonics techniques due to the very shape of the defect. Many excellent MFL inspections have been compromised
by the inability of a bad Ultrasonic method to both find and accurately assess the severity of indications. In most
cases it is not the technicians fault as there is very little published information in this regard and even less training
available. This is what has prompted the author to publish this paper in the hope that Ultrasonic prove up methods
will become more standardized and reliable within the industry. To this end the author will describe below the
equipment and method that has, in his experience, proven to give the best results possible in the assessment of MFL
indications using the compression wave Ultrasonic Technique. It is assumed that the reader has a basic
understanding of Ultrasonic principles in order to obtain the most benefit from this paper.
EQUIPMENT
ULTRASONIC INSTRUMENTS
Digital thickness gauges are not ideally suited for this application especially when evaluating localized
pitting type corrosion. Most of these gauges use peak or leading edge data from the first and second back wall
response to determine thickness. It is almost impossible to obtain two reliable back wall responses from an irregular
shaped indication. In the case of very small pits the normal back wall response will obviously interfere with the
accurate measurement of the pit depth. The trigger gates are often set relatively high with this type of equipment to
prevent false measurements from noise. Indication responses can be very low amplitude and therefore rejected using
this method. Scanning to locate small indications is impossible with digital thickness gauges. The technician is
limited to a move and measure technique (pecking) that has a limited chance of actually finding the indication at all.
This type of equipment is seriously limited in this application and is not recommended.
There are digital thickness gauges that have a rudimentary A-scan display. These are normally small, low
resolution displays. Even if the processing speed is up to processing the data real time it is often the case that the
screen update speed is too slow to allow any scanning technique to be used. This type of equipment is also
seriously limited in this application and is not recommended.
61
B-scan equipment uses the ultrasonic data to provide a profile view of wall thickness and can be useful as
a reporting function but in most cases does not allow the technician access to the A-scan information necessary to
carry out a reliable evaluation of the Ultrasonic data. The data for the display is obtained in much the same way as
in Digital Thickness Gauges and is therefore seriously limited in this application and is not recommended.
In the opinion of the author the only Ultrasonic apparatus that should be used for the assessment of
corrosion indications is one that has a high resolution real time A-scan display that will allow scanning speeds of at
least 6 inches per second. Most of the current commercially available instruments are more than capable of
meeting these requirements. The very early digital instruments had serious limitations regarding processor and
display update speeds. A good analogue display is still superior to most digital displays for this application. [If you
can still find one.] Having said that, the latest digital display instruments are more than fast enough to give
acceptable results. The A-scan display allows the technician to maximize the response and identify the first and
closest facet of the indication for the accurate measurement of remaining wall thickness.
There are differences between instruments from different manufacturers and the combination of
transducer and instrument is extremely important. All like configuration transducers from different manufacturers
do not always perform the same and should be carefully matched to the ultrasonic instrument being used. A
combination of transducer and instrument from the same manufacturer is recommended as a starting point. If the
instrument allows adjustment of pulse amplitude and width it is possible to experiment with other transducers to
obtain the best results possible.
ULTRASONIC TRANSDUCERS
In this application where nominal plate thickness is in the range of 0.25" – 0.50" it has been determined
that, in most instances, the best results can be achieved by using a 5 MHz, dual element transducer 0.375" in
diameter. In some cases it is necessary to resort to using smaller higher frequency transducers (surface condition) or
larger lower frequency transducers (thicker plates). The implications as regards beam spread and resolution must be
considered when using these alternative configurations. Slight focusing of the elements is required to minimize
inaccuracy on thinner materials. The chosen transducer should exhibit minimal cross talk even when worn down to
its limits. Different transducers vary widely in this regard. A fairly hard wear face is important unless you want to
spend a small fortune on replacements. Tank floor plates can be extremely abrasive. Good quality cables are a must.
ULTRASONIC COUPLANTS
There are many proprietary couplants on the market that perform very well in this application. As a
general rule the higher the viscosity the better. The author has found that in most cases water and plenty of it is
more than capable of achieving the required results and is a lot cheaper.
MARKING MATERIALS
The choice of marking material can have a significant adverse effect on the ultrasonic prove-up. Wax
crayons are the worst followed by paint markers. It is sometimes impossible to couple sound through these
62
materials. This is obviously of concern as the mark should be exactly where the indication is located. A good quality
chalk is recommended for indication location marking. After Ultrasonic prove up the indications can be marked
more permanently with a wax crayon or a paint marker.
METHOD
The method and technique described below is geared towards the assessment of localized pitting corrosion
rather than lake type corrosion. By its very nature lake type corrosion is much easier to locate and assess with a high
degree of reliability unlike pitting corrosion, which can be extremely difficult to locate and measure unless the
correct method and techniques are used.
INSTRUMENT CALIBRATION
Using a step wedge and the transducer of choice, adjust the range and delay controls to display a
calibrated range so that the first two back wall responses can be displayed on the screen. In the case of 0.25"
nominal thickness plate this would mean two responses at 0.25" and 0.50" respectively. Adjust the gain to raise
the first back wall response to full screen height. (Fig. 1.) All responses should be adjusted to the time base. All
gates should be disabled at this time. If the instrument has a reject control, make sure it is turned off or at zero. If
provided, adjustment of any pulse amplitude or pulse width controls can be used to optimize the shape of the
signal envelope.
Reference to any digital read outs of thickness can lead to significant errors in
measurement in this application due to the variations in signal envelope generated by
different corrosion pits. It is therefore recommended that no reference be made to gates
based on signal amplitude and the digital read outs associated with them. All responses
should be referenced to the point at which the signal breaks the time base. (Fig. 4.)
TECHNIQUE
Lock all controls other than gain to prevent any inadvertent adjustment to the base line setup. Evaluation of
the located pit can now begin. Liberally spread the couplant of choice over the area of plate concerned. Place the
transducer adjacent to the location of the pit and obtain a back wall response from the nominal plate thickness. The
gain should be adjusted, at this time, to bring the first back wall response to full screen height. Note where the first
facet (left hand edge) of the first back wall response breaks the time base. This is your nominal plate thickness. Add
a further 6db for scanning and note this setting.
Slowly scan the marked location of the pit. Even at this gain setting there may be no discreet signal from
the corrosion pit at this time. The only indication of anything amiss may be a dip in the amplitude of the back wall
response. Home in on the dip in back wall response and increase the gain until the response from the corrosion pit is
evident. (Fig. 2.) Maximize the earliest response from the corrosion pit by small scanning movements of the
transducer. Continue increasing the gain until the response from the pit reaches full screen height and note where the
first facet of the indication (left hand edge) breaks the time base. (Fig. 3.) This will be your remaining wall thickness
measurement to be recorded. If the gain is so high at this point that electronic noise from the instrument is evident,
raise the signal response only as high as necessary to discriminate between signal facets and the electronic noise.
Do not forget to adjust the gain to the scan setting established earlier before moving to the next indication.
Calibration should be checked at regular intervals as any wear in the face of the transducer will affect the accuracy
63
of the measurements taken. At higher gains electronic noise and cross talk may be evident on the time base but it is
relatively easy to differentiate between the noise and a true signal response. It is sometimes necessary to extrapolate
exactly where the signal breaks the time base based on the slope of the first facet. (left hand edge)
Using this method it is possible to obtain the most accurate measurement of remaining wall thickness from
the Ultrasonic data presented.
RECORDING OF DATA
It is quite common these days to see thickness data presented to three decimal places. In all honesty the
author questions the accuracy of the third digit, bearing in mind the small errors that can occur in the calibration
routine. In the above described method it is possible to make a judgment as to indications that break the base line
between graticules. In this case the author tends to split the reading rather than go to the third decimal. ie. If a signal
breaks the baseline between 0.16 and 0.17 it will be recorded as 0.165.
For each indication the following minimum information should be recorded:
1.
2.
3.
4.
5.
6.
Plate number
Indication number
Nominal plate thickness
Minimum Remaining wall thickness (at location of pit)
Measurement datum point (eg. South West corner of plate)
X – Y location measurement and direction from datum (eg. 25" North 16" West)
This will allow the technician or tank owner to accurately locate any indication at a later date should any marking be
erased.
GENERAL INFORMATION
Many signals generated during an MFL Inspection may not be due to corrosion pitting. Weld scars, arc
strikes and other magnetic anomalies, even lamina inclusions can trigger responses, but whatever the cause it must
be identified. If there is definitely no Ultrasonic evidence of corrosion these other causes must be considered and
investigated.
Accurate measurement of pitting corrosion is problematical when coatings are present. The thicker the
coating the more difficult it becomes. Even if it is possible to transmit sound through the coating material and
evaluate the carbon steel plate underneath, accurate pit depth measurement is unreliable because the velocity in the
coating is generally unknown and as mentioned earlier it is very difficult to obtain repeat responses from small
corrosion pits to allow a peak or edge measurement technique between responses. Invariably the residue of energy
being returned from the nominal thickness around the pit will interfere with this technique. Any high amplitude
localized signals will require the removal of the coating to properly evaluate the accurate depth of the indication.
Low frequency eddy current techniques have been developed to overcome this perceived weakness of MFL and to
avoid the necessity of removing coating. The accuracy of the information from such devices is questionable and is
dependant on the coating having an even thickness. This is rarely the case on fiberglass coated floors as the coating
thickness can vary significantly throughout the floor area.
The ultrasonic energy reflected from a clean back wall will have a relatively tight signal envelope as it is
being reflected back from a flat surface. This is not true of the energy reflected from corrosion. It’s irregular profile
means that energy is being reflected from many different surfaces and therefore the signal envelope will be much
wider on the time base and of a much lower amplitude. This is why it is so important to make significant gain
increases to properly evaluate the significance of the indication. Another point worth bearing in mind is that with
conical shaped reflectors that have a peak there will be very little, and sometimes no energy reflected from the tip of
the indication. In this case it will be seen that the ultrasonic data will underestimate the severity of the
indication.[Food for thought!]
The author does not wish to publish an endorsement of any particular manufacturers equipment but would
be willing to discuss his experience in this regard on a one to one basis and welcomes any comments regarding the
64
points raised in the above text. Please address any comments or questions to:-
Bill Duke
MFE Enterprises Inc
26550 RR 12, Unit 5
Dripping Springs, Texas. 78620
Tel 281 441 8284
Fax 281 441 8361
E-mail [email protected]
65
Fig. 1
Figure 1 shows a screen trace depicting a calibrated time base from 0.00” to 0.50”. The fist facet (left
hand edge) of the first backwall response can be seen to break the time base at 0.25”. The first facet of
the second back wall response can be seen at the right hand side of the screen breaking the time base at
0.50”
Fig. 2
Figure 2 shows the screen trace with the transducer over the top of the corrosion pit. Note the
reduction in the backwall response despite the 6db increase in gain. The response from the pit can be
clearly seen emerging from the time base at 0.165”. At this point a further increase in gain is required to
determine the true remaining wall thickness.
66
Fig. 3
Figure 3 shows the trace with the transducer directly over the corrosion pit and the gain increased to
bring the signal to almost full screen height. It will be noted that cross talk is evident at this high gain
level and it is neccessary to extrapolate where the signal breaks the time base from the slope of the
leading edge. In this case it would be a reasonable assumption that the remainung wall thickness is in
the order of 0.150”.
Fig. 4
Figure 4 shows the screen trace with a gated threshold and a digital read out in operation. It can be seen
that the elevated time base represented by the gate can produce an error, in this case, in the order of
0.020”. Even if the gain is increased to that in figure 3 it will be seen that a significant error would still
exist. NOT RECOMMENDED
67
SECTION 13
Battery Management
The batteries provided with the units are 12V sealed, rechargeable, lead acid batteries
that are both leak-proof and can be place in any orientation. This type of battery is not
regarded as hazardous for shipping purposes. These batteries should only be charged using
the supplied battery chargers which are fully automatic and will maintain the battery at full
charge if left connected and turned on for extended periods without damage to either
battery or charger. If the charger is turned off for any reason the battery must be disconnected
from the charger.
The fully automatic maintenance chargers provided with the scanner is the only charger
that should be used on this equipment. Charging of the battery can be achieved by plugging the
connector plug from the charger into the mating receptacle on top of the battery module (see
Sections 4.1.4, 4.1.7, and 4.2).
Under no circumstances may the charger be rigged so that the unit is powered up
during the charging process. This will cause severe damage to the electronics module.
It is recommended that the battery be charged overnight, every night when the unit is in
continuous use and continuously when not in use. This will ensure an adequate maintenance of
battery power so that the unit will be ready for use at a moment’s notice.
If it is necessary to remove or replace the battery at any time be sure to replace all of
the rubber shielding and foam provided to ensure the original degree of protection against
physical damage and possible dead shorts of the electrical system is maintained.
IT IS STRONGLY RECOMMENDED THAT ALL BATTERIES ARE FULLY CHARGED
PRIOR TO EACH USE OF THE SCANNER!
68
SECTION 14
Scanner Adjustments
Standard setup
The majority of tank floors are constructed of uncoated plates in the order of 0.250 inches in
thickness. The MFE Mark III as supplied from the manufacturer is set up to function on this
configuration of tank floor. No additional set up is required other than the adjustment of the
sensor bar as outlined in Section 6, Step 5 of the Initial Setup.
The intention is to run the sensor bar as close to the inspection surface as possible without
actually contacting the plate. A sensor bar rubbing along the surface will generate a level of
unnecessary noise. CAUTION! Raising the sensor bar too high from the inspection surface will
result in a significant reduction in sensitivity.
69
Section 15
RESTRICTED USE, NON-DISCLOSURE AND NON CIRCUMVENTION
AGREEMENT
This agreement is made and entered into this the
day of
in the year , by and
between MFE Enterprises, Incorporated ("MFE") a corporation duly organized and
existing under the laws of the State of Texas
and
(the purchaser) for the purposes set forth herein:
RECITALS
A.
MFE desires to sell, and purchaser wishes to purchase certain tank floor
scanning equipment, which MFE has developed and manufactured, and
specifically includes the following items:
which
MFE 2412 Mark II Tank Floor Scanner, MFE Mark III,
And Related Software
(hereinafter referred to as the "Scanners").
B.
Purchaser recognizes and acknowledges that MFE has invested substantial and
valuable resources in developing the Scanners and in the technology incorporated in he
development, manufacturing and operation of the
Scanners (the "MFE Proprietary
Information"), and that the MFE Proprietary Information is secret, confidential, and
proprietary to MFE.
C.
Purchaser recognizes and acknowledges that MFE's sale of the Scanners does
not include the right to reproduction of the Scanners or their component
parts.
D.
MFE desires to maintain the confidentiality of the MFE Proprietary Information.
Purchaser recognizes and acknowledges that the unauthorized use of the Scanners
or disclosure of the MFE Proprietary Information to any
person or entity except
MFE and its duly authorized representatives
would be detrimental and damaging to
MFE.
E.
Both MFE and Purchaser (collectively "the parties") represent that they are not
aware of any express or implied obligation to any third parties that conflicts with any of
the obligations of this Agreement.
70
NOW THEREFORE, in consideration of the mutual promises, covenants and conditions
contained herein, the Parties agree as follows:
1.
All Scanners, the components thereof, the technology incorporated
therein, and the MFE Proprietary Information shall be treated as
confidential and proprietary to MFE by the Purchaser, and are
subject to the terms of this agreement. Purchaser must not copy,
replicate, reproduce or modify for the purpose of copying, the
Scanners or the component parts thereof. Purchaser will not
manufacture or produce equipment similar to the Scanners based on
the MFE Proprietary Information.
2.
Purchaser must not (a) modify or translate the MFE Proprietary
Information: (b) reverse engineer, decompile, or disassemble the
Scanners (for other than routine maintenance and cleaning); (c)
create derivative works based on the MFE Proprietary Information;
(d) merge the MFE Proprietary Information with another product;
(e) export or use the data compilations, structures, or algorithms
constituting the MFE Proprietary Information with another product;
(f) remove or obscure any proprietary rights, notices, or labels on the
Scanners, or (g) charge a fee or royalty, or request donations,
for any of the distribution or transmission of the MFE Proprietary
Information.
3.
Purchaser is the sole party authorized to use and operate the
Scanners. Purchaser will not use the Scanners in a manner
inconsistent with the purpose intended for the Scanners in the
inspection of tanks. To this end, neither Purchaser nor any of its
employees, agents, contractors, or other persons or organizations over
which purchaser has control, will rent, sell, assign, transfer, or
relinquish possession of the Scanners or any component thereof, to
any person or organization, without the express written consent of
MFE.
4.
Neither Purchaser nor any of its employees, agents, contractors or
other persons or organizations over which the Purchaser has control,
will at any time publish, release or disclose any MFE Proprietary
Information to any person or organization, without the express
written consent of MFE.
71
5.
Purchaser will undertake all necessary, reasonable and appropriate
steps to protect and maintain the confidentially of all MFE
Proprietary Information related to the Scanners and the components
thereof. These steps include but are not limited to the following:
a)
Preventing the resale or transfer of the Scanners to a third
party without the express written consent of MFE.
b.)
Advising all Purchaser's employees and representatives with
access to the Scanners, of this Agreement and the obligation to
protect the MFE Proprietary information from disclosure;
c.)
Requiring persons who have access to the Scanners to take all
necessary, reasonable, and appropriate steps to protect the
confidentiality of all MFE Proprietary Information.
d.)
Limiting the use of the Scanners to those purposes for which
the Scanners are intended;
e.)
Prohibiting, preventing and refraining from the disassembly,
decompilation, break down, or attempts to perform reverse
engineering on the Scanners or of any components thereof; and
f.)
Copying, replicating or modifying the Scanners for purpose of
copying the Scanners.
6.)
The parties recognize and acknowledge that Purchaser's use of the Scanners
or disclosure of the MFE Proprietary Information in a manner inconsistent with
the terms of this Agreement may cause MFE irreparable harm for
which legal remedies
may be inadequate. Purchaser agrees that MFE shall have the right to injunctive or
other equitable relief from a court of
competent jurisdiction as may be necessary and
appropriate to prevent
unauthorized use or reproduction of the Scanners, or use,
publication, or
disclosure of MFE's Proprietary Information, by the Purchaser, its
employees or agents. As such, Purchaser shall not oppose such injunction on the
grounds that an adequate remedy is available at law. Such remedy shall
be in addition
to other remedies available to MFE.
7.)
Nothing contained in this Agreement, or the Terms and Conditions set forth on the
corresponding invoice shall be construed as granting or conferring to Purchaser
any rights in MFE's Proprietary Information or in the technology
MFE incorporated
in the development, manufacturing and operation of the
Scanners.
8.)
This agreement constitutes the entire agreement between the Parties, their
affiliates and subsidiaries and supersedes any prior or contemporaneous oral
or written representations with regard to the subject matter thereof. This
Agreement may not be modified except in writing signed by both Parties.
72
9.)
Defined terms have the meaning ascribed to them through out this
Agreement,
whether capitalized or lower case. Where the context requires,
singular and plural
terms include the other.
10.) This Agreement shall be construed and governed in all respects in
accordance
with the laws of Texas. This Agreement is performable in Harris
County, Texas, and
unless the parties agree otherwise in writing, venue for the resolution of any dispute
regarding this Agreement or enforcement of
rights relating to this Agreement shall be
proper only in Harris County,
Texas. Any legal proceedings to enforce or interpret the
provisions of this
Agreement must be brought exclusively in the District Court of Harris
County, Texas or in the United States District Court for the Southern District of
Texas.
11.)
In the event that any provision of this Agreement is determined by a court of
competent jurisdiction to be void or unenforceable, then all remaining
paragraphs and provisions shall remain in full force and effect, as if the
invalid
provision was originally deleted from the Agreement.
12.)
In the event of a breach of this Agreement, or in the event that such breach
appears to be imminent, the non faulting party shall be entitled to all legal and
equitable remedies afforded by law as a result thereof. MFE shall, in addition to any and
all other forms of legal and equitable relief, recover from
the other party all
reasonable costs and attorney's fees incurred in seeking any such remedy.
13.) This Non-Disclosure Agreement may be executed in facsimile copies, which
serve as original.
shall
IN WITNESS WHEREOF the parties have executed this Non-Disclosure NonCircumvention Agreement on the date indicated below: Signatures represent agreement to
4 pages including signature page.
MFE Enterprises, Inc.
By:
William B. Duke
19419 Pinehurst Trail Drive
Humble, Texas 77346
By:
Purchaser -
Date:
73