1
SMX-C 1
SMX-C 1
SMX-C14Ri'
SMX-C14GN
........
s:_, ,_the possibiiities
(}
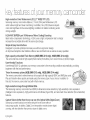
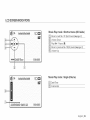
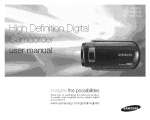
Thank you for purchasing this Samsung product.
To receive more complete service, please
register your product at
www.samsung.com/register
High-resolution
Color Widescreen LCD (2.7" WIDE TFT LCD)
Samsung memory camcorder utilizes a 2.7-inch 230k pixel Widescreen LCD
which allows bright and clear monitoring. In addition, the LCD Enhancer adjusts
color and brightness to the screen lighting conditions for better monitoring under
strong sunlight.
H.264/AVC (MPEG4 part 10/Advanced Video Coding) Encoding
latest video compression technology, H.264, uses a high compression
increase the recordable time with the same size storage.
rate to sharply
Simple & Easy User Interface
Designed to provide optimized and easy use with an ergonomic design.
An improved Graphics User Interface offers a new and fresh look as well as an easy operation.
High-capacity
embedded Flash Memory (8GB (SMX-013 only), 16GB (SMX-014 only))
The camcorder has a built-in high capacity flash memory that allows you to record movie (or photo) images.
User-friendly Functions
User-friendly EASY Q optimises your memory camcorder to the recording conditions automatically, providing
beginners with the best performance.
Twice the memory options (8GB (SMX-013 only), 16GB (SMX-014 only))
The memory camcorder's external memory slot accepts both high capacity SDHC and MMCplus cards.
Play and transfer videos quickly and easily using the memory type of your choice. In addition to
this slot, the memory camcorder has built-in flash memory.
.....
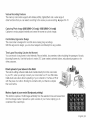
High-resolution
image through Mobile DNle
The Samsung memory camcorder has 3DN R (3-dimensional noise reduction), high-sensitivity color expression
(intelligent color expression), High performance Anti-Shake (Hyper DIS), and automatic face detection (Face Detection)
features.
Capture Visions farther than the eye can see (10x Optical/1200x
Digital Zoom)
Samsung's powerful optical zoom lenses bring the world closer without
losing image quality. In addition, Digital Zoom Interpolation enables clearer digital
zooming, with less distortion than previous types of digital zooms.
ii Englsh
Various
Recording
Features
Thememory
camcorder
supports
Anti-Shake
(HDIS),
Digital
Effect
andawiderange
of
other
functions
thatyoucanselect
according
tothescene
youarerecording,
u,pages
56-70
Capturing
Photo
Image
(8GB (SMX-C13 only}, 16GB (SMX-C14 only})
Captures a moving subject instantly and saves the scene as a photo image.
Comfortable,
Ergonomic Design
This camcorder is designed for comfort when making long recordings.
With this ergonomic design, you can shoot subjects comfortably from any position.
Time Lapse Recording Catches the Moment
You can record a long scene in short intervals. Record artistic, documentary videos including the passage of clouds,
blooming flowers etc. Use this function to make UCC (user created contents) videos, educational programs or for
other purposes.
Direct upload of your videos to the Web!
The built-in editing software Intelli-studio installs directly from this camcorder
to your PC, when you simply connect your camcorder to a PC via USB cable.
Intelli-studio also allows direct uploading of your contents to YouTube or Flickr
with the press of a button. Sharing the contents with your friends is simpler
than ever before.
Make a digest
of your movie! Storyboard
printing!
This function captures 16 still images arbitrarily from the selected movie and saves them
into the storage media. It presents a quick overview of your movie, helping you to
understand the overall topic.
E_glsh
iii
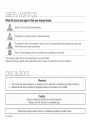
safety warn nqs
What the icons and signs in this user manual mean :
Death or risk of serious personal injury.
WARNING
Potential risk of personal injury or material damage.
CAUTION
CAUTION
To reduce the risk of fire, explosion, electric shock, or personal injury when using your camcorder,
follow these basic safety precautions:
Hints or referential pages that may be helpful when operating the camcorder.
These warning signs are here to prevent injury to you and others.
Please follow them explicitly. After reading this section, keep it in a safe place for future reference.
precs £
This Camcorder should always be connected to an AC outlet with a protectiye grounding connection_
Batte res sh0u d not be exposed to excess ve heat such as sunsh ne, _re or s m ari
j
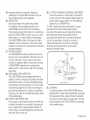
Caution
Danger 0f explosion if battery is incorrectly replaced!
Rep ace ony wth the same or equ vaent type.
[
iv Englsh
If this power supply is used at 240v aC, a Suitable plug adaptor Should Be USed.
J
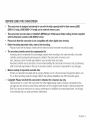
BEFORE USING THiS CAMCORDER
•
This camcorder is designed exclusively for use wth the high-capacity built-in
(SMX=C13 only), (16GB (SMX-C14 only)) and an external memory card.
•
This camcorder records video in H.264/AVC (MPEG4 part 10/Advanced
with the Standard resolution (SD=VIDEO) format.
•
Please note that this camcorder
•
Before recording important video, make a trial recording.
Play back your trial recording to make sure the video and audio have been recorded properly.
o
The recorded contents cannot be compensated for:
Samsung cannot compensate for any damages caused when recording is not made normally or recorded
contents cannot be played back because of a defect in the camcorder or memory card.
Also, Samsung cannot be held responsible for your recorded video and audio.
Recorded contents may be lost due to an error when handling this camcorder or memory card, etc.Samsung
shall not be held responsible for the loss of recorded contents, and cannot compensate for any damages.
is not compatible
flash memory
Video Coding} format
(SGB
compliant
with other digital video formats.
Make a backup of important recorded data.
Protect your important recorded data by copying the files to a PC. We recommend copying the data to your
PC or other recording media for storage. Refer to the software installation and USB connection guide.
•
Copyright: Please note that this camcorder is intended for consumer use only.
Data recorded on a card in this camcorder from other digital/analog media or devices is protected by the
copyright act and cannot be used without permission of the copyright owner except for personal enjoyment.
Even if you record an event such as a show, performance or exhibition for personal enjoyment, it is strongly
recommended that you obtain permission beforehand.
E_glsh
v
fN
NS
electric
shockindicates
is present
within
this unit.
This
symbol
that
dangerous
voltage consisting a risk of
CAUTION:
TO REDUCE THE RISK OF ELECTRIC SHOCK,
NOT REMOVE COVER (OR BACK).
DO
//_[
maintenance
instructions
the literature
accompanying
This
symbol indicates
thatinthere
are important
operating this
and unit.
Warning
To Reduce The Risk Of Fire Or Electric Shock, Do Not Expose This Apparatus To Rain Or Moisture.
Caution
Apparatus
shall not be exposed
to dripping
or splashing and no objects filled with liquids, such as vases, shall be
placed on the apparatus.
To disconnect
the apparatus
from the mains, the plug must be pulled out from the mains
socket, therefore the mains plug shall be readily operable.
t.
Read these instructions.
2.
3.
4.
5.
6.
7.
Keep these instructions.
Heed all warnings,
Followall instructions.
Do not use this apparatus near water,
Clean only with dry cloth.
Do not block any ventilation openings. Install in
accordance with the manufacturer's
instructions.
Do not install near any heat sources such as radiators,
heat registers, stoves, or other apparatus (including
amplifiers) that produce heat.
Do not defeat the safety purpose of the polarized or
grounding-type
plug. A polarized plug has two blades
with one wider than the other. A grounding type plug
has two blades and a third grounding prong. The wide
blade or the third prong are provided for your safety. If
the provided plug does not fit into your outlet, consult
an electrician for replacement of the obsolete outlet.
Protect the power cord from being walked on or
8.
9.
t0.
vi
Englsh
pinched particularly at plugs, convenience
receptacles,
and the point where they exit from the apparatus.
tl.
Only use attachment/accessories
specified by the
manufacturer,
t2. Use only with the cart, stand, tripod,
bracket, or table specified by the
manufacturer,
or sold with the apparatus.
When a cart is used, use caution when
moving the cart/apparatus
combination
to
avoid injury from tipping over.
t3. Unplug this apparatus during lightning storms or when
unused for long periods of time.
t 4. Refer all servicing to qualified service personnel.
Servicing is required when the apparatus has been
damaged in any way, such as power-supply
cord or
plug is damaged, liquid has been spilled or objects
have fallen into the apparatus, the apparatus has been
exposed to rain or moisture, does not operate normally,
or has been dropped.
20.OUTDOOR
ANTENNA
GROUNDING:CAMCORD
t5.Apparatus
shall
notbeexposed
todripping
or
splashing
and
noobjects
filled
withliquids,
such
as
besure
theantenna
orcable
system
isgrounded
to
provide
some
protection
against
voltage
surges
and
vases,
shall
beplaced
ontheapparatus.
t6.VENTILATION:
built-up
static
charges,
Section
810oftheNational
Electrical
Code,
ANSI/NFPA
No.
Slots
and
openings
inthecabinet
areprovided
forventilation
toensure
reliable
operation
ofthe
70-1984,
provides
information
with
respect
toproper
CAMCORDER
and
toprotect
itfrom
overheating. grounding
ofthemast
and
supporting
structure,
These
openings
must
notbeblocked
orcovered.Never
grounding
ofthelead-in
wireand
supporting
structure,
place
your
CAMCORDER
onabed,
sofa,
rug,orother grounding
ofthemast
and
supporting
structure,
similar
surface:
onornear
aradiator
orheat
register. grounding
ofthelead-in
wire
toanantenna
discharge
This
CAMCORDER
should
notbeplaced
inabuilt-in unit,
size
ofgrounding
toconductors,
location
of
installation
such
asabookcase
orrack
unless
proper antenna-discharge
unit,
connection
togrounding
ventilation
isprovided
orthemanufacturer's
instructions
electrodes
andrequirements
forthegrounding
have
been
adhered
to.
electrode.
See
figure
below.
t7.POWER
SOURCES:
The
CAMCORDER
should
beoperated
only
from
the
type
ofpower
source
indicated
onthelabel.
Ifyouare
notsure
ofthetype
ofpower
supply
atyour
home,
consult
your
appliance
dealer
orlocal
power
company.
ACAMCORDER
isintended
tobeoperated
from
battery
power,
orother
sources,
refer
totheoperating
instructions.
t8.GROUNDING
ORPOLARIZATION:
This
CAMCORDER
may
beequipped
with
either
a
polarized
2-wire
AClineplug
(aplughaving
oneblade
wider
than
theother)
ora3-wire
grounding
type
plug,
aplug
having
athird
(grounding)
pin.Ifyouareunable
toinsert
theplug
fully
into
theoutlet,
tryreversing
the 21. LIGHTNING:
plug.
Iftheplug
stillfails
tofit,contact
your
electrician For added protection of this CAMCORDER during a
toreplace
your
outlet.
Donotdefeat
thesafety
purpose lightning storm or when it is left unattended and unused
ofthepolarized
plug.
for long periods of time, unplug it from the wall outlet
t9.POWER-CORD
PROTECTION:
and disconnect
the antenna or cable system. This will
Power-supply
cords
should
berouted
sothat
they
are
prevent damage to the CAMCORDER
due to lightning
notlikely
tobewalked
onorpinched
byitems
placed
and powerline surges.
upon
oragainst
them,
paying
particular
attention
to
cords
orplugs,
convenient
receptacles,
and
thepoint
where
they
exitfrom
theunit.
NECNATI_ ELECTRIC_
CODE
E_glsh
vii
fN
22. POWER LINES:
An outside antenna system should not be located
in the vicinity of overhead power lines or other
electric light or power circuits where it can fall into
such power lines or circuits. When installing an
outside antenna system, extreme care should be
taken to keep from touching such power lines or
circuits as contact with them might be fatal.
NS
a.
b.
c.
d.
23. OVERLOADING:
Do not overload wall outlets and extension cords
as this can result in a risk of fire or electric shock.
24. OBJECTS AND LIQUIDS:
Never push objects of any kind into this
CAMCORDER through openings as they may
touch dangerous voltage points or short out
a part that could result in a fire or electric
shock. Never spill liquids of any kind onto the
CAMCORDER. Should spillage occur, unplug unit
and have it checked by a technician before use.
25. SERVICING:
Do not attempt to service this CAMCORDER
yourself. Opening or removing covers may expose
you to dangerous voltage or other hazards. Refer
all servicing to qualified service personnel.
26. DAMAGE REQUIRING SERVICE:
Unplug this CAMCORDER from the wall outlet
and refer servicing to qualified service personnel
under the following conditions:
viii Englsh
e.
f.
When the power-supply cord or plug is damaged.
If any liquid has been spilled onto, or objects have
fallen into the CAMCORDER.
If the CAMCORDER has been exposed to rain or
water.
If the CAMCORDER does not operate normally
by following the operating instructions, adjust
only those controls that are covered by the
operating instructions. Improper adjustment of
other controls may result in damage and will often
require extensive work by a qualified technician to
restore the CAMCORDER to its normal operation.
If the CAMCORDER has been dropped or the
cabinet has been damaged.
When the CAMCORDER exhibits a distinct
change in performance, this indicates a need for
service.
22. REPLACEMENT PARTS:
When replacement parts are required, be sure the
service technician has used replacement parts
specified by the manufacturer and has the same
characteristics as the original part. Unauthorized
substitutions may result in fire, electric shock or
other hazards.
28. SAFETY CHECK:
Upon completion of any service or repairs to
this CAMCORDER, ask the service technician
to perform safety checks to determine that the
CAMCORDER is in safe operating order.
NOTE: This equipment has been tested and found to comply
29.Toprevent
damage
which
may
result
infireorshock
hazard,
donotexpose
thisappliance
torain
ormoisture.with the limits for a Class B digital devbe, pursuant to part 15
of the FCC Rules.
30.Ifthispower
supply
isused
at240V
ac,asuitabb
plug
These limits are designed to provide reasonabb protection
adaptor
should
beused
31.This
product
iscovered
byone
ormore
ofthefollowing
US against harmful interference in a residential installation. This
equipment generates, uses and can radiate radio frequency
patents:
5,060,220
5,457,669
5,561,649
5,705,762
5,987,417 energy and, if not installed and used in accordance with
6,043,912
6,222,983
6,272,096
6,377,524
6,377,531 the instructions, may cause harmfWinterference to radio
6,385,587
6,389,570
6,408,408
6,466,532
6,473,736 communications. However, there is no guarantee that
will not occur in a particular installation. If this
6,477,501
6,480,829
6,556,520
6,556,521
6,556,522 interference
equipment does cause harmfWinterference to radio or
6,578,163
6,594,208
6,631,110
6,658,588
6,674,697 television
which can be determined by turning the
6,674,957
6,687,455
6,697,307
6,707,985
6,721,243 equipmentreception,
off and on, the user is encouraged to try to correct
6,721,493
6,728,474
6,741,535
6,744,713
6,744,972 the interference
by one or more of the following measures:
6,765,853
6,765,853
6,771,890
6,771,891
6,775,465 Reorientor relocate
the receiving antenna.
6,778,755
6,788,629
6,788,630
6,795,637
6,810,201 Increasethe separation
between the equipment and
6,862,256
6,868,054
6,894,963
6,937,552
receiver.
USER
INSTALLER
CAUTION:
Connect the equipment into an outlet on a circuit different
from that to which the receiver is connected.
Your
authority
tooperate
thisFCC
certified
equipment
could
bevoided
ifyoumake
changes
ormodifications
notexpressly Consult the dealer or an experienced radio/TVtechnician for
approved
bythisparty
responsbb
forcompliance
topart
15
help and for additional suggestions. The user may find the
FCO
rules
following booklet prepared by the Federal Communications
NOTE:
Commission helpful: "How to Identifyand Resolve Radio-TV
InterferenceProblems." This Booklet is availablefrom the
(_)LAMP(S)
INSIDE
THIS
PRODUCT
CONTAIN
MERCURY
AND
MUST
BERECYCLED
ORDISPOSED
OF
U.S. Government Printing Office, Washington, D.C. 20402,
ACCORDING
TOLOCAL,
STATE
ORFEDERAL
Stock No. 004@00@0345-4.
LAWS.
For
details
see
lamprecycb.org,
eiae.org,
orcall
-'COWarning
1-800-Samsung
(7267864)
The user is cautioned that changes or modifications not
expressly approved by the manufacturer could void the user's
CALiFORNiA
USA ONLY
authority to operate the equipment.
This Perchlorate warning applies only to primary CR
(Manganese Dioxide) Lithium coin ceils in the product
sold or distributed ONLY in California USA
"Perchlorate Material - special handling may apply,
See www.dtsc.ca.gov/hazardouswaste/perchlorate."
This device complies with Part 15 of FCC Rules.
Operation is subject to the following two conditions;
(1) This device may not cause harmful interference, and
(2) This device must accept any interference received,
including interference that may cause undesired operation.
E_glsh
ix
rnDor nt
LAS@
I
IMPORTANT NOTE
•
•
•
•
•
•
•
Handle the liquid crystal display (LCD) with care:
The LCD is a very delicate display device: Do not press its surface with excessive force, hit it or prick it with a
sharp object.
If you push the LCD surface, display uneveness may occur. If unevenness does not disappear, turn the
camcorder off, wait for a few moments, and then turn it on again.
Do not place the camcorder with the open LCD screen down.
Close the LCD monitor when not using the camcorder.
Liquid crystal display:
The LCD screen is a product of high precision technology. Out of the total pixels (approx. 230,000 pixels of an
LCD monitor ), 0.01% or less pixels may be out (black dots) or may remain lit as colored dots (red, blue, and
green). This shows the limitations of the current technology, and does not indicate a fault that will interfere with
recording.
The LCD screen will be slightly dimmer than usual when the camcorder is at low temperature, as in cold areas,
or right after the power is turned on. Normal brightness will be restored when the temperature inside the
camcorder rises. Note that this will have no effect on the image in a storage media, so there is no cause for
concern.
Hold the camcorder correctly:
Do not hold the camcorder by the LCD monitor when lifting it: the LCD monitor could detach and the
camcorder may fall.
Do not subject the camcorder to impact:
This camcorder is a precision machine. Take great care that you do not strike it against a hard object or let it
fall.
Do not use the camcorder on a tripod in a place where it is subject to severe vibrations or impact.
No sand or dust!
Fine sand or dust entering the camcorder or AC power adaptor could cause malfunctions or defects.
No water or oil!
Water or oil entering the camcorder or AC power adaptor could cause electric shock, malfunctions or defects.
Heat on surface of product:
The surface of the camcorder will be slightly warm when used, but this does not indicate a fault.
x Englsh
• Becareful
of unusual
ambient temperature:
Using the camcorder in a place where the temperature is over 104°F (40°C) or lower than 32°F (0°C) may result
in abnormal recording/playback.
Do not leave the camcorder on a beach or in a closed vehicle where the temperature is very high for a long
time: This could cause a malfunction.
•
•
•
•
•
Do not point directly at the sun:
If direct sunlight strikes the lens, the camcorder could malfunction or a fire could occur.
Do not leave the camcorder with the LCD screen exposed to direct sunlight: This could cause a malfunction.
Do not use the camcorder
near "IV or radio:
This could cause noise to appear on the TV screen or in radio broadcasts.
Do not use the camcorder
near strong radio waves or magnetism:
If the camcorder is used near strong radio waves or magnetism, such as near a radio transmitter tower or
electric appliances, noise could enter video and audio that are being recorded. During playback of normally
recorded video and audio, noise may also be present in picture and sound.
Do not expose the camcorder to soot or steam:
Thick soot or steam could damage the camcorder case or cause a malfunction.
Do not use the camcorder
near corrosive gas:
If the camcorder is used in a place where there is dense exhaust gas generated by gasoline or diesel engines,
or corrosive gas such as hydrogen sulphide, the external or internal terminals could corrode, disabling normal
operation, or the battery connection terminals could corrode, so that power will not turn on.
Do not use the camcorder
near an ultrasonic humidifier:
Calcium and other chemicals dissolved in water could scatter in the air, and white particles could adhere to the
optical head of the camcorder, which could cause it to operate abnormally.
Do not clean the camcorder
body with benzene or thinner:
The coating of exterior could peel off or the case surface could deteriorate.
When using a chemical cleaning cloth, follow the instructions.
Keep the memory card out of reach of children to prevent swallowing.
To disconnect
the apparatus from the mains, the plug must be pulled out from the mains socket,
therefore the mains plug shall be readily operable.
E_glsh
xi
ABOUT THIS USER MANUAL
,
,
,
,
,
This User Manual covers models SMX-C10RN, SMX-C10LN, SMX-C10GN, SMX-C13RN, SMX-C13LN, SMXC13GN, SMX-C14RN, SMX-C14LN, and SMX-C14GN. The SMX-C13RN, SMX-C13LN and SMX-C13GN have
a 8GB built in flash memory respectively, but also use memory cards. The SMX-C14RN, SMX-C14LN and SMXC14GN have a 16GB built in flash memory respectively, but also use memory cards. The SMX-C10RN, SMXC10LN, SMX-C10GN does not have built-in flash memory and uses memory cards exclusively. Although some
features of SMX-C10RN, SMX-C10LN, SMX-C10GN, SMX-C13RN, SMX-C13LN, SMX-C13GN, SMX-C14RN,
SMX-C14LN, and SMX-C14GN are different, they operate in the same way.
Illustrations of model SMX-C10N are used in this user manual.
The displays in this user manual may not be exactly the same as those you see on the LCD screen.
Designs and specifications of storage media and other accessories are subject to change without any notice.
In this user manual's function descriptions, the icon on the on-screen display section means that it will appear on
the screen when you set the corresponding function.
Ex) Submenu item of "Video Resolution" _ page 58
"TV SuperFine"
Videos recorded in 720x480(60i) resolution at super-fine image quality.
(If set, corresponding icon (_t_) will appear on the screen.)
,
_
Descriptions of the "Photo" and "built-in memory" in this user manual apply only to the following models:
SMX-C13, SMX-C14
NOTES REGARDING TRADEMARK
o
All the trade names and registered trademarks mentioned in this manual or other documentation provided with
your Samsung product are trademarks or registered trademarks of their respective holders.
Windows® is registered trademark or trademark of Microsoft Corporation, registered in the United States and other
countries.
Macintosh is trademark of Apple Inc.
YouTube® is a trademark of Google Inc.
Flickr® is a trademark of Yahoo.
All the other product names mentioned herein may be the trademark or registered trademarks of their respective
companies.
Furthermore, "TM" and "0" are not mentioned in each case in this manual.
xii Englsh
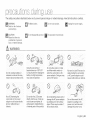
The safety precautions
_
illustrated
WARNINQ
Death or risk of serious
personal injury.
@
below are to prevent
personal
Prohibited aclon.
_
Do not disassemble product. _
injury or material damage.
Heed all instructions
Do not touch product.
_
carefully.
Unplug from power supp,y.
This precaution must be kept.
potential risk of personal
injury or material damage.
_
WARNING
@
,<_J> ,,,'_='i_s#
Do not overload
ex[enslon
coros
result
In abnormal
c-duets or
as this ma
ne£;[Y OF[Ire.
using [ne camooraer at
temoeratures over 140°F t60 °
C nay result infire. Keeping tne
DaEeryat a nlgn iemoerature
may cause aR explosion
@ -
@
No oil! Oil entering _ne
camcoraer or AC cower
aaao[o could cause electric
SHOCK.malfunctions or
defects
Do not aim the I CD screer _
alreot, into [he sun. Doing so
cou_a cause eye _njunes as
well as _eaare malfunctioning
o[ internal naris o[ me oroaucc
Do not allow water or metal
ana inflarnmaDle mat_er to
en[er
IRe camcorder or AC
power adaptor. Doing sc llay
oose
a fire
n_arcJ.
No sand or dust! Fine sand or
ous[ en]enng [ne cantcoroer
or AC power adaptor cc JJa
cause malfunctions or defects.
@
Do not bend the cower-cord or
uamage the AC power adap[or
oy pressng on I[ wl[n a neav',
oqect, rhere ma_ rse a risk oi
fire or electdc shock.
Do not
aoap[or
disconnect
Dy puulng
the AC
Dn IS
power-cora,
aS [nls coula
carnage
IRe 9ower-coro
E_glsh
xiii
®
e
Do not use tne AC adaetor ff it has
samageo, split or broKen cords or wires.
Doing so may cause fire or electric shock.
(_)
-_
Never use cleaning fluid or similar
shemicals. Do not spra_, _'leanersalrecu_
)n tne camcoraer.
®
Do not a_te nDI Is disassemble, reealr Dr
reform t e camcorder or the AC adaptor [o
aVOId a rISK of fire or electric
snOOK
When cleaning the AC adaptor, unE Jg
the )ower-oord to avoid a rISKof a
malfunction or electric shock.
xiv Englsh
Do not cor'qect the AC adautor unless me
plug can De full'y "ser_ea wltn no Dart of
[ne
DiOdeS
exoosed,
e
@
<:eeo tne camooraer
aws} fror'F _,Jater
wnen used near tne oeacn or .}001 or
wnen it rains. There is a riSK of malfu lct
:: " electnc
Do not disDose of bat er} SaCKIn afire as
it may explOde
sn
snOOK.
G j_
Kee} zneused mJum Dasery or memory
card out OTtne reach of children. If the
[nlum battery or memory card is SWallowed
Dy cmaren, tonsure a pnyslclan immediately.
@
Do no_ plug or t nplug _ne c Dwer cord
Mth wet hands. There is a risk of electnc
sr DCK
mecarncorderma_es anasnomlasound
or smellsor smoKes,unplug_nepower-cor(]
"nmsola_ely
andrequestservicefroma S_nsung
esrvicecenter.Thereis a riskoffire or personaInlu%
Keep the Dower-cord unplugged wnen
not in use or dunng Jgntnmngstorms to
}revent fire hazard
f the camcorder malfunctions, immedlate_!
Jetach the AC adaptor or Dat(eP)from
_[necamooroer immeolate._ to avoid fire
or injury.
_
OAU]'ION
@
Do not cress the surface of l_e LCD witl
force Dr nit It wltn a snarp oDjeoI
f you )ush the LCD surface, display
Jnevenness ms, occur
©
Do not use tne camcoroer In direct sun gn[
or near neaung eq.,,ament. This w
especlaly snorten tne operation range of
tne remora con[rol which uses infrared rays.
@
Do not exoose tne camcoroer to soo_ o_
ryes -n.Thick soot or steam could damage
lie samsorder case or cause a malunslon
@
Do not drop or expose tne camcoraer
Darien! pack, AC adaptor or otner
accessories to severe VlDralons or impact
This ms, sause a malfur slon or injun!
®
Do not expose the camcoraer to sans or
Nater when recoralng at tne Deacn or ecol.
)r recc aJng on a rainy :Jay.Doing so ma_
sause a malfunction or electric snOCK.
@
Do not use ule camcorder near dense sxnaus[
gas generates ey gasolne or diesel arc nes
}r cortes ve gas sucn as nyurogensulpnlde.
Doir £ so may corrode lie ex[ernalor irlterna
temllnals, dlsaDIngnormal operaclon
Do not use the cart soroer on a trIDOd 10I
place wnere it is SubJecttC
SUDDIIea
-" a
severe
Vibrations
or
irr baci,
@
Do not leave tne camcoraer In a closes
?enlclewnere the temoeraYurei_ very nlgfor a long time.
@
,,
,i_}"j',"4
DOnot excess the car'llsoroer to inseclcioe
nsdotlcioe snterlng the car'0soroer COUld
cause lie DrOdUCItO oDsraTe aDnor r'0s
mum the car'ncorder el and cover i_ Nltn vlr
_neeL e_c, DeTore using
_SeOTtclde
EngIsh
xv
@
Do not expose IRe camooraer to SUdden
cnanges in temperature or a numlo Jlaces.
There is also a risk of defect or electric shock
wnen uslnc outooors outing ilgrl'[niRgstorms.
©
Do not Dlace tne camcoraer
LCD screen aown.
@
wlIn
tne
ODe[]
Do not w Detne camcaraer boa, MIn
Denzene
or tnlnner.
The exterior coatir ] CouJa
oeel off or the case surface could deteriorate
o
@
E s not leave tne 8D monitc" ooen wnen
not using [ne camcoraer.
Do not nola [ne camcoraer E, tne LCD
monitor when lifting it. The LCD _-onmtor
COUlaaetaon ana tne camcoraer may fa
Do not use [ne camcoraer near TV o
-adio. Tnls COUlacause noise on tne TV
screen or to raa : uroaacas_s.
@
@
®
Do not useIne camcoraer near strong raalo
waves or magneusm sucn as speaKers
or
_argemotors. Noise could enter v_aeoor
aualo that are being recoraea
Keep imeortant aata separa[ely.
Samsung is no[ responsible for data loss.
XVi Englsh
UseSamsung-approvea
accessonesonJy.usng
eroductstom othermanutacturers
ma, cause
overneaung,
fire,expcsmone_ec_nc
SHOCK
or
personam
run,aries
aue_oaunormaJ
ooera_on
Place the ca -coraer on a stable surface
ana a olace wl_n ventuauon openings
conte nt,s
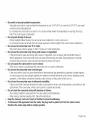
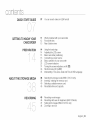
QUICK START GUIDE
07
You can record videos in H.264 format!
GETTING TO KNOW YOUR
CAMCORDER
t1
12
13
What's included with your camcorder
Front & left view
Rear & bottom view
PREPARATION
t4
14
15
16
24
25
Using the hand strap
Adjusting the LCD screen
Basic camcorder positioning
Connecting a power source
Basic operation of your camcorder
LCD screen indicators
31
33
35
Turning the screen indicators on/off (11-31)
Shortcut menu (OK GUIDE)
Initial setting : Time Zone, Date And Time & OSD Language
ABOUTTHE STORAGE MEDIA
38
39
40
43
Selecting the storage media (SMX-C13/C14
Inserting / ejecting the memory card
Selecting a suitable memory card
Recordable time and capacity
RECORDING
45
46
47
48
Recording movie images
Recording with ease for beginners (EASY Q Mode)
Taking photo images (SMX-C13/C14
only)
Zooming in and out
only)
Englsh
03
conte,nt,s
PLAYBACK
49
Changing the playback mode (SMX-C13/C14
50
Playing movie images
............
......................
53
Viewing photo images (SMX-C13/C14
only)
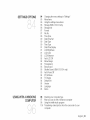
RECORDING OPTIONS
PLAYBACK OPTIONS
04 Engish
54
56
57
57
58
59
59
Changing the menu settings
Menu items
Using the recording menu items
iSCENE
Video resolution
Photo resolution
16:9 Wide
60
61
62
62
EV (Exposure Value)
Back light
Focus
Face detection
64
65
66
66
Anti-Shake (HDIS)
Digital effect
Fader
Wind cut
67
68
70
Digital zoom
Time lapse REC
Guideline
7t
Menu items
72
73
74
75
76
78
80
81
82
83
Play option
Delete
Protect
Story-board print
Copy (SMX-C13/C14
only)
Divide
Combine
Share mark
Slide show (SMX-C13/C14
only)
File info
only)
SETTINGS OPTIONS
USING WITH A WINDOWS
COMPUTER
84
85
86
86
86
87
87
88
90
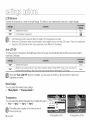
Changing the menu settings in "Settings"
Menu items
Using the settings menu items
Storage (SMX-C13/C14
only)
Storage Info
Format
File No.
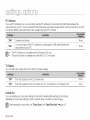
Time Zone
Date/Time Set
90
90
91
91
91
92
92
92
92
93
93
93
94
94
94
95
Date Type
Time Type
Date/Time Display
LCD Brightness
LCD Color
LCD Enhancer
Auto LCD Off
Menu Design
Transparency
Beep Sound
Shutter Sound (SMX-C13/C14
Auto Power Off
PC Software
TV Display
Default Set
Version
95
95
Language
Demo
96
97
98
105
only)
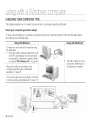
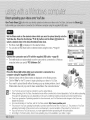
Checking your computer type
What you can do with a Windows computer
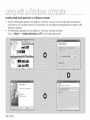
Using the Intelli-studio program
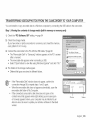
Transferring videos/photos
from the camcorder
computer
to your
i_,_,,,..,.._J
_ '_'_,_%..,._,,_,_!_
Englsh
05
contents
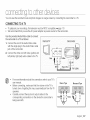
CONNECTING TO OTHER
DEVICES
MAINTENANCE & ADDITIONAL
INFORMATION
TROUBLESHOOTING
SPECIFICATIONS
06 En@sh
107
108
109
Connecting to a TV
Viewing on a TV screen
Recording (dubbing) images on a VCR or DVD/HDD recorder
110
111
Maintenance
Additional information
113
Using your camcorder abroad
114 Troubleshooting
127
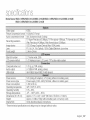
Specifications
©L]I©K StSr
QLJIC]@
O This qUICKstar guide introduces tne basic oDerauon and features of lout
camcorder. See the reference pages for more information.
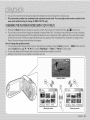
You can record videos in H.264 format!
fOUcap recorq vlqeos - q.264 format. WhiCh enables , )u 1:oconvenlen]:, emal anq snare vlqeos A/liD Jour
friends and farr ,. You can aso ]:aKe 9no]:os ivl]:r /our camcorqer SMX-C13/C14 oF ,,.
nser[ a memor, carq. -,page 39
- You can use commerc_a avanaD_eSDHC
(SD High Oapacity) or M_IO qus carqs ivl]:n]:nls camcorqer
- Set the aDDroDna]:e _]:orage meqla. SMX-C13/C14 oF,
2. inset[ ]:Reioa]:l:er, n]:o ]:ne
ba]:]:ery slo]:. '-,page 16
• Gent, sude ]:ne Battery
pack release SWl]:cn r ]:Re
dlrec]:lon as ShOWn in ]:Re
figure
O
_____ r
0
[Battery
pack
release]
Switch
\
Enc._,,
07
oucl< start ouiGe
L-J
Zoom lever
LCD screen
PHOTO
_) button
SMX--C13/O14 on
CHG indicator
Recording
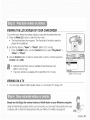
RECORDING VIDEOS WITH H.264
FORMAT
Your camcorqer
uses aavancea
tecnnology
to reallse
-- page 106
1. Ooen
H.264
;Re Clearest video
1. Oeen
quality.
2.
Press the Power
3.
Press the PHOTO
reaa_.
2.
Pressthe
3.
Press the Recording
start/stop
•
Dress tne Recording
To s;c 9 recora_ng,
start/stop
buttor
•
•
08_En j
_-
button
PHOTOS (SMX-C13/C14
comaresslon
;ne LCD screen
Power
RECORDING
ONLY)
start/stop
_ne LCD screen.
(_,_ uu;ton.
( G ) button
fully when
j _u are
uu_;on.
bu;Ior
Your camcoraer is corT ca[iDle wilt H.264 -ecora_ng format. Nnlcn acnleves efficient COding Df higf aUalll_, vlaec
NITn ess capacity.
YOU can recora vlaeos - SD slanaara deft ninon The default semng s "TV Fine (720x480/60i)".
-- page 5_
You can not taKe enoTos While j ou are recoralng videos.
._,,
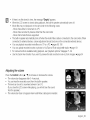
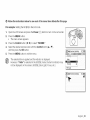
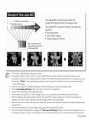
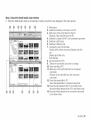
ViEWiNG THE LCD SCREEN OF YOUR CAMCORDER
You can find jour aestrea recoramgs qulcKty Dy usmg _ne _numbna qaex vtew.
1. Sress the Mode (6 DUIX:on]:o setec_ [ne Pla} moae.
o The [numbna
naex vtew aDoears. The thumbnai )f the latest srea[ea or
ptayea file s ntgmgntea.
2. Set the Siaj Mode to "Video" or "Photo". SMX-C13/O14 oF
_ress the MENU buI]:on. Jse _ne Control DU]XOn]:o setec_ "Play Mode"
"Video" or "Photo".
3. Use the Control bu_ton _c setec_ a qestreq vtqeo or ono_o, anq _nen sress _ne
Control bu_ton (OK}.
o
Setting _ne Play Vlode menu s avanabte in _numbna vtew on
SMX-C13/C14 onb
The shots function s avaltabte wltn moqet SMX-C13/C14 )nb
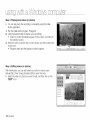
ViEWiNG
7,
9MX C13/C1 I on
ON A TV
YOU can enjoy
cle]:alled.
Drllllan]:
qualll[_
vlqeos
Simple and fun! Enjoy the various features
on a connected TV = page 108
of Inteili=studio on your Windows
computer.
Usir g tne n_etu-s_uato srogram bu,_ =r ,,our camcoraer, you can _nDor[v=aeosmno_os ntc your
comeuter, edit or snare tne vlaeos/enotos
wltn _our friends. For deists, see sage 98.
_::
En¢._,,
09
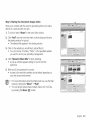
iMPORTiNG AND ViEWiNG VIDEOS/PHOTOS
FROM THE CAMCORDER TO YOUR PC
1. Launcn [ne qtelll-StUCiioprogram Dy connecting [ne camcorder [o your
sC via [ne USB sadie.
_, _ new file saving screen _.DDears NlIn ]:ne in]:elll-StUCIiO
Click "Yes". [ne uploaqmg orocequre w _taR
2.
Click
"import
folder"
]:o ]:ne hi:Dill-StUdiO,
Drowser•
_c -_oorx _ne vlqeos
iou
or Photos
NIII see _:ne files local:Ion
from
main
Folders
directory
on your
"import
folder"
out,on
PC
wlnqow,
the PC
)n _:ne 9]:elll-StUCllO
3. You can ]CUPID-CliCK)r the file/ou
wou_q Ke]:OsIaR: p_aymg.
SHARING VIDEOS/PHOTOS
ON YouTube/Flickr
_7_sr_ed Files
Share/our con;en;s wltn ;ne wone Dy Jploaolng ono;os ano vloeos _lrec_ • ;o a wed site wltr a single CliCK
Click on the "Share" _ "Upload to Share Site" tab on [ne Drowser• -- page 101
The n[elu-s_udlo runs au[oma[ica • once [ne camcorder is connected to a Windows computer
specify "PC Software: On'9. _ page 94
wnen you
If the storage media s full. •ou canno_ record new waeos or 9hotos. Delete videos )r Photos data that have been
savea _n a comouter from the storage mea_a. Then •ou can recora new waeos _r onotos on new_y freed-up space.
Press the Mode {8} button to switch the Play mode _ Press the MENU button
(A/Y / _1 / P,/OK} to select "Delete." -page 73
The ono_o function is available with models SMX-C13/C14
10_En _ ._,,
on
y.
- Control
button
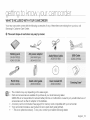
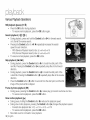
WHAT'S iNCLUDED WITH YOUR CAMCORDER
Your new camcorder comes with the following accessories.
Samsung's Customer Care Center.
If any of these items are missing from your box, call
The exact shape of each item may vary by model.
iiiiiiiiiiiiiiiiiiiiiiiiiiiii
o
o
o
o
o
iiiiiiiiiiiiiiiiiiiiiiiiiiiiiiiiiiiiiiiiiiiiiiiiiiiiiiiiiiiiiii
The contents may vary depending on the sales region.
Parts and accessories are available for purchase at your local Samsung dealer.
SAMSUNG is not responsible for reduced battery life time or malfunctions caused by any unauthorized use of
accessories such as the AC adaptor or the batteries.
A memory card is not included. See page 40 for memory cards compatible with your camcorder.
Your camcorder includes a user manual CD and a quick start guide (printed).
* : This is an optional accessory. To buy one, contact your nearest Samsung dealer.
Englsh
11
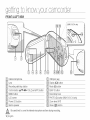
FRONT & LEFT VIEW
@ USBjack(_)
Internal microphone
Lens
Display (Ir-ll) button
Recording star,/stop button
Control button (A/V/.,4/_/OK),
MENU button
LCD screen
Power (_)
EASY Q button
Hand strap hook
PHOTO (Q) button (SMX-C13/014
button
@: Built-in speaker
/_
Mode (9) button
Zoom(W/T) button
Zoom_ever
(wm
@::: Share ([])
button
Be careful not to cover the internal microphone and lens during recording.
CAUTION
12 Englsh
only)
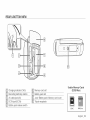
REAR & BOTTOM VIEW
%
®
%
Charging indicator (CHG)
Memory card slot
Recording start/stop button
Battery pack slot
AV cable jack (AV)
JacW Battery pack/Memory
DO IN jack (DO IN)
Tripod receptacle
UsabLe Memory Cards
(32GB Max)
card cover
Battery pack release switch
SDHC
MMCplus
Englsh
13
preparer on
I
I
This section provides information that you should know before using this camcorder; such as how to use the provided
accessories, how to charge the battery, and how to setup the operation mode and initialise setup.
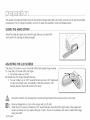
USING THE HAND STRAP
Attach the strap and place your hand through the loop to prevent the
camcorder from damage by being dropped.
ADJUSTING THE LCD SCREEN
The wide LCD screen on your camcorder offers high quality image viewing.
1. Open the LCD screen with your finger.
• The screen opens up to 90 °.
2. Rotate the LCD screen towards the lens.
• You can rotate it up to 180 ° towards the lens and up to 90 ° backward.
To view recordings more conveniently, rotate the screen by 180 °
towards the lens, then fold it back to the body.
i/_k
Excessive rotation may damage the connective hinge between the screen and the camcorder.
WARNING
•
•
Remove fingerprints or dust on the screen with a soft cloth.
When the LCD screen is rotated by 180 ° toward the lens, the left and the right sides of the subject are
shown in reverse as if you were looking at a mirror. This is not a problem and does not affect the image
being recorded.
14 Englsh
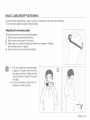
BASIC CAMCORDER
POSITIONING
Use both hands while taking a video or picture to prevent the camcorder from shaking.
Try to avoid any slight movement while shooting.
Adjusting
the shooting
angle
Aim the camcorder as shown in the illustration.
1. Hold the camcorder with both hands.
2. Hook up the hand strap to fit to hand,
3, Make sure your footing is stable and there is no danger of colliding
with another person or object.
4, Aim and focus as shown in the illustration.
•
•
This camcorder lens shooting angle
is approx. 25 ° higher than the rest of
the camcorder body. Make sure the
camcorder lens is angled for proper
shooting.
It is recommended to keep the sun
behind you while shooting.
Englsh
15
pre p r t on
CONNECTING A POWER SOURCE
,
,
,
Be sure to charge the battery pack before you start using your camcorder.
Use the IA-BH130LB battery pack only.
The battery pack may be charged a little at the time of purchase.
Battery pack insertion/ejection
It is recommended
inserting
1.
2.
3.
2.
3.
the battery
pack
Slide and open the battery slot cover as shown in the figure.
Insert the battery pack into the battery slot until it locks.
,
Make sure that the SAMSUNG logo is facing left while
the battery pack is placed as shown in the figure.
Slide and close the battery slot cover.
Ejecting
1.
you purchase one or more additional battery packs to allow continuous use of your camcorder.
the battery
pack
Slide and open the battery slot cover and push the Battery pack
release switch.
,
Gently push the Battery pack release switch in the direction
as shown in the figure to eject the battery.
Pull the ejected battery out in the direction as shown in the figure.
Slide and close the battery slot cover.
o
Remove the battery pack separately from the camcorder
while not in use.
It is recommended to prepare an additional battery pack
for prolonged outdoor use.
Additional battery packs can be purchased from
samsungparts.com.
16 Englsh
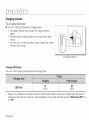
Charging the battery
You can charge the battery using the AC power adaptor or USB cable.
1.
Insert the battery in the camcorder. _page
2.
Press the Power (_}) button to turn off the camcorder.
16
3,
Open the connector cover of the unit.
4,
Charge the battery using the AO power adaptor or USB cable.
, The CHG (charge) lamp lights up and charging starts. When the
battery is fully charged, the charging (CHG) lamp turns green.
_page 18
Connect the AC power adaptor to the
camcorder properly and plug the AC
Power adaptor in the wall outlet.
Connect the USB cable to the camcorder
properly and connect the other end to a
USB pod: of a PC.
o
CAUTION
o
o
o
o
®
o
o
o
o
Charging the battery pack at low temperature may take longer or fail to fully charge (green indicator will not
turn on).
Please make sure that there are no foreign substances in the plug and socket when you connect the AC
power supply to the camcorder.
Fully charge the battery pack before use.
When using the AC power supply, place it close to the wall outlet. If you experience a malfunction while
using the camcorder, separate the AC power supply immediately from the wall outlet.
Do not use the AC power supply in a tight space, such as between furnishings.
When recording indoors with an available wall outlet, it is convenient to use the AC power supply instead of the
battery pack.
It is recommended
to charge the battery pack in a place with ambient temperature of 50°F-86°F (10°C - 30°C).
When charging, if both the USB cable and AC power adaptor are connected, the AC power adaptor will override
the USB.
If the camcorder is turned on, the battery will still charge, but more charging time will be needed.
you to keep the camcorder turned off while charging.
It is recommended
Englsh
17
prep +r I on
Charging indicator
Tips for battery identification
O The color of the LED indicates the charging status.
+ If the battery has been fully charged, the charge indicator is
green.
+ While the battery is being charged, the charge indicator lights
orange.
+ If an error occurs while the battery is being charged, the charge
indicator blinks orange.
<Charging indicator>
Charging (CHG) lamp
The color of the charging indicator shows the charging state.
LED
,
Color
@.}
(Orange)
O
(Green)
If there is no operation for more than 5 minutes when the LCD screen is closed, the charging lamp blink green to
indicate the camcorder is powered on. (uses the battery as main power and make sure the "Auto Power Off" set
on "off")
18 Eng+sh
Battery
LevelDisplay
TheBattery
Level
Display
shows
theamount
ofbattery
power
remaining
inthebattery
pack,
Fully charged
!
20%-40%
used
40%-60%
used
60%-80%
used
80%-99%
used
Exhausted (flickers): The device will soon turn off.
Change the Battery Pack as soon as possible.
(flickers): The device will be forced to turn off after
3 seconds.
•
e
"Low battery"
Before using the camcorder, charge the battery.
Above figures are based on a fully charged battery pack at normal temperature.
Low ambient temperature may affect the use time.
Englsh
19
prep r I on
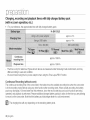
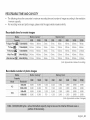
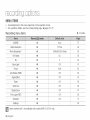
Charging, recording and playback times with fully charged battery pack
(with no zoom operation, etc.}
.
For your reference, the approximate time with fully charged battery pack:
IA-BH130LB
approx, 2 hr.
approx. 4 hr.
approx. 160min.
approx. 180min.
The time is only for reference. Figures shown above are measured under Samsung's test environment, and may
differ according to user and condition.
We recommend using the AC power adaptor when using the Time Lapse REC Function.
Continuous
Recording
(without
zoom)
The continuous recording time of the camcorder in the table shows the available recording time when the camcorder
is in the recording mode without using any other function after recording starts. When actually recording, the battery
pack may discharge 2-3 times faster than this reference, since the record star,/stop and zoom functions are being
operated, and playback is performed. Prepare additional charged battery pack(s) to allow for the time you are planning
to record on the camcorder. Note that the battery pack discharges faster in a cold environment.
_The
charging time will vary depending on the remaining battery level.
20 Englsh
Aboutthebatterypack
, Thebenefits
ofthebattery
pack:
theBattery
pack
issmall
buthasalarge
power
capacity.
Itshould
berecharged
attemperatures
between
50°F
- 86°F
(10°C
- 30°C).
However,
when
itisexposed
tocold
temperatures
(below
32°F
(0°C)),
itsusage
timeisreduced
anditmay
cease
tofunction.
Ifthishappens,
place
thebattery
pack
inyourpocket
oranyother
warm,
protected
place
forashort
time,
thenreattach
ittothecamcorder.
, Thecontinuous
recording
times
intheoperating
instructions
aremeasured
using
afully
charged
battery
pack
at
25°C(77°F).Astheenvironmental
temperature
andconditions
vary,
theremaining
battery
timemaydiffer
from
the
approximate
continuous
recording
times
given
intheinstructions.
Handling
thebatterypack
, Topreserve
battery
power,
keep
your
camcorder
turned
offwhen
youarenotoperating
it.
, Tosave
battery
power,
youcansetthe"AutoPower
Off"function,
which
turns
offthecamcorder
ifthere
isno
operation
for5minutes.
Todisable
thisoption,
change
thesetting
of"AutoPower
Off"to"Off"_page
93
, Donotallow
metallic
objects
tocome
intocontact
withtheterminals.
, Make
sure
thatthebattery
pack
fitsfirmly
intoplace.
Donotdrop
thebattery
pack.
Dropping
thebattery
pack
may
cause
damage.
, Becareful
tokeep
thebattery
pack
outofthereach
ofchildren.
Itisachoking
hazard
ifswallowed.
, Frequent
useoftheLCD
screen
orusing
thefastforward
orrewind
buttons
wears
outthebattery
pack
faster.
, Remove
thebattery
pack
from
thecamcorder
forsafekeeping
after
using
your
camcorder.
, Leaving
thebattery
pack
foranextended
period
oftimemaydischarge
thebattery
pack
completely.
- Abattery
pack
which
iscompletely
discharged
maynotturnontherecharging
LED
during
charging.
Itisdesigned
toprotect
thebattery
pack.
Iftherecharging
LED
turns
onnormally
within
5minutes,
usethe
battery
pack
asnormal.
Englsh
21
preparer on
Maintaining
o
the battery
pack
We recommend only using the original battery pack that is available from your Samsung retailer. When the battery
reaches the end of its life, please contact your local dealer. The batteries have to be dealt with as chemical waste.
Clean the terminals to remove any foreign substances before inserting the battery.
Do not put the battery pack near any heat source (i.e. fire or heater).
Do not disassemble, apply pressure to, or heat the battery pack.
Do not allow the '+' and '-' terminals of the battery pack to be short-circuited.
It may cause leakage, heat generation, induce overheating or fire.
Do not expose the battery pack to water. The battery pack is not water resistant.
When fully discharged, a battery pack damages the internal cells.
The battery pack may be prone to leakage when fully discharged.
Remove the battery pack from the charger or camcorder when not in use. Even when the power is switched off,
the battery pack will still discharge if it is left attached to the camcorder.
When not using the camcorder for an extended period:
It is recommended that you fully charge the battery pack once every 6 months, attach it to the camcorder and use
it up: then remove the battery pack and store it in a cool place.
About
the battery
life
Battery capacity decreases over time and through repeated use. If decreased usage time between charges
becomes significant, it is probably time to replace it with a new one.
Each battery's life is governed by storage, operating and environmental conditions.
22 Englsh
Using a household power source
Make the same connections as you do when charging the battery pack.
The battery pack will not lose its charge in this case.
Using the camcorder
with the AC power adaptor
It is recommended that you use the AC power adaptor to power the camcorder from a household AC outlet when you
perform settings on it, play back, or use it indoors.
Make the same connections as you do when charging the battery pack. u.page 17
/k
,
CAUTION
,
o
,
,
Before detaching the power source, make sure that the camcorder's power is turned off.
Failure to do so can result in camcorder malfunction.
Use a nearby wall outlet when using the AC power adaptor. Disconnect the AC power adaptor from the wall
outlet immediately if any malfunction occurs while using your camcorder.
Do not use the AC power adaptor in a narrow space, such as between a wall and furniture.
Be sure to use the specified AC power adaptor to power the camcorder.
Using other AC power adaptors could cause electric shock or result in fire.
The AC power adaptor can be used around the world. An AC plug adaptor is required in some foreign countries.
If you need one, purchase it from your distributor.
Englsh
23
prep raI on
BASIC OPERATION OF YOUR CAMCORDER
This section explains the basic techniques of recording movie or photo images and also basic settings on your camcorder.
Set the appropriate operation mode according to your preference using Power (_) button and Mode (_) button.
Turning
the camcorder
on or off
You can turn the power on or off by pressing the Power ((,_}) button.
1. Open the LCD screen and press the Power (_,_,)button to turn on the
camcorder.
2. To turn off the camcorder, press the Power ((_,}})button.
Setting
•
the operating
modes
You can switch the operating mode in the following order each time you
press the Mode (Q) button.
Record mode ----->
Play mode ----->
Record mode
Record mode
Play mode
To record movie or photos (SMX-C13/C14 only),
To play movie or photos (SMX-C13/C14 only), or edit them,
This camcorder provides one record mode for both movie and photo recordings.
You can easily record movies or photos in the same mode without having to switch modes. (SMX-C13/C14 only)
When the camcorder is turned on, the self-diagnosis function operates and a message may appear.
In this case, refer to "Warning indicators and messages" (on pages 114-116) and take corrective action.
24 Englsh
LCD SCREEN INDICATORS
Movie Record mode (SMX=ClO only)
...............
................
1_ Time Lapse REC *
Operating mode (STBY (Standby) / e (Recording))
Time counter
(movie recording time: remaining recordable time)
Storage media (memory card)
(_ Battery info. (Remaining battery level)
(_ Movie image resolution
Anti-Shake (HDIS)
(_ LCD Enhancer*
@ Back Light
Wind Cut
Fader *
@ Zoom (Optical zoom / Digital zoom)
Date/Time Display
Time Zone
_
•
o
o
o
The abow._ screen is an example for explanation:
It is different from the actual display.
The on screen indicators are based on an 8GB
SDHC memory card capacity.
Functions marked with * will not be kept when the
camcorder is turned off and on again.
For enhanced performance, the display indications
and the order are subject to change without prior notice.
_) Digital Effect
EV (Exposure value/*
Manual Focus * / Face Detection *
iSCENE / EASYQ *
Record mode
Englsh
25
prep ra on
LCD SCREEN INDICATORS
Movie and Photo record mode
(SMX-C 13/014 only)
@_____
[]-
@_._.____
o
o
o
o
o
o
The above screen is an example for explanation:
It is different from the actual display.
The omscreen
indicators
are based on an 8GB SDHC
memory card capacity.
Functions marked with * will not be kept when the camcorder
is turned off and on again.
For enhanced performance,
the display indications
and the
order are subject to change wkhout prior notice.
The photo function is available only wkh SMX-C13/C14
models.
This camcorder
provides one combined
movie and photo
record mode. You can easily record movies or photos in the
same mode without having to change k. (SMX-C13/C14
only)
The total number d recordable photos is counted based on
available space on the storage media.
26 Englsh
1_ Time Lapse REC *
(_ Operating mode (STBY (Standby) / e (Recording))
Time counter
(movie recording time: remaining recordable time)
Photo image counter
(total number of recordable photo images)
_} Storage media (Memory card or built-in memory (SMXC13/C14 only))
Battery info. (Remaining battery level)
Photo image resolution,
.......Movie image resolution
Anti-Shake (HDIS)
@ LCD Enhancer*
Back Light
@ Wind Cut
@} Fader *
@ Zoom (Optical zoom / Digital zoom)
@ Date/Time Display
@ Time Zone
Digital Effect
@ EV(Exposure value)*
Manual Focus * / Face Detection *
iSCENE / EASY Q *
Record mode
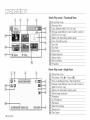
LCD SCREEN INDICATORS
Movie and Photo record mode:
Shortcut menu (OK Guide)
Quick View
Focus* (Auto Focus/Face Detection/Manual
Focus)
Shortcut menu (OK Guide) / Return
EV (Exposure value)*
iSOENE
Movie
and
Shortcut
Photo
menu
record
mode:
(Manual)
Manual Control Bar/Value
Menu name
Shortcut menu (OK Guide) / Return
Value adjust (down)
Value adjust (up)
,
,
,
The illustration to the left shows the EV
(Exposure value) screen.
Functions marked with * will not be kept
when the camcorder restarts.
The shortcut menu (OK guide) represents
the most frequently accessed functions
according to the selected mode. Pressing
the OK button will display a shortcut menu of
frequently used functions on the LCD screen.
Englsh
27
MoviePlaymode:Thumbnail
View
Movie
Play
mode
Recorded
time
Copy
Selected
(SMX-Cl 3/O14 only)
Storage media (Memory card or built-in memory
Battery info (Remaining battery level)
Now/Total file number
Error File
Scroll bar
Share mark
DeleteSelected
ButtonGuide
Edit (Combine)
Protection
Movie
_----._
r_-I
d_!]_#,_(_@
_-
I]2_¢@_
f]@:_,4_(H -
Play mode
View
Movie Play mode
Play Status ( Play (_) / Pause ( || ))
Time code (Elapsed time / Recorded time)
Storage media (Memory card or built-in memory
(SMX-013/014
only)) battery level)
Battery info (Remaining
Movie image resolution
Protection
LCD Enhancer
File Name
Date/Time Display
Share mark
Play Option
28 Englsh
: Single
LCD SCREEN INDICATORS
Movie
Play mode
: Shortcut
menu
(OK Guide)
Move to next file / FF (fast forward) _page 32
_:: Volume Down
Play ( _)/Pause
(||)
@ Move to previous fib / REW (rewind) _page 32
Volume Up
_ r
.............................................................................................................................................
r ,_
Movie
Play mode
: Single
(Volume)
Date/Time
@Volume
Bar
Englsh
29
PhotoPlaymode:Thumbnail
View
(SMX-C13/014
only)
Photo
Play
mode
Protection
Storage
media
(Memory
cardorbuilt-in
memory
(SMX-C13/C14
only))
Battery
info(Remaining
battery
level)
Now/Tota
f enumber
Error
File
Scroll
bar
Delete
Selected
Button
Guide
Copy
Selected
Photo
Play
mode
:Single
View
(SMX-Cl
3/C14
only)
Photo
Play
mode
Slide
Show
Image
counter
(current image / total number of recorded images)
Storage media Memory card or built-in memory
(SMX- C 13/C 14 on ly))
Battery info (Remaining battery level)
Photo image resolution
Protection
LOB Enhancer
File name (file number)
OK Guide (Next image)
Shortcut menu (OK Guide) / Return
OK Guide (Previous image)
30Englsh
The
function is availableonly with SMX- C13/
C14photo
models.
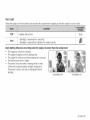
TURNING THE SCREEN INDICATORS ON/OFF ( IFql )
Switching
,
,
the information
display
mode
You can switch the on-screen information display mode:
Press the Display (IE31}button while the camcorder is on.
The full and minimum display modes will alternate.
FuLldisplay mode: All relevant information will appear.
Minimum display mode: Only operating status indicators will appear.
o
If the camcorder has warning information, a warning message will appear.
In the menu screen, the Display (Iml} button will be deactivated.
<Full display
<Minimum
mode>
display
mode>
Englsh
31
pre,
Using the Control button
- Access the shortcut menu
Confirm selection
Exit the shortcut menu
Zoom (wide)
Zoom (tele)
- Shortcut
menu
(OK guide) is
displayed
- Playback / Pause
CUrSOr up
Decreases
- Previous
The photo
function
is available
Moves
the cursor
down
the volume
Skip
only with SMX-C13/C14
Previous
image
Playback
- Search playback
FPS (Forward
Playback
Search) rate:
x2_x4_x8_xl
6
- Next Skip Playback
- Frame-by-frame
playback
- Slow motion playback
(Slow Motion Playback
Rate:
x1!2_x1!4_x1/8_x1/16)
En(jl sh
Moves the
Increases the volume
- Search playback
RPS
(Reverse
Playback
Search)
rate: x2_x4_x8_x16
32
Confirms
selection
Single image
playback
models.
Next image
Moves to
the previous
menu
Moves to
the next
menu
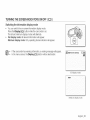
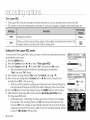
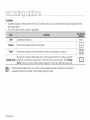
SHORTCUT MENU (OK GUIDE)
The Shortcut menu (OK guide) represents the most frequently accessed functions according to the selected mode.
0 For example: Setting iSCENE in the Record mode using the Shortcut
menu (OK guide).
1.
Press the OK button in STBY mode.
2.
Press the Control button (A) to select "iSOENE" mode.
It displays the iSCENE mode menu, where you can press the Control button
(4 / I1_)to select the desired submenu item.
3.
Press the OK button to confirm your selection.
The selected submenu item indicator (_) will display on the screen.
Press the OK button to exit the shortcut menu.
o
The Shortcut menu (OK guide) is displayed.
•
The
Shortcut
menu
(OK guide)
cannot check
be used
the set
EASY
mode.
Before
selecting
a menu
item, please
thatinyou
the Qappropriate
mode first.
Englsh
33
pr p raI on
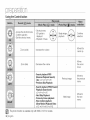
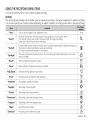
Shortcut function using the Control buttons
- Confirm selection
- Access the shortcut menu
- Exit the shortcut menu
(OK guide) is
displayed
- Shortcut menu
- Playback / Pause
iSCENE
Single image
playback
Increases the volume
Focus
Decreases
- Search
EV
the volume
playback
RPS
(Reverse Playback
rate: x2_x4_x8_xl
- Previous
Skip
Search)
6
Previous image
Playback
- Search playback
FPS
(Forward
Playback
Search)
rate: x2_x4_x8_xl
6
Quick
The photo
34
Englsh
View
function
is available
- Next Skip Playback
- Frame=by-frame
playback
- Slew motion playback
(Slow Motion Playback
Rate:
xf/2_xf/4_xf/8_xl/16)
only with SMX-C13/C14
models.
Next image
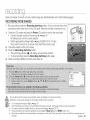
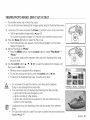
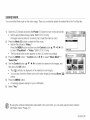
INITIAL SETTING : TIME ZONE, DATE AND TIME & OSD LANGUAGE
,
,
,
Initial setting is available in all operating modes.
To read the menus or messages in your desired language, set the OSD language.
To store the date and time during recording, set the time zone and date/time.
Turning
the power
on and setting
the date and time
Set the date and time when using the camcorder for the first time.
If you do not set date and time, the date and time (time zone) screen appears
every time you turn on your camcorder.
1.
Open the LCD Screen and press the Power (_)) button to turn on the camcorder.
, When you turn on your camcorder for the first time, the Time Zone screen
appears based on London, Lisbon. (Greenwich Mean Time)
, You can also set the Time Zone ("Home") in the "Settings" menu. _page 88
2.
Select your geographical area with Control
button.
, The Date/Time Set screen appears.
3.
Select the date and time information, and change the setting values by using the
Control button ( A / V / _1/ I_).
4.
Make sure the clock is correctly set, and then press the OK button.
o
button (4 / I_), then press the OK
The year can be set up to 2037, using the "Home" menu.
Activating the (_) icon forwards the time by 1 hour.
t
...........
English 35
pr p r I on
Charging the built-in rechargeable
battery
The built-in battery is always recharged while your camcorder is connected to the AC power or while the
battery pack is attached.
If the camcorder is not in use for about 2 months without connecting to the AC power or attaching the
battery pack, the built-in battery fully discharges. If this occurs, charge the built-in battery by connecting
to the supplied AC adaptor for 24 hours.
After setting, the date and time are automatically recorded on a special data area of the storage media.
Turning the date and time display on/off
o To switch the date and time display on or off, access the menu and changethe Date/Timemode. u,page 91
Simple
setting
of the clock
by time difference
You can easily set the clock to the local time by setting a time difference when using your camcorder abroad.
Select "Time Zone" on the menu, then set the time difference, u, page 88
36 Englsh
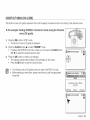
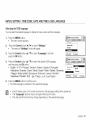
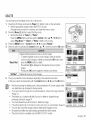
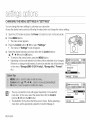
INITIAL SETTING : TIME ZONE, DATE AND TIME & OSD LANGUAGE
Selecting
the OSD language
You can select the desired language to display the menu screen and the messages.
1.
Press the MENU button.
, The menu screen appears.
2.
,
Press the Control button (_1 / I_) to select "Settings."
The menus in "Settings"
mode will appear.
3.
Press the Control button (A / Y) to select "Language",
press the OK button.
4.
Press the Control button (A / V) to select the desired OSD language,
and then press the OK button.
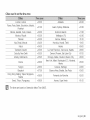
, English / 9!-_- Ot/Frangais / Deutsch / Italiano / EspaSol / Portugu_s /
Nededands / Svenska / Suomi / Norsk / Dansk / Polski / 0e_tina / Slovensky
/ Magyar / limba rom&n& / B_nrapcKH / E_rlvlKa / cpncKH / Hrvatski /
YKpai'HCbKa/ PyccK_ / _a_ / "[_ / TOrkge / _jL_/_,Jl/IsiZulu
5.
and then
Press the MENU button to exit the menu.
, The OSD language is refreshed in the selected language.
*
Even if battery pack or AC power are removed, the language setting will be preserved.
The "Language"
options may be changed without prior notice.
The date and time format may change depending on the selected language.
Englsh
37
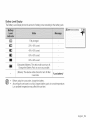
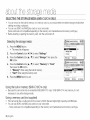
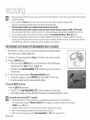
SELECTING
,
,
,
THE
STORAGE
MEDIA
(SMX-013/O14
ONLY)
You can record on the built-in memory or a memory card, so you should select the desired storage media before
starting recording or playback.
You can use SDHC and MMCplus cards on your camcorder.
(Some cards are not compatible depending on the memory card manufacturer and memory card type.)
Before inserting or ejecting the memory card, turn the camcorder off.
Selecting the storage media
1.
Press the MENU button.
° The menu IIS1[ Will aDDear
2.
Press tne Control
button (41 / _) to select "Settings."
3.
Press the Control
OK button.
button _A / Y) to select "Storage",
then press tne
4.
Press the Control
button (A / V) to se ect "Memory"
or "Card",
"Memory": When using tne built-in memory.
When
the memory card.
then"Card":
press the
OKusing
button.
5.
_,<
__'_"
_ _:_.
_ _a,o
Press the MENU button to exit.
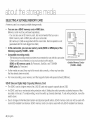
Using the built-in memory (SMX-C13/C14 only)
•
Because this camcorder has an embedded 8GB (SMX-C13 only), 16GB (SMX-C14 only) memory, it is not
necessary to buy extra storage media.
Using a memory card (not supplied)
•
•
This camcorder has a multi-card slot for access to SDHC (Secure Digital High Capacity) and MMCplus.
You can use SDHC and MMC plus cards on your camcorder.
- Some cards are not compatible depending on the memory card manufacturer and memory card type.
38 Englsh
_
I
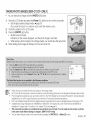
®
,
,
,
,
,
Never format the built-in memory or memory card using a PC.
If you insert a memory card when the camcorder is on, the pop-up message will prompt you automatically
to select the storage type. (SMX-C13/C14 only)
If there is no memory card inserted, only the built-in memory will be available. (SMX-C13/C14 only)
Do not eject a memory card while it is being used in the camcorder. The memory card and its data may be
damaged.
Do not remove the power (battery pack or AC power adaptor) when accessing storage media with
recording, playback, format, delete, etc. The storage media and its data may be damaged.
iNSERTiNG / EJECTING THE MEMORY CARD
Inserting
1.
2.
3.
4.
Ejecting
1.
2.
3.
4.
a memory
card
Turn the camcorder off.
Slide and open the battery/memory card cover as shown in the figure.
Insert the memory card into the memory card slot until it softly clicks
in the direction of the arrow shown in the figure.
Close the cover.
a memory
card
Turn the camcorder off.
Slide and open the battery/memory card cover as shown in the figure.
Slightly push the memory card inwards to pop it out.
Pull the memory card out of the memory card slot and close the cover.
Z_
As shown in the figure, be sure to slide the memory card inwards with the label facing right.
CAUTION
Englsh
39
SELECTING A SUITABLE MEMORY CARD
A memory card is a compact portable storage media.
,
You can use a SDHC memory card or MMC plus.
(Memory cards must be purchased separately.)
- You can also use an SD memory card, but recommended that you use a
SDHC memory card or MMC plus with your camcorder.
(SD cards up to 2GB are supported with this camcorder. Normal operation is not
guaranteed with SD cards bigger than 2GB.)
,
In this camcorder, you can use memory
following capacity: 512MB ~ 32GB
,
Compatible
recording media
- The following recording media have been recommended for use with this camcorder ......................
Others are not recommended, so buy such products with caution.
SDHC or SD memory cards: By Panasonic, SanDisk, and TOSHIBA
<Usable Memory Cards>
MMC plus: By Transcend
(512MB ~32GB)
,
If other media are used, they may fail to record data correctly, or they may lose data
that has already been recorded.
,
For movie recording, use a memory card that supports faster write speed (at least 2MB/sec).
cards (SDHC or MMOplus}
of the
SDHC (Secure Digital High Capacity)
Memory Card
, The SDHC card is a higher version (Ver.2.00) SD card and supports capacity above 2GB.
,
An SDHC card has a mechanical write protection switch. Setting the switch prevents accidental erasure of files
recorded on the card. To enable writing, move the switch up towards terminals. To set write protection, move the
switch down.
,
Due to changes In File Allocation System and physical specifi cations, SDHC memory cards can not be used with
current SD enabled host devices. SDHC memory cards can only be used with only SDHC enabled host devices.
40 Englsh
MMCplus (Multi Media Card plus)
, With MMCplus, cards have no protection tab so pleaseuse the protect function in the menu.
Common
cautions
for memory
card
,
Damaged data may not be recovered. It is recommended
of your PC.
you make a back-up of important data on the hard disk
,
Turning the power off or removing a memory card during operations such as formatting, deleting, recording, and
playback may cause data loss.
,
After you modify the name of a file or folder stored in the memory card using your PC, your camcorder may not
recognize the modified file.
Handling a memory card
, It is recommended that you power off before inserting or removing the memory card to avoid data loss.
,
,
,
It is not guaranteed that you can use a memory card formatted by other devices. Be sure to format your memory card
using this camcorder.
You have to format newly-purchased memory cards, memory cards with data that your camcorder cannot recognize or
are saved by other devices. Note that formatting erases all data on the memory card.
,
If you cannot use a memory card that has been used with another device, format it with your camcorder.
Note that formatting erases all information on the memory card.
A memory card has a certain life span. If you cannot record new data, you have to purchase a new memory card.
,
,
,
A memory card is a precision electronic media. Do not bend, drop, or cause strong impact to the card.
Do not use or store at high temperatures, in humidity or a dusty environment.
Do not bring foreign substances on the memory card terminals. Use a soft, dry cloth to clean the terminals if required.
,
,
Do not paste anything other than the label supplied with the card on the label pasting portion.
Be careful to keep the memory card out of the reach of children, who might swallow it.
Englsh
41
The camcorder
supports SDHC and MMCplus memory cards for data storage.
- The data storage soeed may differ, depending on the manufacturer and oroducuon s Jstem.
Using a lower wine sDeed memory card wnen recording a movie may cause oroblems wnen stonng tne
movie on tne memory 3ard. You may even ose your movie data during tne recording.
In an attembt to ureserve every bit of the recorded movie, tne camcorder
memory card and displays awarning: "Low speed card, Please record
stores
tne movie on tne
a lower resolution."
forClDly
To facilitate movie recording, you are recommended
to use a memory card that supports faster
write speed.
* If you are forced to use a low speed memory card, resolution Df tqe recording may De ower tnan tne set
value.
How aver, tne nlgner tne resolut on. tne more memory Will De USed.
-
For cot real performance of the camcorder
•
ensure tnat you purchase a fast speed memory, card
Samsung
is not responsible
for data
duetotoavoid
misuse.
We recommend
using a memory
cardloss
case
losing data from moving and static electricity.
After a period of use, the memory card may get warm. This is normal and is not a malfunction.
42 Englsh
RECORDABLE TIME AND CAPACITY
,
,
The following
shows the camcorder's
maximum
/ memory
capacity.
For recording
movie and photo images, please
RecordabJe
recording
time and number
note the approximate
of images
maximum
according
to the resolution
limits.
time for movie images
_
TV Super Fine (_)
a
720x480(60i)
190min.
380min.
23rain.
47min.
95rain.
190min.
380rain.
720x480(60i)
240min.
480rain.
30rain.
60min.
120rain.
240min.
480rain.
960min.
TV Normal (_
720x480(60i)
310min.
620rain.
38rain.
77min.
155rain.
310min.
620rain.
1,240rain.
Web
640x480(30p)
240min.
480rain.
30rain.
60min.
120rain.
240min.
480rain.
960min.
640x480(30p)
310min.
620rain.
38rain.
77min.
155rain.
310min.
620rain.
1,240rain.
Fine (_)
Fine ((_)
Web Normal (_])
(Unit: Approximate
Recordable
number
760rain.
minutes of recording)
of photo images
!
4:3
16:9
'
800x600
9,999
9,999
1,920
3,840
7,680
9,999
9,999
g,ggg
1600xl 200
848x480
1696x960
6,080
9,999
6,080
9,999
760
1,530
3,040
6,080
9,999
g,ggg
9,999
1,920
3,840
7,680
9,999
9,999
9,999
9,999
760
1,530
3,040
6,080
9,999
9,999
(Unit: Approximate
number of images)
Englsh
43
[]
o
•
•
•
•
o
•
•
The previous figures are measured under Samsung's standard recording test conditions and may differ
depending on the test or use condition.
The camcorder provides five resolution options for movie recordings:
- "TV Super Fine", "TV Fine", "TV Normal", "Web Fine", "Web Normal."
- "TV Super Fine", "TV Fine" and "TV Normal" modes provide optimal operation with a TV.
"Web Fine" and "Web Normal" modes provide optimal operation with web-based applications.
The compression rate increases while lowering the resolution (in the order of "'IV Super Fine", "TV Fine",
"TV Normal", "Web Fine", "Web Normal"). The higher the compression rate is, the lower the resolution is,
but the recording time will be increased.
The compression rate automatically adjusts to the recording image, and the recording time may vary
accordingly.
You can use a SDHC or MMCplus memory card on your camcorder.
Some cards may not be compatible depending on the memory card manufacturer and memory card type.
Proper operation is not guaranteed for those memory cards that are not formatted by this camcorder.
Perform the formatting directly on the camcorder.
To facilitate movie recording, it is recommended to use a memory card that supports faster write speed.
(Write speed: 2MB / sec or higher) If you use a low write speed memory card, recording may stop with a
message of "Low speed card. Please record a lower resolution."
The camcorder will operate properly with memory cards up to 32GB for recording / playback.
Memory cards bigger than 32GB in capacity may not work properly.
The memory card that is used to store a movie can cause unwritable areas, which may result in reduced
recording time and free memory space.
The maximum size of a movie (H.264/AVC) file that can be recorded at one time is 1.SGB.
You can store up to 9999 movie and photo images in one folder.
Movie (or photo) images recorded by other equipment are not playable on this camcorder.
Items marked with * are available only with 8GB (SMX-C13 only), 16GB (SMX-C14 only) models.
For recording, 16:9 aspect ratio will use more memory than 4:3 aspect ratio.
(You can select the desired LCD display aspect ratio for recording or playback (16:9 Wide/4:3 aspect ratio).
See page 59)
44 Englsh
record ng
Basic procedures to record a movie or photo image are described below and on the following pages.
RECORDING MOVIE iMAGES
,
1.
2.
3.
4.
The camcorder provides two Recording start/stop buttons. One is on the rear side of the
camcorder and the other one is on the LCD panel. Select the one that works best for you.
Open the LCD screen and press the Power (tO) button to turn on the camcorder.
, Connect a power source to the camcorder, u, page 16
(A battery pack or an AC power adaptor)
, Set the appropriate storage media, u, page 38 (SMX-C13/C14 only)
(If you want to record on a memory card, insert the memory card.)
Check the subject on the LCD screen.
Press the Recording start/stop button.
, The recording indicator ( O ) will display and recording will start.
o To stop recording, press the Recording start/stop button again.
When recording is finished, turn the camcorder off.
Do not disconnect the power seurce (battery pack, AC adaptor, etc) dunng recording,
WARNINeOtherwise, it may cause damage to the storage media or data corruption,
••
•
•
•
For on-screen
_page
25 recording to prevent unnecessary battery power consumption,
E:.jectthe
batteryinformation
pack whendisplay.
you have
finished
For various functions available when you record movie images, _*pages 56~70
During recording, seme button operations are unavailable, (Mode (_) button, MENU button, etc,)
Sound is recorded from the internal stereo microphone on the front of the camcorder, Take care that this microphone is not
blocked,
Englsh
45
record ng
o
o
.
.
.
.
Before
recording
an important movie, make sure to test the recording function to check if there is any problem with the audio
and
video
recording.
Do net operate the Power (_H_)button or remove the memory card while accessing the storage media.
Doing so may damage the slorage media or the data on the slorage media.
This camcorder
provides one combined movie and photo record mode.
You can easily record movies or photos in the same mode without having to change it, (SMX-CI3/C14
only}
You cannot use a locked memory card for recording, You will see a message saying recording is disabled due to the lock,
You can switch the play mode to the record mode by pressing the Recording start/stop
or Mode (_) button.
If the power cable/battery is disconnected or recording is disabled during recording, the system is swkched to the data
recovery mode, While data is being recovered, no other Iunction is enabled, After data recovery, the system will be switched
to the STBY mode, When the recording time is short, the data recovery might fail,
RECORDING WITH EASE FOR BEGINNERS (EASY Q MODE)
•
t.
2.
With the EASY Q function, most of the camcorder
which frees you from detailed adjustments.
Open the LCD screen and press the Power
Press the EASY Q button.
•
•
3.
settings are automatically
(_3_) button
adiusted,
to turn on the camcorder.
When you press the EASY Q button, most functions turn off and the following
functions are set to "Auto."
(Focus, iSCENE, etc.)
The EASY Q and Anti-Shake(HDIS)
((_)
indicators appear on the screen at
the same time.
To record movie images, press the Recording start/stop
button.
• To take photo images, press the PHOTO (_,_) button. (SMX-C13/C14
• Recording will begin using the basic automatic settings.
only)
To cancel EASY Q mode
Press the EASY Q button again.
• The EASY Q and Anti-Shake
(HDIS} ( @ ) indicators disappear from the screen,
• Most settings will return to the settings that were set prior to activating the EASY Q mode.
46
Unavailable
buttons
during
operation are unavailable because the items are automatically set.
.
The following
button
and EASY
menu Qoperations
The corresponding message "Release the EASY Q" may appear if unavailable operations are attempted,
- MENU button / OK button
.
Cancel the EASY Q function if you want to add any effect or settings to the images,
.
EASY Q mode settings are released when the camcorder is turned off,
EASY Q mode automatically sets the "Anti-Shake{HDIS)"
to "On" while using EASY Q,
Englsh
TAKING PHOTO iMAGES (SMX-C13/C14 ONLY)
,
You can take photo
1.
2.
3.
4.
®
images
with the PHOTO
((:_)) button.
Open the LCD Screen and press the Power (_}_)button to turn on the camcorder.
, Set the appropriate storage media, u, page 38
(If you want to record on a memory card, insert the memory card.)
Check the subject on the LCD screen.
Press the PHOTO (@) button.
, Shutter sound is heard.
Indicators on the screen disappear, and the photo image is recorded.
, While saving a photo image to the storage media, you cannot take the next photo.
When taking photo images is finished, turn the camcorder off.
•
•
Audio will not be recorded with the photo image on the storage media,
Do not turn off the camcerder or remove the memory card when taking photos as it may damage the storage media or data.
Photo image files recorded by your camcorder cenform to the "DCF (Design rule for Camera File system)" universal standard
eslablished by the JEITA (Japan Electronics and Information Technology Industries Association).
DCF is an integrated image--file format for digital cameras: kT_agefiles can be used on all digital devices cenforming to DCF,
Available photo image resolutions are 1696X960 and 848X480 in 16:9 aspect ratio, while 1600X1200 and 800X600 are
available in 4:3 aspect ratio. (To switch to 4:3, release 16:9 mode.) _page 43
This camcorder
provides one combined movie and photo record mode. You can easily record movies or photos
in the same mode without having to change it. (SMX-C13/C14
only}
You can switch the play mode to the record mode by pressing the PHOTO(Q)
or Mode (0) button,
Englsh
47
record ng
ZOOMING iN AND OUT
Use the zoom function for close-up or wide-angle recording. This camcorder
allows you to record using 10x optical power zoom and 12OOx digital zoom.
, You can zoom with the zoom lever or the Control (W/T) button on the LCD panel.
, Zoom magnification over 1Ox is done through digital image processing,
and is therefore called digital zoom. Digital zooming is possible up to 12OOx.
Set "Digital Zoom" to "On." u, page 67
To zoom
o
in
Slide the Zoom lever towards T (telephoto).
(Or press the Control button (V) on the LCD panel.)
To zoom
out
Slide the Zoom lever towards W (wide-angle).
(Or press the Control button (A) on the LCD panel,)
o
o
o
o
o
o
The minimum possible distance bbetween the camcorder and subject
while maintaining sharp focus is about 5cm (about 1.96 inch) for wide
-angle and 1m (about 39.4 inches) for telephoto.
Optical zoom preserves image quality, but during digital zoom the image
quality may suffer.
Fast zooming or zooming in subject at a far distance may produce slow
focusing. If this occurs, use "Manual Focus." u, page 62
It is recommended to use "Anti-Shake
(HDIS}" with handheld recording
if the subject is zoomed in and enlarged.
Frequent use of the zoom function consumes more power.
The zooming speed of the zoom lever and zoom button are different.
Use appropriately at your preference. For faster zooming adjustment, use
the zoom lever. For slower zooming adjustment, use the zoom buttons.
48 Englsh
image (telephoto)
t tt
J
p /b ck
PLAYING MOVIE IMAGES
,
,
This function works only in Movie Play mode.
You can find a desired movie image quickly using the thumbnail index view.
1.
Open the LCD Screen and press the Power ((u_) button to turn on the camcorder.
, Set the appropriate storage media. (SMX-C13/C14 only)
(If you want to playback images on a memory card, insert the memory card.)
2. Press the Mode t_) button to select the Play mode.
• The thumbnail index view appears. The thumbnail highlight is on the latest
created or played file.
• Playing time of the selected file and the thumbnail showing the movie playback
will appear on the screen.
3. Set the Play Mode to "Video". (SMX-C13/C14 only)
• Press the MENU button. Use the Control button to select "Play Mode"
"Video".
•
4.
--*
You can also simply switch between video and photo thumbnail view using the
zoom lever.
Use the Control button (A / V / _ / I_) to select the desired movie images,
and then press the OK button.
, Shortcut menu for playback will be displayed.
, The selected movie images are played according to the Play Option setting.
u, page 72
, To stop playback and return to the thumbnail index view, move the zoom lever.
50 English
®®®
®®
®
o
If there is no file stored to view, the message "Empty" appears.
When the LCD screen is closed during playback, the built-in speaker automatically turns off.
Movie files may not playback on the camcorder in the following cases:
- Movie files edited or renamed on a PC
- Movie files recorded by devices other than the camcorder
- Movie file formats that are supported
The built-in speaker automatically turns off when the AudioNideo cable is connected to the camcorder. (When
connected to external devices, volume adjustment should be done on the connected external device.)
You can playback recorded movie files on a TV or a PC. i, pages 96, 106
You can upload recorded movies or photos to YouTube or Flickr using Intelli-studio. u, page 101
For various functions available during playback, see "playback options." _,pages 71-83
Use the Quick View function if you want to preview the last recorded movie or photo images, u, page 34
Adjusting the volume
Press the Control button (A / V) to increase or decrease the volume.
, The volume bar disappears after 3-4 seconds.
, You can hear the recorded sound from the built-in speaker.
, The level can be set to anywhere between 0 and 10.
(If you close the LCD screen while playing, you will not hear the sound
from the speaker.)
, The volume bar does not appear when AudioNideo cable jack is inserted.
Englsh
51
p ayback
Various Playback Operations
Still playback (pause) ( t_/II )
, Press the OK button during playback.
To resume normal playback, press the OK button again.
Search playback ( <_ / _
)
, During playback, press and hold the Control button (1_)for forward search,
or to the left for reverse search.
, Pressing the Control button to (41 / I_) repeatedly increases the search
speed for each direction.
RPS (Reverse Playback Search) rate: x2......>x4......_xS.....>xl
6
FPS (Forward Playback Search) rate: x2-_x4......_xS....._xl
6
, To resume normal playback, press the OK button.
Skip playback ( _/_
)
, During playback, press the Control button (_) to locate the star[ point of the
next file. Pressing the Control button (i_) repeatedly skips files in the forward
direction.
, During playback, press the Control button (41)to locate the star[ point of the
current file. Pressing the Control button (4) repeatedly skips files in the reverse
direction.
, Press the Control button (41)within 3 seconds from the star[ point, and the first
image of the previous file is skipped.
Frame-by-frame
playback (II_)
, During pause, pressing the Control button (i_) makes play go forward one frame at a time.
To resume normal playback, press the OK button.
Slow motion playback (I1_)
, During pause, holding the Control button (1_)reduces the playback speed.
, During slow motion playback, pressing the Control button (_) changes the playback speed.
Forward slow playback rate: xl/2 ......_
xl/4 ......_
xl/8 ......_
xl/16
To resume normal playback, press the OK button.
- Recorded sound is not heard in slow playback.
52 Englsh
VIEWING PHOTO iMAGES (SMX-C13/C14 ONLY)
o This function works only in Photo Play mode.
You can find and view desired photo images quickly using the thumbnail index view.
1.
Open the LCD screen and press the Power ((_) button to turn on the camcorder.
, Set the appropriate storage media, u, page 38
(If you want to playback images on a memory card, insert the memory card.)
2. Press the Mode (_) button to select the Play mode.
• The thumbnail index view appears. The thumbnail highlight is on the latest
created or played file.
3. Set the Play Mode to "Photo."
• Press the MENU button. Use the Control button to select "Play Mode" --*
"Photo."
• You can also simply switch between video and photo thumbnail view using
the zoom lever.
4. Use the Control button (_t, / V / _ / I_) to select the desired photo images, and
then press the OK button.
, Shortcut menu for playback will be displayed.
,
To view the previous/next photo, press the Control
,
To return to the thumbnail index view, move the zoom lever.
Z_
,
WAR,_,G
,
,
,
button (4 / 1_).
Do not power off or eject the memory card during photo playback.
Doing so may damage the recorded data.
Your camcorder may not playback the following photo files normally;
- A photo with its file name changed on a PC.
- A photo recorded on other devices.
- A photo with a file format not supported on this camcorder (does not
conform to DCF standards).
Loading
photo. time may vary depending on the size and quality of the selected
The Quick View function is used if you want to preview the last recorded photo
images, u, page 47
.............
_
,
,,,,_ _®
,,-,_1
___
_
Englsh
li:
Ji
53
record nGopt
CHANGING THE MENU SETTINGS
You can change the menu settings to customise your camcorder. Access the
desired menu screen by following the steps below, then change the various settings.
1.
Open the LCD Screen and press the Power ({_) button to turn on the camcorder.
2.
Press the MENU button.
o The menu screen appears.
3.
Select the desired submenu and menu item with the Control buttons
(A / V / 41/ I1_)and the OK button.
To return to the normal screen, press the MENU button.
Depending on the mode selected, some menu items may not be available to
select and change.
You can also access the shortcut menu using the OK button. _,page 33
54 Englsh
Follow
theinstructions
For example:
below to use each of the menu items listed after this page,
Setting the iSCENE in Record mode.
1.
Open the LCD Screen and press the Power (_)
2.
Press the MENU button.
. The menu screen appears.
3.
Press the Control
4.
Select the desired submenu item with the Control
and then press the OK button.
Press the MENU button to exit the menu.
5.
button to turn on the camcorder.
button (41 / I_) to select "iSCENE."
button (A / V),
The
selected
item isisapplied
andinthe
is displayed.
However,
if "Auto"
selected
the indicator
iSCENE mode,
the item's indicator may
not be displayed on the screen. (iSCENE, Back Light, Focus, etc.)
Englsh
55
record nq opt ons
MENU ITEMS
,
,
Accessing
items in the menu depends on the operation
mode,
For operation
details, see the corresponding
page, _pages
57-70
Recording menu items
iSCENE
@ : Possible
@
Auto
Video Resolution
@
TV Fine
Photo Resolution ÷
@
i6:9 Wide
@
On
59
@
0
6O
Back Light
@
Off
61
Focus
@
Auto
62
Anti-Shake (HDIS)
@
Off
64
Digital Effect
@
Off
65
Fader
@
Off
66
EV
Wind
CUt
1696x960(16:9
57
58
Wide)
59
@
Off
66
Digital Zoom
@
Off
67
Time Lapse REC
@
Off
68
Guideline
@
Off
70
Settings
@
Items marked with * are available with models SMX-C13/C14
56 En@sh
85
only.
USING THE RECORDING MENU iTEMS
You can the menu items for movie or photo
images
recording.
jSCENE
This camcorder automatically sets the shutter speed and aperture according to the subject brightness for optimum
You can also specify one of various modes depending on subject conditions,
recording environment
or purpose
"Auto"
- You carl shoot images in Auto adjustment mode,
',SPorts',
- Reduces blurdng when recording rapidly moving subjects such as in golf or tennis.
If the Sports mode is used under a fluorescent light, the image may flicker.
In this case, use the Auto mode for recording,
"Pc rtra i"
t
Creates a shallow depth of field so that the person or subject appears against a softened background.
- The portrait mode is most eff_;ctive when used outdoors.
- EV value is automatically adjusted to the optimal,
,,sPot,_ht,
,,Beao,,,
"SNOW"
,High
Speed!!
"Food!!
recording:
of filming.
- Prevents overexposure
ding or on stage,
of subject's face, etc. when strong light strikes the subject, as in a wed-
®
@
- Where sunlight is intense like a beach,
- Where reflection of light is intense like a snowfield,
- Reduces blurring objects in rapid motion,
- Recording close--up objects in high saturation,
- Recording a waterfall or fountain,
®
,Daylight,
- Recording in broad daylight,
@
,,CJoUdy,
- Recording under cloudy weather,
- Recording under white fluorescent lamp,
"Tungsten"
- Recording under white tungsten lamp.
"Night"
- Recording under low light,
,,Darkness,!
- Recording under exlremely
@
@,
4low light.
English
57
record ncj opt
,
You can check the selected iSCENE on the on-screen information display.
However, nothing will appear in "Auto"' mode.
The iSCENE also can be set in the shortcut menu. _page _
oo
,
Video
Resolution
You can select the resolution of a movie to be recorded. This camcorder can record in "TV Super Fine", "TV Fine",
"TV Normal", "Web Fine" and "Web Normal" modes. The "TV Fine" mode is set as the factory default.
"TV Super
Movie images recorded
in 720x480(60i)
resolution
at super-fine
"TV Fine"
Movie images recorded
in 720x480(60i)
resolution
at fine image quality.
"TV Normal"
Movie images recorded
in 720x480(60i)
resolution
at normal image quality.
"Web
"Web
,
,
Fine"
Fine"
Normal'!
image quality.
Movie images recorded in 640x480 (30p) resolution at fine image quality.
Supports viewing with the optimal resolution on a PC.
Movie images recorded in the 640x480 (30p) resolution
Supports viewing with the optimal resolution on a PC.
at normal image quality.
You can record a scene at five resolution levels: "TV Super Fine"', "TV Fine"', "'IV Normal"',
"Web Normal." However, the better the resolution is, the more memory is used.
The recording times depend on the resolution of a movie to be recorded, u, page 43
58 Englsh
"Web Fine" or
Photo Resolution
You can select the resolution of the photo image to be recorded. For detailed information image capacity. _page
1696x960 (16:9}
Records in 1696x960 resolution.
848x480
IRecords in 848x480 resolution.
(16:9)
1600X1200 (4:3)Records
800x600
o
o
o
(4:3}
in 1600x1200
43
resolution.
Records in 800x600 resolution.
For photo development, the higher the resolution, the finer the image quality.
The number of recordable images varies depending on the recording environment.
High resolution images occupy more memory space than low resolution images. If a higher resolution is
selected, there is less space to store photos in the memory.
The submenu items of Photo Resolution vary depending on the selection of the 16:9 Wide function.
16"9 Wide
You can select the desired LCD display aspect ratio for recording or playback (16:9 Wide/4:3 aspect ratio).
_i
U11 _
_
I
Disables the function. Displays the image in 4:3 aspect ratio.
,
,
None
Select to use the standard display aspect raho of 4:0 on the screen.
"On'
•
•
Recording and viewing of 16:9 aspect ratio.
None
In "16:9 Wide" mode, you cannot use the following functions : "Mosaic"', "'Mirror"', "Step printing"
(Digital Effect). If you want to use the following functions, set the "16:9 Wide" menu to "Off" first.
Please set the aspect ratio before recording. The default setting is "16:9 Wide."
Englsh
59
reoord na opt
_
I
EV (Exposure Value)
The camcorder usually adjusts the exposure automatically.
You can also manually adjust the exposure depending on the recording conditions.
Setting the exposure manually:
When manually setting the exposure, the default setting appears as the value is
automatically adjusted according to the environmental light conditions.
,
,
Press the Control button (4 / I1_)to adjust the exposure while viewing the
image on the LCD screen.
Confirm your selection by pressing the OK button.
Exposure value can be set between "-2.0" and "+2.0"
If you set exposure to manual, the higher the exposure, the brighter the
recorded picture will be.
Exposure value setting will be applied and (J_---'}
_) indicator and setting value
are displayed.
Manual exposure is recommended
in situations:
When shooting using reverse lighting or when the background is too bright.
When shooting against a reflective natural background such as at the beach or
when skiing.
When the background is overly dark or the subject is bright.
,,
The
also also
can be
set automatically
in the shortcut depending
menu. _page
34EV value.
The exposure
shutter speed
varies
on the
60 Englsh
Back Light
When the subject is lit from behind, this function will compensate for lightingso that the subject is not too dark.
,Off,
Disables the function.
,,on.,
- Backlight compensation
- Backlight compensation
None
is executed.
brightens the subject quickly.
Back lighting influences recording when the subject
.
.
.
.
.
is darker than the background:
The subject is in front of a window.
The subject is against a snowy background.
The subject is outdoors and the background is overcast.
The light sources are too bright.
The person to be recorded is wearing white or shiny
clothes and is placed against a bright background:
The person's face is too dark to distinguish his/her
features.
<Backlight off>
<Backlight on>
E_glsh
61
record ng opt ons
Focus
,
,
The camcorder usually focuses on a subject automatically (auto-focus).
You can also manually focus on a subject depending on the recording conditions.
"Aoto',
"Face Detection',
!!Manual,!
In most situations, it is better to use the automatic focus feature, as it enables you
to concentrate on the creative side of your recording.
Records under the optimal condition by detecting faces automatically.
Manual focusing may be necessary under certain conditions that make automatic
focusing difficult or unreliable.
Face detection
It detects and recognizes face-like shapes and adjusts focus, color and exposure
automatically. Also, it adjusts recording conditions optimised for the face detected.
, Press the Control button (A / Y) to select "Face Detection",
and then press
the OK button.
Detects a face and shows a frame on it. The detected face image is optimised
automatically.
[]
,
,
,
,
,
The
Face Detection indicator (_) and Face Detection frame (i_--]) are not
recorded.
Framing a person's face while Face Detection is set will adjust focus and
exposure to optimal values automatically.
Face Detection may not operate depending on the recording conditions.
For example, the Face Detection Frame may appear when framing a
"face-like" shape, even when the subject is not a person's face.
If this occurs, turn off the Face Detection feature.
The Face Detection feature will not work when framing the side of a person's
face. You must be facing them "head-on."
Face Detection will not work in "Web Fine" and "Web Normal" modes.
62 Englsh
None
H
Focusing
manually
during
recording:
This camcorder automatically focuses a subject from close-up to infinity. However, the
correct focus may not be obtained depending on the recording conditions.
In this case, use the manual focus mode.
1.
2.
Press the Control button (A / V) to select "ManuaL"
, The manual focus adjustment indicator appears.
Press the Control button (4 / _') to select the desired indicator to adjust focus,
then press the OK button.
Focusing on a nearer subject
To focus on a nearer subject, press the Control button (_1).
Focusing on a farther subject
To focus on a farther subject, press the Control button (I_).
, The nearer or farther icon (_ / _ ) appears between the indicators when
focus adjustment reaches the end.
, The adjusted value is applied right after pressing the Control button (4 / I_)
to adjust the focus.
, The manual focus setting will be applied and the (_) indicator is displayed.
<Nearer subject >
<Further subject >
Manual focus is recommended
in the following situations :
, A picture containing several objects, some close to the camcorder, others further away.
, A person enveloped in fog or surrounded by snow.
, Very shiny or glossy surfaces like a car.
, People or objects moving constantly or quickly like an athlete or a crowd.
o
o
o
You can easily adjust the focus using the Shortcut menu button. _,page 34
Manual focusing focuses on a point in the framed scene while auto focusing focuses on the center area
automatically.
Use the zoom function to catch the desired target before manually adjusting the focus. If you use the zoom
function after manual focusing, refocusing is required.
Before focusing manually, check if the "Digital Zoom" is turned off. When "Digital Zoom" is turned on,
manual focusing will not focus with accuracy. Turn the "Digital Zoom" off. u, page 67
E_gl sh 63
record ng opt ons
Anti-Shake
(HDIS)
When you use zoom to record a magnified subject image, it will correct fuzziness in the recorded image.
"Off"
"On';
Disables the function.
Compensates for unstable images caused by camcorder-shake,
magnification.
None
particularly at high
Anti-Shake
(HDIS) provides a more stable image when:
. Recording while zooming
. Recording small objects
. Recording while walking or moving
. Recording through the window of a moving vehicle
oo
o
o
o
EASY Q mode automatically sets "Anti-Shake(HDIS}"
to "On."
When "Anti-Shake
(HDIS} : On" is specified, there will be a slight difference between the actual movement
and the movement on screen.
Large camcorder shake may not be entirely corrected even if "Anti-Shake (HDIS} : On" is specified.
Firmly hold the camcorder with both hands.
It is recommended that you specify "Anti-Shake
(HDIS}: Off" when using the camcorder on a desk or
tripod.
When you record pictures with 10x or more magnification and the "Anti-Shake
(HDIS}" is "On" in dim
places, after-images may stand out. In this case, we recommend using a tripod and turning the "Anti-Shake
(HDIS}" to "Off."
64 Englsh
Digital
Effect
, Thedigital
effect
enables
youtogive
acreative
look
toyour
recording.
, Select
theappropriate
digital
effect
forthetypeofpicture
thatyouwishtorecord
andtheeffect
youwishtocreate.
, There
are10different
digital
effect
options.
"off"
Disables the function.
None
[Tj "BLK&WHT"
Changes the images into Black and White.
__]',Sepia "
This mode gives the images a reddish brown
pigment.
I_ ',Negative,,
Reverses the colors and the brightness.
creating the look of a negative.
q_
,,Art',
Adds artistic effects to an image.
q_
"Emboss',
This mode creates a 3D effect (embossing).
"Mosaic"
A mosaic overlay appears on an image.
q_
',Mirror,
This mode cuts the image in half and makes
a mirrored image on the other half.
q_
,Pastel"
This mode applies a pale pastel drawing
effect to an image.
"Cosmetic"
This mode helps correct facial imperfections.
I_ "Step printing',
Technique of recording the image in segments.
E_gl sh 65
record ng opt ons
Fader
You carl give your recording a professional look by using special effects such as fade in at the beginning of a sequence or fade out at
the end of a sequence,
"Off"
Disables the function,
"lrl"
"Out"
As soon as you start recording, the fader will be executed,
"in-Out"
None
When the recording is done, the fader will be executed,
When you start or stop recording, the fader will be executed accordingly,
Fade in
Press the Recording
start/stop
button when "Fader"
is set to "in."
Recording starts with a dark screen and then the image and sound are
faded in.
Fade out
Press the Recording
start/step
button when "Fader"
is set to "Out."
Recording stops as the image and sound are faded out.
Fade
Fade
3 seconds)
i
Fade
Out
(Approx.
3 seconds)
in-out
This
function is disabled after being used
one time.
Press the Recording
start/stop
button when "Fader"
is set to "in=Out."
Recording starts with a dark screen and then the image and sound are faded
in and recording stops as the image and sound are faded out.
Wind
In (Approx.
Cut
You can reduce wind noise when recording sound from the built-in microphone.
If "Wind Cut : On" is set, the low-frequency components in the sound picked up by the microphone will be cut off
during recording: This makes it easier to hear voice and sound during playback.
. Use Wind Cut when recording in windy places such as a beach.
None
When
66
Englsh
"Wind
Cut"
is "On",
some
low frequency
sound
is eliminated
along
with the sound
of the wind.
Digital Zoom
,
You can select the maximum zoom level in case you want to zoom to a level greater than 10x (the default setting)
during recording. Up to 10x zoom is performed optically, and after that, up to 1200X zoom is performed digitally.
Note that the image quality decreases when you use the digital zoom.
This nght side of the bar shows the digital zoomingzone.
zooming zone appears when you move the zoom lever.
o The
"Off"
Only optical zoom is available up to 10x.
None
"On"
Digital zoom is available up to 1200x. Moving the zoom lever will display the digital zoom bar.
None
,
,
The image quality may deteriorate depending on how much you zoom in on the subject.
Maximum zooming may result in lower image quality.
E_glsh
67
record ng opt ons
Time Lapse
•
REC
Time Lapse REC records still images at specific intervals you can set, and plays them as one movie file.
This function is useful for observing the movement of clouds, the changes in daylight or blooming flowers, etc.
"Off"
Disables the function.
"On,,
Setting
When you start movie recording, images of the subject are captured and saved to the
storage media by set interval and total recording period.
the Time
Lapse
REC mode:
To record in the Time Lapse REC mode, you need to set the recording interval and total
recording time in the menu.
1. Press the MENU button.
2. Press the Control button (41 / I_) to select ""Time Lapse REC."
3. Press the Control button (A / V) to select ""On", then press the OK button.
, The recording interval and total time for recording items are displayed.
("Sec": seconds, "Hr": hours)
4. Set a desired recording interval ("See") with the Control button (A / V).
5. Move to the next setting with the Control button (4 / I_) and set a desired total
recording time ("Hr") in the same way.
, While you set the preparatory settings (recording interval and total recording time),
the approximate time-lapse recording time will be displayed on the menu screen.
6. Press the OK button to finish the setting and press the MENU button to exit the menu.
7. After setting the Time Lapse REC mode, press the Recording start/stop button.
The Time Lapse REC starts.
, While playing back, it will display 30 images per second. (Sound is not available.)
For example, if the recording interval was "30" seconds and the total recording
time was "24" hours, images are automatically captured and saved in the storage
media every 30 second for 24 hours. (After 24 hours of recording, playback will last
for about "lMin 36 Sec" (96 seconds.)
68 Englsh
None
[_
Total time
Recording
Time Lapse REC records
mage frames at a
Dredefi ned in:er_ al Droauce a ume-lause
vlaeo.
for recording
nterval
Time Laose
situations;
REC is useful for filming
in the following
• Blooming flowers
o Insect's skin-casting
Clouds rolling Dy in tne SKy
Time for recoro ng on the
__
•-
•
•
•
•
•
•
•
•
storage meo]a _avloeo c ]c
of Time Lapse REC)
Thiscaptured
function images
is disabled
after being
used
one
time, length, Since the minimum length of a video to be saved by your
30
corrlpose
a video
of 1
second
camcorder is one second, the interval defines how long the Time Lapse Recording should be set for, For example, if you set
the interval to "30 Sac," Time Lapse Recording should be set for at least 15 minutes to record a minimum video length of
1 second (30 images),
Once the Time Lapse REC finishes recording for its total recording time, it switches to standby mode,
Press the Recording start/stop
button if you want to stop the Time Lapse REC,
Audio is not recorded during Time L.apse Recording,
When a video recording fills up 1,8GB of storage media, a new recording file is automatically started at that point,
When the battery is discharged exhausted during Time Lapse REC, it saves recording up to that point and switches to
standby mode, After a while, it displays a warning message, then turns off automatically,
When memory runs out while performing Time Lapse REC, the camcorder switches to standby mode after saving what was
recorded so far,
We recommend using the AC power adaptor when using the Time Lapse REC function,
When a time lapse recording starts, a message of "Time Lapse Recording"
blinks on the screen and it appeared to be as
if the screen is stopped, This is a normal operation; do not remove the power source or memory card from the camcorder,
E'_gl sh
69
record ng opt ons
Guideline
.
.
Guideline displays a certain pattern on the LCD screen so that you can easily set the image composition when
recording images.
The camcorder provides 3 types of guidelines.
iiiiiiiiiiiiiiiiiiiiiiiiiii_i_'@i@i!_i_ii!i
"Off"
"Cl'oss"
"Gr=d',
'!Safety Zone,
.
.
Disables the function.
Records the subject placed in the center.
Records the subject on the horizontal or vertical composition or close-up.
Records the subject within safety zone which prevents them from being cut when
editing in 4:3 for left and right and 16 x9 (2.35:1) for top and bottom. Set "Safety
Zone" when you want to have various subjects in one scene with the proper size.
Positioning the subject at the cross point of the guideline provides a balanced composition.
Guideline cannot be recorded on the images being recorded.
70 Englsh
None
MENU ITEMS
,
,
,
Accessible items in the menu vary depending on the operation mode,
See pages 49-53 for playback information and button operation,
See pages 71-83 for details on menu items during playback,
@ : Possible
X : Not possible
Playback menu items
Play Mode *
St0ry_Board Print
Edit
I
Divide
÷
@
Video
9
@
73
@
@
74
÷
x
75
@
@
76
¢
x
78
x
81
d...........................................................................................................
t
Slide Show *
Filelnfo
"
(Full image display
mode only)
,
,
x
l
¢
82
1.............................................................................................................
..........................................................................................................................................
@
@
83
Items marked with * are available only with SMX-C13/C14 models.
The photo function is available only with SMX-C13/C14 models.
E_glsh
71
PLAY OPTION
You can set a specific playback style according to your preference.
!!Play All!!
Plays back from the selected movie to the last movie.
"Play One _'
The selected movie will be played.
"Repeat All,,
All movies will be played repeatedly.
Repeat One
The selected movie will be played repeatedly.
72 Englsh
as,
=!L
DELETE
You can erase your recordings
1.
2.
3.
4.
one by one, or all at once.
Open the LCD Screen and press the Power (_o}) button to turn on the camcorder.
.
Set the appropriate
storage media. (SMX-C13/C14
only)
(If images were recorded on a memory card, insert the memory card.)
Press the Mode (_) button to select the Play mode.
.
Set the Play Mode to "Video"
or "Photo."
Press the MENU button and then use the Control
button (A/Y
/ 4 / I_/OK) to
select "Play Mode" -* "Video"
or "Photo."
(SMX-C13/C14
only)
Press the MENU button -* Control button (4 / t_) to select "Delete."
Select an option by pressing the Control button ( A / Y ) and then press the OK button.
Oe,eindividua,
es se,ected
movie
photo>
images.
- To delete individual movie (or photo) images, select the desired
'!Select Files,
movie (or photo) images to delete by pressing the OK button, then
press the MENU button to delete.
- The indicator (I_) is displayed on the selected movie (or photo)
/
images.
- Pressing the OK button
5.
The pop-up
selection
toggles the selection
menu will appear depending
on the selected
and release,
menu item.
i_,,@,
i
In this case, select the desired item with the Control
buttons (41 / I_) and the OK button.
.
Note that removing the battery pack or disconnecting
the AC power adaptor while
you delete files may damage the storage media.
_
o
To protect important images from accidental deletion, activate the image protection.
-,page 74
The protect ( _ ) indicator will blink if you try to delete an image that was
previously protected. -,page 74
o
You must release the protect function to delete the image.
o
If the write protection tab on the memory card is set to lock, you cannot delete. -.,page 40
o
You can also format the storage media to delete all the images at once.
o
Be aware that all files and data including protected files will be erased.
o
The photo function is available only with SMX-C13/C14
models.
.
..................
A,, _,,_
_z_._
1%i_[
I@,@_
_@
E_glsh
73
PROTECT
,
,
You can protect saved important movie (or photo) images from accidental deletion.
Protected images will not be deleted unless you release the protection or format the memory.
1.
Open the LCD Screen and press the Power (tP¢') button to turn on the camcorder.
,
Set the appropriate
storage media. (SMX-C13/C14
only)
(If images were recorded on a memory card, insert the memory card.)
2.
Press the Mode (_) button to select the Play mode.
,
Set the Play Mode to "Video"
or "Photo."
Press the MENU button and then use the Control
button (A/Y
/ 4 / I_/OK) to
select "Play Mode" -, "Video" or "Photo."
(SMX-C13/C14
only)
,Select
5.
Files,
button to confirm.
- The indicator (_--_Qis displayed on the selected movie (or photo) images.
- Pressing the OK button toggles the selection between protection and
release.
"All On"
Protects all movie (or photo) images.
"All Off !!
Cancels
the protection
for all movie (or photo) images.
The pop-up selection menu will appear depending on the selected menu item.
In this case, select the desired item with the Control
buttons (4 / _) and the OK button.
Protected movie (or photo) images will show the indicator (@_) when they are
displayed.
If the write protection tab on the memory card is set to lock, you cannot set image
protection.
The photo function is available only with SMX-C13/C14
models.
®
®®
d
74 Englsh
STORY-BOARD PRINT
This function captures 16 still images arbitrarily from the selected movie and saves them into
the storage media. It presents a quick overview of your movie, helping you to understand the overall topic.
Open the LCD Screen and press the Power ((:_) button to turn on the camcorder.
, Set the appropriate storage media. (SMX-C13/C14 only)
(If images were recorded on a memory card, insert the memory card.)
2.
Press the Mode (_t button to select the Play mode.
, Set the Play Mode to "Video."
Press the MENU button and then use the Control button (A/V
to select "Play Mode" -_ "Video." (SMX-C13/C14 only)
3.
Press the MENU button -, Control
Print" -_ "Select File."
4.
Use the Control button (_,/V
then press the OK button.
,
5.
/ _ / _,/OK)
button (4 / _,/OK) to select "Story-Board
/ _ / _,) to select the desired movie images, and
A message appears asking for your confirmation.
Select "Yes."
, Images to be captured are selected arbitrarily, and compose a storyboard of
16 images.
, The saved storyboard can be found in the storage media's DCIM folder, using
a computer. _page 106
, You can also find the saved storyboard image in the photo playback display.
(SMX-C13/C14 only) u, page 53
Storyboard images are displayed in 4:3 aspect ratio. Hence, it may not display
the entire image on the LCD screen. On a computer, it will display the entire
image.
E_gl sh 75
COPY (SMX-C13/C14 ONLY)
Images are copied to the destination storage while original images are left in the source storage.
It copies from the currently used memory to another. For example, if the built-in memory was used, it copies to a
memory card.
1.
Open the LCD Screen and press the Power (_}) button to turn on the camcorder.
o Set the appropriate storage media. (Insert a memory card.)
2.
Press the Mode ({G')button to select the Play mode.
Set the Play Mode to "Video" or "Photo".
Press the MENU button and then use the Control button (A/V / 4 / _,/OK)
to select "Play Mode" -* "Video" or "Photo." (SMX-C13/C14 only)
3.
Press the MENU button -, Control
4.
Select an option by pressing the Control
button.
button (4 / _,) to select "Copy."
®®®
button (A / V) and then press the OK
®®
Copies the individual movie (or photo) images.
- To copy individual movie (or photo) images, select the desired
movie (or photo) images by pressing the OK button.
- The indicator ([_ ) is displayed on the selected movie (or photo)
images, then press the MENU button to confirm.
- Pressing the OK button toggles between selecting and releasing
the copy function.
"All
5.
Files"
Copies all the movie (or photo) images.
The pop-up selection menu will appear depending on the selected menu item.
In this case, select the desired item with the Control buttons (4 / I1_)and the OK
button.
Images are copied in another storage media.
76 Englsh
ii
i
@47y
k: g;
.........
o
o
,
,
,
,
,
,
In general, use of functions both in thumbnail display and full image display
employs the same method, while their detailed options may be different.
If a memory card is not inserted, you cannot perform the "¢epy" function.
If free space available on the storage is insufficient, copying may not be possible.
Delete unnecessary images, u, page 73
Copied movie (or photo) images have no protection even if the original is set to be protected.
Copying may take a while depending on the number of files and file size.
Copying may not operate if the battery charge is insufficient. If available, use the AC adaptor while copying
to prevent power disconnection.
Note that removing the battery pack or disconnecting the AC power adaptor while you copy files may
damage the storage media.
Follow the same instructions to copy video clips (or photos) from a memory card to the built-in memory.
Before using this function, select the storage media that contains the desired videos (or photos) to be
copied.
The photo function is available only with SMX-C13/C14 models.
E_gl sh
77
DIVIDE
This function works only in Play mode. _page 49
You can divide a movie image as many times as you want in order to delete a section you no longer need.
The movie images will be divided in groups of two.
Open the LCD Screen and press the Power ({_) button to turn on the camcorder.
, Set the appropriate storage media. (SMX-C13/C14 only)
(If images were recorded on a memory card, insert the memory card.)
2.
Press the Mode (_) button to select the Play mode.
, Set the Play Mode to "Video."
Press the MENU button and then use the Control button (A/V
to select "Play Mode" --, "Video." (SMX-C13/C14 only)
3,
Press the MENU button _Control
"Divide."
4.
Select a desired movie image using the Control
, The selected movie image will be paused.
5.
Search the point of division by pressing the Control
6.
Press the MENU button to pause at the point of division.
,
A message appears asking for your confirmation.
7.
Select "Yes."
,
,
,
button (A/V
/ _ / t_/OK)
/ _ / t_/OK) to select "Edit"
button (A/V
/ _ / t_/OK).
button (,_ / t_/OK).
The selected movie image is divided into two movie images.
You can keep dividing images as long as they are 3 seconds in length.
If you want to delete an unwanted section of a movie image, divide the movie
first, and then delete the image (section) you no longer need. After dividing the
movie image, you can also combine other desired movie images. _,page 80
The second image of the divided image will be displayed at the end of the thumbnail index.
78 Englsh
e
The Divide function is not available in the following
conditions:
If the total recorded time of the video is less than 6 seconds.
If you trying to divide sections without leaving 3 seconds at the beginning and the end.
If the video file is recorded in the Time Lapse REC mode.
If the remaining section of the storage media space is less than 40MB.
Videos recorded or edited by other devices.
Videos transferred to this camcorder by using Samsung Intelli-studio.
You can not delete a protected image. You must first release the protect function to delete it. _page 74
The division point may drift before or after the designated point by approximately 0.5 seconds.
E_gl sh 79
COMBINE
,
,
1o
2.
3.
4.
5.
6.
This function works only in Play mode. _page
You can combine two different movie images.
,t_
Open the LCD Screen and press the Power (_)
button to turn on the camcorder.
,
Set the appropriate
storage media. (SMX-C13/C14
only)
(If images were recorded on a memory card, insert the memory card.)
Press the Mode (G) button to select the Play mode.
,
Set the Play Mode to "Video".
Press the MENU button and then use the Control
button (A/Y
/ 4 / I_/OK) to
select "Play Mode"--*
"Video." (SMX-C13/C14
only)
Press the MENU button --* Select "Edit" -* Select "Combine".
Select a desired movie image using the Control button (A./Y
/ 4 / I_/OK).
,
The (_.,¢)indicator is displayed on the selected movie images.
,
Selecting the movie thumbnail image toggles between the movie thumbnail image
being selected for combining (the (_ indicator appears on image) or not (the
indicator is removed from image).
,
You cannot select and combine two different resolution images.
Press the MENU button.
,
A message appears asking for your confirmation.
Select "Yes."
,
The thumbnail of the first movie image will appear in the combined movie image.
o
80
49
,
,
,
Englsh
- Videos
The
combine
in different
function
resolution
is not formats
available(lV insuper
the following
fine/TV fine/TV
conditions:
normal vs Web fine/Web normal) cannot be combined.
- Videos in different aspect ratio cannot be combined. (4:3 vs 16:9 wide)
- The video file recorded in the Time Lapse REC mode and normal record file cannot be combined.
- If the total size of the two files to be combined exceeds 1.8GB
- If the remaining section of the storage media space is less than 40MB.
- If you combine videos having the same resolution but diff,)rent qualities, the combined video will have the lower image
quality for playback. (For example, if you combine a vide() clip of "TV Super Fine" with another video clip of "TV Fine".
which has the same resolution, then the combined video will be in "TV Fine" resolution and quality.)
- Videos recorded or edited by other devices.
- Videos transferred to this camcorder by using Samsung Intelli-studio.
You cannot combine protected images. You must first release the protect function to paste it. "-,page 74
The two movie images are combined in the selected order and restored as one movie image.
The original movie images will not be preserved.
A maximum of 2 movie images can be combined at a time.
SHARE MARK
You can set the Share mark on the video image. Then you can directly upload the marked file to the YouTube site.
2.
3,
4.
Open the LCD Screen and press the Power (_) button to turn on the camcorder.
, Set the appropriate storage media. (SMX-C13/C14 only)
(If images were recorded on a memory card, insert the memory card.)
Press the Mode (_) button to select the Play mode.
, Set the Play Mode to "Video."
Press the MENU button and then use the Control button (A/V / _ / _/OK)
to select "Play Mode" -_ "Video." (SMX-C13/C14 only)
, The thumbnail index screen appears on the LCD screen accordingly.
Press the MENU button -_ Control button (4 / _) to select "Share Mark" -_
"Select File."
Use the Control
button (A/V
/ _ / _,) to select the desired movie images, and
then press the OK button.
,
,
5,
The ( [] ) indicator is displayed on the selected movie images.
You can also check the Share mark on the video image by pressing Share (l_l)
button.
Press the MENU button.
6.
, A message appears asking for your confirmation.
Select "Yes."
By using the software Intelli-studio embedded
with Share marks. _,page 101
_,,_
_
in the camcorder, you can easily upload videos marked
E_glsh
81
SLIDE SHOW (SMX-C13/C14 ONLY)
You can playback all the photo images stored in the storage media automatically.
1.
Open the LCD Screen and press the Power ('_}) button to turn on the camcorder.
, Set the appropriate storage media.
(If images were recorded on a memory card, insert the memory card.)
2.
Press the Mode (_) button to select the Play mode.
, Set the Play Mode to "Photo".
Press the MENU button and then use the Control
to select "Play Mode" _ "Photo."
,
3.
4.
button (A/V
/ _1/ I_/OK)
The thumbnail index screen appears on the LCD screen accordingly.
Press the MENU button -_ Control
"Start."
button (4 / _,) to select "Slide Show"
-_
Press the OK button.
,
,
,
The (_)
indicator is displayed. The Slide Show will start from the current image.
All photo images will be played back consecutively for 2-3 seconds each.
To end the slide show, press the OK button again.
This function works only in Photo Play mode.
Before selecting a menu item, set the mode to Photo Play first.
82 Englsh
FILE INFO
You can see the image information for all images.
1.
Open the LCD Screen and press the Power (_) button to turn on the camcorder.
, Set the appropriate storage media. (SMX-C13/C14 only)
(If images were recorded on a memory card, insert the memory card.)
2.
Press the Mode (9) button to select the Play mode.
, Set the Play Mode to "Video" or "Photo."
Press the MENU button and then use the Control button (A/V / _ / _,/OK)
to select "Play Mode" -_ "Video" or "Photo." (SMX-C13/C14 only)
, The thumbnail index screen appears on the LCD screen accordingly.
3.
4.
Select the desired movie (or photo) images using the Control
Press the OK button.
5.
, The selected movie (or photo) image is played according to play option setting.
Press the MENU button.
6.
7.
Press the Control button ( _ / _" ) to select "File Info."
Press the OK button.
button.
,
The information of the selected file is displayed as shown below.
Date
Duration
Size
Resolution
,
Press the MENU button again after confirming.
This function is available only in the full image display mode.
E_gl sh
83
ettina
_
opt
I
CHANGING THE MENU SETTINGS IN "SETTINGS"
You can change the menu settings to customise your camcorder.
Access the desired menu screen by following the steps below and change the various settings.
1.
Open the LCD Screen and press the Power ((_}) button to turn on the camcorder.
2.
Press MENU button.
, The menu screen appears.
3.
Press the Control button (4 / I_) to select "Settings."
, The menus in "Settings" mode will appear.
Select the desired submenu and menu item with the Control
4.
buttons
(A / V / _ / I1_)and the OK button.
, To return to the normal screen, press the MENU button.
, Depending on the mode selected not all items will be selectable to be changed.
(If there is no storage media inserted, it cannot be selected and will be dimmed
on the menu: "Storage (8MX-C13/014
only}", "Storage Info", "Format",
etc.)
The pop-up selection menu will appear depending on the selected
menu item. In this case, select the desired item with the Control
buttons (4 / I_) and the OK button.
The illustration to the shows the Movie record mode. Before selecting a
menu item, set the appropriate operation mode first, u, page 24
84 Englsh
MENU ITEMS
•
You can setup the date/time,
OSD language
and display
settings
of the camcorder.
@ : Possible
Settings menu items ( @ )
x: Notpossible
Storage *
@
@
Storage tnfo
Format
File No.
Time Zone
@
@
@
@
@
@
@
@
Memory
86
Series
Home
86
87
87
88
DateA-ime Set
@
@
Date Type
@
@
Time Type
DateA-ime Display
LCD Brightness
LCD Color
@
@
@
÷
@
@
X
X
12Hr
Off
0
90
91
91
91
LCD Enhancer
Auto LCD Off
@
@
@
@
Off
On
92
92
90
90
Menu Design
@
@
Misty White
92
Transparency
Beep Sound
Shutter Sound *
@
@
@
X
@
@
0%
On
On
92
93
93
Auto Power off
PC Software
@
@
x
@
5 Min
On
93
94
TV Display
Default Set
Version
@
@
@
X
@
@
On
94
94
95
Language
Demo
@
@
@
X
English
On
95
95
,
,
,
These Items and Default values may be changed without notice.
There are some functions you cannot activate simultaneously
in the menu. You cannot select the grey menu items.
Items marked with * are available only with SMX-C13/C14
models.
E_gl sh 85
_
I
USING THE SETTINGS MENU ITEMS
Storage (SMX-Cl 3/Cl 4 only)
You can record movie (or photo) images on the built-in memory or a memory card, so you should select the desired
storage media before startinc recording or playback.
,Memory,
',Card"
Select the built-in memory for storage medium. You can record or play back images on the
built-in storage media.
Select a memory card as storage medium. You can record or play back images on a
memory card.
If there is no storage media inserted, it cannot be selected and will be dimmed on the menu.
Storage Info
It shows you the storage information. You can view the storage media, used memory
space and available memory space.
'12
, I It shows you the memory information of the built-in
_
storage
"Card"
....
@
o
o
86 Englsh
media.
It shows you the memory information of the inserted
memory card.
None
None
If there is no storage media inserted, it cannot be selected and will be dimmed
on the menu.
In the Storage Info display, you can check the used and available memory
as well as the remaining recording time for each recording resolution. For the
desired information, scroll the screen using the Control
(A / Y) button.
Format
Theformat
function
completely
deletes
allfiles
andoptions
onthestorage
media,
including
protected
files.
Youcanformat
(initialise)
recording
datainthestorage
media.
Youhave
toformat
thepre-used
storage
media
or
newly
purchased
memory
cards
withthiscamcorder
before
using
them.
Thisenables
stable
speeds
andoperation
when
accessing
therecording
medium.
Beaware
thatallfliesanddataincluding protected flies will be erased.
"Memory"
"Card"
/k
WARNING
Formats the built-in storage media.
None
Formats the memory card.
None
Donot format the recording medium with the PC or a different
Make sure to format the recording medium on the camcorder.
,
,
,
device.
Do not remove the recording medium or perform any other operation (such as turning off the power)
during formatting. Also, be sure to use the provided AC power adaptor, as the recording medium may
be corrupted if the battery becomes exhausted during formatting. If the recording medium becomes
corrupted, format it again.
A memory card with the protection tab set to lock will not be formatted, u, page 41
If there is no storage media inserted, it cannot be selected and will be dimmed on the menu.
File No.
Filenumbers are assignedto recorded filesin the order they were recorded.
None
None
When you set "File No." to "Series", each file is assigned with a different number so as to avoid duplicating file
names. This is convenient when you want to manage your files on a PC.
E_glsh 87
se tinqs opt ons
_
I
Time Zone
You can easily set the clock to the local time when using your camcorder while travelling.
"Home,,
,,Visit',
The clock will be used according to your setting on the "Date/Time Set" menu.
Select it when using this camcorder for the first time or when returning the clock to your
hometown date/time setting.
When you visit a different time zone, it allows you to use the local time without changing your
hometown time setting. The clock will be adjusted in accordance with the time difference
between the two locations.
Setting the clock to the local time ("Visit")
You can easilyset the clock to the local time zone when travelling.
1.
Press the Control button (_, / V) to select the "Time Zone"
and then press the OK button.
. The Time Zone screen will be displayed.
2,
Select "Visit" with the Control button (_, / V / OK), and then select your local
area using the Control button (41/ I_).
. You can check the time difference between "Home" and "Visit."
3,
in Settings mode,
Press the OK button to confirm.
. The clock is set to the time zone of the place you are visiting.
. When "Date/Time Display" : "On" is set, the icon (_) will be displayed next
to the date and time display. _page 91
You can set the date and time in "Date/Time
_page 35
88 Englsh
Set" from the "Settings"
menu.
None
Citiesusedtosetthetimezone
London,
Lisbon
+00:00
+09:30
Rome,
Paris,
Berlin,
Stockholm,
Madrid,+01:00
Guam,
Sydney,
Brisbane
+10:00
Frankfurt
+02:00
Solomon
Islands
+11:00
Athens,
Helsinki,
Cairo,
Ankara
Moskva,
Riyadh
+03:00
Wellington,
Fiji
+12:00
Teheran
+03:30
Samoa,
Midway
-11:00
AbuDhabi,
Muscat
+04:00
Honolulu,
Hawaii,
Tahiti
-10:00
Kabul
+04:30
Alaska
-09:00
Tashkent,
Karachi
+05:00 LA,SanFrancisco,
Vancouver,
Seattle -08:00
Calcutta,
NewDelhi
+05:30
Denver,
Phoenix,
SaltLake
City
-07:00
Almaty,
Kathmandu
+05:45 Chicago,
Dallas,
Houston,
Mexico
City
-06:00
+06:00 New
York,
Miami,
Washington
D.C.,
Montreal,-05:00
Dacca
Atlanta
Yangon
+06:30
Caracas,
Santiago
-04:00
+07:00
Buenos
Aires,
Brasilia,
SaoPaulo
-03:00
Bangkok
Hong
Kong,
Beijing,
Taipei,
Singapore,+08:00
Fernando
deNoronha
-02:00
Manila
Seoul,
Tokyo,
Pyongyang +09:00
Azores,
Cape
Verde
-01:00
Thetimes
arebased
onGreenwich
Mean
Time
(GMT).
E_gl
sh89
ettina
_
I
Date/Time Set
Set the current date and time so they can be recorded correctly. _page 35
Date Type
You can select the desired date type.
2009101/01
JAN/01/2009
01/JAN/2009
01/01/2009
Displays the date in the order of year, month (two-digit) and day.
2009/01/01
Displays the date in the order of month, day and year.
JAN/01/2009
Displays the date in the order of day, month and year.
01/JAN/2009
Displays the date in the order of day, month (two-digit) and year.
This function depends on the "Date/Time
Display"
01/01/2009
setting.
Time Type
You can select the time format to display.
12:00 AM
00:00
This function depends on the "Date/Time
90 Englsh
Display"
setting.
Date/Time
Display
You
cansetthedate
and
time
todisplay
ontheLCD
screen.
, Before
youuse
the"Date/Time
Display"
function,
youmust
setthedate
and
time.
-,page
35
',
,
date/time
will read "JAN/01/2009
12:00 weak
AM" or
in the
following conditions:
-The
The
built in rechargeabb
battery becomes
dead.
This function depends on the "Date Type" and "Time Type" setting.
LCD Brightness
,
You can adjust the brightness
conditions.
of the LCD screen to compensate
,
_button (_11)will
Pressing
the Control
darken button
the screen.
(,) will brighten the screen whereas
,
A brighter LCD screen setting consumes more battery power.
for ambient
lighting
pressing
the Control
"
thelf
yOUmonitoradjustindoers.the
LCD brightness when the ambient lighting is too bright, it is hard to see
,
,
LCD Brightness does no1 affect the brightness of images to be stored.
You carl adjust the LCD Brightness from -15 to 15.
_
i!!
LCD Color
,
,
,
You can change the color impression of the screen with a variety of color options by
adjusting the red and blue color range.
When you set red and blue color range, the higher the figures, the brighter the LCD
_
screen will be.
You can adjust the LCD color (red/blue) from -15 to 15. using the Control
(A/T
/ 4 / I_ / OK).
_
_
_
,
,
button
_
_x_)B_ss!q
_
You can manipulate the color displayed on the LCD screen by adjusting the color ratio
of red and blue.
Adjusting the color display of LCD screen does not affect the irrlage to be recorded.
Higher the value will produce brighter LCD screen when adjusting color range of red and blue.
[]_®
[]_m
_
li
::
E'_gl sh
I_:
91
_
i
LCD Enhancer
Contrast
is enhanced
for a clear and bright
"Off"
Disables the function
"On"
LCD Enhancer is executed.
,
,
,
image.
This effect
is also implemented
outdoors
in bright
daylight.
None
[]
LCD Enhancer function does not affect the quality of the image being recorded.
When the LCD Enhancer works at low illumination, some stripes may occur on the LCD screen. This is not a malfunction.
Using the LCD Enhancer function may cause colour look different on the display.
Auto LCD Off
To reduce power consumption,
more than 2 minutes.
',Off',
,, ,,
On
the brightness
of the LCD screen
is automatically
dimmed
if the camcorder
is idle for
Disables the function
I When the camcorder is idle for more than 2 minutes in Video or Photo STBY mode or for more than 5 I
......
'
I minutes when recordJn A a video, the power saving mode starts by dJmmln¢l the LCD screen.
I
When this "Auto LOD Off" function
brightness to normal.
is enabled,
you can press any button
on the camcorder
to return
None
None
LCD
Menu Design
You can select the desired menu design.
• "Misty White"' --* "Premium Black"
Transparency
You can select the desired transparency to display the menu.
• "0%" --* "20% " --* "40%" --* "60%"
The
setting
value
is applied to the menu screen of
Record
mode
only.
92 Englsh
<Transparency
0%>
<Transparency
60%>
Beep Sound
Youcan set the beepsoundto on/off. Ifthereis a beep soundwhen operatingthe menusettings,the settingis turnedon.
""Off!!
Disables the function
None
"On"
When on, a beep will sound every time a button is pressed.
None
The
Beeprecording,
sound function
- During
playing is canceled in the following cases:
- When the camcorder has a cable connection. (AV cable)
Shutter Sound (SMX-013/O14
only)
You can turn the shutter sound on or off.
None
None
Auto
Power
Off
To save battery power, you can set the "'Auto Power Off"" function which turns off the camcorder if there is no
operation for a certain period of time.
None
None
o
Auto Power Off will be disabled
in the following
cases:
- If the DC power cable (AC power adaptor, USB cable) is connected
- While the "Demo"
menu is running
- During recording, playing (Pause excluded), or a slideshow
Press the Power ('_) button to restart the camcorder.
E/gl sh 93
_
I
PC Software
If you set PC Software to on, you can simply use the PC software by connecting the USB cable between the
camcorder and your PC. You can download the stored video and photo images stored on the camcorder to your PC'
s hard disk. Editing video/photo files is also available using the PC software.
,,Off,
On'
o
Disables the function
You can simply use the PC software by connecting the USB cable between the
camcorder and your PC.
None
None
The
PC Software
compatible
with with
the Windows
OS only.
The photo
functionis is
available only
SMX-C13/C14
models
"IV Display
You can select the output path of the OSD (OnScreen Display).
None
None
Default
Set
You can initialise your camcorder settings to the factory defaults (initial settings at the factory).
Initialising the camcorder settings to factory defaults does not affect recorded images.
After resetting the camcorder, set "Time Zone"' and "Date/Time
94 Englsh
Set.'" i.page
35
Version
Theversion
information
maybechanged
without
notice
forimprovement,
Language
Youcanselect
adesired
language
todisplay
themenu
andmessages,
u,page
37
Demo
Demonstration
automatically
shows
youthemajor
features
thatareincluded
withyour
camcorder
sothatyoumay
use
them
more
easily.
None
None
Using
theDemo
function
, TheDemo
mode
iscanceled
inthefollowing
cases:
Ifanybutton
isoperated
(Recording
start/stop,
PHOTO
(Q),EASY
Q,etc.)
However,
thecamcorder
willenter
theDemo
mode
automatically
after
5minutes
inSTBY
mode
ifitisidlefor5
minutes
without
operation.
Ifyoudon'twant
theDemo
function
tostart,
set"Demo"
to"Off".
The
Derno
function
doesnotoperate in the following
- If "Auto Power Off" is set to "5 Min"(uses the battery
cases:
as main power), the Auto Power Off function will turn
the camcorder off before Demo can run.
E_gl sh 95
CHECKING YOUR COMPUTER TYPE
This chapter
explains
how to connect
Check your computer
type before
the camcorder
to a computer
using the USB cable.
using!!!
To view your recordings on a computer, you need to check your computer type first. Then, take the steps below
according to your computer type.
Using
Using with Macintosh
with Windows
Connect your camcerder to the computer using
the USB cable.
The built-in editing software Intelli-studie, runs
on the PC automatically once the camcorder
is connected to a Windows computer.
(When
you specify "PC Software:
On"). -, page 94
The built-in software on your
camcorder,
'lntelli-studie',
is
net Macintosh compliant.
Play back or edit your recordings on the
computer using the built-in, Intelli-studio
application.
-, page 98
You can also upload your recordings
or other web sites using Intellistudio.
to YeuTube
-, page 101
]
96 Englsh
WHAT YOU CAN DO WITH A WINDOWS COMPUTER
You can enjoy the following operations by connecting your camcorder to your Windows computer by using a USB cable.
Main Functions
•
By using the built-in editing software, 'lntelli-studio' on your camcorder, you can enjoy the following operations:
Playing back recorded videos or photos. _-,page 100
Editing recorded videos or photos. _*page 100
Uploading the recorded videos and photos to YouTube or Flickr, etc. _-page 101
You can transfer or copy the files (videos and photos) saved on the storage media to your computer.
(Mass storage function) _page 105
The photo function is available only with SMX-C13/C14
models.
System Requirements
The following requirements must be met for using the built-in editing software (Intelli-studio):
OS (Operating
System)
RAM
Video Card
Display
USB
Direct X
o
o
o
Microsoft Windows XP, Vista
Intel® Pentium®4 3.0 GHz or higher
AMD Athlon FXTM 3.0 GHz or higher
512 MB (1 GB or higher recommended)
nVIDIA Geforce 7600GT or higher
Ati X1600 series or higher
1024 x 768, 16-bit color or higher
(1280 x 1024, 32-bit color recommended)
USB 2.0 support
DirectX 9.0 or higher
System requirements mentioned above are recommendations. Even on a system that meets the
requirements, operations may not be ensured depending on the system.
On a slower computer than recommended, video playback may skip frames or operate unexpectedly.
When the version of DirectX on your computer is lower than 9.0, install the program in version 9.0 or higher.
E_gl sh 97
USING THE INTELM-STUDIO
PROGRAM
Using the built-in Intelli-studio program in your camcorder, you can transfer video/photo
files onto your PC and edit them
on your computer. The Intelli-studio offers the most convenient way for you to manage video/photo files by using the simple
USB cable connection between the camcorder and your PC.
Starting the Intelli-studio program
Step 1. Connecting
the USB cable
1. Set the menu setting to "PC Software:
On". _page
94
• You will find the default menu settings are set as shown at right.
2. Connect the camcorder and the PC with the USB cable.
A new file saving screen appears with the Intelli-studio main window.
According to your computer type, the corresponding
removable disk window
3. Click "Yes", the uploading procedure will start. Click "Yes" to confirm.
If you do not want to save a new file, select "No."
Disconnecting
After completing
the USB cabte
the data transfer,
make sure to disconnect
the cable in the following
appears.
way:
1. Click on the "Safely Remove Hardware icon" icon on the taskbar.
2. Select "USB Mass Storage Device", and then click "Stop".
3. If the "Stop a Hardware device" window appears, click "OK."
4. Disconnect the USB cable from the camcorder and PC.
[]
98
,,
,
,
,
,
Use
provided
USB force
cable. when
(Supplied
by Samsung)
Don't the
apply
excessive
inserting
or extracting the USB cable into/from a USB jack.
Insert the USB after checking the correct direction of its insertion.
We recommend
using the AC power adaptor as power supply instead of the battery pack.
When the USB cable is connected, turning the camcorder on or off may cause the PC to malfunction.
If you disconnect the USB cable from the PC or the camcorder while transferring data, the data transfer will stop
and the data may be damaged.
,
If you connect the USB cable to a PC via a USB HUB or simultaneously
connect the USB cable along with other
USB devices, the camcorder may not work properly. If this occurs, remove all USB devices from the PC and
reconnect the camcorder.
,
According to your computer type, the Intelli-studio program may not run automatically.
In this case, open the
desired CD-ROM drive that has the Intelli-studio program in My Computer and run iStudio,exe.
,
When a USB cable is connected, if you have EmoDio (Samsung's
MP3 player software) installed on your computer,
the EmoDio software may load first.
Englsh
Step 2. About the Intelli-studio
main window
• When the Intelli-studio starts up, thumbnails of videos and photos are displayed in the main window.
1. Menu items
2. Selects the Desktop or Favorite on the PC.
3, Slide show of the photo files from the PC.
Playback of the video files from the PC.
4, Switches to Library of the PC and connected
5. Switches to Edit mode.
6, Switches to Share mode.
camcorder.
7, Changes the size of thumbnails,
Displays all files (videos and phetes)/Displays video files
only,
Displays photo files only.
Sorts the files.
8, Imports folders from PC.
9, Selects the connected
camcorder or storage.
10. Saves new files to PC,
1 t, Slide show of the photo files from the connected
camcorder.
Playback of the video files from the connected
camcorder.
12, Saves the selected file to PC.
Saves the selected file to connected camcorder.
13, Moves the file selected in the PC to the Edit mode,
Moves the file(s) selected in the PC to the Share mode.
14, Moves the file(s) selected in the connected camcorder
to the Share mode.
E_gl sh 99
Step 3. Playing back videos (or photos}
•
You can play back the recordings conveniently using the Intellistudio application.
1. Run the Intelli-studio program. _page 98
2. Click the desired folder to display your recordings.
• Video (or photo) thumbnails appear on the screen, according to
the selected source.
3. Select the video (or photo) that you want to play, and then double-click
to play back.
Playback starts and the playback controls appear.
Step 4. Editing videos
(or photos}
With Intelli-studio, you can edit videos or photos in various ways.
(Movie Effect, Fine-Tuning,Transition Effect, Insert Text etc.)
Select the video (or photo) you want to edit, and then click on the
"EDIT" icon.
100 Englsh
Step 5. Sharing the video/photo
images online
Share your contents with the world by uploading photos and videos
directly to a web site with one click.
1. To do this, select "Share"
in the main Video window.
2. Click "Add" and and move the video or photo (drag and drop) to
the sharing window for upload.
• The selected file appears in the sharing window.
3. Click on the website you would like to upload files to.
• You can choose "YouTube," "Flickr," or the specified website
you want to set for your uploading management.
4. Click "Upload to Share Site" to start uploading.
A pop-up window appears asking for your ID and the
password.
5. Enter your ID and password to access.
• Access to the web site contents can be limited depending on
your web access environment.
For more information about the Intelli-studio use, see the Help
Guide by clicking the "Menu" -_ "Help".
You can simply upload share marked videos onto YouTube
by pressing the Share (1_) button.
E_glsh
101
Set the Share mark or= the desired videos
Youfube
site. Press the Control
(_,/V/4
which you want to upload
/ _} button and the Share
directly onto the
([]} button to
seloct
adesired
video
inthevideo
thumbna,
inde×
view.
"
"
iiiiiiiiiiiiiiiiiiiiiiiiiiiiiiiiiii_
The Share mark ([_])is displayed on the selected videos.
YOU can also set the Share mark on selected videos using the menu.
Connect
"
the camcorder
and a PC with the supplied
USB cable.
The Intelli-studio runs automatically once the camcorder
computer (when you specify "PC Software:
On").
-,page
_page
is connected
81
98
to a Windows
iiiiiiiiiiiiiiiiiiiiiiiiiiiiiiiiiii_
.....
Press the Share ([]} button while your camcorder
is connected
to a
computer
using the supplied
USB cable.
,
Selected videos with the Share marks are displayed on the Sharing screen.
,
Click the "Yes" on the PC screen to begin uploading your videos to VouTube.
,
If you want to upload directly without showing a pop-up sharing window, check
"lntelli-studio
does not pop a list of share marked files in the connected device."
•
,
,
Your YouTube account must be activated to use the upload feature.
When uploading to the YouTube, the selected movie will be converted into a format playable by YouTube before uploading.
Time spent for uploading may vary depending on the user's conditions including corr_puter and network performance.
There is no guarantee of uploading operation in all environments, and YouTube server-side changes in the future may
disable this function.
For more information on VouTube, visit the YouTube website: http:/Iwww,youtube.com/
This product's YouTube uploading functionality is provided under ttae license from YouTube LLC. The presence of YouTube
uploading functionality of this product is not an endorsement or recommendation of the product by YouTube LLC.
If you do not have a YouTube account, you must register Iirst before proceeding with the authorization.
According to YouTube'e policy, direct movie uploading may not be available in your nation / region.
h
Other functions with the Intelli-Studio
importing
and viewing
the video/photo
images from your PC
1. Launch the Intelli-studio program by doubleclicking the program icon on the desktop screen
or connect the camcorder to your PC.
2. Click 'Import Folder" to import the video or
photo files from your PC.
3. The selected video or photo files are imported
from your PC, and you can see the files'
location on the Intelli-studio browser.
4. You can double-click on the file you would like
to start playback.
Folders directory on your
PC
Imported
Files
"Import
button.
Folder"
The following
is the file format supportable
in Intelli-studio:
- Video formats: MP4 (Video: H.264, Audio: AAC), WMV (WMV 7/8/9)
- Photo formats: JPG, GIF, BMP, PNG, TIFF
Exporting
1.
2.
3.
4.
the videos/photos
to your camcorder.
Select the desired files to export.
Click on the _) icon to export the files to your camcorder.
The following pop-up window appears.
Click on the "OK" to export files. The files are saved to your camcorder.
WARNING
•
While transferring any file, do not disconnect the USB cable.
It may cause damage to the camcorder or computer.
When storing a video through ]nteHi--studio, it is automatically stored into an MP4
file that can be played back. Howew_r, the only video file format supportable in
Intellkstudio can be converted and stored in the camcorder.
According to the resolution and type of the video, the storing time may diff,;r.
Photos cannot be stored on the camcorder through Intelli-studio.
Storing a vide() into the camcorder by using the ]nteHkstudio may not spontaneous
in playback or may produce deteriorated quality, depending on original's format.
E_glsh
103
InstaJling IntelJi=studio appJJcatJon on a Windows
computer
= When the Intelli-studio application is installed on a Windows computer, it will run faster after connecting the
camcorder to your computer. Moreover, the application can be updated automatically and run directly on the
Windows computer.
• The Intelli-studio application can be installed on a Windows computer as follows:
Click on "Menu" -_ "install IntellJ-studJo on PC." in the Intelli-studio screen.
104 Englsh
TRANSFERRING VIDEOS/PHOTOS
FROM THE CAMCORDER
TO YOUR COMPUTER
You can transfer or copy recorded data to a Windows computer by connecting the USB cable to the camcorder.
Step 1. Viewing the contents
1. Check the "PC Software:
of storage
media (built-in
memory
or memory
card}
Off" setting. _ page 94
2. Check the storage media.
(If you have video or photos recorded on a memory card, insert the memory
card.) (SMX-C13/C14 only)
3o Connect the camcorder to the PC with the USB cable. _page 98
• The "Removable Disk" or "Samsung" window appears on the PC's screen
after a moment.
• The removable disk appears when connecting a USB.
Select "Open folders to view files using Windows Explorer" and click "OK."
4. The folders in the storage media appear.
• Different file types are stored in different folders.
If the "Removable Disk" window does not appear, confirm the
connection (_*page 98) or repeat steps 1 and 3 again.
When the removable disk does not appear automatically, open the
removable disk folder of My Computer.
If the connected camcorder's disk drive does not open or the
context menu that appears when right-clicking your mouse (open
or browse) appears broken, your computer may be infected by an
Autorun virus. Be sure to update your antivirus software to the latest
version.
Photos
Videos
E_glsh
105
Structure
.
.
of folders and flies on the storage media
The folder and file structure for built-in memory or memory card is as follows.
Don't arbitrarily
change or remove the folder or file name. It may not be playable.
Image
format
Movie Images
, Movie images are compressed in H.264 format. The file extension is ".MP4."
- Refer to page 58 for video resolution.
Photo Images
, Photo images are compressed in JPEG (Joint Photographic Experts Group) format. The file extension is ".JPG."
- Refer to page 59 for photo resolution.
®
•
•
•
•
When the 9,999th file is creaIed in the 999th folder (i.e. SDV 9999.MP4 is created in the 999 VIDEO folder), no more folders
can be created. Backup your files to a PC and format the storage media, and then reset the file numbering from the menu,
We don't recommend you modify the name of a fi le/folder stored in the storage media using a PC.
If you modify it, this camcorder may not recognise the modifi ed files.
You can use your camcorder as a storage device.
The photo function is available only with SMX-C13/C14 models.
106 Englsh
onn tina to other
You can view the recorded movie and photo images on a large screen by connecting the camcorder to a TV.
CONNECTING TO A TV
,
,
To playback your recordings, the television must be NTSC compatible. _page 113
We recommend that you use the AC power adaptor as power source for the camcorder.
Use the provided Audio/Video cable to connect
the camcorder to a TV as follows:
1. Connect the end of the Audio/Video cable
with the single plug to the Audio/Video cable
jack of the camcorder.
2. Connect the other end with video (yellow) and
left (white)/right (red) audio cables to the TV.
o
For more information about the connection, refer to your TV's
user manual.
Before connecting, make sure that the volume on the TV is
turned down: forgetting this may cause feedback from the TV
speakers.
Carefully connect the input and output cables to the
corresponding connections on the device the camcorder is
being used with.
Stereo
Type
White
Monaural
Type
1
E_glsh
107
onne ina to other d vbe
<_J
VIEWING ON A TV SCREEN
1. Turn on the 71/and set the input selector to the Input connection the camcorder is connected to.
, This is often referred to as "line." Refer to the TV
2,
instruction manual for how to switch the TV input.
Turn the camcorder on.
,
Press the Mode ('G) button to select the Play mode.
u, page 49
The camorder image will appear on the TV screen.
You can also monitor the image on the LCD screen
of the camcorder.
,
,
3.
Perform playback.
, You can perform playback, recording or setting the
menu while viewing on a TV screen.
o
o
When "TV Display" is set to "Off ", OSD (On-Screen-Di play) d66s n6t A##6AF6fi:_Jl__ _6¢6_i _A_
gf! ...................
Feedback may occur when the camcorder is too close to the other devices or the volume is high.
Keep the camcorder a reasonable distance away from the other connected devices.
When the Audio/Video cable is connected to the camcorder, the built-in speaker will automatically turn off and you
cannot adjust the volume bar.
Image display
depending
on LCD and TV screen ratio
_ Refer to page 59 for the "16;9 Wide" setting.
, The photo function is available only with SMX-C13/C14
108 Englsh
models.
J _ Icon
@ Subject J
RECORDING (DUBBING) IMAGES ON A VCR OR DVD/HDD RECORDER
You can record (dub) images played back on this camcorder onto other video devices, such as VCRs or DVD/HDD
recorders. Use the Audio/Video cable (provided) to connect the camcorder to another video device as shown in the
following figure:
1. Press the Mode (Q) button to select the Play
mode. _page 49
VCRs or DVDi
HDD recorders
Camcorder
2. Choose the recorded (dubbed) images on the
thumbnail view and then press the OK button.
3.
Press the record button on the connected
device.
,
Red
Yellow
The camcorder will start playback and the
recording device will record (dub) it.
White
Signalflow
AV cable
Be sure to use the AC adaptor to power the camcorder from a household AC outlet to prevent battery
power from shutting off during recording on another video device.
To prevent recording OSD (information) to be displayed along with the AV signal, set the "TV Display" to
"Off" in Menu Settings. u, page 94
E_glsh
109
MAINTENANCE
Your camcorder is a product of superior design and craftsmanship and should be treated with care.
The suggestions below will help you fulfil any warranty obligations and allow you to enjoy this product for many years.
O For safekeeping of the camcorder, be sure to turn it off.
Remove the battery pack and AC power adaptor, u, page 16
Remove the memory card. u, page 39
Cautions on Storing
,
Do not leave the camcorder
in a place where the temperature
is very high for a long period
of time:
The temperature inside a closed vehicle or trunk can become very high in a hot season. If you leave the camcorder
in such a place, it could malfunction or the case could be damaged. Do not expose the camcorder to direct
sunlight or place it near a heater.
,
Do not store the camcorder in a place where the humidity or dust level is high:
Dust entering the camcorder could cause a malfunction. If humidity is high, the lens could become moldy, and
the camcorder could become inoperative. It is recommended that you put the camcorder in a box together with a
desiccant packet to help protect it from humidity when storing it in a closet, etc.
,
Do not store the camcorder in a place subject to strong
This could cause malfunctions.
,
Detach the battery pack from the camcorder and store it in a cool place:
Leaving the battery pack attached or storing it at high temperature could shorten its life.
magnetism
or intense vibrations:
Cleaning the camcorder
O Before cleaning, turn off the camcorder
, To clean the exterior
,
and remove the battery
pack and AC power adaptor.
Wipe gently with a soft dry cloth. Do not apply excessive force when cleaning, gently rub the surface.
Do not use benzene or thinner to clean the camcorder. The coating of exterior could peel off or the case could
deteriorate.
To clean the LCD monitor
Wipe gently with a soft dry cloth. Be careful not to damage the monitor.
110 Englsh
To clean the lens
Use an optional air blower to blow out dirt and other small objects. Do not wipe the lens with cloth or your fingers.
If necessary, wipe gently with lens cleaning paper.
Mold may form if the lens is left dirty.
If the lens looks dimmer, turn off the camcorder and leave it for about 1 hour.
ADDITIONAL INFORMATION
Storage media
.
Be sure to follow the guidelines below to prevent corruption or damage of your recorded data.
Do not bend or drop the storage media, or subject it to strong pressure, jolts or vibrations.
Do not splash the storage media with water.
Do not use, replace, or store the storage media in locations that are exposed to strong static electricity or
electrical noise.
Do not turn off the camcorder power or remove the battery or AC power adaptor during recording, playback,
or when otherwise accessing the storage media.
Do not bring the storage media near objects that have a strong magnetic field or that emit strong
electromagnetic waves.
Do not store the storage media in locations with high temperature or high humidity.
Do not touch the metal parts.
,
Copy the recorded files to your PC. Samsung shall not be responsible for any lost data.
(it is recommended
that you copy the data from your PC to other media for storage.)
A malfunction
may cause the storage media to fail to operate properly. Samsung wiU not provide any
compensation
for any lost contents.
Refer to pages 38-44 for details.
,
,
LCD screen
,
,
,
To prevent damage to the LCD screen
Do not push it too hard or knock it on anything.
Do not place the camcorder with LCD screen facing down.
To prolong service life, avoid rubbing it with a coarse cloth.
Be aware of the following phenomena for LCD screen use. They are not malfunctions.
While using the camcorder, the surface around the LCD screen may heat up.
If you leave power on for a long time, the surface around the LCD screen becomes hot.
E_glsh
111
Battery packs
The supplied battery pack is a lithium-ion battery. Before using the supplied battery pack or an optional battery pack,
be sure to read the following cautions:
, To avoid hazards
Do not burn.
Do not short-circuit the terminals. When transporting, carry the battery in a plastic bag.
Do not modify or disassemble.
Do not expose the battery to temperatures exceeding 60°C (140°F), as this may cause the battery to overheat,
explode or catch fire.
,
To prevent damage and prolong service life
Do not subject to unnecessary shock.
Charge in an environment where temperatures are within the tolerances shown below.
This is a chemical reaction - cooler temperatures impede chemical reaction, while warmer temperatures can
prevent complete charging.
Store in a cool, dry place. Extended exposure to high temperatures will increase natural discharge and shorten
service life.
Fully charge the battery pack at least every 6 months when storing the battery pack over a long period of time.
Remove from your camcorder when not in use, as these components may use current even when switched off.
,
,
,
,
It is recommended that only genuine Samsung batteries be used in this camcorder.
Using generic non-Samsung batteries can cause damage to the internal charging circuitry.
It is normal for the battery pack to be warm after charging, or after use.
Temperature
range specifications
Charging: 50"F to 95°F (10_'Cto 35°0)
Operation: 32_'F to 104_'F (0°C to 40°C)
Storage: -4_'F to 140"F (-20"C to 60_'C)
The lower the temperature, the longer recharging takes.
Refer to pages 16=22 for details.
112 Englsh
USING YOUR CAMCORDER ABROAD
,
,
Each country or region has its own electric and color systems.
Before using your camcorder abroad, check the following items.
Power sources
The provided AC adaptor enables you to use your camcorder in any country/region within the AC 100 V to 240 V,
50/60 Hz range. Use a commercially available AC plug adaptor, if necessary, depending on the design of the wall
outlet.
On TV color systems
Your camcorder is an NTSO-system-based camcorder. If you want to view your recordings on a TV or to copy it to an
external device, it must be an NTSC-system-based TV or an external device having the appropriate Audio/Video jacks.
Otherwise, you may need to use a separate video format transcoder (NTSC-PAL format converter).
The format transcoder
is not provided
by SAMSUNG.
E_glsh
113
tFoLAbeshootng
TROUBLESHOOTING
0
Before contacting a Samsung authorised service center, perform the following
They may save you the time and expense of an unnecessary call.
Warning
simple checks.
indicators and messages
Power source
I
Low Battery
,
Change to a charged one or use the AC power
adaptor. Charge the battery pack.
,
Delete unnecessary files on the
built in memory. Use a memory card.
Back-up files to your PC or another storage
media and delete files.
The battery pack is almost discharged,
Storage media
I
Memory
Full
_
(SMX
C_S!C_4I LID
only)
There is not enough space to record on the
built-in memory.
,
i
There is no memory card inserted in the
card slot.
,
Insert a memory card.
•
There is not enough space to record on the
memory card.
!/
iiii _i i i!_!_/!_!_
114 Englsh
,ii_ _ _ _ii i
Delete unnecessary files on the memory card.
Use the buik-in memory. (SMX--C13/C14 only)
• Back-up files to your PC or another storage
media and delete files.
Change to another memory card which has
enough free space.
Card
Locked
NotSuPported
C_d
Please [ormat
The write protection tab on an SDHC
card has been set to lock.
Release the write protection tab.
The memory card is not supported
camcorder.
Change to a memory card that we
recommended.
in this
The memory card is not formatted.
Format the memory card using the menu.
I
Not formatted.
Format the Card?
(Format the memory?)
The format of the file is not supported
this camcorder.
Low speed card.
Please record a lower
resolution.
'
The file format is not supported.
Check the supported file.
Format the memory card using menu item.
by
Record movie at a lower resolution.
Change the memory card to a faster one.
page 40
The memory card does not have
enough speed to record.
Recording
I
,
Write Error
Some problems occured while wdting
z
data to storage media,
_
You cannot operate some functions
manually when EASY Q is activated.
_ Format storage media using menus after
backing-up important files to your PC or
another storage media.
I
Release the EASY Q
,
Release EASY Q function.
E_glsh
115
tro Ab , hoot
Playback
iiiiiii_iiilili!i_!_i!i_iiii!_!_!_ii!iiii!i_!!i!_i_i_i_i_i_i_i_i_i_ii!_!;i_
_!iiiiiii
_!_i!iiiiiiiiiiiiiiiii!_iiiiiii!iiiii_!_i_i_
I
Read Error
The Number of
video files is full.
Cannot copy videos,
_
Some problems occurred during
data from storage media.
i
_
Folder and files have reached their
capaeity and you cannot take a picture,
When there is condensation,
,
What is condensation?
CAUTION
,
Format storage media using menus after
backing up important flies to PC or another
storage deviee.
,
Format the storage media using the menu after
backing up important files to your PC or another
storage deviee. Set "File No." to "Reset."
,
Format storage media using the menu item after
backing up important files to your PC or another
storage deviee. Set "File No." to "Reset."
Folder and flies have reached capacky
and you (san not record,
The Number of
photo files is full,
Cannot copy photos,
(SMX-C13/C14 only)
,
reading
put aside
for a while
before
using
Condensation
occurs when a camcorder is moved to a place where the temperature
differs significantly from the
previous place. In other words, the water vapor in the air turns into dew because of the temperature difference,
and it condensates like dew on the external or internal lenses of the camcorder and on the reflection lens.
When this happens, you temporarily may not use the record or play functions of the camcorder. Also, it may
cause a malfunction or damage to the camcorder when using the device with the power on while there is
condensation.
What can I do?
Turn the power off and detach the battery pack, and leave it in a dry area for 1-2 hours before using it.
When does condensation
occur?
When the device is relocated to a place with a higher temperature
than the previous location, or when using it in
a hot area suddenly.
When recording outdoors in cold weather during the winter and then using it in indoors.
When recording outdoors in hot weather after being indoors or inside a car where the air conditioner was
running.
Note before sending your camcorder
for repair.
,
If these instructions do not solve your problem, contact your nearest Samsung authorised service center.
,
Depending on the problem, the camcorder's
built-in memory (SMX-C13/SMX-C14
only) may need to be initialized
or replaced and the data will be deleted. Be sure to back up the data on the camcorder to other storage media
before sending your camcorder in for repair. Samsung cannot guarantee any loss of your data.
,
116
Engl sh
o
if you encounter any problems using your camcorder, check the following before asking for service repair.
if these instructions do not solve your problem, contact the nearest Samsung authonsed service center.
Symptoms
and solutions
Power
o
The camcorder does not ]:urn on,
The battery pack may not be installed on your camcorder.
Insert a battery pack into the camcorder.
The inserted battery pack may be discharged.
Charge the battery pack or replace it with a charged one.
If you use an AC power adaptor, make sure it is properly connected to the
wall outlet.
Remove the battery pack or unplug the AC power adaptor, and reconnect
the power supply to the camcorder before turning it on.
The Dower automatical y turns
off.
Is "Auto Power Off" set to "5 Min"?
If no button is pressed for about 5 minutes, the camcorder is automatically
turned off ("Auto Power Off"). To disable this option, change the setting of
"Auto Power Off" to "Off" l, page 93
The battery pack is almost discharged. Charge the battery pack or replace it
with a charged one.
Use the AC power adaptor.
Power cannot be turned off
Remove the battery pack or unplug the AC power adaptor, and reconnect
the power supply to the camcorder before turning it on.
The battery
dlscnarc_(],
The temperature is too low.
The battery pack is not fully charged. Recharge the battery pack.
The battery pack reached the end of its lifespan and cannot be recharged.
Use another battery pack.
pacK IS qUiCKly
E_glsh
117
tro Abe ,shootng
Displays
The Recorded Image is
more narrow or fat than
onglnal image.
,
You should check the resolution before you record. _page
,
The camcorder is in Demo mode. If you do not want to see Demo images, change
the setting of "Demo" to "Off." _-page 95
,
A warning indicator or message appears on the screen. _-pages 114-116
The after image remains on
tne LCD screen,
,
This occurs if you disconnect the AC power adaptor or remove the battery pack
before turning the power oft.
The image on the LCD
screen OOKSaarK.
,
,
Ambient light is too bright. Adjust the brightness and angle of the LCD.
Use the LCD Enhancer function.
Unknown mage auuears on
ive LCD screen,
Unknown in(alcator auuears
on tne screen.
118 Englsh
58
Storage Media
Mernory card functions are not
Operable.
Image cannot De oeleled.
,
,
Insert a memory card into your camcorder properly. _page 39
If you use a memory card formatted on a computer, format it again directly
on your camcorder. _page 87
,
You cannot delete the images protected by another device.
Release the protection of the image on the device, w, page 74
Release the lock on the write-protect tab of the memory card
(SDHC memory card, etc.), if any. _page 40
,
o
Release the lock on the write-protect tab of the memory card
(SDHC memory card, etc.), if any. l, page 40
Copy all important recorded files to your PC before formatting.
Samsung shall not be responsible for any loss of data. (It is recommended
that you copy the data to your PC or other storage media.)
You cannot format the memory
caro.
o
The data file name is not indicated
,
,
,
The file may be corrupted.
The file format is not supported by your camcorder.
Only the file name is displayed, if the directory structure does not comply
with the international standard.
,
Check whether you're using a Samsung battery pack. A non-Samsung
battery pack may not be recognised properly by the camcorder.
correctl_
Does not cnarge or operate even if
tne battery pacK IS insen:ed.
E_glsh
119
tFOLAb
e,ShOOt
ng
Recording
•
•
Pressing the Recording start/
stop uutton aoes not start
recorolng.
•
•
There is not enough free space to record on the the storage media.
Make sure the memory card is inserted and write-protect tab is set to
unlock.
The internal temperature of your camcorder is unusually high.
Turn off your camcorder and leave it for a while in a cool place.
Your camcorder is damp and moist inside (condensation).
Turn off your camcorder and leave it for about 1 hour in a cool place.
The estimated recording time may vary depending on contents and features
used.
The actual recorolng time
tnan tne estlmatea
time,
IS less
Recording a fast-moving subject increases the bit rate and consequently
the amount of storage space required for the recording, which can lead to a
shorter available recording time.
•
The recording stops au;omaucaHy.
•
•
When recora r _ a subject
lure nateu Dy ungm Hght. vertical
nes appear.
120 Englsh
There is no more free space for recording on the storage media.
Back up important files on your PC and format the storage media or delete
the unnecessary files.
If you frequently record or delete files, the performance of the built-in flash
memory will deteriorate. In this case, reformat the built-in memory.
If you use a memory card with a low writing speed, the camcorder
automatically stops recording the movie images and the corresponding
message appears on the LCD screen.
The camcorder is unable to record these levels of brightness.
Recording
When the screen ISexposed Io
alrect sun ]nt qunng recoralng,
tne screen turns red or black for an
,
Do not leave the camcorder with the LCD screen exposed to direct sunlight.
Dur'qg recorolng, tne aate/ume
aoes not a_sp_a_.
,
"Date/Time"
The been sound is not neara.
,
,
,
Set the "Beep Sound" to "On."
The beep sound is temporally off while recording movies.
When the Audio/Video cable jack is connected to the camcorder, the beep
sound will automatically turn off.
nstant.
is set to off. Set the "Date/Time"
to on. i, page 35
There is a lime cl fference between
tne oolnt wnere you press
Recording start/stop button and
IRe
DOIDI
where
tne
recoroed
On your camcorder, there may be a slight time delay between the point
when you press Recording start/stop
button and the actual point where
the recorded movie starts/stops. This is not an error.
movl÷
star!:s/stoos.
,
The recora_ng stops.
You cannot recora a pnoto image.
_SMX-C13/C14 onl_j
,
,
,
,
The internal temperature of your camcorder is unusually high. Turn off your
camcorder and leave it for a while in a cool place.
Your camcorder is damp and moist inside (condensation). Turn off your
camcorder and leave it for about 1 hour in a cool place.
Set your camcorder to Record mode. _,page 24
Release the lock on the write-protection tab of the memory card if set.
The storage media is full.
Use a new memory card or format the storage media. _,page 87
Or remove unnecessary images. _,page 73
Elglsh
121
tro Ab , hoot
Adjusting
Focus ooes
automatically.
the image
during
recording
not acljust
The _mage appears too #ngnt or o
flickering, or changes in color.
122 Englsh
Set "Focus" to "Auto." _page 62
The recording conditions are not suitable for auto focus.
Adjust the focus manually. _page 62
The lens is dusty on the surface, Clear the lens and check the focus.
Recording is being made in a dark place. Increase the brightness in the place.
This occurs when recording images under a fluorescent lamp, sodium lamp, or
mercury lamp. Cancel "iSOENE" to minimise these phenomena, u, page 57
Playback on your camcorder
Pressing the pla_ DaCK
(Play!Pause) button
did not start playing.
•
•
•
Press the Mode (_) button to set Movie Play mode.
Image files recorded on another camcorder may not play on your camcorder.
Check out the memory card compatibility,
wpage 40
The Skid or Search tunction
does not WOrK propeny.
•
If the temperature inside the camcorder
is toe high, it cannot function properly.
Turn the camcorder off, wait for a few moments, and turn it on again.
Playback is interrupted
unexpecteaJy.
*
Check if the AC adaptor
•
The Time Lapse REC function
•
Photo images recorded
This is not an error.
or battery pack is properly
connected
and stable.
You cannot near sounu
_vnen play ng a Time Lapse
recording.
Photo _mages stored on
a storage media are not
displayed n _ne ac_ua
size. SMX-013/C14
only)
does not support
on other devices
sound. _*page 68
may not appear at actual size.
Playback on other devices (TV, etc.)
o
You
cannot
view the image
or hear the sound on the
connected
device.
,
Connect the audio line of the Audio/Video
cable jack to your camcorder
and the
connected
device (TV, DVD recorder, etc). (Red color- right, White color- left)
The Audio/Video
cable jack is not connected
properly.
Make sure that the Audio/
Video
The image
distorted
Player.
appears
on TV or PC
cable jack is connected
,
The display
,
A video recorded
in 16:9 wide
supports
16:9 screen mode.
mode
to the proper
of the recorded
video
jack. u, page
does not match
mode should
be played
107, 109
that of playback
back
device.
on a TV or PC that
E/glsh
123
tro Abe,shootng
Connecting
to a computer
Symptom
When using tne movtes.
a COre9u[er does not
recognize your camcorder.
ExplanationlSolUtion
,
Disconnect the USB cable from the computer and camcorder, restart the
computer, then reconnect it correctly.
,
A video codec is needed to play the file recorded on your camcorder. Install or run
the built-in edit software (Intelli-studio).
Make sure you insert the connector in the correct direction, and connect the USB
cable to the USB jack on your camcorder firmly.
Disconnect the cable from the computer and camcorder, restart the computer.
Reconnect it properly.
Your computer may not have the necessary performance specifications to playback a video file. Check the recommended computer specifications.
,
Can sot ota_ a movie file
orooerly on a PC
,
,
Intelli-studio does not
function property.
The mage or sound on your
camcorder ts not prayed on
your computer property.
The p_aybaCKscreen ts
caused or distorted.
124 Englsh
,
,
,
,
Exit the Intelli-studio application, and restart the Windows computer.
Intelli-studio is not Macintosh compliant.
Set "PC Software" to "On" in the Settings menu.
According to your computer type, the Intelli-studio program may not run automatically. In this case, open the desired CD-ROM drive that has the Intelli-studio program
in My Computer and run iStudio.exe.
,
,
Movie playback or sound may stop temporarily depending on your computer.
The movie or sound copied to your computer is not affected.
If your camcorder is connected to a computer that does not support Hi-speed
USB (USB2.0), the images or sound may not be played back correctly.
The images and sound copied to your computer are not affected.
,
Check the system requirements to play a movie. _page 97
,
,
Exit all other applications running on the current computer.
If a recorded movie is played on your camcorder when it is connected to a
computer, the image may not play smoothly, depending on the transfer speed.
Please copy the file to your PC, and then play it back.
Connecting/Dubbing
YOu cannot dub coriectly
using the AudioNide0
with other devices (TV, DVD recorder, etc.)
.
cabe_
General
The Audio/Video cable is not connected properly. Make sure that the Audio/Video
cable is connected to the proper jack, i.e. to the input jack of the device used for
dubbing an image from your camcorder, u, page 107, 109
operations
The date and time are
incorrect.
o
Has the camcorder been left unused for a long period of time?
The backup built-in rechargeable battery may be discharged, u, page 36
Pressing a button will not
turn on or operate the
computer,
o
Remove the battery pack or unplug the AC power adaptor, and reconnect the
power supply to the camcorder before turning it on.
E_glsh
125
tro Ab , hoot ncj
Menu
i
ii i!ii i
ii
,
,
,
i
,
You cannot select grayed items in the current recording/playback
mode.
Most of the menu items cannot be selected when you set the EASY Q function.
If there is no storage media inserted, it cannot be selected and will be dimmed
on the menu : "Storage",
"Storage
Info", "Format",
etc.
There are some functions you cannot activate simultaneously.
The following list shows examples
of unworkable combinations
of functions and menu items.
If you want to set the desired functions,
i
de not set the following
items first.
iiiiii
iI
_
iii_
Menu iterns are
grayed out:
:iJ
_i_iiiiiiiiiiiiil
i_:_i____i_
i¸_
__ __!i_
_¸¸
_i_
¸_ii
____ _ !ii_i!
!ii_i_i_i
i___________ii_i
iii_
i_i_i_
!_i
iiiiiillii_il
!_
i ::::::
::::::::
:::::
!_ __
_: :iiil i!i__i___i
__ ! ii¸_____,_:
_i_
_i:',_;_ _i:ii:! _: __i
ii¸::iiii!_i
_i iili iii ili!_
!_
_ii
_,ii_,!
!i_,'i
_!!
_i!l!
?!_!_i!
!_!!
!?i_!
!i_!
i_._i
ii_!
_!_._iii
_!_i_._!'_'_i
_!i_i
_:i!l,
_iiii_,_'_ii,,
,_,_,_,_,,!!!
i_,_,iiii_!_i
!_
_,!i
_!i
_!'_'_i
!_i_'!
i!i
!!!!!
!!!
!!!!!
!_!
_'iiii!ii_!
!_!_i
i!!!_i!
!!_i!!
!_i!
!!_ili:i ii_i_ii_ii_ii_ii_ii_ii_ii_ii_ii_ii_ii_i_i_i_ii!!i
_ii_!_
_i%_i_!_
i_i_i_ii_i!!i_,_id'_!_iiiiiR_i_li_!_i,!ii_i_!_
i_Fii__i_Wi_b:
!,i
!i_i__lil_%i_i_
!_i_!i
i_i_i_!i
!i!i_ii_i_
i_i
i'ii_i_i_i_
i_i_iiiiiiiii!iiii
iiiii
:::: :i:i:il
ii!i_i:i:!:i:iiiii
i iiiii!!!iii_!_:_i_:_i
_:ili_i
iiiiiiiiiiiiiiii:iiiiii_!ii_
i!!!!!!!!!::iiiiiii!!
¸
The following list shows examples of some functions you cannot activate when the camcorder
is in a specific mode. If you want to set the desired function, change the mode first.
ii
126 Englsh
,spec f
on,s
ModeJName: SMX-C10RN/SMX-C10LN/SMX-C10GN/SMX-C13RN/SMX-C13LN/SMX-C13GN/
SMX-C14RN/SMX-C14LN/SMX-C14GN
ii_!!!!!
!!!!!!!ilii
ii:i_iii!iill
iiiiiiii!_i
i_!i_
ii_
ii_ii_ii
_iii_i_
i_
i_ii_i!
!ii!_!
i_ii_
i!i_ii_
i!_!
!i_
i!ii_
l_i!
ii!i_ii_ii_iii
i_i:
iiiiiiiii!i!!_!_!
!_!_!i_
!_!
ililil
i!ii_i
:!ii_ii_ii_i!i!
iliii_ii
li_
_i!
iil!i
_i_
i_ii_
ii_
i_iiii
ii_ilii
_iili
!iii!i
!i_ii_ii_
ii_
i_i!i!
ii_
iiii_iill
if!
i!i
!i_i_
i_ii_ii_
i_i
!i!iiiill
_ii_i
!_!
i_i!_i_iii_
!ii_
_ili
ii_
iil
ilil
_i_
!i_
iiili
iii_ii_i
i_ii_ii_!ii
iill
iiiiiiil
iiiiiiii
iiiii
iii
i_ii!ii!
i_i_i_
_iiiii
ii_
ili
!ii_
ili
!i_
!i_i_ii_
i!_!
iiiili
!i_
iili
iii_i!i
i!i
_i!_
!i_!i_!
iii
iiiiii
liiiil
i_ii
_!i_ii!i
i!i
!!i!_
i_!i_
!i_
iili
ilil
ili_i!!!
i!i
_i_ii
i_i_!i_
i!i!i
iiil
iiil
ilii
!!!
i!i_i_i_
!i_!_i!
i_!i
_!i
iliiil
iii!!!
i!i_i
_!_
!!_
!!_!_
i!ii!ii
iiii
ilil
ili
!i!!!
i!i_i_!i!!i!!i!
i!i,ii
i_i_i_i i_ii
!ii!
ii!iii
ii!i
_i_
!!_
!!i!i_!i_!i!
ii!ill
ii!i
i:!i
i!:!i_!!
i!_i!ii
_i_!;!:!
ii_iiil
iil
ii!!i!ilill
iiiiiii_i!i
i!il
i_i_iiii
iii
i!i!
ili!i_ii!ii!ii!
i_ii
!ii!
i_iiiii
ili!i
!ii
!!i!i!i
i!ii!ii!
i_!i
!!i!
iii_i
iliili
!i!!
i!iii!i!iiiiiii!i!i
i!ii
i!i_i
ill
ill
il!i!
iii!i!ii!ii!ii!!
i_i_!ii!
i!il
iili_i
!_!i_
!!i!i!!i!!_!!_!!
_!_!!i!
i!i
iilii
ii_!i!!
!!i!i
!!i
S_!i_!
i!iiiil
!!i!
iiil
ili!i
!!!
i!i!i!i_
!ii!ii!!
i_!i
!!i!
iii
iiiil
ili!i!!!
!!i!i
!!_
!!i!!i!!
i_!i!!ii
iiiiiiil
ili
!i!!!
!!i!i!!i!!i!!i!!
i_!i!!ii
iiiiiiil
ili
!i!!!!!i!i!!i!!i!!i!!
i_!i!!ii
iiiiiiil
ili
!i!!!
!!i!i!!i!!i!!i!!
i_!i!!ii
iiiiiiil
ili!i
!!!
!!i!i!!i!!i!!i!!
i_!i!!ii
iiiiiiil
ili
!i!!!
!!i!i!!i!!i!!i!!
i_!i!!ii
iiiiiiil
ili
!i!!!
!!i!i!!i!!i!!i!!
i_!i!!ii
iiiiiiil
ili
!i!!!!!i!i!!i!!i!!i!!
i_!i!!ii
iiiiiiil
ili
!i!!!
!!i!i!!i!!i!!i!!
i_!i
!!i!
i!iiii_i
_i!_!!!
Video siqnal
NTSC
Picture compression format
H.264/AVC Format
Audio compression format
AAC (Advanced Audio Codinq)
TV Super Fine (about 5.0Mbps), TV Fine (about 4.0Mbps), TV Normal (about 3.0Mbps),
Recording resolution
Web Fine/about 4.0Mbps), Web Normal (about 3.0Mbps)
Image device
CCD (Charge Coupled Device) (Max: 680K pixels)
Lens
F1.8 to 2.4, 10x (Optical), 1200x (Digital) Electronic zoom lens
Power source
Power source type
Power consumption
Operating temperature
Operating humidity
Storage temperature
Dimensions (W x H x D)
Weight
Internal MIC
5.0V (Using AC adaptor), 3.7V (Using Lithium Ion battery pack)
Power supply (100V-240V) 50/60Hz, Lithium Ion battery pack
1.8W (LCD on)
32°F- 104°F (0°-40°C)
10% -80%
-4°F - 140°F (-20°C - 60°C)
Cpprox. 1.5" x 2.22" x 4.48" (38.5mm x 56.5mm x 114mm)
Cpprox. 0.341bs (156g) (without battery pack or memory card)
Omni-directional stereo microphone
- These technical specifications and design may be changed without notice.
E_glsh
127
SAMSUNG
LIMITED WARRANTY
SAMSUNG Electronics America Inc. (SEA), warrants that this product is free from defective material and
workmanship.
SEA further warrants that if product fails to operate properly within the specified warranty period and the failure is due
to improper workmanship or defective material, SEA will repair or replace the product at it's option.
All warranty repairs must be performed by a SEA authorized service center. The name and address of the location
nearest you can be obtained by calling toll free: 1-800 SAMSUNG (1-800-726-7864).
Labor
90 days carry-in
Parts
1 year
On carry-in models, transportation
to and from the service center is the customer's
responsibility.
The original dated sales receipt must be retained by the customer and is the only acceptable proof of purchase.
It must be presented to the authorized service center.
EXCLUSIONS (WHAT IS NOT COVERED)
This warranty does not cover damage due to accident, fire, flood and/or other acts of God; misuse, incorrect line
voltage, improper installation, improper or unauthorized repairs, commercial use, or damage that occurs in shipping.
Exterior and interior finish, lamps, and glass are not covered under this warranty.
Customer adjustments which are explained in the instruction manual are not covered under the terms of this
warranty.
This warranty will automatically be voided for any unit found with a missing or altered serial number. This warranty is
valid only on products purchased in the United States and Puerto Rico.
Some States do not allow the exclusions or limitations of incidental or consequential damages, or allow limitations on
how long an implied warranty lasts, so the above limitations or exclusions may not apply to you.
This warranty gives you specific legal rights, and you may also have other rights which vary from State to State.
Ifyouhave
anyquestions
orcomments
relating
to
Samsung
products,
please
contact
theSAMSUNG
customer
care
center
Samsung
Electronics
America,
inc.
1-800-SAMSUNG
(726-7864)
www.samsung.com/us
Rolls compliant
Our product
in electrical
complies
with "The Restriction
©f the use of certain Hazardous
and electronic
equipment",
and we do not use the 6 hazardous
Cadmium(Cd),
Lead (Pb), Mercury
Biphenyls
(PBBs), Poly Brominated
Substances
materials-
(Hg), Hexavalent
Chromium
(Cr +6), Poly Brominated
Diphenyl
Ethers(PBDEs)in our products.