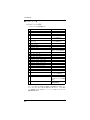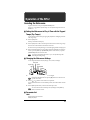
1
取扱説明書
この度は、ローランド RM-2、RP-2 をお買い上げいただき、
まことにありがとうございます。
201a
この機器を正しくお使い いただくために、ご使用前に「安全 上のご
注意」
(P.2 ∼ 3)と「使用上のご注意」
(P.4)をよくお読みくださ
い。また、この機 器の優 れた機能 を十分ご 理解い ただくた めにも、
取扱説明書をよくお読みく ださい。取扱説明書は必要なと きにすぐ
に見ることができるよう、手元に置いてください。
02897701
2*KGS
RP-2 をご使用になる前に、必ずヘッドの張り具合の調整を
行 ってください。ヘッドの張りがゆるんだ状 態でヘッドを
叩くと、 センサーを破損することがあります。
220
※文中記載の会社名及び製品名は、各社の商標または登録商標です。
202
© 2002 ローランド株式会社
本書の一部、もしくは全部を無断で複写・転載することを禁じます。
安全上のご注意
安全上のご注意
火災・感電・傷害を防止するには
警告と
図記号の例
注意の意味について
警告
注意
は、注意(危険、警告を含む)を表わしていま
す。
具体的な注意内容は、 の中に描かれています。
左図の場合は、「一般的な注意、警告、危険」を
表わしています。
取扱いを誤った場合に、使用者が
死亡または重傷を負う可能性が想
定される内容を表わしています。
取扱いを誤った場合に、使用者が
傷害を負う危険が想定される場合
および物的損害のみの発生が想定
される内容を表わしています。
は、禁止(してはいけないこと)を表わしてい
ます。
具体的な禁止内容は、 の中に描かれています。
左図の場合は、「分解禁止」を表わしています。
※物的損害とは、家屋・家財およ
び家畜・ペットにかかわる拡大
損害を表わしています。
● は、強制(必ずすること)を表わしています。
具体的な強制内容は、● の中に描かれています。
左図の場合は、「電源プラグをコンセントから抜
くこと」を表わしています。
以下の指示を必ず守ってください
警告
001
● この機器を使 用する前に、以 下の指示と
取扱説明書をよく読んでください。
......................................................................................................
002c
● この機器および AC アダプターを分解し
たり、改造したりしないでください。
......................................................................................................
003
● 修理/部品の 交換などで、取 扱説明書に
書かれていな いことは、絶対 にしないで
ください。必ずお 買い上げ店 またはロー
ランド・サービスに相談してください。
......................................................................................................
004
● 次のような場所での使用や保存はしない
でください。
○ 温度が極端に高い場所(直射日光の当
たる場所、暖房機器の近く、発熱する
機器の上など)
○ 水気の近く(風呂場、洗面台、濡れた
床など)や湿度の高い場所
○ 雨に濡れる場所
○ ホコリの多い場所
○ 振動の多い場所
......................................................................................................
005
● この機器の設 置には、ローラ ンドが推奨
する専用ス タンド(PDS-2)を使用して
ください。
警告
006
● この機器の設置に PDS-2 を使用する場
合、ぐらついた所や傾いた所に PDS-2 を
設 置しないで ください。安定 した水平な
所 に設置して ください。機器 を単独で設
置 する場合も、同 様に安定し た水平な所
に設置してください。
.....................................................................................................
008b
● AC アダプターは、必ず指定のもの
(BOSS
PSA-100)を、AC100V の電源で使用し
てください。
.....................................................................................................
● 電 源コードを 無理に曲げ たり、電源コー
ド の上に重いも のを載せた りしないでく
だ さい。電源コ ードに傷が つき、ショー
ト や断線の結 果、火災や感電 の恐れがあ
ります。
.....................................................................................................
010
● この機器を単独で、あるいはヘッドホン、
ア ンプ、スピーカ ーと組み合 わせて使用
し た場合、設定に よっては永 久的な難聴
になる程度の音量になります。大音量で、
長 時間使用 しないでく ださい。万一、聴
力 低下や耳鳴 りを感じた ら、直ちに使用
を や めて 専 門の 医師 に 相談 し てく ださ
い。
.....................................................................................................
011
● こ の機器 に、異物(燃えや すいもの、硬
貨、針 金など)や 液体(水、ジュ ースな
ど)を絶対に入れないでください。
009
......................................................................................................
.....................................................................................................
2
注意
警告
012c
● 次のような場 合は、直ちに電 源を切って
AC アダプターをコンセントから外し、お
買い上げ店ま たはローラ ンド・サービス
に修理を依頼してください。
○ AC アダプター本体や電源コードが破
損したとき
○ 異物が内部に入ったり、液体がこぼれ
たりしたとき
○ 機器が(雨などで)濡れたとき
○ 機器に異常や故障が生じたとき
......................................................................................................
013
● お子様のいる ご家庭で使 用する場合、お
子様の取り扱 いやいたずら に注意してく
ださい。必ず大 人のかた が、監視/指導
してあげてください。
......................................................................................................
014
● この機器を落 としたり、この 機器に強い
衝撃を与えないでください。
106
● こ の機器の上 に乗ったり、機 器の上に重
いものを置かないでください。
.....................................................................................................
● 濡れた手で AC アダプターの本体やプラ
グ を持って、機器 本体やコン セントに抜
き差ししないでください。
107d
.....................................................................................................
● この機器を移動するときは、AC アダプ
タ ーをコンセ ントから外 し、外部機器と
の接続を外してください。
108b
.....................................................................................................
● お 手入れをす るときには、電 源を切って
AC アダ プターを コンセント から外して
ください(P.9)。
109b
.....................................................................................................
● 落雷の恐れがあるときは、 早めに AC アダプ
ターをコンセントから外してください。
110b
......................................................................................................
015
● 電源は、タコ足配 線などの無 理な配線を
しないでく ださい。特に、電 源タップを
使用 し てい る 場合、電 源 タ ップ の 容量
(ワット /アンペア)を 超えると 発熱し、
コードの被覆が溶けることがあります。
......................................................................................................
016
● 外国で使用す る場合は、お買 い上げ店ま
たはローラン ド・サービスに 相談してく
ださい。
......................................................................................................
019
● 電池は、充電、加 熱、分解し たり、また
は火や水の中 に入れたりし ないでくださ
い。
.....................................................................................................
● 電池 の使いかたを間違えると、破裂した
り、液漏 れしたりします。次のことに注
意してください(P.9)。
1
○ 電池の + と - を間違えないように、指
示どおり入れてください。
111(選択)
2
3
5
......................................................................................................
注意
101b
● この機器と AC アダプターは、風通しの
よい、正常な通気 が保たれて いる場所に
設置して、使用してください。
......................................................................................................
102d
● AC アダプターを機器本体やコンセントに
抜き差しするときは、必ず AC アダプター
の本体やプラグを持ってください。
......................................................................................................
103b
● 長時間使用しないときは、AC アダプター
をコンセントから外してください。
○ 新しい電池と一度使用した電池や、違
う 種類の 電池を 混ぜて 使用し ないで
ください。
○ 長時間使用しないときは、電池を取り
出しておいてください。
○ 液漏れを起こした場合は、柔らかい布
で 電池ケ ースに ついた 液をよ くふき
と ってか ら新し い電池 を入れ てくだ
さい。また、漏れた液が身体についた
場合は、皮膚に炎症を起こす恐れがあ
ります。また眼に入ると危険ですので
すぐに水でよく洗い流してください。
6
○ 電池を、金属性のボールペン、ネックレ
ス、ヘアピンなどと一緒に携帯したり、
保管したりしないでください。
.....................................................................................................
112
● 使 用済みの電 池は、あなたの 地域のゴミ
分 別収集のし かたに従っ て、捨ててくだ
さい。
.....................................................................................................
● チ ュ ー ニ ン グ・ボ ル ト、ワ ッ シ ャ ー、
チ ューニン グ・キーを外し た場合は、小
さ なお子様が誤 って飲み込 んだりするこ
と のないようお 子様の手の 届かないとこ
ろへ保管してください。
.....................................................................................................
118
......................................................................................................
104
● 接続したコードやケーブル類は、繁雑にな
らな いよ うに 配慮 して くだ さい。特に、
コードやケーブル類は、お子様の手が届か
ないように配慮してください。
......................................................................................................
3
使用上のご注意
291a
2 ページに記載されている「安全上のご注意」以外に、次のことに注意してください。
電源について
その他の注意について
301
553
● 雑音を発生する装置(モ ーター、調光器など)や消
費電力の大きな機器とは、別 のコンセントを使用し
てください。
302
● AC アダプターを長時間使用するとAC アダプター本
体が多少発熱しますが、故障ではありません。
303a
● この機器は消費電流が大きいため、AC アダプターの
使用をお薦めします。電池で 使用する場合はアルカ
リ電池を使用してください。
304a
● 電池のセットや交換は、誤動 作やスピーカーなどの
破損を防ぐため、他の機器と 接続する前にこの機器
の電源を切った状態で行なってください。
306b
● この機器には、電池が付属 されています。この電池
は、機器の動作確認用のた め、寿命が短い場合があ
ります。
307
● 接続するときは、誤動作やス ピーカーなどの破損を
防ぐため、必ずすべての機器 の電源を切ってくださ
い。
設置について
352a
● テレビや ラジオの 近くでこ の機器を 動作させ ると、
テレビ画面に色ムラが出 たり、ラジオから雑音が出
ることがあります。この場 合は、この機器を遠ざけ
て使用してください。
352b
● 携帯電 話な どの 無線機 器を 本機の 近く で使 用する
と、着信時や発信時、通話時に 本機から雑音が出る
ことがあります。この場合 は、それらの機器を本機
から遠ざけるか、もしくは電源を切ってください。
354a
● 直射日光の当たる場所 や、発熱する機器の近く、閉
め切った車内などに放置しないでください。変形、変
色することがあります。
355
● 故障の原因になりますの で、雨や水に濡れる場所で
使用しないでください。
お手入れについて
401a
● 通常のお手入れは、柔らか い布で乾拭きするか、堅
く絞った布で汚れを拭き 取ってください。汚れが激
しいときは、中性洗剤を含ん だ布で汚れを拭き取っ
てから、柔らかい布で乾拭きしてください。
402
● 変色や変形の原因となる ベンジン、シンナーおよび
アルコール類は、使用しないでください。
修理について
451d(和文のみ)
● お客様がこの機器や AC アダプターを分解(取扱説
明書に記載されている指示(P.11 )を除く)、改造
された場合、以後の性能につ いて保証できなくなり
ます。また、修理をお断りする場合もあります。
453
● 当社では、この製品の補修 用性能部品(製品の機能
を維持するために必要な部品)を、製造打切後 6 年
間保有しています。この部品 保有期間を修理可能の
期間とさせていただき ます。なお、保有期間が経過
した後も、故障箇所によって は修理可能の場合があ
りますので、お買い上げ店、ま たは最寄りのローラ
ンド・サービスにご相談ください。
4
● 故 障の原因になりま すので、ボタン、つまみ、入出
力端子などに過度の力を加えないでください。
554
● デ ィスプレイを強く押し たり、叩いたりしないでく
ださい。
556
● ケーブルの抜き差しは、ショートや断線を防ぐため、
プラグを持ってください。
558a
● 音 楽をお楽しみになる場 合、隣近所に迷惑がかから
な いように、特に夜間は、音量 に十分注意してくだ
さ い。ヘッドホンを使用す れば、気がねなくお楽し
みいただけます。
558d
● 本 機は、演奏時の打撃音を小 さくする設計になって
い ますが、床や壁を通じての 振動は意外によく伝わ
りますので、特に夜間やヘッドホン使用時の演奏は、
隣近所に迷惑がかからないように注意しましょう。
559a
● 輸 送や引っ越しをすると きは、この機器が入ってい
た箱と緩衝材、または同等品で梱包してください。
562
● 接 続に は、付属 のケ ーブ ルも しく は当 社ケー ブル
(PCS シリーズな ど)をご使用ください。他社製の
接 続ケーブルをご使用に なる場合は、次の点にご注
意ください。
○ 接続ケーブルには抵抗が入ったものがあります。
本機との接続には、抵抗入りのケーブルを使用
しないでください。パッドの感度が悪くなるた
め、音が極端に小さくなったり、全く聞こえな
くなる場合があります。ケーブルの仕様につき
ましては、ケーブルのメーカーにお問い合わせ
ください。
追加 1
● フ ープのゴム部分は、使って いる年月とともに消耗
する消耗部品です。
消 耗したゴム部分をその まま使用し続けると、誤動
作 したりフープを破損す ることがあります。このよ
うな場合には、フープ・ゴムを交換してください。
なお、フープ・ゴムの交換に関しては、ローランド・
サービスにご相談ください。
追加
2 ッド中央部分の下にある センサーに無理な力をか
●ヘ
け ないでください。打撃を正 しく感知できなくなっ
たり、センサーを破損することがあります。
追加 3
● セ ンサーの素材の性質 上、気温、湿度の変化によっ
て、センサーの感度が変わることがあります。
追加 4
● RP-2 をご使用になる前に、必ずヘッドの張り具合の
調 整を行ってください。ヘッ ドの張りがゆるんだ状
態 でヘッドを叩くと、センサ ーを破損することがあ
ります。
985(ディスプレイか画面のどちらかを使う)
● 本 書では、ディスプレイを使 用して機能説明をして
い ますが、工場出荷時の 設定(音色名など)と本文
中 のディスプレイ上の設 定は一致していません。あ
らかじめご了承ください。
目次
安全上のご注意 ........................................................................................ 2
使用上のご注意 ........................................................................................ 4
目次 .......................................................................................................... 5
はじめに ................................................................................................... 6
主な特長 ............................................................................................................................ 6
このパッケージに入っているもの...............................................................................6
各部の名称と働き..................................................................................... 7
RHYTHM COACH(RM-2).........................................................................................7
V-PRACTICE PAD(RP-2).........................................................................................8
演奏する前に ............................................................................................ 9
RM-2 の操作方法.................................................................................... 13
メトロノームを鳴らす ................................................................................................ 13
たたいたテンポにあわせてメトロノームを鳴らす(タップ・テンポ)....13
メトロノームの設定を変える.............................................................................13
パラメーター一覧 .................................................................................................13
パッドをたたいたときの音色/感度を設定する...................................................15
RP-2 を 2 台接続する ..........................................................................................15
パラメーター一覧 .................................................................................................16
コーチと練習!............................................................................................................. 18
パラメーター一覧 .................................................................................................18
正確にタイミングよくたたくための練習 ........................................................18
持久力と耐久力をつけるための練習 ................................................................20
製品出荷時の設定に戻す(ファクトリー・リセット)........................................22
エラー・メッセージが出たら ....................................................................................22
すすんだ使いかた................................................................................... 23
RP-2 以外のパッドを接続する ................................................................................. 23
パッドを接続する .................................................................................................23
リム・ショット対応のパッドを接続する ........................................................24
トリガー・パラメーターの設定方法 ................................................................26
パラメーター・リスト .........................................................................................27
おもな仕様.............................................................................................. 31
索引 ........................................................................................................ 32
5
はじめに
このたびは、ローランド製品をお買い上げいただき、まことにありがとうございます。
本書は、RHYTHM COACH(RM-2)および V-PRACTICE PAD(RP-2)共通の取扱説明書
です。RHYTHM COACH(RM-2)のみお買い上げいただいた場合は、該当する箇所だけを
お読みください。
主な特長
RHYTHM COACH(RM-2)
• 練習に必須のメトロノームの動きを LED
表示。視覚からも練習をサポートします。
RM-2
• 厳選された表現力豊かなサウンドを搭載。
RP-2
• 楽しく効果的に上達する、インテリジェ
ントなコーチ機能を搭載。(P.18)
• 簡単操作、視認性を考えたデザイン、持
ち運びに便利なコンパクト・ボディです。
• MD や CD の音とあわせて練習できます。
(ミックス・イン)
PDS-2
(別売)
• V-PRACTICE PAD(RP-2)との併用で、
さらに使いかたが広がります。
• 本体からだけでなく、パッドをたたいて
テンポを変えることもできます。(タッ
プ・テンポ)(P.13)
• PD-80R / 120 のリム・センサーにも対応し、リム・ショットが可能です。
(P.24)
• 2 つのトリガー・インプットを使えば、パッド 2 台をつないだ練習や、KD-7 をつないでキッ
クと合わせた練習も行うことができます。(P.23)
• 長時間の電池駆動のほか、AC アダプター(別売)の使用も可能です。
V-PRACTICE PAD(RP-2)
• ローランド V-Drums シリーズでおなじみの網素材のヘッドを使用。打感触に優れ、 打撃音
も静かなため、練習用として最適です。
• ヘッドを好みのテンションに変えられます。
• 高さ/角度を自由に変えられる専用スタンド(PDS-2)を用意しています(別売)
。
立っても座っても使用できるので、長時間の練習に最適です。
このパッケージに入っているもの
□ RHYTHM COACH(RM-2)本体
□ V-PRACTICE PAD( RP-2)本体 *1
■ 取扱説明書(本書)
□ 接続ケーブル *1
0.2m(モノラル)
□
□
□
□
チューニング・キー *1
取り付けネジ(2 本)*2
単三乾電池(4 本)
保証書
*1 RHYTHM COACH( RM-2)のみお買い上げの場合には含まれません。
*2 RHYTHM COACH(RM-2)および V-PRACTICE PAD(RP-2)をセットでお買い上げの
場合は、最初から取り付けネジで組み立てられた状態になっています。
6
各部の名称と働き
RHYTHM COACH(RM-2)
fig.01-01(フロントから見た図)
9
8
7
1
6
2
3
4
5
1. [VOLUME]つまみ
ヘッドフォン/アウトプット・ジャックから
の出力音量を調節します。
2. ディスプレイ
テンポなどを表示します。
また、トリガー・インプット 1 および 2 に接
続さ れた パッ ドを たた くと、対 応す るト リ
ガー 1、2 インジケーターが点滅します。
電池が消耗し てくると、バッテ リー・ロー・
インジケーターが点滅します。(P.9)
fig.01-05
バッテリー・ロー・インジケーター
トリガー1、2インジケーター
3. ブザー
ヘッドフォン/アウトプット・ジャックに何
も接続していない場合、ここからメトロノー
ムのビープ音が鳴ります。パッドの音は鳴り
ません。
5. [TAP]ボタン
ボ タン やパッ ドを たた いた 間隔に あわ せて
メトロノームのテンポを調節します。
(P.13)
6. RP-2 取り付け用穴
7. [メトロノーム]ボタン
メトロノームをスタート/ストップします。
8. [SELECT]ボタン
RM-2 上部にある、8 つのパラメーターを選
択します。
[SELECT]ボタンを押すと、BEAT
から順に COACH まで選択し、一巡して通常
のテンポ表示画面に戻ります。
[SELECT]ボ
タンを押しながら[▼]ボタンを押すと、逆
方向に選択していきます。
9. パラメーター・インジケーター
メトロノームの表示をおこないます。
もしくは、選択されたパラメーターが点滅し
ます。
4. VALUE [▲]
[▼]ボタン
各パ ラメ ーター の値 を上 げた り下げ たり し
ます。
[▲]ボタン を押し ながら [▼]ボタン を押
すと、設定 値が高 速に増 加、
[▼]ボタ ンを
押しながら[▲]ボタンを押すと、設定値が
高速に減 少します 。(メトロノ ームのテ ンポ
表示のときは、スタンダードなメトロノーム
と同じように、段階的に値が変化します。)
7
各部の名称と働き
fig.01-02(側面から図 - その1)0
4
CD/MDデッキ、
カセット・
プレーヤーなど
3
2
5
6
ACアダプター
7
1
ヘッドホン
1. トリガー・インプット 1
4. MIX IN(ミックス・イン)ジャック
MD や CD の出力をここに接続すれば、音楽
とあわせて練習することができます。
2. トリガー・インプット 2
パッドを接続します。
988
RM-2 には、RP-2 の他にも、様々な
パッドを接続することができます。ま
た、トリガー・インプット 1 と 2 を
使って、2 個のパッドを接続すること
もできます。RP-2 を 2 台接続する場
合は「RP-2 を 2 台接続する」(P.15)
を、その他のパッドを接続する場合
は、「RP-2 以外のパッドを接続する」
(P.23)をご覧ください。
3. PHONES / OUTPUT
(ヘッドホン/アウトプット)ジャック
5. 盗難防止用ロック (
SECURITY LOCK)
市販の盗難防止用セキュリティー・ワイヤー
などを接続することができます。
盗難防止用ロックは、キーケーブルロック等の
セキュリティー・ワイヤーに対応しています。
日本国内総販売代理店は、以下のとおりです。
日本ポラデジタル株式会社
〒 104-0032
東京都中央区八丁堀1丁目5番2号はごろもビル
Tel: 03-3537-1070、
Fax: 03-3537-1071
6. AC アダプター・ジャック
ヘッドフォンやアンプ、オーディオ・システ
ムを接続します。
AC アダプター(別売)を接続します。
(P.9)
7. POWER(パワー)・スイッチ
電源をオン/オフします。(P.10)
※ RM-2 の出力はモノラルです。
V-PRACTICE PAD(RP-2)
fig.01-04(上から見た図。RP-2 から取る。)
ヘッド
アウトプット・ジャック
ワッシャー
フレーム
チューニング・
ボルト
盗難防止用
ロック
ゴム足
フープ(リム) センサー
RM-2 取り付け部
8
スタンド取り付け用ナット(M8)
演奏する前に
921
•
928
•
929
•
他の機器と接続するときは、誤動作やスピーカーなどの破損を防ぐため、必
ずすべての機器の音量を絞った状態で電源を切ってください。
本体を裏返す際は、ボタン、つまみなどを破損しないように、新聞や雑誌な
どを重ねて本体の四隅や両端に敷いてください。また、その際、ボタン、つ
まみなどが破損しないような位置に配置してください。
本体を裏返す際は、落下や転倒を引き起こさないよう取扱いにご注意ください。
電池を入れる
付属の電池を+、−の向きに注意して入れます。
fig.
SER. NO.
DC 6 V (1.5 V 4)
R6 / LR6 SIZE (AA)
MADE IN CHINA
電池交換の際は、単三アルカリ電池(4 本)を使用してください。また、電池は新しいもの
と古いものを混ぜて使用しないでください。
アルカリ電池を使用したときの連続使用時間は、常温で約 10 時間です。
(ただし使
用状況などにより異なります。)
電池の交換時期
944a
電池が消耗してくるとバッテリー・ロー・インジケーターが点滅を始めます。電池が少なく
なると、音質が劣化したり、動作が不安定になることがあります。早目に電池の交換をして
ください。
fig. 03-02()
電池がなくなってくると、
点滅します。
AC アダプターをつなぐ
別売りの AC アダプター(BOSS PSA-100)を使用すれば、家庭用のコンセントから電源を
供給することができます。
必ず、BOSS PSA-100 を使用してください。他の AC アダプターの使用は、誤動
作や故障の原因となりますので、絶対におやめください。
9
演奏する前に
音源にパッドを取り付ける
1. 付属のネジを使用して、音源(RM-2)とパッド(RP-2)を以下のように取り付けます。
fig.(何をどこにつけるか、の図)
RM-2 および RP-2 をセットでお買い上げの場合は、最初から音源とパッドが接続
された状態になっています。
2. 付属のケーブルを、RP-2 のアウトプット・ジャックと RM-2 のトリガー・インプット 1 にさ
し込みます。
パッドをたたくと、
演奏対象となるパッドを表示するトリガー 1 インジケーターが点滅します。
926
抵抗入りの接続ケーブルを使用すると 、接続した機器の音量が小さくなることがあ
ります。抵抗の入っていない接続ケーブル(ローランド:PCS シリーズなど)をご
使用ください。
3. RP-2 を 2 台接続する場合は、RP-2 のアウトプット・ジャックと RM-2 のトリガー・インプッ
ト 2 にさし込みます。(P.15)
パッドをたたくと、
演奏対象となるパッドを表示するトリガー 2 インジケーターが点滅します。
電源を入れる/切る
941
•
•
943
•
正しく接続したら、必ず次の手順で電源を投入してください。手順を間違え
ると、誤動作をしたりスピーカーなどが破損する恐れがあります。
必ず、電源を入れてからヘッドフォンを接続してください。手順を間違える
と、誤動作をしたりヘッドフォンなどが破損する恐れがあります。
音量を絞ってから電源を入れてください。音量を絞っても、電源を入れると
きに音がすることがありますが、故障ではありません。
1. [VOLUME]つまみを左いっぱいに回しきって、音量を最小にします。
2. 接続しているアンプやオーディオ・システムがあれば、音量を最小にします。
3. [POWER]スイッチを ON にして、 電源を入れます。
4. ヘッドフォンやアンプを接続します。
5. 接続しているアンプやオーディオ・システムがあれば、電源を入れます。
[VOLUME]つまみを徐々に回して、音量を調節します。
6. パッドをたたいて音を聞きながら、
アンプやオーディオ・システムを接続している場合は、先に音量を適当な大きさに調節します。
10
演奏する前に
電源を切るときは、以下の手順で行ってください。
1. RM-2、および接続している外部機器の音量を最小にします。
2. 外部機器の電源を切ります。
3. RM-2 の[POWER]スイッチを OFF にして、電源を切ります。
ヘッドの張り具合を調整する
調整するときは、付属のチューニング・キーをお使いください。
※ ヘッドの張りがゆるんだ状態でヘッドを叩くと、センサーやヘッドを破損することがありま
す。また、うまく調整ができていない状態でご使用になりますと、以下の症状がでます。
• 演奏時に音が出ないことがある(音量にムラがある)。
• 音が小さい(感度が低い)。
fig.03-05
打感触を確かめながら、チューニング・ボルトを 8 ケ所すべて、チューニング・キーで適切
な張り具合に調整してください。チューニング・ボルトは、必ず上の図の番号順にしめてく
ださい。
• 張り具合は、アコースティック・ドラムの打感触とほぼ同じくらいが適切です。
•
パッドを長く使っていると、ヘッドの張り具合が変わってくることがありま
す。必要に応じて調整しなおしてください。
•
RP-2 のヘッドの張り具合の調整は、打感触の調整を行うもので、アコース
ティック・ドラムのように、音の高さ(ピッチ)を調整するものではありま
せん。
1 ケ所のチューニング・ボルトを一度に強くしめないでください。ヘッドを均一に
張ることができないため、誤動作の原因となります。
11
演奏する前に
ヘッドを交換する
ヘッドは、使っている年月とともに性能が劣化する消耗部品です。ヘッド面が破れたり、ヘッ
ドの張り具合を正しく調整しても、ヘッド面にたるみが残るような場合は、ヘッドを交換し
てください。
交換用ヘッド(別売)
MH-8 メッシュ・ヘッド
ヘッド交換の手順
交換するときには、付属のチューニング・キーをお使いください。
1. すべてのチューニング・ボルトとワッシャーを取り外します。
それぞれ順に少しずつ反時計方向に回してゆるめてください。
取り外したチューニング・ボルトやワッシャーをなくさないようご注意ください。
2. フープを取り外します。
3. 古いヘッドを取り外します。
4. 新しいヘッドをフレームの上にのせます。
5. ヘッドの上にフープをのせます。
6. チューニング・ボルトにワッシャーを通し、フープをフレームに取り付けます。
7. チューニング・ボルトを 8 ケ所すべて、フープに軽くあたるまでしめ付けます。
8. 次にヘッドの張り具合を調整します。「ヘッドの張り具合を調整する」(P.11)をご覧くだ
さい。
12
RM-2 の操作方法
メトロノームを鳴らす
メトロノームを鳴らすには、[メトロノーム]ボタンを押します。
[▲]/[▼]ボタンを押してテンポを調節します。調整範囲は 10 ∼ 300BPM です。
■ たたいたテンポにあわせてメトロノームを鳴らす(タップ・テンポ)
曲に合わせてボタンを押したり、パッドを叩いたりして、メトロノームのテンポを設定する
ことができます。
1. [TAP]ボタンを押します。
ディスプレイのテンポの値が点滅します。
2. 曲にあわせて[TAP]ボタンを押すか、または接続されたパッドを複数回叩きます。
メトロノームと同じ音が鳴ります。
ボタンを押した、またはパッドをたたいた間隔で、メトロノームのテンポが調節されます。
3. ちょうどよいテンポになったら、[TAP]ボタンを 2 秒程度押し続けるか、または
[SELECT]ボタンか[メトロノーム]ボタンを押して値を確定します。
[メトロノーム]ボ
タンを押すと、メトロノームがスタートします。
あらかじめメトロノームを鳴らした状態 で行うと、テンポの変化を確認しながら調
整することができます。
■ メトロノームの設定を変える
メトロノームの拍子、リズム・タイプ、音色、音量、表示を変えることができます。
fig.04-01
リズム・タイプ
拍子
音量
音色
表示
1. [SELECT]ボタンを押して、変更するパラメーターを選択します。
[SELECT]ボタンを押しながら[▼]ボタンを押すと、逆方向に選択していきます。
2. [▲]/[▼]ボタンを押して、各パラメーターの値や種類を設定します。
個々のパラメーターについて、詳しくは次のパラメーター一覧をご覧ください。
3. [SELECT]ボタンを何度か押して「COACH」まで選択すると、次に通常のテンポ表示画
面に戻ります。
[SELECT]ボタンを 2 秒程度押し続けて、通常のテンポ表示に戻ることもできます。
■ パラメーター一覧
BEAT(拍子)
メトロノームの拍子を変更します。
0 ∼ 13、2-3、3-2、3-4、4-3
13
RM-2 の操作方法
RHYTHM TYPE(リズム・タイプ)
メトロノームのリズム・タイプを変更します。
fig.(楽譜で説明。)
小節の頭で鳴ります。
(16分音符)
(2分音符)
(16分音符)
(4分音符)
(16分音符)
(8分音符)
(6連符)
3 - 2 ソン・クラーべ
(8分音符)
2 - 3 ソン・クラーべ
(3連符)
3 - 2 ルンバ・クラーべ
(3連符)
2 - 3 ルンバ・クラーべ
METRONOME INST(メトロノームの音色)
メトロノームの音色を変更します。
ヘッドフォン/アウトプット・ジャック使用時の音色一覧
2
3
4
音色名
トラディショナル・
メトロノーム
エレクトリック・ビープ
シンプル・エレクトリック
ユニーク・スウィープ
5
6
ザップ
ハイ・ハット
7
8
カウベル
シェイカー
9
クラベス
1
10 スティック
11 ボイス
説明
スタンダードな振り子式メトロノーム。
電子ビープ音
シンプルな電子メトロノーム。
生ドラムの練習など大音量の中でも聞き取り
やすい電子音。
長時間の練習に最適な電子音。
リズム・タイプを 8 分音符、3 連符、16 分
音符などにセットすれば、キックとスネアの
コンビネーション練習に使用できます。
音の余韻が長く、テンポの遅い曲にも対応。
リズム・タイプを 8 分音符、16 分音符に
セットすると最適。
リズム・タイプをクラーベにセットし、マン
ボ、サルサなどの練習に使用。
自然で明瞭なスティック音。
変拍子や混合拍子の練習に最適。
※ テンポを速く設定した場合、メトロノームの音が途切れて聞こえることがあります。
ヘッドフォン/アウトプット・ジャックを使用しない時は、ブザーからビープ音が鳴ります。
1 ∼ 7 までのビープ音を選択することができます。
14
RM-2 の操作方法
METRONOME LEVEL(メトロノームの音量)
メトロノーム音の大きさを調節します。
off、1 ∼ 8
off、1 ∼ 2( ヘッドフォン/アウトプット・ジャックを使用しない時のビープ音の大きさを
調節します。)
METRONOME MODE(表示)
メトロノームの表示が変わります。
off、1 ∼ 7
パッドをたたいたときの音色/感度を設定する
RM-2 には、表現力豊かなドラム音色が 28 種類搭載されています。
また、パッドをたたいたときの感度も細かく調整できるため、好みの打感触を得ることがで
きます。
fig.04-03
感度
音色
1. [SELECT]ボタンを押して、変更するパラメーターを選択します。
[SELECT]ボタンを押しながら[▼]ボタンを押すと、逆方向に選択していきます。
2. [▲]/[▼]ボタンを押して、「PAD INST」、「PAD SENS」の値や種類を設定します。
個々のパラメーターについて、詳しくは次のパラメーター一覧をご覧ください。
3. [SELECT]ボタンを何度か押して「COACH」まで選択すると、次に通常のテンポ表示画
面に戻ります。
[SELECT]ボタンを 2 秒程度押し続けて、通常のテンポ表示に戻ることもできます。
■ RP-2 を 2 台接続する
トリガー・インプット 1 および 2 に RP-2 を 2 台接続した場合、それぞれのパッドに異なる
音色を設定することができます。
1. [SELECT]ボタンで、
「PAD INST」を選択します。
2. トリガー・インプット 1 に接続したパッドをたたきます。
設定対象となるパッドを表示するトリガー 1 インジケーターが点滅します。
3. [▲]/[▼]ボタンを押して、「PAD INST」を選択します。
4. 同様に、「PAD SENS」を変更します。
5. トリガー・インプット 2 に接続したパッドを叩きます。
設定対象となるパッドを表示するトリガー 2 インジケーターが点滅します。
6. 同様に「PAD INST」、「PAD SENS」を変更します。
15
RM-2 の操作方法
■ パラメーター一覧
PAD INST(パッドの音色)
パッドをたたいたときの音色を選択します。
1
2
3
4
5
6
7
8
9
10
11
12
13
14
15
16
17
18
19
20
21
22
23
24
25
26
27
28
音色名
メープル・スネア(14"x6-1/2")
スチール・スネア(14"x5-1/2")
ブラス・スネア(14"x5-1/2")
ブラス・スネア・リム(14"x5-1/2")
説明
*1
*1 弱打時に 3 番の音色、強打時にリ
ム・ショットが鳴ります。
メイプル・ピッコロ・スネア(14"x3-1/2") *2
メイプル・ピッコロ・スネア・リム
*2 弱打時に 5 番の音色、強打時にリ
(14"x3-1/2")
ム・ショットが鳴ります。
ブラス・ピッコロ・スネア(14"x3-1/2")
13 インチ・スネア
ディープ・シェル・スネア
マーチング・スネア
*3
マーチング・スネア・リム
*3 弱打時にサイド・スティック、強
打時にリム・ショットが鳴ります。
マーチング・テナー・ドラム
ハイ・タム・タム(10")
ミッド・タム・タム(12")
ロー・タム・タム(14")
マーチング・クワッド・タム 1(8")
マーチング・クワッド・タム 2(10")
マーチング・クワッド・タム 3(12")
マーチング・クワッド・タム 4(13")
バス・ドラム(22")
マーチング・バス・ドラム 1(18")
マーチング・バス・ドラム 2(24")
ティンバレス・ハイ(リム・ショット)
ティンバレス・ロー
カウベル
弱打時にミュート、強打時にオー
プン・ショットが鳴ります。
クラベス
プラクティス・ボード 1
スティック・ワークの強化に最適
な、粒立ちのハッキリとした練習
用音色。
プラクティス・ボード 2
強打時に音が変化し、アクセント
の練習に最適な音色。
*1、*2、*3:
リム・ショット対応パッド (PD-80R/120) 使用時に、同じ注意番号のついた音色(3 と 4、
5 と 6、10 と 11)を一組として割り当てて使用します。詳しくは「リム・ショット対応の
パッドを接続する」
(P.24)をご覧ください。リム・ショットに対応していないパッドでは、
最適な効果を得られません。
16
RM-2 の操作方法
PAD SENS(パッドの感度)
1 ∼ 16
パッドの感度を調節し、たたく強さと音の大きさのバランスを調節します。値を大きくする
と感度が高くなり、パッドを弱くたたいても大きな音量でなります。
パッドを たたく強さ(ベロシ ティー)に応じて、デ ィスプレイに 6 段階でベロシ
ティーが表示されます。
設定の目安は、最も強くたたいたときにベロシティー 127 になるように値を設定します。
fig.04-04
たたく強さ
強い
ベロシティー
127
100∼126
75∼99
50∼74
25∼49
弱い
1∼24
17
RM-2 の操作方法
コーチと練習!
RM-2 のコーチ・モードは、練習の効果を最大限に引き出すために用意された、大変ユニー
クな練習用モー ドです。スピードの コントロール能 力や、精度、持久力を鍛 えるとともに、
タイミングを上手に取る練習に大変適しています。コーチ・モードには、調整可能なパラメー
ターがたくさん用意されているため、それぞれのスキルに応じた練習を行うことができます。
1. [SELECT]ボタンを押して、
「COACH」を選択します。
(Coach)と文字がスクロールしたのち、コーチ・モードになります。
2. [▲]/[▼]ボタンを押して、パラメーターを選択します。
3. [メトロノーム]ボタンを押すと、練習開始です。
•
メトロノーム動作中にコーチ・モードを選ぶと、メトロノームが止まります。
コーチ・モード実行中に[SELECT]ボタンを押すと、コーチ・モードが終
了します。
コーチ・モードでは、
[メトロノーム ]ボタンを押して練習を開始する前であれば、
[TAP]ボタンを押して、テンポを変更することが可能です。好みの速さでパッドを
たたくか、[▲]/[▼]ボタンで調整をしてください。
•
■ パラメーター一覧
∼
Rhythmic Notes
Time Check
Quiet Count
Speed Check
Gradual Up
Gradual Down
Gradual Up/Down
Step Up
Step Down
Step Up/Down
Timer
正確にタイミングよくたた
くための練習(4 種)
持久力と耐久力をつけるた
めの練習(6 種)
(8 種)
■ 正確にタイミングよくたたくための練習
Rhythmic Notes (
)
このモードは、ウォーム・アップのために利用したり、あるいは音符のリズムを教える場合
にも、大変すぐれた効果があります。このモードでは、リズム・タイプが、2 小節ごとに変
化していきます。2 分音符から始まって、6 連符まで演奏したら、また 2 分音符まで戻って
繰り返します。
fig.04-13
スタート
1. コーチ・モードで[▲]/[▼]ボタンを押して、「
」を選択します。
2. [メトロノーム]ボタンを押すと、2 小節のカウント・インの後、練習開始です。
[▲]/[▼]ボタンを押すと、練習中でもテンポを変えることができます。
18
RM-2 の操作方法
Time Check (
)
メトロノームの刻むビートに従って、正確にタイミングよくたたく練習をするためのモード
です。パッドをたたいたタイミングが、メトロノームに合っているかどうか、結果がディス
プレイに表示されます。
fig.04-10_70
遅れぎみです。
ジャスト・タイミングです。
走りぎみです。
1. コーチ・モードで[▲]/[▼]ボタンを押して、「
」を選択します。
2. [メトロノーム]ボタンを押すと、練習開始です。
[▲]/[▼]ボタンを押すと、練習中でもテンポを変えることができます。
Quiet Count (
)
このモードは、身体でリズムを覚えるためのモードです。最初の 8 小節は設定された音量で
メトロノームが鳴りますが、次の 8 小節は音が小さくなります。メトロノーム・ボタンを押
して停止させるまで、この 8 小節間隔のサイクルが続きます。
1. コーチ・モードで[▲]/[▼]ボタンを押して、「
」を選択します。
2. [メトロノーム]ボタンを押すと、練習開始です。
[▲]/[▼]ボタンを押すと、練習中でもテンポを変えることができます。
Speed Check (
)
メトロノームの音に従って正確にたたく、という点では、Time Check と大変似たモードで
す。Speed Check では、8 小節の間、メトロノームのタイミング通りに正確に演奏すること
ができたら、さらにテンポが 5 BPM 速くなります。テンポが最大値になるまで続きます。
1. コーチ・モードで[▲]/[▼]ボタンを押して、「
」を選択します。
2. [メトロノーム]ボタンを押すと、2 小節のカウント・インの後、スピード・チェックの開
始です。
正確に演奏できると、ディスプレイの表示が 4 回点滅し、さらに 5 BPM 速くなり
ます。できなかった場合、1 回点滅し次の 8 小節も同じスピードを繰り返します。
19
RM-2 の操作方法
■ 持久力と耐久力をつけるための練習
Gradual Up (
)
徐々にスピードを上げていく練習に最適です。メトロノームが最大値になるまで、2 拍ごと
に 1 BPM ずつスピードが速くなっていきます。最大値に達すると、スタート時のテンポに
戻り、その後同じ動作を繰り返します。
1. コーチ・モードで[▲]/[▼]ボタンを押して、「
」を選択します。
2. [メトロノーム]ボタンを押して、練習を開始します。
演奏中に[▼]を押すと、そのときのテ ンポでメトロノームの最大値が設定されま
す。[▲]ボタンを押すと、その設定がリセットされます(初期値は 300 です)
。
Gradual Down (
)
徐々にスピードを落としていく練習に最適です。メトロノームが最小値になるまで、2 拍ご
とに 1 BPM ずつスピードが遅くなっていきます。最小値に達すると、スタート時のテンポ
に戻り、その後同じ動作を繰り返します。
1. コーチ・モードで[▲]/[▼]ボタンを押して、「
」を選択します。
2. [メトロノーム]ボタンを押して、練習を開始します。
演奏中に[▲]を押すと、そのときのテ ンポでメトロノームの最小値が設定されま
す。[▼]ボタンを押すと、その設定がリセットされます(初期値は 10 です)
。
Gradual Up/Down (
)
「Gradual Up/Down」モードは、スピードを徐々に上げ下げすることによって、持久力を高
める練習に最適です。メトロノームが最大値になるまで、2 拍ごとに 1 BPM ずつスピード
が速くなっていき、その後、2 拍ごとに 1 BPM ずつスピードが遅くなって最初のテンポに
戻ります。その後、同じ動作を繰り返します。
1. コーチ・モードで[▲]/[▼]ボタンを押して、「
」を選択します。
2. [メトロノーム]ボタンを押して、練習を開始します。
演奏中に[▼]を押すと、そのときのテ ンポでメトロノームの最大値が設定されま
す。[▲]ボタンを押すと、その設定がリセットされます(初期値は 300 です)
。
Step Up (
)
スピードの調整能力と同時に、耐久力を鍛えるためのモードです。メトロノームが最大値に
なるまで、8 小節ごとに 5 BPM ずつスピードが速くなっていきます。最大値に達すると、ス
タート時のテンポに戻り、その後同じ動作を繰り返します。
1. コーチ・モードで[▲]/[▼]ボタンを押して、「
」を選択します。
2. [メトロノーム]ボタンを押して、練習を開始します。
演奏中に[▼]を押すと、そのときのテ ンポでメトロノームの最大値が設定されま
す。[▲]ボタンを押すと、その設定がリセットされます(初期値は 300 です)
。
20
RM-2 の操作方法
Step Down (
)
速いペースから始めて、徐々にスピードを落としていくため、持久力を鍛える練習に最適で
す。メトロノームが最小値になるまで、8 小節ごとに 5 BPM ずつスピードが遅くなってい
きます。最小値に達すると、スタート時のテンポに戻り、その後同じ動作を繰り返します。
1. コーチ・モードで[▲]/[▼]ボタンを押して、「
」を選択します。
2. [メトロノーム]ボタンを押して、練習を開始します。
演奏中に[▲]を押すと、そのときのテ ンポでメトロノームの最小値が設定されま
す。[▼]ボタンを押すと、その設定がリセットされます(初期値は 10 です)
。
Step Up/Down (
)
スピードを段階的に上げ下げすることによって、演奏の耐久力を高めます。メトロノームが
最大値になるまで、8 小節ごとに 5 BPM ずつスピードが速くなっていき、その後、8 小節ご
とに 5 BPM ずつスピードが遅くなって最初のテンポに戻ります。その後、同じ動作を繰り
返します。
1. コーチ・モードで[▲]/[▼]ボタンを押して、「
」を選択します。
2. [メトロノーム]ボタンを押して、練習を開始します。
演奏中に[▼]を押すと、そのときのテ ンポでメトロノームの最大値が設定されま
す。[▲]ボタンを押すと、その設定がリセットされます(初期値は 300 です)
。
Timer (
∼
)
「Timer」は、演奏期間を決めておくためのシンプルなモードですが、設定時間を変えること
により、様々な練習に利用することが可能です。例えば、短い時間に設定すれば、その間に
どれだけ速く演奏できるかチャレンジすることができますし、長い時間に設定すれば、持久
力、耐久力を高めるのに利用できます。
1. [▲]/[▼]ボタンを押して、t1 ∼ t60 までの値を選びます。
タイマー設定時間
: 1分
: 2分
: 3分
: 5分
:
:
:
:
10 分
15 分
30 分
60 分
2. [メトロノーム]ボタンを押して、練習を開始します。
3. 残り時間が表示され、1 分を切ると、60 秒のカウント・ダウンが表示されます。設定した時
間が終了すると、アラームが鳴り、すべてのパラメーター・インジケーターが点滅します。
• 「Timer」動作中は、他のコーチ・モードは使用できません。
[SELECT]ボタンで、
「BEAT」(拍子)や「RHYTHM
• 「Timer」動作中も、
TYPE」
(リズム・タイプ)などを変更することができます。
• コーチ・モード以外でメトロノームを停止させても、タイマーは引き続き動
作を続けます。コーチ・モード以外のときにメトロノームを停止させると、
「COACH」のインジケーターが点滅して、タイマーが動作中であることを表
示します。タイマーを停止するためには、コーチ・モードで
[METRONOME]ボタンを押します。
21
RM-2 の操作方法
製品出荷時の設定に戻す(ファクトリー・リセット)
RM-2 に記憶されている設定内容を、製品出荷時の設定に戻します。
お客さまが変更した RM-2 の設定内容はすべて失われます。ファクトリー・リセッ
トを行う場合は、十分にご注意ください。
1. [▲]、[SELECT]
、[メトロノーム]ボタンを同時に押しながら電源を入れます。
「COACH」のインジケーターが点滅して、ディスプレイに以下のように表示されます。
fig. (RESET と描かれた図)
2. [メトロノーム]ボタンを押すと、ファクトリー・リセットを実行します。
ファクトリー・リセットを中止する場合は、電源を切ってください。
エラー・メッセージが出たら
ここでは、RM-2 が出すエラー・メッセージの意味と、その対処方法について説明します。
症状 1:RM-2 のすべてのパラメーター・インジケーターが点滅し、以下が表示された場合、本体の
内部メモリーが壊れている可能性があります。
fig.
1. [メトロノーム]ボタンを押すと、以下が表示され、ファクトリー・リセットを行える状態
になります。
fig. (RESET と描かれた図)
2. 再度[メトロノーム]ボタンを押して、ファクトリー・リセットを行ってください。
それでも治らないときは、お買い上げ店または最寄りのローランド・サービスにお問い合わ
せください。
お客さまが変更した RM-2 の設定内容はすべて失われます。
症状 2:RM-2 のすべてのパラメーター・インジケーターが点滅し、以下が表示された場合、内部シ
ステムに異常があります。 お買い上げ店または最寄りのローランド・サービスにお問い合わ
せください。
fig.
※[メトロノーム]ボタンを押すと、通常のテンポ表示に戻ります。
22
すすんだ使いかた
RP-2 以外のパッドを接続する
RM-2 には、RP-2 の他にも、ローランド V-Drums シリーズのパッドを接続することができ
ます。トリガー・インプットの設定によって、パッドを 2 台接続したり、リム対応のパッド
を 1 台接続することができますが、パッドにはそれぞれ特性があるため、パッドを接続した
だけでは、うまく音が鳴りません。パッドを接続したら、まずどんなパッドを接続したか(ト
リガー・タイプ)を調整する必要があります。これにより、正しくパッドが認識されるよう
になります。
トリガー・インプット 1
トリガー・インプット 2
パッド 2 台
ヘッド
ヘッド
リム対応のパッド 1 台
ヘッド/リム
--※ リム対応のパッドを接続する場合、トリガー・インプット 2 は無効になります。
■ パッドを接続する
対応パッド
RP-2、PD-80/100、PD-5/6/7/9、KD-7/80/120
PD-80R / 120 といった、リム・ショットに対応したパッドを接続する場合は、次
項「リム・ショット対応のパッドを接続する」(P.24)をご覧ください。
1. 対応パッドを、トリガー・インプット1または 2 に接続します。
2. [SELECT]ボタンを押しながら電源を入れます。
トリガー・パラメーターを設定できる状態になります。
3. [▲]/[▼]ボタンを押して、インプット・モードを
にします。
インプット・モードとは ?
トリガー・インプットに何を接続しているか設定するモードです。通常のパッドを 1 も
しくは 2 台接続する場合は、
を、リム・ショット対応のパッドを 1 台接続する場
合は、
を選択します。
製品出荷時の状態では、
が設定されており、RP-2 を 2 台接続できる状態になっ
ています。
4. [SELECT]ボタンを押します。
と表示された後、トリガー・タイプが選択できるようになります。
接続したパッドにあわせ て、
(RP-2)、
(PD-80/100)、
(PD-5/6/7/9)、
(KD-7/80/120)を選んでください。
パッドをたたくと、設定対象となるパッドを表 示するトリガー 1、2 インジケーターが点滅
します。設定したいパッドが選ばれているかどうか、インジケーターで確認してから、トリ
ガー・パラメーターを設定してください。
ボタンの操作方法について詳しくは、
「トリガー・パラメーターの設定方法」
(P.26)
をご覧ください。
23
すすんだ使いかた
トリガー・タイプとは?
トリガ ー・タイプは、様々な トリガーのパラ メーターを、各パ ッドに適した 値に調整
し、ひとまとめにしたものです。接続したパッドにあったトリガー・タイプを選択すれ
ば、各パラメーターが最適な値に設定され、問題なく演奏ができるようになります。適
切なトリガー・タイプを選んだにも関わらず、うまく演奏ができない場合にのみ、個々
のパラメーターを微調整して、お使いのパッドにあったものにします。
5. 必要であれば、[SELECT]ボタンを押して、トリガー・タイプの各パラメーターを微調整
します。
各パラメーターについて、詳しくは、「パラメーター・リスト」をご覧ください。
6. 設定が終了したら、[METRONOME]ボタンを押して通常のテンポ表示画面に戻ります。
7. パッドの音色と感度を設定します。
「パッドをたたいたときの音色/感度を設定する」の「RP-2 を 2 台接続する」(P.15)を参
考にして、パッドの音色と感度を設定します。
RM-2 には、キック・ドラム用音色も内蔵されています。KD-7 / 80 / 120 を接続す
ると、キック・ドラムとパッドで、手と足のコンビネーションの練習ができます。KD7 / 80 / 120 を使う場合は、「20:バス・ドラム(22")」、「21:マーチング・バス・
ドラム 1(18")
」、
「22:マーチング・バス・ドラム 2(24")
」の音色をご利用ください。
■ リム・ショット対応のパッドを接続する
対応パッド
PD-80R / 120
PD-7/9 のリム・ショットには対応していません。
1. 対応パッドを、トリガー・インプット1に接続します。
接続するときは、必ずステレオ・ケーブルをご使用ください。
リム対応のパッドを接続する場合、ケーブルは必ずトリガー・インプット 1 に接続
し、トリガー・インプット 2 には何も接続しないでください。トリガー・インプッ
ト 2 にケーブルが接続されていると、RM-2 が正常に動作しなくなります。
2. [SELECT]ボタンを押しながら電源を入れます。
トリガー・パラメーターを設定できる状態になります。
3. [▲]/[▼]ボタンを押して、インプット・モードを
インプット・モードとは?(P.23)
24
にします。
すすんだ使いかた
4. [SELECT]ボタンを押します。
と表示された後、トリガー・タイプが選択できるようになります。
接続したパッドにあわせて、
(PD-80R)、
(PD-120)
を選んでください。
トリガー・タイプとは?(P.24)
5. 必要であれば、、[SELECT]ボタンを押して、トリガー・タイプの各パラメーターを微調整
します。
•
各パラメーターについて、詳しくは、「パラメーター・リスト」(P.27)をご
覧ください。
•
ボタンの操作方法について詳しくは、「トリガー・パラメーターの設定方法」
(P.26)をご覧ください。
6. [METRONOME]ボタンを押して通常のテンポ表示画面に戻ります。
7. ヘッドの音色と感度を設定する場合は、パッドのヘッド部分をたたきます。
トリガー 1 インジケーターが点滅します。
8. ヘッドの「PAD INST」と「PAD SENS」を設定します。
リムの感度を調整する場合は、手順 5. ∼ の方法で「リム・センシティビティ」を
調整してください。リムの「PAD SENS」は無効になります。
9. リムの音色を設定する場合は、パッドのリム部分をたたきます。
トリガー 2 インジケーターが点滅します。
10. リムの「PAD INST」を設定します。
PAD INST 番号 4、6、11 が、リム・ショットに最適な音色です。
(P.16)
25
すすんだ使いかた
■ トリガー・パラメーターの設定方法
ボタン
•[SELECT]ボタン
パラメーターを選択します。
(パラメーター名が表示された後、パラメーターの値や種類が表
示されます。)
•[SELECT]ボタンを押しながら[▼]ボタンを押す
一つ前のパラメーターに戻ります。
•[▲]/[▼]ボタン
パラメーターの値を変更します。
•[METRONOME]ボタン
設定を終了し、RM-2 の通常の操作が可能な画面に戻ります。
表示
• ディスプレイ
パラメーター名、パラメーター値を表示します。
また、スレッショルド/センシティビティ/ベロシティー・カーブ/スキャン・タイム設定
時は パッドをたたくとベロシティー値を表示します。( P.28)
• トリガー 1、2 インジケーター
トリガー・インプット 1、2 につないだパッドをたたいたとき、対応するトリガー・インプッ
トのインジケーターが点滅します。点滅しているトリガー・インプットのパラメーターを変
更することができます。
インプット・モードが
のときには表示しません。ただし、リム・センシティ
ビティを調整しているとき、ヘッド・ショットの場合はトリガー 1 が、リム・ショッ
トの場合はトリガー 2 が点灯します。
• RM-2 上部の 8 つのインジケーター
現在のパラメーターを点滅表示します(インプット・モードおよびトリガー・タイプを除く)
。
fig.05-01
スキャン・タイム
ベロシティー・カーブ
センシティビティ
スレッショルド
26
リトリガー・キャンセル
クロストーク・キャンセル
マスク・タイム
リム・センシティビティ
( のときのみ)
すすんだ使いかた
■ パラメーター・リスト
パラメーター
インプット・モード
(電源投入時)
トリガー・タイプ
値
スレッショルド
センシティビティ
ベロシティー・カーブ
スキャン・タイム
リトリガー・キャンセル
クロストーク・キャンセル
マスク・タイム
リム・センシティビティ※
Headx2
Head&Rim
RP-2
PD-80/100
PD-80R
PD-120
PD-5/6/7/9
KD-7/80/120
0 ∼ 15
1 ∼ 16
、
、
、
、
、
0 ∼ 4.0ms(0.1ms 刻み)
1 ∼ 16
、20 ∼ 80(5 刻み)
0 ∼ 64ms(4ms 刻み)
、 1 ∼ 20(または ---)
、
、
※ リム・センシティビティは、インプット・モードが
のときのみ有効です。
また、トリガー・タイプが
、
以外の場合は無効 (---) になります。
スレッショルド
センシティビティ
0 - 15
1 - 16
ある 一定 以上の 強さ でた たい たとき だけ ト
リガー信号を読み込むように設定します。こ
れにより、パッドが周囲の振動を拾うのを防
ぐことができます。次の図で、B の信号は鳴
りますが A と C は鳴りません。
fig.05-10
「PAD SENS」と同じ値になります。(P.17)
ベロシティー・カーブ
た たく 強さに よる 音量 の変 化のし かた を選
びます。
スレッショルド
A
(LINEAR)
B
C
最も標準的な設定です。たたく強さと音量の
変化が最も自然になります。
fig.05-11
音量
大き な値 に設定 する と弱 くた たいた とき に
音が鳴らなくなります。
パッドをたたきながら、スレッショルドの値
を徐 々に 上げ てい きま す。弱め にた たい て
チェックし、音が欠けるようであれば少し値
を下げます。これを繰り返してちょうどよい
設定にします。
たたく強さ
LINEAR
27
すすんだ使いかた
スキャン・タイム
(EXPONENTIAL 1、EXPONENTIAL 2)
LINEAR に比べ、強めにたたくときの変化が
大きくなります。
fig.05-12
音量
音量
たたく強さ
EXPONENTIAL 1
EXPONENTIAL 2
(LOG1、LOG2)
LINEAR に比べ、弱めにたたくときの変化が
大きくなります。
0 - 4.0ms (0.1ms 刻み )
ドラム・パッドの種類やドラム・トリガー固
有の性質により、トリガー信号波形の立ち上
がり時間が微妙に異なるため、同じ強さでた
たいたときでも弱く鳴ったり、強く鳴ったり
することがあります。このような場合に、ト
リ ガー信号 の検出 時間(スキャ ン・タイム)
を調節することで、たたいた強さを正確に検
出することができます。
値 を大 きくす ると 発音 まで の時間 が長 くな
ります。できるだけ小さい値に設定してくだ
さい。
fig.05-16
スキャン・タイム
fig.05-13
音量
音量
時間
たたく強さ
LOG1
LOG2
(SPLINE)
たたく強さによる変化が極端に付きます。
fig.05-14
音量
たたく強さ
SPLINE
(LOUD1、LOUD2)
設定のしかた
パッド を同じ強さでたたき ながらスキャン・
タイムの値を「0」から徐々に上げていき、一
番 大き な音量 で安 定し て発 音する 値に 設定
します。その値で強弱をつけてパッドをたた
き、適切な音量変化が得られることも確認し
てください。
パッドをたたく強さ(ベロシティー)に応じ
て、ディスプレイに6 段階でベロシティーが
表示されます。
強く たたいた ときにベロ シティー 127 にな
るように値を設定します。
fig.05-17
たた く強 さによ る変 化が 少な く演奏 しや す
い音量が保てます。ドラム・トリガーを使用
するときなど、安定した発音が得られます。
たたく強さ
強い
fig.05-15
ベロシティー
127
100∼126
音量
音量
75∼99
50∼74
25∼49
たたく強さ
LOUD1
28
LOUD2
弱い
1∼24
すすんだ使いかた
リトリガー・キャンセル
クロストーク・キャンセル
1 - 16
OFF, 20 - 80 (5 刻み )
市販 のド ラム・ト リガ ーを 取り 付け たス ネ
ア・ドラムなどをたたいたときに、波形が乱
れているために、次の図の A 点でも誤って発
音してしまうことがあります(リトリガー)。
fig.05-18
A
時間
この 現象 は特に 波形 の消 え際 で起こ りや す
いものです。リトリガー・キャンセルは、こ
の波形の乱れを検出して、リトリガーが起こ
らないようにします。
値を 大き くする とリ トリ ガー しなく なり ま
すが、ドラムを速く連打したときに音が抜け
やすくなります。リトリガーが起こらないこ
とを確認しながら、できるだけ小さい値に設
定してください。
マスク・タイムでもこのような 2 度
鳴 りの 症 状を なく す こと が でき ま
す。マスク・タイムは トリガー信号
を受信してから設定し た時間内は次
のトリガー信号を検出 しなくなるの
に対して、リトリ ガー・キャンセル
はトリガー信号レベル の減衰を検出
し、打撃されたときの トリガー信号
か、鳴らす必要のない トリガー信号
かを内部で判別してか ら発音させま
す。
設定のしかた
パッドをたたきながら、リトリガーしなくな
るまでリトリガー・キャンセルの値を上げま
す。
同じスタンドに 2 台のパッドを取り付けてい
る場合などに、一方のパッドをたたいたとき
の振動で、他方の音が誤って発音してしまう
ことがあります(クロストーク)
。誤って鳴っ
てしまうパッドのクロストーク・キャンセル
を調節すると、この現象を防ぐことができま
す。
値を大きくしすぎると 2 つのパッドを同時に
た たい たとき に弱 くた たい た方の パッ ドの
音が鳴りらなくなります。設定値は、クロス
ト ーク が起こ らな い最 小の 値にし てく ださ
い。設定値を「OFF」にすると、クロストー
クを防ぐ処理を行いません。
取り付けられている 2 つのパッドの
距離を離してセッティングすること
により、クロストークを防ぐことが
できる場合もあります。
他のドラム音源に接続したパッドか
らのクロストークを防ぐことはでき
ません。距離を離してセッティング
してください。
設定のしかた
トリガー・インプット 1 のパッドをたたいた
ときにトリガー・インプット 2 のパッドの音
が鳴ってしまう:
トリガー・インプット 1 のパッドをたたきな
がら、トリガー・インプット 2 のパッドのク
ロストーク・キャンセルを設定します。設定
値を「OFF」から徐々に上げ、トリガー・イ
ンプット 1 のパッドをたたいてもトリガー・
インプット 2 のパッドが鳴らなくなる値にし
ます。値を上げるほど、トリガー・インプッ
ト 1 からのクロストークを受けにくくなりま
す。
29
すすんだ使いかた
マスク・タイム
0 - 64ms (4ms 刻み )
特にキック・パッドで、鳴らした直後に再度
ビーター が触れる と、ダブル・トリ ガー(1
度鳴らすつもりなのに 2 度鳴ってしまう)の
原因になります。マスク・タイムはこれを防
ぐための機能で、設定した時間内(0 ∼ 64ms)
に再度起こったトリガー信号を無視します。
値を 大き くする とキ ック を速 く連打 した と
きに音が抜けやすくなります。できるだけ小
さい値に設定してください。
fig.05-19
マスク・タイム
時間
発音しない
パッドを 1 度しかたたいていないの
に 2 度 以上音 が鳴って しまう とき
は、リトリガー・キャ ンセルを調節
してください。
設定のしかた
キック用パッドを踏みながら、バウンシング
(ビータ ーの跳ね返 りによる 発音)しな くな
るまで、マスク・タイムの値を上げます。
リム・センシティビティ
OFF、1 ∼ 20
リムの感度を調整できます。
値を 大き くする とリ ムが 鳴り やすく なり ま
す。
「OFF」にすると、リム・ショットをした
ときにヘッドのインストが鳴ります。値を大
きくしすぎると、ヘッドをたたいたときもリ
ム側 のイ ンスト が鳴 って しま います ので ご
注意ください。
イン プット・モー ドが
のと
きのみ有効です。
ま た、ト リガ ー・タ イプ が
、
以外 の場 合は 無効 (---) に な
ります。
30
おもな仕様
RM-2:RHYTHM COACH
RP-2:V-PRACTICE PAD
最大同時発音数
4 音(内メトロノーム 1 音)
音色数
パッド・インスト:28
メトロノーム・インスト:11
パネル・コントロール
音量つまみ:1
機能選択スイッチ:5
電源スイッチ:1
接続端子
トリガー・インプット・ジャック× 2
(ステレオ標準タイプ× 1、標準タイプ× 1)
ヘッドホン/アウトプット・ジャック:1
(ステレオ・ミニ・タイプ)
ミックス・イン・ジャック:1(ミニ・タイプ)
AC アダプター・ジャック
電源
単 3 乾電池× 4
または DC9V AC アダプター
パッドサイズ
8 インチ
トリガー
1(ヘッド)
外形寸法
264(幅)x297(奥行き)x60(高さ)mm
質量
890 g
スタンド取り付けネジ
M8
961
※ 連続使用時の電池の寿命(使用状況によっ
て異なります)
アルカリ電池 約 10 時間
消費電流
150mA
外形寸法
148(幅)× 96(奥行き)× 62(高さ)mm
質量
340g(電池含む)
240g(電池なし)
※1
※2
※
※
RM-2 and RP-2
外形寸法
264(幅)× 350(奥行き)× 62(高さ)mm
質量
1.2 kg(電池を含む)
付属品
単 3 アルカリ電池× 4
取付け用ネジ× 2 ※ 1
チューニング・キー ※ 2
接続ケーブル(0.2m)
※ 2
取扱説明書
保証書
別売品
AC アダプター(BOSS PSA-100)
パッド(RP-2、PD-80、PD-80R、PD-100、
PD-120、PD-5、 PD-6、PD-7、PD-9)
キック・トリガー(KD-7、KD-80、KD-120)
パッド・スタンド(PDS-2)
メッシュ・ヘッド(MH-8)
RHYTHM COACH( RM-2)および V-PRACTICE PAD(RP-2)をセットでお買い上げ
の場合は、最初から取り付けネジで組み立てられた状態になっています。
RHYTHM COACH( RM-2)のみお買い上げの場合には含まれません。
トリガー・インプット 1 の設定により、PD-80R と PD-120 ではリム・ショットが可能と
なります。ただし、その場合トリガー・インプット 2 は使用することができません。
RM-2 は、PD-7、 PD-9 のヘッド・ショットには対応していますが、リム・ショットには
対応していません。
962a
※製品の仕様および外観は、改良のため予告なく変更することがあります。
31
索引
A
Step Up/Down
AC アダプター・ジャック
........................ 8
B
BEAT
................................................... 13
E
EXPONENTIAL 1、2
............................ 28
G
Gradual Down ......................................
Gradual Up ...........................................
Gradual Up/Down ................................
20
20
20
L
T
TAP ボタン ............................................. 7
Time Check .......................................... 19
Timer .................................................... 21
V
VALUE ....................................................
VOLUME つまみ ......................................
27
28
28
M
METRONOME INST ............................. 14
METRONOME LEVEL ........................... 15
METRONOME MODE ........................... 15
MIX IN ジャック ....................................... 8
P
あ
アウトプット・ジャック
インプット・モード
........................... 8
エラー・メッセージ
クロストーク・キャンセル
コーチ
ゴム足
せ
RHYTHM TYPE .................................... 14
Rhythmic Notes ................................... 18
RM-2 取り付け部 ..................................... 8
RP-2 取り付け用穴 ................................... 7
S
SECURITY LOCK .................................... 8
SELECT ボタン ....................................... 7
Speed Check ....................................... 19
SPLINE ................................................. 28
Step Down ........................................... 21
Step Up ............................................... 20
.................... 29
こ
Q
R
.............................. 22
く
す
......................................... 19
.............................. 23
え
PAD INST ............................................ 16
PAD SENS ........................................... 17
PHONES / OUTPUT ジャック ................ 8
POWER スイッチ ..................................... 8
32
7
7
い
LINEAR ................................................
LOG1、2 ..............................................
LOUD1、2 ...........................................
Quiet Count
..................................... 21
.................................................. 18
..................................................... 8
スキャン・タイム .................................. 28
スタンド取り付け用ナット ....................... 8
スレッショルド ..................................... 27
接続(RP-2 を 2 台接続する) ................ 15
接続(RP-2 以外のパッド).................... 23
接続(リム・ショット対応のパッド) ..... 24
センサー .................................................. 8
センシティビティ .................................. 27
た
タップ・テンポ
..................................... 13
ち
チューニング・ボルト
.............................. 8
て
ディスプレイ
........................................... 7
と
盗難防止用ロック
..................................... 8
索引
トリガー 1、2 インジケーター .................. 7
トリガー・インプット 1、2 ...................... 8
トリガー・タイプ .................................. 24
トリガー・パラメーター ........................ 26
は
バッテリー・ロー・インジケーター .......... 7
パッドの音色/感度 ................... 15 ∼ 17
パラメーター・インジケーター ................. 7
パワー・スイッチ ..................................... 8
ひ
拍子
...................................................... 13
ふ
ファクトリー・リセット ........................ 22
フープ ..................................................... 8
ブザー ..................................................... 7
フレーム .................................................. 8
へ
ヘッド .....................................................
ヘッドホン/アウトプット・ジャック .......
8
8
ま
マスク・タイム
..................................... 30
み
ミックスイン・ジャック
........................... 8
め
メトロノーム ........................................ 13
メトロノームの音色 .............................. 14
メトロノームの音量 .............................. 15
メトロノームの表示 .............................. 15
メトロノーム・ボタン .............................. 7
り
リズム・タイプ ..................................... 14
リトリガー・キャンセル ........................ 29
リム ......................................................... 8
リム・センシティビティ ........................ 30
わ
ワッシャー
............................................... 8
33
お問い合わせの窓口
商品のお取り扱いに関するお問い合わせは・・・
ローランドお客様相談センターまでご相談
ください。尚、お問い合わせの際には取扱
説明書をご用意ください。
ローランドお客様相談センター 受付時間:午前10時∼午後5時(土、日曜、祝日および弊社規定の休日を除く)
<電話番号>
■ 大阪 TEL (06) 6345-9500
■ 東京 TEL (03) 3251-6150
<住所>
〒530-0004 大阪市北区堂島浜1-4-16 大和堂島ビル7F
修理に関するお問い合わせは・・・ 商品をお求めの販売店か保証書に同封されている「サービスの窓口」
に記載の営業所またはサービス・ステーションまでご相談ください。
※上記窓口の名称、所在地、電話番号等は、予告なく変更することがありますのでご了承ください。
'01. 5. 1 現在
Owner’s Manual
Thank you and congratulations on your choice of the Roland RM-2, RP-2.
201a
Before using this unit, carefully read the sections entitled: “USING THE
UNIT SAFELY” (p. 2–3) and “IMPORTANT NOTES” (p. 4). These
sections provide important information concerning the proper
operation of the unit. Additionally, in order to feel assured that you
have gained a good grasp of every feature provided by your new unit,
Owner’s manual should be read in its entirety. The manual should be
saved and kept on hand as a convenient reference.
02897701
Be sure to adjust the head tension before using the RP-2.
Striking the pad with a loose head may damage the
sensor and head.
2*KGS
220
*
All product names mentioned in this document are trademarks or registered trademarks of their respective owners.
202
Copyright © 2002 ROLAND CORPORATION
All rights reserved. No part of this publication may be reproduced in any
form without the written permission of ROLAND CORPORATION.
USING THE UNIT SAFELY
The
symbol alerts the user to important instructions
or warnings.The specific meaning of the symbol is
determined by the design contained within the
triangle. In the case of the symbol at left, it is used for
general cautions, warnings, or alerts to danger.
Used for instructions intended to alert
the user to the risk of death or severe
injury should the unit be used
improperly.
Used for instructions intended to alert
the user to the risk of injury or material
damage should the unit be used
improperly.
* Material damage refers
other adverse effects
respect to the home
furnishings, as well
animals or pets.
to damage or
caused with
and all its
to domestic
001
• Before using this unit, make sure to read the
instructions below, and the Owner’s
Manual.
..................................................................................................
002c
• Do not open (or modify in any way) the unit
or its AC adaptor.
..................................................................................................
• Do not attempt to repair the unit, or replace
parts within it (except when this manual
provides specific instructions directing you
to do so). Refer all servicing to your retailer,
the nearest Roland Service Center, or an
authorized Roland distributor, as listed on
the "Information" page.
..................................................................................................
004
• Never use or store the unit in places that
are:
• Subject to temperature extremes (e.g.,
direct sunlight in an enclosed vehicle,
near a heating duct, on top of heat-generating equipment); or are
• Damp (e.g., baths, washrooms, on wet
floors); or are
• Humid; or are
• Exposed to rain; or are
• Dusty; or are
• Subject to high levels of vibration.
..................................................................................................
005
• This unit should be used only with the
stand that is recommended by Roland (PDS2).
..................................................................................................
006
• When using the unit with the stand recommended by Roland (PDS-2), the PDS-2 must
be carefully placed so it is level and sure to
remain stable. If not using a rack or stand,
you still need to make sure that any location
you choose for placing the unit provides a
level surface that will properly support the
unit, and keep it from wobbling.
..................................................................................................
003
2
The
symbol alerts the user to items that must never
be carried out (are forbidden). The specific thing that
must not be done is indicated by the design contained
within the circle. In the case of the symbol at left, it
means that the unit must never be disassembled.
The ● symbol alerts the user to things that must be
carried out. The specific thing that must be done is
indicated by the design contained within the circle. In
the case of the symbol at left, it means that the powercord plug must be unplugged from the outlet.
008b
• Use only the specified AC adaptor (BOSS
PSA series), and make sure the line voltage
at the installation matches the input voltage
specified on the AC adaptor’s body. Other
AC adaptors may use a different polarity, or
be designed for a different voltage, so their
use could result in damage, malfunction, or
electric shock.
..................................................................................................
009
• Do not excessively twist or bend the power
cord, nor place heavy objects on it. Doing so
can damage the cord, producing severed
elements and short circuits. Damaged cords
are fire and shock hazards!
..................................................................................................
010
• This unit, either alone or in combination
with an amplifier and headphones or
speakers, may be capable of producing
sound levels that could cause permanent
hearing loss. Do not operate for a long
period of time at a high volume level, or at a
level that is uncomfortable. If you
experience any hearing loss or ringing in the
ears, you should immediately stop using the
unit, and consult an audiologist.
..................................................................................................
011
• Do not allow any objects (e.g., flammable
material, coins, pins); or liquids of any kind
(water, soft drinks, etc.) to penetrate the
unit.
..................................................................................................
012c
104
• Immediately turn the power off, remove the
AC adaptor from the outlet, and request
servicing by your retailer, the nearest
Roland Service Center, or an authorized
Roland distributor, as listed on the "Information" page when:
• The AC adaptor or the power-supply
cord has been damaged; or
• Objects have fallen into, or liquid has
been spilled onto the unit; or
• The unit has been exposed to rain (or
otherwise has become wet); or
• The unit does not appear to operate
normally or exhibits a marked change in
performance.
..................................................................................................
013
• In households with small children, an adult
should provide supervision until the child is
capable of following all the rules essential
for the safe operation of the unit.
..................................................................................................
014
• Protect the unit from strong impact.
(Do not drop it!)
• Try to prevent cords and cables from
becoming entangled. Also, all cords and
cables should be placed so they are out of
the reach of children.
..................................................................................................
106
• Never climb on top of, nor place heavy
objects on the unit.
..................................................................................................
• Do not force the unit’s power-supply cord
to share an outlet with an unreasonable
number of other devices. Be especially
careful when using extension cords—the
total power used by all devices you have
connected to the extension cord’s outlet
must never exceed the power rating (watts/
amperes) for the extension cord. Excessive
loads can cause the insulation on the cord to
heat up and eventually melt through.
..................................................................................................
016
• Before using the unit in a foreign country,
consult with your retailer, the nearest
Roland Service Center, or an authorized
Roland distributor, as listed on the "Information" page.
..................................................................................................
019
• Batteries must never be recharged, heated,
taken apart, or thrown into fire or water.
015
..................................................................................................
101b
• The unit and the AC adaptor should be
located so their location or position does not
interfere with their proper ventilation.
..................................................................................................
102d
• Always grasp only the plug or the body of
the AC adaptor when plugging into, or
unplugging from, an outlet or this unit.
..................................................................................................
103b
• Whenever the unit is to remain unused for
an extended period of time, disconnect the
AC adaptor.
..................................................................................................
..................................................................................................
107d
• Never handle the AC adaptor body, or its
plugs, with wet hands when plugging into,
or unplugging from, an outlet or this unit.
..................................................................................................
108b
• Before moving the unit, disconnect the AC
adaptor and all cords coming from external
devices.
..................................................................................................
109b
• Before cleaning the unit, turn off the power
and unplug the AC adaptor from the outlet
(p. 9).
..................................................................................................
110b
• Whenever you suspect the possibility of
lightning in your area, disconnect the AC
adaptor from the outlet.
..................................................................................................
111: Selection
• If used improperly, batteries may explode
or leak and cause damage or injury. In the
interest of safety, please read and observe
the following precautions (p. 9).
1
• Carefully follow the installation instructions for batteries, and make sure you
observe the correct polarity.
2
• Avoid using new batteries together with
used ones. In addition, avoid mixing
different types of batteries.
3
• Remove the batteries whenever the unit
is to remain unused for an extended
period of time.
5
• If a battery has leaked, use a soft piece of
cloth or paper towel to wipe all remnants
of the discharge from the battery
compartment. Then install new batteries.
To avoid inflammation of the skin, make
sure that none of the battery discharge
gets onto your hands or skin. Exercise
the utmost caution so that none of the
discharge gets near your eyes. Immediately rinse the affected area with running
water if any of the discharge has entered
the eyes.
6
• Never keep batteries together with
metallic objects such as ballpoint pens,
necklaces, hairpins, etc.
..................................................................................................
112
• Used batteries must be disposed of in
compliance with whatever regulations for
their safe disposal that may be observed in
the region in which you live.
..................................................................................................
118
• Should you remove tuning bolts and
washers, make sure to put them in a safe
place out of children's reach, so there is no
chance of them being swallowed accidentally.
..................................................................................................
3
IMPORTANT NOTES
291a
In addition to the items listed under “USING THE UNIT SAFELY” on page 2, please read and
observe the following:
Power Supply
301
• Do not use this unit on the same power circuit with
any device that will generate line noise (such as an
electric motor or variable lighting system).
302
• The AC adaptor will begin to generate heat after
long hours of consecutive use. This is normal, and is
not a cause for concern.
303a
• The use of an AC adaptor is recommended as the
unit’s power consumption is relatively high. Should
you prefer to use batteries, please use the alkaline
type.
304a
• When installing or replacing batteries, always turn
off the power on this unit and disconnect any other
devices you may have connected. This way, you can
prevent malfunction and/or damage to speakers or
other devices.
306b
• Batteries are supplied with the unit. The life of these
batteries may be limited, however, since their
primary purpose was to enable testing.
307
• Before connecting this unit to other devices, turn off
the power to all units. This will help prevent
malfunctions and/or damage to speakers or other
devices.
Placement
352a
• This device may interfere with radio and television
reception. Do not use this device in the vicinity of
such receivers.
352b
• Noise may be produced if wireless communications
devices, such as cell phones, are operated in the
vicinity of this unit. Such noise could occur when
receiving or initiating a call, or while conversing.
Should you experience such problems, you should
relocate such wireless devices so they are at a
greater distance from this unit, or switch them off.
354a
• Do not expose the unit to direct sunlight, place it
near devices that radiate heat, leave it inside an
enclosed vehicle, or otherwise subject it to temperature extremes. Excessive heat can deform or
discolor the unit.
355
• To avoid possible breakdown, do not use the unit in
a wet area, such as an area exposed to rain or other
moisture.
Maintenance
401a
• For everyday cleaning wipe the unit with a soft, dry
cloth or one that has been slightly dampened with
water. To remove stubborn dirt, use a cloth impregnated with a mild, non-abrasive detergent. Afterwards, be sure to wipe the unit thoroughly with a
soft, dry cloth.
402
• Never use benzine, thinners, alcohol or solvents of
any kind, to avoid the possibility of discoloration
and/or deformation.
Additional Precautions
553
• Use a reasonable amount of care when using the
unit’s buttons, sliders, or other controls; and when
using its jacks and connectors. Rough handling can
lead to malfunctions.
4
554
• Never strike or apply strong pressure to the display.
• When connecting / disconnecting all cables, grasp
the connector itself—never pull on the cable. This
way you will avoid causing shorts, or damage to the
cable’s internal elements.
558a
• To avoid disturbing your neighbors, try to keep the
unit’s volume at reasonable levels. You may prefer
to use headphones, so you do not need to be
concerned about those around you (especially when
it is late at night).
558d
• This instrument is designed to minimize the extraneous sounds produced when it’s played. However,
since sound vibrations can be transmitted through
floors and walls to a greater degree than expected,
take care not to allow these sounds to become a
nuisance to neighbors, especially when performing
at night and when using headphones.
559a
• When you need to transport the unit, package it in
the box (including padding) that it came in, if
possible. Otherwise, you will need to use equivalent
packaging materials.
562
• Use the included cable or a cable from Roland to
make the connection. If using some other make of
connection cable, please note the following precautions.
• Some connection cables contain resistors. Do not
use cables that incorporate resistors for connecting
to this unit. Since the sensitivity of the pad will be
diminished, the sound may become extremely soft
or even inaudible. For information on cable specifications, contact the manufacturer of the cable.
add1
• The hoop’s rubber portion is an expendable item,
whose performance deteriorates with extended use.
Continued use of this rubber component beyond its
useful service life may result in malfunction or
damage to the hoop. If this occurs, replace the hoop
and insert.
For more on replacing the hoop rubber, consult with
your retailer, the nearest Roland Service Center, or
an authorized Roland distributor, as listed on the
"Information" page.
add2
• Do not apply excessive force to the sensor located
below the center of the head. Doing so can interfere
with accurate detection, and may damage it.
add3
• Due to the nature of the materials used in the sensor,
changes in room temperature may affect the sensitivity of the sensor.
add4
• Be sure to adjust the head tension before using the
RP-2. Striking the pad while the head is loosened
may damage the sensor and head.
985
• The explanations in this manual include illustrations
that depict what should typically be shown by the
display. Note, however, that your unit may incorporate a newer, enhanced version of the system (e.g.,
includes newer sounds), so what you actually see in
the display may not always match what appears in
the manual.
556
Table of Contents
USING THE UNIT SAFELY ..................................................................... 2
IMPORTANT NOTES............................................................................... 4
Table of Contents ................................................................................... 5
Introduction............................................................................................. 6
Main Features .............................................................................................................. 6
What’s in the Package ................................................................................................ 6
Panel Descriptions ................................................................................. 7
RHYTHM COACH (RM-2) ....................................................................................... 7
V-PRACTICE PAD (RP-2) ......................................................................................... 8
Preparations............................................................................................ 9
Operation of the RM-2 ......................................................................... 13
Sounding the Metronome........................................................................................ 13
Setting the Metronome to Play in Time with the Tapped Tempo (Tap Tempo) ... 13
Changing the Metronome Settings ................................................................. 13
Parameter List .................................................................................................... 13
Setting the Sound and the Sensitivity .................................................................... 15
Connecting Two RP-2 Pads.............................................................................. 15
Parameter List .................................................................................................... 16
COACH Mode........................................................................................................... 18
Parameter List .................................................................................................... 18
Accuracy and Timing Exercises....................................................................... 18
Endurance and Stamina Exercises................................................................... 20
Restoring the Factory Settings (Factory Reset)..................................................... 22
If an Error Message Appears................................................................................... 22
Advanced Use....................................................................................... 23
Connecting Pads Other Than the RP-2 .................................................................. 23
Connecting the Pads.......................................................................................... 23
Connecting Pads Capable of Playing Rim Shots........................................... 24
How to Set the Trigger Parameters ................................................................. 26
Parameter List .................................................................................................... 27
Specifications ....................................................................................... 31
Index ...................................................................................................... 32
5
Introduction
Thank you, and congratulations on your choice of this Roland product.
This Owner’s Manual contains information and instructions concerning both the RHYTHM
COACH (RM-2) and the V-PRACTICE PAD (RP-2). If you have purchased only the
RHYTHM COACH (RM-2), then refer only to the relevant portions.
Main Features
RHYTHM COACH (RM-2)
• LED indicators for the metronome, that
essential practice tool. Now you can
follow the beat visually as well for even
RM-2
better practices.
RP-2
• Includes carefully selected sounds for rich
expressions.
• Features an enjoyable “Intelligent Coach”
function, which can help you to progress
more effectively (p. 18).
• Simple to operate and designed for easy
viewing, the unit is housed in a compact
body that is portable and convenient.
PDS-2
• Can used to practice along with sounds on
(Option)
CDs and MDs (Mix In).
• Best used with a V-PRACTICE PAD (RP-2).
• Tempos can be changed not only from the
RM-2, but by striking the pads as well (p. 13).
• Compatible with PD-80R/120 rim sensors,
allowing you to play rim shots (p. 24).
• If you use both trigger inputs, you can
practice using two pads you’ve connected. Or, you can get in some practice on the kick drum
by connecting a KD-7 (p. 23).
• Offers extended battery-powered operation. An AC adaptor (sold separately) can also be used.
V-PRACTICE PAD (RP-2)
• Uses the same type of mesh head as used with Roland’s V-Drums Series. Superior feel and
quiet striking make it an excellent choice for practice.
• The head can be adjusted to the desired tension.
• A special pad stand (PDS-2) (sold separately) that allows you to change the height and angle
as desired. Whether standing or seated, this is perfect for extended practice sessions.
What’s in the Package
RHYTHM COACH (RM-2)
V-PRACTICE PAD (RP-2) *1
Owner’s manual (this document)
Connection cable *1
0.2 m or 7 - 7/8 inches (monaural)
Tuning key *1
RM-2/RP-2 mounting screw x 2 *2
Dry battery (LR6 (AA) type) x 4
* 1 Not included with the purchase of the RHYTHM COACH (RM-2) alone.
* 2 When the RHYTHM COACH (RM-2) and the V-PRACTICE PAD (RP-2) are purchased as a set,
they are already attached together with the screws.
6
Panel Descriptions
RHYTHM COACH (RM-2)
fig.01-01
9
8
7
1
6
2
3
4
5
1. [VOLUME] knob
Adjusts the output volume from the
HEADPHONES/OUTPUT jack.
2. Display
Displays the tempo and other information.
Additionally, the Trigger 1 and 2
indicators flash when the corresponding
pads connected to Trigger Input 1 and 2
are struck.
The BATTERY LOW indicator flashes
when the battery power runs low (p. 9).
fig.01-05
Battery low indicator
Trigger 1, 2 indicators
3. Buzzer
If nothing is connected to the
HEADPHONES/OUTPUT jack, the
metronome’s beep sound is played
from here. Pad sounds are not played.
4. Value [
][
] button
5. [TAP] button
Adjusts the metronome tempo to
match the timing used to tap the button
or strike the pad (p. 13).
6. Holes for mounting the RP-2.
7. [METRONOME] button
Starts and stops the metronome.
8. [SELECT] button
Provides for selection among the eight
parameters shown along the top of the
RM-2. Press the [SELECT] button to
cycle through the available choices,
from BEAT through COACH, and then
return to the normal tempo screen. If
you hold down the [SELECT] button
while you press the [ ] button, you
can select parameters in the reverse
order.
9. Parameter Indicators
These function as metronome
indicators.
Additionally, the indicator for the
selected parameter flashes.
Use these buttons to change the values
of each parameter.
To increase the value rapidly, first hold
down [ ], then hold down[ ]. To
decrease the value rapidly, first hold
down [ ], then hold down [ ].
(When the RM-2 displays the
metronome's tempo, the value changes
in a stepped manner, similar to that of a
standard metronome.)
7
Panel Descriptions
fig.01-02
4
CD/MD deck,
cassette player, etc.
3
2
5
6
AC adaptor
7
1
Headphones
4. MIX IN jack
1. Trigger Input 1
2. Trigger Input 2
Use these inputs to connect pads.
* You can connect various pads other than
RP-2 to the RM-2, and also connect two
pads at the same time using the Trigger
Input 1 and 2. Refer to "Connecting Two
RP-2 Pads" (p. 15) to use two RP-2, and
"Connecting Pads Other Than the RP-2"
(p. 23) to use other pads.
3. HEADPHONES/OUTPUT jack
Connect this to your headphones, amp,
or audio system.
* The RM-2 outputs sounds in monaural.
Connect this to your CD, MD, or other
similar device, and you can play along
with them.
5. Security Slot (
988
)
http://www.kensington.com/
6. DC IN jack
Connect the AC Adapter (Optional)
here (p. 9).
7. POWER switch
This switch turns the power on/off (p.
10).
V-PRACTICE PAD (RP-2)
fig.01-04
Head
Output Jack
J
Washer
Frame
ame
Tuning Bolt
Security
Slot
Rubber Feet
Rub
Hoop (Rim)
here.
Mount the RM-2 here
8
Sensor
Stand Fixing Nut (M8)
Preparations
921
•To prevent malfunction and/or damage to speakers or other devices, always turn
down the volume, and turn off the power on all devices before making any
connections.
•When turning the unit upside-down, get a bunch of newspapers or magazines,
and place them under the four corners or at both ends to prevent damage to the
buttons and controls. Also, you should try to orient the unit so no buttons or
controls get damaged.
•When turning the unit upside-down, handle with care to avoid dropping it, or
allowing it to fall or tip over.
928
929
Loading the Batteries
Confirm that the power to the unit is turned off, and the “+” and “-” ends of the included
batteries are oriented correctly.
fig.03-01
SER. NO.
DC 6 V (1.5 V 4)
R6 / LR6 SIZE (AA)
MADE IN CHINA
When changing the batteries, replace only with four size AA alkaline batteries. Do not mix
new batteries with old ones.
With alkaline batteries, you get approximately ten hours of continuous operation at
normal temperatures (may vary according to usage conditions).
When It’s Time to Change the Batteries
944a
The Battery Low indicator begins to flash when the battery power drops. Insufficient battery
power degrades the sound quality and cause unstable operation. Replace the batteries as
soon as possible.
fig. 03-02
Begins to flash
when the batteries
are low.
Connecting the AC Adaptor
The BOSS PSA-series AC adaptor (sold separately) can be used to run the RM-2 from a
household electrical outlet.
Use only the BOSS PSA-series AC adaptor. Other adaptors may cause faulty
operation or damage to the RM-2 and must never be used.
9
Preparations
Mounting the Sound Module on the Pad
1. Use the screws provided to mount the sound module (the RM-2) on the pad (the RP-2) as
shown below.
fig.
If the RM-2 and RP-2 are purchased as a set, they are already attached together with
the screws.
2. Use the included cable to connect the RP-2’s OUTPUT jack to the RM-2’s Trigger Input 1.
When you strike the pad, the Trigger 1 indicator flashes, indicating the pad is played.
Using a connection cable that contains a resistor can cause the sound level to be low.
Use a connection cable that does not contain a resistor.
926
3. When connecting two RP-2 pads, connect the OUTPUT jack of the second RP-2 to the RM-2’s
Trigger Input 2 (p. 15).
When you strike the pad, the Trigger 2 indicator flashes, indicating the pad is played.
Turning the Power On and Off
941
•Once the connections have been completed, turn on power to your various devices
in the order specified. By turning on devices in the wrong order, you risk causing
malfunction and/or damage to speakers and other devices.
•Be sure to connect your headphone after turning on the power. Turning on the
device in the wrong order can cause malfunction and/or damage to headphones
and other devices.
•Always make sure to have the volume level turned down before switching on
power. Even with the volume all the way down, you may still hear some sound
when the power is switched on, but this is normal, and does not indicate a
malfunction.
1. Turn the [VOLUME] knob completely to the left to lower the volume to the minimum level.
943
2. Turn down the volume control on the connected amp or audio system.
3. Turn on the [POWER] switch.
4. Connect the headphone or amp.
5. Turn on the power of the connected amp or audio system.
6. Listen to the sound while striking the pad, and gradually rotate the [VOLUME] knob to
adjust the volume level.
When connecting to an amp or audio system, first adjust the volume to an appropriate level.
10
Preparations
When turning off the power:
1. Completely turn down the volume of the RM-2 and any connected external devices.
2. Turn off the power to all external devices.
3. Turn off the RM-2.
Adjusting the Head Tension
When adjusting, use the included tuning key.
* Striking the pad with a loose head may damage the sensor. Furthermore, if you use the pad without it
being properly adjusted, you would likely to experience such problems as the following.
•
•
Sometimes it does not sound (uneven volume).
The volume is too low (reduced sensitivity).
fig.03-05
While continuing to check the feel and response, use the tuning key to adjust all eight tuning
bolts until the tension is properly adjusted. Always tighten the tuning bolts in the order
shown in the figure.
•The proper tension is achieved when the feel and response of the head as you
strike the pad is about the same as that of an acoustic drum.
•Head tension may change with extended use of the pad. Make adjustments as
needed.
•On the V-PRACTICE PAD (RP-2), adjusting the head tension affects only the head
response, and does not change the pitch of the sound, as it would on an acoustic
drum.
Do not tighten any one tuning bolt too firmly all at once. Doing so keeps the head
from stretching evenly throughout, which can cause malfunction.
11
Preparations
Replacing the Head
The head is an expendable item, whose performance deteriorates with extended use. If the
head has torn out or remains slack even after proper adjustment, then replace the head.
Replacement heads (sold separately)
MH-8 Mesh Head
Replacing the Head
When replacing, use the included tuning key.
1. Remove all tuning bolts and washers.
Go around and gradually loosen each one in order (by turning it counterclockwise).
Be careful not to lose the tuning bolts and washers that you removed.
2. Remove the hoop.
3. Remove the old head.
4. Place the new head on the frame.
5. Place the hoop onto the head.
6. Pass the tuning bolts through the washers, then attach them to the hoop and frame.
7. Tighten all eight tuning bolts until they lightly contact the hoop.
8. Next, adjust the tension of the head. Refer to "Adjusting the Head Tension" (p. 11).
12
Operation of the RM-2
Sounding the Metronome
To play the metronome sound, press the [METRONOME] button.
Press the [ ] or [ ] button to adjust the tempo. You can adjust the tempo between 10 and
300 BPM.
■ Setting the Metronome to Play in Time with the Tapped
Tempo (Tap Tempo)
You can adjust the metronome tempo by tapping the [TAP] button or striking the pad in time
with a song’s tempo.
1. Press the [TAP] button.
The tempo value flashes in the display.
2. Press the [TAP] button or strike a connected pad several times in time with the song’s tempo.
The same sound as that selected for the metronome will sound.
The metronome’s tempo will adopt the timing you’ve used while tapping the button or striking the pad.
3. When you decide that the tempo is correct, either hold down the [TAP] button for at least two
seconds, or press the [SELECT] or [METRONOME] button to set the value. If you press the
[METRONOME] button, the metronome starts.
If you tap the pad while the metronome is on, you can adjust the tempo while
monitoring the resulting change.
■ Changing the Metronome Settings
fig.04-01
You can change the metronome beat, rhythm type, sound, volume, and display.
Instruments
Rhythm Type
Volume
Beat
Display Mode
1. Press the [SELECT] button to select the parameter to be changed.
Hold down the [SELECT] button and press the [ ] button to have selections come
up in the reverse order.
2. Press the [ ] or [ ] button to set the values for each parameter.
For more detailed information on each individual parameter, refer to the Parameter List that
follows.
3. Press the [SELECT] button until you return to the normal tempo screen.
You can also return to the normal tempo screen by holding down the [SELECT]
button for at least two seconds.
■ Parameter List
BEAT
Changes the beat of the metronome.
0–13, 2-3, 3-2, 3-4, 4-3
13
Operation of the RM-2
RHYTHM TYPE
This allows you to choose the type of rhythm the metronome plays.
fig.
Counts at the top of
the measure.
(16th note)
(half note)
(16th note)
(quarter note)
(16th note)
(8th note)
(8th note)
(16th-note triplets)
3 - 2 Son Clave
2 - 3 Son Clave
(8th-note triplet)
3 - 2 Rumba Clave
(8th-note triplet)
2 - 3 Rumba Clave
METRONOME INST
Changes the metronome sound.
INST No.
1
2
3
4
5
6
7
8
9
10
11
Instruments
Traditional metronome
Electric beep
Simple electric
Unique sweep
Zap
Hi-hat
Cowbell
Shaker
Claves
Sticks
Voice
* If you set the tempo too fast, the metronome sound may occasionally drop out.
A beep tone is played when nothing is connected to the HEADPHONE/OUTPUT jack. You
can select beep sound from 1–7.
14
Operation of the RM-2
METRONOME LEVEL
Adjusts the metronome’s volume level.
off, 1–8
off, 1–2 (Adjusts the volume of the metronome sound that is heard when nothing is
connected to the HEADPHONE/OUTPUT jack.)
METRONOME MODE
Changes the metronome display.
off, 1–7
Setting the Sound and the Sensitivity
The RM-2 features 28 different drum sounds, which can add rich expression to your
performances.
Additionally, you can fine-tune the sensitivity of the connected pads will have, allowing you
to achieve just the right feel and response.
fig.04-03
Sensitivity
Instruments
1. Press the [SELECT] button to select the parameter to be changed.
Hold down the [SELECT] button and press the [
up in the reverse order.
2. Press the [ ] or [
parameters.
] button to have selections come
] button to set the values for the “PAD INST” and the “PAD SENS”
For more detailed information on each individual parameter, refer to the Parameter List that
follows.
3. Press the [SELECT] button until you return to the normal tempo screen.
You can also return to the normal tempo screen by holding down the [SELECT]
button for at least two seconds.
■ Connecting Two RP-2 Pads
With two RP-2 pads connected to Trigger Input 1 and 2, you can make different sound
settings for each pad.
1. Press the [SELECT] button to select “PAD INST.”
2. Strike the pad connected to Trigger Input 1.
When you strike the pad, the Trigger 1 indicator flashes, indicating the pad being set.
3. Press the [
] or [
] button to set the values for the “PAD INST.”
4. Change the “PAD SENS” setting.
5. Now strike the pad connected to Trigger Input 2.
When you strike the pad, the Trigger 2 indicator flashes, indicating the pad being set.
6. Change the “PAD INST” and “PAD SENS” settings.
15
Operation of the RM-2
■ Parameter List
PAD INST
Select the sound to be played when you strike the pad.
1
2
3
4
5
6
7
8
9
10
11
12
13
14
15
16
17
18
19
20
21
22
23
24
25
26
27
Instruments
Maple snare (14" x 6-1/2")
Steel snare (14" x 5-1/2")
Brass snare (14" x 5-1/2")
Brass snare rim (14" x 5-1/2")
Maple piccolo snare (14" x 3-1/2")
Maple piccolo snare rim (14" x 3-1/2")
Brass piccolo snare (14" x 3-1/2")
13 inch snare
Deep shell snare
Marching snare
Marching snare rim
Marching tenor drum
Hi tom-tom (10")
Mid tom-tom (12")
Lo tom-tom (14")
Marching quad-tom 1 (8")
Marching quad-tom 2 (10")
Marching quad-tom 3 (12")
Marching quad-tom 4 (13")
Bass drum (22")
Marching bass drum 1 (18")
Marching bass drum 2 (24")
Hi timbale (rim shot)
Lo timbale
Cowbell
Claves
Practice board 1
28
Practice board 2
Description
*1
*1
*2
*2
*3
*3
soft: same #3 inst / hard: rim shot
soft: same #5 inst / hard: rim shot
soft: side stick / hard: rim shot
soft: muffled / hard: open shot
Clear, well-defined sounds good
for improving your stick technique.
The sound changes when you
strike the pad strongly. Good for
practicing the use of accents.
*1, 2, 3
Use two sounds marked with the same footnote number (3 and 4, 5 and 6, 10 and 11) when
using a rim-shot capable pad (PD-80R/120). For more detailed information, refer to
"Connecting Pads Capable of Playing Rim Shots" (p. 24). The optimum effect cannot be
achieved if a pad that is not capable of playing rim shots is used.
16
Operation of the RM-2
PAD SENS
1–16
Adjust the Sensitivity of the pad to regulate the pad response. Higher settings result in
higher sensitivity, so that the pad will produce a loud volume even when struck softly.
When you strike the pad, the strength with which the pad is struck (velocity) is
shown in the display on a six-level scale.
Set the velocity at a value of 127 when you strike the pad most forcefully.
fig.
Strength
of Striking
Hard
Velocity
127
100–126
75–99
50–74
25–49
Soft
1–24
17
Operation of the RM-2
COACH Mode
The RM-2’s Coach mode is a unique set of exercise modes developed for maximizing the
practice experience. These modes are specifically designed to help build speed, accuracy and
stamina, as well as develop better timing skills. Throughout the Coach modes, you will
discover that many of them have programmable parameters. This is to provide a wide range
of practicing levels to accommodate a wide range of practicing abilities.
1. Press the [SELECT] button until “COACH” is flashing.
The display shows
2. Use the [
] or [
(Coach), and the RM-2 enters into the Coach mode.
] button until “
“ is displayed.
3. Push the [METRONOME] button to begin the exercise.
•Selecting the Coach mode while the Metronome is working stops the metronome.
•If you press the [SELECT] button while in the Coach mode, the Coach mode is
exited.
In Coach mode, you can press the [TAP] button to change the tempo before pressing
the [METRONOME] button to start the exercise. Either strike the pad at the desired
tempo, or adjust the tempo using the [ ] or [ ] button.
■ Parameter List
–
Rhythmic Notes
Time Check
Quiet Count
Speed Check
Gradual Up
Gradual Down
Gradual Up/Down
Step Up
Step Down
Step Up/Down
Timer
Accuracy and Timing Exercise (4
types)
Endurance and Stamina Exercise
(6 types)
(8 types)
■ Accuracy and Timing Exercises
Rhythmic Notes (
)
Rhythmic Notes serves as an excellent warm up exercise as well as a teaching exercise for
learning rhythmic note values. In this mode, the metronome plays through a series of note
intervals or beat divisions. Each note interval or beat division is played for 2 measures before
moving on to the next interval level. The exercise starts with half notes, graduating through
beat division intervals up to 16th-note triplets, then graduating back down to half notes.
fig. (2->4->8->triplet)
Start
1. In the Coach mode, use the [
] or [
] button until “
“ is displayed.
2. Push the [METRONOME] button to begin the exercise.
You can change tempo during the exercise using the [
18
] or [
] button.
Operation of the RM-2
Time Check (
)
Time Check mode is designed to help develop timing skills with the goal of playing exactly
with the beat of the metronome. The beats played on the pad are measured against the
timing of the metronome, and the result is displayed.
fig. (7seg display)
Behind the beat (too slow).
On the beat (perfect timing).
Ahead of the beat (too fast).
1. In the Coach mode, use the [
] or [
] button until “
“ is displayed.
2. Push the [METRONOME] button to begin the exercise.
You can change tempo during the exercise using the [
Quiet Count (
] or [
] button.
)
Quiet Count mode is a timing exercise designed to develop and learn “internal” timing. In
this mode, the metronome will play at the set volume level for the first eight measures then
play the second eight measures at a reduced volume. The eight measure cycle of loud and
soft counts will continue until stopped.
1. In the Coach mode, use the [
] or [
] button until “
“ is displayed.
2. Push the [METRONOME] button to begin the exercise.
You can change tempo during the exercise using the [
Speed Check (
] or [
] button.
)
Speed Check mode is very similar to the Time Check mode in that the goal is to play exactly
in time with the metronome. With Speed Check, when a rhythm is played for eight measures
with the correct timing of the metronome, the RM-2 will acknowledge the performance and
advance 5 beats per minute (5 BPM) faster. This will continue until the metronome’s
maximum tempo is achieved.
1. In the Coach mode, use the [
] or [
] button until “
“ is displayed.
2. Once the [METRONOME] button is pressed, there will be a two measure count in before
Speed Check begins.
If you've played it with the correct timing, the indication in the display will flash
four times, then the BPM will be increased by five. If you were unsuccessful, the
display will flash only one time, and the unit will remain at the same tempo.
19
Operation of the RM-2
■ Endurance and Stamina Exercises
Gradual Up (
)
Gradual Up mode is specifically designed to build speed in a short period of time. In this
mode, the metronome’s tempo will increase by one beat per minute (1 BPM) after every two
beats. This will continue until the metronome’s maximum tempo is achieved.
1. In the Coach mode, use the [
] or [
] button until “
“ is displayed.
2. Push the [METRONOME] button to begin.
After starting the metronome, you can set the desired maximum tempo by pushing
the [ ] button when it reaches the desired tempo. To clear the maximum tempo,
press the [ ] button (initial value: 300).
Gradual Down (
)
Gradual Down mode is designed to begin at a fast pace and gradually slow. In this mode, the
metronome’s tempo will decrease by one beat per minute (1 BPM) after every two beats. This
will continue until the metronome’s minimum tempo is achieved.
1. In the Coach mode, use the [
] or [
] button until “
“ is displayed.
2. Push the [METRONOME] button to begin.
After starting the metronome, you can set the desired minimum tempo by pushing
the [ ] button when it reaches the desired tempo. To clear the minimum tempo,
press the [ ] button (initial value: 10).
Gradual Up/Down (
)
Gradual Up/Down mode is designed to increase playing stamina by slowly increasing and
then decreasing the speed of the metronome. In this mode, the metronome’s tempo will
increase by one beat per minute (1 BPM) after every two beats until it reaches the
metronome’s maximum tempo. After the maximum tempo is achieved, the metronome’s
tempo will decrease by one beat per minute (1 BPM) after every two beats. This will continue
until it reaches back to the metronome’s starting tempo and then repeat the process.
1. In the Coach mode, use the [
] or [
] button until “
“ is displayed.
2. Push the [METRONOME] button to begin.
After starting the metronome, you can set the desired maximum tempo by pushing
the [ ] button when it reaches the desired tempo. To clear the maximum tempo,
press the [ ] button (initial value: 300).
Step Up (
)
Step Up mode is specifically designed to build speed and endurance at the same time. In this
mode, the metronome’s tempo will increase by five beats per minute (5 BPM) after every
eight measures. This will continue until the metronome’s maximum tempo is achieved.
1. In the Coach mode, use the [
] or [
] button until “
“ is displayed.
2. Push the [METRONOME] button to begin.
After starting the metronome, you can set the desired maximum tempo by pushing
the [ ] button when it reaches the desired tempo. To clear the maximum tempo,
press the [ ] button (initial value: 300).
20
Operation of the RM-2
Step Down (
)
Step Down mode is designed to begin at a fast pace and gradually slow thus building
stamina. In this mode, the metronome’s tempo will decrease by five beats per minute (5
BPM) after every eight measures. This will continue until the metronome’s minimum tempo
is achieved.
1. In the Coach mode, use the [
] or [
] button until “
“ is displayed.
2. Push the [METRONOME] button to begin.
After starting the metronome, you can set the desired minimum tempo by pushing
the [ ] button when it reaches the desired tempo. To clear the minimum tempo,
press the [ ] button (initial value: 10).
Step Up/Down (
)
Step Up/Down mode is designed to increase playing endurance by slowly increasing and
decreasing the speed of the metronome. In this mode, the metronome’s tempo will increase
by five beats per minute (5 BPM) after every eight measures until it reaches the metronome’s
maximum tempo. After the maximum tempo is achieved, the metronome’s tempo will
decrease by five beats per minute (5 BPM) after every eight measures. This will continue
until it reaches back to the metronome’s starting tempo and then repeat the process.
1. In the Coach mode, use the [
] or [
] button until “
“ is displayed.
2. Push the [METRONOME] button to begin.
After starting the metronome, you can set the desired maximum tempo by pushing
the [ ] button when it reaches the desired tempo. To clear the maximum tempo,
press the [ ] button (initial value: 300).
Timer (
–
)
The timer is a simple mode where an interval of time is set to play. Although simple, it’s
flexible nature allows the timer’s capabilities to provide a variety of useful practicing
exercises. It can build speed by playing very quickly in a short amount of time, or build
endurance by playing for a long period of time.
1. In the Coach mode, use the [
: 1 minute
: 2 minutes
: 3 minutes
: 5 minutes
] or [
] button to select one of the timing options.
: 10 minutes
: 15 minutes
: 30 minutes
: 60 minutes
2. Push the [METRONOME] button to begin.
3. The last minute will display a 60 second count down followed by an alarm and flashing lights
to signal the end of the timing period.
•While the “Timer“ is working, you cannot try any other Coach mode exercise.
•You can use the [SELECT] button to change things such as the “BEAT“ and
“RHYTHM TYPE.“
•If you stop the metronome in any mode other than Coach, the timer will continue
working. In that case, the [COACH] indicator flashes, indicating that the timer is
still working. If you want to stop the timer, press the [METRONOME] button in
the Coach mode.
21
Operation of the RM-2
Restoring the Factory Settings (Factory Reset)
This restores the settings stored in the RM-2 to the original factory settings.
This operation deletes all of the settings that have been stored on the RM-2.
1. While simultaneously holding down [ ], [SELECT], and the [METRONOME] button, turn
on the power.
The “COACH” indicator will flash and the display will show the following.
fig. 04-05
2. Press the [METRONOME] button to have the Factory Reset be carried out.
Should you decide that you don’t want to proceed with the Factory Reset, turn the power off.
If an Error Message Appears
This section lists the different error messages that may appear, along with their meanings
and measures to resolve the problems described.
Symptom 1: If all of the RM-2’s parameter indicators are flashing and the following appears in the
display, it could likely mean that the internal memory has been corrupted.
fig. 04-07
1. When you press the [METRONOME] button, the following appears, and the unit will be in a
state where a Factory Reset can be performed.
fig. 04-05
2. Press the [METRONOME] button once more to have a Factory Reset be performed.
If this fails to solve the problem, consult your dealer, or the nearest Roland Service Center.
This operation deletes all of the settings that have been stored on the RM-2.
Symptom 2: If all of the RM-2’s parameter indicators are flashing and the following appears in the
display, there may be a problem with the internal system. Consult your dealer or
nearest Roland Service.
fig. 04-08
* Press the [METRONOME] button, and you can return to the normal tempo screen.
22
Advanced Use
Connecting Pads Other Than the RP-2
Not only can you connect the RP-2 to the RM-2, you can connect other Roland V-Drums
Series pads as well. Depending on the trigger input settings, you may be able to connect two
pads, or connect a single rim-capable pad. However, each pad has its own individual
characteristics, so you may not be able to have a right pad sound merely by connecting it to
the RM-2. When connecting a pad, you must first make adjustments (the trigger types) that
are specific to the pad you’ve connected. This allows the pad to be recognized correctly.
Two Pads
One Rim-Shot Capable Pad
Trigger Input 1
Head
Head/Rim
Trigger Input 2
Head
–
* Trigger Input 2 is disabled when a rim-capable pad is connected.
■ Connecting the Pads
Connectable pads
RP-2, PD-80/100, PD-5/6/7/9, KD-7/80/120
If connecting a pad, such as the PD-80R or PD-120, that is capable of producing rim
shots, refer to the next section, "Connecting Pads Capable of Playing Rim Shots" (p.
24).
1. Connect compatible pads to Trigger Input 1 or 2.
2. Hold down the [SELECT] button and turn on the power.
The RM-2 is now in the mode in which the parameters can be set.
3. Press the [
] or [
] button to switch the Input Mode to
.
What is the Input Mode?
This is the mode in which you set what is to be connected to the Trigger Input. When
connecting one or two normal pads, select
; when connecting one pad that is
capable of playing rim shots, select
.
The default setting for this is
, which allows two RP-2 pads to be connected.
4. Press the [SELECT] button.
Once
appears in the display, you can select the Trigger Type.
Select the type for the connected pad:
(RP-2),
(PD-80/100),
(PD-5/6/7/
9), or
(KD-7/80/120).
When you strike a pad, the Trigger 1 or 2 indicator flashes, indicating the pad that is being
set. After checking the indicator to determine that the selected pad is the one you want to set,
make the trigger parameter settings.
The default setting for both Trigger Input 1 and 2 is
, the setting that allows two RP-2
pads to be connected.
For more detailed instructions on using the buttons, refer to "How to Set the Trigger
Parameters" (p. 26).
23
Advanced Use
What is the trigger type?
Trigger types are groups of parameter settings whose values are adjusted specifically
for each type of pad. When you select the trigger type for the connected pad, the
various trigger parameters are as a result automatically set to the proper values,
allowing you to play without further problems. You only make fine adjustments to
individual parameters for your pad if you are unable to get the pad to play right even
after selecting the appropriate trigger type.
5. If necessary, press the [SELECT] button to make fine adjustments to the trigger type
parameters.
For more detailed information about each parameter refer to the "Parameter List" (p.
27).
6. Press the [METRONOME] button to return to the normal tempo screen.
7. Set the pad sound and sensitivity.
While referring to "Connecting Two RP-2 Pads" (p. 15) in “Setting the Sound You’ll Hear and
the Sensitivity,” set the sound and sensitivity for the pad.
The RM-2 features kick drum sounds. With a KD-7/80/120 connected, you can then
practice using the combination of kick drum and pad. When using a KD-7/80/120, use
the “20: Bass drum (22"),” “21: Marching bass drum 1 (18"),” or “22: Marching bass
drum 2 (24")” sound.
■ Connecting Pads Capable of Playing Rim Shots
Connectable pads
PD-80R / 120
With the RM-2, you cannot play rim shots with the PD-7 or 9.
1. Connect a compatible pad to Trigger Input 1.
Be sure to use a stereo cable to connect the pad.
When connecting a pad that plays rim shots, always connect the cable to Trigger
Input 1, and do not connect anything to Trigger Input 2. The RM-2 will stop
functioning properly if a cable is connected to Trigger Input 2.
2. Hold down the [SELECT] button and turn on the power.
The RM-2 is now in the mode in which the parameters can be set.
3. Press the [
] or [
] button to switch the Input Mode to
.
Input Mode (p. 23)
4. Press the [SELECT] button.
Once
appears in the display, you can then select the Trigger Type.
Select the type for the pad being connected;
(PD-80R) or
(PD-120).
Trigger Type (p. 24)
24
Advanced Use
5. If necessary, press the [SELECT] button to make fine adjustments to the trigger type
parameters.
For more detailed information about each parameter, refer to the “Parameter List.”
For more detailed instructions on using the buttons, refer to "How to Set the Trigger
Parameters" (p. 26).
6. Press the [METRONOME] button to return to the normal tempo screen.
7. To set the sound and sensitivity for the head, strike the pad head. The Trigger 1 indicator
flashes.
8. Make the “PAD INST” and “PAD SENS” settings for the head.
When adjusting the rim sensitivity, follow the procedure starting at Step 5 to adjust
the “Rim Sensitivity.” “PAD SENS” is disabled in the rim settings.
9. To set the rim sound, strike the pad’s rim portion. The Trigger 2 indicator flashes.
10. Make the “PAD INST” setting for the rim.
PAD INST No. 4, 6, and 11 are the most suitable sounds for rim shots (p. 16)
25
Advanced Use
■ How to Set the Trigger Parameters
Buttons
• [SELECT] button
Selects the parameter (after the parameter name is displayed, the parameter’s value or type appears).
• Holding down the [SELECT] button and pressing [
Takes you back one parameter.
]
• Pressing [ ] or [ ]
Changes the parameter’s value.
• [METRONOME] button
Finalizes the settings that have been made, and takes you back to the screen displayed
during normal use.
Display
• Display
Parameter names and values are indicated here.
When making the settings for threshold, velocity curve, or scan time, the velocity value is shown
(p. 28).
• Trigger 1/Trigger 2 Indicators
When a pad connected to Trigger Input 1 or 2 is struck, the corresponding trigger input is
selected, and its indicator flashes. You can then change the trigger parameters for the pad
corresponding to the lit indicator.
This is not displayed when
is selected for the input mode. However, during
adjustment of the rim sensitivity, the Trigger 1 indicator lights up when you strike the
head, and Trigger 2 when you strike the rim.
• Eight Indicators (along the top of the RM-2)
The indicator for the selected parameter flashes (except for Input Mode and Trigger Type).
fig.05-01
Scan Time
Velocity Curve
Sensitivity
Threshold
26
Retrigger Cancel
Crosstalk Cancel
Mask Time
Rim Sensitivity
(selectable only when the
Input Mode is
.)
Advanced Use
■ Parameter List
Parameter
Input Mode
(displayed when turning on the power)
Value
Head x 2
Head & Rim
RP-2
PD-80/100
PD-80R
PD-120
PD-5/6/7/9
KD-7/80/120
Trigger Type
0–15
1–16
Threshold
Sensitivity
Velocity Curve
Scan Time
Retrigger Cancel
Crosstalk Cancel
Mask Time
,
,
,
,
,
,
0–4.0 ms
(adjustable in increments of 0.1 ms)
1–16
,
, 20–80
(adjustable in increments of 5)
0–64 ms
(adjustable in increments of 4 ms)
Rim Sensitivity*
, 1–20 (or —)
* Rim sensitivity is active when
is selected as the input mode.
This is disabled (—) when anything other than
or
is selected for the trigger
type.
Threshold
Sensitivity
0–15
This setting allows a trigger signal to be
received only when the pad is struck harder
than a specified force. This can be used to
prevent a pad from sounding in response to
extraneous vibrations from another pad. In
the following example, B will sound but A
and C will not sound.
1–16
Same value as PAD SENS. (p. 17)
fig.05-10_80
Threshold
A
B
C
Velocity Curve
This sets the way the volume changes in
accordance with how strongly the pad is
struck.
(Linear)
This is the normal setting. This produces the
most natural correspondence between the
strength of the strike and the change in
volume.
fig.05-11_80
Volume
When set to a higher value, no sound is
produced when the pad is struck lightly.
Gradually raise the Threshold value while
striking the pad. Check this and adjust
accordingly. Repeat this process until you
get the perfect setting for your playing style.
Striking Force
LINEAR
27
Advanced Use
,
(Exponential 1, Exponential 2)
Compared to Linear, a wider volume change
will occur for stronger hits.
fig.05-12_80
Volume
Volume
EXPONENTIAL 1
Striking Force
EXPONENTIAL 2
,
(Log 1, Log 2)
Compared to Linear, wider volume change
will occur for softer hits.
Scan Time
0–4.0 ms (adjustable in increments of 0.1 ms)
Since the rise time of the trigger signal
waveform may differ slightly depending on
the characteristics of each pad or acoustic
drum trigger (drum pickup), you may notice
that identical hits (velocity) may produce
sound at different volumes. If this occurs,
you can adjust the Scan Time so that your
velocity of playing can be detected more
precisely.
As the value is set higher, the time it takes
for the sound to be played increases. Set this
to as low a value as you can.
fig.05-16_80
fig.05-13_80
Volume
Scan Time
Volume
Time
Striking Force
LOG1
LOG2
(Spline)
Variation in striking force will produce
extreme change.
fig.05-14_80
Volume
Making the settings
While repeatedly hitting the pad at a
constant force, gradually raise the Scan Time
value from 0 msec, until the resulting
volume stabilizes at the loudest level. At this
setting, try both soft and loud strikes, and
make sure that the volume changes
appropriately.
When you strike the pad, the
strength with which the pad is
struck (velocity) is shown in the
display on a six-level scale.
Striking Force
SPLINE
,
(Loud 1, Loud 2)
Variation in striking force will produce little
change, and a constant volume will be
maintained. When using drum triggers,
these settings help maintain stable levels.
fig.05-15_80
Volume
Volume
Set the velocity at a value of 127 when you
strike the pad most forcefully.
fig.05-17_80
Strength
of Striking
Hard
Velocity
127
100–126
75–99
Striking Force
LOUD1
50–74
LOUD2
25–49
Soft
28
1–24
Advanced Use
Retrigger Cancel
Crosstalk Cancel
1–16
Altered waveforms may cause inadvertent
sounding at Point A in the following figure
(This is called retrigger).
OFF, 20–80 (adjustable in increments of 5)
When two pads are mounted on the same
stand, the vibration produced by hitting one
pad may trigger the sound from another pad
unintentionally (This is called crosstalk.) You
can avoid this problem by adjusting
Crosstalk Cancel on the pad that is sounding
inadvertently.
If the value is set too high, then when two
pads are played simultaneously, the one that
is struck less forcefully will not sound. So be
careful and set this parameter to the
minimum value required to prevent such
crosstalk. With a setting of “OFF,” crosstalk
prevention does not function.
fig.05-18_80
A
Time
This occurs in particular at the decaying edge
of the waveform. Retrigger Cancel detects
such distortion in and prevents retriggering
from occurring.
Although setting this to a high value
prevents retriggering, it then becomes easy
for sounds to be omitted when the drums
played fast (roll etc.). Set this to the lowest
value possible while still ensuring that there
is no retriggering.
You can also eliminate this problem
of retriggering with the Mask Time
setting. Mask Time does not detect
trigger signals if they occur within
the specified amount of time after
the previous trigger signal was
received. Retrigger Cancel detects
the attenuation of the trigger signal
level, and triggers the sound after
internally determining which
trigger signals were actually
generated when the head was
struck, while weeding out the other
false trigger signals that need not
trigger a sound.
Making the settings
While repeatedly striking the pad, raise the
Retrigger Cancel value until retriggering no
longer occurs.
In some cases, you can prevent
crosstalk between two pads you
have connected by increasing the
distance between the pads or by
raising the Threshold value.
You cannot prevent crosstalk from
pads connected to other drum
sound modules. Try increasing the
distance between such pads, or raise
the Threshold.
Making the settings
When hitting the pad connected to the
Trigger Input 1, the pad connected to the
Trigger Input 2 also sounds:
Set the Crosstalk Cancel for the pad
connected to the Trigger Input 2 while
striking the pad connected to the Trigger
Input 1. Striking the pad connected to the
Trigger Input 1, raise the Crosstalk Cancel
setting for the pad connected to the Trigger
Input 2 from “OFF” until crosstalk no longer
occurs. As this value is raised, the pad
connected to the Trigger Input 1 will be less
prone to receive crosstalk from the other
pad.
29
Advanced Use
MASK TIME
0–64 ms (adjustable in increments of 4 ms)
On a kick pad, for example, if the beater
bounces back and strikes the pad a second
time immediately after the intended strokeor, like with acoustic drums if you leave the
bass drum beater against the head-it can
cause a single strike to “double trigger” (two
sounds instead of the intended one). The
Mask Time setting helps to prevent such
problems. Once a pad has been hit, any
additional trigger signals occurring within
the specified Mask Time (0-64 msec) will be
ignored.
When set to a high value, it then becomes
easy for sounds to be omitted when the kick
is struck repeatedly in rapid succession. Set
this to as low a value as you can.
fig.05-19
Mask Time
Time
Sound not produced
If two or more sounds are being
produced when you strike the head
just once, then adjust Retrigger
Cancel.
Making the settings
While stepping on the pad being used for the
kick, raise the Mask Time value until there is
no more bouncing (sounds made by the
rebounding of the beater).
RIM SENSITIVITY
OFF, 1–20
When a PD-80R or PD-120 is connected, you
can then adjust the Rim Sensitivity.
Setting this to a higher value makes it easier
to get rim sounds. When set to “OFF,”
playing a rim shot produces the head
instrument’s sound. Increasing the value
excessively may cause the rim instrument to
sound as well when the head is struck.
30
This can be adjusted only when the
Input Mode is set to
. And the
Trigger Type is set to something
other than
or
,a
horizontal line (—) appears, and
you cannot make the setting.
Specifications
RM-2: RHYTHM COACH
RP-2: V-PRACTICE PAD
Maximum polyphony
4 voices (including 1 voice for Metronome)
Pad size
8 inches
Internal sounds
Pad inst: 28
Metronome inst: 11
Trigger
1 (Head)
Panel control
Volume knob: 1
Function select buttons: 5
Power switch: 1
Connectors
Trigger input jack: 2 (stereo 1/4 inch phone
type x 1, 1/4 inch phone type x 1)
Phones/Output jack: 1 (stereo miniature
phone type)
Mix in jack: 1 (miniature phone type)
AC adaptor jack
Power supply
Dry battery (LR6 (AA) type x 4) or DC 9V
AC adaptor
961
* Expected battery life under continuous use:
Alkaline: 10 hours
This figure will vary depending on the
actual conditions of use.
Current draw
150 mA
Dimensions
148 (W) x 96 (D) x 62 (H) mm
5-7/8 (W) x 3-13/16 (D) x 2-1/2 (H) inches
Weight
340 g / 12 oz (with batteries)
240 g / 9 oz (without batteries)
Dimensions
264 (W) x 297 (D) x 60 (H) mm
10-7/16 (W) x 11-3/4 (D) x 2-3/8 (H) inches
Weight
890 g
2 lbs
Stand screw size
M8
RM-2 and RP-2
Dimensions (RM-2 and RP-2)
264 (W) x 350 (D) x 62 (H) mm
10-7/16 (W) x 13-13/16 (D) x 2-1/2 (H) inches
Weight (including batteries)
1.2 kg
2 lbs 12 oz
Accessories
Dry battery (LR6 (AA) type) x 4
RM-2/RP-2 mounting screw x 2 *1
Connection cable (0.2 m or 7 - 7/8 inches) *2
Tuning key *2
Owner's manual
Options
AC adaptor (PSA series)
Pad (RP-2, PD-80, PD-80R, PD-100, PD-120,
PD-5, PD-6, PD-7, PD-9)
Kick Trigger (KD-7, KD-80, KD-120)
Pad Stand (PDS-2)
Mesh Head (MH-8)
*1 When the RHYTHM COACH (RM-2) and the V-PRACTICE PAD (RP-2) are purchased
as a set, they are already attached together with the screws.
*2 Not included with the purchase of the RHYTHM COACH (RM-2) alone.
* Play rim shots by connecting a PD-80R or PD-120 dual trigger mesh V-pad to Trigger
Input 1 and adjusting internal settings. (Note that this disables Trigger Input 2.)
* Connect a PD-7 or PD-9 Pad to Trigger Input 1 or 2 for even more fun.
(Note that this disables the Rim shots.)
962a
* In the interest of product improvement, the specifications and/or appearance of this unit
are subject to change without prior notice.
31
Index
A
AC Adaptor
O
............................................. 9
Output Jack
............................................. 8
B
P
Batteries .................................................. 9
Battery Low indicator ........................... 7, 9
BEAT .................................................... 13
Buzzer .................................................... 7
PAD INST ............................................. 16
PAD SENS ............................................ 17
Parameter Indicators ................................ 7
Power ................................................... 10
POWER switch ........................................ 8
C
Coach mode ..........................................
Connect (Pads for playing rim shots) ........
Connect (Pads Other Than the RP-2) .........
Connect (two RP-2 pads) .........................
Crosstalk Cancel ....................................
18
24
23
15
29
D
DC IN jack ...............................................
Display ...................................................
8
7
E
22
28
F
Factory Reset ......................................... 22
Frame ..................................................... 8
G
Gradual Down .......................................
Gradual Up ...........................................
Gradual Up/Down .................................
20
20
20
H
Head ...................................................... 8
Head (Replace) ...................................... 12
Head Tension ........................................ 11
HEADPHONES/OUTPUT jack .................. 8
Hoop ...................................................... 8
I
........................................... 23
L
Linear ...................................................
Log 1, 2 .................................................
Loud 1, 2 ...............................................
27
28
28
M
MASK TIME .......................................... 30
Metronome ............................................ 13
METRONOME button .............................. 7
METRONOME INST .............................. 14
METRONOME LEVEL ........................... 15
MIX IN jack ............................................. 8
32
.......................................... 19
R
Retrigger Cancel .................................... 29
RHYTHM TYPE .................................... 14
Rhythmic Notes ..................................... 18
RIM SENSITIVITY ................................. 30
Rubber Feet ............................................. 8
S
Error Message ........................................
Exponential 1, 2 ......................................
Input Mode
Q
Quiet Count
Scan Time ............................................. 28
Security Slot ............................................ 8
SELECT button ........................................ 7
Sensitivity ............................................. 27
Sensor .................................................... 8
Speed Check ......................................... 19
Spline ................................................... 28
Stand Fixing Nut ..................................... 8
Step Down ............................................ 21
Step Up ................................................ 20
Step Up/Down ...................................... 21
T
TAP button ............................................. 7
Tap Tempo ........................................... 13
Threshold ............................................. 27
Time Check ........................................... 19
Timer ................................................... 21
Trigger 1, 2 indicators ............................... 7
Trigger Input 1, 2 ..................................... 8
Trigger Parameters ................................ 26
Trigger Type ......................................... 24
Tuning Bolt ............................................. 8
V
Value button ........................................... 7
Velocity Curve ...................................... 27
VOLUME knob ........................................ 7
W
Washer
................................................... 8
For EU Countries
This product complies with the requirements of European Directive 89/336/EEC.
For the USA
FEDERAL COMMUNICATIONS COMMISSION
RADIO FREQUENCY INTERFERENCE STATEMENT
This equipment has been tested and found to comply with the limits for a Class B digital device, pursuant to Part 15 of the
FCC Rules. These limits are designed to provide reasonable protection against harmful interference in a residential
installation. This equipment generates, uses, and can radiate radio frequency energy and, if not installed and used in
accordance with the instructions, may cause harmful interference to radio communications. However, there is no guarantee
that interference will not occur in a particular installation. If this equipment does cause harmful interference to radio or
television reception, which can be determined by turning the equipment off and on, the user is encouraged to try to correct the
interference by one or more of the following measures:
– Reorient or relocate the receiving antenna.
– Increase the separation between the equipment and receiver.
– Connect the equipment into an outlet on a circuit different from that to which the receiver is connected.
– Consult the dealer or an experienced radio/TV technician for help.
This device complies with Part 15 of the FCC Rules. Operation is subject to the following two conditions:
(1) This device may not cause harmful interference, and
(2) This device must accept any interference received, including interference that may cause undesired operation.
Unauthorized changes or modification to this system can void the users authority to operate this equipment.
This equipment requires shielded interface cables in order to meet FCC class B Limit.
For Canada
NOTICE
This Class B digital apparatus meets all requirements of the Canadian Interference-Causing Equipment Regulations.
AVIS
Cet appareil numérique de la classe B respecte toutes les exigences du Règlement sur le matériel brouilleur du Canada.
Information
When you need repair service, call your nearest Roland Service Center or authorized Roland distributor in your country as
shown below.
AFRICA
EGYPT
Al Fanny Trading Office
P.O. Box 2904,
El Horrieh Heliopolos, Cairo,
EGYPT
TEL: (02) 4185531
REUNION
Maison FO - YAM Marcel
25 Rue Jules Hermann,
Chaudron - BP79 97 491
Ste Clotilde Cedex,
REUNION ISLAND
TEL: 28 29 16
SINGAPORE
Swee Lee Company
TAIWAN
ROLAND TAIWAN
ENTERPRISE CO., LTD.
Theera Music Co. , Ltd.
330 Verng NakornKasem, Soi 2,
Bangkok 10100, THAILAND
TEL: (02) 2248821
VIETNAM
Saigon Music
17 Werdmuller Centre Claremont
7700
Republic of SOUTH AFRICA
138 Tran Quang Khai St.,
District 1
Ho Chi Minh City
VIETNAM
TEL: (08) 844-4068
P.O. Box 23032
Claremont, Cape Town
SOUTH AFRICA, 7735
TEL: (021) 674 4030
AUSTRALIA/
NEW ZEALAND
ASIA
Beijing Xinghai Musical
Instruments Co., Ltd.
6 Huangmuchang Chao Yang
District, Beijing, CHINA
TEL: (010) 6774 7491
Shanghai Xingtong Acoustics
Equipment CO.,Ltd.
Rm.1108, No.2240 Pudong South
Road Shanghai, CHINA
TEL: (021) 6873 4123
HONG KONG
Tom Lee Music Co., Ltd.
Service Division
22-32 Pun Shan Street, Tsuen
Wan, New Territories,
HONG KONG
TEL: 2415 0911
INDIA
Rivera Digitec (India) Pvt. Ltd.
409, Nirman Kendra Mahalaxmi
Flats Compound Off. Dr. Edwin
Moses Road, Mumbai-400011,
INDIA
TEL: (022) 498 3079
INDONESIA
PT Citra IntiRama
J1. Cideng Timur No. 15J-150
Jakarta Pusat
INDONESIA
TEL: (021) 6324170
KOREA
Cosmos Corporation
1461-9, Seocho-Dong,
Seocho Ku, Seoul, KOREA
TEL: (02) 3486-8855
MALAYSIA
BENTLEY MUSIC SDN BHD
140 & 142, Jalan Bukit Bintang
55100 Kuala Lumpur,MALAYSIA
TEL: (03) 2144-3333
PHILIPPINES
G.A. Yupangco & Co. Inc.
339 Gil J. Puyat Avenue
Makati, Metro Manila 1200,
PHILIPPINES
TEL: (02) 899 9801
Halilit P. Greenspoon &
Sons Ltd.
Distribuidora De
Instrumentos Musicales
THAILAND
CHINA
Viale delle Industrie 8,
20020 Arese, Milano, ITALY
TEL: (02) 937-78300
PARAGUAY
That Other Music Shop
(PTY) Ltd.
Paul Bothner (PTY) Ltd.
ISRAEL
Roland Italy S. p. A.
Boulevard Andrews, Albrook,
Panama City,
REP. DE PANAMA
TEL: (507) 315-0101
Blk 3014, Bedok Industrial Park E,
#02-2148, SINGAPORE 489980
TEL: 243 9555
SOUTH AFRICA
P.O.Box 32918, Braamfontein 2017
Republic of SOUTH AFRICA
TEL: (011) 403 4105
ITALY
SUPRO MUNDIAL, S.A.
CRISTOFORI MUSIC PTE
LTD
Room 5, 9fl. No. 112 Chung Shan
N.Road Sec.2, Taipei, TAIWAN,
R.O.C.
TEL: (02) 2561 3339
11 Melle St., Braamfontein,
Johannesbourg
Republic of SOUTH AFRICA
PANAMA
150 Sims Drive,
SINGAPORE 387381
TEL: 846-3676
AUSTRALIA
Roland Corporation
Australia Pty., Ltd.
38 Campbell Avenue
Dee Why West. NSW 2099
AUSTRALIA
TEL: (02) 9982 8266
NEW ZEALAND
Roland Corporation Ltd.
32 Shaddock Street, Mount Eden,
Auckland, NEW ZEALAND
TEL: (09) 3098 715
CENTRAL/LATIN
AMERICA
ARGENTINA
Instrumentos Musicales S.A.
Florida 656 2nd Floor
Office Number 206A
Buenos Aires
ARGENTINA, CP1005
TEL: (54-11) 4- 393-6057
BRAZIL
Roland Brasil Ltda
Rua San Jose, 780 Sala B
Parque Industrial San Jose
Cotia - Sao Paulo - SP, BRAZIL
TEL: (011) 4615 5666
COSTA RICA
JUAN Bansbach
Instrumentos Musicales
Ave.1. Calle 11, Apartado 10237,
San Jose, COSTA RICA
TEL: (506)258-0211
CHILE
Comercial Fancy ΙΙ S.A.
Avenida Rancagua #0330
Providencia Santiago, CHILE
TEL: 56-2-373-9100
EL SALVADOR
OMNI MUSIC
75 Avenida Notre YY Alameda,
Juan Pablo 2, No. 4010
San Salvador, EL SALVADOR
TEL: (503) 262-0788
MEXICO
Casa Veerkamp, s.a. de c.v.
Av. Toluca No. 323, Col. Olivar
de los Padres 01780 Mexico D.F.
MEXICO
TEL: (525) 668 04 80
J.E. Olear y ESQ. Manduvira
Edeficio, El Dorado Planta Baja
Asuncion PARAGUAY
TEL: 595-21-492147
PERU
VIDEO Broadcast S.A.
Portinari 199 (ESQ. HALS),
San Borja, Lima 41,
REP. OF PERU
TEL: 51-14-758226
URUGUAY
Todo Musica S.A.
8 Retzif Ha'aliya Hashnya St.
Tel-Aviv-Yafo ISRAEL
TEL: (03) 6823666
NORWAY
JORDAN
Roland Scandinavia Avd.
Kontor Norge
AMMAN Trading Agency
Lilleakerveien 2 Postboks 95
Lilleaker N-0216 Oslo
NORWAY
TEL: 273 0074
Prince Mohammed St. P.O. Box
825 Amman 11118 JORDAN
TEL: (06) 4641200
POLAND
Easa Husain Al-Yousifi
KUWAIT
P. P. H. Brzostowicz
Abdullah Salem Street,
Safat KUWAIT
TEL: 5719499
UL. Gibraltarska 4.
PL-03664 Warszawa POLAND
TEL: (022) 679 44 19
LEBANON
PORTUGAL
A. Chahine & Fils
Tecnologias Musica e Audio,
Roland Portugal, S.A.
P.O. Box 16-5857 Gergi Zeidan St.
Chahine Building, Achrafieh
Beirut, LEBANON
TEL: (01) 335799
Cuareim 1844, Montevideo,
URUGUAY, CP11200
TEL: 5982-924-2335
Cais Das Pedras, 8/9-1 Dto
4050-465 PORTO
PORTUGAL
TEL: (022) 608 00 60
QATAR
VENEZUELA
ROMANIA
Al Emadi Co. (Badie Studio
& Stores)
Musicland Digital C.A.
Av. Francisco de Miranda,
Centro Parque de Cristal, Nivel
C2 Local 20 Caracas
VENEZUELA
TEL: (02) 285 9218
EUROPE
AUSTRIA
Roland Austria GES.M.B.H.
Siemensstrasse 4, P.O. Box 74,
A-6063 RUM, AUSTRIA
TEL: (0512) 26 44 260
BELGIUM/HOLLAND/
LUXEMBOURG
Roland Benelux N. V.
Houtstraat 3, B-2260, Oevel
(Westerlo) BELGIUM
TEL: (014) 575811
DENMARK
Roland Scandinavia A/S
Nordhavnsvej 7, Postbox 880,
DK-2100 Copenhagen
DENMARK
TEL: (039)16 6200
FRANCE
Roland France SA
4, Rue Paul Henri SPAAK,
Parc de l'Esplanade, F 77 462 St.
Thibault, Lagny Cedex FRANCE
TEL: 01 600 73 500
FINLAND
Roland Scandinavia As,
Filial Finland
Lauttasaarentie 54 B
Fin-00201 Helsinki, FINLAND
TEL: (9) 682 4020
GERMANY
Roland Elektronische
Musikinstrumente HmbH.
Oststrasse 96, 22844 Norderstedt,
GERMANY
TEL: (040) 52 60090
GREECE
STOLLAS S.A.
Music Sound Light
155, New National Road
26422 Patras, GREECE
TEL: 061-435400
HUNGARY
Intermusica Ltd.
Warehouse Area ‘DEPO’ Pf.83
H-2046 Torokbalint, HUNGARY
TEL: (23) 511011
IRELAND
Roland Ireland
Audio House, Belmont Court,
Donnybrook, Dublin 4.
Republic of IRELAND
TEL: (01) 2603501
FBS LINES
P.O. Box 62,
DOHA QATAR
TEL: 4423-554
Piata Libertatii 1,
RO-4200 Gheorghehi
TEL: (066) 164-609
SAUDI ARABIA
RUSSIA
aDawliah Universal
Electronics APL
MuTek
3-Bogatyrskaya Str. 1.k.l
107 564 Moscow, RUSSIA
TEL: 095 169 5043
Corniche Road, Aldossary Bldg.,
1st Floor
SAUDI ARABIA
SPAIN
P.O.Box 2154, Alkhobar 31952
SAUDI ARABIA
TEL: (03) 898 2081
Roland Electronics
de España, S. A.
Calle Bolivia 239, 08020
Barcelona, SPAIN
TEL: (93) 308 1000
SYRIA
Technical Light & Sound
Center
SWEDEN
Roland Scandinavia A/S
SWEDISH SALES OFFICE
Danvik Center 28, 2 tr.
S-131 30 Nacka SWEDEN
TEL: (08) 702 0020
Khaled Ibn Al Walid St.
P.O. Box 13520
Damascus - SYRIA
TEL: (011) 2235 384
TURKEY
Barkat muzik aletleri ithalat
ve ihracat Ltd Sti
SWITZERLAND
Roland (Switzerland) AG
Musitronic AG
Siraselviler cad.Guney is hani 8486/6, Taksim. Istanbul. TURKEY
TEL: (0212) 2499324
Gerberstrasse 5, Postfach,
CH-4410 Liestal, SWITZERLAND
TEL: (061) 921 1615
U.A.E.
UKRAINE
Zak Electronics & Musical
Instruments Co. L.L.C.
TIC-TAC
Mira Str. 19/108
P.O. Box 180
295400 Munkachevo, UKRAINE
TEL: (03131) 414-40
Zabeel Road, Al Sherooq Bldg.,
No. 14, Grand Floor DUBAI
U.A.E.
TEL: (04) 3360715
NORTH AMERICA
UNITED KINGDOM
Roland (U.K.) Ltd.
Atlantic Close, Swansea
Enterprise Park, SWANSEA
SA7 9FJ,
UNITED KINGDOM
TEL: (01792) 700139
CANADA
Roland Canada Music Ltd.
(Head Office)
5480 Parkwood Way Richmond
B. C., V6V 2M4 CANADA
TEL: (0604) 270 6626
MIDDLE EAST
Roland Canada Music Ltd.
(Toronto Office)
BAHRAIN
Unit 2, 109 Woodbine Downs
Blvd, Etobicoke, ON
M9W 6Y1 CANADA
TEL: (0416) 213 9707
Moon Stores
Bab Al Bahrain Road,
P.O. Box 20077
State of BAHRAIN
TEL: 211 005
U. S. A.
Roland Corporation U.S.
CYPRUS
Radex Sound Equipment Ltd.
17 Diagorou St., P.O. Box 2046,
Nicosia CYPRUS
TEL: (02) 453 426
5100 S. Eastern Avenue
Los Angeles, CA 90040-2938,
U. S. A.
TEL: (323) 890 3700
IRAN
MOCO, INC.
No.41 Nike St.Dr.Shariyati Ave.
Roberoye Cerahe Mirdamad
Tehran, IRAN
TEL: 285 4169
As of May 15, 2001 (Roland)