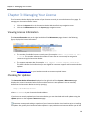
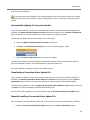
1
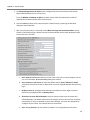
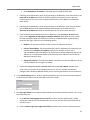
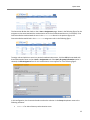
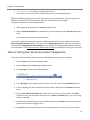
Connection Broker Managing User Connections to Workstations, Blades, VDI, and More Quick Start Integrating with Red Hat Enterprise Virtualization Version 8.0 December 9, 2014 Contacting Leostream Leostream Corporation 465 Waverley Oaks Rd. Suite 200 Waltham, MA 02452 USA http://www.leostream.com Telephone: +1 781 890 2019 Fax: +1 781 688 9338 To submit an enhancement request, email [email protected]. To request product information or inquire about our future direction, email [email protected]. Copyright © Copyright 2002-2015 by Leostream Corporation This software program and documentation are copyrighted by Leostream. The software described in this document is provided under a license agreement and may be used or copied only under the terms of this agreement. No part of this manual may be copied or reproduced in any form without prior written consent from Leostream. Trademarks The following are trademarks of Leostream Corporation. Leostream™ The Leostream graphical logo™ The absence of a product name or logo from this list does not constitute a waiver of the trademark or other intellectual property rights concerning that product, name, or logo by Leostream. HP is a registered trademark that belong to Hewlett-Packard Development Company, L.P. The OpenStack Word Mark and OpenStack Logo are either registered trademarks/service marks or trademarks/service marks of the OpenStack Foundation, in the United States and other countries and are used with the OpenStack Foundation's permission. Leostream is not affiliated with, endorsed or sponsored by the OpenStack Foundation, or the OpenStack community. Linux is the registered trademark of Linus Torvalds in the U.S. and other countries. OpenLDAP is a trademark of The OpenLDAP Foundation. Microsoft, Active Directory, SQL Server, Hyper-V, Windows, and the Windows logo are trademarks or registered trademarks of Microsoft Corporation in the United States and/or other countries. Other brand and product names are trademarks or registered trademarks of their respective holders. Leostream claims no right to use of these marks. Patents Leostream software is protected by U.S. Patent 8,417,796. 2 Quick Start Contents CONTENTS ......................................................................................................................................................................3 CHAPTER 1: INTRODUCTION ...........................................................................................................................................4 LEOSTREAM™ COMPONENTS ................................................................................................................................. 4 WHAT IS THE CONNECTION BROKER? ...................................................................................................................... 4 HOW THE CONNECTION BROKER MANAGES USERS ................................................................................................... 6 CHAPTER 2: QUICK SETUP ...............................................................................................................................................8 STEP 1: CONFIGURING CLIENT DEVICES FOR SPICE CONNECTIONS............................................................................... 8 Installing the SPICE Client ......................................................................................................................... 8 STEP 2: INSTALLING THE CONNECTION BROKER......................................................................................................... 9 STEP 3: ENTERING LICENSE KEYS AND UPDATING THE CONNECTION BROKER ................................................................. 10 STEP 4: CONFIGURING THE NETWORK ..................................................................................................................... 11 STEP 5: CREATING A RED HAT CENTER .................................................................................................................... 12 STEP 6: DEFINING POOLS ...................................................................................................................................... 14 STEP 7: DEFINING PROTOCOL, POWER CONTROL, AND RELEASE PLANS ........................................................................ 16 Protocol Plans ........................................................................................................................................... 17 Power Control Plans.................................................................................................................................. 18 Release Plans ............................................................................................................................................ 18 STEP 8: DEFINING USER POLICIES ........................................................................................................................... 19 STEP 9: AUTHENTICATING USERS ........................................................................................................................... 21 STEP 10: ASSIGNING USER ROLES AND POLICIES ....................................................................................................... 24 STEP 11: TESTING YOUR CONNECTION BROKER CONFIGURATION ................................................................................ 26 CHAPTER 3: MANAGING YOUR LICENSE ..........................................................................................................................28 VIEWING LICENSE INFORMATION ............................................................................................................................ 28 CHECKING FOR UPDATES ....................................................................................................................................... 28 Automatically Updating the Connection Broker ....................................................................................... 29 Downloading a Connection Broker Update File ........................................................................................ 29 Manually Installing a Connection Broker Update File .............................................................................. 29 INSTALLING A NEW LICENSE ................................................................................................................................... 30 3 Chapter 1: Introduction Chapter 1: Introduction This document provides information on how to install and configure the Leostream™ Connection Broker for use with Red Hat Enterprise Virtualization for Desktops. See the associated sections of the complete Connection Broker Administrator’s Guide for more information pertaining to each step. Leostream™ Components The Leostream Connection Broker consists of the following four components. Connection Broker: The Connection Broker is the central management layer for configuring your deployment, including: inventorying desktops, applications, printers, and other resources; assigning these resources to users; defining the end-user experience. Connection Broker version 7.5 is available as a virtual appliance that installs directly on to the Red Hat Enterprise Virtualization Hypervisor, and can be upgraded to the most recent Connection Broker release. Leostream Agent: When installed on the remote desktops, the Leostream Agent provides the Connection Broker with insight into the connection status of remote users. The Leostream Agent also performs functions related to the Leostream printing and USB management features. Although optional, the Leostream Agent is a critical component when scaling out deployments to a large number of end users. For users connecting to desktops using the SPICE protocol, the Leostream Agent can also be used to provide single sign-on to Microsoft® Windows® desktops. Leostream Connect: Leostream Connect is a software client provided by Leostream that allows users to log into desktops from fat or thin clients. Using Leostream Connect, you can repurpose existing fat desktops and laptops, lowering the cost of VDI deployments. Some thin clients provide built-in Leostream Connect clients. Leostream Connect is required for users connecting to desktops using the SPICE protocol. Database: By default, the Connection Broker stores all information in an internal database. A typical installation requires one Gbyte of disk space for the internal database. Large scale deployments that require Connection Broker clusters must use an external Microsoft SQL Server® 2012 or 2014 database. What is the Connection Broker? A connection broker lies at the heart of any VDI deployment, and is the key component for assigning resources to end users. The Leostream Connection Broker runs as a virtual appliance within the Red Hat Enterprise Virtualization Hypervisor, making it easy to install, maintain, and update. The Connection Broker provides end users with consistent, reliable access to data and desktops from a wide range of fat and thin clients. The Connection Broker also allows you to manage: Desktop usage, to optimize resource and power consumption USB device redirection, to ensure data security 4 Quick Start End user experience, to provide the optimal working environment for your end users And much more! To set up your Leostream Connection Broker, you define the following concepts: Authentication Servers: A server that provides authentication services to users logging into the Connection Broker. The Connection Broker supports Microsoft Active Directory®, Novell® eDirectory™, or OpenLDAP™ directory services. You can specify any number of (trusted or nottrusted) domains, using any combination of authentication server types. In addition, the Connection Broker allows you to manually define users without configuring an authentication server. Centers: The external systems from which the Connection Broker pulls resources, including desktops, applications, and printers. Centers can be created from the following systems: Red Hat Enterprise Virtualization Manager; HP® Moonshot Systems; VMware vSphere, ESXi, and vCenter Server; Citrix XenServer®, XenApp, and XenDesktop; open source Xen; OpenStack® clouds, including HP Helion OpenStack; and Microsoft Hyper-V™ via System Center Virtual Machine Manager (SCVMM), Remote Desktop Services (RDS), and Active Directory. Resources: Desktops, applications, and printers available for assignment to an end user. Desktops: Virtual machines, physical machines, blades, and Microsoft Terminal Services to assign to end users. The Connection Broker supports desktops that run Windows and Linux® operating systems. Applications: Applications and desktops hosted in a Citrix XenApp farm. Pools: Collections of desktops or applications, gathered from a single or multiple centers. Clients: An application or device used to log into the Connection Broker. The Connection Broker supports Linux and Windows fat clients, a variety of thin clients, and Web browsers and mobile devices. Locations: A group of clients defined by client attributes such as manufacturer, device type, OS version, or IP address. The end user’s experience can be modified based on the location of their client, including assigning printers and modifying registry keys on the remote desktop. Plans: Common sets of rules used as building blocks for defining the end-user experience. There are two types of plans: pool-based plans such as protocol, power control, and release plans are applied to pools in a policy and define how the Connection Broker manages the desktops in that pool; location-based plans such as display, printer, and registry plans are applied to desktops based on the user’s client device. Policies: Rules that assign desktops and applications to users and define how the user’s entire session is managed, including options that define assignment, login, disconnect, and logout actions. Policies assign plans to desktops based on the desktop’s pool membership, and manage USB passthrough permissions. 5 Chapter 1: Introduction Roles: Permissions that control the actions an end user is allowed to take on their desktops and the level of access they have to the Connection Broker Administrator Web interface. Assignments: A set of rules that determine which role and policy the Connection Broker assigns to a user, based on the authentication server the user was found in, the attributes of the user’s account in that authentication server, and the location the user is logging in from. Administrator-defined access control rules map end users to roles and policies. The Connection Broker maps users to these rules via their authentication server attributes and assigns desktops and applications from pools, as depicted in the following figure. How the Connection Broker Manages Users The following figure illustrates the steps involved in connecting users to desktops. With the exception of authenticating users, policy logic determines how the Connection Broker handles each step. 6 Quick Start 1. User signs into the Connection Broker: End users can log into the Connection Broker from a Web browser, thin client, mobile device, or Leostream Connect. Different clients support different authentication methods, such as user name/password, smart cards, or fingerprints, and different display protocols. Users that connect to their desktops using the SPICE protocol must install the Leostream Connect software client on a Windows client device. 2. Connection Broker authenticates user: Once the Connection Broker has the user’s credentials, it searches for the user in the domains defined in the > Users > Authentication Servers page. If the user previously logged in, the Connection Broker begins by looking in the authentication server used for the previous login before searching the remaining authentication servers in the order defined by the authentication server’s Position property. If this is the first time the user logged in, the Connection Broker searches all authentication servers in order of their position. 3. Connection Broker offers resources based on user’s policy: The Connection Broker then assigns a policy using the assignment table associated with the authentication server chosen in step 2. The policy determines the desktops and applications offered to the user, the USB passthrough permissions, and the display protocol used to connect the user to their resources. At this point, in addition to assigning a policy, the Connection Broker assigns a role to the user. 4. User requests connection to desired desktop: The user selects one or more of their offered desktops. 5. Connection Broker assigns desktop: After the user selects one or more resources, the Connection Broker assigns those resources to the user. Once a resource is assigned to a user, the Connection Broker will not offer that resource to another user. After the assignment is made, the Connection Broker initiates the remote session. This process varies based on display protocol used. In most cases, the Connection Broker sends the connection’s definition to the user’s client and the viewing application on the client launches the remote connection to the desktop. If the user is using an Active-X RDP client or another external viewer, the Web browser on the client retrieves the viewing component stored in the Connection Broker. The viewer then runs in the user’s browser. In any case, the remote viewer in the client’s environment connects directly to the desktop. The connection does not flow through the Connection Broker. 6. User ends remote viewer session: If the Leostream Agent is installed on the remote desktop, you can manage the user’s session differently based on if the user disconnects or logs out of their remote session. 7. Connection Broker unassigns desktop: If the user’s policy releases the desktop back to its pool, the Connection Broker unassigns the desktop. Otherwise, the Connection Broker retains the desktop assignment. 8. Connect Broker applies power policy: Lastly, the Connection Broker takes any power control plan actions set in the user’s policy. 7 Chapter 2: Quick Setup Chapter 2: Quick Setup You can download all Leostream software from the Leostream Web site http://www.leostream.com/resources/downloads.php You must obtain a Connection Broker license in order to use the Connection Broker. If you do not have a license, register for a trial license, as follows: 1. Click the Free Trial… link in the top right of any page in the Leostream Web site. 2. Enter your contact information into the Free Trial Request form. 3. Click Submit. After you submit the form, Leostream contacts you with your trial license. Step 1: Configuring Client Devices for SPICE Connections In order for Leostream to connect to a user to a virtual machine using SPICE, the user’s client device must include the following components. Leostream Connect for Windows version 2.8, or higher The SPICE client version 5.x Leostream Connect does not use the SPICE ActiveX component, therefore users cannot launch SPICE connections from the Leostream Web client. You must ensure that spicec.exe exeutable exists on the client device and that users log in to the Connection Broker using Leostream Connect. Installing the SPICE Client You must install version 5 of the SPICE client on each client device. After running the SPICE installer, the spicec.exe file should be located in a directory similar to the following. C:\Program Files\RedHat\RHEV\SpiceClient To ensure that you have the correct version of the SPICE client, open the Properties dialog for the spicec.exe file, go to the Version tab, and ensure that version 5 is installed, as shown in the following figure. 8 Quick Start Older versions of the SPICE client are not compatible with Leostream protocol plans. You must upgrade all spicec.exe files to version 5. Step 2: Installing the Connection Broker Connection Broker 7.5 and later runs as a virtual appliance on the Red Hat Enterprise Virtualization Hypervisor. Use the Import option in the Red Hat Enterprise Virtualization Manager to install the Connection Broker in your environment, as follows. To download the Connection Broker: 1. Go to the Leostream Connection Broker page in the Red Hat MarketPlace. 2. Click the Download button. Your Leostream Connection Broker download begins. You also receive an email from Leostream that contains your trial license key and instructions for updating your Connection Broker. 3. If you do not already have an export domain attached to your Red Hat Enterprise Virtualization Manager, create an export domain and attach it to your data center before proceeding. 4. Uncompress the Leostream archive in the root of the export domain, which is located under a UID, one directory down from the mount point. 5. You must set the permissions of all files to vdsm:kvm using the following command: chown -R 36:36 6. In the Red Hat Enterprise Virtualization Manager, under the storage domain, go to the VM Import tab 7. Click on the LeostreamCB VM and click Import. 8. In the Complete the import page, ensure that the Start VM after import option is selected and click Finish. 9. After the virtual machine is running, connect to the Connection Broker console to view the Connection Broker IP address. If the console cannot obtain an IP address from DHCP, manually configure the network. See “Manually Configuring the Connection Broker Address” section in the Leostream Installation Guide for more information. 9 Chapter 2: Quick Setup Step 3: Entering License Keys and Updating the Connection Broker Once you have the Connection Broker IP address, open the Administrator Web interface, as follows. 1. Open any Web browser. 2. Enter the Connection Broker IP address in your browser’s URL edit field. The Connection Broker Sign In page opens, as shown in the following figure: 3. Sign into the Connection Broker Web interface using the following default credentials: User name: admin Password: leo 4. Click Sign In. The Leostream license page, shown in the following figure, opens. 5. In the License key edit field, enter the license key you received from Leostream. Ensure that there are no spaces in or after the sequence, and that you include the lines containing the text ----BEGIN LICENSE----- and -----END LICENSE-----. 6. Click on the License Agreement link to view the End User License Agreement for the Connection Broker. 7. Read the agreement and, if you accept it, select the I have read and accept the license agreement check box. 8. Click Save. 9. Go to the > System > Maintenance page to perform a Connection Broker updates. You must update your Connection Broker to integrate with Red Hat Enterprise Virtualization 10 Quick Start 3.0. Follow the instructions in the email from Leostream you received when you downloaded the Connection Broker from the Red Hat MarketPlace to update your Connection Broker to version 7.8 10. Click the link in the third step to skip the update and go to the Getting Started page, shown in the following figure. This page lists the general steps required to configure your Connection Broker. You can change your default Connection Broker password, as follows. 1. Click the Users tab in the main navigation menu. 2. Click the My Options tab in the Users page navigation menu. 3. Enter your new password in the Password and Re-type password edit fields. 4. Click Save. The Connection Broker cannot remind you of your password. If you forget your administrator password, you must reset it using the Connection Broker virtual machine console. Please contact [email protected] for instructions. Step 4: Configuring the Network By default, the Connection Broker uses DHCP to determine its IP address. Leostream recommends using a static IP address for the appliance, and configuring DNS with your primary search domain. Otherwise, if your DHCP has a short lease time, your Connection Broker IP address may time-out and your end users may not be able to log in. You setup a static IP address for the Connection Broker and configure the DNS, as follows. 1. Click the System tab in the main navigation menu. 11 Chapter 2: Quick Setup 2. Click the Network tab in the System page navigation menu 3. Enter the Connection Broker IP address, in the Connection Broker area: a. Select Static IP => from the Configuration drop-down menu, as shown in the following figure. b. Enter the IP address, Netmask, and Gateway in the appropriate edit fields. 4. To configure the DNS, in the DNS section: a. Enter the domain name in the Domain edit field b. Enter the primary, secondary, and tertiary DNS addresses, as required, in the appropriate edit fields 5. This example assumes your Connection Broker cluster consists of a single Connection Broker. Therefore, enter the IP address used in the Connection Broker area into the Connection Broker VIP edit field. For more information on the Connection Broker VIP, see “Setting Network Configuration and Connection Broker VIP” in the Connection Broker Administrator’s Guide. 6. Click Save. Step 5: Creating a Red Hat Center You can use the Connection Broker to manage and assign virtual machines in Red Hat Enterprise Virtualization versions 3.0, by creating a Red Hat Enterprise Virtualization Manager center in your Connection Broker. Leostream defines centers as the external systems that inform the Connection Broker about desktops and other resources (such as applications, printers, and Teradici PC-over-IP host devices) that are available for assignment to end users. To create the center: 12 Quick Start 1. Go to the Resources tab in the main navigation menu. 2. Go to the Centers tab in the Resources page navigation menu. 3. Click Add Center. The Add Center form opens. 4. Select Red Hat Enterprise Virtualization Manager from the Type drop-down menu. The form updates, as follows: 5. Enter a name for the center in the Name edit field. 6. In the URL for REST API edit field, enter the URL to the REST API. This URL typically takes the following form. https://RHEV-M.your_company.com:8443/api Where RHEV-M.your_company.com is the fully qualified domain name for the Red Hat Enterprise Virtualization Manager machine. 7. In the Port used by RHEV Manager edit field, enter the port that the Connection Broker should use to retrieve the certificate from the Red Hat Enterprise Virtualization Manager. The certificate is required when establishing SPICE connections to VMs hosted in Red Hat. 8. In the Realm edit field, enter the name of the Red Hat realm. Typically, this value is RHEVM. 9. In the Username edit field, enter the username, including domain, of an Administrator for your Red Hat Enterprise Virtualization Manager. 13 Chapter 2: Quick Setup 10. In the Password edit field, enter this user’s password. 11. Select the Refresh interval. This setting tells the Connection Broker how often to refresh the virtual machines imported from this center. The refresh interval is the length of time between when one refresh action is finished and the next refresh action is invoked. 12. Uncheck the Offer desktops from this center option if the Connection Broker should not offer desktops from this center to users who log into the Connection Broker. The Connection Broker continues to offer assigned desktops in this center to the assigned user, even when this option is not selected. 13. Select Assign rogue users to desktops from this center (requires Agent) if you want the Connection Broker to manage users that log into desktops in this center when they do not log in through Leostream. The desktop must have a running Leostream Agent, which informs the Connection Broker of user logins. 14. Select the Set newly-discovered desktops to “Unavailable” option if the Connection Broker should mark desktops as unavailable as they are discovered. Otherwise, leave this option unchecked. You can manually mark any Unavailable desktop as Available using the Availability drop-down menu on the desktop’s Edit Desktop page. To access the Edit Desktop page, go to the > Resources > Desktops page and select the Edit action associated with that desktop. 15. Select the Continuously apply any Auto-Tags option if you want to automatically set tags on desktops that are discovered when the center is refreshed (see “Continuously Applying Tags to Desktops” in the Connection Broker Administrator’s Guide for more information). Leave this option unchecked for this example, which does not use tags. 16. Click Save. After you click Save, the Connection Broker adds the center to your Centers list and lists the desktops in the > Resources > Desktops page. See the “Working with Desktops and Applications” chapter of the Connection Broker Administrator’s Guide for information on working with desktops in the Connection Broker. Step 6: Defining Pools After you create your center and the Connection Broker registers all your desktops, you can combine the desktops into logical groups, or pools. Use pools to create sets of desktops that have similar attributes, or come from the same center. Creating pools is optional, but provides convenience and flexibility when configuring your Connection Broker. The Leostream Connection Broker defines a pool as any group of desktops or applications. To create a pool: 1. Click the Resources tab in the main navigation menu. 14 Quick Start 2. Click the Pools tab in the Resources page navigation menu. 3. Click Create Pool, as shown in the following figure. 4. In the Create Pool form, enter the basic pool characteristics, as follows: a. Name: A unique identifier for this pool. b. Subset of pool: The parent pool from which to draw resources for this pool. Select All Desktops or any nested desktop pool to create a pool of desktops Select All Applications or any nested application pool to create a pool of applications You cannot create a pool that contains both desktops and applications. If you select All Desktops, or a pool that is a subset of desktops, you will create a new desktop pool c. Define pool using: The information to use when defining resources in this pool. You can define desktop pools using any of the following methods. Desktop attributes: Fill the pool with desktops with common attributes, such as desktop name or operating system. Tags: Fill the pool with desktops with a particular tag. You must define tags in your Connection Broker to use this option. Centers: Fill the pool with all desktops or applications in one or more centers. vCenter Server (VirtualCenter) Clusters: Fill the pool with all desktops in one or more vCenter Server clusters. vCenter Server (VirtualCenter) Resource Pools: Fill the pool with all desktops in a particular vCenter Server resource pool. LDAP attributes: Fill the pool with desktops with common LDAP attributes. This option is available only if you defined an Active Directory center in your Connection Broker. Selection from parent pool: Manually select desktops or applications to include in the pool. 15 Chapter 2: Quick Setup 5. Based on your selection in part c of step 4, enter the characteristics that define the pool. For this example, the following figure shows how to create a pool that is a subset of all the Windows desktops in the Connection Broker. The figure them selects Centers from the Define pool using drop-down menu, and selects the Red Hat center created in Step 5 to further restrict the contents of the pool to only the Windows desktop hosted in the Red Hat center. 6. The Logging section allows you to log events when the number of desktops in the pool drops below a specified threshold. For this example, leave the default values for this section. 7. Click Save. The Pools page displays a hierarchy of all available pools. For a complete description of pools, see the “Creating Desktop and Application Pools” chapter in the Connection Broker Administrator’s Guide. Step 7: Defining Protocol, Power Control, and Release Plans After you separate your desktops into pools, define the behaviors you want to assign to the desktops in those pools. To perform this step, ask yourself the following questions. What display protocols do I want the user to be able to use to connect to their desktops? This example uses the SPICE protocol. How do I want to manage the power state of each desktop, for example, should it be turned off when the user logs out? This example does not modify the desktop’s power state. How long do I want my user to be able to use a particular desktop, and claim it for their use? For example, if the user logs out, should they remain assigned to that desktop, or should another user be able to log into that desktop? This example unassigns the desktop when the user logs out. The Leostream Connection Broker defines a plan as a set of behaviors that can be applied to any 16 Quick Start number of pools via policies. This step describes three types of plans: 1) Power Control, 2) Release, and 3) Protocol. Protocol plans determine the display protocol used to connect the user to their resources. Power control and release plans perform actions at three points in the user’s session: When the user disconnects from their desktop When the user logs out of their desktop When the desktop is released to its pool When the user’s session has been idle for a specified length of time The remote desktop must have an installed and running Leostream Agent to allow the Connection Broker to distinguish between user logout and disconnect. Not all display protocols support user disconnect. Protocol Plans Protocol plans determine which display protocols the Connection Broker tries when connecting a user to a desktop from a particular pool. For a complete description of protocol plans, see “Building Pool-Based Plans” in the Connection Broker Administrator’s Guide. The Connection Broker provides one default protocol plan, which is shown on the > Plans > Protocol page, shown in the following figure. For this example, create a second protocol plan that instructs the Connection Broker to connect to the virtual machines using SPICE. 1. Go to the Plans tab in the main navigation menu 2. Click the Protocols tab in the Plans page navigation menu. 3. Click the Create Protocol Plan at the top of the page. The Create Protocol Plan form opens. 4. In the Plan name edit field, enter the name to use when referring to this protocol plan. 5. In the Leostream Connect and Thin Clients Writing to Leostream API section, select Do not use from the Priority menu associated with RDP and RemoteFX. 6. Also in the Leostream Connect and Thin Clients Writing to Leostream API section, select 1 from the 17 Chapter 2: Quick Setup Priority drop-down menu associated with Red Hat SPICE. The form appears as shown in the following figure. 7. The Command line parameters lists the parameters used to launch the spicec.exe client. The default parameters include Connection Broker dynamic tags for the SPICE host IP address, port, and ticket. Do not modify these default values. 8. Click Save. Power Control Plans Power control plans define what power control action is taken on a desktop when the user disconnects or logs out of the desktop or when the desktop is released to its pool. Available power control plans are shown on the > Plans > Power Control page, shown in the following figure. New Connection Broker installations contain one default power control plan that does not alter the desktop’s power state. You can create as many additional power control plans as needed for your deployment. This example uses the default power control plan Release Plans Release plans define how long a desktop remains assigned to a user. Available release plans are shown on the > Plans > Release page, shown in the following figure. 18 Quick Start New Connection Broker installations contain one default release plan, called Default. You can create as many additional release plans as needed for your deployment. The default release plan keeps the desktop assigned to the user when they disconnect from their session, but releases the desktop to its pool when the user completely logs out of their desktop. This release plan configuration ensures that the desktop is available for other users after the originally assigned user logs out. This example uses the default release plan. Step 8: Defining User Policies After you define your pools and plans, build policies that assign the plans to desktops. The Leostream Connection Broker defines a policy as a set of rules that determine how desktops are offered, connected, and managed for a user, including: what specific desktops are offered; what display protocol is used to connect to those desktops; which power control and release plans are applied to those desktops; what USB devices the user can access in their remote desktop; and more. The Connection Broker provides a Default policy that is assigned to the user if no other policy exists or is applicable. You can modify the default policy, or create new policies to assign pools of desktops and applications to users. For this example, create a new policy that offers two desktops from the pool of Windows desktops created in Step 6, as follows. 1. Click the Users tab in the main navigation menu. 2. Click the Policies tab in the Users page navigation menu. 3. Click Create Policy, as shown in the following figure. 4. In the Create Policy form, enter a name for the policy in the Policy name edit field. For a discussion of the remaining general policy properties, see the Connection Broker Administrator’s Guide. 19 Chapter 2: Quick Setup 5. The Desktop Assignment from Pools section configures the pools from which the Connection Broker offers desktops to users of this policy. From the Number of desktops to offer drop-down menu, select 2 to indicate the number of desktops the Connection Broker offers from this pool. 6. From the Pool drop-down menu, select the pool created in Step 6, containing the Windows desktops hosted in Red Hat. 7. After you select the pool, the remainder of the When User Logs into Connection Broker section, shown in the following figure, defines how the Connection Broker selects which desktops to offer the end-user from this pool. a. Offer desktops from this pool: Determines which users of this policy are offered desktops from this pool. Leave the default To all users of this policy option selected. b. Select desktops to offer based on: Leave the default value of User (“follow-me” mode) selected to ensure that the user is offered their currently assigned desktops wherever they log in. c. Display to users as: Configures how desktops are listed by the client. Again, leave this option set to the default value of Desktop name. d. Allow users to reset offered desktops: Select an option to allow users to restart their offered desktops. The default value used in this example restricts the user from restarting their desktop. If users are allowed to restart their desktops, you must also appropriately configure the user’s Role. This example does not cover Roles. e. Offer running desktops: Use this option to indicate if a running desktop must have an 20 Quick Start installed and running Leostream Agent. By default, the Connection Broker does not offer a desktop to a user if the desktop does not have an installed Leostream Agent. Because this example does not cover installing Leostream Agents on the remote desktops, select the Yes, regardless of Leostream Agent status option. f. Offer stopped and suspended desktops: Use this option to indicate if the Connection Broker should offer stopped or suspended desktops. Similar to the previous step, because this example does not cover installing Leostream Agents on the remote desktops, select the Yes, regardless of Leostream Agent status option. If the user tries to connect to a stopped desktop, Leostream automatically powers up the desktop before establishing the connection. g. Offer desktops with pending reboot job: Use this option to indicate if the Connection Broker can offer desktops with a scheduled reboot job. When the default value of Yes is selected, the Connection Broker cancels the pending reboot job if a user connects to the desktop. h. Desktop selection preference: Use the default Favor desktops previously assigned to this user option to indicate if the Connection Broker should first offer desktops that were previously assigned to the user. 8. The When User is Assigned to Desktop section controls what happens when a desktop from this pool is assigned to a user. Offered desktops are assigned to the user when the user initiates a connection to the desktop. For this example, leave all options unchecked. 9. The Plans section, shown in the following figure, allows you to associate a protocol, power control, and release plan with the desktops offered from a pool. From the Protocol drop-down menu, select the SPICE protocol plan. Plan and policy settings are stored at login time. If you modify the plans while the user is logged in, the Connection Broker does not use these modifications. 10. The remainder of the Edit Policy page does not apply to this example. Therefore, click Save. Step 9: Authenticating Users The Connection Broker can authenticate users in standard LDAP systems, such as Active Directory, OpenLDAP™, or Novell® eDirectory™. For information on adding OpenLDAP or eDirectory services, see the Connection Broker Administrator’s Guide. 21 Chapter 2: Quick Setup For this example, add an Active Directory authentication server, as follows. 1. Click the Users tab in the main navigation menu. 2. Click the Authentication Servers tab in the Users page navigation menu. 3. Click Add Authentication Server, as shown in the following figure. 4. In the Authentication Server name edit field, enter a name for this record in the Connection Broker. 5. In the Domain Name edit field, enter the domain name associated with this authentication server. If you do not specify a domain name in this field, the Authentication Server name field must contain the domain name. 6. Use the Include domain in drop-down option to indicate if this is the default domain for the Domain field in the Leostream Connect client. 7. In the Connection Settings section, shown in the following figure, use the following procedure to set up an Active Directory authentication server. a. Select Active Directory from the Type drop-down list. b. From the Specify address using drop-down menu, indicate if you are using a DNS SRV record to define the authentication server, or if you are manually entering the server’s address information. Select DNS SRV record to indicate that the DNS record is defined by the ldap SRV record. The Connection Broker does not query the SRV record at every authentication request. Instead, the Connection Broker honors any TTL value associated with the record, for example, and queries the SRV record only after the TTL expires. 22 Quick Start Select Hostname or IP address to manually enter the address information. c. If defining the authentication server using hostnames or IP addresses, enter these values in the Hostname or IP address edit field. To associate multiple authentication servers with this authentication server record, enter multiple authentication server addresses separated by blank spaces. d. If defining the authentication server using hostnames or IP addresses, enter the port number into the Port edit field. If you entered multiple authentication server addresses in the Hostname or IP address edit field, all authentication servers must use the same port. e. If you entered multiple authentication server addresses in the Hostname or IP address edit field, use the Algorithm for selecting from multiple addresses drop-down menu to indicate how the Connection Broker should select from the list of addresses when authenticating a particular user login. Select one of the following options. f. Random: The Connection Broker randomly selects an address from the list. Circular / Round Robin: The Connection Broker uses the addresses in the order they are entered in the Hostname or IP address edit field. For example, the first user is authenticated using the first address, the second user is authenticated using the second address, etc. The Connection Broker circles back to the first address in the list after all addresses have been used. Sequential / Failover: The Connection Broker continues to use the first address in the list until that address can no longer be reached. Click on the Encrypt connection to authentication server using SSL (LDAPS) checkbox if you need a secure connection to the authentication server. The port number automatically changes to 636. Re-edit the Port edit field if you are not using port 636 for secure connections. 8. In the Search Settings section, shown in the following figure, enter the username and password for an administrator account that has read rights to the user records. 9. The User Login Search section defines where and how the Connection Broker looks for a user in the Active Directory tree. a. In the Sub-tree: Starting point for user search field, enter the fully qualified path in LDAP format to the top point on the authentication server tree you want the Connection Broker to search for users. b. From the Match Login name against this field drop-down menu, enter the attribute that the 23 Chapter 2: Quick Setup Connection Broker should match the user’s entered login name against, for example: CN: The user’s common name sAMAccountName: The NT4 logon name userPrincipalName: The user’s email address uid: For OpenLDAP authentication servers, the user’s login ID 10. In the Other section, configure any additional options for this authentication server. The settings in this section allow you to do the following a. Query order: Sets the Position property of this authentication server. The Connection Broker uses the position to determine the order in which it searches for users in your different authentication servers. b. Allow login with an expired password: Allows users with a valid, but expired, password to log in into the Connection Broker and be assigned a desktop. The Windows GINA on the desktop prompts the user to enter a new password. c. Verbose error message for failed login: When selected, presents the user with a detailed explanation if their login fails. Active authentication server: Indicates that the Connection Broker should search this authentication server for users. d. Query for group information: This setting indicates if the Connection Broker automatically loads group information from Active Directory. Loading group information can place a significant load on the Connection Broker. If you have a large Active Directory structure, uncheck this option. This example, however, assumes this option is selected. This option will not appear when you subsequently edit the authentication server, To change the setting for the Query for group information option after initially creating the authentication server, go to the > Users > Assignments page associated with that authentication server. e. Notes: Optional notes for this authentication server. 11. Click Save. Step 10: Assigning User Roles and Policies Use the > Users > Assignments tab to assign roles and policies to users based on the user’s attributes and location. When a user logs in to the Connection Broker, the Connection Broker searches the authentication servers defined on the > Users > Authentication Servers page, shown in the following figure, for a user that matches those credentials. 24 Quick Start The Connection Broker then looks on the > Users > Assignments page, shown in the following figure, for the assignment rules associated with the authentication server that authenticated the user. For example, if the Connection Broker authenticated the user in the Leostream domain in the previous figure, the Connection Broker would look in the Leostream assignment rules in the following figure. To assign roles and policies to users in a particular authentication server, click the Edit link associated with that authentication server on the > Users > Assignments tab. If the Query for group information option is selected, the Edit Assignment form for this authentication server appears as in the following figure. In this configuration, the Connection Broker matches the selection in the Group drop-down menu to the following attributes: memberOf for Active Directory authentication server 25 Chapter 2: Quick Setup groupMembership for eDirectory authentication servers You cannot use this method when authenticating users in an OpenLDAP directory. If you modified your groups since you last signed into your Connection Broker, you must sign out and sign back in to have your Connection Broker reflect the authentication server changes. To assign rules based on the user’s group attribute: 1. Select the group attribute from the Group drop-down menu 2. Select the Red Hat and Spice policy created earlier in this example from the User Policy drop-down menu. This example does not cover Locations and Roles. If you need to assign roles and policies based on a different authentication server attribute, uncheck the Query for group information option at the bottom of the Edit Assignments form. After you save the form, the format of the Assigning User Role and Policy section changes. See “Assigning Roles and Policies Based on Any Attribute” in the Connection Broker Administrator’s Guide for information on using this new format. Step 11: Testing Your Connection Broker Configuration To test your Connection Broker, ensure that users are assigned the correct policies, as follows: 1. Click the Users tab in the main navigation menu. 2. Click the Users tab in the Users page navigation menu. 3. Click Test Login, as shown in the following figure: 4. In the Test Login form that opens, enter the name of the user to test in the User Name edit field. 5. If you are allowing the user to specify their domain, select a domain from the Domain drop-down menu. 6. Use the Filter client list by location drop-down menu to restrict the clients shown in the Clients drop-down menu. You create these locations on the > Clients > Locations page. If you are not using locations, select All. 7. If you have any clients loaded into your Connection Broker, use the Client menu to select the client you want to test this user logging in from. 8. Click Run Test. The Connection Broker searches the authentication server for your user, and then 26 Quick Start presents a report indicating which role and policy it assigned the user, and what applications it would offer. Please complete a login test prior to contacting Leostream technical support. After you test a login from the Connection Broker, you can use a Leostream Connect client to log in as this user, and ensure that the Connection Broker assigns the same desktops and that the user successfully logs in. 27 Chapter 3: Managing Your License Chapter 3: Managing Your License The Connection Broker displays the number of your licenses currently in use at the bottom of any page. To manage your Connection Broker license: 1. 2. Click on the System tab in the Connection Broker Web interface’s top navigation menu. Click on the Maintenance tab in the System page navigation menu. Viewing License Information The License Information text on the right hand side of the Maintenance page, shown in the following figure, displays the license information. The number of available licenses currently used, for example: Number of licenses in use: 7 of 100. This number indicates the number of users that can concurrently be assigned to resources using the Connection Broker. The support expiration date, for example: Your support license expires 2020-05-03. This date indicates the last date that you are eligible for Leostream support and Connection Broker updates. Contact [email protected] or your hardware vendor to renew an expired license. Checking for Updates The Connection Broker information displayed on the right side of the > System > Maintenance page displays the current Connection Broker version and the last time it was updated. You can remotely determine the Connection Broker version by querying: http://cb-address/version where cb-address is your Connection Broker address. If you have not recently updated your Connection Broker, you can download and install updates using the Update options on the > System > Maintenance page. Leostream recommends taking a snapshot of your Connection Broker virtual machine prior to installing an update. Also, qualify the Connection Broker update in a pre-production environment before you roll the 28 Quick Start new version into production. If the update options are disabled, your Leostream support license has expired and you are no longer eligible for Connection Broker updates. Contact [email protected] to renew your Leostream support license. Automatically Updating the Connection Broker If your Connection Broker can access the Leostream Web site and a new Connection Broker update file is available, the Update Connection Broker to version x.x.x.x option appears on the > System > Maintenance page. The x.x.x.x in the prompt indicates the version number of the available update. To automatically update the Connection Broker to this new version: 1. Select the Update Connection Broker to version x.x.x.x option. 2. Click Next. The Download and Install page, shown in the following figure, opens. 3. Click the Download and Install button to perform the update. The Connection Broker automatically begins to download the update file from the Leostream Web site. After the download completes, the Connection Broker installs the update file. After the installation completes, the Connection Broker reboots. Downloading a Connection Broker Update File If your Connection Broker can access the Leostream Web site and a new Connection Broker update file is available, the Download Connection Broker update for version x.x.x.x option appears on the > System > Maintenance page. The x.x.x.x in the prompt indicates the version number of the available update. To download the update file, select the Download Connection Broker update for version x.x.x.x option and click Next. The Connection Broker immediately downloads the file. You can use this file to update any Connection Broker using the Install Connection Broker update option. Manually Installing a Connection Broker Update File After you obtain a Connection Broker update file, you can install it into any Connection Broker, as follows. 1. Select the Install Connection Broker update option on the > System > Maintenance page. 29 Chapter 3: Managing Your License 2. Click Next. The following Install Update File form opens. 3. Browse for the update file or enter the full path to the update file. 4. Click Upload File. The Connection Broker checks the new file, and opens a form indicating the current version number and the new version number. 5. Click Install version x.x.x.x in this form to finish the installation. Installing a New License To update your support license, or add users to your license: 1. Go to the > System > Maintenance page. 2. In the Update section, select the Install new license option. 3. Click Next. 4. In the Leostream license page, shown in the following figure, enter your new license key. 5. Click on the License Agreement link to open the End User License Agreement for the Leostream Connection Broker 6. Read the agreement and, if you accept it, select the I have read and accept the License Agreement check box. 7. Click Save. 30