1
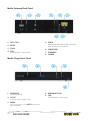
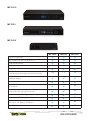
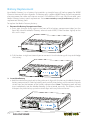
Contents
Media Gateway Hardware
Getting to Know Your Media Gateway�����E-1
Media Gateway Front Panel���������������E-1
Media Gateway Back Panel��������������� E-2
Media Player Front Panel������������������ E-2
Media Player Back Panel������������������ E-3
MP 2050 Front��������������������������������� E-3
MP 2050 Back��������������������������������� E-4
MP 2000������������������������������������������ E-5
MP 2150������������������������������������������� E-5
MP 2050������������������������������������������ E-5
External Hard Drive �������������������������������E-6
Troubleshooting Your Media Gateway ���E-6
Frequently Asked Questions������������� E-7
Wireless Network Configuration������������� E-7
Connecting Devices to Your Network� E-7
Battery Replacement�����������������������������E-8
i
Media Gateway Hardware
Manage the features and configuration of your Media Gateway.
Your Media Gateway is not only the central hard drive for recorded content enabling Whole
Home DVR, it is also an advanced cable modem and wireless router supporting WOW! Internet
and WOW! Phone. Your Media Gateway will be installed by a WOW! technician but should you
decide to change the configuration of your home network, or need to troubleshoot your
services, this section will help guide you through working with your Media Gateway.
Getting to Know Your Media Gateway
Media Gateway Front Panel
2
4
8
6
10
11
12
1
1. USB
The USB port is not active.
2. Power LED
Illuminates when the Media Gateway is
powered on.
3. Downstream LED
Illuminates when your Media Gateway is
downloading.
4. Upstream LED
Illuminates when your Media Gateway is
downloading.
5. Online LED
Illuminates when your Media Gateway is
online.
6. Link LED
Illuminates when a computer is
connected directly via the Ethernet to
the Media Gateway.
3
5
7
9
7. MOCA LED
Illuminates when the Media Gateway is
connected to a Media Player.
8. Recording
Glows red when the Media Gateway is
recording.
9. WiFi LED
Illuminates when the Wi-Fi is on and
connected.
10.Tel1 LED
Illuminates when the first telephone line
is provisioned and functioning.
11. Tel2 LED
Illuminates when the second telephone
line is provisioned and functioning.
12. Battery LED
Illuminates when the battery is present
and charged.
MEDIA GATEWAY HARDWARE
E-1
Media Gateway Back Panel
1
2
3
4
7
1. Tel 1/ Tel 2
6
5
8
5. eSata
Where you connect a DVR-certified
eSATA external hard drive.
2. Reset
3. Coax
6. CableCARD
4. USB
The USB port is not active.
7. Ethernet
8. Power
Media Player Front Panel
1
2
3
4
5
1. IR Sensor
Infrared sensor.
2. Clock
Displays the current time.
3. Menu
Acts the same as the MENU button on
your remote.
E-2
MEDIA GATEWAY HARDWARE
4. Arrow Keys/OK
5. USB
The USB port is not active.
Media Player Back Panel
1
2
4
3
5
7
8
6
11
9
1. Coax
7. USB
2. Composite
8. Ethernet
3. Component
9. IR Blaster
4. Digital Audio COAX
10. Reset
5. Digital Audio Optical
11. Power
10
6. HDMI
MP 2050 Front
1
2
1. Power light
2. MoCA light
MEDIA GATEWAY HARDWARE
E-3
MP 2050 Back
1
2
3
4
5
6
1. Coax
5. USB
2. Reset
6. IR Extender
3. HDMI
7. Power
4. Ethernet
E-4
MEDIA GATEWAY HARDWARE
7
MP 2000
MP 2150
MP 2050
MP 2000
MP2150
MP 2050
2
1
1
1.3b
1.4
1.4
Full HD 3D graphics
HD/SD, MPEG4-10/H.264, MPEG-2
Ethernet connector
USB 2.0 Host ports
F connector (MoCA 1.1)
One HDMI connector
(supporting up to 1080p: 24/30/50/60 Hz)
One IR RC-6 compatible remote control
interface output
Reset switch
One set of component video outputs supporting
up to 1080i
x
One composite video output with stereo audio
outputs for left and right channels
x
x
x
x
x
One electrical S/PDIF digital audio output
One optical S/PDIF digital audio output
Navigation buttons — arrows
(left, right, up, down), OK, Menu
Clock Display
MEDIA GATEWAY HARDWARE
E-5
External Hard Drive
The Ultra TV hard drive is 500GB and will store up to 300 hours of SD programming or 75 hours
of HD programming. You can expand the amount of hard drive storage on your Media Gateway
by connecting a DVR-certified eSATA external hard drive.
When you first insert the external drive into the Media Gateway, you’ll see a dialog on all
connected Media Players indicating that the drive needs to be formatted. You can choose to
respond on any Media Player; formatting can take up to 30 minutes, and you will lose any
existing content on the drive. You will receive notification when the formatting is complete.
Before you physically disconnect an external hard drive, you must eject it using software.
Although the external hard drive is connected only to the Media Gateway, you can eject an
external hard drive using any Media Player. To disconnect an external hard drive, from any Media
Player, go to the Settings category on the main menu and choose External Hard Drive. Choose
disconnect and wait for notification that you may now disconnect the drive. If you disconnect
the hard drive, stored content will not be accessible, although it will not be erased from the hard
drive. Reconnect the hard drive and ensure that the power is on to access stored programming.
Setting Up Your External Hard Drive:
1. Plug the eSATA connector into the eSATA port on the rear of the Media Gateway.
2. Wait for the confirmation on all of your Media Players that the Media Gateway recognizes
the external hard drive. You will receive this confirmation on all Media Players and can
respond on any that’s convenient.
3. I f this is the first time this hard drive has been connected to this system, or if the hard drive
is not properly formatted for any reason, the system will ask if you want to reformat the
external hard drive. (Reformatting deletes all data on the hard drive). Select yes to confirm
the reformatting of the external hard drive.
4. O
nce the external hard drive is recognized and properly formatted, the scheduler will
include the additional space in scheduling decisions.
Disconnecting Your External Hard Drive:
Disconnecting an external hard drive while it is in use (playing a recording or recording a show),
can result in corrupting stored data.
1. M
anually stop all recordings in progress by selecting the program card in the main menu,
and then choosing “stop recording.”
2. In the Settings category, select the External Hard Drive card.
3. Select disconnect, and then press OK. 4. You may be presented with a message that the drive is still busy. If this happens, please
repeat the disconnect process at a later time.
Troubleshooting Your Media Gateway
The lights on the front panel of the Media Gateway provide a quick indication of how Ultra TV
is functioning.
If your Media Gateway is not performing as expected, these following tips may help. If you
need further assistance, please contact WOW!.
• Check that your coaxial cable, power, Ethernet/USB, and Media Gateway connections are
tight. If the connection becomes loose at one of these places, you will not be able to send or
receive data. Secure the connection.
E-6
MEDIA GATEWAY HARDWARE
• Check to see if your Media Gateway is connected to the WOW! network. Look at your Media
Gateway and confirm that the lights are correct per the table above.
• If you checked the connections and you are still experiencing problems, press and release
the Reset button to reboot the Media Gateway.
Frequently Asked Questions
What if my Internet connection is not working?
If none of your WOW! services are working, there may be a cable outage in your area. Call
WOW! at 1-866-4WOW-NOW (1-866-496-9669). If you’re WOW! Cable is working but WOW!
Internet is not, proceed with the troubleshooting steps below.
What should I do if my cable TV is working but I don’t have Internet connection or dial tone?
Reset your Media Gateway by pressing and releasing the reset button once. Be careful not to
hold the button down for more than ten seconds as that will cause your router to reset to
factory defaults, eliminating any home network configurations you may have set.
What if I reset my Media Gateway I still don’t have dial tone?
If you have reset the Media Gateway and still don’t have dial tone, check the status of the
lights on the front of the Gateway. The Telephone 1 line (and / or Telephone 2 for a second line)
light should be solid if the phone is on the hook. If the Telephone light is blinking, check all of
your phones to see if one is off hook.
Wireless Network Configuration
When your installer leaves your home after setting up your Ultra TV, your network will be
configured and functional.
There are a few settings that you may want to alter at some point in the future that are
accessible from the Gateway’s eRouter website at http://192.168.0.1
The default user name to log in to the website is Admin. Your installer should leave you with
information about the login password.
You may, at some point, want to change the following settings:
SSID: The default SSID for your router is taken from the Media Gateway serial number on the bottom
of the Gateway. You have the option to change the SSID to a more friendly, recognizable name.
Passphrase: The passphrase for your wireless network is printed on the label on the bottom
of your Media Gateway. You may want to change this passphrase initially to something more
secure. In addition, you may want to change it periodically to maintain security levels.
RF Channel: If you’re experiencing interference from a neighbor’s wireless network, for
example, try changing the RF channel frequency.
If, at any point, you forgot your SSID or passphrase and need to access them to add additional
devices to your network, you can use the reset button to reset the router to default settings.
See the previous section for details.
Connecting Devices to Your Network
If you are using a wireless network, you will need to enter the SSID and passphrase to connect
additional devices. Each device that you connect should have instructions on where to enter
this information. For more information on WOW! Home Networking, see the Internet chapter.
MEDIA GATEWAY HARDWARE
E-7
Battery Replacement
Your Media Gateway has a battery that provides up to eight hours of backup power for WOW!
Phone in the event of a loss of power. The battery only supports WOW! Phone and will not provide
alternate power for cable and Internet services. If the Battery LED is not fully illuminated, your
Media Gateway battery needs replacement. Go to www.wowway.com/phonebattery to order a
replacement battery pack.
To replace the Media Gateway battery:
1. Remove the Battery Compartment Door
a. Press your thumbs firmly against the front of the battery compartment door (on the
front left side of the Media Gateway where it reads ARRIS). Slide the door slightly to the
left until it stops.
b. Pull the door straight out toward you to remove it. Use the battery pull strap to dislodge
the battery.
2. Insert New Battery
a. Hold the new battery pack so that the guides on it align with the slots on the Media Gateway
battery compartment. Slide the battery pack partially into the bay until it contacts the two
raised stops on the bottom of the battery compartment. Note: The battery pack will not
insert completely into the Media Gateway if not oriented correctly. The battery should
slide part way into the bay up to the raised stops with very little resistance.
E-8
MEDIA GATEWAY HARDWARE
b. Apply even pressure on both ends of the battery pack with your thumbs until the battery
pack slides over the raised stops and snaps firmly into place.
3. Replace the Door
a. Push the door straight onto the front of the Media Gateway until the tabs on the door
insert into the matching slots on the battery compartment.
b. Slide the door to the right until it closes.
MEDIA GATEWAY HARDWARE
E-9