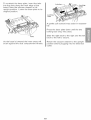
1
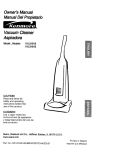
Owner's Manual
Manual Del Propietario
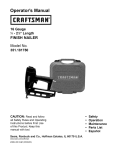
Vacuum Cleaner
Aspiradora
Model,
Modelo
116.36724
CAUTION:
Read and follow all
safety and operating
instructions before first
use of this product.
CUIDADO:
Lea y sigue todas las
instrucciones de operaci6n
y seguridad antes del uso de
este producto.
Sears, Roebuck and Co., Hoffman Estates, IL 60179 U.S.A.
www.sears.com
Part No. C01ZCSC{3{3UOQ - KCO1ZCSCZOUO
Impreso en China
Printed in China
Vacuum
Before Using Your New
Vacuum Cleaner
....................
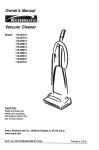
Kenmore
Vacuum
Cleaner
Warranty
Important Safety Instructions
.........
Parts and Features
..................
Assembly
Instructions
2
...
2
3
4
.............
5-6
Operating Instructions
...............
How To Start .......................
6
6
Pile Height Selection and Setting ........
Releasing the Handle .................
ON/OFF Switch .....................
Attachments ........................
Attachment Use Chart ................
Vacuuming Tips .....................
Performance Features ...............
7
7
7
8
9
9
10
Cleaner
Care
...............
11
Cleaning Exterior and Attachments
.....
11
Dust Bin Cleaning ..................
12
Dust Bin Assembly ..................
13
Dust Bin Filter Changing/Cleaning
......
14
Secondary Filter Cleaning ............
15
Filter Changing/Cleaning .............
16
Belt Changing and Agitator Cleaning .. 17-19
Clog Removal .....................
20
Light Bulb Changing .................
21
Agitator Servicing ...................
22
Troubleshooting
....................
Requesting
Assistance
Or Service
...................
23
Back Page
Please read this guide. It will help you assemble and operate your new Kenmore vacuum
cleaner in the safest and most effective way.
For more information about vacuum cleaner care and operation, call your nearest Sears store.
You will need the complete model and serial numbers when requesting information.Your vacuum cleaner's model and serial numbers are located on the Model and Serial Number Plate.
Use the space below to record the model number and serial number of your new Kenmore
vacuum cleaner.
Model No.
Serial No.
Date of Purchase
Keep this book and your sales check (receipt) in a safe place for future reference.
LIMITED ONE YEAR WARRANTY ON KENMORE VACUUM CLEANER
This warranty is for one year from the date of purchase, and includes only private household
vacuum cleaner use. During the warranty year, when this vacuum cleaner is operated and
maintained according to the owner's manual instructions, Sears will repair any defects in
material or workmanship free of charge.
This warranty excludes vacuum bags, belts, light bulbs, and filters, which are expendable parts
and become worn during normal use.
For warranty service, return this vacuum cleaner to the nearest Sears Service Center in
the United States.
This warranty applies only while this product is in use in the United States. This warranty gives
you specific legal rights, and you may also have other rights which vary from state to state.
Sears, Roebuck and Co., 1:)/817WA, Hoffman Estates, IL 60179
2
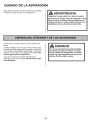
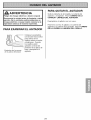
WARNING
Your safety is important to us. To reduce the risk of fire, electrical shock,
injury to persons or damage when using your vacuum cleaner, follow basic
safety precautions including the following:
Read all instructions in this manual before
assembling or using your vacuum cleaner.
Use your cleaner only as described in this
manual. Use only with Sears recommended attachments.
Disconnect electrical supply before
servicing or cleaning out the brush area.
Failure to do so could result in the brush
unexpectedly starting, causing personal
injury from moving parts.
Do not leave cleaner when plugged in.
Unplug from outlet when not in use and
before servicing.
To reduce the risk of electrical shock - Do
not use outdoors or on wet surfaces.
Do not allow to be used as a toy. Close
attention is necessary when used by or
near children.
Do not use with a damaged cord or plug.
If cleaner is not working as it should, has
been dropped, damaged, left outdoors, or
dropped in water, return it to a Sears
Service Center.
Do not pull or carry by cord, use cord as
a handle, close a door on cord, or pull
cord around sharp edges or corners. Do
not run cleaner over cord. Keep cord
away from heated surfaces.
Do not unplug by pulling on cord. To
unplug, grasp the plug, not the cord.
Do not handle plug or cleanerwith wet
hands.
Do not put any objects into openings.
Do not use with any opening blocked;
keep free of dust, lint, hair, and anything
that may reduce air flow.
Keep hair, loose clothing, fingers, and all
parts of body away from openings and
moving parts.
Turn off all controls before unplugging.
Use extra care when cleaning on stairs.
Do not put on chairs, tables, etc. Keep
on floor.
Do not use cleaner to pick up flammable
or combustible liquids (gasoline, cleaning
fluid, perfumes, etc.), or use in areas
where they may be present. The fumes
from these substances can create a fire
hazard or explosion.
Do not pick up anything that is burning or
smoking, such as cigarettes, matches, or
hot ashes.
Do not use cleaner without dust bin
and/or filters in place.
Always clean the dust bin after vacuuming carpet cleaners or freshener, powders,
and fine dust. These products clog the filters, reduce airflow and can cause damage to the cleaner. Failure to clean the
dust bin could cause permanent damage
to the cleaner.
Do not use the cleaner to pick up sharp
hard objects, small toys, pins, paper clips,
etc. They may damage the cleaner or
dust bin.
Hold plug when rewinding onto cord reel.
DO NOT allow plug to whip when rewinding.
Unplug before connecting Handi-mate Jr.
(if applicable).
You are responsible for making sure that
your vacuum cleaner is not used by anyone unable to operate it properly.
SAVE THESE INSTRUCTIONS
Proper assembly and safe use of your vacuum cleaner are your responsibilities. Your
cleaner is intended for Household use. Read this Owner's Manual carefully for important
use and safety information. This guide contains safety statements under warning and caution symbols.
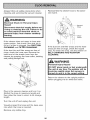
Itisimportant
toknow
yourvacuum
cleaner's
partsandfeatures
toassure
itsproper
andsafe
use.Review
thesebefore
using
yourcleaner.
Object
Part No.
in USA
Exhaust Filter
20-86880
Primary Filter
20-82720
Headlight Bulb
20-5248
Belt
20-5275
Part No.
(Inside)
Dust
Dusting
Brush
-
Exhaust
Hose
Filter
(Inside)_
Height
A d_us tm en t
Carry
Power
Cord_
_Headlight
Furniture
Guard
Wands
Base
"_
Handle
Belt
(Underneath)
Release
Pedal
\
Numbers
_Agitatur
Rewind
Button
(Underneath)
I
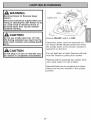
Please pay special attention to these hazard alert boxes, and follow any instructions
given. WARNING statements alert you to such dangers as fire, electric shock, burns I
and personal injury. CAUTION statements alert you to such dangers as personal
n ury and/or property damage.
WARNING
Electrical Shock Hazard
Do not plug into the electrical supply
until the assembly is complete. Failure
to do so could result in electrical shock
or injury.
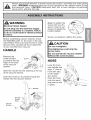
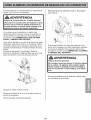
Begin to tighten the
screw with your fingers. It may be necessary to adjust the
handle slightly.
Using a screwdriver, tighten the screw.
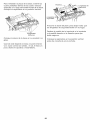
Before assembling vacuum cleaner, check
the PACKING LIST on the cover of the separate Repair Parts List. Use this list to verify
that you have received all the components
of your new Kenmore vacuum.
Do not overtighten.
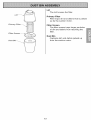
HANDLE
Overtightening could strip the
screw holes.
Remove the
screw located
just below the top
edge of the back
of the vacuum
cleaner.
J'
CAUTION
Do not operate the vacuum cleaner
vvithout the screw in place.
Screw_
HOSE
Loop the hose
over handle and ..... L
Slide the handle into the opening at the top
of the vacuum cleaner.
Insert the screw so it passes through the
handle into the vacuum cleaner.
Handle
Sot'ew
Hole
Handle
i
align "J"slots in _.
hose with tabs _ "_
on
exten_/_.._
sionthe
wand.
Push the hose _1,',_
onto the wand
and twist to lock _
in place.
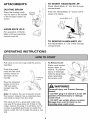
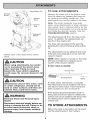
ATTACHMENTS
DUSTING
TO INSERT
BRUSH
Place the dusting brush
into the back of the handle
in the storage location as
shown.
HANDI-MATE
HANDI-MATE
JR ®
Place Handi-Mate Jr.® into the storage
compartment.
Dusting
Push the Handi-Mate Jr. ®down until it
snaps into place.
JR.@
For operation of HandiMate Jr.® see seperate
owners manual.
TO REMOVE
HANDI-MATE
JR. _
Pull Handi-Mate Jr.® out of the storage
compartment.
OPERATING INSTRUCTIONS
Pull cord out of cord reel until the end is
reached.
Push the power
cord into the cord
locking notch on
the back of the
handle.
To Retract Cord:
Press cord rewind
button down to
rewind. To prevent
injury or damage,
hold the plug head
while rewinding
the power cord.
',,
/
Plug the polarized
power cord into a
120 Volt outlet
located near the
floor.
Note: To reduce the risk of electric shock,
this vacuum cleaner has a polarized plug,
one blade is wider than the other.
This plug will fit in a polarized outlet only
one way. If the plug does not fit fully in the
outlet, reverse the plug. If it still does not fit,
contact a qualified electrician to install the
proper outlet. Do not change the plug in any
way.
Cord /
Rewind
Button
WARNING
Personal Injury and Product Damage
Hazard
DO NOT plug in if switch is in the ON
bosition. Personal injury or damage
'ould result.
• DO NOT use outlets above counters.
Damage from cord to items in surrounding area could occur.
Toselecta pileheightsetting:
SUGGESTED PILE HEIGHT SETTINGS
Turn off vacuum cleaner. Select a pile height
setting by tilting the cleaner back until front
wheels are lifted slightly off the floor as illustrated.
You may need to raise the height to make
some jobs easier, such as scatter rugs and
longer pile carpets. Suggested settings are:
Slide the adjustment lever to the correct
setting.
HIGH: shag carpet, long pile, plush, scatter
rugs.
MED: medium to long pile.
LOW: short to medium pile.
BARE FLOOR: very low pile.
Release the handle by pressing down on
the handle release pedal with your foot and
pulling back and down on the handle with
your hand.
Handle
Release
Pedal
To start the vacuum cleaner, push the
On/Off switch from the OFF position to the
ON position. To stop the vacuum cleaner,
push the On/Off switch to the OFF position.
/
TO USE ATTACHMENTS
Dusting
Brush
Hose
Remove the lower end of the stretch hose
from the cleaner by grasping the hose collar, twisting and pulling straight out. The
attachments can now be added to the hose.
\
Note: The motor protector may open
when using attachments or when cleaning
new carpet, due to reduced airflow by the
attachments themselves or by new carpet
fuzz filling the dust bin quickly. See the
TROUBLESHOOTING
section.
Wands
The attachments will fit on the hose or the
wand. In addition, the dusting brush will
also fit on the crevice tool.
The hose can be pulled off the wand by
grasping the cuff and twisting while pulling
up.
L
Identify each ofthe attachments shown
above.
The attachments can be added to the hose
if the item to be cleaned is not far from the
vacuum cleaner.
NOTE: When cleaner is turned on, the hose
will have a tendency to collapse due to
suction of the vacuum cleaner.
When using attachments, be careful
not to overextend the stretch hose
when reaching. Trying to reach
beyond the hose stretch capability
could cause the vacuum cleaner to ti
over.
If more reach is needed:
Crevice
Teol
Wand
Attachments used in dirty areas, such
as under refrigerator, should not be
used on other surfaces until they are
washed. They could leave marks.
Electrical Shock And Personal Injury
Hazard
Disconnect electrical supply before servicing or cleaning the unit. Failure to do
so could result in electrical shock or
personal injury from cleaner suddenly
starting.
An extra wand, without tabs, is included.
This extra wand can be added to the wand
with tabs for extra reach. Insert wand and
twist a quarter of a turn to secure fit.
If the dusting brush/combination brush is
being used and more reach is needed, the
crevice tool can be added to the wand, then
the dusting brush can be added to the
crevice tool.
TO STORE ATTACHMENTS
Return the hose to its position on the wand
and the attachments to their holders.
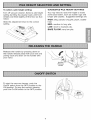
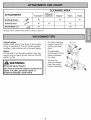
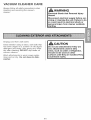
CLEANING
ATTACHMENT
Dusting Brush
Furniture*
v'
Between
Cushions*
Drapes*
AREA
Stairs
v'
v'
Crevice Tool
Handi-Mate Jr.®
i,,'
i,,'
*Alwaysclean attachmentsbefore using on fabrics.
Carpet edges
Guide either side or the front of the nozzle
along a baseboard. The full width agitator
brushes help remove dirt at carpet edges.
For best cleaning
results, keep the
airflow passage
clear.
Stairs
Put handle in full upright position. Use the
crevice tool or fabric brush. Set the On/Off
switch to ON.
Occasionally,
check each of the
areas indicated
for clogs.
Unplug the
vacuum cleaner
from the outlet
before checking.
Walls
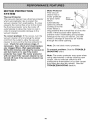
Motor Protector
"_
This vacuum
cleaner has a
motor protector
by-pass valve
Motor
which
automatically
opens to provide
cooling air to the
motor when a
clog prevents the normal flow of air to the
motor. If the by-pass valve opens to
prevent motor overheating and possible
damage to the vacuum cleaner, you will
notice a change of sound as air rushes
through the valve opening.
MOTOR PROTECTION
SYSTEM
Thermal Protector
This vacuum cleaner has a thermal protector
which automatically trips to protect the
vacuum cleaner from overheating. If a clog
prevents the normal flow of air to the motor,
the thermal protector turns the motor off
automatically to allow the motor to cool in
order to prevent possible damage to the
vacuum cleaner.
To correct problem: If this occurs, turn the
vacuum cleaner off and unplug the power
cord from the outlet to allow the vacuum
cleaner to cool and the thermal protector to
reset. Check for and remove clogs, if
necessary. Also check and clean/replace
any clogged filters. Wait approximately
thirty (30) minutes and plug the vacuum in
and turn back on to see if the motor
protector has reset. The motor protector
will not reset if the vacuum cleaner is not
turned off even if the vacuum cleaner has
cooled down.
Note: Do not block motor protector.
To correct problem: See the TROUBLESHOOTING chart.
Note: The motor protector may open when
using attachments or when cleaning new
carpet, due to reduced airflow by the
attachments themselves or by new carpet
fuzz filling the dust bin quickly. See the
TROUBLESHOOTING
section.
10
VACUUM CLEANER CARE
Always follow all safety precautions when
c!saning and servicing the vacuum
cleaner.
Electrical Shock And Personal Injury
Hazard
Disconnect electrical supply before servicing or cleaning the unit. Failure to do
so could result in electrical shock or
personal injury from cleaner suddenly
starting.
Unplug cord from wall outlet.
CAUTION
Clean exterior using a clean, soft cloth that
has been dipped in a solution of mild liquid
detergent and water, then wrung dry. Wipe
dry after cleaning= DO NOT drip water on
vacuum cleaner.
Do not use attachments if they are
wet. Attachments used in dirty
areas, such as under a refrigerator,
should not be used on other
surfaces until they are washed. They
could leave marks.
Wash attachments in warm soapy water,
rinse and air dry. Do not dean in dish=
washer.
11
Electrical Shock And Personal Injury
Hazard
Separate the lid from
the dust bin by lifting
it straight off.
Always unplug power cord from electrical outlet before performing any service
on vacuum.
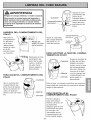
Bm
TO REMOVE DUST BIN
Remove dust
bin assembly
from vacuum
cleaner by lifting the release
lever as
shown.
\
Empty contents into a
trash container.
Lever
Remove dust
bin from vacuum cleaner by
tilting out as
shown.
TO REPLACE DUST BIN LID
Place dust bin lid
assembly back
onto top of dust
bin. Align marks
with bin marks as
shown. Rotate lid
clockwise while
pressing downward
so that marks align
as shown.
TO EMPTY DUST BIN
Holddust bin over a trash container.
Rotate lid counterclockwise from the
locked position to
the unlocked
position as shown.
TO REPLACE DUST BIN
First align base
of dust bin with
the vacuum
cleaner. Then
rotate dust bin
in place making
sure dust bin is
securely
latched.
Lid
Unlock
Locked
12
Lid
The Lid houses the filter.
Primary Filter
Filter traps dirt and debris that is picked
up by the suction motor.
Filter Screen
The filter screen traps larger particles
of dirt and debris from reaching the
filter.
Dust Bin
Captures dirt and debris picked up
from the suction motor.
Dust Bin
13
Check primary filter frequently and clean
when dirty• Remove the dust bin assembly
as outlined in the DUST BIN CLEANING
section and empty contents of dust bin.
Before replacing the primary filter it is a good
idea to clean the inside of the dust bin and lid
area•
Make sure dust bin is empty before filter is
removed• Grasp filter screen, rotate
counter-clockwise and lift out.
Primary
Filter
Rotate filter clockwise until slots lock onto
tabs in lid.
To re-install the filter screen, align tabs on
filter screen with tabs on lid.
Grasp primary filter, rotate counterclockwise and lift out. Clean primary filter
by gently tapping over a trash container.
The filter may be cleaned by tapping it on a
firm surface. Tap on several sides to
ensure best cleaning.
After every 5th cleaning cycle, rinse filter
exterior with water under a faucet• Once
the filter is rinsed clean, damp dry with a
cloth and let air dry for 24 hours•
Rotate filter screen clockwise to lock in
place•
Rinse with water only, do not use detergent
or soap. Allow filter to dry 24 hours
before putting it back into the dust bin.
When the cleaning of the filter no longer
restores vacuum suction to full power you
need to replace the filter.
Before replacing the filter it is a good idea to
clean the inside of the dust bin and lid area.
Primary
Rotate filter clockwise until slots lock onto
tabs in lid.
NOTE: Under normal use and care, your filter can be expected to last up to 3 years•
Fi ter
NOTE: See Parts and Features for Filter
number•
Lid _
14
Check
secondary
filterfrequently
andclean
whendirty.
Remove
thedustbinasoutlined
inthe
DUST
BINCLEANING
section.
Tocleanfilterscreen
wipescreen
withadry
cloth.
Secondary
FiZter--_
NOTE:
Filterscreen
isnotremovable.
I
Replace
thedustbinasoutined
inthe
DUST
BINCLEANING
section.
_PJ_d_
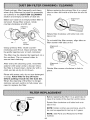
15
Pull out on
both sides of
the exhaust
filter cover.
and pull out to
remove from
vacuum
cleaner.
Electrical Shock Hazard
Unplug power cord from electrical outlet. Do not operate the vacuum cleaner
without the primary or exhaust filters.
Be sure the filters are properly installed
to prevent motor failure and/or electrical shock.
EXHAUST
FILTER
Exhaust
The exhaust filter must be replaced when
dirty. It should be replaced regularly
depending on use conditions.
Remove the
exhaust filter
cartridge.
The filter CANNOT be washed as it will
lose its dust trapping ability.
Push only on filter
cartridge frame,
not on filter
material itself.
NOTE: See PARTS AND FEATURES
for the exhaust filter number.
Exhaust
Replace the exhaust filter cover by placing
tabs in slots and pushing in until cover
snaps into place.
16
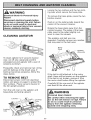
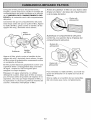
Locate the two latches and the two locking tabs which secure the base plate.
Electrical Shock Or Personal Injury
Hazard
To remove the base plate, press the two
latches inward.
Disconnect electrical supply before
servicing or cleaning the unit. Failure
to do so could result in electrical
shock or personal injury from vacuum
cleaner suddenly starting.
CLEANING
Push in on the locking tabs toward the
center of the vacuum cleaner.
Rotate the base plate away from the
nozzle housing. The sides of the base
plate need to be pulled slightly outward to clear the wheels.
AGITATOR
The agitator and belt are now
exposed. Carefully remove any residue
that may exist in the belt area.
Motor
Shaft
e_bly
To clean agitator turn vacuum cleaner
over, cut off any carpet pile and lint
entangled around agitator with a pair of
scissors as shown.
Frequently check and remove hair, string
and lint build-up in the brush area. If
build-up becomes excessive, follow the
steps below.
TO REMOVE
If the belt is still
shaft, there will
If the belt is not
the motor shaft
BELT
Disconnect power cord from electrical
outlet, and place on paper to protect the
floor surface. Place vacuum cleaner in
the full upright posiiton.
attached to the motor
be tension on the agitator.
broken, remove it from
before lifting the agitator.
Carefully lift the one end of the agitator
and then lift the other end.
Turn the unit over so the agitator and
base plate are facing upward.
WARNING
Personal Injury Hazard
Be careful when removing the agitator as the belt tension is high. Failure
to do so could result in personal
injury from the agitator releasing
quickly and snapping away.
Latches
Locking
/
Locking
Tabs
17
TO CLEAN
AGITATOR
BELT ROUTING
NOTE: In order to keep cleaning efficiency
high and to prevent damage to your vacuum
cleaner, the aqitator must be cleaned every
time the belt is chanqed.
Press firmly, checking to see that each end
is completely inserted.
The agitator must also be cleaned according to the following schedule:
Vacuum Use
Clean Agitator
HEAVY (used daily)
every week
MODERATE (used 2-3 times/week)
every month
LIGHT (used 1 time/week)
every 2 months
Belt-
Agitator
Check to see that the belt is centered in the
belt groove. Turn the agitator with your fingers to see that it turns freely.
Remove any dirt or debris in the belt path
area or in the agitator area.
Agitator Assembly
TO REPLACE
BELT
NOTE: See PARTS AND FEATURES for
belt number.
Loop the new belt on the motor shaft.
Loop the end of the new belt on the agitator.
Insert the agitator by placing the rounded
portion of the end cap down into the slot
in the nozzle base.
New
s.aft
/L.'_
/_
Assembly
_'%',
_\
sorto_oove
/
NOTE: Care must be taken due to the belt
tension during reassembly.
18
To re-attach the base plate, insert the tabs
into the slots along the front edge of the
base. Place the vacuum cleaner in full
upright position. Lower the base plate to its
original position.
Latches--
-Locking
tabs
Lockb
Tabs
A gentle pull outward may assist in reassemNy.
Press the base plate down until the two
locking tabs snap into place.
Slide the right latch to the right and the left
latch to the left to secure.
Tabs
As the base is lowered the inner areas will
brush against the dust compartment wheels.
Return the vacuum cleaner to the upright
position before plugging into the electrical
outlet.
19
Reassemble the stretch hose to the extension wand.
Always follow all safety precautions when
cleaning and servicing the vacuum cleaner.
WARNING
Electrical Shock Or Personal Injury
Hazard
Disconnect electrical supply before servicing or cleaning the unit. Failure to do
so could result in electrical shock or
personal injury from cleaner suddenly
starting.
If the cleaner does not seem to have adequate suction, first check if the dust bin is
full or if a filter is clogged. See DUST BIN
CLEANING and FILTER CHANGING.
If the dust bin and filter areas and the hose
areas are free of clogs, check the nozzle
area. To check this area, see the section on
BELT CHANGING AND AGITATOR
CLEANING,
If the dust bin and filter areas are free of
clogs, check the hose area. Remove the
lower end of the stretch hose from the
cleaner by grasping the hose collar, twisting,
and pulling straight out.
WARNING
Personal Injury Hazard
DO NOT place hands or feet underneath
the unit at any time.The agitator will be
revolving rapidly when the vacuum is
turned on and is in the carpet setting.
Return the cleaner to the upright position
before plugging into an electrical outlet.
Plug in the vacuum cleaner and turn it on.
Stretch the hose to maximum length and
then allow the hose to return to its storage
length.
Turn the unit off and unplug the unit.
Visually inspect the hose and the base area
into which the hose is inserted.
Remove any visible clog.
2O
WARNING
Electrical Shock Or Personal Injury
Hazard
Disconnect electrical supply before servicing or cleaning the unit. Failure to do
so could result in electrical shock or
personal injury from vacuum cleaner
suddenly starting.
Ensure ON-OFF switch is OFF.
I CAOT,O.
Disconnect power cord from electrical outlet. Press handle release pedal and rotate
the handle down so the vacuum cleaner is
laying flat on the floor.
I
Pry out light lens at slots. Remove old bulb
from the socket by pulling from socket.
Do not plug in or turn on until the vacuum cleaner is completely reassembled.
Replace bulb by pressing into socket. Only
use a bulb rated 13 V AC-9 Watts.
Reinstall light lens by snapping into place.
Return the vacuum cleaner to the upright
position.
21
TO REPLACE AGITATOR
Remove the nozzle cover, agitator cover,
and agitator assembly. See BELT CHANGING AND AGITATOR CLEANING.
Electrical Shock Or Personal Injury
Hazard
Disconnect electrical supply before servicing or cleaning the unit. Failure to do
so could result in electrical shock or
personal injury from vacuum cleaner
suddenly starting.
Replace the agitator assembly with a new
one.
Reassemble the belt, agitator, agitator cover
and nozzle cover. See "To replace belt" in
BELT CHANGING AND AGITATOR
CLEANING section.
TO CHECK AGITATOR
Base
Ptate
Belt
Guard
Turn the vacuum
cleaner over to
check for worn
brushes. When
brushes are worn
to the level of the
base belt guard,
replace the agitator.
22
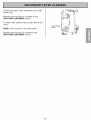
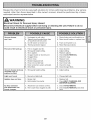
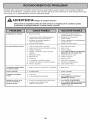
Review this chart to find do-it-yourself solutions for minor performance problems. Any service
needed, other than those described in this owner's manual, should be performed by a Sears
authorized service representative.
Electrical Shock Or Personal Injury Hazard
Disconnect electrical supply before servicing or cleaning the unit. Failure to do so
could result in electrical shock or personal injury.
Vacuum cleaner
1, Unplugged at wall outlet.
1, Plug in firmly, push on/off switch to on.
won't run.
2, Tripped circuit breaker/blown fuse
at household service panel.
3, On/off switch not turned on.
2, Reset circuit breaker or replace fuse.
4. Thermal protector tripped.
4. Reset thermal protector.
1, Full or clogged dust bin.
1. Clean dust bin.
2. Wrong pile height setting.
2. Adjust setting.
3, Worn agitator.
3, Replace agitator.
4, Check CLOG REMOVAL.
Poor job of dirt pick-up.
4, Clogged nozzle or dust bin port.
5. Clogged hose.
6. Hole in hose.
7, Broken/misplaced
3, Push on/off switch to on.
5. Check for clogs.
6. Replace hose.
belt.
7, Replace/fix belt.
8. Hose not inserted fully.
8. Insert hose fully.
9. Motor protection system activated.
10, Dirty filters.
9. Check for clogs.
10, Clean/change filters.
Vacuum cleaner picks up
moveable rugs or
pushes too hard,
1, Wrong pile height setting.
1, Adjust setting.
Light won't work.
1, Burned out light bulb.
1, Change light bulb.
Agitator
1, Broken belt.
1, Replace belt.
2. Belt installed incorrectly,
2. Check BELT CHANGING AND
AGITATOR CLEANING.
1, Attachment use restricts air flow,
1, Check ATTACHMENTS.
2, New carpet fuzz clogged air path.
2, Check CLOG REMOVAL and clean
hose,
does not turn.
Air flow restricted
with attachment
Sound changes,
use.
23
Antes de usar su aspiradora nueva ..... 1
Garantia de la aspiradora de Kenmore
1
Instrucciones importantes de
seguridad ............................
2
Piezas y caracteristicas ................
3
Instrucciones de ensamblamiento ..... 4-5
Instrucciones de operacion
............
Para comenzar .......................
Ajuste y selecci6n de nivel de pelo de la
alfombra ............................
5
5
5
Desprendimiento del mango ..............
Interrupter de encendido/apagado .........
Accesorios ...........................
Cuadro de use de los accesorios ..........
6
6
7
8
Sugerencias para aspirar ................
Caracteffsticas de rendimiento ............
8
9
Cuidado
de la aspiradora
..............
10
Limpieza del exterior y de los accesorios ... 10
Limpiande el cube de la basura ........
11-12
Ensamble del copartimiento del pelvo .....
Cambiando/limpiando filtres ............
Remplazo del filtro ....................
Limpieza del filtro secundario ...........
13
13
14
14
Cambio/limpieza de filtros ..............
Cambio de la cerrea y limpieza
del agitador .......................
C6mo eliminar los residues de basura
en los conductes .....................
Cambio de la bombilla .................
15
16-18
Cuidado del agitader ..................
19
20
21
Reconocimiento
de problemas
.........
22
Informacion
de assistancia
o servicio
................
Posterior Cubierta
Per favor lea esta guia que le ayudara a assemblar y operar su aspiradora nueva de Kenmore en una manera
m_.ssegura y effectiva.
Para mas informaci6n acerca del cuidado y operaci6n de esta aspirador, Ilame a su tienda Sears mas cercana.
Cuando prequnte per informaci6n usted necisitara el nQmero complete de serie y modelo de la aspiradora que
esta Iocado en la placa de los nQmeros de modelo y serie.
Use el espacio de abajo para registrar el nQmero de modelo y serie para su nueva aspiradora de Kenmore.
NOmero de Modelo
NOmero de Serie
Fecha de Compra
Matenga este libro y su recibo en u lugar seguro para referencias futuras.
GARANTiA LIMITADA DE UN AI_IODE LA ASPIRADORA KENMORE
Esta garantfa es per un afro desde la fecha de compra, e incluye solamente el use de la aspiradora en
hogares privados. Durante el afro de garantfa, cuando la aspiradora es operada y mantenida de acuerdo al
manual de instrucciones del dueffo, Sears reparara cualquier defecto en materiales o fabricaci6n libre de cargo.
Esta garantfa excluye las bolsas de colecci6n, correas, lamparillas, y filtros, las cuales son partes gastables que
se deterioran con el use normal.
Para el servicio de garantfa, retorne esta aspiradora al Centro de Servicio Sears m_s cercano en los
Estados Unidos.
Esta garantfa se aplica solamente mientras este producto esta en use en los Estados Unidos. Esta garantfa le
da a usted derechos legales especfficos, y usted puede tener tambien otros derechos los cuales varfan de
estado a estado.
Sears, Roebuck and Co., D/817 WA, Hoffman Estates, IL 60179
ADVERTENCIA
Su seguridad es muy importante para nosotros. Para reducir el riesgo de incendio, choque
electrico, lesi6n corporal o da_os al utilizar su aspiradora, actue de acuerdo con precauciones
basicas de seguridad, entre elias:
Lea todas las instrucciones en este manual
antes de armar o usar su aspiradora.
Use su aspiradora solamente como se
describe en este manual. Use solamente con
los accesorios Sears recomendados.
Mantenga los cabellos, ropas sueltas, dedos,
y todas las partes del cuerpo lejos de
aberturas y partes movibles.
Apague todos los controles antes de
desenchufar.
Desconecte la fuente de electricidad antes de
hacer el servicio o limpiar el area del cepillo.
La falla de hacer esto puede resultar en cheque
electrico o en el arranque st_bito del cepillo.
Use cuidado extra cuando limpie escaleras. No
la ponga sobre sillas, mesas, etc.
Mant_ngala sobre el piso.
No deje la aspiradora cuando esta
enchufada. Desenchufe del tomacorriente
cuando no est_.en uso y antes de hacer el
servicio.
No use la aspiradora para levantar Ifquidos
inflamables o combustibles (gasolina, fluido
de limpiar, perfumes, etc.), o la use en Areas
donde puedan estar presentes. Los vapores
de estas substancias pueden crear un
peligro de incendio o explosion.
Para reducir el riesgo de choque electrico No la use afuera o sobre superficies mojadas.
No permita que se la use como un juguete.
Gran atenciOn es necesaria cuando es
usada por o cerca de nihos.
No la use con un cordon o ficha dahados. Si
la aspiradora no est,. trabajando como debe,
se la ha dejado caer, dahado, dejada
afuera, o volteada en el agua, ret0rnela a un
Centro de Servicio Sears.
No la tire o arrastre del cordon, use el cordon
come una manija, cierre una puerta sobre el
cordon, o tire del cordon alrededor de bordes
afilados o esquinas. No pase la aspiradora
sobre el cordon. Mantenga el cordon lejos
de superficies calientes.
No levante nada que est_ ardiendo o
echando humo, tal come cigarrillos,
f0sforos, o cenizas calientes.
No use la aspiradora sin el canasto del
polvo y/o filtros en su lugar.
Siempre limpie el canasto del polvo despues
de limpiar la alfombra, limpiadores o
refrescantes, polvos, y polvo fino. Estos
productos obstruyen los filtros, reducen la
circulaci0n del aire y pueden causar da_o a
la aspiradora. La falla en limpiar el canasto
de la basura puede causar daho
permanente a la aspiradora.
No desenchufe tirando del cordon. Para
desenchufar, tome la ficha, no el cordon.
No use la aspiradora para levantar objetos
duros afilados, pequehos juguetes, alfileres,
sujetapapeles, etc. EIIos pueden da_ar la
aspiradora o el canasto de la basura.
No tome la ficha o la aspiradora con las
manos mojadas.
Hold plug when rewinding onto cord reel. DO
NOT allow plug to whip when rewinding.
No ponga ningQn objeto en las aberturas.
Desenchufe antes de conectar el Handi-mate
Jr.(si es aplicable).
No la use con ninguna abertura bloqueada;
mant_ngala libre de polvo, hilachas, pelo, y
cualquier cosa que pueda reducir la
circulaci0n del aire.
Usted es responsable de estar seguro de
que su aspiradora no es usada por alguien
incapaz de operarla correctamente.
GUARDE ESTAS INSTRUCCIONES
El armado y uso seguro de su aspiradora son su responsabilidad. Esta aspiradora ha sido dise_ada
exclusivamente para uso domestico. La aspiradora debera almacenarse en un lugar seco yen el interior. Lea este Manual del propietario detenidamente, pues contiene informaciOn importante sobre seguridad y uso. Esta quia contiene informaciOn sobre seguridad debajo de simbolos de advertiencia
cuidado.
Esimportante
concer
laspiezas
ycaracterfsticas
desuaspiradora
para
asegurar
suuso
adecuado
yseguro.
Examfnelas
antes
deusar
suaspiradora.
Objeto
Pieza N-°
en EUA
Pieza N-°
en Canad_
Filtro de escape
20-86880
20-40325
Primary filtro
20-82720
20-40319
Bombilla de farol
20-5248
.....
Correa
20-5275
20-40096
Handi-Mate
Jr,®
Manija de
soltar el cube
de la basura
encendidoapagado
i',',
jiiI
ii'i'i
Compartimiento
de polvo .......
(dentr_
uera
Cepgto para
sacudir.
Mango
Fgtro
de
escape
(dentro) \
Height
Adjustment
\_
Lever .........................
para
para
hendiduras
Cord6n
electrico_
Boquilta
Lu_
Protector
muebtes
Pedal de
liberaci6n
del
de
Correa
(debajo)
modelo
Bet6n de
cord6n
ef6ctrico
Agitador
(debajo)
J
informaci6n le alertara del peligro de fuego, cheques electricos, quemadas y lesiones. Cuidado:
Per favor
Este
informaci6n
ponga especial
le alertara
atenci6n
de peligros
a estos
come
recuadros
lesionescon
y dairies
alerta de
de propiedad.
riesgo. Advertencia: Este
I
DVERTENCIA
m
a rta
ec
tornillo con los dedos.
Quiza sea necesario
Peligro de choque electrico
No conecte la aspiradora hasta que termine de
armarla. De Io contrario podria causar un cho-
ajuetar un poco el
mango.
que el_ctrico o lesi6n corporal.
AntAntes de armar la aspiradora, chequee la LISTA
DE EMBALAJE en la cubierta separada de la Lieta
de Partes para Reparaci6n. Use esta lista para verificar que ha recibido todas las componentes de su
nueva aspiradora Kenmore.
MONTAJE DEL MANGO
Quite el tornillo del
mango Iocalizado
jueto debajo del
borde superior de la
parte posterior de la
aspiradora, ver ilustraoidn de arriba.
_
CUIDADO
No apriete demasiado el tornillo.
Si Io aprieta demasiado podria arruinar los orificios para el tornillo.
No opere la aspiradora sin tenet instalado el
tornillo.
}
Apriete el tornillo con un destornillador.
Tern
MANGUERA
S"
4
;
AI mantener la manguera de manera que no interfera, mueva el mango a la abertura en la parte
superior de la aspiradora.
"I
Coloque la
manguera sobre
la manija y alinear
/
,,_
_\_,_...i.._, ,
Xt_ '_,
las ranuras
}_%\
" J" de
,omon oo
cono
los retenedores
Inserte el tornillo para que pase per el mango de la
aspiradora.
si6n. Empuje y
del
tubepara
de exten-__
tuerza
asepartes.
Hole
de tornillo
del mango
Tornillo
del mango\\._
_\
_'_\
\_''i
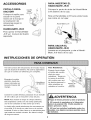
ACCESSORIOS
PARA INSERTAR EL
HANDI-MATE JR.@
J
CEPILLO
SACUDIR
PARA
Cepille
i!,
Coloque el cepillo para
sacudir en la parte
trasera de la manija en
la Iocalizacion del
almacenaje segL_nIo
demostrado
HANDI-MATE
Coloque la parte de atras del Handi-Mate
Jr.@adentro de la caja.
Rote el Handi-Mate Jr.® hacia atras hasta
que calce en su lugar.
JR.@
Para operar el Handi-Mate
Jr.® ver manual del dueSo
separado.
PARA SACAR EL
HANDI-MATE JR.@
Levante en el picaporte y rote el HandiMate Jr.@fuera de la caja.
INSTRUCCIONES
DE OPERATION
Tire del cord6n del mecanismo
de enrollar hasta
que se alcance el extremo. No use la aspiradora
sin que el cord6n se extienda por completo.
Empuje el cord6n
electrico hasta las
_.reas indicadas en
la parte trasera del
mango.
Para Rebobinar:
Empuje hacia abajo
el bot6n del cord6n
electrico para
rebobinar. Tenga en
la mano el enchufe
de fijaci6r_
Conecte el cord6n electrico polarizado en un enchufe
de 120 voltios que se encuentre cerca del piso.
NOTA: Para reducir el riesgo de choque electrico,
esta aspiradora cuenta con una clavija polarizada,
uno de los contactos es mas ancho que el otro.
La clavija s61o puede introducirse de una manera en
el enchufe. Si la clavija no cabe bien en el enchufe,
inviertala. Si ann no cabe, Ilame a un electricista para
que instale un enchufe correcto. No altere la clavija
de ninguna manera.
del cord6n para evitar lesi6n personal o
daho mientras se
rebobina el cord6n.
ADVERTENClA
Peligro de lesion personal y daSo al producto
, NO conecte la aspiradora si el interruptor
.=staen la posici6n ON. Podria resultar en
lesion personal o dai_o.
, NO use los enchufes Iocalizados sobre los
rnuebles. Los objetos cercanos podrian resulIar dai_ados.
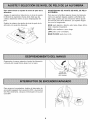
Para seleccionar un ajuste de nivel de pelo de la
alfombra:
$UGERENCIA$ DE AJUSTE DE NIVEL DE PELO
ALFOMBRA
Apague la aspiradora. Seleccione un nivel de ajuste
inclinando la aspiradora hacia atras hast que las
ruedas delanteras esten un pose despegadas del
piso.
Para que se le faciliten algunas tareas de limpieza,
come per ejemplo tapetes aueltos y alfombras de
pelo large, puede que sea necesario elevar ajuste
de nivel de pelo de la alfombra. Los ajustes sugeridos son los suguientes.
Deslice la palanca de ajuste de nivel de pelo de la
alfombra a la posici6n deseada.
HIGH: pelo aspero y lanudo, pelo largo, felpa, alfombras o tapetes irregulares.
MED: pelo mediano o poco largo.
LOW: pelo corto o mediano.
BARE FLOOR: pelo muy corto.
Desprenda el mango pisando el pedal de liberaci6n
y tiranda del mango hacia abajo con la mane.
Para arrancar la aspiradora, deslice el interrupter de
encendido/apagado de la posici6n OFF a la posici6n
ON. Para detenerla, coloque el interrupter en la posici6n OFR
COIVIO UTILIZAR LOS
ACCESORIOS
Cepitlo
para
Saca la parte inferior de la manguera expansible de
la aspiradora y tirando per atras Ahora se puede
conectar la manguera.
pafa
hendiduras
Nota: La v41vula de desviaci6n puede estar
abierta mientras se usan los accesorios o para
limpiar una alfombra nueva a causa de un flujo
reducido de aire per los accesorios mismos o
per la pelusa de la alfombra que Ilene el cube
de la basura rapidamente. Consulte el cuadro
RECONOClMIENTO
DE PROBLEMAS.
Los accesorios podran colocarse en la manguera o
en el tube. Ademas, el cepillo para polvo tambien
podra colocarse en la boquilla para huecos reducidos,
La manguera y el tube pueden sacarse del tube corta tomandolos per el extreme y tirando hacia arriba.
Identifique cada uno de les accesorios mostrades a
centinuaci6n.
CUIDADO
Los accesorios se pueden conectar a la manguera si
el objete que se desea limpiar no esta lejos de la
aspiradora.
NOTA: Cuando la aspiradora este prendida, la
manguera tendera a caerse debido a la succi6n de
la aspiradora.
Si desea mas extension:
Herramienta
CUIDADO
para
para
hendJduras
sacudir
Tube
Se incluye un tube extra, sin pestai_as.El tube extl
se puede conectar al tube con pestahas para Iogr_
un mayor alcance. Introduzca el tube y dele un cu_
to de vuelta para asegurarlo,
ADVERTENClA
Peligro de cheque el_ctrico o lesion corporal
Desconecte la unidad antes de limpiarla o darle
servicio. De Io contrario podrfa producirse un
cheque el_ctrico o causar lesi6n corporal si la
aspiradora arranca de manera imprevista.
Si utiliza el cepillo para polvo y necesita mas alcar
ce, puede conectar la boquilla para huecos reducidos al tube y el cepillo para polvo/cepillo para
combinaci6n en la boquilla para huecos reducidos.
ALMACENAJE DE LOS
ACCESORIOS
Devuelva la manguera a su lugar en la manguera
corta y las herramientas a su soporte.
AREA A LIMPIAR
ACCESORIO
Cepillo
para sacudir
Herramienta
hendiduras
Handi-Mate
para
Jr._
Entre
Muebles*
i/
coijines*
Cortinas*
€
i/
i/
* Siempre limpie los accesorios antes de usar sobre telas.
Orillas de alfombras
Gufe uno de los costados o la parte anterior de la
boquilla a Io largo del borde de la pared. Los cepiIlos largos ayudan a aspirar la tierra en las orillas de
las alfombras.
Escalones
Coloque el mango en la posici6n vertical. Use la
herramienta para hendiduras o el cepillo para telas.
Coloque el interruptor de encendido/apagado en
ON.
ADVERTENCIA
Para obtener los
mejores resultados
de limpieza, mantenga desbloqueados
los conductos de
flujo de aire.
Examine de vez en
cuando cada una de
las zonas que se
indica podrfan causar
bloqueo.
Desconecte la aspiradora del enchufe
antes de examinarla.
Escalones
Paredes
i/
SISTEMA DE PROTECTION
DE MOTOR
Protector Termal
Esta aspiradora tiene un protector termal que se
ajusta autom_.ticamente para proteger a la aspiradora
del sobrecalentamiento. Si una obstrucci6n impide el
flujo normal de aire al motor, el protector termal apaga
el motor automaticamente para permitir que el motor
se enfrfe a fin de evitar posibles da_os a la
aspiradora.
Para corregir el problema: Si esto ocurre, apague la
aspiradora y desenchufe el corddn del tomacorriente
para permitir que la aspiradora se enfrfe y que el
protector termal se reajuste. Busque y saque las
obstrucciones, si es necesario. Examine tambien y
reemplace/limpie cualquier filtro obstruido. Espere
aproximadamente treinta (30) minutos y enchufe la
aspiradora y volteela para ver si el protector del
motor se ha reajustado. El protector del motor no
se reajustara si no se ha apagado la aspiradora
aun cuando la aspiradora se haya enfriado.
Protector de motor
_'_;
Esta aspiradora
tiene una vMvula de
desviaci6n que
sirve como
protector de motor
que se abre
automaticamente
Protector
I
para proveer un
flujo de aire al
motor cuando un
zueco impida que circule el aire al motor. Si se
abre la v_.lvula bypass para impedir que se
recalente el motor y que no haga daho a la
aspiradora, se notaria un cambio de
sonidomientras el aire por la abertura d la
vMvula.
Nota: No obstruye el protector de motor.
Para corregir el problema: Consulte el cuadro
RECONOCIMIENTO
DE PROBLEMAS.
Nota: La vMvula de desviaci6n puede estar
abierta mientras se usan los accesorios o para
limpiar una alfombra nueva a causa de un flujo
reducido de aire por los accesorios mismos o
por la pelusa de la alfombra que Ilene la cubo de
la basura rapidamente. Consulte el cuadro
RECONOClMIENTO
DE PROBLEMAS.
CUIDADO DE LA ASPIRADORA
Siga siempre todas las instrucciones de seguridad
al limpiar y darle servicio a su aspiradora.
ADVERTENCIA
Peligro de choque el_ctrico o lesi6n corporal
Desconecte la unidad antes de limpiarla o darle
servicio. De Io contrario podria producirse un
choque el_ctrico o causar lesi6n corporal si la
aspiradora arranca de manera imprevista.
Desconecte el cord6n electrico de la clavija de la
pared.
CUIDADO
Limpie el exterior con un trapo suave y limpio, que
ha sido exprimido despues de remojar en una soluci6n de agua y detergente Ifquido ligero. Seque el
exterior con un trapo seco despues de limpiar. NO
choree agua sobre la aspiradora.
No use los accesorios sil estan mojados.
Los accesorios que se utilicen en areas
sucias, debajo del refrigerador, no deben
usarse en otras superficies sin antes set
lavados. Podrian dejar marcas.
Lave los accesorios en agua tibia jabonosa,
enjuague y deje secar al aire. No los lave en lavadora de platos.
10
Peligro
dechoque
el_ctrico
olesion
corporal
Desconecte
launidad
antes
delimpiarla
o
darle
servicio.
DeIocontrario
podfia
produ-
Cubierfa
Separe el compartimiento del
polvo de la
cubierta levant6.ndola derecho
_'_
Compartimiento
cirse un choque electrico o causar lesi6n
corporal si la aspiradora arranca de manera
imprevista.
det polvo
--._._!
partimiento
del
fuera
del com-
_
] polvo.
[_
LIMPIEZA DEL COMPARTIMIENTO
POLVO
DEL
Remover el
Vaci@ el contenido
compartimiento del polvo
de la aspiradera levantando la mani-
del compartimiento
del polvo en un
cubo de basura.
soltar el cubo
de ta basura
ja de liberaci6n como
se muestra.
Cubo de
basufa
PARA SUSTITUlR LA TAPA DEL COMPARTIMIENTO DE POLVO
Remueva el compartimiento de
pelvo de la aspiradora, inclinando este hacia
Cubierta
afuera segOn Io
demostrado.
PARA VACIAR EL COMPARTIMIENTO DEL
POLVO
Cerrado
Cubierta
Gire la cubierta del
Ponga el montaje de
la tapa del compartimiento de polvo
detr_.s sobre la tapa
del compartimiento
de polvo. Alinee las
marcas de la tapa
con las mamas del
compartimiento de
polvo segQn Io
demostrado.
Rote la tapa a la derecha mientras que presiona
hacia abajo de modo que las mamas se alineen
segt_n Io demostrado.
compartimiento del
polvo hacia la izquierda de la posici0n cerrado a la posici6n
abierto como se muestra.
PARA REINSTALAR EL
COMPARTIMIENTO DEL POLVO
Primero aline_ la
base del compartimiento del polvo en
la aspiradora.
Despues gire el compartimiento del polvo
en su lugar, cercior_.ndose que el
compartimiento del
polvo quede seguro.
11
Cubierta del compartimiento
La cubierta del compartimiento
el filtro primario.
del polvo
de contiene
Filtro primario
El filtro atrapa la basura y desperdicios que
fueron levantados por la succion del motor.
Rejilla del filtro
La rejilla del filtro atrapa las particulas
grandes de tierra o basura y evita que
alcancen el filtro.
Compartimiento
del polvo
Captura la tierra y desperdicios que fueron
levantados por la succi6n del motor.
12
Antes de substituir el filtro es una buena idea
Chequee
elfiltroprimario
frecuentemente
y
Ifmpielo
cuando
estgsucio.
Quite
elmontaje
del limpiar el interior del area del ompartimiento
compartimiento
delpolvo
conforme
alasecci6n y de la tapa del polvo.
delaLIMPIEZA
DEL COMPARTIMIENTO
DEL
POLVO y al contenido vacfo del compartimiento
del polvo.
Cerci6rese de que el compartimiento del polvo
estg limpio antes de que se quite el fiitro. Agarre
la rejilla del filtro, gfrela contra el sentido de las
agujas del reloj y levantelo hacia afuera.
Substituya el compartimiento del polvo
conforme a la seccidn de la limpieza del
compartimiento del polvo.
Guias de
atineaciSn
l
Cubierta
RejiHa
de f_ltro
Agarre el filtro, gfrelo contra el sentido de las
agujas del reloj y levantelo hacia afuera. Limpie
el filtro primario golpegndolo suavemente sobre
un recipiente de basura.
El filtro puede limpiarse golpeandolo solore una
superficie firme o enjuagandolo bajo una Ilave
de agua. Golpee en varios lugares para
asegurar la mejor limpieza.
Para reinstalar la rejilla del filtro, acomode las
guias de alineaci6n en la rejilla con las de la
cubierta.
Enjuagar con agua solamente, no utilizar
detergente o jab6n. Dejar que el filtro se seque
por 24 horas antes de ponevlo de regreso en la
aspirdora. Una vez que haya limpiado el filtro, y
la aspiradora no alcanza la potencia maxima de
succi6n, nesecitara reemplazar el filtro.
Gire la rejilla en el sentido de las manecillas
del reloj hasta que cierre completamente.
13
Antes de substituir el filtro es una buena idea
limpiar el interior del Area del compartimiento
de la tapa del polvo.
primario
y
Substituya el compartimiento del polvo conforme a la secci6n de la limpieza del compartimiento del polvo
NOTA: Bajo uso y cuidado normal, su filtro
puede Ilegar a durar hasta 3 ahos.
Cubierta
NOTA: Vea caracterfsticas
numero del filtro.
Revisar frecuentemente el filtro secundario y
limpiarlo cuando est_ sucio.
Remueva el cube para basura como en la ilustraci6n en la secciOn de LIMPIEZA DEL CUBO
PARA BASURA.
Para limpiar la cubierta del filtro, limpiela con un
trapo seco.
Filtro
Sec#r_dario
NOTA: La cubierta del filtro es removible.
Reemplace el cube de basura come en la ilustraci6n en la secciOn de LIMPIEZA DEL CUBO
PARA BASURA.
14
--_
de la piradora para el
Para sacar, jale
hacia afuera per
ambos lades de
la cubierta del
Peligro de cheque electrico
Desenchufe el cable de poder del tomacorriente. No opere la limpiadora sin el filtro primario o el filtro de escape. Este seguro que el
filtros est_ instalado propiamente para prevenir
falla del motor y/o sacudida electrica.
filtro de escape y
tire hacia afuera
para remover de la
aspiradora de
polvo.
FILTRO DE ESCAPE
Este cartucho del filtro escape se tiene que cambiar
este sucio. Debe cambiarse peri6dicamente segQn
las condiciones de use.
Remueva el cartucho
del filtro de escape.
El filtro no se puede lavar pues perderia su
capacidad para atrapar altrapar polvo.
Empuje Qnicamente el
cartucho de filtro, no el
filtro miemo.
Reemplace la cubierta del filtro de escape poniendo
las lengt)etas en las ranuras y empujando adentro
hasta que la cubierta calza en su lugar,
15
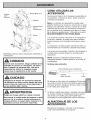
Ubique los dos pestillos y las dos leng0etas de
cierre que aseguran la placa de base.
ADVERTENCIA
Para sacar la placa de base, apriete
pestillos hacia adentro.
Desconecte la unidad antes de limpiarla o darle
servicio. De Io contrario podria producirse un
choque electrico o causar lesi6n corporal si la
Peligro de choque el_ctrico o lesi6n corporal
los dos
Apriete hacia adentro sobre las leng0etas de
cierre hacia el centro de la aspiradora.
aspiradora arranca de manera imprevista.
LIMPIEZA
Tire la placa de base lejos del alojamiento de la
boquilla. Los costados de la placa de base
necesitan set tirados ligeramente hacia afuera
para que pasen las ruedas.
DEL AGITADOR
Para limpiar el agitador apague la aspirado
corte cualquier acumulaci6n de pelusa y
alfombras alrrededor del agitador con un par de
tijeras como se muestra.
Quite el pelo, la secuencia,
ruina del mezclador.
Eje
de trar_smisi6n
de!
motor
_
Agltador
la pelusa y la otra
Desconecte el cord6n de poder del tomacorriente, y p6ngalo sobre papel para proteger la
superficie del piso. Ponga la aspiradora en la
posici6n vertical.
El agitador y la correa est_.n ahora expuestos.
Cuidadosamente remueva cualquier residuo
que pueda existir en el area de la correa.
Si la correa esta todav[a agarrada al eje del
motor, habr_, tensi6n sobre el agitador. Si la
correa no est6. rota, remu@vala del eje del
motor antes de levantar el agitador.
D@vuelta la unidad de modo que el agitador y
la placa de base miren hacia arriba.
Cuidadosamente levante un extremo del
agitador y entonces levante el otro extremo.
PARA SACAR
LA CORREA
ADVERTENCIA
Peligro de lesi6n personal
Tenga cuidado al quitar el cepillo cilindrico, la
tensi6n de la correa es grande. Si no tiene
precaucion podria sufrir una lesion personal si
el cepillo se libera rapidamente y sale
disparado.
16
CORREA SOBRE LA RANURA GUIA
NOTA: Para mantener una alta eficiencia de
limpieza y evitar el daffo a la aspiradora, hay que
limpiar el agitador cada vez que se cambia la correa,
Haga presi6n firmemente, asegurandose de
que hayan entrado bien ambos extremos.
Asegt_rese de que la correa este centrada
sobre la ranura gufa. Gire el agitador con los
dedos para asegurarse de que gire libremente.
Tambien hay que limpiar el agitader segt_n el
siguiente horario:
El use de la
aspiradora
Limpie el
agitador
Freouente -
cada semana
(usada dirariamente)
Moderado -
cada mes
Correa
--
(usada 2 o 3 veces
per semana)
Ligero (usada 1 vez per semana)
cada 2 meses
Retire todo indicio de basura o suciedad de la zona
de la correa y del agitador.
Agitador
Agitador
PARA CAMBIAR LA CORREA
Nota: Consulte las PIEZAS Y
CARACTERISTICAS
correa.
para determinar el N _. de
Coloque la nueva correa alrededor
transmisi6n del motor.
del eje de
Ensarte la correa nueva sobre el agitador.
Alinee la extensi6n cuadrada de cada tapa con las
ranuras de la estructura de la boquilla.
_--Correa
_X_
co, oo
dol motor
/_
Polea
/ _
correa
para
/-
Nota: Debido a la tensi6n de la correa, debe
actuar con cuidado al instalarla.
17
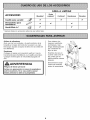
Para
reinstalar
laplaca
delabase,
inserte
las
cuatro
pestahas
dentro
delascuatro
ranuras
ubicadas
aIolargo
delborde
frontal
delabase.
Coloque
laaspiradora
enlaposici6n
vertical.
Pestiffos
_.
_._j_<_&_Leng#etas
Leng_et
Precione la base del plato para abajo hasta que
las lengOetas de seguridad esten en su lugar.
Deslize el pestillo de la izquierda a la izquierda
y el pestillo derecho a la derecha para que
estan seguros.
Leng#etas/
Raf_ura$
Coloque la placa de la base en su posici6n original.
Coloque la aspiradora en la posici6n vertical
antes de conectarla en el enchufe.
Cuando este bajando la base, la parte interior
va a rozar contra las ruedas. Si ud, le hala un
poco afuera le ayudara a resamblarlo.
18
de
Proceda
siempre
conprecauciones
deseguridad
al
limpiar
ydarservicie
laaspiradora.
Reassemble the stretch hose to the extension wand.
ADVERTENCIA
Si censidera que la aspiradora no aspira bien
asegOrese primero de que la belsa no este Ilena y
de que el filtro no este atascado. Consulte las instrucciones sobre CAMBIO DE LA BOLSA PARA
POLVO y LIMPIEZA DES FILTROS.
Si las zonas del filtro y la cube de la basura no est_.n
atascadas, examine la zona de la manguera. Retire
el extreme inferior de la manguera expansible de la
spiradora tomandola per el collar y tirando de hacia
arriba.
Enchufe la aspiradora y enciendala. Estire al
maximo la manguera y luege permita que se enceja
hasta su tamaho normal de almacena-miento.
Si las zenas del filtre y la cube de la basura y las
zonas de la manguera no est_.n atascadas, examine
la zona de la bequilla. Para examinar dicha zena,
consulte la secci6n sobre CAMBIO DE LA CORREA
Y LIMPIEZA DEL AGITADOR.
ADVERTENCIA
Peligro de lesi6n personal
NO coloque nunca las manos ni los pies debajo
de la unidad, El agitador data vueltas rapidamente cuanda la aspiradora este encendida y
este en la posici6n "carpet setting" (con alfombra),
Celoque la aspiradera en la pesici6n vertical antes
de cenectarla en el enchufe.
Apague la unidad y descenectela.
Examine visualmente la zona de la base donde se
inserta la manguera.
Retire cualquier material bloqueante.
19
ADVERTENCIA
Peligro de choque el_ctrico o lesi6n corporal
Lente
de tuz
Desconecte la unidad antes de limpiarla o
darle servicio. De Io contrario podria producirse un choque electrico o causar lesi6n
corporal si la aspiradora arranca de manera
imprevista.
CUIDADO
Aseg_rese de que el control ON-OFF este en la
posici6n OFR
Desconecte el cable del contacto. Presione el
pedal del liberaci6n de la manija y gire manija
abajo asf que el limpiador estdt completamente
en el piso.
CUIDADO
No conecte o encende la aspiradora antes
de armada completamente.
Quite lente de luz en las ranuras. Remover el
foco jalandolo de la base.
Ensamble foco presionandolo
en la base.
Use solamente una bombilla de 13 V AC- 9
vatios o de menos voltios.
Reemplace lentes de luz empujdmdolo en su
lugar. Vuelva la aspiradora a la posici6n vertical.
2O
PARA QUITAR EL AGITADOR
ADVERTENCIA
Quite la cubierta de la boquilla, la cubierta del
agitador, y el agitador. Vease CAMBIO DE LA
CORREAY LIMPIEZA DEL AGITADOR.
Reemplazca el agitader con un nueve.
Rearme la correa, el agitador, la cubierta del
agitader y la cubierta de la boquilla. Vease CAIVlBIO
DE LA CORREAY LIMPIEZA DEL CEPILLO.
PARA EXAMINAR EL AGITADOR
Celoque la aspiradera
con la base hacia arriba
Protector
de la placa
de ta correa
dela
base
para revisar si los
cepilles esten en malas
condicienes. Cuando
los cepilles esten
gastades al nivel del
protector de la placa de
base, reemplazca el
agitador.
21
Consulte
este
cuadro
para
encontrar
soluciones
que
usted
mismo
puede
realizar
cuando
tenga
problemas
menores
derendimiento.
Cualquier
servicio
quenecesite
aparte
deotros
descritos
eneste
manual
tienen
que
serhechos
porunrepresetante
deservicio
autorizado
Sears,
ADVERTENCIA
Peligro de choque electrico
Desconecte la aspiradora antes de darle servicio o limpiarla. De Io contrario podria
producirse un choque electrico o causar lesion corporal.
La asplradora no runclona.
No asplra satlsractodamente.
1. Esta desconectada.
1. Conecte bien, oprima selector de
encendido/apagado a la posicion ON.
2. Cortacircuitos botado o fusible quemado en
el tablero de servicio de la residencia.
2. Restablezca el cortacircuitos o
cambie el fusible.
3. ]nferruptor de encendido/apagado
esta en la posicion ON.
3. Coloque el interruptorde encendido/apagado
en la posicion ON.
no
4. P rotector terreal activado.
4. Reajuste el protector termal.
1. Cubo de la basura ]]eno o atascado.
1. Cubo de la basura limpio.
2. Ajuste incorrecto de nivel de pelode la alfornbra.
2. Ajuste el nivel.
3. Agitador desgastado.
3. Cambie el agitador.
4. Boquilla, o portillo de la cubo de ]a basura
atascada.
4. Revise COM(3 ELIMINAR LOS RESIDUOS
DEBASURA EN LOS CONDUCTOS.
5. Manguera atascado.
5. Limpiar tubo para e] mugre.
6. Manguera rot&
6. Cambie la manguera.
7. Correa rota.
7. Cambie la correa.
8. La manguera no esta bien insertada.
8. ]nserte bien la manguera.
9. Activaci6n del sistema de protection del motor.
10.
Filtros de segufidad.
9. Determine si existen bloqueos.
10.
Limpie/carnbie el filtros.
La aspltadora levanta tapetes
o es dlf[cul empuJat.
1. Ajuste incorrecto de nivel de pelo de la a#ombra.
1. Ajuste el nivel.
La luz no funclona,
1. Sombilla fundida.
1. eatable la bombilla.
Elensambledelagltador
1. Correarota.
1. Cambielacorrea.
rtoglra,
2. Correainstaladaincorrectamente.
2. ReviseCAMBIODELACORREAY
LIMPIEZA DEL CEPILLO.
Restrlccl6ndelrlujo
1. Elusodelosaccesorioslimitaelflujodeaire.
1. Revise USO DE LOS ACCESORIOS.
usodelosaccesonos.
deel
2. Lapelusadeunaalfornbranueva
2. ReviseCOMOELIMINARLOSRESIDUOS
Camblo de sonldo,
obstruye el paso de aire.
DE BASURA EN LOS CONDUCTOS.
y limpie la manguera.
22
Your Home
For repair - in your home - of aH major brand appliances,
lawn and garden equipment, or heating and cooling systems,
no matter who made it, no matter who sold it!
For the replacement parts, accessories and
owner's manuaB that you need to doqt-yourself,
For Sears professional installation of home appliances
and items like garage door openers and water heaters,
1-800-4-MY=HOME @ Anytime,day'or night
( -800-489-4888) (US,A,
andCanada)
www.sears.com
www.sears.ca
Our Home
For repair of carry-in products like vacuums, lawn equipment,
and electronics, call or go on-line for the nearest
Sears Parts and Repair Center,
1-800-488-1222
Anytirne,dayor night(U.S.A.only)
www.sears.com
To purchase a protection agreement (U,S,A,)
or maintenance agreement (Canada) on a product serviced by Sears:
1-800-827-6655 (U.S.A.)
1-800-361-6665 (Canada)
Para pedir servicio de repataci6n
a domicitio, y para ordenar piezas:
1-888-SU°HOGAR SM
Au Canada pour service en francais:
1-800-LE-FOYER Ivlc
_iiiiiiiiiiiiiiiii
(1-800-833-8937)
(1-888-784-6427)
@ Sears, Roebuck and Co.
@ Registered Trademark / TMTIademark / SMService Mark of Sears, Roebuck and Co.
@ Mama Registrada / TMMama de F_ibrica / SMMama de Servicio de Sears, Roebuck and Co,
MCMarque de commerce / M[_Marque d_posee de Sears, Roebuck and Co.
,,,,,,,,,,,,,,,,