1
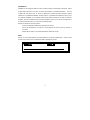
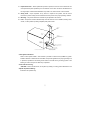
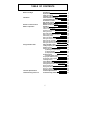
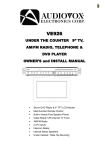
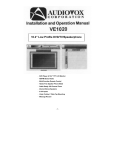
VE720
UNDER THE COUNTER 7” TV,
AM/FM RADIO and DVD
PLAYER
OWNER’S and INSTALL
12:00
ON/OFF
SET
ADD
DEL
TV
FM/AM
AV
VOLUME
DVD
CH
P1
P2
P3
SEEK
•
Slot-in DVD Player & 9” TFT LCD Monitor
•
Multi-function Remote Control
•
Cable Ready 125 Channel TV Tuner
•
AM/FM Radio
•
2 A/V Inputs
•
Internal Stereo Speakers
•
Under Cabinet / Table Top Mounting
0
P4
MUTE
INTRODUCTION
WARNING – To prevent fire or shock hazard, do not expose this unit to moisture.
CAUTION: TO REDUCE THE RISK OF ELECTRIC
CAUTION
SHOCK, DO NOT REMOVE COVER (OR BACK).
NO
USER-SERVICEABLE
PARTS
INSIDE.
CAUTION: TO REDUCE THE RISK OF ELECTRIC SHOCK, DO NOT
REFER SERVICING TO QUALIFIED SERVICE
REMOVE COVER (OR BACK). NO USER-SERVICEABLE PARTS
PERSONNEL.
INSIDE. REFER SERVICING TO QUALIFIED SERVICE PERSONNEL
.
This symbol alerts the user to the fact that exposed “dangerous
voltages” reside within this product’s enclosure and contact with any of
these voltages will result in electric shock.
This symbol alerts the user that important and maintenance (servicing)
instructions in the literature accompanying the unit.
To prevent electric shock: do not use this unit’s polarized ac plug with extension
cords, receptacles or other outlets that prevent the units plug from being fully
seated and leave any part of the blade exposed.
1
INFORMATION
Installation of this equipment shall be in strict accordance with the manufacture’s instructions. Failure
to follow these instructions may cause or result in the reception of unwanted interference.
This unit
complies with FCC Rules Part 15, which are designed to provide reasonable protection against
interference in a residential installation. However, there is no guarantee that interference will not occur
in a particular installation. If this equipment does cause harmful interference with radio or television
reception, which can be determined by turning the equipment off and on, the user is encouraged to try
to correct the interference by one or more of the following means:
Reorient or relocate the receiving antenna
- Increase the separation between the equipment and receiver
- Connect the equipment to an outlet on a circuit different from that to which the receiver is
connected
- Consult with the dealer or an experienced radio/TV technician for help
NOTE:
Record your unit’s Model Number and Serial Number in the space provided below.
numbers if you need to call your AUDIOVOX dealer regarding this product.
MODEL No.
SERIAL No.
_____________________
_______________________
2
Refer to these
IMPORTANT SAFETY INFORMATION
1.
Read Instructions – All the safety and operating instructions should be read before the product
is operated.
2.
Retain Instructions – The safety and operating instructions should be retained for future
reference.
3.
Heed Warnings – All warnings on the product and in the operating instructions should be
adhered to.
4.
Follow Instructions – All operating and use instructions should be followed.
5.
Cleaning – Unplug this product from the wall outlet before cleaning. Do not use liquid or aerosol
cleaners. Use a damp cloth for cleaning.
Do not apply pressure to the LCD screen.
Excess
pressure may damage the screen.
6.
External Accessories – Do not use external accessories that have not been recommended by
the product manufacturer, as they may damage the unit.
7.
Water and Moisture – Do not use this product near water, for example, near a bathtub, kitchen
sink, washing machine, in a wet basement, near a swimming pool, or similar environment.
8.
Mounting considerations – Do not mount this product on an unstable surface.
The product
may fall, causing serious injury to a child or adult, and may result in damage to the product. Use
only with a cart, stand, tripod, bracket, or table recommended by the manufactures, or sold with
the product.
Mounting of this product should be in accordance the manufacture’s instructions,
and should use the mounting hardware provided with the unit by the manufacturer.
9.
Carts – A product and cart combination should be moved with care. Quick
stops, excessive force, and uneven surfaces may cause the product and cart
combination to overturn.
10. Ventilation – Slots and openings in the cabinet are provided for ventilation
and protect the product from over heating.
These openings must not be blocked or covered.
This product should not be placed in a built-in installation such as a bookcase or rack unless
proper ventilation is provided.
11. Power Sources – This product should be operated only from the type of power source indicated
on the marking label. If you are not sure of the type of power supply in your home, consult your
product dealer or local power company.
12. Grounding or Polarization – This product may be equipped with a polarized alternating current
line plug (a plug having one blade wider than the other). This plug will fit into the power outlet only
one way this is a safety feature. If you are unable to insert the plug into the outlet, try rotating the
plug 180 degrees. If the plug still cannot be inserted, contact your electrician to replace your
outlet. Do not defeat the safety purpose of the polarized plug, doing so will void product warranty.
3
13. Power-Cord Protection – Route the power supply cord in a manner that protects it from being
stepped on or pinched by items placed on it.
Pay particular attention to the power cord’s plug,
and the point where the power cord exits from the product.
14. Outdoor Antenna Grounding – If an outside antenna or cable system is being connected to the
product, verify that it is properly grounded to insure some type of protection against voltage
surges and static build-up. Article 810 of the National Electrical Code, ANSI/NFPA 70, provides
information with regards to proper grounding of the mast, supporting structure, grounding of the
lead-in wire to an antenna discharge unit, size of grounding conductors, location of antennadischarges unit, and connection to grounding electrode
15. Lightning – For added protection against lightning storms, or when the unit is not going to be
used for long periods of time, it is recommended that it be unpluged from the wall outlet and
disconnected from the antenna or cable system. This will prevent damage to the product due to
lightning and power-line surges.
16. Power Lines – An outside antenna system should not be located in the vicinity of overhead
power lines or other electric light or power circuit, or where it can fall into such power lines or
circuits.
When installing an outside antenna system, extreme care should be taken to keep from
touching such power lines or circuits, as contact with them might be fatal.
17. Overloading – Do not overload wall outlets, extension cords, or integral convenience receptacles,
as this can result in a risk of fire or electric shock.
18. Object and Liquid Entry – Never insert objects of any kind into this product through the
openings in the chassis as this may result in a fire or electric shock. Never spill liquid of any kind
on the product.
19. Servicing – Do not attempt to service this product yourself as opening or removing covers will
expose you to dangerous voltages and other hazards. Refer servicing to qualified service
personnel.
20. Damage Requiring Service – Unplug this product from the wall outlet and refer servicing to
qualified service personnel under the following conditions:
A.
When the power-supply cord or plug is damaged.
B.
If liquid has been spilled, into the product.
C.
If the product has been exposed to rain or water.
D.
If the product does not operate normally as defined by the operating instructions.
Adjust only those controls that are covered by the operating instructions, as an
improper adjustment of other controls may result in damage and will often require
extensive work by a qualified technician to restore the product to it’s normal operation.
E.
F.
If the product has been dropped or damaged in any way.
When the product exhibits a significant change in performance this indicates a need or
service.
4
21. Replacement Parts – When replacement parts are required, be sure the service technician has
used replacement parts specified by the manufacturer or that have the same characteristics as
the original part. Unauthorized substitutions may result in fire, electric shock or other hazards.
22. Safety check – Upon completion of any service or repairs to this product, ask the service
technician to perform safety checks to determine that the product is in proper operating condition.
23. Mounting – The product should be mounted only as specified in this manual.
24. Heat – The product should be situated away from heat sources such as radiators, heating vents,
stoves, or other products (including amplifiers) that produce heat.
ANTENNA
LEAD IN
WIRE
GROUND
CLAMP
ANTENNA
DISCHARGE UNIT
(NEC SECTION 810-20)
ELECTRIL
SERVICE
EQUIPMENT
GROUND CONDUCTORS
(NEC SECTION 810-21)
GROUND CLAMPS
POWER SERVICE GROUNDING
ELECTRODE SYSTEM
(NEC ART 250, PART H)
NEC-NATIONAL ELECTRICAL CODE
– Cable System Installation:
Note to CATV system installer: “This reminder is provided to call the CATV (CABLE-TV) system
installer’s attention to article 820-40 of the NEC, that provides guidelines for proper grounding and,
in particular, specifies that the cable ground shall be connected to the grounding system of the
building, as close to the point of cable entry as possible”
– Under cabinet mounting:
CAUTION: to reduce the risk of fire, do not place any heating or cooking product beneath this unit.
– Speaker Impedance Marking:
External 8 ohm speakers only
5
TABLE OF CONTENTS
Before You Begin
Installation
Remote Control Functions
Modes of Operation
Using the DVD Loader
Technical Specifications
Troubleshooting Check List
Introduction
1
3
Important Safety Information
6
Table of Contents
7
Contents of package
8
Under Cabinet Installation
Countertop/Desktop Installation
9
10
Front Panel Controls
11
Rear Panel Controls
12
Battery Installation
13
Remote Control Functions
16
Operation
16
Initial Set up
16
Channel Tuning Set up
16
Positioning the Screen
16
Setting the Time
16
SETTING THE ALARM VOLUME
16
Setting and Activating The Alarm
17
Deactivating Alarm
17
Setting the Alarm Tones
17
Setting the Cable TV Mode
18
Setting the Air TV Mode
Setting the Speaker Mode
18
Setting the Presets (FM and AM or TV Modes) 18
19
Using the DVD Loader
19
Inserting and Ejecting the Disc
19
Playback and Stop
Searching for a Specific Scene/Song
19
by Selecting the Chapter Number
19
by Using the Chapter
20
by Using Playback Speed
Repetitive Playback
20
To Repeat a Specific Section
20
Changing the Subtitle Language
20
Changing the Vocal Language
21
To Enlarge a Picture
21
Viewing Different Angles
21
Viewing a Menu Installed in Discs
21
Viewing the Playback Time, Title, Chapter Status
23
Playing Audio CDs
23
Playing MP3 Discs
25
Playing A JPEG FILE
25
SETUP (Language, Video, Rating)
29
Technical Specifications
30
Troubleshooting Check List
6
CONTENTS OF PACKAGE
3
2
5
6
1
4
7
8
11
10
9
1. VE720
5. Batteries (AAA)
2. Hardware bag
6. FM Dipole Antenna
A. 2” Mounting screws (4)
7. Right Angle Coaxial Adaptor
B. 2-1/2” Mounting screws (4)
8. FM Antenna Balun
C. 3”Mounting screws (4)
9. AM Antenna
D. Foot (4)
10. Mounting Hole Template
E. Hole cap (4)
11. Owners Installation manual
3. Remote Control
4. Multi Height Spacer (4)
7
8
UNDER CABINET INSTALLATION
1)
Choose an appropriate mounting location underneath a cabinet or shelf. Close proximity to an electrical
outlet, TV antenna or cable connection will facilitate a neat, easy installation. Do not mount the VE720
above a range or oven. Be sure that the location chosen will provide adequate access to the electrical
connections on the rear of the unit before continuing.
2)
If the location chosen has a bottom edge molding it may be necessary to use the mounting spacers
provided to effectively lower the VE720 below or even with the molding. Measure the distance between
the edge molding and the bottom of the cabinet. The spacers and mounting holes are stepped to
achieve different mounting heights from .5” to 1”.
rotating the spacer in the mounting hole.
Adjusting the mounting height is done by lifting and
Choose a spacer height, which will allow the VE720 to clear
the edge molding.
3)
Measure the thickness of the bottom of the cabinet or shelf and the spacer height chosen. Select the
4)
Cut out the template supplied and tape it in place onto the cabinet surface to be drilled. Center punch
5)
Carefully drill four 1/8″ holes at the locations marked above.
6)
Connect your TV antenna or cable system to the antenna connector on the rear of the VE720.
7)
Attach the FM Dipole Antenna and position the antenna for the best reception.
8)
Attach the AM Antenna and position the antenna for the best reception.
9)
Position the VE720 and mount it in place using the selected screws. NOTE: Do not over-tighten.
shortest screw length, which will secure the VE720 to the bottom of the cabinet.
the four holes indicated on the template and remove the template.
10) Plug the AC power cable into the wall outlet. Route the wires safely away from heat and moisture
sources.
9
COUNTERTOP/DESKTOP INSTALLATION
NOTE: Use caution to avoid damaging the LCD screen and the main unit when converting this unit
from an under-counter unit to a countertop unit. Leave the protective plastic on the screen until this
procedure is completed.
1)
Place the unit (with the screen facing up) on a soft padded surface.
2)
Pivot the screen so that it is perpendicular to the front of the unit and then turn it sideways.
3)
Remove the hinge guide covers (#1) using a flat blade screwdriver inserted into the removal
slots.
Unscrew the mounting screws (#2).
Remove the connector from the unit (#3), be
careful not to damage the screen (#5) or wires.
4)
Turn the unit over and remove the blank cover (#4)
5)
Connect the plug of the LCD monitor into the connector (#3). NOTE: Align the “L” and “R”
stamped on the screen-mounting bracket with the “L” and “R” molded into the connector
housing.
6)
Replace the screws and slide the hinge guide covers onto the unit, be careful to not damage
the wires. NOTE: Do not over-tighten.
7)
Insert the rubber pieces (#6) (Foot, Mounting Cap - please refer to the illustration above) into
the unit.
Install the blank cover on the unused port.
10
FRONT PANEL CONTROLS
1)
ON/OFF BUTTON – Power ON/OFF.
2)
SET BUTTON – Press this button to set the TIME, ALARM, TV Mode or Speaker Mode.
3)
ADD BUTTON – Press this button to add a selected TV channel.
4)
DEL BUTTON – Press this button to delete a selected TV channel.
5)
TV BUTTON – Press this button to select TV mode, press and hold to change the aspect ratio.
6)
FM/AM BUTTON – Press this button to select FM or AM mode.
7)
AV BUTTON – Press this button to select AV1 or AV2 mode.
8)
DVD BUTTON – Press this button to select DVD mode.
9)
MUTE BUTTON – Press this button to mute the audio (++++ will appear and blink on the
display when the system is muted).
10) P4 BUTTON – Selected Preset Channel “4” in the Radio or TV mode.
Stop and Eject(press and hold) button in DVD play mode.
11) P3 BUTTON – Selected Preset Channel “3” in the Radio or TV mode.
Next button in DVD play mode.
12) P2 BUTTON – Selected Preset Channel “2” in the Radio or TV mode.
Play/Pause button in DVD play mode.
13) P1 BUTTON – Selected Preset Channel “1” in the Radio or TV mode.
Previous button in DVD play mode.
14) VOLUME UP (X) BUTTON – Press this button to raise the volume.
15) VOLUME DOWN (W) BUTTON – Press this button to lower the volume.
11
16) SEEK BUTTONS (TS-Right Side) – Press these buttons to go to next available channel with
sufficient signal strength.
17) CHANNEL BUTTONS (TS-Left Side) – Press these buttons to go to next available channel.
18) DISPLAY WINDOW – Displays the channel/station number, time, and selected source.
19) REMOTE INFRARED SENSORS-These sensors receive infrared command signals from the
hand held remote control unit.
20) Disc Insertion Slot
21) Contrast Control- Use this control to adjust the contrast
22) Color Control- Use this control to adjust the color
23) Brightness Control- Use this control to adjust the brightness
REAR PANEL CONNECTIONS
TEL
1
2
3
4
5
6
7
8
9
1)
AC LINE CORD – Connects to AC outlet
2)
AUDIO LINE OUT – Connect to low-level input of stereo system or low-level input of computer
speaker
3)
SPEAKER OUT TERMINAL – Connect to external speakers (min. 8ohms)
4)
FM ANTENNA – Allows the VE720 to be connected to a 75-Ohm external antenna for the
5)
AM ANTENNA - Allows the VE720 to be connected to an external antenna for the reception of
reception of FM broadcast signals.
AM broadcast signals.
6)
A/V (AUDIO/VIDEO) INPUT CONNECTORS – Connect to A/V OUTPUT of a VCR or
Camcorder.
7)
TV ANTENNA (75 OHM ANTENNA CONNECTOR) -Allows the VE720 to be connected to a
75-ohm external coaxial antenna or cable TV system.
12
8)
BATTERY INSTALLATION
(Rear View, Battery Size AAA)
13
REMOTE CONTROL FUNCTIONS
(1) EJECT
(2) DVD
(3) TV
(4) SETUP
1
17
2
3
18
19
4
20
21
5
22
(8) STOP(■)
6
23
(10) Digit 0-9 Select
7
24
8
9
25
26
27
28
(5) SEEK DN, SEEKUP
(6) MENU
(7) FR(WW)
(9) PREV (IWW)
10
(11) TITLE
(12) DISPLAY
(13) SUB TITLE
(14) AUDIO
(15) SCREEN
(16) ANGLE (AP)
(17) ON/OFF
29
30
31
32
33
34
11
12
13
14
15
16
(18) A/V
(19) AM/FM
(20) TEL (Not Used)
(21) CH+, CH(22) ENTER
(23) MUTE
(24) FF (XX)
(25) SF (IX )
(26) NEXT (XXI)
(27) PLAY/PAUSE (XII)
(28) VOL +/(29) SEARCH
(30) REPEAT
(31) A-B Repeat
(32) ZOOM
(33) DELETE
(34) STEP (ADD)
14
DVD REMOTE FUNCTION
(1) EJECT: Press this button to Eject and Load the disc tray.
(2) DVD: Press this button to select DVD mode of operation.
(4) SETUP: Displays setup menu for initial user settings.
(5) SEEK DN/UP (21) CH+/-: For selecting item on menu.
(6) MENU: For displaying the menu contained in the disc. (PBC ON/OFF Function - VCD)
(7) FR (WW): Fast reverse (2X, 4X, 8X, and 20X).
(8) STOP (■): Press this button to stop disc playback
(1 time) Stop at the present playing point / (2 times) Stop playing
(9) PREV (IWW): For skipping to the next or previous chapter or track.
(10) Digit 0~9 Select: For direct selecting a chapter (or tack) and for password input.
(11) TITLE: For displaying the title menu contained in the disc.
(12) DISPLAY: For checking the current disc status.
(13) SUBTITLE: For selecting the subtitle language
(14) AUDIO: For selecting the audio language.
(15) SCREEN: Press this button to change Display Mode. Push the SCREEN Button to enlarge the
screen. The screen will be enlarged in the following order:
TV MODE:
Normal (default) ->
Full
AV, DVD MODE: Full (default)
->
Normal
Full (default)
->
Normal
CDDA, MP3:
->
LCD MONITOR OFF
(16) ANGLE: If a DVD disc contains sequences recorded from different camera angles you can
change the camera angle for playback.
(17) ON/OFF: Press this button to turn power ON and OFF.
(22) ENTER: Press this button will cause the chapter (or track) change to occur immediately.
(23) MUTE: Press this button to remove all sound (++++ blanks on display window).
(24) FF (WW): Fast Forward (2X, 4X, 8X, and 20X).
(25) SF (IX ): Slow Play (1/2, 1/4, 1/6, 1/7) speed in forward.
(26) NEXT (XXI): For skipping to the next chapter or track.
(27) PLAY/PAUSE (XII): Start disc playback or Pauses disc play.
(28) VOL +/-: Use these buttons to increase or decrease the volume level.
(29) SEARCH: Allows a search to a desired Chapter/Title/Song/etc.
(30) REPEAT: For repeated playback of disc title, chapter/track.
(31) A-B: For specifying and repeating playback of a section of the disc.
(32) ZOOM: For magnifying the screen (1, 2, 3 or OFF).
(34) STEP: Advance one frame each time the button is pressed.
15
TV REMOTE FUNCTION
(3) TV: Press this button to select TV mode.
(5) SEEK DN/UP: Use these buttons to advance to the next higher or lower station.
(10) 0~9: Use these buttons to make a direct channel selection
(15) SCREEN: Press this button to change the Display Mode.
(16) AP (Auto Program): Press and hold this button for 0.5sec to program and save all active stations
in memory.
(21) CH+/-: Use these buttons to advance to the next higher or lower channel.
(23) MUTE: Press this button to remove all sound (++++ blinks on display window)
(28) VOL+/-: Use these buttons to increase or decrease the volume.
(33) Delete: Use to remove selected channel from memory.
(34) Step (Add): Use to add a selected channel to memory.
RADIO REMOTE FUNCTION
(5) SEEK DN/UP: Use these buttons to advance to the next higher or lower active station.
(19) AM/FM: Each time this button is pressed, the VE720 will alternate between the AM and FM radio
bands.
(21) CH +/-: Use these buttons to advance to the next higher or lower channel.
(23) MUTE: Press this button to mute the sound (++++ blinks on display window).
(28) VOL+/-: Use these buttons to increase or decrease the volume.
MISC REMOTE FUNCTION
(20) TEL: Not used in this model
(18) A/V: Press this button to select external A/V source 1 or 2.
16
OPERATION
INITIAL SETUP
This unit defaults to cable TV mode.
When the unit is first powered on, it will detect the cable system
and auto-program the TV tuner to the available stations.
before attempting to operate the unit.
Please wait while the unit auto-programs
During this time the unit will not respond to any commands.
The unit will respond normally once the cable mode and channel search mode is concluded.
CHANNEL TUNING SETUP
If you are Cable TV subscriber, in addition to normal broadcast reception of VHF and UHF channels,
your new TV is capable of receiving many unscrambled Cable channels without the use of a converter
box. When set to broadcast (AIR) TV, it receives CH2-CH69. When set to one of the CATV modes
(STD, HRC, or IRC) it receives CH1-CH125.
NOTE: Most cable companies broadcast in STD Mode
After a power interruption, the unit will go into a cable mode search (HRC, IRC, STD) and channel
search mode automatically.
During this time the unit will not respond to any commands.
The unit
will respond normally once the cable mode and channel search mode is concluded.
POSITIONING THE SCREEN
Press the screen lock button and pivot the screen forward until a comfortable viewing angle is reached.
The screen may also be rotated from side to side.
Do not force the screen beyond its rotational limit.
The VE720 is now ready for use.
Pressing the ON/OFF button on the unit or the remote will turn the system on or off. Remember to turn
the unit off and pivot the screen to the closed position when not in use to prevent damage to the
screen.
SETTING THE TIME
NOTE: All settings (except setting the presets) are performed with the VE720 turned OFF.
1) Press the SET button and the minutes will flash.
2) Use the CH up/down button to set the minutes.
3) Press the SEEK button to toggle between the hour and minutes.
4) Use the CH up/down button to set the hour. (Check AM/PM indicator)
5) Press the ON/OFF button to return to the time display.
17
SETTING and ACTIVATING the ALARM
NOTE: The VE720 must be turned “OFF” when performing the following procedure.
1) Press the SET button twice to enter the alarm mode, press the P3 button to toggle between
the active and deactivated mode.
NOTE: If a series of dashes appear (--: --), the Alarm is DEACTIVATED.
2) Press the CH up/down buttons to set the desired hour/minute. When setting the alarm, check
the AM/PM indicator to assure the proper setting.
3) Press the SEEK buttons to toggle between the hours and minutes.
4) Press the ON/OFF button. The alarm is now set and activated.
Once the alarm is set it will
sound each day at the same time as long as it is activated.
DEACTIVATING ALARM
1) Press the SET button twice to enter the alarm mode.
2) Press the P3 button once. The set time will disappear from the Display Window and a series of
dashes (--: --) will appear, Alarm DEACTIVATED mode.
3) Press the ON/OFF button. The alarm is now deactivated.
NOTE: The set time will be stored in memory and can be reactivated whenever desired by
performing step 1) – 3) of the ACTIVATING ALARM procedure.
SETTING THE ALARM TONES
1) Press the SET button twice (power off).
2) Press the P4 button once to hear the alarm tone.
NOTE: Alarm must be in the “Activated” mode to hear tones.
3) Each time CH UP/DOWN button(s) is pressed it will select a different alarm tone.
4) Press the ON/OFF button to confirm the selected tone.
5) When the alarm sounds, press the ON/OFF button to turn it off.
SETTING THE ALARM VOLUME
1) Power OFF
2) Press the SET button twice for the Alarm setting mode.
3) To select alarm tone, Press "P4" button and press volume UP/DOWN for your desired volume
level.
Then, press "SET" button for volume setting
18
SETTING THE CABLE TV MODE
1) Press the SET button three times to enter the TV/Cable configuration mode.
2) CABLE or AIR will appear on the display.
3) Press the SEEK button to select Cable mode.
4) Press the CH UP/DOWN button(s) to select the desired cable mode (STD/IRC/HRC).
5) When the desired mode is reached, press the ON/OFF button to confirm.
SETTING THE AIR TV MODE
1) Press the SET button three times to enter the TV/Cable configuration mode.
2) Press the SEEK button to select the AIR mode.
3) Press the ON/OFF button to confirm.
SETTING THE SPEAKER MODE
1) With power off, press the SET button four times to enter the speaker configuration mode.
″ISP” (Internal Speaker) or “ESP” (External Speaker) appears on the VFD.
2) Press the seek button to toggle between the ″I SP″ and ″E SP″
3) When the desired mode is reached, press the ON/OFF button.
SETTING THE PRESETS (IN AM, FM OR TV MODES)
1) Tune to the desired channel/station.
2) Press the SET button and the display flashes.
3) Press desired preset (P1, P2, P3 & P4) to confirm the selection.
NOTE: you can preset four (4) AM, (4) FM and (4) TV Channels
19
USING THE DVD PLAYER
Inserting and Ejecting the Disc
1. Set the unit to DVD mode (press source button until (-----------) appears on the display.
2. Insert the disc with the label facing up.
3. The disc will begin playing automatically. If this is a DVD it will go to the DVD root menu.
Press the PLAY button to begin watching the movie.
4. To eject the disc, press and hold the f/ button. The disc will be ejected.
* Discs playable through DVD player – DVD, CD, CD-RW with MP3.
Playback and Stop
1. To temporarily stop playback, press the STOP button once. The player memorizes the exact
position where it was stopped, and it will resume playback again from that position. When it
is desired to playback from the beginning, press the STOP button twice.
2. To Playback again, Press the PLAY (XII) button.
* For some VCDs, stop mode is possible by pressing the NEXT button.
Searching for a Specific Scene/song by Selecting the Chapter Number
1. Pressing the SEARCH button once will display the Time / Title / Chapter input screen.
2. Input the chapter number or time that is desired and press the ENTER button. The player
will commence play from the chapter number or time that that was entered.
Searching for a Specific Scene/song by using Chapters
1. The player will automatically change to the next or previous chapter from the current chapter
being played when the PREV (IWW) or /NEXT (XXI) button is pressed.
2. Pressing PREV (IWW) will change the player to the chapter previous to the chapter currently
being played.
3. The chapter change status is displayed on the upper part of the screen.
* While playing MP3 discs, PREV (IWW)/NEXT (XXI) button to select the previous or next
song. When the MP3 disc is stopped, Press CH+/- button to select the song.
Searching for a Specific Scene/song by Playback Speed
1. Search by Fast Forward (XX) and Fast Reverse (WW).
2. Search by Slow Forward (IX)
3. Search by watching one scene at a time. Press the PLAY/PAUSE (XII) button.
* For normal speed playback, press the PLAY (X) button.
20
Repetitive Playback –To Repeat a Specific Section
1. Press the REPEAT button once to enable the REPEAT selection screen, follow by pressing
the REPEAT button until REPEAT CHAPTER is displayed, the current chapter or track will
be replayed repetitively (CHPTER REPEAT ON).
2. Repeat step 1 until REPEAT TITLE is displayed on the screen, the currently playing title or
CD will be played repetitively (TITLE REPEAT ON).
3. Repeat step 1 until OFF is displayed on the screen, the repeat function will be turned off
(REPEAT OFF).
* For MP3 discs, Press the REPEAT button to change the PLAY MODE
Repetitive Playback –To Repeat a Specific Section (A-B Repeat)
1. Choose the section to be repeated by pressing the A-B button once (SET A).
2. Press the A-B button again to choose the end of the section. (SET B)
3. Press the button until OFF is displayed on the screen this will turn off the repeat
function. (A TO B OFF)
Changing the Subtitle Language
1. If the disc contains caption data, press the SUBTITLE button to choose a specific language.
(e.g., 1/3 ENG, 2/3 SPA, 3/3 FRE will be displayed on the screen)
2. SUBTITLE OFF shows that there are no subtitles.
* This function may not be incorporated in some disc titles
Changing the Vocal Language (AUDIO)
1. If the disc contains different audio tracks, press the AUDIO button to choose between the
various spoken languages (e.g., 1/4 5.1ch ENG, 2/4 2ch ENG, 3/4 2ch ENG, 3/4 2ch ENG).
* This function may not be incorporated in some disc titles
ZOOM (To Enlarge a Picture)
1. Pressing the ZOOM button allows the picture to be enlarged by X1, X2 or X3.
2. Navigation buttons (Seek DN/Seek UP/ Ch UP/Ch DN) allow the enlarged picture to be
shifted.
3. To resume normal settings, press the ZOOM button again until ZOOM is OFF.
21
Viewing Different Angles
Angle indicator appears on the upper part of the LCD display.
When the Angle indicator appears,
press the ANGLE button to view the screen from various angles.
* This function may not be incorporated in some titles.
Viewing the Main Disc Menu
A DVD is divided into sections called titles and chapters. When you play a DVD, a root menu of
the disc will appear on the screen of your Monitor. Contents of the menu will vary depending on
the disc content. Press MENU during playback to display the main menu. Some DVDs only
allow you to select disc playback options using the DVD root menu
1. The root menu of a disc appears when pressing the MENU button.
2. Use the navigation buttons to select the desired item on the menu and press ENTER button
* Use the TITLE button instead of the MENU button, depending on the type of disc being
played
Viewing the Playback Time, Title and Chapter Status
1. Pressing the DISPLAY button will allow the user to see the title, chapter number, and the
elapsed time of the currently playing disc on the upper part of the screen, show the
remaining time of the current title, show the elapsed time of the current chapter, show the
remaining time of the current chapter.
2. Pressing the button once again will turn the display OFF.
22
During playback press DISPLAY to display the current disc playback information. Press display
again to remove the display.
1. The type of disc.
12. The number of current subtitle language.
2. The number of current title.
13. The speed at which the disc is being read.
3. The number of total titles.
14. The number of total subtitle languages.
4. The number of current chapter.
15. Current subtitle language.
5. The elapsed time of title.
16. Dolby audio mode.
6. The number of total chapters.
17. Current audio language selected.
7. The remaining time of title.
8. The number of the current angle.
9. The number of total angles.
10. The number of the current audio language.
11. The number of total audio languages.
23
PLAYING AUDIO CDS
When playing an audio CD the display will automatically display the disc playback information.
The options below show you what information is displayed. Press the ‘DISPLAY’ button to remove
the display.
1. The current track.
2. The number of total tracks.
3. Playing time of the disc.
4. Remaining time of the disc.
USING THE REPEAT FEATURE
The default mode for the Repeat feature is OFF. Pressing REPEAT consecutively changes the
repeat options:
• Repeat Single- repeats the track that is playing.
• Repeat All- repeats the disc that is playing.
• Off
As you toggle through the options, the repeat option changes. The selected repeat option loops
repeatedly until its turned off.
PLAYING MP3 DISCS
MP3 is a digital audio format.
An audio CD-quality song is compressed into the MP3 format with
no significant loss of audio quality. CD-R/RW discs that have been encoded in MP3 format are
compatible with this device.
Insert an MP3 Disc, the DVD player will initialize the disc and the directory (folder) will be shown
on the monitor screen.
When an MP3 disc is inserted into the unit, the menu screen appears automatically. You can use
the menu screen to change folders and songs. The system plays the songs in the order they
were recorded onto the disc.
24
1. Press the f or g button to choose a folder from the folder list on the left side of the
screen.
2. Press ENTER to select the highlighted folder. All songs available under the selected folder
will be listed.
3. Use f or g button to choose a song from the list, then press ENTER to play the selected
song.
4. To move back up to the previous folder use the f button to highlight the
at the top of
the screen, make sure that the disc is paused and press ENTER.
Use the NEXT (XXI) button to move to the next song. Press the PREVIOUS (IWW) button to
move to the previous song.
USING THE REPEAT FEATURE
The default mode for the Repeat feature is OFF. Pressing REPEAT consecutively changes the
repeat options:
•
Repeat Single (repeat playback of a song)
•
Repeat All (repeat playback of all folder)
•
Off (normal playback)
Pressing REPEAT a 3rd time will resume normal playback. As you toggle through the options, the
repeat option changes. Selected repeat option loops repeatedly until you turn it off.
NOTICE
•
sign in front of a file name indicates that this is a folder, not a MP3 file.
•
sign in front of a file name indicates that this is a MP3 file.
NOTE: During MP3 playback, you cannot access “PLAY MODE”, folders or songs.
25
PLAYING A JPEG FILE
1. Insert the JPEG Disc into tray.
2. Select JPEG file by pressing the “UP/DOWN” button.
3. You can preview the JPEG file by pressing “Play” or “ENTER”.
4. Pressing the left or right button will rotate the JPEG in that direction.
5. When browsing the photos, you can reverse the photo horizontally by pressing the “Up”
button, or you can reverse the photos vertically by pressing the “Down” button.
6. You can return the root Menu by pressing “MENU” key.
SETUP
The setup menu allows the user to select the play mode settings. Follow the basic steps below
for each setup menu selection.
The following options are available when in SETUP mode.
OSD Menu: Use to select DVD Setup Menu Language (ENGLISH - Default).
Subtitle: Select a language for subtitles (disc dependent).
ENGLISH (Default), FRENCH, SPANISH, CHINESE.
OFF: No subtitles are displayed.
Audio: Select a language for audio (where available – language depend on disc).
ENGLISH (Default), FRENCH, SPANISH, CHINESE.
DVD Menu: (where available – language depend on disc).
ENGLISH (Default), FRENCH, SPANISH, CHINESE
LANGUAGE Menu
1. Press the SETUP button to display the main menu. The following Menu will appear.
2. Press ENTER, the following screen will appear.
26
3. Use the f or g buttons to highlight the desired menu item.
4. Press ENTER button to display the sub-menu.
5. Each sub-menu item provides a number of option items to its right. Use the f or g buttons
to highlight the desired option item for selection.
6. Press the ENTER button to select the option item.
7. Press the f or g button to highlight the next sub-menu item for setup and repeat steps 3
and 6.
8. Press the SETUP button to exit the SETUP mode.
27
VIDEO Menu
1. Press the SETUP button to display the main menu (see sample screen under
LANGUAGE Menu)
2. Press the
button to highlight Video and press ENTER one time. Use the following
screen to select screen aspect ratio.
* 4:3 PS : When the player is connected to a normal TV, and a wide picture is shown on the
full screen.
* 4:3 LB : When the player is connected to a normal TV, and a wide picture is shown on the
screen with a black strip at both the top and bottom of the screen.
* 16:9
: When the player is connected to a wide screen TV, a wide picture is shown on the
full screen(Default).
28
Rating Menu
Press the SETUP button to display the main menu (see sample screen under LANGUAGE
Menu).
Use to select parental Rating:
Kid Safe.
NC-17.
G.
PG.
PG-13.
PG-R.
R.
Adult.
CHANGE PASSWORD & RATING
1. Select Rating by h or d buttons and press ENTER to enter the Rating setup page
2. Enter the current password and press ENTER button (unlock).
3. Select Rating by g button and press ENTER button to enter the sub-menu.
4. Select the rating level you desire by repeatedly pressing the ENTER button.
5. Select password by f button and input either the default password or any new 4-digit
password and press ENTER button (locked).
6. Press SETUP button.
NOTE: The Default Password is 3308. This password is always effective even after you have
selected your own password and changed it. To avoid the possibility of others using
the default password to set the parental level and change the password, you can
record this default password in another area and delete it from this manual. Some
discs can be limited depending on the age of users while some discs cannot.
Load Factory
To restore all of the options to the default settings select ‘LOAD FACTORY’ using the f or g
buttons and press ENTER.
This will return all of the settings except for parental to the
29
default settings.
30
TECHNICAL SPECIFICATIONS
GENERAL
Power Supply
:
AC100-240V ~50/60Hz 40watts
Operating Temperature
:
0°~40°C / 32°~104°F
Operating Humidity
:
10% ~ 75%
Body Size
:
400 X 280 X 56mm / 15.8” x 11.0” x 2.20”Inches
Weight
:
3.4 Kg
LCD Illumination
:
CCFL Edge Lit Tube
Backlighting Life Expectancy
:
30,000Hrs
Resolution
:
1440(W) X 234(H)
Screen
:
TFT LCD (16:9)
DVD
:
Linear Velocity - 3.49m/sec, Maximum
CD
:
Linear Velocity 1.2~1.4m/sec, Maximum Playback
/
7.50Lbs
DISPLAY
DISC AVAILABLE
– Playback Time – 135minute
Time – 74minute CD-R/CD-RW
MISC
TV Channels
:
VHF/UHF (2-69), CABLE TV (STD,IRC,HRC) 1 - 125
TV Channels
:
NTSC
Radio Frequency Range
:
AM 530KHz – 1710KHz,
Audio output
:
1.2W / 8ohm (2 Speakers)
31
FM 87.5MHz – 107.9MHz
TROUBLESHOOTING CHECK LIST
Problem
Solution
Power does not turn on
•
Check if the power cord is securely plugged into the wall
•
Check if the batteries of the remote control unit are not
depleted.
Disc fails to play
•
Check if the disc is inserted properly into tray (Label Side Up).
•
Check if the disc has viewing restriction selected.
•
Check if the disc is the proper region code.
•
Not all discs are playable in the DVD.
•
Check with the beginning part of the manual on whether the
disc is playable.
Camera angles cannot be
•
The disc being played does not support ANGLE functions.
changed
•
In order to check whether the disc supports the ANGLE
functions, see if the ANGLE indicator on the upper part of the
main display is illuminated.
•
The disc being played does not support subtitle functions.
•
The disc is prohibited from changing subtitle languages.
Vocal languages (AUDIO)
•
The disc being played does not support AUDIO functions.
cannot be changed
•
The disc is prohibited from changing vocal languages (AUDIO).
No sound output
•
Check whether the player is in slow or fast playback mode
Subtitles cannot be changed
(if
it is case, then just press PLAY button for normal playback)
•
Check whether the MUTE function is on.
•
If the internal speakers are being used, make sure they are
turned on and volume is turned up.
Remote control doesn’t work
Setup menu does not operate
•
Remote too far from the unit.
•
Batteries in the remote control are dead.
•
Angle of remote to unit too extreme.
•
DVD must have a setup menu; if the disc does not have a setup
you will not be able to display a menu.
TV
work
MODE
functions
don’t
•
Confirm Antenna is connected.
•
Confirm Air/Cable setting is correct.
•
Confirm that unit is in TV mode.
32
©
2005 Audiovox Electronics Corp., Hauppauge, NY 11788
33
128-7340