1
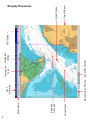
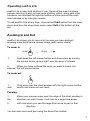
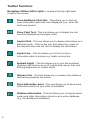
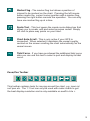
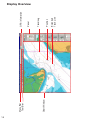
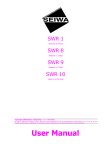
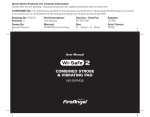
Leisu re
Product
Ra n g e
User Guide
PLEASE READ THIS FIRST!
Insurance
The security dongle has significant value and is the key to your system and
your charts. It is not possible to replace lost or stolen dongles without charge
for the FULL replacement value of both software and charts. YOU MUST
MAKE SURE THAT YOUR DONGLE IS INSURED AGAINST THESE RISKS.
This Manual
This manual has been designed to get you up and running with the basic
functions of seaPro and seaPro Lite .
It is designed to run in conjunction with the tutorials and help files within
seaPro and the technical helps to be found on our web site
(www.euronav.co.uk) that deal with some of the more advanced functions.
Please use the manual, help and website files before contacting us.
For the use of this system a general knowledge of PCs and their operation is
assumed. For information about the operation of your PC and its
capabilities please refer to a PC specialist.
Disclaimer
This product is designed to ease and speed up navigational
calculations. It is not designed to replace official printed-paper
charts or the navigator's responsibility to exercise common
prudence. Neither Euronav Ltd nor their distributors accept
responsibility or liability either to the product user or their estate for
any accident, loss, injury, or damage whatsoever arising out of the
use of or inability to use this product. You may be required by law to
carry suitable paper charts for the passage intended.
This product uses data copyrighted to third parties. This copyright
must at all times be respected, failure to do so may result in civil or
criminal prosecution against you.
Contents
Using seaPro Lite
- Display overview
- Zooming and panning
- Toolbar functions
- Route plotting
- Tidal curves
- AIS display
- Additional information
- Upgrading
5
6
7
8
10
11
11
11
11
Using seaPro Standard, Sailing & Plus
- Display overview
- Main toolbar
- Toolbars
- Night mode
- Chart windows
- Panel
- Zooming and panning
- Routes and planning
- Tides
- Weather & weather routing
- Measuring
- AIS
- Radar
13
14
15
16
16
16
17
18
19
20
21
22
23
24
Installation & Set Up
Please see the seaPro Quick Start Guide for information on how to
do this.
Technical support
Additional information can be found in help files within the seaPro
program (accessed via the Help menu). If you require any further
technical assistance either:
1:
2:
3:
4:
See page 25, Troubleshooting
contact your dealer
visit - www.euronav.co.uk
email - [email protected]
3
Using
Lite & Lite+
Contents
Page
Display overview
6
Zooming and panning
7
Toolbar functions
8
Route Plotting
10
Tidal Curves
11
AIS Display
11
Additional Information
11
Upgrading
11
Troubleshooting
25
5
6
Vessel Track
Extended
Track Line
Menu Items
Mouse Pointer Position
Chart
Information
Navigation
Utilities
Zoom/Pan Toolbar
Information
Tools
GPS Status
Chart Window
Boat Position
Display Overview
Operating seaPro Lite
seaPro Lite is easy and intuitive to use. Some of the main functions
include zooming in and out and route plotting, which, along with other
functions, are reached through the toolbar or icons around the main
chart window or by using the mouse.
To exit seaPro Lite at any time, choose the Chart option from the main
menu and from the drop-down menu select Exit at the bottom of the
list.
Zooming In and Out
seaPro Lite allows you to zoom into the area you have defined,
showing more detail and a clearer image (with vector charts).
To zoom in
Hold
1:
+
Drag
Hold down the left mouse button and draw a box by moving
the mouse cursor up and right over the area of interest.
2:
When you have outlined the area you want to zoom into,
release the left mouse button.
To zoom out
1:
and
Click once over the chart window with the right mouse button
seaPro will zoom out one level.
Panning
1:
the
Place your mouse cursor near the edge of the chart window in
direction you wish to pan, it will turn to a large blue arrow.
2:
Left click when you see the large blue arrow to pan in that
direction.
You can also zoom and pan using the Zoom/Pan toolbar.
7
Toolbar Functions
Navigation Utilities (left to right) - Located at the top right hand
corner of the screen
Show Additional Chart Info - This allows you to find out
more information about the chart displayed (e.g. when the
chart was issued).
Show Chart Text - This tool allows you to display the text
normally displayed on the paper chart.
Inquire Mark - This tool allows you to display information on a
particular mark. Click on the tool, then place the cursor on
the required mark and left click to display the information.
Inquire Line - This tool allows you to find out more
information about a contour e.g. depth contour line.
Animate Lights - This tool allows you to turn the animated
(flashing) light feature on or off (marks flash as per their real
flashing sequence) on certain charts.
Measure Tool - This tool allows you to measure the distance
and bearing between two points.
Show information point - This tool allows you to show extra
information points on your chart (if available).
Database Information - This tool allows you to enquire about
marks and other information stored on an overlay database
(e.g. the Boatlaunch database).
8
Marker Flag - The marker flag tool allows a position of
interest to be marked on the chart. Pressing the left mouse
button marks the current cursor position with a marker flag,
pressing the right button cancels the operation. You can only
have one marker flag up at a time.
Route Tool - This tool opens the create route dialog box that
allows you to create, edit and select previous routes. Simply
left click to place way points on your chart.
Chart Auto-Scroll - This is only active if your GPS is
connected. When selected it maintains the vessel roughly
centred on the screen scrolling the chart automatically as the
vessel moves.
Tidal Curve - If you have purchased the additional tidal curve
data you can use this tool to select a port and display its tidal
curve.
Zoom/Pan Toolbar
This toolbar contains tools for moving around the chart, e.g. zoom in/
out/ pan etc. The 1:1 tool can only be used with raster charts to get
the best display resolution and is only available on seaPro Lite +.
9
Route Plotting
seaPro Lite allows you to easily enter and visualize your chosen route.
Making and planning a route
- Click this button to start a route. This will open the route
dialogue box. Follow the instruction below to make the route.
10
1:
Click on New to create a new route.
2:
Type in a name for the route or use the default name and click
OK.
3:
Click on Add then enter the required waypoints directly on the
chart. To do this, place your cursor on your starting point, left
click and repeat this until you reach your desired destination.
Right click to terminate. Bearings and distances are
automatically calculated, and displayed close to each
waypoint, with a total distance on the last one.
4:
Modify the waypoints as required by selecting the Add,
Delete, Move or Insert buttons on the route dialogue box.
5:
Once the route is complete zoom in and look along your route
to check that you do not cross any dangerous areas etc. and
the route is correct.
6:
Press Start to start your passage and view bearings and
distance to the next waypoint.
7:
Select the Off option to terminate, or close the toolbar
window if you wish to leave the route on the screen.
Tidal curves
- Click this icon to select a tidal curve
With the optional tidal curve module installed you can simply click on the
tidal curve icon which will turn your cursor into a target symbol. Just click
on the tidal station you wish to view (marked by small cyan squares) and a
curve will appear.
AIS Display
Your seaPro Lite can display AIS targets when connected to a suitable
AIS receiver that can output NMEA 0183 (such as Euronav’s AI3000).
With the receiver connected click on Setup then Serial Ports to set up
seaPro Lite to read the correct serial port, then within seaPro Lite click
View then Show AIS Toolbar. Use the setup button (last button on the
right of the AIS toolbar) to switch AIS functionality on/off, enable
CPA/TCPA and alter the information displayed for the AIS targets.
Please allow a few minutes to acquire targets, it can take a little while! If
no targets are seen check the antenna and that you can actually see ships
likely to have AIS transponders installed.
Additional Information
Any additional information can be found in the tutorial and help files
within the seaPro Lite program (accessed via the Help menu). If you
require any further technical assistance either:
1:
2:
3:
contact your dealer
visit - www.euronav.co.uk
email - [email protected]
Upgrading
You can upgrade seaPro Lite National Pack at any time to have more
functionality such as tidal information, advanced waypoints and route
planning, weather information etc. Other products include seaPro
Standard, seaPro Performance Sailing and seaPro Plus. Your charts
will remain on your PC for use with the new program.
11
Using
Standard, Sailing & Plus
Contents
Display overview
Main toolbar
Toolbars
Night mode
Chart windows
Panel
Zooming and panning
Routes and planning
Tides
Weather & weather routing
Measuring
AIS
Radar
Troubleshooting
Page
14
15
16
16
16
17
18
19
20
21
22
23
24
25
13
14
Chart Window
Menu Bar
Tool Bar
Extended
Track Line
Position
Track/Log
Panel
GPS information
Display Overview
Inquire
Chart Auto-Scroll
Chart Auto Detail
Folio Mode
1:1 Scale
Show Vessel Track
Show Extended Track Line
View
Open Instrument Panel
Chart Functions
GRIB Weather Display
Show Tidal Atlas
Tidal Curve Selection
Route Tools
AIS Tools
Radar Tools
RADARpc
Marker Flag
Measure
Where an icon has a down arrow
next to it, click it to reveal a menu
with more functions
Main Toolbar
15
Toolbars
Opening toolbars
Many of the toolbars in seaPro will automatically appear when a
particular function is selected (eg tidal streams), however it is possible
to open the toolbars at any time you wish by either:
a) Click on Setup then Toolbars
b) Right click on the menu bar at the top
Docking toolbars
The main toolbar and cursor position indicator are fixed at the top of
the chart window but all other toolbars maybe docked at either the top
or bottom of the screen for convenience
Night Mode
seaPro has a built in feature to dim the screen for use at dusk or at
night time. Simply click on Chart then Colors... and select the display
mode you wish.
There are parts of the Windows operating system that seaPro
can not dim. For best results set the Windows taskbar to
autohide and the Windows desktop theme to ‘Windows
Classic’.
Charts and Chart Windows
Select Chart then Settings to enhance/alter your display of charts.
Click on the Chart Directories tab to switch on and off different chart
types to view.
seaPro can display many chart windows showing different views. Click
on Chart then New Window for a chart window on your current
monitor or New Window (Multi-monitor) if you would like to put the
chart window on either a separate monitor or to occupy the full
screen.
16
Panel
- Click this button to toggle the panel on and off.
To change the information displayed in the Panel click the Options
button.
NOTE: seaPro will only show the information from the instruments that
are connected to your PC.
The items you can see in the Panel are:
Navigator GPS information
Plan
Gives you original information from your planned
route.
Actual
Updated information on your planned route
against your actual position/speed/direction.
Target Marker
If a target marker is dropped from using the icon
bar your distance and bearing to the marker is
constantly updated.
Wind Apparent and True
Tide/Current Indicator
Log
ARPA Radar Target TCPA/CPA
AIS Target TCPA/CPA
Depth
Temperature
You can scroll through the panel items by either
the toggle buttons, the scroll wheel on your
mouse or by clicking and dragging.
17
Zooming and Panning
seaPro allows you to zoom into the area you have defined, showing
more detail and a clearer image (with vector charts).
To zoom in
Hold
+
Drag
1:
Hold down the left mouse button and draw a box by moving
the mouse cursor up and right over the area of interest.
2:
When you have outlined the area you want to zoom into,
release the left mouse button.
To zoom out
1:
Click once over the chart window with the right mouse button
and seaPro will zoom out one level.
Panning
1:
Place your mouse cursor near the edge of the Chart window
in the direction you wish to pan, it will turn to a large blue
arrow.
2:
Left click when you see the large blue arrow to pan in that
direction.
You can also move around the chart using the arrow keys on your
keyboard or the icons on the Zoom / Pan toolbar (click on Setup then
select Toolbars, tick Zoom/Pan Bar) .
To Select a Chart
Click once with your left mouse button within a chart (a chart is
signified by a purple or blue box), or go to Chart and click on Select.
18
Routes and Route Planning
Entering a Route
- Click this button to open Route Tools.
1:
2:
3:
4:
Select New.
Enter your route name and click OK.
Click Yes to start a new log for the route.
Insert waypoints by one of two ways:
a) Select Add from Route Tools then left click on
the chart to place waypoints. Right click when
done.
b) Select Wpt from Route Tools, pick a waypoint
from the waypoint list and click Add. When done
click OK.
Planning a Route
1:
2:
3:
4:
Select Plan from Route Tools.
Enter start date and time of your departure in the Start Date
and Time window.
Enter your vessel speed.
Click on Calculate Plan.
Finding Best Departure Time
1:
2:
3:
4:
Select Plan from the Route Tools.
Enter the desired date of departure in the Start Date and Time
window.
Enter predicted boat speed.
Click Build Graph.
To Activate the Route
Click the Start button on Route Tools to activate the route and send
any data to your instruments/autopilot.
19
Tides
Create Tidal Atlas
1:
2:
3:
Select Chart from the menu bar and select Folio.
Click on Create Tidal Atlas.
Click OK when done.
Viewing the Tidal Atlas
- Click this button to show the tidal streams and open the
Tidal Atlas toolbar.
Use the Tidal Atlas Toolbar to:
a) View tides at a particular time.
b) View tides updated in real time.
c) Estimate rate and direction of the tide at a specific point.
d) Show the area considered to be affected by an individual
tidal diamond.
Because the Tidal Atlas is based on tidal prediction there is no
guarantee as to the accuracy of the tidal database used within
seaPro. The prediction can be dramatically affected by
changes in the atmospheric pressure and other weather
conditions.
Viewing the Tidal Curve Window
- Click this button to select a tidal station.
Use the cross hairs to select a tidal station indicated by a cyan square
on your chart.
Use the mouse to drag the cross hairs across the graph to determine
a tidal height at a particular time.
20
Weather
- Click this button to open the GRIB weather toolbar
1:
2:
From the GRIB toolbar click the open icon (furthest icon on
the left of the toolbar).
Find the GRIB file you have downloaded select it and click
Open.
To find GRIB files for weather go to the Euronav
website (www.euronav.co.uk) for the latest sites.
Weather Routing
1:
2:
3:
4:
5:
Select Sailing from the menu bar.
Select Weather routing.
Click on Set Start/End points.
Left click where you want to start and end your route then
click Next.
Enter the weather information by either:
a) Using a GRIB weather file downloaded from the
internet.
b) Enter the weather forecast manually in the boxes
provided.
Click Next when done.
6:
7:
8:
9:
10:
11:
Enter the time interval at which you want seaPro to read the
wind and tide.
Enter the arrival distance. seaPro will endeavour to find the
best route to the “arrival circle”.
Set the start date and time.
Click Plan.
Click Next.
Your best route with wind indicators will be shown on your
chart.
Please make sure the time taken to complete your voyage is
less than the time span of your GRIB file. seaPro can’t
complete its calculations if there is not sufficient weather data
and will show an error message if this is the case.
21
Measuring
You can use your seaPro to measure distances from point to point or
for a total distance over many points.
- Click this button to open the Measure toolbar
Distance Total Bearing Reciprocal
Total Distance Measured
Measure Magnetic Variation
Toggle Text Label Windows
Toggle Great Circle Distance Display
Clear the Measure Lines
Measure From Vessel
Measure Total Distance
Measure Point to Point
To measure select the appropriate measure tool (Measure, Measure
total distance, Measure from vessel etc.). Your mouse pointer
should then turn into a ‘cross hairs’ when moved over the chart
window. Left click to place points and if using Measure Total
Distance right click to finish.
The information on your screen can be toggled on and off using the
Toggle Text Label button.
To measure a great circle first put in a normal point to point measure
then click on the Toggle Great Circle Distance Display button
Magnetic variation can be seen by clicking on the Measure Magnetic
Variation button and clicking any chosen point within the chart window.
22
AIS (Automatic Identification system)
seaPro has the built in capability to interface with a suitable AIS
receiver, such as Euronav’s AI3000.
- Click this button to open the AIS toolbar
Use the select vessel button (on the far left) on the toolbar to select a
vessel to interrogate, or use the other buttons to use other AIS
functions within seaPro.
Setup of the AIS functionality within seaPro is easy, simply click the
Settings button on the AIS toolbar (last button on the right) and set up
all the functionality of AIS in seaPro.
CPA/TCPA
Potential collisions will be alerted to you by circling the ‘dangerous’
vessels with a red circle and the PC emitting a warning tone. Settings
for collision warnings can be set by clicking the Settings button on the
AIS toolbar.
Trouble shoot AIS
Once you have set up your AIS receiver and made sure that the AIS
functionality is turned on in seaPro (enter Setup from the AIS toolbar
then tick Enable UAIS) you will start to see AIS targets appearing on
your charts. If the targets do not appear check:
1) There are AIS equipped vessels within AIS range of your antenna
and that they are within your ‘line of sight’.
2) There is power to your AIS receiver and it is on.
3) Your VHF antenna is of the right type, mounted correctly and
working.
4) The correct serial port is set up within seaPro to receive the NMEA
data from your AIS receiver (click Setup then Serial Ports to do
this).
23
Radar
ARPA Radar
- Click here to open the RADAR toolbar
With seaPro connected to your ARPA radar the radar targets will be
shown overlayed on your chart window.
Using the RADAR toolbar you can select a particular vessel to follow,
and pull up a list of targets with their TCPA/CPA to help avoid collision.
RADARpc
Connecting the RADARpc is simple.
Once the radar black box has been set up and plugged into the
ethernet port of your PC start seaPro.
Click on AIS/Radar and select Radar Settings... Tick Enable PC
RADAR then restart seaPro.
seaPro will automatically search and find the RADARpc when seaPro
is started.
- The PC RADAR icon will now be on your main toolbar. Click
this to open the radar settings and adjustments. Click the TX
button to start the radar.
seaPro’s implementation of RADARpc is a flexible and has several
display modes:
Full window multi monitor - Click the RADARpc icon then click the
Image button.
Separate window in seaPro - Click on AIS/RADAR then click on PC
RADAR Window.
Overlayed image on chart - Within the PC RADAR settings window tick
Show on chart. The PC RADAR function can auto range to match
your zoom level, simply tick Auto range to activate this function.
24
Troubleshooting
Should you encounter any problems with the installation or use of
seaPro, don’t panic, help is at hand.
Technical support is available in the form of online help, within the
seaPro program (just click on Help, it’s what it’s there for), the
technical pages on our web site (www.euronav.co.uk) or you can email
us at:
[email protected]
In the following pages you will find the most common problems which
are encountered with the use of a PC and seaPro.
seaPro Restarts Unexpectedly
If seaPro does not install properly, is slow to zoom and pan, crashes
when you build folio or when a menu item is selected, etc, your
computer may be at fault.
You may need to turn down (or switch off) your computers Hardware
Acceleration to do this in Windows XP do the following:
1:
2:
3:
4:
5:
6:
Shut down all programs you may be running.
Right click the mouse on the desktop and select Properties
from the drop down menu.
From the Display Properties window select the Settings tab.
Click the Advanced button.
Select the Troubleshoot tab from the windows that opens.
Adjust the Hardware Acceleration as desired then click OK.
Note: It is best to start with the Hardware Acceleration on the lowest
setting.
These instruction may differ for Windows 2000 or Vista please contact
your PC supplier for more information if required.
If this solves the problem then you have a bad or old graphics card
driver on your PC. Contact your PC supplier or manufacturer for
advice on possible updates and fixes.
Note: For a lot of programs the acceleration setting will make little
difference to their PC performance
25
How do I get back to my boat’s location?
This is controlled by the chart auto-scroll button (see page 15 for the
location of this button).
When it is ‘on’ a green dot will appear in the corner of the button and
seaPro will follow your boat.
I can’t zoom or pan away from my boat’s position
This is controlled by the chart auto-scroll button (see page 15 for the
location of this button).
Switch this button to ‘off’, you can then zoom and pan around your
charts with complete freedom.
When I zoom/pan my chart keeps zooming out to a much smaller
scale chart
When you're zooming/panning, you are exceeding the limits of the
chart you are using, i.e. the area you are moving to, cannot be
completely shown by the chart you are on. In these cases seaPro will
automatically offer a chart which can cover the entire area you have
selected.
To rectify this either:
a) Switch “Folio mode” off. Use the Folio Mode icon on the
main toolbar.
b) Ensure that, when zooming into an area, you draw the
zoom box within the magenta limits of that chart.
c) Increase your chart coverage in that area, to reduce the
chances of being moved on to an unsuitably large-scale
chart.
I can’t see any tidal arrows
This is because either there are no tidal arrows in the area you are
looking or the tidal atlas is out of date.
If your tidal atlas is out of date please visit the Euronav website
(www.euronav.co.uk) for information and downloads of the latest tidal
data.
26
I can’t see my boat
This can be caused by:
a) GPS incorrectly setup.
b) seaPro incorrectly setup.
c) GPS incorrectly wired to the computer.
How to rectify:
Find the interface or communications setup screen on your GPS.
Ensure that the GPS is set to NMEA to NMEA. seaPro uses NMEA
0183, recommended baud rate 4800.
In seaPro go to Setup, then click Serial Ports... . Click on AUTO
SCAN to locate the GPS and set its correct com port.
I can’t see my charts
This is caused by either:
a) Charts not being installed correctly
b) Folio mode being turned off
How to rectify:
Make sure the charts have been installed then in seaPro click on Chart
then Folio. Make sure the appropriate chart folder is ticked (if in doubt
tick them all) and click Create folio. When done click Close. If your
charts are still not visible to you click on the folio mode icon on the
main toolbar (it should have a green dot in the corner).
My charts are almost black with text and detail
This is caused by:
a) Auto-detail mode is switched off.
How to rectify:
Click on the Auto Detail icon on the main toolbar, it's the one that looks
like a magnifying glass. In normal operation it will have a green dot in
the corner.
27
Euronav Ltd, 20 The Slipway, Port Solent, Portsmouth, PO6 4TR, UK
www.euronav.co.uk
version: IX