1
TABLE OF CONTENTS
Page
About Your Maytag ...............................................................................................
For Future Reference ..........................................................................................
Consumer Publications ........................................................................................
Installation ..............................................................................................................
General Features ..................................................................................................
1
1
1
2
3
Operating the Refrigerator
.................................................................................
• Temperature Controls ..................................................................................
• Energy" Saver Switch ....................................................................................
• Warm Cabinet Surfaces ...............................................................................
44
4
Adjusting the Refrigerator
and Freezer Interiors .........................................
• Refrigerator Interior ....................................................................................
Cantilever Shelves ...................................................................................
• Freezer Interior ............................................................................................
Full-Width Freezer Shelf ........................................................................
5
5
5
5
5
Expandable-Width Freezer Shelf ...........................................................
Special Storage Areas ...........................................................................................
• Crispers .........................................................................................................
• Deli Drawer ..................................................................................................
• Gallon Door Storage ....................................................................................
• Covered Dairy Compartment ......................................................................
• Egg Cradle ....................................................................................................
Energy Saving Tips ...............................................................................................
Food Storage Tips .................................................................................................
• Fresh Food Storage ......................................................................................
• Frozen Food Storage ....................................................................................
• Food Storage Chart ......................................................................................
Ice Service ..............................................................................................................
• Twist Ice Cube Trays ....................................................................................
• Automatic Ice Maker ...................................................................................
5
66
Care and Cleaning ................................................................................................
• t/efrigerator Exterior and Interior ...............................................................
• Cleaning Under the Ilefrigerator ................................................................
• Cleaning the Condenser ..............................................................................
• Cleaning the Defrost Pan .............................................................................
• Replacing the Interior Lights ......................................................................
• Cleaning Chart .............................................................................................
Non-Use Periods ....................................................................................................
• Vacations .......................................................................................................
• Moving ..........................................................................................................
Important
Personal Safety Instructions ...........................................................
To Avoid Unnecessary Service Calls ..................................................................
Notes ........................................................................................................................
Warranty .................................................................................................................
4
6
6
6
67
7-10
7-8
8
9-10
11
11
ll
12-13
12
12
12
12
I2
13
14
14
14
14
15
16
17
ABOUT YOUR MAYTAG
FOR FUTURE REFERENCE
Congratulations on your choice of a Maytag
refrigerator! As you use your new refrigerator we
know you will appreciate the many features that
provide excellent performance, ease of cleaning,
convenience and dependability,
For future reference we suggest you retain this
manual after recording the model number, serial
number (six numbers and two letters) and
revision number of this refrigerator in the spaces
provided below.
It is important to understand how your new
refrigerator operates before you use it. On the
following pages you will find a wealth of
information regarding all aspects of your
refrigerator. By following the instructions
This information can be found on the data
sticker located at the top front interior of the
refrigerator compartment. (See example below.)
carefully, you will be able to fully enjoy and
properly maintain your Maytag refrigerator.
Should you have any questions about using your
Maytag refrigerator, contact us. Be sure to
provide the model and serial nmnber of your
refrigerator.
MAYTAG CONSUMER
USA
50208
Md_tt:00
(_
mc .An..
oz
........................
Model Number
SerialNumber
RevisionNumber
For service and warranty information,
see pages 15 and 17.
CONSUMER
PUBLICATIONS
For more information about appliances, order the following items from Maytag at the prices indicated.
Send your name, address, booklet title, form number and payment to: Maytag Consumer Edncation, One
Dependability" Square, Newton, IA 50208. Allow"4-6 weeks for delivery.
Appliance Buying Guides .........................................................................................................
Washer -- 211YG
50¢ EACH
Dryer -- 212YG
Dishwasher
213YG
Electric Range -- 214YG
Gas Range
215YG
Refrigerator -- 276YG
Energy" Savings Tips -- 392YG ..........................................................................................
]
/
"_"..
EDUCATION
ONE DEPENDABILITY SQUARE
NEWTON, IOWA 50208
(515) 791-8911
(Mon.-Fri., 8 am 5 pm Central Time)
NOTE:
MAYTAG
,Ewzo, IA
50¢
PAGE
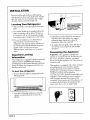
INSTALLATION
Remove and discard cantilever shelf packing
clips located just above each shelf where it hooks
onto the frame. To remove plastic clips, wiggIe
the clips sideways and pull straight out.
Locating
Your Refrigerator
TURN LEO CLOCKWISE TO
1. Allow a free flow of air through the front base
grille.
TURN
RAISE
LEG
CABINET
COUNTERCORNER.
CLOCKWISE TO LOWER
CABINET CORNER.
2. Your model should not be installed where the
room temperature wilI go below 56 degrees
F., beeanse it will not run frequently enough
to maintain proper temperature in the fi'eezei:
3. For ease of installation, you should leave a
space of about 1/2 ineh between the
refrigerator and adjacent walls or cabinets. If
the refrigerator is placed with the hinge side
against a wall, you may want to leave
additional space so the door can be opened
3. If the floor is not level and it is necessary to
raise the back of the cabinet, we suggest
rolling the back wheels onto a piece of
plywood or other shim material.
4. To replace the base grille, center the clips in
the cut-out areas and push in until it snaps
into place.
Connecting the Appliance
wider.
Important
Leveling
Information
W_INC:
This appliance is designed to
operate on a nominal 115 volt, 15 amp, 60 cycle
Your refrigerator is equipped with front and back
rollers for ease in installation and cleaning,
Leveling legs are also located beneath each front
corner to ensure the refrigerator sits firmly on
the floor and is level,
line. There should be a separate, grounded
circuit serving this appliance only. Do not use an
extension cord.
This appliance is equipped with a fllree-pronged
grounding plug for your protection against
possible electrical shock hazards. It must be
plugged into a grounding receptacle. Where a
To
level
the
refrigerator:
1. Remove the base grille by grasping the ends,
lift and pull out.
_
standard two-prong wall receptacle is
encountered, it is the personal responsibility and
obligation of the customer to have it replaced
with a properly grounded three-prong wall
receptacle. Do not under any circumstances, cut
or remove the third (ground) prong from the
power cord. Do not use an adapter plug.
_
2. Turn the leveling leg cloe!c_viseto raise the
eabinet or counterclockwise to lower the
cabinet.
PAGE 2
I_
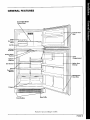
GENERAL FEATURES
Expandable-Width
Freezer Shelf
\
,oe
Cr:_:
Ice Bin
Twist
Upfront
Controls
Energy
.....
___[_
q
.__
F_eezer Door
Saver
Switch-
Up front,
Lighting
Compartment
Deli
Door
Storage
Cantilever
Shelves
Door
Bins
Crispers,
Front
Rollers
Base Grille
Features vary according to model.
PAGE 3
OPERATING
THE REFRIGERATOR
Temperature Controls
Your new refrigerator has two controls: one for the refrigerator compartment and one for the freezer
compartment. Both controls are up-front, located at the top front of the refrigerator compartment. To
adjust the controls, grasp the underside of the control and turn.
Fresh Food
9 - Coldest
Energy Saver Controls
Saves _Switch _
Energy
Freezer
Reduces
Exterior
Moisture
9 - Coldest
Initial Setting
of the Controls
FRESH FOOD Control: This control has
Refrigerator
too warm
Turn the
refrigerator control to the next higher
settings from 1 (warmest) to 9 (coldest). Initially
set this control at 5. The refrigerator may run
for several hours when you first start it. This is
normal,
number. For example, turn the control from
5 to 6.
Refrigerator
too cold--Turn the
refrigerator control to the next lower
FREEZER Control: This control has settings
from 1 (warmest) to 9 (coldest). Initially set
number. For example, turn the control from
5 to 4.
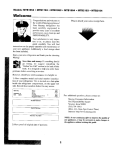
Energy
this control at 5.
Saver
Switch
This switch operates a heater that helps keep
moisture from forming on the outside of the
refrigerator.
Let the refrigerator
run at least 8 to 12
hours before adding food. A day or so after
adding food, you may decide one or both
compartments should be colder or warmer. If so,
adjust the control(s) as instructed below,
To Use:
Adjusting
Controls
2. Move the switch to the "Saves Energy"
position when the humidity is low to save on
the Temperature
Except when starting the refrigerator, do not
change either control more than one
number at a llme. Allow 24 hours for the
temperature to stabilize before resetting.
Changing either control will have some effect on
the temperature of the other compartment,
Freezer too warm
Tuna the freezer
control to the next higher number. For
example, turn the control from 5 to 6.
Freezer too cold Turn the freezer control
to the next number. For example, turn the
control from 5 to 4.
PAGE 4
1. Move the switch to the "Reduces Exterior
Moisture" position only when moisture forms
on the outside of the refrigerator.
the energy needed to operate the refrigerator.
Warm Cabinet
Surfaces
Some portions of the cabinet may be warm to
the touch. This is a normal function of the
refrigerator which helps prevent moisture from
condensing on the cabinet. This condition will be
more noticeable when you first start your
refrigerator, during hot weather and after
excessive or lengthy door openings.
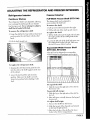
ADJUSTING
Refrigerator
THE REFRIGERATOR AND FREEZER INTERIORS
Interior
Freezer
Interior
Cantilever Shelves
Full-Width Freezer Shelf (R1-1"1700)
The refrigerator shelves are adjustable, allowing
you to arrange the shelving to fit your family's
food storage needs. Never attempt to adjust a
shelf that is loaded with food.
The freezer shelf can be adjusted to
accommodate the food load.
To remove the shelf:
1. Lift up on the shelf and push to the right.
To remove
2. Tilt the lef_tside of the shelf up and remove.
the refrigerator
shelf:
1. Grasp the shelf at the front with one hand and
push up under the shelf back with the other
hand.
To replace the shelf:
1. Tilt the shelf and insert the right rod ends into
the upper portion of the oblong holes in the
freezer wall.
'2. Lift the shelf straight out.
2. Lower the left side of the shelf and insert into
the oblong holes on the left side. Make sure
the shelf is secure before loading.
Expandable-Width Freezer Shelf
{RTT1900, RTT2100)
This shelf can be adjusted to accommodate
vertical storage for tall packages such as pJzza.
To replace
the refrigerator
shelf:
1. Keeping the shelf horizontal, guide the tabs
into the slots in the shelf supports at the rear
of the cabinet.
"2.Lower the shelf until the tabs lock into
position. Make sure the shelf is secnre]y
locked into position before loading it with
food,
To expand
the shelf.'
1. Slide the leg on the right side of the shelf to
the fi'eezer wall.
To provide
tall storage:
1. Slide the leg on the right side of the shelf to
the left.
"2.Place tall items vertically between the leg and
freezer wail.
To adjust shelf height:
1. Remove the shelf from the freezer.
'2. Slide the leg out of the channels and reinsert
in alternateheight position.
3. Place the left side of the shelf on the lower
hooks in the freezer compartment.
PAGE 5
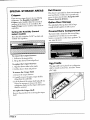
SPECIAL STORAGE AREAS
De|i Drawer
This drawer is provided for short term storage of
meat and cheese. It slides out to provide easy
Crispers
There are two crisper drawers in your Maytag
refrigerator. The Humidity Controlled
Crispers (select models) allow the amount of
moisture in the drawer to be controlled. The
access to items stored within. Keep the Dell
Drawer closed at all times.
Sealed Crisper can be used for either fruits or
vegetables,
The right half of the top door shelf is large
enough to hold a gallon of milk or juice.
Setting
Covered
the
Humidity
Control
(select
models)
Move the slide control to "LOW" for fruits and
"HIGH" for vegetables,
Gallon
Door
Dairy
Storage
Compartment
The butter dish is located in the covered dairy
compartment. Use this area to store either
butter or margarine or ether dairy products. To
use, raise the cover.
LOW
To remove the Crisper Drawers:
1. Pull out to the stop position.
2. Tilt up the drawer front and pull ont.
To replace the Crisper Drawers:
Egg Cradle
1. Align the drawer sides in the tracks.
2. Lift the drawer front and push in.
The egg cradle can be placed on a refrigerator
shelf or stored in a door bin. It holds a "dozen-
To remove the Crisper Shelf:
plus" eggs.
1. Remove the crisper drawers.
2. Carefully remove the glass crisper shelf by
tilting from the underside.
3. Hit the front of the crisper shelf and pull out.
It may be necessary to remove the lower
refrigerator shelves so the crisper shelf can be
tilted for removal.
To replace
the Crisper
Shelf:
Reverse the procedure for removing the crisper
shelf.
PAGE 6
\
ENERGY SAVING TIPS
FOOD STORAGE TIPS
1. Locate the refrigerator away"from heat
Fresh Food Storage
producing appliances such as the range or
dishwasher, heat vents and direct sunlight,
2. Level the refrigerator and do not block
ventilation around the front grille,
The flesh food compartment of a refrigerator
should be kept between 34°F and 40°F with an
optimum temperature of 87°E To cheek the
temperature, place an appliance thermometer in
3. Keep the freezer full to near capacity so less
cold air will escape during door openings,
When less than two-thirds full, place milk
cartons half full of water in the freezer,
a glass of water and place in the eenter of the
refrigerator. Cheek after 24 hours. If the
temperature is above 40°F adjust the controls as
explained on page 4.
4. Let hot dishes cool slightly"before putting into
the refrigerator or freezer.
Avoid overcrowding the refrigerator shelves.
Overcrowding reduces tbe circulation of air
5. Cover liquids,
around the food and results in uneven cooling.
Leave breathing space around food containers
6. Clean the refrigerator condenser coils every
3-4 months, more often if you have pets (see
page 1"2),
7. Wipe moisture from the outside of containers
before placing them into the refrigerator,
S. Set the Energy Saver switch to the "Saves
Energy" position unless moisture forms
around the door opening,
9. Avoid opening the doors too often.
for best cooling results.
The storage requirements
for different foods
vary depending on the temperature and
moisture needed. Refer to the Food Storage
Chart on pages 9-10 for approximate
storage limes. To maintain the best possible
quality, keep the following considerations
in mind:
Meat
and Cheese
• To maximize storage time of items in the Deli
Drawer close the drawer tightly.
Fruits
and Vegetables
• Storage in the crisper drawers traps moisture
to help keep fruits and vegetables flesh. The
Humidity- Controlled Crisper (select models)
allows the moisture level to be adjusted
depending on what is stored in the crisper.
Refer to page 6 for setting the control.
• Fruit and vegetable quality affects the length
of storage. Quali_" can vary from item to item,
variety to variety and season to season. For
example, a rainy growing season can cause
lettuce to be brown when purchased or brown
more quickly. Sort fruits and vegetables before
storage and use bruised or soft items first.
Discard those showing signs of decay.
• When storing vegetables, the crispers will
perform better if they are at least two-tbirds
PAGE 7
fhlL If they are less than two-thirds
store vegetables
ftl]], _ways
in plastic bags or airtight
cout_finers to reduce
moisture
Packaging
• \Vhell freezing
loss.
foods,
times (especially
lettuce),
seleet
products.
• Use a freezer wrap that is air, moisture- and
vapo>preuf.
Some good choices are hea_
duly ahlminmn
• While vegetables need a certain amount of
moisture to remain fresh, too much moisture
storage
frnits and vegetal)les
fresh, top-quality
• Always wrap odorous foods such as onions and
cabbage so tile odor does not transfer to other
can shorten
Foods for Freezing
foil, freezer
plastic wrap,
polyethylene-coated
freezer paper, t}:eezer
}lags or airtight containers. Force as much air
out of the packages
as possible
and be surc
Be sure the vegetables are well drained before
storing. It may also be helpful to place a layer
they are tightly sealed. Trapped _fir can cause
the food to dJ)' out, change color and develop
of paper
an offLflavor (fJ'eezer burn).
absorb
towels in the bottom
of the bag to
any excess moisture.
• Fresh
Dairy Food
• Store butter
and margarine
store wrapping when fieezing for less than two
weeks. For longer storage, overwrap with a
snitable t}eezer wrap. Do not refreeze ]neat
in the Dab),
Compartment
fbund in the refrigerator
dooJ:
• Most dairy foods snell as milk, cream, sour
cream an{l cottage
on their cartons
cheese
have freshness
for appropriate
meats and poultry can be left in the
dates
length of
storage. Store these foods in the original carton
and refrigerate immediately
after purchasing
and each use. (:lose carton lids tightly to keep
out air and odors.
• Occasiomdl) mold will develop on the surface
of hard cheeses (Swiss, Cheddar, Parmesan).
The moldy areas can be trimmed away and tile
remaining cheese will still be flavorfid and safe
to eat.
that has completely
thawed.
Loading the Freezer
• Avoid adding too much warnl food to the
freezer at one trine. This overloads the freezer,
slows the rate of freezing and can raise the
temperature
of already frozen foods.
• Place tile packages in the coldest part of the
freezer first (against the walls or bottom of the
compartment)
to insure the food freezes as
quickly as possible. Leave a little space
between the packages so cold air can circulate.
• Avoid storing hard-to-freeze
Foods such as ice
cretan and orange juice on the fieezer door
shelves. These foods are best stored in the
Frozen Food Storage
t}ceezer interior
The freezer
less with door openings.
compartment
of a refiigerator
the temperature
should be kept at 0°F or lower. To check the
freezer, place an appliance thermometer
Foods
between the frozen packages and check after 24
hours. A freezer operates more ett)ciently when
• Some fbods cannot be frozen successtull)
because
freezinginclude:
causes them to
deteriorate.the These
it is at least two-thirds fifll. If not this fhll, it will
be helpfid to fill milk cartons half fidl of water
and place them in the freezer,
Refer
to the Food
Storage
Chart
on pages
That
where
Don't
Well
potatoes (unless mashed)
cream fillings
cooked egg whites
sour ereanl
9-10 for approximate
storage times. For the
best results when freezing fbods, follow these
salad greens
hmcheon meat
soft cheeses (cream,
guidelines:
mayonnaise
milk and cream
gelatin salads
hananas
citrus frnits
PAGE 8
Freeze
varies
cottage,
processed)
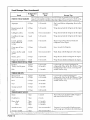
Food Storage
Chart
The _bllowing chart shows approximate
storage
times can va U depending
Foods
DAIRY
storage
times ° }br various refrigerated
on the type of packaging
Refrigerator
Time
and frozen foods
These
used and the storage tetnperatures.
Freezer
Time
Storage
Tips
PRODUCTS
Butter
1-2 weeks
6 9 months
Stor{'.on]y enough for imm{ diate use in the
Dab T Compartment. Wrap tightly or cover.
Milk 6_ cream
1 week
Not recommended
Cheek the carton dating. Close tightly. Don't
return unused portkms to origimd container.
Don't fi'eeze cream unless whipped.
Cream cheese, cheese
spread & cheese food
1-2 weeks
Not reeomm{ nded
Wrap tightly. Some cheese fbods can he
stored fbr longer periods.
Cottage ehees{
5-7 days
Not reeommended
Store in original carton. Cheek the carton
dating.
Hard cheese (Swiss,
Cheddar & Parmesm_)
1-2 months
May b( come crumbly
Wrap tightly. Cut off mold if it dew,lops on
the surfkme.
Sour cream
I0 days
Not recommended
Stor{ ir_ the origimt] carton. C}leek the carton
dating.
Eggs ill the sh(l]
I week
Not recommellded
IRefi'igtrate small (nds down.
l,eftover yoll<s or
whites
2 4 days
9-12 months
For each cup of yolks to be frozen, add 1 tsp.
sugar for use in sweet, or 1 tsp. salt for nonsweet dishes.
EGGS
FRESH
FRUITS
Ripening of h'uits is sh>\_ed by reffigeratiIm
Apples
1 month
6-I2 months
May also store unripe or hard apples at 6070°F.
Bmnmas, pears &
avocados
3-5 days
6 12 months
llipen at room temperature betbre
refrigerating. Bantams and avocados will
darken when refrigerated.
Berries & cherries
2-3 days
6 ] 2 months
Store covered or in the Crispers to prexent
moisttlr_
_ loss.
Citrns tYuits
1-2 weeks
Not recommended
May also store at 60-70°F. If refrigerated,
store uneow_red.
Grapes
3-5 days
6 12 months
Store covered or in th{ Crispers to prevent
moisture loss.
Peaches, nectmines,
plums & apricots
3-5 days
6-12 months
Ripen at room temperature
refrigerating.
Pineapples, cut
2-3 days
6-12 mo]]ths
will ]lot ripen after purchase. Uso quickly to
avoid further deterioration.
be[bre
Cmltimwd
on Iwxt 11a¢1_
PAGE9
Food
Storage
Chart
(continued)
Refrigerator
Time
Foods
FRE SH VEGETABLES
Freezer
Time
Storage Tips
Since vegetables remain fiesh longest in a moist environment, they should be stored in the Sealed
Crisper or in the Humidity Controlled Crisper (select models) with the control on the "HIGH" setting.
If the crispers are full, store vegetables in plastie hags or plastic containers to prevent moisture loss.
Asparagus
2-3 day-s
8-12 months
Don't wash befbre refrigerating. Store in the
crisper.
Brussels sprouts &
broccoli
3-5 days
8 12 months
Wrap odorous foods & refrigerate in the crisper.
Cabbage & celery
1-2 weeks
Not recommended
Wrap odorous foods & refrigerate in the crisper.
Cauliflower & snap
beans
i week
8-12 months
Wrap odorous foods & refiigerate in the crisper.
Carrots, parsnips,
beets, radishes &
turnips
2 weeks
8-12 months
Remove tops. Wrap odorous foods and
refrigerate in the crisper.
Green peas & lima
beans
3 5 days
8-12 months
Leave in pods & refiigerate.
Lettuce & other salad
greens
1 week
Not recommended
Wash. Drain well. Refrigerate in the crisper.
Onions, green
3-5 days
8-12 months
Wrap odorous foods & refrigerate in crisper.
8-12 months
Wrap odorous foods & refrigerate in crisper.
1-2 days
1-2 davs
•
1-2 days
6-112months
4-6 months
Can be kept in its original packaging for
refrigeration. Place in tbe Deli Drawer. When
f?eezing longer than 2 weeks, nverwrap _4th
suitable f)'eezer wrap.
Beef', ground
Beef', roast & steak
1-2 days
3-5 days
4-6 months
9-12 months
Pork
3-5 day's
6-9 months
Veal
3 5 days
4-6 months
Sausage, ground
1-2 da)_s
1 3 months
3-5 days
9-12 months
Bacon
7 days
1 month
Frankfurters
7 days
2 weeks
Ham, whole
half
slices
7 days
5 days
3 clays
1-3 months
1-3 months
1_2 months
Luncheon meat
3-5 days
Not recommended
Sausage, smoked
7 days
Not recommended
Peppers & eucmnbers
FRESH POULTRY
i week
& FISH
Chicken
Turkey, duck & goose
Fish
FRESH
1-2 months
MEATS
Lamb
PROCESSED
Can be kept in originalt_aekaging for
refrigeration. Place in the Deli Drawer. When
freezing Ionger than 12weeks, overwrap with
suitable freezer wrap.
MEATS
Processed meats should be tightly wrapped
and stored in the Dell Drawer.
Unol?ened , vacuum-packed luncheon meat
maybe kept up to 2 weeks in the Dell Drawer.
°S_mre_s: United States Department of Agriculture; Food Marketing Instihlte: Coopenffivc Extension Service IowaState University
PAGE 10
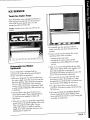
ICE SERVICE
Twist Ice Cube Trays
Yore" refrigerator comes equipped with twist ice
cube trays and a storage bin. To release frozen
cubes hold the trays upside dovm over the
storage bin and twist both ends.
NOTE: Number of ice cube trays will vary"by
model.
,E
• To manually stop the operation of the ice
maker, move the wire lever arm into the up
position.
• Certain sounds may accompany the various
operating cycles of the ice maker:
_buzzing of the water valve
--nmning of the water as the tray fills
--rattling of ice cubes falling into an empty
Automatic
Ice Maker
If your refrigerator is equipped with an
automatic ice maker, there are some things to
keep in mind about its operation:
ice bin
• If the ice is not used frequently, the ice cubes
will become cloudy, shrink, stick together and
taste stale. Empty the ice storage bin
periodically and wash it in lukewarm water. Be
sure to dry the bin before replacing it.
• After your refrigerator has been hooked up to
the water supply; move the wire lever m'm into
the down position. This will start its operation,
The ice maker wiIl fill with water when the
• To remove the ice bin, pull it forward, away
from the ice maker. To avoid the ice maker
dumping the ice while the bin is removed, turn
the ice maker offby lifting the wire lever.
(optional)
freezer reaches the proper temperature. With
a newly installed refrigerator this could take up
to 24 hours,
• Discard
all themade,
cubes These
from the
firstbatches
two or of
three batcbes
initial
ice cubes may be irregular in shape and
diseolored,
• When the ice cubes are ejected it is normal for
several cubes to be joined together at the ends.
They can easily be broken apart. The ice
maker will continue to make ice nntil the
• To replace the ice bin, reverse the above
procedure. Tnm the ice maker on by lowering
the wire arm.
• Beverage and foods should not be placed in
the ice storage bin for quick chilling. These
items em_block the wire lever arm, causing the
ice maker to malfnnetion.
supply of iee cubes raises the wire lever amL
shutting the ice maker off.
PAGE 1
CARE
AND
Refrigerator
Interior
CLEANING
Exterior
and
Cleaning
the Defrost
Pan
The defrost water drains into a shallow pan
Refer to the chart on the next page when
cleaning the refrigerator,
beneath the cabinet and evaporates. This pan
should
water. be cleaned periodically with warm sudsy
CAUTION: Disconnect the power cord before
cleaning. Also, do not touch refrigerated
To remove the defrost pan:
1. Remove the base gillie (see page 2).
surfaces with wet or damp hands. Damp objects
stick to cold metal surfaces. Before cleaning the
freezer, allow it to warm up. Allow glass shelves
to warm up before immersing in warm water.
2. Lift the pan up and pull out.
NOTE: The drain plug is located under the
crisper drawers on the bottom of the
refrigerator compartment. Pull straight up to
remove. If it becomes clogged, remove and
flush the drain line with baking soda and hot
water. This water will drain into the defrost pan.
(See this page for cleaning the defrost pan.)
to snap in plaee.
2. Replace the base grille.
To replace the defrost pan:
1. Position the side flanges to fit over the slide
rails and press dox_n on the center of the pan
Cleaning Under the
Refrigerator
Your refrigerator can be rolled out for cleaning
the floor underneath. Raise the locking feet if
engaged. Pull the refrigerator straight out front
the wall.
Cleaning
the Condenser
¢
Replacing
the Interior
Lights
CAUTION; Disconnect the power cord before
replacing light bulb(s). Wear gloves as
The area around the condenser should be
cleaned eveJy 3-4 months for efficient operation
(clean more oi}en if there are pets in the home).
protection against possible broken glass.
To do so, first m@ug the refrigerator. Then
thoroughly vacuum the dirt and lint front the
front and open end of the condenser. The
condenser can be reached through the right
front base opening. See page 2 for remoxdng the
The refrigerator lights are located directly
behind the temperature controls.
base grille.
2. Unscrew the bulb 0nd replace with a 40 watt
appliance bulb.
PAGE 12
Refrigerator
To replace the refrigerator
1. Unplug file refrigerator.
bulb(s):
Refrigerator
Cleaning
Chart
Cleaning Agents*
Many different cleaning agents are recommended
for the various parts of Maytag refrigerators.
following brand names may help you make an appropriate
selection:
1.
2.
3.
4.
Mild abrasive cleaners such as Bon Ami, Soft Scrub, Bar Keepers
Mild liquid sprays such as Fantastik, Formula 409.
Glass cleaner such as Windex, Glass Plus.
Appliance wax such as Jubilee.
Friend,
The
Cameo.
DO NOT USE abrasive cleansing powders such as Comet or Zud, soap-filled scouring pads like S.O.S. or
Brillo except when indicated.
See pages 5-6 on how to remove and replace specific parts.
Refrigerator
Agents
Exterior
Part
Cleaning
Base grille
Soap and water
Milct liquid sprays
Vacuum cleaner
attachment
Remove the base grille by grasping the ends, lift and
pull out .To replace, center the clips in the cut-out areas
and push in until the base grille snaps into place.
Condenser
Vacuum cleaner
The area around the condenser should be cleaned every
3-4 months for efficient operation, clean more often if
there are pets in the home. See page 13 for more
information.
attachment
Tips and Precautions
Defrost pan
Soap and water
See page 12 on how to remove and replace.
Door handles
Soap and water
Mila liquid sprays
Painted metal surfaces:
Cabinet, doors
Soap and water
Mild liquid sprays
Appliance wax
Wax at least once a year. Do not wax plastic or vinyl
parts.
Black decorator panels
Glass cleaners
Soft, clean, lint-free cloth
(cotton diaper or
cheesecloth)
The following glass cleaners clean these panels best
without streaking: Glass Plus, S.O.S. GIKss Cleaner, The
Works Glass Cleaner and Glassmates Wipes*. Do not
use paper towels or soiled cloths because panels can
serateta easily.
Refrigerator 8( Freezer Interior
Door gasket
Baking soda and water
Soap and water
Use 1-2 tablespoons baking soda per quart of water. Be
sure to wring out excess water from sponge or cloth
when cleaning around controls, lights_ or_lectrical parts.
Glass shelves
Soap and water
Glass cleaner
Mild liquid sprays
Mild abrasive cleaners
Allow the glass to warm up to room temperature
before immersing in warm water. Never use hot
water.
Interior and door liner
Soap and water
Baking soda and water
See above for baking soda solution.
DO NOT use abrasive cleaners, concentrated
detergents, bleaches, eleaning waxes, solvents or polish
cleaners to clean the refrigerator interior.
Crisl0ers, door bins, egg
cradle, meat/cheese
drawer, etc.
Soap and water
Wire shelves
Soap and water
Mild liquid sprays.
*Brand names of cleaning agents are trademarks of the respective manut_aeturers.
PAGE 13
NON-USE
PERIODS
Vacations
Moving
If'you will be gone for a month or less, leave the
controls at the usual settings.
When moving, follow steps a_l under Vaeations.
In addition, remove and carefully pack any items
During longer absences:
that are easily"removable. Ship the refrigerator in
an upright position with the doors taped shut.
a) remove all food,
b) shut offthe ice maker (if installed) and the
valve where you tapped into the water line
to supply the refrigerator,
e) disconnect the refrigerator from the
electrical outlet,
d) clean and dry the refrigerator thoroughly
including the defrost pail,
e) leave the doors open to prevent odors.
IMPORTANT
PERSONAL
SAFETY INSTRUCTIONS
1. To prevent possibili_ "of hazard due to
electrical shoek, never plug the refrigerator
into a receptacle whieh has not been
grounded adeqnately and in accordance with
the local and national electrical codes. See the
grounding instructions on page 2.
2. Unplug the refrigerator before cleaning the
condenser or replacing a light bulb.
3. In case of power failure, minimize door
openings. If the power failure is of a long
duration, protect the food by placing blocks of
dry ice on top of the packages or cheek with a
local frozen foods locker plant about
temporary storage. Frozen foods whicb have
thawed completely should not be refrozen.
PAGE 14
4. Any electrical service cord that becomes
frayed or damaged should be immediately
repaired or replaced. Never unplug your
appliance by pulling on the power cord.
5. Your refrigerator should not be operated in
the presence of explosive fumes.
6. Remove the doors from any out-of-use
refrigerator to prevent child entrapment
suffoeation.
and
7. Children should not climb, hang or stand on
the shelves of this refrigerator.
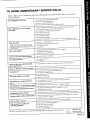
TO AVOID UNNECESSARY
Before
calling
a service
technician,
cheek
SERVICE CALLS...
the following
list for possible
trouhles
that
you can remedy
without difficulty.
The refrigerator
won't
The refrigerator
frequently
runs
run
•
•
•
•
too long_oo
• modem rcfr/gerators are larger and run colder, which requires nmre
running time to prox4de more stable temperatures
• the condenser needs cleaning (see page 12)
• the control set too cold
•
•
•
•
Noisy operation
NOTE: Additional motors and controls are used to
pro_Sde imprmed perform_mce. Therefore, rtorma/
operating sounds may, be more aolieeable than o*_the
modeI it repIaeed.
Odor in the cabinet
prolonged door openings
the base grilJe blocked
too many door openings
the door not seahng (due to a package or a container holding door open)
• _an noise -- normal air flow
• the defrost pan not positioned correctly
• the cabinet not
• a weak floor
level
• odor producing foods should be covered or wrapped
• the interior needs cleaning
• the defi'ost pan needs cleaning
Warm air from the cabinet
The cabinet
the temperature control turned to "Off"
the power cord not plugged in
no power at the electrical cord
the circuit breaker tripped or the house fuse blowa
bottom
• normal air flow for condenser
vibrates
• the cabinet not level
• a weak floor
Water on the back wall of the fresh
food compartment
* a normal defrost condition to channel moisture to the de_¥ost pau
Water
on the floor
• the defrost pan missing or not positioned properly
Foods
dry" out
The cabinet
under
the cabinet
• the packages not wrapped or sealed properly
• the crisper not tightly closed
light
not working
The refrigerator
warm
compartment
The refrigerator
compartment
The freezer
Sizzling
Moisture
compartment
sound
The autonmtic
operating
NOTE:
too
• the refrigerator control set too warm - see page 4 to adjust
• prolonged door openings
too cold
too warm
* a normal sound caused by defrost water dripping on defrost mechanism
on the otRslde
surface
evaporate
ice maker
assistance
• hot humid weather increases condensation,
"Red,me Moisture" position
move energy saver switch to
• cold air moving over the ice cubes when not used regularly
not
(optional)
For further
• the refi%erator control set too cold - see page 4 to adjust
• the }ieezer control set too warJn - see page 4 to adjust
• prolonged door openings
in the freezer
collects
The ice cubes
• the bulb burned out
• no power at the outlet
° the stop arm in OFF (up) position
• the water supply, turned off
• the water pressure too low
• the freezer too warm
contact
your Maytag
dealer
or Ma}_ag Customer
Sezvice:
U.S,
Canada
1-800-688-9900
1-800-688-2002
PAGE 15
MAYTAG
REFRIGERATOR
WARRANTY
Full One Year "Warranty
For one (l) year from the date of original retail purchase, any part which flailsin normal home use will be
repaired or replaced flee of eharge.
Limited Warranty
Second thru Fifth Year -- major refrigeration
components:
After tile first year and through the fifth year alter the date of original retail purchase Maytag will repair or
replace, at its option, free of charge to the owuer for parts and labor any part of tile sealed refrigeration
system (consisting of the eompressor, evaporator, condenser, drier and connecting tubing) and the cabinet
liner (exclusive of the door liner) wbich fails in normal home use. Trip cbarges, travel and transportation, if
required, shall be the responsibility of the owuer.
Second Year -- other parts:
Other parts which fail in normal home use during the second year following date of original retail purchase
will be repaired or replace free of charge for the part itself, with the owner paying all other eosts, including
labor and trip eharges.
Ice Maker - when purchased with the refrigerator and installed by the dealer the ice maker will be considered
part of the refrigerator for warran_ purposes.
This fu]l warranty and the limited warr_mty apply only when the appli_mee is loeated in the United States or
Canada.
LIMITATION
OF LIABILITY
The warrantor, Ma_ag Company, shall not be liable for any ineidental or consequential damages, including food
loss. Some states do not allow the exelusion or limitations of consequential damages, so the abo_e limitations or
exelusion may not apply to you.
To Receive
Warranty
Service
To locate ,an authorized service eomp;my in your area, contact the Maytag dealer from whom your
appliance was purchased or call Maytag Customer Service. Should you not receive satisfactoJ T
w'arran_ serxdee, call or write:
Maytag Customer Service
240 Edwards St. S.E.
Cleveland, TN 37311
U.S.
1-800-688-9900
CANADA
1-800-688-2002
When contacting Customer SmMee be sure to provide the model and serial number of your
appliance, the name and address of the dealer from whom you purchased the appliance, and the
date of purchase.
This Warranty gives you specifie legal rights, and you may also have other rights which vary from
state to state.
Should you still have a problem, write to: Major Apphance Consumer Action Panel, 20 North Wacker Drive, Chicago,
l]linois 60606. MACAP is an industry sponsored but independent group of consumer experts who receive and act on
eomplairJtsfrom appliance owners.
NOTE: When writing ahout an unsoh,ed service problem, please include the following information:
(a) Your name, address and telephone number;
(b) Model number, serial number, and re_ision number/found on the top front interior of the refrigerator
compartment);
(c) Name and address of your dealer and the date the appliance was bought;
(d) A clear descfptJon of the problem you are ha_Sng.
PAGE 17