1
Models: RST2400 and RST2200
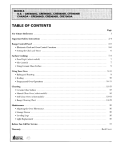
TABLE OF CONTENTS
Page
Installation
Energy
General
...........................................................................................................................................
Saving Tips ............................................................................................................................
Features
...............................................................................................................................
Operating
the
Adjusting
the
Special Storage
Food Storage
Ice and Water
Controls .....................................................................................................................
Interior
.......................................................................................................................
Areas ........................................................................................................................
Tips ..............................................................................................................................
Serviee .......................................................................................................................
Care and Cleaning
.............................................................................................................................
Non-Use Periods .................................................................................................................................
Important
Consumer
To Avoid
Warranty
1
Personal
Safety Instructions
........................................................................................
Publications
.....................................................................................................................
Unnecessal_
Service Calls ..............................................................................................
..............................................................................................................................................
1
2
3
3
4
5-7
8-9
10-11
12
12
12
13
14
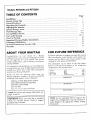
ABOUT YOUR MAYTAG
FOR FUTURE REFERENCE
Congratulations
on your choice of a May'tag
refrigerator! As you use your new refrigerator we know
you will appreciate the inany features that provide
excellent performance, ease of cleaning, cmwenience
and dependability.
It is important to understand how your new refrigerator
operates befbre you use it. By follow'ing the instructions
carefully, you will be aisle to fully enjoy and properly
maintain your Ma_ag refrigerator.
For future reference we suggest you retain this manual
after recording the model number, serial number (six
numbers and two letters) and revision number of this
refrigerator in the spaces provided below.
This information can be found on the data sticker
located at the top front interior of the refrigerator
compartment. (See example below.)
MAYTAG
NEW'fON
Should yon have any questions about using your
May"tag refrigerator, contact us. Be sure to provide the
mode/and serial immber of your refrigerator,
MAYTAG CONSUMER EDUCATION
ONE DEPENDABILITY
SQUARE
NEV_rI'ON, IOWA 50208
(515) 791-8911
(Mon. Fri., 8 am-5 pm Central Time)
usa
IA
s0208
_0_,ILtlQ
°
_ax _Mes
s_,
_%2'_"_,
...................
blodelNumber
SerialNumber
Revision
Number
pages 13For
and service
14.
I NOTE:
and warranty ififormation,
see
purchase date is needed,
I IMPORTANT:
Keep your sales slip or cancelled
check for warranty service. Proof of original
make changes to the appearance without revising
I NOTE:
In our continuing effort to improve the
this manual.
I quality of our refrigerators, it may be necessary to
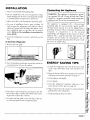
INSTALLATION
Connecting
1. Remove and discard shelf packing clips.
2. Do not install where the room temperature will go
below 55 degrees F. It will not run frequently enough
to maintain proper temperature in the freezer,
the Appliance
WAliNIN(7,: This appliance is designed to operate
on a nominal 115 volt, 15 amp, 60 cycle line. There
should be a separate, grounded circuit serving this
appliance only. Do not use an extension cord.
3. Allow a free flow of"air through the front base grille.
4. For ease nf installation, leave a space of about 1/2
inch between the refrigerator and adjacent walls or
cabinets. If placed with the hinge side against a wall,
leave additional space so the door can be opened
w_der. (Refer to the installation instruetlans for
more detail.)
,5. Level the refrigerator to ensure it sits firmly on the
floor,
To level the refrigerator:
This appliance is equipped with a three-pronged
grounding plug for your protection against possihle
electrical shock hazards. It must he plugged into a
gr( nnd ng receptacle. Where a standard two-prongwall
receptacle
is encountered,
it is the personal
responsibility and obligation of the customer to have it
replaced with a properly grounded three-prong wall
receptacle. Do not under any eireumstances, cut or
remme the third (ground) prong from the power cord.
Do not use an adapter plug.
1. Remo_e the base grille.
2. Turn the leveling leg cloekavise to raise the cabinet or
cmmtercloc_vise to lower the cabinet.
ENERGY
SAVING
TIPS
1. Locate the refrigerator away from heat sources such
as the range, dishwaslmr, heat _ents and direct sunlight.
TURNLEGCLOCKWISE
TO
RAISE
CABINET
2. Keep the freezer filll to near capacity so less cold air
x_dllescape dnring door openings (see page 5).
CORNER.
TURN LEG COUNTERCLOCKWISE
TO LOWER
3.
Let
CABINET
4.
Co• V er
CORNER.
hot
dishes
cool
sliglitly.
'
,
liquids.
5. Clean the refrigerator condenser coils once a },car,
more often if yon have pets (see page 10).
6. Wipe moisture from the outside of containers before
3. If the floor is not level and it is necessary to raise the
back of the cabinet, roll the back wheels onto a piece
of pl}avood or other shim material.
placing them in the refrigerator.
7. Avoid opening the doors too often.
4. To replace the base grille, center the clips in the cutout areas and push in until it snaps into place.
PAGE 1
GENERAL FEATURES
Automatic
Ice Maker
Light
Freezer
Temperature
Control
Refrigerator
Temperature
Control
Compartment
2
Cradle
Door
Jstable
Bins
Light
ilever
Shelves
Adjustable
Shelves
Deli Drawer
Temperature
Meat/Cheese
Drawer
Tall Bottle
Retainer
gm
gm
Freezer Storage
Drawer
Front
m
Rollers
Base Grille
Features may vm), according to model.
PAGE 2
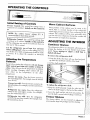
OPERATING
THE CONTROLS
FREEZER
REFRIGERATOR
I
Initial
D-INITIAL
SETTING
G.GOLUF_T
_E3q'ING
Setting
6-INITIAL
SETTING
II-COLOEST
SEITtNG
of Controls
Warm
Freezer Control: This control has settings from A
(warmest) to G (coldest). Initially set this eontrol to
D.
NOTE. The
recommended
1
coldest
freezer , _ttmg
,(G) !s
for short term use, only
, ". : ' :° " , [ [
Cabinet
I
Surfaces
Some portions of the cabinet may be warm to the
touch. This is a normal tkmction of the refrigerator
which helps prevent moisture from condensing on the
you first start your refrigerator, during hot weather and
cabinet.
after
excessive
This condition
or lengthy_x411
doorbe openings.
more noticeable when
Refrigerator
Control, This control has settings from
1 (warmest) to 11 (coldest). Initially set this control to
6. The refrigerator may" rnn for several hours when yon
ADJUSTING
first start it. This is normal.
Let the refrigerator
run at least 8 to 12 hours
before adding food• A day or so after adding food, you
may decide one or both compartments should be colder
or warme_: If so, adjust the control(s) as instrncted
below.
The refrigerator shelves are adjustable, all_wing you to
arrange the shelving to t_t your family_ food storage
needs. Never attempt
to adjust a shelf that is
loaded with food.
Adjusting
Cantilever
To remove
THE
INTERIOR
Shelves
the refrigerator
shclfl
1. Grasp the shelf at the front with one hand and push
up under the shelf back with the other hand.
the Temperature
Controls
2. Lift the shelf straight out.
Except when starting the refrigerator, do not change
either control more than one number or letter at
a time. Allow '24 hours for the temperature
before resetting. Changing either control
some eft_et on the temperature
of
compartment.
Freezer too warm--Torn
the freezer
the succeeding letter. For example, tuna
from D to E.
to stabilize
will have
the other
control to
the control
Freezer too cold--Turn the freezer control to the
preceding letter. For example, turn the control from
D to C.
To rcplaee
the refrigerator
shelf:
I, Keep the shelf horizontal. Guide dm tabs into the
slots in the shelf support at the back of the cabinet.
Refrigerator
too warm--Turn
the refrigerator
control to the next higher number. For example,
torn the control from 6 to 7.
2. Lower the shell" until the tabs lock into position. Be
sure the shelf is secure before loading it with fi)od.
Refrigerator
too eold--Tnrn
the refrigerator
control to the next lower number. For example, turn
the control from 6 to 5.
The freezer shelves can be removed or adjusted
accommodate large size packages and fbr cleaning.
Freezer
Shelves
to
PAGE 3
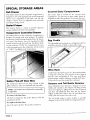
SPECIAL STORAGE AREAS
De|i
Drawer
Covered
This shallow drawer in the refrigerator compartment is
designed to store small packages such as dell meats and
cheeses. It is suspended on the back wall like the
cantilever shelves, thus it is adjustable and removable
according to storage needs.
Sealed
Dairy
Compartment
Tile butter dish is located in the covered dairy
compartment. Use this area to store either butter or
margarine or other daiJy products. To use, raise the cover.
Crisper
This deeper drawer is sealed to provide
storage conditions for fruits amt vegetables.
Temperature
Controlled
optimum
Drawer
The l)ottom drawer in the refi%erator compartment is
designed tbr storing fresh meat products. To regnlate
the amount of cold air being channeled from the freezer
and _tround this drawer, move the temperature slide
control located on the lett wall near the drawer front.
Set the control on "COOL" for a temperature the same
as the surrounding air in the refrigerator. Set the control
on COLD for shghtly cooler temperatures.
Egg Cradle
The egg cradle can be placed on a refrigerator shelf or
stored in a door bin. It holds a "dozen-plus" eggs.
I
!
Wine
Gallon Pick-off
The refffgerator
Door Bins
door bins are deep enough to hold
gallon containers. They are adjustable and removable.
NOTE: The bottom bin is fixed and not removable
or adjustable,
To remove the door bins:
Lift the bin straight up. Tip out the bottom of the bin
and pnI1 out the bin.
To replace tbe door bins:
Insert the top honks first. Then push in and down.
PAGE 4
Rack
Corked \;ines should be stored in a horizontal position
to keep the cork moist. Tiffs prevents air from getting
into the x_dne and spoiling it. The wine rack allows
proper storage without taking up valnable shelf space.
It may also be used for storing liter containers.
Keepers
and Tall Bottle
Retainer
Some refrigerator door bins have "keepers" to secure
bottles and contmners. The keepers will help prevent
items from tipping or falling when the door is opened
and shut. On adjustable door bins, lift the keeper
slightly to slide from side to side. On fixed door bins,
simply slide the keeper from side to side.
The tall bottle retainer (select models) is specially
designed to prevent tall bottles from tipping torward.
FOOD STORAGE TIPS
Fresh
purchasing
andeaebriseClose
ca onlidst gbtly
to
Food Storage
keep out air and odors.
_.
The FRESH FOOD compartment should be kept at
34°F_t0°F with an optimum temperature of 37°F. To
cbeek thetmnperature, place an appliancethermometer
in a glass of water in the center of the refrigerator,
* Occasionally mold will develop on the surface of hard
cheeses (Swiss, Cheddar, Parmesan). This can be
trimlned away and the remaining cheese will be
flavorful and safe to eat.
Check after 24 hours. If the temperature is abo_e 40°F
adjust the control as explab_ed on page 3.
Frozen Food Storage
Axoid overcrowding the refi-igerator shelves as this
reduces the circulation of air around the food and
results in uneven cooling.
The FREEZER compartment should be kept at 0°F or
lowec To cbeek the temperature, place an appliance
thermometer between frozen packages and check after
% hours. If the temperature is above 0°F, a{iust the
depending
The
storageon requirements
the temperatureibr and
different
moisturefoods
needed,
var_
Refer to the Food Storage Chart on pages 6-7 for
approximate
storage times. To maintain the best
efficiently
control as described
when it isonat page
least 3.two-thirds
A freezer Full.
operates
It may
more
be
helpful to fill milk cartons half full of water and place
them in the freezer, if not this thll.
qualib_, keep the following considerations
Refer to the Food Storage Chart on pages 6-7 for
approximate
storage times. For the best resnlts when
freezing foods, follow these guidelines:
Meat
and
in mind:
Cheese
• To maximize storage time of items in the Temperature
Controlled Drawer dose the drawer tightly and set
the control for the desired coolness. (See page 4).
Fruits and VegetabLes
• Storage io the crisper drawer traps moisture to keep
filfits and vegetables fresh. (Refer to page 4).
• Qualil), can _ary from item to item, varlet), to variety
and season to season. Sort fruits and vegetables before
storage and use bruised or sot} items first. Discard
those showing signs of deeajx
Packaging
Foods
Loading
the
* Avoid adding too much warm food to the f)ceezer at
one time. This overloads the freezer, slows the rate of
freezing and can raise the temperature of already
frozen foods.
well before storing. It may be helpful to place a layer
of paper towels in the bag to absorb excess moisture,
Dairy
• Place the packages in the coldest part of the Freezer
f'lrst (agamst
• the walls or bottom of"the compartment)
to insure the food freezes as quickly as possible. Leave
a little space between the packages so cold air van
circulate.
Compartment found in the refiigerator door.
• IVlostdaiiy foods such as milk, cream, sour cream and
cottage cheese have freshness dates on their cartons
• Avoid storing hard-to-fi'eeze foods such as ice cream
and orange juice on the freezer door shelves. These
foods are best stored in the freezer interior where the
and
margarine
in
the
the origina/cation
and refi'igerate immediatels afteJ
for appropriate length of' storage. Store these fbods in
P_'
Qt_
r_
temperature
*
Freezer
cabbage so the odor does not transfer to other foods.
• While vegetables need a certain amount of moisture
to remaiu fresh, too much moisture can shorten
storage times (especially lettuce). Drain vegetables
Dairy Food
• Store
butter
:
• Use a freezer wrap that is air-, moisture- and vapor
proof. Some good choices are hea;T-duty aluminum
foil, freezer plastic wrap, pnlyethylene-coated freezer
paper, freezer bags or airtight containers. Force as
much air out of the packages as possible and be sure
they are tightly sealed. Trapped air can cause the fbod
to dly" out, change color and develop an off-flaxor
(freezer burn).
• Always wrap
and
I_
ae
• When freezing filfits and vegetables select fresh, topcluality products,
• Fresh meats and poultry can be left in the store
wrapping when freezing for less than two weeks. For
longer storage, ovenvrap with a suitable freezer wrap.
Do not refreeze meat that has completely thawed.
fbods such as onions
_1_
t_
for Freezing
• When storing vegetables, the crisper will perform
better if"it is at least V,vo thirds full If less than twothirds dill, store vegetables in plastic bags or airtight
containers to reduce moisture loss.
odorous
¢,_
_"
varies less with door openings.
_
[
PAGE 5
;
Food Storage
Chart
The following chart shows approxiinate
storage times ° for various refrigerated
and frozen
can xaL'y depending
on the t31)e of packaging used and the storage temperatures.
foods. These storage
Butter
1-2 weeks
6-9 months
Store only enough for immediate use in the
Dairy Compartment. Wrap tightly or cover.
Milk & cream
i week
Not reeommended
Check the carton dating. Close tightly. Don't
return unused portions to original container.
Don't freeze cream unless whipped.
Cream cheese, cheese
spread & cheese food
1-2 weeks
Not recommended
Wrap tightly. Some cheese foods can be
stored for longer periods.
Cottage cheese
5-7 days
Not recommended
Store in original carton. Check the carton
dating.
Hard cheese (Swiss,
Cheddar & Parmesan)
1-2 months
May"become crumbly
Wrap tightly. Cut off mold if it develops on
the surface.
Sour cream
10 days
Not recommended
Store in the original carton. Check the carton
dating.
Eggs in the shell
1 week
Not recommended
Refrigerate small ends do'am.
Leftover yolks or
whites
'2-4 days
9-1'2 months
For each cup of yolks to be frozen, add i tsp.
sugar for use in sweet, or 1 tsp. salt for nonsweet dishes.
FRESH
FRUITS
Ripening of fruits is slowed by refrigeration.
Apples
1 month
6-12 months
May also store unripe or hard apples at 6070°K
Bananas, pears &
avocados
3-5 days
6-12 months
Ripen at room temperature before
refrigerating. Bananas and avocados will
darken when refrigerated.
Berries & cherries
2-3 days
6-1`2 months
Store covered or in the crisper to prevent
moisture loss.
Citrus fruits
1-2 weeks
Not recommended
May"also store at 60-70°E If refrigerated,
store uncovered.
Grapes
3-5 days
6-12 months
Store covered or in the crisper to prevent
moisture loss.
Peaches, nectarines,
plums & apricots
3-5 days
6-12 months
Ripen at room temperature
refrigerating.
Pineapples, cut
`2-3 days
6-12 months
Will not ripen after purchase. Use quickly to
avoid further deterioration.
before
Continued
PAGE 6
on _rext page
times
Food
Storage
Chart
Refrigerator
Time
Foods
FRESH
(continued)
VEGETABLES
Freezer
Time
Storage
Tips
These keep best when stored in a moist crisper drawer. If the crisper is not two-thirds full,
store vegetables in phtstie bags or plastic containers to prevent moisture loss.
Asparagus
2-3 days
8-12 months
Don't wash before refrigerating.
crisper.
Store in the
Brussels sprouts &
broccoli
3-5 days
8-12 months
Wrap odorous foods & refrigerate in the crisper.
Cabbage & celery-
1-2 weeks
Not recmnmended
Wrap odorous foods & refrigerate in the crisper.
Cauliflower & snap
beans
I week
8-12 months
Wrap odorous foods & refrigerate in flm crisper.
Carrots, parsnips,
beets, radishes &
2 weeks
8-I2 months
Remove tops. Wrap odorous foods and
refrigerate-in the crisper.
Green peas & lima
beans
3-5 days
8-12 months
Leave in pods & refrigerate.
Lettuce & other salad
greens
1 week
Not recommended
Wash, Drain well. Refrigerate in the crisper,
Onions, green
3-5 days
8-12 months
Wrap odorous foods & refrigerate
in crisper.
8-12 months
Wrap odorous foods & refrigerate
in crisper.
Can be kept in its original packaging for
refrigeration. Plaee in the Temperature
Controlled Drawer. When freezing longer
than 2 weeks, overwrap with suitable freezer
wrap.
turnips
Peppers
FRESH
POULTRY
1 week
& FISH
Chicken
Turkey, duck & goose
1-'2 days
i-2 days
6-i2 months
4-6 months
Fish
1-2 days
i-2 months
Beef, ground
Beef, roast & steak
1-2 days
3-5 days
4-6 months
9-12 months
Pork
3-5 days
6-9 months
Veal
3-8 days
4-6 months
Sausage, ground
1-2 days
1-3 months
3-5 days
9-12 months
Bacon
7 days
1 month
Frankfurters
7 days
2 weeks
Ham, whole
half
slices
7 days
5 day's
3 days
1-3 months
1-3 months
1-2 months
Luncheon
3-5 days
Not recommended
7 days
Not recommended
_RESIt
MEAT_
Lamb
PROCESSED
Can be kept in original packaging for
refrigeration. Place in the Temperature
Controlled Drawer. When freezing longer
than 2 weeks, overwrap with suitable freezer
wrap.
MEATS
meat
Sausage, smoked
"Somces: United States Department
Processed meats should be tightly wrapped
and stored in the Deli Drawer.
Unopened, vacuum-packed luncheon meat
maybe kept up to 2 weeks in the Dell
Drawer.
of Agricultalre; Food bIarketin_ lastau_e; Cooperative Extension Sew ee Iowa S te U;1',ers v
PAGE
7
ICE AND WATER SERVICE
Automatic
Ice Maker
ltere are some thi_lgs to keep in mind about the
automatic ice maker's operation:
• If the ice is not used frequently the ice cubes will
become cloudy, shrink stick together and taste stale.
Empty the ice storage bin periodically and wash it in
lukewarm water. Be sure to dry tile bin hefbre
replacing it or the ice cubes will stick to the metal
auger.
• To remove the ice hin. lift the front of the bin and pull
forward. To avoid the ice maker dumping ice while
the bin is removed, turn the ice maker off by lifting
the wire lever.
• To replace the ice bin, reverse the above procedure.
Turn the ice maker on by lowering the wire arm.
• Beverage and foods should not be placed in the ice
storage bin for quick chilling. These items can block
the wire lever arm, causing the ice maker to
malfimction.
Automatic
Dispenser
Ice and Water
The antomatic ice and water dispenser offers a variety
of convenience features. These are outlined as follows:
• After your refrigerator has been hooked up to the
water supply, move the wire lever arm into the down
position. This will start its operation. The ice maker
will fill with water x_en the freezer reaches the
proper
temperature.
With a newly installed
refrigerator this could take up to '24 hours.
• Discard all the cubes t_om the first two or three
batches made. These initial hatches of'ice cubes may
he irregular in shape and discolored.
• When the ice cubes are ejected it is normal for
several cubes to be joined together at the ends. They
can easily be broken apart. The ice maker will
contiuue to make ice until the supply of ice cubes
raises the wire lever arm, shutting the ice maker off.
• To manually stop the operation of the ice maker,
moxe the wire lever arm into the up position.
• Certain sounds mar"accompany the various operating
cycles of the ice maker:
buzzing
of the water valve
--running
of the water as the tray {_lls
--rattling
of the ice cubes th]ling into an empty ice bin
PAGE8
t'_MAY,a_
..........
,_...........
I
I
Water/Ice
Control
To dispense ice cubes, place the glass against the left
paddle,
To Stop
Dispensing
To dispense chilled water, place the glass against the
right paddle,
Release the pressure (111the paddle and 11o1(tthe
container in position momentaril) to catch the last
pieces of ice or drops of water. The ice delivery door
will remain open fnr a short time. When it doses you
will hear a closing sound.
NOTE: When using the ice dispenser for the first
time, discard the first two or three dozen cubes.
When using the water dispenser for the first time,
press the pad for one to two minutes to bleed the
air from the water line. Discard the first five to six
glasses of water dispensed. This will insure pure ice
Spill Tray
Do not pour water into the grille at the bottom of the
dispenser. This is a spill area, not a drain. Normal spills
x411evaporate in the recessed area below the spill shelf
grille. Excessive spills sh(mld be wiped up after
removing the grille.
and fresh water for drinking.
Dispenser
Water fi'om the dispenser is chilled, but not as cold as
ice water. For colder watel; simply add ice befbre
dispensing water. Also, tbe first glass of water dispensed
each time inay be warmer than consecutive glasses. It
will be cooler if a full glass of water is dispensed rather
than a partial glass.
Light
To turn the light on and of}_depress the dispenser light
switch located behind the rigbt side of the decorative
panel.
Ice Dispensing
• If"the ice dispenser is not used frequently, ice mlbes
may clump together and need to be broken apart or
discarded.
• Do Not add ice to the storage bin which was not
produced by )our ice maker - it may not dispense
properly.
• Avnid operating the ice dispenser eontimlouslv h)r
more than five lninutes. Simply remove iarge
quantities from the bin by hand.
• Avoid dispensing ice directly into thin, fine china or
delicate clTstal - tbey can crack or chip from the
combined pressure of vour hand pressing them
against the actuator pad and ice dropping into the
container.
PAGE 9
CARE AND CLEANING
Refrigerator
Exterior
and
Interior
Replacing
Refer to the chart on the next page when cleaning the
C_UTION:
refrigerator,
r_la6ing
CAUTION_
Disconnect
the
po*ef
cleaning
*Is0,don0t to.c
eo_d'_fo_']
surfaces with wet or damp hands_ Damp, _6bj_bt_,
stick to cold metal Surfacey. Before _eleaning _e
freezer, allow it t o warm'up. AlJ0wgl_s §h_!V_it0'
wxrm u before immersing in wtu-m _'atBr.
5, P .............
,
, "'
,
Cleaning
Under
the
Refrigerator
Your refrigerator can be rolled out for cleaning the floor
underneath. Raise the locking feet if engaged (see page
1). Pull the refrigerator straight out from the wall.
Cleaning
the Condenser
The area around the condenser should be cleaned once
a year for efficient operation (dean more often if there
are pets in the home). To do so, first unplug the reffigcrater. Then thoroughly vacuum the dirt and lint from
the front of the condenser. The condenser can be
reached through the left front base opening. See page
1 for removing the base grille.
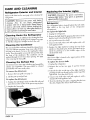
Cleaning
the
Defrost
Pan
the
Interior
Lights
Di_e0mm_t the i_ower cord _ before
light _ulb(s/. Wear gloves as prgtection
against,, p0ss{b!e
.... .
broken
,
., glass.
,,,
Refrigerator
The refrigerator
,.
.......
light is located behind the full width
light shieM at the top back
compartment.
To replace the light bulb:
of the
refrigerator
1. Unplug the refrigerator.
2. Remove the light shield by grasping the bottom of the
shield at each end and pulling forward to remove.
3. Li}_ up and remove the shield.
4. Unscrew the bulb when cool and replace with a 40
watt appliance bulb.
5. Replaee the light shield by hooking the top of the
shield over the plastic pins. Secure the bottom of the
shield by pushing in on the middle edges of the
shield at both ends.
Freezer
The freezer light is located in the upper portion of the
freezer compartment.
To replace
The defrost water drains into a shallow pan beneath the
the freezer bulb:
1. Unplug the refrigerator.
cabinet a_d evaporates. This pan should be cleaned
periodically with warm sudsy water,
2. Remove the ice bin (see page 8) and the freezer
shelf.
To remove
3. Unhook the tabs on the top of the light shield by
the defrost
pan:
1. Remove the base grille (see page 1).
2. Lift the pan up and pull out.
To replace the defrost pan:
1. Position the side flanges to fit over the slide rails and
press down on tile center of the pan to snap in place,
2. Replace the base grille.
PAGE 10
pressing in with your thmnb on the center top of the
light shield. Pivot the shield clown.
4. Unscrew the bulb when cool and replace it with a
standard 40 watt appliance bulb.
5. Pivot the shield up into place, snapping the tabs into
the slots. Replace the freezer shelf and ice bin.
I
t
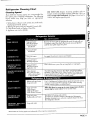
Refrigerator
Cleaning
Chart
Cleaning Agents*
DO NOT USE abrasive cleansing powders such a_s
Many different cleaning agents are recommended
for
the various parts of Maytag refrigerators.
The following
brand
names
may help you make an appropriate
selection:
Comet or Zud, soap-filled scouring pads like S.O.S. or
Bril[o exeept when indicated.
See pages 3-4 on how to
remove and replace specifie pares.
1. Mild ahrasive
cleaners
such as Bon Ami, Soft Scrub,
Bar Keepers Friend, Cameo.
2. Mild liquid sprays such as Fantastik, Formula
3. Glass cleaner such as Windex, Glass Plus.
4. Appliance
4(19.
wax such as Jubilee.
Soap and water
Milg! liquid sprays
Vacuum cleaner
attachment
Remove tile base grille by grasI_ing the ends, lift and pull out,
To replace, center the clips in the cut-out areas and push in
until l:he base grille snaps-into place.
Vacuum cleaner
attachment
Soap and water
See page 10 on how to remove and replace.
Soap and water
Mild liquid sprays
Soap and water
Milcl liquid sprays
Appliance wax "
Wax at least once a year. Do not wax plastic or vinyl parts.
Glass cleaners
Soft, clean, lint-free
cloth (eotton diaper
or cheesecloth)
The followin_ g]ass cleaners clean these panels best without
streaking: G_s Plus, S.O.S. Glass Cleaner, The Works Glass
Cleaner and G]assmates XMpes_. De not use paper towels or
soiled cloths beeause panels-can scratch easil)c -
Baking soda and water
Soap and water
Use 1-2 tablespoons baking soda per quart of water. Be sure to
r -r
-.
_rmc*
out excess
uater
from-- sponc_e
or-- cloth when cleamug
around controls, li_,hts, or electrical pares.
Soap and water
Glass cleaner
Mild liquid sprays
iVlild abrasive cleaners
Allow the glass to warm up to room temperature
immersing in warm water. Never use hot water.
Soap and water
Bal_ing soda and water
See above for baking soda solutiom
DO NOT use abrasive cleaners, concentrated detergents,
bleaches, cleaning waxes, solvents or polish cleaners to clean
the refrigerator interior.
before
Soap and water
*Brand names o/:cleaning agents are trademarks of t/_e respective manufacturers.
PAGE 11
NON-USE
PERIODS
Vacations
Moving
Ifyou _41lbe gone for a month or less, leave the controls
at the usual settings,
When moving, follow steps _d under Vacations. In
addition, remove and carefully pack any items that are
During longer absences:
a) remove all food,
easily removable. Ship the refrigerator
position with the doors taped shut.
in an upright
b) shut off the ice maker (if installed) and the valve
_ere you tapped into the water line to supply
the refrigeratoi;
c) disconnect
outlet,
the refrigerator
from the electrical
d) clean and dry the refrigerator
including tile defrost pan,
thoroughly
e) leave the doors open to prevent odors.
IMPORTANT
1. To prevent possihility
shock, never plug the
which has not been
accordance with the
PERSONAL
SAFETY INSTRUCTIONS
of hazard due to electrical
refrigerator iuto a receptacle
grounded adequately and in
local and national electrical
4. Any electrical service cord that becomes frayed or
damaged
should be immediately
repaired
or
replaced. Never unplug your appliance by pulling on
the power cord.
codes. See the grounding instructions on page 2.
2. Unplug
the refrigerator
before
cleaning
the
5. Your refrigerator should not be operated
presence ofexplosivefumes.
condenser or replacing a light bulb.
3. In case of power failure, minimize door openings. If
6. Bemove the doors from an).'out-of-use refrigerator to
prevent child entrapment and suf_bcation.
the power failure is of a long duration, protect the
food by p/acing blocks of dry ice on top of the
packages or check _dth a local frozen foods locker
plant about temporary, storage. Frozen foods which
have thawed cumpletely should not he refrozen.
7. Children should not climb, hang or stand on the
shelves of this refi'igerator.
CONSUMER
in the
PUBLICATIONS
Fur more information about appliances, order the following items from Maytag at the prices indicated. Send your
name, address, booklet title, form nmnber and payment to: Maytag Consumer Education, One Dependability Square,
Nmvton, IA 50208. Allow 4-6 weeks for deliver)_
Appliance Buying Guides .........................................................................................................
Washer ................................... '211YG
Dishwasher ........................... 213YG
Di),er ..................................... '212YG
Refrigerator ............................ 276YG
Cooking Appliances ............... 27/'afG
PAGE 12
50¢ EACH
TO AVOID
Before
calling
UNNECESSARY
a service
WON'T
technician,
check
the
RUN
following
SERVICE CALLS...
list for possible
troubles
that
you can remedy
x_dt}]out difficult?:
nae temperature control turned to "Off"
• , n._e power cord not plugged in
• 1 [_o power at the electrical cord
u Ille circuit breaker tripped or the house fuse blown
• _Rlodern refrigerators are larger and run colder, which requires
iBunning time to provide more stable temperatures
• , II_e condenser needs cleaning (see page 10)
• : It_e control set too cold
RUNS TOO LONG/
TOO FREQUENTLY
lille base grille blocked
1 t0rolonged door openings
• [ioo mmlv door openings
:J _e door not sealing (due to a package or a container
more
holding door open]
E_llan noise -- normal air flow
NOISY OPERATION
:, lhe defrost pan not positioned correctly
t_ I/,he cabinet not level
_- mkweak floor
ODOR
[dor producing foods should be covered or wrapped
,, |_he interior needs cleaning
¢, [the defrost pan needs eleaning
IN CABINET
WARM AIR FROM
BOTTOM
CABINET
" morm_fl air flow for condenser
CABINET
n [he cabinet not level
_ ta weak floor
VIBRATES
WXTER ON BACK WALL OF
REFRIGERATOR
COMPARTMENT
• , ta normal defrost condition to channel moisture to the defrost pan
WATER ON FLOOR
CABINET
u |be defrost pan missing or not positioned properly
FOODS
UNDER
DRY OUT
CABINET
LIGHT
NOT WORKING
Bite packages not wrapped or sealed properly
• :Ithe crisper not tightly dosed
::Ithe bulb burned out
:= no power at the outlet
REFRIGERATOR
TOO WARM
COMPARTMENT
L=the refrigerator control set too warm - see page 3 to adjust
_. prolonged door openings
REFRIGERATOR
TOO COLD
COMPARTMENT
_. the refrigerator
FREEZER
WARM
COMPARTMENT
SIZZLING
SOUND
L_the freezer control set too warm - see page 3 to adjust
u prolonged
ICE CUBES
AUTOMATIC
OPERATING
NOTE:
TOO
IN FREEZEB
For filrd]er
assistance
door openings
n a normal sound caused by defrost water dripping on defrost mechanism
u cold air moxing over the ice cubes when not used regularly
EVAPOBATE
ICE MAKER
(OPTIONAL)
control set too cold - see page 3 to adjust
NOT
contact
the stop ann in OFF (up) position
t_ the water supply turned off
u the water pressure too low
• , the freezer too warm
your Maytag
dealer
or Ma}_ag Customer
Assistance:
U.S.
Canada
1-800-688-9900
1-800-688-2002
PAGE 13
MAYTAG
REFRIGERATOR
WARRANTY
Full One Year Warranty
For one (1) year from the date of original retail purchase, any part which fails in normal home use will be repaired or
replaced free of charge.
Limited Warranty
Second thru Fifth Year -- major refrigeration
components:
After the first year and through the fiflh year after the date of original retail purchase May'tag will repair or replace,
at its option, free of charge to the owner for parts and labor any' part of the sealed refrigeration system (consisting of
the eompressor, evaporator, condenser, drier and connecting tubing) and the cabinet liner (exclusive of the door
liner) which fads in normal home use. Trip charges, travel and transportation, if required, shall be the responsibility
of tile owner.
Second Year -- other parts:
Other parts which fail in normal home use during the seeond year following date of original retail purchase will be
repaired or replace free of charge for the part itself, with the owner paying all other costs, including labor and trip
charges.
Ice Maker - when purchased with the refrigerator
refrigerator for warranty purposes.
and installed by the dealer the ice maker will be considered part of the
This full warranty and the limited warranty apply only when the applianee is located in the United States or Canada.
LIMITATION OF LIABILITY
The warrantor, Maytag Company, shall not be liable for any incidental or consequential damages, including food loss. Some
states do not allow the exclusion or limitations of consequential damages, so the above limitations or exclusion may not
apply to you.
To Receive
Warranty
Service
To locate an authorized smwiee company in }'our area, contact the May'tag dealer frorq whom your appliance
was purchased or call Maytag Customer Service. Should you not receive satisfactory warranty service, call or
write:
Maytag Customer Assistance
C/o Maytag Customer Selwice
RO. Box '2370
Clex eland, TN 37320-2370
U.S.
1-800-688-9900
CANADA
1-800-688-2002
When contacting Maytag Customer Assistance be sure to provide the model and serial nnmber of your
appliance, the name and address of the dealer from whom yon purchased the appliance, and the date of
purchase.
This Warranty gives you specific legal rights, and you may also have other rights which vat), from state to state.
Should you still hare a problem, write to: Major Appliance Consumer Action Program, 90 North Wacker Drive, Chicago, Illinois 60606.
MACAP is an indust_F sponsored but independent group of eonsmner experts who receive and act on complaints i?ora appliance o_mers.
NOTE: When writing about an unsolved service problem, please include the fonoxring infomlation:
(a) Your name, address and telephone number;
(b) Mc_.le/number, serial number, and revision number (found on the top front interior of the refrigerator compartme_lt);
(c) Name and address of your dealer and the date the appliance was bought;
(d) A clear description of the problem you are having.
MAYTAG
FormNo.412CM
• One Dependability"
PartNo. 110133-1
Square
•
Newton,
Iowa 50208
JN
LithoU.S.A.