1
MAYTAG
REFRIGERATOR
WARRANTY
Full One Year Warranty
For one (1) year from the date of original retail purchase, ar_vpart which fails in normal home use will be repaired or replaced
free of charge.
Limited WarrantySecond thru Fifth Year -- major refrigeration
components:
After the first year _md through the fifth year after the date of original retail purchase Maytag will repair or replace, at
its option, free of charge to the owner for pa_s and labor any- part of tile sealed refrigeratton s)_tem consisting of the
compressor, evaporator, condenser, drier aud connecting tabing) and the cabinet liner exclusive of the door liner which
fails in normal home use. Ttip ch_ges, travel and transportation, if required, shall be the responsibility o£the owner
Second Year -- other parts:
Other parts whieh fail iu normal hmne use duriog tile second year followiug date of original retail purchase _@1 be
repaired or replace free of charge for th_ part itself, with tile owner paying all other costs, including labor and trip
charges.
Ice Maker - when purchased with the refi'igerator and installed by the dealer the ice maker ,Mll be considered part of the refrigerator for warranty' purposes.
This full warranty and the limited warranty apply"only When the appliance is located in the United States or Canada.
LIMITATION
OF LIABILITY
The warrantor, iVla_ag Compan}; shall not be liable for an), ineidei_f_ or consequential damages, }nelnding food loss. Some states
do not allow the exclusion or limitations of consequeh/JaI darnages, so the above limitations or exclusioit may not apply to you.
To Receive
Warranty
Service
To locate an authorized service company in your area, contact the Maytag de_der from whom your
appliance was purchased or call Maytag Customer Seivice. Should you not receive satisfactory warrantv selMce, call or write:
Ma_ag Customer Service
240 Edwards St. S.E.
Cleveland, TN 37311
U.S.
1-800-688-9900
CANADA
1-800-688-2002
When contacting Customer Service be sure to provide tile model and serial nmnber of your appliance, the name and address of the dealer from whom you purchased the appliance, and the date of
purchase.
This Warrant T gives you specific legal rights, and you may also have other rights which vary from
state to state.
Should you still have a problem, write to: Major Appliance Consumer Action Program, 20 North Wacker Drive,
Chicago, Illinois 60606. MACAP is an iudustD' sponsored but independent group of consumer experts who receive
and act on complaints from appliance owners.
NOTE:When writing about an unsolved service problem, please include the following information:
(a) Your name, address and telephone number;
(b) Model number, serial nmnber, and rmdsion number (found on the top front interior of the refrigerator compartlnent);
(c) Name and address of your dealer and the date the appliance was bought;
(d) A dear description of the problem you _tre ha_{ng.
MAYrAG
PartNo. 10223-1
"
One Dependability"
Square
"
Newton,
Iowa 50208
JN
kitho U.S.A.
INSTALLATION
Remove and discard the canti]e;er shelf packing clips
located just above each shelf" where it books onto the
frame. To remove the plastic clips, _iggle the clips
sideways and pull straight out.
Locating
Your Refrigerator
1. Allow a free
2. Yonr model
temperature
will not run
temperatnre
3. For ease of
flow of air through the front base grille.
should not be installed where the room
will go below 55 degrees F., because it
freqnently enough to maintain proper
in the freezer,
installation, you should leave a space of
about 1/2 inch between the refrigerator and adjacent
walls or cabinets. If the refrigerator is placed ruth the
hinge side against a wall, you mav want to leave
additional space so the door can be opened x_4der,
(Refer to the installation instructions for more
detail.)
Important
Leveling
Information
Your refrigerator is equipped with front and back rollers
sn it can be moved away from the wall fbr cleaning. The
front rollers are adjustable and should be positioned so
the refrigerator sits firmly on the floor and is level.
If the floor is not level and it is neecssaD7 to raise the
rear of the cabinet, we suggest rolling the rear wheels
onto apiece ofply_Tood or other sbim material.
4. To replace, center the clips in the cut-out areas and
push in mltil the base grille snaps into place.
Connecting
the Appliance
WARNING: This appliance is designed to operate
on a nominal 115 volt, 15 amp, 60 cycle line. There
should be a separate, grounded circuit serving this
appliance only. Do not use an extension cord.
This appliance is equipped with a three-pronged
grounding plug for your protection against possible
electrical shock hazards. It must be plugged into a
grounding reccptacIe. Where a standard two prongwall
receptacle
is encountered,
it is the personal
responsibility arid obligation of"the customer to haxe it
replaced
with a properly
grounded
three-prnng
wall
receptacle.
under pro;lg
anv circmnstances,
or
remove the Do
third not
(ground)
f?om the power cut
cord.
Do not use an adapter plug.
To adjust the front rollers:
1. Remove the base grille by grasping file ends, lift and
,ull out.
_,_
_
o
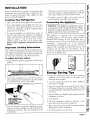
Energy Saving Tips
_
_
2. To level the refrigeratm; nse a screwdriver and tnrn
roller adjusting screws cloc!_vise to raise the cabinet
or counterclockavise to lower the cabinet.
l. Locate the refrigerator away f)'ona be'at prodndng
appliances such as the range or dishwasher, heat
vents and direct sunlight.
2. Level the refrigerator and do not block ventilation
i
3. around
Kccp thethefreezer
fidl to near capaci)' so less cold air
f?ont grille.
will escape during door openings. When less than
two-thirds full, place milk cartons half full of water in
the freezer.
4. Let hot dishes cool slightl;_ before putting into the
refrigerator or freezer.
5. Cover liquids.
6. Clean the refrigerator condenser coils once a year;
more often if yon have pets (see page 12).
3. It is not necessary- to lock the refrigerator in place.
However, if that is desirable, tuna one or both of the
locking feet clocl_4se. They are located near the
front wheels.
7. Wipe moisture from the outside of containers before
placing them into the refi'igerator.
8. A_oid opening the doors too often.
PAGE 1
INSTALLATION
Remove and discard the canti]e;er shelf packing clips
located just above each shelf" where it books onto the
frame. To remove the plastic clips, _iggle the clips
sideways and pull straight out.
Locating
Your Refrigerator
1. Allow a free
2. Yonr model
temperature
will not run
temperatnre
3. For ease of
flow of air through the front base grille.
should not be installed where the room
will go below 55 degrees F., because it
freqnently enough to maintain proper
in the freezer,
installation, you should leave a space of
about 1/2 inch between the refrigerator and adjacent
walls or cabinets. If the refrigerator is placed ruth the
hinge side against a wall, you mav want to leave
additional space so the door can be opened x_4der,
(Refer to the installation instructions for more
detail.)
Important
Leveling
Information
Your refrigerator is equipped with front and back rollers
sn it can be moved away from the wall fbr cleaning. The
front rollers are adjustable and should be positioned so
the refrigerator sits firmly on the floor and is level.
If the floor is not level and it is neecssaD7 to raise the
rear of the cabinet, we suggest rolling the rear wheels
onto apiece ofply_Tood or other sbim material.
4. To replace, center the clips in the cut-out areas and
push in mltil the base grille snaps into place.
Connecting
the Appliance
WARNING: This appliance is designed to operate
on a nominal 115 volt, 15 amp, 60 cycle line. There
should be a separate, grounded circuit serving this
appliance only. Do not use an extension cord.
This appliance is equipped with a three-pronged
grounding plug for your protection against possible
electrical shock hazards. It must be plugged into a
grounding reccptacIe. Where a standard two prongwall
receptacle
is encountered,
it is the personal
responsibility arid obligation of"the customer to haxe it
replaced
with a properly
grounded
three-prnng
wall
receptacle.
under pro;lg
anv circmnstances,
or
remove the Do
third not
(ground)
f?om the power cut
cord.
Do not use an adapter plug.
To adjust the front rollers:
1. Remove the base grille by grasping file ends, lift and
,ull out.
_,_
_
o
Energy Saving Tips
_
_
2. To level the refrigeratm; nse a screwdriver and tnrn
roller adjusting screws cloc!_vise to raise the cabinet
or counterclockavise to lower the cabinet.
l. Locate the refrigerator away f)'ona be'at prodndng
appliances such as the range or dishwasher, heat
vents and direct sunlight.
2. Level the refrigerator and do not block ventilation
i
3. around
Kccp thethefreezer
fidl to near capaci)' so less cold air
f?ont grille.
will escape during door openings. When less than
two-thirds full, place milk cartons half full of water in
the freezer.
4. Let hot dishes cool slightl;_ before putting into the
refrigerator or freezer.
5. Cover liquids.
6. Clean the refrigerator condenser coils once a year;
more often if yon have pets (see page 12).
3. It is not necessary- to lock the refrigerator in place.
However, if that is desirable, tuna one or both of the
locking feet clocl_4se. They are located near the
front wheels.
7. Wipe moisture from the outside of containers before
placing them into the refi'igerator.
8. A_oid opening the doors too often.
PAGE 1
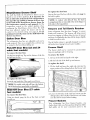
OPERATING
THE CONTROLS
Your new refrigerator has two controls: one for the refrigerator compartment
These controls are located at the top, rear of the refrigerator compartment.
FREEZER
and one }br the freezer compartment.
_
REFRIGERATOR
I
Initial
Freezer
Setting
Control:
I
of Controls
This control has settings from A
(warn est)toG (coldest)Initiallyset thiscontrolto D.
ADJUSTING
THE
INTERIOR
Sure-Lock
Shelves
The refi'igerator shelves are adjustable, allowing you to
Refrigerator
Control: This control has settings {)om
1 (warmest) to 11 (c_]dest). Initially set this control
to 6. The refrigerator may run for several hours _en
voo first start it. This is normal.
arrange the shelving to flt your family's food storage
needs. Never attempt
to adjust a shelf that is
loaded with food.
Let the refrigerator
run at least 8 to 12 hours
before adding food. A day or so after adding tbod,
you may decide one or both compartments should be
colder ur warmer. If so, adjust the control(s) as
instrncted below.
1. Grasp the shelf at the front with one hand and push
up under the shelf back with the other band.
Adjusting
the
Temperature
To remove
the refrigerator
shelf:
2. Lift the shelf straight ont.
Controls
Except when starting the refrigerator, do not change
either control more than one number or letter at
a time. Allow 24 hours for the temperature to stabilize
before resetting. Changing either control will have some
effect on the temperature of the other compartment.
Freezer too warm--Turn
the freezer control to the
succeeding letter. For example, turn the control from
D to E.
Freezer too eold_Tnrn
the freezer control to the
preceding letter. For example, turn the control from
D to C.
Refrigerator
too warm
Turn the ref?igerator
control to the next higher number, For example, torn
the control from 6 to 7,
Refrigerator
too cold
Turn the refrigerator
control to the next lower numbeJ: For example, turn
the control _Yom6 to 5,
Warm Cabinet
Surfaces
To replace
the refrigerator
shelf:
1. Keeping the shelf horizuntal, guide the three support
tabs into the sluts in the shelf supports at the rear of
the cabinet.
2. Lower the shelf until the tabs lock into position.
Make sure the shelf is securely locked into position
before loading it x_Sthfond.
Easy-Glide
Shelves
Grasp the front edge of the shelf and pull forward. Push
in shelf to retnrn to the original position•
Some portions of the cabinet may be warm to the
touch. This is a normal funetion of the refrigerator
which helps prevent moisture from condensing on the
cabinet. This condition will be more noticeable when
you first start your ref?dgerator, during hot weather and
after excessive or lengthy door openings.
PAGE 3
Meat/Cheese
Drawer
Shelf
The shelf that holds the iVleat/Cheese drawer can be
placed in one of three positions. It is necessary for
tile air inlet tube at tile back of the refrigerator
to
llne up at the top, middle or bottom of the air slots
in the back of the Meat/Cheese
drawer frame for
the temperature
control to work properly. Set the
temperature
control to the coldest position when
positioning the Meat/Cheese drawer. Once the shelf
has been adjusted, replace the drawer and set the
control to the desired setting (see page 5). If not
positioned correctly, items on the shelf below the
drawer may freeze,
Gallon
Door
Bins
I
NOTE: In models with slide-off bins, the dairy I
compartment bin is removable. Due to its shape, it
fits only in the top position.
Keepers
and Tall Bottle
Retainer
Some refrigerator door bins have "keepers" to secure
bottles and containers. The keepers will help prevent
items from tipping or falling when the door is opened
and shut. On adjustable doer bins lificthe keeper slightly
to slide from side to side.
The refrigerator dour bins are adjustable and can be
easil)' removed. They are a complete bin, so items may
he carried in the bin without falling ont.
Pick-Off Door Bins (22 and 24
cubic feet models)
To remove
To replace the door bins:
Line up the top of the bin with the slides and snap the
bin back in place.
the door bins:
The tall bottle retainer is special b' designed to prevent
tall bottles from tipping fmxvard (select models).
Freezer Shelf
The freezer shelf can be reinoved
large size packages and for cleaning.
to accommodate
Lift the bin straight up. Tip out the bottom of the bin
To remove the shelf:
and pull ont the bin.
1. Lift up on the shelf and push to the right.
'2. Tilt the left side of the shelf" up and remove.
\\
To replace
the shelf:
1. Tilt the shelf and insert the right rod ends into the
upper portion of the oblong holes in the freezer wall.
&
_Y
To replace
the door bins:
Insert the top hooks first. Then push in and down.
NOTE: In models with pick-0ff bins, the bottom
bin is t_xed and not removable or adjustable,
o
Slide-Off Door Bins (27 cubic
feet models)
To remove
the door bins:
Using two hands, grasp the bin at the front and pnll
toward you.
2. Lower the left side of the shelf and insert into the
oblong holes in the left side of the freezer wall. Make
sure the shelf is secure before loading.
Freezer
Baskets
Your refrigerator
has three freezer baskets
one
shallow Easy Glide, one Pizza and one deep Easy Glide.
Each glides out for more convenient access to the
PAGE4
frozen food. The Pizza basket is designed with a lower
right side for easy storage of frozen pizzas. All baskets
can be removed for cleaning. In addition, the shallow
Easy Glide and Pizza baskets can be adjusted up or
To remove
down to accommodate various sized packages.
To remove the baskets:
To replace
1. Pull the basket toward you until it stops. Lift the
front of the basket and pull until it stops again.
2. Lift the drawer front amt push in.
2. Lift the basket up and over the front tabs.
To remove
To replace
1. Remove the crisper drawers.
Reverse theaboveprocedure.
the
shallow
Easy
Glide
Drawers:
1. Pull out to the stop position.
2. Tilt up the drawer t>ont and pull out.
the Crisper
Drawers:
1. Align the drawer rollers in tracks.
the baskets:
To adjust
baskets:
the Crisper
and
Pizza
1. Remove the basket as directed previously,
2. Place one of the bottom two hea_T wires in the track
and replace the basket.
the Crisper
Shelf:
2. Remove the glass insert. Reach in from the
underside and tilt up. Carefillly remove the insert.
3. Lift the front of the crisper shelf and pull out. It may
be necessary to remoxe the lower refrigerator
shelves so the crisper shelf can be tilted for renmval.
To replace the Crisper Shelf:
Reverse the procednre for removing the crisper shelf.
Meat/Cheese
Drawer
Fresh meat, hmcheon nmat and cheese need to be
stored in the coldest part of the refi%erator to maximize
storage time. The Meat/Cheese
drawer provides these
colder temperatures because air from the freezer is
directed into the drawer.
Setting the Temperature
Control
To regulate the amount of cold air surrounding the
Meat/Cheese
drawer, move the temperature
slide
control. Set the slide control to the "DELI/CHEESE"
(right) position fbr storage of luncheoil meat and
cheese. Set the slide control to the "FRESH MEAT"
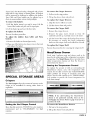
SPECIAL
STORAGE
(left)position
AREAS
Crispers
to provide the lowest temperature
for
fresh meat storage.
The Yari Crisper allows the mnount of moisture in the
crisper to he controlled for storing either fruits or
vegetables.
e
e
,
e g g
5
FRUITS _
VEGETABLES
_]
...................
Setting
the
Vari
Crisper
__ __ __ ' _
NOTE: If the shelf holding the Meat/Cheese
drawer is not positioned correctly, items on the
shelf below may freeze. Refer to page 4 on how to
position the shell:
Control
To remove
the Meat/Cheese
Drawer:
Move the slide control to "FRUITS" for a low moisture
1. Pull out to the stop position.
environment
moisture.
2. Tilt up the drawer front and pull out.
and
to
"VEGETABLES"
for
high
PAGE 5
To replace
the Meat/Cheese
Egg Cradle
Drawer:
1. Align the drawer rollers in tracks.
2. Lift tile drawer front and push in.
Wine
Tile egg cradle can be placed on a refrigerator shelf or
stored in a door bin. It holds a "dozen-plus" eggs.
Rack
Corked wines should be stored in a horizontal position
to keep the cork moist. This prevents air from getting
into the x_dne and spoiling it. The wine rack allows
proper storage without taking up valuable shelf space. It
may also be used fur storing one liter containers of soda.
To use the wine rack, fit it along either side of any
refrigerator shelf, engage its rear notch to the shelf back
corner and lay the bottle on the rack.
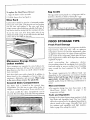
FOOD STORAGE TIPS
Fresh
Food
Storage
The fresh food compartment of a refrigerator should be
kept between 34°F and 40°F with an optimum
temperature of 37°F. To cheek the temperature, place
an appliance thermometer in a glass of water and place
in the center of the refrigerator. Cheek after 24 hours.
If the temperature is above 40°F adjust the controls as
Microwave
(select
Storage
Dishes
explained on page 3.
Avoid
overcrowding
the
refrigerator
shelves.
Overcrowding reduces the circulation of air around the
food and results in uneven cooling. Leave breathing
space around the food containers for best cooling
results.
models)
Pyrex containers are provided to store leftovers fbr
reheating at a later time. Fill any of the containers and
place them in a door bin or on a shelf - wherever it's the
inos{ convenient.
The storage requirements
for dift_rent foods vary
depending on the temperature and moisture needed.
Each Pyrex
_dth a plastic
In addition
to
being
storeddish
in comes
the re_)igerator
or lid.
freezm;
they are
microwave-, dishwasher- arid oven-safe. When using
in the oven, always remove the plastic lid.
Covered
Dairy
Refer to the Food Sturage Chart on pages 8-9 for
approximate
storage times. To maintain the best
possible quality,-, keep the following considerations in
Compartment
mi_d:
Meat
The butter dish is located in the covered dairy
compartment. Use tiffs area to store either butter or
narga'ine or other daffy products. To use. raise the cover
1
Fruits
I
• Storage in the crisper drawers traps moisture to help
keep fruits and vegetables fresh. The Vari Crisper
allows the moisture level to be adjusted depending on
what is stored in the crisper. Generally, fruits need
low moisture and vegetables need high moisture.
/
/
!
PAGE 6
Cheese
• To maximize storage time store these items in the
Meat/Cheese
drawer,
Refer to page
5 for
temperature settings.
On select models the dait T compartment
can be
removed. Due to its shape, it fits only in the top position.
f
and
and
Vegetables
Refer to page 5 for setting the control.
• Fruit
and vegetable
quality
affects the length
of
Packaging
Foods
for
Freezing
storage. Quality can vary"from item to item, variety to
variety and season to season. For example, a rainy
growing season can cause lettuce to be brown when
purchased or brown more quickly. Sort fruits and
vegetables before storage and use bruised or soft
items first. Discard those showing signs of decay,
• When freezing ffnits and vegetables select fresh, topquality-products.
• \Vhen storing vegetables, the crispers will perform
better if they are at least two-thirds full. If they are
less than taro-thirds fnll, always store the vegetables
in
plastic loss.
bags or airtight containers to reduee
moisture
mneh air out of the packages as possible and be sure
paper,arefreezer
airtight air
contait,
ers. Force
as
they
tightly bags
sealed.or Trapped
can cause
the food
to dry out, change color and develop an off-flavor
(freezer burn).
• Always wrap odorous foods sueh as onions and
cabbage so the odor does not transfer to other foods,
• Fresh meats and poult_ can be left in the store
wrapping when freezing for less than two weeks. For
longer storage, ovelavrap with a suitable freezer wrap.
• While vegetables need a certain amount of moisture
to remain fresh, too much moisture can shorten
Do not refreeze meat that has emnpletelv thawed.
Loading
the Freezer
storage times (especially lettuce).
Be sure the
vegetables are well drained before storing. It may also
be helpful to place a layer of paper towels in the
bottom of the bag to absorb any excess moisture,
Dairy Food
• Use a freezer wrap that is air-, moisture- and vaporproof. Some good choices are hea_-duty aluminuin
foil, fi'eezer plastic wrap, polyethylet_e-eoated freezer
•Avoidaddingtoomuehwarm
foodtothe
freezerat
one time. This overloads the freezer, slows the rate of
freezing and can raise the temperature of already
frozen fbods.
Dairy
Place the packages in the coldest part of the freezer
first (against the walls orbottom of the compartment)
Compartment found in the refrigerator door.
• Most daily fbods such as milk, cream, sour cream and
cottage cheese have freshness dates on their cartons
to insure the tbod i?eezes as quickly as possible.
Leave a little space between the packages so cold air
can circulate.
for appropriate length of storage. Store these foods in
the original carton and refrigerate immediately after
purchasing and each use. Close carton lids tightly to
• Avoid storing hard-to-freeze foods such as ice cream
and orange juice on the freezer door shelves. These
foods are best stored in the fi_eezer interior where the
• Store
butter
and
margarine
in
the
keep out air and odors,
• Occasionally mold will develop on the surface of hard
cheeses (S_6ss, Cheddar, Parmesan). The moldy
areas can be trimmed aw_, and the remaining cheese
will still be flavorfnl and safe to eat.
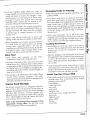
Frozen Food Storage
x_
temperature varies less udth door openings.
Foods That Don't Freeze Well
• Some foods cannot be frozen successfully because the
freezing causes tbem to deteriorate. These include:
potatoes (unless mashed)
cream fillings
The freezer compartment of a refrigerator should be
kept at 0°F or lower. To check the freezer, place an
appliance thermometer between the frozen packages
and cheek after '24 hours. A freezer operates more
efficiently when it is at least two-thirds fi, ll. If not this
fidl, it will be helpfid to fill milk cartons half full of
sour
cream
cooked
egg whites
water and place them in the freezer,
milk and cream
gelatin salads
bananas
citrus fruits
Refer to the Food Storage Chart on pages 8-9 for
approximate
storage times. For the best results
when freezing foods, follow these guidelines:
B:_"
;
[i"
_
*
salad
greens
luncheonmeat
soft cheeses (cream, cottage, processed)
mayonnaise
(.
PAGE 7
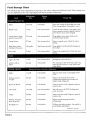
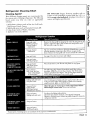
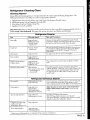
Food Storage
Chart
The following chart shows approximate storage times _ for various refiigerated
and frozen foods. These storage times
can valy depending
on the t?qpe of packaging used and the storage temperatures.
Foods
DAIRY
Refrigerator
Time
Freezer
Time
Storage Tips
PRODUCTS
Butter
1-2 weeks
6-9 months
Store only enough for immediate use in the
Dairy- Compartment. Wrap tightly or cover.
Milk & cream
i week
Not recommended
Cheek the carton dating. Close tightly. Don't
return unused portions to original container.
Don't freeze cream unless whipped.
Cream cheese, cheese
spread & cheese food
1-2 weeks
Not recommended
Wrap tightly. Stone cheese foods can be
stored for longer periods.
Cottage cheese
5-7 days
Not recommended
Store in original ca_on. Check the carton
dating.
Hard cheese (Swiss,
Cheddar & Parmesan)
1-2 months
May become crumbly
Wrap tightly. Cut off mold if it develops on
the surface.
Sour cream
10 day's
Not recommended
Store in the original carton. Check the carton
dating.
Eggs in the shell
1 week
Not recommended
Refiigerate
Leftover yolks or
whites
2-4 days
9-12 months
For each cup of yolks to be frozen, add i tsp.
sugar for use in sweet, or 1 tsp. salt for nonsweet dishes.
FRESH
FRUITS
small ends down.
I1: ,ening of fruits is slowed by refrig
Apples
1 month
6-12 nmnths
May"also store unripe or hard apples at 6070°F.
Bananas, pears &
avocados
3-5 day-s
6-12 months
Ripen at room temperature before
refrigerating. Bananas and avocados will
darken when refrigerated.
Berries & cherries
2-3 days
6-12 months
Store covered or in the Crispers to prevent
moisture loss.
Citrus fruits
1-2 weeks
Not recommended
May also store at 60-70°F. If refrigerated,
store uncovered.
Grapes
3-5 days
6-12 months
Store covered or in the Crispers to prevent
moisture loss.
Peaches, nectarines,
plums & apricots
3-5 days
6-12 months
Ripen at room temperature
refrigerating.
Pineapples, cut
2-3 days
6-12 months
Will not ripen after purchase. Use quickly to
avoid further deterioration.
before
Continued
PAGE8
on nert page
Food
Storage
Chart
Refrigerator
Time
Foods
FRESH
(continued)
Foods
,
VEGETABI,ES
VEGEIABLt
Asparagus
Freezer
"lime
K
Storage Tips
These
These
Timekeep
keep be_
be , t when stored in a moist
_ Crisper (select nodels) **itb the control
store vegetable ; in plastic bags or plastic
__ store vegetable
2-3 days
8-12 months
isper drawer such as the Humidity Controlled
i "HIGH." If the crispers are not two-thirds full,
ontainers to prevent moisture loss.
Don't wash before refrigerating.
crisper.
Store in the
Brussels sprouts &
broccoli
3-5 days
8-12 months
Wrap odorous foods & refrigerate in the erispe_
Cabbage & celery
1-2 weeks
Not recommended
Wrap odorous foods & refrigerate in the crisper.
Cauliflower & snap
beans
i week
8-12 months
Wrap odorous foods & refrigerate in the crisper.
Carrots, parsnips,
beets, radishes &
turnips
2 weeks
8-12 months
Remove tops. Wrap odorous foods and
refrigerate in the crisper.
Green peas & lima
beans
3-5 days
8-12 months
Leave in pods & refrigerate.
Lettuce & other salad
1 week
Not recommended
Wash. Drain well. Refrigerate in the crisper.
3-5 days
8-1'2 months
Wrap odorous foods & refrigerate in crisper.
8-12 months
Wrap odorous foods & refrigerate in crisper.
Can be kept in its original packaging for
refrigeration. Place in the Meat andCheese
Drawer. When freezing longer than 2 weeks,
overwrap with suitable freezer wrap.
greens
Onions, green
Peppers
FRESH
/
POULTRY
1 week
& FISH
Chicken
Turkey; duck & goose
1-2 day's
1-2 days
6-1'2 months
4-6 months
Fish
1-'2 days
1-2 months
I
FRESH
MEATS
Beef, grmmd
Beef, roast & steak
1-2 days
3-5 days
4-6 months
9-12 months
Pork
3-5 days
6-9 months
Veal
3-5 days
4-6 months
Sausage, ground
1-2 days
1-3 months
Lamb
3-5 days
9-12 months
Bacon
7 days
1 month
Frankfurters
7 day's
2 weeks
Ham, whole
half
dices
7 days
5 clays
3 days
1-3 months
1-3 months
i-'2 months
Luncheon meat
3-5 days
Not recommended
PROCESSED
MEATS
Sausage, smoked
_Sollr(XYs:
United
Stat(s
Can be kept in original packaging for
refrigeration. Place in the Meat and Cheese
Drawer. When freezing longer than 2 weeks,
overwrap with suitable freezer wrap.
7 days
Departmenl
cd Agldcu]ture:
Processed meats should be tightly wrapped
and stored in the Meat and Cheese Drawer.
Unopened, vacuum-packed luncheon meat
maybe kept up to 2 weeks in the Meat and
Drawer.
Not recommended
Food
M_lr]¢(!tin_
]nstittIte;
C_lt_pe_ative
ExU'll_iol3
_(!l%rjc( , Io_va
Stah
l, nJ\,crsJty
PAGE 9
_"
_1_
qt_
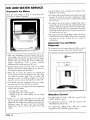
ICE AND WATER SERVICE
Automatic
Ice Maker
ttere
are some things to keep
automatic ice maker's operation:
• To eheck the ice level or to gain aceess to the ice bin,
lift the Ice Access door.
in mind
about
the
• Toremoxetheicebin,
lift the front ofthe bin and pull
forward. To avoid the ice maker dumping ice while
the bin is removed, turn the ice maker off by lifting
the wire lever.
• To replace the ice bin, push it straight back until it
stops. Lift it up and over the stop, pushing it back into
position. Make sure that the tabs that turn the auger,
located at the back of the bin, are positioned between
the prongs on the auger motor. Turn the ice maker on
by lowering the wire arm.
• Beverage and foods should not be placed in the ice
storage bin for quick chilling. These items can block
the wire lever arm, causing
the ice maker
to
mallhnetion.
Automatic
Dispenser
The automatic
of convenienee
• After your refrigerator
has been hooked up to the
water supply, move the wire lever arm into the down
position. This will start its operation.
The ice maker
will fill x_dth water when the freezer reaches
the
proper
temperature.
With
a
newly
ice and water dispenser offers a variety
features. These are ontlined below:
E_ MA_/m
..........................................................................
installed
............
refrigerator this could take up to 24 honrs.
• Diseard all the cubes from the first two or three
batches made. These initial batches of ice eubes may
be irregular
Ice and Water
I[
I
0_ _
o._
0
___
_ _,
• To manually
stop the operation
of the ice maker,
move the wire lever arm into the up position.
__
• Certain sounds may aeeompany
cycles of the ice maker:
I
°
_
_
;_
;_
the various operating
buzzing of the water valve
--running
of the water as the tray fills
--rattling
of the ice cubes f_tlling into
ice bin
..........
an empty
• If the ice is not used frequently,
the iee cubes x_d]l
become eloudy, shrink, stick together and taste stale.
Empty the iee storage bin periodically and wash it in
lukewarm
water. Be sure to dr}, the bin before
replaeing it or the ice cubes will stick to the metal
PAGE 10
I
in shape and discolored.
• When the ice cubes are ejected
it is normal for
severalcu b esto b e j oine d t o g e th erat th eeu d s. Th ey
can easily be broken
apart. The ice maker will
continue to make ice until the supply of ice cubes
raises the wire lever arm, shutting the ice maker off.
auger,
_............
Water/Ice
Control
For dispensing
ice cubes,
"CUBE" position (eenter).
slide
the
For dispeusing
crushed ice, slide the
"CIRUSHED"position
(left).
control
eontrol
For dispensing
ehilled
water,
slide
the
eompleteIy to the "WATER" position (right).
to the
to the
control
To fill a glass or pitcher, position it against the top
Spill
portiou of the actuator pad and press. Hold the
container high in the dispenser opening to reduce
ice from spilling,
Do not pour water into the grille at the bottom of the
dispenser. This is a spill area, not a drain. Normal spills
will evaporate in the recessed area below the spill shelf
grille. Excessive spills should be wiped up after
removing the grille.
NOTE:
When the
using
ice ordispenser
for thecubes,
first
time, discard
firstthetwo
three dozen
When using the water dispenser for the first time,
Tray
Dispenser
Light
press the pad for one to two minutes to bleed the
air from the water line. Discard the first five to six
glasses of water dispensed. This will insure pure ice
and fresh water for drinking,
When the pad is pressed, the light automatically turns
on. To manually tom the light on and off, depress the
dispenser light switch. It is located on the left side and
recessed 1/2 inch up and behind the decorative panel.
Water from the dispenser is chilled, but not as cold as
ice water. For colder water, simply add ice before
Dispenser
Pad-Lock
The dispenser pad-lock rocker switch, also located on
dispensing water. Also, the first glass of water dispensed
eacb time may be warmer than consecutive glasses. It
will be cooler if a full glass of water is dispensed rather
the left side, will interrupt power to the water and ice
dispenser so it cannot be used. The leek is recessed 3/4
inch up and back behind the decorative panel. Depress
than a partial glass. To prevent splashing, fill a container
with ice before adding liquid.
the switch to lock and unlock the dispenser.
Ice Dispensing
NON-USE
Vacations
• When
changing
Tips
the control from CBUSHED
to
CUBE, or vice versa, some crnshed ice or irregular
shaped cubes may be in the storage bin and
dispensed.
• If the ice dispenser is not used frequently, ice cubes
may clump together and need to be broken apart or
discarded,
• A slight pause may be noticed when dispensing
crushed ice. This is normal because the ice is being
channeled to the crusher. Crushed ice pieces will vary
in size and shape,
• Do Not add ice to the storage bin which was not
produced by ),our ice maker - it may not crush and
/or dispense properly,
• Avoid operating the ice dispenser continuously fbr
more thall five minutes. Simply remove large
quantities from the bin by hand.
"
• Avoid dispensing ice direct b, into thin, fine china or
delicate crystal - they can crack or chip from the
combined pressure of ),our hand pressing them
against the actuator pad and ice dropping into the
container.
I_
.__
c._
t_
,_
_.
¢_
t_
ee-
PERIODS
If you will be gone for a month or less, leave the controls
at the usual settings.
During hmger absences:
a) remove all food,
b) shut offthe ice maker {if installed) and the valve
where vou tapped into the water line to supply
the refrigerator,
c) disconnect the refrigerator from the electrical
outlet,
d) clean and dry the refrigerator
thoroughly
including the defrost pan,
e) leave the doors open to pre_ent odors.
Moving
When moving, follow steps a-d under Vacations. In
addition, remove and carefnlly pack any items that are
easily removable. Ship the refrigerator in an upright
position w_iththe doors taped shut.
To Stop Dispensing
Release the pressure on the pad and hold the container
in pnsitinn momentarily to catch the last pieces of ice or
drops of watch The ice delively door will remain open for
a short time. When it doses you will hear a closing sound.
PAGE 11
CARE AND CLEANING
Re_r to the chart on page 1,3 when
refrigerator.
cleaning
the
CAUTION: Disconnect the power cord before
cleaning.
Also, do not tqnch
refrigerated
surfaces with wet or damp hands. Dmnp objects
stick to the eold metal surfaces. Before cleaning the
freezer, allow it to warm up. Altow glass shelves to
warm up before immersing in warm water
..........
Cleaning
Under the Refrigerator
Your refrigerator can be rolled out for cleaning the floor
underneath. Simply unlock the front roller locks (see
page 2). Pull the refrigerator straight out from the wall.
Cleaning
the Defrost
Pan
To replace the upper refrigerator
1. Unplug the refJigerator.
bulbs:
'2. Remove the light shield by grasping the bottom of"
the shield at each end and pnll forward to remove.
3. Lift tip and remove the shield.
4. Unscrew the bulb and replace with a 40 watt
appliance bulb.
5. Replace the light shield by hooking the top of the
shield over the plastic pins. Seeure the bottom of the
shield by"pushing in on middle edges of the shield at
both ends.
To replace
the lower refrigerator
1. Unplug the refrigerator.
2. Remove the Meat/Cheese
bulb:
drawer.
The defrost water drains into a shallow pan beneath the
cabinet and evaporates. This pan should be cleaned
3. Using two hands, spread the top and bottom of the
light shield vertically away from each other and pull
to the front to remove.
periodically with warm sudsy water.
To remove the defrost pan:
4. Unscrew the bulb
showease bulb.
1. Remove the base grille (see page 1).
2. Lift the pan up and pull out.
5. Using two hands, spread the top and bottom of the
light shield and push it into place, engaging the tabs
into the slots.
To replace
6. Replace the Meat/Cheese
the defrost
pan:
and replace
with a 40 watt
drawer.
I. Position the side flanges to fit over the slide rails and
Freezer
press down on the center of the pan to snap in place.
2. Replace the base grille,
The freezer light is loeated in the npper portion of the
freezer compartment.
:
To replace
the freezer
bulb:
1. Unplug the refrigerator.
2. Remove the ice bin (see page 10) arid the freezer
shelf (see page 4).
3. Unhook the tabs on the top of the light shield bv
pressing in with yonr thnmb on the center top of the
light shield. Pivot the shield do_;ll.
4. Unscrew the bulb when cool and replace it with a
standard 40 watt appliance bulb.
Replacing
the Interior
Lights
5. Pivot the shield up into place, snapping the tabs into
the slots. Replace the freezer shelf and ice bin.
replacing light bulb(s). Wear _10ves as protection
Ice and
against
possible
broken glass,
i
CArrION:
Diseonnec_
the ipower
,
To replace the dispenser
1. Unplug the refrigerator.
cord
,,, before
;,,
•]
Refrigerator
Two upper lights are located behind the fhll width light
shield at the top back of the refrigerator compartment,
A lower refrigerator
light is located behind the
bleat/Cheese drawer on select models.
PAGE 12
Water
Dispenser
b.lb:
2. Reach up behind the deeoratbe
panel on the right
side, unscrew the bulb and replace it with a 7 watt
appliance bulb,
Refrigerator
Cleaning
Cleaning
Chart
Agents*
DO
iVlany different cleaning agents are recommended
for
the various parts of Maytag refrigerators.
The following
brand
names
may help you make an appropriate
selection:
1. Mild abrasive
Bar Keepers
cleaners
Friend,
USE
abrasive
cleansing
powders
such
as
Comet or Zud, soap-filled
scouring pads like S.O.S.
or
•
•
n
Brillo except when indicated.
See pages 3-4 o how to
remove and replace specific parts.
such as Bon Alni, Soft Scrub,
Cameo.
'2. Mild liquid sprays such as Fantastik, Formula
3. (;lass cleaner such as \_,index, Glass Plus.
4. Appliance
NOT
409.
w_tx sneh as Jubilee.
Soap and water
MiI(t liquid sprays
Vacuum cleaner
attachment
Remove the base grille by grasping the ends, lift and pull out.To
replace, center the ehps in the cut-out areas a d push in until
the base grille snaps into place.
\aacuum cleaner
attachment
The area around the condenser should be cleaned once a year for
efficient operation, clean more often if there are pets in tlle
home. Remove the base grille and vacuum around the condenser.
Soap and water
See page 12 on how to remove and replace.
Soap and water
Mi]_l liquid sprays
and water
liquid sprays
Wax at least once a year. Do not wax plastic or vi@ parts.
vc'ax
Glass cleaners
Soft, clean, lint-flee
cloth (cotton diaper
or cheesecloth)
The following glass cleaners clean these panels best without
streaking: Glass Plus, S.O.S. GFass Cleaner, The Works Glass
Cleaner and Glassmates Wipes . Do not use paper towels or
so ed cloths because panels can scratch easily:
Baking soda and water
Soap and water
Use 1-2 tablespoons baking soda per quart of water. Be sure to
wring out excess water from sponge or cloth when cleaning
around controls, lights, or electrical parts.
Soap and water
Glass cleaner
Mild liquid sprays
Mild abrasive eleaners
Allow the glass to warm up to room temperature
immersing in warm water. Never use hot water.
Soap and water
Baking soda and water
See above for baldng soda solution.
DO NOT use abrasive cleaners, concentrated detergents,
bleaches, cleaning waxes, solvents or polish cleaners to dean the
refrigerator interior.
before
Soap and water
Soap and water
Mikt liquid sprays.
*Brand names of cleaning agents are trademarks of the respective manufacturers.
PAGE 13
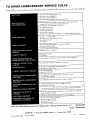
TO AVOID
UNNECESSARY
Befbre
technician,
calling
a service
check
the following
•
•
•
•
SERVICE CALLS...
list for possible
troubles
that
you can remedy
without
difficulty.
the temperature control htrned to "Off"
the power cord not plugged in
no power at tile eleetrieal cord
the circuit breaker tripped oi"the house fuse blow_
• modern ref?igerators are larger and run colder, which requires more
running time to provide more stable temperatures
• the condenser needs cleaning (see page 13)
• the control set too cold
•
•
•
•
prolonged door openings
the base grille blocked
too many door openings
the door not sealing (due to a package or a container holding door open)
• fan noise -- normal air flow
• the defrost pan not positioned
• the cabinet not level
• a weak floor
correctly
• odor producing foods should be covered or wrapped
• the interior needs eleaning
• the &frost pan needs cleaning
• normal air flow for condenser
• the cabinet not level
• a weak floor
• a normal defrost eondition to channel moisture
• the defrost pan missing or not positioned
to the defrost pan
properly
• the packages not wrapped or sealed properly
• the crisper not tigbtly dosed
• the bulb burned out
• no power at the outlet
• the refrigerator control set tcx_warm - see page 3 to adjust
• prolonged door openings
the refrigerator
control set too cold - see page :3to adjust
• the freezer control set too warm - see page 3 to adjust
• prolonged door openings
• a normal sound eaused by defrost water dripping on defrost mechanism
• hot humid weather increases condensation,
"Reduce Moisture" position
move energy, saver switch to
• cold air moving over the ice cubes when not used regularly
the stop arm in OFF (up) position
• the water supply turned off
• the water pressure too lmv
• the freezer too warm
NOTE:
For further
assistance
contact
MAYTAG
Form No. 408CM-0895
•
Part No. 109387-1
your
One
Maytag
dealer
Dependibility
or Maytag
Square
Customer
•
Newton,
SexMee:
Iowa
U.S.
1-800-688-9900
Canada
1-800-688-2002
50208
JN
Litho U.S.A.
Refrigerator
Cleaning
Chart
Cleaning Agents*
Many different cleaning agents are recommended
for the various parts of Maytag refrigerators.
following brand names mav help you make an appropriate
selection:
1. Mild abrasive eleaners such as Bou Ami, Soft Semb,
2. Mild liquid spray's such as Fantastik, Formula 409.
3. Glass eleaner such as Windex, Glass Plus.
4. Appliance
Bar Keepers
Friend,
The
Cameo.
wax sueh as Jubilee.
DO NOT USE abrasive eleansiug powders such as Comet or Zud, soap-filled scouring pads like S.O.S. or
Brillo except when indicated,
See pages 5-8 on how to remove and replace specific parts.
Refrigerator
Exterior
Part
Cleaning Agents
Tips and Precautions
Base grille
Soap and water
Mild liquid sprays
Vacuum cleaner
attttchment
Remove the base grille by grasping the ends, lift and
pull out.To replace, center the clips in the cut-out areas
and push in ufatil the base grille s13apsinto place.
Condenser
Vaeumn cleaner
attachment
The area around the condenser should be cleaned eve D'
3-4 months for efficient operation (clean more often if
there are pets in the hornr). See page 14 for more
information.
Defrost pan
Soap and water
See page 14 on how to remove and replace.
Door handles
Soap and water
Mild liquid sprays
Painted metal surfaces:
Cabinet, doors
Soal_ and water
Mild liquid sprays
Appliance wax
W_x at least once a year. Do not wax plastic or vinyl
parts.
Black decorator panels
(;lass cleaners
Soft, clean, lint-free eloth
(cotton diaper or
cheesecloth)
The followinKglass cleaners clean these panels best
without strea}ing: Glass Phls, S.O.S. Glass Cleaner, The
Works Glass Gleaner aod Glassuiates WipesL Do not
use paper towels or soiled cloths because panels c_m
scratch easily.
Refrigerator
& Freezer Interior
Door gasket
Baking soda and water
Soap and water
Use 1-2 tablespoons baking soda per quart of water. Be
sure to wrin_ out excess water from sponge or cloth
when cleauing around controls, light_, or'electrical parts.
Glass shelves
Soap and water
Glass cleaner
Allow the glass to warm up to room temperature
before immersing in warm water. Never use hot
Milil
Mild liquid
abrasi_sprays
e cleaners
water.
Interior and door liner
Soap and water
Baking soda and water
See above for baking soda solution.
DO NOT use abrasive e]eaners, eoneentrated
detergents, bleaches, cleaning wKxes, solvents or polish
cleaners to clean the refrigerator interior.
Crispers, door bins, egg
erauie, wine rack,
meat/cheese drawers, etc.
Seap and water
Wire shelves/baskets
Soap and water
Mild liquid sprays.
_Brand names of cleaning agents are trademarks of the respec'tive manuf:acturers.
PAGE 15
NON-USE
PERIODS
Vacations
Moving
If you will be gone for a month or less, leave the
controls at the usual settings.
When moving, follow steps a-e under Vacations.
In addition, remove and carefully pack any items
During longer absences:
a) remove all food,
that are easily removable. Ship the refrigerator in
an upright position with the doors taped shut.
b) shut off the ice maker and the valve where
you tapped into the water line to supply the
refrigerator,
e) drain all water from the water dispenser,
d) disconnect the refrigerator from the
electrical outlet,
e) clean and dry"the refrigerator thoroughly,
including the defrost pan,
f) leave the doors open to prevent odors.
IMPORTANT
PERSONAL
SAFETY
1. To prevent the possibility of hazard due to
electrical shock, never plug the refrigerator
into a receptacle which has not been
grounded adequately and in accordance with
the local and national electrical codes. See the
grounding instructions on page 2.
2. Unplug tile refrigerator before cleaning the
condenser or replacing a light bulb.
8. In case of power failure, minimize door
openings. If the power failure is of a long
duration, protect the food by placing blocks of
dry ice on top of the packages or check with a
local frozen foods locker plant about
temporary storage. Frozen foods which have
thawed completely should not be refrozen.
PAGE 16
INSTRUCTIONS
4. Any electrical service cord that becomes
frayed or damaged should be immediately
repaired or replaced. Never unplug your
appliance by pulling on the power cord.
5. Your refrigerator should not be operated in
the presence of explosive fumes.
6. Remove the doors from any out-of-use
refrigerator to prevent child entrapment
suffocation.
and
7. Children should not climb, hang or stand on
the shelves of this refrigerator.
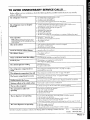
TO AVOID UNNECESSARY
Before
calling
a service
technician,
check
SERVICE CALLS...
tile following
list for possible
troubles
that
you can remedy
without difficuli):
The refrigerator
won't rtm
• the temperature control turned to "Of}"
P
no power at the electrical cord
i the
ower cord
not tripped
plugged orintbe bol2se ft_se blow.
the circuit
breaker
The refrigerator
runs
• modem refrigerators
too long/too
frequenffy
are larger and mn colder which requires more
• running time to provide more stable temperatures
the cor_denser rleeds cleaning (see page 14)
• the control set too cold
,
• prolonged door openings
too many door openi_lgS
i the
blocked(due
_ to a package or a container holding door open)
the base
door grille
not sealing
Noisy- operation
• fan noise -- normal air flow
NOTE:
Additional
motorsandcontrolsare
usedto
provideimproved
per_i_rmance
Th(refore,normal
operatingsoundsmaybe morenoticeablethan on the
modelit replaced.
Odor
in the cabinet
Warm
• odor producing foods should be covered or wrapped
• the interior needs cleaning
• the defiost pan needs cleaning
air from the cabinet
The cabinet
bottom
• the cabinet not level
• a weak tloor
on the floor under
Foods
dry out
the cabinet
light
The refrigerator
Sizzling
Moisture
not working
compartment
the refrigerator control set too warm - see page 4 to adjust
: prolonged door openings
too cold
too warm
collects
surface
evaporate
The ice dispenser
For fllrther
not
not operating
assistance
• hot humid weather increases condensation
* cold air moving over the ice cubes when not used regularly
not operating
The water dispenser
control set too cold - see page 4 to adjust
• a norm_d sound caused by defrost water dripping on defrost mechanism
on the outside
ice maker
• the refrigerator
• the freezer control set too warm - see page 4 to adjust
• prolonged door openings
in the freezer
The automatic
operating
NOTE:
• the bulb burned out
• no power at the outlet
too
compartment
sound
The ice cubes
• the defrost pan missing or not positioned properly
I
_,
PP
P
• the _aeka-es not wra ed or sealed roperlv
the crisper not tightly close(!
Thewarmrefrigerator compartment
The freezer
• normal air flow tor eolldenser
vibrates
Water
The cabinet
_ the
corcectlv
the defrost
cabinet pan
1lOt Elotpositioned
level
• a weak floor
contact
the stop arm in OFF (up)position
_ the water supply turned0ff
• the water pressure too low
• tile fi'eezer too warm
• an ice jam in the dispenser (clear "Mth plastic or wooden utensil)
the ice maker not operating
the pad lock switch actuated (depress sMteh to check)
the ice clumped in bi_ (break up or discard)
• an ice jam in crusher (remove ice f;'om storage bin and turn auger bv band
• the water supply turned off
the waf(,r pF(_ssure tot) IOW
_thc pad lock s_htch at tuated (depress switch to cheek/
your Maytag
dealer
or/vla}_ag
Customer
Service:
U.S.
Canada
1-800-688 9900
1-800-688-2002
PAGE 17
MAYTAG
REFRIGERATOR
WARRANTY
Full One Year Warranty
For one (1) year from the date of origirlal retail ptlrchase, any' part whieh fails in normal home llse v_ll be
repaired or replaced free of charge.
Limited
Warranty
Second thru Fifth Year -- major refrigeration
eomponents:
After the first year and through the fifth year after the date of off, hal retail purchase Maytag will repair or
replace, at its option, free of ch_ge to the ox_merfor pmts _md labor any part of the sealed refrigeration
system (consisting of the compressor, ewq3orator, condenser, drier and connecting tubing) and the cabinet
liner (exclusi_ e of the door lictor) wbieh fails in normal home use. Trip charges, travel and transportation, if
required, shall be the responsibility- of the owaaer.
Second Year-
other parts:
Other parts which fail in normal home use during the second year following date of original retail purchase
will be repaired or replace flee of charge for the part itself, with the ow_qer paylag all other costs, including
labor and trip charges.
Ice Maker when purchased with the refrigerator and installed by the dealer the ice maker will be considered
part of the refrigerator for warrant, puq3oses.
This full warranty and the limited warranty apply only when the appfiance is located in the United States or
Cmmda.
LIMITATION
OF LIABILITY
The warrantor, Maytag Company, sh_dl not be liable for any incidental or eonsequenl.ial damages, inchlding food
loss. Solne states do not allow the exclusion or limitations of consequential damages, so the above limitations or
exchlsion inay not apply to yon.
To Receive Warranty
Service
To locate an authorized selMee company in your area, contact the Ma)4ag dealer from whom yore
appliance was purchased or call Maytag Custom{ r Service. Should you not receive satisfactory
warranty se]Mce, call or write:
Ma)ntag Customer SelMe_
240 Edwards St. S.E.
Cleveland, TN 37:3/1
U.S.
1-800-688-9900
CANADA
1-800-688-2002
Whell contat:ting Customer Service he sure to provld{ the mo&l amt serial number of vour.
appliance the name and address of the dealer from whonl y,'oupurcllased tile appliance, and the
date of purchase.
Tiffs Warranty girts you specific: lcg;d rig]its, and you m_lvalso have other rights which vaU fi'om
state tn state.
Should you still have a problem, write to: Major Appliance Consumer Action Program. 20 North Wacker I)rivc Chicago.
tl{inois60(506.MACAF is an imlustlT sponsored but indepeladent group of consumer experts who rccei\ c and act on
complaints from appliance owners.
NOTE: {'_;hel3
V,,Ti@g
abotlt all unsolvcdser,Tceproblem, pleaseincbide the tbi/oMrig iliit;:)rliiatioJl:
(it)
gol_lr
ll&llle,
address
and
telc:plfioii(
nlJl/li)t:r
(b) Model number, serial number, and re_dsionnundJcr (fiJundon the top front inferior of the rcf:cigerator
compal_ment);
(c) Nanie and address of your dvaler and the date the applial_cewas l)oltglit_
(d) A ckar description of the prllblem you are ha_4ng.
MAYTAG
Form No.260TM-0395
" One Dependability
PartNo. 309887-1
Square
I
Newton,
Iowa 50208
dN
LithoU.S.A.
REFRIGERATOR
WARRANTY
Full One Year Warranty
For one (1) year from the date of original retail purchase, any part which fails in normal home use will be
repaired or replaced free of charge.
Limited Warranty
Second thru Fifth Year -- major refrigeration
components:
After the first year and through the fifth year after the date of original retail purchase Ma>ecagwill repair or
replace, at its option, free of charge to the owner for parts and labor any part of the sealed refrigeration
system (consisting of the compressor, evaporator, condenser, drier and connecting tubing) and the cabinet
liner (exclusive of the door liner) which fails in normal home use. Trip charges, tlavel and transportation, if
required, shall be the responsibilib: of the owner.
Second Year _ other parts:
Other parts which fail in normal home use during the second year follox_ing date of original retail purchase
will be repaired or replace free of charge for the part itself, with the owner pa_ng all other costs, including
labor and trip charges.
Ice Maker - when purchased with the refrigerator and installed by the dealer the ice maker will be considered
part of the refrigerator for warran_ purposes.
This full warran_ and the limited warranty apply only when the appliance is located in the United States or
Canada.
LIMITATION
OF LIABILITY
May_ag Company shall not be liable for any incidental or consequential damages, including food loss. Some states
do not allow the exclusion or limitations of consequential damages, so the above limitations or exclusion may not
apply to you.
This Warranty gives you specific legal rights, and you may also have other rights which vaU from state to state.
To Receive
First:
Warranty
Service
Call or write the MAYTAG dealer fix)m whom your appliance was purchased or the authorized service
firm designated by the dealer.
If you have moved from the selling dealer's service area call or write any authorized MAYTAG dealer
or authorized service firm at your new location. Check the telephone directo W yellow pages to identify
the dealer or service firm in your area.
Second:
Third:
Should your contact with the dealer or the serx_ce firm fail to satisfactorily resolve the problem, contact
the manager of the dealership or the manager of the service firm for assistance.
Should you not receive satisfaetou, warrant" ser_Sce from one of the above or need help in identifying an
authorized service firm write:
MAYCOtl Appliance Parts and Se_Mce Company
A Division of Mavtag Corporation
P.O. Box 2370
Cleveland, TN 37311
Arrangements ibr warranty, service will be made. If' the problem is urgent, call MAYCOB at
(615) 472-3833.
When contacting MAYCOR be sure to include the model and serial number of your appliance, the
name and address of the dealer from whom you purchased the appliance and the date of purchase.
Should you still have a problem, write to: Major Appliance Consumer Action Panel, 20 North Waeker Drive, Chicago,
Illinois 60606. MACAP is an indust D'sponsored but independent group of consumer experts who receive and act on
complaints from appliance owlmrs.
NOTE: When writing about an unsolved serx%e problem, please include the following information:
(a) Your name, address and telephone number;
(b) Model number, serial number, and bill of material number (found on the top front interior of the refrigerator
compartment);
(c) Name and address of your dealer and the date the appliance was bought;
(d) A clear description of the problem you are having.
FormNo. 868FE
MAYTAG
PartNo. 108617-1
COMPANY
• Newton,
Iowa 50208
MP
LithoU.S.A.