1
WHITE
It
czak
Quilt ‘N Sew Instruction Book
I/t/L’J
li
! frc
1
[
8(X) 3.31 31 64
/
att’
LLJ1UCSCV:IflJCOfli
:‘ee3
‘,
-‘-.R
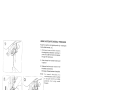
9MPORTANT SAFETY INSTRUCTIONS
When useig an etectbc& appisince. basic safety precautions shou’d always be foliowed, [ ckiding
the foflowing.”
ROad ai nstrucLrons before using tns sewrng macme.”
Th reduce the risk of etectdc shock:
This ewng machine shauki rrever be left unattended when plugged sn, Always unplug this sewing
machna from
the erc co tidtimmediattl4y after u.srrg. and befc.we cleafling:
2. AIwavs unplug before reptacing light bulb. Replace bulb with same type rated 15 watts.”
“VARN I N G
2.
—
Ti reduce the risk of burns fire electric shock or nury to persons
Do not allow to be usce as a Icy. Close attention iS necessary when this sewing machine
is used by or neat children.
ft sewing machine only for its intended use as descilbed in this manual. Use only attachments
recommended
the martufeottirer ascoritained. in this.
Never operate this sewing machine if it has a damaged vvrd or plug, if it is not worldng
properly, if it has been dropped
or damaged, or dropped ate water, Return the sewing machine to the nearest authorized dealer
Or seice centre for
examination repan, elecincal or mechanical aalustment
Never operate the sewing macfeds with any air openings blocked, Keep ventilation openings of
the
machine
end- toot coetroi free from the accumulation of lint, dust, and loose doth.
Neve
or osert any object irdo any opening”
‘Do not use ouIdOora.
Do not operate where BCrOSOI (spray) products are being used or where oxygen being sdministered
.
To dsconnccl, turn swrtctr to Inc oft (O”) position, than remove plug from outlet.”
ir unp ug by pui’n in ora lo unolug grasp Inc plug
not tne cord
Keep hngars
I r”iuvrtig patts Specml care is required around the sewing machine
“Never sew with a damaged needle plate as this can cause needle to break.’
Do rot use oent needles
“
mantel
3
4
sewing
5
B
7.
8
S
10
I
I
.
away
from
a
needle
I
13 Du Out pull cc push tahoe
whde sbtchmg it may deflect the
needle caueing ii to break:
14 SMtCh th sewng macimne
oft (O) when makog any adju
stm
ents in the needic area, such
iangng neodb. throadrg bobbin,
as threading needle,
or channg presser foot, etc
I
uflpIu sewing machine from the
elec(nca outlet when removing
covers, lubricating, or en
nlhm user servicing adpistm
makng any
ents mentioned in the nstrucb
on manual
AI
M
Movinu parts
T3 reduce nsl of injurj. switch oft
before servicing.
Close cover before operating mao
hine”
“SAVE THESE INSTRUCTION
S”
Tms product is for
hooshoid use. or equivalentS
FOOT CONTROL (USA ONLY
)
ELECTRONIC MODEL
Use Mu .sMM Ekaurio, Model
4CU31bB with this sewing
machine.
POLARIZED PLUGS CAUTION
0
nir
hj )ILJ Plug (0flt biece Wider than the
otner) To wducc the rtcl
I M it ti i put 00 U uUuet onl
ut rlcctnc. hock
y one way If ihe plug dos
the plug if il still doSe 101 Id,
e
1101
lit
full
y
in
the enlist evc r
Contact a qualif ted eleclrtc
tari La install the proper
5100: o any w
outfeh Do not modify
the
I
I
TABLE OF CONTENTS
Rernovinq Front Cover
Rep4acnq ttvt covers on The rna
chtne
?dachno ulc iplication
S€icu.j up your rnahri
t (:cfltiOl, Vuw 1gtit.
0
F
Acce.s
soies
Winditjobbifl
inserhfih the bObbin
45
6-7
8 10
it
..
....
.
Thrcniind lop theud
Usinj auPc occillo ihie
ader
Pickinrj up bobb.ti thread
Gang
pesertee
Machine soUnj chart
$Oai
ti1ch
Seini ceam
s-.
lrsettd ‘np’o and puig
Aastit
12
13
14
15
16
17
-18
19
20-21
tense
24
Gisanning the reecie, thread
and labuc chart 25
g steed
26
Solo stitch.....2 7
Blind stitch
27
tei -ch
28
juy,:Wi
$1
32
32
33
33
:33
Elastic ov ort stdch
.
Double overleck stitch
Feather stitch
Buttonholes
34
34
35
Qudting
36
Procedure
Corded buttonhole
Feed cover la1e
37
38
...
22-23
24
read
3-stepsigza
A
u
1
stid
ng stretCh slitch balance
Triple str cjhl stitch
Rick-rack stitch
Stretch ovetiock stPch
Ove-;lock stirek
Honeycomb tiLh
29
,.
-
-51
Twn needle, poci pins
39
Carwid kr your
Cleaning the teed doqo and hook area
.
Cbs nqinq iglo. bulb
.
.
For tubber inlormation visit our w8bsite at
wwwNteseWiflg. Corn
40
flmon Front Cov
t
“i
L.
/
a ,.,ortahu case
iJ 1 irl aso Lv
JfWC.
10
TH COv:
ge b
:
(.Q.2i
J, iL.irC tO( 1jt: r.ct•-.
tiil ha’ i.oracF’ o yuu iwHkJ flObC;iS
{Xl 1S dr eXt iCfl tabk fC) inure S&wnq
I
kk
‘1 ‘:c, cj,NiI fl
I..’l
i
4
I
Iptr prr cct€d nt thi ine
lr
.‘.H
i
coc ,
r&;i! y’ou will wv a i1
wqe ai
ht rr slUe ot nacrrc
Swr’ !ti
1 ..
I.
U
,_ii
1
d
i
dun
!I
IaCt [ vI
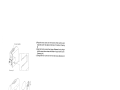
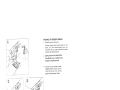
FUWeOtE AR COvtFI:
I P’ace y hwd ti oir tne
and push
rear cover
ar 1
ma
to the back until it ts rsd (Driwinçj
3)
2 tin t: o bck ccjv+jr u viari fl’J 4C:PO.3
:
erie ‘dct iii
Uiaw ng 4)
i
fyj
U’e erirww6
REAR COVER AS AN EXTENSION TABLE:
) badc metal utip le
t’jWti
jfl c,vjf irnu
arm.
cover
I
N
‘
4
—4
V
5
At th
on
ict )cIcd ir IFc _d
u on the cover
the iot5 Ttt
the ttch (Drz4wrg 5)
i3nd ci
ot
arid
rr
place
REPLAicG C COVERS Gi L.
.-
_-fl,
:dAcHr1L.
Rop4acrig thu rear cov.
1 Push down the spool pin at the back of the machine for
storage, (Drawing 6)
2. Asmoo the roar cover from the free arm (used as an
ex1erson table) oy lilting up and removing horn the latch
Slide the ‘ear cover away From the free arm. (Drawing 7)
-‘
Drainj?
6
3.
thu na
fij) tj))
)iiiM iiiO
jv’
pLCO
ot
no
)fl
dck
T
ru
m:i.
C
i
1
i•3
h,i
)uuw ncj
4 AIgn the front cover at tns hinges. IReleaso tho top nnge
into mu (r;dJ( then rr)oao the b’utcsm nc nt, he
Dvi9 -1
5 Swing the front cover to inc front ani cnsa.fDrawicg 9)
E
Nil Lc
,
NiJI
g
Dawnq 9 I
7
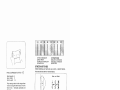
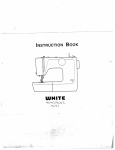
MACFUNE IDENTtFCAT1ON
Bobbin winder tension disc
—
4’
4
c,
-
8
2.
3.
4.
5
6.
7.
&
Thread guide
Fst thread guide
Face cover
Thread guide
Needle plate
Bobbin cover plate
Accessory storage
9. Bobbin winder shaft
10, Bobbin winder stop
11, Spool pin
12
13.
14
15.
16.
17
I 9.
19.
20.
21.
22.
23
24.
25.
26.
27.
25
29
30
31
32
Hand wheel
Stitch sIctoi
Powerf hght switch
Plug socket
Presser toot lever
Thread cutter
AutcrnaUc needle threader
Foot roleae lever
Presser foot screw
Feed dogs
Thread guide
Needle damp screw
Needle
All purpose presser foot
Foot control
Exlenskn table
Start / stop button
Stow sj stop button
Sing te stiich! baste button
Needle up,’ bown burton
Speed control
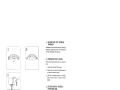
1. ADJUSi [OP THREAD
TEN SlO N
De4reao
thr
ri
b
f
-:3
r ir q th.
i
nL’ trt
,nr
1
)i
4
ti’.
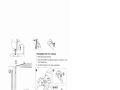
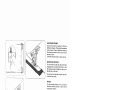
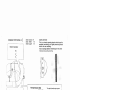
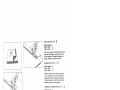
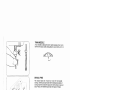
2 PRESSER FOOT LEVER
•
There are three positions for your presser
foot.
Lower the presser foot to
2.
sew.
Raise the tevor to the micJcIe posihon
to inserl or remove fabric.
3
Lift it to its highest position to change
the presser foot or to remove thIck
fabric.
3. STfTCH WD1H / NEEDLE
POSITION LAL
T re icth it
nts rna:n—
.M
1h•
-
hc pioduceci r
U
St.ii U sI I;’
‘ljç
.,
SIr.t
It st’_l
•.rrow€r z
A
Ith Lcih
y!J
pcIiu s fron
(iicjnt riki
t 3 teJt nor.!h,
positon1 will thu s ic:oiiirot mat Tn
t’i-:ingle ma ‘mr O:l 2 aid 3 shows
thu cenw position
sutect
9
oi
tc1o
4. STITCH SELECTOR AND
INDICATOR
To select a stitch, be sure needle s out
of fabric at its highest position
2. Then turn the selector until the requrea
stitch is indicated on the mdicator paneL
)
5. STITCH LENGTH I SUPER
(STRETCH) STITCH DIAL
Stitch ength can be selected easOy
according to thickness and type of fabric,
Super (stretch) stitch patterns can be
selected by turning the same dIa to S mad
wherC hne adjustment can be made
6. REVERSE STITCH LEVER
It is recommended to begin, or end seams
with several stitches in reverse for
reinforcemonL As long as you are pessing
dove, this lever while sewing, the machine
wilt cantnua to feed the fabric backwards.
-
10
OFF
Th sowIng speed s regutated
by how much the foot control is
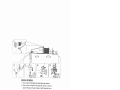
SETTING UP YOUR WHITE SEWING MACHINE
ELECTRICAL CONNECTION
C orieth the foot contiel to the machine by irisertmg the 3hole plug etc
the .sookel. dcated u.n the right: sIde ott the sewing• machIne.
2... PIuq the. pwer coif Into a wall out.Idt
the on
orCoff owflch
f; rtqht sIde of the marf,ine
Torn the
Turning the power switch ON.
automatically turns on the
sewing hght
pushed down
I
I
on.
CAUTION:
POLARIZED PLUS INFORMATION
naanzd plug tone iade s wider than the orner) Ic
1e0ur ne nr.
snoc;I hs plug is inlooded to fit in a polarized
univ uie ay If the pug coca not ift tuNy intO the outlet. revee the
does rot t contact a ualihed eiecrIan to instrill the proper
1 tie pug n any way
Cu not mudt
When the machine is not
in us or when dearong
the machine, unplug the
ma;n power rd from the
iacnne nas
wall outlet
-
11
—
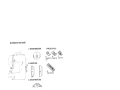
Open the accessory box and you will find a variety of
accessories inside, They are listed below.
Straight stitch or piecing foot
2 Oil
3 Buttonhole foot
& Ziprper foot
5 Eht:bbi.iis.
6. Needles(#j 4xapcs & Twin needlasxi PC>
7. Spool pin cap (small)
8. Spool pin cap (large)
9 Buttonhole opener with brush
0. Screwdrivers,3
—
(10;
)
ii
(1
11. Spool pin base
12. Sp.oai p.ir.
13.
in felt
14. Stipling/Darriing foot
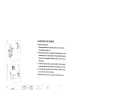
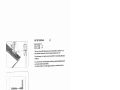
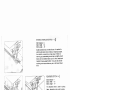
WINDING BOBBIN
Pivot sped pin into highest horizontal spool pin pos4tion.
2 Pnss a spool of thread on the spool pin Secure to place a
spool of threaa on the pin. Secure 1 with the spool cap to
ensure smooth flow of thread
3. Pass thread from spoof through thread guides as shown.
4 Pull end ot thread through hole rn bobbm as shown
5. Make sure the bobbin winder shaft is in left position Place
bobbin onto shaft with end of thread Corning from top of
bobbin. Push bobbin winder shaft to right until it clicks. Hold
onto end of thread,
6. Start machine. The thread that is held wifl snap or may
be trimmed with a scissors. Bobbin wili cease turning when
completely tilted, Push shaft to left to remove bobbin.
13
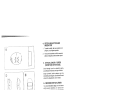
INSERTING THE BOBBN
RaIse the presser foot
1, Raise the needle to its highest position by rotating the
handwheel towards yoLi,
2. Remove the bobbin cover plate by pressing down on the
towor left corner of the bobbin cover plate wtide pressing
the latch to the right that holds the bobbin cover in place.
(See fig. 2)
3. insert the bobbin making sure the bobbin rotates counter
clockwise with the thread off the top of bobbin to the left.
4. Pull thread Through The slot W and then to the laft, Leave
abOut 6 inches (15cm) of thread.
S. Replace the bobbin covec plate onto the needle plate.
4.
4
-
‘ii
-
/
/
-
.
-
,I.
II
j
aV1JHi
I
1/
©
4
ro
)1’MC)l
1
dO! ILLL ?)NGV3 W-I I
---
USING AUTOMATIC NEEDLE THREADER
Raise Die needte to its highest position by rotating
the
hand whe& towards you.
1
Pull down teve and hdok thread to
t19 read guide as illustrated. Cofitinue ta
push lever until the hooked &nd passes
through the needle eye.
2. Guide thread into hooked end and null
ti upward.
3, Release the lever and needle will be
threaded automatically
.
:,
PuN loop oh thread to back oh machine.
N
NOIE:
4,
..,....—.
..,
‘
16
For smooth threading
it
is
recommended to set Pie machno
at slraight stitchny lrniddie
position) when using needle
threader
PICKING UP BOBBIN THREAD
I
Raise the presaer foot leer.
Haloing needle thread Ioose with your ott
hand, turn hand wheel towards you one
rovoluton with your nqht hand until the needle
comes to its highest position
2. Lightly pull up on the needle thread.
11 a loop of bobbin thread
This will pu
h
throug the needle plate slot,
3. Pull both top and bobbin threads
together towards back of machine
under the presser foot, lea1ng
about 8 inch thread tail (1 5cm.
CHANGING PRESSER FE
Make swo the needle is n the highest position.
2. Raise the presser toot lever Prass loot release lever to
remove foot.
3. Place presser toot betow presser toot hdier so that the
presser toot pin s aliçjnecl with the slit In the presser
toot holder.
4 Lower the presser foot so that the presser foot holder
snaps onto the toot.
FEED TEETH LEVER
The feed teeth move the fabric under the presser tout
as it is sewn The feed teeth hnuld he up for all general
sewing I. ower the feed teeth tar free motion dairung,
embroidery, rnenogrammirig and stipple qrulting When
the teed teeth are lowered, you must move the fabiic
as you sew
To lower th feed teeth push the lier in and to the
right Ta return the feed teeth to the up position, puss
the lever to the front.
18
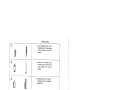
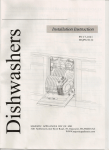
MACHINE StNG CHART
I STITCH INDICATOR
5PRESSER FOOT
S
A.
TUJI
EN
HDA
LJ1t,
W
TIT
1
T
DtAL
RDtAL
H
19
ir
1.
INDCATGR
STITCH
A
STRAIGHT
42.
3.
STITCH STITCH PRESSER
FOOT
LENGTH WIDTH
CON
CONThOL TROL
A, B
1 —4
B
I R
OS
Si IND
-
4
—
F
I -5
1—4
SHELL
...----------
3STEP
7Ic7AG
DOUBLE ACTION
,\/AAA
£
-
f’J\ARJV
C
G
BRIDGING
A
TRIPLE St RAtCH
R!CK RACK
‘MMAMMi
B
STRETCH O\/FRIOCK
”
1
•1
OCERLOCK
B
S
5
FEATHER
13
ELASTIC CVLRLOCK
B
B
H
I
‘
C
INSERTING ZIPPERS
20
STRAIGHT STITCHES
A
Stitch, Selector A
Stitch dth
Stitch Length
3
1-4
Straight stitch is most freQuently used for every aspect of sewing Learn the correct method of your machine
following the steps btlow.
2. Pul’ both threads under the
I
SET NGS
presser foot toward the back
A
titi:.h iriric:.kir
of the machine
2
I :nqV
Stiich width (2-3)
3. Place the fabric under the
1hfOr{i tCfluU 3
presser toot d ‘ower the
Ha,u the r.ko up le.w to rn
sser toot iever,
-
.
—
hijh:t;t P{
r.
I.: p1
ItiI_I1
t) t.rririq th
trd t
(7i re-up Ivar
Tension dial
) Sitch wJthrieeJ
I it()fl tIpSI
Ji -ttjr
litch s.
(j
(F_) land woel
Stitch ii.r&jth dial
fj l’ovnr/h,ht swtL:It
I )
ittih tirr
I Kt
I ::
j)
—.
©
21
4 Turn the hand wheel toward
you until the needle enters the
fabric.
•Si (o w skpp-rj on
loot -r hiil
d
thi
1, (tj:.j tt labnL qonhly
vth yjjr Fnd
r:F_n itt.
511’p
1LI
01
Th’
tio
I€_sLr’; Ti’
tu::t .triir ii
0
;I
ri
0.
r’ tOo prc
p.t;On (lit t-.
I_J_
b
1
It;
tho:du
•
0-vr thr 1Ji’...r
•
•.
i
Needle position for straight
stitching
i Straott stitch at left rortlr tori
•,
with neeokj poSItion control at L
(ft Siraiqt,t titch at middle needle
nonhon wtth needle losihuri Control
set at M.
.:
U
Straqht stitch at tiqht oedlc
po1tiori with needle posthen control
at R
i.
22
d
I•t.il
iri i
‘•••ft
or
l r.
tIll
.or
it
•rL.
!_t...±j_f.-r’-._
1 i,
..t
:li;
_,
-
b_j.i
‘rt
1
-
cm, thread ta
SECURING SEAMS
Secure your oam by Lak’nq th’ fi,f Iw
1rtct-,
ft’ur54 rier altLW (I ie it Lilul
W qo torward rrs rS caileci bjc.k tackrig
flvtr the machue at the ord of your
seams as welt
Loer the r. cr30 Ive fur b1. iactc .j
INS ERTING ZIPPERS
To sew down the rioht side, att:ich ott side
Of ‘tpp Io it to
foot ii’ ki .r o It
tttc tit:di p.;r>e
OOLt I the ulfriIiit; on
the left skJe of the foot
To sew down ti-re ltI skle, atLaijt
of toot to toot riukier
‘jrit ‘;1er
PIPING
-r pipe soft fur nishrriqs rnvor cord itrr a
trip of rr orid p, i or tir.4
t• tI
main
of tabric
Attach ntjht side oF zipper toot to foot holder
so that needle passes thruqh tt uperwiq
the ritll tie of thu In
‘.
23
ADJUSTING STRAIGHT STFICH ThREAD TENSION
d oaic,u
[.
iLh.
l]{1 .LL1(
\
• /S
\S.
/1
\.,
Thraid ock on the top
de.
N
The good iooking appearance of your stitchng is argely determined
by the balanced tension of both top and bobiiri threads The tension
is well balanced when these two threads lock in the rniddte of
layers of fabric you are sewing.
Decrease tension
iN
-
Threads ock on the
under side.
Increase tensn
24
j
Chan9ing the needie
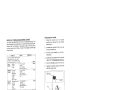
NEEDLE, THREAD AND FABRIC CHAAT
Your fabhc will detecmne the chorce of a needfe and thread The
on
tollowing table is a pactical guide to needle and thread selecti
Mways refer to it betore a new sewing project And be sure to
use the same size and type of thread in the bobbin as in the top
1.
toward you.
2. Lsen the neede clamp screw by
turning it toward you
thread supply.
3
THHEAD
bekyw can bi of un
fIber: coflon IIrlurk, elk, wocI
synthetc rayon blends They
PAkCS
are :td as earrp
Lkht-
Wigt1f
1r1f wuin1
r r r
Polyester
100% Pofyoslin
Ua1e
4
Chdtorr
Crepe
*
$4dIu*n CorOuioy
Wekgtu
He Y
I aririel
Gahamne
GinQhur
Mu&n
Wuci Cp
rkiciad Wa5
Canvas
flanm
Duck
S•k)th
K1ut5
EIoflJXJ Kr0.
Dojnie Krit
Jerscy
Tncc1
SIZE
12/80
cpea
5
Insert the new needle into the needle
damp with the
Push the needle up as far as it can go
Tighten the needle clamp screw firmly
with the screw driver.
Mrerized Soe tb________
Cuitoruwr upped
Po.tw
100% Pu1yesfer
Mercz SiLO fIr)
Nylon
Remove the need’e by pulling it
downwwd
NEEDLESJ
The tabncs
Raise the needle bar to Is hrqhest
positton by turning the hand wheel
14/PD
161100
1-dyster
10O Poyeter
Merrzu Sru 40
Hi-y Ourk
Conan-wrapped
Polyester
Nylon
[10 no ullu On suetch Iabrcu,
2
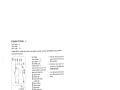
ZIGZAG STITCHING
SAflN STITCH
Stitch Seieclcr
Stitch Wdth
5
Stitch Length 14
B
This is a closely spaced attractive stitch used for
app’iqué bar-tacking, etc. Slightiy loosen top thread
tension for satin stitchin9.
Use a backing stabittzer interfacing for the sheer
materials to avoid puckering.
Stitch Indicator
B
\IQ/
Li
I
—
Thread tension dial
Under side
Stitch length
/
I
top
26
The top thread may appear
on the under side dependng
on the thread, fabric and
sewng speed, but the bobb*n
BLlNDST1CH
c
F
Stitch Selector CF
1-5
Stitch Width
Stitch Length 1-4
I
Fust nish the raw edge Do this by turning rt under
on fine fabrics and overcasting it on medium to
heavyweight ones
Then turn the hem up the equired depth, press and
po in place.
—S
2
—S
Now told the fabric as illustrated
-5-
C
Regular blind stitch for woven labhcs
F
Elastic blind stitch for soft, stretchable fabrics
3. Place the fabric under
the foot wth the fold of
the tabric positioned so
that the needle just
pierces We fold wen the
neerHe Swing s to the left
Use stitch width control
La fine tune etact
position of needle.
4
27
When cornpoted, the
stitching is almost invisible
on the rrght tde of the
fabric
SHELL STITCH
Stitch Selector 1)
Stitch Width 15
Stitch Length
L
14
Sh&L stitch is for seaming and overcasting sheer soft fabrics in
one operatIon t also produces a dehcale shell hem on lingelie
and other fine garments.
SEAM AND OVERCAST IN ONE
Place the right sides of the fabric together and position under the
presser foot so that the zg zag part of the stitch sews just over the
raw edge.
SHELL TUCKS
Turn under the raw edge and press Place the fabric tight side up
so that the zigzag part of the stitch sews just over the folded edge,
pulling the fabric in to form a shell hem Trim away excess fabric
close to the stitching line.
23
3-STEP ZtGZAG
Stitch Sector E
15
Stitch VWfth
Stftch LenGTh
14
This is a strong sütch because as its name imphes, It makes three
short stitches where the normal zigzag makes only one
For this reason ii is highly recommended for overcasting all types
of fabrics.
ing. patch
ft Is also ideal for morxting tears, patching, sewing toweff
.
elastic
ng
fiat
attachi
work arid
bailack.
At 0 stitch length the 3-step Zigzag makes an excellent
zr
‘_
ZE
_i
29
DOUBLE-ACTION STITCH
a
Slitch Sluctor G
Strich Wieth
Stlc I ength
:“
d{ for porlucH1 ha’
ttJ, oflect
..Liic A
(
rrj wiifl conti isring thr.acJ
I )ojb
.•;_•.
(jfl
1.
1 -4
tii)fl :3tIkL S
d1ij
-d.rl1I.)(1 se:w
r it
frinj
-
./
:‘r.-
BRIDGING STITCH
-
c
‘--
*._-
—
H
Stitch Selector H
1S
Stitch Width
Stitch Length
14
This is a popular decorative stitch (used in sleeves or fronts of
blouses and dresses) To attach two separate pieces of labrle
together, leave a little space in between, To prepare the fabric:
Fold under the seam allowances on the cut edges, and press,
Baste folded edges to stablizer with aboul 1/8 inch (0.3 cm)
space between. Stitch over the 1/8 inch (0.3 cm) allowance. iust
catching the fabric fold on both sides with needle Recove bastings
and stadilizer then press.
30
:E
TRIPLE STRAIGHT STITCH
A
IF’Ljz
i AKiH!
..HONEYCOM13
Ei.ASrc OyEFLU
1FF fi.If
F A -:,c---i.
Irc
.‘
A u
iii :Dc4’
STRETCH STITCHES
Stretch slc
are
nanly tor uso cii knit or si
Idbn(s
but an aiso be sewn ou wQvOfl labrics
Sktch S&edor A
3
Stitch Mdth
h
Stitch.
Ic ra
j
Triple straight stitch is far sirarier than
ordinary straight stitch because it locks
forwards, backwards and
three times
-
forwards.
ft is particularly suitable for reinforcing the
seams at sportswear in stretch and non—
stretch fabrics and tar curved seams whch
take a lot of sirCin.
Use this stitch also to top—stitch around
lapels, collars and cuffs to give a
professional finish to your jarrnents
+
AOJUS1 NG STRETCH SflTH ALANE
S:iioi er kjtr / Supef (sti tCh I shi i
shot d
t S nr
moot
matenais. Se aroeg upon ih lyu of tabri uud you moy
to nctust trui dial Lu rch twwirct stitches of hctcn nwrg fi I
rt.vers- n14I.ur strtchc ii 1i: it’iCFu±S 31U tH) üP Lijo ThC JLiI
to + oitiu’i
31
1 tr
-
si Ic us u-*.u.ai. turn the dI,ii
.
‘c
RICK-RACK STflCH
Stitch Selecto B
1-5
Stitch Width
Stitch Length -5+
Rickrack is a quidc method of finishing a raw
edge and providing a decorative top-stitch
in one operation. ft is ideal fo edging neck
bands, armholes, sleeves and hems
OVERLOCK STITCH
Stitch Selector D
Strtct ‘Mdth ‘1 5
Stitch Length -5+
Stretch overlock seams and overcasts in
one to produce a narrow, supple seam.
particularly suited to swimwear, sportswear,
T-shirts, babywear ri stretch nylon, stretch
towelling, jersey and cotton jersey
STRETCH OVERLOCK STITCH
C
Stitch Selector C
1-5
Stitch WidTh
Stitch Length S+
This is the same type stitch used by the
garment industry in making sportswear it
forms and finishes the seam In one
operation.
It’s very effective fr use in repairing raw or
worn edges of older garments.
-
32
Elizabeth SwartzIUSAJHSM
06/26/2007 11 43 AM
To Mary Caramell/USAIHSM©Husqvarna, Dorothy
McCahan/tJSA/HSMHusqvarna, Lynn
Watkins/USA/HSMHusqvarna, Sue
cc
bcc
Subject Fw: WHITE 1730 instruction book
Make sure these are saved on the shared file and put on the White Web page
Liz Swartz
Accounts Operations Manager
Forwarded by Elizabeth Swartz/USAIHSM on 06/26/2007 11:40 AM
An Elmeke/Sweden/HSM
To WilliamsC©SingerCocom
06/26/2007 06:37 AM
cc Elizabeth Swartz’USNHSM©Husqvarna
Subject Fw: WHITE 1730 instruction book
With best regards,
An Elmeke
Forwarded by An Elmeke/Sweden/HSM on 2007-06-26 12:36
“jeenchia”
<[email protected]>
2007-06-22 05:25
To “AriElmeke©Vsmgroup. Corn”
<ari.elmekevsmgroup.com>
Subject FW: WHITE 1730 instruction book
Dear An,
hereby we send the instruction book of #1730 as attached!!
Best regards,
meson
..,
.
.,
.
O1.jpg 02.jpg 03jpo O4.jpg 05.jpg OB.jpg 07.jpg 08.jpg 09jpg 10.jpg 11ipg 12.ipg 13ipg 14jpg 15jpg 16.jpg
Mu
fl°°OCLL tP 6
It DC tE IC Odle
ate ait ait Ma aneL!!
! !! !
&Itt
!L!
DOUBLE OVERLOCK STITCH
-
G
Stitch Selector S
Stitch Width I-S
Stitch Lenqth -5+
Double overlook has a number of uses It rs perfect for
attaching flat elastic when making or repairing lingerie.
It is ideal for overcasting a single layer of fabric or
seaming and overcastrng in one step cm slightly stretch
fabric and non Stretch fabrics such as linen, tweed and
-
‘Ni
medium to heavy-weight cotton. It may also be used for
couching over narrow ribbon or yarn or for drawn thread
work
FEATHER STITCH H
Stitch Seleclor H
Stitch Width 1-5
StItch Length
-Si-
oining
This beautiful stitch s used for 1
quttmg
fabric, decorative crazy patch
and embellishment.
:
-_
34
8IJ1TONHOLE S
Caietully mark the buttonhole length on your garmenl Place the
tabric with the buttonhole marked under the buttonhole foot. Slide
the toot faiward so that the needle pierces the fabric at the beginning
of the buttonhole.
ADJUSTING STITCH LENGTH (DENSITY) AND WIDTH
You can also change sutch denstty to your preference withn the
buttonhole zone marked on stitch length dial.
Narrow buttonholes may be sewn by adjusting the stitch width
diaL
4
4
%1re cerIy
35
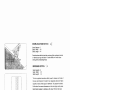
Quilting
Piecing
The first step n rnat<inq a quilt is to piece
the qujlt lop
I iu n
$ peLrnq ‘o. Ou de inc edge of the
pieces even wdh the edge of the
foot
Attet the quilt is compktely assembled, you are ready to machin
e
quilt
Free Motion Quilting
Cover the teed dogs with the feed cover plate
Attach the Stippitng!Darnirig Foot
t
h
read with sewing thread top
e rt
‘
traiant ctrteh
antI hobhn
Ihc stitch length dnesn I matter
Pace a hand on the fabric on both sides of the needle bar
and
move the fabric as you sow Practice on a scrap, until
you feel
comfortable moving the fabric around You are contro
lling the stitch length, by the way you
move the fooric You may need to adjust the tension Usuah
y, you need iha make it tighter,
by putting it at a higher numhc I hat will depend on the fabric, batting
and threads thai
you are ustng A traditional quilting method is called stippling.
You move the fabric
randomly, in curvy motion, creating the pattern shown. Techni
cally, you dontwant to cross
over a
tue
Craz Patch Quilting
Crazy Patcn quilting is done by sewing together irregul
ar shapes,
anti tnn stitching over the seams with decorative
stitches Piece the
shapes. then attach the All Purpose Foot. Thread with
decorative
tii:CarJ on top and sewing thread n the bobbin
Place tear away
stabilizer under the quilt top, and stitch your favorit
e decorative
Iitches aver lhi searns
36
Quilting
Piecing
The first step n making a quilt s to piece the quilt top.
Attach the 1 !4’ piecing toot Guide the edge of the pieces. even wdh the edge of the foot
After the quilt is completely assembled,
quilt it.
you are
ready to machine
Free Motion Quilting
Cover the teed dogs wrth the feed cover plate
Attach the StippiinqtDarnina r oot
thread with sewing thread top and bobbin
-
cci tragbt Sutc’h
1 he stitch length doesri I matter
Place a hand on the fabric on both sdes of the need)e bar and
move the fabric as you sew. Practice on a scrap, until you feel
comfortable movinrt the fabric around, You are cenhotling the stitch length, by the way you
move the fabric tou may need to adjust the tension Usually, you need tho make it tighter,
by putting rt at a hgher number, That will depend on the fabric, batting and threads that
you are using Atradilional quilting method is called stippling You move thefabric
ri curvy motion, creating the pattern shown, Technically, you
don’ twanito cross
a
runciomiy,
Crary Patch Quittrnq
rtrozy Paten quilting is clone by sewing together irregular
shapes,
and then stitching over the seams with decorative stitches. Piece the
shapes. then attach the All Purpose Foot Thread with decorative
thiead on top and sewing thread in the bobbin Place tear away
stabilizer enact the quill top, and stitch your favorite decoi alive
•tith ever the seams..
rcv
PROCEDURE
1. Stitch torward to the end ot
buttonhole mark Stop sewrn
at the left stitch and raise
needle:
)
2. Bartack 4 or stitches. Stop
sewing at the left stitch and
raise needle to ts highest
position
d
3, Stitch backword to th start of
buttonhole mark to complete
buttonhole.
3
1U
4. Bartack 4 or 5 stitches. Stop
sewing at the right stitch and
raise needle.
:,:
37
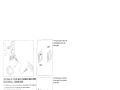
CORDED RUTTONHOLES
Hook fifler cord (crochet thread or buttonho
twist) to the spur
and pull both ends of the cord forward under the fool.
Sew buttonhole so that zigzag smches cover the cord
When completed, release the cord from foot pu
tt ends of cord
forward and snp off extra length.
FEED COVER PLATE
th
ted
\hn
tti
Fjttrrr. .A
38
cover p!tc
rincr1
ro
jht fecu rI
‘.Ii-il
_n_;j1 JrIIrr ri.j.jrI
1
i
r-.—j
Iippiriq
1ii
.i
nq
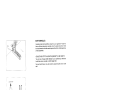
TWIN NEEDLE
A
IWLH
1h-: i EflhJcSOj or rwiri rLLeIie
1FCF:TANTitc vdh sitc j FA,i bcl
2
3
iflhf 1411 1LLI
i1 ;titch
ili
I
4
Ti
*
sf
SPOOL PINS
ihe UflL1 ro
scwinq Set thu
& paoI pin bs tor twin ntelc
hns fl111 hn cbl
huh {t ck uS
(V’ifLg mJc[tlntn & S1,ris Uiu SpoiI ifl into ie huh of spuu’ pin
tLLLS: FiLJL
TuhL Lwe€n 3poo pin WLTt Spoor ot 1rr,jO
39
pri
()
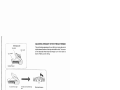
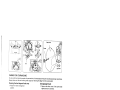
CARING FOR YOUR MACHiNE
To ensure the best possible operation of your machine, it is necessary to keep the essential
pails clean at all times.
Aiways disconnect the machine from power supply by removing the plug from the socketoutiet.
Cleaning the teed dogs and hack area
L Raise the needle
to
Changing light bulb
1. Remove the face cover. Push up the bulb
sflghuy and turn cIockwse.
ts highest
position
2. Remove the needle plate (1)
3
Remove the bobbin
2
(3
4. Clean the teed do9s and hook area with the
lint bwsh
NOlE
before chanin a buth.
more than 15wafls.
Puta drop ot sewig machine
the hook race as indcated by the
arrows A
h
Replace the bobbin case wth the projechon
3) positioned against the spring 14). Replace
the needle plate
insert new bulb, push up and turn
counterclockwise. Replace the face covei’,
40
Do not use a buth of