1
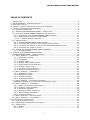
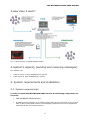
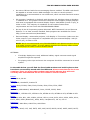
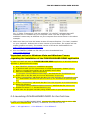
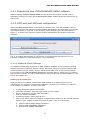
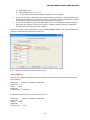
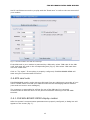
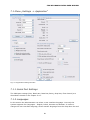
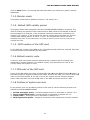
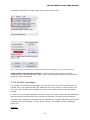
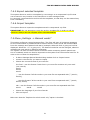
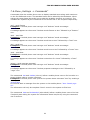
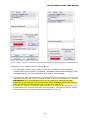
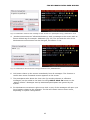
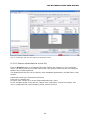
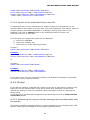
FUN BILLBOARD DEMO
USER MANUAL
by
http://www.xplorex.pl
Version 2.5
FUN BILLBOARD DEMO USER MANUAL
TABLE OF CONTENTS
1. Introduction ...................................................................................................... 4
2. FUN BILLBOARD – Essential features.................................................................... 5
3. How does it work? ............................................................................................. 6
4. System’s capacity (sending and receiving messages) ............................................. 6
5. System requirements and installation................................................................... 6
5.1. System requirements.................................................................................... 6
5.2. Installing FUN BILLBOARD DEMO – step by step .............................................. 9
5.3. Launching FUN BILLBOARD DEMO for the first time .........................................10
5.3.1. Registering your FUN BILLBOARD DEMO software......................................11
5.3.2. COM port and SIM card configuration .......................................................11
5.3.2.1. Modem & Phone Settings ..................................................................11
5.4. SIM card note .............................................................................................13
5.4.1. FUN BILLBOARD DEMO display modes......................................................13
5.4.2. Launching the system in the multiple monitor mode...................................14
5.4.3. Launching the default screen of FUN BILLBOARD DEMO system...................15
5.4.4. Launching the „Admin console” ...............................................................16
5.5. Testing the FUN BILLBOARD DEMO installation ...............................................17
5.5.1. Troubleshooting.....................................................................................18
6. Shutting down FUN BILLBOARD DEMO ................................................................18
7. FUN BILLBOARD DEMO – system settings ............................................................19
7.1. Menu „Settings -> Application” .....................................................................20
7.1.1. Serial Port Settings ................................................................................20
7.1.2. Languages ............................................................................................20
7.1.3. Monitor mode........................................................................................21
7.1.4. Default SMS validity period .....................................................................21
7.1.5. GSM number of the SIM card ..................................................................21
7.1.6. Default country code ..............................................................................21
7.1.7. PIN code of the SIM card ........................................................................21
7.1.8. Prefixes of system services .....................................................................21
7.2. Menu „Settings -> Moderator” ......................................................................22
7.2.1. Application mode ...................................................................................22
7.2.2. Moderator console .................................................................................22
7.2.3. Private messages...................................................................................23
7.2.4. Changing password................................................................................24
7.3. Menu „Settings -> Incoming messages” .........................................................25
“Message is displayed on the screen for minimum (sec)” .....................................25
7.4. Menu „Settings -> Templates” ......................................................................26
7.4.1. Static and dynamic lower banner .............................................................26
7.4.2. Creating a new template.........................................................................27
7.4.3. Deleting a template ...............................................................................28
7.4.4. Editing template (branding) ....................................................................28
7.4.5. Export selected template ........................................................................31
7.4.6. Import template ....................................................................................31
7.5. Menu „Settings -> Banned words” .................................................................31
7.6. Menu „Settings -> Commands” .....................................................................32
8. How does the system work? ...............................................................................33
8.1. Chat on the big screen .................................................................................33
8.2. Registering nicknames in the system .............................................................36
8.3. System Tabs...............................................................................................37
8.3.1. Outbox .................................................................................................37
8.3.2. Sent.....................................................................................................37
2
FUN BILLBOARD DEMO USER MANUAL
8.3.3. Inbox ...................................................................................................37
8.3.4. Subscribers...........................................................................................37
8.3.4.1. Export subscribers to a text file..........................................................38
8.3.4.2. Import list of subscribers from a text file.............................................39
8.3.5. Groups .................................................................................................39
8.3.5.1. Subscribing to a group via text message and communication with the
groups. .......................................................................................................39
8.3.5.2. Export groups to a text file................................................................40
8.3.6. Black list ..............................................................................................40
8.3.6.1. Export black list to a text file .............................................................40
8.3.7. Voting ..................................................................................................40
8.3.7.1. Setting up new voting.......................................................................42
8.3.7.2. Voting process .................................................................................43
8.3.7.3. Archiving votes results......................................................................44
8.3.7.4. Saving detailed information about the vote into an .XML file ..................45
8.3.7.5. Repeating an archived vote ...............................................................45
8.3.7.6. Displaying past votes results on the screen .........................................46
8.3.8. Alarm...................................................................................................46
8.3.9. Multimedia library (visualization) .............................................................46
8.3.10. Playlists (visualization) .........................................................................47
8.3.10.1. Description of the main playlist options .............................................47
9. Contact information ..........................................................................................49
3
FUN BILLBOARD DEMO USER MANUAL
1.Introduction
FUN BILLBOARD DEMO is a demo version of Fun Billboard Pro - a professional
DIGITAL SIGNAGE system for displaying SMS text messages, ads and multimedia
presentations on the walls of buildings, TV screens and LCD displays. FUN BILLBOARD
PRO is designed for music clubs, pubs and for the organizers of concerts, conferences,
trainings and public events.
FUN BILLBOARD DEMO has exactly the same functionality as Fun Billboard Pro,
however it is not intended for commercial use but only for the demonstration purposes.
A ready-to-work system consists of FUN BILLBOARD software installed on a Windows PC.
A GSM modem or a mobile phone should be connected to the PC. In order to fully enjoy
all functions of the system, it is recommended to use an external LCD display or a
multimedia projector (video beamer). Optionally, it is also possible to use a network of
LCD displays or multimedia projectors.
FUN BILLBOARD DEMO ensures fun for the audience and business benefits for the event
organizer.
Fig. 1. FUN BILLBOARD DEMO in Blue Star disco club in Warsaw
The system is equipped with a simple, intuitive, user-friendly interface and does not
require Internet connection.
FUN BILLBOARD DEMO works in either of two modes:
Moderated Mode – all incoming text messages are controlled by Moderator and appear
on the big screen upon Moderator’s approval. The Moderator has full control over the
4
FUN BILLBOARD DEMO USER MANUAL
content of messages.
Non-moderated Mode – incoming text messages are displayed directly on the screen
without Moderator’s approval. The only protection of the screen against undesirable
content is a filter of prohibited words described in the chapter 7.5.
FUN BILLBOARD DEMO - CONNECTING PEOPLE
The system allows strangers who are at the event (dance club, pub) to chat and flirt with
each other anonymously on the big screen. That brings people closer together and
positively contributes to the vibe of the evening.
2.FUN BILLBOARD – Essential features
•
Receiving text messages from the audience and displaying them on a big surface
like: a wall of a building, an LCD display, a projector screen, etc.
•
Moderator feature. A Moderator (a person from the venue’s staff) can approve or
reject incoming messages before they appear on the screen. The Moderator can
also organize and control SMS votes/polls and manage multimedia presentations.
•
Recording users’ phone numbers, nicknames and their descriptions. This feature
can be used in direct marketing (sending messages about new events, parties,
special offers etc.)
•
Users can register their nicknames in the system by sending specially formatted
text messages.
•
Coarse language filter - eliminates vulgar and obscene words.
•
Black list feature. The Moderator can remove from the chat those users who
abuse the chat etiquette.
•
Displaying graphic ads of various products (drinks, beverages, etc.)
•
Displaying announcements for the audience.
•
Play list feature. The system can play/replay ready play lists to entertain the
audience (for example text messages combined with images, video and music).
•
Organizing SMS votes and SMS contests.
•
Sending text messages to individual users and to groups of people.
•
Alert feature. With only one mouse click the system can send earlier prepared
alarm messages to the specific groups of users - i.e. security personnel.
•
Exporting recorded data to a text or .xml file for later use by other applications.
5
FUN BILLBOARD DEMO USER MANUAL
3.How does it work?
Fig. 2. Block diagram of FUN BILLBOARD DEMO
4.System’s capacity (sending and receiving messages)
The system can:
Receive up to 15 text messages per minute
Send up to 15 text messages per minute
5. System requirements and installation
5.1. System requirements
In order to install FUN BILLBOARD DEMO version the following components are
required:
•
FUN BILLBOARD DEMO software
•
A GSM terminal (modem) or a mobile phone that can be connected to the PC and
that is able to send and receive text messages (please see the list of supported
hardware at the end of this section).
6
FUN BILLBOARD DEMO USER MANUAL
•
An active SIM card with the text messaging feature enabled. The SIM card should
be capable to at least receive SMS messages. In order to use all system’s
capabilities it is recommended to use a SIM card, which can both send and receive
text messages.
•
PC computer (notebook or desktop) with Windows XP, Windows Vista or Windows
7 installed on it. The graphic card of the computer must support multiply displays
and must be equipped with external display output: VGA/SVGA (D-sub 15 pin), SVideo or DVI. The majority of notebooks on the market meets those
requirements and can work with FUN BILLBOARD DEMO.
•
On top of the PC’s operating system Microsoft .NET Framework 2.0 and Internet
Explorer 7.0 or later must be installed. Both programs are available for free at
http://www.microsoft.com/downloads/.
•
External display: multimedia projector, LCD display or TV monitor (make sure the
Video output in your computer is compatible with your external display: VGA (Dsub 15 pin), S-Video or DVI
NOTE: We do not recommend using FUN BILLBOARD with plasma monitors due to
a so-called "memory effect". In some plasma monitors the memory effect causes
texts displayed on them to leave streaks behind.
OPTIONAL:
If multiply displays are used, additional cables, signal converters and signal
amplifiers might be required.
For playing video clips and music the computer should be connected to a sound
system.
In the table below you will find the list of GSM modems and mobile phones that
have been successfully tested with Fun Billboard. Please note that the list is not
complete. There are many other modems and mobile phones that will work
correctly with Fun Billboard but we are unable to test all of them.
Enfora:
SA-EL, SA-G, SA-GL
Falcom:
Twist, Swift, Samba 55, Samba 75
Huawei E122, E156G, E160, E169, E169G, E180, E220, E510, E585
iTegno:
WM1080A, WM1080A1I, WM1080A1E, 3000, 3232E, 3232I, 3898
Multitech:
MTCBA-G-F1, MTCBA-G-F2, MTCBA-G-F4, MTCBA-G-UF1, MTCBA-G-UF2, MTCBA-G-UF4
Nokia:
N12, N22, N30, N31, N32, N3220, N5100, N5110, 6100, 6150, 6210, 6220, 6250, 6310,
6310i, 6610, 6820 (Bluetooth), 8250, 8910, Cardphone II, CS-10, CS-15
Samsung:
SGH-C230, SGH-E600, SGH-E700, SGH-E800
Siemens:
A65, AC75, AC45, C35, C45, ES75, M35, M45, MC35, MC35i, MC45, MC55, MC65, MC75,
7
FUN BILLBOARD DEMO USER MANUAL
S35, TC35, TC35i, TC45, TC65
SIMCOM:
SIM100S, SIM100T
Sony Ericsson:
T226, T230, T238, T290, T310, T610, T630, T637, T68, T68i, K310, K320, K500, K510,
K600, K700, K750i, K800i, W810, W900, S700, S710, V800, W300, W550, W600, W700,
W800i, W810, W900, Z500, Z600, Z1010, GC75, GC79, GC83, GC85, GC89
Teltonika:
T-ModemUSB, T-ModemCOM
Wavecom:
Fastrack M1206B, Fastrack M1306B, Integra, WMOi3, Fastrack Supreme 20, Fastrack Go,
Fastrack Xtend
Which GSM modems / GSM mobile phones can I use with Fun Billboard?
Fun Billboard supports SMS sending / receiving according to ETSI specification GSM
07.05 GSM. It will work with any GSM modem or mobile phone that complies with this
specification and supports sending of text messages in PDU mode using AT Commands.
There are many good GSM modems available in the market. Some of the brands are:
Enfora, Wavecom, Siemens, Ericsson, Falcom and Nokia. Most of them can be used with
Fun Billboard. However we can only guarantee that modems sold by us will work
correctly with Fun Billboard. To make other modems work with Fun Billboard is the user’s
responsibility.
Why is it better to use a GSM Modem rather than a GSM mobile phone with Fun
Billboard?
GSM mobile phones, that have a built in modem and supports AT Commands, can also be
used with Fun Billboard, however, if Fun Billboard has to be turned on for a long time or
it has to receive / send large number of messages then we recommend using GSM
modems because:
•
GSM mobile phones normally run on battery power and no phone manufacturer
recommends that the phone should be connected to battery charger continuously.
•
GSM mobile phones get heated up when they are used for sending large number
of messages in sequence.
•
GSM modems normally run directly from power source and have a more robust
design in terms of heat dissipation and heavy duty usage.
•
Some GSM mobile phones like Nokia do not support AT Commands directly and
require the installation of Nokia Data Suite, PC Suite for Nokia or some other
appropriate modem driver. This in turn causes additional problems when trying to
make the phone work with Fun Billboard.
8
FUN BILLBOARD DEMO USER MANUAL
5.2.Installing FUN BILLBOARD DEMO – step by step
To install FUN BILLBOARD DEMO follow the steps below:
1. Make sure that you are logged on as an administrator of Windows XP, Widows Vista
or Windows 7.
2. Install a GSM modem or a mobile phone driver on your PC. The driver should be
supplied by the modem or phone manufacturer. See the list of supported GSM
devices in the chapter 5.1.
3. Establish the communication between your mobile phone (or GSM modem) and the
PC and TURN OFF any applications that might be using the connection (e.g. Internet
connection software). You can check the connection between your PC and your
modem or phone using a Windows program “Hyper Terminal”. There are several
tutorials on the Internet on how to set-up the connection parameters and test the
connection. One of them for “Enfora” modems can be found here:
http://www.testech-elect.com/enfora/tutorial_send_receive_sms_using_gsm_modem.htm.
Remember that the new modems usually communicate with PC using the baud rate
115200, 460800 or 921600. More about establishing and testing the connection
between your PC and the modem/phone can be found in chapter 5.4.2.1
4. Make sure that .NET Framework 2.0 is installed on your computer. FUN BILLBOARD
will not function without .NET framework.
Note: You can check if .NET Framework 2.0 is installed by copying the following line:
%systemroot%\Microsoft.NET\Framework\
and pasting it into your Windows Explorer address bar. Look for a folder, which name
begins with „v2.0...”
.NET Framework 2.0 can be downloaded for free from Microsoft Corp. web site
http://www.microsoft.com/downloads/. The .NET Framework 2.0 installation file
(dotnetfx.exe) is also included on the installation CD in the directory "CD\DOT NET\".
9
FUN BILLBOARD DEMO USER MANUAL
Fig. 3. Folder "Framework" with the subfolder “v2.0.50727” indicates that .NET
Framework 2.0 is installed on your computer. Note: The last 5 digits of the
subfolder’s name may be different on your computer from those shown in the above
example.
5. Make sure that you have the latest version of Internet Explorer (7 or later) installed
on your computer. Without this or later version of the browser, the system will not
display graphics correctly. The newest version of IE can be downloaded from:
http://www.microsoft.com/downloads/.
6. Run the FBSETUP_DEMO.exe file that you have downloaded from
http://www.xplorex.pl
Important notice for Windows Vista and Windows 7 users
regarding the installation of the FUN BILLBOARD DEMO application
In order to install and start an FUN BILLBOARD DEMO application in Windows Vista or
Windows 7, please follow the steps:
1.
2.
3.
4.
Run “FBSETUP_DEMO.exe” installation program.
If Windows asks you for a permission to install the program, choose “Allow”.
Don’t try to start the program yet! It probably won’t start!
After the installation, open the directory:
“C:\Program Files\FunBillboard\MainApp\” and find the file “FunBillboard.exe”
5. Right-click on the file with your mouse and select “Properties”.
6. In the “Compatibility” tab check the box “Run this program in compatibility mode
for:” and choose “Windows XP (Service Pack 2)” or “Windows XP (Service Pack
3)”.
7. In the “Compatibility” tab check the box “Run this program as an administrator”.
8. Open the directory:
“C:\Program Files\FunBillboard\AdminConsole\” and find the file “Admin.exe”
9. Repeat the steps 5 – 7 for the file Admin.exe.
10. Now start the program normally using START menu in your Windows system.
5.3.Launching FUN BILLBOARD DEMO for the first time
In order to start FUN BILLBOARD DEMO, connect the GSM modem with an active SIM
card to your computer first and then, in Windows environment click on:
„Start -> All applications -> Fun Billboard -> Fun Billboard”.
10
FUN BILLBOARD DEMO USER MANUAL
5.3.1.Registering your FUN BILLBOARD DEMO software
After launching FUN BILLBOARD DEMO for the fist time the system will ask you for
registering online your copy of FUN BILLBOARD DEMO. Please follow the instructions on
the screen.
5.3.2.COM port and SIM card configuration
When FUN BILLBOARD DEMO is launched for the first time, you will probably have to
manually configure the system’s communication parameters. On the screen you will see
the window shown in Figure 4. If the program starts displaying the window shown in
Figure 7, it means your system’s communication parameters are already configured
correctly.
Fig. 4. A window that appears on the screen if communication parameters are not
correctly configured or the GSM modem is not connected.
5.3.2.1.Modem & Phone Settings
The system should work with most of GSM modems available on the market including
brands like Enfora, Siemens, Falcom, Nokia, Wavecom, Fargo. For Nokia modems and
mobile phones you will usually need to install Nokia Data Suite or PC Suite for Nokia.
If you want to use FUN BILLBOARD DEMO with a mobile phone, make sure your phone
has a built-in modem. The list of GSM modems and phones with modem support you will
find in the chapter 5.1.
Setting up the COM port
Once you have successfully connected a GSM modem or a mobile phone to your
computer all you need is to find out the COM port on which your modem (or cable for
your modem) is installed. In order to do that:
•
•
•
•
•
•
In your Windows system click START
Click “My computer” with the right button of your mouse
Select “Properties” Choose TAB “Hardware”
Click on “Device manager”
Unfold the section “Ports (Com & LPT)”
Find out to which port your modem is connected by looking at the entries with the
name of your modem or with the name of cable. Look for entries like:
a. CP210x USB to UART Bridge Controller
b. Profilic USB-TO-SERIAL COM PORT
c. OTI USB-TO-SERIAL COM PORT
11
FUN BILLBOARD DEMO USER MANUAL
d. USB Serial port
e. USB cable DCU-10, 11 or 12
f. … or for other entries that might be related to your modem
•
•
If you are not sure, disconnect and reconnect your modem or mobile phone while
looking at the section “Ports (Com & LPT)”. The entry you are interested in should
first disappear from the list and then appear again on the list.
If you are not able to set up the COM port in your Fun Billboard system using the
data from the section “Ports (Com & LPT)”, please unfold the section "Modems"
and find the port setting of your modem
Now you can set up the COM port in your FUN BILLBOARD DEMO. Just go to Modem and
SIM card settings and choose the right port:
Fig. 5. Modem and SIM card settings dialog window
Other settings
Most of the supported GSM modems and mobile phones should work with the following
port settings:
Baud rate:
115200 or 460800 or 921600
Data bits:
8
Parity:
none
Stop bits:
1
Flow control: hardware
If the above setting does not work, try this one:
Baud rate:
115200 or 460800 or 921600
Data bits:
8
Parity:
none
Stop bits:
1
Flow control: none
12
FUN BILLBOARD DEMO USER MANUAL
And if it still does not work try to play with the “Baud rate” or refer to the user manual of
your modem.
Fig. 6. Communication and SIM card settings.
If the SIM card in your modem is protected by a PIN code, select "PIN code of the SIM
card" and enter the code in the corresponding box (Fig. 6). Else select "SIM card does
not have a PIN code."
Click on "Try again." If everything is properly configured, FUN BILLBOARD DEMO will
start using the communication functions.
5.4.SIM card note
FUN BILLBOARD usually works with any SIM card from any GSM service provider of your
choice. Please make sure that your SIM card has the text messaging feature enabled
(can send and receive text messages).
The customer is responsible for all fees for use of the SIM card. It is strongly
recommended to test the card in a cell phone first before inserting it into the GSM
terminal.
5.4.1.FUN BILLBOARD DEMO display modes
After the system’s communication parameters are properly configured, a dialog box will
appear on the screen (Fig. 7).
13
FUN BILLBOARD DEMO USER MANUAL
NOTE: Before selecting „Multiple monitor mode” you must configure your MS Windows
display parameters. The configuration is described in chapter 5.4.2.
Fig. 7. Dialog box - choice of a display mode.
FUN BILLBOARD system can work in either of the following modes:
Multiple monitor mode (recommended)
Single monitor mode
In either mode the system can work with or without the GSM terminal, however its
functionality without the GSM terminal is very limited because the system cannot send
and receive text messages.
5.4.2. Launching the system in the multiple monitor mode
In order to launch the system in the multiple monitor mode make sure that your external
display (or displays) is connected to the computer via VGA/SVGA port. Optionally, DVI-I
or S-Video ports also can be used to connect the displays. Please note that the video
quality of S-Video connection may not be good enough.
To enable a multi-monitor configuration using the Windows Display applet:
1. Right-click on the MS Windows desktop and select Properties or
Select Start
Settings
Control Panel
Display.
2. Go to “Settings” tab in your “Display Properties” window and click on Monitor 2
(blue rectangle with number 2 on it).
3. Set the screen resolution for the 2nd display/monitor to 1024x768 pixels.
4. Check the box “Extend my Windows desktop onto this monitor”.
5. From the “Color quality” menu choose the highest settings for monitor 2 and ensure
that the screen resolution still remains 1024 x 768.
6. Click on “Identify” button on the bottom of the “Display Properties” window to make
sure that both displays/monitors (1 and 2) are configured correctly. A big number
“1” should appear on display/monitor 1 for a few seconds and than a big number “2”
should appear on the external display (monitor 2).
7. Click OK.
14
FUN BILLBOARD DEMO USER MANUAL
Fig. 8. Multi-monitor configuration in Windows XP
5.4.3.Launching the default screen of FUN BILLBOARD DEMO
system
After choosing the preferred display mode (Fig. 7), a default FUN BILLBOARD DEMO
screen will appear on the monitor 1 or 2 (depending on the selected display mode).
15
FUN BILLBOARD DEMO USER MANUAL
Fig. 9. The default FUN BILLBOARD DEMO screen, right after the first launch of the system.
If you are working in a single-monitor mode, the default system’s screen will occupy the
entire display of your computer. In order to switch between active application windows in
your Windows operating system, use the combination of ALT and TAB keys (Press and
hold down ALT key and at the same time press TAB to navigate between applications).
To activate Windows „Start” menu and the taskbar press the special Windows Key
on
your keyboard next to the spacebar.
The configuration of other system options can be accomplished in a separate program
called the „Admin console”. The functions of „Admin console” are described in the
chapters 7 and 8 of this manual.
5.4.4. Launching the „Admin console”
In order to start „Admin console” (Fun Billboard Admin), the FUN BILLBOARD DEMO main
application (Fun Billboard) must be already running.
The „Admin console” is a separate application. It allows the administrator of the system
to control the behavior, look and content the display. In this manual we are going to go
through each and every function of the „Admin console”, but let’s start with basics.
To launch the „Admin console” in MS Windows click on:
“Start -> All programs-> Fun Billboard -> Fun Billboard Admin”
The window of „Admin console” will appear on the screen (fig. 10).
16
FUN BILLBOARD DEMO USER MANUAL
Fig. 10. View of the „Admin console” window after the first logon.
5.5.Testing the FUN BILLBOARD DEMO installation
Here are a few steps that will assure your system works properly:
Sending a message from mobile phone to the system FUN BILLBOARD:
Using your mobile phone create a test message and send it to the number of the SIM
card inside the GSM terminal. Give it a minute – the delays are normal on any GSM
networks. After a moment your message should appear on the main screen (wall) and in
the upper left corner of the „Admin console”.
Sending the message from the system FUN BILLBOARD to mobile phone:
Check the radio button next to the “Send private SMS” and enter your phone number. In
the field “Enter your message here” write your test message and click the “Send” button
(Fig. 11). After a few moments you should receive the message on your phone.
NOTE: Make sure that your SIM card and associated account allows you for sending the
messages, that you are not over your limit and that you have a credit with your provider.
17
FUN BILLBOARD DEMO USER MANUAL
Fig. 11. Example of a test message ready to be sent to a phone number
5.5.1.Troubleshooting
If the any of the tests failed, please follow the checklist below:
Ensure that your mobile phone or GSM modem is connected to the computer and
that the SIM card has been installed properly.
WARNING: Never replace the SIM card if the mobile phone or modem is
connected to the computer or to an external power source. You may damage the
phone or modem or/and the SIM card.
Make sure the SIM card has sufficient credit to send text messages. You can do
that by inserting the SIM card into a GSM mobile phone and sending a text
message to another GSM mobile phone.
Check if the correct PIN code (if enabled) is entered in a field “PIN code of the SIM
card” (see the chapters 5.3.2.1 and 7.1)
Check the “Serial Port Settings”. The COM port number should be EXACTLY the
same as the COM port number assigned to your GSM device or to the cable of
your GSM device. See the chapters 5.3.2.1 and 7.1.
Make sure you are running MS Windows XP, Windows Vista or Windows 7. The
system has not been tested on other operating systems and probably won’t
function properly.
If the system still doesn't work, follow the steps:
1.
2.
3.
4.
Disconnect the mobile phone or GSM modem from the computer,
Restart the computer,
Reconnect the mobile phone or GSM modem to the computer,
Start “FUN BILLBOARD DEMO” and check the settings according to the chapter
5.3.2.1,
5. Start „Admin console”,
6. Repeat the tests.
If the system still does not work, please ask a computer professional for help.
6.Shutting down FUN BILLBOARD DEMO
In order to shut down the FUN BILLBOARD DEMO, you must first close the „Admin
console”, and then turn off the FUN BILLBOARD DEMO main application (the Big Screen).
In the multiple monitor mode you do that by right-clicking on Fun Billboard icon
in MS
Windows taskbar and selecting "Close". In the single monitor mode you do that by
18
FUN BILLBOARD DEMO USER MANUAL
pressing a combination of the keys ALT-F4 (Press and hold down the ALT key and at the
same time press the F4 key).
7.FUN BILLBOARD DEMO – system settings
The system configuration menu can be accessed by clicking on menu item “Settings”
located in the top left corner of the „Admin console” window. Other system settings can
be configured in numerous tabs of the „Admin console”.
NOTE: As a part of the installation, we strongly recommend you to create a lists of
obscene words and to import those lists to the „Admin console” right after the system
installation. You will learn more about this topic in the chapter 7.5
NOTE: Instructions for the public are JPG images that are displayed on Fun Billboard
screens in order teach the audience how to send message to the screen, how to register
a nickname, how to send a private message etc. We suggest dowloading example
instructions from www.xplorex.pl (menu English) and importing them into “Multimedia
Library” (described in chapter 8.3.9). The instructions can be displayed from time to time
during the event on the Fun Billboard screen. They can also be included as part of play
lists described in chapter 8.3.10.
Note that you can also create your own instructions in your own language in any graphics
editor like for example MS Windows Paint program.
19
FUN BILLBOARD DEMO USER MANUAL
7.1.Menu „Settings -> Application”
Fig. 12. Application settings window
7.1.1.Serial Port Settings
The COM port settings (Port, Baud rate, Data bits, Parity, Stop bits, Flow Control) are
described in details in the chapter 5.4.1.
7.1.2.Languages
In this section the administrator can select a user interface language. Currently the
system supports four languages – English, Polish, German and Russian. In order to
change the user interface language, select another language from the drop down list and
20
FUN BILLBOARD DEMO USER MANUAL
click on Save button. The change will take place after you restart the „Admin console”
application.
7.1.3.Monitor mode
This option is described in details in sections: 5.4.2 and 5.4.3.
7.1.4. Default SMS validity period
This option affects text messages sent from FUN BILLBOARD DEMO to recipients. It is
used for setting the period of time within which a GSM network will attempt to deliver
text messages to a recipient, if the recipients cannot be temporarily reached by the
network. For instance, if the recipient has his/her mobile phone switched off, and the
„default SMS validity period” is set to “1 hour”, the recipient will receive the text
message only then, if the mobile phone is turned on within one hour from the moment the
message was sent.
7.1.5. GSM number of the SIM card
In this field the number of the SIM card in the GSM terminal should be entered. This field
is usually filled out automatically by the system.
7.1.6.Default country code
A country code is the prefix used for dialing foreign numbers and for sending text
messages to foreign networks. The default country code should be the code of the
country where the system is used.
7.1.7.PIN code of the SIM card
Some of the SIM cards come with so called PIN code (Personal Identification Number). It
provides protection against unauthorized usage. If that is the case, you have to enter PIN
code in the field provided. If you fail to do so, the system will not function properly.
Select “SIM card does not have a PIN code” if the SIM card does not have a PIN.
7.1.8.Prefixes of system services
In this section user can predefine prefixes to be used by various features and services
offered by FUN BILLBOARD DEMO:
1.
2.
3.
4.
Private messages prefix - Private message function is described in section 7.2.3.
Group registration prefix - Group function is described in chapter 8.3.5.1.
Votes prefix – Voting function is described in chapter 8.3.7.
Nick registration prefix - Chapter 8.2 describes nick registration function in detail.
21
FUN BILLBOARD DEMO USER MANUAL
7.2.Menu „Settings -> Moderator”
7.2.1.Application mode
There are two working modes of FUN BILLBOARD DEMO: moderated mode and nonmoderated mode (automatic).
ATTENTION: This is a very important system function. Please read carefully.
In the moderated mode all incoming messages must be manually approved by Moderator
(system operator) before they are displayed on the big screen.
In the automatic mode the messages do not require Moderator’s approval and will appear
on the big screen immediately after they are received by the system. In this mode the
only protection from unwanted content is the coarse language filter (described in the
section 7.5).
Fig. 13. The view of the „Moderator settings” window
7.2.2.Moderator console
„Show rejected messages in moderator console” – If this option is checked all
rejected messages will appear in „Admin console” section and will be marked with a red
traffic light icon (see the first message in the fig. 14).
“Show blocked messages in moderator console” - If this option is checked all
blocked messages will be displayed in „Admin console” section and will be marked with a
“no entry” icon (see the second message in the fig. 14). Blocked messages are the
22
FUN BILLBOARD DEMO USER MANUAL
messages received from “black listed” users (see section 8.3.6).
Fig. 14. Rejected, non-authorized, blocked and authorized messages in the „Admin console”.
“Beep when a new message arrives” - If this option is checked the incoming
messages will be announced with a beep sound. The messages containing commands or
votes will not be announced.
7.2.3.Private messages
The system can forward text messages received from one user to the mobile phone of
another user. The messages won’t be displayed on the big screen. In other words: one
user can send a private text message to another user without knowing his/her phone
number.
In order for the “private messages” function to work, the option „Allow private messages”
must be checked and the SIM card should have the ability of sending text messages.
A private text message should start with the nickname of recipient preceded with private
message prefix (see chapter 7.1.8 for prefix setting). The default private messaging
prefix is *.
Example:
23
FUN BILLBOARD DEMO USER MANUAL
You want to send a private message from your phone to the person whose nickname is
Ann – you saw her messages on the big screen with this nickname and now you want to
send her a private message.
The correct format of your text message should be:
*Ann I want to buy you a beer
The Fun Billboard would receive your message and forward it to the phone number
registered in the system under the nickname ANN. Your phone number or nickname (if
registered in the system) will also be forwarded to Ann. Your message will not be visible
to the public.
If the user don’t register any specific nickname in the system the system will
automatically assign the generic nickname Guest followed by the sequential number
(Guest1, Guest2,..)
Using variables, the administrator can format the beginning of the private message which
will be forwarded to recipient. This way, the recipient of the message will find out who
was the sender of the message. The variables have the following meaning:
#phone# - The variable will be replaced with the sender’s phone number
#name# - The variable will be replaced with the sender’s first and last name
#nick# - The variable will be replaced with the sender’s sender nick (alias)
#nickorphone# - If nick exists, the variable will be replaced with the sender’s nick.
Otherwise the variable will be replaced with the sender’s phone number.
#nameorphone# - If first or last name exists, the variable will be replaced with the
sender’s name. Otherwise the variable will be replaced with the sender’s phone number.
Fig. 15. The choice of variables in private messaging
ATTENTION: Enabling the „private messages” function might incur additional costs on
the SIM card, especially if “private messaging” becomes popular among the audience.
Private messages are forwarded to recipient using the credit of the SIM card.
7.2.4.Changing password
In the bottom part of the “Moderator settings” window (Fig. 13) there is a Change
password button. It allows the Moderator to enable/disable or change a password
protection of the „Admin console”. If the password protection is enabled the
Administrator will be prompted to enter the correct password every time he starts the
„Admin console” application. Leave those fields blank if you don’t want to protect the
system with password.
24
FUN BILLBOARD DEMO USER MANUAL
7.3.Menu „Settings -> Incoming messages”
“Message is displayed on the screen for minimum (sec)”
ATTENTION: This is a very important system function. Please read carefully.
This parameter defines in seconds the minimal period of time, how long the massage will
stay on the screen. The setting prevents messages received from the audience from
scrolling too fast on the screen. It is recommended to keep this setting at reasonable
value, especially when the audience sends a lot of messages. If the message stays on the
screen for too long it will block other incoming messages from displaying and they will be
put in queue. The rule of thumb is: the more messages are sent by the audience, the
lower the value of this parameter should be.
The settings of this parameter also affects the time of displaying incoming messages in
full screen mode (see below). The period of time when the message is being displayed in
full screen mode cannot be longer than the “Minimal period of time when message is
visible on the screen”.
„Message is displayed in full screen mode for minimum (sec)”
If this option is set to more than 0 seconds, incoming messages will be displayed in a
full-screen mode (Fig. 16). The maximum length in seconds of the full-screen mode
depends on the setting "Message is displayed on the screen for minimum (sec)”
described in the previous section. The longer a message stays on the screen, the longer
it can be displayed in a full-screen mode. For example, if "Message is displayed on the
screen for minimum (sec)" is set to 15 seconds, then the maximum length in seconds of
the full-screen mode is 15 seconds.
Fig. 16. Displaying messages in a full-screen mode.
„Show time in front of messages on the screen”
If this option is checked, every message displayed on a big screen will be preceded by
the arrival time of the message in the format <hour>: <min>: <sec>, as is shown in
figure 17. The message counter will not be shown.
25
FUN BILLBOARD DEMO USER MANUAL
Fig. 17. View of a message on the big screen if the option “Show time in front of messages on the
screen” is checked.
„Don’t show nick in front of message text”
If this option is checked, the incoming messages appear on the screen without showing
the nickname of the sender in front the message. This option is useful for example for
asking questions during a seminar, where the nickname of the sender does not really
matter.
„Don’t show number in front of message text”
Usually the messages sent by mobile phone users are numbered for reference. At the
beginning of each new Fun Billboard session the counter is reset to 1 and the messages
received are numbered 1, 2, 3, 4 etc. If you check this option, the system won’t display
numbers in front of messages.
„Real time export to XML file”
This option is useful, when you want other systems to read the incoming messages. E.g.
you may want to display incoming messages on your web page in real time. The
incoming messages are saved to an XML file in real time. “Banned words” filter is applied.
(More about banned words in the chapter 7.5)
7.4.Menu „Settings -> Templates”
The functionality contained in the menu “Settings -> Templates" allows the user to
change the appearance of the screen and to do the “screen branding”, which in turn
makes it possible to obtain revenue from sponsors. Example screen brandings can be
found at http://www.xplorex.pl
7.4.1.Static and dynamic lower banner
The user can choose whether the lower banner is static or dynamic. A static banner does
not change its content over time. A dynamic banner might change its content and show
several different messages over a period of time.
1. Lower banner is static, when the option "Use dynamic banner" is not selected. The text
of the static banner can be changed after clicking on the button Edit selected template
and then by editing the text box "Text on the lower banner."
2. Lower banner is dynamic, when the option "Use dynamic banner" is selected (Fig. 18).
The user can configure the options of lower banner by clicking on the button Dynamic
banner settings. Clicking on the button Add (Fig. 19) lets the user create a message
that will be displayed on the lower banner. The user can add an unlimited number of
messages to the banner. Each of them will be displayed for a certain period of time
defined by the user. By right-clicking on a message the user can choose to edit or delete
26
FUN BILLBOARD DEMO USER MANUAL
it. Messages can be displayed on the lower banner for the period in the range from 5 to
60 seconds.
Fig. 18. Menu „Settings - Template settings with the „Use dynamic banner” option selected
Fig. 19. List of dynamic messages displayed in the lower banner
7.4.2.Creating a new template
To create new template click on Create new template button in the Template settings
tab (Fig.18). Name your template and click on Save. New template new will appear
„Template” dropdown menu list. Choose your new template from that list and start
editing it according to your needs (template editing is described in details in chapter
27
FUN BILLBOARD DEMO USER MANUAL
7.4.4.). Please note that default base template for each new template for editing is a
tempated designed by our home-designer.
7.4.3.Deleting a template
To remove any template from the system click on „Template” dropdown list and choose
the template you want to remove. Then click on Delete selected template button.
Please note that you cannot remove the currently active template. If you want to remove
the currently active template deactivate it first by choosing from the list any other
template and clicking on Save changes (Fig. 18). Now you can select the previously
active template from the list and remove it.
The „Main template” is a default system template and cannot be removed.
7.4.4.Editing template (branding)
User can change the look and feel of the FUN BILLBOARD DEMO main screen by editing
any template. This feature allows to brand the screen with prepared by the user images
and graphics as well as change the color of the screen and text.
NOTE: Editing the system default template (Main Template) is limited and allows only to
change the text of lower and upper banner.
To edit existing template choose it from the Template list and click on Edit selected
template (Fig. 18)
The following template items can be edited:
„Text on the upper banner”
This field contains the message that appears on the top of the big screen all the time
when the system is running. It can be changed to any text. Usually it contains
instructions along with the modem phone number so that the audience knows how to
send a text message. System default message is: „SEND YOUR TEXT MESSAGE TO
#phone#”, where the #phone# is a variable field which is automatically filled by the
system with the phone number detected from the SIM card.
It is not recommended to remove or replace this variable field with any other text as that
would cause the system to stop detecting the phone number directly from the SIM card.
In this case the SIM card phone number needs to be entered manually.
„Text on the lower banner”
This field contains a static text message displayed on the bottom of the screen all the
time when the system is running. User can enter here additional instructions or
messages. System default message is set to: „NO EXTRA CHARGE! A MESSAGE TO THE
SCREEN IS A REGULAR TEXT MESSAGE”.
NOTE: If the „Use dynamic banner option is selected the „Text on the lower banner” field
is inactive.
„Use big announcement text?”
This option increases the size of the text of Moderators announcements. Sending
messages to the screen is described in section 8.1.
28
FUN BILLBOARD DEMO USER MANUAL
„Announcement text”
This option allows to change the color of the Moderator announcements. Click on the
color box and choose a new color from the palette for the announcement text.
Fig. 20. Editing options for „Main template” – the system default template.
Only the „Main template” has limited editing options, all other templates allow to edit
images/graphics and colors (Fig. 20 and 21)
To change graphic /image file click on the button >> next to the name of the currently
used graphic file (Fig.22)
IMPORTANT: All the graphics must be formatted to the following dimensions
(in pixels):
•
•
•
•
left side banner image 147 x 660
left top banner image 58 x 68
vote header image 68 x 136
vote bar image 1 x 6
29
FUN BILLBOARD DEMO USER MANUAL
Fig. 21. Editing options for all templates accept the default „Main template”.
Fig. 22. Graphics/images editing options (branding).
30
FUN BILLBOARD DEMO USER MANUAL
7.4.5.Export selected template
This option allows to archive a template by converting it to a compressed .zip file that
can be saved in any location on the hard drive or other storage media.
It is strongly recommended to archive all the templates, so that they can be restored any
time if necessary.
7.4.6.Import template
This option allows to import the templates saved in compressed .zip files.
IMPORTANT: Do not attempt to unzip the archive template file in order to edit its
elements. Always edit the template within FUN BILLBOARD.
7.5.Menu „Settings -> Banned words”
This option configures coarse language filter. The filter will scan all incoming messages
for the words stored in predefined list of banned words. Those words will be eliminated
from the message and replaced with stars (example: What the fuck is going on? will be
displayed: What the **** is going on?). The banned words list can be changed, edited or
updated with new words in different languages.
The system can filter out whole words or all the words containing specific partial text.
List of unwanted words can be also imported to the system from the external text file. In
order to do so follow the steps below:
•
•
•
In Menu-Settings-Banned Words dialog window click on Import button.
Locate in the text file you want to import
Choose the correct format of your text file:
line feed – use this format if each line in your text file contains only one word
(one record):
word1
word2
word3
; - use this format if all the words in your text file are separated with”;” (word1;
word2;)
, - use this format if all the words in your text file are separated with”,” (word1,
word2, word3)
tab – use this format if all the words in your text file are separated with Tab:
word1
word2
word3
•
•
Choose the language of your list of words
Click on Import
Make sure that the “Replace the whole words only” option is checked.
31
FUN BILLBOARD DEMO USER MANUAL
7.6.Menu „Settings -> Commands”
Commands allow the mobile phone user to display standard texts along with emoticons
on the Fun Billboard screen. The standard texts can be edited by the Moderator. When
editing the texts please be careful not to edit the variables #nick1# an #nick2#. The
variables are replaced by the nicknames of the sender and or the recipient respectively.
%sf – send flowers
Example 1: A mobile phone user having a nick “Andrew” sends a message:
%sf Ann
A message appears on the screen “Andrew sends flowers to Ann” followed by a “flowers”
icon.
%sk – send kiss
Example 2: A mobile phone user having a nick “Andrew” sends a message:
%sk Ann
A message appears on the screen “Andrew sends kiss to Ann” followed by a “kiss” icon.
%sl – send love
Example 3: A mobile phone user having a nick “Andrew” sends a message:
%sl Ann
A message appears on the screen “Andrew sends love to Ann” followed by a “heart” icon.
%sb – send beer
Example 4: A mobile phone user having a nick “Andrew” sends a message:
%sb Ann
A message appears on the screen “Andrew invites Ann for a beer” followed by a “beer”
icon.
%smp – send marriage proposal
Example 5: A mobile phone user having a nick “Andrew” sends a message:
%smp Ann
A message appears on the screen “Andrew proposes marriage to Ann” followed by a
“rings” icon.
The commands #wi and #whois (who is?) allow a mobile phone user to find out who is a
person hiding under a certain nickname.
Example 6: A mobile phone user queries the system about nickname “Ann” by sending a
message:
%whois Ann
He receives back a message from the system on his mobile phone: “Ann: female, age:
22”.
The information will only be complete if Ann’s record in the system is filled out.
The commands #wa and #whoasked (who asked?) allow a mobile phone user to find out
if anybody was asking the system for information about him/her by using the command
#wi or #whois.
32
FUN BILLBOARD DEMO USER MANUAL
8.How does the system work?
8.1.Chat on the big screen
The main function of FB system is receiving text messages from the audience and
displaying them on the big screen. All incoming messages appear in the „Admin console”
window.
The system can be ran in one of the following modes:
moderated- Moderator can reads and accepts or rejects every incoming message.
Only messages accepted by Moderator appear on the large screen.
or
non-moderated (open mode) - all incoming messages are displayed on the big screen
and they don’t require approval from Moderator
How to switch between those two modes see section 7.2.
33
FUN BILLBOARD DEMO USER MANUAL
Fig. 23. „Admin console”: on the left: chat in moderated mode, on the right non-moderated mode.
Description of the „Admin console” (shown above)
1. The top right section of the „Admin console” contains all the messages
received during the session: accepted, rejected and blocked messages. Each
message has its own icon indicating the type of the message.
2.
“Send private SMS” allows to send text message to a phone number or a nick name
assigned by the system. Type the message into: “Enter your message here” window
IMPORTANT: It is recommended not to use any special or national language
characters in the message as the system switches to UNICODE coding mode which
limits the number of characters for one message from 160 to 70.
3. The function “Send as participant” allows to send a message to the big screen, that
would appear as a message sent from chat participant. This function can be used to
stimulate audience to send messages to the system. (Fig. 24).
34
FUN BILLBOARD DEMO USER MANUAL
Fig. 24. Moderator sends a text message to the screen as a participant using „chameleon” nick.
4. „Send announcement as” allows Moderator to send a message to the screen with an
admin defined tag for example: Moderator (Fig. 25) The size and the color of the
Moderators announcements can be changed, see section 7.4.4.
Fig. 25. Moderators Announcement using predefined nick „MODERATOR”.
6. CLS button cleans up the screen immediately from all messages. This function is
useful when some unwanted content appears on the screen.
7. The participants who abuse the chat rules (by sending obscene or offensive
messages) can be added to the black list using Add to black list button on the
„Admin console”. Messages sent by blacklisted participants are ignored by the
system.
8. For Moderators convenience right mouse click on any of the messages will open up a
list of options related to the message. The list will contain various menu items,
depending on system configuration.
35
FUN BILLBOARD DEMO USER MANUAL
Fig. 26. List of options activated by right-click.
8.2.Registering nicknames in the system
Subscribers nick can be registered both by Moderator (from the Subscribers tab) and
individual participants from the audience. All messages from registered users will be
displayed with their registered nicknames.
To register or change his nick the participant must send a message to the system in the
following format: <registration prefix><nick>
The registration prefix can be specified in Settings - > Application. Default registration
prefix is #.
For example: Participant who want to register his nick Mario should send to the system
the following message: #Mario. From now on all the messages from Mario’s phone
number will be displayed on the screen preceded with nick Mario.
The following text message sent to the system would register nick Mario and display a
message “Hello everybody!” from this user at the same time:
#Mario Hello everybody!
When the participant attempts to register a nick, which has already been registered in
the system by other user, the system will assign to this nick next available number. For
example: Nick Mario is already registered in the system, so the next user who want to
register the same nick will be registered as Mario2.
36
FUN BILLBOARD DEMO USER MANUAL
8.3.System Tabs
8.3.1.Outbox
Outbox keeps queued messages that are waiting to be sent. High modem load, poor
quality of the GSM network coverage or lack of credit on SIM card can cause the delays
in message dispatch. Please note that system capacity is 15 messages per minute.
If the messages keep pilling up in the Outbox it might indicate some problems with
connectivity with a GSM network. Therefore it is recommended to monitor the content of
the Outbox periodically.
8.3.2.Sent
The tab Sent includes text messages sent by the user of the system to the recipients,
and information on the status of delivery of those messages. Clicking on a message with
the right mouse button will activate the function "Delete", which can be used to remove a
single message.
8.3.3.Inbox
Inbox contains all messages received by FUN BILLBOARD DEMO from participants/users
via GSM network. Right click on any message opens up a menu with more options.
8.3.4.Subscribers
Participants or users with their nick registered in Fun Billboard are called the Subscribes.
Section 8.2. describes in details how to register a nick.
As mentioned before the Fun Billboard operator (Moderator) can also register new
subscriber by clicking on Add new subscriber button in the Subscribers tab. “Phone
number” and “Nick” are two mandatory fields that need to be filled in order to register
new subscriber.
Right click on any subscribers record opens up a menu with more options (Fig.27)
In order to quickly assign several subscribes to a group choose the group from the
dropdown list on the bottom of the screen, select subscribers you want to assign to that
group and click on Assign to group button on the bottom of the screen.
37
FUN BILLBOARD DEMO USER MANUAL
Fig. 27. Subscriber tab with the right-click dropdown menu
8.3.4.1.Export subscribers to a text file
Click on Export button on the Subscribers tab. Choose the location on your computer
where you want to save your black list text file. The system saves the text file using the
default name Subscriberst.txt
The Subscribers text file can be used by other database applications, like MS Excel or MS
Access.
Subscribers text file is formatted as follows:
First row is a header line
All other rows contain four record fields separated with <tab>
In the example below in the last line “Name” and “Lastname” records are empty, this
user is registered with two mandatory fields: phone and nick.
38
FUN BILLBOARD DEMO USER MANUAL
NAME<TAB>LASTNAME<TAB>PHONE<TAB>NICK
Philip<TAB>Kowalski<TAB>+48881998328<TAB>Phil
Patricia<TAB>Banasiak<TAB>+48799884932<TAB>Patti
<TAB><TAB>+48617994321<TAB>Pittbull
8.3.4.2.Import list of subscribers from a text file
A “Subscribers.txt” text file created by the “Export” feature of Fun Billboard can be
imported back to the system or to any other copy of Fun Billboard. This feature allows to
archive (backup) subscribers database or exchange it among other users of Fun
Billboard. Just click on Import button in the Subscribers tab and locate your
Subscribers.txt file on your disk.
Text files that are accepted for Import by Fun Billboard
a. must be in UNICODE
b. must have a header line
c. must have one of the following formats:
Format 1:
NAME<TAB>LASTNAME<TAB>PHONE<TAB>NICK
Example:
Philip<TAB>Kowalski<TAB>+48881998328<TAB>Phil
Patricia<TAB>Banasiak<TAB>+48799884932<TAB>Patti
or
Format 2:
NAME<TAB>LASTNAME<TAB>PHONE
Example:
Philip<TAB>Kowalski<TAB>+48881998328
Patricia<TAB>Banasiak<TAB>+48799884932
In the latter case, since no nickname is defined, Fun Billboard will assign an automatic
nick name to every imported contact.
8.3.5.Groups
In this tab the operator of FB PRO can create new groups or edit/remove existing ones.
Right-click on the selected name of the group opens up a dropdown list with more
options like adding or removing members, editing members records or removing the
whole group.
To see the list of all subscribers assigned to the selected group click on View/remove
subscribers button.
8.3.5.1.Subscribing to a group via text message and communication with
the groups.
This feature enables participants/users to register themselves in a selected group in FB
PRO by sending a text message with the proper registering prefix.
39
FUN BILLBOARD DEMO USER MANUAL
Example:
A manager of the night club (FUN BILLBOARD DEMO user/operator) wants to offer to his
visitors/customers a service that would periodically send to their cell phone a text
message with current events in the club. The manager wants his customers to decide if
they want to subscribe to that service or not, therefore the manager sets up FB PRO to
allow the individual customer register with the group by sending a text message:
1.
2.
3.
4.
Click on Add group
Name new group (for example: Customers)
Check the box “Allow registration via SMS”
Choose a registration prefix for that group (for example: !Subscribe) and click o Save
button
NOTE: The registration prefix needs to be preceded with some special character like:! or
? (default character for registration is !) . The default character can be changed in
Settings -> Application window.
Now the individual participants can subscribe themselves to the group Customers by
sending the following text message: !Subscribe
The manager will be sending his event calendar to the group Customers.
IMPORTANT: The registration prefix cannot contain spaces or characters from national
languages.
8.3.5.2.Export groups to a text file
Individual groups can be exported to a text file using Export button on the list of the
groups. All records of subscribers assigned to that group will be exported to a text file.
The default name format of the text file is group <name of the group>.txt
8.3.6.Black list
“Black List” contains the list of blocked phone numbers – the messages from those
numbers will be ignored by the system. Moderator can add to the black list any user, who
abuse the rules by sending for example obscene or vulgar messages.
8.3.6.1.Export black list to a text file
Click on Export button on the Black List tab. Choose the location on your computer
where you want to save your black list text file. The system saves the text file using the
default name Blacklist.txt
The black list text file can be used by other database applications, like MS Excel or MS
Access.
8.3.7.Voting
Taking a vote is one of the most attractive features of the Fun Billboard system. The
audience or public can participate in voting by sending a text message containing the
proper phrase/text defined by Moderator.
An active voting can be presented in full screen mode, shared screen mode (along with
the chat) or can be hidden.
40
FUN BILLBOARD DEMO USER MANUAL
Fig. 28. Voting in full screen mode.
Fig. 29. Voting and chat (shared screen mode).
41
FUN BILLBOARD DEMO USER MANUAL
8.3.7.1.Setting up new voting
In order to set up new voting go to the Votes tab and fill out the following fields:
Name – Moderator can name the voting/poll. This name will not appear on the
screen, will be used by the system to identify this particular voting in the archive.
Question - the question that is put to the vote. This question is displayed on the
screen all the time during the voting. For example on Fig. 28 the question is: „Which
girl is the most beautiful ?”. On Fig.29: „Do you like beer ?”.
Instruction - this information explains to the public how to cast a vote. Instruction
is displayed on the screen along with the voting question. For example on Fig. 28 the
instruction reads: „Send the name of the girl to the screen” and it is displayed right
under the question. On Fig.29 the instruction reads: „Send YES or NO” and it is
displayed in the lower banner.
Use prefix - with this option checked all messages with votes need to be preceded
with voting prefix. As this option may be confusing for the public we do not
recommend using it unless it is found necessary. The default voting prefix is @.
Example of correct message with vote from Fig.29: @YES. (Sending a message only
with YES would not be accounted by the system as a vote.
The default prefix can be changed in Settings – Application.
Allow several voting from one phone number - if this option is checked each
user can cast more than only one vote from his phone. This way a voting participant
can increase chances in a poll for his favorites.
NOTE: If the question that is put to the vote has only two answers (for example: yes
or no) it is recommended to present it in the shared screen mode (see Fig.29). In
order to do so check Split screen in screen settings on the Votes tab.
If the voting question has more than two answers use the full screen mode (check
Voting only option) or hidden mode (check Chat only option).
Section Answers:
Number of answers – this value defines the number of all possible answers to
voting question.
Name – list all names of the possible answer (each name-answer will be represented
by separate column in the voting bar chart on the screen).
Value – defines the exact text or phrase of the voting text message that will trigger
the column with the corresponding name to rise. In most cases both fields (name and
the corresponding value) should be the same.
42
FUN BILLBOARD DEMO USER MANUAL
Fig. 30. Vote setup.
8.3.7.2.Voting process
To start a vote press the Start button on the bottom of the Votes tab. The dialog window
will change and will display voting bars. The bars will change accordingly to the casted
votes.
The big screen will show the voting bar chart in the mode previously chosen in the screen
settings (Fig.28 and 29).
Moderator can also cast votes by pressing “+” button next to the corresponding bar
(pressing the button once casts one vote).
The vote can be temporary paused by pressing the Pause button and all incoming votes
will be ignored.
Suspended (paused) votes can be reactivated by pressing Start button again.
Ongoing votes can be hidden (but still active and counting votes) by pressing Hide
button (Fig. 31). At the same time the big screen can be used to display some other
content (chat, commercials, announcements). To restore the vote on the screen press
Show button.
Button Stop or Stop vote ends the voting procedure and displays the results on the
screen (Fig. 32).
43
FUN BILLBOARD DEMO USER MANUAL
Fig. 31. Vote tab during an active voting.
8.3.7.3.Archiving votes results
All incoming text messages with votes will be ignored after stopping the voting procedure
with buttons Stop or Stop Vote. The vote (poll) results, however, will still remain on the
screen and on the Votes tab.
Clicking on Move to archive button will move the current voting to the archive and clear
the vote results from the big screen and Votes tab.
All archived votes can be accessed any time by clicking on History button (Fig.30)
44
FUN BILLBOARD DEMO USER MANUAL
Fig. 32. Vote tab after the vote has been closed
8.3.7.4.Saving detailed information about the vote into an .XML file
The system can create an .xml file with all the details of any of the past votes stored in
the archive. Just click on History button and from Votes history window select the vote
from the vote name column and click on Export link next to the name of that vote (Fig.
33). From the Save dialog window choose the location where you want to save your .xml
file and name your .xml file. The default name format is:
voting<vote name><vote date>.xml
The .xml file contains the following details about the vote:
Name of the vote
Start date and time
End date and time
Question put to the vote
Instructions for the voting audience
Number of voters
Number of all votes
Number of votes for each option put to the vote and the final results in percentages
Detailed information about each voter (name, nick, phone, the option he voted for)
8.3.7.5.Repeating an archived vote
The system allows to repeat any of the past votes stored in the archive. Just click on
History button and from Votes history window select the vote to be repeated and click
on Repeat link next to the name of that vote.
45
FUN BILLBOARD DEMO USER MANUAL
8.3.7.6.Displaying past votes results on the screen
To display on the big screen the results of any achieved past votes; open the Votes
history window (Fig.33) by clicking on History button (Fig.30). Select the name of the
voting and click on Show on the screen link.
Fig. 33. Votes history window.
8.3.8.Alarm
With only one click the system can send prepared alert messages to the specific groups
of users – for example security staff or bartenders. Moderator can prepare alert
messages to be sent in various cases of emergency. The alert is activated with a single
click of the Alarm (Alert) red button in the lower right corner of the „Admin console”.
Clicking this button sends a pre made alert message to a predefined group of recipients.
(For example in case of any disturbance the Moderator can ask security staff to intervene
by sending to all of them a prepared alert message: Your immediate help on the dance
floor is required!)
Administrator can create a list of phone numbers of recipients to whom all alert
messages will be sent by clicking Add phone number button on the bottom of the
Alarm/Alert tab.
8.3.9.Multimedia library (visualization)
Another highlight of the Fun Billboard system is capability of playing all sorts of media
files on the screen; music, video clips, presentations, images. Fun Billboard supports all
major media formats, like: jpg, gif, png, bmp, wmv, mpg, avi, mp3, mp4 ond others.
NOTE: Capability of playing media files depends on media codecs installed and supported
by Windows system. It is strongly recommended to download and install the K-Lite Codec
Pack for Windows to make sure that all media files are supported. It can be downloaded
from: http://www.codecguide.com/download_kl.htm.
Media files can be played either in full screen mode or in a small window in the lower part
of the screen.
In the Media library tab Administrator can create a list of media files and group them into
categories (for example: music files, videos, images/slide shows). Each file from the list
can be played/stopped by clicking play
or stop
46
icon next to it.
FUN BILLBOARD DEMO USER MANUAL
Right click on the file will show a list of all actions that can be performed on this file (play
mode, screen mode or remove from the list).
Visualization/Multimedia library is strongly correlated with another important feature of
the system; Playlists (described in the chapter below).
Fig. 34. The Media library tab with the list of multimedia files
8.3.10.Playlists (visualization)
This feature enables the system to automatically play text, music, pictures, video on the
big screen according to a schedule. This feature is especially useful when the system
rarely receives SMS messages from the audience.
A playlist consists of so-called events. An event is defined as one video clip, one piece of
music, one picture or one text message sent to the screen. Events follow each other. The
interval between events may be fixed or variable (random) depending on user’s settings.
A playlist is simply a set of several events that follow one after another in order to:
a.
b.
c.
d.
Draw the audience’s attention
Encourage the audience to send text messages
Make a presentation of a place, product or service
A, b and c
Optionally, when a playlist is being played, the audience may send text messages to the
screen and „interact” with the playlist.
Playlist can work from start to finish, or it can be “looped” and start from the beginning
after finish (when Play in the loop option is selected).
8.3.10.1.Description of the main playlist options
Name: The name should be descriptive and should uniquely identify the playlist, for
instance: „3 girls talking”.
47
FUN BILLBOARD DEMO USER MANUAL
Constant interval between events: This option enables the user to set the default
interval between all events to a constant value.
Random: This option enables the user to set the time frame in which the system is
supposed to randomly decide when to show the next event. For example: Set the
random interval between events in the intervening period from 30 seconds to 2 minutes.
Play in the loop: If this option is selected, the playlist will restart upon termination.
Wait until all media file finish: Selecting this option prevents currently played song or
video clip from being interrupted, if the interval between events is shorter than the
length of the song or the video clip.
Fig. 35. Example playlists
48
FUN BILLBOARD DEMO USER MANUAL
9.Contact information
To buy a licensed version of Fun Billboard please visit:
http://www.xplorex.pl
Technical support:
Xplorex Mobile Corp. provides technical support only for licensed users of FUN
BILLBOARD PRO.
However you might try to ask for help by writing to:
[email protected]
When sending questions please provide your personal / company details and the version
number of the system you are using.
49