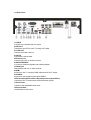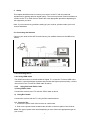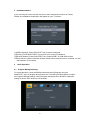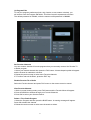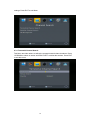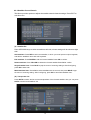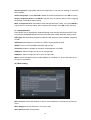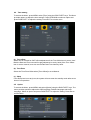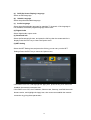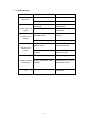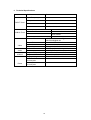
1
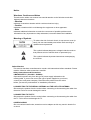
Notice
Warnings, Cautions and Notes
Throughout the whole user manual, pay special attention to the following marks that
indicate hazardous situations.
• Warning
Indicates a hazardous situation which could result serious injury.
• Caution
Indicates a situation which could damage the equipment or other apparatus.
• Note
Indicates additional information to make the user aware of possible problems and
information of any importance to help understand, use and maintain the installation.
Meaning of Symbols
To reduce the risk of electric shock, do not remove cover (or
back). No user serviceable parts inside. Refer servicing to
qualified service personnel.
This symbol indicates dangerous voltage inside the receiver
that presents a risk of electric shock or personal injury.
This symbol indicates important instructions accompanying
the receiver.
Safety Warning
This receiver has been manufactured to comply with international safety standards. Please
read the following safety precautions carefully.
Safety Instructions and Precautions
1.MAINS SUPPLY (100-240V - 50/60Hz)
•Operate this product only from the type of power supply indicated on the
marking label. If you are not sure of the type of power supplied to your home,
consult your local power company. Disconnect the product from the mains
before you start any maintenance or installation procedures.
2.CONNECTION TO THE AERIAL ANTENNA and THE SATLLITE ANTENNA
•Disconnect the product from the mains before connecting or disconnecting the cable from
the aerial. Fail to do so can damage the aerial.
3.CONNECTION TO THE TV
•Disconnect the product from the mains before connecting or disconnecting the cable from
the TV. Fail to do so can damage the TV.
4.OVERLOADING
•Do not overload a wall outlet, extension cord or adapter as this may result in electric fire
or shock.
1
5.LIQUIDS
•The product should not be exposed to liquid of any kind. In addition, no objects
filled with liquid should be placed on the apparatus.
6.CLEANING
• Disconnect the product from the wall outlet before cleaning.
• Use a light damp cloth (no solvents) to dust the product.
7.VENTILATION
• The slots on top of the product must be left uncovered to allow proper airflow into the
unit.
• Do not stand the product on soft furnishings or carpets.
• Do not stack electronic equipments on top of the product.
8.ATTACHMENTS
•Do not use any unsupported attachments as these may be hazardous or cause
damage to the product.
9.EARTHING
•The aerial cable must be buried in the ground.
10.EXTRANEOUS OBJECTS
• Do not insert anything through the openings in the unit, where they can touch dangerous
voltage points or damage parts.
11.LOCATION
• Place the product indoors to avoid exposing it from to lightning, rain or sun.
• Do not place it near a radiator or heat register.
•Make sure it has more than 10 cm clearance from any appliances susceptible to
electromagnetic influences, such as a TV or a VCR.
•Do not block the openings with any object, and do not place the product on a bed, sofa,
rug, or other similar surface.
• If you place the product on a rack or a bookcase, ensure that there is adequate
ventilation and that you have followed the manufacturer's instructions for mounting.
• Do not place the product on an unstable cart, stand, tripod, bracket, or table where it
can fall. A falling product can cause serious injury to a child or adult, and serious
damage to the appliance.
12.LIGHTNING, STORM or NOT IN USE
•Unplug the product from the wall outlet and disconnect the antenna during a
thunderstorm or when left unattended and unused for long periods of time. This will
prevent damage to the unit due to lightning and power-surges.
13.REPLACEMENT of PARTS
•When replacement of parts is required, be sure the service technician uses replacement
parts specified by the manufacturer or those that have the same characters as the
original part. Unauthorized substitution may result in additional damage to the unit.
2
Contents
1Before Using the Product ....................................................................... 4
1.1 Front Panel ............................................................................................. 4
1.2 Rear Panel ..............................................................................................5
1.3 Remote Control ...................................................................................... 6
2Setup ......................................................................................................... 7
2.1 Connecting the Antenna ........................................................................ 7
2.2 Connecting the TV................................................................................. 7
2.2.1Using HDMI Cable.............................................................................. 7
2.2.2Using SCART Cable ........................................................................... 8
2.2.3Using RCA Cable ................................................................................8
2.3Powering On...........................................................................................8
3 Installation Wizard ................................................................................9
4 Basic Operation ..................................................................................... 9
4.1 Program Manage Settings ......................................................................9
4.2 Picture Setting ....................................................................................... 12
4.3 Channel Search ......................................................................................12
4.4 Time Setting .......................................................................................... 14
4.5 Option ................................................................................................... 14
4.6 System Setting ...................................................................................... 15
4.7 USB ...................................................................................................... 16
5 Troubleshooting .................................................................................... 18
6 Technical Specifications.... ................................................................... 19
3
1 Before Using the Product
This section provides detailed instructions on the product and its accessories.
1.1 Front Panel
1.POWER BUTTON
Push to power on/off the main power supply.
2.VOL+/VOL- BUTTON
Adjusts the audio volume.
3.OK BUTTON
Selects a menu, or confirms the selected operation. Also displays the channel list while
4.CH+/CH- BUTTON
Moves the TV/radio channel up or down.
5.MENU BUTTON
Displays the main menu
6.LED DISPLAY WINDOW
Displays the current channel number.
7.OPERATION INDICATOR
The LED will turn green only when the receiver is in operation mode.
8.STNAOBY INDICATOR
The LED will turn red only when the receiver is in standby mode.
9.USB INTERFACE
It is used to software upgrade and media playback.
10.Smart card Reader slot.
4
1.2 Rear Panel
1.LNB IN
Connect to the satellite dish for signal.
2.ANT-OUT
Connects to the RF IN of the TV using a RF cable.
3.LOOP OUT
Connect to another receiver.
4.ANT-IN
Connects the aerial cable.
5.Ethernet port
Connect to the PC or another receiver.
6.USB INTERFACE
It is used to software upgrade and media playback.
7.RS232 port
Data transfer with PC or other receiver.
8.HDMI
Connects to the TV using an HDMI cable and HD OUT output
9.COAXIAL
Connects to the Amplifier and outputs SPDIP .
10.RCA output(Video,Audio L&R);Component output(YPbPr)
Connects to the TV and outputs video and audio signals.
11.Power Inlet
Connect to the detachable power cord.
12.Power Switch
On/Off switch for AC power.
5
1.3 Remote Control
Key
Function
Tums power ON/DFF of the DTR
MUTE
AUDIO
SUB
TIMESHIFT
USB
TV/RADIO
TTX/CC
PVRLIST
When watching a program, mute
the sound.
Choose audio mode.
Subtitle
Timeshift
Enter media menu
Switches between TV and Radio
mode.
Switch to teletext mode.
Enter PVR file list
Starts or resumes media play
Pauses media play.
Stop media play/Stop to record program.
Press this key start to record the program.
MENU
EXIT
EPG
INFO
OK
ASPECT
P/N
0~9
RECALL
FAV
6
Press this key one time to run menu
on screen, and call command box.
Retunes to the previous menu on the
menu screen or escape from the
menu.
Calls up the EPG (Electronic
Program Guide).
Shows information of the current
program.
Executes the selected item in the
Menu screen or enters the desired
Value in any input mode or eners
the channel list menu.
When watching a program, change
programs or move to the next higher
or lower item in the menu.
When watching a program, adjust
the volume or move to the left
or right item in the menu.
Page up/Down
(FF/FB)Fast playback of recorded
programs.
Switch aspect ratio
Switch resolution
Enter number of the required
menu item or select a program
number to watch.
Switches back to previous program.
Display the favorite program list.
2
Setup
This chapter describes how to connect your receiver to the TV with the particular
equipments for gaining optimum signal quality. The receiver provides various interfaces to
connect to the TV or other devices. Select the most appropriate procedure depending on
the equipment you have.
Note: If you encounter any problems setting up your receiver, please contact your local
receiver distributor
2.1 Connecting the Antenna
Connect your aerial to the ANT-IN and connect your satellite antenna to the LNB IN as
follows:
2.2 Connecting the TV
2.2.1 Using HDMI Cable
The HDMI connection is recommended for Digital TV. In case the TV has a HDMI input
connector, a special all-digital interface that provides the highest picture quality, connect
the receiver to the TV with the HDMI cable as above.
2.2.2
Using RCA and YPbPr Cable
1) Using YPbPr Cable
Connect the receiver to the TV with the YPbPr cable as above .
2) Using RCA Cable
Connect the receiver and the TV using an RCA cable as above.
2.3 Powering On
1. Connect the power cord of the receiver to a wall outlet.
2. Push on the power button located at the left side on the front panel of the receiver.
Note: The type of power cord varies depending on area. Select the appropriate type for
your country.
7
3 Installation Wizard
If you are using the receiver at the first time or have restored the receiver to Factory
Default, the Installation Guide Menu will appear on your TV screen.
(1)[OSD Language]: Press RIGHT/LEFT key to select a language.
(2)[Country]: Press RIGHT/LEFT key to select your country of residence.
(3)[Channel Search]: Press RIGHT/LEFT key to select DVB-T or DVB-S/S2 to Scan .
(4)Press OK key to begin Automatic channel search,Once channel tuning is complete, you can
start watching TV programs.
4
Basic Operation
4.1 Program Manage Settings
To access the Menu, press the MENU button and select [Program] using the
RIGHT/LEFT keys to navigate through the menu. The Menu provides options to adjust
the Program Manage Settings. Select an option and press OK or RIGHT to adjust the
setting. Press the EXIT button to exit the Menu.
8
(a) Program Edit
To edit your program preferences (lock, skip, favorite, move,rename or delete), you
will need to enter the Program Edit Menu. This Menu requires a password to access.
The default password is '000000', while the master unlock password is '888888'.
Set Favorite Channels
You can create a shortlist of favorite programs that you can easily access. Set Favorite TV
or Radio program:
1.Select your desired channel then press the FAV button. A heart-shaped symbol will appear
and the channel is marked as a favorite.
2.Repeat the previous step to select more Favorite channels.
3.To confirm and exit the Menu, press the EXIT key.
Disable Favorite TV or Radio
Select the Favorite channel and press FAV button on the remote control to cancel.
View Favorite Channel
1.While in normal viewing mode, press FAV button and the Favorite Menu will appear.
2.Press UP/DOWN to browse through your Favorite Channels
3.Press OK to select your favorite channel.
Delete a TV or Radio Program
1.Select the Program and then press the BLUE button. A warning message will appear.
Press OK to delete the channel.
2.Repeat the previous step to select more channels to delete.
9
Skip TV or Radio Channel
1.Select the channel you would like to skip and press the GREEN button. A skip symbol is
displayed. The channel is marked as a skip.
2.Repeat the previous step to skip more channels.
3.To save your settings and exit the menu, press EXIT key.
Disable the Skip Channel function:
Select the skip channel and press the GREEN button on the remote control to cancel.
Move a TV or Radio Program
1.Select the preferred channel then press the RED button. A move symbol will appear.
2.Press UP/DOWN to move the channel.
3.Press OK to confirm.
4.Repeat the above steps to move more channels.
Lock Program
You can lock selected programs for restricted viewing.
Lock a TV or Radio channel
1.Select the preferred channel then press the YELLOW button. A lock-shaped symbol
is displayed. The channel is now marked as locked.
2.Repeat the previous step to select more channels.
3.To confirm your settings and exit the menu, press the EXIT button.
4.Press the YELLOW button to disable the locked channels function.
5.To view the locked channels, you will be required to enter either the default
password '000000' or your last set password. The master unlock password is
'888888'.
(b) EPG (Electronic Program Guide)
The EPG is an on-screen TV guide that shows scheduled programs seven days in
advance for every tuned channel. Press the EPG button on the Remote Control to
access the guide.
You can use the UP/DOWN key to select the preferred program. If there is more than
one page of information, use the BLUE button for page up and the YELLOW button
for page down.
(c) Sort
Sort your channels from the following options:
[By Default] - Sort the channels according to the station.
[By Service Name] - Sort the channels in alphabetical order.
[By Encrypt] - Sort the channels according to encryption.
[By Freq] - Sort the channels according to frequency.
4.2
Picture Setting
To access the menu, press MENU then select [Picture] using the RIGHT/LEFT key.
The Menu provides options to adjust the video setting. Press UP/DOWN to select an
option and press RIGHT/LEFT to adjust that setting. Press EXIT to exit the menu.
10
(a) Aspect Ratio
You can set the display format to either 4:3 Pan Scan, 4:3 Letter Box , 16:9 Wide
Screen or Screen or Auto to get the maximum display when watching TV.
(b) Resolution
You can change this setting if the picture resolution does not appear to be correct.
This setting is to match the most common setting for HDMI.
[480P]: for NTSC TV system
[576i]: for PAL TV system
[576P]: for PAL TV system
[720P]: for NTSC or PAL TV system
[1080i]: for NTSC or PAL TV system
[1080P(50HZ)]: for NTSC or PAL TV system
(c) TV Format
If the picture does not appear to be correct you can change this setting. This setting
should match the most common setting for TVs in your country.
[NTSC]: for NTSC system TV.
[PAL]: for PAL system TV.
(d) Video Output
If the picture does not appear to be correct you can change this setting. This setting
should match the most common setting for TVs in your country.
4.3 Channel Search
To access the menu, press MENU and select [Search Channel] using the
RIGHT/LEFT keys. This Menu provides options to adjust the Search Channel
settings. Press UP/DOWN to select an option and RIGHT/LEFT to adjust the
11
settings. Press EXIT to exit Menu.
4.3.1 Terrestrial Channel Search
This Menu provides options to adjust the terrestrial search channel settings. Press
UP/DOWN to select an option and RIGHT/LEFT to adjust the settings. Press EXIT
to exit this menu.
12
(a) Auto Search
This option will automatically search for channels and save them once the scanning is
complete. All previously saved channels and settings will be deleted.
1.Select [Auto Search] and press OK or RIGHT to start channel search.
2.To cancel channel search, press EXIT. Any channels that have been found will be
saved.
(b) Manual Search
This option allows you to scan for new channels without deleting previously saved
channels and settings.
1. Select [Manual Search] then press OK or RIGHT. The channel search screen will
appear.
2.Press the RIGHT/LEFT key to select the channel frequency.
3.Press OK to start searching channels.
If a channel is found, it is saved and added to the channels list. If channels can not be
found during searching, the receiver will exit automatically.
(c)
Country
Select your country of residence.
13
4.3.2 Satellite Channel Search
This Menu provides options to adjust the satellite search channel settings. Press EXIT to
exit this menu.
(a) Satellite list
Press UP/DOWN keys to select a satellite at left side, whose settings will be shown at right
side.
Add satellites: Press RED to add a new satellite, in which you must input an unique longitude,
and edit the satellite’s name with soft keyboard.
Edit satellites: Press GREEN to edit the focused satellite.Press OK to confirm.
Delete satellites: Press YELLOW to delete the focused satellite.Press OK to confirm.
Single Satellite Scan: Press BLUE to pop the menu of scanning settings. After Configuring,
press OK to start scan.
Multi-Satellites Scan: Press OK to select satellites with the a mark, then press BULE to pop
the menu of scanning setting. After Configuring, press OK to start multi-satellites scan.
(b) Transponder list
Press GOTO to switch the list to show transponders of the focused satellite. Also you can press
GOTO to switch back satellites’ list.
14
Add transponder: Press RED to add a new transponder. It can’t save an existing TP under the
same satellite.
Delete transponder: Press YELLOW to delete the focused transponder. Press OK to confirm.
Single Transponder Scan: Press BULE to pop the menu of scanning setting. After configuring
the settings, Press OK to start scanning.
Multi- Transponder Scan: Press OK to select transponders with a mark , then press BULE to
pop the menu of scanning setting. After configuring the settings, Press OK to start scanning.
(c) Antenna Setting
Press RIGHT key to highlight the Antenna Setting menu at right side,and press EXIT key
to return the satellite\transpoder list menu from this menu .there are these setting items:
LNB Type: Set the working frequency band for LNB. select the local oscillation frequency
of LNB.
LNB Power:Set whether or not there is a STB to supply power to LNB.
22Khz:Turn on or off the 22KHz switch(On,Off or Auto).
Toneburst: Enable or Disable the toneburst switcher(BurstA or BurstB).
DiSEqC1.0: Select the right port up to 4 for the right LNB.
DiSEqC1.1: Select the right port up to 16 for the right LNB.
Motor: Press LEFT/RIGHT keys to select DiSEqC1.2 or DiSEqC1.3. Then Press OK to show
the menu to set position.
(d) Motor setting
Move Continue: Press LEFT/RIGHT to start to move West/East. It will keep moving until you
stop it.
Move Step[1]:Press LEFT/RIGHT to move just a step.
Goto Reference:Rest all the position.
15
4.4 Time Setting
To access the Menu, press MENU select [Time] using the RIGHT/LEFT keys. The Menu
provides options to adjust the time settings. Press UP/DOWN to select an option and
press RIGHT/LEFT to adjust the setting. Press EXIT to exit the menu
(a) Time offset
Select auto or manual for GMT offset adjustments.If the Time Offset item is set as ‘Auto’.
Both the Date and Time items will be grayed(cannot be set by hand).If the Time Offset
item is set as ‘manual’,users can set the Date and Time items by hand.
(b) Time Zone
Select the Time Zone Offset when [Time Offset] is set to Manual.
(c) Sleep
If the Sleep item is set any hour,the system will auto enter the standby mode after server
hours of no operaions.
4.5 Option
To access the Menu, press MENU and select [Option] using the RIGHT/LEFT keys. The
menu provides options to adjust the OSD Language, Subtitle Language and Audio
Language. Select an option and press RIGHT/LEFT to adjust the setting. Press Exit to
exit the Menu.
16
(a)
OSD (On Screen Display) Language
Select an OSD language.
(b)
Subtitle Language
Select the preferred subtitle language.
(c)
Audio Language
Select the preferred audio language for watching TV channels. If the language is
not available, the default program language will be used.
(d) Digital Audio
Select digital audio output mode.
(e) Smartcard info
Select the Smartcard info item ,and press the OK key,then the smartcard info is
display.Press the EXIT key to return the Option menu.
(f) NET Setting
Select the NET Setting item,and press the Ok key,you can carry out the NET
Settings.Press the EXIT key to return the Option menu.
If the DHCP is set ‘On’ ,and highlight the Apply item, press OK key, then users can
establish the network connection Auto.
If the DHCP is set ‘Off’, the IP Address, Subnet mask, Gateway ,and DNS items will
became active, and highlight the Apply item, then users can establish the network
connection by giving these parameters.
17
4.6 System Setting
To access the Menu, press MENU select [System] using the RIGHT/LEFT keys. The
menu provides options to adjust the system settings. Press the UP/DOWN key to select
an option and press RIGHT/LEFT to adjust the setting. Press EXIT to exit the Menu.
(a) Parental Guidance
Select the Parental Guidance item and press OK key to enter your password or the
default password ‘000000’ , then the Parental Guidance menu is display.
Age: Press the RIGHT/LEFT keys to select the age. If select the ‘Off’ ,the Parental
Guidance function is disable.
(b) Set Password
Set or change the password for locked programs. Enter your old password or the default
password '000000'. You will then be asked to enter your new password. Press OK button
to confirm your new password. Once it is confirmed, press EXIT to exit the Menu. The
master unlock password is '888888'.
(c) Restore Factory Default
Reset your Set Top Box to the Default Factory Settings. In Main Menu select [Restore
Factory Default] using the RIGHT/LEFT keys and press OK or RIGHT to select. Enter
your password or the default password '000000' and press OK to confirm. This option will
delete all preset channels and settings. The Master unlock password is '888888'.
(d) Information
View model, hardware and software information.
(e) Recall List
Enable or disable Recall list function , which support multi-recall-program switching.
(f) Software update
USB Upgrade: Select to start software update if USB is connecting and there’s a upgrading
file.
OAD: If the status is set 'ON ', it will scan new software from broadcast according to your
preferred time in "Start time".
18
4.7
USB
To access the Menu, press the MENU button and select [USB] using the RIGHT/LEFT
keys. The menu provides options to playback Music, Photo and Multimedia files. It can
support AVI, MP3, WMA, JPEG and BMP formats. The receiver will only support USB
device with FAT32 file system. It will not support NTFS file system.
(a) Multimedia
When a USB device is attached you can select from the Music, Photo or Movie options in
this menu using the RIGHT/LEFT keys and OK to select. If a USB device is not
connected, the warning message "No USB device is Found" will appear.
(b) Photo configure
-Slide Time: adjust slide show interval to 1-8 seconds.
-Slide Mode: adjust slide show effect as mode 0-59 or random.
-Aspect Ratio:
[Keep]: Play picture in its original aspect.
[Discard]: Play picture in full screen mode.
(c) Movie Configure:
-Subtitle Specific:
[Small]: Displays the subtitle as small mode.
[Normal]: Displays the subtitle as normal mode.
19
[Big]: Displays the subtitle as big mode.
- Subtitle BG:
[White]: Displays the subtitle in white background.
[Transparent]: Displays the subtitle in transparent background.
[Grey]: Displays the subtitle in grey background.
[Yellow green]: Displays the subtitle in yellow green background.
- Subtitle Font Color:
[Red]: Displays Subtitle in red font.
[Blue]: Displays Subtitle in blue font.
[Green]: Displays Subtitle in green font.
Notes:
-We can't guarantee compatibility (operation and/or bus power) with all USB mass
storage devices and assume no responsibility for any loss of data that may occur
when connected to this unit.
-With large amounts of data, it may take longer for the system to read the contents
of a USB device.
-Some USB devices may not be properly recognized.
-Even when they are in a supported format, some files may not play or display
depending on the content.
20
5 Trouble Shooting
Problem
Potential Reasons
What to do
Power is not connected
Connect the power
The power switch is not on
Switch on the power
DVB-T or DVB-S2 cable not
connected
cable is faulty
Plug in the DVB-T or
DVB-S2 cable
Check cable and
connections
No or incorrect connection
with audio cable
Connect the audio cable
correctly
Sound on mute
Turn off mute function
No or incorrect connection
with AV cable
Make sure cables are
connected correctly
The program is a radio
program
Press<TV/RADIO>key to
shift into TV mode
The battery is exhausted
Change battery
Remote control is not facing
or close enough to the Set
Top Box
Adjust the position of the
Remote control and move
closer to the receiver
The signal is too weak
Check aerial cable and
connections
No picture
Screen shows "No
Signal"
No sound from
speaker
Only sound, no
image on the
screen
Remote control is
not working
Picture is breaking
up
21
6 Technical Specifications
Item
DVB-T Tuner
DVB-S2 Tuner
Sub Item
Parameter
Input Frequency
174~800MHz UHF & VHF
RF Input Level
-25~-85dBm
IF Bandwidth
7MHz and 8MHz
Modulation
QPSK, 16QAM, 64QAM
lnput frequency
950~2150 MHz,
Symbol Rate
2~45MB/S
Band
SCPC&MCPC receivable from C/Ku
band satellites
QPSK,8PSK
Demodulation
Decoder Format
Video
Audio
USB2.0
Power
MPEG4 AVC/H.264 HP@L4
MPEG2 MP@ML/HL
576P, 720P,1080i,1080P
4:3, 16:9, Auto
HDMI(V1.3C), YPbPr, CVBS
MPEG-1(layer1&1&2&3), WMA, AC3
S/PDIF(Coaxial), RCAx2(L/R)
Unlimited
MP3, WMA, JEPG, BMP,AVI
100~240V 50/60Hz
10W
Output Format
Aspect Ratio
Output Port
Decoder Format
Audio output
Supported Capacity
Supported Media
Supply Voltage
Maximum Power
Consumption
Standby Power
Consumption
<0.8W
22