1
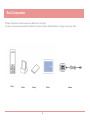
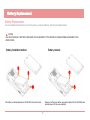
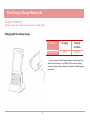
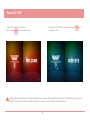
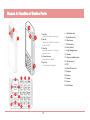
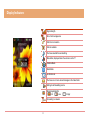
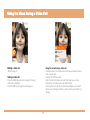
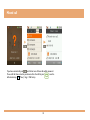
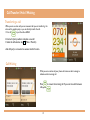
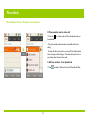
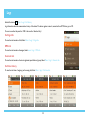
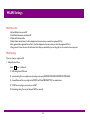
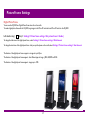
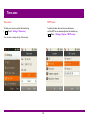
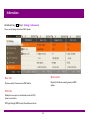
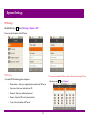
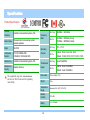
User Manual
This manual includes product specifications and instructions for SQ-3500 phone operation. This manual must be read before operating the product.
The SQ-3500 phone access point is required to use this product. Usage of the SQ-3500 access point provided in the full package is recommended.
Safety Precautions
Do not put the SQ-3500 in heating appliances such as heaters and microwave ovens to dry it if the device is wet.
This can cause explosions, deformation, or other problems. If this occurs, free services shall not be provided.
Do not use the SQ-3500 in places that are too hot or too wet (keep it indoors between 0 ℃ and + 50 ℃).
If the device gets wet with rain, or through spilled beverages, or is used in extremely hot/wet places such as public saunas, it can cause battery explosions.
Be careful that conductors such as necklaces, keys, and coins not to contact battery terminals (the metal section).
Since short circuits can cause explosions, be careful to prevent this.
Keep the SQ-3500 and chargers out of the reach of children or pets.
Batteries in the mouth, or using broken batteries, can hurt or cause electric shocks.
Be sure to only use the designated batteries and accessories for the SQ-3500 provided by our company.
If you use unauthorized batteries or accessories, it can reduce the life of the SQ-3500, cause explosions, or damage. If this occurs free servicing is avoid .
Correctly install the SQ-3500 in compliance with instructions.
Otherwise, abnormal operation of the SQ-3500, or a reduction in its life span may occur.
Record and keep the information contained in the SQ-3500 separately.
Since important information stored in the SQ-3500 can be removed due to unavoidable circumstances such as user carelessness, maintenance, and product
upgrades, please keep a record of important information. Take note that the manufacturer will not take responsibility for any damage from the loss of
information.
Never push the power button when the SQ-3500 is wet, and do not touch the SQ-3500, charger, or power cords with wet hands. This
can cause fires or electric shocks. The SQ-3500 is not water-resistant. Keep it dry
Do not use chemical detergents such as benzene, thinners, and alcohol to clean the SQ-3500.
This can cause fires.
1
Safety Precautions
Do not hold the SQ-3500 to your ears to turn on the power. This can cause hearing impairments or physical injuries.
Do not look at the infrared window in a direct way when using the remote control. this can cause visual impairment.
Refrain from the use of SQ-3500, and leave the power cord for the charger unplugged when it is thundering and flashed lightning.
Thunderbolts can cause severe physical injuries or fires.
Do not disassemble the SQ-3500 temporarily, or apply shocks to device.
If the device is damaged when you disassemble it, or inflict shocks on the device, it causes electric shocks, electric leakage or fires.
2
Index
Safety Precautions………………………………………………………………………………....................................................................................1
Basic Components...………….…………………………………………………………………………………….….…...………………………….……4
Battery Replacement….…………………………………………………………………………………….......….……………………………….……...5
Time Taking to Charge / Battery Life………………...………………………………………………………….……………………………………….6
Inserting / Removing a micro SD card…..…………………………………………………………………….…………………………………………8
Power On/Off………………………………………………………………………………………..................................................................................9
Names & Function of Device Parts……………………………………...………………………………………………………………………………10
Display Indicators…………………………………………………………………………………………………………………………………………..11
Calling Method……………………………………………………………………..………………………………………………….……………………12
Phone Book………………………………………………………………………………………………………………………………………………….20
Messaging………………………………………………………………………………………………………...…………….……………………………27
Display………………………………………………………………………………………………………………………………………………………..28
Sound Settings…………………………………………………………………………………………………………………………………...…………29
Tools………………………………………………………………………………………………………………………………………………...………..30
Multimedia…………………………………………………………………………………………………………..………………………………………31
Logs…………………………………………………….…………………………………….……………………………………………..………………..32
Settings……………..……………………….……………………………………………………………………………………………..………………..33
Before going to service Center …………………………….…………………………………………………………..............................................43
3
Basic Components
The Basic Components as shown below may be different from the original.
For safety in use, please purchase authentic products. If you want to purchase additional batteries or chargers, contact your dealer.
Phone
Cradle
Battery
Manual
4
Adapter
Battery Replacement
Battery Replacement
Use only batteries authorized by the company when you replace batteries, following the diagram below.
CAUTION
RISK OF EXPLOSION IF A BATTERY IS REPLACED WITH AN INCORRECT TYPE. DISPOSE OF USED BATTERIES ACCORDING TO THE
INSTRUCTIONS.
Battery installation method
Battery removal
①
②
②
③
①
If the battery is inserted upside down, the SQ-3500 phone will not work.
Please turn off the power before removing the battery from the SQ-3500 phone.
(a sudden power off can cause problems)
5
Time Taking to Charge / Battery Life
Charge the battery
Charge the battery after purchasing the product as it is not fully charged.
Charging with the desktop charger
Features
Charging
Charging
Complete
Charging Lamp
RED
GREEN
※ Lamp on the charger flickers? Separate the battery from the charger, and
then re-fits into the charger. It is still flickering? Then, cleans the charging
terminal and charge the battery. (When the lamp doesn‟t stop flickering, apply
to the dealer.)
6
Time Taking to Charge / Battery Life
Time Taking to Charge / Battery Life
※ Battery life varies with the environment temperature,
battery age and movement of the user.
Model
Standard Model
Charging time
3 hours 30 minutes
Battery life
(continuous
calling)
Voice
6 hours
Video
3 hours
-Battery life is not permanent
The successive use time and standby time of batteries are the
estimates of the company‟s laboratory, which can vary from
the figures in the manual depending on the patterns used
7
Inserting / Removing the Micro SD card
Inserting the micro SD card
Use Only compatible micro SD cards approved by UniData for use with this device. UniData uses approved industry standards for memory
cards, but some brands may not be fully compatible with this device. Incompatible cards may damage the card, the device and corrupt data
stored on the card.
The phone supports micro SD cards up to 8GB.
1.
2.
3.
Open the side cover of the micro SD slot.
Insert the card into the micro SD card slot with the contact surface facing down, and press it until it locks into place.
Close the side cover.
Remove the micro SD card
1.
2.
3.
Make sure that no application is currently accessing the micro SD memory card.
Open the side cover of the micro SD slot.
Press the micro SD card slightly in to release lock, and pull the card out.
Important: Do not remove the memory card in the middle of an operation when the card is being accessed.
Removing the card in the middle of an operation may damage the memory card as well as the device, and data stored on the
card may be corrupted.
You can remove or replace the micro SD card during phone operation without switching the device off.
8
Power On / Off
If you want to turn on the power,
keep pressing
for 3 seconds or more.
If you want to turn off the power, keep pressing
seconds or more.
for 3
If anything abnormal takes place, or if the power button does not work while using a Wi-Fi phone, start the phone after removing and
inserting the battery. Turn on the power after waiting for 5 seconds or more when you restart the phone
9
Names & Function of Device Parts
19
21
14
1 Send Key
Used for receiving and making call
2 End Key
Used to end a call and to switch the
power ON/OFF
3 Clear Key
Removing characters or moving to
previous screen.
4 Vibration shortcut
Press and hold to vibrate
5 Key Lock
Lock and unlock the keypad.
10
6
7
8
9
10
11
12
13
14
15
16
17
18
19
20
21
Left Selection Key
Right Selection Key
Mute Shortcut
AP Search Key
Alarm Shortcut
Using Message function
Calendar
Using user-defined function
Volume Control
MIC
Micro SD Insert hole
Earphone
Earpiece
Speaker
Camera
Back Camera
Display Indicators
Signal strength
Out of call coverage area
Call trial or connection
Call not available
You have selected the sound setting
Mute button, displayed when the volume is set to “0”
Vibration Mode
Silent Mode
An Alarm is set
You have one or more unread messages in the Inbox folder
Setting to call forwarding service
Remaining battery life
Full
Low
Connecting to network
11
Empty
Calling Method
Voice Calls
Call
Connect
In standby, enter the numeric keys and then press the
key
※ Call quality may be reduced at increased distance away from the access point.
12
Calling Method
Video Calls
Call
connect
In standby, enter the numeric keys and then press
.
※ Call quality may be reduced at increased distance away from the access point.
13
Calling Method
Call logs
Redialing recently used numbers
You can make voice or video calls by dialing
recently used numbers (incoming, outgoing,
missed, received/sent text messages). During
stand-by, press the SEND key and then select
the phone number you want to call.
- Select VIDEO in the menu if you want to
make a video call.
Speed dialing
You can speed dial saved numbers to make
calls quickly and easily.
During stand-by, enter the speed dial number
but press the last number longer to make a
call.
If you enter the speed dial number and press
SEND key, it does not work as the speed dial.
And the speed dial doesn‟t work by using
video call, only voice call.
14
Calling Method
Number
Key
Auto-search
Press a part of the number you want to call to auto-search
the phonebook and display the results. Select a phone number
and press the OK key.
-Press the VIDEO key to make a video call.
※ Under Development
15
Using the Menu During a Voice Call
Using the menu during a voice call
Making a voice call
•Refer to page 12.
Mute: This function stops your caller from hearing your
voice temporarily. The caller's voice can still be heard.
Taking a voice call
Press the SEND key to take an incoming call.
Press the END key to reject an incoming call.
16
Using the Menu During a Video Call
Making a video call
Using the menu during a video call
Change Camera: To converts the current video preview to back or
front camera sight.
Preview Off: Off the preview.
Mute: This function stops your caller from hearing your voice
temporarily. The caller's voice can still be heard.
View my picture: Turns off your picture and displays your caller's
picture only. (Changes to 'Hide my picture' when your picture is in
display.)
•Refer to page 13.
Taking a video call
Press the SEND key when the message “Incoming
video call” is displayed.
Press the END key to reject the incoming call.
17
Missed call
If you have a missed call, press
, and the last one of those calls will be answered.
To see calls that have arrived in your absence from the call list, press
or use the
Left selection key
Menu) > Logs > Call history
18
Call Transfer / Hold / Waiting
Transferring a call
While you are on active call, you can announce that you are transferring the
active call to another party, or you can directly transfer the call.
1. Press the
to put the call on HOLD.
2. Dial the 3rd party numbers and place a new call
3. Select the left selection key
(Menu > Transfer)
while 3rd party is connected to execute transfer function.
Call Waiting
While you are on active call, your phone will receive an alert message to
indicate another incoming call.
Press
to answer the incoming call. If you want to switch between
calls, press
19
Phone Book
Right select key
Left selection key
for shortcut
( Menu > Contacts > Search contacts )
Enter a part of a name, phone number or e-mail address to search for a phone number.
Search all: Search by a part (more than 1 character) of a name,
phone number or e-mail address.
Search by letter or digits: Enter letters or digits, then all names
starting with these letters/digits will be displayed..
Search by group: Select a group to search in (unspecified, standard
groups, custom groups).
Shortcut key search: Enter a set shortcut number to search for a
phone number.
Enter the name of the person you want to call and press the View
key to call a number saved in the phone book.
Press the (
) key to edit the saved details.
Press the ( Send ) key to call a found number.
You can search for phone numbers just by pressing „Search‟ in
stand-by mode. If you want to call the phone number selected,
press .
20
Phone Book
1. Phone Number Search - Menu (for a saved number)
2. Phone number search – video call
1. Press the
have selected.
to make a video call from the phone book you
- The phone number selected must be compatible with video
calling.
- A video call will be converted to a voice call if the dialed number
does not support video calling or if the video call receiver is in an
area where video calls cannot be made.
3. Add new contacts – from phonebook
1. Press
21
and select > Add contacts on the Phone Book Menu.
Phone Book
1. Phone Number Search - Menu (for a saved phone number)
4. Phone Number Search - Delete
Press
and select > Delete from Phone Book menu.
Delete the selected number.
5. Phone Number Search – Selection delete
Press
and select > Delete all you selected from Phonebook menu.
6. Phone Number Search – Delete All
Press
and select > Delete all from Phonebook menu.
Press „Yes‟ after entering the password to delete all saved numbers.
- Take note that if you select Delete All, all stored phone numbers will be
deleted.
Check again before deleting as deleted phone numbers cannot be recovered.
22
Phone Book
2. Add new contacts (
Add contacts )
Menu > Contacts >
Add a new phone number and other details.
Up to 1,000 phone numbers can be saved.
※ Each type of phone number can be selected. If more than 2
phone numbers are to be saved, one phone number must be
selected as the main phone number.
Name
Save a name. (Up to 48 alphabet characters)
Group
Assign a group.
Use direction key to assign the group.
Phone
Number
Save a phone number.
Select a main phone number and phone number type.
Press the shortcut key to assign a speed dial number.
Add number
Add a new number.
Up to 5 phone numbers can be saved.
(Select an icon and press OK to save)
E-Mail
Address
Save an e-mail address.
Messenger
Save messenger details.
Ringtone
Assign a ring tone.
Birthday
Save a birthday. (Can be saved on the scheduler)
Memo
Save a memo.
Up to 65 alphabet characters can be saved.
23
Phone Book
You can add new number in standby mode.
Dial a phone number and press SAVE during stand-by to save phone numbers.
24
Phone Book
3.To set speed dial, select
( Menu > Contacts > Speed dial )
Set speed dial numbers for phone numbers saved in the phone book that are frequently called (up to 99 speed dial numbers can be saved).
1. Select a speed dial number and press SET.
View Speed Dial Number List: Displays a list of saved
speed dial numbers.
2. Search for a phone number in the phone book.
Clear All: Clears all saved speed dial numbers.
3. Select a phone number and press SELECT to complete
the setting.
> Move: Moves a phone number to a different speed dial number.
: Clears an assigned speed dial number.
25
※ Select a speed dial number and press
call.
to make a
Phone Book
Group Settings
( Menu > Contacts > Group Settings )+ Edit
a group to assign a phone number or add a new group.
Select a group to edit and change the group name and
ring tone.
Group name: Enter a group name (24 alphabet characters)
Up to 10 groups can be set.
Group ring tone: Assign a ring tone to a group.
※ Incoming call from a phone number assigned to a group will sound the
selected ring tone. However, the group ring tone will be ignored if another
ring tone is assigned in the phone book.
26
Messaging
In messaging, you can read, write and send messages.The messaging service can only be used if it is supported by your
network or service provider
Left selection key
( Menu > Messaging ) or press the shortcut key
Create a text message
Select Menu > Messaging > New message
1. Enter the message.
2. To add symbol and emoticon during writing a text, select menu
3. To add recipients, scroll to the To field, and enter the recipient‟s number
or select Search to add recipients from the available options.
You can add recipients up to 20 recipients.
Messaging folders
Inbox – All the incoming messages are stored in the <Inbox> folder with detailed date, time and sender of each message shown.
You can use <menu> to reply, forward, save number, save in saved box and delete the selected message or delete all messages
in the Inbox
Outbox – Outbox is the place where the messages sent out are saved. The time the message was sent out and the receiver information
is shown
Draft – Draft is the place where the messages in process are kept. A message is put in the <Draft> folder when you saved the text you just
keyed into the message and it is kept in the Draft folder until sent out.
27
Display
Display settings Select the left selection
Menu > Display
There are 4 options included in Display Settings
Wallpaper
Select Menu > Display > Wallpaper
This feature enables you to set a picture as a wallpaper image in your phone‟s stand -by screen.
There are fifteen built-in pictures for you to change the background image
Screen
To define the clock type of the time format in stand-by screen, Select Menu > Display > Screen
Banner
To select the type of the banner as a phone number or greeting in your phone‟s stand-by screen
Select Menu > Display > Banner > Set banner >
Greeting, Select Menu > Display > Banner > Set banner > Input text
This option enables you to set welcome as a greeting to be displayed in your phone‟s stand-by screen.
To change the Greeting text, Select Menu > Display > Banner > Edit Input text
Backlight
To set time to dim the display Select Menu > Display > Backlight > LCD backlight
28
Sound Settings
Bell
Select left selection
Menu > Sound settings > Bell to change the type of the bell type
Bell mode
Select menu > Sound settings > Bell mode to choose how the phone notifies you of an incoming voice call.
The alert type allows you to choose between Ringing(Ringtone), Vibrating and Silent.
Volumes
To adjust the ring volume and incoming message alert volume.
Select menu > Sound settings > Volumes
Etiquette Mode
Select menu > Sound settings > Etiquette mode to choose vibrating mode to notify you of an incoming voice call and to set key tone and alarm to silent
mode
29
Tools
Alarm
To set an alarm, Select left selection
Menu > Tools > Alarm > Speed alarm.
When an alarm is activated, the alarm indicator will be displayed.
To dismiss the alarm and return to standby mode,
press <CRL> or <Right selection Key
Unit converter
To convert unit to different unit, Select menu > Tools > Unit converter
From this submenu you can use unit converter of Length, Weight, Width, Bulk and Temperature.
Calendar
To view the calendar, Select menu > Tools > Calendar
Memo pad
To view the memo, Select menu > Tools > Memo pad
30
Multimedia
Multimedia
To optimize the use of Multimedia, insert a memory card in your device.
To use multimedia, Select left selection
Menu > Multimedia
The player supports files formats such as MP4, MP3, JPG, PNG, GIF and BMP.
31
Logs
Select left selection
Menu > Logs > Call history
Log information about the communication history of the device. The device registers missed , received calls and SMS history up to 100.
To move to another tab press the <CRL> then use the <direction Key>
Call logs info
To view the total number of calls, Select Menu > Logs > Clogs info
SMS info
To view the total number of messages, Select menu > logs > SMS info
Contacts info
To view the total number of contacts registered, speed dials and groups, Select Menu > logs > Contacts info
Call time history
To view the total time of outgoing and incoming calls, Select Menu > logs > Call time hist.
32
Settings
Press the shortcut key
Left selection key (
to set to Wi-Fi
Menu) > Setting > Wi-Fi )
Wi-Fi Settings.
If you select Wi-Fi, the following display will appear:
1. Display registered Wi-Fi profile (Top)
•
SQ-3000 can be registered Wi-Fi up to 4
•
If there is no registered Wi-Fi profile, Wi-Fi profile do not appear
2. Display scanned AP list. (Bottom)
•
Display strength signal and SSID of scanned AP
•
Hidden AP will not display
33
WLAN Settings
Wi-Fi Menu lists
• Refresh: Refresh the scanned AP
• Detail: Detail information of selected AP
• Profile add: Add new profile.
• Delete: Delete selected item ( It will be displayed on the menu when you select the registered AP list )
• View registered: See registered Access Point ( It will be displayed on the menu when you select the registered AP list )
• Change touch: It shows the icons for the Access Points that you searched. And you can drag the icon to connect to the access point.
Wi-Fi Settings.
There are 3 ways to register an AP
1. Add profile from Menu
Select
menu > Profile add
1) SSID setting: Enter SSID name
2) Security setting: You can configure security settings to be used. (WEP/WPA-PSK/WPA-EAP/WPA2-PSK/WPA2-EAP)
3) Account/Password:You can configure the ID/PWD and Mode(MD5/PEAP/TTLS) for authentication
4) STUN:You can configure server and port of NAT
5) Networking setting : You can set Network DHCP or manually
34
WLAN Settings
Wi-Fi Settings.
2. Add profile from AP list
Select
add
1) SSID setting: Enter SSID name
2) Security setting: You can configure security to use. (WEP/WPA-PSK/WPA-EAP/WPA2-PSK/WPA2-EAP)
3) Account/Password:You can configure the ID/PWD and Mode(MD5/PEAP/TTLS) for authentication
4) STUN:You can configure server and port of NAT
5) Networking setting : You can set Network DHCP or manually
3. Add profile as Temporary
Select OK or Temp
1) Security setting: You can configure security to use. (WEP/WPA-PSK/WPA-EAP/WPA2-PSK/WPA2-EAP)
2) Account/Password:You can configure the ID/PWD and Mode(MD5/PEAP/TTLS) for authentication
3) STUN:You can configure server and port of NAT
4) Networking setting : You can set Network DHCP or manually
35
If you add a profile as <Temp>, it
means it is connected as temporary
so you should connect to the AP
manually every time when you
connect to the AP if it is not
registered
User Settings
Reset to default Left selection key (
Menu) > Settings > User settings > Reset to default )
To reset all preference settings and delete all personal data, such as contacts, message, WLAN and SIP information
36
Picture Frame Settings
Digital Photo Frame
You can use the SQ-3500 as a Digital Photo Frame when it‟s on the cradle.
To make a digital photo frame with the SQ-3500, copy images to the Micro SD card and insert Micro SD card into the SQ-3500.
Left selection key (
Menu) > Settings > Picture frame settings > Set picture frame > Enable )
To change the slide time of the digital photo frame, select Settings > Picture frame settings > Slide timeout
To change the start time of the digital photo frame after you put the phone on the cradle, select Settings > Picture frame settings > Start timeout
The function of the digital photo frame supports an image of up to 30pcs.
The function of the digital photo frame supports four different types of image – JPEG, GIF, BMP and PNG
The function of the digital photo frame supports images up to 1MB.
37
Time-zone
Time-zone
NTP server
To define your time zone, select Left selection key
(
Menu) > Settings > Time-zone)
To update the time, date, and time zone information
with the NTP server automatically, select Left selection key
(
Menu) > Settings > System > NTP server)
You can select country and city of the country.
38
Call Forwarding
Call Forwarding
To set the divert setting to on, select Left selection key (
Menu) > Settings > Call Forwarding)
With call forwarding, you can direct your incoming calls to another number.
Select the forwarding option you want from Unconditional(when you want to divert
all incoming calls), Busy(when your number is busy) to No Answer (when you don‟t
answer an incoming call).
Auto answer
To set the auto answer, function select Left selection key (
Menu) > Settings > Auto answer)
You can accept the incoming calls automatically without answering from the
registered number.
39
Information
Left selection key (
Menu) > Settings > Information)
You can see the setting information of Wi-Fi phones.
Basic Info.
Network info.
My phone number, Firmware version, MAC address
Displays the IP address, netmask, gateway and DNS
address.
Wi-Fi Info.
Displays the access point or wired/wireless router the Wi-Fi
phone is connected to.
SSID, Signal Strength, BSSID, Security, Channel, Beacon Interval
40
System Settings
SIP Settings.
Left selection key (
Menu) > Settings > System > SIP
You can set the information of the SIP server.
SIP Account.
* You can select symbol in Phone number, User name, Domain, Proxy.
If you select SIP, the following options will appear:
Left selection key (
•
Phone number – Enter your registered phone number from SIP server
•
User name – Enter your authorized user ID
•
Password – Enter your authorized password
•
Domain – Enter the SIP server‟s domain address.
•
Proxy – Enter the address of SIP server
41
Menu) > Symbol
System Settings
NTP server
Please refer to page 38.
Select Left selection key (
Menu) > Settings > System > NTP Server
Provision Settings
To download the new firmware via our Auto Provisioning Sever,
Select Left selection key (
Menu) > Settings > System > Provision > Enable
Firmware upgrade
To download the new firmware manually via HTTP server,
Select Left selection key (
Menu) > Settings > System > Firmware upgrade
Regulatory Domain
To adjust Wi-Fi channeling of the country,
Select Left selection key (
Menu) > Settings > System > Regulatory Domain.
Some phone versions may not support all the functions mentioned above on the manual.
42
Before going to Service Center
Wi-Fi phone cannot start.
• Check whether it is correctly installed.
• Check whether battery is fully charged.
• Press the power button of Wi-Fi phone.
• If it shows no response to that, remove battery,
and install it again.
Wi-Fi phone shows “poor call condition” during
calls
The battery is full, but the phone keeps turned off?
• Separate the battery from the phone, and then, re-fits into
the phone and turn it on.
• It is still turned off? Then, clean a contact part to cradle,
re-fit into the phone and turn it on.
Video screen is not clear and it seems that your
camera lens is not clean.
• Please clean up a camera lens with a soft cloth.
• Check whether it is too far from AP..
• Electric waves might have become weak due to obstacles such
WiFi phone has charging troubles
as walls, or electro magnetic disturbance might have taken place.
Turn off the power of AP, and on again in 3 seconds.
• If volume is low, adjust it properly by using volume key.
• Check whether it is correctly installed.
• Please clean up WiFi phone and charger interface.
WiFi phone bell does not ring.
Newly purchased Wi-Fi phone does not work
• Check whether it is correctly installed.
• Check whether wireless LAN information include the name of
the LAN in Wi-Fi info.
- refer to 40 page
• Check whether WiFi phone battery has been charged.
• Check whether sound setting is No Ring or Etiquette mode.
• Check whether it is correctly installed.
• Check whether it is connected to AP.
- refer to 40 page (Wi-Fi Info)
• Check whether it shows any error messages when the
power of Wi-Fi phone has been turned off and on.
• Check whether battery is fully charged
43
Before going to Service Center
Calls are not made
If calls are not made on Wi-Fi phones after installing AP, check Internet connection, and then the following.
• If Wi-Fi phone screen displays
and
, check the following
If Wi-Fi phone displays
in signal strength, check if the wireless condition indicator of AP, lights of its lamp, and turn off
and on the power of Wi-Fi phone after temporarily maintaining a distance of 1.5-3 meters between AP and Wi-Fi phone.
If the problem still continues, refer to the part of “Check Points by Error Message” in page 50 of this manual.
• If Wi-Fi phone screen displays
and
, check the following:
If
is displayed even after turning off and on the power of Wi-Fi phone, check if LAN cable is properly connected to the
Internet port of AP.
DO NOT USE chemicals or detergent when you clean an alien substance on a phone or charger.
Cleans it out of an eraser or a soft patch only.
44
Specification
Product Specification
인증번호: UDC-SQ-3500-VA(B)
Certified
Company
UniData Communication Systems, INC.
Device Name
Wireless Data Communication system
wireless appliance
Model
SQ-3500
Certification
Number
FCC ID: SQMSQ-3500
CANADA IC: 6303A-SQ-3500
Manufacture
UniData Communication Systems, INC.
Manufacture
Country
Republic of Korea
This equipment may occur radio interference
and can not offer the service that regarding
men’s safety
FCC ID: SQMSQ-3500
Frequency
Band
Operating
Channel
Transmission
Output
6303A-SQ-3500
802.11b/g
2400MHz ~ 2483.5MHz
802.11a
5150MHz ~ 5250MHz (A band)
5725MHz ~ 5850MHz (D band)
802.11b/g
Ch1 ~ Ch 13
802.11a
A Band : Ch36, Ch40, Ch44, Ch48
D Band : Ch149, Ch153, Ch157, Ch161, Ch165
802.11b/g
Under 10mW/MHz
802.11a
A Band : Under 2.5mW/MHz
D Band : Under 10mW/MHz
Dimensions
125(L) x 58(W) x 17(T)
Weight
135g
Temperature
Range
Operation: 32 to 122°F (0°C~50°C)
Relative
humidity
10%~90%
Battery
3.7V/, 1450mAh
40
Specification
FCC ID: SQMSQ-3500
This device complies with Part 15 of the FCC Rules. Operation is subject to the following two conditions:
(1) This device may not cause harmful interference.
(2) This device must accept any interference received, including interference
that may cause undesired operation. Any changes or modifications (including the antennas) made to this device
that are not expressly approved by the manufacturer may void the user's authority to operate the equipment.
FCC RF Radiation Exposure Statement: This equipment complies with FCC RF radiation exposure limits set forth for an uncontrolled
environment. This device and its antenna must not be co-located or operating in conjunction with any
other antenna or transmitter. This equipment has been tested and found to comply with the limits for a class B digital device, pursuant to
part 15 of the FCC Rules. These limits are designed to provide reasonable protection against harmful interference in a residential installation.
This equipment generates, uses and can radiate radio frequency energy and, if not installed and used in accordance with the
instructions, may cause harmful interference to radio communications.
However, there is no guarantee that interference will not occur in a particular installation.
If this equipment does cause harmful interference to radio or television reception, which can be determined by turning the equipment
off and on, the user is encouraged to try to correct the interference by one or more of the following measures:
---Reorient or relocate the receiving antenna.
---Increase the separation between the equipment and receiver.
---Connect the equipment into an outlet on a circuit different from that to which the receiver is connected
---Consult the dealer or an experienced radio/TV technician for help.
Frequency band of 5.15GHz to 5.25GHz is restricted to indoor used only to reduce any potential for harmful interference.
Open Source Software Information
For instructions on how to obtain a copy of any source code being made publicly available by UniData related to software used in this UniData Wi-Fi
phone, you may send your request in writing to the address below. Please make sure that the request includes the model number and the software
version number.
UniData Communication Systems, Inc.
3F,BuRim-Bldg, 837-6, BangBae-Dong, SeoCho-Gu, Seoul, 137-835, Korea
The UniData website www.udcsystems.com/opensource also contains information regarding UniData's use of open source.
41
http://www.udcsystems.com