1
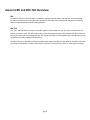
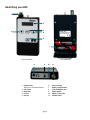
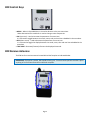
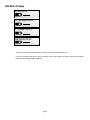
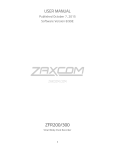
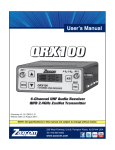
Table of Contents
ZAXCOM ERX AND ERX-TCD OVERVIEW ........................................................................................................................................................................2
ERX ..............................................................................................................................................................................................................................................2
ERX-TCD ....................................................................................................................................................................................................................................2
IDENTIFYING YOUR ERX .............................................................................................................................................................................................................3
ERX CONTROL KEYS...................................................................................................................................................................................................................4
ERX RECEIVE ANTENNAS ...........................................................................................................................................................................................................4
ERX MAIN DISPLAY ......................................................................................................................................................................................................................5
SETTING UP YOUR ERX IN THE EXTENDED MENU ............................................................................................................................................................6
Accessing the Extended Menu .............................................................................................................................................................................................6
Exiting the Extended Menu ..................................................................................................................................................................................................6
Maximum Volume ...................................................................................................................................................................................................................6
Time Code Frame Rate ..........................................................................................................................................................................................................6
IFB Frequency ............................................................................................................................................................................................................................7
Audio Delay ................................................................................................................................................................................................................................7
Software Update ......................................................................................................................................................................................................................7
Group ID .....................................................................................................................................................................................................................................7
IFB Voting Enable .....................................................................................................................................................................................................................8
Time Code Output Enable - (ERX-TCD Only) ...............................................................................................................................................................8
Time Code Delay - (ERX-TCD Only) .................................................................................................................................................................................8
Time Code Jam Mute - (ERX-TCD Only).........................................................................................................................................................................9
Backlight Timer .........................................................................................................................................................................................................................9
LED Brightness ..........................................................................................................................................................................................................................9
1K Notch Filter Enable...........................................................................................................................................................................................................9
1K Notch Filter Frequency ................................................................................................................................................................................................. 10
ZaxNet Output Enable - (ERX-TCD Only)................................................................................................................................................................... 10
Time Code Output Level - (ERX-TCD Only) ................................................................................................................................................................ 10
VOLUME CONTROL MODE - (ERX-TCD Only) ........................................................................................................................................................ 10
Alternative IFB Frequency ................................................................................................................................................................................................... 11
Encryption Code .................................................................................................................................................................................................................... 11
QUICK START GUIDE: ............................................................................................................................................................................................................... 12
Interfacing Your ERX-TCD with a Nomad ................................................................................................................................................................... 12
FIRMWARE .................................................................................................................................................................... 13
UPDATING ERX FIRMWARE - USING AN IFB 100/200 .................................................................................................................................................. 13
UPDATING ERX FIRMWARE (USING AN TRX TRANSMITTER) .................................................................................................................................... 14
ERX SPECIFICATIONS ................................................................................................................................................................................................................ 15
PRODUCT SUPPORT .................................................................................................................................................. 16
ZAXCOM WARRANTY POLICY AND LIMITATIONS ......................................................................................................................................................... 17
Page 1
Zaxcom ERX and ERX-TCD Overview
ERX
The Zaxcom ERX will receive IFB audio and display timecode, Scene ID, Take # and user-bits. A time code hold
function is included to aid script supervisors so that they can easily note timecode and metadata. The ERX also
features onboard SMPTE timecode reader/generator.
ERX-TCD
The “TCD” adds the ability to output a timecode signal from the headphone jack. This can be used to send time
code to a camera or slate. This will continuously jam the timecode ensuring no drift between your Deva, Fusion or
Nomad. The timecode can be assigned to the left, right or both sides of the headphone jack. The ERX-TCD can also
output both timecode and audio simultaneously.
The ERX-TCD also has the ability to delay the output audio signal up to 400 ms. This delay can be useful to provide
an individual audio delay to match a video delay to monitors or cameras that is due to a video signal processing.
Page 2
Identifying your ERX
1
1
1.
2
2.
3.
3
4
5
4.
5
5.
6
6.
7.
7
8.
9.
Front View ERX2
Back View ERX1
8
9
10
11
.
1. Volume knob
ERX2 has a collar ERX1 doesn’t
2. LCD Screen
3. Menu Key
4. Inc key
5. Dec Key
Page 3
6.
7.
8.
9.
10.
11.
Time Code Key
Battery Compartment
1/8” Headphone Jack
Power Switch
Signal / Power LED
Volume Knob
ERX Control Keys
• MENU – When in Extended Menu it is used to advance to the next menu item.
When Alternative IFB is enabled it is used to change receive frequencies.
• INC (up arrow) – Used to increase the parameter of a menu item.
It is also used to toggle between time code, scene, take and user bits embedded in the meta data.
• DEC (down arrow) – Used to decrease the parameter of a menu item.
It is also used to toggle the display between time code, scene, take and user bits embedded in the
meta data.
• TIME CODE– Alternately freezes/unfreezes the displayed timecode.
ERX Receive Antennas
The ERX has four receive antennas located behind the faceplate as indicated below.
IMPORTANT: If placed in a pocket, ERX should be facing out. To ensure better performance don’t place
anything in front of these areas that could block reception.
Page 4
ERX Main Display
01:02:03:04
S: (SCENE INFO)
T: (TAKE INFO)
UB 00:00:00:00
The main screen of the ERX will display TC battery level and receive audio level.
If you are receiving signal from a Zaxcom recorder you can also display the Scene, Take and User-Bits by
pressing and holding the INC or DEC key.
Page 5
Setting up your ERX in the Extended Menu
NOTE: All settings changes are saved in to the ERX’s flash ROM and remembered
Accessing the Extended Menu
1. Press and hold the MENU key while powering up the unit.
2. Pressing the MENU key will advance to the next menu item.
3. At any time if you press and hold the menu key you will be taken back to the top of the Extended
Menu.
Exiting the Extended Menu
• Cycle the power.
Or
• Hold down the MENU key to get back to this page and press the INC key.
Maximum Volume
MAX VOLUME: 23dB
This sets the maximum headphone output volume of the ERX.
Time Code Frame Rate
TC FRAME RATE:
23.98
This sets the time code frame-rate of the ERX’s internal TC Reader/Generator. The ERX can be set
all standard time code frame rates.
The frame rate options are: 23.98, 24, 25, 29.97DF, 29.97DF, 30 DF, 30 NDF
Page 6
IFB Frequency
FREQ: 2.403 RX
SIGNAL: A01 B01
When the ERX is receiving a signal RX will be
displayed.
Signal strength.
Signal strength indicator
This is the frequency the ERX’s will receive audio, time code and meta data on.
To adjust the frequency press the INC and DEC arrows to match the frequency your transmitter is set on.
You can choose any frequency form 2.403GHz to 2.475GHz
The signal represents the strength of the ZaxNet signal that the ERX is receiving.
When a valid signal is received, RX is displayed on the right side of the top line.
If you pressing the TIME CODE key while on this page the ERX will cycle through:
• FREQ – signal strength of all antennas are displayed.
• FRONT – Signal strength of only the front antennas are displayed.
• SIDE – Signal strength of only the side antennas are displayed.
Audio Delay
AUDIO DELAY:
OFF
This adjusts the audio output delay in milliseconds.
You can adjust the delay from 5MS to 400MS in 5MS increments.
Software Update
PRESS UP 5X TO
UPDATE SOFTWARE
This is used to update the ERX software. When you press the INC key 5 times the ERX will look for
software being transmitted from an IFB100/200 or TRX transmitter.
Group ID
REMOTE CONTROL
GROUP ID =1
This allows you to set your ERX to a “GROUP” so it can receive audio, time code and meta data via ZaxNet.
So for example a transmitter set to Group 1 will send to all Group 1 receivers and a Group 2 transmitter
will send to all Group 2 receivers. This allows you to control a group of receivers without affecting others.
Group codes can be set from 1 to 99
Page 7
IFB Voting Enable
IFB VOTING:
NORMAL (OFF)
This enables / disables the IFB Voting function.
The purpose of the voting is to allow the ERX to choose and switch to the stronger signal from two
different ZaxNet transmitters. One purpose of this is if you are on a large set you can place a second
transmitter at a different location and the ERX will choose the stronger signal. Just set the second
transmitting frequency a minimum of 2MHz higher than the first unit.
Time Code Output Enable - (ERX-TCD Only)
TIMECODE OUTPUT
OFF
This allows you to enable /disable time code output from the headphone jack.
• OFF- Time code output is disabled.
• ON: OUT BOTH – Sends time code to both left and right out of the headphone output.
• ON: OUT RIGHT– Sends time code to the right side of the headphone output.
• ON: OUT LEFT – Sends time code to the left side of the headphone output.
If you send time code out it will override the audio to the selected output - so it is possible to output both
time code and audio simultaneously to a camera.
Time Code Delay - (ERX-TCD Only)
TC DELAY
0 (NORMAL)
This allows you to adjust the delay of the timecode out of the ERX. The ERX will allow you to either delay
or advance the time code.
Adjustments are from -5.5 frames to 50 frames in 0.5 frame increments.
Page 8
Time Code Jam Mute - (ERX-TCD Only)
TCJAM MUTE TIME:
0MS (DEFAULT)
This menu sets how long the time code output will be paused when the time code is being jammed.
When this is set to on the time code output will mute for the duration selected whenever the ERX sees a
jump in time code of more than 2 frames. This simulates removing the time code completely from a
device and plugging it back in so that the receiving device recognizes that there is new time code.
This was added to fix a bug in the RED camera software.
Adjustments are from 500MS to 2000MS in 500MS increments.
Note: In the case of RED you would set this to 1000 milliseconds.
Backlight Timer
BACKLIGHT TIMER:
OFF
This will allow you to adjust how long the LCD backlight will remain on after a key press.
Your options are:
• Always Off
• Always On
• 1 to 29 seconds in - 1 second increments
LED Brightness
LED BRIGHTNESS:
BRIGHT
This will allow you to adjust the brightness the LED.
You can choose DIM or BRIGHT
1K Notch Filter Enable
1K NOTCH FILTER
OFF
This will notch out the 1 kHz frequency – This way if someone is monitoring audio from the ERX and
you send a 1 kHz tone the listener will not hear it.
Page 9
1K Notch Filter Frequency
This menu will only appear if you enable the 1K notch Filter
1K NOTCH FREQ
1000 HZ
This allows the ERX to adjust the notch frequency if the tone generator feeding the ERX isn’t exactly
at 1 kHz.
This can be set between 960Hz to 1040Hz in 2Hz steps.
ZaxNet Output Enable - (ERX-TCD Only)
ZAXNET OUTPUT
OFF
This enables / disables passing Zaxnet commands embedded within the time code output.
Since some time code devices have issues receiving time code with embedded ZaxNet commands, this
feature will allow you to turn off the ZaxNet data that is embedded within the time code. So basically if
you are not sending time code to another Zaxcom device the ZAXNET OUTPUT ENABLE should be
turned OFF.
Time Code Output Level - (ERX-TCD Only)
TC OUTPUT LEVEL:
1.0 VOLTS
This allows you to adjust the voltage level of the timecode output for cameras that need different levels.
The options are: .001, .003, .005, .010, .031, .062, .125, .250, .500, 1.000, 2.000, 3.000
IMPORTANT: When supplying TC to certain Red cameras, you should set this page to 1.0 VOLT.
Individuals have experienced problems with the RED One not being able to reboot while it is receiving too
hot a TC signal.
VOLUME CONTROL MODE - (ERX-TCD Only)
VOLUME MODE:
VARIABLE
This will override the ERX volume control knob.
You would likely use this if you have an ERX mounted on a camera feeding audio and you want to avoid an
accidental change to the output level. The two settings are:
• VARIABLE - allows the volume knob to act normally.
• FIXED MAX GAIN - the audio output will be set and locked to the level that was set in the Maximum
Volume menu.
Page 10
Alternative IFB Frequency
ALTERNATE IFB
FREQ: 2.420
This allows you to set a second receive frequency so a listener could toggle between multiple receive
frequencies from different ZaxNet transmitters.
To listen to the alternative frequencies:
• From the home screen press the Menu key - the current receive frequency will be displayed
• Then toggle through the frequencies by pressing the INC and DEC keys.
• The metadata displayed will be corresponding to the transmitter being monitored.
When selecting frequencies the first frequency will be the Base frequency.
Then Alternative 1 - which is the frequency that was selected in this menu.
Then additional alternative frequencies are available- these are frequencies that are 2MHz higher than the
frequency selected in this menu.
CHAN: 2.405
(BASE) 00
CHAN 2.420
(ALT) 01
CHAN 2.422
(ALT) 02
NOTE: It is recommended at keeping at least 2 MHz space between the two frequencies. So for example
if one frequency is 2406 the second should be no closer than 2408.
Encryption Code
ID1:000 ID0:000
This sets the encryption code on the ERX receiver to match the code on the transmitter that is feeding it.
If you set an encryption code on the transmitter the audio transmitted will be encrypted and can only
be listened to if the receiver has the matching encryption code entered. When receiving an audio
signal and the codes do not match, all that will be heard is white-noise or silence.
These two sets of numbers are formed into a single six-digit encryption code which provides a total of
16,777,216 possible combinations.
To adjust the encryption code
1. Momentarily press the MENU key to advance to the next character.
2. To change the designated character, press the INC or DEC key.
3. To exit this page, press and hold the MENU key for 1 second.
NOTE: Both of these codes should always be set to 000 for normal un-encrypted operation
Page 11
Quick Start Guide:
Interfacing Your ERX-TCD with a Nomad
1. In the main menu of Nomad select ZaxNet Setup
2. Scroll down and select Input Configure. Make sure that the input configure is set to 8 or higher. Press the
back button and return to the ZaxNet Setup Menu.
3. Power cycle your Nomad
4. Return to the ZaxNet setup menu scroll up and select IFB Mode. Make sure that it is set to TX or TX+RX
5. Scroll down and select your transmit channel and choose which frequency you’d like to transmit on.
Tip: There are several smart phone apps which will scan what WiFi frequencies are being used in your
area. This can be useful in selecting a clear frequency.
6. Scroll down to Group Code and choose a number. Unless you’re using multiple Zaxcom IFB transmitters,
you can just leave this set to 1.
7. Turn your ERX-TCD while holding the Menu button on the ERX-TCD. This will take you to the Extended
Menu.
8. Advance to the Timecode Frame-rate menu and set the frame rate to the same frame rate that Nomad is
set to.
9. Press menu again to enter the IFB Frequency Menu. Make sure that the frequency is the same as the
frequency you selected in the ZaxNet Setup menu of your Nomad. If the ERX-TCD is receiving a good
signal, you should see two bars on the right hand side of the screen which is displaying the signal
strength.
10. Advance to the Timecode Output Enable menu. If you’re using the ERX-TCD as an IFB for a director or
script supervisor, leave the timecode output set to OFF. If you’d like to use the ERX-TCD to send timecode
and audio or just timecode to a camera, select OUT LEFT TIP, OUT RIGHT or BOTH depending what you
want to send and how your cable is wired. If the camera has trouble receiving timecode, proceeded until
you get to the TC OUTPUT LEVEL menu. Increase the voltage until the camera recognizes the timecode.
11. On your Nomad go to the BUS MENU and select TAPE / IFB Out and select what you’d like to send
to the ERX-TCD. You can use any combination of card tracks, outputs or returns.
Page 12
Firmware
Each unit is shipped with the latest firmware version installed. As newer firmware becomes available,
it can be downloaded from the Zaxcom website:
http://www.zaxcom.com/software-updates
Newer version of Beta software may be found on the Zaxcom Forums:
http://www.zaxcom.com/forum
Each time a unit is powered up, the firmware version number is displayed briefly on the LCD screen.
Pressing the DEC key during the boot up will slow down the screen to allow easier viewing of the
information.
Updating ERX Firmware - using an IFB 100/200
NOTE: Version TRX-6.26A or greater is required in the IFB100 to perform this process.
1. Format a media card in the IFB 100/200.
2. Using a computer with a MiniSD card adapter, perform the following:
• Delete the “DELETE.ME” file on the card.
• Download the ERX software and load it into the card.
3. Insert the card into the IFB 100/200.
4. Insert a fresh set of batteries into each ERX.
5. At each ERX:
• With it turned ‘OFF’, press and hold the MENU key while powering up.
• Set the ERX IFB Frequency and Group ID to the same frequency and ID as the IFB100/200.
• In the Extended Menu go to the Software Update menu and press the INC Key 5 times. The ERX will
display “Waiting For Program”. This indicates the ERX is ready to receive the new software. You can
do this for all your ERX’s so they will all be updated at the same time.
NOTE: Place the ERX within 3 feet of the IFB100/200 and away from any Wi-Fi or Bluetooth devices
6. At theIFB100/200:
• With the IFB100 turned ‘OFF’, press and hold the MENU key while powering up to enter the
Extended Menu.
• Advance to the “Send ERX Program” Menu and press the INC Key.
• TheIFB100/200 will indicate that it found the program and has started sending it.
NOTE: The IFB100/200 will continue to transmit the program until manually stopped.
7. The ERX screen should indicate that it is receiving the program. If there is a reception error, the affected
receiver automatically restarts the process with the start of the next cycle.
8. For the ERX’s that have completed reprogramming, the screen will display “SUCCESS”.
9. Once ALL units have displayed SUCCESS, at the IFB100/200 press the MENU key to stop the process.
10. At each ERX unit cycle the power and verify it is running the new version of software.
Page 13
Updating ERX Firmware (using an TRX Transmitter)
NOTE: You need a TRX-900 or similar devise that has an IFB option and the TRX needs to be running
software version 7.02 or higher.
1. Format a media card in the TRX transmitter.
2. Using a computer with a MiniSD card adapter, perform the following:
• Delete the “DELETE.ME” file on the card.
• Download the ERX software and load it into the card.
3. Insert the card into the TRX.
4. Insert a fresh set of batteries into each ERX.
5. At each ERX:
• With it turned ‘OFF’, press and hold the MENU key while powering up.
• Set the ERX IFB Frequency and Group ID to the same frequency and Group ID as the transmitter.
• In the Extended Menu go to the Software Update menu and press the INC Key 5 times. The ERX will
display “Waiting For Program”. This indicates the ERX is ready to receive the new software. You can
do this for all your ERX’s so they will all be updated at the same time.
NOTE: Place the ERX within 3 feet of the TRX and away from any Wi-Fi or Bluetooth devices
6. At theTRX transmitter:
• In the TRX go to the Factory Menu (go the lock page and press down 5 times)
• Press the Menu key once to get to the IFB MODE page press the INC key change the IFB mode to TX
• Press the Menu key twice to get to the Send ERX Program page.
• Press UP to start transmitting the program.
NOTE: The TRX will continue to transmit the program until manually stopped.
7. The ERX screen should indicate that it is receiving the program. If there is a reception error, the affected
receiver automatically restarts the process with the start of the NEXT cycle.
8. For the ERX’s that have completed reprogramming, the screen will display SUCCESS.
9. Once ALL units have displayed SUCCESS, at the TRX press the MENU key to stop the process.
10. At each ERX unit cycle the power and verify it is running the new version of software.
11. Change the IFB mode on the TRX back to “RX”
Warning: Some older versions of TRX software will crash if the unit tries to power on while the IFB
mode is set to TX. If that happens you can force the IFB mode to OFF by holding the MENU and DOWN
key while powering on the TRX.
Page 14
ERX Specifications
IFB Receiver
RF Frequency Range
RF Modulation
RF Frequency Step
RF Bandwidth
Channel Separation
Sensitivity
DAC Bit-depth
DAC Rate
2.403 to 2.475 GHz
Digital Spread Spectrum
0.001 GHz (1 MHz)
1 MHz
2 MHz
-96 dBm
24 bit
48 kHz
Receiver Audio
System Group Delay
Dynamic range
Distortion
Frequency Response
Output Connector
Compatible HP Impedance
10 ms
96 dB
0.01%
60 Hz to 12 kHz
1/8” Stereo (3.5 mm)
32 to 200 ohms
Timecode Reader/Generator
Clock Accuracy
Timecode Type
Timecode Frame-rates
1.54 PPM (1 frame out in 6 hours)
SMPTE
23.98 (23.976), 24, 25, 29.97NDF, 29.97DF, 30NDF, 30DF
Timecode Output
Connector
Level Range
Impedance
1/8” Stereo (3.5 mm)
1 V P-P
32 ohms
Physical
Weight
Dimensions (H x W x D)
External Power
Internal Power
Display
2.3 oz (65 grams) w/o battery
4.56” x 2.37” x 0.63” (116 mm x 60 mm x 16 mm)
N/A
up to 20 hours (2 AA Lithium batteries)
Graphic LCD panel
Page 15
Product Support
Register your product with Zaxcom:
http://www.zaxcom.com/product-registration
Download the latest Firmware from:
http://www.zaxcom.com/software-updates
Download the latest User Manuals from: http://www.zaxcom.com/instruction-manuals
Submit Technical Questions at:
http://www.zaxcom.com/submit-a-technical-question
Submit information for Repair Services at:http://www.zaxcom.com/repairs
Join the Zaxcom Forum at:
http://www.zaxcom.com/forum
Page 16
Zaxcom Warranty Policy and Limitations
Zaxcom Inc. values your business and always attempts to provide you with the very best service.
No limited warranty is provided by Zaxcom unless your ERX2 / ERX2TCD (“Product”) was purchased from an authorized distributer or
authorized reseller. Distributers may sell Product to resellers who then sell Product to end users. Please see below for warranty information
or obtaining service. No warranty service is provided unless the Product is returned to Zaxcom Inc. or a Zaxcom dealer in the region where
the Product was first shipped by Zaxcom.
Warranty Policy
The Product carries a Standard Warranty Period of one (1) year.
NOTE: The warranty period commences from the date of delivery from the Zaxcom dealer or reseller to the end user.
There are no warranties which extend beyond the face of the Zaxcom limited warranty. Zaxcom disclaims all other warranties, express or
implied, regarding the Product, including any implied warranties of merchantability, fitness for a particular purpose or non-infringement. In the
United States, some laws do not allow the exclusion of the implied warranties.
Troubleshooting & Repair Services
No Product should be returned to Zaxcom without first going through some basic troubleshooting steps with the dealer you purchased your
gear from.
To return a product for repair service, go to the Zaxcom Repair Services page (http://www.zaxcom.com/repairs) and fill in your information;
there is no need to call the factory for an RMA. Then send your item(s) securely packed (in the original packaging or a suitable substitute) to
the address that was returned on the Repair Services page. Insure the package, as we cannot be held responsible for what the shipper does.
Zaxcom will return the warranty repaired item(s) via two-day delivery within the United States at their discretion. If overnight service is
required, a FedEx or UPS account number must be provided to Zaxcom to cover the shipping charges.
*Please note, a great resource to troubleshoot your gear is the Zaxcom Forum: http://www.zaxcom.com/forum.
Warranty Limitations
Zaxcom’s limited warranty provides that, subject to the following limitations, each Product will be free from defects in material and
workmanship and will conform to Zaxcom’s specification for the particular Product.
Limitation of Remedies
Your exclusive remedy for any defective Product is limited to the repair or replacement of the defective Product.
Zaxcom may elect which remedy or combination of remedies to provide in its sole discretion. Zaxcom shall have a reasonable time after
determining that a defective Product exists to repair or replace a defective Product. Zaxcom’s replacement Product under its limited warranty
will be manufactured from new and serviceable used parts. Zaxcom’s warranty applies to repaired or replaced Product for the balance of the
applicable period of the original warranty or thirty days from the date of shipment of a repaired or replaced Product, whichever is longer.
Limitation of Damages
Zaxcom’s entire liability for any defective Product shall, in no event, exceed the purchase price for the defective Product. This limitation
applies even if Zaxcom cannot or does not repair or replace any defective Product and your exclusive remedy fails of its essential purpose.
No Consequential or Other Damages
Zaxcom has no liability for general, consequential, incidental or special damages. These include loss of recorded data, the cost of recovery of
lost data, lost profits and the cost of the installation or removal of any Product, the installation of replacement Product, and any inspection,
testing or redesign caused by any defect or by the repair or replacement of Product arising from a defect in any Product.
In the United States, some states do not allow exclusion or limitation of incidental or consequential damages, so the limitations above may not
apply to you. This warranty gives you specific legal rights and you may also have other rights, which vary from state to state.
Your Use of the Product
Zaxcom will have no liability for any Product returned if Zaxcom determines that:
•
•
The Product was stolen.
The asserted defect:
1. Is not present,
2. Cannot reasonably be fixed because of damage occurring when the Product is in the possession of someone other than Zaxcom, or
3. Is attributable to misuse, improper installation, alteration, including removing or obliterating labels and opening or removing external
covers (unless authorized to do so by Zaxcom or an authorized Service Center), accident or mishandling while in the possession of
someone other than Zaxcom.
•
The Product was not sold to you as new.
Additional Limitations on Warranty
Zaxcom’s warranty does not cover Product, which has been received improperly packaged, altered or physically abused.
Page 17