1
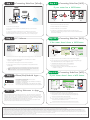
Product View
RoboCam
The Ultimate Remote Monitor
[ Front View ]
[ Right Side View ]
Micro-SD Card Slot
Night Time Lens
SPK
WPS Button
Day Time Lens
Micro-SD Card Indication LED
Ethernet Indication LED
Status Indication LED
PIR
Quick
Installation
Guide
IR LED
Microphone
SD
Speaker Jack
[ Back View ]
F12 & F12HD
[ Bottom View ]
Reset Button
Bracket Screw Jack
NET
Power Jack
NET
Ethernet Jack
DC/IN
myRoboCam com
RESET
Speaker and thermometer holes are positioned on the front cover in F12HD model
Hardware Installation
Package Contents
SPK
A
SD
Quick Installation Guide
ID
Password
RoboCam
Cross-head
screw driver
Bracket
ID/Password card
Power adapter
USB
SPK
Day&Night IP Camera
USB
SD
B
Guide
Anchors
and screws
Ethernet cable
Embed the bracket in the
mounting hole and adjust it to the
appropriate angle.
Use "Cross-head Screw Driver" A
counterclockwise to loosen the screw
a little. B
Also ask for: (subject to availability)
USB
SPK
A
B
Extended
Warranty
1 Click Router
or Access Point
Video SD cards for
Weeks or months
Use "Cross-head Screw Driver" A
clockwise to tighten the screw. B
Extra peace
of mind
3 meter power adaptor
and 3 meter extension
Frequently Asked Questions
Is it possible to change RoboCam’s viewing password?
How to access RoboCams remotely from my PC?
Yes, follow step 4-2-1 and navigate to video from the left menu, choose video settings and
change the password (play video), don’t forget to scroll to the bottom and (save & apply).
Right click [Camera List] in [Plug&View] and select [New Camera] add the Camera ID &
Is it possible to change RoboCam’s admin [settings] password?
the moment; you could also drag & Drop the Cam-ID from [Auto Search] into the [Camera
password as per the card and you’re done, if you’re on the same network as RoboCams at
Yes, following the same steps as above, select Admin from the side menu and then change
the password from Admin Login.
List] Area.
What should I do if I forgot the password or lost the ID card?
For PC, right click the RoboCam in [Camera List]; then choose [SD Card Playback], For
How can I check recorded video [playback] remotely?
You could press the “reset” button for five seconds. The RoboCam will be reset to the
factory default settings. The default video-play password is “ipcam”. and the default admin
account is “admin” with no password.
iPhone/iPad: [see Step 3], you can access the SD card Playback from the side arrow to the
If I unplug RoboCam and turn it on later, do I need to configure it again?
Check if the orange LED on the RoboCam labeled SD card is blinking.
That’s not necessary, the camera will keep your network settings even if it was turned off
and will connect automatically once restarted.
What should I do if I cannot see the video remotely?
What if I’m getting disconnected some times when I try to access RoboCams?
Strong WiFi signal must be available where the camera is installed, Under step 4-2-1 setup
window, then Network>WiFi Security, you should get not less than three to four bars when
you perform a WiFi Scan.
right of the camera name, scroll down and you’ll find SD card Playback.
How would I know if my camera is recording or not?
The red LED should be always on when the IP camera is connected to the Internet. If the
red LED is blinking, please double check the network connection and settings.
Can I disable the LED lights on the RoboCam?
Yes, also under the Admin settings, see above step, there’s the option for LED Control.
Step 1
Connecting RoboCam [Wired]
Step 4-1
Connecting RoboCam [WiFi]
If your router has a WPS button
RoboCam
NAT Router
/Access Point
SD
NET
SD
NET
NET
NET
DC/IN
DC/IN
SD
Internet
Power Adapter
1
2
4
3
Ethernet Cable
1. Remove the Ethernet cable from the camera.
1. Connect the power adapter.
2. Press the WPS button on the NAT/Router.
2. Connect the Ethernet cable to the NAT/Router which is connected to
the internet.
3. Press the WPS button on the RoboCam.
3. The IP camera will get IP address from the NAT/Router (with DHCP
enabled) automatically and connect to internet. Check if the red LED of IP
camera is always on. If it’s blinking, please check step 1 and step 2 again.
Step 2
PC Software
4. The blue LED on the RoboCam will start blinking along with other LEDs.
If the blue LED stops blinking and stays on for one minute, the wireless network
is connected successfully.
Step 4-2-1 Connecting RoboCam [WiFi]
If the router doesnʼt have a WPS button
Camera List
Camera List
P l ug& Vi ew
Auto Search
001001001
001001002
001001003
001001004
Auto Search
001001001
001001002
001001003
001001004
1
Auto search
001001001
001001002
001001003
001001004
001001001
!
Please make sure the Ethernet cable is connected to the IP Cam !
Auto Search
Enable WiFi function
Security mode
001001001
001001002
Web Configure
001001003
3
Disable WiFi function
SSID
Auto Search
001001004
2
WiFi Security Settings
Connect to 10.0.0.198
001001001
001001002
001001003
admin
Username(U):
None
WEP
WPA(2)-PSK(WPA pers onal)
WEP Encryption
Password(P):
WEP Key
Remember my password(R)
WPA Encryption
001001004
Yes
WPA-PSK Key
Cancel
Save&Apply
A
B
IP address
WiFi test
C.1
3.1
WiFi scan
PC software could be found on http://myrobocam.com/plugview.zip or under downloads.
1. Execute the installed Plug&View software on the desktop or from “Start→
Programs→Plug&View→Plug&View”.
2. The “Auto Search” will display the IP camera in the local network.
3. Double click the camera and key in the password on the ID/password card to
see the video.
1
2
You can drag the camera on the “Auto Search” area to the “Camera List” area.
You could also add new item on the “Camera List” area by “Camera List”
→“New Camera” →Key in camera ID and Password.
A. Right click camera on the “Auto Search” area and click “Web Configure”.
B. Key in the admin account and password to enter the web configuration page.
Click “Network\WiFi Security” of the configuration menu.
The default admin account is “admin”, and no password.
C. Four steps to setup the wireless connection:
C.1 Click the “WiFi Scan” button, all the available wireless AP will
be listed in 10 seconds.
Step 4-2-2
Step 3
iPhone/iPad/Android Apps
You can download the app that suits your smart phone:
"mEZviewerFree" – Free iPhone app.
"mEZviewer" - Free Android app.
"mEZViewerFull" – Paid iPhone app (+push notifications +SD Playback)
"mEZViewerHD" – Free iPad app
"mEZViewerHDFull" – Paid iPad app (+push notifications +SD Playback)
Then you could easily add RoboCams by entering the Cam ID & password
Connecting RoboCam [WiFi]
If your router doesnʼt have a WPS button
TEST
3.2
54Mbps WPA
NAS
54Mbps WPA
Example
54Mbps WPA
Test1
54Mbps WPA
Test2
54Mbps WPA
Test3
54Mbps WPA
OK
Adding Robocams to Apps
Once your Robocams are online, start the app and press the ‘+’ sign under Camera List, simply give the
Robocam a name and type in the ID and Password as per the card [or as per your new password if you
changed it], then hit ‘Done’ , you’ll get a message confirming that your camera was added successfully and
you’ll find it under the Camera list, you could touch the camera icon to access live, as for settings and SD
Playback you need to press the blue arrow to the right side of the camera icon.
Optionally, if you’re on the same WiFi range as the cameras for the moment, you could perform (Local
Search) in this case the search will find the Cam ID for you automatically.
SSID
C.2
Disable WiFi function
TEST
None
Security mode
WEP
WPA(2)-PSK(WPA personal)
NET
WEP Encryption
WEP Key
WPA Encryption
If scanning failed, please check the antenna or AP.
Step 3-1
WiFi Security Settings
Enable WiFi function
WPA-PSK Key
Save&Apply
NET
DC/IN
3.2
12345678
IP address
3.3
WiFi test
WiFi scan
Ethernet
Cable
C.3
C.4
C.2 Choose the wireless AP and key in the encryption key.
C.3 Click “WiFi test” button and wait for 20~40 seconds to verify if the
encryption key is correct. If “WiFi test” failed, check “encryption key”.
Please do not remove the Ethernet cable during WiFi test.
C.4. If the “WiFi test” succeeded, remove the Ethernet cable from the
IP camera to start the wireless connection.
The blue LED and red LED will be always on after wireless connection is successful.
FCC Compliance Statement: This equipment has been tested and found to comply with limits for a Class B digital device ,pursuant to Part 15 of the FCC rules. These limits are designed to provide reasonable protection against harmful interference in residential
installations. This equipment generates, uses, and can radiate radio frequency energy, and if not installed and used in accordance with the instructions, may cause harmful interference to radio communications.
However, there is no guarantee that interference will not occur in a particular installation. If this equipment does cause interference to radio or television equipment reception, which can be determined by turning the equipment off and on, the user is encouraged to try to
correct the interference by one or more of the following measures: -Reorient or relocate the receiving antenna -Move the equipment away from the receiver-Plug the equipment into an outlet on a circuit different from that to which the receiver is connected.
-Consult the dealer or an experienced radio/television technician for additional suggestions You are cautioned that any change or modifications to the device not expressly approve by the party responsible for compliance could void Your authority to operate such device.
This device complies with Part 15 of the FCC Rules. Operation is subjected to the following two conditions 1) This device may not cause harmful interference. 2) This device must accept any interference received, including interference that may cause undesired operation
FCC Caution: Any changes or modifications not expressly approved by the party responsible for compliance could void the user's authority to operate this equipment.
This transmitter must not be co-located or operating in conjunction with any other antenna or transmitter.
Mobile Device Usage, Radiation Exposure Statement: This device complies with FCC radiation exposure limits set forth for an uncontrolled environment. This device should be installed and operated with minimum distance 20cm between the radiator & your body.