1
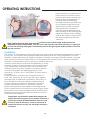
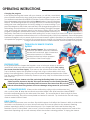
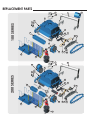
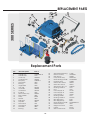
100 SERIES
300 SERIES
200 SERIES
Use & Care Guide
Robotic Pool Cleaning System
The Worlds Leader in Robotic
Pool Cleaning Solutions
LOCATING INFORMATION
MAKE A RECORD FOR FUTURE USE
Model
Purchase Date
Place Purchased
Serial Number
Note: Serial number can be found on the warrantee
card or on the packing carton.
QUESTIONS ?
INTERNET
1-800-845-4856 For Technical Support
For online support and product information
visit www.AquaProducts.com/Service
Before performing any troubleshooting or maintenance procedures on your cleaner, it should
be disconnected from the Power Supply (transformer) and the Power Supply should be
unplugged from the electrical outlet to prevent the possibility of personal injury or damage to
the cleaner.
Always Unplug your Power Supply when not in use to prevent accidental starts.
Never operate the cleaner out of the water. Doing so will cause severe damage to the motor
and void the product Warrantee.
Water temperature and chemical composition changes can greatly affect the buoyancy of
your cleaner. Therefore, if you have previously installed floatation devices in your cleaner to
assist its buoyancy, it may be necessary to remove the devices one by-one until proper
buoyancy is restored.
Never lift your cleaner out of the pool using the Floating Cable. You may use the Floating Cable
to pull the cleaner to the side of the pool, but always use the Floating Handle to remove it from
the pool. Pulling on the Floating Cable to remove the cleaner from the pool will result in internal
connections being broken and severe damage being caused to your cleaner.
Please Read The Entire Manual Carefully Before
Using Your Automatic Pool Cleaner
CAUTION
RISK OF ELECTRIC SHOCK
DO NOT REMOVE TRANSFORMER
COVER. NO USER-SERVICABLE
PARTS INSIDE.
This symbol is intended to alert the
user to the presence of uninsulated
“dangerous voltage” within the
product’s enclosure that may be of
sufficient magnitude to constitute
a risk of electric shock to persons.
This symbol is intended to alert the
user to the presence of important
operating and maintenance
(servicing) instructions in the
literature accompanying the
appliance.
LOCATING INFORMATION
Contents
Operating Features....................................... 2
Quick Start Instructions............................... 3
Locking the Floating Handle....................... 3
Setting up of the Power Supply....................4
Filter Bag Maintenance................................5
Adding Floatation........................................ 5
Cable Care....................................................7
Programming the Cleaner............................ 6
Propeller Care...............................................7
Brush Replacement...................................... 7
Drive Track Replacement.............................7
Jet Wash System...........................................8
Troubleshooting Guide................................ 9
Replacement Parts List...............................15
Warranty......................................................16
“H”-Float
1
“W” Frame
Bag Support
Floating
Handle
2
13
3
5
Pocket
Float
4
Outlet Top
Bottom Lid
Assembly
6
Intake Valve
Flap Housings
Propeller
Handle
Spring Lock
Drive Motor
Pump Motor
7
8
15
Side Plate
Bushing
Wheel Tube
Retaining Ring
9
10
11
12
14
Brushes
16
G Drive Track
22
20
Robotic Pool Cleaner
17
21
18
19
Wheel Tube*
Stepped
Sleeve Roller
2
Drive Belt
Pulley
Lock Tabs
Jet Bracket
QUICK START INSTRUCTIONS
Preparing your new cleaner to clean your pool is as
easy as 1, 2, 3!
1. Lock the Floating Handle diagonally across the cleaner's body
and place the unit in the pool. (This step is not required on cleaners
that have a permanently fixed handle.)
2. Plug the Floating Cable into the Power Supply (the Power Supply
should be placed at least 12 feet from the edge of the
pool).Spread the Floating Cable evenly over the pool's surface.
3. Plug the Power Supply into a Ground Fault Circuit Interrupter
grounded 115V outlet. It is recommended that the Power Supply be
un-plugged when the cleaner is not in use.
*Never operate your cleaner when it is not totally submersed in
the pool.
Submerge the cleaner upside down. While holding the Floating
Handle, gently rock it back and forth under the water to allow
trapped air to escape. Turn upright, then let go allowing the
cleaner to settle to a level area on the pool floor. Turn on the Power
Supply and enjoy as your cleaner goes to work for you!
(Ref.# 1.1)
Power Supplies are equipped with a Safety Reset Button which
must be pressed each time you turn on your cleaner. The
Safety Reset Button prevents the cleaner from unintentional,
“out of water” starts due to power surges or accidental pressing
of the Power Supply On/Off Switch, which could damage your
cleaner. Warning! A ground fault circuit interrupter (GFCI) must
be installed to protect your electrical outlet and to prevent any
possible electrical shock.
SETTING UP YOUR POOL CLEANER
FLOATING HANDLE
The Floating Handle is a floatation device that helps your cleaner climb the walls It acts as a guidance
mechanism while the cleaner scrubs the waterline, directing it to circle the pool either clockwise or counterclockwise. For proper operation of your pool cleaner (Unless your cleaner has a permanently FIXED Handle),
the Handle must be locked diagonally across the top of the cleaner's body. Important: It is necessary to
reverse the diagonal Handle direction after each use of the cleaner to insure that the Floating Cable does
not become twisted or kinked and does not limit the cleaning coverage of the cleaner. To change Handle
locked position pull the right front Spring Lock down and slide the Handle toward you as far as it will go.
Release the Spring Lock to secure the Handle in place. Pull the left rear Spring Lock down and slide the
Handle away from you as far as it will go. Release the Spring Lock to secure the Handle in place. To reverse
diagonal position of the Floating Handle, simply reverse the above procedure and lock the Handle
diagonally across the cleaner's body in the opposite direction.
SETTING UP THE POWER SUPPLY
Switch the Power Supply ON. The LED light will Flash two horizontal bars until you select either CONTINIOUS or
TIMED operation.
Continuous Operation: Press the C-RUN button, both the green LED above the button and the Red “ON” LED
will illuminate. The Cleaner will now clean your pool until you stop it by switching the Power Supply Switch to
the “OFF” position. This position maybe used for automatic on-off operation if plugged into automatic
timers. Be certain to unplug your cleaner should you remove it from the pool.
3
OPERATING INSTRUCTIONS
Timed Operation: You can control the length of the cleaning cycle by using the control pad on the Power
Supply. Press the “UP” arrow button once for each hour of operation you desire (up to 7 hours). When you
have selected the proper number of hours, press the RESET button you have set the cleaning time you may add
or subtract hours by simply pressing the “UP” or
“DOWN” arrow button. This may be done while
the cleaner is in operation. The Power Supply will
shut down and restart every eight minutes. This
feature well help keep the cleaner from
becoming stuck in the pool
In “Continuous” mode the Safety Reset
Button is inactive and cannot protect your
cleaner from accidental “out of water”
starts.
Use GFCI protected source ONLY
Set the operating mode for your cleaner
after the cleaner has been placed in the pool, the Floating Cable from the
cleaner has been plugged in to the Power Supply and the Power Supply has
been plugged into a GFCI protected 115v electrical outlet.
The Power Supply should be placed in a sheltered area, at least twelve (12) feet
away from the pool. While the Power Supply is weather-resistant, it should be
placed in an elevated area where it will not sit in puddles of water.
For best performance, locate the Power Supply at the mid-point on the longest side
of your pool. This will make the best use of its length of Floating Cable. If the distance
from the grounded outlet to the pool is greater, then a heavy duty, 16ga. grounded
extension cord may be used.
CLEANING THE FILTER BAG
Unplug the Power Supply . Use the Floating Handle (not the Floating Cable) to slowly pull the cleaner out of the
pool after allowing most of the water to drain from the cleaner.
Using the Floating Cable to lift the cleaner out of the water will cause severe damage!
Lay the cleaner on its back on a soft surface to avoid scratching it. Gently pull-on the Lock Tab ) on one
end of the Bottom Lid Assembly freeing one end of the Bottom Lid. Repeat this procedure on the other end
and remove the Bottom Lid Assembly. Remove the Filter Bag from the “W” Frames, turn it inside out and wash
off all the dirt with a garden hose or in a bucket. Squeeze the Bag gently until the rinse water is clear. If
necessary, machine wash (Gentle Cycle only) the Bag using only cold water with NO DETERGENT. You may reinstall the bag immediately or allow it to air dry (never machine dry the Filter Bag). Re-install the Bag on the
“W” frames of the Bottom Lid Assembly, making sure that the “felt” (soft) side is facing
in. To ensure a proper fit of the Filter Bag onto the Bottom Lid Assembly, locate the
small Label near the Filter Bag's elastic bottom. Position the Filter Bag so that the
small Label is at the center of either long side of the Bottom Lid. Then pull the
elastic bottom over each Wire and slide the Filter Bag down along the Wires
until the Bag reaches the Bottom Lid. At that point, the Filter Bag's elastic
bottom should be stretched over the plastic ridges located at opposing ends
of the short sides of the Bottom Lid. This holds the Filter Bag in place. Press
o
down on top of the Filter Bag where each of the four “U” shaped slots on the
Wire Frame are located. This will pull the Filter Bag corners to the corners of the
Wire Frame. Re-install the Bottom Lid Assembly into the bottom of the cleaner.
P
Be sure that the Filter Bag's fabric is not interfering with the locking of the Lock
A
Tabs. The cleaner's Filter Bag can filter out particles down to 10 times smaller
O
S
than many main filters. This means that the fine particles such as algae and
bacteria, invisible to the naked eye, which slip through the main filter and
60
4
OPERATING INSTRUCTIONS
back into the pool to settle into the
pores of the pool's surface, will be
scrubbed loose and vacuumed up
by the cleaner and retained in its
Filter Bag. When the Filter Bag
becomes saturated with debris, the
flow of water through it becomes
restricted and suction is reduced.
Strong water flow is required to
force the cleaner against the wall
when climbing. A dirty Filter Bag also
weighs the cleaner down, making it
hard for the cleaner to climb due to
the added weight and reduced
water flow.
Fig. 2
If the cleaner does not climb and reach the waterline to move left and right, as directed by the
diagonally locked Floating Handle, it will not cover and clean the entire pool. Therefore, it is important
to clean the Filter Bag thoroughly so that the fine particles that get trapped within the fibers of the Filter
Bag are removed.
FLOATATION
The cleaner is a universal pool cleaner which performs under varying chemical and temperature conditions
in your pool. Your cleaner offers the best possible performance when it is virtually weightless in your pool.
Therefore, careful balancing of its weight is important. Generally, a new Aqua Products cleaner is very light
when used for the first time. Careful removal of air trapped in the housing is critical. Typically, additional
floatation is not required on start-up. Most pool conditions allow your
cleaner to climb the pool walls and stairs effortlessly up to the
waterline. However, in some instances, the pool environment
(e.g., temperature, chemicals, water, etc.) may offset your
cleaner's natural buoyancy. Therefore, 3 floatation devices
have been included in the packaging with your new
cleaner: an “H”-Float and 2 “Side Pocket” Floats to assist its
buoyancy.
To Add Floatation: 1. Remove the 2 Screws from the “H”“H”-Float
Float. Then, place the “H”-Float, foam-side down, against
the inside base of the Bottom Lid Assembly. Secure the “H”Float with the two screws provided by fastening them in
Pocket
from the outside of the Bottom Lid Assembly. This should
Floats
provide adequate buoyancy. 2. Should your cleaner
require more floatation, then add the 2 remaining Pocket
Floats. Pocket Floats do not require any screws or glue. Simply
place them into the open rectangular areas situated beside
Intake Valves Housings, Insuring that the floats do not block
the Intake Valve Housings.)
Temperature and chemical composition changes can
greatly affect the buoyancy of your cleaner. Therefore, if
you have previously installed floatation devices in your
cleaner to assist its buoyancy, it may be necessary to
remove the devices one by-one until proper buoyancy
is restored.
5
B
A
OPERATING INSTRUCTIONS
POWER CABLE
The Floating Power Cable may become twisted after being used for a period of time. To correct this condition,
simply lock the Floating Handle on the top of the cleaner in the opposite diagonal direction. There are two ways
to correct twisting of the Cable. If your cleaner does not have a permanently fixed Floating Handle, you will
need to reverse the diagonal locking position of the Handle (suggested to reverse diagonal
position with each use). Your cleaner will now travel the opposite direction and will uncoil.
For all cleaner models, it is suggested to occasionally stretch the Cable out to its full
length. For this reason we have added a new feature to your cleaner. This
patented feature will allow you to untwist your Cable easily. Disconnect
the Power Supply Cord from the Power Supply, place your cleaner on the ground
outside of the pool perpendicular to you. At the end of the Cable, located near the
connection plug to the Power Supply, is a plastic handle(”Swivel”). Grab the handle firmly as shown in the illustration.
Walk away from the cleaner while pulling the handle. This will cause the Cable to rotate within the plastic handle
and force the Cable to untwist itself. For best results remember to pull the handle until the Cable is completely
untwisted. At that time you should also check the Cable for external damage. Continual rubbing against sharp or
rough surfaces may abrade the Floating Cable resulting in damage and possible short-circuiting of the cleaner.
200 SERIES
100 SERIES
PROGRAMMING THE CLEANER
For information on programming your pool cleaner, please refer to the instructions next to the illustration of your
model.
You can control the cleaning pattern of your cleaner by adjusting the foam float located on the floating
handle. The further from center the float is located the greater the cleaner will turn. Alternatively the closer the
float is towards the center a
smaller angle can be
achieved. To make the
cleaner turn right the float
should be located on the left
side. To make the cleaner turn
left locate the float on the right
side.
A computerized program is used to control the systematic
cleaning of the entire pool. There are several important
things that you can do to help the cleaner do the best job it
can and prolong the life of your pool cleaner. There are
many different pool styles, sizes, and
surfaces. These differences can affect the
cleaning pattern. The cleaner has the ability to
run 4 different cleaning programs. The cleaner
comes factory set to clean the majority of the
standard sizes, and types of pools.
Initially, use the factory setting regardless of pool size or type. If you notice
that the cleaner does not cover and clean the entire pool, you may need
to change the factory setting to run one of the four additional programs.
When set correctly, the cleaner should climb the wall of the pool, wait a
few seconds, reverse, and travel just beyond the center of the pool. It
should then stop, turn slightly and return to the same wall. The cleaner
should not climb both walls repeatedly. The
cleaner will travel around the entire pool in a
clockwise or counter-clockwise motion
depending on what cycle the program is in.
Periodically the cleaner will make a turn, you may increase the angle of the turn by
removing the Philips head screw located in the center of the wheel tube. As shown in
the picture to the right.
6
Remove Screw to increase
turning radius.
OPERATING INSTRUCTIONS
300 SERIES
Changing the program
In the spare parts bag that came with your cleaner, you will find a small black
piece of plastic attached to a key-chain that contains a Magnet. On the side of
your cleaner locate the AQUA PRODUCTS sticker. Turn the Power Supply on and
place the Magnet in the center of the sticker Once for about 1 second and then
remove. The Scrubbing Brushes will change direction to indicate the program
setting has been changed from its factory setting to its second setting. If you
place the Magnet on the sticker a second time it will change the program to its
third setting, and a third time to its fourth and final setting. Placing the Magnet
once more resets the program back to the factory setting. Each time the
Magnet
Aqua Products Logo
program is changed it will increase the time your cleaner spends on the floor of
the pool by 5 seconds. It is not important which setting it is in, so don’t worry if you lose count. What is important is
that when you operate the cleaner in the pool it covers the majority of the pool completely. Once the program
has been changed to suit your needs, there is not need to reset it again for each time you operate your cleaner it
will operate the program you had set. Do not operate your cleaner out of water for any longer than 3 minutes.
Doing so will cause the motors to overheat and fail, which may result in costly repairs.
OPERATION OF REMOTE CONTROL
MODELS
Remote Control Cleaners: The models have 2
Drive Motors, Split Wheel Tubes and a Wireless
Controller that controls left, right, forward and
backward movements. Your Wireless
Controller functions best when operated
within 100 feet of the Power Supply.”.
PROPELLER CARE
It is a good practice to inspect the Propeller once or twice per season to check for
obstructions which may reduce water flow and thus vacuuming ability. First, unplug
the cleaner from the Power Supply. Then remove the 4 Screws that secure the Outlet
Top to the Body. Inspect the Propeller for clogs: hair, twigs, or other debris, which may
keep it from spinning freely. Remove any accumulated material and replace the Outlet
Top. Do not over-tighten the Outlet-Top Screws or you may “strip” the Screw Holes or crack
the Outlet Top.
Never carry or lift your cleaner out of the pool using the Floating Cable. You may use the Floating
Cable to pull the cleaner to the side of the pool, but always use the Floating Handle to remove
it from the pool. Pulling on the Floating Cable to remove the cleaner from the pool will result in
internal connections being broken and severe damage being caused to your cleaner.
TO CHANGE BRUSHES: 1. Remove the old Brush by pulling out the stainless steel locking pin
with a pair of pliers. 2. Wrap the new Brush around the Wheel Tube. 3. Re-insert the stainless steel pin
into the corresponding slot on the other end of the brush. Tip: Leave Brushes in direct sunlight to warm
up before mounting. They will be more pliable and easier to work with. Tip: Lubricate the rod with soapy
water to make it easier to insert.
DRIVE TRACKS
Drive Tracks may become worn over time. Should this happen it will affect the Cleaner’s ability to climb stairs
and climb over obstacles in your pool. Worn Tracks may also have an effect on the cleaner's cleaning
pattern, impeding its ability to cover the entire pool. If you inspect the Tracks and find that they are
stretched, loose or “flat-spotted” due to wear, it is time to replace them. Always replace both Tracks at the
same time. Replacing only one will adversely effect the cleaner's cleaning pattern. 1. Unplug the cleaner
7
MAINTANCE AND CARE
from the Power Supply and remove it from the pool. 2. Place the cleaner on its side, on a soft surface which
will not scratch the body's finish. 3. With your thumbs pushing against the Side Plate,, hook your fingers around
the Track and pull it toward the Side Plate. When you get the Drive Track over the “lip” of the Side Plate, hold it
there with one hand, and with the other hand, grip the Wheel Tube and rotate it toward you until the Track
“walks” over the Sideplate. Continue this until the Drive Track is free. 4. To mount the new Track, hook it around
one Wheel Tube end and pull it toward you as you guide it inside the bottom of the Side Plate. 5. Push inward
on the Drive Track and force it over the edge of the Side Plate. Rotate the Wheel Tube away from you until the
Drive Track seats itself properly. 6. Repeat steps 1 through 5 with the Drive Track on the other side of the
cleaner.
TO CHANGE BRUSHES
The cleaner's Scrubbing Brushes provide traction and give it the ability to loosen debris. It is important that the
Brushes are not worn down otherwise the cleaner may lose the ability to climb to the waterline and move
sideways to reach other areas of the pool. The Rubber Brushes that come standard on most cleaner models
will function well on most any surface (including concrete, plaster, gunite, vinyl, fiberglass, etc.). Note: Brushes
stiffen in water less than 70oF which lessens their ability to climb pool walls. Eventually you will need to change
the Brushes on your cleaner. When they need replacement will depend upon how often you use your cleaner
and upon the conditions of your pool. High chemical concentrations and rough surfaces will cause faster Brush
wear. We recommend that you inspect Brushes frequently to check for excessive wear.
TO CHANGE THE DRIVE BELTS
After a number of months or
years, depending on usage,
the Drive Belts (Ref.# 3) [2
1....Drive Pulley
located behind the Side
2....Step Sleeve
Plate (Ref.# 6) on the Drive
3....Drive Belt
Motor side of the cleaner*]
4....Drive Track
may begin to stretch. To
5....Jet Wash
maintain optimum
6....Side Plate
performance these will
Sideplate
require replacement. 1.
Unplug the cleaner from the
Power Supply. 2 .Remove Drive Tracks (Ref.# 4). 3. Place the cleaner on a non-abrasive surface and turn
cleaner upside down. Remove Bottom Lid Assembly. 4. Remove the Wheel Tube Retaining Rings. 5. Locate
and remove 4 Screws on Drive Motor side, which holds Side Plate
in place. NOTE: Before removing the Screws, notice how the Drive
Belts, Drive Pulley (Ref.# 1), Stepped Sleeve Rollers(Ref.# 2), and
Bushings are positioned for re-assembly. 6.Remove old Belts and
replace them with new Drive Belts, being careful to properly
position the replacements. One Belt from the Drive Pulley to the
Front Wheel Tube one from the Drive Pulley to the Rear Wheel
Tube. The Belts must press against the thicker side of the
Stepped Sleeve Rollers for proper tension .To re-assemble,
reverse steps.*Remote Control Cleaners with Two Drive Motors
have a total of 4 Drive Belts, 2 located behind each Side Plate.
?
?
?
?
?
?
JET WASH SYSTEM
Your cleaner comes equipped with the “Jet Wash” system. An internal
centrifugal pump produces a pressurized stream of water that will help
dislodge debris and help pick up small and heavy objects like sand and coins.
Periodically check jet opening to make sure that they are not clogged.
8
TROUBLESHOOTING GUIDE
The most common troubleshooting issues are described here. Should you wish a more detailed
description of a procedure or have other troubleshooting issues please refer to the complete
Troubleshooting Guide visit www.AquaProducts.com for the most up-to-date troubleshooting
information.
Pumps Water, but Does Not Move or Moves Slowly
1. Remove any foreign matter that may be obstructing Drive Tracks.
2. Check Drive Belts and Tracks. Make sure they have not slipped out of place and that they're not loose.
3. Observe Drive Pulley, if it is not moving contact Customer Service.
Does Not Clean Entire Pool (Misses Areas) or Does Not Climb Walls
1. Make sure cleaner climbs walls up to the waterline and moves left or right before reversing
2. Floating Handle should be locked at an angle across the unit's body, and be sure that no water is
present in the Floating Handle. If water is present, please contact Customer Service.
3. Clean Filter Bag thoroughly.
4. Install floatation to help the cleaner climb.
5. Operate the cleaner several cycles (2 To 3 hours depending upon model), Each time locking the
Floating Handle in opposite directions and starting the cleaner in different areas of the pool.
Moves But Does Not Pick Up Dirt and Debris (Does Not Pump Water)
1. Remove Outlet Top by removing screws at top and clean any hair or debris on or around the propeller.
When reassembling Outlet Top be careful not to over-tighten the screws.
2. Clean Filter Bag thoroughly.
3. Ensure that the Intake Valves on the underside of the Bottom Lid are free to open and close.
Gets Stuck On Ladders, Main Drains, Return Fittings, Lights, Stairs Or In Corners
1. Remove obstructions from pool walls and floor if possible.
2. Check scrubbing brushes for wear.
3. Add floatation.
Floating Cable Gets Wrapped Around the Cleaner
1. Make sure Floating Handle Is locked at an angle across the cleaner's body.
2. If your pool's main filter is on while you are using your cleaner, turn off the filter.
3. Remove any additional floatation that you may have added.
4. Reverse the diagonal direction of the Floating Handle with each use.
Falls Or Flips Backward Off Of The Wall
1. Check pump motor operation.
2. Check the Floating Handle for water.
3. Make sure that the Floating Handle is locked in a diagonal position.
4. Remove any added floatation devices.
Debris Falls Out of Cleaner When Removing It From The Pool - Bottom Lid Does Not Close Properly
1. Make sure Filter Bag Is mounted properly onto the Bottom Lid Assembly.
2. Make sure Intake Valves on underside of your cleaner move freely to open and close.
Does Not Pump Water Or Move Or Power Supply Does Not Turn On
1. Check to see If electrical outlet has power.
2. Make sure Cable Plug fits tightly Into power supply.
3. If your Power Supply Is equipped with a safety reset button make sure that the power Switch is “ON”
and that you press the safety reset button.
4. Check the fuse In the Power Supply. If necessary, replace with 5 AMP Slo Blow fuse.
5. Using a cotton swab dry any moisture within Fuse Holder and on fuse itself.
6. Check cables for possible cuts or damage.
9
TROUBLESHOOTING GUIDE
Before performing any troubleshooting maintenance procedures on your cleaner, it should be
disconnected from the Power Supply (transformer) and the Power Supply should be unplugged from the
electrical outlet to prevent the possibility of personal injury or damage to the cleaner.
Pumps Water, But Cleaner Moves Slowly or Does Not Move at All
Place cleaner upside down (on a non-abrasive surface so that it won't become scratched or scuffed) and
unplug it from the Power Supply.
Check for any debris such as hair, string, or leaves that may be obstructing the free movement of the Drive
Þ
Pulley, Drive Belts, or Drive Tracks.
Check that the Drive Belts and Drive Tracks are properly aligned and are taut, adjust or replace if necessary.
Þ
Then, plug the cleaner into the Power Supply and turn it on outside the water (while still upside down), allowing it
to run a maximum of 1 minute to check the following:
Check that the Drive Pulley is turning. If it is not, grip one Wheel Tube with both hands and rotate it forward and
Þ
reverse to see if the Drive Motor to which the Drive Pulley is connected, loosens and begins to operate correctly.
If you have checked all of the suggestions and the problem still exists then please contact Customer Service.
Does Not Clean Entire Pool (Misses Areas) or Does Not Climb Walls
Your cleaner is designed to clean the pool many times over within its recommended cleaning cycle (up to 3
hours) by cleaning one section at a time in a systematic pattern. If large portions of the pool are missed, then
please check the following:
Be sure that the Power Supply is located in the center of one of the long sides of the pool. This will allow
Þ
optimum use of the cleaner's Floating Cable's length. Make sure that the Floating Cable is untangled and
spread out on the surface of the water.
Clean the Filter Bag thoroughly so that the fine particles of dirt that get trapped within the fibers of the Filter Bag
Þ
are removed. To test if the Filter Bag is inhibiting the cleaner's performance, simply remove the Filter Bag and
operate the cleaner without it. If the cleaner then pumps water strongly, and climbs the walls properly, the Bag
most likely requires a thorough cleaning
Note: When at the waterline your cleaner should have a portion of its Scrubbing Brushes out of the water.
Should your cleaner not make it to the waterline during its cleaning cycle then the cleaner will be
unable to move left or right at the waterline. It will then be unable to reach and clean all areas of the
pool and may remain in one or two sections while missing others. Make sure that the Floating Handle is
locked diagonally across the top of your cleaner's body.
Shake the Handle. Listen for the presence of water within it. The Handle should be lightweight and airtight
Þ
without water in it. If water is present, please contact Customer Service.
Check that the Pump Motor is operating. Remove obstructions from your pool.
Þ
Objects protruding from walls may impede the left/right movement of your cleaner when it is at the waterline
Þ
causing the cleaner to remain in one or two sections while missing others. For optimal performance, it is
recommended to remove objects from the pool walls when operating your cleaner. If some objects, such as
ladders, can’t be removed during your cleaner's cleaning cycle, place the cleaner in each of the 'separate'
portions of the pool allowing each portion separate complete cleaning cycles. In this case, place the Power
Supply at the farthest points of the pool during each cleaning cycle.
Check that the Drive Belts and Drive Tracks are properly aligned and are taut, adjust or replace if necessary.
Þ
Check for excessive wear of the Scrubbing Brushes and replace if necessary. Note: Rubber Brushes begin to
Þ
stiffen in water less than 70oF which lessens their ability to climb pool walls.
You may need to add Floatation. Your cleaner needs to properly climb the walls and to move left or right
Þ
scrubbing the waterline in order to properly clean the entire pool.
Check the surface of your pool walls. In rare instances (e.g., new pools) the pool walls may be slippery and
Þ
require cleaning/brushing first. If algae has accumulated in your pool and there is a slick green or clear layer
along the base of the walls, this impedes the climbing ability of your cleaner. We suggest you “Shock” your
pool*, and then manually brush and vacuum the dead algae from all surfaces to “waste” (not through the main
filter) to remove the bulk of the algae from the pool. If you use your cleaner to remove the dead algae be
aware that the Filter Bag may clog quickly, requiring several cleaning cycles and thorough Filter Bag cleanings.
NOTE: Your cleaner's Brushes will become covered with algae. Thoroughly clean them to ensure traction
for future use.*IMPORTANT: When shocking your pool water, remove your cleaner from the water for at
least 24 hours to allow proper dilution before returning the cleaner to the pool. Otherwise premature
discoloration and wear of plastic and rubber components will occur.
10
TROUBLESHOOTING GUIDE
If you use a non-chlorine solution (i.e. Baquacil) to clean your pool, a clear slick film may form along your
pool's walls impeding the cleaner's ability to climb. We suggest adding 225 to 300 parts per million of Calcium
Hardener to your pool water to combat the film built-up.
If your pool is irregular in shape (T, L, freeform) or has large swim out areas your cleaner may not be able to
Þ
properly negotiate coming out of or entering all pool areas in a standard cleaning cycle. To ensure cleaning
of all areas, we suggest placing the cleaner in each of the 'separate' areas of the pool allowing each area a
complete cleaning cycle.
Moves But Does Not Pick Up Dirt And Debris
Check the operation of the Pump Motor. While the cleaner is in the pool, and with the Power Supply switched
Þ
on, hold the cleaner by its Floating Handle so that the Outlet Top breaks the pool surface. Water should gush
from the Outlet Top. If there is no water flow, or if it appears weak, proceed to the next step.
Using a screwdriver, remove the screws that secure the Outlet Top to the body and inspect the Propeller for
clogs, hair or other debris which may keep it from spinning freely. If it appears to be frozen and no debris is
blocking its movement, or if the Propeller moves freely when spun manually but not when the cleaner is turned
on, or if the propeller is loose and wobbles when spun manually, contact Customer Support for assistance. If
the Pump is operating properly replace the Outlet Top. Be careful not to over tighten and “strip” the screws,
then proceed to the next step.
Clean the Filter Bag thoroughly so that the fine particles of dirt that get trapped within the fibers of the Filter
Þ
Bag are removed.
Check the Intake Valve Flaps on the underside of your cleaner. The Flaps should move freely to open and
Þ
close. Clean and free the Valve Flaps if necessary.
Gets Stuck On Ladders, Main Drains, Return Fittings, Lights, Stairs Or In Corners Cleaners have approximately
one inch of clearance between the floor and its underside. The Brushes enable the cleaner to climb over
obstacles like raised main drains, return filters, lights, and pop-up, in-floor systems, and to climb upstairs in most
pools. But, in some cases, the size or convex surface of some of these obstacles (i.e. lights, main drains) are too
great and stop the cleaner from moving forward or reverse by catching on the underside of the cleaner.
Follow these recommendations to assist your cleaner with the following obstacles: Ladders, Return Fittings,
Lane Hooks, Lighting Fixtures Objects protruding from walls may impede the left/right movement of your
cleaner when it is at the waterline. For optimal performance, it is recommended to remove objects from the
pool walls when operating your cleaner. The greater the number of objects on the pool walls, the greater the
difficulty your cleaner will have covering the entire pool. One object (i.e. ladder)in pool may affect the overall
cleaning cycle of your cleaner to a minor extent. Two or more objects in the pool positioned either directly
opposite one another, or diagonally across from one another, will restrict your cleaner to primarily clean only
one section of the pool on one side of the objects during its cleaning cycle. If these objects can not be
removed then place the cleaner in each of the 'separate' areas of the pool, allowing each a separate
complete cleaning cycle. It is best to place your cleaner at the farthest points of the pool at the beginning of
each cleaning cycle. Main Drains - Contact an Authorized Dealer location to purchase a main drain guard,
which will prevent your cleaner from becoming stuck on the Main Drain .Return Fittings - Contact your
Authorized Dealer for return fittings of the same diameter as your current fittings, yet with smaller extensions
(under 1” height). This should provide the clearance needed for your cleaner to climb freely.
Note: The bottom step of a ladder may stop your cleaner from freely climbing and tilting 90o up the wall
from the floor. This means the cleaner will remain in the forward mode, 'spinning its wheels', under the
ladder, not allowing its internal incline sensors to detect the wall. Fortunately, your cleaner is equipped
with a safety timer that will automatically reverse your cleaner after a period of time.
This means the cleaner may not reach the waterline in that specific area and may slightly affect its cleaning
pattern. Scrubbing Brushes.
Check that your Brushes are plush and not worn. Should they require replacement, contact Customer Service.
Þ
The replacement Brushes are a different style with a larger diameter, providing increased ground clearance
and a faster speed to climb over obstacles.
Note: Incline Sensors - Always start your cleaner on a horizontal level surface (both Brushes touching the
floor). Should your cleaner begin its cleaning cycle in an incline, the Incline Sensors within the Drive Motor
may begin operating assuming that the incline angle is a level floor. When the cleaner does become
level, the Incline Sensors will tilt and consider the floor to be the wall. This will offset its operation, resulting
11
TROUBLESHOOTING GUIDE
in insufficient cleaning due to remaining in forward or reverse positions for great lengths of time when not
needed.
Floating Cable Gets Wrapped Around Or Sucked Into The Cleaner
Floating Handle - Ensure that the Floating Cable is untangled and spread out on top of the water, allowing
Þ
enough length for your cleaner to reach all areas of the pool without restriction and without excess of Floating
Cable. For best results, place the cleaner half way across the length of the pool and alternate its point of entry
with each use.- If the pool is irregular in shape and has large swim-out areas (e.g. “L”, “T”, etc.) then it is
suggested to begin a cleaning cycle within each swim-out area to ensure these areas are covered. You may
even restrict the Floating Cable length so that the cleaner is allowed to clean only within each desired area.
Should the Floating Cable continue to get tangled in or around the cleaner, contact Customer Service.
Falls Or Flips Backwards Off Walls Or Stairs
Check the operation of the Pump Motor.
Þ
Check that the Floating Handle does not have water inside. If it does, contact Customer Service.
Þ
Debris Comes Out Of The Cleaner When Removing It From Pool (Bottom Lid Does Not Close Properly)
Filter Bag's small Label
on the elastic edge should be at the center of either long side of the Bottom Lid Assembly plastic. Stretch the
elastic bottom over each Wire and slide the Filter Bag down until the Filter Bag reaches the Bottom plastic. At
that point, the Filter Bag's elastic bottom should be stretched over the plastic lips located on each short side of
the Bottom Lid Assembly, and will hold the Filter Bag in place. Press down on top of the Filter Bag where each of
the 4 “U”-shaped slots on the Wire Frame are located. This will pull the Filter Bag corners into the corners of the
Wire Frame. Insert the Bottom Lid into the bottom of the cleaner.
Be sure that the Filter Bag's fabric is not interfering with the locking of the Lock Tabs. Be sure that each of the
Þ
Lock Tabs are “Locked” closed.
Lock Tabs -Check that the Lock Tabs are not warped. They should be straight and aligned with the cleaner's
Þ
body. If they are warped then contact Aqua Products' Customer Service Department.
Intake Valves - Check that the Intake Valve Flaps on the underside of your cleaner (in the Bottom Lid ) move
Þ
freely to open and close. Clean Flaps if necessary.
Filter Bag -Ensure that the Filter Bag is properly mounted on the “W” Bag Support Frame .
Þ
Pump Water Or Move Or Power Supply Does Not Turn On
It is unlikely that both Motors and Pump Motor are experiencing mechanical problems. In most cases, the issue
lies with something that is hindering the flow of electricity from the electrical outlet to the Power Supply or
through the Floating Cable to the cleaner itself. To locate and resolve where electrical flow is being hindered
check the following:
Electrical Outlet & Connections - Make sure that the Power Supply is firmly plugged into a grounded electrical
Þ
outlet which has power. To test the outlet, plug in another electrical instrument that you know works to the
outlet.
Check that the Floating Cable is securely plugged into the Power Supply.
Þ
Power Supply
Check that the Power Switch is pressed upwards to the “ON” position. Note: Some models have a Safety Reset
Þ
Button, which must be pressed each time you switch the power “ON”. Switch the Power Supply “OFF” and “ON”
several times, allowing approximately 30 seconds between each” ON” and “OFF”. Remember, if your cleaner
comes equipped with a Reset Switch it must be pressed each time after pressing the “ON” button. Unplug the
Power Supply from the electrical outlet.
Check that the Fuse in the Power Supply's Fuse Holder appears operational. If the Fuse appears burned out,
Þ
then replace it with a 5 AMP SLO BLOW Fuse available at your Authorized Parts Stocking Dealer Please note that
there are various Power Supply model types and the location of the Fuse may be in either the front or the back
of your Power Supply. After unplugging the Power Supply from the electrical outlet, use a cotton swab to dry all
sides of the Fuse and Fuse Holder (inside and out).
Cable Assembly - With the Power Supply unplugged, check the Power Cable (Ref.# 4.6) and the Floating Cable
Þ
for cuts or damage. If you detect damage to either Cable, please contact Customer Service.
Power Supply Appears To Shut Off Before Completing A Cleaning Cycle
If you have a cleaner (which does not have a timer) or a cleaner with Remote Control (which has an external
timer), unplug the Power Supply and check the Fuse. If the Fuse appears burned out, then replace it with a5
AMP SLO BLOW Fuse. If the Fuse is intact, please by calling Aqua Products' Customer Service Department.
12
REPLACEMENT PARTS
3
2
1
4
5
6
100 SERIES
7 8
9
12
10
11
16 17
14
13
15
19
18
20
21 22 23
24
25
26
3
27
4
30
5
6
200 SERIES
7 8
9
10
11
28
16 17
14
15
31
19
18
29
24
25
26
13
21 22 23
REPLACEMENT PARTS
3
41
4
30
42
5
6
300 SERIES
7 8
9
10
11
28
16 17
14
15
31
19
18
29
21 22 23
24
25
26
Replacement Parts
ID#
Item Description
Item #
1
2
3
4
5
6
7
8
9
10
11
12
13
14
15
16
17
18
19
20
21
22
Handle Assy.
Handle Float
Outlet Top
Outlet Bottom
Body Assy.
Drive Track
Bushing
Large Roller
Lock Tab
Jet Nozzle
Jet Bracket
E-Z Brush
Wheel Tube Assy.
Sleeve Roller
Pulley
Washer
Side Plate
Propeller
Motor Float
Drive Motor
Drive Belt
Bushing
A100000BK-T2
3113
2230WT-1
2250WT
A2005BL-1
3203
2610
3700
9204WT
3398WT
3397WT
3016
A38216
3506
S3605
3603
3400WT
4402
3101
A8545
3302
2600
23
24
25
26
27
28
29
30
31
32
33
34
35
36
37
38
39
40
41
42
43
44
45
14
Wheel Retaining Ring
Bottom Lid Assy.
Filter Screen
Pump Motor Assy.
Fixed Floating Handle
E-Z Brush 5.812
Master Drive Motor
Slave Drive Motor
Wheel Tube Assy. T4
Floating Cable T4
Fuse
Power Supply T4
Power Supply T2
Power Supply T
Floating Cable T
Floating Cable T4
Filter Bag (Fine)
Filter Bag (Mesh)
Fixed Floating Handle
Rubber Bumper
Magnet Actuator
H-Float
Side Pocket Floats
11058
A9200XW
A5083
A6005-03
A100000WT
3108BL
A8546
A8547
A38010
1661
7207
A7181
7098D
7098D
1661
A16675
8100
8200
A100000WT-T2
3399
4628
S3103
SP3104
Warranty
Servicing
On a Yearly/Seasonal basis we recommend that you have your cleaner inspected by Aqua Products Inc. or one of its authorized
service centers. This will help ensure that your cleaner will continue to provide you with years of trouble free operation. Contact
our Service Department Toll-free at 1-800-845-4856 or e-mail [email protected] to schedule servicing,
review warranty, or inquire about technical service issues. To service your cleaner properly, a Return Authorization Number
must be assigned to your cleaner. To receive this number please contact our customer service department. NO UNITS CAN BE
SERVICED WITHOUT A PRIOR RETURN AUTHORIZATION NUMBER FROM AQUA PRODUCTS. UNITS
WITHOUT A PROPER RETURN AUTHORIZATION NUMBER WILL BE REFUSED.
Warranty
This automatic pool cleaner has been manufactured, tested and inspected in accordance with carefully specified engineering
requirements. Aqua Products Inc. warrants that your automatic pool cleaner is free from defects in workmanship and materials
under normal use and service, subject to qualifications, conditions and limitations as described below.
TO WHOM EXTENDED: This warranty extends to the first consumer purchaser only for the specified period from the date of
the original purchase.
PARTS NOT COVERED BY WARRANTY: Wear and tear items, such as drive belts, drive tracks, brushes, and filter bags are
not covered. These items require replacement in the ordinary course of use due to normal wear. Therefore, these parts are not
covered by this warranty.
PREVENTATIVE MAINTENANCE: Your cleaner requires a minimum amount of preventative maintenance as outlined in
your operator’s manual. Failure to observe this will void the warranty.
IMPROPER USE: This warranty covers only normal use for private residential pools in the United States of America only, and
is not intended for commercial use. Damage, defects or any use which does not comply with the instructions in the Operator's
Manual are excluded.
UNAUTHORIZED REPAIR: Damage, defects, malfunctions or other failure caused by repair, which is done by anyone other
than an authorized service representative of Aqua Products Inc., shall not be covered.
LEGAL LIMITATIONS: No agent, representative, dealer or employee of Aqua Products Inc. has the authority to increase or
alter the obligations of this warranty.
TO VALIDATE THIS WARRANTY: The enclosed warranty registration card must be mailed within ten (10) days of purchase
accompanied with a copy of the original proof of purchase or sales slip. No warranty service will be performed unless Aqua
Products Inc. has received this material.
NOTE: This limited warranty is in lieu of all other express warranties, obligations or liabilities.
ANY IMBUED WARRANTIES, OBLIGATIONS OR UTILITIES, INCLUDING BUT NOT LIMITED TO ANY IMPLIED
WARRANTY OF MERCHANTABILITY, SHALL BE UNLIMITED IN DURATION TO THE PERIOD OF TIME OF THIS
WRITTEN UNLIMITED WARRANTY. ANY ACTION FOR BREACH OF ANY WARRANTY HEREUNDER,
INCLUDING BUT NOT LIMITED TO ANY IMPLIED WARRANTY OF MERCHANTABILITY, MUST BE BROUGHT
WITHIN A PERIOD OF EIGHTEEN (18) MONTHS FROM DATE OF ORIGINAL PURCHASE.
IN NO CASE SHALL AQUA PRODUCTS INC. BE LIABLE FOR ANY CONSEQUENTIAL DAMAGES FOR BREACH
OF THIS OR ANY OTHER WARRANTY, EXPRESSED OR IMPLIED, WHATSOEVER.
Some states do not allow the exclusion or limitations of incidental or consequential damages, so the above exclusion may not
apply to you.
This limited warranty is valid and enforceable only in the United States of America on units owned and normally operated in the
United States of America.
This warranty gives you specific legal rights and you may also have other rights, which vary from state to state.
100 SERIES
3
4
Duration of Limited Warranty: Three year pro-rated from original date of purchase. Subject to the warranty conditions below,
during the thirty-six months from original date of purchase, Aqua Products Inc. shall make any necessary repairs, including parts
and labor without charge, except for transportation costs, which shall be paid by purchaser. Our 3 year pro-rated warranty will
cover up to 200 cleaning cycles or 100% of parts and labor the first year, 50% parts and labor the second year, 25% parts and
labor the third year, whichever comes first.
200 SERIES
Duration of Limited Warranty: Four year pro-rated from original date of purchase. Subject to the warranty conditions below,
during the forty-eight months from original date of purchase, Aqua Products Inc. shall make any necessary repairs, including
parts and labor without charge, except for transportation costs, which shall be paid by purchaser. Our 3 year pro-rated warranty
will cover up to 300 cleaning cycles or 100% of parts and labor the first year, 75% on parts the second year, 50% parts and labor
the third year, 25% on parts fourth year whichever comes first.
300 SERIES
Duration of Limited Warranty: Four year pro-rated from original date of purchase. Subject to the warranty conditions below,
during the forty-eight months from original date of purchase, Aqua Products Inc. shall make any necessary repairs, including
parts and labor without charge, except for transportation costs, which shall be paid by purchaser. Our 3 year pro-rated warranty
will cover up to 300 cleaning cycles or 100% of parts and labor the first year, 75% on parts the second year, 50% parts and labor
the third year, 25% on parts fourth year whichever comes first.
PENDING