1
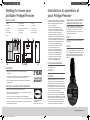
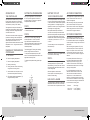
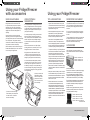
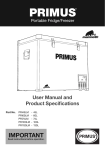
PRIMUS
®
Series III Fridge/Freezers
40 60 80
LITRE
LITRE
LITRE
3 YEAR
AUSTRALIA WIDE
WARRANTY
www.primusaustralia.com.au
www.primusaustralia.com.au
PRI1290_Series_III_booklet_ED4.indd 1
9/06/10 4:20 PM
Getting to know your
portable Fridge/Freezer
Installation & operation of
your Fridge/Freezer
IDENTIFICATION
It is important that your appliance is installed &
operated in accordance with the manufacturer’s
instructions to guarantee the performance,
efficiency and operation.
•Position the appliance in a safe and
secure location. Limit exposure to heat
sources or direct sunlight which can affect
the unit’s performance and efficiency.
•The normal operation of the appliance
requires heat to be radiated away from the
condensers located in the front and end of
the cabinet. Adequate airflow is required to be
available around the compressor at all times.
•The cooling system has been designed
to operate correctly when the appliance
is positioned on angles up to 35
degrees. It is recommended that the
time the unit is exposed to angles over
30 degrees is limited to a maximum of
four (4) hours continuous operation.
•Your appliance can be used as either
a freezer or a refrigerator, it cannot
be used as both simultaneously.
1. Brand
7. Lid inner liner
12. Feet
3. Insulated lid
9. Temperature controller
14. Drain plug
2. Handle
4. Baskets
5. Door gasket
6. Latch
8. PVC lid frame
10. Side handle
11. Lid hinge
13. Grill panel
15. AC connector
16. DC connector
WIRELESS ‘IN CAR’ REMOTE
TEMPERATURE READ OUT
When your appliance is first connected to the
DC input, the internal cabinet temperature can
be displayed on the wireless ‘in car’ remote
temperature read out when it is connected to a
separate DC power source.
STEP 1.
Connect your fridge & set the desired cabinet
temperature.
STEP 2.
Plug the wireless ‘in car’ read out into a 12V DC
outlet socket a maximum of 10 metres from the
fridge. The digital read out will show the cabinet
temperature and battery voltage. The cabinet
temperature information will be updated every
2 minutes.
POWER REQUIREMENTS
WARRANTY
• The fridge is covered for a period of 36 months from date
of purchase.
• In the case of warranty repair or service please call Primus Service
on 1300 555 197 for your nearest approved service agent.
• Proof of purchase (receipt) and ownership must be supplied for all
warranty repairs.
The Fridge/Freezer is designed to operate on AC
& DC voltage inputs.
3 YEAR
AUSTRALIA WIDE
WARRANTY
ITEMS NOT COVERED UNDER WARRANTY
• Loss of food or goods caused by failure of the unit.
• All costs associated with the return of the unit to an approved service
agent is at the owner’s expense.
• Loss of time, income or associated costs for accommodation or
transport as a direct result of a failure is not covered under the warranty.
• Primus reserves the right, at their discretion, to repair or replace any
unit returned under warranty.
CUSTOMER SERVICE
1300 555 197
[email protected]
AC INPUT
Voltage is required to be 240V AC at 50Hz.
DC INPUT
Voltage is required to be either 12 or 24V DC.
The power system is fitted with an Automatic
Voltage Change over program; this will allow for
both the AC & DC power cords to be connected
to the appliance at the same time. The AC power
input has priority and the unit will select this input
over DC if both are being provided.
Once the AC power is shut off the appliance
will switch over to DC power. The compressor
will then not start immediately as the controller
will program itself for the change in supply and
within 3 minutes the unit will restart using the
DC input. This same process will be taken if
AC power is resupplied to the appliance.
www.primusaustralia.com.au
PRI1290_Series_III_booklet_ED4.indd 2-3
9/06/10 4:20 PM
OPERATION OF
THE CONTROLLER
SETTING THE TEMPERATURE
When your Fridge/Freezer is first connected to
AC or DC input the digital read out will show
the factory setting of -18 degrees, to adjust the
temperature follow these steps:
The temperature controller fitted to your Fridge/
Freezer provides the ability to set the desired
temperature level and three (3) 12V DC battery
cut-out levels to protect your car’s battery.
The digital read out will provide information on
the cabinet & set temperature, battery voltage at
the fridge, as well as the voltage level that the
controller has been set to.
The electronic controller has been programmed
to maintain an average of the set temperature.
The compressor will start up when the internal
cabinet temperature increases 0.5 to 1.5
degrees above that selected and will run until the
temperature is 0.5 to 1.5 degrees below the set
temperature.
DIAGRAM OF TEMPERATURE
CONTROLLER
A. SET: Set button
B. Button for adjusting temperature +
STEP 1.
Push the “SET” button once, the digital read out
“G” will then start to flash
STEP 2.
Push B “up” or C “down” until you reach the
desired temperature – DO NOT push “SET”
again. Now that the temperature has been
selected it will flash three (3) times on the digital
read out then return to the current internal
cabinet temperature.
The indicating light “E” will be green indicating
that the cooling function will commence.
To check the set temperature press the “SET”
button. The selected temperature will flash on the
digital read out three (3) times.
To change the temperature setting repeat steps
1 & 2.
C. Button for adjusting temperature D. Battery cut-out setting
E. Running indicator: red when fast freezing
and green when running normal.
F. Alarm indicator: when the power is too low,
the indicator will be yellow and flashing.
G. LED indicator: displays the temperature (˚C),
voltage and battery condition
A
E
BATTERY CUT-OUT
12V DC OPERATION ONLY
The control system allows for the voltage cut-out
to be set to three (3) different settings depending
on the environment & situation that the appliance
is being operated in. Low voltage supply to the
appliance can result in poor cooling performance
and damage to the supply battery.
Most modern vehicles require a minimum of
10.5V DC to start correctly and ensure that all
electronic & safety features will operate correctly.
To ensure that suitable battery voltage can be
maintained the controller has been programmed
to offer three (3) cut-out levels - 11.8, 10.7 &
10.0V DC.
To set the battery cut-out to the required level
follow these steps:
STEP 1.
Push the “BATT” button once, the digital read out
“G” will show the current setting.
STEP 2.
Push button “A” or “C” to adjust the setting.
The display will flash four (4) times with the
selected setting. To check press “batt” once and
the selected setting will flash and then return to
current voltage input.
When the appliance is disconnected
from the power source the battery cut-out
remains at its last setting.
B
°C
LED LIGHT & ALARM
adjust
set
run
low
Your Fridge/Freezer is fitted with an LED light to
illuminate the cabinet in the dark. The LED will
turn on when the door is opened and turn off wh
AC POWER CONNECTION
The Fridge/Freezer is supplied with an approved
3 pin AC Power Lead and this must not be
modified or lengthened.
When connecting to AC power ensure that the
power socket is switched “off”. Plug the AC
Power Lead into the AC socket on the appliance
and then plug the other end of the AC Power
Lead into the AC supply and switch on.
DC POWER CONNECTION
The Fridge/Freezer is supplied with a 1.5m
power cord fitted with a 12V DC outlet fitting. It
is recommended that this lead is not lengthened
as this may result in a voltage drop and reduced
performance.
When connecting the appliance to DC power
ensure that the power socket is switched “off”.
Plug the 1.5m power cord into the DC socket
on the appliance and then plug the other end
of the 1.5m power cord into the DC supply and
switch on.
For optimum performance & efficiency, it is
important that the appliance has a reliable
10amp fuse protected DC supply in good
condition. Direct connection to the battery is
recommended and reduces the risk of voltage
dropping to the appliance.
It is recommended that the correct sized
Automotive Electrical Cable is used for the
direct connection and that this includes a
10amp fuse; do not use resetable circuit
breakers. It is important that the correct cable
size is used for the installation of the DC supply
as over distance the voltage can decrease if the
incorrect sized wire is being used.
Distance
Wire Gauge
4.5m or less
4.6m & over
2.1mm2 (AWG14)
3.3mm2 (AWG12)
batt
G
D
C
F
www.primusaustralia.com.au
PRI1290_Series_III_booklet_ED4.indd 4-5
9/06/10 4:20 PM
Using your Fridge/Freezer
with accessories
Using your Fridge/Freezer
USING SOLAR PANELS
TIPS & SUGGESTIONS
The power consumption & efficiency of your
Fridge/Freezer makes it ideal to be used
in conjunction with solar panels to provide
recharging of the DC supply. Solar panels
will provide charge into the battery during the
daylight hours even while the appliance is
operating.
As the output from solar panels changes
depending on the level of sunlight & intensity,
your Fridge/Freezer cannot be connected directly
to the solar panels. The appliance must be
connected to a suitable DC battery and then the
solar panels connected to the battery.
We recommend the use of the Primus range of
Portable Solar Panel Kits from 40 to 120 watts
for use with your Fridge/Freezer.
USING PORTABLE
GENERATORS
It is important that the correct generator is used
with your Fridge/Freezer. An incorrect generator
or output may result in reduced performance or
damage to your Fridge/Freezer which may void
your appliance warranty.
If connecting directly to an AC generator ensure
that only a digital or inverter type generator is
used. These provide a more reliable & constant
240V AC output and are specifically designed
to power electronic and other power sensitive
appliances.
Primus recommends the use of Kipor Digital
Inverter generators to provide AC power to your
Fridge/Freezer when in remote locations.
Most generators are fitted with a DC output
- DO NOT connect your fridge directly to the
DC output of the generator as this will result in
damage to your appliance and void warranty.
It is recommended that the appliance remains
connected to the DC power source. Then using
the DC output of the generator connect this to
the battery to recharge it. It is important that you
monitor the battery being charged, ensuring that
an over supply of charge is not being provided to
it causing damage.
* You cannot connect the
Fridge/Feezer directly
to the DC output of the
generator as it will not
work. Connection must
be to the battery.
* You cannot connect the Fridge/
Feezer directly to the solar panel
as it will not work. Connection
must be to the battery.
•Fresh & frozen foods should not be stored
together. The coldness from the frozen goods
can be transferred to the other produce causing
the goods to spoil. It is best to put an insulating
layer between these goods.
•When the appliance is being set at 0 or lower
temperatures, do not store glass bottles or
liquids such as beer, milk, juices or soft drinks in
the unit as these may freeze and shatter.
•Items such as fruit & vegetables should be
stored closer to the top of the cabinet as this
area is normally slightly warmer. This will reduce
the risk of spoiling and ensures that damage is
not caused by being crushed by heavier items.
•To improve the efficiency of your Fridge/Freezer
it is better to have the cabinet as full as possible
at all times. A full cabinet will provide lower
power consumption over 24 hours than a half
empty one. When the cabinet is full there is little
air space between the goods so the cold air is
trapped, when there is lots of air the coldness
cannot be captured and held. On a trip it is a
good idea to replace finished products with
bottles of water or similar. This will fill the empty
spaces and allow the coldness to remain within
the cabinet.
•Make your selection of what you wish to remove
from the cabinet before you open the door. This
will reduce the time that the cabinet is open and
the level of warm air that will enter the cabinet
while the door is open.
•When located in the rear of a car or trailer, it
is recommended that the appliance be kept
away from direct sunlight to reduce the risk of
increased heat. It should also be provided with
suitable ventilation to guarantee efficient power
consumption & performance. You must remember
that when a vehicle is parked in the sun that on
a day where the ambient temperature is +30
degrees, the interior of the vehicle can reach +55
degrees.
DEFROSTING THE CABINET
If your appliance is being used solely as a freezer, it
is possible that a build up of ice on the interior may
occur. This build up can affect the performance
& efficiency of the cooling system and must be
removed.
Do not use solid or sharp utensils such as knives
to remove the ice as this may result in damage to
the unit.
Turn the appliance off and remove the content from
the cabinet, allow the ice to melt, then drain the
water from the cabinet. Use a soft clean cloth to
wipe down all surfaces and allow to dry.
ACCESSORIES
PROTECTIVE COVERS
Offers protection to the external surface of the
fridge. Includes clear view section for temperature
control.
Part No. 5919563 - 40L
Part No. 5919673 - 60L
Part No. 5919843 - 80L
SOLAR PANEL KITS
Primus offers a selection of portable solar charging
solutions from 40 to 120 watt output using Mono
& Poly Crystalline panel configurations. Each kit is
equipped with inbuilt charging regulators and power
cables for direct connection to any 12V DC battery.
Each kit features adjustable mounting stands that
allow the panels to be directed towards the sun
at all times maximising the battery charging time
throughout the day.
Padded or heavy duty aluminium carry cases are
included to provide protection to the solar panels
during transportation & storage.
Part No. 522040 - 40 watt
Part No. 522180 - 80 watt
Part No. 522310 - 120 watt
Part No. 522123 - 80 watt with aluminium case
www.primusaustralia.com.au
PRI1290_Series_III_booklet_ED4.indd 6-7
9/06/10 4:20 PM
Troubleshooting
Problem
Cause
Remedy
The Compressor
runs for
1-5 minutes
and stops.
The ambient temperature is too high and
exceeds the allowable range of the freezer.
Select a well-ventilated place,
keep the freezer away from
direct sunlight.
The voltage is not in the normal range.
Switch off power and restart
when power is normal.
The compressor
runs but inner
liner does not
get cold.
The refrigerant has leaked from system.
Contact service support.
The system is blocked.
The ice layer on the evaporator is too thick.
Defrost.
The door is being opened and closed
too frequently.
The door should be opened as
little as possible.
The freezer is overloaded.
Remove some product.
The condenser is not well-ventilated.
Select a well-ventilated place.
The controller is faulty.
Contact service support.
The temperature - sensor is not correctly
located.
Contact service support.
The ambient temperature is too high
and the thermostat is set too low.
The thermostat should be set to
higher level.
Fridge is not connected correctly.
Check power connections.
Fridge is not earthed correctly.
Check earth points are correct.
The controller is faulty
(the power indicator is not on).
Contact service support.
The thermostat is set too high;
the ambient temperature is too low.
Contact service support.
Display shows
“LL”
Internal cabinet temperature is below
-28˚C.
Disconnect and allow to stabilise.
Display shows
“HH”
Internal cabinet temperature is above
+40˚C.
Disconnect and allow to stabilise.
The inner liner is
very cold and the
compressor runs
continuously.
The compressor
does not run.
If the appliance is still not functioning correctly, contact Primus Australia’s Customer Service Centre
for your nearest authorised service agent.
SPECIFICATIONS
Model
591540 591760 591680
Capacity
40L gross 60L gross 80L gross
Measurements
628 x 450 x 528mm 715 x 455 x 525mm
715 x 455 x 605mm
Weight
22kgs 28kgs 30kgs
Distributed by
PRIMUS AUSTRALIA PTY LTD
Bundoora Victoria 3083
www.primusaustralia.com.au
Customer service 1300 555 197
[email protected]
PRI1290_Series_III_booklet_ED4.indd 8
9/06/10 4:20 PM